

Page 1

ENGLISH
Operator’s Manual
VACUUM PACKING MACHINE WITH DUAL 16" SEALING BARS
Safety PrecautionS
To ensure safe operation, read the following statements and understand their
meaning. This manual contains safety precautions which are explained below.
Please read carefully.
WARNING
Warning is used to indicate the presence of a hazard that will or can cause
severe personal injury or death.
CAUTION
Caution is used to indicate the presence of a hazard that will or can cause minor
or major personal injury if the caution is ignored.
NOTICE is used to note information that is important but not hazard-related.
These precautions should be followed at all times. Failure to follow these
precautions could result in injury to yourself and others.
■ Unplug when not in use.
■ Keep unit and power cord away from open ames, electric burners or
excessive heat.
■ Do not operate unattended.
■ Do not operate if unit has been damaged or is malfunctioning in any way.
function and PurPoSe
This unit is intended to vacuum seal food products in a commercial kitchen
environment. It is not intended for household, industrial or laboratory use.
Item Model Description Voltage HZ Amps Plug
40833 VP16
Vacuum Packaging Machine with
Dual 16" Sealing Bars
120 60 13 5-20P
Thank you for purchasing this Vollrath Vacuum Packing machine. Before operating the equipment, read and familiarize yourself with
the following operating and safety instructions. SAVE THESE INSTRUCTIONS FOR FUTURE REFERENCE. Save the original box and
packaging. Use this packaging to ship the equipment if repairs are needed.
Item No. 26133-1 Rev 2/27/15
Page 2

clearance requirementS
inStallation
The minimum clearance is 6 inches (15 cm) on all sides of the machine and
30 inches (76.2 cm) inches above the machine.
Ambient temperature must be between 41-86 °F (5-30 °C). Never locate the
machine near a heat source. This can damage the lid.
1. Remove all packing material and tape, as well as any protective plastic
from the equipment.
2. Clean any glue residue left by the plastic or tape.
3. Place the vacuum packing machine on a at, level surface.
4. Check the oil gauge window on the side of the machine. Verify the oil
level is between the minimum and maximum ll lines.
NOTICE: Using the machine without oil or insufcient oil will
5. Plug the power cord into a grounded electrical outlet that matches the
nameplate rated voltage.
NOTICE: Using a voltage other than the nameplate rated voltage will
6. Run the Pump Conditioning program. See “Pump Conditioning Program”
on page 6.
overview
damage the machine and void the warranty.
cause damage to the unit. Incorrect voltage, modication
to the power cord or electrical components can damage
the unit and will void the warranty.
A
ENGLISH
B
C
D
A
Lid
B
Chamber
C
Seal Bar
D
Control Panel
E
Lid Retainer
F
Oil Inspection Window
G
Seal Pad
G
A
B
C
F
E
C
A
Program Display
B
Program Button
C
Reprogram Button
D
Function Select Button
E
Function Display
F
Increase Value / Cycle Stop Button
G
Vacuum Gauge
H
Pump Conditioning Program Button
I
Function LEDs
D F
E G
I J
KH
2
OperatOr’s Manual
J
Decrease Value / Vacuum Stop Button
K
On/Off Button
Page 3
oPeration
4. Multiple vacuum bags can be placed over the sealing bars. Do NOT
CAUTION
Burn Hazard.
Sealing bar may become hot after repeated use.
Do not touch the sealing bar.
NOTICE:
Never pack products that can be damaged by vacuum packaging.
To reduce condensation and corrosion risk for the pump, cool products
before packing.
Special instructions apply for packing liquid products. See ““Edit
Programs” on page 4.
The machine is designed for a maximum use of 5 hours per day.
This machine is not designed for continuous use. Allow 15 seconds
between packing cycles.
Do NOT exceed a vacuum time of 60 seconds.
If the machine has been in use for one hour, stop the machine and
allow it to cool to ambient temperature.
Do NOT tilt the machine. Tilting could enable oil to ow out of the pump
and cause damage to the machine.
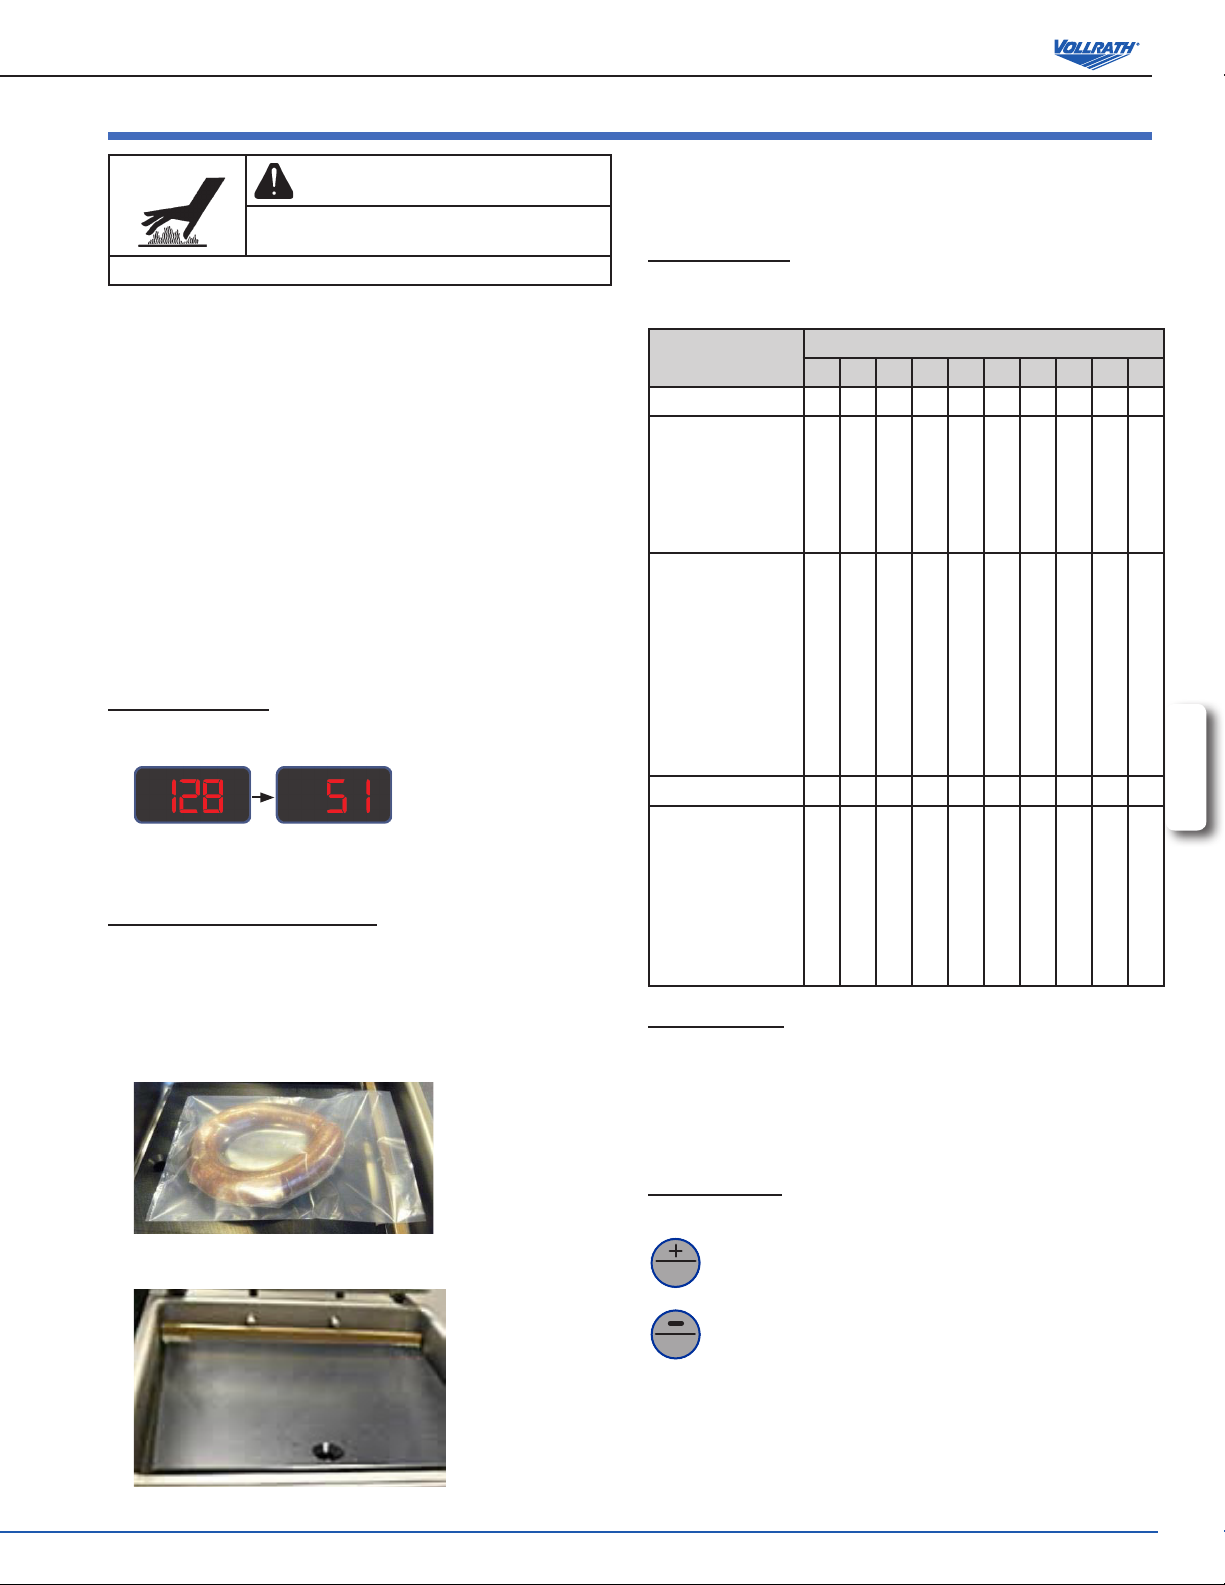
turn on the machine
1. Press the power button. The function display shows codes for the
software revision. For example:
2. If the machine has not been used for a while, run the Pump Conditioning
Program. See “Pump Conditioning Program” on page 6.
Place the Product in the chamber
If packing a liquid or moist products, see important information under
“Packing Liquid Products” on page 5.
1. Place food product in a vacuum sealing bag that ts completely within
the chamber.
2. Place the bag in the chamber with the open end over the sealing bar.
Make sure the bag is smooth, without wrinkles or folds.
overlap vacuum bags. One of the seal bars can be removed to
accommodate large bags.
Select a Program
Press the program button until the desired program number is shown in the
program display.
Function
Vacuum Pressure % 99 90 99 99 99 80 90 50 90 60
Vacuum Plus
(seconds)
Extends the vacuum
cycle to enable air
trapped in the product
to escape the bag.
H2O Liquid Sensor
Control
Detects the boiling
point, stops the
vacuum and
advances to the next
step to produce a
better quality product
and save the pump
from taking on liquids.
Sealing (seconds) 2.5 2.5 2.5 2.5 2.5 2.5 2.5 2.5 2.5 2.5
Soft-Air
(seconds)
Gently forms the bag
to protect delicate
products or prevent
damage to the bag
from sharp edges on
product.
run the Program
1. Close the lid. Do NOT use the lid retainer. The cycle automatically starts.
2. The lid opens when the cycle is complete.
3. Remove the packed product.
4. Wait 15 seconds before packing another product.
Program
0 1 2 3 4 5 6 7 8 9
15 OFF 15 10 10 OFF OFF OFF OFF OFF
OFF ON OFF OFF OFF OFF OFF OFF OFF OFF
ENGLISH
3 3 2 2 2 OFF OFF 2 OFF OFF
StoPPing a cycle
3. For small products, place one or more insert plates under the product.
This lls empty space in the chamber which reduces the cycle time.
The machine can be stopped before a packing cycle is complete.
stop
vac
stop
Stops the vacuum function and continues to next function.
Stops and cancels the program.
OperatOr’s Manual
3
Page 4

edit ProgramS
1. Select a program to edit.
Programs 1 through 9 can be customized. Program 0 cannot be changed.
Press until the number of the program to be edited is shown in the program display. For example:
2. Reprogram.
Press to edit the program. The program number begins to ash.
3. Select a function to edit.
Vacuum Pressure Percentage Vacuum Time H2O Liquid Sensor Control
1. Press until the Vacuum LED
illuminates.
2. Press
stop
vac
or
stop
to set a vacuum
pressure.
• Recommended minimum is 50%.
• To use Vacuum Plus, Vacuum
Pressure must be set to 99%.
3. Press to conrm the setting.
4. To edit the Vacuum Plus function, continue
with the steps for Vacuum Plus.
ENGLISH
Vacuum Plus
1. Turn on Vacuum Plus.
Press until the Vacuum LED
illuminates and the function display shows:
2. Set the time.
Press
stop
stop
vac
or
to set the number of
seconds. A red dot indicates Vacuum Plus
is active.
1. Press until the Vacuum LED
illuminates.
2. Press
stop
to reduce the vacuum
pressure to OFF.
3. Press once to enter Vacuum Time
function. The Vacuum LED remains
illuminated. The function display shows:
4. Press
stop
vac
or
stop
to set the number
of seconds. A red dot indicates Vacuum
Time is active.
• Recommended maximum is 60
seconds.
5. Press to conrm the setting.
1. Turn on H2O Liquid Sensor Control.
Press to turn the function on or off.
When H2O is turned on the function display
shows:
2. To edit the H2O Plus function, continue
with the steps for H2O Plus.
H2O Plus
1. Turn on H2O Plus.
Press until the Vacuum LED
illuminates and the function display shows:
stop
Press
tenths of a second.
2. Press to conrm the setting. A red
dot after H2O indicates H2O Plus is active.
stop
vac
or
to set the time, in
3. Press to conrm the setting.
4. Edit another function in the current program.
Press .
5. Save changes and exit the current program.
Press .
4
OperatOr’s Manual
Page 5

Sealing Time Soft-Air Time
1. Press until the Seal LED is
illuminated.
1. Press until the Soft -Air LED is
illuminated.
Packing liquid ProductS
Special care needs to be taken when vacuum packing
liquid or moist products.
■ Cool foods before packing. Hot food quickly reaches
the boiling point, which can lead to an insufcient
seal.
NOTICE: Hot products create condensation which
can damage the pump.
■ Use the included incline plate and magnetic bars to
position the bag so the liquid is below the sealing bar.
2. Press
stop
vac
or
stop
to set the number
of seconds.
• 2.0 to 2.5 seconds recommended
for most bags.
3. Press to conrm the setting.
2. Press
stop
vac
or
stop
to set the number
of seconds.
3. Press to conrm the setting.
ENGLISH
Magnetic bar
■ Use a program that includes the H2O Liquid Sensor
Control function. This will prevent the product from
boiling.
NOTICE: Boiling will increase the amount of
moisture that enters the pump, which
can lead to corrosion.
■ Run the Pump Conditioning Program at the end of
the work day.
Incline plate
OperatOr’s Manual
5
Page 6

daily cleaning
Clean the exterior and interior
WARNING
Electrical Shock Hazard.
Keep water and other liquids from entering the inside
of the unit. Liquid inside the unit could cause an
electrical shock
Do not spray water or cleaning products. Liquid could contact the
electrical components and cause a short circuit or an electrical
shock.
NOTICE: Do NOT tilt the machine. Tilting could enable oil to ow out of
the pump and cause damage to the machine.
NOTICE: If the machine will be idle for more than one month, the oil
should be drained from the pump. Moisture in the oil could
corrode the pump.
Run the Pump Conditioning Program at the end of the work day.
1. Unplug the machine. Allow it to cool.
2. Wipe the vacuum chamber, lid, sealing bar, silicone holder and exterior
3. Do not use abrasive materials, scratching cleansers or souring pad to
4. Thoroughly wipe off any mild soap or chemical cleaners. Residue could
with a clean damp cloth.
clean the unit. These can damage the nish.
corrode the surface of the machine.
maintenance
NOTICE: Do NOT tilt the machine. Tilting could enable oil to ow out of
the pump and cause damage to the machine.
ENGLISH
The following maintenance schedule is only a guideline. Actual maintenance
needs will vary depending on machine use. Inspect your machine regularly.
Interval Procedure
Weekly Check the oil by viewing the Oil Inspection Window
Inspect the seal bar for wear
Inspect the seal pad under the lid for wear
Inspect the lid gasket and lid
Every six
months
Yearly Inspect the oil exhaust lter. Contact Vollrath
Every four years Replace the lid, gas springs and seal cylinder
Replace the oil in the vacuum pump. Contact Vollrath
Technical Services.
Replace the sealing wires and Teon® tape
Replace the seal pad under the lid
Replace the lid gasket
Technical Services.
membranes. Contact Vollrath Technical Services.
PumP conditioning Program
The Pump Conditioning Program removes any moisture that may have
accumulated in the pump. During the program, the pump and oil reach
operating temperature, which evaporates any moisture in the pump.
1. Press the Pump Conditioning Program button .
2. The function display shows .
3. Close the lid.
4. The program starts. Moving dots appear on the function display.
5. The program runs for approximately 15 minutes. Do not interrupt the
program. If the program is interrupted, it must be run again to ensure
completion.
6
OperatOr’s Manual
Page 7

rePlace the Sealing wireS and teflon® taPe
Check the sealing bar for damage. Replace the Teon tape or sealing wires
if the seal quality is no longer sufcient or if the Teon tape or seal wires are
worn.
Tools Needed:
■ Phillips screwdriver
■ Tensioning tool or pliers
■ Scissors
■ Lint-free cleaning cloth
■ Replacement Teon tape
■ Replacement sealing wire
1. Pull up on the sealing bar to remove it from the machine.
2. Remove the Teon tape that protects the sealing wires.
3. Remove the screws on the bottom side of the seal bar.
5. Remove the Teon tape from the sealing bar.
6. Clean the sealing bar with a lint-free cloth.
7. Cut a piece of replacement Teon tape to the same length as the sealing
bar.
8. Apply the replacement tape to the sealing bar.
9. Cut new sealing wires to the length of the sealing bar, plus about 6
inches (15 cm).
10. Attach one wire to one side of the seal bar by tightening the screw.
ENGLISH
4. Remove the sealing wires.
11. Pull the wire across the sealing bar straight and tight.
12. Attach it by tightening the screw.
13. Repeat steps 10 through 12 for the second wire.
14. Trim the wires.
15. Cut a piece of Teon tape the same length of the sealing bar, plus about
2 inches (5 cm).
16. Apply the tape smoothly over the sealing wires on the sealing bar.
17. Trim the tape.
18. Place the sealing bar back in the machine. Verify that the sealing bar is
properly snapped into the holder.
OperatOr’s Manual
7
Page 8

rePlace the Seal Pad
Inspect the seal pad for roughness. Replace if areas of the silicone appear
rough.
Tools Needed:
■ Replacement seal pad
■ Scissors
1. Remove the worn seal pad from the holder.
rePlace the lid gaSket
The lid gasket ensures that the vacuum chamber is completely sealed during
the packing cycle. This is essential to achieve a maximum vacuum. The lid
gasket wears due to the extreme pressure differences and must be replaced
regularly.
Tools Needed:
■ Replacement gasket
■ Scissors
1. Remove the worn gasket.
Seal pad
2. Cut a new piece of seal pad the same length as the old one. A pad that is
too short or too long will cause sealing problems.
3. Place the new pad in the holder. Ensure that the pad is completely and
evenly placed in the groove.
4. Place the new piece in the silicone holder. Ensure that the silicone rubber
is completely and evenly placed in the groove.
ENGLISH
Lid gasket
2. Cut a new piece of gasket slightly longer than the old one. Position the
new gasket so the lip faces downward and outward.
3. Press the gasket into the slot evenly.
4. Trim the gasket so the ends come tightly together to prevent leakage.
The ends must be cut off straight. If the lid gasket is too short or too long,
it can cause problems when closing the lid or leakage may occur.
8
OperatOr’s Manual
Page 9

troubleShooting
Problem It Might Be Caused By Course of Action
The control panel does not
illuminate.
The control panel is on but there is
no activity after closing the lid.
The lid does not open automatically. The gas spring is damaged. Contact Vollrath Technical Services.
F1 in display The lid micro switch may need adjusting.
F2 in display The printed circuit board or liquid control sensor has
– – in display The lid may have not opened correctly. Check the lid.
Final vacuum is not sufcient. The set vacuum time is too short. Extend the vacuum time.
The machine extracts air too slowly. The oil exhaust lter is saturated. Contact Vollrath Technical Services.
Vacuum bag is not sealed correctly.
The machine is not connected to an electrical outlet. Connect the machine to the power supply.
The main fuse is burned out.
The circuit board fuse is burned out.
The lid micro switch may need to be adjusted.
The control transformer fuse is burned out.
The pump may require technical services.
malfunctioned.
The machine use has reached a scheduled oil change. Contact Vollrath Technical Services.
There is too little oil in the vacuum pump. Contact Vollrath Technical Services.
The extraction hole at the back of the vacuum chamber is
partially covered by the vacuum bag during extraction.
The lid gasket is worn. Replace the lid gasket.
The oil is contaminated. Contact Vollrath Technical Services.
The oil exhaust lter is saturated. Contact Vollrath Technical Services.
The pump’s extraction lter is blocked. Contact Vollrath Technical Services.
The vacuum bag is being placed incorrectly on the sealing bar.
The sealing time is too long or too short. Adjust the sealing time longer or shorter.
The silicone pad under the lid is damaged or worn. Replace the silicone pad.
The Teon tape is damaged. Replace the Teon tape.
The vacuum bag opening iis not clean. Clean the vacuum bag’s opening.
Contact Vollrath Technical Services.
Contact Vollrath Technical Services.
Contact Vollrath Technical Services.
Contact Vollrath Technical Services.
Place the vacuum bag closer to the sealing bar.
Place the vacuum bag smoothly on the sealing
bar and within the chamber.
ENGLISH
OperatOr’s Manual
9
Page 10

Service and rePair
There are no user serviceable parts within this appliance. To avoid serious injury or damage, never attempt to repair the unit or replace a damaged power cord
yourself. Do not send units directly to The Vollrath Company LLC. Please contact Vollrath Technical Service from the list below.
VOLLRATH Technical Service • 1-800-628-0832 • Email: techservicereps@vollrathco.com
When contacting Vollrath Technical Service, please be ready with the item number, model number (if applicable), serial number, and proof of purchase showing
the date the unit was purchased.
warranty Statement for the vollrath co. l.l.c.
The Vacuum Packing Machine with Dual 16" Sealing Bars has a 2 year warranty.
This warranty does not apply to products purchased for personal, family or household use, and The Vollrath Company LLC does not offer a written warranty to
purchasers for such uses.
The Vollrath Company LLC warrants the products it manufactures or distributes against defects in materials and workmanship for a period of one year, except
as specically described in our full warranty statement. In all cases, the warranty runs from the date of the end user’s original purchase date found on the
receipt. Any damages from improper use, abuse, modication or damage resulting from improper packaging during return shipment for warranty repair will not
be covered under warranty.
For complete warranty information, product registration and new product announcement, visit www.vollrath.com.
www.vollrath.com
The Vollrath Company, L.L.C.
1236 North 18th Street
Sheboygan, WI 53081-3201
U.S.A.
Main Tel: 800.628.0830
Fax: 800.752.5620
Technical Services: 800.628.0832
Service Fax: 920.459.5462
Canada Service: 800.695.8560
Item No. 26133-1 Rev 2/27/15
 Loading...