

Page 1

Operator’s Manual
Heavy-Duty Electric Slicers
Item No. Model No. Description
40952 SLM300/S 12
Thank you for purchasing this Vollrath equipment. Before operating the
equipment, read and familiarize yourself with the following operating
and safety instructions. SAVE THESE INSTRUCTIONS FOR FUTURE
REFERENCE. Save the original box and packaging. Use this packaging
to ship the equipment if repairs are needed.
SAFETY PRECAUTIONS
To ensure safe operation, read the following statements and understand
their meaning. This manual contains safety precautions which are
explained below. Please read carefully.
WARNING
Warning is used to indicate the presence of a hazard that will or can
cause severe personal injury or death.
CAUTION
Caution is used to indicate the presence of a hazard that will or can
cause minor or major personal injury if the caution is ignored.
NOTICE: Notice is used to note information that is important but not
hazard-related.
Drive Peak HP Voltage Amps Hz Plug
" Blade Belt 1/2 120 2.0 60
NEMA
5-15P
WARNING
Severe injury can occur if this equipment is not used properly.
To reduce risk of injury or damage to the equipment:
• Keep out of reach of children.
• Do not turn equipment on unless all guards are in place.
• Keep the carriage slide and gauge plate slide lubricated to ensure
easy movement.
• Do not load food by hand: always use food pusher.
• Equipment must be connected to a properly-grounded electrical
supply matching the nameplate rating.
• Always unplug equipment before cleaning.
• Keep equipment away from water; avoid water jets during cleaning.
• Equipment should only be used in a flat, level position.
• Do not operate unattended.
• Do not operate this appliance if it has a damaged cord or a plug, if it
is not working properly or if it has been damaged or dropped.
• Do not immerse the cord or plug in water. Keep the cord away from
heated surfaces. Do not hang the cord over the edge of a table or
counter.
• Do not use an extension cord with this equipment. Do not plug this
equipment into a power strip or multi-outlet power cord.
• This equipment must be installed by a qualified person and in
accordance with local codes and ordinances.
• Do not spray controls or outside of equipment with liquids or
cleaning agents.
• Do not clean the equipment with steel wool.
• Keep equipment and power cord away from open flames, electric
burners or excessive heat.
Register your product at Vollrath.com/registration and become eligible to win a free 10" Vollrath Tribute® fry pan
©
2017 The Vollrath Company L.L.C. Part No. 350009-1 ml 6/16/17
Page 2

FUNCTION AND PURPOSE
This equipment is intended to be used to slice food products in
commercial foodservice operations only. It is not recommended for use
with bone-in meat. It is not intended for household or laboratory use.
UNCRATE THE EQUIPMENT
1. Upon arrival, inspect the package and equipment for damage.
2. Immediately inform the carrier of any damage.
3. Position the pallet with the slicer on a flat surface.
4. Remove all packing material and tape, as well as any protective
plastic from the equipment.
6. Gently turn the slicer so it is resting on the blade cover knob.
7. Remove the four nuts that fasten the slicer to the pallet. Remove the
four washers and unscrew the four fastening tie rods from the pallet.
NOTICE: Take care to support the slicer so it does not tip when the
fastening hardware is removed.
5. Remove the sharpener. See “Disassemble the Slicer” on
page 5.
8. Remove the pallet.
9. Install the metal spacers and rubber feet.
NOTICE: Feet and spacers must be installed to meet agency
listing criteria.
10.Upright the slicer and set on its feet.
11.Turn the feet to level the slicer.
2 Heavy-Duty Electric Slicers Operator’s Manual
Page 3
SET UP THE EQUIPMENT
B
A J
C
D
E
L
H
G
K
M
N
O
F
P
Q
I
R
Clearance and Environmental Requirements
Slicer must be placed:
• 31-1/2" (80 cm) from the ground
• 7-7/8" (20 cm) from walls or surrounding objects to allow for
sufficient room to operate the slicer
• in a dry area, away from heat sources and not in a passageway.
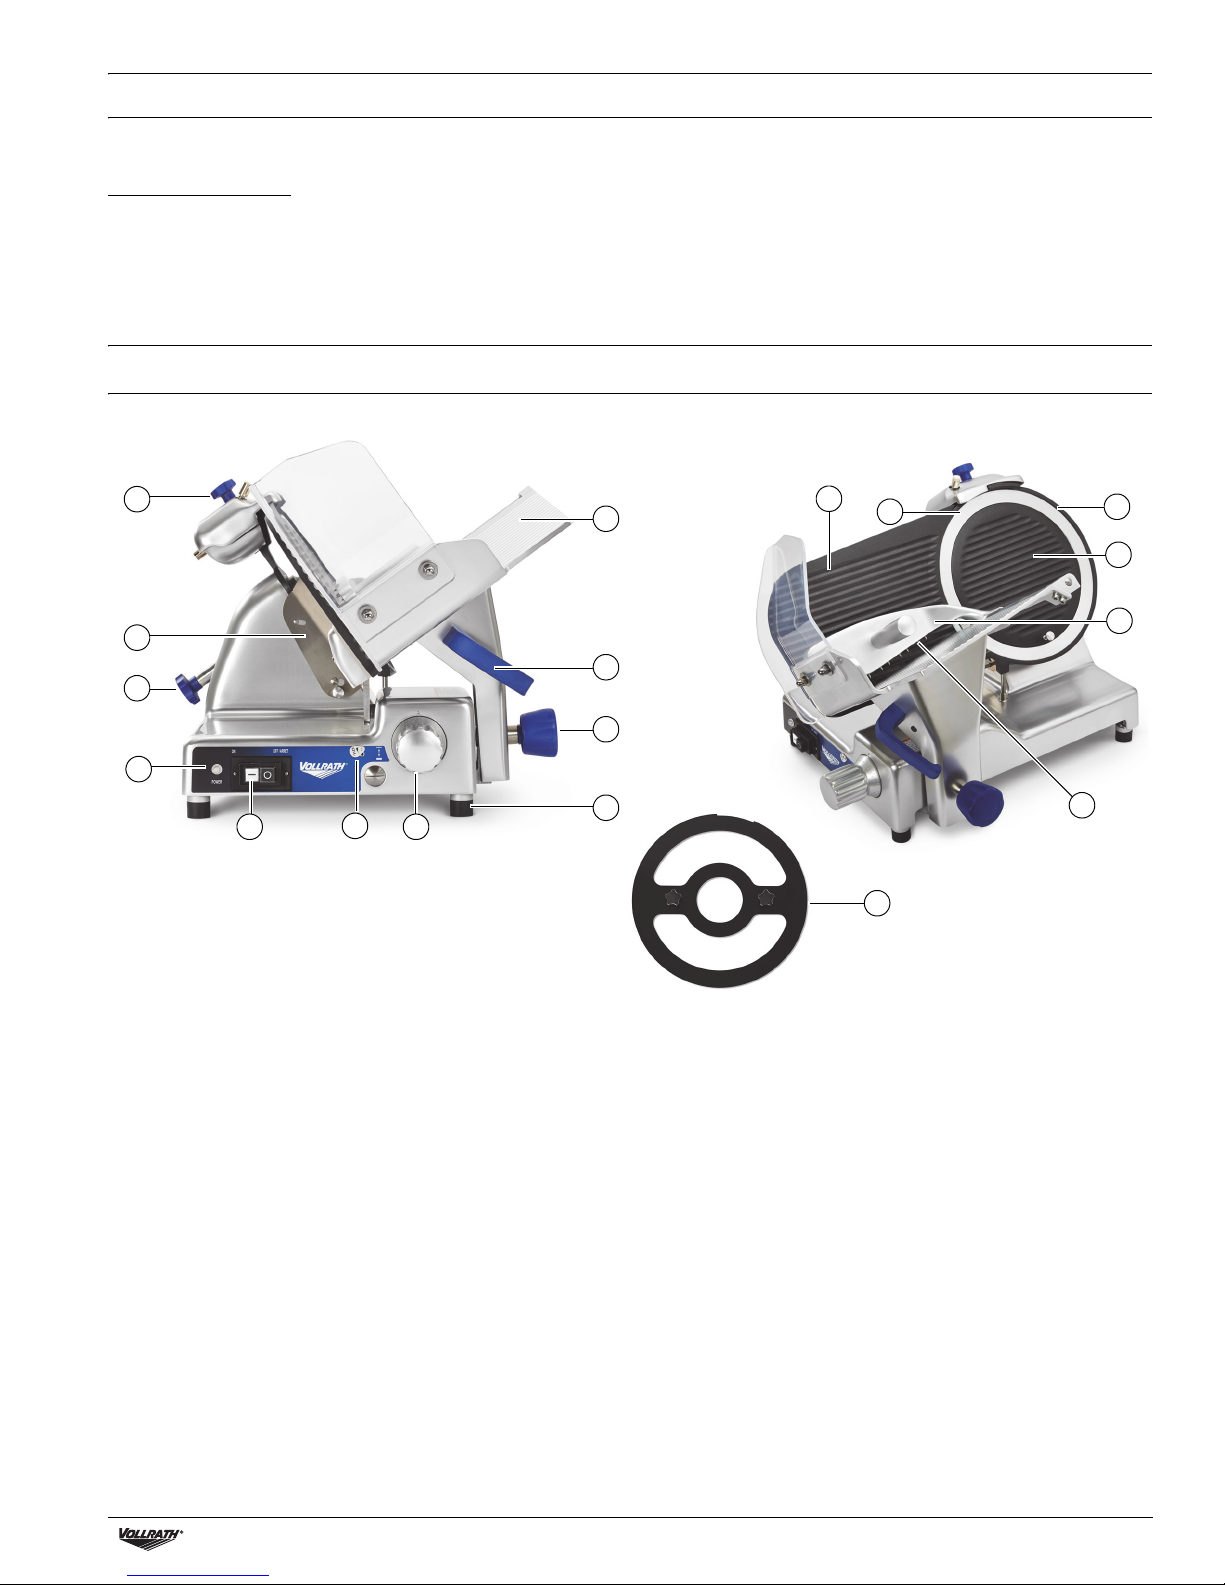
FEATURES AND CONTROLS
Set Up
1. Clean the equipment.
Before using this equipment it must be cleaned thoroughly. See
“Clean and Sanitize the Slicer” on page 5. Failure to clean surfaces
before using the equipment could cause food contamination.
2. Plug the equipment into a properly-grounded electrical outlet that
matches the rating on the nameplate. Damage to the equipment can
occur if incorrect power is supplied to equipment.
A On/Off Buttons L Gauge Plate
B Power Indicator Light M Blade
C Blade Cover Knob N Blade Guard
D Slice Guard O Blade Cover
E Blade Sharpener P Product Grip
F Carriage Tray Q Product Grip Handle
G Carriage Handle R Safe Blade Removal Tool
H Carriage Release Knob
I Foot and Metal Spacer
J Index Control
K Carriage Slide Lubricant Access
Heavy-Duty Electric Slicers Operator’s Manual 3
Page 4
OPERATION
Overload Reset Switch
WARNING
Cut and Amputation Hazard
The blade on this commercial slicer is extremely sharp. Severe
injury can occur if care is not used when using or cleaning this
product. Only trained personnel should operate equipment or
perform maintenance. To reduce the risk of injury, the use of a
cut resistant glove(s) is recommended when cleaning this
equipment.
WARNING
Electrical Shock Hazard
Keep water and other liquids from entering the inside of the
equipment. Liquid inside the equipment could cause an
electrical shock. Do not spray water or cleaning products.
Liquid could contact the electrical components and cause a
short circuit or an electrical shock.
Inspect the Slicer
• Inspect the slicer for correct assembly.
• Verify the carriage release knob is fully tight and the carriage tray
does not wobble. Gently move the carriage to verify the carriage
release pin is fully retracted and does rub against the slicer body.
• Verify the slicer is in good working condition.
• Do not use the slicer if it is not in good working condition. Contact
authorized Vollrath service agency to service the slicer.
LUBRICATION
To ensure smooth and safe operation properly lubricate the slicer.
Carriage Slide
Lubricate the carriage slide monthly or more frequently as needed. See
“Lubricate the Carriage Slide” on page 8.
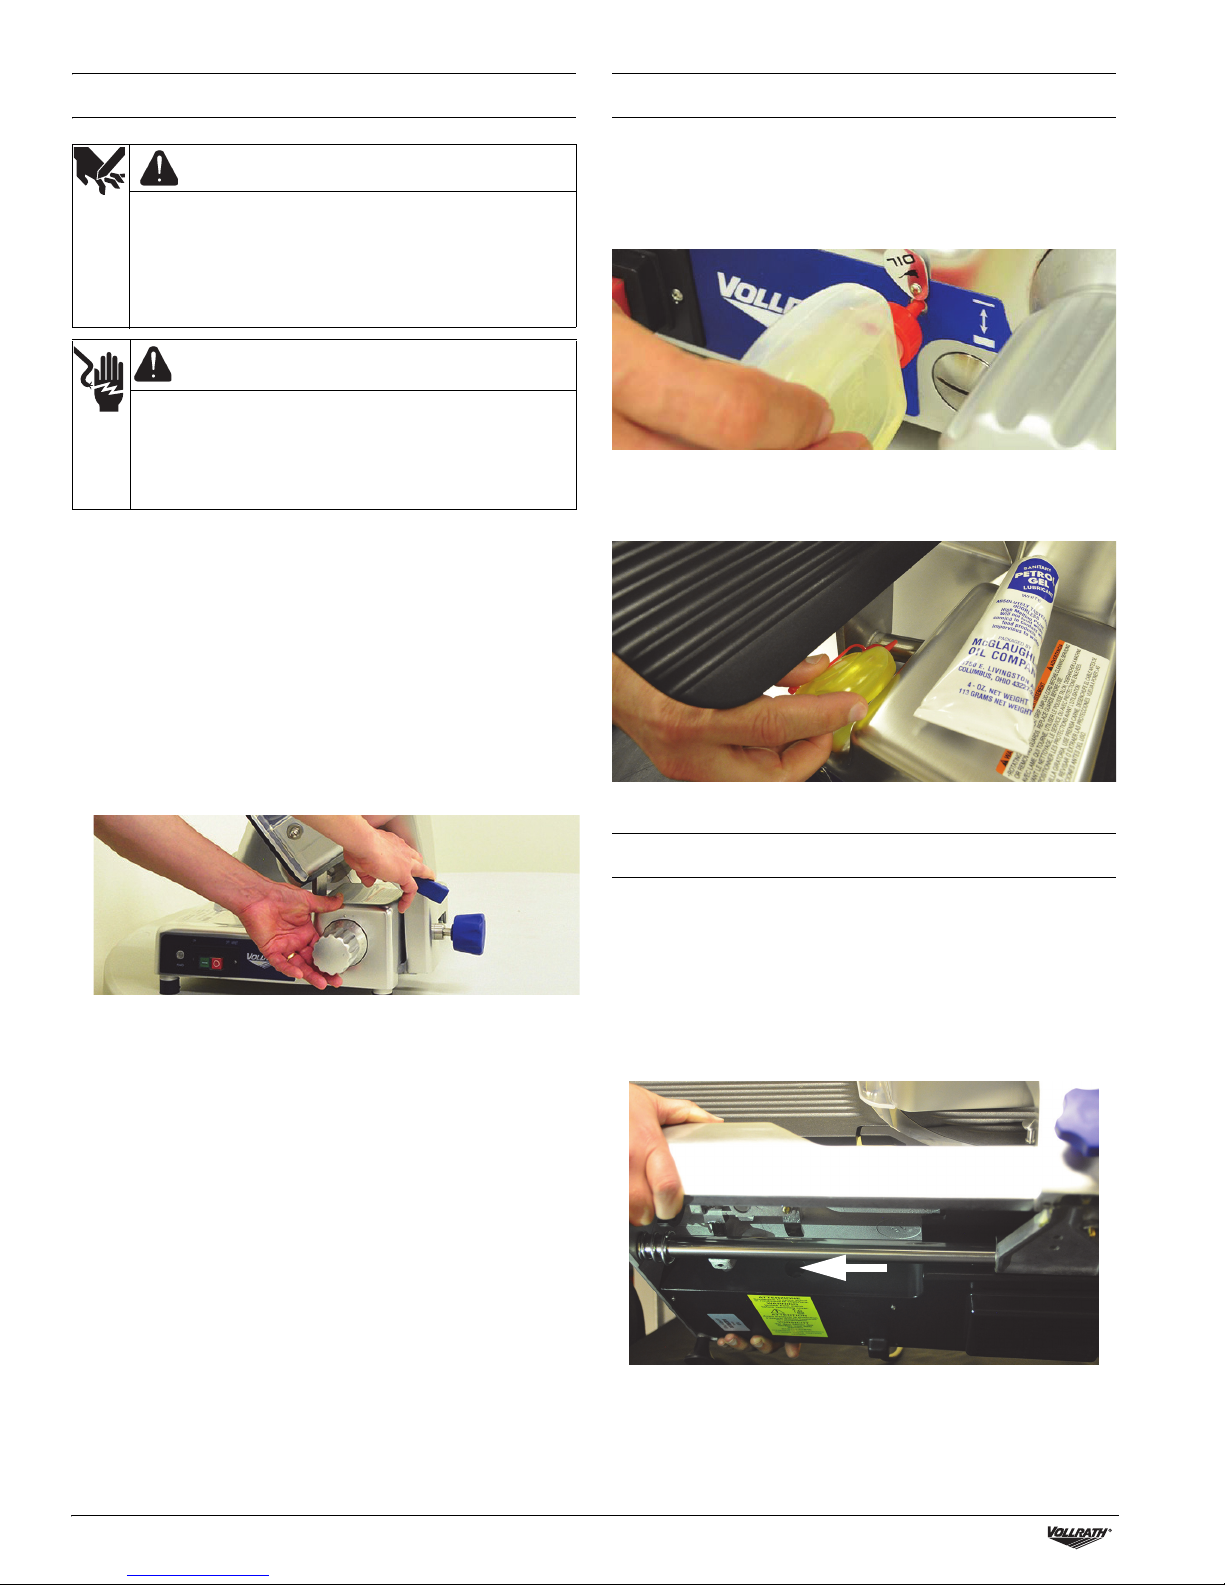
Gauge Plate Slide
Lubricate the gauge plate slide at least daily, and after every cleaning
with the oil supplied with the slicer or a food-grade lubricant.
Load the Slicer
1. Slide the carriage tray to the load/start position (closest to the
operator).
2. Lift the product grip and place the food onto the carriage tray and in
contact with the gauge plate.
3. Place the product grip either on top or behind the food to be sliced.
4. Use the index control knob to set the desired slice thickness.
5. Press and release the ON (—) button.
Slice Food
1. Use the carriage handle to push the carriage tray back and forth to
slice the food.
Turn Off Slicer
1. Turn the index control to the zero (0) position so the gauge plate
protects the blade edge.
2. Press and release the OFF (O) button.
OVERLOAD RESET SWITCH
If the slicer becomes overloaded, the reset switch stops the slicer to
protect the motor. In case of overload:
1. Press and release the OFF (O) button.
2. Unplug the slicer power cord from the electrical outlet.
3. Remove the food that caused the overload. If necessary, clean the
equipment. See “Clean the Slicer” on page 6.
4. Press and release the reset button, located on the bottom of the
slicer.
4 Heavy-Duty Electric Slicers Operator’s Manual
5. Plug the slicer into the electrical outlet.
6. Press and release the ON (—) button to resume operation.
Reset should be a rare occurrence and should be due to overloading the
slicer. Contact a Vollrath authorized repair service center if the switch is
activating often during normal use.
Page 5
CLEAN AND SANITIZE THE SLICER
WARNING
Cut and Amputation Hazard
The blade on this commercial slicer is extremely sharp. Severe
injury can occur if care is not used when using or cleaning this
product. Only trained personnel should operate equipment or
perform maintenance. To reduce the risk of injury, the use of a
cut resistant glove(s) is recommended when cleaning this
equipment.
WARNING
Electrical Shock Hazard
Keep water and other liquids from entering the inside of the
equipment. Liquid inside the equipment could cause an
electrical shock. Do not spray water or cleaning products.
Liquid could contact the electrical components and cause a
short circuit or an electrical shock.
NOTICE: This slicer shall be cleaned and sanitized at intervals to
comply with national, state and/or local health codes.
NOTICE: This slicer shall be cleaned and sanitized each time the
blade is sharpened.
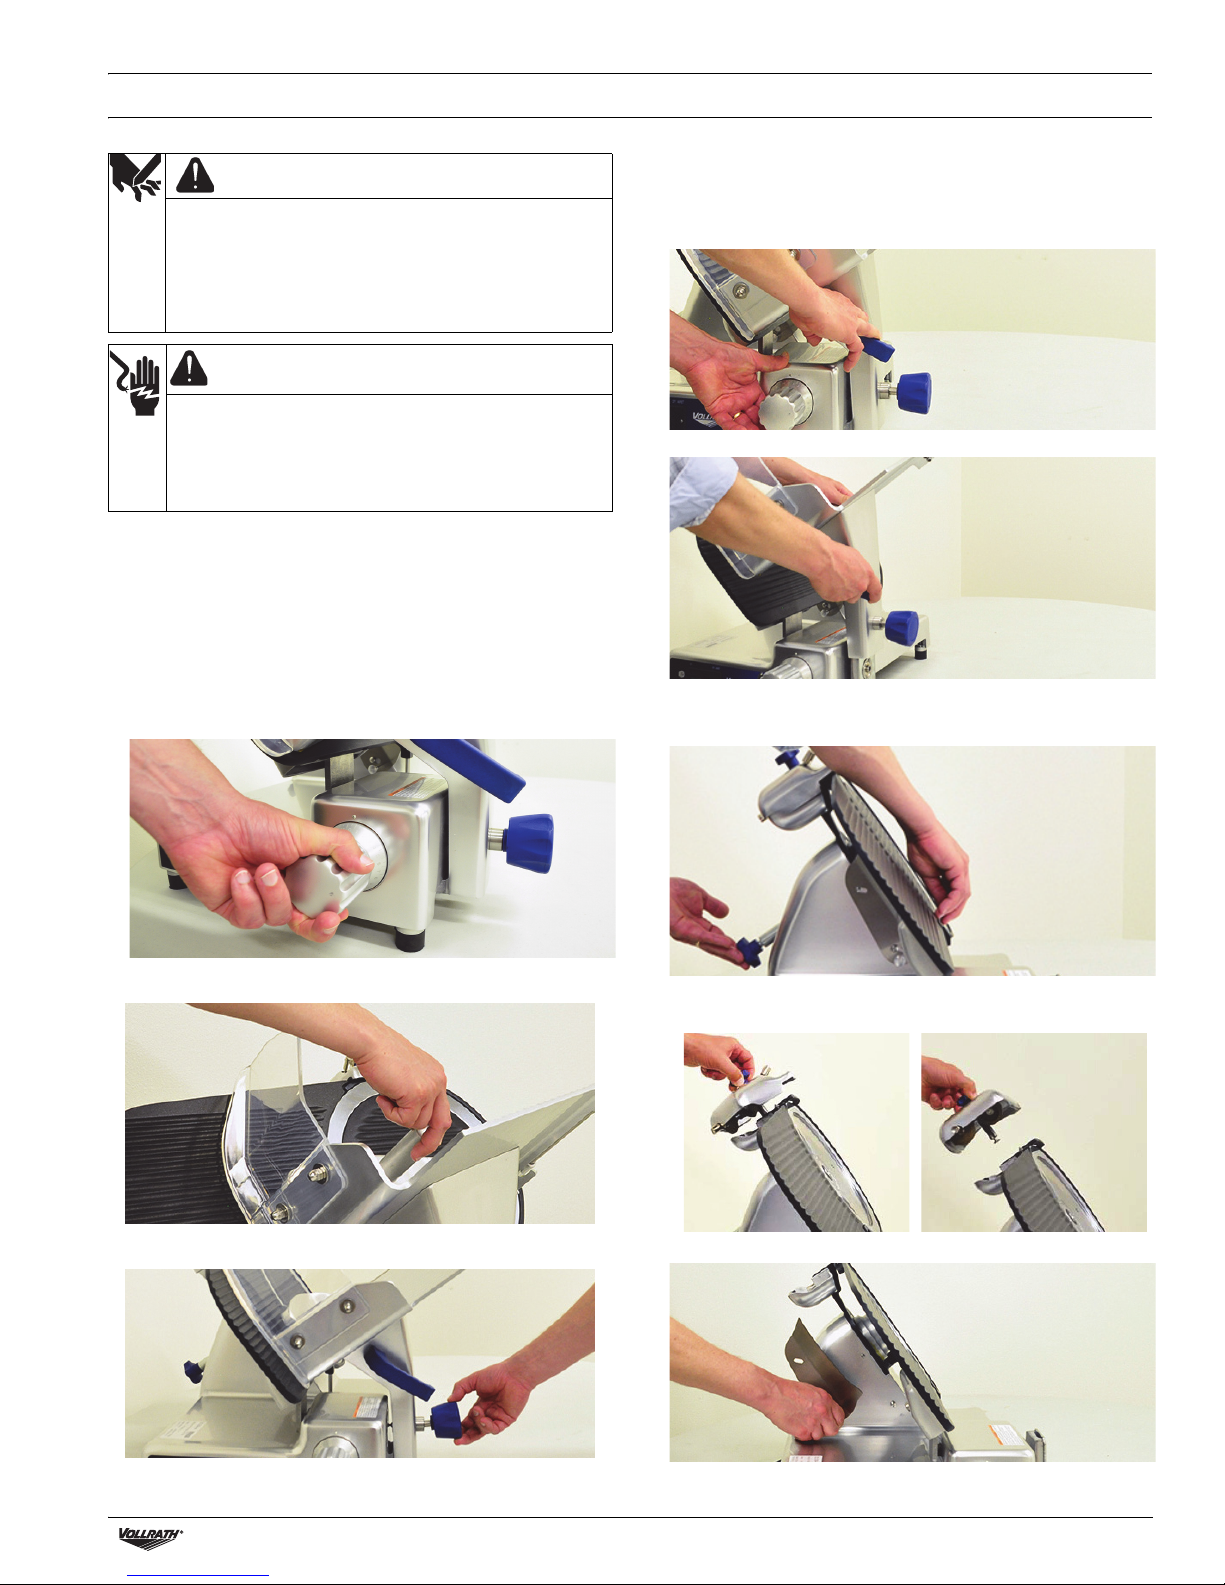
Disassemble the Slicer
1. Unplug the slicer from the electrical outlet.
2. Turn the index control knob to the right, past zero (0), until it will not
turn any further. This positions the gauge plate to protect you from
the blade and is required for the carriage tray to be locked.
5. Use the carriage handle to firmly pull (do not force) the carriage tray
forward until you hear a click and it is locked into place.
Note: If it is difficult to lock the carriage tray, verify the index control
knob is turned past zero and as far as possible to the right. Then,
further loosen the carriage release knob.
6. Lift to remove the carriage tray.
7. Grasp the knob on the blade cover with one hand. With the other
hand, loosen and push the blade cover knob to lift the blade cover
from the blade.
3. Remove the product grip handle. Note on some models, the handle
is not removable.
4. Turn the carriage release knob until it is very loose. Note: it is not
removable.
Heavy-Duty Electric Slicers Operator’s Manual 5
8. Lift the blade sharpening assembly and rotate it 90° counterclockwise. Lift to remove it.
9. Remove the slice guard.
10.Use a clean cloth to remove all coarse residual food and liquid from
the slicer surfaces.
Page 6
CLEAN AND SANITIZE THE SLICER (CONTINUED)
Clean the Slicer
NOTICE: Do not clean the equipment with abrasive materials or
scratching cleansers. These can damage the finish. Clean
the slicer with only water, a mild detergent and sanitizing
solution.
NOTICE: Hand-wash only.
NOTICE: Do NOT soak the sharpening assembly.
NOTICE: Do NOT wash the sharpening stones. Wet stones will not
properly sharpen the blade and will need to be replaced.
1. Wash the removable parts in a clean basin filled with a solution of
clean warm water and mild detergent.
2. Rinse the parts with clean warm water.
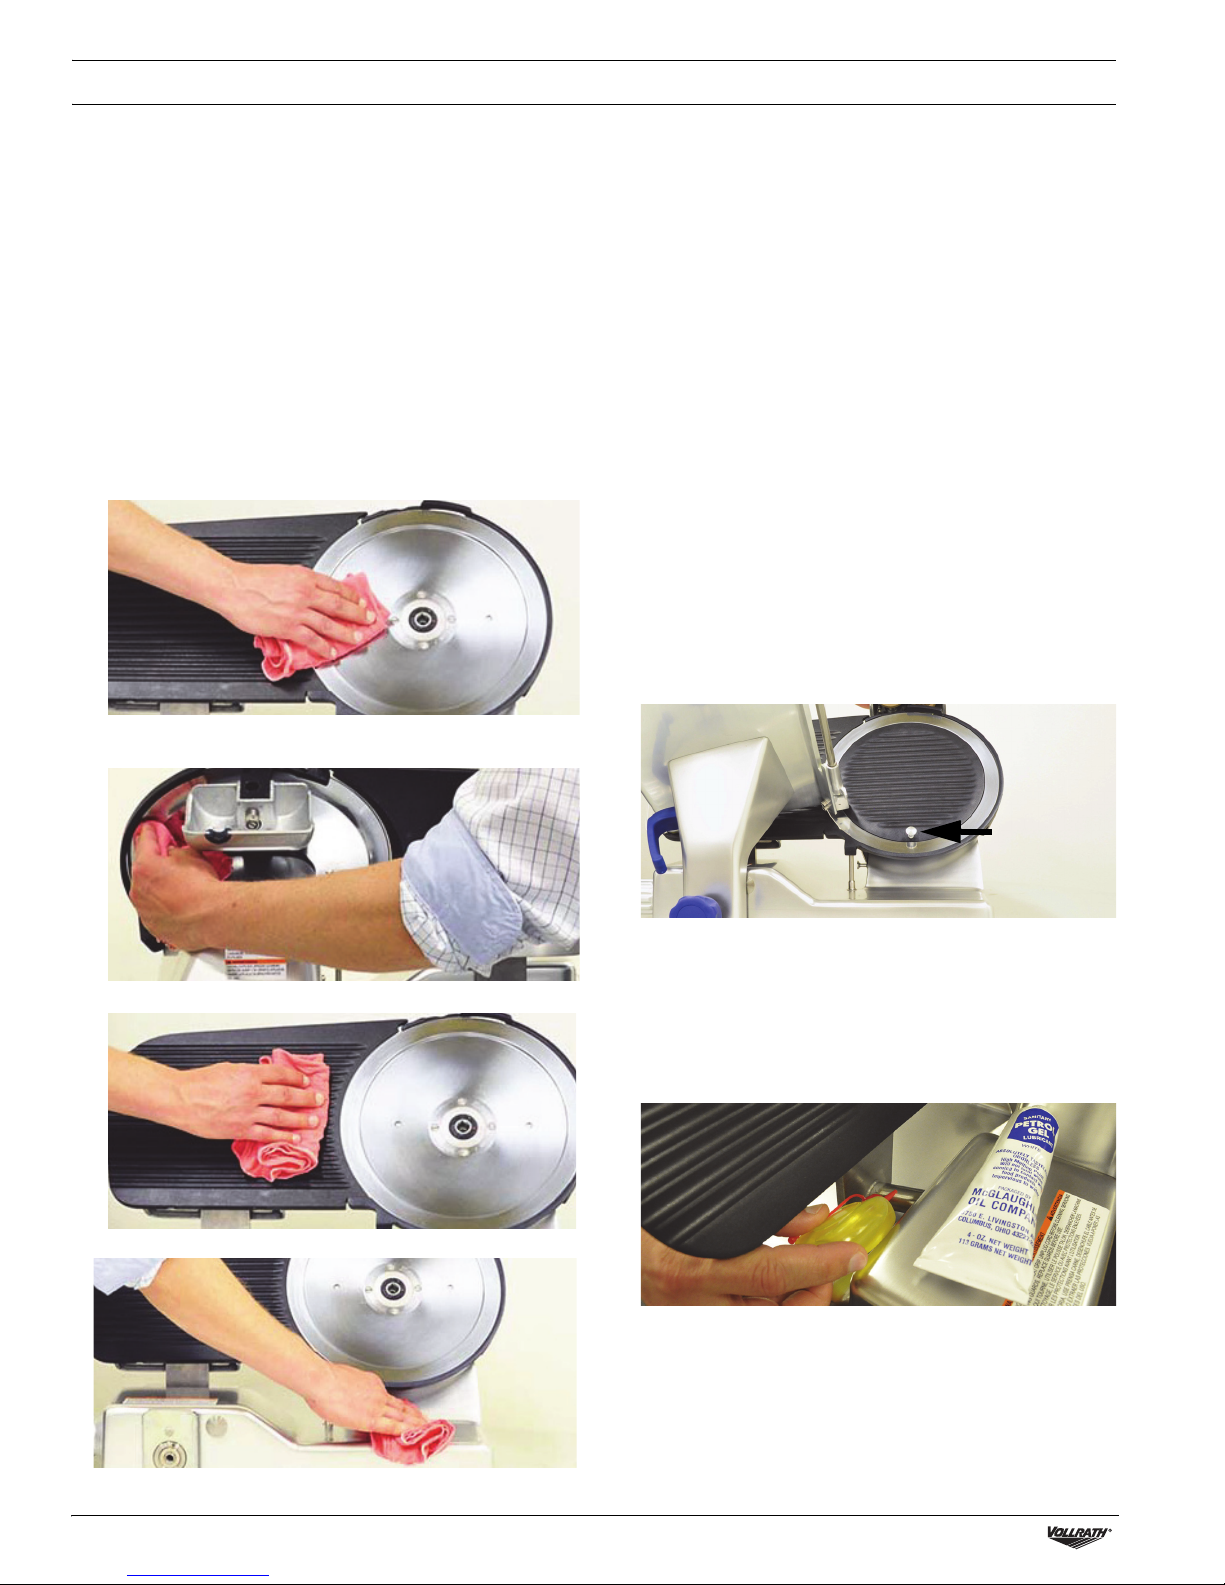
3. Use a soft cloth, clean warm water and a mild detergent to clean the
non-removable parts of the slicer:
• The front and back sides of the blade. Start at the center of blade
and wipe toward the edge.
Sanitize the Slicer
NOTICE: The sanitizer concentration shall comply with Section
4-501.114, Manual and Mechanical Warewashing
Equipment, Chemical Sanitization – Temperature, pH,
Concentration, and Hardness of the FDA Food Code.
NOTICE: If a chemical sanitizer other than chlorine, iodine or
quaternary ammonium is used, it shall be applied in
accordance with the EPA registered label use instruction.
1. Wash your hands.
2. Soak the removable parts in a clean basin or sink, in a solution of
clean warm water and correctly-diluted sanitizing solution.
NOTICE: Do NOT soak the sharpener assembly. Wet stones will
not properly sharpen the blade and will need to be
replaced.
3. Remove the parts from the basin and allow them to air dry. Do not
rinse or wipe the sanitizer off of the parts.
4. Moisten a soft clean cloth with correctly-diluted sanitizing solution.
5. Use the cloth to sanitize the non-removable parts and the body of
the slicer. See Step 3 under “Clean the Slicer.” Do not rinse or wipe
the sanitizer off of the parts.
Reassemble the Slicer
1. Install the slice guard.
2. Position the blade cover so the cover knob is at the bottom, as
shown below. Install the blade cover knob and secure the blade
cover.
• Blade guard. From the backside of the blade guard, carefully wipe
the inside edge of the guard.
• Gauge plate. Start at the blade and wipe outward.
4. Body of the slicer.
3. Install the carriage tray and tighten the carriage release knob.
NOTICE: Tighten the carriage release knob until it will no longer
turn. Under-tightening could cause the carriage to wiggle
and damage the gauge plate or body of the slicer.
4. Install the product grip handle.
5. Install the blade sharpening assembly.
6. Lubricate the gauge plate slide with the oil supplied with the slicer or
with a food-grade lubricant.
5. Rinse the non-removable parts of the slicer with clean warm water.
6 Heavy-Duty Electric Slicers Operator’s Manual
Inspect the Slicer
• Inspect the slicer for correct assembly.
• Verify the carriage release knob is fully tight and the carriage tray
does not wobble. Gently move the carriage to verify the carriage
release pin is fully retracted and does rub against the slicer body.
• Verify the slicer is in good working condition.
• Do not use the slicer if it is not in good working condition. Contact
authorized Vollrath service agency to service the slicer.
Page 7
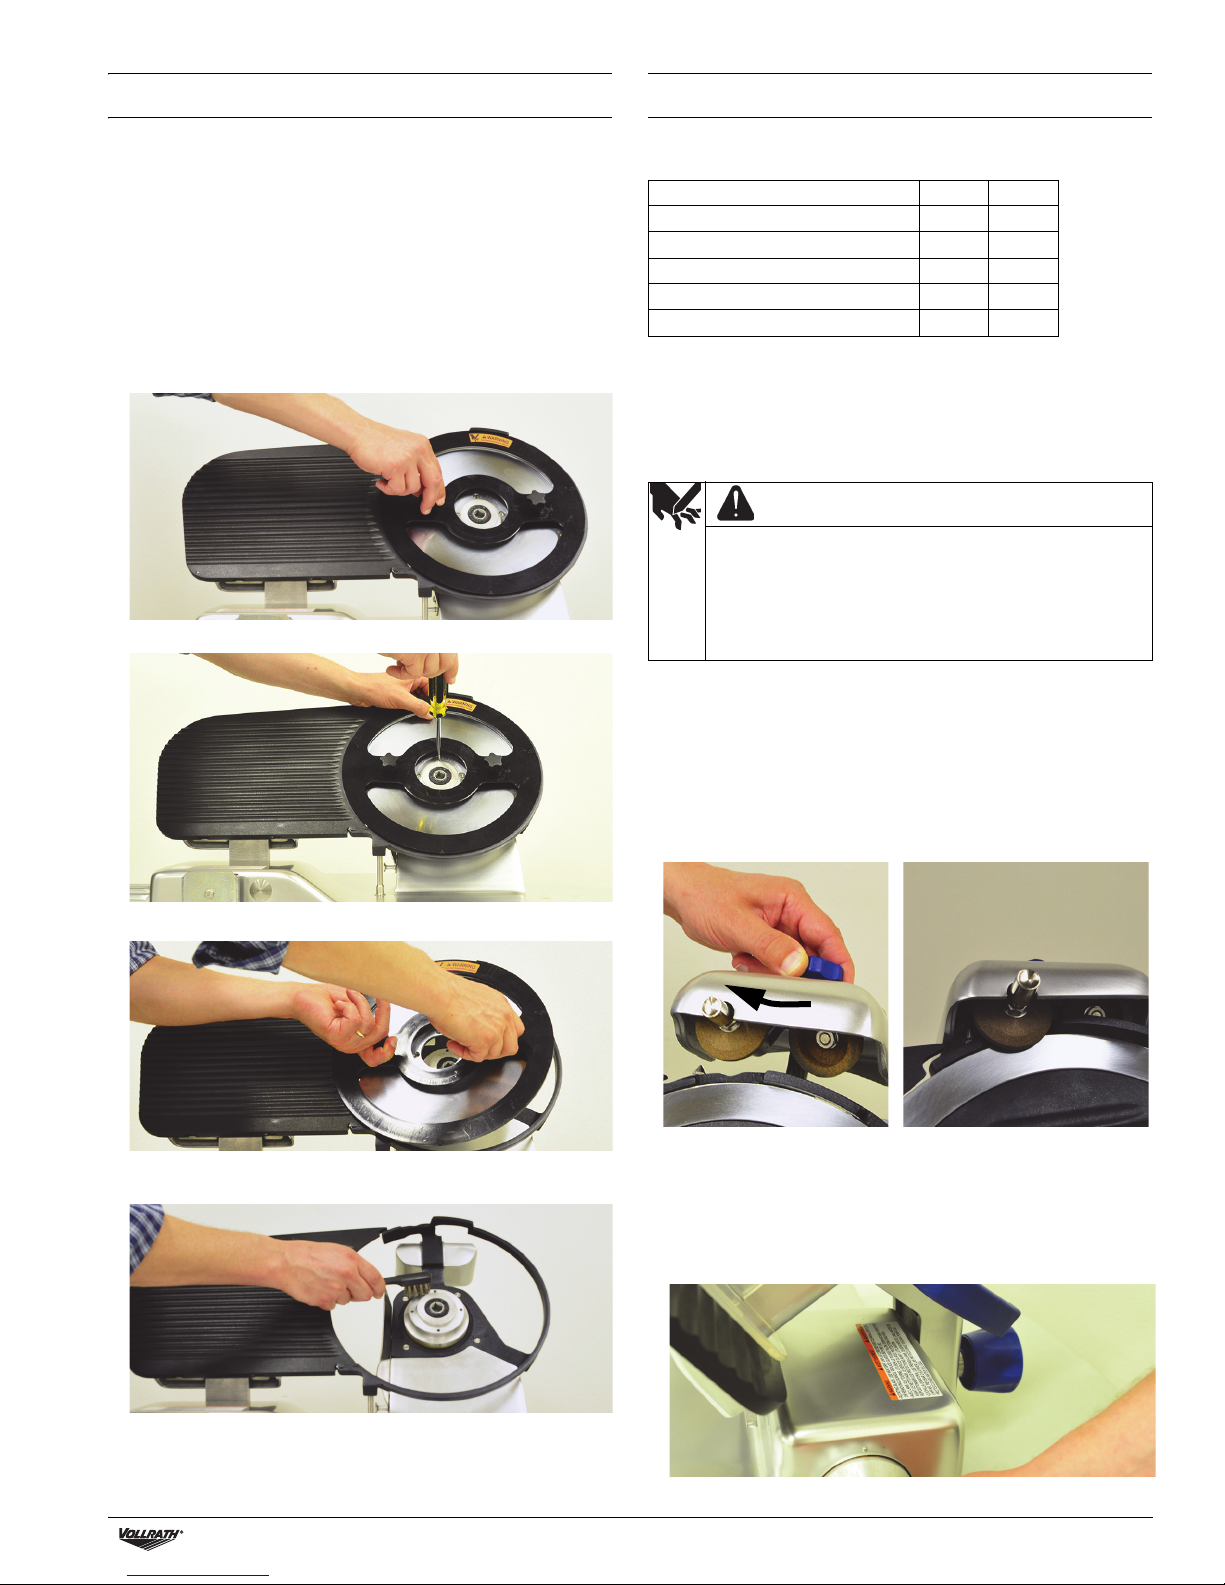
SAFE BLADE REMOVAL TOOL
MAINTENANCE
1. Unplug the slicer from the electrical outlet.
2. Remove the blade guard cover.
3. Clean the front side of the blade. See “Clean the Slicer” on page 6.
4. Remove the sharpener.
5. Rotate the blade so that the screw holes are parallel to the base of
the slicer.
6. Place the safe blade removal tool on the blade and align the two
knobs on the tool with the holes in the blade.
Tip: Rotate the tool so the warning label is at the top of the tool and
the notch fits around the bump out of the blade guard.
7. Tighten the knobs to secure the tool to the blade.
8. Remove the screws that fasten the blade to the slicer.
Schedule
Procedure
Inspect the slicer before each use X
Sharpen the blade X
Clean and sanitize the slicer X
Lubricate the gauge plate slide X
Lubricate the carriage slide X
Daily Monthly
Sharpen the Blade
Sharpen the blade daily or any time that cutting becomes difficult or
produces a large amount of waste. The slicer should be treated as a
knife. If it is not adequately sharpened, the slicing results will be poor
and the machine will be overloaded.
WARNING
Cut and Amputation Hazard
The blade on this commercial slicer is extremely sharp. Severe
injury can occur if care is not used when using or cleaning this
product. Only trained personnel should operate equipment or
perform maintenance. To reduce the risk of injury, the use of a
cut resistant glove(s) is recommended when cleaning this
equipment.
NOTICE: Use the integrated sharpener to sharpen the blade. Do not
1. Turn the index control to the zero (0) position.
2. Press and release the OFF (O) button.
3. Unplug the slicer from the electrical outlet.
4. Clean the blade to remove any grease or food.
5. Lift the sharpener and rotate it 180° counter clockwise. Position the
remove the blade to sharpen.
sharpener so the blade is between the sharpening stones.
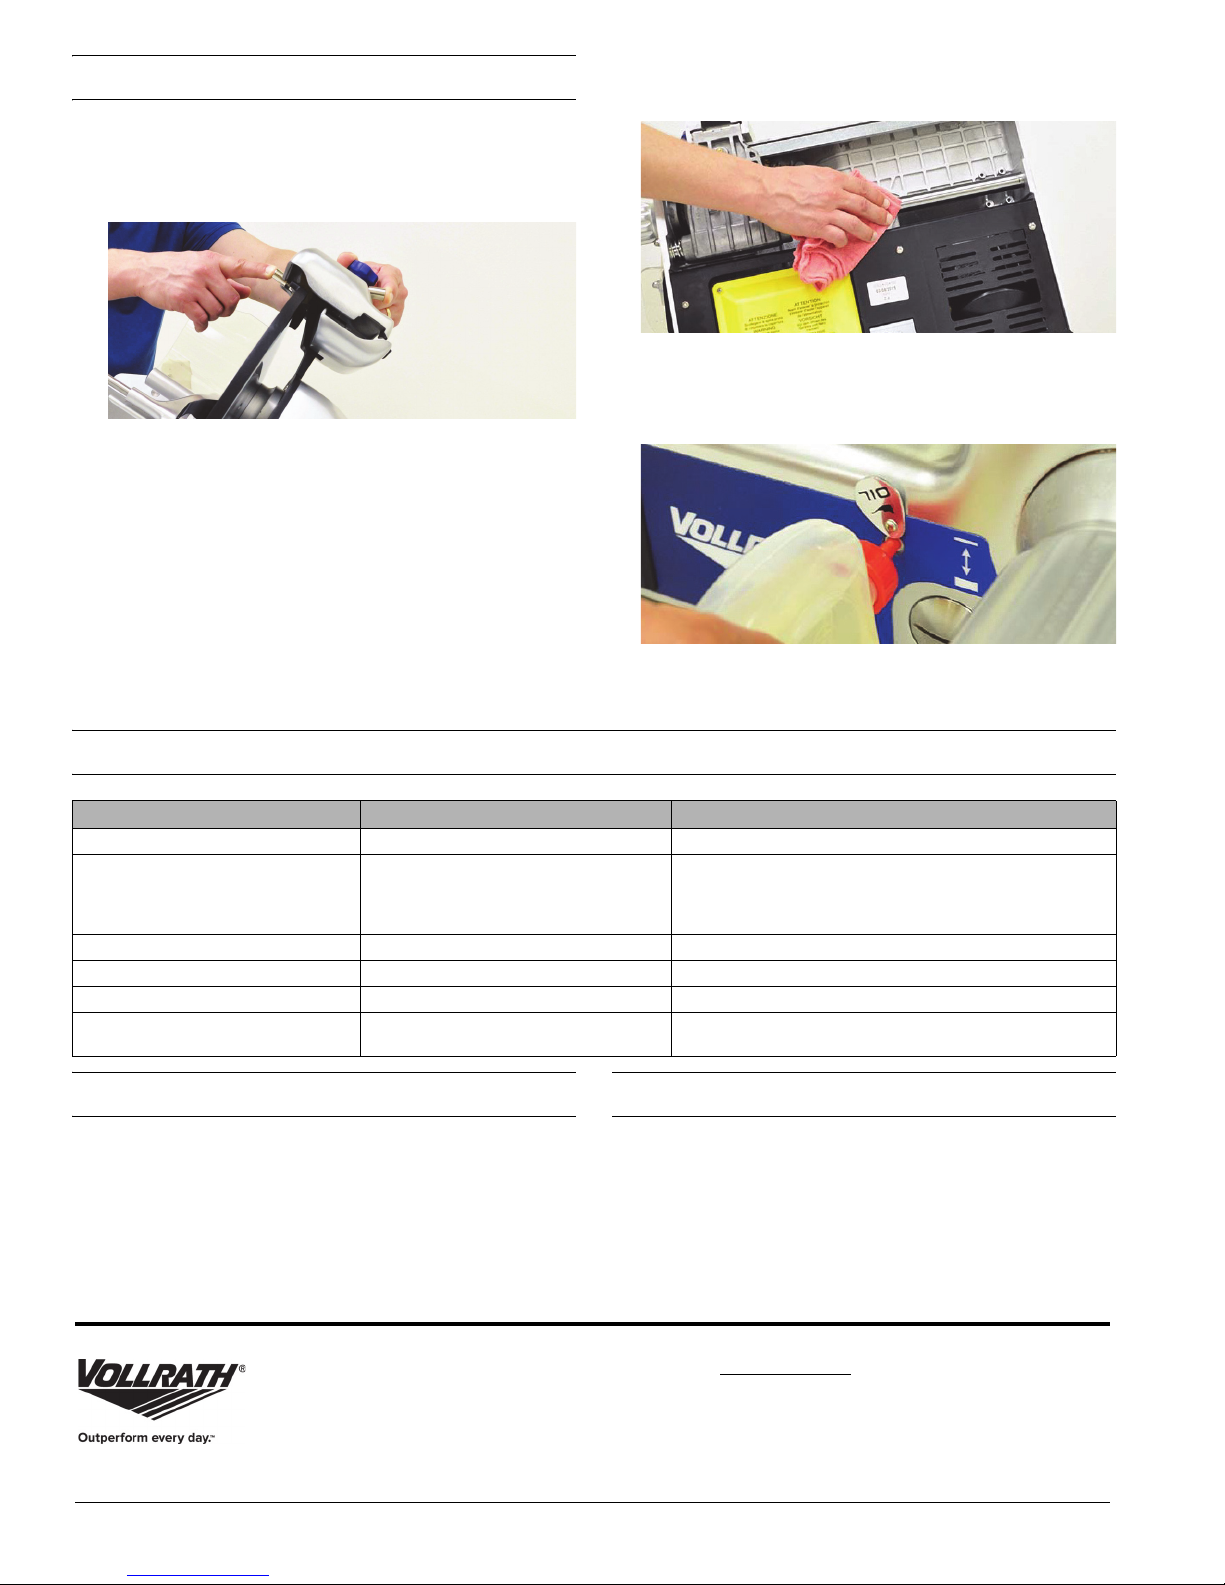
9. Lift the safe blade removal tool to remove the blade.
10.Use a brush to clean any debris from the area where the blade
attaches to the slicer body.
11.Reverse the procedure to reinstall the blade. Verify the blade is
installed flat against the pulley.
12.Plug the slicer into the electrical outlet.
6. Plug the slicer into the electrical outlet.
7. Press and release the ON (—) button.
8. Press and hold the sharpening stone button. Let the blade rotate
against the sharpening stone for 30-40 seconds. Release the button.
Correctly sharpening the blade should produce sparks. See the
Troubleshooting section if sharpening does not produce sparks.
Heavy-Duty Electric Slicers Operator’s Manual 7
Page 8
MAINTENANCE (CONTINUED)
9. Simultaneously press and hold the sharpening and deburring stone
buttons for 3-4 seconds. Release the buttons.
NOTICE: NOTICE: Pressing the buttons for longer than 3-4 seconds
could bend the blade, which could then damage the
slicer.
10.Press and release the OFF (O) button and unplug the slicer.
11.Return the sharpener to the original position.
12.Clean the slicer. See “Clean and Sanitize the Slicer” on page 5.
Lubricate the Carriage Slide
Lubricate the carriage slide at least once a month and any time that
pushing the tray becomes difficult.
NOTICE: NOTICE: Use the oil supplied with the slicer or a food safe
lubricant. Do NOT use vegetable oil or oil containing
silicone. Do NOT spray oil onto the slicer components.
Sprayed oil could unintentionally reach areas of the slicer
that should not be lubricated.
1. Press and release the OFF (O) button.
2. Unplug the slicer from the electrical outlet.
3. Use a clean soft cloth to clean the carriage slide.
4. Pull carriage all the way forward. This will align the carriage slide
with the oil access hole (OIL) on the front of the slicer. If the slide is
not aligned, oil will drip and pool below the slicer.
5. Put a few drops of the oil that was supplied with slicer into the
carriage slide lubricant access hole.
TROUBLESHOOTING
Problem Might Be Caused By Course of Action
Poor cutting performance. The blade needs to be sharpened. Sharpen the blade.
Poor cutting performance even though
blade is routinely sharpened.
No sparks when sharpening. Sharpening stones need to be replaced. Replace the stones.
Dirty sharpening stones. Blade was not cleaned prior to sharpening. Replace the stones.
Overload reset is activating too often. Contact Vollrath Technical Services.
Gauge plate is difficult to adjust Gauge plate slide needs lubrication.
SERVICE AND REPAIR
Serviceable parts are available on Vollrath.com.
To avoid serious injury or damage, never attempt to repair the unit or
replace a damaged power cord yourself. Do not send units directly to
The Vollrath Company LLC. Please contact Vollrath Technical Services
for instructions.
When contacting Vollrath Technical Services, please be ready with the
item number, model number (if applicable), serial number, and proof of
purchase showing the date the unit was purchased.
Sharpening process is incorrect.
WARRANTY STATEMENT FOR THE VOLLRATH CO.
The Vollrath Company LLC warrants the products it manufactures or
distributes against defects in materials and workmanship as specifically
described in our full warranty statement.
For complete warranty information, product registration and new
product announcement, visit www.vollrath.com.
Repeat the sharpening process. Press and hold the sharpening stone button for a few seconds longer to allow burrs to
form on the blade. If the problem persists contact Vollrath
Technical Services.
Lubricate the gauge plate slide with the oil supplied with the
slicer or with a food-grade lubricant.See page 6.
The Vollrath Company, L.L.C.
1236 North 18th Street
Sheboygan, WI 53081-3201 U.S.A.
Main Tel: 800.624.2051 or 920.457.4851
Main Fax: 800.752.5620 or 920.459.6573
www.vollrath.com
Customer Service: 800.628.0830
Canada Customer Service: 800.695.8560
Technical Services
techservicereps@vollrathco.com
Induction Products: 800.825.6036
Countertop Warming Products: 800.354.1970
All Other Products: 800.628.0832
©
2017 The Vollrath Company L.L.C. Part No. 350009-1 ml 6/16/17
Page 9

Manuel d’utilisation
Trancheurs électriques pour service sévère
Entraî-
Art. Modèle Descrip.
40952 SLM300/S
Avant d’utiliser cet appareil, lisez et familiarisez-vous avec le mode
d’emploi et les consignes d’utilisation qui suiven. CONSERVEZ CES
INSTRUCTIONS POUR RÉFÉRENCE ULTÉRIEURE. Conservez
l’emballage et le carton d’origine. L'emballage devra être réutilisé pour
expédier l’appareil si une réparation est nécessaire.
CONSIGNES DE SÉCURITÉ
Pour garantir un fonctionnement sûr, lisez les avertissements suivants
et comprenez leur signification. Ce manuel contient des consignes de
sécurité, présentées ci-dessous. Lisez-les attentivement.
AVERTISSEMENT
Un avertissement permet d'indiquer la présence d'un danger qui
causera ou peut causer des blessures personnelles graves ou la mort.
ATTENTION
Une mise en garde indique la présence d'un danger qui causera ou
pourra causer des blessures mineures ou majeures si elle est ignorée.
AVIS : Un avis met en évidence des informations qui sont
importantes mais sans rapport avec un danger.
Inscrivez votre produit sur Vollrath.com/registration pour avoir une chance de gagner une poêle Tribute® Vollrath de 10" (25 cm).
Risque blessures graves si cet appareil n’est pas correctement utilisé.
Pour réduire le risque de blessures et d'endommagement de l'appareil :
• Tenez hors de portée des enfants.
• Ne mettez pas l'appareil en marche sans que les sécurités en place.
• Gardez la glissière du chariot et la glissière de la plaque d’épaisseur
de tranche lubrifiées pour garantir un mouvement fluide.
• N'introduisez pas les aliments à la main : utilisez toujours le
poussoir.
• L'appareil doit être branché sur une prise électrique correctement
mise à la terre correspondant aux valeurs indiquées sur la plaque
signalétique.
• Débranchez toujours l'appareil avant de le nettoyer.
• Tenez l'appareil loin de l'eau; évitez les projections d'eau durant le
nettoyage.
• Cet appareil doit uniquement être utilisé en position horizontale.
• N’utilisez pas l’appareil sans surveillance.
• Installez ou placez cet appareil en suivant scrupuleusement les
instructions d'installation fournies.
• N'utilisez pas cet appareil s'il a un cordon ou une fiche abîmé(e), s'il
fonctionne mal ou s'il a été endommagé ou est tombé par terre.
• Ne plongez pas le câble électrique ou sa fiche dans l'eau. Tenez le
câble électrique à l'écart des surfaces chauffées. Ne laissez pas
pendre le câble électrique d'une table ou d'un comptoir.
• N'utilisez pas de rallonge électrique avec cet appareil. Ne branchez
pas cet appareil sur une barrette d'alimentation ou un cordon
d'alimentation à prises multiples.
• L'appareil doit être installé par un personnel qualifié conformément
à tous les codes et décrets locaux.
• Ne vaporisez pas les commandes ou l’extérieur de l’appareil avec
des liquides ou des produits nettoyants.
• Ne nettoyez pas l'appareil à la laine d'acier.
• Tenez l'appareil et son cordon d’alimentation à l’écart des flammes
nues, des brûleurs électriques ou d’une chaleur excessive.
©
2017 The Vollrath Company L.L.C. Num. d'art. 350009-1 ml 6/16/17
Lame 12"
(30,5 cm)
AVERTISSEMENT
nement
Courroie 1/2 120 2,0 60
Puiss.
(HP) Tens. A Hz Fiche
NEMA
5-15P
Page 10

FONCTION ET OBJET
Cet appareil permet de couper des aliments en tranches dans les
opérations de restauration commerciales seulement. Il est déconseillé
de l'utiliser avec de la viande sur l'os. Il n’est pas destiné à une
utilisation ménagère ou en laboratoire..
SORTEZ L’APPAREIL DE SA CAISSE
1. À son arrivée, inspectez l’état du colis et de l’appareil.
2. Informez immédiatement le transporteur en cas de dommages.
3. Positionnez la palette contenant le trancheur sur une surface plane.
4. Enlevez tout le matériel d'emballage et le ruban adhésif, ainsi que le
plastique de protection.
6. Tournez le trancheur de sorte qu’il soit en appui sur le bouton du
couvre-lame.
7. Enlevez les quatre écrous qui fixent le trancheur sur la palette.
Enlevez les quatre rondelles et dévissez les quatre tiges d’attache de
la palette.
AVIS: Veillez à soutenir le trancheur pour qu’il ne bascule pas
au moment de la dépose de la visserie d’attache.
5. Enlevez l’affûteuse. Voir « Démontez le trancheur », à la page 5.
8. Enlevez la palette.
9. Installez les espaceurs métalliques et les pieds en caoutchouc.
AVIS : Les pieds et les espaceurs doivent être installés de
manière conforme aux critères d’homologation
d’agence.
10.Redressez le trancheur et posez-le sur ses pieds.
11.Tournez les pieds pour caler le trancheur.
2 Manuel d’utilisation de trancheurs électriques pour service sévère
Page 11

INSTALLEZ L’APPAREIL
B
A J
C
D
E
L
H
G
K
M
N
O
F
P
Q
I
R
Dégagements minimums et conditions
ambiantes exigées
Le trancheur doit être placé :
• à 31-½" (80 cm) du sol
•à 7-⁷⁄₈" (20 cm) des murs ou des objets avoisinants pour laisser une
place suffisante pour utiliser le trancheur
• à un endroit sec, loin de sources de chaleur et pas dans un couloir.
FONCTIONS ET COMMANDES
Installation
1. Nettoyez l'appareil.
Avant d'utiliser cet appareil, il doit être minutieusement nettoyé.
Voir « Nettoyez et désinfectez le trancheur », à la page 5. Nettoyez
les surfaces avant d’utiliser l’appareil sous peine de contamination
alimentaire.
2. Branchez l'appareil sur une prise électrique correctement mise à la
terre correspondant aux valeurs nominales indiquées sur la plaque
signalétique. L'appareil risque d'être abîmé s'il est alimenté par une
alimentation non conforme.
A Boutons marche/arrêt L Plaque d’épaisseur de tranche
B Voyant d’alimentation M Lame
C Bouton du couvre-lame N Protège-lame
D Protection anti-coupures O Couvre-lame
E Affûteuse de lame P Pièce de serrage du produit
F Plateau de chariot Q Poignée de serrage du produit
G Poignée du chariot R Outil de dépose de lame sans danger
H Bouton de libération du chariot
I Pied et espaceur métallique
J Bouton de réglage d’épaisseur de tranche
K Accès pour lubrifier la glissière de chariot
Manuel d’utilisation de trancheurs électriques pour service sévère 3
Page 12

MODE D'EMPLOI
Interrupteur de
réarmement
post-surcharge
AVERTISSEMENT
Risque de coupure et d'amputation
La lame sur ce trancheur commercial est extrêmement affûtée.
Risque de blessures graves si ce produit n'est pas utilisé ou
nettoyé avec précaution. Seul un personnel formé doit utiliser
l'appareil et effectuer son entretien. Pour réduire le risque de
blessures, l'emploi de gants résistant aux coupures est
recommandé lors du nettoyage de cet appareil.
AVERTISSEMENT
Risque d'électrocution
Empêchez toute infiltration d'eau et d'autres liquides dans
l'appareil. L'infiltration de liquide dans l'appareil risque de
causer une électrocution. Ne vaporisez pas d'eau ou de
produits nettoyants. Du liquide risque d’entrer en contact avec
les composants électriques et de causer un court-circuit ou
une décharge électrique.
Inspectez le trancheur
• Inspectez le trancheur pour vous assurer qu’il a été correctement
assemblé.
• Vérifiez le serrage complet du bouton de libération du chariot et
assurez-vous que le plateau du chariot n’oscille pas. Déplacez
doucement le chariot pour vérifier la rétraction complète de la
goupille de libération du chariot et vous assurer qu’elle ne frotte pas
contre le corps du trancheur.
• Vérifiez que le trancheur est en bon état de fonctionnement.
• N’utilisez pas le trancheur s’il n’est pas en bon état de
fonctionnement. Contactez un centre de réparation agréé par
Vollrath pour la maintenance du trancheur.
LUBRIFICATION
Pour garantir un fonctionnement fluide et sûr, lubrifiez le trancheur.
Glissière du chariot
Lubrifiez la glissière du chariot une fois par mois ou plus souvent si
nécessaire. Voir « Lubrifiez la glissière du chariot », à la page 8.
Glissière de la plaque d’épaisseur de tranche
Lubrifiez la glissière de la plaque d’épaisseur de tranche au moins une
fois par jour et après chaque nettoyage avec l’huile fournie avec le
trancheur ou un lubrifiant alimentaire.
Chargez le trancheur
1. Glissez le plateau du chariot jusqu'à la position charger/démarrer (la
position la plus proche de l'opérateur).
2. Soulevez la poignée de serrage du produit et placez la pièce à
trancher sur le plateau du chariot et en contact avec la plaque
d’épaisseur de tranche.
3. Placez la poignée de serrage du produit sur ou derrière la pièce à
couper en tranches.
4. Utilisez le bouton de réglage d’épaisseur de tranche à l’épaisseur
souhaitée.
5. Appuyez brièvement sur le bouton marche (—).
Coupez la pièce en tranches
1. Utilisez la poignée du chariot pour imprimer au plateau du chariot un
mouvement de va-et-vient pour couper la pièce en tranches.
Éteignez le trancheur
1. Mettez la commande de réglage d’épaisseur de tranche à zéro (0) de
sorte que la plaque d’épaisseur protège le tranchant de la lame.
2. Appuyez brièvement sur le bouton arrêt (O).
4 Manuel d’utilisation de trancheurs électriques pour service sévère
INTERRUPTEUR DE RÉARMEMENT
POST-SURCHARGE
Si le trancheur est en état de surcharge, l’interrupteur de réarmement
arrête le trancheur pour protéger le moteur. En cas de surcharge :
1. Appuyez brièvement sur le bouton arrêt (O).
2. Débranchez le câble électrique du trancheur de la prise électrique.
3. Enlevez les aliments qui ont causé la surcharge. Si nécessaire,
nettoyez l’appareil. Voir « Nettoyez le trancheur », à la page 6.
4. Appuyez sur le bouton-poussoir de réinitialisation, sous le trancheur.
5. Branchez le trancheur dans la prise secteur.
6. Appuyez brièvement sur le bouton marche (—) pour reprendre le
fonctionnement.
Un réarmement devrait être une occurrence rare due à la surcharge du
trancheur. Contactez un centre de réparation agréé par Vollrath si
l’interrupteur s’active souvent en cours d’utilisation normale.
Page 13

NETTOYEZ ET DÉSINFECTEZ LE TRANCHEUR
AVERTISSEMENT
Risque de coupure et d'amputation
La lame sur ce trancheur commercial est extrêmement affûtée.
Risque de blessures graves si ce produit n'est pas utilisé ou
nettoyé avec précaution. Seul un personnel formé doit utiliser
l'appareil et effectuer son entretien. Pour réduire le risque de
blessures, l'emploi de gants résistant aux coupures est
recommandé lors du nettoyage de cet appareil.
AVERTISSEMENT
Risque d'électrocution
Empêchez toute infiltration d'eau et d'autres liquides dans
l'appareil. L'infiltration de liquide dans l'appareil risque de
causer une électrocution. Ne vaporisez pas d'eau ou de
produits nettoyants. Du liquide risque d’entrer en contact avec
les composants électriques et de causer un court-circuit ou
une décharge électrique.
AVIS : Ce trancheur devra être nettoyé et désinfecté à des
intervalles conformes aux codes sanitaires nationaux,
provinciaux et/ou locaux.
AVIS : Ce trancheur doit être nettoyé et désinfecté à chaque
affûtage de la lame.
Démontez le trancheur
1. Débranchez le trancheur de la prise secteur.
2. Tournez le bouton de réglage d’épaisseur de tranche à droite, audelà de zéro (0), jusqu’à ce qu’il bute. Cette procédure positionne la
plaque d’épaisseur de tranche de sorte à vous protéger de la lame et
elle est requise pour permettre le verrouillage du plateau du chariot.
5. Utilisez la poignée du chariot pour tirer fermement (sans forcer) le
plateau du chariot vers l’avant jusqu’à ce que vous entendiez un
déclic confirmant son verrouillage en place.
Remarque : S’il est difficile de verrouiller le plateau du chariot,
vérifiez si le bouton de réglage d’épaisseur de tranche est au-delà de
zéro, et le plus loin possible à droite. Desserrez davantage le bouton
de libération du chariot.
6. Soulevez pour enlever le plateau du chariot.
7. Saisissez d’une main le bouton sur le couvre-lame. De l’autre,
desserrez et poussez le bouton du couvre-lame pour soulever le
couvre-lame de la lame.
3. Déposez la poignée de serrage du produit. Notez que sur certains
modèles, la poignée est inamovible.
4. Tournez le bouton de libération du chariot jusqu’à ce qu’il soit bien
desserré. Remarque : Il n’est pas amovible.
Manuel d’utilisation de trancheurs électriques pour service sévère 5
8. Soulevez l’affûteuse de lame et tournez-la de 90° dans le sens
inverse des aiguilles d’une montre. Soulevez pour la déposer.
9. Enlevez la protection anti-coupures.
10.Utilisez un chiffon propre pour enlever tous les résidus alimentaires
grossiers et les liquides des surfaces du trancheur.
Page 14

NETTOYEZ ET DÉSINFECTEZ LE TRANCHEUR (SUITE)
Nettoyez le trancheur
AVIS : Ne nettoyez pas l’appareil avec un produit abrasif ou des
nettoyants qui rayent. sous peine d'endommager la
finition. Nettoyez le trancheur seulement avec de l’eau,
un détergent doux et une solution désinfectante.
AVIS : Lavez exclusivement à la main.
AVIS : Ne faites PAS TREMPER l’affûteuse.
AVIS : NE LAVEZ PAS les pierres d’affûtage. Les pierres
mouillées n’affûteront pas correctement la lame et devront
être remplacées.
1. Lavez les pièces amovibles dans une bassine propre remplie d’une
solution d’eau chaude propre et de détergent doux.
2. Rincez les pièces à l'eau propre.
3. Utilisez un chiffon doux, de l’eau chaude propre et un détergent doux
pour nettoyer les pièces inamovibles du trancheur :
• L’avant et l’arrière de la lame. Démarrez au centre de la lame et
essuyez vers le bord.
• Protège-lame. En partant de l’arrière du protège-lame, essuyez
avec précaution son bord intérieur.
Désinfectez le trancheur
AVIS : La concentration de désinfectant devra être conforme à
AVIS : Si un désinfectant chimique autre que le chlore, l'iode ou
1. Lavez-vous les mains.
2. Faites tremper les pièces amovibles dans une bassine ou un évier
3. Enlevez les pièces de la bassine et laissez-les sécher à l'air. Ne rincez
4. Humectez un chiffon doux propre avec une solution désinfectante
5. Utilisez le chiffon pour désinfecter les pièces inamovibles et le corps
Remontez le trancheur
1. Installez la protection anti-coupures.
2. Positionnez le couvre-lame de sorte que son bouton soit en bas,
Section 4-501.114, Manual and Mechanical Warewashing
Equipment, Chemical Sanitization – Temperature, pH,
Concentration, and Hardness (Section 4-501.114,
Équipement de lavage manuel et mécanique, Désinfection
chimique – Température, pH, concentration et dureté) du
Code des aliments de la FDA.
l'ammonium quaternaire est utilisé, il devra être appliqué
conformément au mode d'emploi de l'étiquette enregistrée
auprès de l'EPA.
propre contenant une solution d’eau chaude propre et une solution
désinfectante diluée à la bonne concentration.
AVIS : Ne faites PAS TREMPER l’affûteuse. Les pierres
mouillées n’affûteront pas correctement la lame et
devront être remplacées.
ou n’essuyez pas le désinfectant des pièces.
correctement diluée.
du trancheur. Reportez-vous à l’étape 3 sous « Nettoyez trancheur ».
Ne rincez ou n’essuyez pas le désinfectant des pièces.
comme illustré ci-dessous. Installez le bouton du couvre-lame et
fixez le couvre-lame.
• Plaque d’épaisseur de tranche. Démarrez à la lame et essuyez vers
l’extérieur.
4. Corps du trancheur.
5. Rincez les pièces inamovibles du trancheur à l’eau chaude propre.
3. Installez le plateau du chariot et serrez le bouton de libération du
chariot à fond.
AVIS : Serrez le bouton de libération du chariot jusqu’à ce qu’il
4. Installez la poignée de serrage du produit.
5. Installez l’affûteuse de lame.
6. Lubrifiez la glissière de la plaque d’épaisseur de tranche avec l’huile
fournie avec le trancheur ou un lubrifiant alimentaire.
Inspectez le trancheur
• Inspectez le trancheur pour vous assurer qu’il a été correctement
assemblé.
• Vérifiez le serrage complet du bouton de libération du chariot et
assurez-vous que le plateau du chariot n’oscille pas. Déplacez
doucement le chariot pour vérifier la rétraction complète de la
goupille de libération du chariot et vous assurer qu’elle ne frotte pas
contre le corps du trancheur.
• Vérifiez que le trancheur est en bon état de fonctionnement.
• N’utilisez pas le trancheur s’il n’est pas en bon état de
fonctionnement. Contactez un centre de réparation agréé par
Vollrath pour la maintenance du trancheur.
bute. Un serrage insuffisant peut causer l’oscillation du
chariot et endommager la plaque d’épaisseur de tranche
ou le corps du trancheur.
6 Manuel d’utilisation de trancheurs électriques pour service sévère
Page 15

OUTIL DE DÉPOSE DE LAME SANS DANGER
MAINTENANCE
1. Débranchez le trancheur de la prise secteur.
2. Enlevez le couvre-lame.
3. Nettoyez l’avant de la lame. Voir « Nettoyez le trancheur »,
à la page 6.
4. Enlevez l’affûteuse.
5. Faites tourner la lame de sorte que les trous de vis soient parallèles
à la base du trancheur.
6. Placez l’outil de dépose de lame sans danger sur la lame et alignez
les deux boutons de l’outil sur ceux de la lame.
Astuce : tournez l’outil de sorte que l’étiquette d’avertissement se
trouve en haut de l’outil et l’encoche autour de la protubérance qui
dépasse du protège-lame.
7. Serrez les boutons pour attacher l’outil sur la lame.
8. Enlevez les vis qui fixent la lame au trancheur.
Calendrier
Procédure
Inspectez le trancheur avant
chaque utilisation
Affûtez la lame X
Nettoyez et désinfectez trancheur X
Lubrifiez la glissière de la plaque
d’épaisseur de tranche
Lubrifiez la glissière du chariot X
Une fois par jour Une fois par mois
X
X
Affûtez la lame
Affûtez la lame une fois par jour ou chaque fois que la coupe devient
difficile ou produit des déchets en grandes quantités. Le trancheur doit
être considéré et traité comme un couteau : s’il n'est pas correctement
affûté, les résultats de coupe seront médiocres et la machine sera en
état de surcharge.
AVERTISSEMENT
Risque de coupure et d'amputation
La lame sur ce trancheur commercial est extrêmement affûtée.
Risque de blessures graves si ce produit n'est pas utilisé ou
nettoyé avec précaution. Seul un personnel formé doit utiliser
l'appareil et effectuer son entretien. Pour réduire le risque de
blessures, l'emploi de gants résistant aux coupures est
recommandé lors du nettoyage de cet appareil.
AVIS : Utilisez l’affûteuse intégrée pour affûter la lame.
1. Mettez le bouton de réglage d’épaisseur de tranche à zéro (0).
2. Appuyez brièvement sur le bouton arrêt (O).
3. Débranchez le trancheur de la prise secteur.
4. Nettoyez la lame pour enlever la graisse et les particules
5. Soulevez l’affûteuse de lame et tournez-la de 180° dans le sens
Ne déposez pas la lame pour l’affûter.
alimentaires.
inverse des aiguilles d’une montre. Positionnez l’affûteuse de sorte
que la lame se trouve entre les pierres d’affûtage.
9. Soulevez l’outil de dépose de lame sans danger pour déposer la
lame.
10.Utilisez une brosse pour nettoyer tous les débris du point où la lame
est attachée au corps du trancheur.
11.Inversez la procédure pour réinstaller la lame. Vérifiez que la lame
est installée à plat contre la poulie.
12.Branchez le trancheur dans la prise secteur.
6. Branchez le trancheur dans la prise secteur.
7. Appuyez brièvement sur le bouton marche (—).
8. Appuyez en continu sur le bouton de la pierre d'affûtage. Laissez
tourner la lame contre la pierre d’affûtage pendant 30-40 secondes.
Relâchez le bouton. L’affûtage correct de la lame devrait produire
des étincelles. Si l’affûtage ne produit pas d’étincelles, reportez-vous
à la section « Dépannage ».
Manuel d’utilisation de trancheurs électriques pour service sévère 7
Page 16

MAINTENANCE (SUITE)
9. Apuyez simultanément sur les boutons de pierre d’affûtage et de
pierre d’ébarbage pendant 3-4 secondes. Relâchez les boutons.
AVIS : Une pression sur les boutons pendant plus de 3-4
secondes risque de courber la lame, ce qui peut
endommager le trancheur.
10.Appuyez brièvement sur bouton arrêt (O) et débranchez le trancheur.
11.Remettez l’affûteuse dans sa position initiale.
12.Nettoyez le trancheur. Voir « Nettoyage et désinfection du
trancheur », à la page 5.
Lubrifiez la glissière du chariot
Lubrifiez la glissière du chariot au moins une fois par mois et chaque
fois qu'il devient difficile de pousser le plateau.
AVIS : Utilisez l’huile fournie avec le trancheur ou un lubrifiant
alimentaire. N’UTILISEZ PAS d’huile végétale ou d’huile
contenant du silicone. NE PULVÉRISEZ PAS d’huile sur les
composants du trancheur. L’huile pulvérisée peut atteindre
des zones du trancheur qui ne doivent pas être lubrifiées.
1. Appuyez brièvement sur le bouton arrêt (O).
2. Débranchez le trancheur de la prise secteur.
3. Utilisez un chiffon doux propre pour nettoyer la glissière du chariot.
4. Tirez le chariot à fond vers l’avant. Ceci permet d’aligner la glissière
du chariot sur le trou d’accès à l’huile (OIL) sur l’avant du trancheur.
Si la glissière n’est pas alignée, de l’huile coulera et s’accumulera
sous le trancheur.
5. Mettez quelques gouttes d’huile fournie avec le trancheur dans le
trou d’accès au lubrifiant de la glissière du chariot.
DÉPANNAGE
Problème Cause possible Mesure corrective
Mauvaise performance de coupe. La lame doit être affûtée. Affûtez la lame.
Mauvaise performance de coupe malgré un
affûtage régulier de la lame.
Pas d’étincelles en cours d’affûtage.
Pierres d’affûtage sales.
Le réarmement post-surcharge s’active trop
souvent.
La plaque d’épaisseur de tranche est difficile
à régler.
Procédure d’affûtage incorrecte.
Les pierres d’affûtage doivent être
remplacées.
La lame n’a pas été nettoyée avant
affûtage.
La glissière de la plaque d’épaisseur
de tranche doit être lubrifiée.
SAV ET RÉPARATIONS
Des pièces détachées sont disponibles sur Vollrath.com.
Pour éviter toute blessure grave ou tout dommage sévère, n’essayez
jamais de réparer l'appareil ou de remplacer vous-même un cordon
d’alimentation endommagé. N’envoyez aucun appareil directement à
la Vollrath Company LLC. Pour des instructions, contactez les services
techniques de Vollrath.
Lorsque vous contacterez les services techniques de Vollrath, tenezvous prêt à fournir le numéro d'article, le numéro de modèle (s'il y a
lieu), le numéro de série et le justificatif d’achat indiquant la date
d’achat de l’appareil.
The Vollrath Company, L.L.C.
1236 North 18th Street
Sheboygan, Wi 53081-3201 États-Unis
Standard : 800.624.2051 ou 920.457.4851
Télécopieur : 800.752.5620 ou 920.459.6573
www.vollrath.com
Service clientèle : 800.628.0830
Service clientèle Canada : 800.695.8560
Répétez la procédure d’affûtage. Appuyez sur le bouton de la
pierre d’affûtage pendant quelques secondes de plus pour
permettre à des bavures de se former sur la lame. Si le problème
persiste, contactez les services techniques Vollrath.
Remplacez les pierres.
Remplacez les pierres.
Contactez le support technique Vollrath.
Lubrifiez la glissière de la plaque d’épaisseur de tranche avec
l’huile fournie avec le trancheur ou un lubrifiant alimentaire. Voir
page 6.
GARANTIE DE THE VOLLRATH CO. L.L.C.
Cette garantie ne s'applique pas aux produits achetés pour un usage
personnel, familial ou ménager, et The Vollrath Company LLC ne
propose aucune garantie écrite aux acheteurs pour de telles utilisations.
Pour des informations complètes sur la garantie, l'enregistrement
des produits et l'annonce de nouveaux produits, consultez
www.vollrath.com.
Services techniques
techservicereps@vollrathco.com
Produits à induction : 800.825.6036
Réchauds de comptoir : 800.354.1970
Tous les autres produits : 800.628.0832
©
2017 The Vollrath Company L.L.C. Num. d'art. 350009-1 ml 6/16/17
Page 17

Rebanadoras eléctricas para servicio pesado
Gracias por comprar este equipo Vollrath. Antes de usar el equipo, lea y
familiarícese con las siguientes instrucciones de operación y seguridad.
CONSERVE ESTAS INSTRUCCIONES COMO REFERENCIA PARA EL
FUTURO. Conserve la caja y embalado originales. Deberá utilizarlos
para devolver el equipo en caso de que requiera reparaciones.
PRECAUCIONES DE SEGURIDAD
Para garantizar una operación segura, lea las siguientes afirmaciones y
comprenda su significado. Este manual contiene precauciones de
seguridad que se explican a continuación. Léalas atentamente.
ADVERTENCIA
Advertencia se usa para indicar la presencia de un peligro que
provocará o puede provocar lesiones graves o letales.
PRECAUCIÓN
Precaución se usa para indicar la presencia de un peligro que provocará
o puede provocar lesiones personales o daños materiales leves si se
ignora el aviso.
AVISO: Aviso se usa para señalar información importante no
relacionada con peligros.
Inscriba su producto en Vollrath.com/registration y participe para ganar una sartén Tribute® de 10" (25 cm) de Vollrath.
Manual del operador
Art. Modelo Descrip. Trans. Máx. HP V A Hz Enchufe
40952 SLM300/S
Hoja de 12"
(30,5 cm)
Correa 1/2 120 2,0 60
ADVERTENCIA
El uso incorrecto de este equipo puede causar lesiones graves.
Para disminuir el riesgo de lesiones personales o daños al equipo:
• Manténgalo fuera del alcance de los niños.
• No encienda el equipo si las protecciones no están en su lugar.
• Mantenga lubricadas la guía deslizante del carro y de la placa
calibradora para garantizar un desplazamiento fácil.
• No agregue el alimento con la mano: siempre use el empujador de
alimento.
• El equipo debe conectarse en un suministro eléctrico correctamente
puesto a tierra cuyo voltaje nominal corresponda al indicado en la
placa identificatoria.
• Siempre desenchufe el equipo antes de limpiarlo.
• Manténgalo lejos del agua; evite los chorros de agua durante la
limpieza.
• Este equipo debe utilizarse sólo en posición plana y nivelada.
• No deje el equipo operando solo.
• Instale o ubique este artefacto sólo de acuerdo con las instrucciones
de instalación que se proporcionan.
• No opere este artefacto si el cable o el enchufe están dañados, si no
funciona correctamente o si se ha dañado o caído.
• No sumerja el cable ni el enchufe en agua. Mantenga el cable lejos
de superficies calientes. No permita que el cable cuelgue sobre el
borde de una mesa o mostrador.
• No use un cable de extensión con este equipo. No enchufe este
equipo en una regleta eléctrica ni cable de múltiples tomas.
• Este equipo debe ser instalado por personal calificado en
cumplimento con los códigos y ordenanzas locales.
• No rocíe con líquidos ni agentes de limpieza los controles ni la parte
externa del equipo.
• No lo limpie con lana de acero.
• Mantenga el equipo y el cable eléctrico lejos de llamas expuestas,
quemadores eléctricos o calor excesivo.
©
2017 The Vollrath Company L.L.C. Núm. pieza 350009-1 ml 6/16/17
NEMA
5-15P
Page 18

FUNCIÓN Y PROPÓSITO
Este equipo está exclusivamente diseñado para rebanar productos
alimenticios en operaciones comerciales de servicio de comidas.
No se recomienda usarlo con carne sin deshuesar. No está diseñado
para uso doméstico ni de laboratorio.
DESEMBALADO DEL EQUIPO
1. Al recibirlo, inspeccione el paquete y equipo para constatar que no
presenten daños.
2. Informe inmediatamente al transportista cualquier daño presente.
3. Coloque la tarima con la rebanadora en una superficie plana.
4. Retire del equipo todo el material y cinta de embalado, así como el
plástico protector.
6. Gire cuidadosamente la rebanadora de manera que quede apoyada
en la perilla de la cubierta de la hoja.
7. Retire las cuatro tuercas que sujetan la rebanadora a la tarima.
Retire las cuatro arandelas y desenrosque los cuatro tirantes de
fijación en la tarima.
AVISO: Cerciórese de apoyar la rebanadora de manera que no se
voltee al retirar los herrajes de fijación.
5. Retire el afilador. Consulte “Desmontar la rebanadora” en la
página 5.
2 Manual del operador de rebanadoras eléctricas para servicio pesado
8. Retire la tarima.
9. Instale los espaciadores metálicos y las patas de caucho.
AVISO: Las patas y espaciadores deben instalarse de modo que
cumplan los criterios de los organismos registrantes.
10.Coloque la rebanadora en posición vertical asentándola sobre sus
patas.
11.Gire las patas para nivelar la rebanadora.
Page 19

PREPARACIÓN DEL EQUIPO
B
A J
C
D
E
L
H
G
K
M
N
O
F
P
Q
I
R
Requisitos ambientales y distanciado
La rebanadora debe colocarse:
•31½" (80 cm) respecto del suelo.
•7⁷⁄₈" (20 cm) respecto de las paredes u objetos circundantes a fin de
permitir suficiente espacio para operar la rebanadora.
• en un área seca, lejos de fuentes de calor y nunca en un pasillo.
CARACTERÍSTICAS Y CONTROLES
Preparación
1. Limpie el equipo.
Antes de usarlo, el equipo debe limpiarse completamente.
Vea “Limpieza e higienización de la rebanadora” en la página 5.
Si no se limpian las superficies antes de usar el equipo, los
alimentos podrían contaminarse.
2. Enchufe el equipo en un suministro eléctrico correctamente puesto a
tierra cuyo voltaje nominal corresponda al indicado en la placa
identificatoria. El equipo puede resultar dañado si recibe suministro
eléctrico incorrecto.
A Botones de encendido/apagado (On/Off) L Placa calibradora
B Luz indicadora de energía M Hoja
C Perilla de la cubierta de la hoja N Protección de la hoja
D Protección contra rebanado O Cubierta de la hoja
E Afilador de la hoja P Agarre de productos
F Bandeja del carro Q Mango del agarre de productos
G Mango del carro R Herramienta de retiro seguro de la hoja
H Perilla de liberación del carro
I Pata de caucho y espaciador metálico
J Control de grosor
K Acceso para lubricar guía deslizante del carro
Manual del operador de rebanadoras eléctricas para servicio pesado 3
Page 20

OPERACIÓN
Interruptor de reinicio
por sobrecarga
LUBRICACIÓN
.
ADVERTENCIA
Peligro de corte y amputación
La hoja de esta rebanadora comercial es sumamente filosa.
Pueden producirse lesiones graves si no se tiene cuidado al
emplear o limpiar este producto. Sólo personal calificado debe
operar o dar mantenimiento al equipo. Para reducir el riesgo de
lesiones, se recomienda usar guantes resistentes a los cortes
al limpiar el equipo.
ADVERTENCIA
Peligro de descarga eléctrica
Evite que ingrese agua o cualquier otro tipo de líquido al
interior del equipo, ya que ello podría causar una descarga
eléctrica. No lo rocíe con agua ni productos de limpieza. El
líquido podría hacer contacto con los componentes eléctricos
y causar un cortocircuito o una descarga eléctrica.
Inspeccionar la rebanadora
• Compruebe que el montaje de la rebanadora se haya realizado
correctamente.
• Verifique que la perilla de liberación del carro esté completamente
apretada y que no tambalee la bandeja del carro. Mueva
cuidadosamente el carro para verificar que su pasador de liberación
esté completamente retraído y que no roce contra el cuerpo de la
rebanadora.
• Verifique que la rebanadora esté en buen estado de operación.
• De lo contrario, no utilice el equipo. Comuníquese con un taller de
servicio autorizado de Vollrath para reparar la rebanadora
Para garantizar una operación segura y uniforme, lubrique
adecuadamente la rebanadora.
Guía deslizante del carro
Lubrique la guía deslizante del carro mensualmente (o con mayor
frecuencia) según sea necesario. Consulte “Lubricar la guía deslizante
del carro” en la página 8.
Guía deslizante de placa calibradora
Lubrique la guía deslizante de la placa calibradora al menos
diariamente, y tras cada limpieza con el aceite incluido con la
rebanadora o bien con un lubricante apto para alimentos.
Cargar la rebanadora
1. Deslice la bandeja del carro hasta la posición de carga/inicio (la más
cercana al operador).
2. Levante el agarre de productos y coloque el alimento en la bandeja
del carro en contacto con la placa calibradora.
3. Coloque el agarre de productos ya sea encima o detrás del alimento
que va a rebanar.
4. Use la perilla del control de grosor para establecer el espesor
deseado de la rebanada.
5. Pulse y suelte el botón de encendido (—).
Rebanar alimentos
1. Utilice el mango del carro para empujar la bandeja del carro hacia
atrás y adelante a fin de rebanar el alimento.
Apagar la rebanadora
1. Gire el control de grosor hasta la posición del cero (0) de modo que
la placa calibradora proteja el borde de la hoja.
2. Pulse y suelte el botón de apagado (O).
INTERRUPTOR DE REINICIO POR SOBRECARGA
Si la rebanadora llegara a sobrecargarse, el interruptor de reinicio
permite detener el equipo para proteger el motor. En caso de
sobrecarga:
1. Pulse y suelte el botón de apagado (O).
2. Desenchufe del tomacorriente el cable eléctrico de la rebanadora.
3. Retire el alimento que causó la sobrecarga. Limpie el equipo si es
necesario. See “Limpiar la rebanadora” on page 6.
4. Pulse y suelte el botón de reinicio, situado en la parte inferior de la
rebanadora.
5. Enchufe la rebanadora en el tomacorriente.
6. Pulse y suelte el botón de encendido (—) para reanudar la
operación.
El reinicio debiera ocurrir con muy poca frecuencia y su causa debiera
ser la sobrecarga de la rebanadora. Comuníquese con un centro de
servicio de reparación autorizado de Vollrath si el interruptor se activa
frecuentemente durante el uso normal.
4 Manual del operador de rebanadoras eléctricas para servicio pesado
Page 21

LIMPIEZA E HIGIENIZACIÓN DE LA REBANADORA
ADVERTENCIA
Peligro de corte y amputación
La hoja de esta rebanadora comercial es sumamente filosa.
Pueden producirse lesiones graves si no se tiene cuidado al
emplear o limpiar este producto. Sólo personal calificado debe
operar o dar mantenimiento al equipo. Para reducir el riesgo de
lesiones, se recomienda usar guantes resistentes a los cortes
al limpiar el equipo.
ADVERTENCIA
Peligro de descarga eléctrica
Evite que ingrese agua o cualquier otro tipo de líquido al
interior del equipo, ya que ello podría causar una descarga
eléctrica. No lo rocíe con agua ni productos de limpieza. El
líquido podría hacer contacto con los componentes eléctricos
y causar un cortocircuito o una descarga eléctrica.
AVISO: Esta rebanadora debe limpiarse e higienizarse a una
frecuencia que cumpla los códigos de salud nacionales,
estatales y/o locales.
AVISO: Esta rebanadora debe limpiarse e higienizarse cada vez
que se afile la hoja.
Desmontar la rebanadora
1. Desenchufe la rebanadora del tomacorriente.
2. Gire la perilla del control de grosor a la derecha, después del cero
(0), hasta que deje de girar. Ello posiciona la placa calibradora a fin
de proteger al usuario contra la hoja y es necesario para que quede
bloqueada la bandeja del carro.
5. Use el mango del carro para jalar firmemente (sin forzar) la bandeja
del carro hacia adelante hasta escuchar un chasquido y que quede
bloqueada en su lugar.
Nota: Si le resulta difícil bloquear la bandeja del carro, verifique que
la perilla del control de grosor se haya girado después del cero y lo
más posible hacia la derecha. Posteriormente, afloje aún más la
perilla de liberación del carro.
6. Levántela para retirar la bandeja del carro.
7. Agarre con una mano la perilla en la cubierta de la hoja. Con la otra
mano, afloje y empuje la perilla para levantar la cubierta de la hoja.
3. Retire el mango del agarre de productos. Tenga presente que en
algunos modelos no es posible retirar el mango.
4. Gire la perilla de liberación del carro hasta que quede bastante
suelta. Nota: no es retirable.
8. Levante el conjunto de afilado de la hoja y gírelo 90° en sentido
antihorario. Levántelo para retirarlo.
9. Retire la protección contra rebanado.
10.Use un paño limpio para eliminar todos los líquidos y residuos
gruesos de las superficies de la rebanadora.
Manual del operador de rebanadoras eléctricas para servicio pesado 5
Page 22

LIMPIEZA E HIGIENIZACIÓN DE LA REBANADORA (CONTINUACIÓN)
Limpiar la rebanadora
AVISO: No limpie el equipo con materiales abrasivos ni con
limpiadores que rayen la unidad, ya que pueden dañar el
acabado. Limpie la rebanadora únicamente con agua,
detergente suave y solución higienizante.
AVISO: Solamente lávela a mano.
AVISO: NO remoje el conjunto de afilado.
AVISO: NO lave las piedras afiladoras. Las piedras húmedas no
afilarán correctamente la hoja y deberán reemplazarse.
1. Lave las piezas retirables en un recipiente limpio que contenga una
solución de agua tibia y detergente suave.
2. Enjuague las piezas con agua tibia limpia.
3. Utilice un paño suave, agua tibia limpia y detergente suave para
limpiar las piezas no retirables de la rebanadora:
• Parte delantera y trasera de la hoja. Comience en el centro de la
hoja limpiando hacia el borde.
• Protección de la hoja. Desde la parte trasera de la protección de la
hoja, limpie cuidadosamente el borde interior de la protección.
Higienizar la rebanadora
AVISO: La concentración de la solución higienizante debe cumplir
los requisitos de la Sección 4-501.114 del Código de
Alimentos de la FDA sobre equipos manuales y mecánicos
para el lavado de utensilios, higienización química,
temperatura, pH, concentración y dureza.
AVISO: Si se usa una solución higienizante química distinta del
cloro, iodina o amonio cuaternario, ésta debe aplicarse de
acuerdo con las instrucciones de uso que aparecen en la
etiqueta registrada por EPA.
1. Lávese las manos.
2. En un recipiente o fregadero limpio, remoje las piezas retirables en
una mezcla de agua tibia limpia con solución higienizante
correctamente diluida.
AVISO: NO remoje el conjunto del afilador. Las piedras húmedas
no afilarán correctamente hoja y deberán reemplazarse.
3. Retire las piezas del recipiente y deje que se sequen al aire. No las
enjuague ni use un paño para eliminar la solución higienizante.
4. Humedezca un paño limpio suave con solución higienizante
correctamente diluida.
5. Utilice el paño para higienizar las piezas no retirables y el cuerpo de
la rebanadora. Consulte el Paso 3 en el apartado “Limpiar la
rebanadora”. No las enjuague ni use un paño para eliminar la
solución higienizante.
Volver a montar la rebanadora
1. Instale la protección contra rebanado.
2. Coloque la cubierta de la hoja de tal manera que la perilla quede en la
parte inferior, tal cual se muestra en la figura de abajo. Instale la
perilla de la cubierta de la hoja y afiance la cubierta.
• Placa calibradora. Comience en la hoja limpiando hacia afuera.
4. Cuerpo de la rebanadora.
5. Enjuague las piezas no retirables de la rebanadora con agua tibia
limpia.
3. Instale la bandeja del carro y apriete la perilla de liberación.
AVISO: Apriete la perilla de liberación del carro hasta que deje
de girar. Si no la aprieta lo suficiente podría menearse el
carro y dañarse la placa calibradora o el cuerpo de la
rebanadora.
4. Instale el mango del agarre de productos.
5. Instale el conjunto de afilado de la hoja.
6. Lubrique la guía deslizante de la placa calibradora con el aceite
incluido con rebanadora o bien con lubricante apto para alimentos.
Inspeccionar la rebanadora
• Compruebe que el montaje de la rebanadora se haya realizado
correctamente.
• Verifique que la perilla de liberación del carro esté completamente
apretada y que no tambalee la bandeja del carro. Mueva
cuidadosamente el carro para verificar que su pasador de liberación
esté completamente retraído y que no roce contra el cuerpo de la
rebanadora.
• Verifique que la rebanadora esté en buen estado de operación.
• De lo contrario, no utilice el equipo. Comuníquese con un taller de
servicio autorizado de Vollrath para reparar la rebanadora.
6 Manual del operador de rebanadoras eléctricas para servicio pesado
Page 23

HERRAMIENTA DE RETIRO SEGURO DE LA HOJA
MANTENIMIENTO
1. Desenchufe la rebanadora del tomacorriente.
2. Retire la cubierta protectora de la hoja.
3. Limpie la parte delantera de la hoja. See “Limpiar la rebanadora” on
page 6.
4. Retire el afilador.
5. Gire la hoja de modo que los orificios de los tornillos queden
paralelos respecto a la base de la rebanadora.
6. Coloque la herramienta de retiro seguro sobre la hoja y alinee las
dos perillas de la herramienta con los orificios en la hoja.
Consejo: Gire la herramienta de modo que la etiqueta de advertencia
quede en la parte superior de la herramienta y que la muesca se
ajuste alrededor de la protuberancia de la protección de la hoja.
7. Apriete las perillas para afianzar la herramienta a la hoja.
8. Retire los tornillos que sujetan la hoja en la rebanadora.
Programa
Procedimiento
Revise la rebanadora antes de cada uso X
Afile la hoja X
Limpie e higienice la rebanadora X
Lubrique la guía deslizante de la placa
calibradora
Lubrique la guía deslizante del carro X
Diariamente Mensualmente
X
Afilar la hoja
Afile la hoja diariamente o cada vez que cueste cortar o cuando se
produzca una mayor cantidad de desechos. La rebanadora debe
tratarse como si fuera un cuchillo. Si no está adecuadamente afilada, el
rebanado será deficiente y la máquina se sobrecargará.
ADVERTENCIA
Peligro de corte y amputación
La hoja de esta rebanadora comercial es sumamente filosa.
Pueden producirse lesiones graves si no se tiene cuidado al
emplear o limpiar este producto. Sólo personal calificado debe
operar o dar mantenimiento al equipo. Para reducir el riesgo de
lesiones, se recomienda usar guantes resistentes a los cortes
al limpiar el equipo.
AVISO: Utilice el afilador integrado para afilar la hoja. No retire la
1. Gire el control de grosor hasta la posición del cero (0).
2. Pulse y suelte el botón de apagado (O).
3. Desenchufe la rebanadora del tomacorriente.
4. Limpie la hoja para eliminar cualquier resto de grasa o alimento.
5. Levante el afilador y gírelo 180° en sentido antihorario. Coloque el
hoja para afilarla.
afilador de modo que la hoja se sitúe entre las piedras afiladoras.
9. Levante la herramienta de retiro seguro para extraer la hoja.
10.Use un cepillo para limpiar todo desecho del área en que la hoja se
conecta al cuerpo de la rebanadora.
11.Utilice el procedimiento inverso para reinstalar la hoja. Verifique que
la hoja se instale en plano horizontal respecto a la polea.
12.Enchufe la rebanadora en el tomacorriente.
6. Enchufe la rebanadora en el tomacorriente.
7. Pulse y suelte el botón de encendido (—).
8. Mantenga pulsado el botón de la piedra afiladora. Deje que la hoja
gire contra la piedra afiladora durante 30 a 40 segundos. Suelte el
botón. Debieran producirse chispas al afilar correctamente la hoja.
Si ello no ocurre, consulte la sección “Solución de problemas”.
Manual del operador de rebanadoras eléctricas para servicio pesado 7
Page 24

MANTENIMIENTO (CONTINUACIÓN)
9. Mantenga pulsado simultáneamente los botones de la piedra de
desrebabado y piedra afiladora 3 a 4 segundos. Suelte los botones.
AVISO: Pulsar los botones por más de 3 a 4 segundos podría
doblar la hoja, dañando a la vez la rebanadora.
10.Pulse y suelte el botón de apagado (O) y desenchufe la rebanadora.
11.Vuelva a colocar la rebanadora en la posición original.
12.Limpie la rebanadora. Consulte “Limpieza e higienización de la
rebanadora” en la página 5.
Lubricar la guía deslizante del carro
Lubrique la guía deslizante del carro al menos una vez al mes y cada vez
que cueste empujar la bandeja.
AVISO: Use el aceite que se proporciona con la rebanadora o bien
un lubricante apto para alimentos. NO use aceite vegetal
ni que contenga silicona. NO rocíe aceite sobre los
componentes de la rebanadora. Ello podría provocar que el
aceite llegue a áreas de la rebanadora que no deben
lubricarse.
1. Pulse y suelte el botón de apagado (O).
2. Desenchufe la rebanadora del tomacorriente.
3. Use un paño suave y limpio para limpiar la guía deslizante del carro.
4. Mueva el carro completamente hacia adelante. Ello permitirá alinear
la guía deslizante del carro con el orificio de acceso para el aceite
(" OIL" ) situado en la parte delantera de la rebanadora. Si la guía
deslizante no está alineada, el aceite goteará y se acumulará debajo
de la rebanadora.
5. Coloque unas cuantas gotas del aceite incluido con la rebanadora en
el orificio de acceso para lubricar la guía deslizante del carro.
SOLUCIÓN DE PROBLEMAS
Problema Podría deberse a Solución
Bajo rendimiento de corte. Es necesario afilar la hoja. Afile la hoja.
Bajo rendimiento de corte incluso al afilar
regularmente la hoja.
No se producen chispas durante el
afilado.
Las piedras afiladoras están sucias. No se limpió la hoja antes del afilado. Remplace las piedras.
El interruptor de reinicio por sobrecarga
se activa con demasiada frecuencia.
Resulta difícil ajustar la placa calibradora
SERVICIO Y REPARACIÓN
Vollrath.com encontrará las piezas que puedan ser reparadas.
Para evitar lesiones o daños materiales graves, no trate de reparar la
unidad ni reemplazar un cable eléctrico por su cuenta. No envíe las
unidades directamente a The Vollrath Company LLC. Pida instrucciones
a los Servicios de asistencia técnica de Vollrath.
Al comunicarse con los servicios, esté listo para proporcionar el
El procedimiento de afilado no es el correcto.
Es necesario reemplazar las piedras
afiladoras.
Es necesario lubricar la guía deslizante de
placa calibradora.
CLÁUSULA DE GARANTÍA DE THE VOLLRATH CO. L.L.C.
The Vollrath Company LLC garantiza los productos que fabrica o
distribuye contra defectos en materiales y fabricación, según se
especifica en nuestra cláusula de garantía completa.
Para obtener información de garantía, inscripción de productos y
anuncios de productos nuevos, visite www.vollrath.com.
número de artículo, número de modelo (si corresponde), número de
serie y el comprobante de compra que muestre la fecha en que adquirió
la unidad.
The Vollrath Company, L.L.C.
1236 North 18th Street
Sheboygan, WI 53081-3201 EE. UU.
Tel. principal: 800.624.2051 ó 920.457.4851
Fax principal: 800.752.5620 ó 920.459.6573
Servicio al cliente: 800.628.0830
www.vollrath.com
Servicio al cliente en Canadá: 800.695.8560
Repita el proceso de afilado. Mantenga pulsado el botón de la
piedra afiladora algunos segundos más hasta que se formen
rebabas en la hoja. Si el problema persiste, comuníquese con los
Servicios de asistencia técnica de Vollrath.
Remplace las piedras.
Comuníquese con los Servicios de asistencia técnica de Vollrath.
Lubrique la guía deslizante de la placa calibradora con el aceite
incluido con la rebanadora o bien con un lubricante apto para
alimentos. Vea la página 6.
Servicios de asistencia técnica:
techservicereps@vollrathco.com
Productos de inducción: 800.825.6036
Productos de calentamiento para mostrador:
800.354.1970
Todos los demás productos: 800.628.0832
©
2017 The Vollrath Company L.L.C. Núm. pieza 350009-1 ml 6/16/17
 Loading...