

Page 1
Thank you for purchasing this Vollrath equipment. Before operating the
equipment, read and familiarize yourself with the following operating
and safety instructions. SAVE THESE INSTRUCTIONS FOR FUTURE
REFERENCE. Save the original box and packaging. Use this packaging
to ship the equipment if repairs are needed.
Safety Precautions
To ensure safe operation, read the following statements and understand
their meaning. This manual contains safety precautions which are
explained below. Please read carefully.
WARNING
Warning is used to indicate the presence of a hazard that will or can
cause severe personal injury or death.
CAUTION
Caution is used to indicate the presence of a hazard that will or can
cause minor or major personal injury if the caution is ignored.
NOTICE: Notice is used to note information that is important but not
hazard-related.
To reduce risk of injury or damage to the equipment:
• Check equipment before each use to insure the equipment is clean.
• Check for broken, nicked or dull blades and if found, replace the
blade assembly.
• Check to insure that the pusher head sits down completely on the
rubber bumpers.
• On tabletop models the suction cups will hold the equipment
securely to smooth surfaces.
• If necessary, lubricate guide rods using a light coating of mineral oil,
Petro Gel, or food grade lubricant. DO NOT USE COOKING OIL AS IT
WILL BECOME STICKY AND MAY PERMANENTLY DAMAGE THE
PUSHER HEAD BEARINGS.
Operator’s Manual
®
Redco
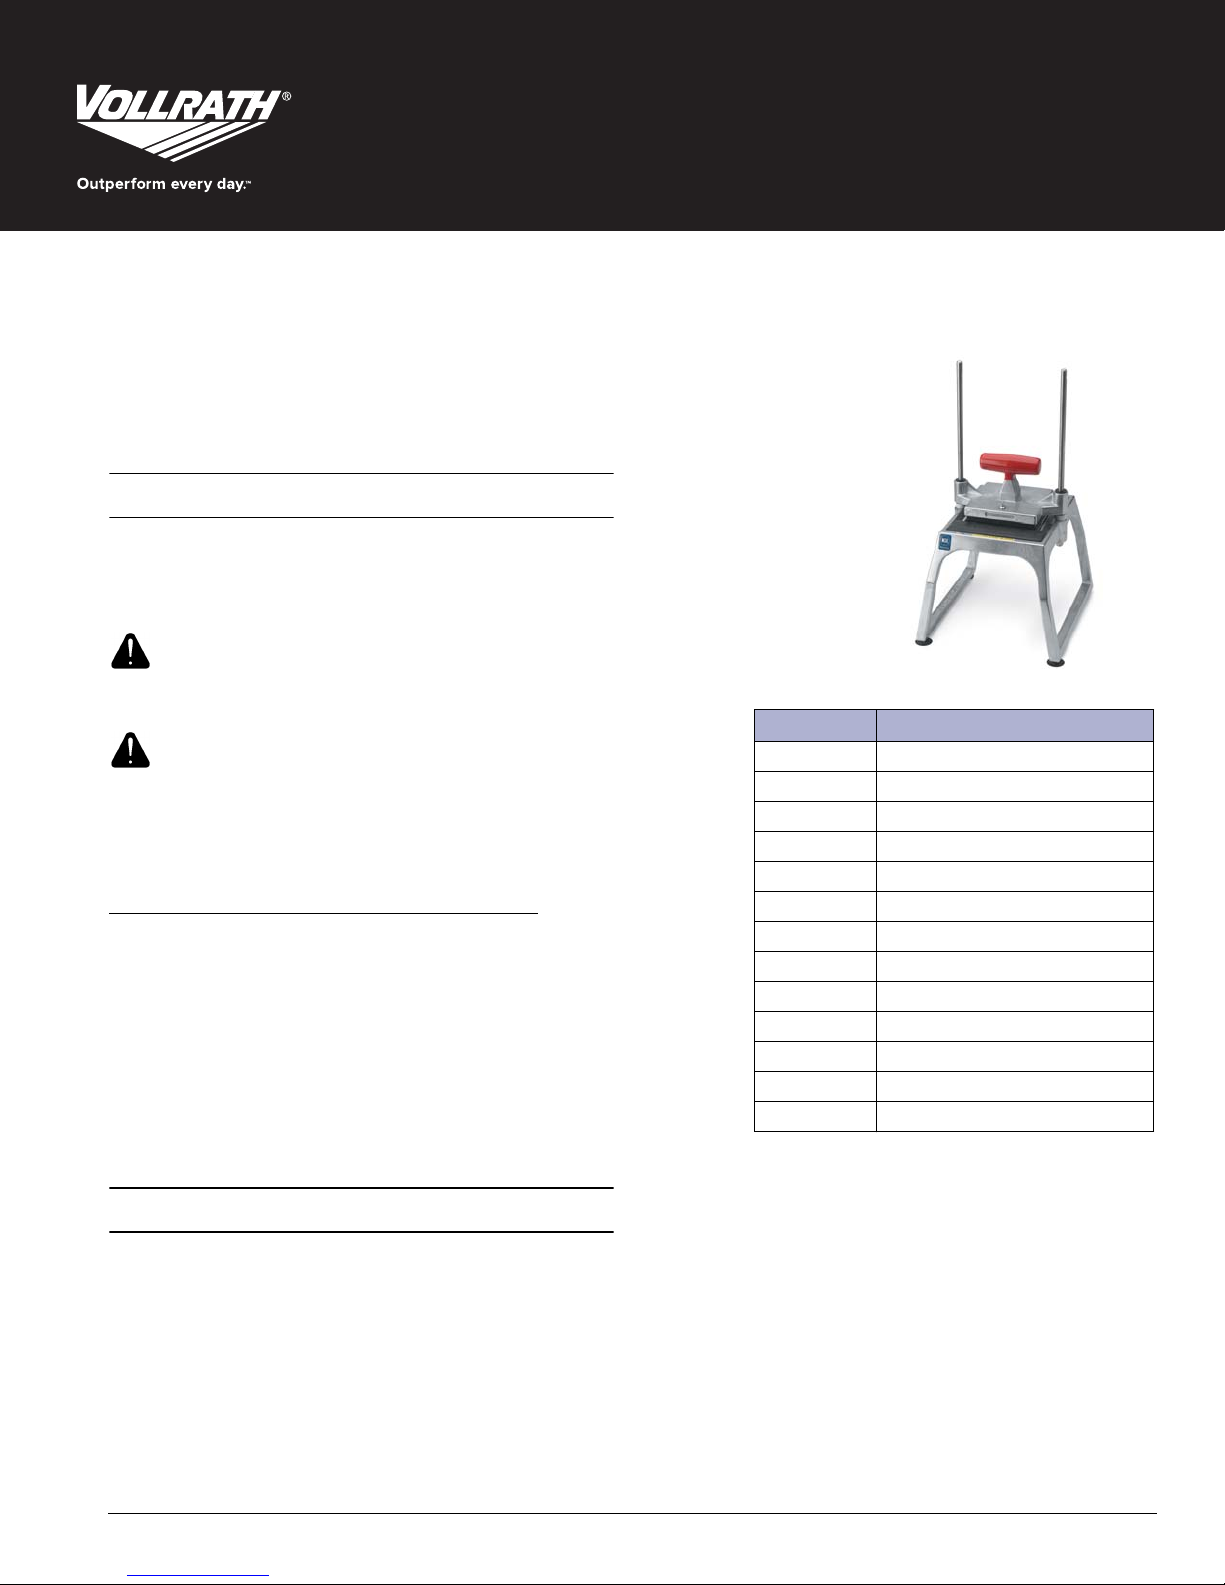
Item No. Description
55000 ¼" Dice
55001 ³⁄₈" Dice
55002 ½" Dice
55011 ¼" Dice
55012 ³⁄₈" Dice
55013 ½" Dice
15150 4 Section Wedge
15151 6 Section Wedge
15152 8 Section Wedge
15153 10 Section Wedge
15155 12 Section Wedge
15126 6 Section Core
15128 8 Section Core
Instacut™5.0
FUNCTION AND PURPOSE
Intended for cutting, dicing and wedging vegetables and fruits.
Please register your product at Vollrath.com
©
2016 The Vollrath Company L.L.C. Part No. 2350023-1 ml 2/26/16
Page 2
FEATURES AND CONTROLS OPERATION
G
F
E
D
H
C
I
B
D
A
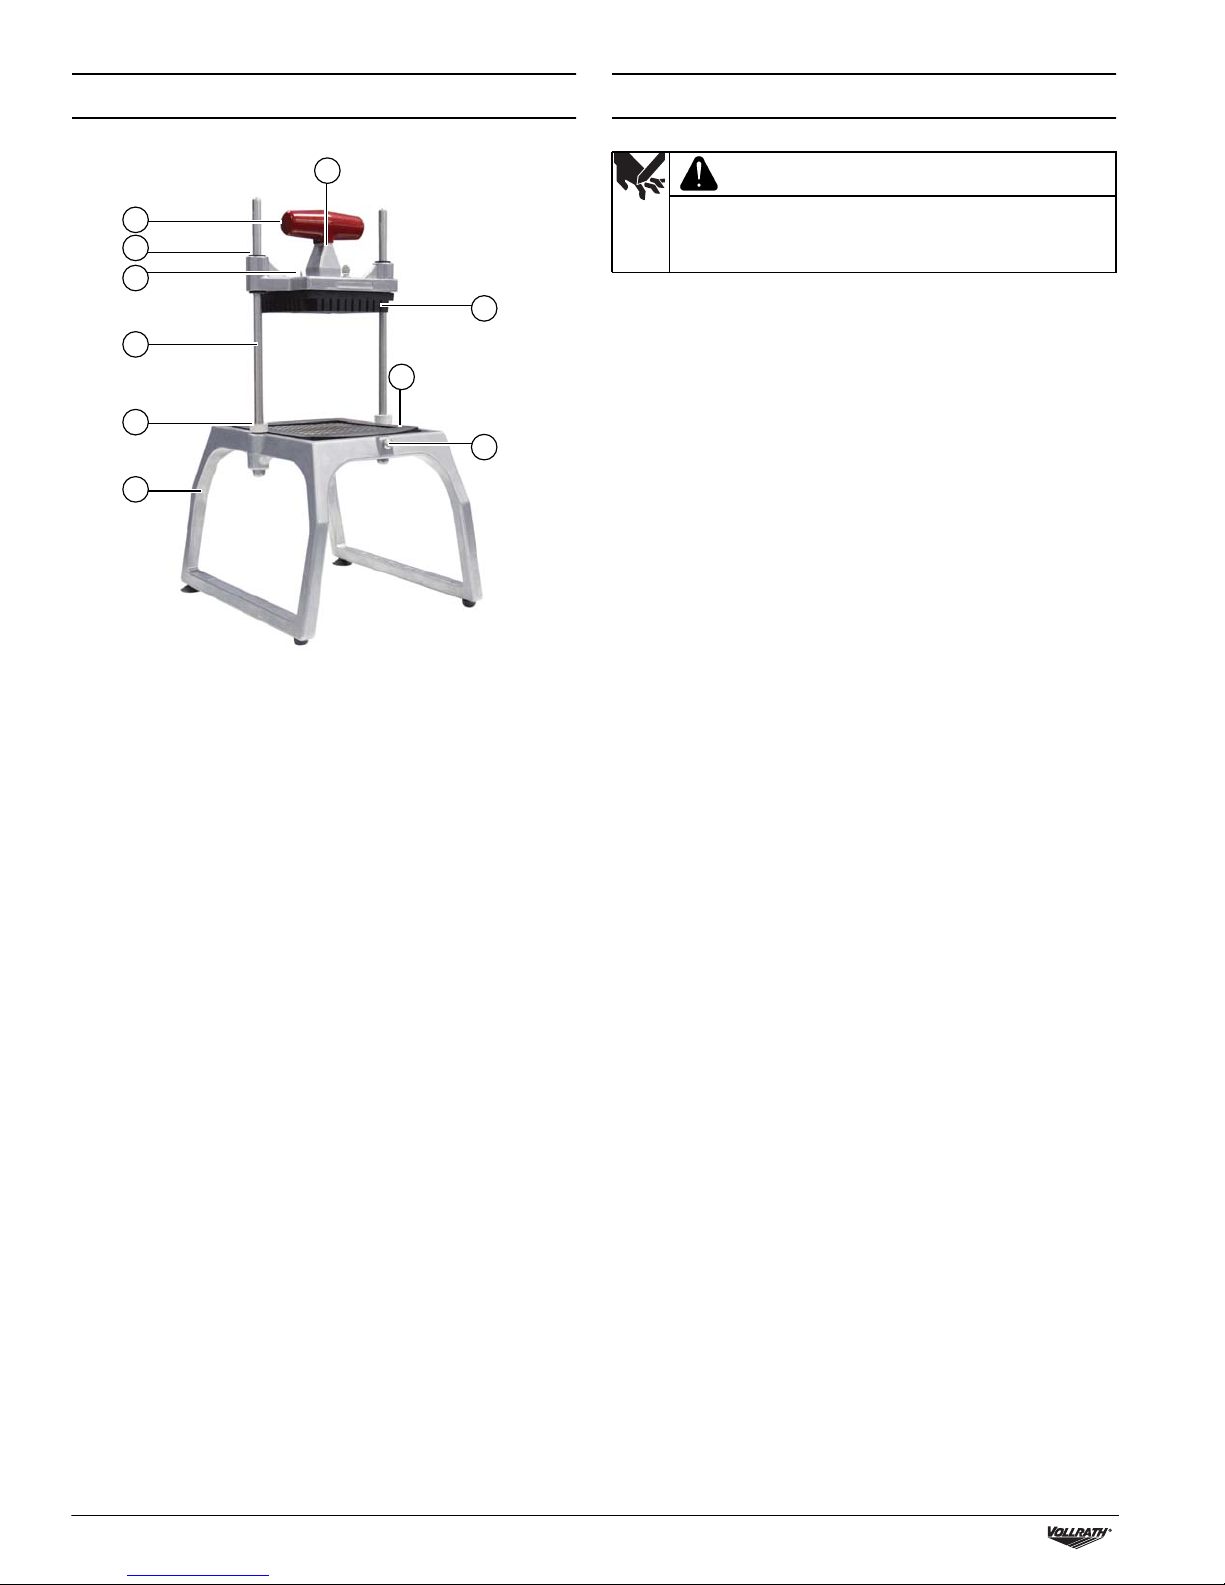
A Base Assembly. Holds the guide rods and blade assembly.
B Bumpers. Cushions the pusher head during operation.
C Guide Rods. Guides and aligns the pusher head onto the
blade set.
D Thumbscrew. Secures the pusher head block to pusher head
assembly. Secures the blade assembly to the base assembly.
E Guides. Used for smooth and consistent operation of pusher
head on the guide rods.
F Handle. Used to lower and raise the pusher head.
G Pusher Head Assembly. Made up of the guides, the pusher
head block and the handle.
H Pusher Head Bock. Pushes the food product through the blade
set. Specifically sized to match the corresponding blade
assembly.
I Blade Assembly. Houses the blades. Specifically sized to match
the corresponding pusher head block.
WARNING
Sharp Blade Hazard
Blades are sharp and can cause cuts. To avoid injury from
sharp blades, handle with caution.
Prior to first use, it is important to clean the equipment. Wash new
blades with warm soapy water and rinse thoroughly to remove the thin
protective oil film.
1. Before each use, check that the equipment is clean and the blades
are in good condition. If loose or broken blades are found, blades
must be replaced.
2. Place the equipment on a clean, flat work surface.
3. Before each use, always check for proper blade alignment. Slowly
set the pusher head onto the blade assembly. They should slide
together with no obstructions. If there are obstructions, verify they
are a matching set.
4. Remove the obstruction.
5. Verify that the blade assembly and pusher head assembly are the
desired size.
6. Prepare the food product to be processed. For Slicing and dicing the
maximum size of the food product is 5" (12.7 cm). For Wedging and
coring the maximum size of the food product is 3½" (8.9 cm) in
diameter.
7. Lift the handle and place the food product on the blade assembly
with the flat side down.
8. Remove hand from the blade assembly area and place that hand on
the leg of the base.
9. Using a strong, quick, downward thrust, force the food product
through the blade assembly.
10.Repeat this process until you have prepared enough food product
for your daily needs.
11.Clean and lubricate your equipment immediately after each use. See
the CLEANING section of this manual for more information.
2 Redco®Instacut™5.0 Operator’s Manual
Page 3
CLEANING
WARNING
Sharp Blade Hazard
Blades are sharp and can cause cuts. To avoid injury from
sharp blades, handle with caution.
To maintain the appearance and increase the service life, clean your
equipment daily.
NOTICE: Food acids will make blades dull and corrode the metal.
Always clean this food preparation equipment immediately
after every use.
1. Slide the pusher head off the rod guides.
2. Raise the bumpers approximately 2" (5.0 cm).
3. Loosen the thumbscrew on the base and carefully remove the blade
assembly.
4. Wipe, rinse or spray off equipment, pusher head assembly and blade
assembly thoroughly with HOT water.
5. Do not wipe across the blades or use scrub pads on this equipment.
Wiping across the sharp edge of the blade can cause injury and will
dull the blades.
6. The blade assembly is best cleaned by forcing water under pressure
through the blades from the unsharpened side. If necessary, use a
nylon bristle cleaning brush to push food particles out from the
unsharpened side of the blade assembly.
7. Do not put this equipment in a dishwasher or dish machine with
soaps, detergents, or other alkaline chemicals that can harm the
equipment.
8. After cleaning, let the equipment air dry.
9. Install the blade assembly by inserting the tab on the blade holder
into the groove in the base, then lowering the blade holder into the
seated and flush position in the base. Tighten the thumbscrew.
10.Lubricate the guide rods with mineral oil or Petro Gel after each use.
Do not use cooking oil as it will become sticky and may permanently
damage the equipment.
11.Slide the bumpers into place.
12.Install the pusher head assembly: Slide the pusher head onto the rod
guides.
PREVENTATIVE MAINTENANCE
1. Clean the equipment after every use.
2. Use for intended purposes only.
3. Change the blades regularly – based on usage.
REPLACING BLADE ASSEMBLY
WARNING
Sharp Blade Hazard
Blades are sharp and can cause cuts. To avoid injury from
sharp blades, handle with caution.
Wash new blades with warm, soapy water and rinse thoroughly to
remove the thin protective oil film. Keep the sharp edge away from you
when handling blades.
1. Familiarize yourself with the parts diagram for your equipment.
2. Remove the pusher head assembly by sliding the pusher head off
the rod guides.
3. Raise the bumpers approximately 2" (5.0 cm).
4. Loosen the thumbscrew and carefully remove the blade assembly.
Remove the cutting blade assembly by pressing upwards on the
bottom of the side of the blade holder, where the thumbscrew is
located. Discard the old blade assembly.
5. Install the new cutting blade assembly by inserting the tab on the
blade holder into the groove in the base, then lowering the blade
holder into the seated and flush position in the base. Tighten the
thumbscrew.
6. Slide bumpers down guide rods to contact base. Position pusher
head assembly onto the guide rods, slowly lower pusher head
assembly, and check pusher head block to blade alignment.
7. Lubricate the guide bar with mineral oil or Petro Gel after each use.
Do not use cooking oil as it will become sticky and may permanently
damage the equipment.
TROUBLESHOOTING
Problem Might be Caused By Course of Action
Broken Blade Blades were dull.
Redco®Instacut™5.0 Operator’s Manual 3
Pre-score whenever possible to avoid undue shock and stress to blades.
Replace the blade assembly.
Page 4

SERVICE AND REPAIR
Serviceable parts are available on Vollrath.com.
To avoid serious injury or damage, never attempt to repair the unit or replace a damaged power cord yourself. Do not send units directly to
The Vollrath Company LLC. Please contact Vollrath Technical Services for instructions.
When contacting Vollrath Technical Services, please be ready with the item number, model number (if applicable), serial number, and proof of
purchase showing the date the unit was purchased.
WARRANTY STATEMENT FOR THE VOLLRATH CO. L.L.C.
This warranty does not apply to products purchased for personal, family or household use, and The Vollrath Company LLC does not offer a written
warranty to purchasers for such uses.
The Vollrath Company LLC warrants the products it manufactures or distributes against defects in materials and workmanship as specifically
described in our full warranty statement. In all cases, the warranty runs from the date of the end user’s original purchase date found on the receipt.
Any damages from improper use, abuse, modification or damage resulting from improper packaging during return shipment for warranty repair will
not be covered under warranty.
For complete warranty information, product registration and new product announcement, visit www.vollrath.com.
The Vollrath Company, L.L.C.
1236 North 18th Street
Sheboygan, WI 53081-3201 U.S.A.
Main Tel: 800.624.2051 or 920.457.4851
Main Fax: 800.752.5620 or 920.459.6573
www.vollrath.com
Customer Service: 800.628.0830
Canada Customer Service: 800.695.8560
Technical Services
techservicereps@vollrathco.com
Induction Products: 800.825.6036
Countertop Warming Products: 800.354.1970
All Other Products: 800.628.0832
©
2016 The Vollrath Company L.L.C. Part No. 2350023-1 ml 2/26/16
Page 5

Manuel d’utilisation
Merci d’avoir acheté cet appareil Vollrath. Avant d’utiliser cet appareil,
lisez et familiarisez-vous avec le mode d’emploi et les consignes
d’utilisation qui suivent. CONSERVEZ CES INSTRUCTIONS POUR
RÉFÉRENCE ULTÉRIEURE. Conservez l’emballage et le carton d’origine.
L’emballage devra être réutilisé pour expédier l’appareil si une
réparation est nécessaire.
CONSIGNES DE SÉCURITÉ
Pour garantir un fonctionnement sûr, lisez les avertissements suivants
et comprenez leur signification. Lisez-les attentivement.
AVERTISSEMENT
Un avertissement indique la présence d’un danger qui peut causer des
blessures graves, un décès ou des dégâts matériels importants s’il est
ignoré.
ATTENTION
Une mise en garde indique la présence d’un danger qui causera ou
pourra causer des blessures mineures ou des dégâts matériels si elle
est ignorée
REMARQUE : Une remarque signale des informations importantes
sur l’installation, l’utilisation et la maintenance mais
ne présentant pas de danger.
Pour réduire le risque de blessures et d’endommagement de
l’appareil
• Vérifiez l’équipement avant chaque utilisation pour s’assurer qu’il est
propre.
• Vérifiez si les lames ne sont pas cassées, ébréchées ou émoussées
et, s’il y a lieu, remplacez la lame.
• Assurez-vous que la tête de poussée repose complètement sur les
caoutchoucs amortisseurs.
• Sur les modèles de table, les ventouses fixeront solidement
l’appareil sur les surfaces lisses.
• Si nécessaire, lubrifiez les tiges-guides avec un film d’huile minérale,
du Petro Gel ou un lubrifiant de qualité alimentaire. N’UTILISEZ PAS
D’HUILE DE CUISSON CAR ELLE COLLERA ET RISQUE
D’ENDOMMAGER À TOUT JAMAIS LES ROULEMENTS DE LA TÊTE
DE POUSSÉE.
Redco
No. modèle Description
55000 Dés de 0.6 cm (¼ po)
55001 Dés de 1 cm (³⁄₈ po)
55002 Dés de 1.3 cm (½ po)
55011 Tranches de 0.6 cm (¼ po)
55012 Tranches de 1 cm (³⁄₈ po)
55013 Tranches de 1.3 cm (½ po)
15150 4 quartiers
15151 6 quartiers
15152 8 quartiers
15153 10 quartiers
15155 12 quartiers
15126 6 sections à évider
15128 8 sections à évider
®
Instacut™5.0
FONCTION ET OBJET
Pour couper, couper en dés et en quartiers les légumes et les fruits.
Veuillez enregistrer votre produit sur Vollrath.com
©
2016 The Vollrath Company L.L.C. Réf. 230023-1 ml 2/26/16
Page 6

CARACTÉRISTIQUES ET COMMANDES MODE D’EMPLO
G
F
E
D
H
C
I
B
D
A
A Tiges-Guides. Guident et alignent la tête de poussée sur le jeu
de lames.
B Poignée. Permet d’abaisser et de relever la tête de poussée.
C Guides. Permettent le fonctionnement uniforme et lisse de la
tête de poussée sur les tiges-guides.
D Tête de Poussée. Constituée des guides, du bloc de tête de
poussée et de la poignée.
E Caoutchoucs Amortisseurs. Amortit la tête de poussée en
cours d’utilisation.
F Vis À Oreilles. Fixe le bloc de tête de poussée sur la tête de
poussée. Fixe le jeu de lames au socle.
G Bloc de Tête de Poussée. Pousse le produit alimentaire à
travers le jeu de lames. Taille spécialement conçue pour
correspondre au jeu de lames.
H Jeu de Lames. Contient les lames. Taille spécialement conçue
pour correspondre au bloc de tête de poussée.
I Socle. Contient les tiges-guides et le jeu de lames.
AVERTISSEMENT
Danger – Lames coupantes
Les lames sont affûtées et peuvent causer des coupures. Pour
éviter les blessures causées par les lames coupantes,
manipulez avec prudence.
Avant la première utilisation, il est important de nettoyer l’équipement.
Lavez les lames neuves à l’eau savonneuse chaude et rincez
minutieusement pour enlever le film d’huile de protection.
1. Avant chaque utilisation, assurez-vous que l’appareil est propre et
les lames en bon état. Si vous constatez des lames desserrées ou
cassées, elles devront être resserrées ou remplacées.
2. Placez l’appareil sur un plan de travail propre et plat.
3. Avant chaque utilisation, vérifiez toujours l'alignement correct des
lames. Placez lentement la tête de poussée sur le jeu de lames. Ils
doivent glisser l'un sur l'autre sans à-coup. En cas d'obstructions,
assurez-vous qu'ils concordent.
4. Enlevez l’obstruction.
5. Assurez-vous que le jeu de lames et la tête de poussée sont de la
taille souhaitée.
6. Préparez le produit alimentaire à traiter. La taille maximum de
produit alimentaire est de 12.7 cm (5 po). Pour coupe en quartiers la
grandeur maximal de la nourriture de 38.9 cm (3¹⁄₂ po).
7. Soulevez la poignée et placez le produit alimentaire sur le jeu de
lames le côté plat en bas.
8. Enlevez la main de la zone du jeu de lames et placez cette main sur le
pied du socle.
9. En appuyant fort et vite, expulsez de force le produit alimentaire à
travers le jeu de lames.
10.Reprenez jusqu’à ce que vous ayez préparé assez de produit
alimentaire pour vos besoin quotidiens.
11.Nettoyez et lubrifiez l’appareil juste après chaque utilisation. Pour
plus de renseignements, reportez-vous à la section NETTOYAGE de
ce manuel.
2 Redco®Instacut™5.0 manuel d’utilisation
Page 7

NETTOYAGE
AVERTISSEMENT
Danger – Lames coupantes
Les lames sont affûtées et peuvent causer des coupures. Pour
éviter les blessures causées par les lames coupantes,
manipulez avec prudence.
Pour maintenir l’apparence et augmenter la durée de service, nettoyez
chaque jour l’appareil.
REMARQUE : Les acides émousseront les lames et corroderont le
métal. Nettoyez toujours cet appareil de préparation
des aliments juste après chaque utilisation.
1. Glissez la tête de poussée en dehors des tiges-guides.
2. Relevez les caoutchoucs de 5 cm (2 po) environ.
3. Desserrez la vis à oreilles du socle et enlevez avec précaution le jeu
de lames.
4. Essuyez, rincez ou pulvérisez minutieusement l’appareil, la tête de
poussée et le jeu de lames d’eau CHAUDE.
5. Ne passez pas l’éponge sur le tranchant des lames et n’utilisez pas
de tampons à récurer sur cet appareil. Ne passez pas l’éponge sur le
tranchant de la lame sous peine de causer des blessures et
d’émousser les lames.
6. Il est préférable de nettoyer le jeu de lames au jet d’eau sous
pression à travers les lames du côté non tranchant. Si nécessaire,
utilisez une brosse de nettoyage à soies nylon pour pousser les
particules d’aliment par le côté non tranchant du jeu de lames.
7. Ne passez pas cet appareil au lave-vaisselle avec des savons,
détergents ou autres produits chimiques alcalins susceptibles de
l’abîmer.
8. Après nettoyage, laissez l’appareil sécher à l’air.
9. Installez le jeu de lames en insérant l’onglet du porte-lame dans la
rainure du socle, avant d’abaisser le porte-lame en position calée et
affleurante dans le socle. Serrez la vis à oreilles.
10.Lubrifiez les tiges-guides à l’huile minérale ou au Petro Gel après
chaque utilisation. N’utilisez pas d’huile de cuisson, car elle finira par
coller et risque d’abîmer l’équipement à tout jamais.
11.Glissez les caoutchoucs en place.
12.Installez la tête de poussée : Glissez la tête de poussée sur les tigesguides.
ENTRETIEN PRÉVENTIF
1. Nettoyez l’appareil après chaque utilisation.
2. Utilisez uniquement aux fins indiquées.
3. Remplacez régulièrement les lames – selon l’utilisation.
REMPLACEMENT DES LAMES
AVERTISSEMENT
Danger – Lames coupantes
Les lames sont affûtées et peuvent causer des coupures. Pour
éviter les blessures causées par les lames coupantes,
manipulez avec prudence.
Lavez les lames neuves à l’eau savonneuse chaude et rincez
minutieusement pour enlever le film d’huile de protection. Gardez le
bord tranchant à l’écart lors de la manipulation des lames.
1. Familiarisez-vous avez le diagramme des pièces de votre appareil.
2. Glissez la tête de poussée en dehors des tiges-guides.
3. Relevez les caoutchoucs de 5 cm (2 po) environ.
4. Desserrez la vis à oreilles et enlevez avec précaution le jeu de lames.
Enlevez le jeu de lames de coupe en poussant vers le haut en bas du
porte-lame, où se trouve la vis à oreilles. Jetez le jeu de lames usagé.
5. Installez le jeu de lames de coupe neuf en insérant l’onglet du portelame dans la rainure du socle, avant d’abaisser le porte-lame en
position calée et affleurante dans le socle. Serrez la vis à oreilles.
6. Glissez les caoutchoucs en bas des tiges-guides jusqu’à ce qu’ils
touchent le socle. Placez la tête de poussée sur les tiges-guides,
abaissez lentement la tête de poussée et vérifiez l’alignement du bloc
de tête de poussée sur le jeu de lames.
7. Lubrifiez la barre-guide à l’huile minérale ou au Petro Gel après
chaque utilisation. N’utilisez pas d’huile de cuisson, car elle finira par
coller et risque d’abîmer l’équipement à tout jamais.
DÉPANNAGE
Problèm La cause en est peut-être..... Mesure corrective
Lame cassée Les lames sont émoussées.
Redco®Instacut™5.0 manuel d’utilisation 3
Préentaillez le fruit ou le légume si possible pour éviter les chocs et
contraintes exagérés sur les lames.
Remplacez le jeu de lames.
Page 8

RÉPARATION
Les pièces de remplacements sont disponible au Vollrath.com. Pour éviter toute blessure grave ou tout dommage sévère, n’essayez jamais de
réparer le réchaud à induction ou remplacer vous-même un cordon d’alimentation endommagé. N’envoyez aucun appareil directement à la Vollrath
Company. Contactez le service de réparation professionnel qualifié indiqué ci-dessous.
Lorsque vous contacterez le service de réparation professionnel, tenez-vous prêt à fournir le numéro de modèle, le numéro de série et le justificatif
d’achat indiquant la date d’achat de l’appareil.
GARANTIE DE LA VOLLRATH CO. L.L.C
Cette garantie ne s’applique pas aux produits achetés pour un usage personnel, familial ou ménager, et la Vollrath Company LLC ne propose aucune
garantie écrite aux acheteurs pour de telles utilisations.
La Vollrath Company L.L.C. garantit que les produits qu’elle fabrique et distribue seront dépourvus de vices de matériaux et de malfaçons sauf
indication contraire dans notre déclaration complète de garantie. Dans tous les cas, la garantie entre en vigueur à la date d’achat par l’utilisateur
initial indiquée sur le reçu.
Pour des informations complètes sur la garantie, l’enregistrement des produits et l’annonce de nouveaux produits, consultez www.vollrath.com.
The Vollrath Company, L.L.C. Headquarters
1236 North 18th Street
Sheboygan, Wisconsin
53081-3201 USA
Main Tel: 800-624-2051 or 920-457-4851
Main Fax: 800-752-5620 or 920-459-6573
Canada Customer Service: 800-695-8560
Tech Services: techservicereps@vollrathco.com
www.vollrath.com
Vollrath Europe BV
Beneluxbaan 7
5121 AD RIJEN
The Netherlands
+31161870005
Vollrath of China
Vollrath Shanghai Trading Limited
23A, Time Square Plaza | 500
Zhang Yang Road
Pudong, Shanghai 200122
Tel: 86-21-50589580
©
2016 The Vollrath Company L.L.C. Réf. 230023-1 ml 2/26/16
Vollrath de Mexico S. de R.L. de C.V.
Periferico Sur No. 7980 Edificio 4-E
Col. Santa Maria Tequepexpan
45600 Tlaquepaque, Jalisco | Mexico
Tel: (52) 333-133-6767
Tel: (52) 333-133-6769
Fax: (52) 333-133-6768
Page 9

Manual del operador
Gracias por comprar este equipo Vollrath para el procesamiento de
alimentos. Antes de usar el equipo, lea y familiarícese con las
siguientes instrucciones de operación y seguridad. CONSERVE ESTAS
INSTRUCCIONES COMO REFERENCIA PARA EL FUTURO. Conserve la
caja y embalado originales. Deberá utilizarlos para devolver el equipo en
caso de que requiera reparaciones.
PRECAUCIONES DE SEGURIDAD
Para garantizar una operación segura, lea las siguientes afirmaciones y
comprenda su significado. Este manual contiene precauciones de
seguridad que se explican a continuación. Léalas atentamente.
ADVERTENCIA
Advertencia se usa para indicar la presencia de un peligro que puede
provocar lesiones personales graves, muerte o daños materiales
considerables si se ignora el aviso.
PRECAUCIÓN
Precaución se usa para indicar la presencia de un peligro que
provocará o puede provocar lesiones personales o daños materiales
leves si se ignora el aviso.
AVISO: Nota se utiliza para indicar información sobre instalación,
funcionamiento o mantenimiento que es importante, pero
que no reviste peligros.
Para disminuir el riesgo de lesiones personales o daños al
equipo:
• Revise el equipo antes de cada uso para asegurarse de que esté
limpio.
• Revise si hay hojas rotas, melladas o desafiladas, y si es así,
reemplace el conjunto de hojas.
• Verifique que el cabezal de empuje esté completamente asentado en
los topes de goma.
• En los modelos de sobremesa las ventosas sujetan el equipo
firmemente en superficies lisas.
• Si es necesario, lubrique las varillas guía usando una capa delgada
de aceite mineral, Petro Gel, o lubricante apto para alimentos. NO
USE ACEITE DE COCINA YA QUE SE TORNARÁ PEGAJOSO Y PUEDE
DAÑAR PERMANENTEMENTE LOS COJINETES DEL CABEZAL DE
EMPUJE.
Redco
Número de
artículo Descripción
55000 0.6 cm (¼") cubos
55001 1 cm (³⁄₈") cubos
55002 1.3 cm (½") cubos
55011 0.6 cm (¼") cubos
55012 1 cm (³⁄₈") cubos
55013 1.3 cm (½") cubos
15150 4 segmentos
15151 6 segmentos
15152 8 segmentos
15153 10 segmentos
15155 12 segmentos
15126 6 segmentos saca corazones
15128 8 segmentos saca corazones
®
Instacut™5.0
FUNCIÓN Y PROPÓSITO
Diseñado para cortar verduras y frutas en cubos y segmentos.
Inscriba su producto en Vollrath.com
©
2016 The Vollrath Company L.L.C. Núm. art. 230023-1 ml 2/26/16
Page 10

CARACTERÍSTICAS Y CONTROLES OPERACIÓN
G
F
E
D
H
C
I
B
D
A
A Varillas Guía. Guían y alinean el cabezal de empuje sobre el
juego de hojas.
B Mango. Se usa para bajar y subir el cabezal de empuje.
C Guías. Se usan para que el cabezal de empuje opere en forma
suave y uniforme sobre las varillas guía.
D Conjunto del Cabezal de Empuje. Compuesto por las guías, el
bloque del cabezal de empuje y el mango.
E Topes. Amortiguan el cabezal de empuje durante la operación.
F Tornillo de Mano. Afianza el bloque del cabezal de empuje al
conjunto de dicho cabezal. Afianza el conjunto de hojas al
conjunto de la base.
G Bloque del Cabezal de Empuje. Empuja el alimento a través del
juego de hojas. Dimensionado específicamente para coincidir
con el conjunto de hojas correspondiente.
H Conjunto de Hojas. Alberga las hojas. Dimensionado
específicamente para coincidir con el bloque del cabezal de
empuje.
I Conjunto de la Base. Sostiene las varillas guía y el conjunto de
hojas.
ADVERTENCIA
Peligro con hojas filosas
Las hojas son filosas y pueden causar cortes. Manipule el
equipo con cuidado para evitar lesiones con las hojas filosas.
Es importante limpiar el equipo antes de usarlo por primera vez. Lave
las hojas nuevas con agua caliente jabonosa y enjuáguelas totalmente
para eliminar la delgada película protectora de aceite.
1. Antes de usarlo, cerciórese de que el equipo esté limpio y las hojas
estén en buen estado. Si hay hojas sueltas o rotas, repárelas.
2. Coloque el equipo en una superficie de trabajo limpia y plana.
3. Antes de cada uso, siempre verifique que las hojas estén
correctamente alineadas. Fije lentamente el cabezal de empuje sobre
el conjunto de hojas. Deben deslizarse juntas sin obstrucciones. Si
hay obstrucciones, verifique que ambas piezas efectivamente sean
del mismo conjunto.
4. Elimine la obstrucción.
5. Verifique que el conjunto de hojas y el conjunto del cabezal de
empuje sean del tamaño deseado.
6. Prepare el alimento que va a procesar. El tamaño máximo del
alimento debe ser de 12.7 cm (5"). Para alimentación y extracción
del alimento el tamaño máximo es 8.9 cm (3-1/2") de diámetro.
7. Suba el mango y coloque el alimento en el conjunto de hojas con el
lado plano hacia abajo.
8. Quite la mano del área del conjunto de hojas y colóquela en la pata
de la base.
9. Fuerce el alimento a través del conjunto de hojas empujando el
mango hacia abajo en forma rápida y firme.
10.Repita este proceso hasta que haya preparado suficiente comida
según sus necesidades diarias.
11.Limpie y lubrique inmediatamente el equipo tras usarlo. En la
sección LIMPIEZA de este manual encontrará más información
2 Redco®Instacut™5.0 manual del operador
Page 11

LIMPIEZA
ADVERTENCIA
Peligro con hojas filosas
Las hojas son filosas y pueden causar cortes. Manipule el
equipo con cuidado para evitar lesiones con las hojas filosas.
Para conservar su aspecto hermoso y prolongar su vida útil, limpie
diariamente el equipo.
AVISO: Los ácidos de los alimentos desafilarán las hojas y
corroerán el metal. Siempre limpie este equipo de
preparación de alimentos inmediatamente tras usarlo.
1. Deslice el cabezal de empuje para retirarlo de las varillas guía.
2. Suba los topes aproximadamente 5.0 cm (2").
3. Afloje el tornillo de mano en la base y retire cuidadosamente el
conjunto de hojas.
4. Limpie, enjuague o rocíe totalmente el equipo, el cabezal de empuje
y el conjunto de hojas con agua CALIENTE.
5. No limpie con un paño las hojas ni use estropajos abrasivos en el
equipo. El pasar un paño por el borde filoso puede causar lesiones y
desafilar las hojas.
6. El conjunto de hojas de corte se limpia mejor forzando agua a
presión por las hojas desde el lado sin filo. Si es necesario, use un
cepillo de limpieza con cerdas de nylon para eliminar las partículas
de alimento de dicho lado.
7. No coloque este equipo en un lavavajillas ni máquina para lavar
platos con jabones, detergentes ni productos químicos alcalinos que
puedan dañarlo.
8. Tras limpiarlo, deje que el equipo se seque al aire.
9. Instale el conjunto de hojas introduciendo la lengüeta del portahojas
en la ranura de la base, y luego baje el portahojas al interior de la
posición asentada y a ras en la base. Apriete el tornillo de mano.
10.Lubrique las varillas guía con aceite mineral o Petro Gel tras usar el
equipo. No use aceite de cocina ya que se tornará pegajoso y puede
dañar permanentemente el equipo.
11.Deslice los topes a su posición.
12.Instale el conjunto del cabezal de empuje: Deslice el cabezal de
empuje por las varillas guía.
MANTENIMIENTO PREVENTIVO
1. Limpie el equipo después de usarlo.
2. Utilícelo sólo para los propósitos para los cuales está diseñado.
3. Cambie regularmente las hojas – basándose en el uso.
REEMPLAZO DEL CONJUNTO DE HOJAS
ADVERTENCIA
Peligro con hojas filosas
Las hojas son filosas y pueden causar cortes. Manipule el
equipo con cuidado para evitar lesiones con las hojas filosas.
Lave las hojas nuevas con agua caliente jabonosa y enjuáguelas
totalmente para eliminar la delgada película protectora de aceite.
Mantenga el borde filoso lejos de usted al manipular las hojas.
1. Familiarícese con el diagrama de piezas de su equipo.
2. Retire el conjunto del cabezal de empuje deslizando dicho cabezal
hacia afuera de las varillas guía.
3. Suba los topes aproximadamente 5.0 cm (2").
4. Afloje el tornillo de mano y retire cuidadosamente el conjunto de
hojas(H). Retire el conjunto de hojas presionando hacia arriba la
parte inferior del lado del portahojas, donde se encuentra el tornillo
de mano. Deseche el conjunto de hojas antiguo.
5. Instale el nuevo conjunto de hojas introduciendo la lengüeta del
portahojas en la ranura de la base, y luego baje el portahojas al
interior de la posición asentada y a ras en la base. Apriete el tornillo
de mano .
6. Deslice los topes hacia abajo por las varillas guía para que hagan
contacto con la base. Coloque el conjunto del cabezal de empuje
(sobre las varillas guía, baje lentamente dicho conjunto y revise el
alineamiento del bloque del cabezal de empuje con respecto a las
hojas.
7. Lubrique la barra guía con aceite mineral o Petro Gel tras usar la
unidad. No use aceite de cocina ya que se tornará pegajoso y puede
dañar permanentemente el equipo.
SOLUCIÓN DE PROBLEMAS
Problema Podría deberse a Solución
Hoja rota Hojas desafiladas.
Redco®Instacut™5.0 manual del operador 3
Haga hendiduras previas cada vez que sea posible para evitar
impactos indebidos y tensión en las hojas.
Reemplace el conjunto de hojas.
Page 12

REPARACIONES
Las partes reparables están disponibles en nuestra página web www.vollrath.com. Para evitar lesiones o daños materiales graves, no trate de reparar
el calentador de inducción ni reemplazar un cable eléctrico por su cuenta. No envíe las unidades directamente a The Vollrath Company. Comuníquese
con el servicio de reparación profesional calificado que se menciona a continuación.
Al comunicarse con el centro del servicio de reparación profesional autorizado, esté listo para proporcionar el número de modelo, número de serie y
el comprobante de compra que muestre la fecha en que adquirió la unidad.
CLÁUSULA DE GARANTÍA DE THE VOLLRATH CO. L.L.C.
Esta garantía no se aplica a los productos adquiridos para uso personal, familiar ni doméstico, y The Vollrath Company LLC no ofrece una garantía
por escrito a los compradores para dichos usos.
The Vollrath Company L.L.C. garantiza los productos que fabrica o distribuye contra defectos en materiales y fabricación por un período de un año,
salvo según se especifica en nuestra cláusula de garantía completa. En todos los casos, la garantía rige desde la fecha de compra original del usuario
final que aparece en el recibo. Cualquier daño por uso inadecuado, abuso, modificación o daño que resulte en el empaque durante el embarque de la
devolución para la reparación de garantía no serán cubiertos por la garantía.
Para obtener la información completa de garantía, registro de productos y publicidad de productos nuevos, visite www.vollrath.com.
The Vollrath Company, L.L.C. Headquarters
1236 North 18th Street
Sheboygan, Wisconsin
53081-3201 USA
Main Tel: 800-624-2051 or 920-457-4851
Main Fax: 800-752-5620 or 920-459-6573
Canada Customer Service: 800-695-8560
Tech Services: techservicereps@vollrathco.com
www.vollrath.com
Vollrath Europe BV
Beneluxbaan 7
5121 AD RIJEN
The Netherlands
+31161870005
Vollrath of China
Vollrath Shanghai Trading Limited
23A, Time Square Plaza | 500
Zhang Yang Road
Pudong, Shanghai 200122
Tel: 86-21-50589580
©
2016 The Vollrath Company L.L.C. Núm. art. 230023-1 ml 2/26/16
Vollrath de Mexico S. de R.L. de C.V.
Periferico Sur No. 7980 Edificio 4-E
Col. Santa Maria Tequepexpan
45600 Tlaquepaque, Jalisco | Mexico
Tel: (52) 333-133-6767
Tel: (52) 333-133-6769
Fax: (52) 333-133-6768
 Loading...