

Page 1

Thank you for purchasing this Vollrath equipment. Before operating the
equipment, read and familiarize yourself with the following operating
and safety instructions. SAVE THESE INSTRUCTIONS FOR FUTURE
REFERENCE. Save the original box and packaging. Use this packaging
to ship the equipment if repairs are needed.
SAFETY PRECAUTIONS
To ensure safe operation, read the following statements and understand
their meaning. This manual contains safety precautions which are
explained below. Please read carefully.
WARNING
Warning is used to indicate the presence of a hazard that will or can
cause severe personal injury or death.
Operator’s Manual
Refrigerated Display Cases
Curved Case
Drop-in Case
CAUTION
Caution is used to indicate the presence of a hazard that will or can
cause minor or major personal injury if the caution is ignored.
NOTICE: Notice is used to note information that is important but not
hazard-related.
To reduce risk of injury or damage to the equipment:
• Use only grounded electrical outlets matching the nameplate rated
voltage.
• Have a qualified person install the equipment in accordance with
local codes and ordinances.
• Use equipment in a flat, level position.
• Do not use an extension cord with this equipment. Do not plug this
equipment into a power strip or multi-outlet power cord.
• Unplug equipment and turn off before cleaning or moving.
• Do not spray controls or outside of equipment with liquids or
cleaning agents.
• Do not clean the equipment with steel wool.
• Keep equipment and power cord away from open flames, electric
burners or excessive heat.
• Do not operate unattended.
• Do not operate equipment in public areas and/or around children.
• Do not operate if equipment has been damaged or is malfunctioning
in any way.
Please register your product at Vollrath.com
Self-Serve Curved Case
Item No. Model Description Voltage Amps HP Hz Plug
40842 RDE7136
40843 RDE7148 48" 4.2
40844 RDE7160 60" 4.4
4084205 RDE1136 36"
4084305 RDE1148 48"
4084405 RDE1160 60"
40852 RDE8136
40853 RDE8148 48" 4.6
40854 RDE8160 60" 4.9
4085205 RDE1236 36"
4085305 RDE1248 48" 3.1
4085405 RDE1260 60" 3.3
40862 RDE8236
40863 RDE8248 48" 5.0
40864 RDE8260 60" 6.0 ¹⁄₃
4086205 RDE1336 36"
4086305 RDE1348 48" 3.3
4086405 RDE1360 60" 3.7
40880 RDE8336
40881 RDE8348 48" 7.4
40882 RDE8360 60" 8.1
4088005 RDE1436 36"
4088105 RDE1448 48" 5.2
4088205 RDE1460 60" 5.4
40886 RDE8436
40887 RDE8448 48" 7.6
40889 RDE8460 60" 8.2
4088605 RDE1536 36"
4088705 RDE1548 48" 4.8
4088905 RDE1560 60" 5.0
*Display Case has IEC inlet. Ships with three electrical cords, one each with UK,
Schuko or China plug.
©
2016 The Vollrath Company L.L.C. Part No. 2350087-1 ml 6/27/16
Drop-In
Countertop
Curved
Countertop
Cubed
Self-Serve
Countertop
Curved
Self Serve
Countertop
Cubed
36"
120
220-240
36"
120
220-240
36"
120
220-240
36"
120
220-240
36"
120
220-240
Cubed Case
3.4 ¹⁄₅
¹⁄₄
2.2 ³⁄₈
2.8 ¹⁄₂
3.6 ¹⁄₅
2.6 ³⁄₈
3.9
2.8 ³⁄₈
4.2 ¹⁄₄
3.4 ¹⁄₄
4.3 ¹⁄₄
3.9 ³⁄₈
50/60
¹⁄₄
50/60
¹⁄₂
¹⁄₄
50/60
¹⁄₂
¹⁄₃
50/60
¹⁄₃
¹⁄₃
50/60
¹⁄₃
60
60
60
60
60
NEMA
5-15P
UK/
Schuko/
China*
NEMA
5-15P
UK/
Schuko/
China*
NEMA
5-15P
UK/
Schuko/
China*
NEMA
5-15P
UK/
Schuko/
China*
NEMA
5-15P
UK/
Schuko/
China*
Page 2
FUNCTION AND PURPOSE
This equipment is designed for illuminated display of food products at
temperatures between 32°F (0°C) and 68°F (20°C). This equipment is
intended and designed to keep chilled food at proper serving
temperatures while it is displayed for sale. Food must be prepared and
placed in display cabinets at proper serving temperatures. Display
cases not intended or designed to cool or chill food. They are not
intended for overnight storage of perishable food. They are not
intended for household, industrial or laboratory use.
UNPACK THE EQUIPMENT
If the unit has been transported in a non-vertical position allow at least
one hour before operating.
1. Remove all packing material and tape, as well as any protective
plastic from the equipment.
2. Remove bolts that secure the equipment to the pallet.
3. Remove any glue residue left over from the plastic or tape.
4. Clean the equipment before use. See Cleaning procedure in this
document.
COUNTERTOP MODEL INSTALLATION
Clearance Requirements
• Countertop cases require a minimum of 4” (10.2 cm) between the
equipment and any surrounding walls. Surrounding walls must be
made of non-combustible materials.
Installation
1. Place the equipment on a flat stable surface.
2. Plug the equipment into a properly grounded electrical supply
matching the nameplate rating. Damage to the equipment can occur
if incorrect power is supplied to equipment.
NOTICE: Using a voltage other than the nameplate rated voltage
will cause damage to the unit. Incorrect voltage,
modification to the power cord or electrical components
can damage unit and will void the warranty.
3. After the installation is complete the thin breather wires on the top of
the side glass panels may be trimmed and crimped closed.
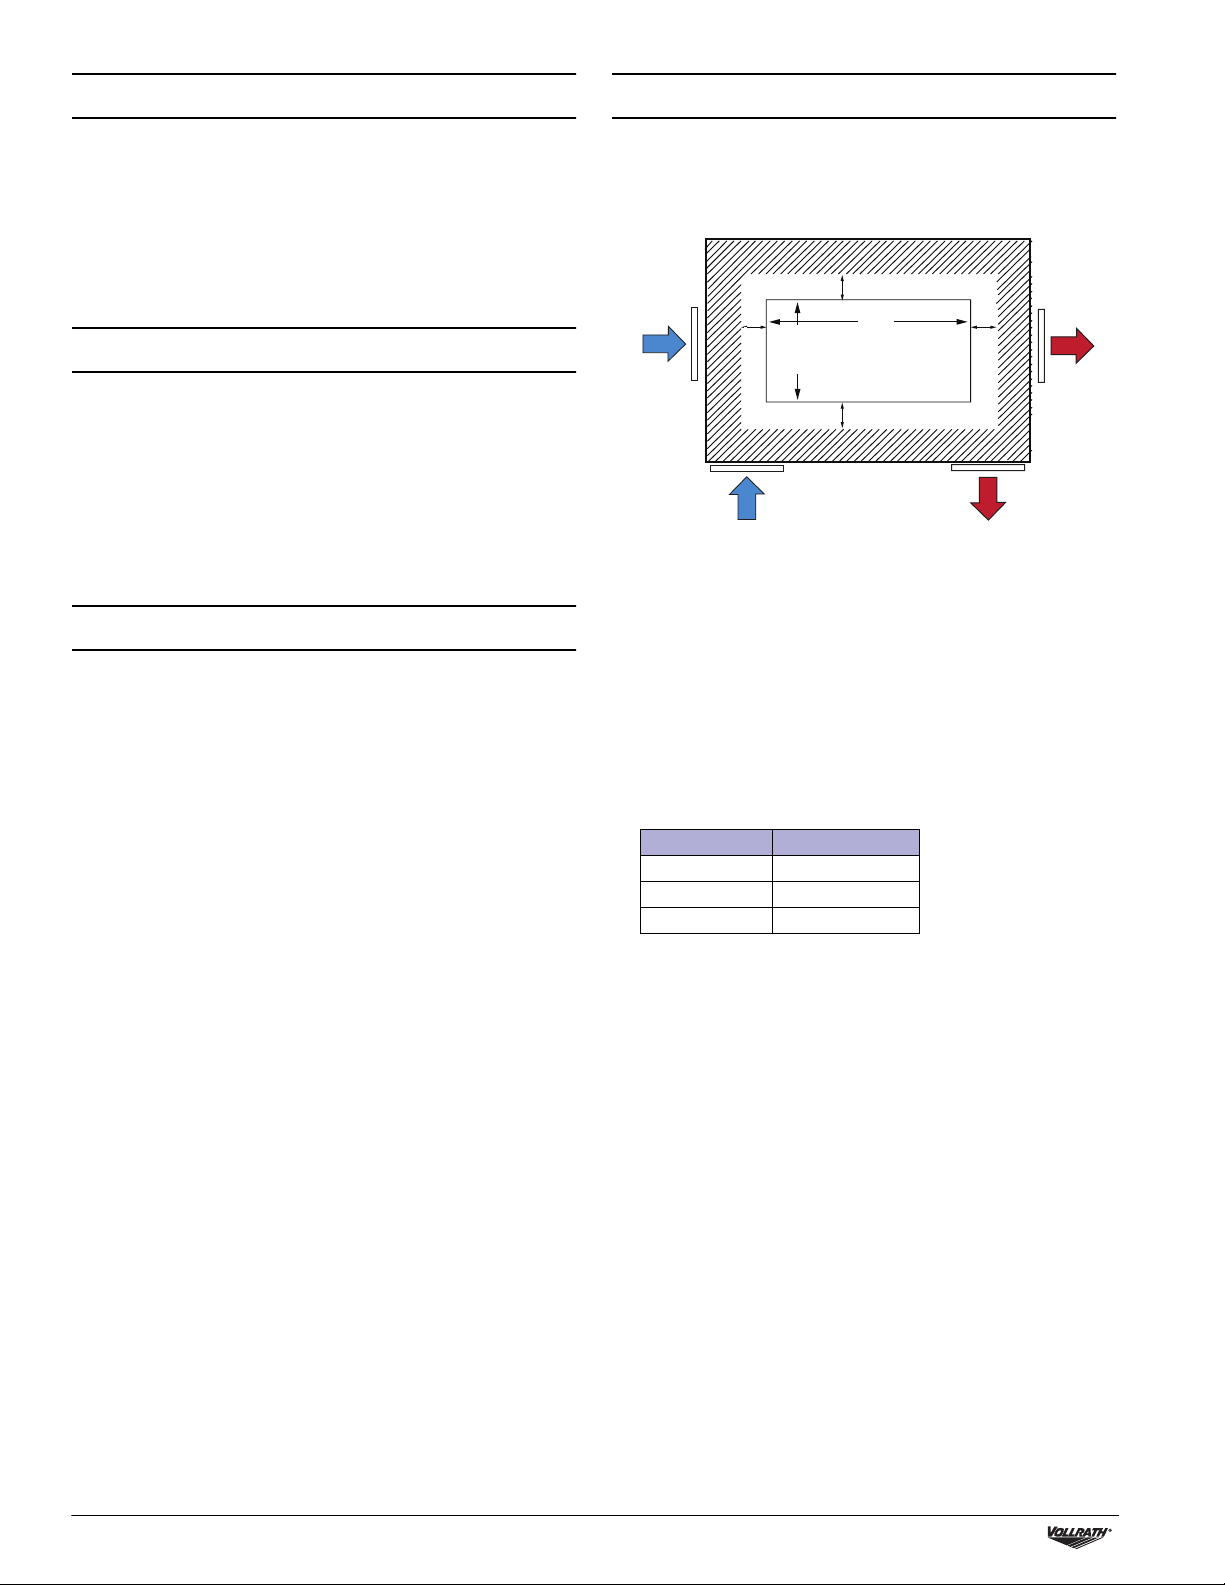
DROP-IN MODEL INSTALLATION
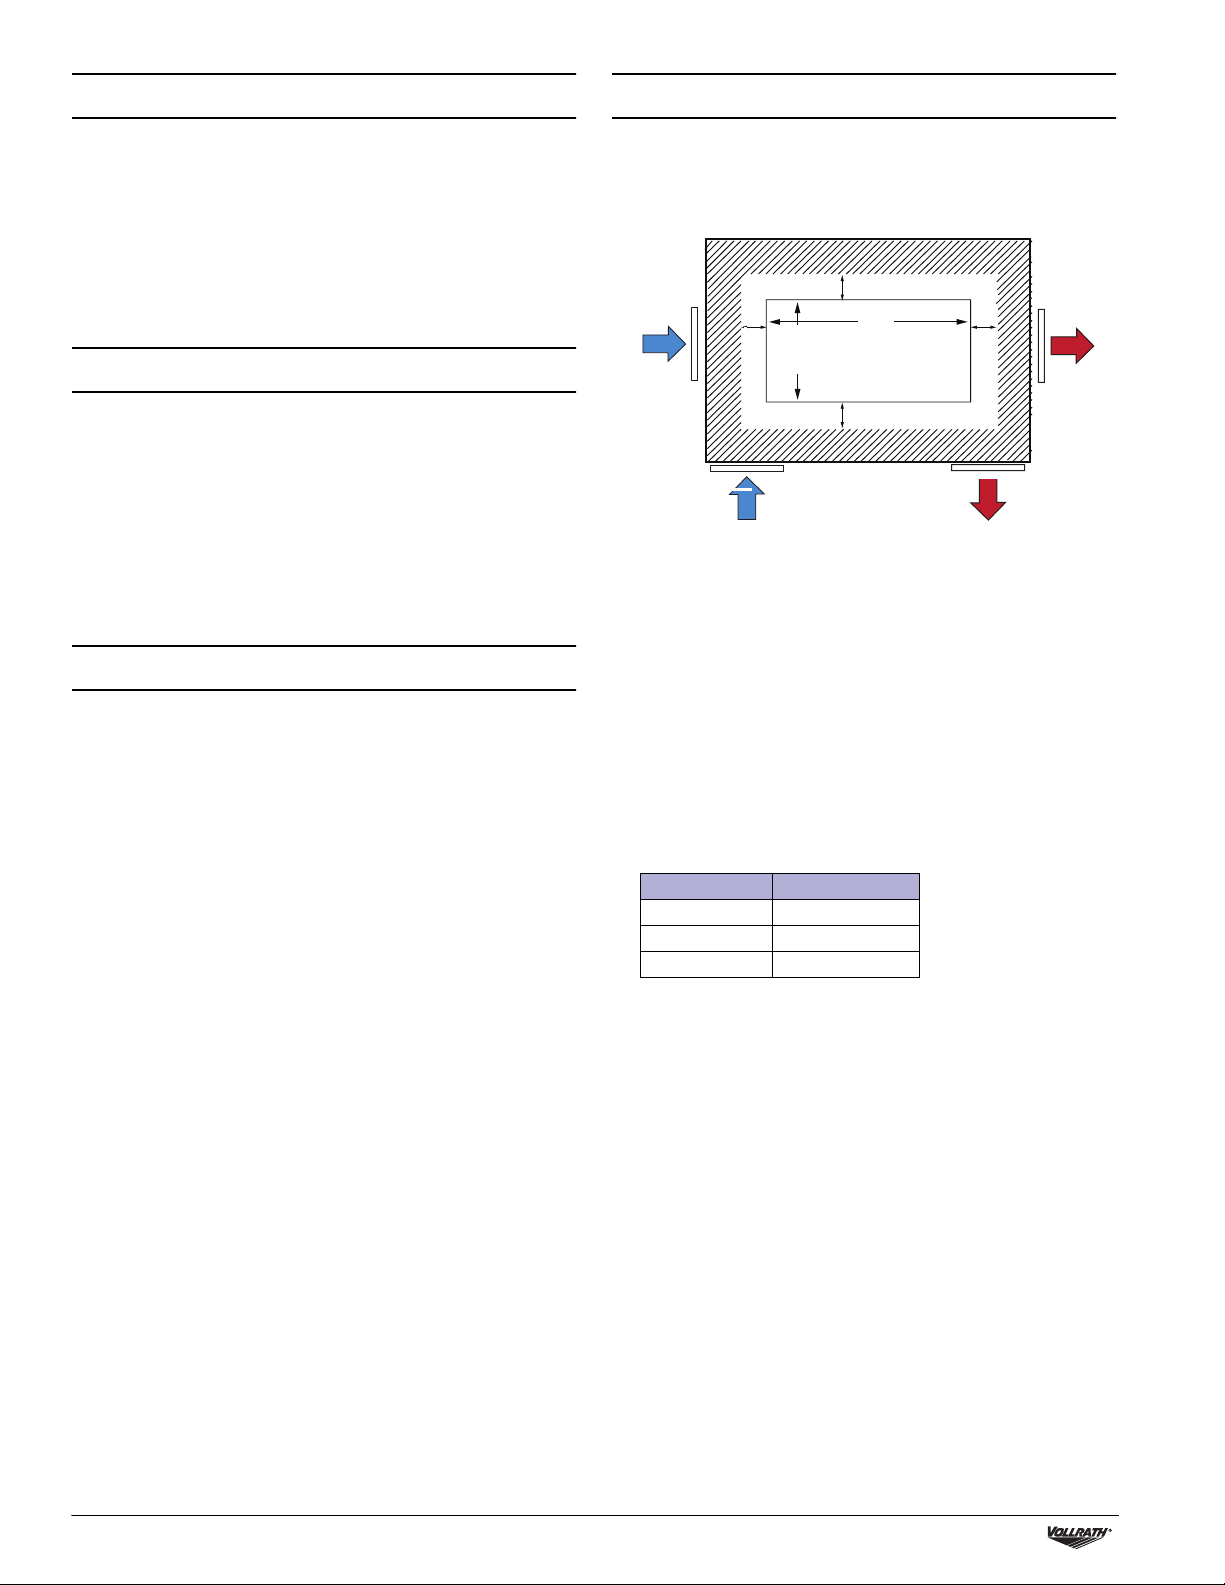
Clearance, Cutout and Ventilation
4"
(10.2)
6" (15.2)
A
19
(48.2)
Preferred
Alternate
• Drop-in cases require a minimum of 4” (10.2 cm) of noncombustible countertop to support the unit and a minimum of 6”
(15.2 cm) clearance on all sides of the drop-in for proper air
circulation.
• Drop-in case requires a minimum of 80 square inches for fresh air
intake and a minimum of 80 square inches for exhaust. Customer
supplied louvers must be installed in the surrounding cabinet to
ensure adequate ventilation. One intake and one discharge louver are
required. Preferred louver location is the short ends of the cabinet.
6" (15.2)
6" (15.2)
Customer Side
6" (15.2)
4"
(10.2)
4"
(10.2)
Preferred
4"
(10.2)
Alternate
Installation
1. Choose a flat, level countertop for the mounting surface.
2. Measure the area for the cutout. See above drawing.
Display Cabinet A
36" 34" (86.3 cm)
48" 45" (114.3 cm)
60" 58" (147.3 cm)
3. Seal the base of the unit to the countertop with food-grade silicone
seal.
4. Plug the equipment into a properly grounded electrical supply
matching the nameplate rating. Damage to the equipment can occur
if incorrect power is supplied to equipment.
NOTICE: Using a voltage other than the nameplate rated voltage
5. After the installation is complete the thin breather wires on the top of
the side glass panels may be trimmed and crimped closed.
will cause damage to the unit. Incorrect voltage,
modification to the power cord or electrical components
can damage unit and will void the warranty.
2 Refrigerated Display Cases Operator’s Manual
Page 3
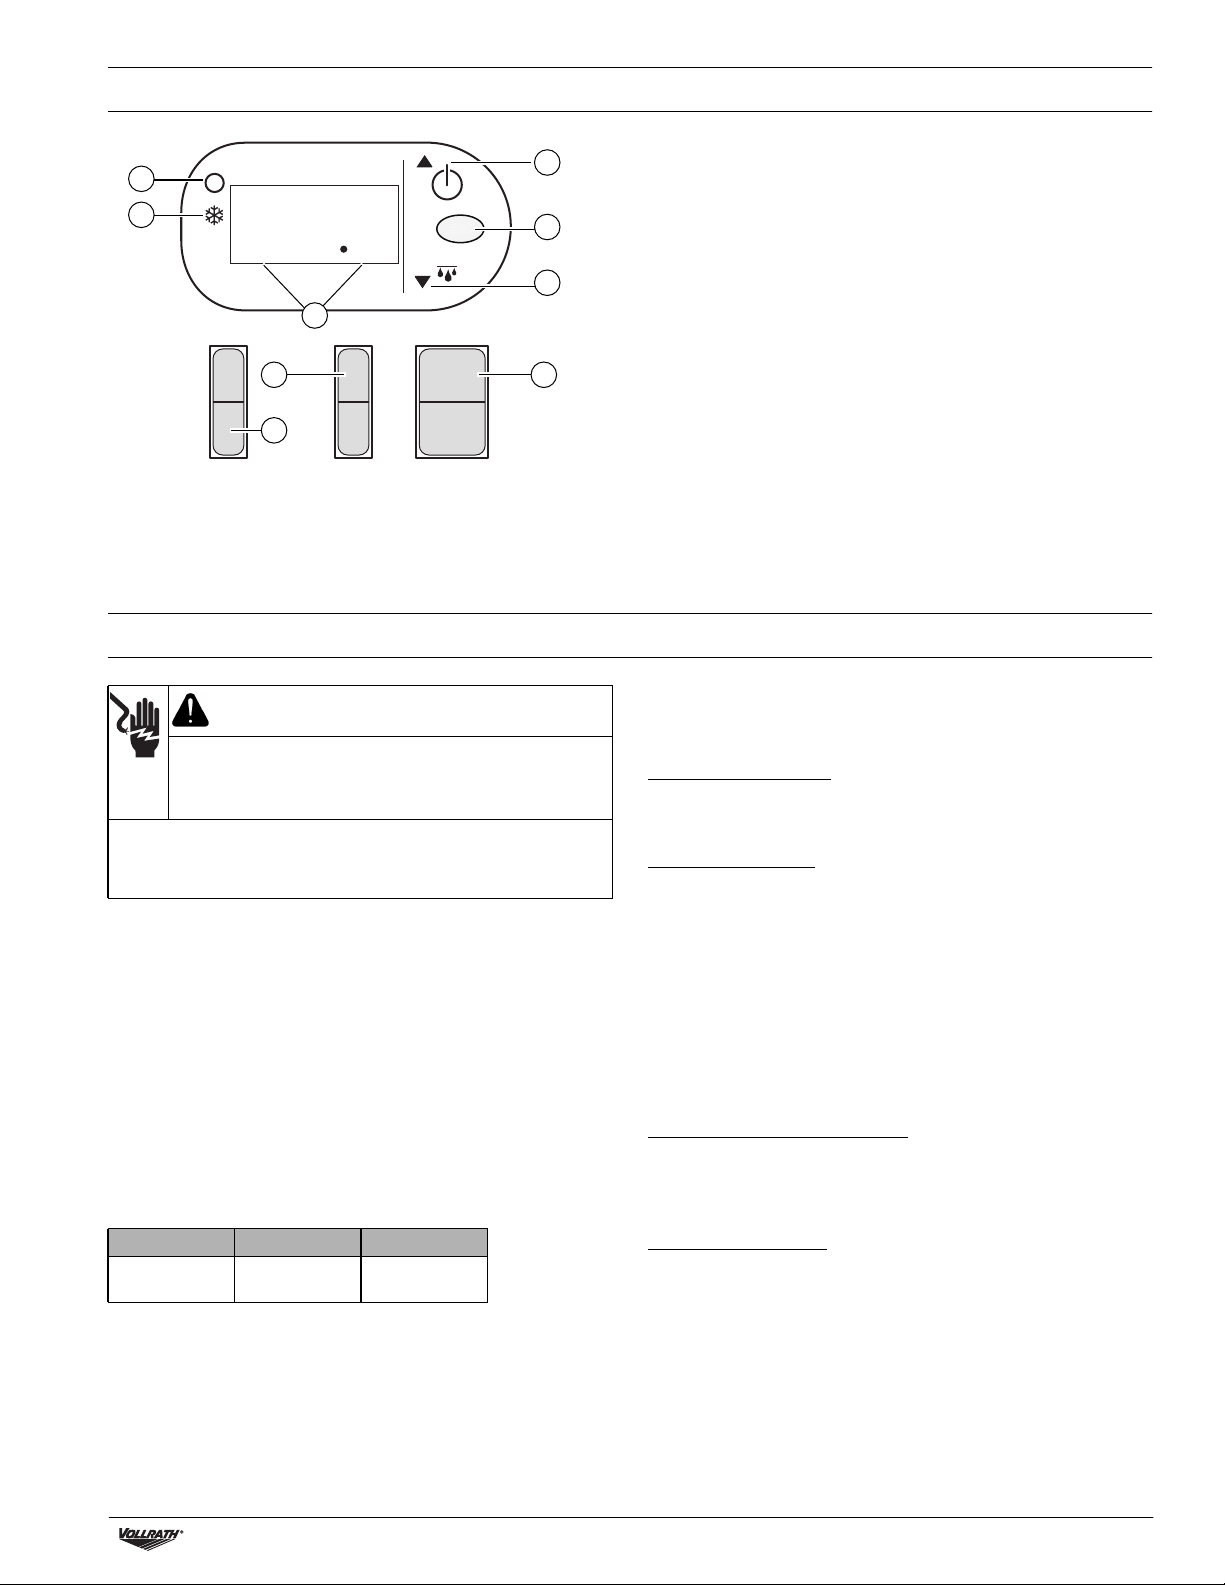
FEATURES AND CONTROLS
G
H
V
000
F
B
I
OPERATION
7
set
A Main Power Switch. Illuminated switch turns the power ON or
C
E
D
A
OFF to the equipment.
B Light Switch. Switches the lights ON or OFF.
C Multi-Function Button. Depending on the mode this button
turns the power ON or OFF to the controller or increases the
temperature.
D Multi-Function Button. Depending on the mode this button
activates the defrost function or decreases the temperature.
E Set Button. Switches the temperature setting mode ON or OFF.
F Display. Displays the current temperature or the temperature
being programed.
G Compressor Cycle Light. Illuminates steadily when the
compressor is running. Flashes when the compressor is in the
delay cycle, this lasts for about two minutes and is a normal part
of compressor cycling.
H Defrost Light. Flashes when the equipment is in the defrost
mode.
I Glass Heater Switch. Available on countertop display cases
with only operator side access. Not available on drop-in cases or
cases with customer-side (self-serve) access. Switches the
glass defrost ON or OFF.
WARNING
Electrical Shock Hazard
Keep water and other liquids from entering the inside of the
equipment. Liquid inside the equipment could cause an
electrical shock.
Do not spray the unit or controls with water or cleaning products.
Liquid could contact the electrical components and cause a short
circuit or an electrical shock. Do not use unit if power cord is damaged
or has been modified.
NOTICE: Before using, clean this equipment as described in the
NOTICE: Allow the display case to chill for approximately 30
NOTICE: Food must be prepared and placed in display cases at
NOTICE: Monitor food temperature closely for food safety. The
Bottom Shelf Weight Capacity
Weight must be distributed evenly over the bottom shelf.
CLEANING section of this document.
minutes before placing food into the case.
proper serving temperatures. This equipment is not
intended or designed to cool or chill food. Regularly check
the food temperature.
United States Public Health Service recommends that hot
food be held at a minimum of 140 ºF (60 ºC) to help prevent
bacteria growth.
36" models 48" models 60" models
40 lbs.
(18.1 Kg)
48 lbs.
(21.7 Kg)
55 lbs.
(24.9 Kg)
Prepared, Cold Food Display Use
1. Switch the main power switch to the ON position.
2. Switch the light switch to the ON position if desired.
Turn on the Controller
Press and hold the multi-function button for three seconds. When the
display shows a temperature, the controller is ON and will refrigerate.
Set the Temperature
1. Press and hold the set button for two seconds. The controller is now
switched ON. The display flashes the programmed temperature.
2. To adjust the temperature, press the multi-function button to
increase the temperature, or press the down button to decrease the
temperature.
3. Press the set button. The number display is constant, showing the
current temperature.
4. The unit will now operate to the set temperature.
5. Allow the display case to chill for approximately 30 minutes before
placing food into the case.
Glass Heater (defrost) Function
1. Switch the glass heater switch to the ON position.
2. When glass has defrosted, switch the glass defrost switch to the OFF
position.
Case Defrost Function
1. Press and hold the multi-function button for three seconds. The
defrost cycle will begin and the defrost light will flash. The defrost
cycle takes approximately two hours.
2. To manually stop, press and hold the multi-function button for three
seconds. The defrost cycle will end.
Ambient Temperature, Non-Chilled Display Use
1. Turn the controller to the OFF mode.
2. Press and hold the multi-function button for three seconds. When
the number display flashes “OFF”, the controller is in the OFF mode
and will not refrigerate. The unit may be used for ambient
temperature display.
Refrigerated Display Cases Operator’s Manual 3
Page 4
To maintain the appearance and increase the service life, clean your
CLEANING
equipment daily.
1. Unplug the equipment.
2. Use a damp cloth or sponge dipped in soapy water to clean the
equipment; rinse and dry thoroughly.
WARNING
Electrical Shock Hazard
Keep water and other liquids from entering the inside of the
equipment. Liquid inside the equipment could cause an
3. A high quality non-toxic glass cleaner may be used to clean the glass
components of the unit.
4. Periodically remove the rear panel and clean the coil fins with a stiff
brush.
electrical shock.
Do not spray the unit or controls with water or cleaning products.
Liquid could contact the electrical components and cause a short
PREVENTATIVE MAINTENANCE
circuit or an electrical shock. Do not use unit if power cord is damaged
or has been modified.
Have a qualified person clean the condenser coils, evaporator and fans
twice a year or as necessary.
NOTICE: Do not use cleaning products containing aggressive
chemicals, acids, or that contain chlorine.
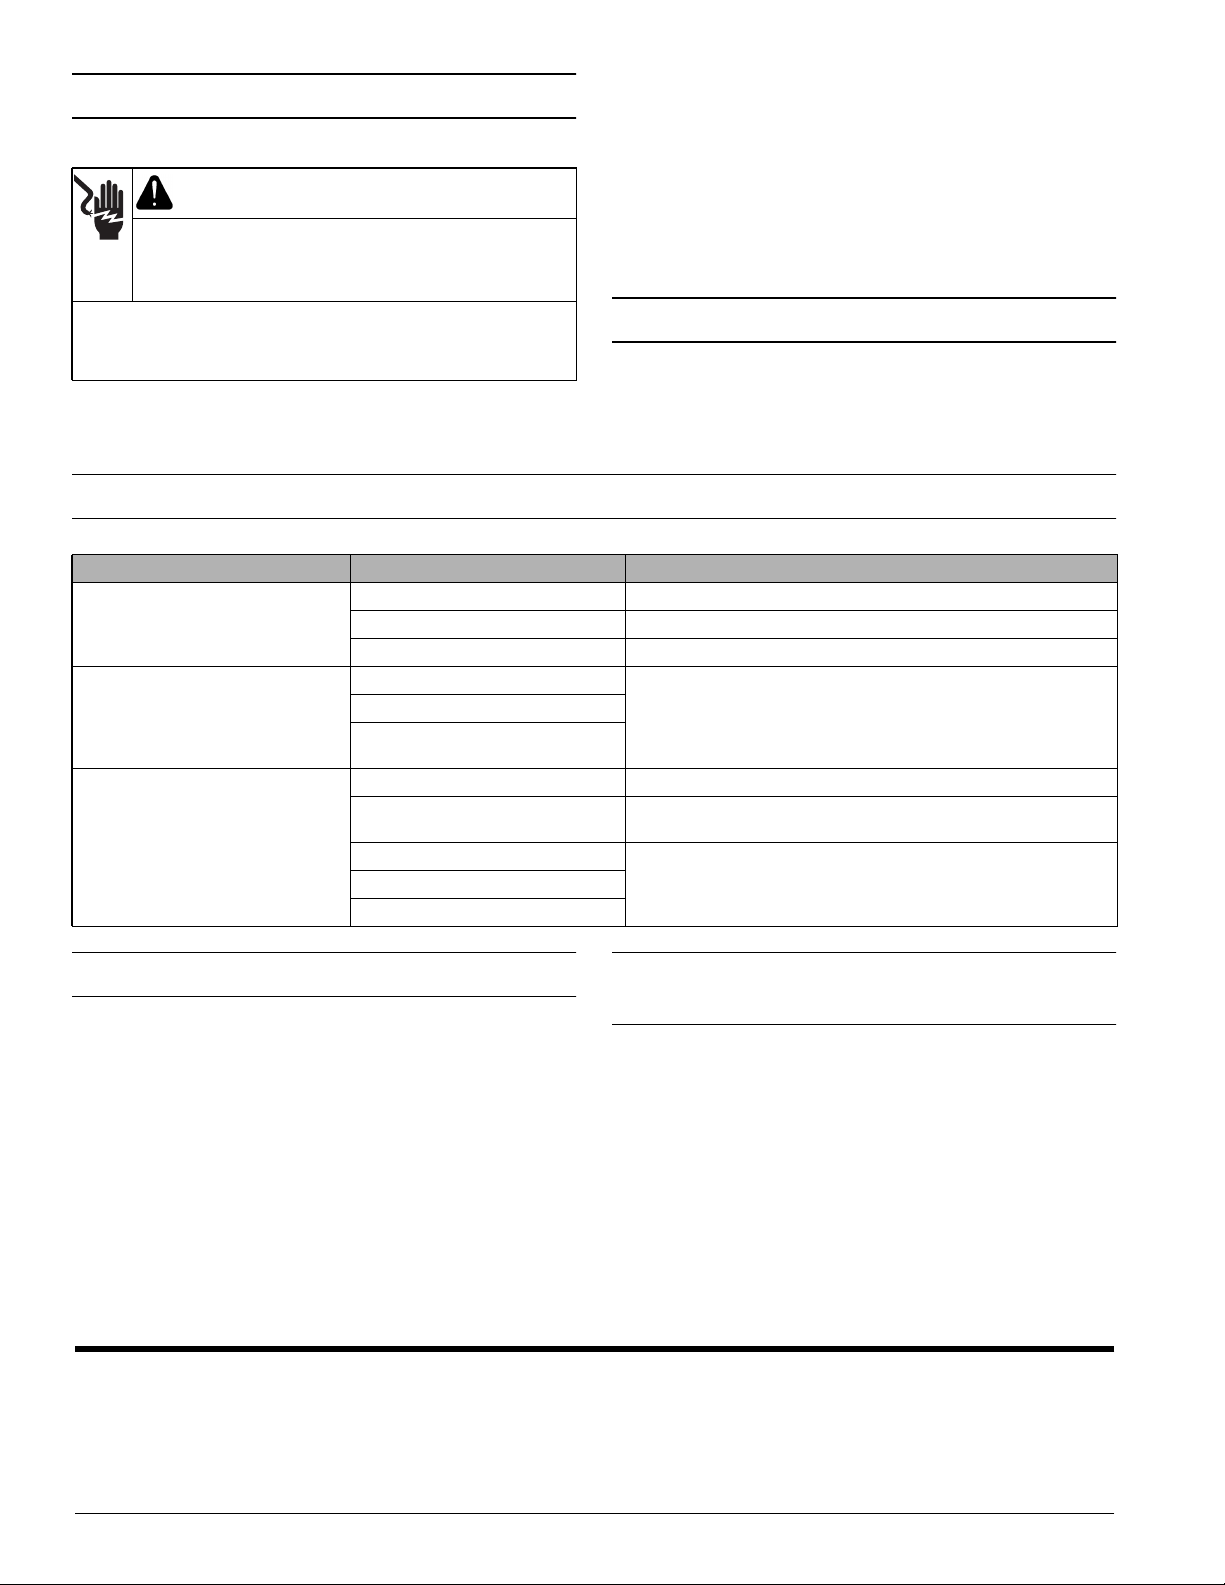
TROUBLESHOOTING
Problem Might be Caused By Course of Action
Faulty outlet. Have a qualified person replace the outlet.
No power to the equipment.
Compressor does not run.
Compressor runs, temperature inside
too warm.
Circuit breaker tripped. Reset the circuit breaker.
Compressor in “delay” cycle. Wait two minutes for compressor to run.
Faulty controller.
Faulty compressor.
Have a qualified person repair the equipment.
Faulty compressor starter or
capacitor.
Ambient temperature too high. Lower ambient temperature.
Excessive ice/frost build up on
evaporator.
Use manual defrost function.
Faulty controller.
Use manual defrost function.Dirty or faulty condenser fan.
Dirty or faulty evaporator fan.
SERVICE AND REPAIR
Serviceable parts are available on Vollrath.com.
To avoid serious injury or damage, never attempt to repair the unit or
replace a damaged power cord yourself. Do not send units directly to
The Vollrath Company LLC. Please contact Vollrath Technical Services
for instructions.
When contacting Vollrath Technical Services, please be ready with the
item number, model number (if applicable), serial number, and proof of
purchase showing the date the unit was purchased.
The Vollrath Company, L.L.C. Headquarters
1236 North 18th Street
Sheboygan, Wisconsin
53081-3201 USA
Main Tel: 800-624-2051 or 920-457-4851
Main Fax: 800-752-5620 or 920-459-6573
Canada Customer Service: 800-695-8560
Tech Services: techservicereps@vollrathco.com
www.vollrath.com
Vollrath Europe BV
Beneluxbaan 7
5121 AD RIJEN
The Netherlands
+31161870005
WARRANTY STATEMENT FOR THE VOLLRATH CO.
L.L.C.
This warranty does not apply to products purchased for personal,
family or household use, and The Vollrath Company LLC does not offer
a written warranty to purchasers for such uses.
The Vollrath Company LLC warrants the products it manufactures or
distributes against defects in materials and workmanship as specifically
described in our full warranty statement. In all cases, the warranty runs
from the date of the end user’s original purchase date found on the
receipt. Any damages from improper use, abuse, modification or
damage resulting from improper packaging during return shipment for
warranty repair will not be covered under warranty.
For complete warranty information, product registration and new
product announcement, visit www.vollrath.com.
Vollrath of China
Vollrath Shanghai Trading Limited
23A, Time Square Plaza | 500
Zhang Yang Road
Pudong, Shanghai 200122
Tel: 86-21-50589580
©
2016 The Vollrath Company L.L.C. Part No. 2350087-1 ml 6/27/16
Vollrath de Mexico S. de R.L. de C.V.
Periferico Sur No. 7980 Edificio 4-E
Col. Santa Maria Tequepexpan
45600 Tlaquepaque, Jalisco | Mexico
Tel: (52) 333-133-6767
Tel: (52) 333-133-6769
Fax: (52) 333-133-6768
Page 5

Merci d’avoir acheté cet appareil Vollrath. Avant de l’utiliser, lisez et
familiarisez-vous avec le mode d’emploi et les consignes d’utilisation
qui suivent. CONSERVEZ CES INSTRUCTIONS POUR RÉFÉRENCE
ULTÉRIEURE. Conservez l’emballage et le carton d’origine. L'emballage
devra être réutilisé pour expédier l’appareil si une réparation est
nécessaire.
Manuel d'utilisation
Vitrines réfrigérées
CONSIGNES DE SÉCURITÉ
Pour garantir un fonctionnement sûr, lisez les avertissements suivants
et comprenez leur signification. Ce manuel contient des consignes de
sécurité, présentées ci-dessous. Lisez-les attentivement.
AVERTISSEMENT
Un avertissement permet d'indiquer la présence d'un danger qui
causera ou peut causer des blessures personnelles graves ou la mort.
ATTENTION
Une mise en garde indique la présence d'un danger qui causera ou
pourra causer des blessures mineures ou majeures si elle est ignorée.
AVIS : Un avis met en évidence des informations qui sont
importantes mais sans rapport avec un danger.
Pour réduire le risque de blessures et d'endommagement de
l'appareil :
• Utilisez l’appareil uniquement sur une prise de terre correspondant à
la tension nominale de la plaque signalétique.
• Faites installer l'appareil par une personne qualifiée conformément à
tous les décrets locaux.
• Utilisez l'appareil à l'horizontale sur une surface plane.
• N'utilisez pas de rallonge électrique avec cet appareil. Ne branchez
pas cet appareil sur une barrette d'alimentation ou un cordon
d'alimentation à prises multiples.
• Débranchez l’appareil et éteignez-le avant de le nettoyer ou de le
déplacer.
• Ne vaporisez pas les commandes ou l’extérieur de l’appareil avec
des liquides ou des produits nettoyants.
• Ne nettoyez pas l'appareil à la laine d'acier.
• Tenez l'appareil et son cordon d’alimentation à l’écart des flammes
nues, des brûleurs électriques ou d’une chaleur excessive.
• N’utilisez pas l’appareil sans surveillance.
• N'utilisez pas l'appareil dans des lieux publics et/ou à proximité
d’enfants.
• N’utilisez pas l’appareil s’il a été endommagé ou s’il fonctionne mal.
Veuillez enregistrer votre produit sur Vollrath.com
©
Vitrine encastrable
Vitrine incurvée pour self
Num.art. Modèle Description Tension A W Hz Fiche
40842 RDE7136
40843 RDE7148 48" 4,2
40844 RDE7160 60" 4,4
4084205 RDE1136 36"
4084305 RDE1148 48"
4084405 RDE1160 60"
40852 RDE8136
40853 RDE8148 48" 4,6
40854 RDE8160 60" 4,9
4085205 RDE1236 36"
4085305 RDE1248 48" 3,1
4085405 RDE1260 60" 3,3
40862 RDE8236
40863 RDE8248 48" 5,0
40864 RDE8260 60" 6,0 ¹⁄₃
4086205 RDE1336 36"
4086305 RDE1348 48" 3,3
4086405 RDE1360 60" 3,7
40880 RDE8336
40881 RDE8348 48" 7,4
40882 RDE8360 60" 8,1
4088005 RDE1436 36"
4088105 RDE1448 48" 5,2
4088205 RDE1460 60" 5,4
40886 RDE8436
40887 RDE8448 48" 7,6
40889 RDE8460 60" 8,2
4088605 RDE1536 36"
4088705 RDE1548 48" 4,8
4088905 RDE1560 60" 5,0
*La vitrine a une prise CEI. Expédiée avec trois cordons électriques (fiche UK,
Schuko ou Chine).
2016 The Vollrath Company L.L.C. Num. d’art. 2350087-1 ml 6/27/16
Encastrable
Incurvée
sur
comptoir
Carrée sur
comptoir
Incurvée
sur
comptoir
pour self
Carrée sur
comptoir
pour self
Vitrine incurvée
36"
120
220-240
36"
120
220-240
36"
120
220-240
36"
120
220-240
36"
120
220-240
Vitrine carrée
3,4 Z\b
¹⁄₄
2,2 ³⁄₈
2,8 ¹⁄₂
3,6 Z\b
2,6 ³⁄₈
3,9
2,8 ³⁄₈
4,2 Z\v
3,4 ¹⁄₄
4,3 Z\v
3,9 ³⁄₈
50/60
¹⁄₄
50/60
¹⁄₂
Z\v
50/60
¹⁄₂
¹⁄₃
50/60
¹⁄₃
¹⁄₃
50/60
¹⁄₃
60
60
60
60
60
NEMA
5-15P
R.-U /
Schuko/
Chine*
NEMA
5-15P
R.-U /
Schuko/
Chine*
NEMA
5-15P
R.-U /
Schuko/
Chine*
NEMA
5-15P
R.-U /
Schuko/
Chine*
NEMA
5-15P
R.-U /
Schuko/
Chine*
Page 6

FONCTION ET OBJET
Cet appareil est destiné à la présentation sous lampes de produits
alimentaires à des températures comprises entre 0 et 20 °C. Il a été
conçu pour maintenir les aliments réfrigérés présentés à la vente aux
températures de service adéquates. Les aliments doivent être préparés
et placés dans les vitrines aux températures correctes de service. Les
vitrines ne sont pas prévues ou conçues pour refroidir ou réfrigérer les
aliments. Elles ne sont pas destinées au stockage d'aliments
périssables toute une nuit. Non prévues pour une utilisation ménagère,
industrielle ou en laboratoire.
DÉBALLAGE DE L'APPAREIL
Si l'appareil a été transporté dans une position non verticale, comptez
une heure minimum avant de l'utiliser.
1. Enlevez tout le matériel d'emballage et le ruban adhésif, ainsi que le
plastique de protection.
2. Enlevez les boulons qui fixent l'appareil sur la palette.
3. Nettoyez les résidus de colle du plastique ou du ruban adhésif.
4. Nettoyez l'appareil avant utilisation. Voir la procédure de nettoyage
dans ce document.
INSTALLATION DU MODÈLE SUR COMPTOIR
Dégagements minimums
Il doit y avoir au moins 4” 10,2 cm entre les vitrines sur comptoir et les
murs avoisinants. Les murs voisins doivent être en matériaux non
combustibles.
INSTALLATION DU MODÈLE ENCASTRABLE
Dégagement, découpe et ventilation
4"
(10.2)
6" (15,2)
A
19
(48,2)
Préférable
Autre possibilité
• Les vitrines encastrables exigent un comptoir d'une épaisseur
minimum de 4” (10,2 cm) pour soutenir l'appareil et un dégagement
minimum de 15,2 cm de tous les côtés pour une bonne circulation
de l'air.
• La vitrine encastrable exige un minimum de 80 pouces carrés pour
l'admission d'air frais et de pouces carrés pour l'évacuation. Des
registres à lattes fournis par le client doivent être installés dans
l'armoire environnante pour garantir une ventilation adéquate. Un
registre à lattes est requis pour l'admission et un autre pour la
décharge. L'emplacement préférable pour les registres est le côté de
l'armoire.
6" (15,2)
6" (15,2)
Côté client
Autre possibilité
6" (15.2)
4"
(10,2)
4"
(10,2)
Préférable
4"
(10,2)
Installation
1. Placez l'appareil sur une surface stable et plane.
2. Branchez l'appareil sur une prise électrique correctement mise à la
terre correspondant aux valeurs indiquées sur la plaque
signalétique. L'appareil risque d'être abîmé s'il est alimenté par une
alimentation non conforme.
AVIS : L’utilisation d’une tension différente de la tension
nominale indiquée sur la plaque signalétique
endommagera l’appareil. Une tension incorrecte, la
modification du cordon d'alimentation ou les
composants électriques risquent d'endommager
l'appareil et d'annuler la garantie.
3. Une fois l'installation terminée, les fils fins du reniflard sur le dessus
des panneaux en verre latéraux peuvent être coupés et fermés par
sertissage.
Installation
1. Choisissez un comptoir plat et horizontal pour la surface de
montage.
2. Mesurez la surface pour la découpe. Reportez-vous au croquis
ci-dessus.
Vitrine A
36" 34" (86,3 cm)
48" 45" (114,3 cm)
60" 58" (147,3 cm)
3. Scellez la base de l'appareil sur le comptoir à l'aide de pâte à base de
silicone de qualité alimentaire.
4. Branchez l'appareil sur une prise électrique correctement mise à la
terre correspondant aux valeurs indiquées sur la plaque
signalétique. L'appareil risque d'être abîmé s'il est alimenté par une
alimentation non conforme.
AVIS : L’utilisation d’une tension différente de la tension
nominale indiquée sur la plaque signalétique
endommagera l’appareil. Une tension incorrecte, la
modification du cordon d'alimentation ou les
composants électriques risquent d'endommager
l'appareil et d'annuler la garantie.
5. Une fois l'installation terminée, les fils fins du reniflard sur le dessus
des panneaux en verre latéraux peuvent être coupés et fermés par
sertissage.
2 Vitrines réfrigérées Manuel d'utilisation
Page 7

CARACTÉRISTIQUES ET COMMANDES
G
H
V
set
000
7
F
B
I
A Interrupteur d’alimentation secteur. L'interrupteur lumineux
C
E
D
A
permet de mettre l'appareil sous ou hors tension.
B Interrupteur des lampes. Permet d'allumer et d'éteindre les
lampes.
C Bouton multifonction. Selon le mode, ce bouton met le
contrôleur sous ou hors tension ou augmente la température.
D Bouton multifonction. Selon le mode, ce bouton active la
fonction de dégivrage ou diminue la température.
E Bouton de réglage. Permet d'activer ou de désactiver le mode
de réglage de la température.
F Affichage. Affiche la température actuelle ou la température en
cours de programmation.
G Voyant de cycle du compresseur. S'allume en continu quand le
compresseur fonctionne. Clignote quand le compresseur est
dans le cycle Retard ; ceci dure deux minutes environ et fait
normalement partie des cycles du compresseur.
H Voyant de dégivrage. S'allume quand l'appareil est en mode
Dégivrage.
I Interrupteur du chauffage de vitre. Disponible sur les vitrines
sur comptoir avec accès uniquement côté opérateur. Non
disponible sur les vitrines encastrables ou les vitrines avec
accès côté client (self). Permet de mettre en marche ou d'arrêter
le dégivrage.
MODE D'EMPLOI
AVERTISSEMENT
Risque d'électrocution
Empêchez toute infiltration d'eau et d'autres liquides dans
l'appareil. L'infiltration de liquide dans l'appareil risque de
causer une électrocution.
Ne vaporisez pas les commandes ou l’appareil avec de l'eau ou un
produit nettoyant. Du liquide risque d’entrer en contact avec les
composants électriques et de causer un court-circuit ou une décharge
électrique. N'utilisez pas l'appareil si le cordon d'alimentation est abîmé
ou a été modifié.
AVIS : Avant d'utiliser cet appareil, nettoyez-le comme décrit à la
AVIS : Laisser refroidir la vitrine pendant une trentaine de
AVIS : Les aliments doivent être préparés et placés dans les
AVIS : Surveillez de près la température des aliments pour
Capacité de l'étagère du bas
Le poids doit être uniformément réparti sur l'étagère du bas.
Utilisation de la vitrine pour des plats
préparés froids
1. Placez l'interrupteur d'alimentation en position Marche.
2. Placez l'interrupteur des lampes en position Marche si vous
section NETTOYAGE de ce document.
minutes avant d'y placer des aliments.
vitrines aux températures correctes de service. Cet
appareil n'est pas destiné au refroidissement ou à la
réfrigération d'aliments. Vérifiez régulièrement la
température des aliments.
maintenir la sécurité des aliments. Les services d'hygiène
publique des États-Unis préconisent le maintien des
aliments chauds à (140 ºF (60 ºC) minimum pour éviter la
prolifération des bactéries.
Modèles 36" Modèles 48" Modèles 60"
40 lbs.
(18,1 Kg)
souhaitez les allumer.
48 lbs.
(21,7 Kg)
55 lbs.
(24,9 Kg)
Mise sous tension du contrôleur
Appuyez sur le bouton multifonction pendant trois secondes. Lorsque
l'affichage indique une température, le contrôleur est en marche et
réfrigère.
Réglage de la température
1. Appuyez sur le bouton de réglage pendant deux secondes. Le
contrôleur est désormais sous tension. La température programmée
clignote sur l'affichage.
2. Pour ajuster la température, appuyez sur la flèche vers le haut pour
monter la température ou sur la flèche vers le bas pour la baisser.
3. Appuyez sur le bouton de réglage. L'affichage numérique est
constant, indiquant la température actuelle.
4. L'appareil fonctionne désormais à la température de consigne.
5. Laisser refroidir la vitrine pendant une trentaine de minutes avant d'y
placer des aliments.
Fonction de chauffage de la vitre (dégivrage)
1. Placez l'interrupteur de chauffage de la vitre en position Marche.
2. Une fois la vitre dégivrée, mettez l'interrupteur de chauffage de la
vitre en position Arrêt.
Fonction de dégivrage de la vitrine
1. Appuyez sur le bouton multifonction pendant trois secondes. Le
cycle de dégivrage commence et le voyant de dégivrage clignote.
Le cycle de dégivrage prend deux heures environ.
2. Pour l'arrêter manuellement, appuyez sur le bouton multifonction
pendant trois secondes. Le cycle de dégivrage s'arrête.
Utilisation de la vitrine non réfrigérée
(température ambiante)
1. Mettez le contrôleur hors tension.
2. Appuyez sur le bouton multifonction pendant trois secondes.
Lorsque « OFF » clignote sur l'affichage numérique, le contrôleur est
arrêté et ne réfrigère pas. L'appareil peut être utilisé comme vitrine à
température ambiante.
Vitrines réfrigérées Manuel d'utilisation 3
Page 8
Pour maintenir l’apparence et augmenter la durée de service, nettoyez
NETTOYAGE
chaque jour l'appareil.
1. Débranchez l'appareil.
2. À l'aide d'un chiffon humide ou d'une éponge trempée dans de l'eau
savonneuse, nettoyez l'appareil ; rincez et essuyez bien.
AVERTISSEMENT
Risque d'électrocution
Empêchez toute infiltration d'eau et d'autres liquides dans
l'appareil. L'infiltration de liquide dans l'appareil risque de
causer une électrocution.
3. Un nettoyant pour vitres non toxique de haute qualité peut être
utilisé pour nettoyer les vitres de l'appareil.
4. Enlevez périodiquement le panneau arrière et nettoyez les ailettes
des serpentins avec une brosse à soies raides.
Ne vaporisez pas les commandes ou l’appareil avec de l'eau ou un
produit nettoyant. Du liquide risque d’entrer en contact avec les
composants électriques et de causer un court-circuit ou une décharge
ENTRETIEN PRÉVENTIF
électrique. N'utilisez pas l'appareil si le cordon d'alimentation est abîmé
ou a été modifié.
AVIS : N'utilisez pas de produits nettoyants contenant des
produits chimiques agressifs, des acides ou des produits
qui contiennent du chlore.
Demandez à une personne qualifiée de nettoyer les serpentins du
condenseur, l'évaporateur et les ventilateurs deux fois par an ou si
nécessaire.
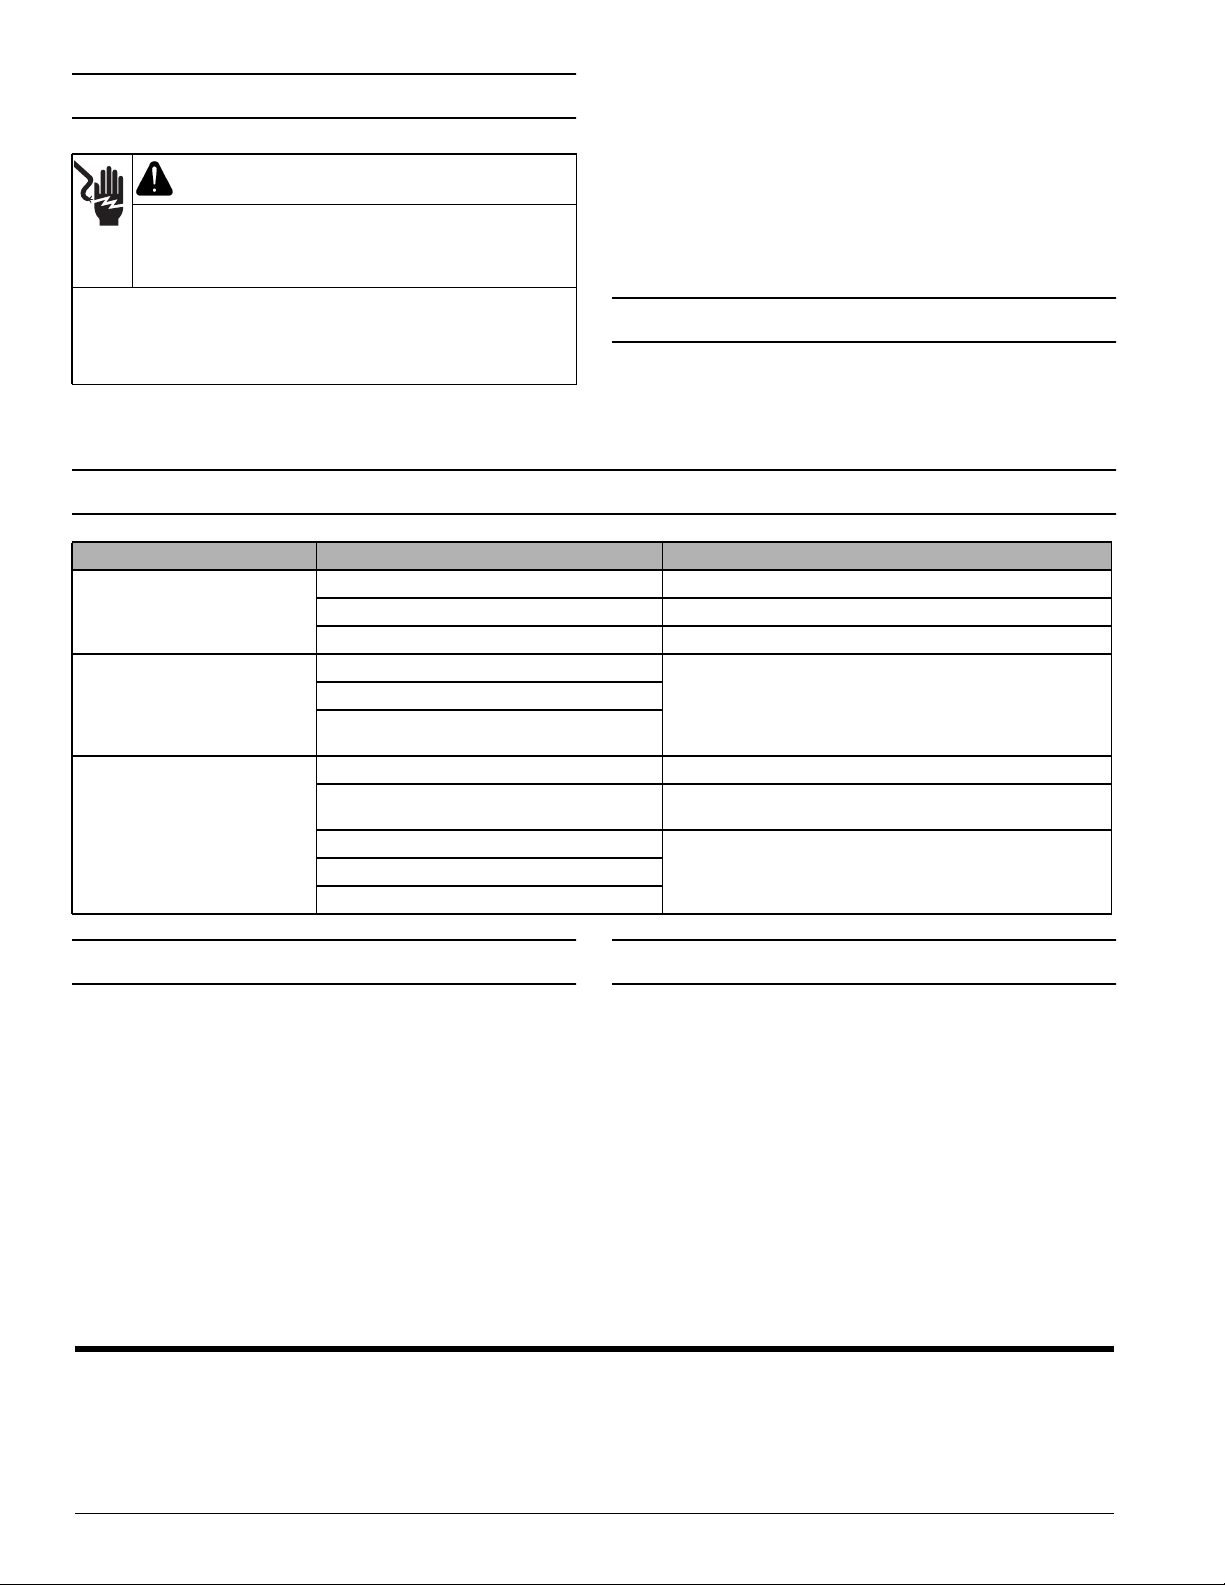
DÉPANNAGE
Problème Cause possible Mesure corrective
Prise électrique défectueuse. Faites remplacer la prise par une personne qualifiée.
L'appareil n'est pas alimenté.
Le compresseur ne fonctionne
pas.
Le compresseur fonctionne, la
température intérieure est trop
élevée.
Le disjoncteur a sauté. Réarmez le disjoncteur.
Compresseur en cycle « retard ». Attendez (deux minutes) la mise en marche du compresseur.
Contrôleur défectueux.
Compresseur défectueux.
Faites réparer l'appareil par une personne qualifiée.
Démarreur du compresseur ou condensateur
défectueux.
Température ambiante trop élevée. Baissez la température ambiante.
Accumulation excessive de glace/givre sur
l'évaporateur.
Utilisez la fonction de dégivrage manuel.
Contrôleur défectueux.
Utilisez la fonction de dégivrage manuel.Ventilateur du condenseur sale ou défectueux.
Ventilateur de l'évaporateur sale ou défectueux.
SAV ET RÉPARATIONS
Des pièces détachées sont disponibles sur Vollrath.com.
Pour éviter toute blessure grave ou tout dommage sévère, n’essayez
jamais de réparer l'appareil ou de remplacer vous-même un cordon
d’alimentation endommagé. N’envoyez aucun appareil directement à
la Vollrath Company LLC. Pour des instructions, contactez les services
techniques de Vollrath.
Lorsque vous contacterez les services techniques de Vollrath, tenezvous prêt à fournir le numéro d'article, le numéro de modèle (s'il y a
lieu),
le numéro de série et le justificatif d’achat indiquant la date d’achat de
l’appareil.
The Vollrath Company, L.L.C. Headquarters
1236 North 18th Street
Sheboygan, Wisconsin
53081-3201 USA
Main Tel: 800-624-2051 or 920-457-4851
Main Fax: 800-752-5620 or 920-459-6573
Canada Customer Service: 800-695-8560
Tech Services: techservicereps@vollrathco.com
www.vollrath.com
Vollrath Europe BV
Beneluxbaan 7
5121 AD RIJEN
The Netherlands
+31161870005
©
GARANTIE DE THE VOLLRATH CO. L.L.C.
Cette garantie ne s'applique pas aux produits achetés pour un usage
personnel, familial ou ménager, et The Vollrath Company LLC ne
propose aucune garantie écrite aux acheteurs pour de telles utilisations.
The Vollrath Company L.L.C. garantit que les produits qu'elle fabrique
et distribue seront dépourvus de vices de matériaux et de malfaçons,
comme indiqué dans notre déclaration complète de garantie. Dans tous
les cas, la garantie entre en vigueur à la date d'achat par l'utilisateur
initial indiquée sur le reçu. Tous les dommages subis lors d’une
utilisation impropre ou abusive, ou résultant d’une modification ou d'un
emballage inadapté lors d’un renvoi du produit pour une réparation
sous garantie ne seront pas couverts par la garantie.
Pour des informations complètes sur la garantie, l'enregistrement des
produits et l'annonce de nouveaux produits, consultez
www.vollrath.com.
Vollrath of China
Vollrath Shanghai Trading Limited
23A, Time Square Plaza | 500
Zhang Yang Road
Pudong, Shanghai 200122
Tel: 86-21-50589580
2016 The Vollrath Company L.L.C. Num d’art. 2350087-1 ml 6/27/16
Vollrath de Mexico S. de R.L. de C.V.
Periferico Sur No. 7980 Edificio 4-E
Col. Santa Maria Tequepexpan
45600 Tlaquepaque, Jalisco | Mexico
Tel: (52) 333-133-6767
Tel: (52) 333-133-6769
Fax: (52) 333-133-6768
Page 9

Gracias por comprar este equipo Vollrath. Antes de usar el equipo, lea y
familiarícese con las siguientes instrucciones de operación y seguridad.
CONSERVE ESTAS INSTRUCCIONES COMO REFERENCIA PARA EL
FUTURO. Conserve la caja y embalado originales. Deberá utilizarlos
para devolver el equipo en caso de que requiera reparaciones.
PRECAUCIONES DE SEGURIDAD
Para garantizar una operación segura, lea las siguientes afirmaciones y
comprenda su significado. Este manual contiene precauciones de
seguridad que se explican a continuación. Léalas atentamente.
ADVERTENCIA
Advertencia se usa para indicar la presencia de un peligro que
provocará o puede provocar lesiones graves o letales.
Manual del operador
Vitrinas refrigeradas
Vitrina curva
Vitrina empotrada
PRECAUCIÓN
Precaución se usa para indicar la presencia de un peligro que provocará
o puede provocar lesiones leves o importantes si se ignora el aviso.
AVISO: Aviso se usa para señalar información importante no
relacionada con peligros.
Para disminuir el riesgo de lesiones personales o daños al
equipo:
• Enchúfelo sólo en tomacorrientes con puesta a tierra cuyo voltaje
nominal sea el indicado en la placa identificatoria.
• Haga que personal calificado instale el equipo en cumplimento con
los códigos y ordenanzas locales.
• Use el equipo en posición plana y nivelada.
• No use un cable de extensión con este equipo. No enchufe este
equipo en una regleta eléctrica ni cable de múltiples tomas.
• Desenchufe el equipo y apáguelo antes de limpiarlo o moverlo.
• No rocíe con líquidos ni agentes de limpieza los controles ni la parte
externa del equipo.
• No lo limpie con lana de acero.
• Mantenga el equipo y el cable eléctrico lejos de llamas expuestas,
quemadores eléctricos o calor excesivo.
• No deje el equipo operando solo.
• No opere el equipo en áreas públicas ni cerca de los niños.
• No opere el equipo si se ha dañado o si funciona defectuosamente
de algún modo.
Inscriba su producto en Vollrath.com
©
Vitrina curva para autoservicio
Num. art. Modelo Descripción Voltaje A HP Hz Enchufe
40842 RDE7136
40843 RDE7148 48" 4,2
40844 RDE7160 60" 4,4
4084205 RDE1136 36"
4084305 RDE1148 48"
4084405 RDE1160 60"
40852 RDE8136
40853 RDE8148 48" 4,6
40854 RDE8160 60" 4,9
4085205 RDE1236 36"
4085305 RDE1248 48" 3,1
4085405 RDE1260 60" 3,3
40862 RDE8236
40863 RDE8248 48" 5,0
40864 RDE8260 60" 6,0 ¹⁄₃
4086205 RDE1336 36"
4086305 RDE1348 48" 3,3
4086405 RDE1360
40880 RDE8336
40881 RDE8348 48" 7,4
40882 RDE8360 60" 8,1
4088005 RDE1436 36"
4088105 RDE1448 48" 5,2
4088205 RDE1460 60" 5,4
40886 RDE8436
40887 RDE8448 48" 7,6
40889 RDE8460 60" 8,2
4088605 RDE1536 36"
4088705 RDE1548 48" 4,8
4088905 RDE1560 60" 5,0
*La vitrina tiene una entrada IEC. Se despacha con tres cables eléctricos, cada uno
con enchufe para el Reino Unido, Schuko o China.
2016 The Vollrath Company L.L.C. Num. pieza 2350087-1 ml 6/27/16
Empotrada
Curva para
mostrador
Cúbica para
mostrador
Curva de
autoservicio
para
mostrador
Cúbica de
autoservicio
para
mostrador
36"
120
220-240
36"
120
220-240
36"
120
220-240
60"
36"
120
220-240
36"
120
220-240
Vitrina cúbica
3,4 Z\b
60
¹⁄₄
2,2 ³⁄₈
2,8 ¹⁄₂
3,6 Z\b
2,6 ³⁄₈
3,9
2,8 ³⁄₈
3,7
4,2 Z\v
3,4 ¹⁄₄
4,3 Z\v
3,9 ³⁄₈
50/60
60
¹⁄₄
50/60
¹⁄₂
Z\v
60
50/60
¹⁄₂
60
¹⁄₃
50/60
¹⁄₃
60
¹⁄₃
50/60
¹⁄₃
NEMA
5-15P
RU/
Schuko/
China*
NEMA
5-15P
RU/
Schuko/
China*
NEMA
5-15P
RU/
Schuko/
China*
NEMA
5-15P
RU/
Schuko/
China*
NEMA
5-15P
RU/
Schuko/
China*
Page 10
FUNCIÓN Y PROPÓSITO
Este equipo está diseñado para la exhibición iluminada de alimentos a
temperaturas entre 32 °F (0 °C) y 68 °F (20 °C). Este equipo está
diseñado y tiene el propósito de mantener los alimentos enfriados a
temperatura de servicio adecuada mientras son exhibidos para la venta.
Los alimentos deben prepararse y colocarse en las vitrinas a
temperaturas de servicio apropiadas. Las vitrinas no están diseñadas ni
tienen el propósito de enfriar ni helar la comida. No tienen el propósito
de almacenar alimentos perecederos durante la noche. No están
diseñadas para uso doméstico, industrial ni de laboratorio.
DESEMBALADO DEL EQUIPO
Si la unidad ha sido transportada en una posición no vertical deje pasar
al menos una hora antes de hacerla funcionar.
1. Retire del equipo todo el material y cinta de embalado, así como el
plástico protector.
2. Retire los pernos que afianzan el equipo a la tarima.
3. Elimine todo residuo adhesivo que haya quedado del plástico o la
cinta.
4. Limpie el equipo antes de usarlo. Consulte el procedimiento de
limpieza en este documento.
INSTALACIÓN DEL MODELO PARA MOSTRADOR
Requisitos de espacio
• Las vitrinas de mostrador requieren un mínimo de 4” (10,2 cm) entre
el equipo y toda pared circundante. Las paredes circundantes deben
estar hechas de materiales incombustibles.
Instalación
1. Coloque el equipo en una superficie plana y estable.
2. Enchufe el equipo en un suministro eléctrico correctamente puesto a
tierra cuyo voltaje nominal corresponda al indicado en la placa
identificatoria. El equipo puede resultar dañado si recibe suministro
eléctrico incorrecto.
AVISO: Usar un voltaje distinto del indicado en la placa
identificatoria dañará la unidad. Usar un voltaje
incorrecto, o modificar el cable eléctrico o los
componentes electrónicos puede dañar la unidad e
invalidará la garantía.
3. Una vez finalizada la instalación los cables delgados del respiradero
en la parte superior de los paneles de vidrio laterales pueden
recortarse y engarzarse cerrados.
INSTALACIÓN DEL MODELO EMPOTRADO
Espacio, corte y ventilación
4"
(10.2)
6" (15,2)
A
19
(48,2)
Preferido
Alternativo
• Las vitrinas empotradas requieren un mínimo de 4” (10,2 cm) de
mostrador incombustible para soportar la unidad y un mínimo de
6” (15,2 cm) de espacio en todos los lados del empotrado para la
circulación correcta del aire.
• La vitrina empotrada requiere un mínimo de 80 pulgadas cuadradas
para la entrada de aire fresco y un mínimo de 80 pulgadas
cuadradas para la salida. Las celosías proporcionadas por el cliente
deben instalarse en el armario circundante para garantizar una
ventilación adecuada. Se requiere una celosía de entrada y otra de
descarga. La ubicación preferida de la celosía son los extremos
cortos del armario.
6" (15,2)
lado del cliente
6" (15,2)
Alternativo
6" (15.2)
4"
(10,2)
4"
(10,2)
Preferido
4"
(10,2)
Instalación
1. Escoja un mostrador plano y nivelado para la superficie de montaje.
2. Mida el área para el corte. Consulte el diagrama de arriba.
Vitrina A
36" 34" (86,3 cm)
48" 45" (114,3 cm)
60" 58" (147,3 cm)
3. Selle la base de la unidad en el mostrador con sello de silicona apto
para alimentos.
4. Enchufe el equipo en un suministro eléctrico correctamente puesto a
tierra cuyo voltaje nominal corresponda al indicado en la placa
identificatoria. El equipo puede resultar dañado si recibe suministro
eléctrico incorrecto.
AVISO: Usar un voltaje distinto del indicado en la placa
5. Una vez finalizada la instalación los cables delgados del respiradero
en la parte superior de los paneles de vidrio laterales pueden
recortarse y engarzarse cerrados.
identificatoria dañará la unidad. Usar un voltaje
incorrecto, o modificar el cable eléctrico o los
componentes electrónicos puede dañar la unidad e
invalidará la garantía.
2 Manual del operador de vitrinas refrigeradas
Page 11

CARACTERÍSTICAS Y CONTROLES
G
H
V
000
F
B
I
7
set
A Interruptor principal. Interruptor iluminado para encender y
C
E
D
A
apagar el equipo.
B Interruptor de iluminación. Enciende o apaga las luces.
C Botón de múltiples funciones. Según el modo, este botón
enciende o apaga el controlador o aumenta la temperatura.
D Botón de múltiples funciones. Según el modo, este botón
activa la función de descongelación o disminuye la temperatura.
E Botón Set (Fijar). Enciende o apaga el modo de ajuste de
temperatura.
F Pantalla. Muestra la temperatura actual o la que se esté
programando.
G Luz de ciclo del compresor. Se ilumina en forma continua
cuando el compresor está funcionando. Destella cuando el
compresor está en el ciclo de retardo, esto dura unos dos
minutos y forma parte del ciclo de funcionamiento normal del
compresor.
H Luz de descongelación. Destella cuando el equipo está en el
modo de descongelación.
I Interruptor del calentador del vidrio. Disponible en vitrinas
para mostrador con acceso lateral del operador solamente. No
disponible en vitrinas empotradas ni vitrinas con acceso lateral
del operador (autoservicio). Enciende y apaga la descongelación
del vidrio.
OPERACIÓN
ADVERTENCIA
Evite el peligro de descarga eléctrica
Evite que ingrese agua o cualquier otro tipo de líquido al
interior del equipo, ya que ello podría causar una descarga
eléctrica.
No rocíe con agua ni agentes de limpieza la unidad ni los controles. El
líquido podría hacer contacto con los componentes eléctricos y causar
un cortocircuito o una descarga eléctrica. No use la unidad si el cable
eléctrico está dañado o se ha modificado.
AVISO: Antes de usar este equipo, límpielo tal como se describe
AVISO: Deje que la vitrina se enfríe aproximadamente 30 minutos
AVISO: Los alimentos deben prepararse y colocarse en las vitrinas
AVISO: Supervise estrechamente la temperatura de los alimentos
Capacidad de peso de la repisa inferior
El peso debe distribuirse uniformemente sobre la repisa inferior.
en la sección LIMPIEZA de este documento.
antes de colocar los alimentos en su interior.
a temperaturas de servicio apropiadas. Este equipo no
está diseñado ni tiene el propósito de enfriar ni helar la
comida. Revise regularmente la temperatura de los
alimentos.
para mantenerlos seguros. El Servicio de Salud Pública de
los Estados Unidos (United States Public Health Service)
recomienda mantener los alimentos a un mínimo de 140 ºF
(60 ºC) para prevenir el crecimiento de bacterias.
Modelos 36" Modelos 48" Modelos 60"
40 lbs.
(18,1 Kg)
48 lbs.
(21,7 Kg)
55 lbs.
(24,9 Kg)
Encienda el controlador
Mantenga pulsado el botón de múltiples funciones durante tres
segundos. Cuando la pantalla muestre una temperatura, el controlador
se encenderá y refrigerará.
Fije la temperatura
1. Mantenga pulsado el botón Set (Fijar) durante dos segundos. Ahora
el controlador está encendido. La pantalla destella la temperatura
programada.
2. Para ajustar la temperatura, pulse el botón de hacia ascendente fin
de aumentarla, u oprima el botón de hacia abajo para disminuirla.
3. Pulse el botón Set (Fijar). El número exhibido es constante, y
muestra la temperatura actual.
4. Ahora la unidad funcionará a la temperatura fijada.
5. Deje que la vitrina se enfríe aproximadamente 30 minutos antes de
colocar los alimentos en su interior.
Función del calentador del vidrio (descongelación)
1. Coloque el interruptor del calentador del vidrio en la posición de
encendido (ON).
2. Una vez que el vidrio se haya descongelado, coloque el interruptor
de descongelación en la posición de apagado (OFF).
Función de descongelación de la vitrina
1. Mantenga pulsado el botón de múltiples funciones durante tres
segundos. Se iniciará el ciclo de descongelación y la luz de
descongelación destellará. El ciclo de descongelación tarda
aproximadamente dos horas.
2. Para detener manualmente el ciclo, mantenga pulsado el botón de
múltiples funciones durante tres segundos. Finalizará el ciclo de
descongelación.
Usos de la vitrina con alimentos preparados y fríos
1. Coloque el interruptor principal en la posición de encendido (ON).
2. Si lo desea coloque el interruptor de iluminación en la posición de
encendido (ON).
Manual del operador de vitrinas refrigeradas 3
Temp. ambiente, uso de la vitrina no enfriada
1. Gire el controlador al modo de apagado.
2. Mantenga pulsado el botón de múltiples funciones durante tres
segundos. Cuando la pantalla numérica destelle la palabra OFF,
el controlador estará en el modo de apagado y no refrigerará. La
unidad puede usarse para mostrar la temperatura ambiente.
Page 12

Para conservar su aspecto hermoso y prolongar su vida útil, limpie
LIMPIEZA
diariamente el equipo.
1. Desenchúfelo.
2. Use un paño húmedo o esponja sumergida en agua jabonosa para
limpiarlo; enjuáguelo y séquelo completamente.
ADVERTENCIA
Evite el peligro de descarga eléctrica
Evite que ingrese agua o cualquier otro tipo de líquido al
interior del equipo, ya que ello podría causar una descarga
eléctrica.
3. Se puede usar un limpiavidrios de alta calidad no tóxico para limpiar
los componentes de vidrio de la unidad.
4. Retire periódicamente el panel posterior y limpie las aletas de las
bobinas con un cepillo duro.
No rocíe con agua ni agentes de limpieza la unidad ni los controles. El
líquido podría hacer contacto con los componentes eléctricos y causar
un cortocircuito o una descarga eléctrica. No use la unidad si el cable
MANTENIMIENTO PREVENTIVO
eléctrico está dañado o se ha modificado.
Haga que una persona calificada limpie las bobinas del condensador, el
AVISO: No use productos de limpieza que contengan sustancias
evaporador y los ventiladores dos veces al año o según sea necesario.
químicas fuertes, ácidos ni cloro.
SOLUCIÓN DE PROBLEMAS
Problema Podría deberse a Solución
Tomacorriente defectuoso. Haga que personal calificado reemplace el tomacorriente.
Equipo sin suministro.
El compresor no funciona.
El compresor funciona, la temperatura
interna es demasiado caliente.
Cortacircuito disyuntado. Reinícielo.
Compresor en ciclo de “retardo”. Espere dos minutos para que funcione.
Controlador defectuoso.
Compresor defectuoso.
Haga que personal calificado repare el equipo.
Arrancador o condensador del
compresor defectuoso.
Temperatura ambiente muy alta. Disminúyala.
Exceso de escarcha/hielo acumulado
en el evaporador.
Use la función de descongelación manual.
Controlador defectuoso.
Ventilador del condensador sucio o
defectuoso.
Use la función de descongelación manual.
Ventilador del evaporador sucio o
defectuoso.
SERVICIO Y REPARACIÓN
En Vollrath.com encontrará las piezas que puedan ser reparadas.
Para evitar lesiones o daños materiales graves, no trate de reparar la
unidad ni reemplazar un cable eléctrico por su cuenta. No envíe las
unidades directamente a The Vollrath Company LLC. Pida instrucciones
a los Servicios de asistencia técnica de Vollrath.
Al comunicarse con los servicios, esté listo para proporcionar el
número de artículo, número de modelo (si corresponde), número de
serie y el comprobante de compra que muestre la fecha en que adquirió
la unidad.
The Vollrath Company, L.L.C. Headquarters
1236 North 18th Street
Sheboygan, Wisconsin
53081-3201 USA
Main Tel: 800-624-2051 or 920-457-4851
Main Fax: 800-752-5620 or 920-459-6573
Canada Customer Service: 800-695-8560
Tech Services: techservicereps@vollrathco.com
www.vollrath.com
Vollrath Europe BV
Beneluxbaan 7
5121 AD RIJEN
The Netherlands
+31161870005
©
2016 The Vollrath Company L.L.C. Num. pieza 2350087-1 ml 6/27/16
CLÁUSULA DE GARANTÍA DE THE VOLLRATH CO. L.L.C.
Esta garantía no se aplica a los productos adquiridos para uso
personal, familiar ni doméstico, y The Vollrath Company LLC no ofrece
una garantía por escrito a los compradores para dichos usos.
The Vollrath Company LLC garantiza los productos que fabrica o
distribuye contra defectos en materiales y fabricación, según se
especifica en nuestra cláusula de garantía completa. En todos los
casos, la garantía rige desde la fecha de compra original del usuario
final que aparece en el recibo. La garantía no cubrirá ningún daño que
resulte del uso indebido, abuso, modificación o daños causados por el
embalado incorrecto durante la devolución para obtener servicio de
reparación dentro del período de vigencia de la garantía.
Para obtener información de garantía, inscripción de productos y
anuncios de productos nuevos, visite www.vollrath.com.
Vollrath of China
Vollrath Shanghai Trading Limited
23A, Time Square Plaza | 500
Zhang Yang Road
Pudong, Shanghai 200122
Tel: 86-21-50589580
Vollrath de Mexico S. de R.L. de C.V.
Periferico Sur No. 7980 Edificio 4-E
Col. Santa Maria Tequepexpan
45600 Tlaquepaque, Jalisco | Mexico
Tel: (52) 333-133-6767
Tel: (52) 333-133-6769
Fax: (52) 333-133-6768
 Loading...