

Page 1
Operator’s Manual
English, Spanish, French, Italian, German
Countertop Mixer
Floor/Bench Mixers
Item Model Description Voltage HP Amp Hz Plug
40755 MIX1007 7 Quart Countertop Mixer 110V-120V 1/3 6 60 5-15P
4075503 MIX1007CE 7 Quart Countertop Mixer 220-230V 1/3 3 50 UK-15P (BS546)
4075502 MIX1007CE 7 Quart Countertop Mixer 220-230V 1/3 3 50 Schuko CEE7-7
4075505 MIX1007CE 7 Quart Countertop Mixer 220-230V 1/3 3 50 AU2-15P
40756 MIX1010 10 Quart Countertop Mixer 110V-120V 1/3 6 60 5-15P
4075603 MIX1010CE 10 Quart Countertop Mixer 220-230V 1/3 3 50 UK-15P (BS546)
4075602 MIX1010CE 10 Quart Countertop Mixer 220-230V 1/3 3 50 Schuko CEE7-7
4075605 MIX1010CE 10 Quart Countertop Mixer 220-230V 1/3 3 50 AU2-15P
40757 MIX1020 20 Quart Bench Mixer 110V-120V 1/2 10 60 5-15P
4075703 MIX1020CE 20 Quart Bench Mixer 220-230V 1/2 4 50 UK-15P (BS546)
4075702 MIX1020CE 20 Quart Bench Mixer 220-230V 1/2 4 50 Schuko CEE7-7
4075705 MIX1020CE 20 Quart Bench Mixer 220-230V 1/2 4 50 AU2-15P
40758 MIX1030 30 Quart Floor Mixer 110V-120V 1 16 60 5-20P
4075803 MIX1030CE 30 Quart Floor Mixer 220-230V 1 8 50 UK-15P (BS546)
4075802 MIX1030CE 30 Quart Floor Mixer 220-230V 1 8 50 Schuko CEE7-7
4075805 MIX1030CE 30 Quart Floor Mixer 220-230V 1 8 50 AU2-15P
40759 MIX1040 40 Quart Floor Mixer 208-240V 1-1/2 12 60 6-15P
4075903 MIX1040CE 40 Quart Floor Mixer 220-230V 1-1/2 11 50 UK-15P (BS546)
4075902 MIX1040CE 40 Quart Floor Mixer 220-230V 1-1/2 11 50 Schuko CEE7-7
4075905 MIX1040CE 40 Quart Floor Mixer 220-230V 1-1/2 11 50 AU2-15P
40760 MIX1060 60 Quart Floor Mixer 208-240V 2 16 60 6-20P
4076003 MIX1060CE 60 Quart Floor Mixer 220-230V 2 16 50 -4076002 MIX1060CE 60 Quart Floor Mixer 220-230V 2 16 50 Schuko CEE7-7
4076005 MIX1060CE 60 Quart Floor Mixer 220-230V 2 16 50 AU2-15P
ENGLISH
Thank you for purchasing this Vollrath Food Processing Equipment. Before operating the equipment, read and familiarize yourself with the
following operating and safety instructions. SAVE THESE INSTRUCTIONS FOR FUTURE REFERENCE. Save the original box and packaging.
Use this packaging to ship the equipment if repairs are needed.
Item No. 2350045-1 ml Rev 05/14
Page 2
saFety Precautions
Function and PurPose
To ensure safe operation, read the following statements and understand
their meaning. This manual contains safety precautions which are
explained below. Please read carefully.
WARNING
Warning is used to indicate the presence of a hazard that can cause
severe personal injury, death, or substantial property damage if the
warning is ignored.
CAUTION
Caution is used to indicate the presence of a hazard that will or can
cause minor personal injury or property damage if the caution is
ignored.
NOTE
Note is used to notify people of installation, operation, or maintenance
information that is important but not hazard-related.
For Your Safety!
These precautions should be followed at all times. Failure to follow
these precautions could result in injury to yourself and others or
damage the equipment.
To reduce risk of injury or damage to the equipment:
Plug only into grounded electrical outlets matching the nameplate rated
voltage.
Do not modify or tamper with safety switches.
Do not operate unattended.
ENGLISH
Do not operate equipment in public areas and/or around children.
Do not use an extension cord with this equipment. Do not plug this
equipment into a power strip or multi-outlet power cord.
For best results, Vollrath attachments are recommended.
Check equipment before each use to insure the equipment is clean.
Do not use a hose to clean mixer. Use a damp cloth to wipe down the
exterior of the mixer.
Wear proper apparel. Do not wear loose tting or hanging garments while
operating this equipment.
Have equipment installed by a qualied personnel in accordance with
local codes and ordinances.
Use equipment in a at, level position.
Unplug equipment, turn off and let it cool before cleaning or moving.
Do not spray controls or outside of equipment with liquids or cleaning
agents.
Do not clean the equipment with steel wool.
Keep equipment and power cord away from open ames, electric burners
or excessive heat.
Do not operate if equipment has been damaged or is malfunctioning in
any way.
Do not use the attachments on hub while mixing.
Intended for mixing batters, doughs, cake mix, etc. It is not intended for
household, industrial or laboratory use.
Features and controls
5
4
3
2
1
TIMER
ON/
SPEED
OFF
G
F
C
D
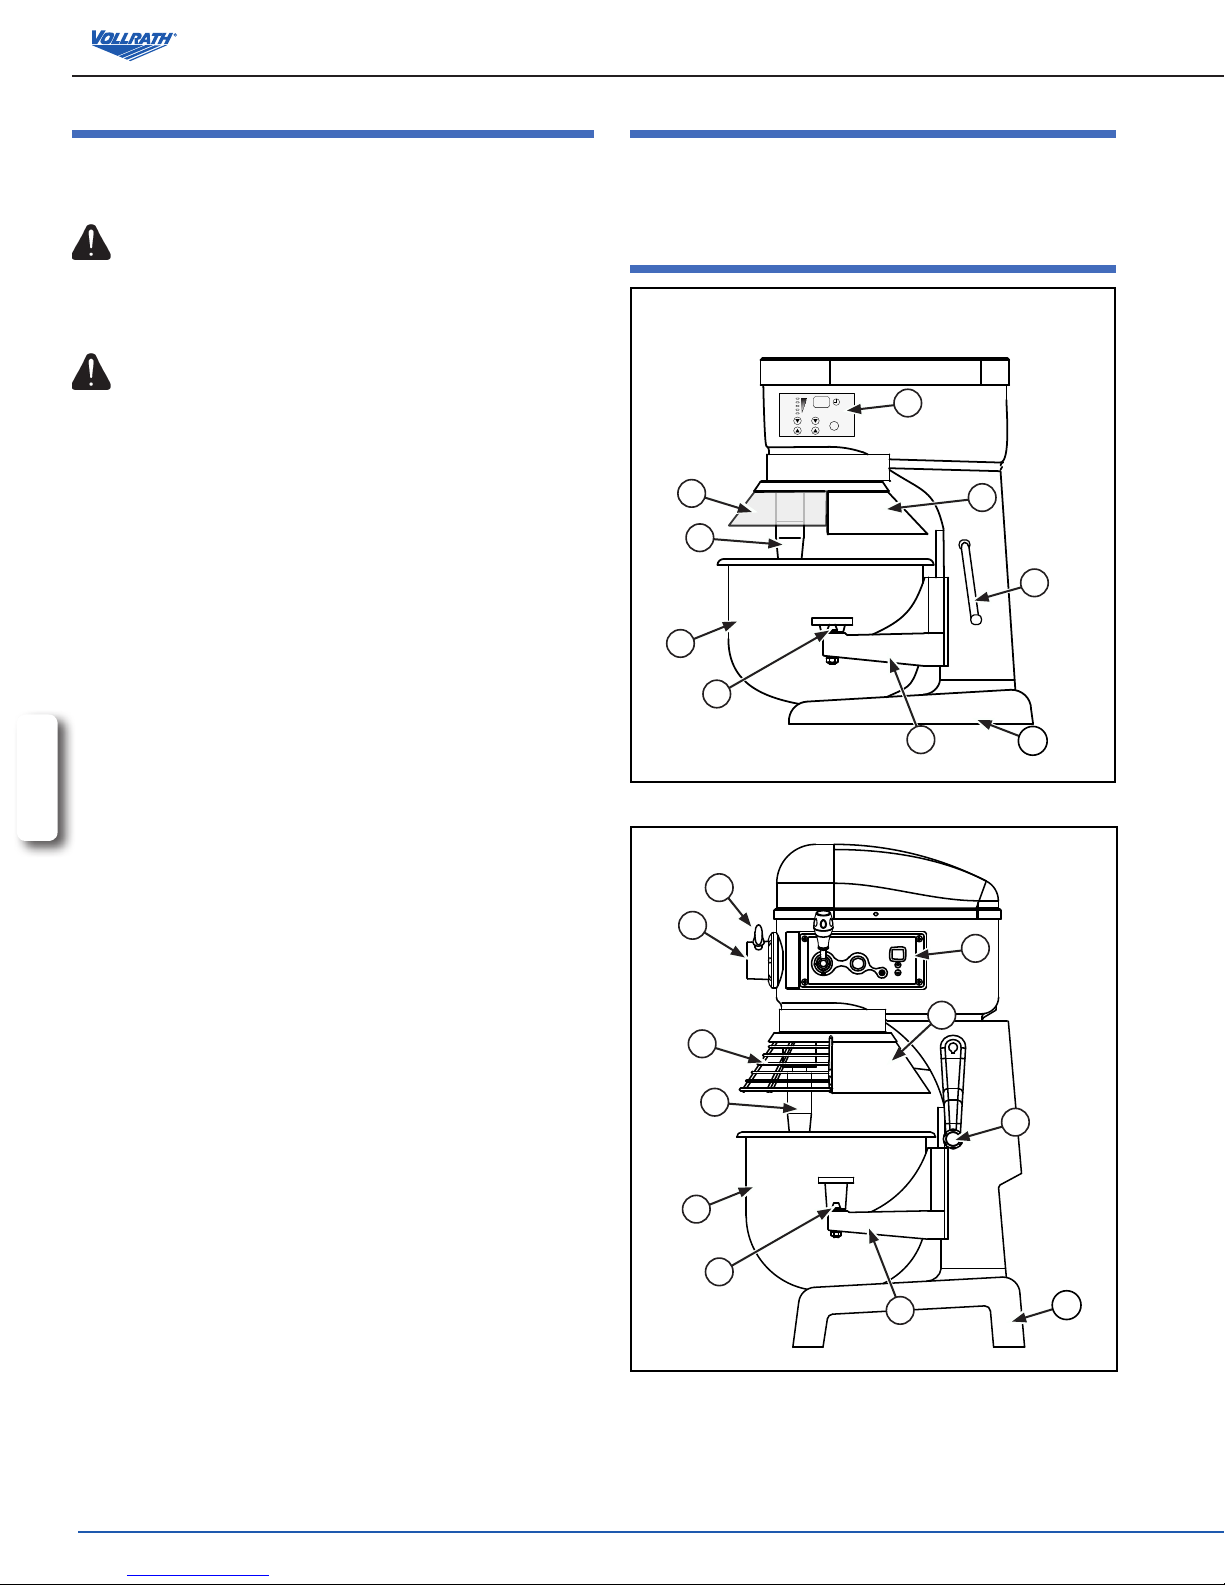
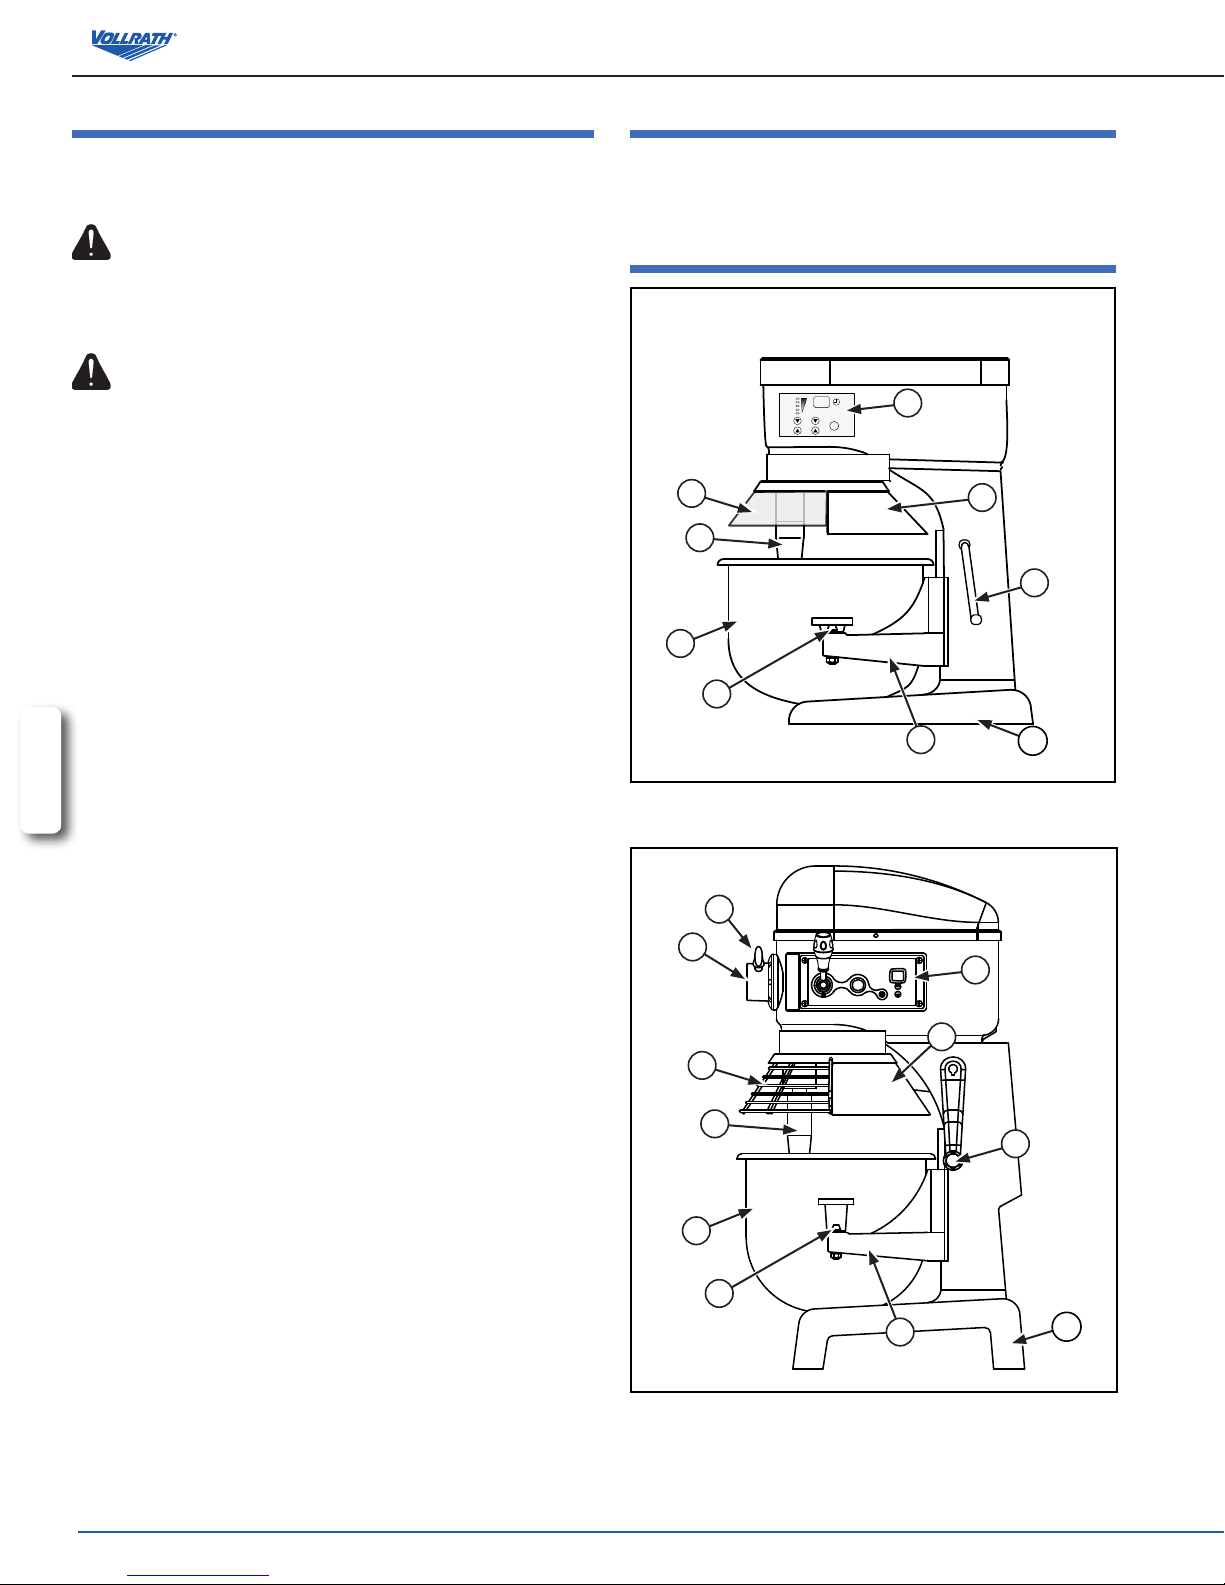
Figure 1. 7 Quart. and 10 Quart. Mixer, Features and Controls.
K
J
G
F
C
D
Figure 2. 20 Quart and 30 Quart Mixers, Features and Controls.
A
H
B
E
A
H
E
I
B
I
2
OperatOr’s Manual
Page 3
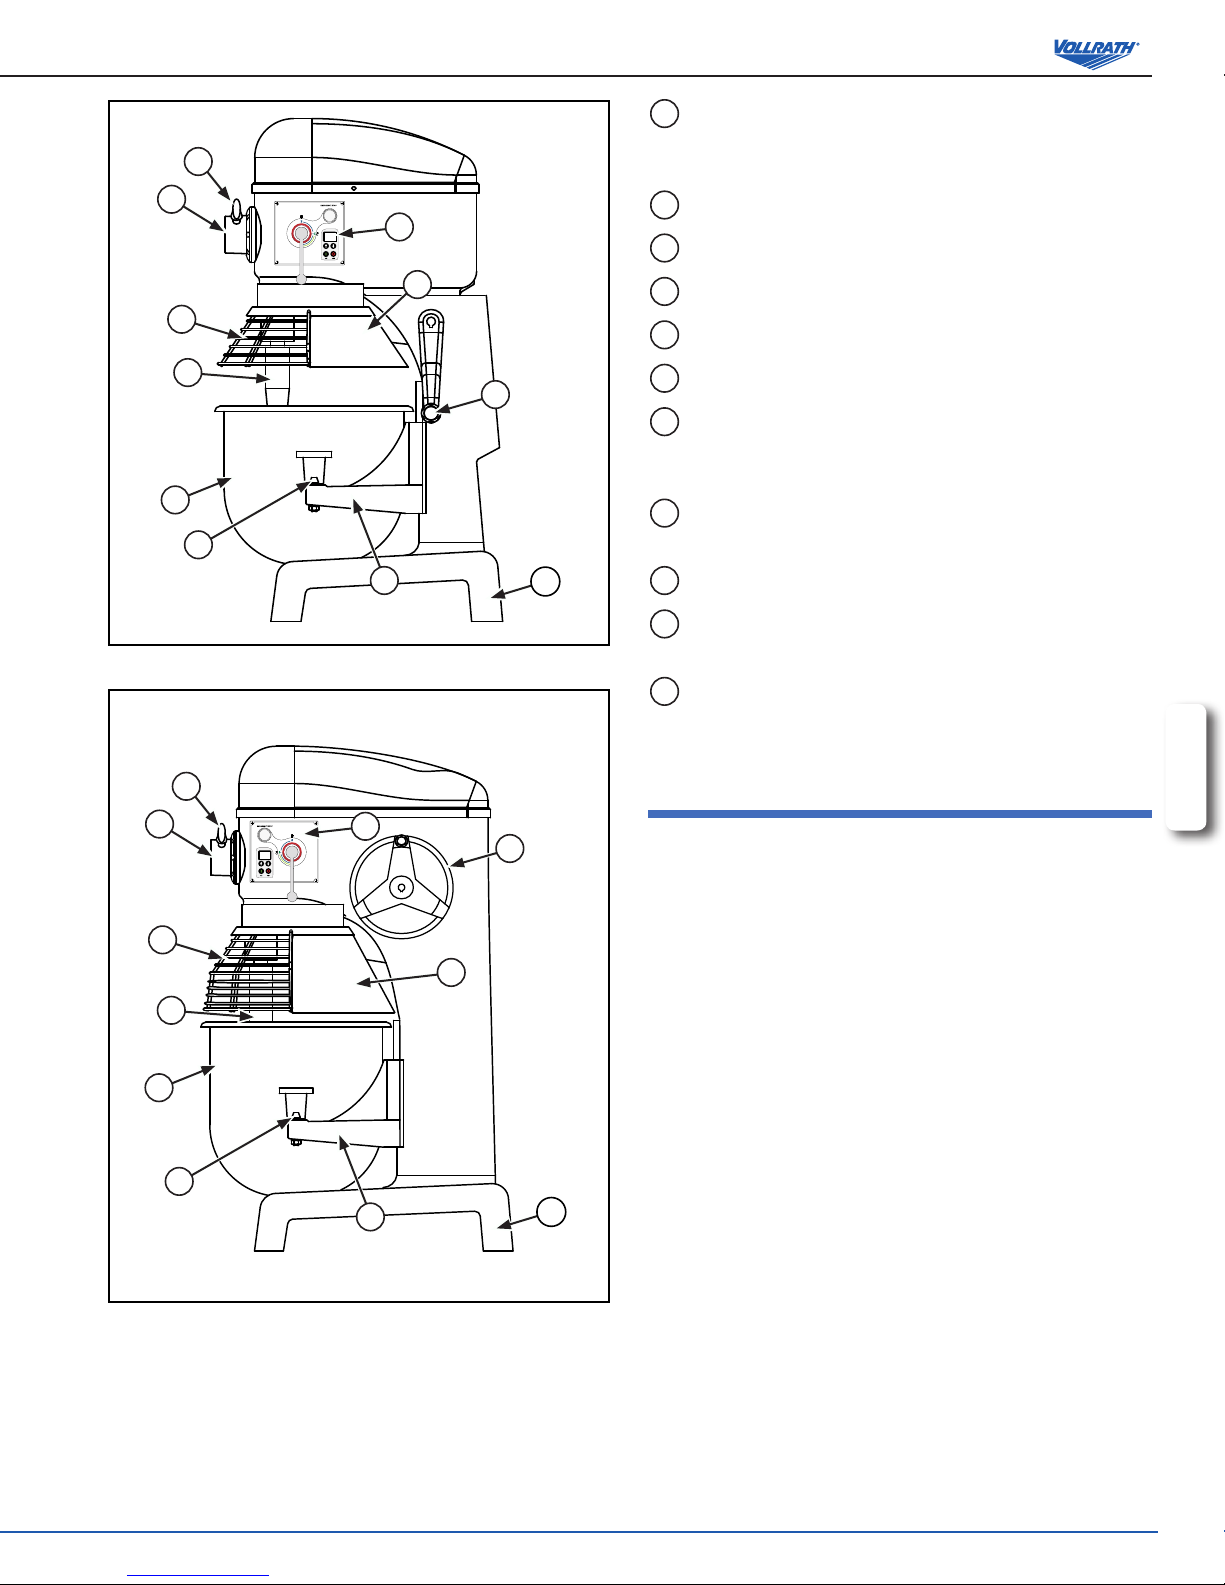
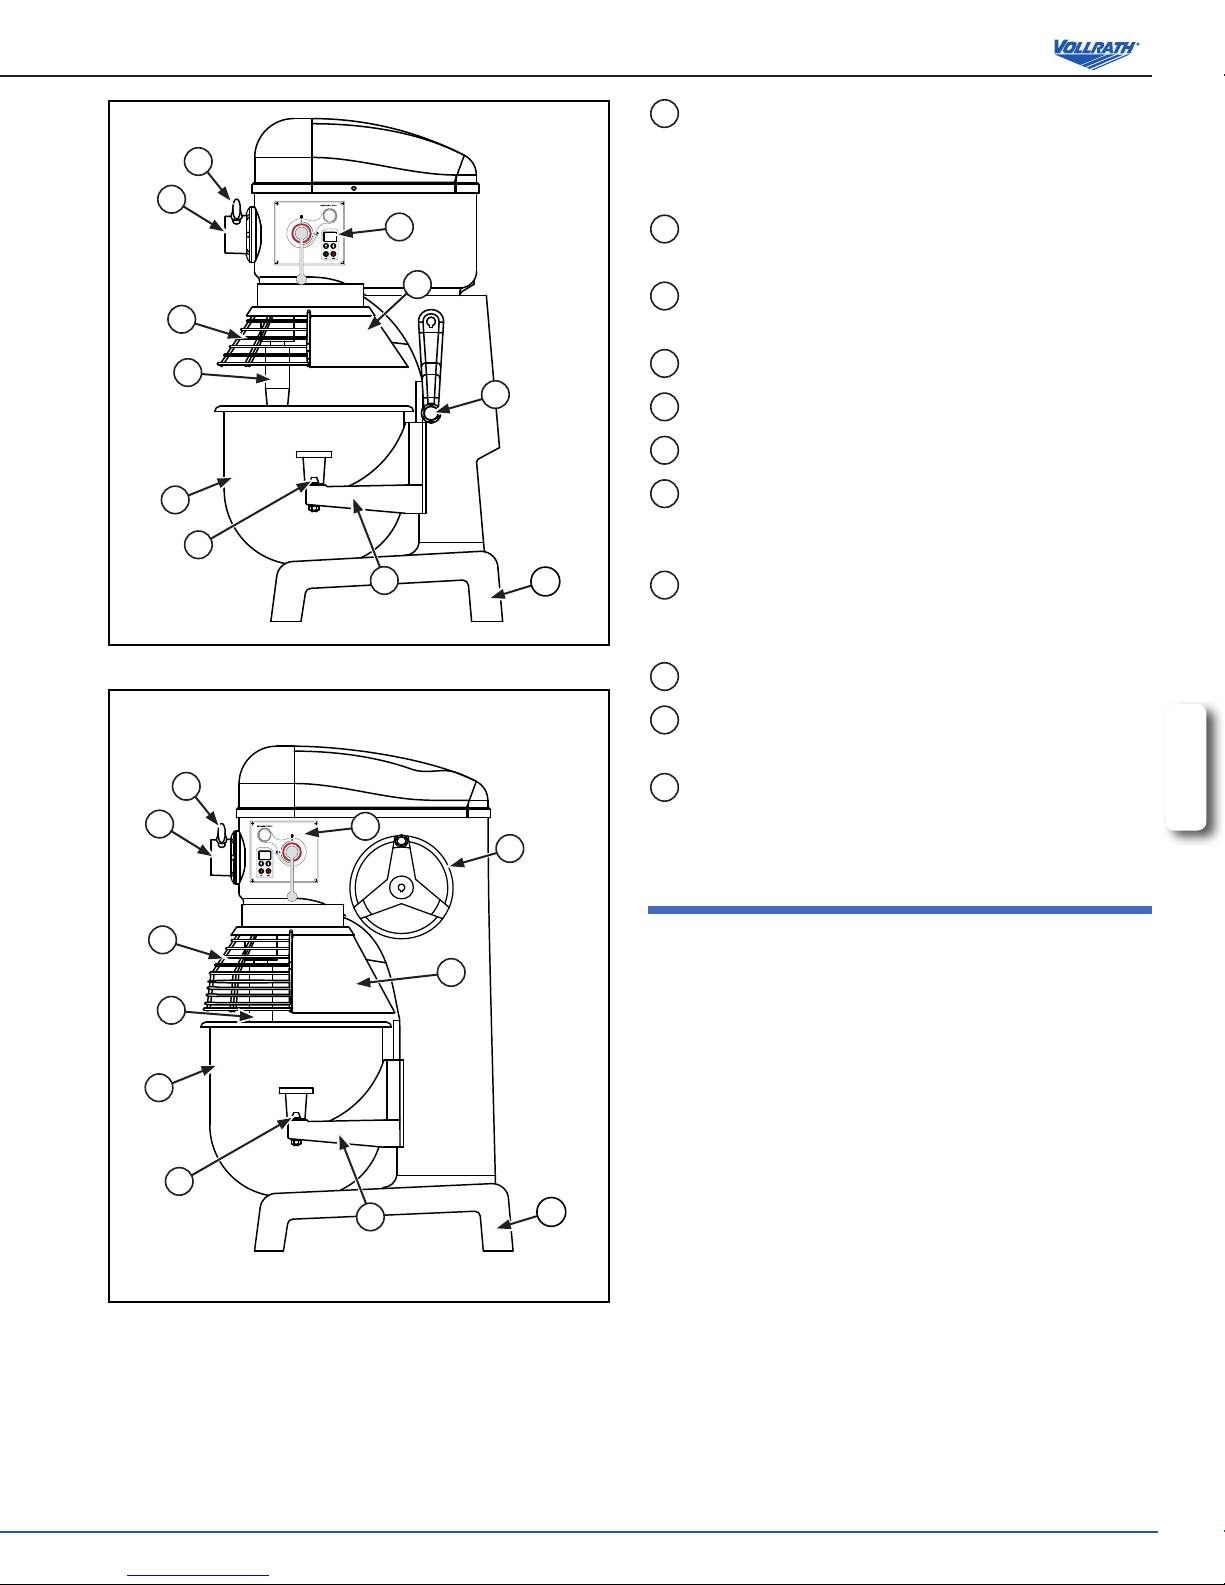
A
CONTROL PANEL. Includes the On/Off Button, Speed Control,
K
J
A
H
G
F
B
Timer Controls, Timer Display and Emergency Stop (some
models).
B
BOWL LIFT. Used to lower and raise the bowl cradle.
C
BOWL. Holds the food product mixing contents.
D
BOWL CLAMP. Secures the bowl to the bowl cradle.
E
BOWL CRADLE. Holds the bowl.
F
MIXING SHAFT. Holds the mixing attachment.
G
BOWL GUARD. Helps prevent injury or contact with mixing
shaft or attachment. This guard needs to be closed for
operation.
C
D
H
SPLASH GUARD. Helps prevent spillage of mixing contents.
Helps prevent injury or contact with mixing shaft or attachment.
E
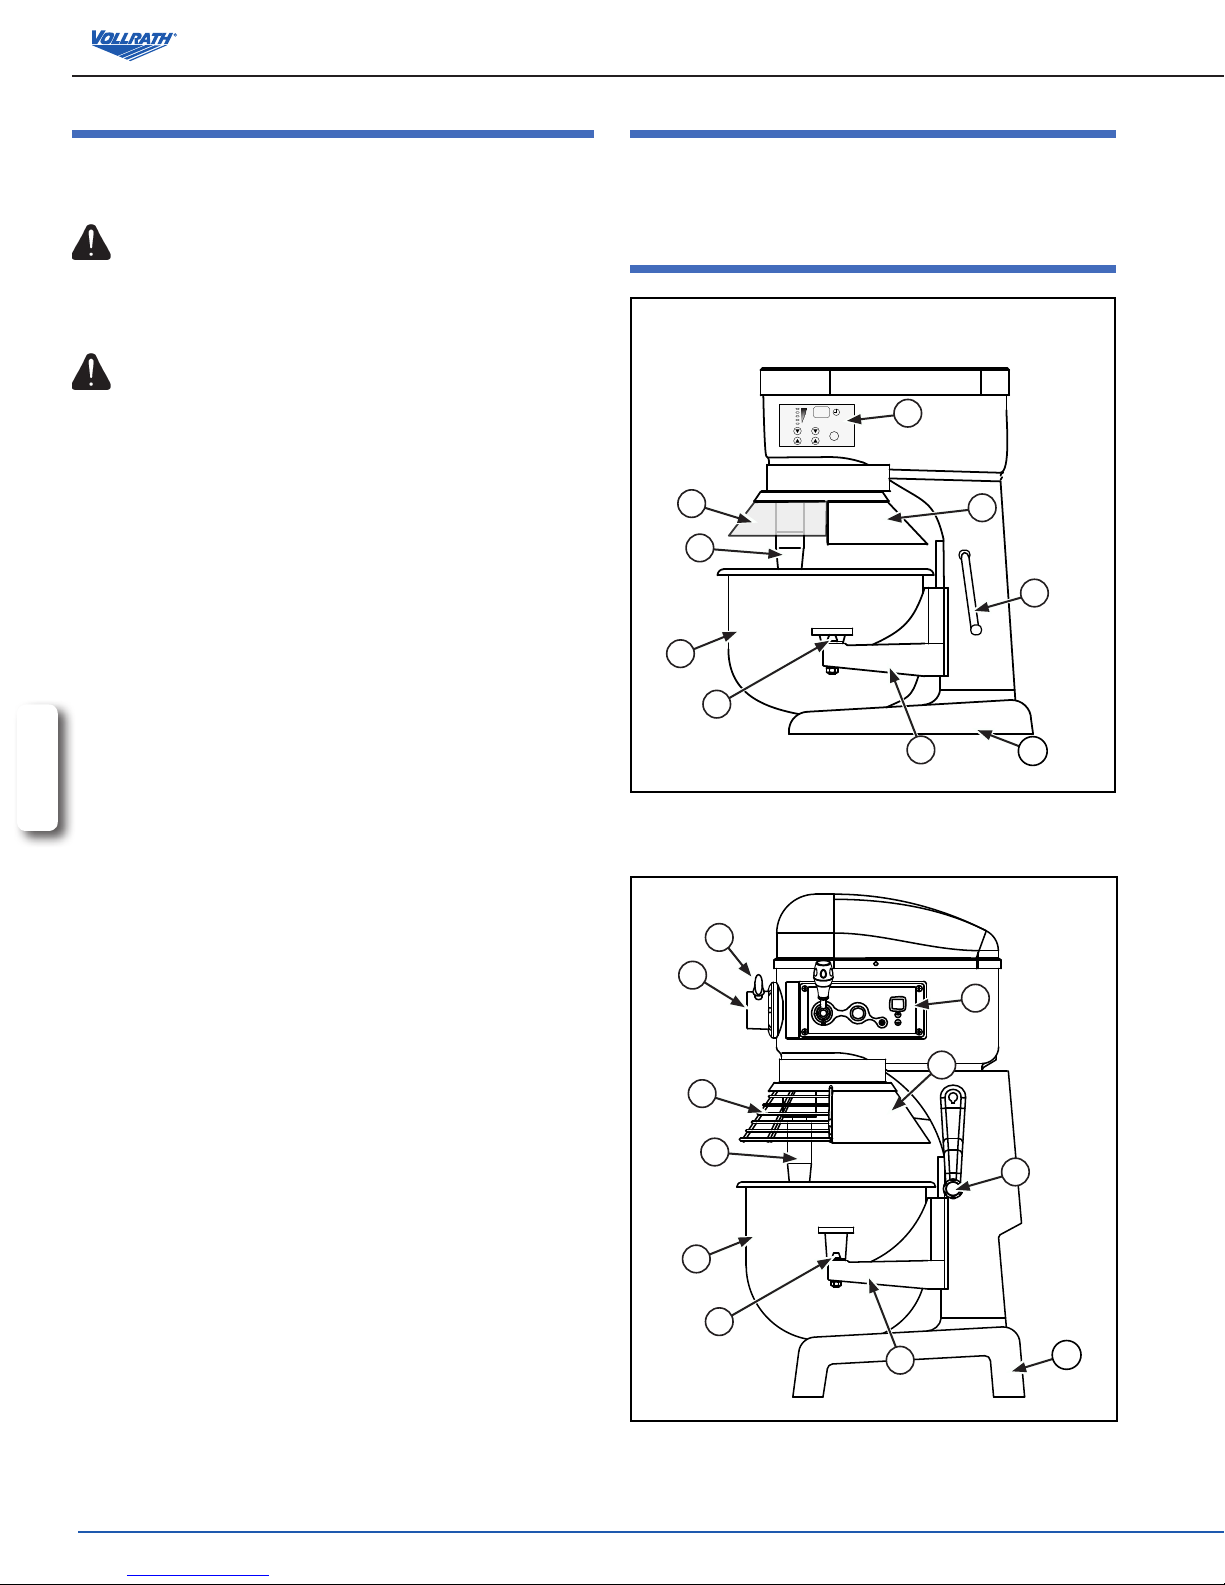
Figure 3. 40 Quart Mixer, Features and Controls.
K
J
G
F
C
A
H
I
I
BASE. Supports the mixer.
J
ATTACHMENT HUB (some models). Used to locate an
attachment to the mixer.
K
ATTACHMENT HUB THUMBSCREW (some models). Secures
ENGLISH
the attachment to the mixer.
unPacking the equiPment and initial setuP
B
Carefully remove crating or packaging materials from the equipment. Models
shipped on pallets are bolted to the pallet. Bolts must be removed to safely
separate the equipment from the pallet. When no longer needed, dispose of
all packaging, materials in an environmentally responsible manner.
Place the equipment on a at surface with sufcient space around the mixer
to allow for safe cleaning and service.
Plug only into grounded electrical outlets matching the nameplate rated
voltage. Do not use an extension cord with this equipment. Do not plug
this equipment into a power strip or multi-outlet power cord. Some models
require electrical connection to be installed by a qualies service personal in
accordance with local ordinances.
D
E
Figure 4. 60 Quart Mixer, Features and Controls.
I
OperatOr’s Manual
3
Page 4
oPeration
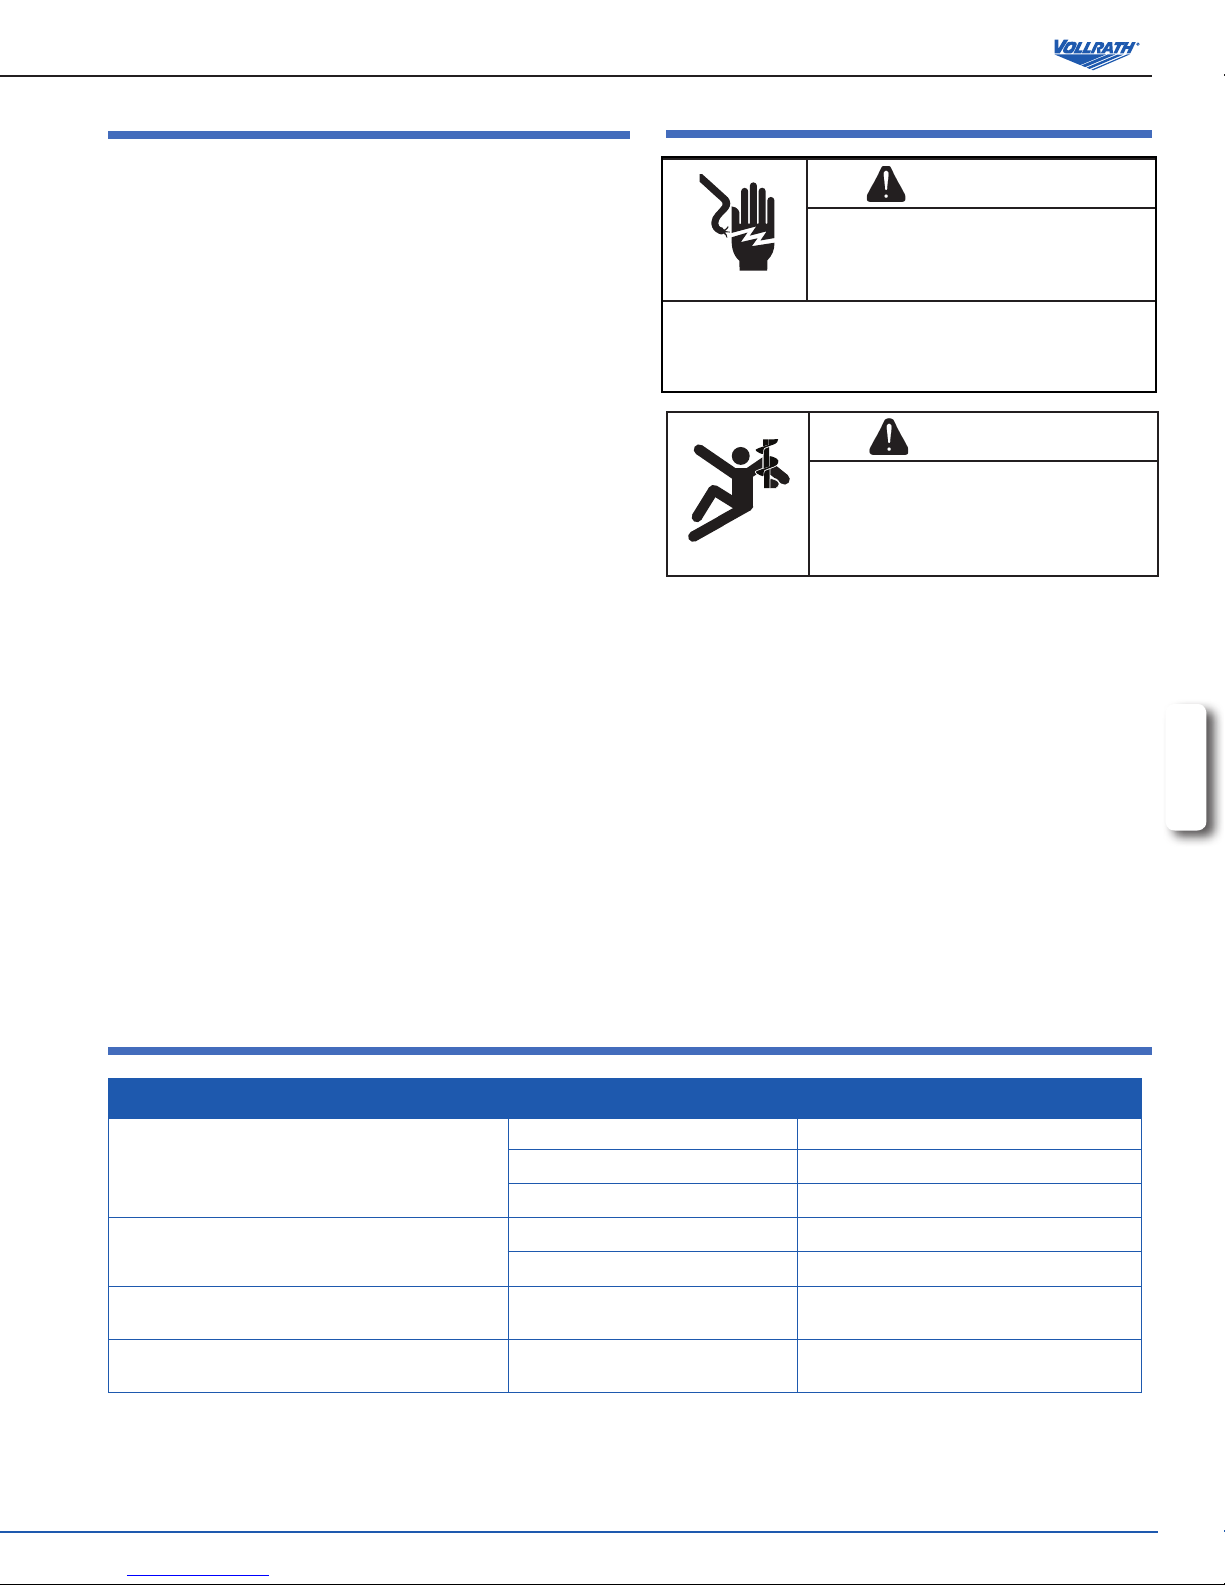
WARNING
Entanglement Hazard.
Rotating shaft or attachments can cause traumatic
amputations or sever lacerations. To avoid injury,
keep hands and clothing away from rotating parts.
Do not operate with guards modied or missing.
WARNING
Electrical Shock Hazard.
Keep water and other liquids from entering the
inside of the equipment. Liquid inside the equipment
could cause an electrical shock.
Do not spray water or cleaning products. Liquid could contact
the electrical components and cause a component failure or an
electrical shock. Do not use equipment if power cord is damaged or
has been modied.
Prior to rst use, it is important to clean the equipment. Wash new the
attachments, bowl, guards and other parts with warm soapy water and rinse
thoroughly to remove the thin protective oil lm.
The safety guard must be in the fully closed position in order to activate the
mixer. If the safety guard is not closed properly then the mixer will not start. If
the safety guard is opened during use then the mixer will switch off. In order
to restart the mixer the safety guard must be closed.
20 qt., 30qt., 40qt. and 60qt. mixers: The motor is tted with a safety shut
off device which will automatically turn off the mixer if the temperature of
the motor exceeds the manufacturers recommended operating limits. The
overload protection switch which will trip if the batch size being mixed is too
ENGLISH
heavy. If this happens allow the mixer to cool for minimum of 30-60 minutes
and reduce the batch size by 10-15%.
7 qt and 10 qt mixers have an overload protection device which will
automatically turn off the mixer if the resistance of the motor exceeds the
manufacturers recommended operating limits. An alarm will beep and the
display will ash. Pressing the OFF button will reset the mixer.
1. Before each use, check that the equipment is clean.
2. Before attaching the bowl select the mixing attachment you will be using.
Place your selected mixing attachment inside the empty bowl (C). Do not
attempt to t the mixing attachment onto the mixing shaft (F) before the
bowl is in position. See Figures 1, 2, 3 or 4.
3. Lower the bowl cradle to its lowest position by rotating the bowl lift (B).
4. Rotate the bowl clamp levers (D) to the out or back position.
5. Hold the bowl (C) so that the pin on the bowl is facing in towards the
mixer. Position the bowl so that the pin is lined up with the pin slot on the
bowl cradle (E). Slide the pin into the slot.
6. Align the holes on the bowl tabs with the pins on the bowl cradle (E).Set
the bowl (C) on the bowl cradle (E).
7. Rotate the bowl clamp levers (D) to the front over the bowl tabs to
secure the bowl (C) onto the bowl cradle (E).
8. Install the attachment to the mixing shaft (F). Ailing the grove on the
attachment with the pin on the mixing shaft. Push the attachment up and
rotate to lock onto the pin.
9. Raise the bowl (C) to its maximum height using the bowl lift (B) by
rotating in a counter clockwise direction until it snaps into place.
oPerating the 10 quart mixer.
B
5
F
SPEED
E
4
3
2
1
TIMER
D
A
C
ON/
OFF
G
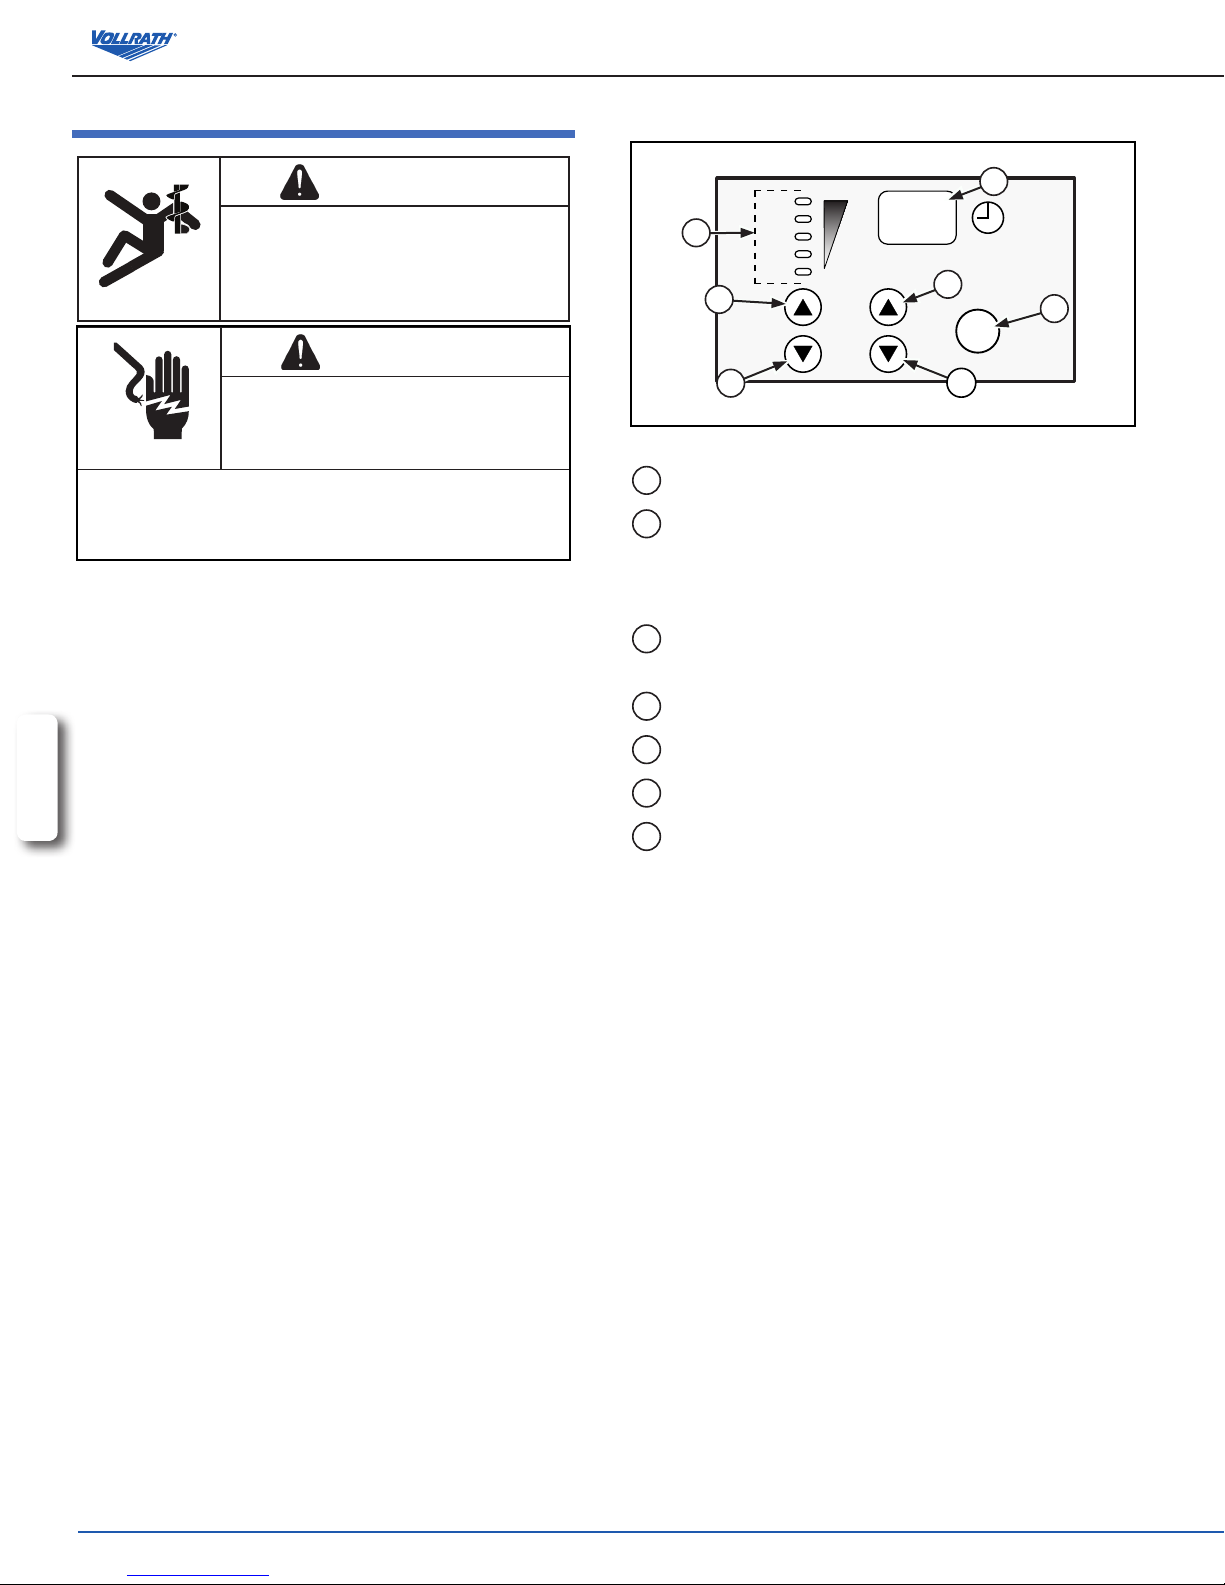
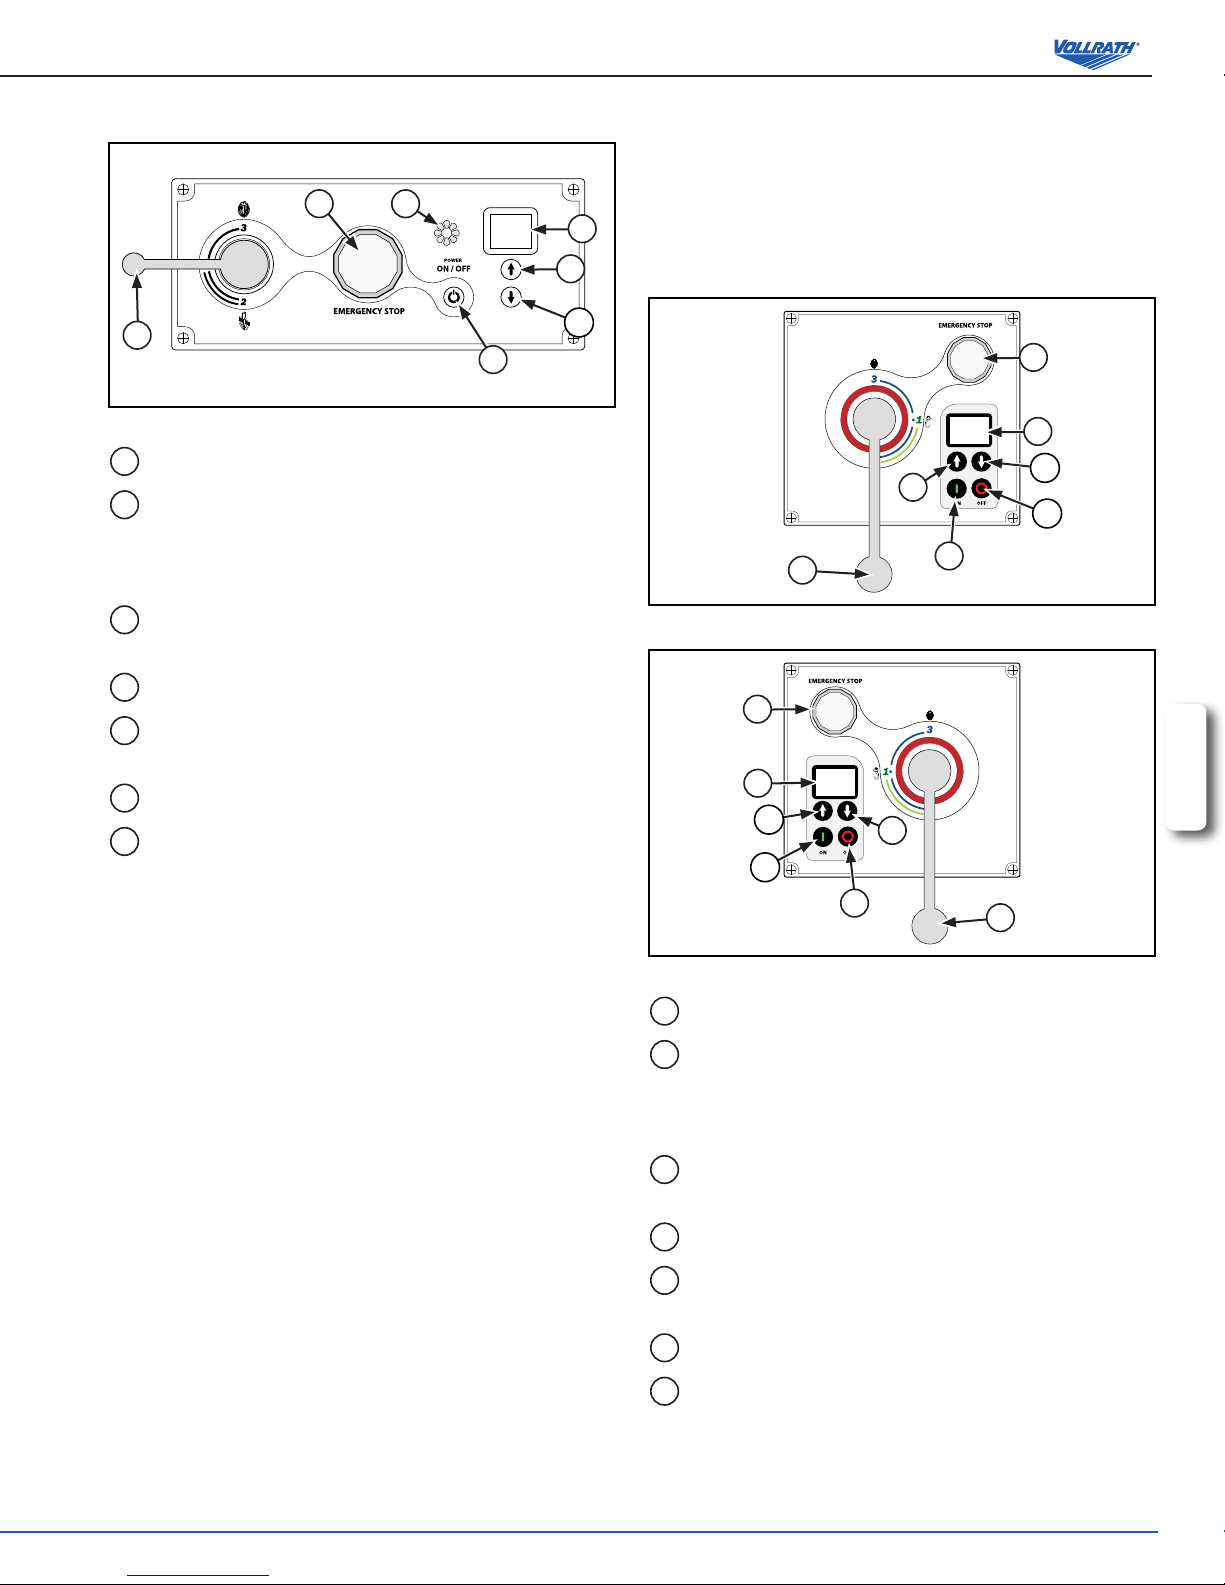
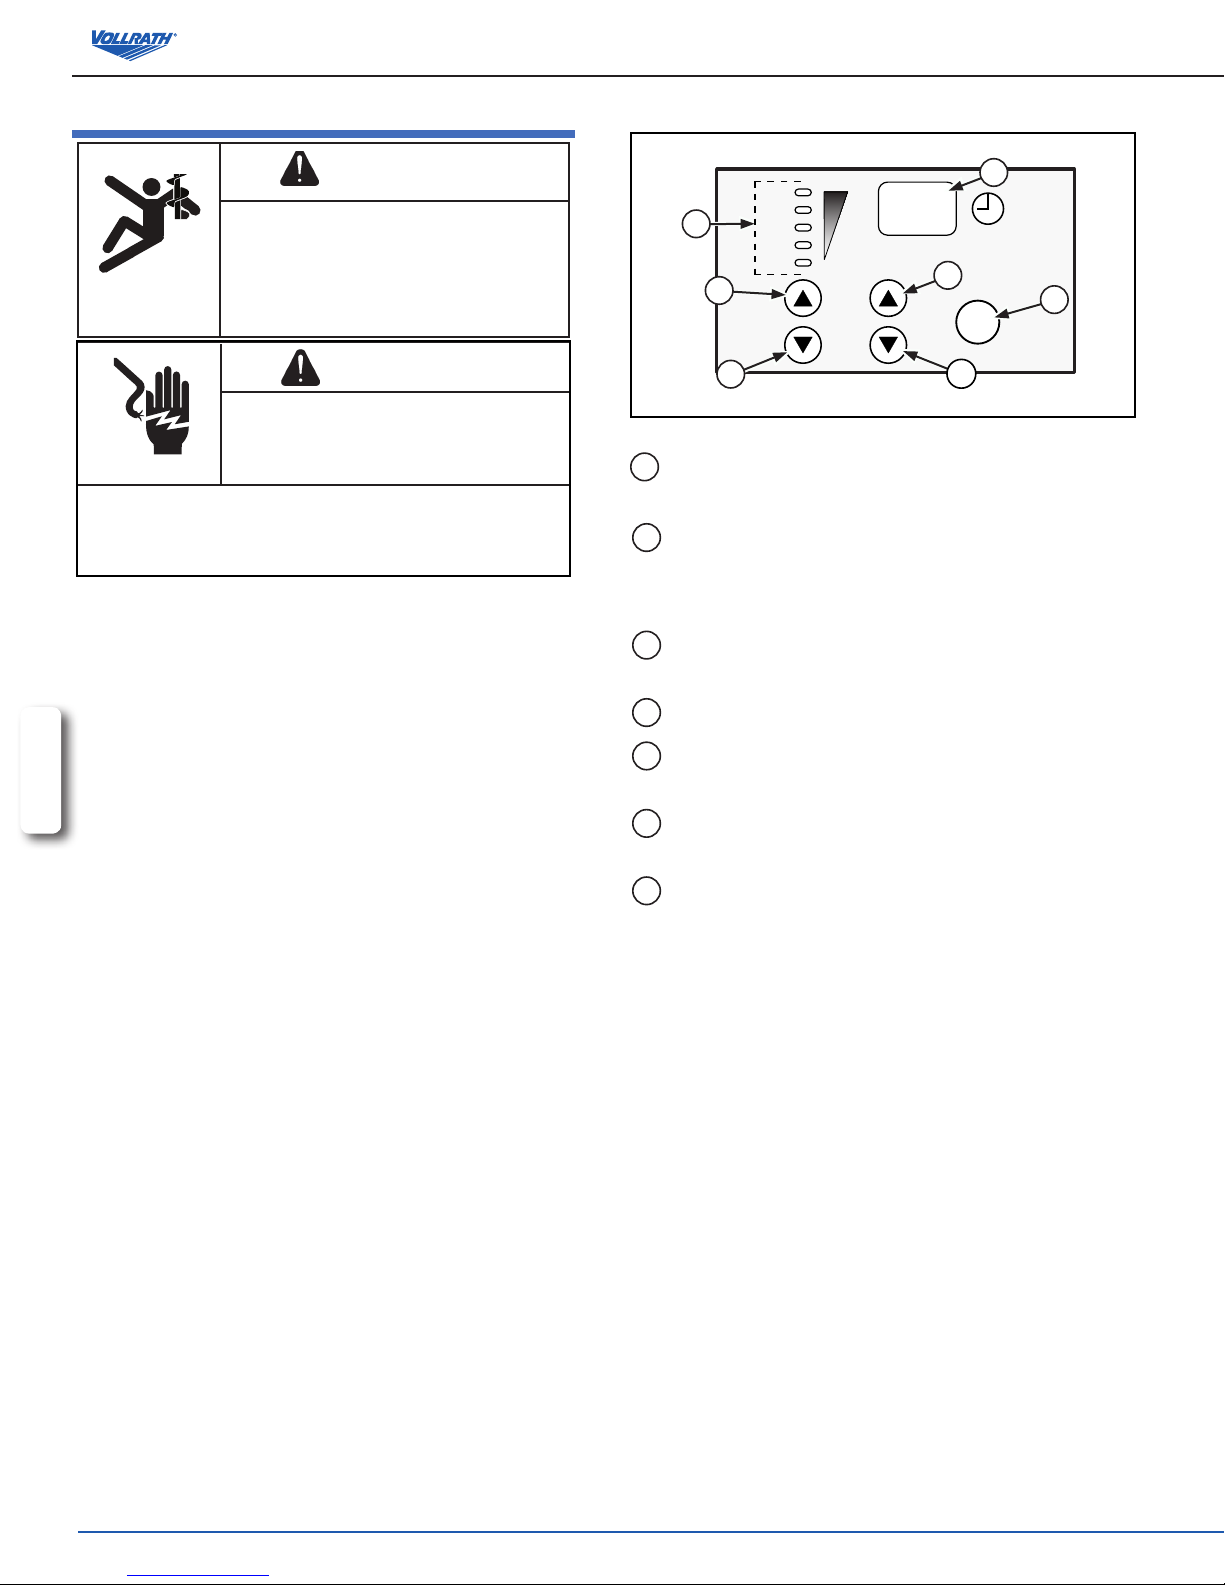
Figure 5. 7 Quart and 10 Quart Mixer Control Panel.
A
ON/OFF BUTTON. Switches the mixer on and off.
B
DIGITAL DISPLAY. Displays the time remaining in a timed
operation cycle, displays “ON” when operating in an non-timed
cycle and displays “OFF” equipment is plugged in and not
operating.
C
TIME UP BUTTON. Increases the time. Maximum time of
30 minutes.
D
TIME DOWN BUTTON. Decreases the time.
E
SPEED UP BUTTON. Increases the mixing speed.
F
SPEED DOWN BUTTON. Decreases the mixing speed.
G
SPEED NUMBERS AND LIGHTS. Numbers and lights
correspond to show the mixing speed. The larger the number
the faster the speed, the smaller the number the slower the
speed.
When mixing light batches it is recommended that the mixer is not used
continuously for a time period of more than 20 minutes and a brief cooling off
period of 10-15 minutes should be allowed between mixing cycles.
1. Close the bowl guard (G). See Figure 1. The safety guard must be closed
for the mixer to operate. If the safety guard is open or not closed properly
then the mixer will not operate.
2. Select the desired operating speed based on the ingredients. Use the
speed up (E) or speed down button (F) to program the speed. See
Figure 5.
Speed 1 – Use for slow mixing, mashing and kneading yeast dough.
Speed 2 – Use for mixing cookie and cake batters.
Speed 3 – Use for beating, creaming and medium fast whipping.
Speed 4 – For whipping heavy cream and egg whites.
Speed 5 – For whipping small amounts off heavy cream/egg whites.
3. Set the time cycle, if desired by using the time up button (C) and time
down button (D). The maximum time that can be set is 30 minutes.
4. To begin mixing cycle press the on/off button (A). The mixer will continue
to operate until the on/off button (A) is pressed again. Or, the mixer will
operate until the time cycle has been completed.
4
OperatOr’s Manual
Page 5
oPerating the 20 quart and 30 quart mixers.
E
G
5. The mixer will stop and the timer will beep three times after the time
cycle has ended.
NOTE:
Turn the mixer off before switching from one speed to another. Failure
to stop the mixer before changing speeds may damage the gearbox
B
and void the warranty.
D
F
A
C
oPerating the 40 quart and 60 quart mixers.
Figure 6. 20 Quart and 30 Quart Mixer Control Panel.
A
ON/OFF BUTTON. Switches the mixer on and off.
B
DIGITAL DISPLAY. Displays the time remaining in timed
operation cycle, displays “ON” when operating in an non-timed
cycle and displays “OFF” equipment is plugged in and not
operating.
C
TIME UP BUTTON. Increases the time. Maximum time of 30
minutes.
D
TIME DOWN BUTTON. Decreases the time.
E
STOP BUTTON. Press the switch in to stop the mixer. Rotate
the switch in the clockwise direction to reset.
F
SPEED SELECT LEVER. Used to change the mixer speed.
G
INDICATOR LIGHTS. Illuminates when the mixer in operating
or time has been programmed.
Figure 7. 40 Quart Mixer Control Panel.
NOTE:
Turn the mixer off before switching from one speed to another. Failure to stop
the mixer before changing speeds may damage the gearbox and void the
warranty.
1. Close the bowl guard (G). See Figure 2. The safety guard must be
closed for the mixer to operate. If the safety guard is open or not closed
properly then the mixer will not operate.
Figure 8. 60 Quart Mixer Control Panel.
A
B
2. Select the desired operating speed based on the ingredients. Use the
speed select lever (F) to set the speed. See Figure 6.
Speed 1 – Use for mixing heavy dough with an absorption ratio of 50%
or less.
Speed 2 – Use for mixing cakes, batters or heavy dough with an
C
absorption ratio of more than 50%.
Speed 3 – Used for mixing egg whites.
D
NOTE:
The moisture content of heavy dough is critical when selecting the
E
proper mixing speed. Do not use speed 2 when mixing heavy dough
with an absorption ratio of 50% or less.
3. Once the speed has been selected, press the on/off button to start the
mixer. Or, select a time by pressing the time up button (D) or time down
button (C). Press the on/off button.
4. To change speeds, press the red button to stop the mixer. Once the
mixing attachment has stopped rotating then change the speed using the
speed control knob. Once the new desired speed has been selected then
press the on/off button to reactivate the mixer.
F
G
NOTE:
Turn the mixer off before switching from one speed to another. Failure
to stop the mixer before changing speeds may damage the gearbox
and void the warranty.
E
B
C
D
G
F
E
B
C
G
A
ON BUTTON. Switches the mixer on.
DIGITAL DISPLAY. Displays the time remaining in timed
operation cycle, displays “ON” when operating in an non timed
cycle and displays “OFF” equipment is plugged in and not
operating.
TIME UP BUTTON. Increases the time. Maximum time of 30
minutes.
TIME DOWN BUTTON. Decreases the time.
STOP BUTTON. Press the switch in to stop the mixer. Rotate
the switch in the clockwise direction to reset.
SPEED SELECT LEVER. Used to change the mixer speed.
STOP BUTTON. Switches the mixer off.
A
D
F
ENGLISH
OperatOr’s Manual
5
Page 6
1. Close the bowl guard (G). See Figures 3 or 4. The safety guard must be
closed for the mixer to operate. If the safety guard is open or not closed
properly then the mixer will not operate.
2. Select the desired operating speed based on the ingredients. Use the speed
select lever (F) to set the speed. See Figures 7 or 8.
Speed 1 – Use for mixing heavy dough with an absorption ratio of 50% or
less.
Speed 2 – Use for mixing cakes, batters or heavy dough with an absorption
ratio of more than 50%.
Speed 3 – Used for mixing egg whites.
NOTE:
The moisture content of heavy dough is critical when selecting the proper
mixing speed. Do not use speed 2 when mixing heavy dough with an
absorption ratio of 50% or less.
3. Once the speed has been selected, press the on/off button to start
the mixer. Or, select a time by pressing the time up button (D) or time
down button (D). Press the on/off button.
4. To change speeds, press the red button to stop the mixer. Once
the mixing attachment has stopped rotating then change the speed
using the speed control knob. Once the new desired speed has been
selected then press the on/off button to reactivate the mixer.
5. The mixer will stop and the timer will beep three times after the time
cycle has ended.
NOTE:
Turn the mixer off before switching from one speed to another. Failure to
stop the mixer before changing speeds may damage the gearbox and void
the warranty.
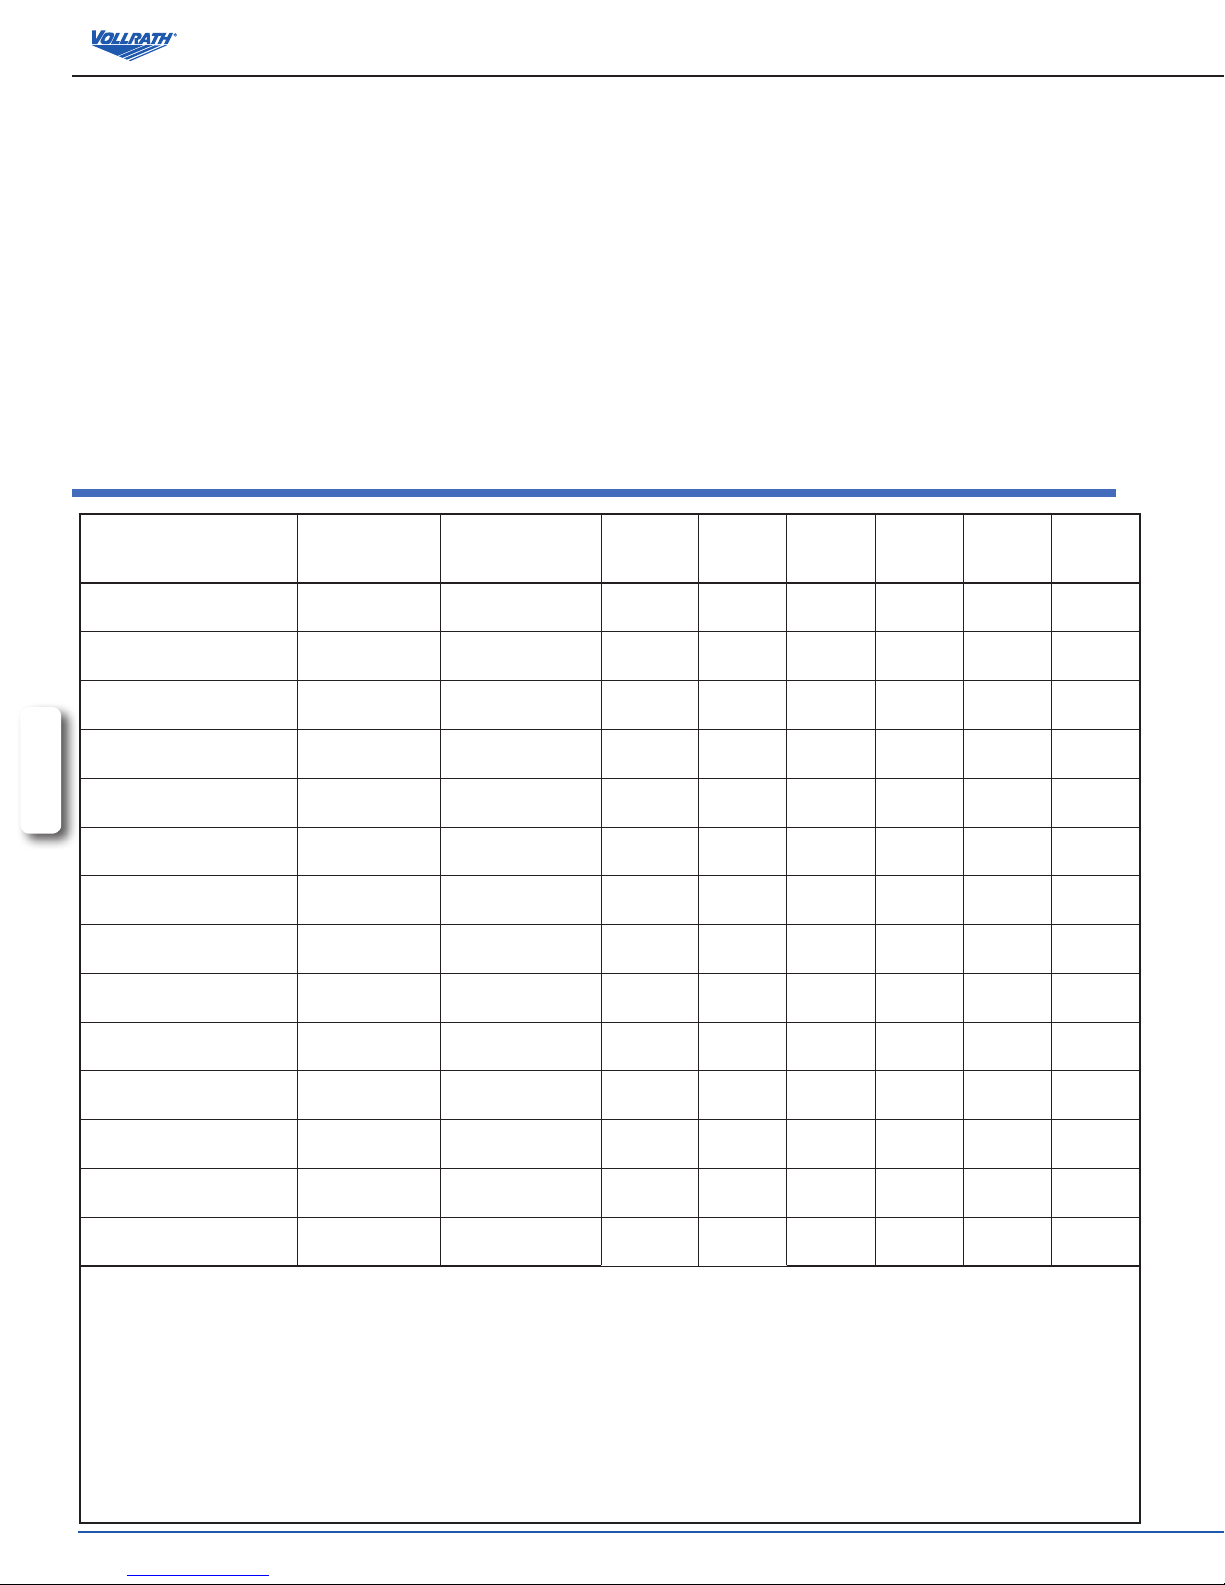
mixing caPacity chart
Product Agitator Speed
Bread and Roll Dough – 60% AR
Heavy Bread Dough – 55% AR
Pizza Dough, Thin – 40% AR
Pizza Dough, Medium – 50% AR
Pizza Dough, Thick – 60% AR
Raised Donut Dough – 65% AR
ENGLISH
Pie Dough Flat Beater All Speeds 4 lbs. 4 lbs. 18 lbs. 30 lbs. 35 lbs. 60 lbs.
Dough Hook 1st speed only
Dough Hook 1st speed only
Dough Hook 1st speed only
Dough Hook 1st speed only
Dough Hook 1st speed only
Dough Hook 1st speed only
7 Quart
Mixer
4 lbs. 5 lbs. 25 lbs. 45 lbs. 50 lbs. 90 lbs.
2 lbs. 3 lbs. 15 lbs. 30 lbs. 40 lbs. 70 lbs.
2 lbs. 3 lbs. 9 lbs. 14 lbs. 25 lbs. 40 lbs.
3 lbs. 4 lbs. 10 lbs. 20 lbs. 32 lbs. 60 lbs.
4 lbs. 5 lbs. 20 lbs. 40 lbs. 50 lbs. 70 lbs.
2 lbs. 2 lbs. 9 lbs. 15 lbs. 25 lbs. 40 lbs.
10 Quart
Mixer
20 Quart
Mixer
30 Quart
Mixer
40 Quart
Mixer
60 Quart
Mixer
Mashed Potatoes Flat Beater All Speeds 4 lbs. 5 lbs. 15 lbs. 23 lbs. 30 lbs. 45 lbs.
Cake Flat Beater All Speeds 6 lbs. 8 lbs. 20 lbs. 30 lbs. 12 lbs. 60 lbs.
Wafe or Hot Cake Batter Flat Beater All Speeds 3 qts. 4 qts. 8 qts. 12 qts. 16 qts. 24 qts.
Egg Whites Wire Whisk All Speeds 3/4 pt. 1 pt. 1 qts. 1-1/2 qts. 2 qts. 3 qts.
Meringue Wire Whisk All Speeds 1/2 pt. 3/4 pt. 1 qts. 1-1/2 qts. 2 qts. 3 qts.
Whipped Cream Wire Whisk All Speeds 1-3/4 qts. 2 qts. 4 qts. 6 qts. 8 qts. 12 qts.
Cake, Pound Flat Beater All Speeds 6 lbs. 8 lbs. 20 lbs. 30 lbs. 40 lbs. 60 lbs.
When mixing dough check the “AR” (Absorption Ratio) = Water weight divided by our weight.
The capacities listed above are based on 12% our moisture at 70° F (21° C) water temperature. If high gluten our is used reduce batch
size by 10%.
1 gallon of water = 8.3 lbs.
1 quart of water =2.1 lbs.
Example:
If a recipe calls for 5 lbs. of water and 10 lbs. of our, then 5 divided by 10 = 0.50 x 100 =50% AR.
Do not use 2nd speed with mixtures with below 50% AR.
6
OperatOr’s Manual
Page 7
using the attachment hub
The mixer is tted with a standard No. 12 mixing hub attachment. It is
recommended that original Vollrath attachments be used. To use the attachment
hub:
NOTE:
Turn the mixer off before switching from one speed to another. Failure to
stop the mixer before changing speeds may damage the gearbox and void
the warranty.
1. Turn the mixer off
2. Loosen the hub attachment thumbscrew (K). It is not necessary to fully
remove the screw. See Figures 2, 3, and 4.
3. Remove the attachment hub cover.
4. Insert the shaft of the attachment into the attachment hub (J).
5. Align the pin on the attachment shaft with the pin receptor inside the hub.
6. Slide the attachment in as far as it will go. Secure the attachment with the
thumbscrew (K).
7. Use the speed control knob to select the required hub operating speed:
Speed 1 – recommended for slicing vegetables or grinding meat
Speed 2 – recommended for grating cheese
8. Press the On/Off or On button to operate the hub and attachment the hub.
The mixer bowl must be in the up position and the safety guard must be in
the closed position in order for the hub to operate. The hub assembly and
the mixer cannot be used simultaneously.
9. To change speeds, press the red button to stop the mixer. Once the mixing
attachment has stopped rotating then change the speed using the speed
control knob. Once the new desired speed has been selected then press
the on/off button to reactivate the mixer.
Speed 3 is not recommended for use with attachments.
troubleshooting
cleaning
Do not spray water or cleaning products. Liquid could contact
the electrical components and cause a component failure or an
electrical shock. Do not use equipment if power cord is damaged or
has been modied.
To maintain the appearance and increase the service life, clean your
equipment daily.
NOTE:
Do not clean the equipment with steel wool. Do not hose
down or submerge electrical controls or components in
water. Do not store attachment on attachment hub.
1. Switch off the mixer.
2. Unplug the mixer from the power supply before cleaning. If the mixer
is hard wired to the electrical outlet then the power should be turned
off at the circuit breaker.
3. Remove the bowl and attachment after each use and clean with
warm water and food safe cleaning detergent. Failure to remove
the attachment from the mixing shaft may result in the attachment
becoming stuck onto the mixing shaft.
4. Remove the attachment and clean with a damp cloth and mild food
safe cleaning detergent. Dry the attachment thoroughly.
5. To clean the exterior of the mixer, wipe with a damp cloth and mild
food safe cleaning detergent.
WARNING
Electrical Shock Hazard.
Keep water and other liquids from entering the
inside of the equipment. Liquid inside the equipment
could cause an electrical shock.
WARNING
Entanglement Hazard.
Rotating shaft or attachments can cause traumatic
amputations or sever lacerations. To avoid injury,
keep hands and clothing away from rotating parts.
Do not operate with guards modied or missing.
ENGLISH
Problem It might be caused by Course of Action
No lights on Display Panel.
Power and time lights on but mixer does not operate.
7 quart and 10 quart mixers only: Mixer attachment stops
moving, alarm beeps and display ashes.
20 quart, 30 quart, 40 quart and
60 quart: Mixer attachment stops.
The equipment is not plugged in. Plug equipment in.
Circuit breaker is in the “OFF” position. Switch circuit breaker to “ON” position.
Stop switch in the “in/stop” position. Rotate the stop switch to the “out/run” position.
Bowl guard not completely closed. Close bowl guard completely.
Bowl not lifted into operating position. Raise bowl completely.
Mixer is overloaded.
Thermal overload protection activated.
Press the off button to reset mixer. Reduce the
batch size by 10-15%.
Allow the mixer to cool for 30-60 minutes.
Reduce the batch size by 10-15%.
OperatOr’s Manual
7
Page 8

service and rePair
There are no user serviceable parts within this appliance. To avoid serious injury or damage, never attempt to repair the equipment or replace a damaged power cord
yourself. Do not send equipment directly to The Vollrath Company. Please contact Vollrath Technical Service from the list below..
VOLLRATH Technical Service • 1-800-628-0832 • 920-457-4851
• Email: techservicereps@vollrathco.com
When contacting Vollrath Technical Service, please be ready with the item number, model number (if applicable), serial number, and proof of purchase showing the
date the unit was purchased.
Warranty statement For the vollrath co. l.l.c.
This warranty does not apply to products purchased for personal, family or household use, and The Vollrath Company LLC does not offer a written warranty to
purchasers for such uses.
The Vollrath Company LLC warrants each of its products listed below against defects in materials and workmanship for the applicable period provided below. All
other products manufactured or distributed by The Vollrath Company LLC are warranted against defects in materials and workmanship for a period of one year. In
all cases, the warranty runs from the date of the end user’s original purchase found on the receipt. Any damages from improper use, abuse, modication or damage
resulting from improper packaging during return shipment for warranty repair will not be covered under warranty.
Mixers – The warranty period is 2 years, except that on belts the warranty period is 5 years.
Replacement parts – The warranty period is 90 days.
For complete warranty information, product registration and new product announcement, visit www.vollrath.com.
www.vollrath.com
The Vollrath Company, L.L.C.
1236 North 18th Street
Sheboygan, Wisconsin
53081-3201 USA
Main Tel: 920-457-4851
Main Fax: 920-459-6573
Service Tel: 920-457-4851
Service Fax: 920-459-5462
Vollrath Europe BV
Beneluxbaan 7
5121 AD RIJEN
The Netherlands
+31161870005
Vollrath of China
Vollrath Shanghai Trading Limited
29D, 855 South Pu Dong Road
Shanghai, China 200120
Tel: 86-21-50589580
Vollrath de Mexico S. de R.L. de C.V.
Periferico Sur Edicio 2-C
Col. Santa Maria Tequepexpan
45601 Tlaquepaque, Jalisco Mexico
Tel: (52) 333-133-6767
Tel: (52) 333-133-6769
Fax: (52) 333-133-6768
Item No. 2350045-1 en Rev 5/14
Page 9

Manual del operador
Batidora de sobremesa
Batidoras de piso/banco
Artículo Modelo Descripción Voltaje HP Amp. Hz Enchufe
40755 MIX1007 Batidora de sobremesa de 7 ct. gal. (6,6 L)
4075503 MIX1007 Batidora de sobremesa de 7 ct. gal. (6,6 L)
4075502 MIX1007 Batidora de sobremesa de 7 ct. gal. (6,6 L)
4075505 MIX1007 Batidora de sobremesa de 7 ct. gal. (6,6 L)
40756 MIX1010 Batidora de sobremesa de 10 ct. gal. (11 L)
4075603 MIX1010 Batidora de sobremesa de 10 ct. gal. (11 L)
4075602 MIX1010 Batidora de sobremesa de 10 ct. gal. (11 L)
4075605 MIX1010 Batidora de sobremesa de 10 ct. gal. (11 L)
40757 MIX1020 Batidora de banco de 20 ct. gal. (22 L)
4075703 MIX1020 Batidora de banco de 20 ct. gal. (22 L)
4075702 MIX1020 Batidora de banco de 20 ct. gal. (22 L)
4075705 MIX1020 Batidora de banco de 20 ct. gal. (22 L)
40758 MIX1030 Batidora de piso de 30 ct. gal. (33 L)
4075803 MIX1030 Batidora de piso de 30 ct. gal. (33 L)
4075802 MIX1030 Batidora de piso de 30 ct. gal. (33 L)
4075805 MIX1030 Batidora de piso de 30 ct. gal. (33 L)
40759 MIX1040 Batidora de piso de 40 ct. gal. (44 L)
4075903 MIX1040 Batidora de piso de 40 ct. gal. (44 L)
4075902 MIX1040 Batidora de piso de 40 ct. gal. (44 L)
4075905 MIX1040 Batidora de piso de 40 ct. gal. (44 L)
40760 MIX1060 Batidora de piso de 60 ct. gal. (66 L)
4076003 MIX1060 Batidora de piso de 60 ct. gal. (66 L)
4076002 MIX1060 Batidora de piso de 60 ct. gal. (66 L)
4076005 MIX1060 Batidora de piso de 60 ct. gal. (66 L)
110V-120V
220-230V
220-230V
220-230V
110V-120V
220-230V
220-230V
220-230V
110V-120V
220-230V
220-230V
220-230V
110V-120V
220-230V
220-230V
220-230V
208-240V
220-230V
220-230V
220-230V
208-240V
220-230V
220-230V
220-230V
1/3 6
1/3 3
1/3 3
1/3 3
1/3 6
1/3 3
1/3 3
1/3 3
1/2 10
1/2 4
1/2 4
1/2 4
1 16
1 8
1 8
1 8
1-1/2 12
1-1/2 11
1-1/2 11
1-1/2 11
2 16
2 16
2 16
2 16
60 5-15P
50 UK-15P (BS546)
50 Schuko CEE7-7
50 AU2-15P
60 5-15P
50 UK-15P (BS546)
50 Schuko CEE7-7
50 AU2-15P
60 5-15P
50 UK-15P (BS546)
50 Schuko CEE7-7
50 AU2-15P
60 5-20P
50 UK-15P (BS546)
50 Schuko CEE7-7
50 AU2-15P
60 6-15P
50 UK-15P (BS546)
50 Schuko CEE7-7
50 AU2-15P
60 6-20P
50 -50 Schuko CEE7-7
50 AU2-15P
ESPAÑOL
Gracias por comprar este equipo Vollrath para el procesamiento de alimentos. Antes de usar el equipo, lea y familiarícese con las siguientes
instrucciones de operación y seguridad. CONSERVE ESTAS INSTRUCCIONES COMO REFERENCIA PARA EL FUTURO. Conserve la caja y
embalado originales. Deberá utilizarlos para devolver el equipo en caso de que requiera reparaciones.
Núm. art. 2350045-1 es Mod 05/14
Page 10
Precauciones de seguridad
Función y ProPósito
Para garantizar una operación segura, lea las siguientes armaciones
y comprenda su signicado. Este manual contiene precauciones de
seguridad que se explican a continuación. Léalas atentamente.
ADVERTENCIA
Advertencia se usa para indicar la presencia de un peligro que puede
provocar lesiones personales graves, muerte o daños materiales
considerables si se ignora el aviso.
PRECAUCIÓN
Precaución se usa para indicar la presencia de un peligro que
provocará o puede provocar lesiones personales o daños materiales
leves si se ignora el aviso.
NOTA
Nota se utiliza para indicar información sobre instalación,
funcionamiento o mantenimiento que es importante, pero que no
reviste peligros.
¡Por su propia seguridad!
Debe acatar estas precauciones en todo momento, ya que si no lo
hace podría lesionarse a sí mismo y a otras personas.
Para disminuir el riesgo de lesiones personales o daños al equipo:
Enchúfelo sólo en tomacorrientes con puesta a tierra cuyo voltaje nominal
corresponda al indicado en la placa identicatoria.
No modique ni manipule indebidamente los interruptores de seguridad.
No lo deje operando solo.
ESPAÑOL
No opere el equipo en áreas públicas ni cerca de los niños.
No use un cable de extensión con este equipo. No enchufe este equipo
en una regleta eléctrica ni cable de múltiples tomas.
Para los mejores resultados, los accesorios de Vollrath son
recomendados.
Revise el equipo antes de cada uso para asegurarse de que esté limpio.
No use una manguera para limpiar la batidora. Use un paño húmedo para
limpiar el exterior de la misma.
Use vestimenta apropiada. No use prendas sueltas ni que cuelguen
mientras opera este equipo.
Haga que personal calicado instale el equipo en cumplimento con los
códigos y ordenanzas locales.
Use el equipo en posición plana y nivelada.
Apague el equipo, desenchúfelo y deje que se enfríe antes de limpiarlo o
trasladarlo.
No rocíe con líquidos ni agentes de limpieza los controles ni la parte
externa del equipo.
No limpie el equipo con lana de acero.
Mantenga el equipo y el cable eléctrico lejos de llamas expuestas,
quemadores eléctricos o calor excesivo.
No opere el equipo si se ha dañado o si funciona defectuosamente de
algún modo.
No utilice los accesorios conectados al borne mientras esté batiendo.
Diseñado para mezclar batidos, masa, mezcla para pasteles, etc. No está
diseñado para uso doméstico, industrial ni de laboratorio.
características y controles
5
4
3
2
1
TIMER
ON/
SPEED
OFF
G
F
C
D
Figura 1. Características y controles de la batidora de
7 ct. gal. (6,6 L) y 10 ct. gal. (11 L).
K
J
G
F
C
D
Figura 2. Características y controles de la batidora de
20 ct. gal. (22 L) y 30 ct. gal. (33 L).
A
H
B
E
A
H
E
I
B
I
2
Manual del operador
Page 11
A
PANEL DE CONTROL. Incluye el botón de encendido/apagado,
K
J
A
el control de velocidad, los controles del temporizador, el
visor del temporizador y la parada de emergencia (algunos
modelos).
B
ELEVADOR DEL TAZÓN. Se usa para bajar y subir el
portatazón.
H
G
F
B
C
TAZÓN. Sostiene los contenidos del producto alimenticio que
se va a batir.
D
ABRAZADERA DEL TAZÓN. Aanza el tazón al portatazón.
E
PORTATAZÓN. Sostiene el tazón.
F
VÁSTAGO DE BATIDO. Sostiene el accesorio de batido.
C
D
E
I
Figura 3. Características y controles de la batidora de 40 ct. gal. (44 L).
K
J
A
B
G
PROTECCIÓN DEL TAZÓN. Ayuda a prevenir lesiones o el
H
PROTECCIÓN ANTISALPICADURAS. Ayuda a prevenir el
I
BASE. Soporta la batidora.
J
BORNE DE ACCESORIOS (algunos modelos). Se usa para
K
TORNILLO DE MANO DEL BORNE DE ACCESORIOS
desembalado del equiPo y conFiguración inicial
G
H
F
C
D
E
I
Retire cuidadosamente del equipo la caja o los materiales de embalado. Los
modelos despachados en tarimas van empernados a las mismas. Se deben
retirar los pernos a n de separar el equipo de la tarima en forma segura.
Cuando ya no los necesite, deseche todos los materiales de embalado de
una manera ambientalmente responsable.
Coloque el equipo en una supercie plana con espacio suciente alrededor
de la batidora a n de limpiarla y darle servicio en forma segura.
Enchúfelo sólo en tomacorrientes con puesta a tierra cuyo voltaje nominal
corresponda al indicado en la placa identicatoria. No use un cable de
extensión con este equipo. No enchufe este equipo en una regleta eléctrica
ni cable de múltiples tomas. Algunos modelos requieren que personal de
servicio calicado instale la conexión eléctrica en cumplimento con las
ordenanzas locales.
contacto con el vástago o accesorio de batido. Esta protección
debe cerrarse para la operación.
derrame del contenido que se va a batir. Ayuda a prevenir
lesiones o el contacto con el vástago o accesorio de batido.
ESPAÑOL
ubicar un accesorio en la batidora.
(algunos modelos). Aanza el accesorio a la batidora.
Figura 4. Características y controles de la batidora de 60 ct. gal. (66 L).
Manual del operador
3
Page 12
oPeración
oPeración de la batidora de 10 ct. gal. (11 l).
ADVERTENCIA
Peligro de enredo.
El vástago o los accesorios giratorios pueden
causar amputaciones traumáticas o laceraciones
graves. Para evitar lesiones, mantenga las manos
y ropa lejos de las piezas giratorias. No opere el
equipo con protecciones modicadas o faltantes.
ADVERTENCIA
Peligro de descarga eléctrica.
Evite que ingrese agua o cualquier otro tipo de
líquido al interior del equipo, ya que ello podría
causar una descarga eléctrica.
No rocíe agua ni agentes de limpieza. El líquido podría hacer
contacto con los componentes eléctricos y causar una falla de
los mismos o una descarga eléctrica. No use el equipo si el cable
eléctrico está dañado o se ha modicado.
Es importante limpiar el equipo antes de usarlo por primera vez. Lave los
accesorios, el tazón, las protecciones y demás piezas nuevas con agua
caliente jabonosa y enjuáguelos totalmente para eliminar la delgada película
protectora de aceite.
La protección de seguridad debe estar en la posición plenamente cerrada a
n de activar la batidora. Si no está bien cerrada, la batidora no arrancará. Si
la protección está abierta durante el uso la batidora se apagará. Para poner
en marcha la batidora la protección de seguridad debe estar cerrada.
Batidoras de 20 ct. gal. (22 L), 30 ct. gal. (33 L), 40 ct. gal. (44 L) y 60
ct. gal. (66 L): El motor viene equipado con un dispositivo de cierre de
seguridad que apagará automáticamente la batidora si la temperatura del
ESPAÑOL
motor excede los límites de operación recomendados por el fabricante. El
interruptor de protección contra sobrecargas se disyuntará si el tamaño del
lote que se está batiendo es demasiado denso. Si ello ocurre deje que la
batidora se enfríe durante un mínimo de 30-60 minutos y reduzca el tamaño
del lote en un 10-15%.
Las batidoras de 7 ct. gal. (6,6 L) y 10 ct. gal. (11 L) tienen un dispositivo
de seguridad contra sobrecargas que apagará automáticamente la batidora
si la resistencia del motor excede los límites de operación recomendados
por el fabricante. La alarma emitirá un tono y el visor destellará. Al pulsarse
el botón de APAGADO la batidora se reiniciará.
1. Antes de usarlo, cerciórese de que el equipo esté limpio.
2. Antes de colocar el tazón seleccione el accesorio de batido que va a
usar. Coloque el accesorio escogido dentro del tazón vacío (C). No
intente jar el accesorio de batido sobre el vástago de batido (F) antes
de que el tazón esté en su posición. Consulte las Figuras 1, 2, 3 o 4.
3. Coloque el portatazón en su posición más baja girando el elevador del
tazón (B).
4. Gire las palancas de sujeción del tazón (D) hasta la posición de afuera
o atrás.
5. Sujete el tazón (C) de modo que el pasador de éste quede orientado
hacia la batidora. Coloque el tazón de modo que el pasador quede
alineado con el surco del mismo en el portatazón (E). Deslice el pasador
dentro del surco.
6. Alinee los oricios en las lengüetas del tazón con los pasadores del
portatazón (E). Fije el tazón (C) en el portatazón (E).
7. Gire las palancas (D) de sujeción del tazón (C) hacia adelante sobre la
lengüetas del mismo a n de aanzarlo sobre el portatazón (E).
8. Instale el accesorio en el vástago de batido (F). Alinee la ranura en el
accesorio con el pasador en el vástago de batido. Empuje el accesorio
hacia arriba y gírelo para trabarlo sobre el pasador.
9. Suba el tazón (C) hasta su altura máxima girando el elevador del mismo
(B) en sentido antihorario hasta que calce en su lugar.
B
5
F
SPEED
E
4
3
2
1
TIMER
D
A
C
ON/
OFF
G
Fig. 5. Panel control de batidora de 7 ct. gal. (6,6 L) y 10 ct. gal. (11 L).
A
BOTÓN DE ENCENDIDO/APAGADO (ON/OFF). Enciende y
apaga la batidora.
B
VISOR DIGITAL. Muestra el tiempo restante en un ciclo de
operación sincronizado, muestra “ON” (ENCENDIDO) cuando
el equipo está funcionando en un ciclo no sincronizado y “OFF”
(APAGADO) cuando está enchufado pero no funcionando.
C
BOTÓN AUMENTAR TIEMPO. Aumenta el tiempo. Tiempo
máximo de 30 minutos.
D
BOTÓN DISMINUIR TIEMPO. Disminuye el tiempo.
E
BOTÓN AUMENTAR VELOCIDAD. Aumenta la velocidad del
batido.
F
BOTÓN REDUCIR VELOCIDAD. Disminuye la velocidad del
batido.
G
NÚMEROS Y LUCES DE VELOCIDAD. Los números y luces
se corresponden para mostrar la velocidad del batido. Mientras
más grande o más pequeño sea el número, más alta o más
baja es la velocidad respectivamente.
Al batir lotes pequeños se recomienda usar la batidora durante un tiempo no
superior a 20 minutos y dejar un período breve de 10-15 minutos entre los
ciclos de batido para que se enfríe.
1. Cierre la protección del tazón (G). Consulte la Figura 1. La protección de
seguridad debe estar cerrada para hacer funcionar la batidora. Si está
abierta o no está correctamente cerrada, la batidora no funcionará.
2. Seleccione la velocidad de operación deseada basándose en los
ingredientes. Use el botón de aumento (E) o descenso de velocidad (F)
para programarla. Consulte la Figura 5.
Velocidad 1 – Se usa para batir, macerar y amasar lentamente harinas
con levadura.
Velocidad 2 – Se usa para mezclar batidos de galletas y pasteles.
Velocidad 3 – Se usa para batir, preparar crema y batir a velocidad
media.
Velocidad 4 – Para batir cremas densas y claras de huevo.
Velocidad 5 – Para batir pequeñas cantidades de cremas densas/claras
de huevo.
3. Si lo desea je el ciclo de tiempo usando el botón de aumento (C) y
descenso (D) del tiempo. El tiempo máximo que puede jar es de 30
minutos.
4. Pulse el botón de encendido/apagado (A) para iniciar el ciclo de batido.
La batidora continuará funcionando hasta que se vuelva a pulsar el botón
(A). O bien funcionará hasta que se haya completado el ciclo de tiempo.
4
Manual del operador
Page 13

oPeración de batidoras 20 ct. gal. (22 l) y 30 ct. gal. (33 l).
haber seleccionado la velocidad nueva, pulse el botón de encendido/
apagado para volver a poner en marcha la batidora.
5. La batidora se detendrá y el temporizador sonará tres veces cuando
haya concluido el ciclo de tiempo.
E
G
B
NOTA:
Apague la batidora antes de cambiar de una velocidad a otra. Si no la
apaga puede dañar la caja de engranajes y anular la garantía.
D
oPeración de batidoras 40 ct. gal. (44 l) y 60 ct. gal. (66 l).
F
A
Fig. 6. Panel control de la batidora 20 ct. gal. (22 L) y 30 ct. gal. (33 L).
A
BOTÓN DE ENCENDIDO/APAGADO (ON/OFF). Enciende y
apaga la batidora.
B
VISOR DIGITAL. Muestra el tiempo restante en un ciclo de
operación sincronizado, muestra “ON” (ENCENDIDO) cuando
el equipo está funcionando en un ciclo no sincronizado y “OFF”
(APAGADO) cuando está enchufado pero no funcionando.
C
BOTÓN AUMENTAR TIEMPO. Aumenta el tiempo. Tiempo
máximo de 30 minutos.
D
BOTÓN DISMINUIR TIEMPO. Disminuye el tiempo.
E
BOTÓN DE PARADA. Oprima el interruptor para detener la
batidora. Gírelo en sentido horario para reiniciarla.
F
PALANCA SELECCIONADORA DE VELOCIDAD. Se usa para
cambiar la velocidad de la batidora.
G
LUCES INDICADORAS. Se iluminan cuando se ha programado
la batidora en funcionamiento o tiempo.
NOTA:
Apague la batidora antes de cambiar de una velocidad a otra. Si no la apaga
puede dañar la caja de engranajes y anular la garantía.
1. Cierre la protección del tazón (G). Consulte la Figura 2. La protección de
seguridad debe estar cerrada para hacer funcionar la batidora. Si está
abierta o no está correctamente cerrada, la batidora no funcionará.
2. Seleccione la velocidad de operación deseada basándose en los
ingredientes. Use la palanca seleccionadora (F) para jar la velocidad.
Consulte la Figura 6.
Velocidad 1 – Se usa para batir masa densa con una proporción de
absorción inferior al 50%.
Velocidad 2 – Se usa para batir pasteles, batidos o masa densa con
una proporción de absorción superior al 50%.
Velocidad 3 – Se usa para batir claras de huevo.
NOTA:
El contenido de humedad de la masa densa es fundamental al
seleccionarse la velocidad de batido apropiada. No use la velocidad 2
para batir masa densa con una proporción de absorción inferior al 50%.
3. Tras haber seleccionado la velocidad, pulse el botón de encendido/
apagado para poner en marcha la batidora. O bien seleccione un lapso
pulsando el botón de aumento (C) o descenso (D) del tiempo. Pulse el
botón de encendido/apagado.
4. Para cambiar las velocidades, pulse el botón rojo a n de detener la
batidora. Una vez que el accesorio de batido haya dejado de girar,
cambie la velocidad usando la perilla controladora de velocidad. Tras
C
Figura 7. Panel de control de la batidora de 40 ct. gal. (44 L).
Figura 8. Panel de control de la batidora de 60 ct. gal. (66 L).
A
BOTÓN DE ENCENDIDO. Enciende la batidora.
B
VISOR DIGITAL. Muestra el tiempo restante en un ciclo de
operación sincronizado, muestra “ON” (ENCENDIDO) cuando
el equipo está funcionando en un ciclo no sincronizado y “OFF”
(APAGADO) cuando está enchufado pero no funcionando.
C
BOTÓN AUMENTAR TIEMPO. Aumenta el tiempo. Tiempo
máximo de 30 minutos.
D
BOTÓN DISMINUIR TIEMPO. Disminuye el tiempo.
E
BOTÓN DE PARADA. Oprima el interruptor para detener la
batidora. Gírelo en sentido horario para reiniciarla.
F
PALANCA SELECCIONADORA DE VELOCIDAD. Se usa para
cambiar la velocidad de la batidora.
G
BOTÓN DE PARADA. Apaga la batidora
NOTA:
Apague la batidora antes de cambiar de una velocidad a otra. Si no la
apaga puede dañar la caja de engranajes y anular la garantía.
E
B
C
D
G
F
A
ESPAÑOL
E
B
C
G
D
A
F
Manual del operador
5
Page 14
1. protección de seguridad debe estar cerrada para hacer funcionar la batidora.
Si está abierta o no está correctamente cerrada, la batidora no funcionará.
2. Seleccione la velocidad de operación deseada basándose en los ingredientes.
Use la palanca seleccionadora (F) para jar la velocidad. Consulte las Figuras
7 u 8.
Velocidad 1 – Se usa para batir masa densa con una proporción de
absorción inferior al 50%.
Velocidad 2 – Se usa para batir pasteles, batidos o masa densa con una
proporción de absorción superior al 50%.
Velocidad 3 – Se usa para batir claras de huevo.
NOTA:
El contenido de humedad de la masa densa es fundamental al seleccionarse
la velocidad de batido apropiada. No use la velocidad 2 para batir masa
1. Tras haber seleccionado la velocidad, pulse el botón de encendido/
apagado para poner en marcha la batidora. O bien seleccione un
lapso pulsando el botón de aumento (C) o descenso (D) del tiempo.
Pulse el botón de encendido/apagado.
2. Para cambiar las velocidades, pulse el botón rojo a n de detener la
batidora. Una vez que el accesorio de batido haya dejado de girar,
cambie la velocidad usando la perilla controladora de velocidad. Tras
haber seleccionado la velocidad nueva, pulse el botón de encendido/
apagado para volver a poner en marcha la batidora.
3. La batidora se detendrá y el temporizador sonará tres veces cuando
haya concluido el ciclo de tiempo.
NOTA:
Apague la batidora antes de cambiar de una velocidad a otra. Si no la
apaga puede dañar la caja de engranajes y anular la garantía.
densa con una proporción de absorción inferior al 50%.
tabla de caPacidades Para batidoras
Producto Agitadora Velocidad
Masa para pan y panecillos –
60% PA
Masa densa de pan –
55% PA
Masa de pizza delgada –
40% PA
Masa de pizza mediana –
50% PA
Masa de pizza gruesa –
60% PA
ESPAÑOL
Masa de rosquillas leudadas –
65% PA
Masa de tarta Batidor plano Todas las velocidades
Puré de papas Batidor plano Todas las velocidades
Pastel Batidor plano Todas las velocidades
Batido de gofre (wafe) o
panqueque
Claras de huevo Batidor globo Todas las velocidades
Merengue Batidor globo Todas las velocidades
Crema batida Batidor globo Todas las velocidades
Bizcochuelo Batidor plano Todas las velocidades
Gancho de amasar Sólo primera velocidad 4 lbs.
Gancho de amasar Sólo primera velocidad 2 lbs.
Gancho de amasar Sólo primera velocidad 2 lbs.
Gancho de amasar Sólo primera velocidad 3 lbs.
Gancho de amasar Sólo primera velocidad 4 lbs.
Gancho de amasar Sólo primera velocidad 2 lbs.
Batidor plano Todas las velocidades
Batidora de
7 ct. gal.
(6,6 L)
(5 kg)
(0.9 kg)
(0.9 kg)
(1.3 kg)
(1.8 kg)
(0.9 kg)
4 lbs.
(1.8 kg)
4 lbs.
(1.8 kg)
6 lbs.
(2.7 kg)
3 qts.
(3.3 l)
3/4 pt.
(0.4 l)
1/2 pt.
(0.3 l)
1-3/4 qts.
(1.9 l)
6 lbs.
(2.7 kg)
Batidora de
10 ct. gal.
(11 L)
5 lbs.
(2.3 kg)
3 lbs.
(1.3 kg)
3 lbs.
(1.3 kg)
4 lbs.
(1.8 kg)
5 lbs.
(2.3 kg)
2 lbs.
(0.9 kg)
4 lbs.
(1.8 kg)
5 lbs.
(2.3 kg)
8 lbs.
(3.6 kg)
4 qts.
(4.4 l)
1 pt.
(0.5 l)
3/4 pt.
(0.4 l)
2 qts.
(2.1 l)
8 lbs.
(3.6 kg)
Batidora de
20 ct. gal.
(22 L)
25 lbs.
(11.3 kg)
15 lbs.
(6.8 kg)
9 lbs.
(4.1 kg)
10 lbs.
(4.5 kg)
20 lbs.
(9.1 kg)
9 lbs.
(4.1 kg)
18 lbs.
(8.2 kg)
15 lbs.
(6.8 kg)
20 lbs.
(9.1 kg)
8 qts.
(8.8 l)
1 qts.
(1.1 l)
1 qts.
(1.` l)
4 qts.
(4.4 l)
20 lbs.
(9.1 kg)
Batidora de
30 ct. gal.
(33 L)
45 lbs.
(20.4 kg)
30 lbs.
(13.6 kg)
14 lbs.
(6.4 kg)
20 lbs.
(9.1 kg)
40 lbs.
(18.1 kg)
15 lbs.
(6.8 kg)
30 lbs.
(13.6 kg)
23 lbs.
(1.3 kg)
30 lbs.
(13.6 kg)
12 qts.
(13.2 l)
1-1/2 qts
(1.7 l).
1-1/2 qts
(1.7 l).
6 qts.
(6.6 l)
35 lbs.
(13.6 kg)
Batidora de
40 ct. gal.
(44 L)
50 lbs.
(22.7 kg)
40 lbs.
(18.1 kg)
25 lbs.
(11.3 kg)
32 lbs.
(14.5 kg)
50 lbs.
(22.7 kg)
25 lbs.
(11.3 kg)
35 lbs.
(15.8 kg)
30 lbs.
(13.6 kg)
12 lbs.
(0.9 kg)
16 qts.
(17.6 l)
2 qts.
(2.1 l)
2 qts.
(2.1 l)
8 qts.
(8.8 l)
40 lbs.
(18.1 kg)
Batidora de
60 ct. gal.
(66 L)
90 lbs.
(40.8 kg)
70 lbs.
(31.8 kg)
40 lbs.
(18.1 kg)
60 lbs.
(27.2 kg)
70 lbs.
(31.8 kg)
40 lbs.
(18.1 kg)
60 lbs.
(27.2 kg)
45 lbs.
(20.4 kg)
60 lbs.
(27.2 kg)
24 qts.
(26.4 l)
3 qts.
(3.3 l)
3 qts.
(3.3 l)
12 qts.
(13.2 l)
60 lbs.
(27.2 kg)
Al batir masa verique la “PA” (proporción de absorción) = Peso del agua dividido por el peso de la harina.
Las capacidades antedichas se basan en un 12% de humedad de la harina con una temperatura del agua de 70° F (21° C).
Si se usa harina alta en gluten, reduzca en un 10% el tamaño de lote de la masa
1 gal, (1 l )de agua = 1 kg
1 ct gal. (0,25 l) de agua = 0,25 kg
Ejemplo:
Si una receta necesita 5 lb (2,3 kg) de agua y 10 lb (4,5 kg) de harina, divida 5 por 10 = 0.50 x 100 =50% PA.
No use la segunda velocidad con mezclas cuya PA sea inferior al 50%.
6
Manual del operador
Page 15

uso del borne de accesorios
La batidora viene con un accesorio de batido estándar núm. 12. Se recomienda
usar accesorios Vollrath originales. Para usar el borne de accesorios:
NOTA:
Apague la batidora antes de cambiar de una velocidad a otra. Si no la
apaga puede dañar la caja de engranajes y anular la garantía.
1. Apague la batidora
2. Aoje el tornillo de mano (K) en el accesorio del borne. No es necesario
retirar completamente el tornillo. Consulte las Figuras 2, 3 y 4.
3. Retire la tapa del borne de accesorios.
4. Introduzca el vástago del accesorio en el borne (J).
5. Alinee el pasador en el vástago del accesorio con el receptor del pasador
dentro del borne.
6. Deslice el accesorio hacia adentro lo más que pueda. Aáncelo con el
tornillo de mano (K).
7. Use la perilla controladora de velocidad a n de seleccionar la velocidad
requerida para operar el borne:
Velocidad 1 – recomendada para rebanar verduras o moler carne
Velocidad 2 – recomendada para rallar queso
8. Pulse el botón de encendido/apagado para operar el borne y el accesorio.
El tazón de la batidora debe estar en posición arriba y la protección de
seguridad en posición cerrada a n de operar el borne. El conjunto del
borne y la batidora no se pueden usar simultáneamente.
9. Para cambiar las velocidades, pulse el botón rojo a n de detener la
batidora. Una vez que el accesorio de batido haya dejado de girar, cambie
la velocidad usando la perilla controladora de velocidad. Tras haber
seleccionado la velocidad nueva, pulse el botón de encendido/apagado
para volver a poner en marcha la batidora.
No se recomienda la velocidad 3 para usarla con accesorios.
limPieza
No rocíe agua ni agentes de limpieza. El líquido podría hacer
contacto con los componentes eléctricos y causar una falla de
los mismos o una descarga eléctrica. No use el equipo si el cable
eléctrico está dañado o se ha modicado.
Para conservar su aspecto hermoso y prolongar su vida útil, limpie
diariamente el equipo.
NOTA:
No limpie el equipo con lana de acero. No use una
manguera a presión ni sumerja los componentes ni
controles eléctricos en agua. No guarde el accesorio en
el borne.
1. Apague la batidora.
2. Desenchufe la batidora del suministro eléctrico antes de limpiarla.
Si la batidora está cableada a un tomacorriente, el suministro debe
cortarse en el cortacircuito.
3. Retire el tazón y el accesorio después de usarlos y límpielos con una
solución detergente tibia que sea apta para alimentos. Si no se retira
del vástago de batido, el accesorio puede quedar atascado en el
vástago.
4. Retire el accesorio y límpielo con un paño humedecido en una
solución detergente suave que sea apta para alimentos. Seque
completamente el accesorio.
5. Para limpiar el exterior de la batidora, use un paño humedecido en
una solución detergente suave que sea apta para alimentos.
ADVERTENCIA
Peligro de descarga eléctrica.
Evite que ingrese agua o cualquier otro tipo de
líquido al interior del equipo, ya que ello podría
causar una descarga eléctrica.
ADVERTENCIA
Peligro de enredo.
El vástago o los accesorios giratorios pueden
causar amputaciones traumáticas o laceraciones
graves. Para evitar lesiones, mantenga las manos
y ropa lejos de las piezas giratorias. No opere el
equipo con protecciones modicadas o faltantes.
ESPAÑOL
solución de Problemas
Problema Podría deberse Solución
Panel de visor sin luces.
Luces de potencia y tiempo encendidas, pero la batidora
no funciona.
Sólo batidoras de 7 ct. gal. (6,6 L) y 10 ct. gal. (11 L):
El accesorio de la batidora deja de moverse, la alarma
suena y el visor destella.
20, 30, 40 y 60 ct. gal. (22 L, 33 L, 44 L y 66 L):
El accesorio de la batidora se detiene.
El equipo no está enchufado. Enchúfelo.
Cortacircuitos en posición apagado
(OFF).
Interruptor de parada en posición
adentro/parada (in/stop).
La protección del tazón no está
completamente cerrada.
Recipiente no levanta en posición de
funcionamiento.
La batidora está sobrecargada.
Se activó la protección contra
sobrecarga térmica.
Colóquelo en posición encendido (ON).
Gírelo hasta la posición afuera/funcionamiento (out/
run).
Ciérrela plenamente.
Elevar recipiente completamente.
Pulse el botón de apagado para reiniciarla. Reduzca
el tamaño del lote en un 10-15%.
Deje que la batidora se enfríe durante 30-60
minutos. Reduzca el tamaño del lote en un 10-15%.
Manual del operador
7
Page 16

servicio y reParación
Este artefacto no tiene piezas que puedan ser reparadas por el usuario. Para evitar lesiones o daños materiales graves, no trate de reparar el equipo ni reemplazar
un cable eléctrico por su cuenta. No envíe el equipo directamente a The Vollrath Company. Comuníquese con el servicio de reparación profesional calicado que se
menciona a continuación.
SERVICIO de asistencia técnica de Vollrath • 1-800-628-0832 • 920-457-4851
• E-mail: techservicereps@vollrathco.com
cláusula de garantía de the vollrath co. l.l.c.
Esta garantía no se aplica a los productos adquiridos para uso personal, familiar ni doméstico, y The Vollrath Company LLC no ofrece una garantía por escrito a los compradores para
dichos usos.
The Vollrath Company LLC garantiza cada uno de sus productos enumerados a continuación contra defectos en materiales y fabricación durante el período pertinente indicado a
continuación. Todos los demás productos fabricados o distribuidos por The Vollrath Company LLC están garantizados contra defectos en materiales y fabricación por un período de un
año. En todos los casos, la garantía rige desde la fecha de compra original del usuario nal que aparece en el recibo.
Batidoras – período de garantía de 2 años, salvo para las correas cuyo período de garantía es de 5 años.
Repuestos – período de garantía de 90 días.
Para obtener información de garantía, inscripción de productos y anuncios de productos nuevos, visite www.vollrath.com.
www.vollrath.com
The Vollrath Company, L.L.C.
1236 North 18th Street
Sheboygan, Wisconsin
53081-3201 USA
Main Tel: 920-457-4851
Main Fax: 920-459-6573
Service Tel: 920-457-4851
Service Fax: 920-459-5462
Vollrath Europe BV
Beneluxbaan 7
5121 AD RIJEN
The Netherlands
+31161870005
Vollrath of China
Vollrath Shanghai Trading Limited
29D, 855 South Pu Dong Road
Shanghai, China 200120
Tel: 86-21-50589580
Vollrath de Mexico S. de R.L. de C.V.
Periferico Sur Edicio 2-C
Col. Santa Maria Tequepexpan
45601 Tlaquepaque, Jalisco Mexico
Tel: (52) 333-133-6767
Tel: (52) 333-133-6769
Fax: (52) 333-133-6768
Núm. art. 2350045-1 es Mod 05/14
Page 17

Manuel d’utilisation
Mélangeur sur comptoir
Mélangeurs au sol / de table
Article Modèle Description V HP A Hz Fiche
40755 MIX1007
4075503 MIX1007
4075502 MIX1007
4075505 MIX1007
40756 MIX1010
4075603 MIX1010
4075602 MIX1010
4075605 MIX1010
40757 MIX1020
4075703 MIX1020
4075702 MIX1020
4075705 MIX1020
40758 MIX1030
4075803 MIX1030
4075802 MIX1030
4075805 MIX1030
40759 MIX1040
4075903 MIX1040
4075902 MIX1040
4075905 MIX1040
40760 MIX1060
4076003 MIX1060
4076002 MIX1060
4076005 MIX1060
Mélangeur de comptoir 7 qt (6,6 l) 110V-120V
Mélangeur de comptoir 7 qt (6,6 l) 220-230V
Mélangeur de comptoir 7 qt (6,6 l) 220-230V
Mélangeur de comptoir 10 qt (11 l) 220-230V
Mélangeur de comptoir 10 qt (11 l) 110V-120V
Mélangeur de comptoir 10 qt (11 l) 220-230V
Mélangeur de comptoir 10 qt (11 l) 220-230V
Mélangeur de comptoir 10 qt (11 l) 220-230V
Mélangeur de table 20 qt (22 l) 110V-120V
Mélangeur de table 20 qt (22 l) 220-230V
Mélangeur de table 20 qt (22 l) 220-230V
Mélangeur de table 20 qt (22 l) 220-230V
Mélangeur au sol 30 qt (33 l) 110V-120V
Mélangeur au sol 30 qt (33 l) 220-230V
Mélangeur au sol 30 qt (33 l) 220-230V
Mélangeur au sol 30 qt (33 l) 220-230V
Mélangeur au sol 40 qt (44 l) 208-240V
Mélangeur au sol 40 qt (44 l) 220-230V
Mélangeur au sol 40 qt (44 l) 220-230V
Mélangeur au sol 40 qt (44 l) 220-230V
Mélangeur au sol 60 qt (66 l) 208-240V
Mélangeur au sol 60 qt (66 l) 220-230V
Mélangeur au sol 60 qt (66 l) 220-230V
Mélangeur au sol 60 qt (66 l) 220-230V
1/3 6
1/3 3
1/3 3
1/3 3
1/3 6
1/3 3
1/3 3
1/3 3
1/2 10
1/2 4
1/2 4
1/2 4
1 16
1 8
1 8
1 8
1-1/2 12
1-1/2 11
1-1/2 11
1-1/2 11
2 16
2 16
2 16
2 16
60 5-15P
50 UK-15P (BS546)
50 Schuko CEE7-7
50 AU2-15P
60 5-15P
50 UK-15P (BS546)
50 Schuko CEE7-7
50 AU2-15P
60 5-15P
50 UK-15P (BS546)
50 Schuko CEE7-7
50 AU2-15P
60 5-20P
50 UK-15P (BS546)
50 Schuko CEE7-7
50 AU2-15P
60 6-15P
50 UK-15P (BS546)
50 Schuko CEE7-7
50 AU2-15P
60 6-20P
50 -50 Schuko CEE7-7
50 AU2-15P
FRANÇAIS
Merci d’avoir acheté cet appareil de transformation des aliments Vollrath. Avant d’utiliser cet appareil, lisez et familiarisez-vous avec le mode
d’emploi et les consignes d’utilisation qui suivent. CONSERVEZ CES INSTRUCTIONS POUR RÉFÉRENCE ULTÉRIEURE. Conservez
l’emballage et le carton d’origine. L’emballage devra être réutilisé pour expédier l’appareil si une réparation est nécessaire.
Item No. 2350045-1 fr Rev 05/14
Page 18
consignes de sécurité
Fonction et objet
Pour garantir un fonctionnement sûr, lisez les avertissements suivants
et comprenez leur signication. Ce manuel contient des consignes de
sécurité, présentées ci-dessous. Lisez-les attentivement.
AVERTISSEMENT
Un avertissement indique la présence d’un danger qui peut causer des
blessures graves, un décès ou des dégâts matériels importants s’il est
ignoré.
ATTENTION
Une mise en garde indique la présence d’un danger qui causera ou
pourra causer des blessures mineures ou des dégâts matériels si elle
est ignorée.
REMARQUE
Une remarque signale des informations importantes sur l’installation,
l’utilisation et la maintenance mais ne présentant pas de danger.
Pour votre sécurité !
Ces consignes de sécurité doivent être suivies à tout moment sous
peine de blessures.
Pour réduire le risque de blessures et d’endommagement de l’appareil :
Branchez l’appareil uniquement sur une prise de terre correspondant à la
tension nominale de la plaque signalétique.
Ne modiez pas les interrupteurs de sécurité.
N’utilisez pas l’appareil sans eau.
FRANÇAIS
N’utilisez pas l’appareil dans des lieux publics et/ou à proximité d’enfants.
N’utilisez pas de rallonge électrique avec cet appareil. Ne branchez pas
cet appareil sur une barrette d’alimentation ou un cordon d’alimentation à
prises multiples.
Pour les meilleurs résultats, les attachements de Vollrath sont
recommandés.
Vériez l’équipement avant chaque utilisation pour s’assurer qu’il est
propre.
Ne nettoyez pas le mélangeur au jet d’eau. Utilisez un chiffon humide
pour nettoyer l’extérieur du mélangeur.
Portez des vêtements adéquats. Ne portez pas de vêtements lâches ou
qui pendent en utilisant cet appareil.
L’appareil doit être installé par un personnel qualié conformément à tous
les décrets locaux.
Utilisez l’appareil à l’horizontale sur une surface plane.
Débranchez l’appareil, éteignez-le et laissez-le refroidir avant de le
nettoyer ou de le déplacer.
Ne vaporisez pas les commandes ou l’extérieur de l’appareil avec des
liquides ou des produits nettoyants.
Ne nettoyez pas l’appareil à la laine d’acier.
Tenez l’appareil et son cordon d’alimentation à l’écart des ammes nues,
des brûleurs électriques ou d’une chaleur excessive.
N’utilisez pas l’appareil s’il a été endommagé ou s’il fonctionne mal.
N’utilisez pas les accessoires sur le moyeu en mélangeant.
Destiné au mélange de pâtes liquides et épaisses, etc. Non prévu pour
une utilisation ménagère, industrielle ou en laboratoire.
caractéristiques et commandes.
5
4
3
2
1
TIMER
ON/
SPEED
OFF
G
F
C
D
A
H
B
E
I
Figure 1. Mélangeur 7 qt (6,6 l) et 10 qt (11 l), caractéristiques et
commandes.
K
J
A
H
G
F
C
D
E
Figure 1. Mélangeur 20 qt (22 l) et 30 qt (33 l), caractéristiques et
commandes.
B
I
2
OperatOr’s Manual
Page 19

K
J
A
H
G
F
B
C
D
E
I
Figure 3. Mélangeur 40 qt (44 l), caractéristiques et commandes.
A
PANNEAU DE COMMANDE Inclut le bouton Marche/Arrêt, le
sélecteur de vitesse, les commandes de la minuterie,
l’afchage de la minuterie et le bouton d’arrêt d’urgence
(certains modèles).
B
MÉCANISME DE LEVAGE DU BOL. Permet d’abaisser et de
relever le berceau du bol.
C
BOL. Contient le produit alimentaire à mélanger.
D
MÉCANISME DE SERRAGE DU BOL. Fixe le bol dans le
berceau.
E
BERCEAU DE BOL. Contient le bol.
F
ARBRE DE MÉLANGE. Point de xation de l’accessoire de
mélange.
G
BARRIÈRE DE SÉCURITÉ. Évite les blessures et tout contact
avec l’arbre ou l’accessoire de mélange. Cette barrière doit être
fermée pour permettre le fonctionnement de l’appareil.
H
PARE-ÉCLABOUSSURES. Permet d’éviter le déversement du
contenu du bol. Évite les blessures et tout contact avec l’arbre
ou l’accessoire de mélange.
I
SOCLE. Soutient l’appareil.
FRANÇAIS
J
MOYEU DE FIXATION (certains modèles). Permet d’attacher
K
J
A
B
un accessoire au mélangeur.
K
VIS À OREILLES DU MOYEU DE FIXATION (certains
modèles). Fixe l’accessoire au mélangeur.
déballage et installation initiale de l’aPPareil
G
H
F
C
D
E
I
Enlevez avec précaution les caisses et le matériel d’emballage de l’appareil.
Les modèles expédiés sur des palettes sont boulonnés à la palette. Les
boulons doivent être enlevés pour détacher l’appareil de la palette. Lorsque
vous n’en avez plus besoin, jetez tout le matériel d’emballage en respectant
l’environnement.
Placez l’appareil sur une surface plane en prévoyant un dégagement
sufsant pour permettre son nettoyage et sa maintenance sans difcultés.
Branchez l’appareil uniquement sur une prise de terre correspondant à
la tension nominale de la plaque signalétique. N’utilisez pas de rallonge
électrique avec cet appareil. Ne branchez pas cet appareil sur une barrette
d’alimentation ou un cordon d’alimentation à prises multiples. Certains
modèles exigent l’installation d’un branchement électrique par un électricien
qualié aux ns de conformité aux décrets locaux.
Figure 4. Mélangeur 60 qt (44 l), caractéristiques et commandes.
OperatOr’s Manual
3
Page 20

mode d’emPloi
AVERTISSEMENT
Risque d’emmêlement.
L’arbre et les accessoires rotatifs peuvent causer
des amputations traumatiques ou des lacérations
sévères. Pour éviter les blessures, tenez les mains
et les vêtements à l’écart des composants rotatifs.
N’utilisez pas sans les protections ni avec les
protections altérées.
mode d’emPloi du mélangeur 10 qt (11 l) .
5
F
SPEED
4
3
2
1
TIMER
D
G
ON/
OFF
B
A
AVERTISSEMENT
Risque d’électrocution.
Empêchez toute inltration d’eau et autres liquides
dans l’appareil. L’inltration de liquide dans
l’appareil risque de causer une électrocution.
Ne vaporisez pas d’eau ou de produits nettoyants. Du liquide risque
d’entrer en contact avec les composants électriques et de causer la
défaillance d’un composant ou une décharge électrique. N’utilisez
pas l’appareil si le cordon d’alimentation est abîmé ou a été modié.
Avant la première utilisation, il est important de nettoyer l’équipement.
Lavez les accessoires, le bol, les protections et autres composants à l’eau
savonneuse chaude et rincez minutieusement pour enlever le lm d’huile de
protection.
La barrière de sécurité doit être en position entièrement fermée pour
permettre l’activation du mélangeur. Si la barrière de sécurité n’est pas bien
fermée, le méIangeur ne démarrera pas. Si elle est ouverte en cours de
marche, le mélangeur s’arrêtera. Pour remettre le mélangeur en marche,
fermez la barrière de sécurité.
Mélangeurs 20 qt. (22 l) , 30 qt. (33 l) , 40 qt. (44 l) et 60 qt. (66 l)
: Le moteur est équipé d’un dispositif d’arrêt de sécurité qui arrêtera
FRANÇAIS
automatiquement le mélangeur si la température du moteur dépasse les
limites opératoires recommandées par le fabricant. Le commutateur de
protection contre les surcharges se déclenchera si le volume mélangé est
trop lourd. Dans ce cas, laissez refroidir le mélangeur pendant 30 à 60
minutes minimum et réduisez le volume à mélanger de 10 à 15 %.
Les mélangeurs 7 qt (6,6 l) et 10 qt (11 l) ont un dispositif de protection
contre les surcharges qui arrêtera automatiquement le mélangeur si la
résistance du moteur dépasse les limites opératoires recommandées par
le fabricant. Une alarme retentira et l’afchage clignotera. Une pression sur
OFF (Arrêt) réarmera le mélangeur.
1. Avant chaque utilisation, assurez-vous que l’appareil est propre.
2. Avant d’attacher le bol, sélectionnez l’accessoire de mélange que vous
utiliserez. Placez l’accessoire de mélange sélectionné dans le bol vide
(C). N’essayez pas d’attacher l’accessoire de mélange sur l’arbre de
mélange (F) avant que le bol ne soit en position. Voir gure 1, 2, 3 ou 4.
3. Abaissez le berceau du bol à la position la plus basse en tournant le
mécanisme de levage du bol (B).
4. Tournez les leviers serrage du bol (D) en position ouverte ou arrière.
5. Tenez le bol (C) de manière à ce que la goupille sur le bol soit tournée
vers l’intérieur, vers le mélangeur. Positionnez le bol de manière à
aligner la goupille sur la fente du berceau du bol (E). Glissez la goupille
dans la fente.
6. Alignez les trous des ergots du bol sur les goupilles du berceau du bol
(E). Placez le bol (C) sur son berceau (E).
7. Tournez les leviers de serrage du bol (D) vers l’avant sur les ergots du
bol pour xer le bol (C) sur le berceau (E).
8. Installez l’accessoire sur l’arbre de mélange (F). Alignez la gorge de
l’accessoire sur la goupille de l’arbre de mélange. Poussez l’accessoire
vers le haut et tournez-le pour le verrouiller sur la goupille.
9. Remontez le bol (C) à la hauteur maximale à l’aide du mécanisme de
levage du bol (B) en tournant dans le sens anti-horaire jusqu’à ce qu’il
s’enclenche en place.
4
OperatOr’s Manual
E
C
Figure 5. Panneau commande mélangeur 7 qt (6,6 l) et 10 qt (11 l).
A
Bouton ON/OFF (Marche/Arrêt). Permet la mise en marche et
l’arrêt du mélangeur.
B
AFFICHAGE NUMÉRIQUE. Afche le temps restant dans un
cycle minuté ; afche “ON” quant l’appareil fonctionne sans
la minuterie et “OFF” lorsque l’appareil est branché et ne
fonctionne pas.
C
BOUTON + MINUTERIE. Augmente le temps de la minuterie.
Temps maximum 30 minutes.
D
BOUTON - MINUTERIE. Diminue le temps de la minuterie.
E
BOUTON + VITESSE. Augmente la vitesse de mélange.
F
BOUTON - VITESSE. Diminue la vitesse de mélange.
G
VALEURS ET TÉMOINS DE VITESSE. Les valeurs et voyants
correspondent pour indiquer la vitesse de mélange. Plus le
nombre est élevé, plus la vitesse est grande, et inversement.
Pour les mélanges légers, il est recommandé de ne pas utiliser le mélangeur
en continu pendant plus de 20 minutes et de prévoir une période de
refroidissement de 10 à 15 minutes entre deux cycles de mélange.
1. Fermez la barrière de sécurité (G) (Figure 1). Pour que le mélangeur
fonctionne, la barrière de sécurité doit être fermée. Si la barrière de
sécurité est ouverte ou pas bien fermée, le méIangeur ne fonctionnera
pas.
2. Sélectionnez la vitesse opératoire en fonction des ingrédients. Utilisez le
bouton de vitesse + (E) ou - (F) pour programmer la vitesse (Figure 5).
Vitesse 1 – Utilisez pour un mélange lent, pour écraser et pour pétrir les
pâtes levées.
Vitesse 2 – Utilisez pour mélanger les pâtes à biscuits et à gâteaux.
Vitesse 3 – Utilisez pour battre et fouetter à vitesse moyenne-rapide.
Vitesse 4 – Pour faire de la crème chantilly et fouetter des blancs d’œuf.
Vitesse 5 – Pour faire de la crème chantilly et fouetter des blancs d’œuf
en petite quantités.
3. Programmez la durée du cycle si vous le souhaitez à l’aide du bouton
+ (C) ou - (D) de la minuterie. La durée de cycle maximum est de 30
minutes.
4. Pour commencer le cycle de mélange, appuyez sur On/Off (A). Le
mélangeur continue à fonctionner jusqu’à ce que vous rappuyiez sur
On/Off (A). Ou bien, le mélangeur fonctionnera jusqu’à la n du cycle
programmé.
Page 21

mode d’emPloi des mélangeurs 20 qt (22 l) et 30 qt (33 l).
E
G
5. Le mélangeur s’arrêtera et la minuterie émettra trois bips une fois le
cycle terminé.
REMARQUE :
Éteignez le mélangeur avant de passer d’une vitesse à l’autre sous
peine d’endommager la boîte d’engrenages et d’annuler la garantie.
B
mode d’emPloi des mélangeurs 40 qt (44 l) et 60 qt (66 l).
D
F
A
C
Figure 6. Panneau de commande mélangeurs 20 qt (22 l) et 30 qt (33 l).
A
Bouton ON/OFF (Marche/Arrêt). Permet la mise en marche et
l’arrêt du mélangeur.
B
AFFICHAGE NUMÉRIQUE. Afche le temps restant dans un
cycle minuté ; afche “ON” quant l’appareil fonctionne sans
la minuterie et “OFF” lorsque l’appareil est branché et ne
fonctionne pas.
C
BOUTON + MINUTERIE. Augmente le temps de la minuterie.
Temps maximum 30 minutes.
D
BOUTON - MINUTERIE. Diminue le temps de la minuterie.
E
BOUTON D’ARRÊT D’URGENCE. Appuyez sur ce bouton pour
arrêter le mélangeur. Tournez-le dans le sens des aiguilles
d’une montre pour le réarmer.
F
MANETTE DE SÉLECTION DE LA VITESSE. Permet de
modier la vitesse du mélangeur.
G
VOYANT INDICATEUR. S’allume quand le mélangeur
fonctionne ou qu’il a été programmé.
REMARQUE :
Éteignez le mélangeur avant de passer d’une vitesse à l’autre sous peine
d’endommager la boîte d’engrenages et d’annuler la garantie.
Figure 7. Panneau de commande du mélangeur 40 qt (44 l).
Figure 8. Panneau de commande du mélangeur 60 qt (66 l).
A
Bouton ON (Marche). Permet de mettre en marche le
mélangeur.
1. Fermez la barrière de sécurité (G) (Figure 2). Pour que le mélangeur
fonctionne, la barrière de sécurité doit être fermée. Si la barrière de
sécurité est ouverte ou pas bien fermée, le méIangeur ne fonctionnera
pas.
2. Sélectionnez la vitesse opératoire en fonction des ingrédients. Utilisez la
manette de sélection de vitesse (F) pour régler la vitesse (Figure 6).
Vitesse 1 – Pour mélanger les pâtes lourdes avec un taux d’absorption
de 50 % maximum.
Vitesse 2 – Pour mélanger les pâtes à gâteaux, les pâtes liquides et les
pâtes lourdes avec un taux d’absorption de plus de 50 %.
Vitesse 3 – Pour mélanger les blancs d’œuf.
REMARQUE :
La teneur en eau de la pâte lourde est critique lors de la sélection de la
vitesse de mélange correcte. Pour mélanger les pâtes lourdes avec un
taux d’absorption de 50 % maximum, n’utilisez pas la vitesse 2.
3. Une fois la vitesse sélectionnée, appuyez sur le bouton On/Off pour
démarrer le mélangeur. Ou bien, sélectionnez un temps de cycle en
appuyant sur le bouton + (D) ou - (C) de la minuterie. Appuyez sur le
bouton On/Off.
4. Pour changer de vitesse, appuyez sur le bouton rouge pour arrêter le
mélangeur. Une fois que l’accessoire de mélange s’arrête de tourner,
changez la vitesse en tournant le sélecteur de vitesse. Une fois la
nouvelle vitesse sélectionnée, appuyez sur le bouton On/Off pour
redémarrer le mélangeur.
B
AFFICHAGE NUMÉRIQUE. Afche le temps restant dans un
cycle minuté ; afche “ON” quant l’appareil fonctionne sans
la minuterie et “OFF” lorsque l’appareil est branché et ne
fonctionne pas.
C
BOUTON + MINUTERIE. Augmente le temps de la minuterie.
Temps maximum 30 minutes.
D
BOUTON - MINUTERIE. Diminue le temps de la minuterie.
E
BOUTON D’ARRÊT D’URGENCE. Appuyez sur ce bouton pour
arrêter le mélangeur. Tournez-le dans le sens des aiguilles
d’une montre pour le réarmer.
F
MANETTE DE SÉLECTION DE LA VITESSE. Permet de
modier la vitesse du mélangeur.
G
BOUTON D’ARRÊT D’URGENCE. Permet d’arrêter le
mélangeur.
REMARQUE :
Éteignez le mélangeur avant de passer d’une vitesse à l’autre sous
peine d’endommager la boîte d’engrenages et d’annuler la garantie.
E
B
C
D
G
F
E
A
FRANÇAIS
B
C
G
D
A
F
OperatOr’s Manual
5
Page 22

1. Fermez la barrière de sécurité (G) (Figure 3 ou 4). Pour que le mélangeur
fonctionne, la barrière de sécurité doit être fermée. Si la barrière de sécurité
est ouverte ou pas bien fermée, le méIangeur ne fonctionnera pas.
2. Sélectionnez la vitesse opératoire en fonction des ingrédients. Utilisez la
manette de sélection de vitesse (F) pour régler la vitesse (Figure 7 ou 8).
Vitesse 1 – Pour mélanger les pâtes lourdes avec un taux d’absorption de
50 % maximum.
Vitesse 2 – Pour mélanger les pâtes à gâteaux, les pâtes liquides et les
pâtes lourdes avec un taux d’absorption de plus de 50 %.
Vitesse 3 – Pour mélanger les blancs d’œuf.
REMARQUE :
La teneur en eau de la pâte lourde est critique lors de la sélection de la
vitesse de mélange correcte. Pour mélanger les pâtes lourdes avec un taux
1. Une fois la vitesse sélectionnée, appuyez sur le bouton On/Off pour
démarrer le mélangeur. Ou bien, sélectionnez un temps de cycle en
appuyant sur le bouton + (D) ou - (C) de la minuterie. Appuyez sur le
bouton On/Off.
2. Pour changer de vitesse, appuyez sur le bouton rouge pour arrêter le
mélangeur. Une fois que l’accessoire de mélange s’arrête de tourner,
changez la vitesse en tournant le sélecteur de vitesse. Une fois la
nouvelle vitesse sélectionnée, appuyez sur le bouton On/Off pour
redémarrer le mélangeur.
3. Le mélangeur s’arrêtera et la minuterie émettra trois bips une fois le
cycle terminé.
REMARQUE :
Éteignez le mélangeur avant de passer d’une vitesse à l’autre sous peine
d’endommager la boîte d’engrenages et d’annuler la garantie.
d’absorption de 50 % maximum, n’utilisez pas la vitesse 2.
tableau de contenances des mélangeurs
Produit
Pâte à pain et petits pains
– Taux d’absorption 60 %
Pâte à pain lourde –
Taux d’absorption 55 %
Pâte à pizza, ne –
Taux d’absorption 40 %
Pâte à pizza, moyenne –
Taux d’absorption 50 %
Pâte à pizza, épaisse –
Taux d’absorption 60 %
FRANÇAIS
Pâte à beignets levée –
Taux d’absorption 65 %
Pâte à tarte
Purée de pommes de terre
Gâteau
Pâte à gaufres ou crêpes
Agitateur
Crochet à pétrir les
pâtes
Crochet à pétrir les
pâtes
Crochet à pétrir les
pâtes
Crochet à pétrir les
pâtes
Crochet à pétrir les
pâtes
Crochet à pétrir les
pâtes
Branche de batteur
plate
Branche de batteur
plate
Branche de batteur
plate
Branche de batteur
plate
Vitesse
Vitesse 1 seulement
Vitesse 1 seulement
Vitesse 1 seulement
Vitesse 1 seulement
Vitesse 1 seulement
Vitesse 1 seulement
Toutes les vitesses
Toutes les vitesses
Toutes les vitesses
Toutes les vitesses
Blancs d’œuf Fouet métallique Toutes les vitesses
Meringue Fouet métallique Toutes les vitesses
Crème fouettée Fouet métallique Toutes les vitesses
Gâteau, quatre-quart
Branche de batteur
plate
Toutes les vitesses
Mélangeur
7 qt (6,6 l)
4 lbs.
(5 kg)
2 lbs.
(0.9 kg)
2 lbs.
(0.9 kg)
3 lbs.
(1.3 kg)
4 lbs.
(1.8 kg)
2 lbs.
(0.9 kg)
4 lbs.
(1.8 kg)
4 lbs.
(1.8 kg)
6 lbs.
(2.7 kg)
3 qts.
(3.3 l)
3/4 pt.
(0.4 l)
1/2 pt.
(0.3 l)
1-3/4 qts.
(1.9 l)
6 lbs.
(2.7 kg)
Mélangeur
10 qt (11 l)
5 lbs.
(2.3 kg)
3 lbs.
(1.3 kg)
3 lbs.
(1.3 kg)
4 lbs.
(1.8 kg)
5 lbs.
(2.3 kg)
2 lbs.
(0.9 kg)
4 lbs.
(1.8 kg)
5 lbs.
(2.3 kg)
8 lbs.
(3.6 kg)
4 qts.
(4.4 l)
1 pt.
(0.5 l)
3/4 pt.
(0.4 l)
2 qts.
(2.1 l)
8 lbs.
(3.6 kg)
Mélangeur
20 qt (22 l)
25 lbs.
(11.3 kg)
15 lbs.
(6.8 kg)
9 lbs.
(4.1 kg)
10 lbs.
(4.5 kg)
20 lbs.
(9.1 kg)
9 lbs.
(4.1 kg)
18 lbs.
(8.2 kg)
15 lbs.
(6.8 kg)
20 lbs.
(9.1 kg)
8 qts.
(8.8 l)
1 qts.
(1.1 l)
1 qts.
(1.` l)
4 qts.
(4.4 l)
20 lbs.
(9.1 kg)
Lors du mélange de la pâte, vériez le taux d’absorption = Poids de l’eau divisé par le poids de la farine.
Les contenances ci-dessus sont fonction d’une teneur en eau de 12 % de la farine à une température d’eau 70 °F (21 °C).
Si la farine est à haute teneur en gluten, réduisez le volume à mélanger de 10 %.
1 gallon (1 l) d’eau = 8,.3 lb (1 kg)
1 pinte d’eau = 2.1 lb (0.25 l)
Exemple :
Si la recette demande 5 lb d’eau pour 10 lb de farine, donc 5 divisé par 10 = 0.50 x 100 = Taux d’absorption de 50 %.
N’utilisez pas la vitesse 2 avec des mélanges avec un taux d’absorption inférieur à 50 %
Mélangeur
30 qt (33 l)
45 lbs. (20.4
kg)
30 lbs. (13.6
kg)
14 lbs.
(6.4 kg)
20 lbs.
(9.1 kg)
40 lbs. (18.1
kg)
15 lbs.
(6.8 kg)
30 lbs. (13.6
kg)
23 lbs.
(1.3 kg)
30 lbs.
(13.6 kg)
12 qts.
(13.2 l)
1-1/2 qts
(1.7 l).
1-1/2 qts
(1.7 l).
6 qts.
(6.6 l)
35 lbs.
(13.6 kg)
Mélangeur
40 qt (44 l)
50 lbs.
(22.7 kg)
40 lbs.
(18.1 kg)
25 lbs.
(11.3 kg)
32 lbs.
(14.5 kg)
50 lbs.
(22.7 kg)
25 lbs.
(11.3 kg)
35 lbs.
(15.8 kg)
30 lbs.
(13.6 kg)
12 lbs.
(0.9 kg)
16 qts.
(17.6 l)
2 qts.
(2.1 l)
2 qts.
(2.1 l)
8 qts.
(8.8 l)
40 lbs.
(18.1 kg)
Mélangeur
60 qt (66 l)
90 lbs.
(40.8 kg)
70 lbs.
(31.8 kg)
40 lbs.
(18.1 kg)
60 lbs.
(27.2 kg)
70 lbs.
(31.8 kg)
40 lbs.
(18.1 kg)
60 lbs.
(27.2 kg)
45 lbs.
(20.4 kg)
60 lbs.
(27.2 kg)
24 qts.
(26.4 l)
3 qts.
(3.3 l)
3 qts.
(3.3 l)
12 qts.
(13.2 l)
60 lbs.
(27.2 kg)
6
OperatOr’s Manual
Page 23

utilisation du moyeu à accessoire
nettoyage
Le mélangeur est équipé d’un moyeu de mélange standard n° 12. Il est
recommandé d’utiliser des accessoires Vollrath d’origine. Pour utiliser le moyeu
à accessoire :
REMARQUE :
Éteignez le mélangeur avant de passer d’une vitesse à l’autre sous peine
d’endommager la boîte d’engrenages et d’annuler la garantie.
1. Arrêtez le mélangeur.
2. Desserrez la vis à oreilles du moyeu (K). Il n’est pas nécessaire d’enlever
complètement la vis (Figures 2, 3 et 4).
3. Enlevez le cache du moyeu à accessoire.
Ne vaporisez pas d’eau ou de produits nettoyants. Du liquide risque
d’entrer en contact avec les composants électriques et de causer la
défaillance d’un composant ou une décharge électrique. N’utilisez
pas l’appareil si le cordon d’alimentation est abîmé ou a été modié.
4. Insérez l’arbre de l’accessoire dans le moyeu (J).
5. Alignez la goupille de l’arbre de l’accessoire sur le renfoncement du moyeu.
6. Glissez l’accessoire le plus loin possible. Fixez-le en serrant la vis à oreilles
(K).
7. Utilisez le sélecteur de vitesse pour choisir la vitesse opératoire requise
pour le moyeu :
Vitesse 1 – recommandée pour émincer les légumes ou hacher la viande
Vitesse 2 – recommandée pour râper le fromage
8. Appuyez sur le bouton On/Off ou On pour actionner le moyeu et
l’accessoire. Pour que le moyeu fonctionne, le bol du mélangeur doit
être en position haute et la barrière de sécurité fermée. Le moyeu et le
mélangeur ne peuvent pas être utilisés en même temps.
9. Pour changer de vitesse, appuyez sur le bouton rouge pour arrêter le
mélangeur. Une fois que l’accessoire de mélange s’arrête de tourner,
changez la vitesse en tournant le sélecteur de vitesse. Une fois la nouvelle
vitesse sélectionnée, appuyez sur le bouton On/Off pour redémarrer le
mélangeur.
La vitesse 3 est déconseillée avec les accessoires.
Pour maintenir l’apparence et augmenter la durée de service, nettoyez
chaque jour l’appareil.
REMARQUE :
Ne nettoyez pas l’appareil à la laine d’acier. Ne lavez pas
l’appareil au jet d’eau et n’immergez pas les commandes
ou les composants électriques dans l’eau. Ne laissez
pas l’accessoire inutilisé sur le moyeu en guise de
rangement.
1. Arrêtez le mélangeur.
2. Débranchez le mélangeur du secteur avant de le nettoyer. Si le
mélangeur est câblé à la prise électrique, l’alimentation devra être
coupée au disjoncteur.
3. Enlevez le bol et l’accessoire après chaque utilisation et nettoyez à
l’eau chaude et avec un détergent sans danger en cas de contact
avec les aliments. Ne laissez pas l’accessoire inutilisé en place sur
l’arbre de mélange au risque qu’il se bloque sur l’arbre de mélange.
4. Enlevez l’accessoire et nettoyez avec un chiffon humide et un
détergent léger sans danger en cas de contact avec les aliments.
Essuyez bien l’accessoire.
5. Pour nettoyer l’extérieur du mélangeur, passez dessus un chiffon
humide et un détergent léger sans danger en cas de contact avec les
déPannage
aliments.
AVERTISSEMENT
Risque d’électrocution.
Empêchez toute inltration d’eau et autres liquides
dans l’appareil. L’inltration de liquide dans
l’appareil risque de causer une électrocution.
AVERTISSEMENT
Risque d’emmêlement.
L’arbre et les accessoires rotatifs peuvent causer
des amputations traumatiques ou des lacérations
sévères. Pour éviter les blessures, tenez les mains
et les vêtements à l’écart des composants rotatifs.
N’utilisez pas sans les protections ni avec les
protections altérées.
FRANÇAIS
Problème La cause en est peut-être... Mesure corrective
Le panneau d’afchage ne s’allume pas.
Les témoins d’alimentation et de minuterie sont allumés,
mais le mélangeur ne fonctionne pas.
Mélangeurs 7 qt (6,6 l) et 10 qt (11 l) seulement :
l’accessoire du mélangeur arrête de tourner, l’alarme
retentit et l’afchage clignote.
Mélangeurs 20 qt, 30 qt, 40 qt et 60 qt (22 l, 33 l, 44 l,
66 l) :
l’accessoire du mélangeur s’arrête.
L’appareil n’est pas branché. Branchez-le.
Le disjoncteur est en position OFF (Arrêt). Le disjoncteur est en position ON (Marche).
Interrupteur Stop en position enfoncée/
Arrêt.
La barrière de sécurité n’est pas
complètement fermée.
Tournez l’interrupteur Stop en position remontée/
Marche.
Fermez complètement la barrière de sécurité.
Bol pas levé en position de fonctionnement. Bol relever complètement.
Appuyez sur Off (Arrêt) pour réarmer le
Le mélangeur est surchargé.
mélangeur. Réduisez le volume à mélanger de
10 à 15 %.
Laissez refroidir le mélangeur pendant 30 à 60
Protection contre la surchauffe activée.
minutes environ. Réduisez le volume à mélanger
de 10 à 15 %.
OperatOr’s Manual
7
Page 24

sav et réParations
Cet appareil ne contient aucune pièce réparable par l’utilisateur. Pour éviter toute blessure grave ou tout dommage sévère, n’essayez jamais de réparer l’appareil ou
de remplacer vous-même un cordon d’alimentation endommagé. N’envoyez aucun appareil directement à la Vollrath Company. Contactez le service de réparation
professionnel qualié indiqué ci-dessous.
SERVICE technique VOLLRATH • 1-800-628-0832 (États-Unis) • 920-457-4851
• E-mail: techservicereps@vollrathco.com
Lorsque vous contacterez le service de réparation professionnel, tenez-vous prêt à fournir le numéro de modèle, le numéro de série et le justicatif d’achat indiquant
la date d’achat de l’appareil.
garantie de la vollrath co. l.l.c.
Cette garantie ne s’applique pas aux produits achetés pour un usage personnel, familial ou ménager, et la Vollrath Company LLC ne propose aucune garantie écrite
aux acheteurs pour de telles utilisations.
La Vollrath Company LLC garantit chacun de ses produits ci-dessous contre les vices de matériaux et les malfaçons pendant la période applicable indiquée ci-après.
Tous les autres produits fabriqués ou distribués par la Vollrath Company LLC sont garantis contre les vices de matériaux et les malfaçons pendant une période d’un
an. Dans tous les cas, la garantie entre en vigueur à la date d’achat par l’utilisateur initial indiquée sur le reçu.
Mélangeurs – La période de garantie est de 2 ans, sauf les courroies, assorties d’une période de garantie de 5 ans.
Pièces détachées – La période de garantie est de 90 jours.
Pour des informations complètes sur la garantie, l’enregistrement des produits et l’annonce de nouveaux produits, consultez www.vollrath.com.
www.vollrath.com
The Vollrath Company, L.L.C.
1236 North 18th Street
Sheboygan, Wisconsin
53081-3201 USA
Main Tel: 920-457-4851
Main Fax: 920-459-6573
Service Tel: 920-457-4851
Service Fax: 920-459-5462
Vollrath Europe BV
Beneluxbaan 7
5121 AD RIJEN
The Netherlands
+31161870005
Vollrath of China
Vollrath Shanghai Trading Limited
29D, 855 South Pu Dong Road
Shanghai, China 200120
Tel: 86-21-50589580
Vollrath de Mexico S. de R.L. de C.V.
Periferico Sur Edicio 2-C
Col. Santa Maria Tequepexpan
45601 Tlaquepaque, Jalisco Mexico
Tel: (52) 333-133-6767
Tel: (52) 333-133-6769
Fax: (52) 333-133-6768
Item No. 2350045-1 fr Rev 5/14
Page 25

Manuale dell’utente
Miscelatore da piano di lavoro
Miscelatori da pavimento/banco
Articolo Modello Descrizione Tensione HP A Hz Spina
40755 MIX1007 Miscelatore da piano di lavoro da 6,6 l 110V-120V 1/3 6 60 5-15P
4075503 MIX1007 Miscelatore da piano di lavoro da 6,6 l 220-230V 1/3 3 50 UK-15P (BS546)
4075502 MIX1007 Miscelatore da piano di lavoro da 6,6 l 220-230V 1/3 3 50 Schuko CEE7-7
4075505 MIX1007 Miscelatore da piano di lavoro da 6,6 l 220-230V 1/3 3 50 AU2-15P
40756 MIX1010 Miscelatore da piano di lavoro da 11 l 110V-120V 1/3 6 60 5-15P
4075603 MIX1010 Miscelatore da piano di lavoro da 11 l 220-230V 1/3 3 50 UK-15P (BS546)
4075602 MIX1010 Miscelatore da piano di lavoro da 11 l 220-230V 1/3 3 50 Schuko CEE7-7
4075605 MIX1010 Miscelatore da piano di lavoro da 11 l 220-230V 1/3 3 50 AU2-15P
40757 MIX1020 Miscelatore da banco da 22 l 110V-120V 1/2 10 60 5-15P
4075703 MIX1020 Miscelatore da banco da 22 l 220-230V 1/2 4 50 UK-15P (BS546)
4075702 MIX1020 Miscelatore da banco da 22 l 220-230V 1/2 4 50 Schuko CEE7-7
4075705 MIX1020 Miscelatore da banco da 22 l 220-230V 1/2 4 50 AU2-15P
40758 MIX1030 Miscelatore da pavimento da 33 l 110V-120V 1 16 60 5-20P
4075803 MIX1030 Miscelatore da pavimento da 33 l 220-230V 1 8 50 UK-15P (BS546)
4075802 MIX1030 Miscelatore da pavimento da 33 l 220-230V 1 8 50 Schuko CEE7-7
4075805 MIX1030 Miscelatore da pavimento da 33 l 220-230V 1 8 50 AU2-15P
40759 MIX1040 Miscelatore da pavimento da 44 l 208-240V 1-1/2 12 60 6-15P
4075903 MIX1040 Miscelatore da pavimento da 44 l 220-230V 1-1/2 11 50 UK-15P (BS546)
4075902 MIX1040 Miscelatore da pavimento da 44 l 220-230V 1-1/2 11 50 Schuko CEE7-7
4075905 MIX1040 Miscelatore da pavimento da 44 l 220-230V 1-1/2 11 50 AU2-15P
40760 MIX1060 Miscelatore da pavimento da 66 l 208-240V 2 16 60 6-20P
4076003 MIX1060 Miscelatore da pavimento da 66 l 220-230V 2 16 50 -4076002 MIX1060 Miscelatore da pavimento da 66 l 220-230V 2 16 50 Schuko CEE7-7
4076005 MIX1060 Miscelatore da pavimento da 66 l 220-230V 2 16 50 AU2-15P
ITALIANO
Grazie per aver acquistato questa attrezzatura di preparazione gastronomica Vollrath. Prima di adoperare l’attrezzatura, è importante prendere
dimestichezza con le istruzioni per l’uso e le misure di sicurezza seguenti. CONSERVARE QUESTE ISTRUZIONI PER RIFERIMENTO
FUTURO. Conservare la confezione e l’imballo originali, in quanto sono necessari nel caso in cui l’attrezzatura debba essere spedita per
eventuali riparazioni.
art. n. 2350045-1 it Rev. 05/14
Page 26
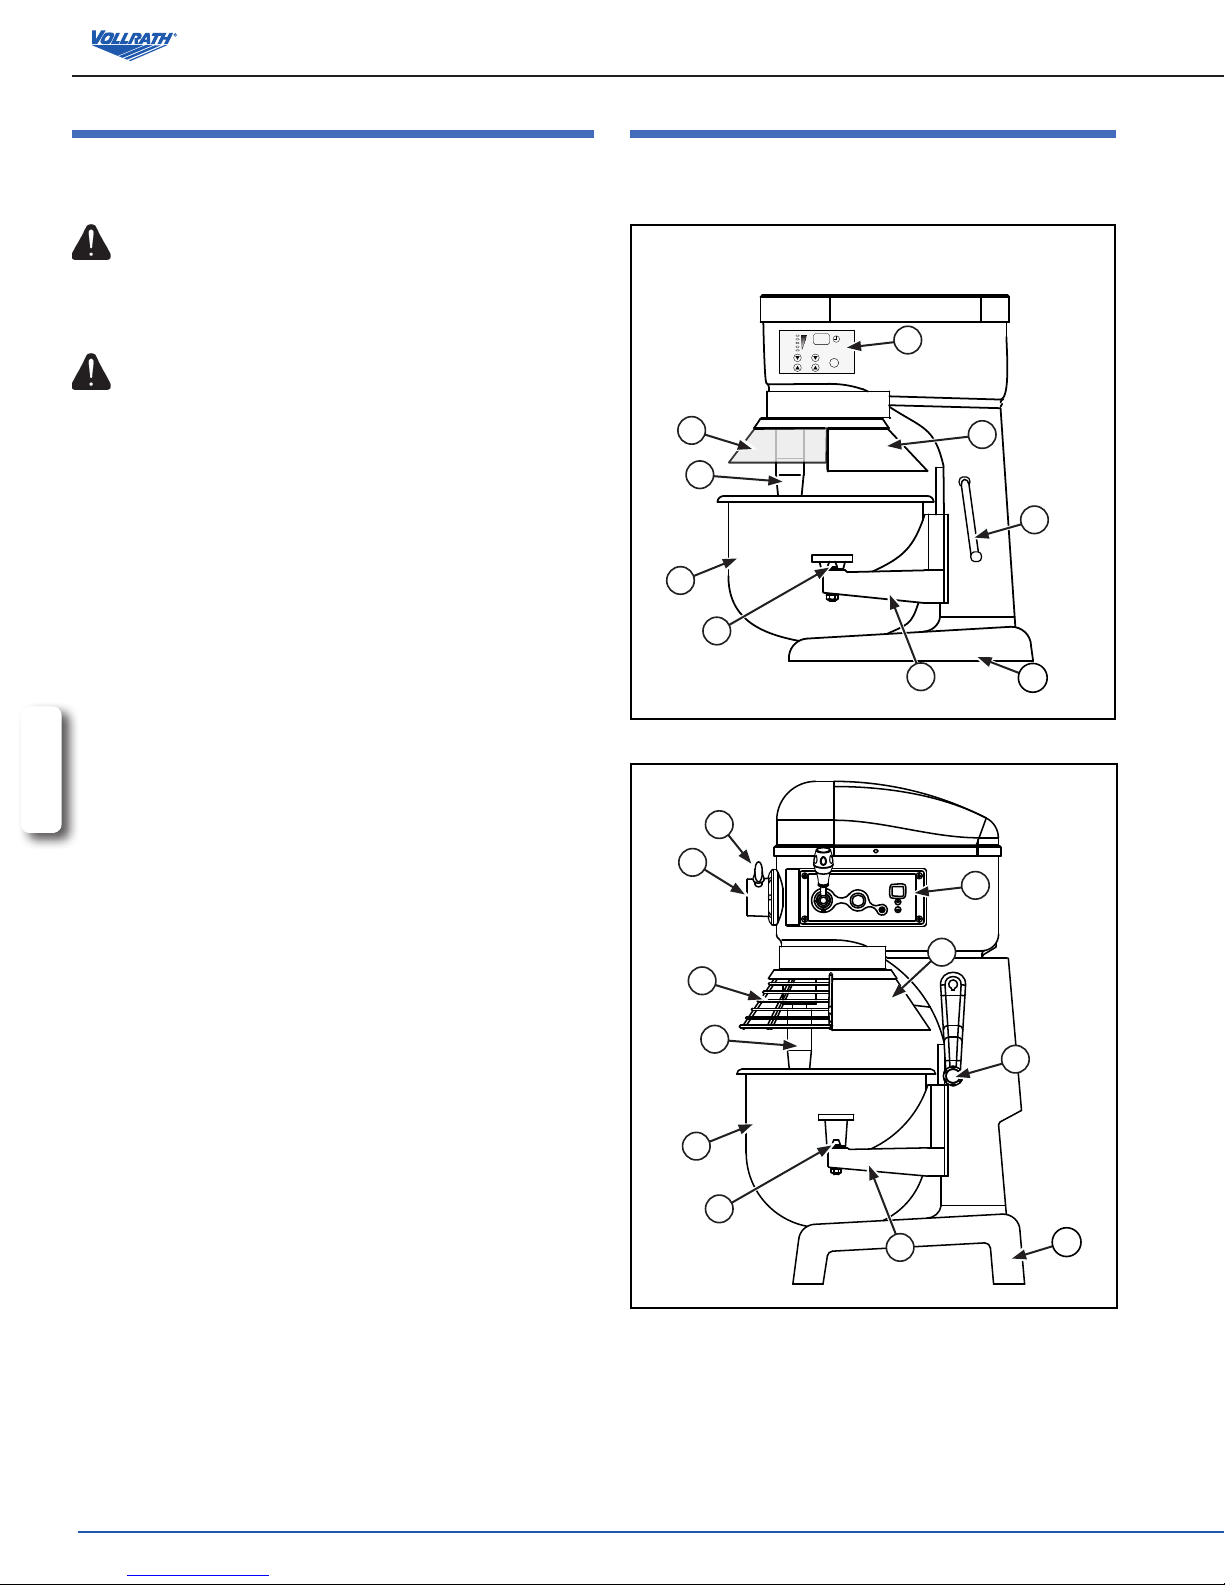
Precauzioni di sicurezza
Funzioni e scoPi
Per garantire un funzionamento sicuro, leggere le avvertenze seguenti
e comprenderne il signicato. Il presente manuale contiene le
precauzioni di sicurezza descritte di seguito. Leggere con attenzione.
AVVERTENZA
La dicitura Avvertenza viene utilizzata per indicare la presenza di un
pericolo che, se ignorato, può causare gravi lesioni personali, anche
letali o danni notevoli alla proprietà.
ATTENZIONE
La dicitura Attenzione viene utilizzata per indicare la presenza di un
pericolo che, se ignorato, causa o può causare lesioni personali o danni
alla proprietà di entità minore.
NOTA
La dicitura Nota viene utilizzata per indicare al personale di
installazione, azionamento o manutenzione informazioni importanti ma
non correlate a pericoli.
Informazioni di sicurezza!
È necessario attenersi sempre alle precauzioni riportate di seguito.
La mancata osservanza di tali precauzioni può essere causa di lesioni
personali per l’utente e le altre persone.
Per limitare il rischio di lesioni o danni all’unità:
Collegare il piano di cottura solamente a prese elettriche dotate di messa
a terra e con tensione nominale adeguata.
Non alterare o manomettere gli interruttori di sicurezza.
ITALIANO
Non lasciare il piano di cottura incustodito durante l’uso.
Non utilizzare l’apparecchiatura in luoghi pubblici e/o in presenza di
bambini.
Non utilizzare una prolunga con questa attrezzatura. Non collegare questa
attrezzatura a una ciabatta elettrica o a un cavo con presa multipla.
Per ottenere i migliori risultati, si consiglia Vollrath allegati.
Controllare l’apparecchiatura prima dell’uso per sincerarsi che sia pulita.
Non lavare il miscelatore con un getto d’acqua, ma utilizzare un panno
umido per detergerne le parti esterne.
Indossare indumenti appropriati, aderenti e senza appendici sciolte
mentre si utilizza l’apparecchiatura.
Afdare l’installazione dell’apparecchiatura a personale qualicato nel
rispetto delle norme e degli ordinamenti locali.
Utilizzare l’apparecchiatura su superci piane e livellate.
Prima di pulire o spostare l’apparecchiatura, scollegarla dalla presa
elettrica e lasciarla raffreddare.
Non spruzzare liquidi o detergenti sui comandi o sull’esterno
dell’apparecchiatura.
Non pulire l’apparecchiatura con pagliette di lana di vetro.
Tenere l’apparecchiatura e il cavo di alimentazione a distanza da amme
libere, cucine elettriche o calore eccessivo.
Non usare l’apparecchiatura se è stata danneggiata o se il suo
funzionamento è stato compromesso in qualsiasi modo.
Non utilizzare gli accessori sul mozzo durante la miscelazione.
L’apparecchiatura è destinata per miscelare pastelle, impasti per torte e
così via. Non è destinata all’uso domestico, industriale o di laboratorio.
caratteristiche e controlli
5
4
3
2
1
TIMER
ON/
SPEED
OFF
G
F
C
D
Figura 1. Miscelatore da 6,6 l e da 11 l, funzioni e comandi.
K
J
G
F
C
D
Figura 2. Miscelatore da 22 l e da 33 l, funzioni e comandi.
A
H
B
E
A
H
E
I
B
I
2
Manuale dell’utente
Page 27

K
J
A
H
G
F
B
C
D
E
Figura 3. Miscelatore da 44 l, funzioni e comandi.
A
PANNELLO DI CONTROLLO Presenta i tasti On/Off, velocità,
tempo, visore del tempo e arresto di emergenza (alcuni
modelli).
B
LEVA ALZACIOTOLA. Utilizzato per alzare e abbassare il
portaciotola.
C
CIOTOLA. Contiene gli ingredienti da impastare o miscelare.
D
MORSETTO CIOTOLA. Fissa la ciotola al portaciotola
E
PORTACIOTOLA. Trattiene la ciotola.
F
ALBERO MISCELATORE. Trattiene l’accessorio di
miscelazione.
G
PROTEZIONE CIOTOLA. Impedisce infortuni e il contatto con
l’albero o l’accessorio. La protezione deve essere chiusa per
poter avviare l’apparecchiatura.
H
I
PARASPRUZZI. Previene versamenti del contenuto miscelato.
Impedisce infortuni e il contatto con l’albero o l’accessorio
I
BASE. Supporta il miscelatore.
J
MOZZO ACCESSORIO (alcuni modelli). Utilizzato per
posizionare un accessorio sul miscelatore.
ITALIANO
K
J
G
F
C
D
A
B
H
E
Figura 4. Miscelatore da 66 l, funzioni e comandi.
K
VITE AD ALETTE MOZZO ACCESSORIO (alcuni modelli).
Fissa l’accessorio al miscelatore.
disimballo dell’aPParecchiatura e PreParativi
Disimballare attentamente l’unità. I modelli spediti su pallet sono imbullonati.
Rimuovere i bulloni per liberare l’apparecchiatura dal pallet. Quando non
sono più necessari, eliminare tutti i materiali d’imballo in maniera consona
alle normative ambientali.
Posizionare l’apparecchiatura su una supercie piatta con spazio circostante
sufciente per la pulizia e gli interventi di riparazione.
Collegare il piano di cottura solamente a prese elettriche dotate di messa
a terra e con tensione nominale adeguata. Non utilizzare una prolunga
con questa attrezzatura. Non collegare questa attrezzatura a una ciabatta
elettrica o a un cavo con presa multipla. Alcuni modelli necessitano di un
collegamento elettrico speciale, che deve essere predisposto da un tecnico
specializzato nel rispetto delle normative locali.
I
Manuale dell’utente
3
Page 28

oPeration
AVVERTENZA
Pericolo di intrappolamento.
L’albero o un accessorio rotante può provocare
gravi lacerazioni e l’amputazione traumatica di
un arto. Per evitare infortuni, tenere le mani e
gli indumenti lontani dalle parti in rotazione. Non
azionare l’unità senza le protezioni o se queste
risultano manomesse.
Funzionamento del miscelatore da 11 l.
5
F
SPEED
4
3
2
1
TIMER
G
B
D
ON/
OFF
A
AVVERTENZA
Pericolo di scossa elettrica.
Evitare l’inltrazione di acqua e altri liquidi
all’interno dell’apparecchiatura. Il liquido
all’interno dell’apparecchiatura può causare
scosse elettriche.
Non spruzzare acqua sul prodotto durante la pulizia. Il liquido
potrebbe penetrare nel vano dei componenti elettrici e causare
un guasto dei componenti o scosse elettriche. Non utilizzare
l’apparecchiatura se il cavo di alimentazione appare alterato o
danneggiato.
Prima dell’utilizzo iniziale, è necessario pulire l’apparecchiatura. Lavare i
nuovi accessori, la ciotola, le protezioni e altri componenti in acqua calda e
sapone e risciacquarli abbondantemente per eliminare la pellicola oleosa di
protezione.
La protezione deve essere chiusa completamente per poter attivare il
miscelatore. Il miscelatore non si avvierà se non è chiusa correttamente. Se
si apre la protezione durante l’uso, il miscelatore si spegnerà. Chiudere la
protezione per riavviare il miscelatore.
Miscelatori da 22 l , 33 l, 44 l e 66 l: il motore è dotato di un meccanismo
ITALIANO
di spegnimento di sicurezza che disattiva automaticamente il miscelatore se
la temperatura del motore supera i limiti operativi consigliati dal produttore.
L’interruttore di protezione da sovraccarichi interverrà se l’impasto da
miscelare è troppo pesante. In questo caso, lasciar raffreddare il miscelatore
per almeno 30-60 minuti e ridurre l’impasto del 10-15%.
I miscelatori da 6,6 l e 11 l hanno un interruttore di protezione da
sovraccarichi che disattiva automaticamente il miscelatore se la resistenza
del motore supera i limiti operativi consigliati dal produttore. Scatterà un
allarme e il display lampeggerà. Premere il tasto OFF per reimpostare il
miscelatore.
1. Vericare che l’apparecchiatura sia pulita ogni volta prima di utilizzarla.
2. Prima di montare la ciotola, selezionare l’accessorio che si prevede di
utilizzare. Inserire l’accessorio selezionato all’interno della ciotola vuota
(C). Non tentare di montare l’accessorio sull’albero (F) prima di aver
ssato la ciotola in posizione. Vedere la gura 1, 2, 3 o 4.
3. Abbassare il portaciotola alla posizione minima ruotando la leva
alzaciotola (B).
4. Ruotare le levette di presa della ciotola (D) in posizione esterna o
arretrata.
5. Afferrare la ciotola (C) in modo che il perno sia rivolto verso il
miscelatore. Posizionarla in modo che il perno si allinei alla fessura sul
portaciotola (E). Inserire il perno nella fessura.
6. Allineare i fori sulle linguette della ciotola con i perni sul portaciotola (E).
Adagiare la ciotola (C) nel portaciotola (E).
7. Ruotare le levette di presa della ciotola (D) in avanti sopra le linguette
per ssare la ciotola (C) sul portaciotola (E).
8. Installare l’accessorio sull’albero miscelatore (F). Allineare la scanalatura
sull’accessorio al perno dell’albero. Spingere l’accessorio in alto e
ruotarlo per bloccarlo sul perno.
9. Sollevare la ciotola (C) all’altezza massima mediante la leva alzaciotola
(B) ruotandola in senso orario no a bloccarla in posizione.
E
C
Figura 5. Miscelatore da 6,6 l e da 11 l, pannello di controllo.
A
TASTO ON/OFF. Accende e spegne il miscelatore.
B
DISPLAY DIGITALE. Visualizza il tempo restante di un ciclo
temporizzato, la dicitura “ON” quando funziona con un ciclo non
temporizzato e “OFF” quando l’unità è alimentata ma non in
funzione.
C
TASTO TEMPO SU. Aumenta il tempo. Il tempo massimo è di
30 minuti.
D
TASTO TEMPO GIÙ. Riduce il tempo.
E
TASTO VELOCITÀ SU. Aumenta la velocità di miscelazione.
F
TASTO VELOCITÀ GIÙ. Riduce la velocità di miscelazione.
G
NUMERI E SPIE VELOCITÀ. I numeri e le spie corrispondono
alla velocità di miscelazione. A un numero maggiore,
corrisponde una maggiore velocità e viceversa.
Quando si miscelano impasti leggeri, si consiglia di non utilizzare il
miscelatore in continuazione per oltre 20 minuti e di lasciarlo raffreddare
periodicamente per 10-15 minuti tra cicli di miscelazione.
1. Chiudere la protezione ciotola (G). Vedere la gura 1. Questa protezione
deve essere chiusa per azionare il miscelatore. Il miscelatore non si
avvierà se la protezione è aperta o non è chiusa correttamente.
2. Selezionare la velocità desiderata in base agli ingredienti. Utilizzare il
tasto Velocità su (E) o Velocità giù (F) per impostare la velocità. Vedere
la gura 5.
Velocità 1 – Per miscelazione lenta di impasti a base di lievito.
Velocità 2 – Per miscelazione di pastelle per biscotti e torte.
Velocità 3 – Per sbattere e montare a media-alta velocità.
Velocità 4 – Per montare la panna e gli albumi d’uovo.
Velocità 5 – Per montare piccole quantità di panna e albumi d’uovo.
3. Impostare il ciclo di tempo utilizzando il tasto Tempo su (C) o Tempo giù
(D). L’impostazione di tempo massimo è di 30 minuti.
4. Premere il tasto On/Off (A) per avviare il ciclo di miscelazione. Il
miscelatore continuerà a funzionare no alla successiva pressione del
tasto On/Off (A). In alternativa, il miscelatore funzionerà no al termine
del ciclo di tempo.
4
Manuale dell’utente
Page 29

Funzionamento dei miscelatori da 22 l e da 33 l.
E
G
5. Il miscelatore si ferma e il timer emette tre segnali acustici al termine del
ciclo di tempo.
NOTA:
spegnere il miscelatore prima di cambiare velocità. Diversamente, si
possono arrecare danni alla scatola del cambio che annulleranno la
B
garanzia.
D
F
A
C
Funzionamento dei miscelatori da 44 l e da 33 l.
Figura 6. Miscelatore da 22 l e da 33 l, pannello di controllo.
A
TASTO ON/OFF. Accende e spegne il miscelatore.
B
DISPLAY DIGITALE. Visualizza il tempo restante di un ciclo
temporizzato, la dicitura “ON” quando funziona con un ciclo non
temporizzato e “OFF” quando l’unità è alimentata ma non in
funzione.
C
TASTO TEMPO SU. Aumenta il tempo. Il tempo massimo è di
30 minuti.
D
TASTO TEMPO GIÙ. Riduce il tempo.
E
TASTO STOP. Premere questo tasto per arrestare il
miscelatore. Ruotarlo in senso orario per reimpostare.
F
LEVA DI SELEZIONE VELOCITÀ. Consente di cambiare la
velocità del miscelatore.
G
SPIE LUMINOSE. Si accendono quando il miscelatore è in
funzione o è programmato con un ciclo.
Figura 7. Miscelatore da 44 l, pannello di controllo.
NOTA:
spegnere il miscelatore prima di cambiare velocità. Diversamente, si
possono arrecare danni alla scatola del cambio che annulleranno la
garanzia.
1. Chiudere la protezione ciotola (G). Vedere la gura 2. Questa protezione
deve essere chiusa per azionare il miscelatore. Il miscelatore non si
avvierà se la protezione è aperta o non è chiusa correttamente.
Figura 8. Miscelatore da 66 l, pannello di controllo.
A
B
2. Selezionare la velocità desiderata in base agli ingredienti. Utilizzare la
leva di selezione velocità (F) per impostare la velocità. Vedere la gura 6.
Velocità 1 – Per miscelare impasti pesanti con un rapporto di
assorbimento massimo del 50%.
Velocità 2 – Per miscelare impasti per torte, pastelle o impasti pesanti
C
con un rapporto di assorbimento superiore al 50%.
Velocità 3 – Per montare gli albumi d’uovo.
NOTA:
il contenuto umido di un impasto pesante è cruciale nella selezione
D
E
della velocità di miscelazione corretta. Non utilizzare la velocità 2 per
miscelare impasti pesanti con un rapporto di assorbimento massimo
del 50%.
F
3. Una volta selezionata la velocità, premere il tasto On/Off per avviare il
miscelatore. Alternativamente, selezionare un ciclo di tempo utilizzando il
tasto Tempo su (D) o Tempo giù (C). Premere il tasto ON/OFF.
4. Premere il tasto rosso per arrestare il miscelatore e cambiare velocità.
Dopo che l’accessorio ha cessato di ruotare, cambiare la velocità agendo
sulla manopola. Una volta selezionata la velocità, premere il tasto On/Off
per riavviare il miscelatore.
G
NOTA:
spegnere il miscelatore prima di cambiare velocità. Diversamente, si
possono arrecare danni alla scatola del cambio che annulleranno la
garanzia.
E
B
C
D
G
F
E
B
C
G
A
TASTO ON. Accende il miscelatore.
DISPLAY DIGITALE. Visualizza il tempo restante di un ciclo
temporizzato, la dicitura “ON” quando funziona con un ciclo non
temporizzato e “OFF” quando l’unità è alimentata ma non in
funzione.
TASTO TEMPO SU. Aumenta il tempo. Il tempo massimo è di
30 minuti.
TASTO TEMPO GIÙ. Riduce il tempo.
TASTO STOP. Premere questo tasto per arrestare il
miscelatore. Ruotarlo in senso orario per reimpostare.
LEVA DI SELEZIONE VELOCITÀ. Consente di cambiare la
velocità del miscelatore.
TASTO STOP. Spegne il miscelatore.
A
D
F
ITALIANO
Manuale dell’utente
5
Page 30

1. Chiudere la protezione ciotola (G). Vedere la gura 3 o 4. Questa protezione
deve essere chiusa per azionare il miscelatore. Il miscelatore non si avvierà
se la protezione è aperta o non è chiusa correttamente.
2. Selezionare la velocità desiderata in base agli ingredienti. Utilizzare la leva di
selezione velocità (F) per impostare la velocità. Vedere la gura 7 o 8.
Velocità 1 – Per miscelare impasti pesanti con un rapporto di assorbimento
massimo del 50%.
Velocità 2 – Per miscelare impasti per torte, pastelle o impasti pesanti con
un rapporto di assorbimento superiore al 50%.
Velocità 3 – Per montare gli albumi d’uovo.
NOTA:
il contenuto umido di un impasto pesante è cruciale nella selezione della
velocità di miscelazione corretta. Non utilizzare la velocità 2 per miscelare
3. Una volta selezionata la velocità, premere il tasto On/Off per avviare
il miscelatore. Alternativamente, selezionare un ciclo di tempo
utilizzando il tasto Tempo su (D) o Tempo giù (C). Premere il tasto ON/
OFF.
4. Premere il tasto rosso per arrestare il miscelatore e cambiare velocità.
Dopo che l’accessorio ha cessato di ruotare, cambiare la velocità
agendo sulla manopola. Una volta selezionata la velocità, premere il
tasto On/Off per riavviare il miscelatore.
5. Il miscelatore si ferma e il timer emette tre segnali acustici al termine
del ciclo di tempo.
NOTA:
spegnere il miscelatore prima di cambiare velocità. Diversamente, si
possono arrecare danni alla scatola del cambio che annulleranno la
garanzia.
impasti pesanti con un rapporto di assorbimento massimo del 50%.
tabella delle caPacità del miscelatore
Prodotto
Pasta di pane e panini – RA60%
Pasta di pane pesante – RA55%
Pasta per pizza, sottile – RA40%
Pasta per pizza, media – RA50%
ITALIANO
Pasta per pizza, spessa – RA60%
Pasta lievitata per ciambelle –
Agitatore Velocità
Gancio per pasta Solo 1ª velocità
Gancio per pasta Solo 1ª velocità
Gancio per pasta Solo 1ª velocità
Gancio per pasta Solo 1ª velocità
Gancio per pasta Solo 1ª velocità
Gancio per pasta Solo 1ª velocità
RA65%
Pasta per crostate Sbattitore piatto Tutte le velocità
Purè di patate Sbattitore piatto Tutte le velocità
Torta Sbattitore piatto Tutte le velocità
Pastella per crespelle o pancake Sbattitore piatto Tutte le velocità
Albumi d’uovo Frusta metallica Tutte le velocità
Meringhe Frusta metallica Tutte le velocità
Panna montata Frusta metallica Tutte le velocità
Torta tipo paradiso Sbattitore piatto Tutte le velocità
Miscelatore
da 6,6 l
4 lbs.
(5 kg)
2 lbs.
(0.9 kg)
2 lbs.
(0.9 kg)
3 lbs.
(1.3 kg)
4 lbs.
(1.8 kg)
2 lbs.
(0.9 kg)
4 lbs.
(1.8 kg)
4 lbs.
(1.8 kg)
6 lbs.
(2.7 kg)
3 qts.
(3.3 l)
3/4 pt.
(0.4 l)
1/2 pt.
(0.3 l)
1-3/4 qts.
(1.9 l)
6 lbs.
(2.7 kg)
Miscelatore
da 11 l
5 lbs.
(2.3 kg)
3 lbs.
(1.3 kg)
3 lbs.
(1.3 kg)
4 lbs.
(1.8 kg)
5 lbs.
(2.3 kg)
2 lbs.
(0.9 kg)
4 lbs.
(1.8 kg)
5 lbs.
(2.3 kg)
8 lbs.
(3.6 kg)
4 qts.
(4.4 l)
1 pt.
(0.5 l)
3/4 pt.
(0.4 l)
2 qts.
(2.1 l)
8 lbs.
(3.6 kg)
Miscelatore
da 22 l
25 lbs.
(11.3 kg)
15 lbs.
(6.8 kg)
9 lbs.
(4.1 kg)
10 lbs.
(4.5 kg)
20 lbs.
(9.1 kg)
9 lbs.
(4.1 kg)
18 lbs.
(8.2 kg)
15 lbs.
(6.8 kg)
20 lbs.
(9.1 kg)
8 qts.
(8.8 l)
1 qts.
(1.1 l)
1 qts.
(1.` l)
4 qts.
(4.4 l)
20 lbs.
(9.1 kg)
Quando si miscela l’impasto controllare il RA” (rapporto di assorbimento) = acqua diviso per il peso della farina.
Le capacità elencate si basano su un contenuto umido della farina del 12% a una temperatura dell’acqua di 21°C.
Se si utilizza farina ad alto contenuto di glutine, ridurre la quantità dell’impasto del 10%.
1 gallone d’acqua = 1 kg
1 quarto d’acqua = 0,25 kg
Esempio:
Se la ricetta richiede 2,5 kg di acqua e 5 kg di farina, dividere 5 per 10 = 0,50 x 100 = 50% (RA).
Non utilizzare la seconda velocità per impasti con RA inferiore al 50%.
Miscelatore
da 33 l
45 lbs.
(20.4 kg)
30 lbs.
(13.6 kg)
14 lbs.
(6.4 kg)
20 lbs.
(9.1 kg)
40 lbs.
(18.1 kg)
15 lbs.
(6.8 kg)
30 lbs.
(13.6 kg)
23 lbs.
(1.3 kg)
30 lbs.
(13.6 kg)
12 qts.
(13.2 l)
1-1/2 qts
(1.7 l).
1-1/2 qts
(1.7 l).
6 qts.
(6.6 l)
35 lbs.
(13.6 kg)
Miscelatore
da 44 l
50 lbs.
(22.7 kg)
40 lbs.
(18.1 kg)
25 lbs. (11.3
kg)
32 lbs.
(14.5 kg)
50 lbs.
(22.7 kg)
25 lbs.
(11.3 kg)
35 lbs.
(15.8 kg)
30 lbs.
(13.6 kg)
12 lbs.
(0.9 kg)
16 qts.
(17.6 l)
2 qts.
(2.1 l)
2 qts.
(2.1 l)
8 qts.
(8.8 l)
40 lbs.
(18.1 kg)
Miscelatore
da 66 l
90 lbs.
(40.8 kg)
70 lbs.
(31.8 kg)
40 lbs.
(18.1 kg)
60 lbs.
(27.2 kg)
70 lbs.
(31.8 kg)
40 lbs.
(18.1 kg)
60 lbs.
(27.2 kg)
45 lbs.
(20.4 kg)
60 lbs.
(27.2 kg)
24 qts.
(26.4 l)
3 qts.
(3.3 l)
3 qts.
(3.3 l)
12 qts.
(13.2 l)
60 lbs.
(27.2 kg)
6
Manuale dell’utente
Page 31
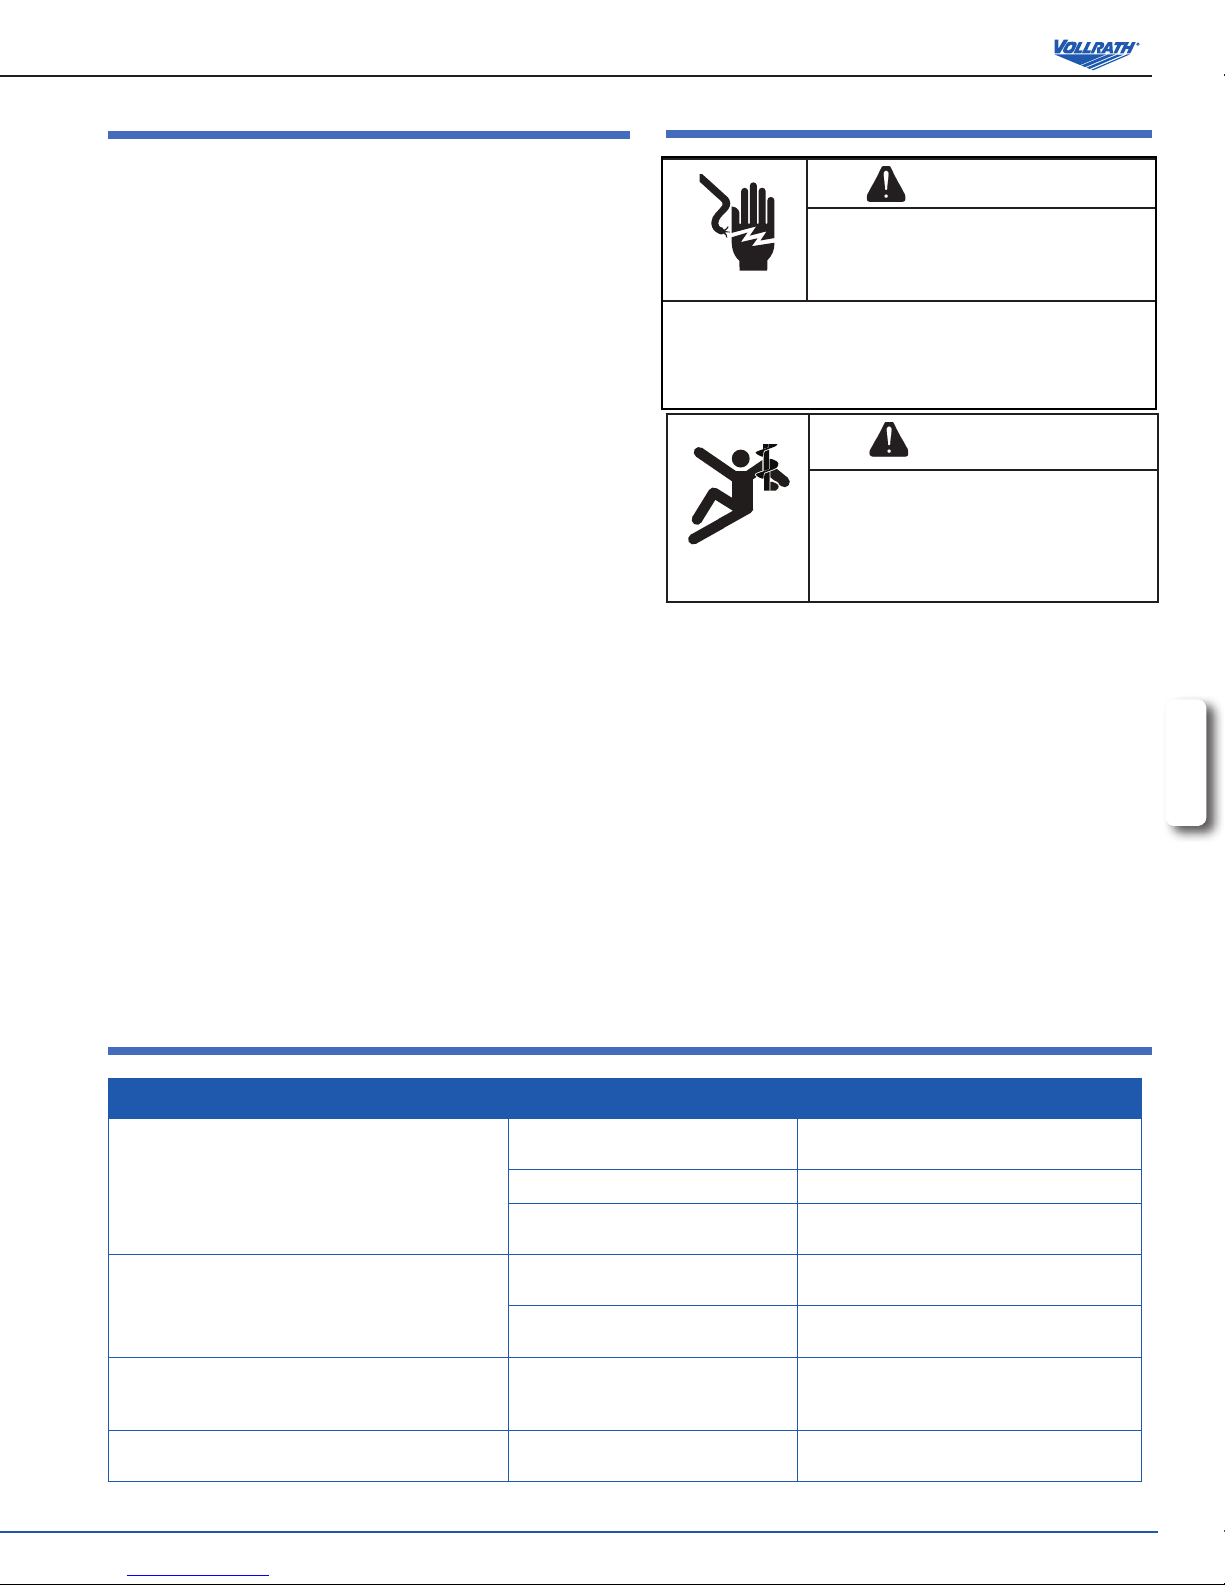
utilizzo del mozzo accessorio
Il miscelatore è munito di un mozzo miscelatore standard di misura 12. Si
consiglia di utilizzare accessori originali Vollrath con questo mozzo. Per
utilizzare il mozzo accessorio:
NOTA:
spegnere il miscelatore prima di cambiare velocità. Diversamente, si
possono arrecare danni alla scatola del cambio che annulleranno la
garanzia.
1. Spegne il miscelatore.
2. Allentare la vite ad alette del mozzo (K). Non è necessario rimuovere
completamente la vite. Vedere le gure 2, 3 e 4.
3. Rimuovere il coperchio del mozzo.
4. Inserire l’albero dell’accessorio nel mozzo (J).
5. Allineare il perno sull’albero dell’accessorio all’incastro all’interno del
mozzo.
6. Inserire l’accessorio a fondo. Richiudere l’accessorio con la vite ad alette
del mozzo (K).
7. Utilizzare la manopola di velocità per selezionare la velocità desiderata del
mozzo:
Velocità 1 – Consigliata per affettare le verdure o macinare la carne
Velocità 2 – Consigliata per grattugiare il formaggio
8. Portare il tasto On/Off su On per azionare il mozzo e l’accessorio montato.
La ciotola del miscelatore deve essere in alto con la protezione in
posizione chiusa per poter azionare il mozzo. Non è possibile utilizzare
simultaneamente il gruppo del mozzo e il miscelatore.
9. Premere il tasto rosso per arrestare il miscelatore e cambiare velocità.
Dopo che l’accessorio ha cessato di ruotare, cambiare la velocità agendo
sulla manopola. Una volta selezionata la velocità, premere il tasto On/Off
per riavviare il miscelatore.
La velocità 3 non è consigliata con gli accessori.
identiFicazione e risoluzione dei Problemi
Pulizia
Non spruzzare acqua sul prodotto durante la pulizia. Il liquido
potrebbe penetrare nel vano dei componenti elettrici e causare
un guasto dei componenti o scosse elettriche. Non utilizzare
l’apparecchiatura se il cavo di alimentazione appare alterato o
danneggiato.
Per preservarne l’aspetto e prolungarne la durata, l’apparecchiatura deve
essere pulita quotidianamente.
NOTA:
Non pulire l’apparecchiatura con pagliette di lana di
vetro. Non lavare i componenti elettrici con un getto
d’acqua e non immergerli in acqua. Non lasciare
l’accessorio installato sul mozzo.
1. Spegnere il miscelatore.
2. Scollegare il miscelatore dalla rete elettrica prima di pulirlo. Se
è collegato in modo permanente alla presa elettrica, spegnere
l’alimentazione disattivando l’interruttore di circuito.
3. Rimuovere la ciotola e l’accessorio dopo ogni uso e lavarli in acqua
calda con un detergente per piatti. Se l’accessorio non viene rimosso
dall’albero del miscelatore i residui potrebbero indurirsi e impedirne il
distacco in un momento successivo.
4. Rimuovere l’accessorio e pulirlo con un panno umido e un detergente
per piatti. Asciugare completamente l’accessorio.
5. Per pulire l’esterno del miscelatore, passare le superci con un panno
umido e un detergente per piatti.
AVVERTENZA
Pericolo di scossa elettrica.
Evitare l’inltrazione di acqua e altri liquidi
all’interno dell’apparecchiatura. Il liquido
all’interno dell’apparecchiatura può causare
scosse elettriche.
AVVERTENZA
Pericolo di intrappolamento.
L’albero o un accessorio rotante può provocare
gravi lacerazioni e l’amputazione traumatica di
un arto. Per evitare infortuni, tenere le mani e
gli indumenti lontani dalle parti in rotazione. Non
azionare l’unità senza le protezioni o se queste
risultano manomesse.
ITALIANO
Problema Causa possibile Rimedio
Le spie sul pannello non si accendono.
L’alimentazione e le spie sono accese ma il miscelatore
non funziona.
Solo miscelatori da 6,6 l e da 11 l: l’accessorio
miscelatore si ferma, scatta un allarme e il display
lampeggia.
Miscelatori da 22 l, 33 l, 44 l e 66 ):
L’accessorio si ferma.
L’unità non è inserita nella presa di
alimentazione.
L’interruttore di circuito è spento. Portare l’interruttore in posizione “ON”.
L’interruttore di arresto di emergenza è
in posizione “Stop”.
La protezione ciotola non è chiusa
completamente.
Ciotola non sollevata in posizione di
funzionamento.
Il miscelatore è sovraccarico.
Si è attivato l’interruttore di protezione
termica.
Collegare l’unità alla presa elettrica.
Portare l’interruttore in posizione “Run”.
Chiudere completamente la protezione ciotola.
Sollevare ciotola completamente.
Premere il tasto OFF per reimpostare il
miscelatore. Ridurre l’impasto del 10-15%.
Lasciar raffreddare il miscelatore per 30-60
minuti. Ridurre l’impasto del 10-15%.
Manuale dell’utente
7
Page 32

riParazione e assistenza
Questo elettrodomestico non contiene parti che l’utente può riparare. Per evitare infortuni o danni gravi, l’utente non deve mai tentare di riparare l’apparecchiatura o
di sostituire il cavo di alimentazione eventualmente danneggiato. Non spedire l’apparecchiatura direttamente a Vollrath Company. Rivolgersi al personale qualicato
del servizio di riparazione indicato sotto.
ASSISTENZA tecnica VOLLRATH • 1-800-628-0832 • 920-457-4851
• E-mail: techservicereps@vollrathco.com
dichiarazione di garanzia di the vollrath co. l.l.c.
Questa garanzia non si applica ai prodotti acquistati per uso personale, familiare o domestico e The Vollrath Company LLC non offre una garanzia scritta agli acquirenti per tali usi.
The Vollrath Company LLC garantisce ciascuno dei prodotti elencati di seguito da difetti nei materiali e nella lavorazione per un periodo specicato di seguito. Tutti gli altri prodotti
fabbricati o distribuiti da The Vollrath Company LLC sono garantiti da difetti nei materiali e nella lavorazione per un periodo di un anno. In tutti i casi, la garanzia ha decorso dalla data di
acquisto originale da parte dell’utente nale, riportata sullo scontrino o sulla fattura.
Miscelatori – Il periodo di garanzia è di 2 anni, tranne i nastri che hanno un periodo di garanzia di 5 anni.
Pezzi di ricambio – Il periodo di garanzia è di 90 giorni.
Per informazioni sulla garanzia completa, la registrazione del prodotto e annunci di nuovi prodotti, visitare www.vollrath.com
www.vollrath.com
The Vollrath Company, L.L.C.
1236 North 18th Street
Sheboygan, Wisconsin
53081-3201 USA
Main Tel: 920-457-4851
Main Fax: 920-459-6573
Service Tel: 920-457-4851
Service Fax: 920-459-5462
Vollrath Europe BV
Beneluxbaan 7
5121 AD RIJEN
The Netherlands
+31161870005
Vollrath of China
Vollrath Shanghai Trading Limited
29D, 855 South Pu Dong Road
Shanghai, China 200120
Tel: 86-21-50589580
Vollrath de Mexico S. de R.L. de C.V.
Periferico Sur Edicio 2-C
Col. Santa Maria Tequepexpan
45601 Tlaquepaque, Jalisco Mexico
Tel: (52) 333-133-6767
Tel: (52) 333-133-6769
Fax: (52) 333-133-6768
art. n. 2350045-1 it Rev. 05/14
Page 33
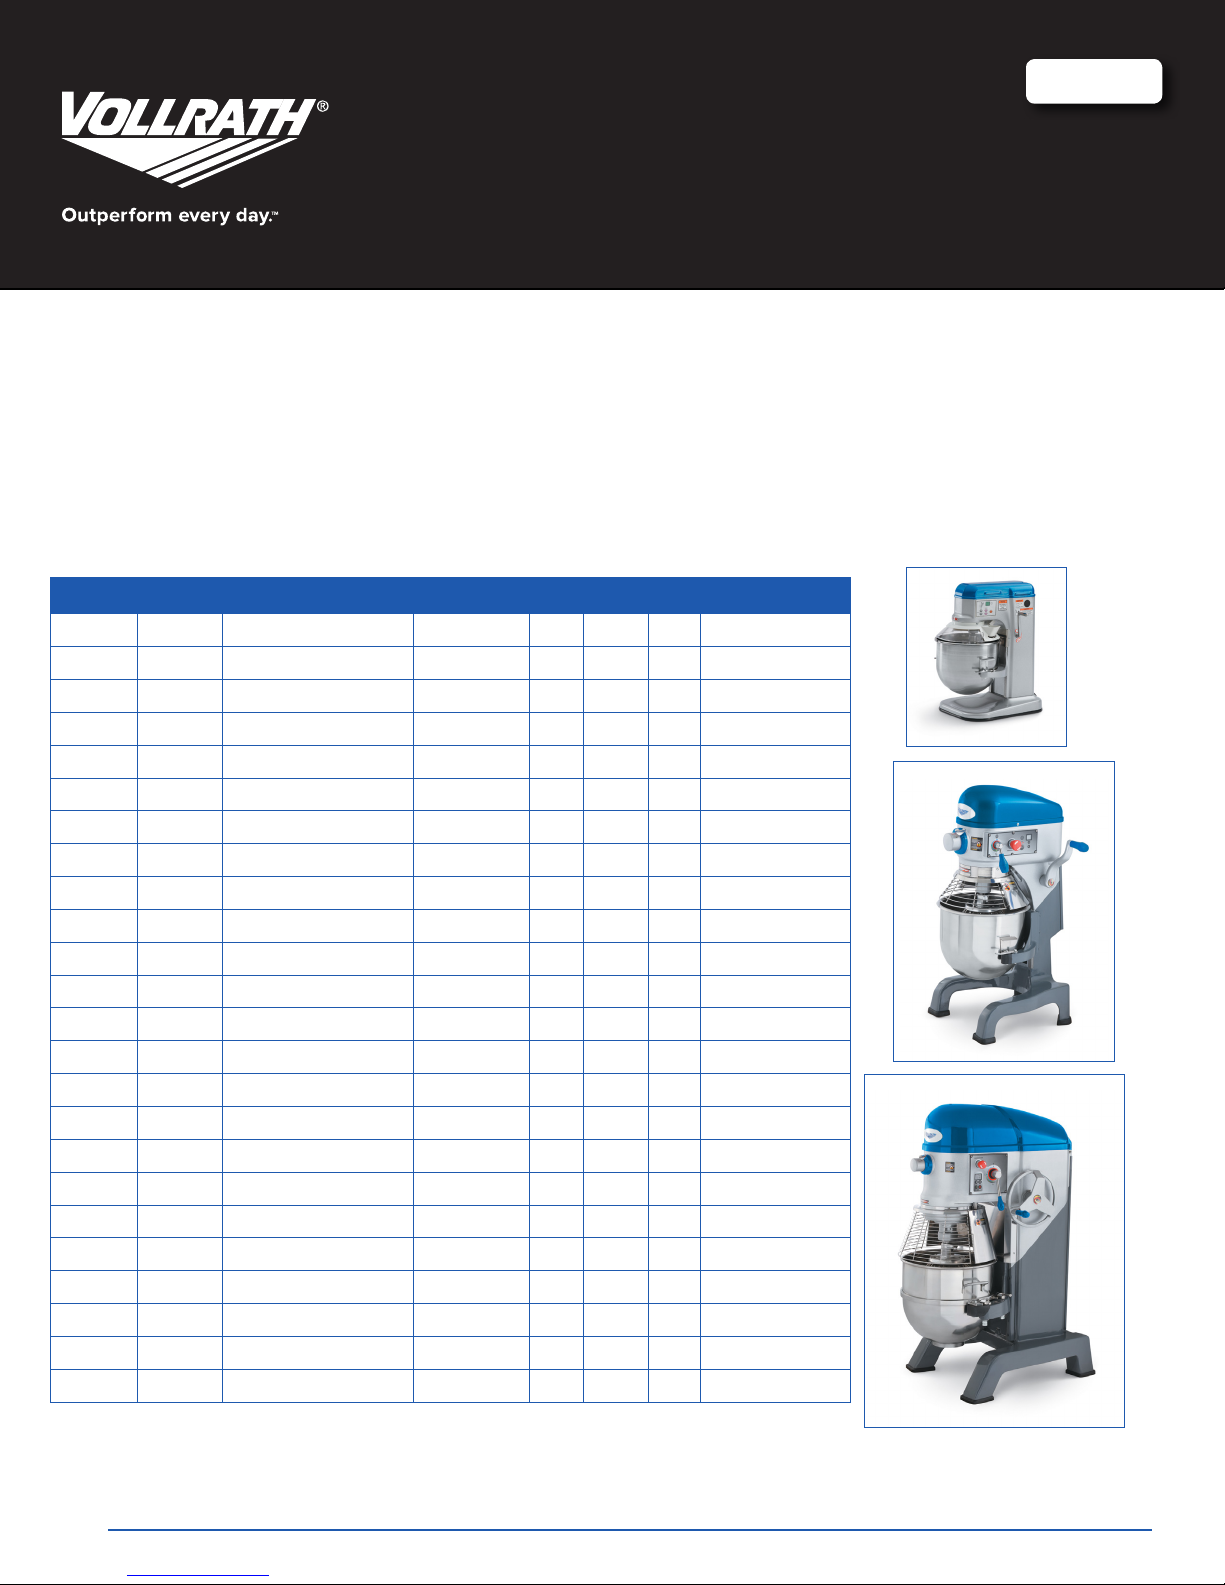
DUETSCH
Bedienungsanleitung
Arbeitsplatten-Mixer
Boden-/Tisch-Mixer
Artikel
40755 MIX1007 Arbeitsächen-Mixer, 6,6 l 110V-120V 1/3 6 60 5-15P
4075503 MIX1007 Arbeitsächen-Mixer, 6,6 l 220-230V 1/3 3 50 UK-15P (BS546)
4075502 MIX1007 Arbeitsächen-Mixer, 6,6 l 220-230V 1/3 3 50 Schuko CEE7-7
4075505 MIX1007 Arbeitsächen-Mixer, 6,6 l 220-230V 1/3 3 50 AU2-15P
40756 MIX1010 Arbeitsächen-Mixer, 11 l 110V-120V 1/3 6 60 5-15P
4075603 MIX1010 Arbeitsächen-Mixer, 11 l 220-230V 1/3 3 50 UK-15P (BS546)
4075602 MIX1010 Arbeitsächen-Mixer, 11 l 220-230V 1/3 3 50 Schuko CEE7-7
4075605 MIX1010 Arbeitsächen-Mixer, 11 l 220-230V 1/3 3 50 AU2-15P
40757 MIX1020 Tisch-Mixer 22 l 110V-120V 1/2 10 60 5-15P
4075703 MIX1020 Tisch-Mixer 22 l 220-230V 1/2 4 50 UK-15P (BS546)
4075702 MIX1020 Tisch-Mixer 22 l 220-230V 1/2 4 50 Schuko CEE7-7
4075705 MIX1020 Tisch-Mixer 22 l 220-230V 1/2 4 50 AU2-15P
40758 MIX1030 Boden-Mixer, 33 l 110V-120V 1 16 60 5-20P
4075803 MIX1030 Boden-Mixer, 33 l 220-230V 1 8 50 UK-15P (BS546)
4075802 MIX1030 Boden-Mixer, 33 l 220-230V 1 8 50 Schuko CEE7-7
4075805 MIX1030 Boden-Mixer, 33 l 220-230V 1 8 50 AU2-15P
40759 MIX1040 Boden-Mixer, 44 l 208-240V 1-1/2 12 60 6-15P
4075903 MIX1040 Boden-Mixer, 44 l 220-230V 1-1/2 11 50 UK-15P (BS546)
4075902 MIX1040 Boden-Mixer, 44 l 220-230V 1-1/2 11 50 Schuko CEE7-7
4075905 MIX1040 Boden-Mixer, 44 l 220-230V 1-1/2 11 50 AU2-15P
40760 MIX1060 Boden-Mixer, 66 l 208-240V 2 16 60 6-20P
4076003 MIX1060 Boden-Mixer, 66 l 220-230V 2 16 50 -4076002 MIX1060 Boden-Mixer, 66 l 220-230V 2 16 50 Schuko CEE7-7
4076005 MIX1060 Boden-Mixer, 66 l 220-230V 2 16 50 AU2-15P
Modell Beschreibung Spannung
HP A Hz Stecker
Wir freuen uns, dass Sie sich zum Kauf dieses Vollrath-Lebensmittelverarbeitungsgeräts entschieden haben. Bevor Sie dieses Gerät in Betrieb
nehmen, bitten wir Sie, sich mit der folgenden Bedienungs- und Sicherheitsanleitung vertraut zu machen. HEBEN SIE DIESE ANLEITUNG
ZUM NACHSCHLAGEN AUF. Heben Sie den Originalkarton und die Verpackung gut auf. Diese sollten zum Versand des Geräts für evtl.
notwendige Reparaturen verwendet werden.
Art.-Nr. 2350045-1 de Rev 05/14
Page 34

sicherheitsvorkehrungen
Funktion und zWeck
Für eine sichere Bedienung dieser Geräte lesen und beachten Sie die
folgenden Hinweise. Bitte lesen Sie diese sorgfältig durch.
ACHTUNG
Mit dem Wort „Achtung“ wird auf das Vorhandensein einer Gefahr
aufmerksam gemacht, die schwere Verletzungen, den Tod oder
erhebliche Sachschäden verursachen kann, wenn diese Warnung nicht
beachtet wird.
VORSICHT
Mit dem Wort „Vorsicht“ wird auf das Vorhandensein einer Gefahr
aufmerksam gemacht, die leichtere oder erhebliche Sachschäden
verursacht oder verursachen kann, wenn dieser Hinweis nicht
beachtet wird.
HINWEIS
Mit einem „Hinweis“ werden Installations-, Betriebs- oder
Wartungsinformationen übermittelt, die zwar wichtig sind, aber nicht auf
Gefahren aufmerksam machen.
Zu Ihrer Sicherheit!
Diese Vorsichtsmaßnahmen müssen jederzeit beachtet werden. Ein
Missachten dieser Vorsichtshinweise kann Verletzungen Ihrer eigenen
Person und anderer zur Folge haben.
So wird das Risiko von Verletzungen oder einer Beschädigung des Geräts
reduziert:
Das Gerät nur an geerdeten Steckdosen anschließen, deren Spannung
DEUTSCH
der auf dem Typenschild angegebenen Nennspannung entspricht.
Die Sicherheitsschalter nicht modizieren oder manipulieren.
Nicht unbeaufsichtigt bedienen.
Das Gerät nicht in öffentlichen Bereichen und/oder in der Nähe von
Kindern in Betrieb nehmen.
Kein Verlängerungskabel mit diesem Gerät verwenden. Dieses Gerät
nicht an einer Mehrfachsteckdose oder einem Netzkabel mit mehreren
Steckdosen anschließen.
Für beste Ergebnisse, Vollrath Anhänge werden empfohlen.
Vor jedem Gebrauch des Geräts sicherstellen, dass dieses sauber ist.
Zum Reinigen des Mixers keinen Schlauch verwenden. Die Außenächen
des Mixers mit einem feuchten Tuch abwischen.
Angemessene Kleidung tragen. Beim Betrieb dieses Geräts keine locker
sitzenden oder herabhängenden Kleidungsstücke tragen.
Das Gerät von einem qualizierten Techniker unter Beachtung der
geltenden Vorschriften und Bestimmungen installieren lassen.
Das Gerät auf einer achen, ebenen Stelläche verwenden.
Vor dem Reinigen oder Versetzen/Bewegen des Geräts das Netzkabel
abziehen, das Gerät ausschalten und es abkühlen lassen.
Die Bedienelemente und das Äußere des Geräts nicht mit Flüssigkeiten
oder Reinigungsmitteln besprühen.
Das Gerät nicht mit Stahlwolle reinigen.
Gerät und Netzkabel von offenen Flammen, elektrischen Kochstellen und
großer Hitze fern halten.
Das Gerät nicht in Betrieb nehmen, wenn es beschädigt wurde oder
irgendwelche Funktionsstörungen aufweist.
Während des Mixbetriebs keine an der Anschlussnabe aufgesteckten
Zubehörprodukte verwenden.
Dieses Gerät ist zum Rühren von Teigen, Kuchenmischungen usw.
vorgesehen. Es ist nicht für den Haushalts-, industriellen- oder
Laborgebrauch bestimmt.
Funktionsmerkmale und bedienelemente
5
4
3
2
1
TIMER
ON/
SPEED
OFF
G
F
C
D
Abbildung 1. 6,6- und 11-l-Mixer – Funktionsmerkmale und
Bedienelemente.
K
J
G
F
C
D
Abbildung 2. 22- und 33-l-Mixer – Funktionsmerkmale und
Bedienelemente.
A
H
B
E
A
H
E
I
B
I
2
Bedienungsanleitung
Page 35

K
J
A
H
G
F
B
C
D
E
I
Abbildung 3. 44-l-Mixer – Funktionsmerkmale und Bedienelemente.
A
CONTROL PANEL. Includes the On/Off Button, Speed Control,
Timer Controls, Timer Display and Emergency Stop (some
models).
B
SCHÜSSEL-HEBEVORRICHTUNG Zum Absenken und
Anheben der Schüsselauage.
C
SCHÜSSEL. Nimmt die zu vermischenden Bestandteile des
Speiseprodukts auf.
D
SCHÜSSELSICHERUNG. Sichert die Schüssel in der
Schüsselauage.
E
SCHÜSSELAUFLAGE. Hält die Schüssel fest.
F
RÜHRWELLE. Nimmt das Mischzubehör auf und sichert
dieses.
G
SCHÜSSEL-SCHUTZBLENDE. Verhindert Verletzungen und
den Kontakt mit der Rührwelle oder dem Mischzubehör. Diese
Schutzblende muss beim Betrieb geschlossen sein.
H
SPRITZBLENDE. Verhindert ein Verschütten des zu
vermischenden Schüsselinhalts. Verhindert Verletzungen und
den Kontakt mit der Rührwelle oder dem Mischzubehör.
K
J
A
B
ausPacken des geräts und erstmaliges auFstellen
G
H
F
C
D
E
I
Abbildung 4. 66-l-Mixer – Funktionsmerkmale und Bedienelemente.
Das Verschlags- bzw. Verpackungsmaterial vorsichtig vom Gerät entfernen.
Auf Paletten versandte Modelle sind mit der Palette verschraubt. Diese
Schrauben müssen entfernt werden, damit das Gerät sicher von der Palette
abgenommen werden kann. Die gesamte Verpackung und alle schützenden
Materialien auf umweltfreundliche Weise entsorgen, wenn diese nicht mehr
benötigt werden.
Das Gerät auf einer ebenen Fläche absetzen. Darauf achten, dass rund
um den Mixer genügend Platz zum sicheren Reinigen und Instandhalten
vorhanden ist.
Das Gerät nur an geerdeten Steckdosen anschließen, deren Spannung
der auf dem Typenschild angegebenen Nennspannung entspricht. Kein
Verlängerungskabel mit diesem Gerät verwenden. Dieses Gerät nicht an
einer Mehrfachsteckdose oder einem Netzkabel mit mehreren Steckdosen
anschließen. Für manche Modelle muss ein qualizierter Techniker
unter Beachtung der örtlichen Vorschriften einen elektrischen Anschluss
installieren.
I
SOCKEL. Trägt den Mixer.
J
ANSCHLUSSNABE (bei bestimmten Modellen). Zum
Aufstecken eines Zubehörteils am Mixer.
K
ANSCHLUSSNABEN-RÄNDELSCHRAUBE (bei bestimmten
Modellen). Zum Sichern des Zubehörteils am Mixer.
DEUTSCH
Bedienungsanleitung
3
Page 36

bedienung
bedienung des 11-l-mixers
ACHTUNG
Einzugsgefahr.
Die sich drehende Welle oder die Zubehörprodukte
können traumatische Amputationen oder schwere
Schnittwunden verursachen. Um Verletzungen
zu vermeiden, müssen Hände und Kleidung von
sich drehenden Teilen ferngehalten werden. Das
Gerät nicht mit modizierten oder fehlenden
Schutzblenden in Betrieb nehmen.
ACHTUNG
Stromschlaggefahr.
Ein Eindringen von Wasser und anderen
Flüssigkeiten in das Gerät verhindern. Flüssigkeiten
im Geräteinnern können einen Stromschlag
verursachen.
Kein Wasser und keine Reinigungsprodukte auf das Gerät
sprühen. Flüssigkeiten könnten mit den elektrischen Komponenten
in Berührung kommen und einen Komponentenausfall oder
Stromschlag verursachen. Das Gerät nicht mit einem modizierten
oder beschädigten Netzkabel verwenden.
Vor dem erstmaligen Gebrauch muss das Gerät gereinigt werden.
Zubehörprodukte, Schüssel, Schutzblenden und andere Teile mit
warmem Seifenwasser waschen und gründlich abspülen, um die dünne
Ölschutzschicht zu entfernen.
Die Schutzblende muss ganz geschlossen sein, damit der Mixer
eingeschaltet werden kann. Wenn die Schutzblende nicht richtig
geschlossen ist, lässt sich der Mixer nicht starten. Wenn die Schutzblende
während des Betriebs des Mixers geöffnet wird, schaltet dieser sich aus. Um
den Mixer neu zu starten, muss die Schutzblende geschlossen werden.
22-l-, 33-l-, 44-l- und 66-l-Mixer: Der Motor ist mit einer Sicherheitsabschalt-
vorrichtung versehen, die den Mixer automatisch ausschaltet, wenn die
DEUTSCH
Motortemperatur die vom Hersteller empfohlenen Betriebsgrenzwerte
übersteigt. Der Überlastschutzschalter wird ausgelöst, wenn das Gewicht
des jeweils verrührten Teigs zu hoch ist. Den Mixer in diesem Fall
mindestens 30 bis 60 Minuten lang abkühlen lassen und die Teigmenge um
10-15 % reduzieren.
6,6-l- und 11-l-Mixer besitzen eine Überlastschutzvorrichtung, die den Mixer
automatisch ausschaltet, wenn der Motorwiderstand die vom Hersteller
empfohlenen Betriebsgrenzwerte übersteigt. In diesem Fall ertönt ein Alarm
und das Display blinkt. Durch Drücken der Betriebstaste (AUS) wird der
Mixer zurückgesetzt.
1. Vor jedem Gebrauch sicherstellen, dass das Gerät sauber ist.
2. Vor dem Befestigen der Schüssel das zu verwendende Mischzubehör
auswählen. Das ausgewählte Mischzubehör in die leere Schüssel
(C) geben. Keinen Versuch unternehmen, das Mischzubehör an
der Rührwelle (F) zu befestigen, bevor sich die Schüssel in der
vorgesehenen Position bendet. Siehe Abbildung 1, 2, 3 oder 4.
3. Die Schüsselauage durch Drehen der Schüssel-Hebevorrichtung (B) in
ihre unterste Position absenken.
4. Die Schüsselsicherungshebel (D) in die ausgezogene bzw. hintere
Position drehen.
5. Die Schüssel (C) so halten, dass der Stift auf der Schüssel nach innen
zum Mixer zeigt. Die Schüssel so ausrichten, dass der Stift mit dem
Stiftschlitz auf der Schüsselauage (E) ausgerichtet ist. Den Stift in den
Schlitz schieben.
6. Die Löcher in den Schüsselvorsprüngen mit den Stiften auf der
Schüsselauage (E) zur Deckung bringen. Die Schüssel (C) auf die
Schüsselauage (E) setzen.
7. Die Schüsselsicherungshebel (D) über die Schüsselvorsprünge nach
vorne drehen, um die Schüssel (C) auf der Schüsselauage (E) zu
sichern.
8. Das Zubehörprodukt an der Rührwelle (F) befestigen. Die Nut am
Zubehörteil mit dem Stift an der Rührwelle zur Deckung bringen. Das
Zubehörprodukt nach oben drücken und drehen, um es mit dem Stift zu
arretieren.
9. Die Schüssel (C) mit der Schüssel-Hebevorrichtung (B) durch Drehen
nach links auf ihre maximale Höhe anheben, bis sie einrastet.
4
Bedienungsanleitung
B
5
F
SPEED
E
4
3
2
1
TIMER
D
A
C
ON/
OFF
G
Abbildung 5. 6,6- und 11-l-Mixer – Bedienfeld.
A
Betriebstaste (ON/OFF). Zum Ein- und Ausschalten Mixers.
B
DIGITALANZEIGE. Zeigt die Zeit in einem Zeitschaltzyklus an.
Beim Betrieb in einem nicht zeitgeschalteten Zyklus erscheint
ON; wenn das Gerät am Netz angeschlossen und nicht in
Betrieb ist, erscheint OFF.
C
TASTE MEHR ZEIT. Verlängert die Zeit. Maximale Zeit: 30
Minuten.
D
TASTE WENIGER ZEIT. Verkürzt die Zeit.
E
TASTE HÖHERE GESCHWINDIGKEIT. Erhöht die
Rührgeschwindigkeit.
F
TASTE NIEDRIGERE GESCHWINDIGKEIT. Reduziert die
Rührgeschwindigkeit.
G
DREHZAHL-ZAHLEN UND -LEUCHTEN. Die Zahlen und
Leuchtanzeigen geben die Rührgeschwindigkeit an. Je größer
die Zahl, desto höher die Geschwindigkeit; je kleiner die Zahl,
desto geringer die Geschwindigkeit.
Beim Mischen leichter Teige wird empfohlen, den Mixer nicht länger als 20
Minuten lang im Dauerbetrieb laufen zu lassen. Zwischen den einzelnen
Mischzyklen sollte eine kurze Abkühlperiode von 10 bis 15 Minuten eingelegt
werden.
1. Die Schüssel-Schutzblende (G) schließen. Siehe Abbildung 1. Die
Schutzblende muss geschlossen sein, damit der Mixer eingeschaltet
werden kann. Wenn die Schutzblende offen oder nicht richtig
geschlossen ist, lässt sich der Mixer nicht in Betrieb nehmen.
2. Die den Zutaten entsprechende Betriebsgeschwindigkeit einstellen. Die
Drehzahl mit der Taste „Höhere Geschwindigkeit“ (E) oder „Niedrigere
Geschwindigkeit“ programmieren. Siehe Abbildung 5.
Drehzahlstufe 1 – zum langsamen Mischen, Pürieren oder Kneten von
Hefeteig.
Drehzahlstufe 2 – zum Mischen von Plätzchen- und Kuchenteig.
Drehzahlstufe 3 – zum Schaumigrühren und mittelschnellen Schlagen.
Drehzahlstufe 4 – zum Schlagen von Doppelrahm und Eiweiß.
Drehzahlstufe 5 – zum Schlagen kleiner Mengen Doppelrahm/Eiweiß.
3. Auf Wunsch den Zeitschaltzyklus mit der Taste „Mehr Zeit“ (C) oder
„Weniger Zeit“ (D) einstellen. Maximal können 30 Minuten eingestellt
werden.
4. Zum Start des Mischzyklus die Betriebstaste (A) drücken. Der Mixer läuft,
bis erneut die Betriebstaste (A) gedrückt wird oder der Zeitschaltzyklus
abgelaufen ist.
Page 37

bedienung des 22- und 33-l-mixers.
E
nach Auswahl der neuen gewünschten Geschwindigkeit durch Drücken
der Betriebstaste neu starten.
5. Der Mixer bleibt stehen und das Zeitschalterwerk piepst nach dem Ende
G
B
D
des Zeitschaltzyklus dreimal.
HINWEIS:
Vor dem Umschalten von einer Drehzahlstufe zur anderen den Mixer
ausschalten. Andernfalls kann der Getriebekasten beschädigt und die
Garantie unwirksam werden.
F
Abbildung 6. 22- und 33-l-Mixer – Bedienfeld.
A
Betriebstaste (ON/OFF). Zum Ein- und Ausschalten des Mixers.
B
DIGITALANZEIGE. Zeigt die Zeit in einem Zeitschaltzyklus an.
Beim Betrieb in einem nicht zeitgeschalteten Zyklus erscheint
ON; wenn das Gerät am Netz angeschlossen und nicht in
Betrieb ist, erscheint OFF.
C
TASTE MEHR ZEIT. Verlängert die Zeit. Maximale Zeit: 30
Minuten.
D
TASTE WENIGER ZEIT. Verkürzt die Zeit.
E
TASTE STOPP. Durch Drücken dieser Taste wird der Mixer
angehalten. Zum Zurücksetzen des Mixers den Schalter nach
rechts drehen.
F
GESCHWINDIGKEITSWAHLHEBEL. Zum Einstellen der
Drehzahl des Mixers.
G
ANZEIGELEUCHTE. Leuchtet auf, wenn der Mixer in Betrieb ist
oder eine Zeit programmiert wurde.
HINWEIS:
Vor dem Umschalten von einer Drehzahlstufe zur anderen den Mixer
ausschalten. Andernfalls kann der Getriebekasten beschädigt und die
Garantie unwirksam werden.
1. Die Schüssel-Schutzblende (G) schließen. Siehe Abbildung 2. Die
Schutzblende muss geschlossen sein, damit der Mixer eingeschaltet
werden kann. Wenn die Schutzblende offen oder nicht richtig
geschlossen ist, lässt sich der Mixer nicht in Betrieb nehmen.
2. Die den Zutaten entsprechende Betriebsgeschwindigkeit einstellen.
Die Drehzahl mit dem Geschwindigkeitswahlhebel (F) einstellen. Siehe
Abbildung 6.
Drehzahlstufe 1 – zum Mischen schwerer Teige mit einem
Absorptionsverhältnis von 50 % oder weniger.
Drehzahlstufe 2 – zum Mischen von Kuchenteigen und dünnen oder
schweren Teigen mit einem Absorptionsverhältnis von über 50 %.
Drehzahlstufe 3 – zum Mischen von Eiweiß.
HINWEIS:
Der Feuchtigkeitsgehalt von schweren Teigen ist der bei der Wahl der
richtigen Mischdrehzahl entscheidende Faktor. Beim Mischen schwerer
Teige mit einem Absorptionsverhältnis von 50% oder weniger nicht die
Drehzahlstufe 2 verwenden.
3. Den Mixer nach Auswahl der gewünschten Geschwindigkeit durch
Drücken der Betriebstaste starten oder durch Drücken der Taste „Mehr
Zeit“ (D) oder „Weniger Zeit“ (C) die gewünschte Laufzeit einstellen.
Dann die Betriebstaste drücken.
4. Zum Ändern der Drehzahl den Mixer durch Drücken der roten Taste
stoppen. Wenn das Mischzubehör zum Stillstand gekommen ist, die
Geschwindigkeit mit dem Drehzahlregelungsknopf ändern. Den Mixer
C
A
bedienung des 44- und 66-l-mixers.
D
F
E
B
C
G
A
Abbildung 7. 44-l-Mixer – Bedienfeld.
DEUTSCH
E
B
C
G
Abbildung 8. 66-l-Mixer – Bedienfeld.
A
EINSCHALTTASTE. Zum Einschalten des Mixers.
B
DIGITALANZEIGE. Zeigt die Zeit in einem Zeitschaltzyklus an.
Beim Betrieb in einem nicht zeitgeschalteten Zyklus erscheint
ON; wenn das Gerät am Netz angeschlossen und nicht in
Betrieb ist, erscheint OFF.
C
TASTE MEHR ZEIT. Verlängert die Zeit. Maximale Zeit: 30
Minuten.
D
TASTE WENIGER ZEIT. Verkürzt die Zeit.
E
TASTE STOPP. Durch Drücken dieser Taste wird der Mixer
angehalten. Zum Zurücksetzen des Mixers den Schalter nach
rechts drehen.
F
GESCHWINDIGKEITSWAHLHEBEL. Zum Einstellen der
Drehzahl des Mixers.
G
TASTE STOPP. Zum Ausschalten des Mixers.
D
A
F
Bedienungsanleitung
5
Page 38

HINWEIS:
Vor dem Umschalten von einer Drehzahlstufe zur anderen den Mixer
ausschalten. Andernfalls kann der Getriebekasten beschädigt und die
Garantie unwirksam werden.
1. Die Schüssel-Schutzblende (G) schließen. Siehe Abbildung 3 oder 4. Die
Schutzblende muss geschlossen sein, damit der Mixer eingeschaltet werden
kann. Wenn die Schutzblende offen oder nicht richtig geschlossen ist, lässt
sich der Mixer nicht in Betrieb nehmen.
2. Die den Zutaten entsprechende Betriebsgeschwindigkeit einstellen. Die
Drehzahl mit dem Geschwindigkeitswahlhebel (F) einstellen. Siehe Abbildung
7 oder 8.
Drehzahlstufe 1 – zum Mischen schwerer Teige mit einem
Absorptionsverhältnis von 50 % oder weniger.
Drehzahlstufe 2 – zum Mischen von Kuchenteigen und dünnen oder
schweren Teigen mit einem Absorptionsverhältnis von über 50 %.
Drehzahlstufe 3 – zum Mischen von Eiweiß.
HINWEIS:
richtigen Mischdrehzahl entscheidende Faktor. Beim Mischen
schwerer Teige mit einem Absorptionsverhältnis von 50% oder
weniger nicht die Drehzahlstufe 2 verwenden.
1. Den Mixer nach Auswahl der gewünschten Geschwindigkeit durch
Drücken der Betriebstaste starten oder durch Drücken der Taste
„Mehr Zeit“ (D) oder „Weniger Zeit“ (C) die gewünschte Laufzeit
einstellen. Dann die Betriebstaste drücken.
2. Zum Ändern der Drehzahl den Mixer durch Drücken der roten Taste
stoppen. Wenn das Mischzubehör zum Stillstand gekommen ist,
die Geschwindigkeit mit dem Drehzahlregelungsknopf ändern. Den
Mixer nach Auswahl der neuen gewünschten Geschwindigkeit durch
Drücken der Betriebstaste neu starten.
3. Der Mixer bleibt stehen und das Zeitschalterwerk piepst nach dem
Ende des Zeitschaltzyklus dreimal.
HINWEIS:
Vor dem Umschalten von einer Drehzahlstufe zur anderen den Mixer
ausschalten. Andernfalls kann der Getriebekasten beschädigt und die
Garantie unwirksam werden.
Der Feuchtigkeitsgehalt von schweren Teigen ist der bei der Wahl der
rührleistungstabelle
Produkt Rührwerk Drehzahl 6,6-l-Mixer 11-l-Mixer 22-l-Mixer 33-l-Mixer 44-l-Mixer 66-l-Mixer
Brot- und Brötchenteig – 60 % AV
Schwerer Brotteig – 55 % AV
Pizzateig, dünn – 40 % AV
Pizzateig, mittel – 50 % AV
DEUTSCH
Pizzateig, dick – 60 % AV
Aufgegangener Brotteig – 65 % AV
Knethaken Nur 1. Stufe
Knethaken Nur 1. Stufey
Knethaken Nur 1. Stufe
Knethaken Nur 1. Stufe
Knethaken Nur 1. Stufe
Knethaken Nur 1. Stufe
Tortenteig Flachrührer Alle Stufen
Kartoffelpüree Flachrührer Alle Stufen
Kuchen Flachrührer Alle Stufen
Waffel- oder Pfannkuchenteig Flachrührer r Alle Stufen
Eiweiß Schlagbesen Alle Stufen
Schaumgebäck Schlagbesen Alle Stufen
Schlagsahne Schlagbesen Alle Stufen
Rührteigkuchen Flachrührerr Alle Stufen
4 lbs.
(5 kg)
2 lbs.
(0.9 kg)
2 lbs.
(0.9 kg)
3 lbs.
(1.3 kg)
4 lbs.
(1.8 kg)
2 lbs.
(0.9 kg)
4 lbs.
(1.8 kg)
4 lbs.
(1.8 kg)
6 lbs.
(2.7 kg)
3 qts.
(3.3 l)
3/4 pt.
(0.4 l)
1/2 pt.
(0.3 l)
1-3/4 qts.
(1.9 l)
6 lbs.
(2.7 kg)
Beim Rühren des Teigs das AV (Absorptionsverhältnis) prüfen. AV = Wassergewicht geteilt durch das Mehlgewicht.
Die oben angegebenen Füllvolumen basieren auf einer Mehlfeuchtigkeit von 12 % bei einer Wassertemperatur von 21° C.
Bei Verwendung von Mehl mit einem hohen Glutengehalt die Teigmenge um 10 % reduzieren.
1 Liter Wasser = 1 kg
0,25 Liter Wasser = 0,25 kg
Beispiel:
Wenn für ein Rezept 2,5 kg Wasser und 5 kg Mehl benötigt werden, ist der AV 5 geteilt durch 10 = 0,50 x 100 = 50 %.
Bei Gemischen mit einem AV von unter 50 % keine 2. Drehzahlstufe verwenden.
5 lbs.
(2.3 kg)
3 lbs.
(1.3 kg)
3 lbs.
(1.3 kg)
4 lbs.
(1.8 kg)
5 lbs.
(2.3 kg)
2 lbs.
(0.9 kg)
4 lbs.
(1.8 kg)
5 lbs.
(2.3 kg)
8 lbs.
(3.6 kg)
4 qts.
(4.4 l)
1 pt.
(0.5 l)
3/4 pt.
(0.4 l)
2 qts.
(2.1 l)
8 lbs.
(3.6 kg)
25 lbs.
(11.3 kg)
15 lbs.
(6.8 kg)
9 lbs.
(4.1 kg)
10 lbs.
(4.5 kg)
20 lbs.
(9.1 kg)
9 lbs.
(4.1 kg)
18 lbs.
(8.2 kg)
15 lbs.
(6.8 kg)
20 lbs.
(9.1 kg)
8 qts.
(8.8 l)
1 qts.
(1.1 l)
1 qts.
(1.` l)
4 qts.
(4.4 l)
20 lbs.
(9.1 kg)
45 lbs.
(20.4 kg)
30 lbs.
(13.6 kg)
14 lbs.
(6.4 kg)
20 lbs.
(9.1 kg)
40 lbs.
(18.1 kg)
15 lbs.
(6.8 kg)
30 lbs.
(13.6 kg)
23 lbs.
(1.3 kg)
30 lbs.
(13.6 kg)
12 qts.
(13.2 l)
1-1/2 qts
(1.7 l).
1-1/2 qts
(1.7 l).
6 qts.
(6.6 l)
35 lbs.
(13.6 kg)
50 lbs.
(22.7 kg)
40 lbs.
(18.1 kg)
25 lbs.
(11.3 kg)
32 lbs.
(14.5 kg)
50 lbs.
(22.7 kg)
25 lbs.
(11.3 kg)
35 lbs.
(15.8 kg)
30 lbs.
(13.6 kg)
12 lbs.
(0.9 kg)
16 qts.
(17.6 l)
2 qts.
(2.1 l)
2 qts.
(2.1 l)
8 qts.
(8.8 l)
40 lbs.
(18.1 kg)
90 lbs.
(40.8 kg)
70 lbs.
(31.8 kg)
40 lbs.
(18.1 kg)
60 lbs.
(27.2 kg)
70 lbs.
(31.8 kg)
40 lbs.
(18.1 kg)
60 lbs.
(27.2 kg)
45 lbs.
(20.4 kg)
60 lbs. (
27.2 kg)
24 qts.
(26.4 l)
3 qts.
(3.3 l)
3 qts.
(3.3 l)
12 qts.
(13.2 l)
60 lbs.
(27.2 kg)
6
Bedienungsanleitung
Page 39

gebrauch der anschlussnabe
Der Mixer ist mit einer standardmäßigen Rühr-Anschlussnabe (Nr. 12)
ausgestattet. Es wird empfohlen, Originalzubehörprodukte von Vollrath zu
verwenden. Gebrauch der Anschlussnabe:
HINWEIS:
Vor dem Umschalten von einer Drehzahlstufe zur anderen den Mixer
ausschalten. Andernfalls kann der Getriebekasten beschädigt und die
Garantie unwirksam werden.
1. Den Mixer ausschalten.
2. Die Anschlussnaben-Rändelschraube (K) lockern. Diese Schraube muss
nicht vollständig entfernt werden. Siehe Abbildung 1, 2, 3 und 4.
3. Die Anschlussnaben-Abdeckung abnehmen.
4. Die Welle des Zubehörteils in die Anschlussnabe (J) einführen.
5. Den Stift in der Zubehörwelle mit der Stiftannahme im Innern der Nabe
ausrichten.
6. Das Zubehörprodukt bis zum Anschlag hineinschieben und mit der
Rändelschraube (K) sichern.
7. Mit dem Drehzahlregelungsknopf die erforderliche Nabenbetriebsdrehzahl
einstellen:
Drehzahlstufe 1 – für das Schneiden von Gemüse oder das Faschieren
von Fleisch empfohlen
Drehzahlstufe 2 – für das Reiben von Käse empfohlen
8. Zum Einschalten der Nabe und des daran angeschlossenen Zubehörteils
die Betriebstaste (ON/OFF oder ON) drücken. Die Mixer-Schüssel muss
angehoben und die Schutzblende geschlossen sein, damit die Nabe
eingeschaltet werden kann. Die Nabeneinheit und der Mixer können nicht
gleichzeitig verwendet werden.
9. Zum Ändern der Drehzahl den Mixer durch Drücken der roten Taste
stoppen. Wenn das Mischzubehör zum Stillstand gekommen ist, die
Geschwindigkeit mit dem Drehzahlregelungsknopf ändern. Den Mixer nach
Auswahl der neuen gewünschten Geschwindigkeit durch Drücken der
Betriebstaste neu starten.
Drehzahlstufe 3 ist für den Gebrauch mit Zubehörprodukten nicht empfohlen.
reinigung
Kein Wasser und keine Reinigungsprodukte auf das Gerät
sprühen. Flüssigkeiten könnten mit den elektrischen Komponenten
in Berührung kommen und einen Komponentenausfall oder
Stromschlag verursachen. Das Gerät nicht mit einem modizierten
oder beschädigten Netzkabel verwenden.
Zur Wahrung der äußeren Erscheinung des Geräts und zur Verlängerung
seiner Nutzungsdauer muss es täglich gereinigt werden.
HINWEIS:
Das Gerät nicht mit Stahlwolle reinigen. Elektrische
Bedienelemente oder Komponenten nicht abspritzen
oder in Wasser eintauchen. Zubehörteile nicht an der
Anschlussnabe lagern.
1. Den Mixer ausschalten.
2. Den Mixer vor dem Reinigen vom Netz nehmen. Wenn der Mixer mit
der Stromversorgung festverdrahtet ist, muss er am Trennschalter
ausgeschaltet werden.
3. Schüssel und Zubehörprodukt nach jedem Gebrauch entfernen und
mit warmem Wasser und einem lebensmittelsicheren Reinigungsmittel
säubern. Wenn das Zubehörprodukt nicht von der Rührwelle entfernt
wird, kann es an der Welle stecken bleiben.
4. Das Zubehörprodukt entfernen und mit einem feuchten Tuch und
einem schonenden, lebensmittelsicheren Reinigungsmittel reinigen.
Das Zubehörprodukt gründlich trocknen.
5. Die Außenächen des Mixers mit einem feuchten Tuch und einem
schonenden, lebensmittelsicheren Reinigungsmittel reinigen.
Fehlerbeseitigung
ACHTUNG
Stromschlaggefahr.
Ein Eindringen von Wasser und anderen
Flüssigkeiten in das Gerät verhindern. Flüssigkeiten
im Geräteinnern können einen Stromschlag
verursachen.
ACHTUNG
Einzugsgefahr.
Die sich drehende Welle oder die Zubehörprodukte
können traumatische Amputationen oder schwere
Schnittwunden verursachen. Um Verletzungen
zu vermeiden, müssen Hände und Kleidung von
sich drehenden Teilen ferngehalten werden. Das
Gerät nicht mit modizierten oder fehlenden
Schutzblenden in Betrieb nehmen.
DEUTSCH
Problem Mögliche Ursache Behebungsmaßnahme
Keine Leuchten auf dem Anzeigefeld.
Einschalt- und Zeitschaltleuchten sind eingeschaltet, aber
Mixer läuft nicht.
Nur für 6,6- und 11-l-Mixer: Mixer-Zubehörteil bleibt
stehen, Alarm ertönt und Display blinkt.
22, 33, 44 und 66 l:
Mixer-Zubehörteil bleibt stehen.
Das Gerät ist nicht an der Steckdose
angeschlossen.
Trennschalter ist in der Stellung AUS. Trennschalter auf EIN schalten.
Stoppschalter in der Stellung IN/STOP. Stoppschalter in die Stellung OUT/RUN drehen.
Schüssel-Schutzblende nicht ganz
geschlossen.
Schüssel nicht aufgehoben in die
Betriebsposition zu bringen.
Mixer ist überladen.
Wärmeüberlastschutz aktiviert.
Das Gerät am Netz anschließen.
Schüssel-Schutzblende ganz schließen.
Die Schale vollständig.
Mixer durch Betätigen der Taste OFF
zurücksetzen. Teigmenge um 10-15 %
reduzieren.
Mixer 30 bis 60 Minuten lang abkühlen lassen.
Teigmenge um 10-15 % reduzieren.
Bedienungsanleitung
7
Page 40

instandhaltung und reParaturen
Dieses Elektrogerät hat keine vom Benutzer zu wartenden Teile. Um schwere Verletzungen oder Beschädigungen zu vermeiden, darf kein Versuch unternommen
werden, das Gerät oder ein beschädigtes Netzkabel eigenständig zu reparieren. Schicken Sie Ihr Gerät nicht direkt an die Vollrath Company zurück. Wenden Sie
sich statt dessen an den unten genannten, qualizierten Fachreparaturdienst.
Wenn Sie mit dem autorisierten Fachreparaturzentrum Verbindung aufnehmen, halten Sie bitte die Modell- und Seriennummer sowie Ihren Kaufbeleg griffbereit, auf
dem das Kaufdatum angegeben ist.
TECHNISCHER Vollrath-Kundendienst • 1-800-628-0832 • 920-457-4851
• Email: techservicereps@vollrathco.com
garantieerklärung der vollrath co. l.l.c.
Diese Garantie gilt nicht für zum persönlichen oder Haushaltsgebrauch gekaufte Produkte und The Vollrath Company LLC bietet Käufern keine schriftliche Garantie für einen solchen
Gebrauch.
The Vollrath Company LLC gewährt für jedes seiner nachstehend aufgeführten Produkte für den ebenfalls unten angegebenen, anwendbaren Zeitraum eine Garantie auf Material- und
Ausführungsfehler. Für alle anderen von The Vollrath Company LLC hergestellten oder vertriebenen Produkte gilt eine einjährige Garantie auf Material- und Ausführungsfehler. Die
Gültigkeit der Garantie beginnt in allen Fällen an dem auf der Quittung angegebenen Datum des Originalkaufs durch den Endbenutzer.
Mixer – Garantiezeit von 2 Jahren, außer auf Riemen, für die eine Garantiezeit von 5 Jahren gilt.
Ersatzteile – Garantiezeit von 90 Tagen.
Vollständige Garantieinformationen, Hinweise zur Produktregistrierung und Ankündigungen neuer Produkte nden Sie auf www.vollrath.com.
www.vollrath.com
The Vollrath Company, L.L.C.
1236 North 18th Street
Sheboygan, Wisconsin
53081-3201 USA
Main Tel: 920-457-4851
Main Fax: 920-459-6573
Service Tel: 920-457-4851
Service Fax: 920-459-5462
Vollrath Europe BV
Beneluxbaan 7
5121 AD RIJEN
The Netherlands
+31161870005
Vollrath of China
Vollrath Shanghai Trading Limited
29D, 855 South Pu Dong Road
Shanghai, China 200120
Tel: 86-21-50589580
Vollrath de Mexico S. de R.L. de C.V.
Periferico Sur Edicio 2-C
Col. Santa Maria Tequepexpan
45601 Tlaquepaque, Jalisco Mexico
Tel: (52) 333-133-6767
Tel: (52) 333-133-6769
Fax: (52) 333-133-6768
Art.-Nr. 2350045-1 de Rev 05/14
 Loading...