

Page 1
Installation Instructions
Meat Grinder Chamber and Components
Assembly and Disassembly
To ensure safe installation and operation, read the following statements
and understand their meaning. Please read carefully.
WARNING
Warning is used to indicate the presence of a hazard that can cause
severe personal injury, death, or substantial property damage if the
warning is ignored.
Safety PrecautionS
WARNING
Electrical Shock Hazard.
Keep water and other liquids from entering the inside of
the unit. Liquid inside the unit could cause an electrical
shock.
Do not spray water or cleaning products. Liquid could contact the
electrical components and cause a short circuit or an electrical shock.
Do not use unit if power cord is damaged or has been modied. Do not
use an extension cord with this unit.
WARNING
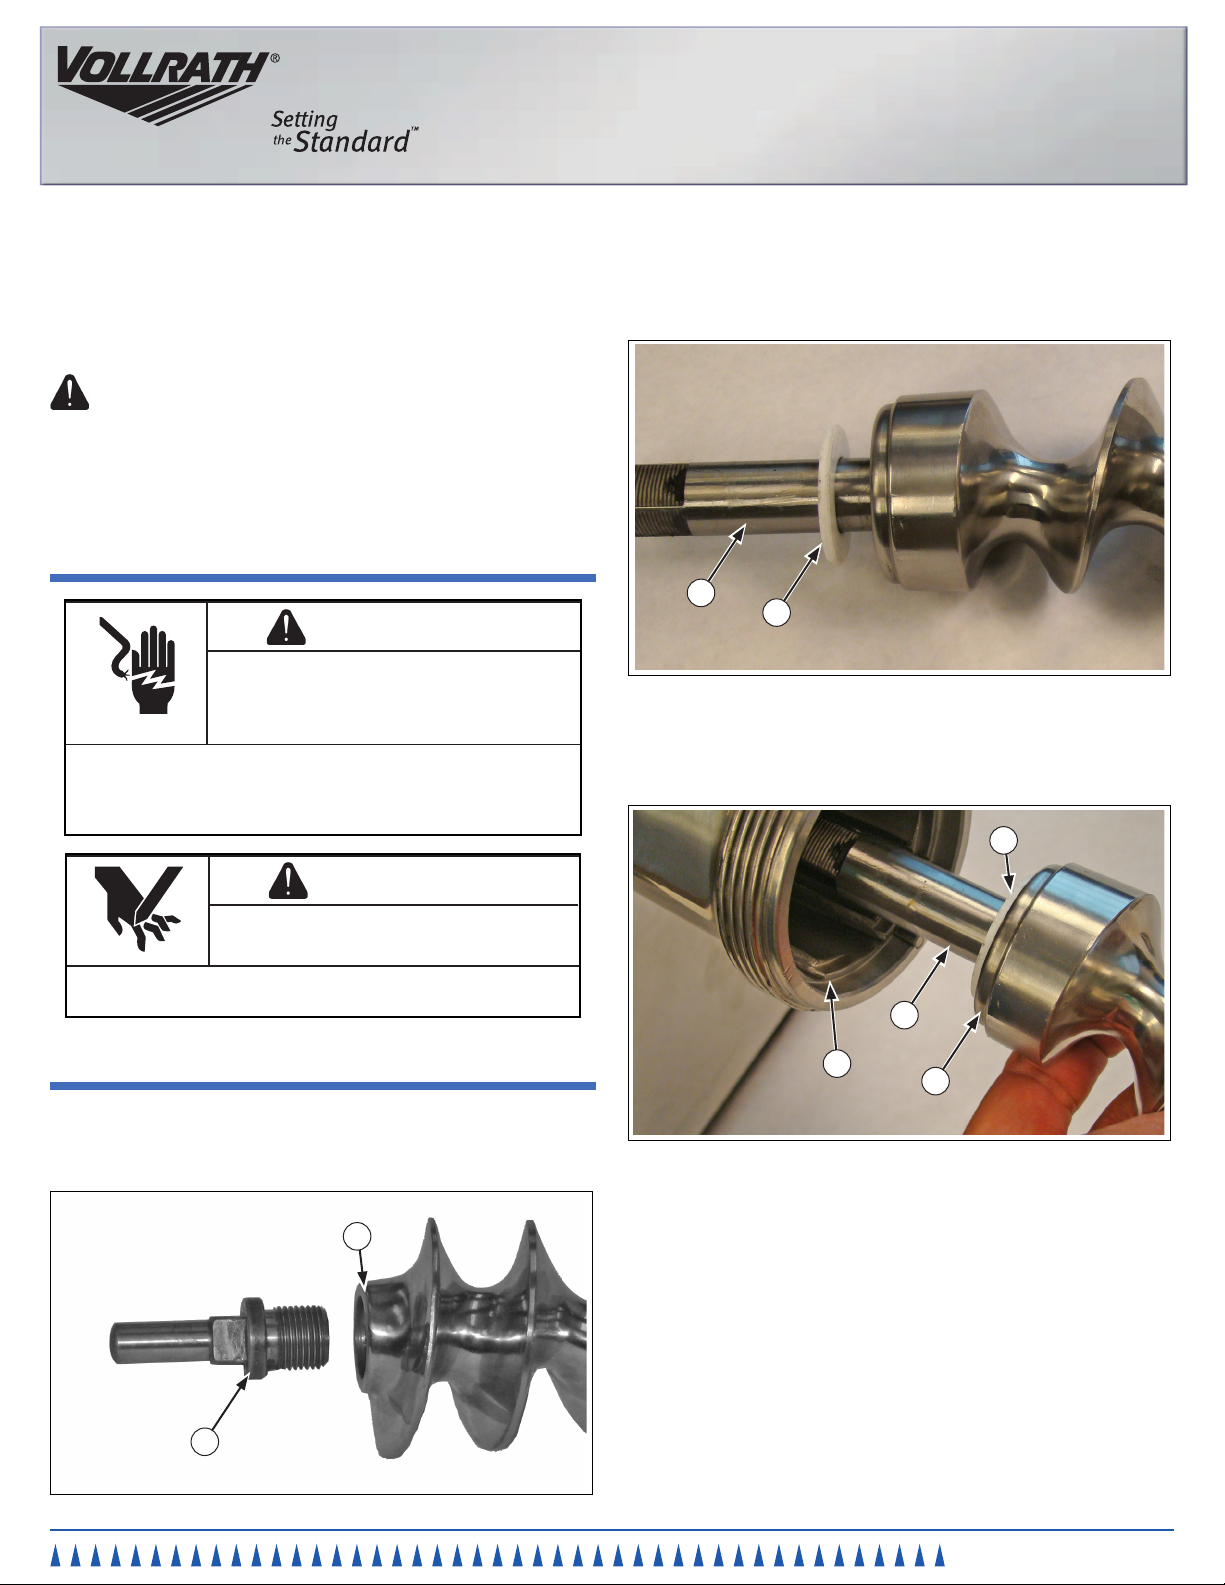
4. Inspect the shaft washer (A) for wear. See Figure 2. Replace if necessary.
B
A
Figure 2. Shaft Washer and Worm Gear Shaft
5. Slide the shaft washer (A) onto the worm gear shaft (B).
6. Slide the shaft washer (A) so that it is seated against the worm gear
assembly (B) as shown. See Figure 3.
A
Sharp Blade Hazard.
Blades are sharp and can cause cuts and amputation.
To avoid injury from sharp blades, handle with caution. Only trained
personal should operate equipment or preform maintenance.
aSSembly ProcedureS
1. Turn the meat grinder off and unplug from its power source.
2. Thoroughly clean and dry all parts.
3. If necessary assemble the blade shaft (B) into the worm gear (A). See Figure 1.
A
B
Figure 3. Shaft Washer, Worm Gear Assembly and Grinder Chamber
7. Slide the worm gear assembly (B) and the shaft washer (A) into the grinder
chamber (C). Slide the worm gear shaft (D) in until it is seated fully.
D
C
B
Figure 1. Blade Shaft and Worm Gear
Item No. 2350053-1 Rev 07/10
Page 2
8. Slide the knife blade (B) so that the at ground edges (A) face to the outside as
shown, onto the blade shaft (C). See Figure 4.
11. If a sausage ller is to be used, place it between the coupling cover (A) and the
grinder chamber (B). See Figure 7.
D
B
A
C
Figure 4. Knife Blade and Blade Shaft
9. Slide the knife blade (B) onto the blade shaft (C) so that it seats completely
over the square (D). See Figure 5.
B
A
Figure 7. Coupling Cover and Grinder Chamber
12. Thread the coupling cover (A) onto the grinder chamber (B) and tighten
diSaSSembly ProcedureS
1. Turn the meat grinder off and unplug from its power source.
2. Unscrew and remove the coupling cover (A) from the grinder chamber (B). See
3. Remove the grinder plate (D) from the blade shaft (A). See Figure 6.
C
4. Carefully remove the knife blade (B) from the blade shaft (C). See Figure 5.
5. Remove the worm gear assembly (B) from the grinder chamber (C). See
Figure 5. Knife Blade and Blade Shaft
6. Thoroughly clean and dry all parts.
A
B
securely.
Figure 7.
Figure 3.
10. Place the grinder plate (D) onto the blade shaft (A) so that the cutout (C) slides
over the locating pin (B). See Figure 6.
A
D
C
B
Figure 6. Grinder Plate, Cutout, Locating Pin and Blade Shaft
The Vollrath Company, L.L.C.
1236 North 18th Street
Sheboygan, WI 53081-3201
U.S.A.
www.vollrathco.com
Main Tel: 800.628.0830
Fax: 800.752.5620
Technical Services: 800.628.0832
Service Fax: 920.459.5462
Canada Service: 800.695.8560
© 2010 The Vollrath Company, L.L.C.
 Loading...