

Page 1
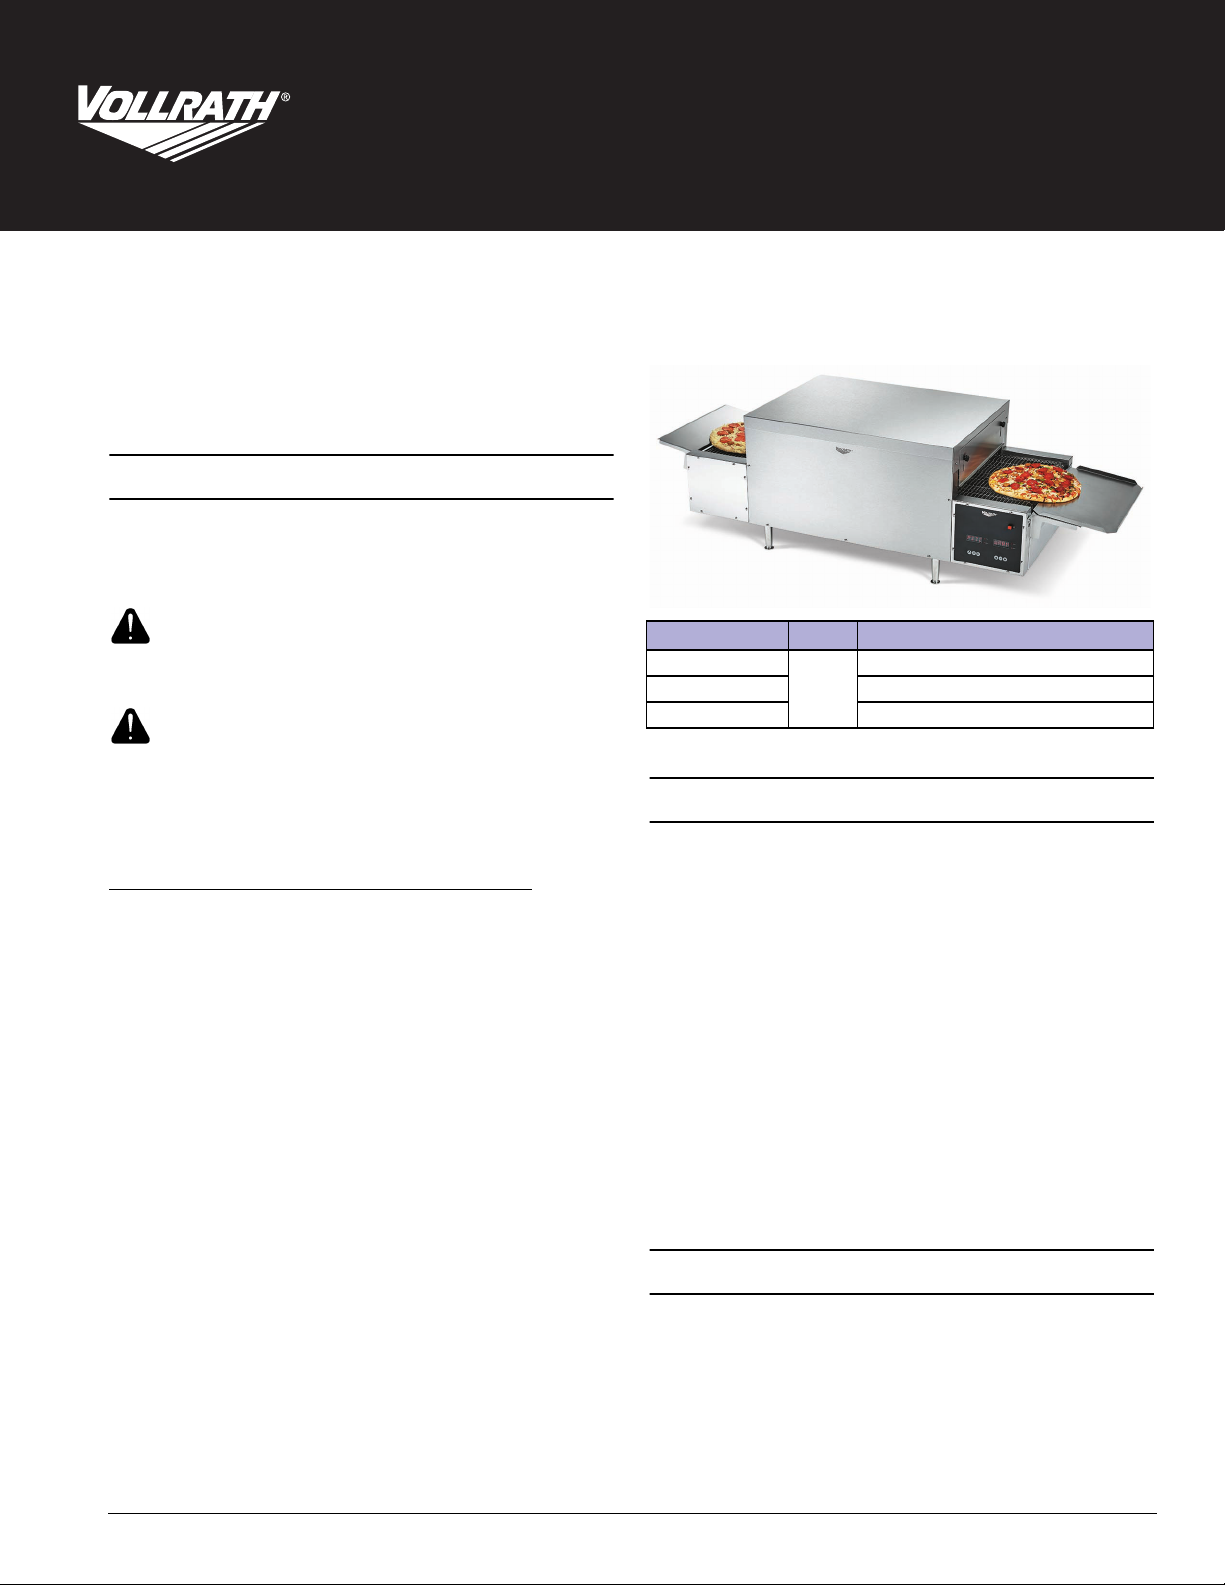
68 Inch Digital Conveyor Pizza Ovens
Thank you for purchasing this Vollrath equipment. Before operating the
equipment, read and familiarize yourself with the following operating
and safety instructions. SAVE THESE INSTRUCTIONS FOR FUTURE
REFERENCE.
SAFETY PRECAUTIONS
To ensure safe operation, read the following statements and understand
their meaning. This manual contains safety precautions which are
explained below. Please read carefully.
Operator’s Manual
Model MGD18
WARNING
Warning is used to indicate the presence of a hazard that will or can
cause severe personal injury or death.
CAUTION
Caution is used to indicate the presence of a hazard that will or can
cause minor or major personal injury if the caution is ignored.
NOTICE: Notice is used to note information that is important but not
hazard-related.
To reduce risk of injury or damage to the equipment
• Plug only into grounded electrical outlets matching the voltage on
the rating plate.
• Use this equipment in a flat, level position.
• Unplug equipment and let it cool before cleaning or moving.
Equipment remains hot after it is turned off.
• Do not touch during operation.
• Unplug when not in use.
• Keep equipment and power cord away from open flames, electric
burners or excessive heat.
• Do not operate unattended.
• Closely supervise equipment operating in public areas and/or
around children.
• Do not operate if equipment has been damaged or is malfunctioning
in any way.
Item No. Model Description
PO6-20818
PO6-22018 18" wide conveyor, 220V
PO6-24018 18" wide conveyor, 240V
MGD18
18" wide conveyor, 208V
FUNCTION AND PURPOSE
This equipment is intended to bake fresh dough and par-baked pizzas,
flat breads, calzones and toast sandwiches. It is not intended bake
frozen or deep dish pizzas, or to cook raw food or raw pizza toppings. It
is intended for use in commercial foodservice operations that serve
pizzas, but that also serve other menu items. It is intended for
occasional, not continuous use. It is not intended for pizzerias,
household, industrial or laboratory use.
Ventless Operation
This oven is UL tested and verified for ventless operation under the
following conditions:
• For use with pre-cooked foods such as pizza toppings, sandwiches
and melting cheese
• Not for use with raw and/or fatty proteins such as skin-on or bone-in
chicken, hamburger meat or sausages
Note: Local codes may apply. Approval for ventless operation is subject
to the local Authority Having Jurisdiction (AHJ). Please contact your
AHJ for more information
CLEARANCE AND ENVIRONMENT REQUIREMENTS
Do not place this oven on surfaces or near walls, partitions or kitchen
furniture unless they are made of non-combustible material or clad with
non-combustible heat-insulating material. Ovens must not be used near
or below curtains and other combustible materials. Do not place the
oven adjacent to a heat producing appliance.
©
2019 The Vollrath Company L.L.C. Part No. 350844-1 ml 6/3/19
Page 2
SET UP
FROZEN/FRESH DOUGH HANDLING TIPS
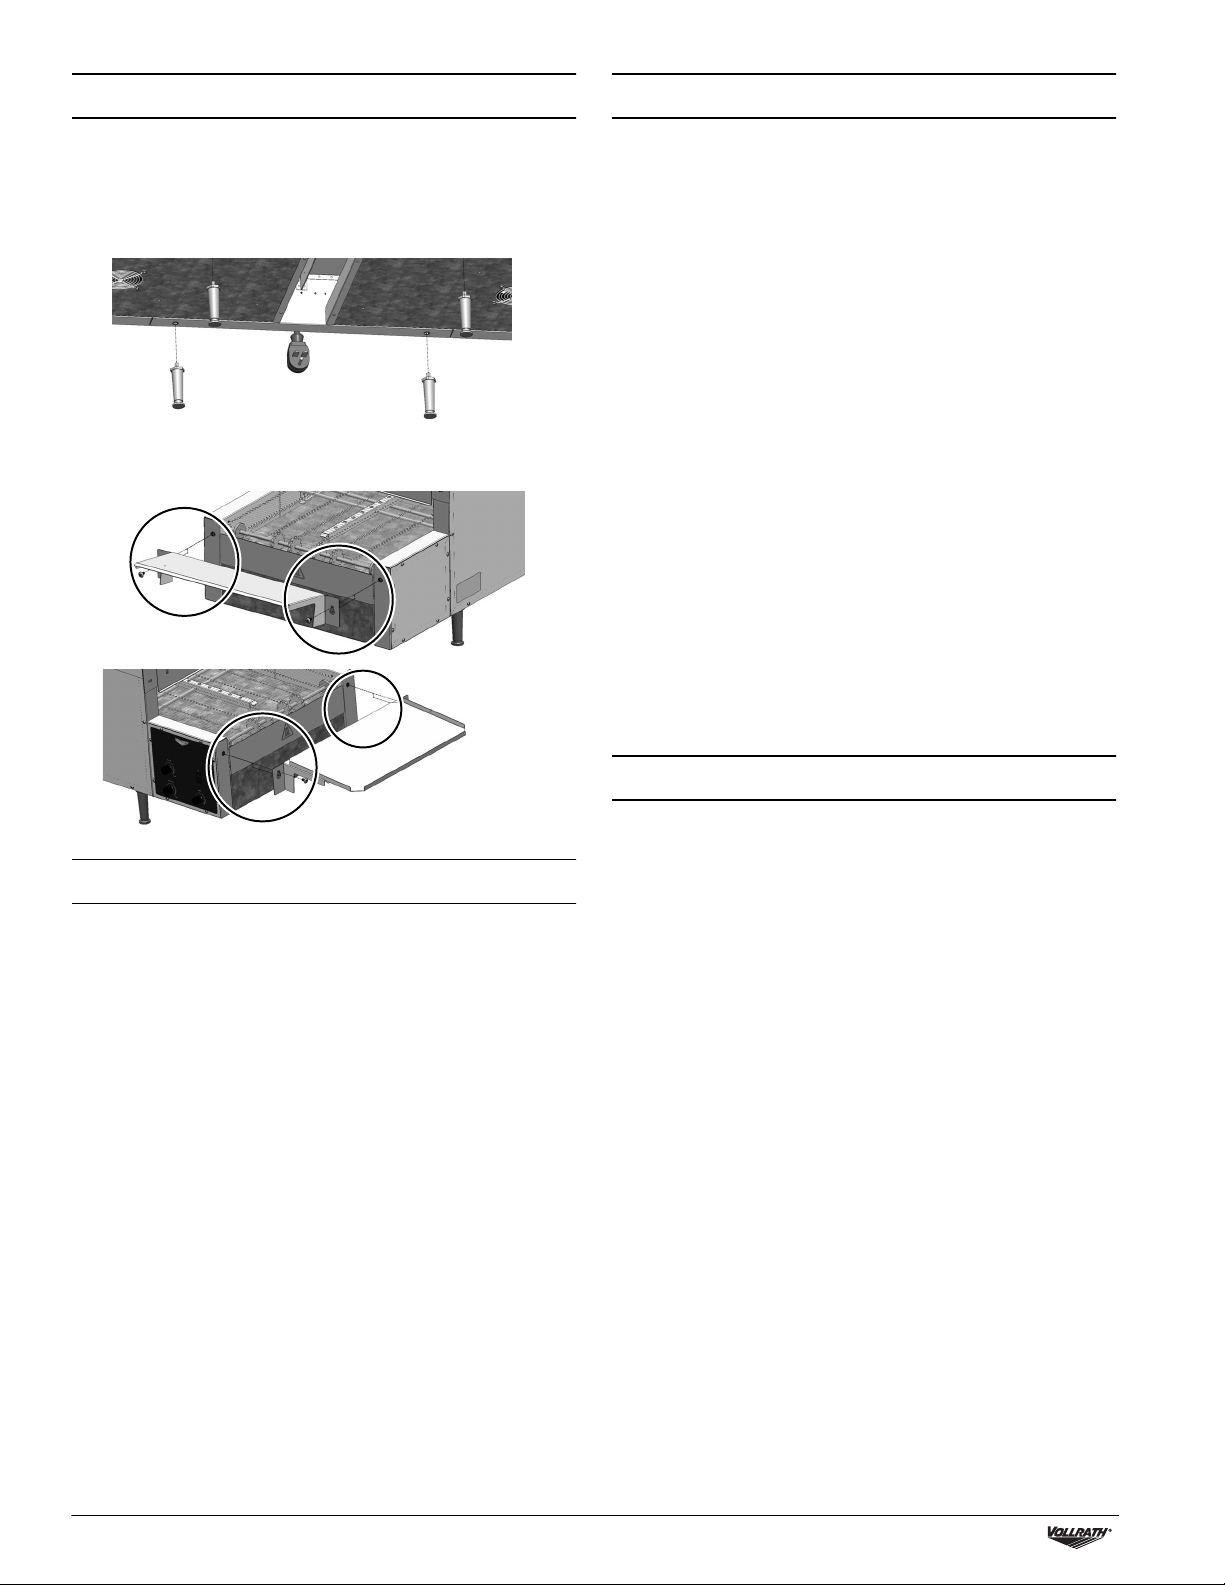
1. Place the oven on a hard, flat, stable surface.
2. Install the legs. Two people required. Have one person lift one end of
the oven while the other person installs the legs. Repeat for the other
side of the oven.
NOTICE: Legs must be installed. Failure to install the legs will
restrict airflow and cause the oven to overheat.
3. Install the load and unload trays to match the conveyor direction.
The load tray slants toward the conveyor. The unload tray slants
away from the conveyor.
The following are general tips. Follow any instructions specific to your
brand of dough or recipe.
• Remove the wrapping from frozen dough balls.
• Place the dough balls a few inches apart, into a proofing box or on a
sheet pan.
• Lightly spray top of the dough balls with a non-stick cooking spray,
then cover with a layer of freezer paper.
• Refrigerate overnight.
• Remove only enough dough balls from the sheet pan to
accommodate what you will need for a few hours.
• Sprinkle flour, cornmeal or Pizza Crisp onto the surface on which
you plan to roll out the dough.
• Roll the dough, starting from the center and working your way to the
outer edges. Turn the dough as you work toward the outer edges to
maintain a round shape.
• Use a rolling pin, dough press or dough sheeter to form the dough
to the desired size and thickness.
• Place the flattened shell onto a dark metal or seasoned pizza screen
or pan.
NOTICE: Fresh dough pizzas must be baked on metal pizza
screens or pizza pans. Do NOT put fresh dough pizzas
directly on the conveyor. Dough will stick to or fall
through the conveyor.
NOTICE: Do NOT use paper pizza pans in this oven. Paper pizza
pans will burn and could create a fire hazard.
NOTICE: Dark metal or seasoned metal screens or pans perform
best. Shiny metal or aluminum foil will reflect heat away
from the pizza and preventing browning.
BEFORE FIRST USE
1. Clean the oven. See “Daily Cleaning” on page 5.
PIZZA ASSEMBLY TIPS
• Spread the sauce, starting from the center and moving toward the
outer edges of the crust to ensure a uniform thickness of sauce.
Leave an inch of space to the outer edge of the crust to allow the
crust to brown. Spreading sauce too close to the edge prevents the
crust from browning.
• Spread out high moisture content toppings, such as vegetables.
High moisture toppings will prevent the surrounding areas from
baking until ALL of the moisture has evaporated.
2 68 Inch Digital Conveyor Pizza Ovens Operator’s Manual – Model MGD
Page 3

FEATURES
Left to Right Conveyor Set-up Shown
A
C
B
Front View
A Heat Shield
B Crumb Tray
C Load/Unload Trays
Load. Slants toward conveyor
Unload. Slants away from conveyor
D Reset Button (Reference only. See page 6.)
Back View
E
G
F
E Control Panel Circuit Breaker
F Power Cord
G Conveyor Circuit Breaker
H Main Power Switch - Turns on main power to the oven
I Oven Stacker Receptacle. Powers the oven stacker accessory.
H
I
D
Control Panel
Power Button - Press to turn on the heating elements and
conveyor.
speed
recipe
Speed Button - Press to set the time it takes for food to pass
through the oven.
Recipe Button - Press to select a recipe. There are six
customizable recipe programs. Each recipe includes temperature
settings for each oven zone and the conveyor speed.
Pizza 1-2 Select for pizzas that have 1-2 topping
Pizza 3-4 Select for pizzas that have 3-4 toppings
Calzone Select for baking fresh dough calzones
Sandwich Select for toasting sandwiches
M1 Create your own recipe program
M2 Create your own recipe program
Temp Button - There are four temperature zones, two on top of the
oven and two on the bottom. For a diagram, see “Change
temp
Temperatures” on page 5.
Up Button - Press to scroll through the recipes or to increase the
speed or temperature.
Set Button - Press to select a recipe or save a change to the speed
or temperature.
set
Down Button - Press to scroll through the recipes or to decrease
the speed or temperature.
A
B
C
68 Inch Digital Conveyor Pizza Ovens Operator’s Manual – Model MGD 3
Page 4
OPERATION
Adjust the Heat Shields
Rotate the knobs to adjust the heat shields to allow food to pass into
the oven, and to regulate the amount of heat retained at each end of the
oven to achieve desired results.
Tips:
Menu Item Suggestions
Fresh dough Entry shield all the way down, and exit shield
partially down to retain heat to bake the dough.
Par baked Entry and exit shields half way down to finish crust
and brown the toppings.
Sandwich Entry and exit shields half way down.
Calzone Entry and exit shields half way down.
Preheat
1. Plug the oven into a grounded electrical outlet that matches the
rating on the name plate found on the oven.
NOTICE: Using a voltage other than the nameplate rated voltage
will cause damage to the unit. Incorrect voltage,
modification to the power cord or electrical components
can damage unit and will void the warranty.
2. Position the main power switch on the back of oven to the ON
position.
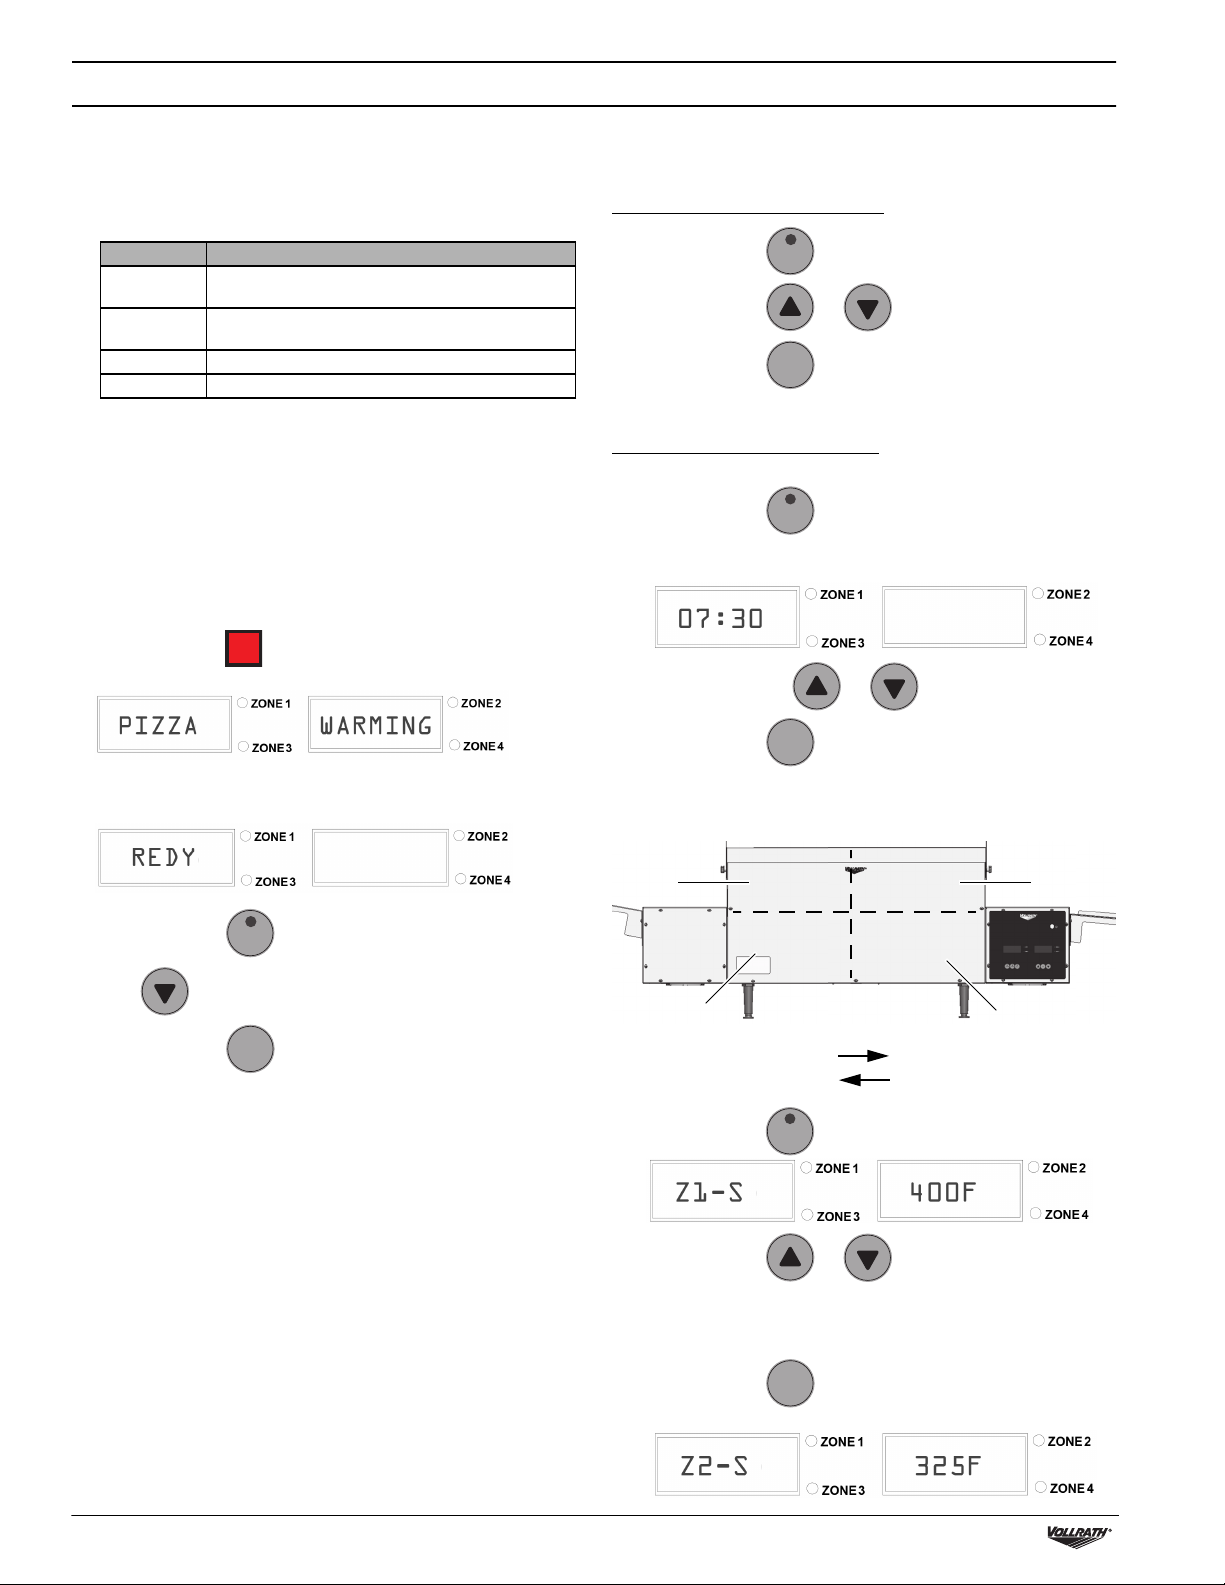
3. Press and release on the display. You will hear a beep. The
oven will start to preheat. The display will read:
Adjust the Recipe Settings
Customize the default recipe settings to meet your baking needs.
STEP 1: Select a Recipe to Adjust
1. Press and release . The control panel will beep.
2. Press and release or to scroll through the recipes.
3. Press and release to select a recipe.
Note: Press set within 10 seconds or the change will not be saved.
STEP 2: Select Settings to Adjust
Change the Conveyor Speed
1. Press and release . The current speed will display.
Tip: For pizza start with a 7:30 pass time. Ideal pass time is
dependent on the type of crust and toppings.
2. Press and release the or to change the speed.
recipe
set
speed
4. The oven will be ready to use in approximately 20 minutes. The
display will read:
5. Press and release .
6. Press to scroll through the recipe options.
7. Press and release to select a recipe.
8. Adjust the recipe settings according to the menu item to be baked.
See “Adjust the Recipe Settings” on this page.
9. Wait 5 minutes for the oven to adjust to the new settings.
recipe
set
Test
NOTICE: Fresh dough pizzas must be baked on metal pizza screens
NOTICE: Do NOT use paper pizza pans in this oven. Paper pizza pans
NOTICE: Dark metal or seasoned metal screens and pans perform
1. Test the settings by placing a sample pizza into the oven.
2. Monitor the baking process and adjust the temperatures and
3. Evaluate the results.
or pizza pans. Do NOT put fresh dough pizzas directly on
the conveyor. Dough will stick to or fall through the
conveyor.
will burn and could create a fire hazard.
best. Shiny metal or aluminum foil will reflect heat away
from the pizza and preventing browning.
conveyor speed to prevent the pizza from burning.
3. Press and release to select and save the selection.
Change the Temperatures
1. There are four temperature zones. Zones are always in the same
location, regardless of the direction of the conveyor.
1
3
Conveyor Direction Pizza Direction Through Zones
Left to Right
Right to Left
2. Press and release . Zone 1 is displayed.
3. Press and release or to change the temperature.
Tip: For pizza, set the bottom heat approximately 75
degrees hotter than the top control. Ideal temperatures are
dependent on the type of crust and toppings.
4. Press and release to save the selection. The display will
advance to next heat zone.
set
2
4
1 and 3 2 and 4
1 and 3 2 and 4
temp
° to 100°
set
4 68 Inch Digital Conveyor Pizza Ovens Operator’s Manual – Model MGD
Page 5
OPERATION (CONTINUED)
Bake
1. Press and release . The control panel will beep.
2. Press and release or to scroll through the recipes.
recipe
CLEANING
WARNING
Electrical Shock Hazard
Do not spray water or cleaning products. Liquid could contact
the electrical components and cause a short circuit or an
electrical shock.
3. Press and release to select a recipe.
4. Allow time for the oven to adjust to new heat settings before placing
a pizza on the conveyor.
5. Do not overload the oven. Wait a few minutes for the oven to recover
before placing the next pizza onto the conveyor.
Maximum oven capacity: One 16" diameter pizza or multiple smaller
pizzas with a combined maximum diameter of 16"
set
If a Pizza is Stuck in the Oven
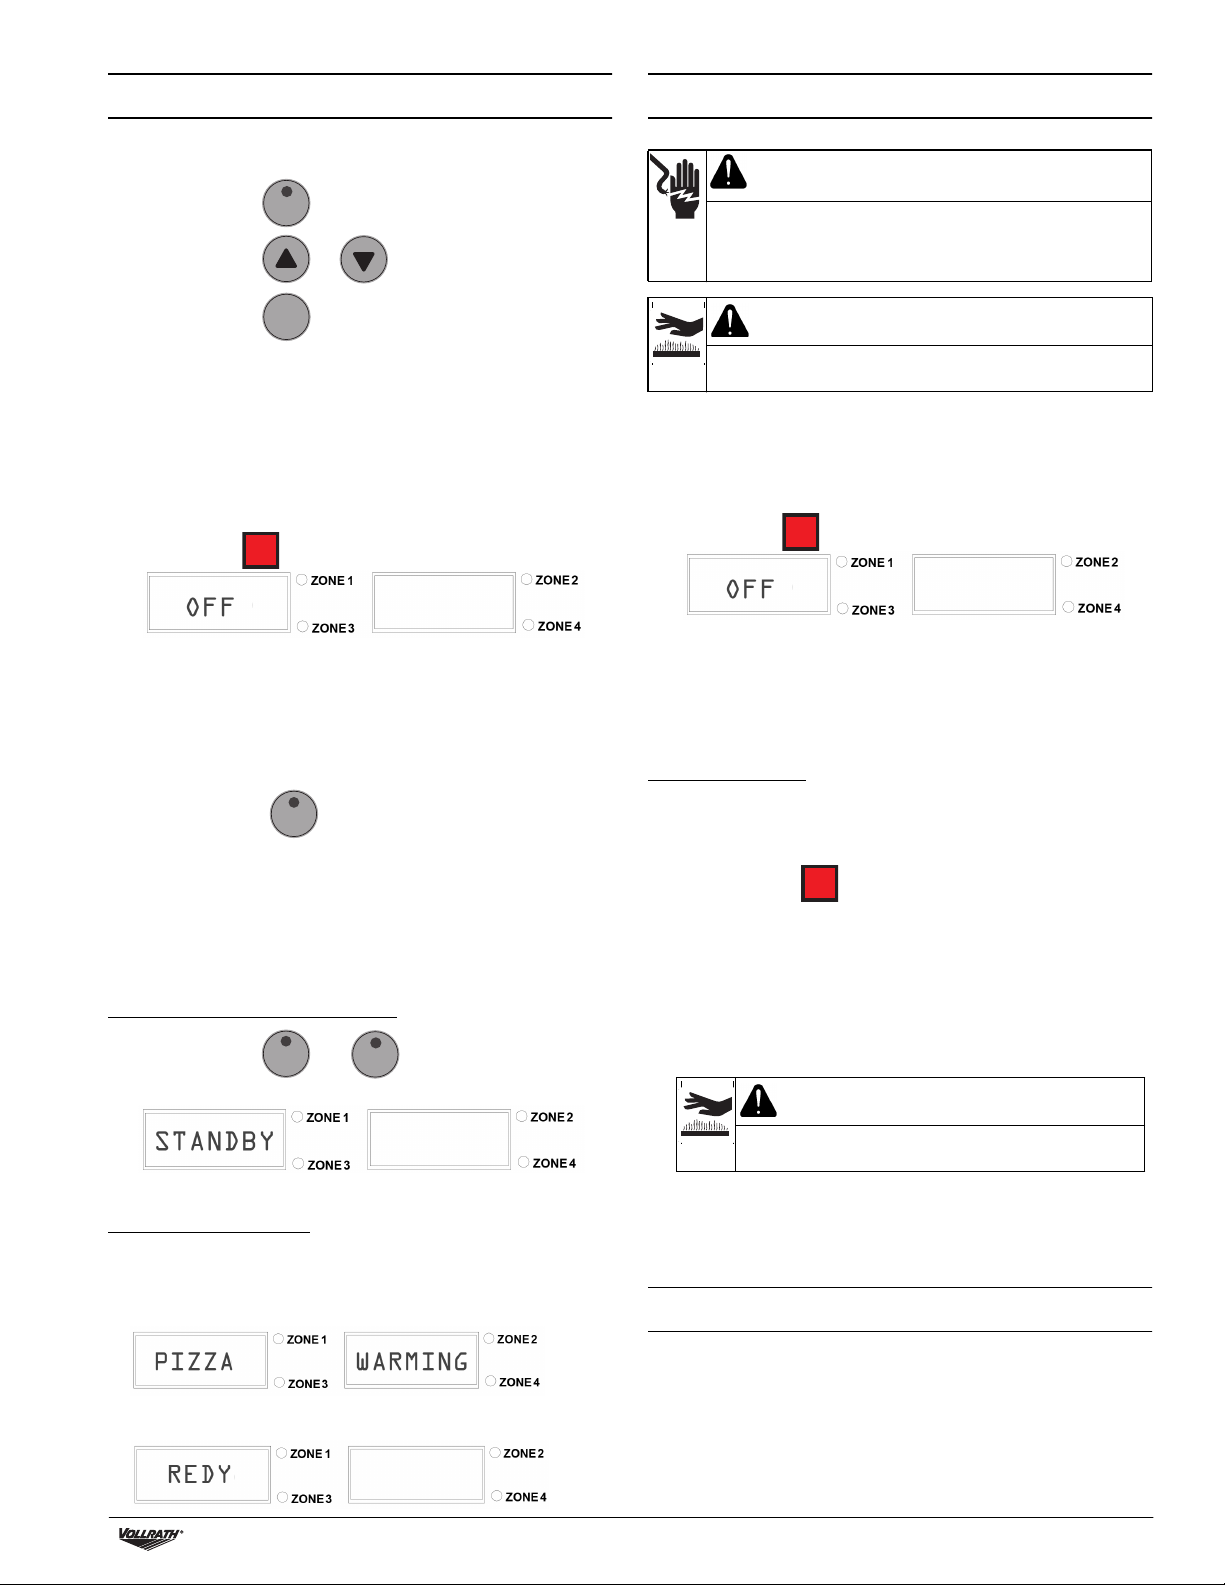
1. Press and hold until the display shows
2. Unplug the oven.
3. Let the oven cool completely.
4. Use tongs to remove the pizza. Take care to not bump the glass
heating elements above and below the conveyor.
Change the Conveyor Direction
1. Press and hold the until you hear two beeps.
2. The conveyor will stop. After about 10 seconds it will start again in
the opposite direction.
speed
CAUTION
Burn Hazard
Allow equipment to cool before moving or cleaning.
NOTICE: Do not use abrasive materials, scratching cleansers or
scouring pads to clean the exterior of the equipment.
These can damage the finish.
Daily Cleaning
1. Press and hold until the display shows
2. Unplug the oven.
3. Let the oven cool completely.
4. Slightly dampen a soft cloth with warm water.
5. Use the dampened cloth to clean the exterior of the oven, the air
intake under the oven, the feed ramp, and collection tray.
Clean the Conveyor
Tip: Use M1 or M2 to create a “recipe” with settings for cleaning the
oven,
1. Plug in the oven.
2. Press and release .
Standby Mode
Use standby mode to reduce electrical consumption by up 75% during
non-peak usage time.
To Place the Oven in Standby Mode
1. Press and release and at the same time.
2. The display will show
temp
To Cancel Standby Mode
1. Press any button on the control panel to return the oven to full
power.
2. The display will show WARMING until the oven reaches the
temperature for the selected recipe.
3. When the oven reaches the set temperature, the display will show
recipe
3. Set the temperature in all 4 zones to 150
4. Set the conveyor speed to 90 seconds.
5. Press and hold a heat resistant (steel wool, metal wire brush, etc)
abrasive pad or brush against the conveyor. Move the pad or brush
back and forth (left to right) across the conveyor to remove food
debris.
6. Empty and clean the crumb trays.
°.
CAUTION
Burn Hazard
Crumb trays may be hot. Use oven mitts to protect hands.
Special Instructions for Ventless Operation
Clean the adjacent surfaces and kitchen equipment at least every other
month or more frequently as needed.
PREVENTATIVE MAINTENANCE
Contact an authorized service agent for a professional cleaning of the
components.
68 Inch Digital Conveyor Pizza Ovens Operator’s Manual – Model MGD 5
Page 6
TROUBLESHOOTING
Problem Might be Caused By Course of Action
Oven will not turn on when the power
button on the front of the oven is
pressed.
Display on control panel is blank, oven is
plugged in and turned on.
Display shows an zone alarm: prb1,
prb2, prb3, prb4 and the control
panel emits a continuous beep.
Display will not change from Warming
to Redy.
Display changes from Warming to
Heating and does not display Redy.
Conveyor will not reverse direction. The conveyor may be obstructed. Check for and clear obstructions in the conveyor.
Conveyor speed will not change. Set button was not pressed after setting
Conveyor will not turn, but the oven
heats.
Top or bottom heater tubes do not heat. One or more heating elements may have
Oven repeatedly overheats. The crumb tray may not be installed. Verify the crumb tray is installed.
Master On/Off switch on the back of the
oven is in the OFF position.
Oven is plugged into incorrect voltage. Check voltage at the wall outlet. Plug oven into correct voltage.
Control panel circuit breaker, located on
the back of the oven, may have tripped.
Temperature probe in the zone indicated
by the alarm code is not responding.
One heat zone may not be on. Examine heating elements in each heat zone to verify they are
Oven is plugged into incorrect voltage. Check voltage at the wall outlet. Plug oven into correct voltage.
Temperature setting in one or more
zones may be too high.
The speed button was not been pressed
correctly.
There may be a problem with the drive
system relay.
the new speed.
There may be a problem with the driver
board.
The conveyor may be obstructed. Check for and clear obstructions in the conveyor.
There may be a problem with one of the
components.
Conveyor circuit breaker, located on the
back of the oven, may have tripped.
burned out in the zone indicated by the
alarm code shown on the display.
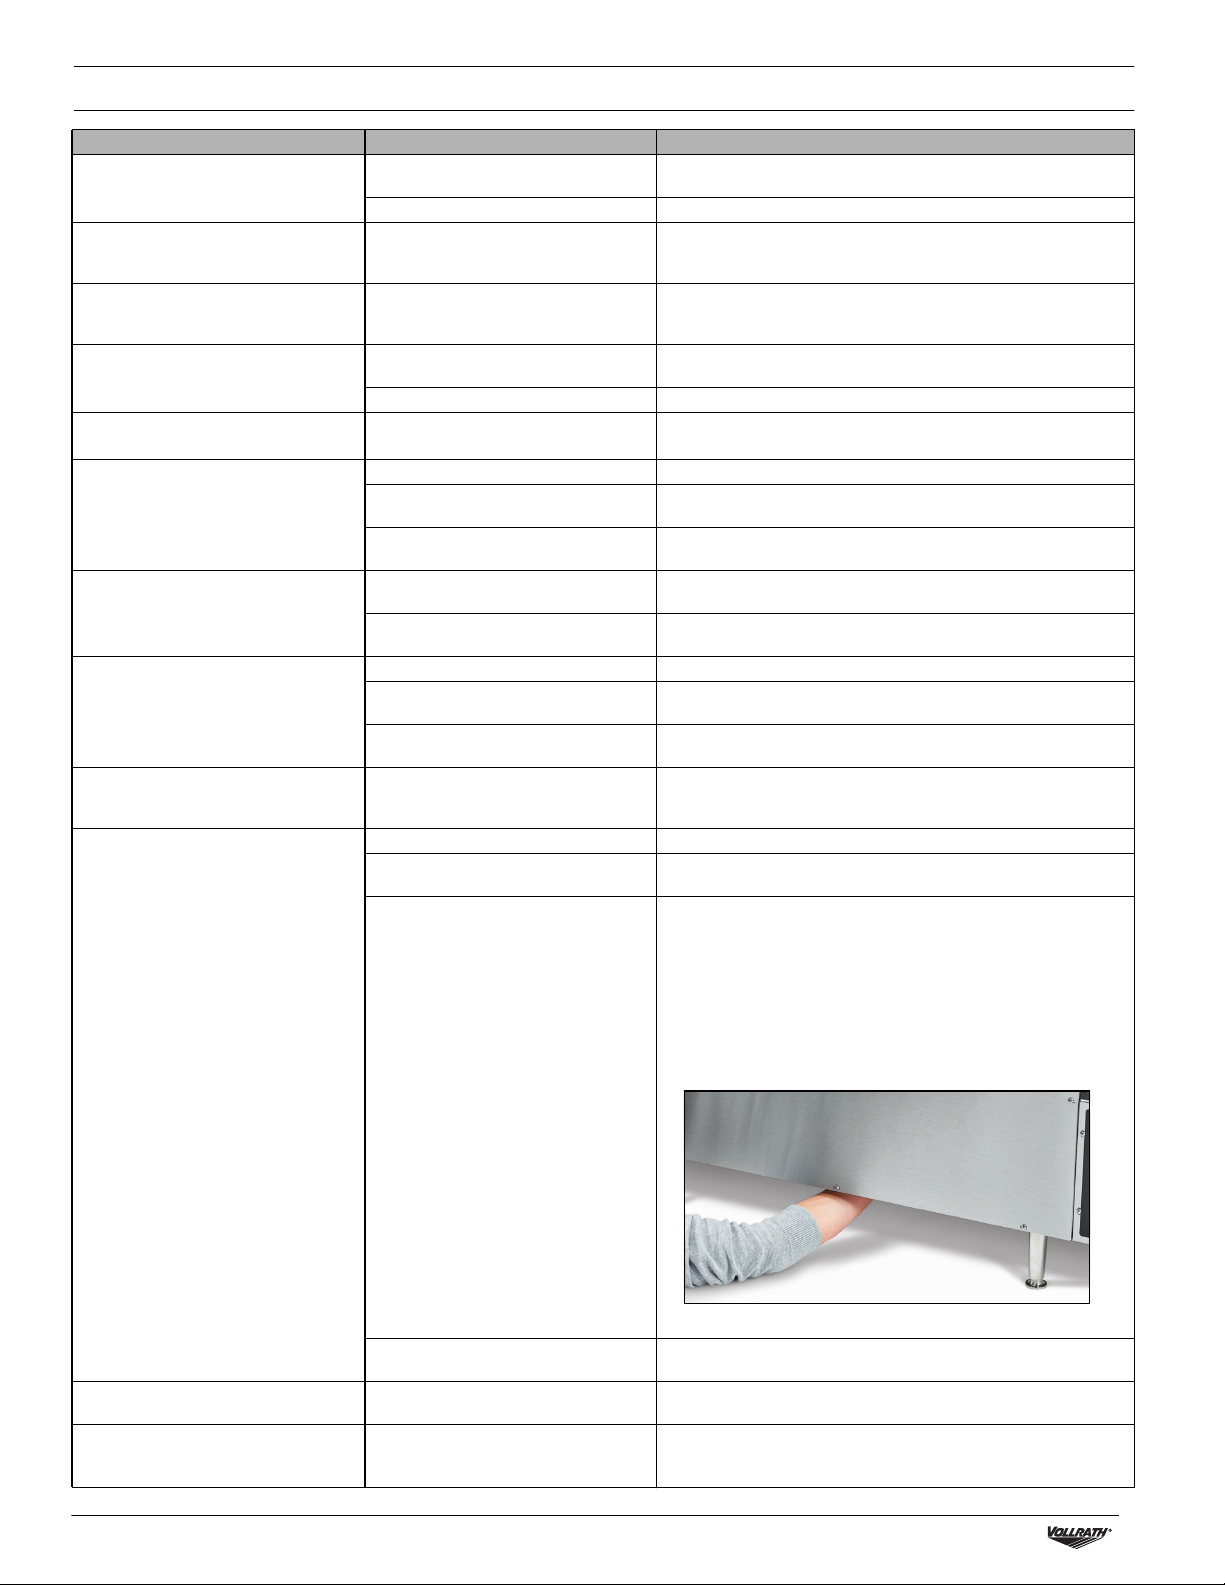
The fan may be dirty. Verify the fan blades of both fans are clean. See the instructions
The fan blades may be dirty. Inspect the fan blades of both to see if they are dirty.
Position the switch to the ON position.
Check for a broken heating element. Replace the element. After the
issue has been resolved, press the button on the circuit breaker to
reset it.
Press any key to turn off the alarm. Contact Vollrath Technical
Services.
working.
Maximum temperature for each zone is 550
temperatures to below the maximum.
Press and hold the speed button until you hear two beeps.
Contact Vollrath Technical Services.
Press the Set button after changing the speed. See “Change the
Conveyor Speed” on page 4.
Contact Vollrath Technical Services.
Contact Vollrath Technical Services.
Press the button on the circuit breaker to reset it.
Press any key to turn off the alarm. Contact Vollrath Technical
Services.
below for inspecting and cleaning the fan blades.
1. Press and hold the power button on the front of the oven until
the display shows OFF. Unplug the oven.
2. Wait 30 minutes for the oven cool.
3. Clean the fan blades.
4. Plug in the oven.
5. Press the power button on the front of the oven.
6. Press the reset button.
°F. Adjust the
7. If the problem persists call Vollrath Technical Services.
There may be a problem with the fan. Run the oven for 10 minutes. If the fan does not run, contact
The fan is not running. There may be a problem with the fan or
The oven is turned off and the fan is
running.
6 68 Inch Digital Conveyor Pizza Ovens Operator’s Manual – Model MGD
fan switch.
Normal operation. The fan turns on as
needed to cool the oven.
Vollrath Technical Services.
Run the oven for 10 minutes. If the fan does not run, contact
Vollrath Technical Services.
_
Page 7

This page intentionally left blank.
68 Inch Digital Conveyor Pizza Ovens Operator’s Manual – Model MGD 7
Page 8

SERVICE AND REPAIR
When under warranty, repair is available for this product. To begin the process:
1. Contact Vollrath Technical Services at 1-800-309-2250. Please be ready with the item number, model number and serial number. You can find this
information on the nameplate located on the side or back of the equipment. Also please provide a proof of purchase indicating the date the
equipment was purchased.
2. A technical services representative will help you troubleshoot the problem over the phone.
3. If the representative determines the issue requires professional service, he or she will help you locate an authorized service center.
4. Contact the authorized service center to make arrangements for the repair. Vollrath will cover the cost to repair and/or replace defective parts
within the equipment warranty period.
WARRANTY STATEMENT FOR THE VOLLRATH CO. L.L.C.
The Vollrath Company LLC warrants the products it manufactures or distributes against defects in materials and workmanship as specifically
described in our full warranty statement. In all cases, the warranty runs from the date of the end user’s original purchase date found on the receipt.
Any damages from improper use, abuse, modification or damage resulting from improper packaging during return shipment for warranty repair will
not be covered under warranty.
The warranty does not apply to products purchased for personal, family or household use, and The Vollrath Company LLC does not offer a written
warranty to purchasers for such uses.
Warrantied Parts: The warranty period is 2 years parts, 1 year labor.
Heater Tubes: The warranty period is 1 year, including labor. Heater tube glass damage is not covered by this warranty.
For complete warranty information, product registration and new product announcements, visit www.vollrath.com.
www.vollrath.com
The Vollrath Company, L.L.C.
1236 North 18th Street
Sheboygan, WI 53081-3201 U.S.A.
Main Tel: 800.624.2051 or 920.457.4851
Main Fax: 800.752.5620 or 920.459.6573
Customer Service: 800.628.0830
Canada Customer Service: 800.695.8560
©
2019 The Vollrath Company L.L.C. Part No. 350844-1 ml 6/3/19
Technical Services
techservicereps@vollrathco.com
Toasters: 1-800-309-2250
All Other Products: 800.628.0832
Page 9

Manuel d'utilisation
Fours à pizza convoyeurs numériques 68 pouces (1,7 m)
Modèle MGD18
Merci d’avoir acheté cet appareil Vollrath. Avant d’utiliser cet appareil,
lisez et familiarisez-vous avec le mode d’emploi et les consignes
d’utilisation qui suiven. CONSERVEZ CES INSTRUCTIONS POUR
RÉFÉRENCE ULTÉRIEURE. Conservez l’emballage et le carton d’origine.
L'emballage devra être réutilisé pour expédier l’appareil si une
réparation est nécessaire.
CONSIGNES DE SÉCURITÉ
Pour garantir un fonctionnement sûr, lisez les avertissements suivants
et comprenez leur signification. Ce manuel contient des consignes de
sécurité, présentées ci-dessous. Lisez-les attentivement.
AVERTISSEMENT
Un avertissement permet d'indiquer la présence d'un danger qui
causera ou peut causer des blessures personnelles graves ou la mort.
Num.d’art. Modèle Description
PO6-20818
PO6-22018 Convoyeur de 18" (45,7 cm) de largeur,
PO6-24018 Convoyeur de 18" (45,7 cm) de largeur,
MGD18
Convoyeur de 18" (45,7 cm) de largeur,
208 V
220 V
240 V
ATTENTION
Une mise en garde indique la présence d'un danger qui causera ou
pourra causer des blessures mineures ou majeures si elle est ignorée.
AVIS : Un avis met en évidence des informations qui sont
importantes mais sans rapport avec un danger.
Pour réduire le risque de blessures et d'endommagement
de l'appareil
• Branchez l’appareil uniquement sur une prise de terre correspondant
à la tension indiquée sur la plaque des valeurs nominales.
• Utilisez cet appareil bien calé à l'horizontale.
• Débranchez l’appareil et laissez-le refroidir avant de le nettoyer ou de
le déplacer. L'appareil reste chaud après sa mise hors tension.
• Ne touchez pas l'appareil en cours de fonctionnement.
• Débranchez l’appareil lorsque vous ne comptez pas l’utiliser.
• Tenez l'appareil et son cordon d’alimentation à l’écart des flammes
nues, des brûleurs électriques ou d’une chaleur excessive.
• N'utilisez pas l'appareil sans surveillance.
• Surveillez de près les appareils utilisés dans des lieux publics et/ou à
proximité d’enfants.
• N’utilisez pas l’appareil s’il a été endommagé ou s’il fonctionne mal.
FONCTION ET OBJET
Cet appareil est destiné à la cuisson de pizzas, pains plats, calzones et
sandwichs grillés à pâte fraîche ou partiellement cuite. Il n'est pas
destiné à la cuisson de pizzas surgelées, pizzas de Chicago (de type
profond à pâte épaisse) ou d'aliments ou garnitures de pizza crues. Il
est destiné aux opérations de restauration commerciales qui servent
des pizzas, mais offrent aussi d'autres options sur leur menu. Il est
destiné à une utilisation occasionnelle, pas à une utilisation continue. Il
n'est pas destiné aux pizzerias ni à une utilisation domestique,
industrielle ou en laboratoire.
Fonctionnement sans ventilation
Ce four a été testé par UL et vérifié pour un fonctionnement sans
ventilation dans les conditions suivantes :
• Pour une utilisation avec des aliments précuits tels que les
garnitures de pizza, les sandwichs et le fromage à faire fondre
• Utilisation interdite avec des protéines crues et/ou grasses telles que
le poulet sur l'os ou avec la peau, la viande à hamburger ou les
saucisses
Remarque : Les codes locaux peuvent s'appliquer. L'autorisation pour
un fonctionnement sans ventilation est sujette à l'autorité compétente
(AC). Contactez votre autorité compétente pour en savoir plus.
EXIGENCES EN MATIÈRE DE DÉGAGEMENT
ET DE CONDITIONS AMBIANTES
Ne placez pas ce four sur des surfaces ou près de murs, cloisons ou
mobilier de cuisine sauf s'ils sont faits de matériaux non combustibles
ou recouverts de matériau réfractaire non combustible. Les fours ne
doivent pas être utilisés près ou en dessous de rideaux et d'autres
matériaux combustibles. Ne placez pas le four à côté d'un appareil
produisant de la chaleur.
©
2019 The Vollrath Company L.L.C. Num. d’art. 350844-1 ml 6/3/19
Page 10

INSTALLATION
1. Placez le four sur une surface dure, stable et plane.
2. Installez les pieds. L'installation des pieds exige l'aide d'une
seconde personne. Demandez à quelqu'un de soulever une
extrémité du four pendant que vous installez les pieds.
Répétez de l'autre côté du four.
AVIS : Les pieds doivent être installés. Sans les pieds, la
circulation de l'air sera entravée, ce qui causera la
surchauffe du four.
3. Installez les plateaux de chargement et déchargement dans le sens
de la marche du convoyeur. Le plateau de chargement est penché
vers le convoyeur. Le plateau de déchargement est penché à
l'opposé du convoyeur.
CONSEILS DE MANIPULATION DE PÂTE FRAÎCHE
OU SURGELÉE
Les conseils suivants sont d'ordre général. Suivez toutes les
instructions propres à votre marque de pâte ou à votre recette.
• Enlevez l'emballage des boules de pâte surgelée.
• Placez les boules de pâte à quelques centimètres les unes des
autres, dans une chambre de pousse ou sur une plaque de four.
• Pulvérisez légèrement le dessus des boules de pâte d'enduit végétal,
puis couvrez avec du papier de congélation.
• Laissez reposer toute une nuit au réfrigérateur.
• Sortez seulement le nombre de boules de pâte suffisant de la plaque
de four au vu de vos besoins dans les heures à venir.
• Saupoudrez de la farine, de la semoule de maïs ou du Pizza Crisp sur
la surface sur laquelle vous envisagez de rouler la pâte.
• Roulez la pâte du centre vers les bords extérieurs. Tournez la pâte à
mesure que vous roulez vers les bords extérieurs pour maintenir
une forme ronde.
• Utilisez un rouleau à pâtisserie, une presse à pâte ou un laminoir
pour mettre en forme la pâte à la taille et l'épaisseur souhaitées.
• Placez l'abaisse sur une plaque ou une tôle à pizza perforée en métal
foncé ou conditionnée.
AVIS : Les pizzas à pâte fraîche doivent être cuites sur une
plaque ou une tôle à pizza perforée en métal. Ne placez
PAS de pizzas à pâte fraîche directement sur le
convoyeur. La pâte collera ou tombera au travers du
convoyeur.
AVIS : N'utilisez PAS de plaque à pizza en papier dans ce four.
Les plaques à pizza en papier brûleront et peuvent
causer un départ de feu.
AVIS : Les plaques ou tôles à pizza perforées en métal foncé ou
conditionnées donnent les meilleurs résultats. Les
métaux brillants et le papier aluminium réfléchiront la
chaleur, l'éloignant de la pizza et réduisant la coloration.
AVANT LA PREMIÈRE UTILISATION
1. Nettoyez le four. Voir « Nettoyage quotidien»àlapage 5.
CONSEILS D'ASSEMBLAGE DE PIZZAS
• Étalez la sauce, en partant du centre et en allant vers les bords
extérieurs de la pâte pour garantir une couche de sauce uniforme.
Arrêtez-vousà1po(2,5 cm) du bord extérieur de la pâte pour
permettre sa coloration. Si vous étalez la sauce trop près du bord, la
pâte ne se colorera pas.
• Étalez les garnitures à haute teneur en eau, comme les légumes,
car elles empêcheront les zones avoisinantes de cuire tant que
TOUTE l'eau ne se sera pas évaporée.
2 Manuel d'utilisation de fours à pizza convoyeurs numériques 68 pouces (1,7 m) – Modèle MGD
Page 11

CARACTÉRISTIQUES
Installation d'un convoyeur gauche-droite illustrée
A
C
B
Vue avant
A Écran thermique
B Plateau ramasse-miettes
C Plateaux de chargement/déchargement
Chargement. Penché vers le convoyeur
Déchargement. Penché à l'opposé du convoyeur
D Bouton de réarmement
(Pour référence seulement. Voir page 6.)
Vue arrière
E
G
F
E Disjoncteur du panneau de commande
F Cordon d'alimentation
G Disjoncteur du convoyeur
H Interrupteur général - Mise sous tension du four
I Prise pour empileur de fours. Alimente l'empileur de fours
(accessoire).
H
I
D
Panneau de commande
Bouton d'alimentation - Appuyez dessus pour mettre sous
tension les éléments chauffants et le convoyeur.
speed
recipe
Bouton speed - Appuyez dessus pour définir le temps de
passage des aliments à travers le four.
Bouton recipe - Appuyez dessus pour sélectionner une
recette. Il y a six programmes de recette personnalisables.
Chaque recette inclut des réglages de température pour
chaque zone du four et une vitesse de convoyeur.
Pizza 1-2
Pizza 3-4
Calzone
Sandwich
M1 Créez votre propre programme de recette
M2 Créez votre propre programme de recette
Bouton temp - Il y a quatre zones de température deux en haut du four et deux en bas. Pour diagramme,
temp
voir « Modification des températures»àlapage 5.
Bouton Haut - Appuyez dessus pour faire défiler l
es recettes ou augmenter la vitesse ou la température.
Bouton set - Appuyez dessus pour sélectionner une
recette ou enregistrer une modification de la vitesse
set
ou la température.
A
B
C
Sélectionnez cette option pour les pizzas
à 1-2 garnitures
Sélectionnez cette option pour les pizzas
à 3-4 garnitures
Sélectionnez cette option pour faire cuire
des calzones à pâte fraîche
Sélectionnez cette option pour faire griller
les sandwichs
Bouton Bas - Appuyez dessus pour faire défiler les recettes
ou diminuer la vitesse ou la température.
Manuel d'utilisation de fours à pizza convoyeurs numériques 68 pouces (1,7 m) – Modèle MGD 3
Page 12

MODE D'EMPLOI
Réglage des écrans thermiques
Tournez les boutons pour ajuster les écrans thermiques afin de laisser
passer les aliments dans le four et pour régler la quantité de chaleur
conservée à chaque extrémité du four pour obtenir résultats souhaités.
Conseils :
Art. de menu Suggestions
Pâte fraîche Écran thermique d'entrée complètement abaissé
Pâte partiellement cuite
Sandwich Écrans thermiques d'entrée et de sortie ouverts
Calzone Écrans thermiques d'entrée et de sortie ouverts
et écran thermique de sortie partiellement abaissé
pour piéger la chaleur afin de cuire la pâte.
Écrans thermiques d'entrée et de sortie ouverts
de moitié pour finir la cuisson de la croûte et faire
dorer les garnitures.
de moitié.
de moitié.
Préchauffage
1. Branchez le four sur une prise de terre qui correspond à la plaque
signalétique sur le four.
AVIS : L’utilisation d’une tension différente de la tension
2. Positionnez l'interrupteur général sur l'arrière du four en position
Marche.
nominale indiquée sur la plaque signalétique
endommagera l’appareil. Une tension incorrecte,
la modification du cordon d'alimentation ou les
composants électriques risquent d'endommager
l'appareil et d'annuler la garantie.
Ajustement des réglages de recette
Personnalisez les réglages de recette par défaut en fonction de vos
besoins de cuisson.
ÉTAPE 1 : Sélection d'une recette à ajuster
1. Appuyez brièvement sur . Le panneau de commande émet
une tonalité sonore.
2. Appuyez brièvement sur ou pour faire défiler les
recettes.
3. Appuyez brièvement sur pour sélectionner une recette.
Remarque : Appuyez sur le bouton set dans les 10 secondes ou la
modification ne sera pas enregistrée.
ÉTAPE 2 : Sélection de réglages à ajuster
Modification de la vitesse du convoyeur
1. Appuyez brièvement sur . La vitesse actuelle s'affiche.
Conseil : Pour une pizza, commencez par un temps de passage de
7:30. Le temps de passage idéal dépend du type de pâte et des
garnitures.
recipe
set
speed
3. Appuyez brièvement sur sur l'affichage. Un bip retentit.
Le four commence à préchauffer. L'affichage indique :
4. Le four sera prêt à utiliser dans une vingtaine de minutes.
L'affichage indique :
5. Appuyez brièvement sur .
6. Appuyez sur pour faire défiler les options de recette.
7. Appuyez brièvement sur pour sélectionner une recette.
8. Ajustez les réglages de la recette en fonction de l'élément du menu à
faire cuire. Référez-vous à la section « Ajustement des réglages de
recette » sur cette page.
9. Attendez 5 minutes pour laisser le temps au four de s'adapter aux
nouveaux réglages.
recipe
set
Test
AVIS : Les pizzas à pâte fraîche doivent être cuites sur une plaque
AVIS : N'utilisez PAS de plaque à pizza en papier dans ce four.
AVIS : Les plaques ou tôles à pizza perforées en métal foncé ou
1. Testez les réglages en plaçant une pizza d'essai dans le four.
2. Surveillez la cuisson et ajustez les températures et la vitesse du
3. Évaluez les résultats.
ou une tôle à pizza perforée en métal. Ne placez PAS de
pizzas à pâte fraîche directement sur le convoyeur. La pâte
collera ou tombera au travers du convoyeur.
Les plaques à pizza en papier brûleront et peuvent causer
un départ de feu.
conditionnées donnent les meilleurs résultats. Les métaux
brillants et le papier aluminium réfléchiront la chaleur,
l'éloignant de la pizza et réduisant la coloration.
convoyeur pour empêcher la pizza de brûler.
2. Appuyez brièvement sur ou pour modifier la vitesse.
3. Appuyez brièvement sur pour sélectionner et enregistrer la
sélection.
Modification des températures
1. Il y a quatre zones de température. Les zones sont toujours au
même endroit, quelle que soit la direction du convoyeur.
1
3
Direction du convoyeur Direction de la pizza à travers les zones
Gauche à droite
Droite à gauche
2. Appuyez brièvement sur . La zone 1 s'affiche.
3. Appuyez brièvement sur ou pour modifier la temp.
Conseil : Pour la pizza, réglez le thermostat du bas à 75-100
degrés de plus que le thermostat du haut. Les températures idéales
dépendent du type de pâte et des garnitures.
4. Appuyez brièvement sur pour enregistrer la sélection.
L'affichage passe à la zone de température suivante.
set
2
4
1et3 2et4
1et3 2et4
temp
°
set
4 Manuel d'utilisation de fours à pizza convoyeurs numériques 68 pouces (1,7 m) – Modèle MGD
Page 13

MODE D'EMPLOI (SUITE)
Cuisson
NETTOYAGE
1. Appuyez brièvement sur . Le panneau de commande émet
une tonalité sonore.
2. Appuyez brièvement sur ou pour faire défiler les
recettes.
3. Appuyez brièvement sur pour sélectionner une recette.
4. Attendez que le four s'adapte aux nouveaux réglages de température
avant de mettre une pizza sur le convoyeur.
5. Ne surchargez pas le four. Attendez la reprise du four pendant
quelques minutes avant de poser la pizza suivante sur le convoyeur.
Capacité maximale du four : Une pizza de 16" (40.6 cm) de
diamètre ou plusieurs pizzas plus petites d'un diamètre cumulé
maximum de 16"
recipe
set
Si une pizza est coincée dans le four
1. Appuyez brièvement sur jusqu'à ce que l'affichage indique
2. Débranchez le four.
3. Laissez complètement refroidir le four.
4. Utilisez une pince pour enlever la pizza. Veillez à ne pas cogner les
éléments chauffants en verre au-dessus et au-dessous du
convoyeur.
Changement de direction du convoyeur
1. Appuyez brièvement sur jusqu'à ce que deux bips
retentissent.
2. Le convoyeur s'arrête. Après une dizaine de 10 secondes, il
redémarrera dans la direction opposée.
speed
Mode Veille
Utilisez le mode Veille pour réduire la consommation d'énergie de 75 %
aux heures creuses.
Pour mettre le four en mode Veille
1. Appuyez brièvement sur et en même temps.
temp
recipe
AVERTISSEMENT
Risque d’électrocution
Ne vaporisez pas d'eau ou de produits nettoyants. Du liquide
risque d’entrer en contact avec les composants électriques et
de causer un court-circuit ou une décharge électrique.
ATTENTION
Risque de brûlure
Laissez refroidir l'appareil avant de le manipuler ou de le laver.
AVIS : N’utilisez pas de produits ou nettoyants abrasifs, ni de
Nettoyage quotidien
1. Appuyez brièvement sur jusqu'à ce que l'affichage indique
2. Débranchez le four.
3. Laissez complètement refroidir le four.
4. Humectez légèrement un chiffon doux avec de l'eau chaude.
5. Utilisez le chiffon humecté pour nettoyer l'extérieur du four,
Nettoyage du convoyeur
Conseil : Utilisez M1 ou M2 pour créer une « recette » avec des
réglages destinés au nettoyage du four.
1. Branchez le four.
2. Appuyez brièvement sur .
3. Réglez la température dans les 4 zones à 150
4. Réglez la vitesse du convoyeur à 90 secondes.
5. Appuyez en continu avec une brosse ou un tampon abrasif (laine
6. Videz et nettoyez les plateaux ramasse-miettes.
tampons récurants pour nettoyer l'extérieur de l'appareil
sous peine d'endommager le fini.
l'admission d'air sous le four, la rampe d'alimentation et le plateau
de récupération.
°.
d'acier, brosse à soies métalliques, etc.) contre le convoyeur.
Déplacez le tampon ou la brosse d'avant en arrière (gauche à droite)
à travers le convoyeur pour enlever les particules alimentaires.
2. L'affichage indique
Pour annuler le mode Veille
1. Appuyez sur n'importe quel bouton du panneau de commande pour
remettre le four à pleine puissance.
2. L'affichage indique « WARMING » jusqu'à ce qu'il atteigne la
température programmée pour la recette sélectionnée.
3. Lorsque le four atteint la temp. de consigne, l'affichage indique
Manuel d'utilisation de fours à pizza convoyeurs numériques 68 pouces (1,7 m) – Modèle MGD 5
ATTENTION
Risque de brûlure
Les plateaux ramasse-miettes peuvent être chauds.
Utilisez des gants de four pour vous protéger les mains.
Instructions spéciales pour un fonctionnement
sans ventilation
Nettoyez les surfaces adjacentes et l'équipement de la cuisine tous les
deux mois minimum ou plus souvent si nécessaire.
ENTRETIEN PRÉVENTIF
Contactez un agent de maintenance agréé pour un nettoyage
professionnel des composants.
Page 14

DÉPANNAGE
Problème Cause possible Mesure corrective
Le four ne se met pas sous tension
lorsque vous appuyez sur le bouton
d'alimentation sur l'avant du four.
L'affichage du panneau de commande
est vide, mais le four est branché et sous
tension.
L'affichage indique une alarme de zone :
prb1, prb2, prb3, prb4 et le
panneau de commande émet un bip
continu.
L'affichage ne passe pas de Warming à
Redy.
L'affichage passe de Warming à
Heating et n'affiche pas Redy.
Le convoyeur ne change pas de
direction.
La vitesse du convoyeur ne change pas. Vous n'avez pas appuyé sur le bouton
Le convoyeur ne tourne pas, mais le four
chauffe.
Les tubes chauffants supérieurs ou
inférieurs ne chauffent pas.
Le four surchauffe régulièrement. Le plateau ramasse-miettes n'est peut-
L'interrupteur général à l'arrière du four
est en position Arrêt.
Le four est branché sur une tension
incorrecte.
Il est possible que le disjoncteur du
panneau de commande, situé à l'arrière
du four, se soit déclenché.
La sonde de température dans la zone
indiquée par le code d'alarme ne répond
pas.
Une zone de température n'est pas-être
pas activée.
Le four est branché sur une tension
incorrecte.
La température de consigne dans une
ou plusieurs zones est peut-être trop
élevée.
Le mouvement du convoyeur est peutêtre obstrué.
Vous n'avez pas appuyé correctement
sur le bouton speed.
Il y a peut-être un problème au niveau
du relais du système d'entraînement.
set après avoir défini la nouvelle vitesse.
Il y a peut-être un problème au niveau
de la carte pilote.
Le mouvement du convoyeur est peut-
être obstrué.
Il y a peut-être un problème au niveau
d'un des composants.
Il est possible que le disjoncteur du
convoyer, situé à l'arrière du four, se
soit déclenché.
Un ou plusieurs éléments chauffants ont
peut-être grillé dans la zone indiquée par
le code d'alarme affiché.
être pas installé.
Le ventilateur est peut-être sale. Vérifiez si les pales des deux ventilateurs sont propres. Reportez-
Les pales des ventilateurs sont peut-être
sales.
Placez l'interrupteur en position Marche.
Vérifiez la tension de la prise secteur. Branchez le four sur la
tension correcte.
Vérifiez si un élément chauffant n'est pas cassé. Remplacez
l'élément chauffant. Une fois le problème résolu, appuyez sur le
bouton du disjoncteur pour le réarmer.
Appuyez sur n'importe quel bouton pour couper l'alarme.
Contactez le support technique Vollrath.
Examinez les éléments chauffants dans chaque zone de
température pour vérifier qu'ils fonctionnent.
Vérifiez la tension de la prise secteur. Branchez le four sur la
tension correcte.
La température maximum pour chaque zone est de 550
°C). Ajustez les températures en dessous du maximum.
Vérifiez et enlevez tout ce qui empêche le mouvement du
convoyeur.
Appuyez en continu sur le bouton speed jusqu'à ce que deux
bips retentissent.
Contactez le support technique Vollrath.
Appuyez sur le bouton set après avoir modifié la vitesse.
Voir « Modification de la vitesse du convoyeur », à la page 4.
Contactez le support technique Vollrath.
Vérifiez et enlevez tout ce qui empêche le mouvement du
convoyeur.
Contactez le support technique Vollrath.
Appuyez sur le bouton du disjoncteur pour le réarmer.
Appuyez sur n'importe quel bouton pour couper l'alarme.
Contactez le support technique Vollrath.
Vérifiez si le plateau ramasse-miettes est installé.
vous aux instructions ci-dessous pour inspecter et nettoyer les
pales des ventilateurs.
Inspectez les pales des deux ventilateurs pour voir si elles ne sont
pas sales.
1. Appuyez en continu sur le bouton d'alimentation sur l'avant du
four jusqu'à ce que « OFF » s'affiche. Débranchez le four.
2. Attendez 30 minutes que le four refroidisse.
3. Nettoyez les pales du ventilateur.
4. Branchez le four.
5. Appuyez sur le bouton d'alimentation à l'avant du four.
6. Appuyez sur le bouton de réarmement.
°F (287
7. Si le problème persiste, contactez le support technique Vollrath.
6 Manuel d'utilisation de fours à pizza convoyeurs numériques 68 pouces (1,7 m) – Modèle MGD
Page 15

DÉPANNAGE (SUITE)
Problème Cause possible Mesure corrective
Le ventilateur ne marche pas. Il y a peut-être un problème au niveau
du ventilateur ou de son interrupteur.
Le four est éteint et le ventilateur tourne. Fonctionnement normal. Le ventilateur
se met en marche au besoin pour
refroidir le four.
Préchauffez le four pendant 10 minutes. Si le ventilateur ne tourne
pas, contactez le support technique Vollrath.
_
Manuel d'utilisation de fours à pizza convoyeurs numériques 68 pouces (1,7 m) – Modèle MGD 7
Page 16

SERVICE ET RÉPARATION
Lorsque le produit est sous garantie, sa réparation est possible en retour atelier. Pour commencer la procédure :
1. Contactez le support technique Vollrath au 1-800-309-2250. Soyez prêt à fournir les numéros de référence, modèle et série. Ces informations se
trouvent sur la plaque signalétique sur le côté ou à l'arrière de l'appareil. Fournissez également une preuve d'achat indiquant la date d'achat de
l'appareil.
2. Le support technique vous aidera à dépanner le problème au téléphone.
3. Si l'agent détermine que le problème exige l'intervention d'un professionnel, il vous aidera à localiser un centre de réparation agréé.
4. Contactez le centre de réparation agréé et transportez-y l'appareil. Vollrath couvrira le coût de la réparation et/ou du remplacement des pièces
défectueuses durant la période de garantie. Les frais de transport de l'appareil à destination et au départ du centre de réparation ne sont pas
couverts par la garantie.
GARANTIE DE LA VOLLRATH CO. L.L.C.
La Vollrath Company LLC garantit que les produits qu'elle fabrique et distribue seront dépourvus de vices de matériaux et de malfaçons, comme
indiqué dans notre déclaration complète de garantie. Dans tous les cas, la garantie entre en vigueur à la date d'achat par l'utilisateur initial indiquée
sur le reçu. Tous les dommages subis lors d’une utilisation impropre ou abusive, ou résultant d’une modification ou d'un emballage inadapté lors
d’un renvoi du produit pour une réparation sous garantie ne seront pas couverts par la garantie.
La garantie ne s'applique pas aux produits achetés pour un usage personnel, familial ou ménager, et la Vollrath Company LLC ne propose aucune
garantie écrite aux acheteurs pour de telles utilisations.
Pièces sous garantie : la période de garantie est de 2 ans pour les pièces et de 1 an pour la main-d'œuvre.
Tubes chauffants : la période de garantie est de 1 an, y compris la main-d'œuvre, lorsque la réparation est effectuée dans un centre de réparation
agréé. Les dommages subis par le verre des tubes chauffants ne sont pas couverts par cette garantie. Le client est responsable des frais de transport
du produit au centre de réparation agréé.
Pour des informations complètes sur la garantie, l'enregistrement des produits et l'annonce de nouveaux produits, consultez www.vollrath.com.
www.vollrath.com
The Vollrath Company, L.L.C.
1236 North 18th Street
Sheboygan, Wi 53081-3201 États-Unis
Standard : 800.624.2051 ou 920.457.4851
Télécopieur : 800.752.5620 ou 920.459.6573
Service clientèle : 800.628.0830
Service clientèle Canada : 800.695.8560
©
2019 The Vollrath Company L.L.C. Num. d’art. 350844-1 ml 6/3/19
Services techniques
techservicereps@vollrathco.com
Grille-pains : 800.309.2250
Tous les autres produits : 800.628.0832
Page 17

Manual para operadores
Hornos digitales para pizza de 68 pulgadas (1,7 m)
con correa transportadora
Gracias por comprar este equipo Vollrath. Antes de usar el equipo, lea y
familiarícese con las siguientes instrucciones de operación y seguridad.
CONSERVE ESTAS INSTRUCCIONES COMO REFERENCIA PARA EL
FUTURO. Conserve la caja y embalado originales. Deberá utilizarlos
para devolver el equipo en caso de que requiera reparaciones.
PRECAUCIONES DE SEGURIDAD
Para garantizar una operación segura, lea las siguientes afirmaciones y
comprenda su significado. Este manual contiene precauciones de
seguridad que se explican a continuación. Léalas atentamente.
ADVERTENCIA
Advertencia se usa para indicar la presencia de un peligro que
provocará o puede provocar lesiones graves o letales.
PRECAUCIÓN
Precaución se usa para indicar la presencia de un peligro que provocará
o puede provocar lesiones personales o daños materiales leves si se
ignora el aviso.
AVISO: Aviso se usa para señalar información importante
no relacionada con peligros.
Para disminuir el riesgo de lesiones personales o daños
al equipo
• Enchúfelo solo en tomacorrientes con puesta a tierra cuyo voltaje
nominal sea el indicado en la placa identificatoria.
• Use el equipo en posición plana y nivelada.
• Desenchúfelo y deje que se enfríe antes de limpiarlo o trasladarlo,
pues permanece caliente tras apagarse.
• No lo toque durante el funcionamiento.
• Desenchúfelo cuando no esté en uso.
• Mantenga el equipo y el cable eléctrico lejos de llamas expuestas,
quemadores eléctricos o calor excesivo.
• No lo deje funcionando solo.
• Supervise de cerca los equipos en áreas públicas y/o cerca de niños.
• No opere el equipo si se ha dañado o si funciona defectuosamente
de algún modo.
Núm. art.
PO6-20818
PO6-22018 Correa transportadora de 18" (45,7 cm)
PO6-24018 Correa transportadora de 18" (45,7 cm)
Modelo Descripción
Correa transportadora de 18" (45,7 cm)
de ancho, 208V
MGD18
de ancho, 220V
de ancho, 240V
FUNCIÓN Y PROPÓSITO
Este equipo está diseñado para hornear masa fresca y pizzas
prehorneadas, panes planos, calzones ("calzone") y sándwiches
tostados. No está diseñado para hornear pizzas congeladas o de masa
gruesa (estilo Chicago) ni para cocinar alimentos crudos ni agregados
crudos para pizza. Está destinado a usarse en operaciones comerciales
de servicio de comidas que sirven pizzas, pero que también sirven
otros alimentos. Está diseñado para uso ocasional, no continuo. No
está diseñado para pizzerías, uso doméstico, industrial ni de
laboratorio.
Funcionamiento sin ventilación
Este horno ha sido probado y verificado por UL para su funcionamiento
sin ventilación en las siguientes condiciones:
• Para usarse con alimentos precocidos como agregados para pizza,
sándwiches y derretir queso
• No debe utilizarse con proteínas crudas y/o grasas como el pollo
con piel o con hueso, carne de hamburguesa o salchichas
Nota: Pueden aplicarse códigos locales. La aprobación para el
funcionamiento sin ventilación está sujeta a la autoridad local
competente (ALC). Comuníquese con dicha autoridad para obtener más
información.
Modelo MGD18
REQUISITOS AMBIENTALES Y DISTANCIADO
A menos que estén hechos de material incombustible o revestidos con
material aislante térmico no combustible, no coloque este horno en
superficies o cerca de paredes, tabiques o muebles de cocina. Los
hornos no deben usarse cerca ni debajo de cortinas y otros materiales
combustibles. No coloque el horno junto a un aparato que produzca
calor.
©
2019 The Vollrath Company L.L.C. Núm. pieza 350844-1 ml 6/3/19
Page 18

PREPARACIÓN
1. Coloque el horno en una superficie dura, plana y estable.
2. Instale las patas. Se requieren dos personas. Haga que una persona
levante un extremo del horno mientras la otra instala las patas.
Repita el procedimiento con el otro lado del horno.
AVISO: Las patas deben estar instaladas, de lo contrario se
restringirá el flujo de aire y el horno se sobrecalentará.
3. Instale las bandejas de carga y descarga de modo que coincidan con
la dirección de la correa transportadora. La bandeja de carga se
inclina hacia la correa transportadora. La bandeja de descarga se
inclina en sentido opuesto a la correa transportadora.
CONSEJOS PARA MANIPULAR
MASA CONGELADA/FRESCA
Los siguientes son consejos generales. Siga las instrucciones
específicas de su marca de masa o receta.
• Retire el envoltorio de las bolas de masa congelada.
• Coloque las bolas de masa a unas cuantas pulgadas de distancia
entre sí, en una caja de pruebas o en una fuente plana.
• Rocíe ligeramente la parte superior de las bolas de masa con un
aerosol de cocción antiadherente, luego cúbralas con una capa de
papel para congelador.
• Refrigere durante la noche.
• Solo retire suficientes bolas de masa de la fuente para obtener lo
que necesitará durante algunas horas.
• Espolvoree harina, harina de maíz o crocante para pizza sobre la
superficie sobre la cual planea extender la masa.
• Enrolle la masa, comenzando desde el centro y avanzando hacia los
bordes exteriores. Gire la masa mientras trabaja hacia los bordes
exteriores a fin de mantener una forma redonda.
• Use un rodillo de amasar, una prensa de masa o una laminadora de
masa para formar la masa al tamaño y grosor deseados.
• Coloque la cubierta aplanada sobre una bandeja o molde para pizza
de metal oscuro o condimentado.
AVISO: Las pizzas de masa fresca deben hornearse en bandejas
o moldes de metal para pizza. NO ponga pizzas de masa
fresca directamente sobre la correa transportadora, ya
que la masa se pegará o caerá por la correa.
AVISO: NO use moldes de papel para pizza en este horno, pues
se quemarán y podrían crear un peligro de incendio.
AVISO: Los moldes de metal oscuro o metal sazonado se
desempeñan mejor. El metal brillante o el papel de
aluminio reflejarán el calor lejos de la pizza y reducirán
el dorado.
ANTES DEL PRIMER USO
1. Limpie el horno. Consulte “Limpieza diaria” en la página 5.
CONSEJOS PARA MONTAR LA PIZZA
• Esparza la salsa, comenzando desde el centro y moviéndose hacia
los bordes exteriores de la corteza para garantizar un espesor
uniforme de la salsa. Deje una pulgada de espacio en el borde
exterior de la corteza para permitir que esta se dore. Esparcir la salsa
demasiado cerca del borde evita que la corteza se dore.
• Esparza hacia afuera los agregados con alto contenido de humedad,
como las verduras. Los agregados con alto contenido de humedad
evitan que las áreas circundantes se horneen hasta que TODA la
humedad se haya evaporado.
2 Manual para operadores de hornos digitales para pizza de 68 pulgadas (1,7 m) – Modelo MGD
Page 19

CARACTERÍSTICAS
S
e muestrala configuracióndela correatransportadoradeizquierdaaderecha
A
C
B
Vista delantera
A Protección contra calor
B Bandeja para migas
C Bandejas de carga/descarga
Carga. Se inclina hacia la correa transportadora
Descarga. Se inclina en sentido opuesto a la correa
transportadora
D Botón de reinicio (referencia solamente. Consulte la page 6).
Vista posterior
E
G
F
E Cortacircuito del panel de control
F Cable eléctrico
G Cortacircuito de la correa transportadora
H Interruptor principal - Enciende el suministro principal del horno
I Tomacorriente del apilador de horno. Alimenta el accesorio
apilador de horno.
H
I
D
Panel de control
Botón de encendido - Púlselo para encender los elementos
calefactores y la correa transportadora.
speed
recipe
Botón de velocidad - Púlselo para ajustar lo que tarda
la comida en pasar por el horno.
Botón de recetas - Púlselo para seleccionar una receta.
Hay seis programas de recetas personalizables. Cada receta
incluye ajustes de temperatura para cada zona del horno y
la velocidad de la correa transportadora.
Pizza 1-2
Pizza 3-4
Calzone
Sandwich Selecciónelo para tostar sándwiches
M1 Cree su propio programa de recetas
M2 Cree su propio programa de recetas
Botón Temp - Hay cuatro zonas de temperatura, dos en
la parte superior del horno y dos en la parte inferior.
temp
Para un diagrama, Consulte “Cambiar las temperaturas”
en la página 5.
Botón ascendente - Púlselo para desplazarse por las recetas o
para aumentar la velocidad o la temperatura.
Botón Set - Púlselo para seleccionar una receta o guardar un
cambio en la velocidad o temperatura.
set
Botón descendente - Púlselo para desplazarse por las recetas o
para disminuir la velocidad o la temperatura.
A
B
C
Selecciónelo para pizzas que tienen1a2
agregados
Selecciónelo para pizzas que tienen3a4
agregados
Selecciónelo para hornear masa fresca
de calzones
Manual para operadores de hornos digitales para pizza de 68 pulgadas (1,7 m) con correa transportadora – Modelo MGD 3
Page 20

FUNCIONAMIENTO
Ajuste las protecciones contra calor
A fin de obtener los resultados deseados gire las perillas para ajustar
las protecciones contra calor con el objeto de permitir que el alimento
pase al horno y regular así la cantidad de calor retenido en cada
extremo del mismo.
Consejos:
Alimento Sugerencias
Masa fresca La protección de entrada está completamente abajo y
la protección de salida parcialmente hacia abajo para
retener el calor y hornear la masa.
Prehorneada Protecciones de entrada y salida abiertas hasta la mitad
para terminar la corteza y dorar los agregados.
Sándwich Protecciones de entrada y salida abiertas hasta la mitad.
Calzone Protecciones de entrada y salida abiertas hasta la mitad.
Precalentar
1. Enchufe el horno en un tomacorriente puesto a tierra cuyo voltaje
nominal corresponda al indicado en la placa identificatoria.
AVISO: Usar un voltaje distinto del indicado en la placa
identificatoria dañará la unidad. Usar un voltaje
incorrecto, o modificar el cable eléctrico o los
componentes electrónicos puede dañar la unidad e
invalidará la garantía.
2. Coloque el interruptor principal situado en la parte posterior del
horno en la posición de encendido (ON).
3. Pulse y suelte en el visor. Se oirá un tono. El horno comenzará
a precalentar. El visor leerá:
Ajustar la configuración de las recetas
Personalice la configuración de recetas predeterminada para satisfacer
sus necesidades de horneado.
PASO 1: Seleccione la receta que va a ajustar
1. Pulse y suelte . El panel de control emitirá un tono.
2. Pulse y suelte o para desplazarse por las recetas.
3. Pulse y suelte para seleccionar una receta.
Nota: Pulse el botón Set (fijar) dentro de 10 segundos o el cambio
no se guardará.
PASO 2: Seleccione la configuración que va a ajustar
Cambiar la velocidad de la correa transportadora
1. Pulse y suelte . Aparecerá la velocidad actual.
Consejo: Para pizza comience con un tiempo de paso de 7:30. El
tiempo de paso ideal depende del tipo de corteza y los agregados.
2. Pulse y suelte o para cambiar la velocidad.
recipe
set
speed
4. El horno estará listo para usarse en aproximadamente 20 minutos.
El visor leerá:
5. Pulse y suelte .
6. Pulse para desplazarse por las opciones de recetas.
7. Pulse y suelte para seleccionar una receta.
8. Ajuste la configuración de la receta de acuerdo con el alimento que
va a hornear. Consulte la sección “Ajustar la configuración de las
recetas” en esta página.
9. Espere 5 minutos para que el horno se ajuste a la nueva
configuración.
recipe
set
Prueba
AVISO: Las pizzas de masa fresca deben hornearse en bandejas o
AVISO: NO use moldes de papel para pizza en este horno, pues se
AVISO: Los moldes y fuentes de metal oscuro o metal sazonado se
1. Pruebe los ajustes colocando una pizza de muestra en el horno.
2. Controle el proceso de horneado y ajuste las temperaturas y la
3. Evalúe los resultados.
moldes de metal para pizza. NO ponga pizzas de masa
fresca directamente sobre la correa transportadora, ya que
la masa se pegará o caerá por la correa.
quemarán y podrían crear un peligro de incendio.
desempeñan mejor. El metal brillante o el papel de
aluminio reflejarán el calor lejos de la pizza y reducirán el
dorado.
velocidad de la correa transportadora para evitar que la pizza se
queme.
3. Pulse y suelte para seleccionar y guardar la selección.
Cambiar las temperaturas
1. Hay cuatro zonas de temperatura. Las zonas están siempre en la
misma ubicación, independientemente de la dirección de la correa
transportadora.
1
3
Dirección de la
correa transportadora
Izquierda a derecha
Derecha a izquierda
2. Pulse y suelte . Se muestra la zona 1.
3. Pulse y suelte o para cambiar la temperatura.
Consejo: Para pizza, fije el calor inferior en aproximadamente 75
a 100° más que el control superior. Las temperaturas ideales
dependen del tipo de corteza y los agregados.
4. Pulse y suelte para guardar la selección. El visor avanzará
a la siguiente zona de calor.
set
2
4
Dirección de la pizza por las zonas
1y3 2y4
1y3 2y4
temp
set
°
4 Manual para operadores de hornos digitales para pizza de 68 pulgadas (1,7 m) – Modelo MGD
Page 21

FUNCIONAMIENTO (CONTINUACIÓN)
Horneado
LIMPIEZA
1. Pulse y suelte . El panel de control emitirá un tono.
2. Pulse y suelte o para desplazarse por las recetas.
3. Pulse y suelte para seleccionar una receta.
4. Deje que el horno se ajuste a la nueva configuración de calor antes
de colocar una pizza en la correa transportadora.
5. No sobrecargue el horno. Espere unos minutos para que el horno se
recupere antes de colocar la próxima pizza en la correa.
Capacidad máxima del horno: Una pizza con diámetro de 16" (40,6
cm) o varias pizzas más pequeñas con un diámetro máximo
combinado de 16"
recipe
set
Si una pizza se atasca en el horno
1. Mantenga pulsado hasta que el visor muestre
2. Desenchufe el horno.
3. Deje que se enfríe totalmente.
4. Use tenazas para retirar la pizza. Tenga cuidado de no golpear los
elementos calefactores de vidrio por encima y por debajo de la
correa transportadora.
ADVERTENCIA
Peligro de descarga eléctrica
No lo rocíe con agua ni productos de limpieza. El líquido podría
hacer contacto con los componentes eléctricos y causar un
cortocircuito o una descarga eléctrica.
PRECAUCIÓN
Peligro de quemaduras
Deje que el equipo se enfríe antes de moverlo o limpiarlo.
AVISO: No emplee materiales abrasivos, limpiadores que rayen
ni esponjas metálicas para asear el exterior del equipo,
ya que pueden dañar el acabado.
Limpieza diaria
1. Mantenga pulsado hasta que el visor muestre
2. Desenchufe el horno.
3. Deje que se enfríe totalmente.
4. Humedezca levemente un paño suave con agua tibia.
5. Use el paño humedecido para limpiar el exterior del horno,
la entrada de aire debajo del horno, la rampa de alimentación
y la bandeja recolectora.
Cambiar la dirección de la correa transportadora
1. Mantenga pulsado hasta que escuche dos tonos.
2. La correa transportadora se detendrá. Después de unos 10
segundos, se pondrá nuevamente en marcha en la dirección
opuesta.
speed
Modo de espera
Use el modo de espera para reducir el consumo eléctrico hasta en un
75% durante el tiempo de uso no máximo.
Para colocar el horno en el modo de espera
1. Pulse y suelte y al mismo tiempo.
2. El visor mostrará
temp
Para cancelar el modo de espera
1. Pulse cualquier botón en el panel de control para devolver el horno a
su máxima potencia.
2. La pantalla mostrará WARMING (PRECALENTANDO) hasta que el
horno alcance la temperatura para la receta seleccionada.
recipe
Limpie la correa transportadora
Consejo: Use M1 o M2 para crear una “receta” con ajustes para
limpiar el horno.
1. Enchufe el horno.
2. Pulse y suelte .
3. Fije la temperatura en las 4 zonas en 150
4. Fije la velocidad de la correa transportadora en 90 segundos.
5. Mantenga presionada una almohadilla o cepillo abrasivo resistente
al calor (lana de acero, cepillo de alambre de metal, etc.) contra la
correa transportadora. Mueva la almohadilla o el cepillo hacia
adelante y hacia atrás (de izquierda a derecha) a través de la correa
transportadora para eliminar los restos de alimentos.
6. Vacíe y limpie las bandejas para migas.
°.
PRECAUCIÓN
Peligro de quemaduras
Las bandejas para migas pueden estar calientes. Use
mitones para horno a fin de proteger sus manos.
Instrucciones especiales para el funcionamiento
sin ventilación
Limpie las superficies adyacentes y el equipo de cocina al menos cada
dos meses o con mayor frecuencia según sea necesario.
3. Cuando el horno alcance la temperatura fijada, el visor mostrará
Manual para operadores de hornos digitales para pizza de 68 pulgadas (1,7 m) con correa transportadora – Modelo MGD 5
MANTENIMIENTO PREVENTIVO
Póngase en contacto con un agente de servicio autorizado para que
realicen una limpieza profesional a los componentes.
Page 22

SOLUCIÓN DE PROBLEMAS
Problema Podría deberse a Curso de acción
El horno no se enciende cuando se pulsa el
botón de encendido en su parte delantera.
El visor en el panel de control está en
blanco, el horno está enchufado y
encendido.
El visor muestra una zona de alarma:
prb1, prb2, prb3, prb4 yel
panel de control emite un tono continuo.
El visor no cambia de Warming a Redy. Puede que una zona de calor no esté encendida. Examine los elementos calefactores en cada zona de calor para
El visor cambia de Warming a
Heating y no muestra Redy.
La correa transportadora no invierte la
dirección.
La velocidad de la correa transportadora
no cambia.
La correa transportadora no gira, pero el
horno se calienta.
Los tubos de calor superiores o inferiores
no calientan.
El horno se recalienta repetidamente. Puede que bandeja para migas no esté instalada. Verifique si se instaló la bandeja.
El interruptor maestro de encendido/apagado en
la parte posterior del horno está en la posición de
apagado (OFF).
El horno está enchufado en voltaje incorrecto. Revise el voltaje en el tomacorriente. Enchufe el horno en el
El cortacircuito del panel de control, ubicado en la
parte posterior del horno, puede haberse
disyuntado.
La sonda de temperatura en la zona indicada por
el código de alarma no responde.
El horno está enchufado en voltaje incorrecto. Revise el voltaje en el tomacorriente. Enchufe el horno en el
El ajuste de temperatura en una o más zonas
puede estar demasiado alto.
Es posible que esté obstruida. Revise y elimine las obstrucciones en la correa.
No se pulsó correctamente el botón de velocidad. Mantenga pulsado el botón hasta que escuche dos tonos.
Puede haber un problema con el relé
del sistema de impulsión.
No se pulsó el botón Set (Fijar) después de
configurar la nueva velocidad.
Puede haber un problema con el tablero de
control.
Es posible que esté obstruida. Revise y elimine las obstrucciones en la correa.
Puede haber un problema con uno
de los componentes.
El cortacircuito de la correa transpor-tadora,
situado en la parte posterior del horno, puede
haberse disyuntado.
Es posible que uno o más elementos calefactores
se hayan quemado en la zona indicada por el
código de alarma que se muestra en el visor.
Puede que el ventilador esté sucio. Verifique que las aspas de ambos ventiladores estén limpias.
Puede que las aspas de los ventiladores estén
sucias.
Coloque el interruptor en la posición de encendido (ON).
voltaje correcto.
Revise si hay un elemento calefactor roto. Reemplácelo. Una vez
resuelto el problema, pulse el botón en el cortacircuito para
reiniciarlo.
Pulse cualquier tecla para apagar la alarma. Comuníquese con los
Servicios de asistencia técnica de Vollrath.
verificar que estén funcionando.
voltaje correcto.
La temperatura máxima para cada zona es de 550°F. Ajuste las
temperaturas por debajo del máximo.
Comuníquese con los Servicios de asistencia técnica de Vollrath.
Pulse el botón Set después de cambiar la velocidad. Consulte
“Cambiar la velocidad de la correa transportadora” en la página 4.
Comuníquese con los Servicios de asistencia técnica de Vollrath.
Comuníquese con los Servicios de asistencia técnica de Vollrath.
Pulse el botón en el cortacircuito para reiniciarlo.
Pulse cualquier tecla para apagar la alarma. Comuníquese con los
Servicios de asistencia técnica de Vollrath.
Consulte las instrucciones a continuación para inspeccionar y
limpiar las aspas de los ventiladores.
Inspeccione aspas en ambos ventiladores para ver si están sucias.
1. Mantenga pulsado el botón de encendido en la parte delantera
del horno hasta que el visor muestre OFF (APAGADO).
Desenchufe el horno.
2. Espere 30 minutos a que el horno se enfríe.
3. Limpie las aspas del ventilador.
4. Enchufe el horno.
5. Pulse el botón de encendido en la parte delantera del horno.
6. Pulse el botón de reinicio.
7. Si el problema persiste, comuníquese con los Servicios de
asistencia técnica de Vollrath.
Puede haber un problema con el ventilador. Haga funcionar el horno durante 10 minutos. Si el ventilador no
El ventilador no funciona. Puede haber un problema con el ventilador o su
El horno está apagado y el ventilador está
funcionando.
interruptor.
Funcionamiento normal. El ventilador se enciende
según sea necesario para enfriar el horno.
funciona, comuníquese con los Servicios de asistencia técnica de
Vollrath.
Haga funcionar el horno durante 10 minutos. Si el ventilador no
funciona, comuníquese con los Servicios de asistencia técnica de
Vollrath.
_
6 Manual para operadores de hornos digitales para pizza de 68 pulgadas (1,7 m) – Modelo MGD
Page 23

Esta página se dejó en blanco intencionalmente.
Manual para operadores de hornos digitales para pizza de 68 pulgadas (1,7 m) con correa transportadora – Modelo MGD 7
Page 24

SERVICIO Y REPARACIÓN
Cuando está en garantía, la reparación de este producto está disponible a través del servicio en tienda. Para iniciar el proceso:
1. Comuníquese con los Servicios de asistencia técnica de Vollrath llamando al 1-800-309-2250. Esté preparado con el número de artículo, modelo
y serie. Puede encontrar esta información en la placa identificatoria ubicada en el costado o en la parte posterior del equipo. También proporcione
un comprobante de compra que indique la fecha en que se compró el equipo.
2. Un representante de servicio técnico le ayudará a solucionar el problema por teléfono.
3. Si el representante determina que el problema requiere servicio profesional, le ayudará a localizar un centro de servicio autorizado.
4. Póngase en contacto con el centro de servicio autorizado y lleve el equipo a dicho centro. Vollrath cubrirá el costo de la reparación y/o reemplazo
de las piezas defectuosas dentro del período de garantía del equipo.
CLÁUSULA DE GARANTÍA DE THE VOLLRATH CO. L.L.C.
The Vollrath Company LLC garantiza los productos que fabrica o distribuye contra defectos en materiales y fabricación, según se especifica en
nuestra cláusula de garantía completa. En todos los casos, la garantía rige desde la fecha de compra original del usuario final que aparece en el
recibo. La garantía no cubrirá ningún daño que resulte del uso indebido, abuso, modificación o daños causados por el embalado incorrecto durante
la devolución para obtener servicio de reparación dentro del período de vigencia de la garantía.
La garantía no se aplica a los productos adquiridos para uso personal, familiar ni doméstico, y The Vollrath Company LLC no ofrece una garantía por
escrito a los compradores para dichos usos.
Piezas en garantía: El periodo de garantía es de 2 años para las piezas, 1 año para la mano de obra.
Tubos del calentador: El período de garantía es de 1 año, incluida la mano de obra cuando se realiza en un centro de servicio autorizado. La garantía
no cubre el daño al vidrio del tubo del calentador. El cliente es responsable del costo de transporte del producto al centro de servicio autorizado.
Para obtener información de garantía, inscripción de productos y anuncios de productos nuevos, visite www.vollrath.com.
www.vollrath.com
The Vollrath Company, L.L.C.
1236 North 18th Street
Sheboygan, WI 53081-3201 EE. UU.
Tel. principal: 800.624.2051 ó 920.457.4851
Fax principal: 800.752.5620 ó 920.459.6573
Servicio al cliente: 800.628.0830
Servicio al cliente en Canadá: 800.695.8560
©
2019 The Vollrath Company L.L.C. Núm. pieza 350844-1 ml 6/3/19
Servicios de asistencia técnica:
techservicereps@vollrathco.com
Tostadores: 1-800-309-2250
Todos los demás productos: 800.628.0832
 Loading...