

Vollrath LidSaver LS01S18, LidSaver LS01B, LidSaver LS01V, LidSaver LS01VB, LidSaver LS01VS18 Operator's Manual
...Page 1
LidSaver
Operator’s Manual
™
In-Counter Lid Dispensers
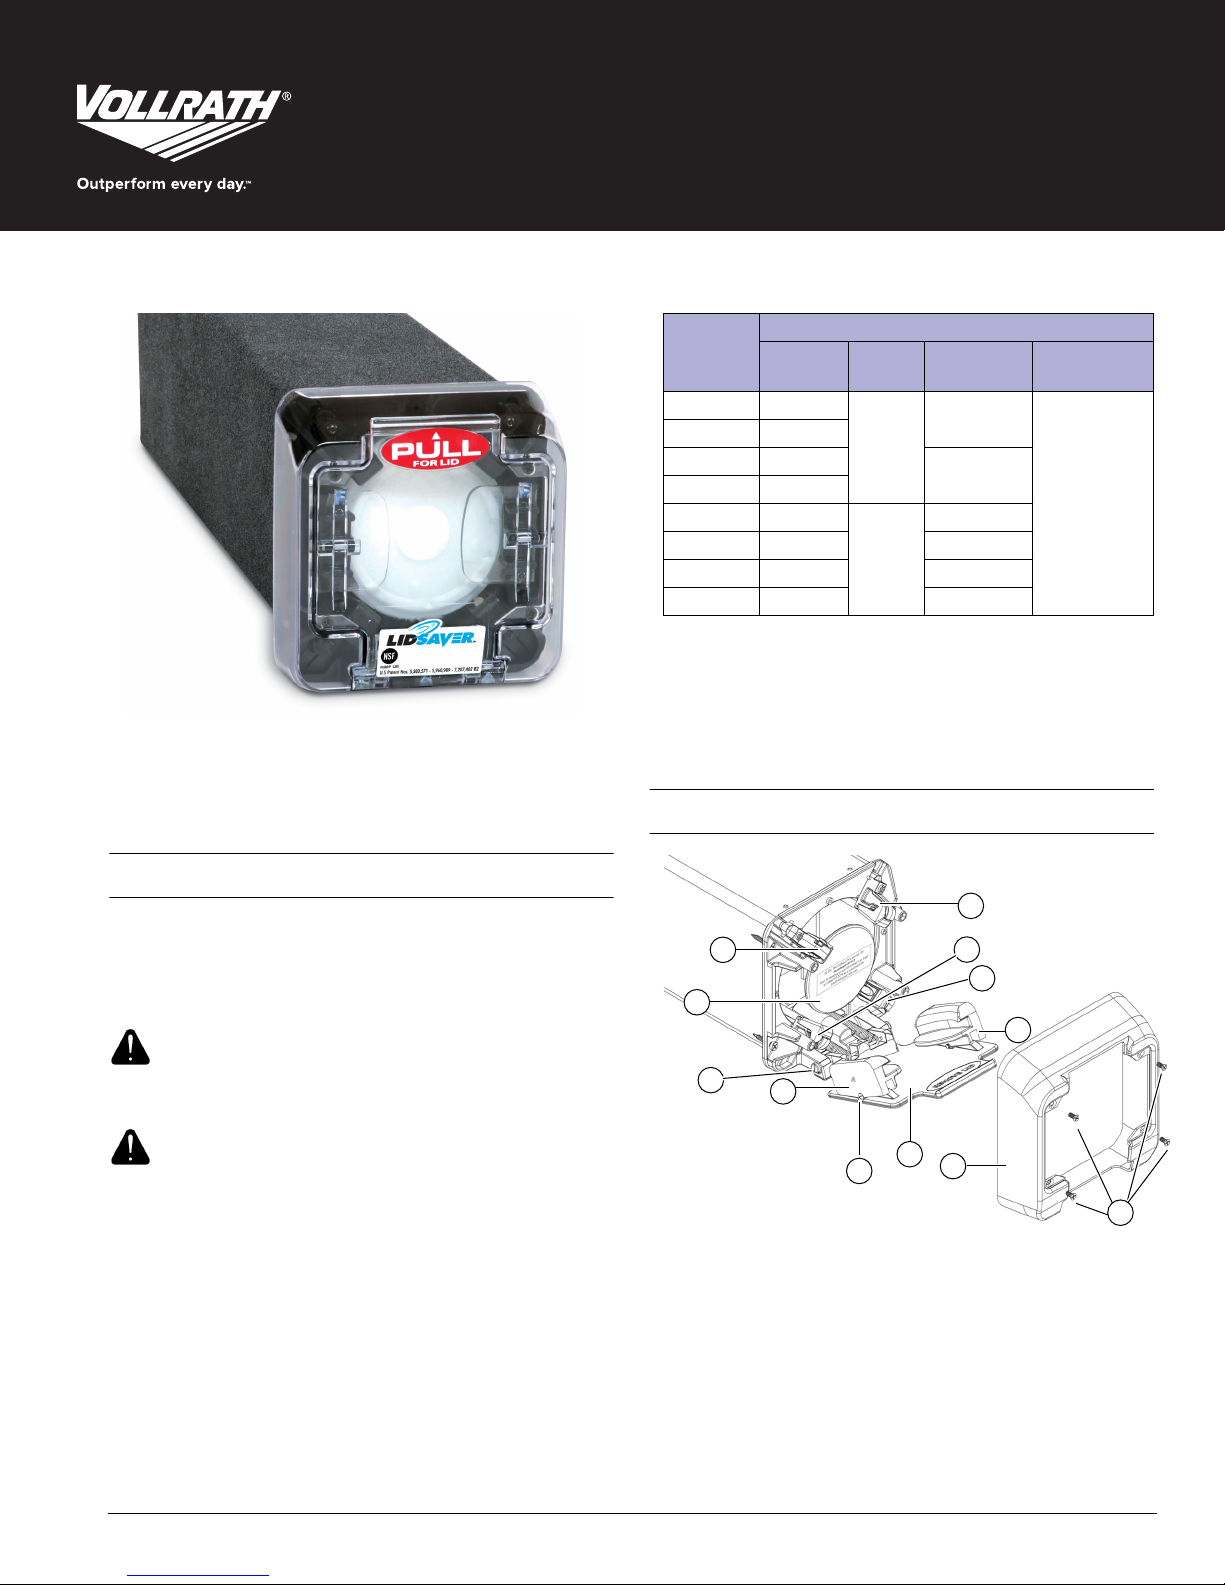
Description
Faceplate
Item No.
LS01 Horizontal
LS01V Vertical
LS01B Horizontal
LS01VB Vertical
LS01S18 Horizontal
LS01S18B Horizontal Black
LS01VS18 Vertical Clear
LS01VS18B Vertical Black
Mounting Length
23"
(58.4 cm)
18"
(45.7 cm)
Color
Clear
Black
Clear
Accommodates
Lid Diameter
2¾"to4¾"
Thank you for purchasing this Vollrath equipment. Before operating the
equipment, read and familiarize yourself with the following operating
and safety instructions. SAVE THESE INSTRUCTIONS FOR FUTURE
REFERENCE. Save the original box and packaging. Use this packaging
to ship the equipment if repairs are needed.
SAFETY PRECAUTIONS
To ensure safe operation, read the following statements and understand
their meaning. This manual contains safety precautions which are
explained below. Please read carefully.
WARNING
Warning is used to indicate the presence of a hazard that will or can
cause severe personal injury or death.
CAUTION
Caution is used to indicate the presence of a hazard that will or can
cause minor or major personal injury if the caution is ignored.
NOTICE: Notice is used to note information that is important but not
hazard-related.
Please register your product at Vollrath.com/ProductRegistrer
NOTICE: Each LidSaver™ is factory set to dispense a particular lid
NOTICE: LidSaver dispensers require regular cleaning to assure
style. If you change lid manufacturers or sizes, your
LidSaver™ will need to modified. Vollrath offers lid
change out kits that are easy to install. Visit
www.Vollrath.com for more information
proper operation. See “cleaning” on page 3.
OVERVIEW
G
G
F
E
A Bezel/Housing
B Door
C Lid Claw Pivot Screws. (6-32 x ³⁄₄ F.H.M.S.)
D “A” Claw. Marked with claw code.
E Door Springs Door Screws. (10-24 x ³⁄₈ R.H.M.S.)
F Piston Lid Plate
G Pivoting Pager Flipper. For smooth lid loading.
H “B” Claw. Marked with claw code.
I Housing Screws
©
2017 The Vollrath Company L.L.C. Part No. 8012600-1 ml 1/30/17
D
C
G
G
H
B
A
I
Page 2
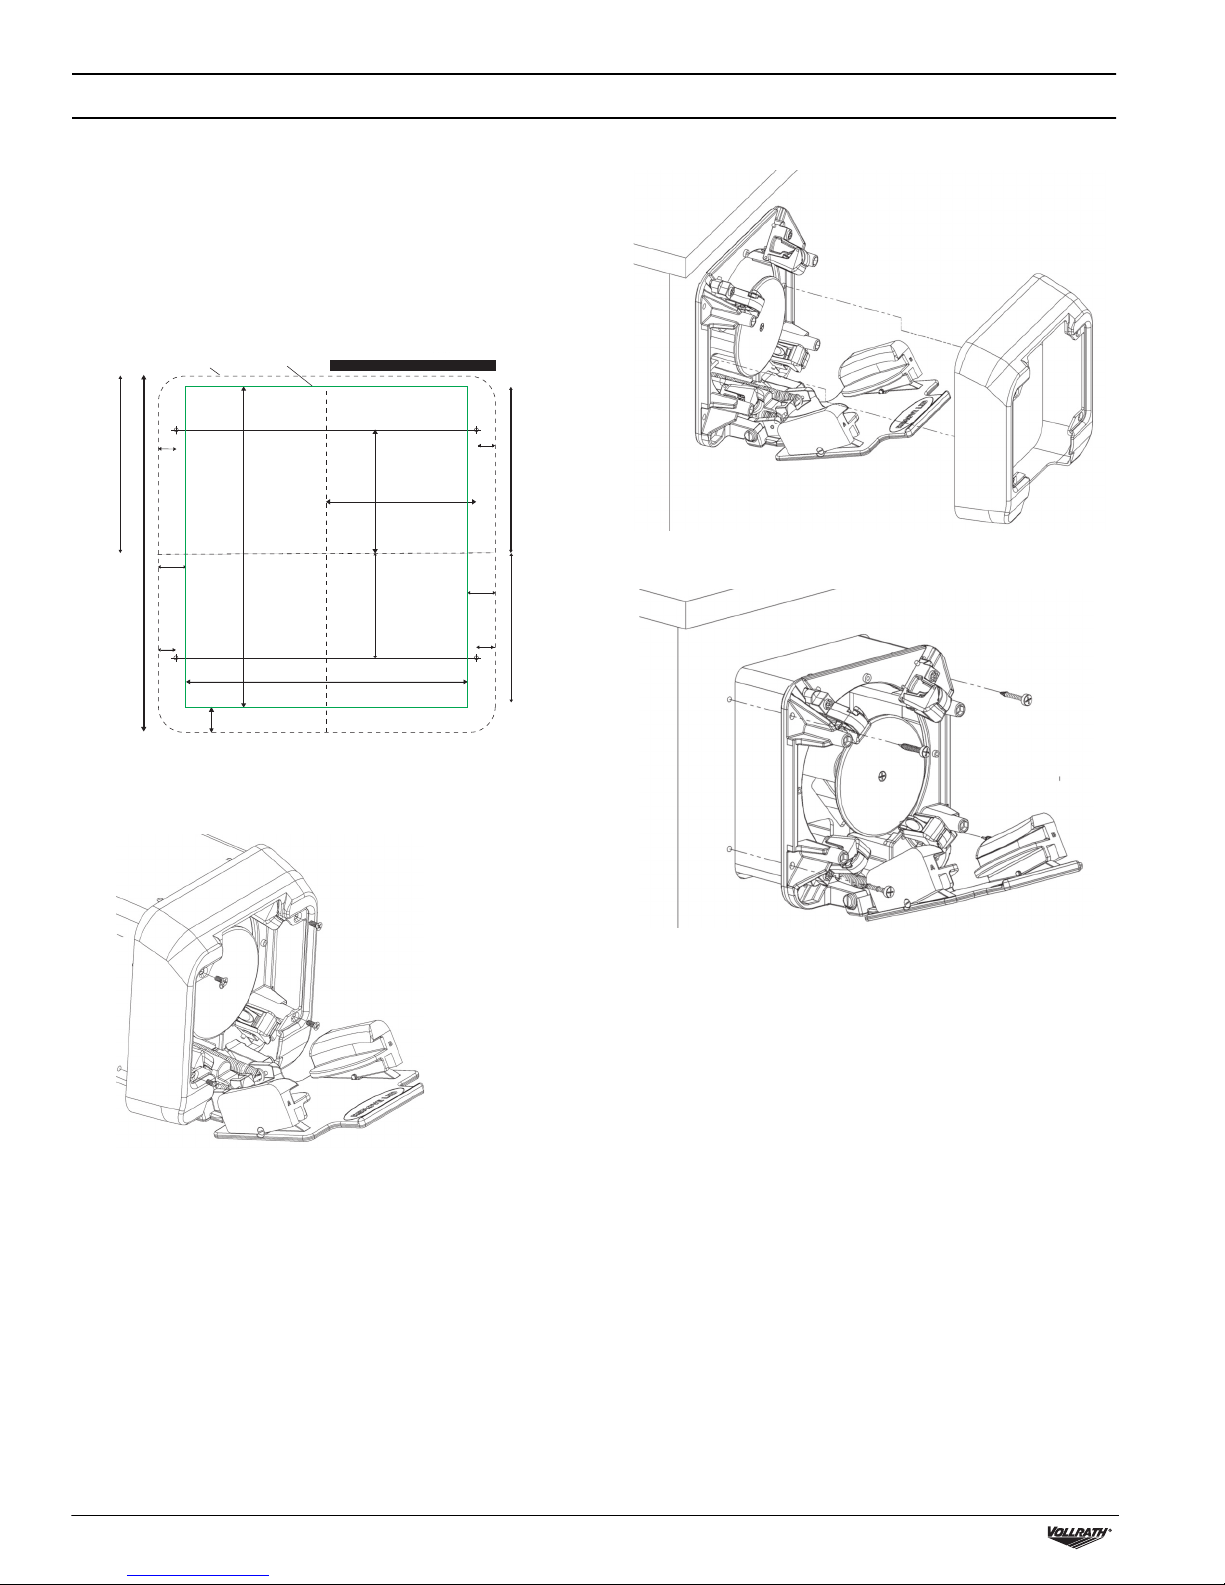
IN-COUNTER INSTALLATION
() ( ) () ( )
Service Fax: 920.459.5462
Tools Needed
• #2 Phillips Screwdriver
• Drill
• 0.125" – 0.136" Drill Bit (For #8 Pilot Hole)
• Sabre Saw or Hand Router
• Cabinet Cut-Out Template (provided)
• (4) #8 x 1.00" Flat Head Wood Screws (included)
1. Use the supplied cabinet cut-out template to cut the LidSaver™ tube
hole and drill four mounting screw pilot holes.
HOUSING
CUTOUT
Please read bottom clearance requirements below.
4. Remove the housing by pulling forward and allowing the housing to
flex around the side edges of the open door.
.343"
8.71mm
8.81mm
3.437"
.53"
13.46mm
6.875" HEIGHT OF HOUSING
174.63mm
8.71mm
.343"
#8/ 4.166 mm
WOODSCREW
PILOT
#8/ 4.166 mm
WOODSCREW
PILOT
.510"
CENTER OF HOUSING
6.187" 157.15 mm
HEIGHT OF HOLE
12.95mm
CENTER OF HOUSING
5.437" 138.10 mm WIDTH OF HOLE
2.365" 60.07mm
1.985" 50.42 mm
#8/ 4.166 mm
WOODSCREW
PILOT (4 PLACES.)
2.906" 53.21mm
#8 / 4.166 mm
WOODSCREW
.343"
8.71mm
3.230"
82.04mm
.53"
13.46mm
2.437"
61.9mm
8.71mm
.343"
PILOT
2. Use a screwdriver or pliers to unlock the the door springs from the
door.
3. Remove the four housing screws.
5. Mount the LidSaver into your cabinet using the four #8 round head
wood screws.
6. Replace the housing.
7. Hook the door springs.
2 LidSaver™In-Counter Lid Dispensers Operator’s Manual
Page 3
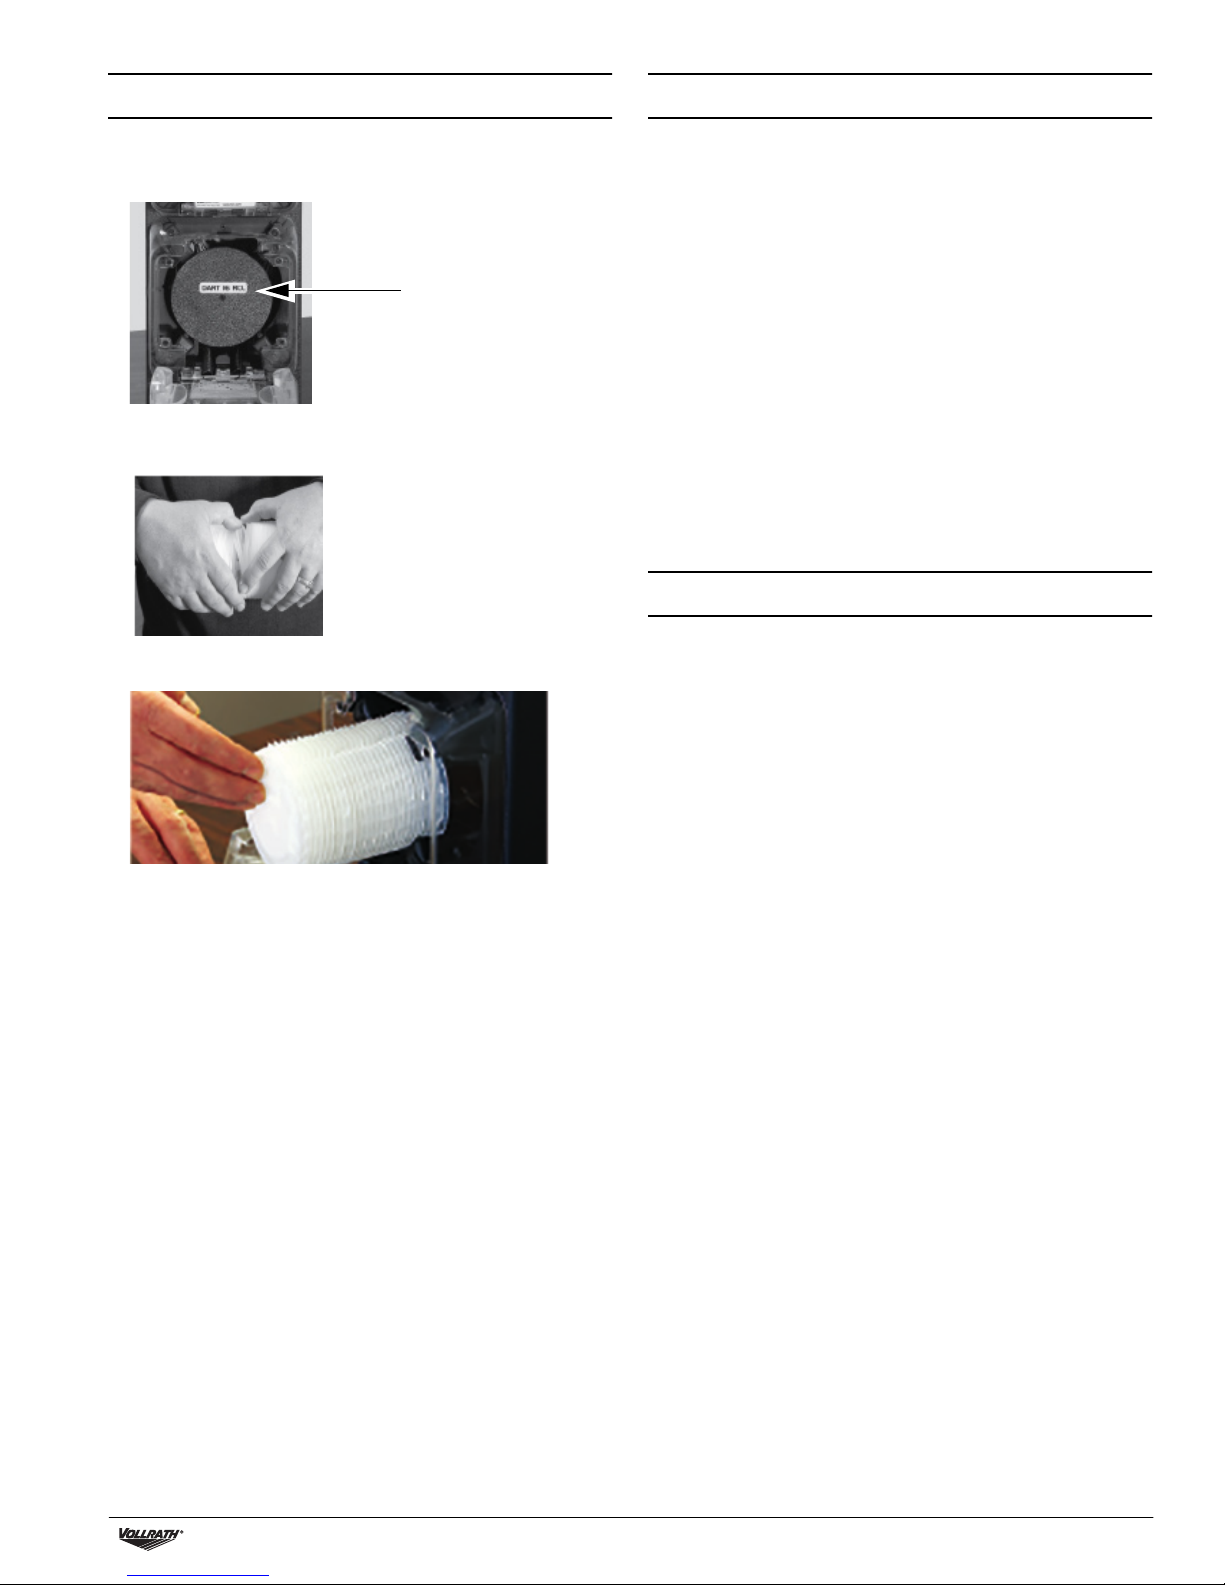
LOADING CLEANING
1. Before loading lids, verify your lids match the manufacturer and lid
number noted on the lid plate label.
2. Separate the lids prior to loading to release any lids that may have been
pressed together during packaging.
3. Load lids or cups.
NOTICE: Do NOT use strong solvents or commercial cleaners
containing ammonia, alcohol, acetone or dry cleaning
products. These will damage the equipment.
Regularly clean the inside and outside of your LidSaver™.
1. Remove all lids from LidSaver™.
2. Remove the bezel/housing (refer to installation instructions).
3. Wipe the interior and exterior with a cotton cloth and warm soapy
water.
4. Saturate each pager assembly with warm soapy water several times.
Flex the flipper portion of the pager to verify flippers operate freely.
5. Push the piston to the back of the tube to expose the bottom of tube.
Wipe the bottom of the tube.
6. Lubricate components:
• Door pivots: Apply lubricant with the door fully open and closed.
• Housing screws
7. Replace the housing.
8. Reattach the door springs.
MAINTENANCE
Tune-Up Your LidSaver™
When lids do not dispense correctly your LidSaver™ may need to be
adjusted. Order a tune-up kit. See www.Vollrath.com for ordering
information.
• Lids must be loaded with the front of the lid stack facing forward.
NOTICE: DO NOT overstock lids. Compressing lids may result in
4. If dispensing tabbed lids, align all lid tabs either up (12:00) or
down (6:00) to avoid interference with the lid claws.
NOTICE: Each LidSaver™ is factory set to dispense a particular lid. If
dispensing problems.
you change manufacturers or sizes, your LidSaver™ will
need to be modified. Vollrath offers lid change out kits that
are easy to install. Visit www.Vollrath.com for more
information.
LidSaver™In-Counter Lid Dispensers Operator’s Manual 3
Page 4
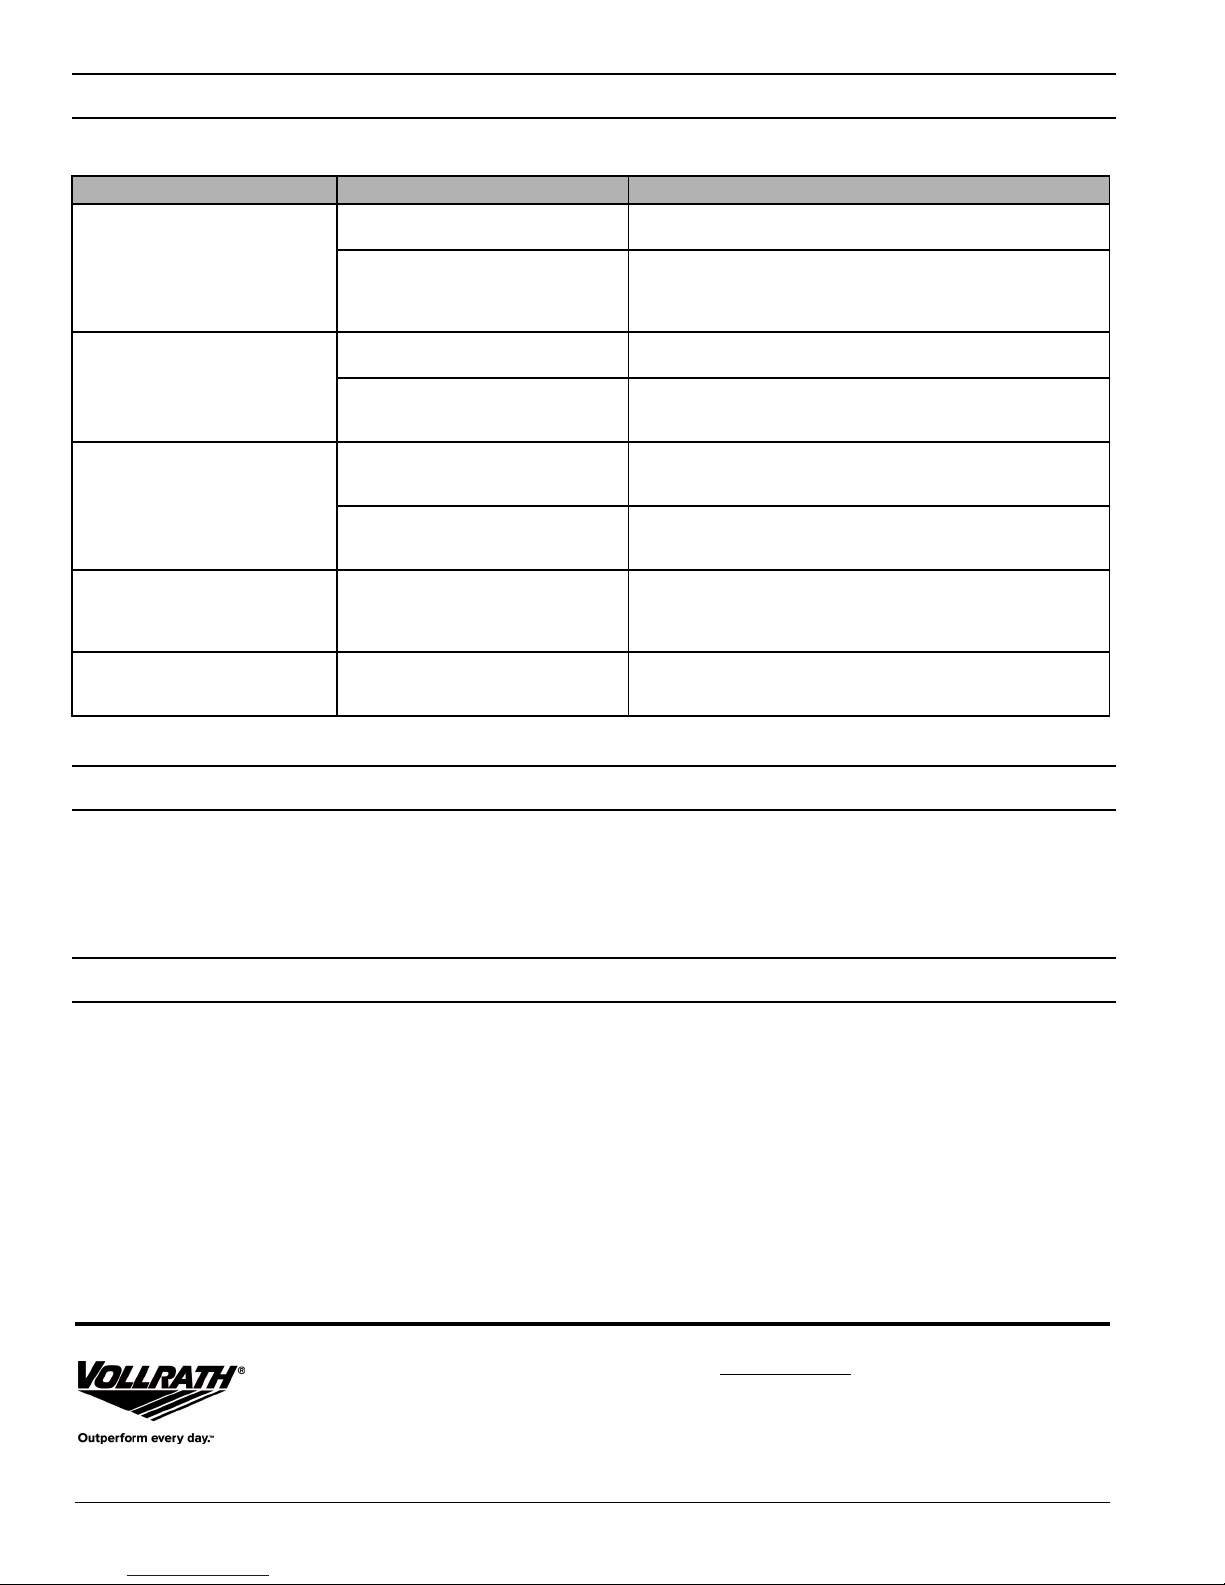
TROUBLESHOOTING
Note: Due to manufacturing defects, damaged lids or poorly stacking lid types, some lids may not dispense as planned. Under these rare conditions
your customer is still able to easily retrieve a lid.
Problem Might be Caused By Course of Action
Unsatisfactory dispensing
More than one lid releases when
opening door
Single lid dispenses inconsistently.
Lids are frequently damaged.
Door is disengaged from door pivots
or becomes disengaged when
opened too far.
Your lid may be incorrect for your
LidSaver™ settings.
LidSaver™ may be overfilled with lids.
When lids are compressed too tightly
from overstocking they will not dispense
well. Instruct staff to not overstock lids.
Pager flipper not returning to proper
working position after loading lid stack.
Pager not securely fastened down.
Lid claw is missing or damaged.
Piston or piston spring may be damaged
and preventing movement to the most
forward position.
One or pager flappers have migrated
inward, causing the lids to be held too
firmly.
Door pivot screws are sheared.
Read label on “lid plate”. If this does not match your lids, order a lid
change kit” to reset your LidSaver™ for your lid.
Remove lids and flake the stack. Avoid overstocking lids when
loading.
Using warm soapy water, thoroughly saturate pager and flipper
until flipper operates freely.
Grasp each pager to determine if it is loose and allows movement
within the adjustment slot. Order a tune-up kit to set these
components accurately.
Look for horizontal motion in one or the other claw. If horizontal
motion is noticed, tighten or replace the claw screws. If claw is
broken, order a new claw.
The piston or piston spring may be damaged. Clean the inside of
the tube
Remove housing. Inspect the lid claw/lid interaction. Move the door
to check if the lid claw reaches behind the first lid when the door is
completely closed. If the claw does not reach back far enough,
order a Lid Tune Up Kit to reset the pagers.
Remove the door pivot screws. Replace with 0.75-1.00" 10-24
round head screws.
SERVICE AND REPAIR
Serviceable parts are available on Vollrath.com.
To avoid serious injury or damage, never attempt to repair the unit or replace a damaged power cord yourself. Do not send units directly to
The Vollrath Company LLC. Please contact Vollrath Technical Services for instructions.
When contacting Vollrath Technical Services, please be ready with the item number, model number (if applicable), serial number, and proof of
purchase showing the date the unit was purchased.
WARRANTY STATEMENT FOR THE VOLLRATH CO. L.L.C.
This warranty does not apply to products purchased for personal, family or household use, and The Vollrath Company LLC does not offer a written
warranty to purchasers for such uses.
The Vollrath Company LLC warrants the products it manufactures or distributes against defects in materials and workmanship as specifically
described in our full warranty statement. In all cases, the warranty runs from the date of the end user’s original purchase date found on the receipt.
Any damages from improper use, abuse, modification or damage resulting from improper packaging during return shipment for warranty repair will
not be covered under warranty.
For complete warranty information, product registration and new product announcement, visit www.vollrath.com.
The Vollrath Company, L.L.C.
www.vollrath.com
1236 North 18th Street
Sheboygan, WI 53081-3201 U.S.A.
Main Tel: 800.624.2051 or 920.457.4851
Main Fax: 800.752.5620 or 920.459.6573
Customer Service: 800.628.0830
Canada Customer Service: 800.695.8560
Technical Services
techservicereps@vollrathco.com
Induction Products: 800.825.6036
Countertop Warming Products: 800.354.1970
All Other Products: 800.628.0832
©
2017 The Vollrath Company L.L.C. Part No. 8012600-1 ml 1/30/17
Page 5

Manuel d'utilisation
Distributeurs de couvercles encastrables LidSaver
8012600-1ml
Description
Couleur plaque
de retenue
Transparent
23"
Noir
Transparent
18"
Merci d’avoir acheté cet appareil Vollrath. Avant d’utiliser cet appareil,
lisez et familiarisez-vous avec le mode d’emploi et les consignes
d’utilisation qui suiven. CONSERVEZ CES INSTRUCTIONS POUR
RÉFÉRENCE ULTÉRIEURE. Conservez l’emballage et le carton d’origine.
L'emballage devra être réutilisé pour expédier l’appareil si une
réparation est nécessaire.
Num.d’art.
LS01 Horizontal
LS01V Vertical
LS01B Horizontal
LS01VB Vertical
LS01S18 Horizontal
LS01S18B Horizontal Noir
LS01VS18 Vertical Transparent
LS01VS18B Vertical Noir
AVIS : Chaque LidSaver™ est réglé à l'usine pour distribuer un
AVIS : Les distributeurs LidSaver demandent un nettoyage
Montage Longueur
(58,4 cm)
(45,7 cm)
style de couvercle particulier. Si vous changez de fabricant
ou de taille de couvercle, votre LidSaver™ devra être
modifié. Vollrath propose des kits de changement de
couvercles qui sont faciles à installer. Pour en savoir plus,
allez sur www.Vollrath.com.
régulier pour fonctionner correctement. Voir page 3 pour
nettoyage.
PRÉSENTATION
™
Diamètre de
couv. max.
2¾"à4¾"
CONSIGNES DE SÉCURITÉ
Pour garantir un fonctionnement sûr, lisez les avertissements suivants
et comprenez leur signification. Ce manuel contient des consignes de
sécurité, présentées ci-dessous. Lisez-les attentivement.
AVERTISSEMENT
Un avertissement permet d'indiquer la présence d'un danger qui
causera ou peut causer des blessures personnelles graves ou la mort.
ATTENTION
Une mise en garde indique la présence d'un danger qui causera ou
pourra causer des blessures mineures ou majeures si elle est ignorée.
AVIS : Un avis met en évidence des informations qui sont
importantes mais sans rapport avec un danger.
Veuillez enregistrer votre produit sur Vollrath.com/ProductRegistrer
G
G
F
E
A Cadre/boîtier
B Porte
C Vis pivots pour pinces à couvercle. (6-32 x ³⁄₄ F.H.M.S.)
D Pince A. Porte le code de pince.
E Vis de ressorts de porte. (10-24 x ³⁄₈ R.H.M.S.)
F Plaque à couvercles à piston
G Aileron de pivot séparateur. Pour le chargement facile
des couvercles.
H Pince B. Porte le code de pince.
I Vis du boîtier
©
2017 The Vollrath Company L.L.C. Num. d’art. 8012600-1 ml 1/30/17
D
C
G
G
H
B
A
I
Page 6

INSTALLATION ENCASTRABLE
() ( ) () ( )
Service Fax: 920.459.5462
Outils nécessaires
• Tournevis cruciforme no 2
• Perceuse
• Mèche 0.125" – 0.136" (pour avant-trou no 8)
• Scie sauteuse ou mortaiseuse à main
• Gabarit de découpe d'armoire (fourni)
• (4) vis à bois à tête plate no 8 x 1.00" (fournies)
1. Utilisez le gabarit de découpe d'armoire fourni pour découper le trou
du tube LidSaver™ et percer quatre avant-trous de vis de montage.
HOUSING
CUTOUT
Please read bottom clearance requirements below.
4. Enlevez le boîtier en tirant vers l'avant et en lui permettant de se plier
au niveau des bords de la porte ouverte.
.343"
8.71mm
8.81mm
3.437"
.53"
13.46mm
6.875" HEIGHT OF HOUSING
174.63mm
8.71mm
.343"
#8/ 4.166 mm
WOODSCREW
PILOT
#8/ 4.166 mm
WOODSCREW
PILOT
.510"
CENTER OF HOUSING
6.187" 157.15 mm
HEIGHT OF HOLE
12.95mm
CENTER OF HOUSING
5.437" 138.10 mm WIDTH OF HOLE
2.365" 60.07mm
1.985" 50.42 mm
#8/ 4.166 mm
WOODSCREW
PILOT (4 PLACES.)
2.906" 53.21mm
#8 / 4.166 mm
WOODSCREW
.343"
8.71mm
3.230"
82.04mm
.53"
13.46mm
2.437"
61.9mm
8.71mm
.343"
PILOT
2. Utilisez un tournevis ou une pince pour déverrouiller les ressorts
de la porte.
3. Enlevez les quatre vis du boîtier.
5. Montez le LidSaver™ dans votre armoire à l'aide des quatre vis à
bois à tête ronde no 8.
6. Remplacez le boîtier.
7. Accrochez les ressorts de porte.
2 LidSaver™Distributeurs de couvercles encastrables - Manuel d'utilisation
Page 7

CHARGEMENT NETTOYAGE
1. Avant la mise en place des couvercles, vérifiez que vos couvercles
correspondent au numéro de fabricant et au numéro de couvercle
indiqués sur l'étiquette de la plaque à couvercles.
2. Séparez les couvercles avant de les mettre en place pour « décoller »
tous ceux qui ont pu être pressés les uns dans les autres en cours
d'emballage.
3. Mettez en place les couvercles ou les gobelets.
AVIS : N'UTILISEZ PAS de solvants puissants ou de nettoyants
commerciaux contenant de l'ammoniaque, de l'alcool, de
l'acétone ou des produits de nettoyage à sec sous peine
d’endommager l'équipement.
Nettoyez régulièrement l'intérieur et l'extérieur de votre LidSaver™.
1. Enlevez tous les couvercles du LidSaver™.
2. Enlevez le cadre/boîtier (voir les instructions d'installation).
3. Essuyez l'intérieur et l'extérieur avec un chiffon en coton et de l'eau
savonneuse chaude.
4. Mouillez bien chaque pivot séparateur plusieurs fois avec de l'eau
savonneuse chaude. Pliez la partie aileron du pivot séparateur pour
vous assurer que les ailerons fonctionnent correctement.
5. Poussez le piston à l'arrière du tube pour exposer le fond du tube.
Essuyez le fond du tube.
6. Lubrifiez les composants :
• Pivots de porte : appliquez du lubrifiant avec la porte grande
ouverte et fermée.
• Vis du boîtier
7. Remettez le boîtier en place.
8. Rattachez les ressorts de porte.
MAINTENANCE
Réglage précis du LidSaver™
Lorsque les couvercles ne sont pas correctement distribués, il est
possible que votre LidSaver™ doive être réglé. Commandez un kit de
réglage. Pour en savoir plus, allez sur www.Vollrath.com.
• Les couvercles doivent être introduits en orientant le dessus de la pile
de couvercles vers l'avant.
AVIS : NE METTEZ PAS trop de couvercles en place. La compression
4. Si vous distribuez des couvercles à onglet, alignez tous les onglets en
haut (à midi) ou en bas (à 6 h) pour éviter les interférences avec les
pinces à couvercle.
AVIS : Chaque LidSaver™ est réglé à l'usine pour distribuer un
des couvercles peut causer des problèmes de distribution.
couvercle particulier. Si vous changez de fabricant ou de
taille de couvercle, votre LidSaver™ devra être modifié.
Vollrath propose des kits adaptateurs qui sont faciles à
installer. Pour en savoir plus, allez sur www.Vollrath.com.
LidSaver™Distributeurs de couvercles encastrables - Manuel d'utilisation 3
Page 8

DÉPANNAGE
Remarque : en cas de défauts de fabrication, de couvercles endommagés ou de types de couvercle qui s'empilent mal, il est possible que certains
couvercles ne se distribuent pas comme prévu. Dans de telles conditions, qui sont rares, votre client pourra toujours récupérer facilement un
couvercle.
Problème Cause possible Mesure corrective
Lisez l'étiquette sur la « plaque à couvercles ». Si elle ne correspond
pas à vos couvercles, commandez un kit de changement de
couvercle pour adapter le LidSaver™ à votre couvercle.
Enlevez les couvercles et « décollez » les couvercles de la pile.
Évitez de trop mettre de couvercles dans le distributeur.
Avec de l'eau savonneuse chaude, mouillez bien le pivot séparateur
et l'aileron jusqu'à ce que l'aileron fonctionne librement.
Saisissez chaque pivot séparateur pour déterminer s'il est mal fixé
et permet le mouvement dans la fente d'ajustement. Commandez
un kit de réglage pour régler précisément ces composants.
Vérifiez le mouvement horizontal de l'une ou l'autre pince. Si un
mouvement horizontal est constaté, serrez ou remplacez les vis de
pince. Si la pince est cassée, commandez-en une neuve.
Le piston ou son ressort est peut-être abîmé. Nettoyez l'intérieur du
tube.
Enlevez le boîtier. Inspectez l'interaction pince à couvercle/couvercle.
Bougez la porte pour voir si la pince à couvercle atteint l'arrière du
premier couvercle lorsque la porte est complètement fermée. Si la
pince ne va pas assez loin, commandez un kit de réglage de
couvercles pour réarmer les pivots séparateurs.
Enlevez les vis pivots de la porte. Remplacez par des vis à tête plate
de 0.75-1.00" 10-24.
Distribution insatisfaisante
Plusieurs couvercles sont distribués
à l'ouverture de la porte.
La distribution d'un seul couvercle
est irrégulière.
Les couvercles sont souvent
endommagés.
La porte est sortie de ses gonds ou
elle en sort lorsqu'elle est trop
grande ouverte.
Couvercle peut-être inadapté à vos
réglages de LidSaver™.
Le LidSaver™ contient peut-être trop
de couvercles. Lorsque les couvercles
sont trop compressés en cas de
surstockage, ils se distribueront mal.
Dites au personnel de ne pas trop
charger le distributeur en couvercles.
L'aileron du pivot séparateur ne revient
pas à la bonne position de
fonctionnement après le chargement de
la pile de couvercles.
Pivot séparateur mal fixé.
Pince à couvercle manquante ou
endommagée.
Le piston ou son ressort est peut-être
abîmé et empêche le mouvement en
position avant maximale.
Il est possible qu'un ou plusieurs
ailerons de pivot séparateur aient
migré vers l'intérieur, causant le
maintien trop ferme des couvercles.
Les vis pivots de la porte sont
cisaillées.
SAV ET RÉPARATIONS
Des pièces détachées sont disponibles sur Vollrath.com.
Pour éviter toute blessure grave ou tout dommage sévère, n’essayez jamais de réparer l'appareil ou de remplacer vous-même un cordon
d’alimentation endommagé. N’envoyez aucun appareil directement à la Vollrath Company LLC. Pour des instructions, contactez les services
techniques de Vollrath.
Lorsque vous contacterez les services techniques de Vollrath, tenez-vous prêt à fournir le numéro d'article, le numéro de modèle (s'il y a lieu),
le numéro de série et le justificatif d’achat indiquant la date d’achat de l’appareil.
GARANTIE DE THE VOLLRATH CO. L.L.C.
Cette garantie ne s'applique pas aux produits achetés pour un usage personnel, familial ou ménager, et The Vollrath Company LLC ne propose
aucune garantie écrite aux acheteurs pour de telles utilisations.
The Vollrath Company L.L.C. garantit que les produits qu'elle fabrique et distribue seront dépourvus de vices de matériaux et de malfaçons, comme
indiqué dans notre déclaration complète de garantie. Dans tous les cas, la garantie entre en vigueur à la date d'achat par l'utilisateur initial indiquée
sur le reçu. Tous les dommages subis lors d’une utilisation impropre ou abusive, ou résultant d’une modification ou d'un emballage inadapté lors
d’un renvoi du produit pour une réparation sous garantie ne seront pas couverts par la garantie.
Pour des informations complètes sur la garantie, l'enregistrement des produits et l'annonce de nouveaux produits, consultez www.vollrath.com.
The Vollrath Company, L.L.C.
www.vollrath.com
1236 North 18th Street
Sheboygan, Wi 53081-3201 États-Unis
Standard : 800.624.2051 ou 920.457.4851
Télécopieur : 800.752.5620 ou 920.459.6573
Service clientèle : 800.628.0830
Service clientèle Canada : 800.695.8560
Services techniques
techservicereps@vollrathco.com
Produits à induction : 800.825.6036
Réchauds de comptoir : 800.354.1970
Tous les autres produits : 800.628.0832
©
2017 The Vollrath Company L.L.C. Num. d’art. 8012600-1 ml 1/30/17
Page 9

Manual del operador
Dispensadores de tapas LidSaver
Núm. art.
LS01 Horizontal
LS01V Vertical
LS01B Horizontal
LS01VB Vertical
LS01S18 Horizontal
LS01S18B Horizontal Negro
LS01VS18 Vertical Transparente
LS01VS18B Vertical Negro
Montaje Largo
™
en mostrador
Descripción
Color placa
frontal
Transparente
23"
(58,4 cm)
Negro
Transparente
18"
(45,7 cm)
diá. de la tapa
Se adapta al
2¾"a4¾"
Gracias por comprar este equipo Vollrath. Antes de usar el equipo, lea y
familiarícese con las siguientes instrucciones de operación y seguridad.
CONSERVE ESTAS INSTRUCCIONES COMO REFERENCIA PARA EL
FUTURO. Conserve la caja y embalado originales. Deberá utilizarlos
para devolver el equipo en caso de que requiera reparaciones.
PRECAUCIONES DE SEGURIDAD
Para garantizar una operación segura, lea las siguientes afirmaciones y
comprenda su significado. Este manual contiene precauciones de
seguridad que se explican a continuación. Léalas atentamente.
ADVERTENCIA
Advertencia se usa para indicar la presencia de un peligro que
provocará o puede provocar lesiones graves o letales.
PRECAUCIÓN
Precaución se usa para indicar la presencia de un peligro que provocará
o puede provocar lesiones leves o importantes si se ignora el aviso.
AVISO: Aviso se usa para señalarinformación importante no
relacionada con peligros.
AVISO: Cada unidad LidSaver™ viene ajustada de fábrica para
AVISO: Los dispensadores LidSaver requieren una limpieza
dispensar un estilo particular de tapas. Si usted cambia de
fabricante o de tamao de tapas, deberá modificar el
dispensador LidSaver™. Vollrath ofrece juegos de
intercambio de tapas, los cuales son fáciles de instalar.
Visite vollrath.com para obtener más información
regular para garantizar un funcionamiento
adecuado.Consulte el procedimiento de “limpieza”
en la página 3.
GENERALIDADES
G
G
F
E
A Bisel/caja
B Puerta
C Tornillos de los pivotes de garras de tapas. (6-32 x ³⁄₄ F.H.M.S.)
D Garra “A”. Marcada con el código de garra.
E Tornillos de la puerta, resortes de puerta. (10-24 x ³⁄₈ R.H.M.S.)
F Placa de tapas con pistón
G Aleta localizadora pivotante. Para cargar suavemente las tapas.
H Garra “B”. Marcada con el código de garra.
I Tornillos de la caja
D
C
G
G
H
B
A
I
Inscriba su producto en Vollrath.com/ProductRegistrer
©
2017 The Vollrath Company L.L.C. Núm. pieza 8012600-1 ml 1/30/17
Page 10

INSTALACIÓN EN MOSTRADOR
() ( ) () ( )
Service Fax: 920.459.5462
Herramientas necesarias
• Destornillador Phillips núm. 2
• Taladro
• Brocas de 0.125" – 0.136" (para orificio piloto núm. 8)
• Sierra caladora o rebajador manual
• Plantilla de recorte para gabinete (se proporciona)
• 4 tornillos de madera de cabeza plana núm. 8 x 1.00" (incluidos)
1. Use la plantilla de recorte para gabinete a fin de cortar el orificio del
tubo del dispensador LidSaver™ y taladre cuatro orificios piloto para
los tornillos de montaje.
HOUSING
CUTOUT
Please read bottom clearance requirements below.
4. Retire la caja tirándola hacia adelante y permitiendo que se doble
alrededor de los bordes laterales de la puerta abierta.
.343"
8.71mm
8.81mm
3.437"
.53"
13.46mm
6.875" HEIGHT OF HOUSING
174.63mm
8.71mm
.343"
#8/ 4.166 mm
WOODSCREW
PILOT
#8/ 4.166 mm
WOODSCREW
PILOT
.510"
CENTER OF HOUSING
6.187" 157.15 mm
HEIGHT OF HOLE
12.95mm
CENTER OF HOUSING
5.437" 138.10 mm WIDTH OF HOLE
2.365" 60.07mm
1.985" 50.42 mm
#8/ 4.166 mm
WOODSCREW
PILOT (4 PLACES.)
2.906" 53.21mm
#8 / 4.166 mm
WOODSCREW
.343"
8.71mm
3.230"
82.04mm
.53"
13.46mm
2.437"
61.9mm
8.71mm
.343"
PILOT
2. Use un destornillador o alicates para desbloquear los resortes de la
puerta.
3. Retire los cuatro tornillos de la caja.
5. Monte el dispensador LidSaver en el gabinete usando los cuatro
tornillos de madera de cabeza redonda núm. 8.
6. Vuelva a colocar la caja.
7. Enganche los resortes de la puerta.
2 Dispensadores de tapas LidSaver™en mostrador - Manual del operador
Page 11

CARGA LIMPIEZA
1. Antes de cargar las tapas, verifique que estas coincidan con el fabricante
y el número de tapa indicado en la etiqueta de la placa de tapas.
2. Separe las tapas antes de cargarlas a fin de liberar aquellas que pueden
haber quedado presionadas entre sí durante el embalado.
3. Cargue las tapas o vasos.
AVISO: NO use disolventes fuertes ni limpiadores comerciales que
contengan amoniaco, alcohol, acetona o productos de
limpieza en seco, ya que pueden daar el equipo.
Limpie regularmente el interior y exterior de su dispensador LidSaver™.
1. Retire todas las tapas del dispensador LidSaver™.
2. Retire el bisel/caja (consulte las instrucciones de instalación).
3. Limpie el interior y exterior con un pao de algodón y agua tibia
jabonosa.
4. Sature varias veces cada conjunto de localizador con agua tibia
jabonosa. Doble la sección de las aletas del localizador para verificar
que las aletas funcionan libremente.
5. Empuje el pistón hasta la parte trasera del tubo a fin de exponer el
fondo del mismo. Limpie con un pao el fondo del tubo.
6. Lubrique los componentes:
• Pivotes de la puerta: Aplique lubricante con la puerta totalmente
abierta y cerrada.
• Tornillos de la caja
7. Vuelva a colocar la caja.
8. Vuelva a conectar los resortes de la puerta.
MANTENIMIENTO
Ponga a punto el dispensador LidSaver™
Si las tapas no se dispensan en forma correcta, es posible que tenga
que ajustar el dispensador. Ordene un juego de puesta a punto. En
vollrath.com encontrará más información.
• Las tapas deben cargarse con la parte delantera de la pila de tapas
orientada hacia adelante.
AVISO: NO cargue tapas de manera excesiva. Las tapas
4. Si va a dispensar tapas con pestaa, alinee todas las pestaas ya sea hacia
arriba (12:00) o hacia abajo (6:00) para no interferir con las garras de
tapas.
AVISO: Cada unidad LidSaver™ viene ajustada en fábrica para
comprimidas pueden causar problemas de dispensado.
dispensar un estilo particular de tapas. Si usted cambia de
fabricante o de tamao de tapas, deberá modificar el
dispensador LidSaver™. Vollrath ofrece juegos de
intercambio de tapas fáciles de instalar. Visite vollrath.com
para obtener más información.
Dispensadores de tapas LidSaver™en mostrador - Manual del operador 3
Page 12

SOLUCIÓN DE PROBLEMAS
Nota: Debido a defectos de fabricación, tapas daadas o tipos de tapas mal apiladas, es posible que algunas tapas no se dispensen como se planificó.
En estas condiciones inusuales aún así los clientes pueden sacar fácilmente las tapas.
Problema Podría deberse a Solución
Dispensado insatisfactorio
Al abrirse la puerta se libera más de
una tapa
Las tapas se dispensan
desigualmente de una la vez.
Las tapas se daan con frecuencia.
La puerta se desengancha de sus
pivotes o se desengancha al abrirse
demasiado.
Puede que las tapas sean incorrectas
para los ajustes del dispensador
LidSaver™.
Puede que el dispensador esté cargado
excesivamente con tapas. Si las tapas
están demasiado comprimidas debido a
la sobrecarga no se dispensarán
correctamente. Instruya al personal para
que no sobrecargue el dispensador con
tapas.
La aleta localizadora no regresa a la
posición de trabajo correcta tras
cargarse una pila de tapas.
El localizador no está firmemente fijado.
La garra de tapas no está presente o
está daada.
Puede que el pistón o su resorte estén
daados impidiendo el movimiento a la
posición más avanzada.
Una o las aletas localizadoras han
migrado hacia adentro, haciendo que las
tapas queden demasiado sujetas.
Los tornillos de los pivotes de la puerta
están cortados.
Lea la etiqueta en la “placa de tapas”. Si ello no coincide con sus
tapas, ordene un juego de intercambio de tapas a fin de reajustar el
dispensador LidSaver™ para sus tapas.
Retire las tapas y desprenda la pila. Evite sobrecargar el
dispensador con tapas.
Sature completamente el localizador y la aleta con agua jabonosa
tibia hasta que la aleta funcione libremente.
Tome cada localizador para determinar si están sueltos y permiten
el movimiento dentro de la ranura de ajuste. Ordene un juego de
puesta a punto a fin de ajustar correctamente estos componentes.
Vea si hay movimiento horizontal en una garra o la otra. Si es así,
apriete o reemplace los tornillos de la garra. Si la garra está rota,
ordene una nueva.
Puede que el pistón o su resorte estén daados. Limpie el interior del
tubo.
Retire la caja. Inspeccione la interacción garra/tapa. Mueva la
puerta para verificar si la garra llega detrás de la primera tapa al
cerrarse completamente la puerta. Si la garra no llega lo
suficientemente atrás, ordene un juego de puesta a punto de tapas
para reajustar los localizadores.
Retire los tornillos de los pivotes. Reemplácelos por tornillos de
cabeza plana 10-24 de 0.75-1.00".
SERVICIO Y REPARACIÓN
En Vollrath.com encontrará las piezas que puedan ser reparadas.
Para evitar lesiones o daños materiales graves, no trate de reparar la unidad ni reemplazar un cable eléctrico por su cuenta. No envíe las unidades
directamente a The Vollrath Company LLC. Pida instrucciones a los Servicios de asistencia técnica de Vollrath.
Al comunicarse con los servicios, esté listo para proporcionar el número de artículo, número de modelo (si corresponde), número de serie y el
comprobante de compra que muestre la fecha en que adquirió la unidad.
CLÁUSULA DE GARANTÍA DE THE VOLLRATH CO. L.L.C
Esta garantía no se aplica a los productos adquiridos para uso personal, familiar ni doméstico, y The Vollrath Company LLC no ofrece una garantía
por escrito a los compradores para dichos usos.
The Vollrath Company LLC garantiza los productos que fabrica o distribuye contra defectos en materiales y fabricación, según se especifica en
nuestra cláusula de garantía completa. En todos los casos, la garantía rige desde la fecha de compra original del usuario final que aparece en el
recibo. La garantía no cubrirá ningún daño que resulte del uso indebido, abuso, modificación o daños causados por el embalado incorrecto durante
la devolución para obtener servicio de reparación dentro del período de vigencia de la garantía.
Para obtener información de garantía, inscripción de productos y anuncios de productos nuevos, visite www.vollrath.com.
The Vollrath Company, L.L.C.
www.vollrath.com
1236 North 18th Street
Sheboygan, WI 53081-3201 EE. UU.
Tel. principal: 800.624.2051 ó 920.457.4851
Fax principal: 800.752.5620 ó 920.459.6573
Servicio al cliente: 800.628.0830
Servicio al cliente en Canadá: 800.695.8560
Servicios de asistencia técnica:
techservicereps@vollrathco.com
Productos de inducción: 800.825.6036
Productos de calentamiento para mostrador:
800.354.1970
Todos los demás productos: 800.628.0832
©
2017 The Vollrath Company L.L.C. Núm. pieza 8012600-1 ml 1/30/17
 Loading...