

Page 1
Operator’s Manual
InstaCut
Thank you for purchasing this Vollrath equipment. Before operating the
equipment, read and familiarize yourself with the following operating
and safety instructions. SAVE THESE INSTRUCTIONS FOR FUTURE
REFERENCE. Save the original box and packaging. Use this packaging
to ship the equipment if repairs are needed.
™
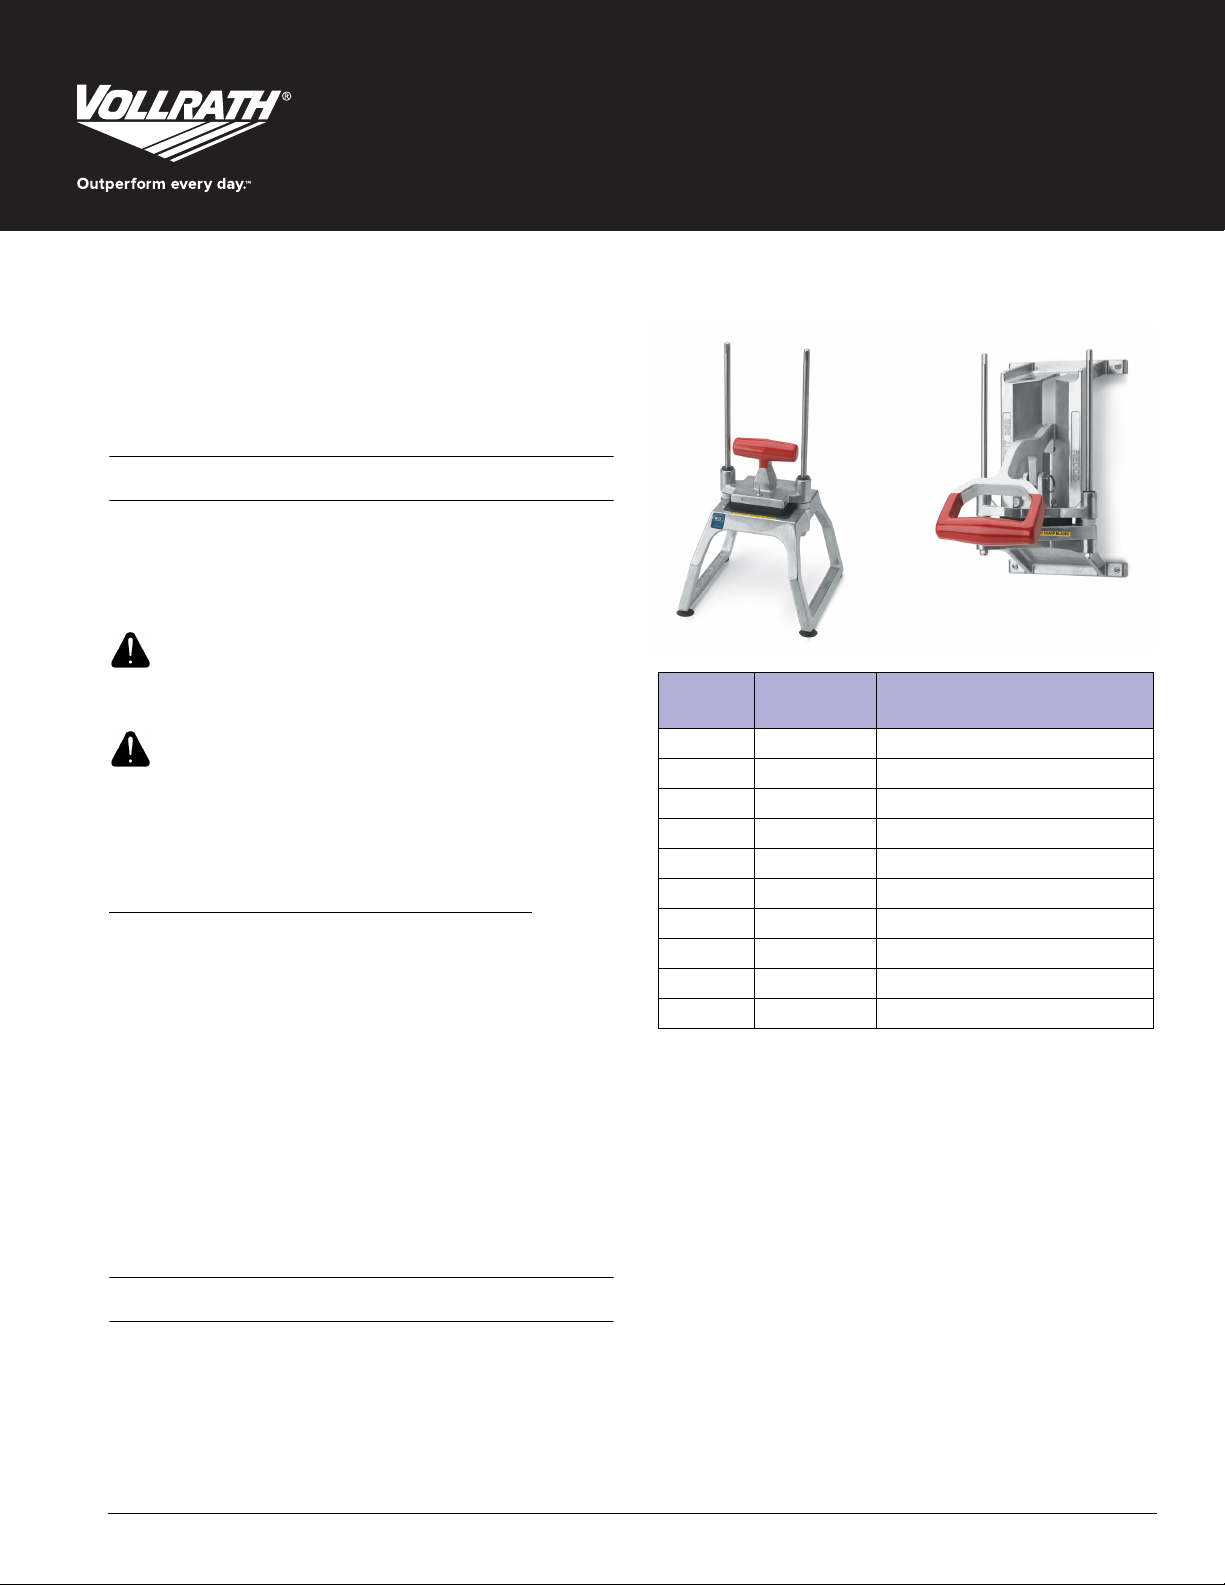
3.5 Slicer, Dicer, Wedger and Corer
SAFETY PRECAUTIONS
To ensure safe operation, read the following statements and understand
their meaning. This manual contains safety precautions which are
explained below. Please read carefully.
WARNING
Warning is used to indicate the presence of a hazard that will or can
cause severe personal injury or death.
CAUTION
Caution is used to indicate the presence of a hazard that will or can
cause minor or major personal injury if the caution is ignored.
NOTICE: Notice is used to note information that is important but not
To reduce risk of injury or damage to the equipment
• Check the equipment before each use to insure it is clean.
• Check for broken, nicked or dull blades and if found, replace the
• Check to ensure the rubber bumpers are in place. DO NOT USE
• Check to insure that the pusher head sits down completely on the
• On tabletop models the suction cups will hold the equipment
• Wall mounted equipment must be securely mounted to wall studs.
• Guide rods must be lubricated using a light coating of mineral oil,
hazard-related.
blade assembly.
EQUIPMENT IF BUMPERS ARE NOT IN PLACE.
rubber bumpers.
securely to smooth surfaces.
Use proper size and type hardware to mount equipment to wall.
Petrol-Gel, or food grade lubricant. DO NOT USE COOKING OIL AS
IT WILL BECOME STICKY AND MAY PERMANENTLY DAMAGE THE
PUSHER HEAD BEARINGS.
Tabletop
Item No.
15000 15016 ¼" Dice
15001 15017 ³⁄₈" Dice
15002 15018 ½" Dice
15003 15019 4 Section Wedge
15005 15021 6 Section Wedge
15006 15022 8 Section Wedge
15007 15023 10 Section Wedge
15008 15024 12 Section Wedge
15009 — 6 Section Core
15010 15026 8 Section Core
Wall Mount
Item No. Description
Installing the wall mounted model
1. Use four (4) ¼" screws of a suitable length to secure the base to the
wall. Install screws into studs. If this is not possible, use proper
anchors and screws to secure base.
FUNCTION AND PURPOSE
The InstaCut™ 3.5 manual food processor is intended for slicing,
dicing, coring and wedging soft vegetables and fruits. It not intended to
cut hard root vegetables such as carrots and sweet potatoes.
Register your product at Vollrath.com/registration and become eligible to win a free 10" Vollrath Tribute©fry pan.
©
2018 The Vollrath Company L.L.C. Part No. 2350022-1 ml 6/28/18
Page 2
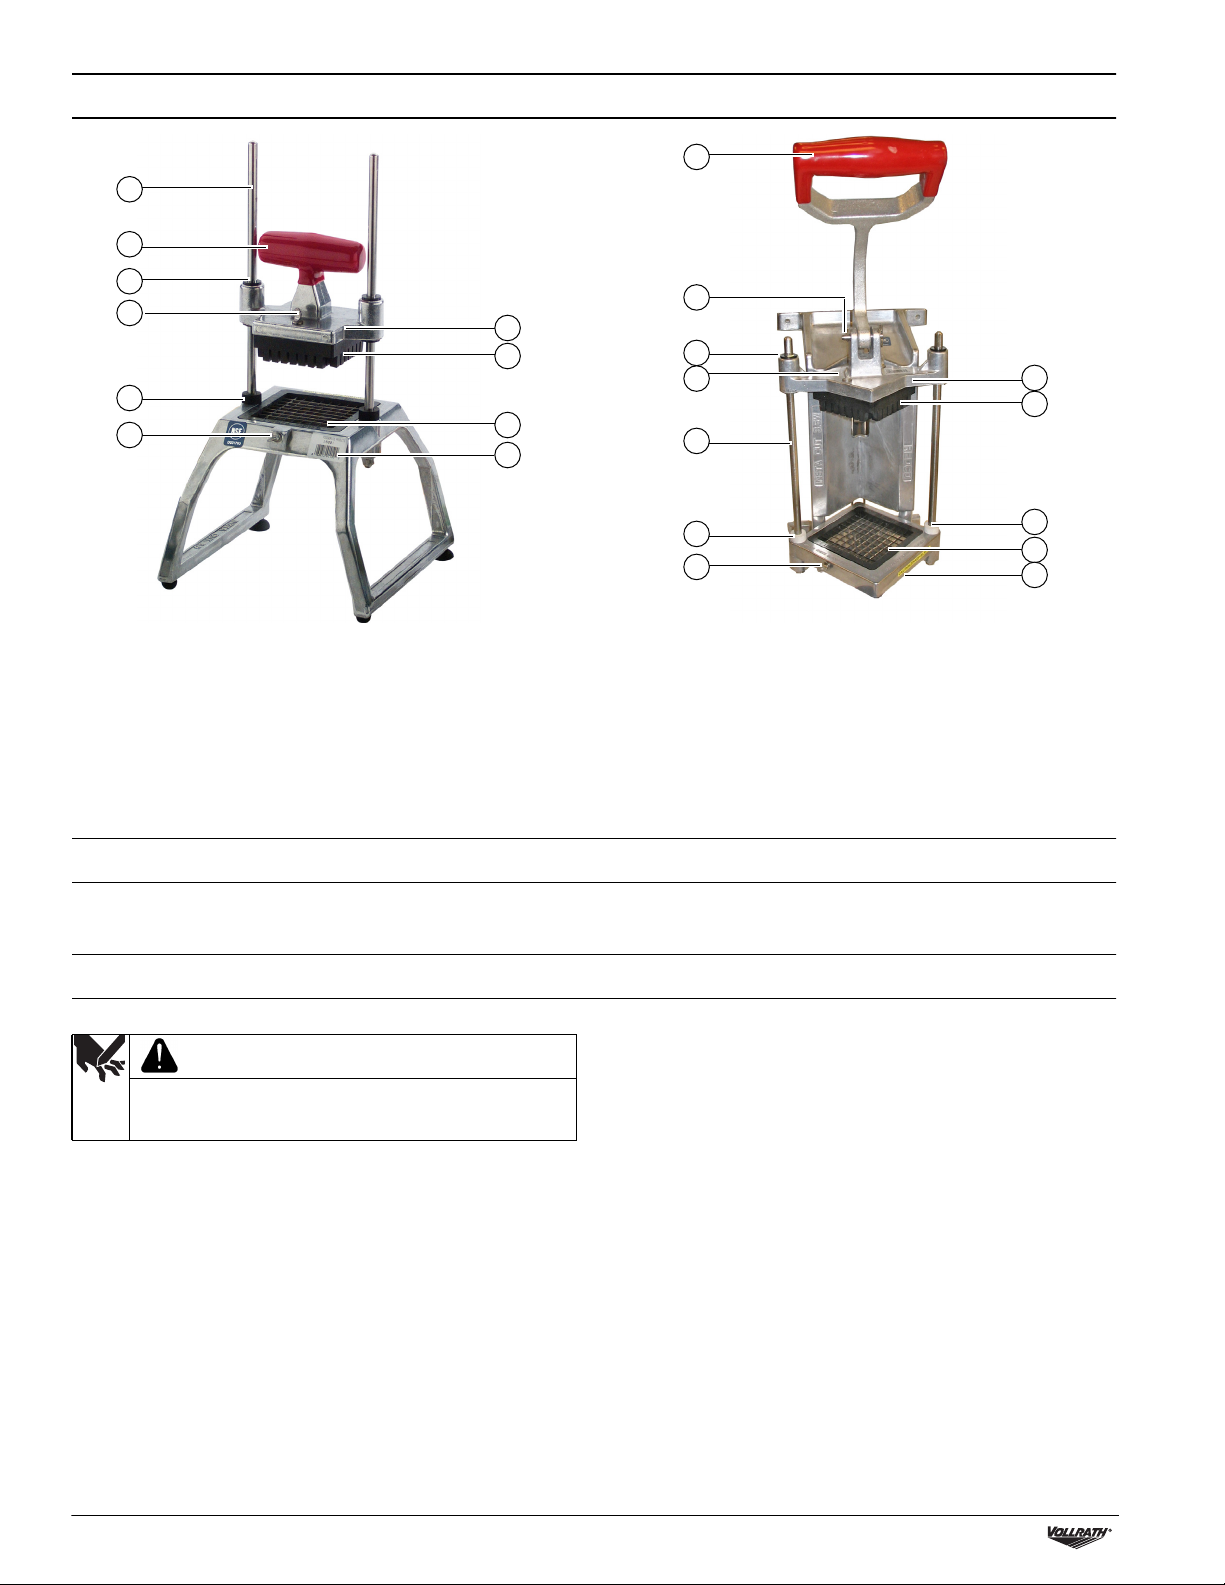
FEATURES AND CONTROLS
A
B
B
C
F
E
F
Table Top Model
A Guide Rods. Guide and align the pusher head onto the blade set. F Thumbscrew. Used to secure the pusher head block or the blade assembly.
B Handle. Used to lower and raise the pusher head block G Pusher Head Bock. Pushes the food product through the blade assembly.
C Bushings. Used for smooth and consistent operation of pusher
head on the guide rods
D Pusher Head Assembly. Consists of bushings, the pusher head
and the pusher bock.
E Bumpers. Cushions the stop of the pusher head. J Locking Pin. Secures the pusher head to the handle.
D
G
H
I
Specifically sized to match the corresponding blade assembly.
H Blade Assembly. Houses the blades. Specifically sized to match the
corresponding pusher head block
I Base Assembly. Holds the guide rods and blade assembly.
J
C
F
A
E
F
Wall Mount Model
D
G
E
H
I
BEFORE FIRST USE
Clean the equipment. See the Cleaning section of this manual.
OPERATION
WARNING
Sharp Blade Hazard
Blades are sharp and can cause cuts. To avoid injury from
sharp blades, handle with caution.
\
1. Check that the equipment is clean and the blades are in good
condition and bumpers are in place. If loose or broken blades are
found, replace the blade assembly.
2. Verify the bumpers are in place on the guide rods. DO NOT USE
EQUIPMENT IF BUMPERS ARE NOT IN PLACE.
3. Place the equipment on a clean, flat work surface.
4. Check for proper blade alignment by slowly setting the pusher head
onto the blade assembly. They should slide together with no
obstructions. If there are obstructions, verify they are a matching
set. Remove the obstruction.
5. Verify that the blade assembly and pusher block are the desired size.
6. Prepare the food product to be processed. The maximum size of the
food product is 3½" (8.9 cm) in diameter.
7. Lift the handle and place the food on the blade assembly with the flat
side down.
8. Remove hand from the blade assembly area and place that hand on
the leg of the base on table top equipment, or on the wall for wall
mounted models.
9. Using a strong, quick, downward thrust, force the food product
through the blade assembly.
10.Repeat this process until you have prepared enough food product
for your daily needs.
11.Clean and lubricate your equipment immediately after each use. See
the Cleaning section of this manual for more information.
2 InstaCut™3.5 Slicer, Dicer, Wedger and Corer Operator’s Manual
Page 3
CLEANING
WARNING
Sharp Blade Hazard
Blades are sharp and can cause cuts. To avoid injury from
sharp blades, handle with caution.
NOTICE: Food acids will dull the blades and corrode the metal.
Always clean this food preparation equipment immediately
after every use.
NOTICE: Do not put this equipment in a dishwasher or dish machine
with soaps, detergents, or other alkaline chemicals that
can harm the equipment.Handwash only.
NOTICE: Do not use abrasive materials, scratching cleansers or
scouring pads to clean this equipment. These can damage
the finish.
Disassemble
1. Remove the pusher head assembly:
Table top models. Slide the pusher head off the guide rods.
Wall mount models. Remove the locking pin. Lift the handle and
slide the pusher head off the guide rods. Place the locking pin back
into the hole on the handle assembly to prevent it from being lost.
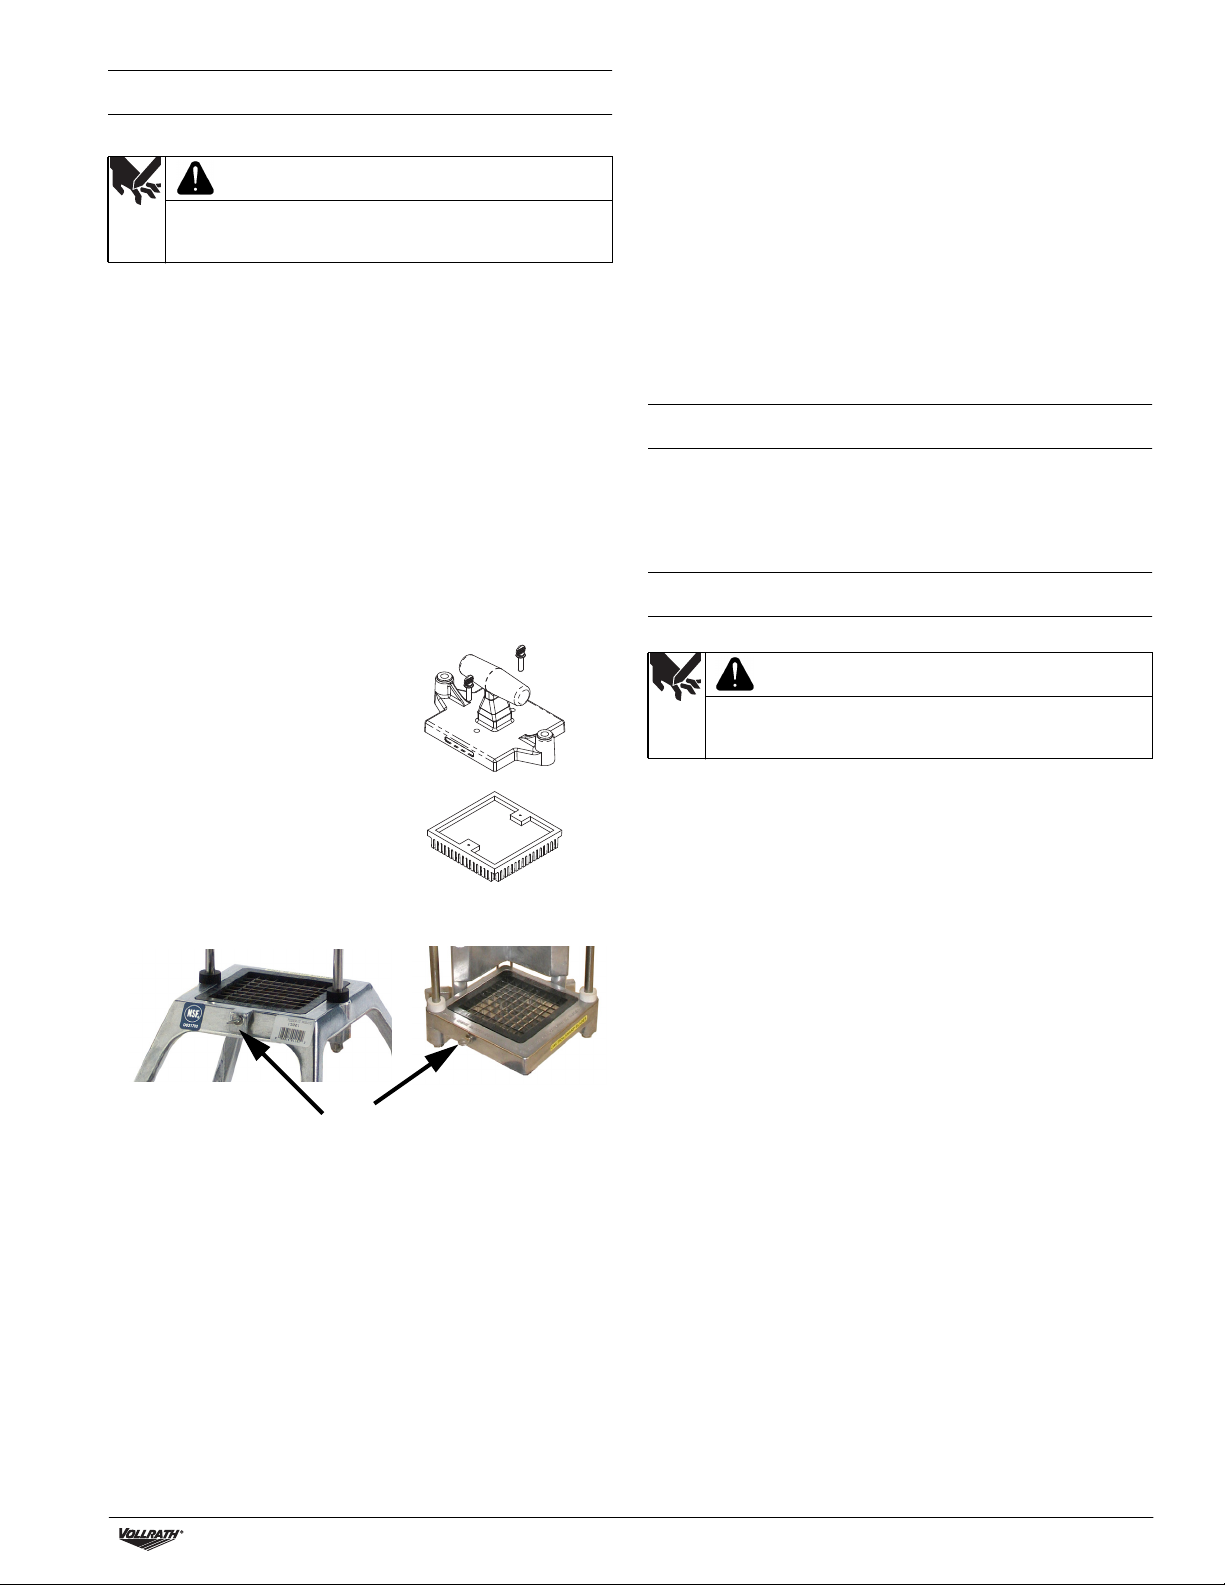
2. Remove the two thumbscrews and
separate the pusher block from the
pusher head.
3. Raise the bumpers approximately 2"
(5.0 cm).
4. Loosen the thumbscrew and carefully
remove the blade assembly.
Wash
1. Wipe, rinse or spray off equipment, pusher head and blade assembly
thoroughly with HOT water.
2. Do not wipe across the blades.
NOTICE: Wiping across the sharp edge of the blade can cause
injury and will dull the blades.
3. Clean the blade assembly by forcing water, under pressure, through
the blades from the unsharpened side. If necessary, use a nylon
bristle cleaning brush to push food particles out from the
unsharpened side of the blade assembly.
4. Let the equipment air dry.
Reassemble
1. Install the cutting blade assembly into the base. Tighten the
thumbscrew to push blade assembly securely against the other side.
2. Lubricate the guide bar with mineral oil or Petrol-Gel.
NOTICE: Do not use cooking oil as it will become sticky and may
permanently damage the equipment.
3. Slide the bumpers into place.
4. Reassemble the pusher head and pusher block together.
5. Install the pusher head assembly:
Table top models. Reassemble the pusher head assembly.
Wall mount models. Remove the locking pin from its storage
location on the handle assembly. Lift handle and slide the pusher
head on the guide rods. Place locking pin back into the hole through
the handle assembly and the pusher head.
PREVENTATIVE MAINTENANCE
1. Clean the equipment after every use.
2. Use for intended purposes only.
3. Change the blades regularly – based on usage.
REPLACE THE BLADE ASSEMBLY
WARNING
Sharp Blade Hazard
Blades are sharp and can cause cuts. To avoid injury from
sharp blades, handle with caution.
Wash new blades with warm, soapy water and rinse thoroughly to
remove the thin protective oil film. Keep the sharp edge away from you
when handling blades.
1. Familiarize yourself with the parts diagram for your equipment.
2. Remove the pusher head assembly:
Table top models. Slide the pusher head off the guide rods.
Wall mount models. Remove the locking pin. Lift handle and slide
the pusher head off the guide rods. Place pin back into the hole on
the handle assembly to prevent loss.
3. Raise the bumpers approximately 2" (5.0 cm).
4. Loosen thumbscrew and carefully remove the blade assembly.
Remove the cutting blade assembly by pressing upwards on the
bottom of the side of the blade holder, where the thumbscrew is
located. Discard the old blade assembly.
5. Install the new cutting blade assembly by inserting the tab on the
blade holder into the groove in the base, then lowering the blade
holder into the seated and flush position in the base. Tighten the
thumbscrew
6. Slide bumpers down guide rods to contact base assembly. Position
pusher head assembly onto the guide rods, slowly lower pusher
head assembly, and check pusher head block to blade alignment.
7. Lubricate the guide rods with mineral oil or Petrol-Gel after each
use. Do not use cooking oil as it will become sticky and may
permanently damage the equipment.
InstaCut™3.5 Slicer, Dicer, Wedger and Corer Operator’s Manual 3
Page 4

TROUBLESHOOTING
If the equipment no longer processes food cleanly or without damage to the food product, the blades could be dull and be in need of replacement.
Broken, bent, or nicked blades must be replaced.
Problem Might be Caused By Course of Action
Broken Blade Blades were dull.
Pusher head does not slide
easily.
Guide rods improperly or insufficiently
lubricated.
Cuts poorly. Blades are dull. Replace blade assembly.
Cannot push food through.
Blades are misaligned or incorrect
pusher block is installed.
Replace the blade assembly. Also inspect the pusher block. Replace if
damaged.
Clean and lubricate the guide rides. See Cleaning.
Confirm the pusher block is correct for the blade assembly and that there
is no interference between the pusher block and blade assembly.
SERVICE AND REPAIR
Serviceable parts are available on Vollrath.com.
To avoid serious injury or damage, never attempt to repair the unit or replace a damaged power cord yourself. Do not send units directly to
The Vollrath Company LLC. Please contact Vollrath Technical Services for instructions.
When contacting Vollrath Technical Services, please be ready with the item number, model number (if applicable), serial number, and proof of
purchase showing the date the unit was purchased.
WARRANTY STATEMENT FOR THE VOLLRATH CO. L.L.C.
This warranty does not apply to products purchased for personal, family or household use, and The Vollrath Company LLC does not offer a written
warranty to purchasers for such uses.
The Vollrath Company LLC warrants the products it manufactures or distributes against defects in materials and workmanship as specifically
described in our full warranty statement. In all cases, the warranty runs from the date of the end user’s original purchase date found on the receipt.
Any damages from improper use, abuse, modification or damage resulting from improper packaging during return shipment for warranty repair will
not be covered under warranty.
For complete warranty information, product registration and new product announcement, visit www.vollrath.com.
The Vollrath Company, L.L.C. Headquarters
1236 North 18th Street
Sheboygan, Wisconsin
53081-3201 USA
Main Tel: 800-624-2051 or 920-457-4851
Main Fax: 800-752-5620 or 920-459-6573
Canada Customer Service: 800-695-8560
Tech Services: techservicereps@vollrathco.com
www.vollrath.com
Pujadas
Ctra. de Castanyet,
132 P.O. Box 121
17430 Santa Coloma de Farners
(Girona) – Spain
Tel. +34 972 84 32 01
info@pujadas.es
©
2018 The Vollrath Company L.L.C. Part No. 2350022-1 ml 6/28/18
Vollrath of China
Vollrath Shanghai Trading
Limited
Room 201, Building A
Xin Yi Plaza
1618 Yi Shan Road
Shanghai, 201103
China, P.R.C.
Tel: +86-21-5058-9580
Vollrath de Mexico S. de R.L. de C.V.
Periferico Sur No. 7980 Edificio 4-E
Col. Santa Maria Tequepexpan
45600 Tlaquepaque, Jalisco |
Mexico
Tel: (52) 333-133-6767
Tel: (52) 333-133-6769
Fax: (52) 333-133-6768
Page 5

Vide-pomme, découpeuse en tranches et découpeuse
en quartiers et en dés InstaCut
Avant d’utiliser cet appareil, lisez et familiarisez-vous avec le mode
d’emploi et les consignes d’utilisation qui suiven. CONSERVEZ CES
INSTRUCTIONS POUR RÉFÉRENCE ULTÉRIEURE. Conservez
l’emballage et le carton d’origine. L'emballage devra être réutilisé pour
expédier l’appareil si une réparation est nécessaire.
CONSIGNES DE SÉCURITÉ
Pour garantir un fonctionnement sûr, lisez les avertissements suivants
et comprenez leur signification. Ce manuel contient des consignes de
sécurité, présentées ci-dessous. Lisez-les attentivement.
AVERTISSEMENT
Un avertissement permet d'indiquer la présence d'un danger qui
causera ou peut causer des blessures personnelles graves ou la mort.
ATTENTION
Une mise en garde indique la présence d'un danger qui causera ou
pourra causer des blessures mineures ou majeures si elle est ignorée.
AVIS : Un avis met en évidence des informations qui sont
importantes mais sans rapport avec un danger.
Pour réduire le risque de blessures et d'endommagement
de l'appareil :
• Vérifiez l'équipement avant chaque utilisation pour s'assurer qu'il
est propre.
• Vérifiez si les lames ne sont pas cassées, ébréchées ou émoussées
et, s'il y a lieu, remplacez la lame.
• Vérifiez que les caoutchoucs amortisseurs sont en place.
N'UTILISEZ PAS L'APPAREIL SANS LES CAOUTCHOUCS.
• Assurez-vous que la tête de poussée repose complètement sur les
caoutchoucs amortisseurs.
• Sur les modèles de table, les ventouses fixeront solidement
l'appareil sur les surfaces lisses.
• L'équipement fixé au mur doit être solidement monté sur des
poteaux muraux. Utilisez de la visserie de type de de taille adéquats
pour fixer l'équipement au mur.
• Les tiges-guides doivent être lubrifiées avec un film d'huile minérale,
du Petro Gel ou un lubrifiant de qualité alimentaire. N'UTILISEZ PAS
D'HUILE DE CUISSON CAR ELLE COLLERA ET RISQUE
D'ENDOMMAGER À TOUT JAMAIS LES ROULEMENTS DE LA TÊTE
DE POUSSÉE.
Manuel d'utilisation
™
3.5
Num d’art.
modèle de table
15000 15016 Dés de ¼"
15001 15017 Dés de ³⁄₈"
15002 15018 Dés de ½"
15003 15019 4 quartiers
15005 15021 6 quartiers
15006 15022 8 quartiers
15007 15023 10 quartiers
15008 15024 12 quartiers
15009 — 6 sections à évider
15010 15026 8 sections à évider
Installation du modèle à fixation murale
1. Utilisez quatre (4) vis de ¼" de longueur adaptée pour fixer le socle
au mur. Installez les vis dans les poteaux muraux. Si ce n'est pas
possible, utilisez des chevilles et des vis adéquates pour fixer le
socle.
Num d’art.
modèle à fixation murale Description
FONCTION ET OBJET
L'appareil manuel de transformation des aliments InstaCut™ 3.5 est
destiné à trancher, couper en dés, évider et tailler en quartiers les
légumes et fruits mous. Il n'est pas destiné à couper des légumes
racines durs comme les carottes et les pommes de terre douces.
©
2018 The Vollrath Company L.L.C. Num.d’art. 2350022-1 ml 6/28/18
Page 6

FONCTIONS ET COMMANDES
A
B
B
C
F
E
F
Modèle de table
A Tiges-guides. Guident et alignent la tête de poussée sur le jeu de
lames.
B Poignée. Permet d'abaisser et de relever le bloc de tête de
poussée.
C Douilles. Permettent le fonctionnement uniforme et lisse de la tête
de poussée sur les tiges-guides.
D Tête de poussée. Comporte les douilles, la tête de poussée et le
bloc de tête de poussée.
E Caoutchoucs amortisseurs. Amortissent l'arrêt de la tête de
poussée.
D
G
H
I
J
C
F
A
E
F
Modèle à fixation
F Vis à oreilles. Permet de fixer le bloc de la tête de poussée ou la lame.
G Bloc de tête de poussée. Pousse le produit alimentaire à travers le jeu de
lames. Taille spécialement conçue pour correspondre au jeu de lames.
H Jeu de lames. Contient les lames. Taille spécialement conçue pour
correspondre au bloc de tête de poussée.
I Socle. Contient les tiges-guides et le jeu de lames.
J Goupille d'arrêt. Fixe la tête de poussée dans la poignée.
D
G
E
H
I
AVANT LA PREMIÈRE UTILISATION
Nettoyez l'appareil. Suivez la section « Nettoyage » de ce manuel.
MODE D'EMPLOI
AVERTISSEMENT
Danger - Lames coupantes
Les lames sont affûtées et peuvent causer des coupures. Pour
éviter les blessures causées par les lames coupantes,
manipulez avec prudence.
\
1. Assurez-vous que l'appareil est propre et que les lames en bon état
et les caoutchoucs en place. Si vous constatez des lames desserrées
ou cassées, l'ensemble des lames devra être remplacé.
2. Vérifiez que les caoutchoucs sont en place sur les tiges-guides.
N'UTILISEZ PAS L'APPAREIL SANS LES CAOUTCHOUCS.
3. Placez l'appareil sur un plan de travail propre et plat.
4. Vérifiez si l'alignement des lames est correct en posant doucement
la tête de poussée sur le jeu de lames. Ils devraient glisser l'un sur
l'autre sans à-coup. En cas d'obstructions, assurez-vous qu'ils
concordent. Enlevez l'obstruction.
5. Assurez-vous que le jeu de lames et le bloc de poussée sont de la
taille souhaitée.
6. Préparez le produit alimentaire à traiter. La taille maximum de
produit alimentaire est de 3½" (8,9 cm) de diamètre.
7. Soulevez la poignée et placez le produit alimentaire sur le jeu de
lames le côté plat en bas.
8. Enlevez la main de la zone du jeu de lames et placez-la sur le pied du
socle (modèle de table) ou sur le mur (modèle à fixation murale).
9. En appuyant fort et vite, expulsez de force le produit alimentaire à
travers le jeu de lames.
10.Reprenez jusqu'à ce que vous ayez préparé assez de produit
alimentaire pour vos besoins quotidiens.
11.Nettoyez et lubrifiez l'appareil juste après chaque utilisation. Pour
plus de renseignements, reportez-vous à la section Nettoyage de ce
manuel.
2 Manuel d'utilisation du vide-pomme, découpeuse en tranches et découpeuse en quartiers et en dés InstaCut™3.5
Page 7

NETTOYAGE
AVERTISSEMENT
Danger - Lames coupantes
Les lames sont affûtées et peuvent causer des coupures.
Pour éviter les blessures causées par les lames coupantes,
manipulez avec prudence.
AVIS : Les acides alimentaires émoussent les lames et corrodent
le métal. Nettoyez toujours cet appareil de préparation des
aliments juste après chaque utilisation.
AVIS : Ne passez pas cet appareil au lave-vaisselle avec des
savons, détergents ou autres produits chimiques alcalins
susceptibles de l'abîmer. Lavez uniquement à la main.
AVIS : N'utilisez pas de produits ou nettoyants abrasifs, ni de
tampons récurants pour nettoyer cet appareil sous peine
d'endommager le fini.
Démontage
1. Enlevez la tête de poussée :
Modèles de table. Glissez la tête de poussée en dehors des tigesguides.
Modèles à fixation murale. Enlevez la goupille d'arrêt. Soulevez la
poignée et glissez la tête de poussée en dehors des tiges-guides.
Remettez la goupille d'arrêt dans le trou de la poignée pour éviter de
la perdre.
2. Retirez les deux vis à oreilles et
séparez le bloc de poussée de la tête
de poussée.
3. Relevez les caoutchoucs de 2" (5,0 cm)
environ.
4. Desserrez la vis à oreilles et enlevez
avec précaution le jeu de lames.
Lavage
1. Essuyez, rincez ou pulvérisez minutieusement l'appareil, la tête de
poussée et le jeu de lames d'eau CHAUDE.
2. N'essuyez pas les lames avec un chiffon.
AVIS : Ne passez pas l'éponge sur le tranchant de la lame sous
peine de causer des blessures et d'émousser les lames.
3. Nettoyez le jeu de lames au jet d'eau sous pression à travers les
lames du côté non tranchant. Si nécessaire, utilisez une brosse de
nettoyage à soies nylon pour pousser les particules d'aliment par le
côté non tranchant du jeu de lames.
4. Laissez sécher l'appareil à l'air.
Remontage
1. Installez l'ensemble des lames de coupe dans le socle. Serrez la vis à
oreille pour bien caler l'ensemble des lames contre l'autre côté.
2. Lubrifiez la barre-guide à l'huile minérale ou au Petro Gel.
AVIS : N'utilisez pas d'huile de cuisson, car elle finira par coller
et risque d'abîmer l'équipement à tout jamais.
3. Glissez les caoutchoucs en place.
4. Remontez la tête et le bloc de poussée ensemble.
5. Installez la tête de poussée :
Modèles de table. Remontez la tête de poussée.
Modèles à fixation murale. Enlevez la goupille d'arrêt de son lieu de
stockage sur la poignée. Soulevez la poignée et glissez la tête de
poussée sur les tiges-guides. Remettez la goupille d'arrêt dans le
trou de la poignée et la tête de poussée.
ENTRETIEN PRÉVENTIF
1. Nettoyez l'appareil après chaque utilisation.
2. Utilisez uniquement aux fins indiquées.
3. Remplacez régulièrement les lames - selon l'utilisation.
REMPLACEMENT DU JEU DE LAMES
AVERTISSEMENT
Danger - Lames coupantes
Les lames sont affûtées et peuvent causer des coupures.
Pour éviter les blessures causées par les lames coupantes,
manipulez avec prudence.
Lavez les lames neuves à l'eau savonneuse chaude et rincez
minutieusement pour enlever le film d'huile de protection. Gardez le
bord tranchant à l'écart lors de la manipulation des lames.
1. Familiarisez-vous avez le diagramme des pièces de votre appareil.
2. Enlevez la tête de poussée :
Modèles de table. Glissez la tête de poussée en dehors des
tiges-guides.
Modèles à fixation murale. Enlevez la goupille d'arrêt. Soulevez la
poignée et glissez la tête de poussée hors des tiges-guides.
Remettez la goupille dans le trou de la poignée pour éviter de la
perdre.
3. Relevez les caoutchoucs de 2" (5,0 cm) environ.
4. Desserrez la vis à oreilles et enlevez avec précaution le jeu de lames.
Enlevez le jeu de lames de coupe en poussant vers le haut en bas du
porte-lame, où se trouve la vis à oreilles. Jetez le jeu de lames usagé.
5. Installez le jeu de lames de coupe neuf en insérant l'onglet du portelame dans la rainure du socle, avant d'abaisser le porte-lame en
position calée et affleurante dans le socle. Serrez la vis à oreilles.
6. Glissez les caoutchoucs en bas des tiges-guides jusqu'à ce qu'ils
touchent le socle. Placez la tête de poussée sur les tiges-guides,
abaissez lentement la tête de poussée et vérifiez l'alignement du bloc
de tête de poussée sur le jeu de lames.
7. Lubrifiez les tiges-guides à l'huile minérale ou au Petro Gel après
chaque utilisation. N'utilisez pas d'huile de cuisson, car elle finira
par coller et risque d'abîmer l'équipement à tout jamais.
Manuel d'utilisation du vide-pomme, découpeuse en tranches et découpeuse en quartiers et en dés InstaCut™3.5 3
Page 8

DÉPANNAGE
Si l'appareil ne coupe plus le fruit ou légume de manière nette ou sans l'endommager, les lames sont peut-être émoussées et doivent être
remplacées. Les lames cassées, tordues ou ébréchées doivent être remplacées.
Problème Cause possible Mesure corrective
Lame cassée Les lames sont émoussées.
La tête de poussée ne glisse
pas facilement.
Tiges-guides mal ou insuffisamment
lubrifiées.
Coupe mal. Les lames sont émoussées. Remplacez l'ensemble des lames.
Impossible de pousser les
aliments au travers.
Les lames sont mal alignées ou un bloc
de poussé incorrect est installé.
Remplacez le jeu de lames. Inspectez aussi le bloc de poussée.
Remplacez-le s'il est endommagé.
Nettoyez et lubrifiez les tiges-guides. Voir Nettoyage.
Confirmez que le bloc de poussée est correct pour l'ensemble des lames
et qu'il n'y a pas d'interférences entre le bloc de poussée et l'ensemble
des lames.
SAV ET RÉPARATIONS
Des pièces détachées sont disponibles sur Vollrath.com.
Pour éviter toute blessure grave ou tout dommage sévère, n’essayez jamais de réparer l'appareil ou de remplacer vous-même un cordon
d’alimentation endommagé. N’envoyez aucun appareil directement à la Vollrath Company LLC. Pour des instructions, contactez les services
techniques de Vollrath.
Lorsque vous contacterez les services techniques de Vollrath, tenez-vous prêt à fournir le numéro d'article, le numéro de modèle (s'il y a lieu), le
numéro de série et le justificatif d’achat indiquant la date d’achat de l’appareil.
GARANTIE DE THE VOLLRATH CO. L.L.C.
Cette garantie ne s'applique pas aux produits achetés pour un usage personnel, familial ou ménager, et The Vollrath Company LLC ne propose
aucune garantie écrite aux acheteurs pour de telles utilisations.
The Vollrath Company L.L.C. garantit que les produits qu'elle fabrique et distribue seront dépourvus de vices de matériaux et de malfaçons, comme
indiqué dans notre déclaration complète de garantie. Dans tous les cas, la garantie entre en vigueur à la date d'achat par l'utilisateur initial indiquée
sur le reçu. Tous les dommages subis lors d’une utilisation impropre ou abusive, ou résultant d’une modification ou d'un emballage inadapté lors
d’un renvoi du produit pour une réparation sous garantie ne seront pas couverts par la garantie.
Pour des informations complètes sur la garantie, l'enregistrement des produits et l'annonce de nouveaux produits, consultez www.vollrath.com.
The Vollrath Company, L.L.C. Headquarters
1236 North 18th Street
Sheboygan, Wisconsin
53081-3201 USA
Main Tel: 800-624-2051 or 920-457-4851
Main Fax: 800-752-5620 or 920-459-6573
Canada Customer Service: 800-695-8560
Tech Services: techservicereps@vollrathco.com
www.vollrath.com
Pujadas
Ctra. de Castanyet,
132 P.O. Box 121
17430 Santa Coloma de Farners
(Girona) – Spain
Tel. +34 972 84 32 01
info@pujadas.es
©
2018 The Vollrath Company L.L.C. Num.d’art. 2350022-1 ml 6/28/18
Vollrath of China
Vollrath Shanghai Trading
Limited
Room 201, Building A
Xin Yi Plaza
1618 Yi Shan Road
Shanghai, 201103
China, P.R.C.
Tel: +86-21-5058-9580
Vollrath de Mexico S. de R.L. de C.V.
Periferico Sur No. 7980 Edificio 4-E
Col. Santa Maria Tequepexpan
45600 Tlaquepaque, Jalisco |
Mexico
Tel: (52) 333-133-6767
Tel: (52) 333-133-6769
Fax: (52) 333-133-6768
Page 9

Manual para operadores
Rebanador, cortador en cubos, segmentador y descarozador
Gracias por comprar este equipo Vollrath. Antes de usar el equipo,
lea y familiarícese con las siguientes instrucciones de operación y
seguridad. CONSERVE ESTAS INSTRUCCIONES COMO REFERENCIA
PARA EL FUTURO. Conserve la caja y embalado originales. Deberá
utilizarlos para devolver el equipo en caso de que requiera
reparaciones.
PRECAUCIONES DE SEGURIDAD
Para garantizar una operación segura, lea las siguientes afirmaciones y
comprenda su significado. Este manual contiene precauciones de
seguridad que se explican a continuación. Léalas atentamente.
ADVERTENCIA
Advertencia se usa para indicar la presencia de un peligro que
provocará o puede provocar lesiones graves o letales.
PRECAUCIÓN
Precaución se usa para indicar la presencia de un peligro que provocará
o puede provocar lesiones leves o importantes si se ignora el aviso.
AVISO: Aviso se usa para señalar información importante no
relacionada con peligros.
Para disminuir el riesgo de lesiones personales o daños
al equipo:
• Revise el equipo antes de cada uso para asegurarse de que esté
limpio.
• Revise si hay hojas rotas, melladas o desafiladas, y si es así,
reemplace el conjunto de hojas.
• Verifique que los topes de goma estén en su lugar. NO USE EL
EQUIPO SI LOS TOPES NO ESTÁN EN SU LUGAR.
• Verifique que el cabezal de empuje esté completamente asentado en
los topes de goma.
• En los modelos de sobremesa las ventosas sujetan el equipo
firmemente en superficies lisas.
• El equipo de pared debe montarse firmemente en soportes murales.
Use herrajes de tamaño y tipo correctos para montar el equipo en la
pared.
• Las varillas guía deben lubricarse usando una capa delgada de aceite
mineral, Petrol Gel o lubricante apto para alimentos. NO USE ACEITE
DE COCINA YA QUE SE TORNARÁ PEGAJOSO Y PUEDE DAÑAR
PERMANENTEMENTE LOS COJINETES DEL CABEZAL DE EMPUJE.
InstaCut
Núm. art.
Sobremesa
15000 15016 Cubo de ¼"
15001 15017 Cubo de ³⁄₈"
15002 15018 Cubo de ½"
15003 15019 Segmento de 4 secciones
15005 15021 Segmento de 6 secciones
15006 15022 Segmento de 8 secciones
15007 15023 Segmento de 10 secciones
15008 15024 Segmento de 12 secciones
15009 — Descarozador de 6 secciones
15010 15026 Descarozador de 8 secciones
Instalación del modelo de pared
1. Use cuatro (4) tornillos de ¼” de largo adecuado para afianzar la
base a la pared. Instale los tornillos en los soportes. Si no es
posible, use anclajes y tornillos apropiados para afianzar la base.
Núm. art.
De pared Descripción
3.5
™
FUNCIÓN Y PROPÓSITO
El procesador manual de alimentos InstaCut™ 3.5 está diseñado para
rebanar, cortar en cubos, descarozar y segmentar verduras y frutas
blandas. No está diseñado para cortar tubérculos duros como
zanahorias y batatas.
Inscriba su producto en Vollrath.com/registration y participe para ganar una sartén de 10" (25,4 cm) Tribute©de Vollrath.
©
2018 The Vollrath Company L.L.C. Núm. art. 2350022-1 ml 6/28/18
Page 10

CARACTERÍSTICAS Y CONTROLES
A
B
B
C
F
E
F
Modelo de sobremesa
A Varillas guía. Guían y alinean el cabezal de empuje sobre el juego
de hojas.
B Mango. Se usa para bajar y subir el bloque del cabezal de empuje. G Bloque del cabezal de empuje. Empuja el alimento a través del conjunto
C Bujes. Se usan para que el cabezal de empuje opere en forma
suave y uniforme sobre las varillas guía.
D Conjunto del cabezal de empuje. Está compuesto por los bujes,
el cabezal de empuje y el bloque de empuje.
E Topes. Amortiguan la parada del cabezal de empuje. J Bulón. Afianza el cabezal de empuje al mango.
D
G
H
I
F Tornillo de mano. Se usa para afianzar el bloque del cabezal de empuje o
el conjunto de hojas.
de hojas. Dimensionado específicamente para coincidir con el conjunto de
hojas correspondiente.
H Conjunto de hojas. Alberga las hojas. Dimensionado específicamente para
coincidir con el bloque del cabezal de empuje correspondiente.
I Conjunto de la base. Sostiene las varillas guía y el conjunto de hojas.
J
C
F
A
E
F
Modelo de pared
D
G
E
H
I
ANTES DEL PRIMER USO
Limpie el equipo. Consulte la sección Limpieza de este manual.
OPERACIÓN
ADVERTENCIA
Peligro con hojas filosas
Las hojas son filosas y pueden causar cortes. Manipule el
equipo con cuidado para evitar lesiones con las hojas filosas.
\
1. Verifique que el equipo esté limpio y que las hojas estén en buen
estado y los topes estén en su lugar. Si hay hojas sueltas o rotas,
reemplace el conjunto de hojas.
2. Verifique que los topes estén en su lugar sobre las varillas guía.
NO USE EL EQUIPO SI LOS TOPES NO ESTÁN EN SU LUGAR.
3. Coloque el equipo en una superficie de trabajo limpia y plana.
4. Verifique el alineamiento correcto de las hojas fijando lentamente el
cabezal de empuje sobre el conjunto de hojas. Deben deslizarse
juntas sin obstrucciones. Si hay obstrucciones, verifique que ambas
piezas efectivamente sean del mismo conjunto. Elimine la
obstrucción.
5. Verifique que el conjunto de hojas y el bloque de empuje sean del
tamaño deseado.
6. Prepare el alimento que va a procesar. El tamaño máximo del
alimento debe ser de 3½" (8,9 cm) de diámetro.
7. Suba el mango y coloque el alimento en el conjunto de hojas con el
lado plano hacia abajo.
8. Quite la mano del conjunto de hojas y colóquela en la pata de la base
en el equipo de sobremesa, o en el muro para los modelos de pared.
9. Fuerce el alimento a través del conjunto de hojas empujando el
mango hacia abajo en forma rápida y firme.
10.Repita este proceso hasta que haya preparado suficiente comida
según sus necesidades diarias.
11.Limpie y lubrique inmediatamente el equipo tras usarlo. En la
sección Limpieza de este manual encontrará más información.
2 Manual para operadores del rebanador, cortador en cubos, segmentador y descarozador InstaCut™3.5
Page 11

LIMPIEZA
ADVERTENCIA
Peligro con hojas filosas
Las hojas son filosas y pueden causar cortes. Manipule el
equipo con cuidado para evitar lesiones con las hojas filosas.
AVISO: Los ácidos de los alimentos desafilan las hojas y corroen
el metal. Siempre limpie este equipo de preparación de
alimentos inmediatamente tras usarlo.
AVISO: No coloque este equipo en un lavavajillas ni máquina para
lavar platos con jabones, detergentes ni productos
químicos alcalinos que puedan dañarlo. Lávelo a mano
solamente.
AVISO: No emplee materiales abrasivos, limpiadores que rayen ni
esponjas metálicas para limpiarlo, ya que pueden dañar el
acabado.
Montaje
1. Instale el conjunto de hojas de corte en la base. Apriete el tornillo de
mano para empujar el conjunto de hojas firmemente contra el otro
lado.
2. Lubrique la barra guía con aceite mineral o Petrol-Gel.
AVISO: No use aceite de cocina ya que se tornará pegajoso y
puede dañar permanentemente el equipo.
3. Deslice los topes a su posición.
4. Vuelva a montar el cabezal de empuje y el bloque de empuje juntos.
5. Instale el conjunto del cabezal de empuje:
Modelos de sobremesa. Vuelva a montar el conjunto del cabezal de
empuje.
Modelos de pared. Retire el bulón de su ubicación de
almacenamiento en el conjunto del mango. Levante el mango y
deslice el cabezal de empuje por las varillas guía. Vuelva a colocar el
bulón en el orificio a través del conjunto del mango y del cabezal de
empuje.
MANTENIMIENTO PREVENTIVO
Desmontaje
1. Retire el conjunto del cabezal de empuje:
Modelos de sobremesa. Deslice el cabezal de empuje hacia afuera
para retirarlo de las varillas guía.
Modelos de pared. Retire el bulón. Levante el mango y deslice el
cabezal de empuje hacia afuera para retirarlo de las varillas guía.
Vuelva a colocar el bulón en el orificio del conjunto del mango para
que no se pierda.
2. Retire los dos tornillos de mano y
separe el bloque de empuje del cabezal
de empuje.
3. Suba los topes aproximadamente
2" (5,0 cm).
4. Afloje el tornillo de mano y retire
cuidadosamente el conjunto de hojas.
Lavado
1. Limpie, enjuague o rocíe totalmente el equipo, el cabezal de empuje
y el conjunto de hojas con agua CALIENTE.
2. No limpie las hojas con un paño.
AVISO: El pasar un paño por el borde filoso puede causar
lesiones y desafilar las hojas.
3. Limpie el conjunto de hojas forzando agua a presión por las hojas
desde el lado sin filo. Si es necesario, use un cepillo de limpieza con
cerdas de nylon para eliminar las partículas de alimento de dicho
lado.
4. Deje que el equipo se seque al aire.
1. Limpie el equipo después de usarlo.
2. Utilícelo solo para los propósitos para los cuales está diseñado.
3. Cambie regularmente las hojas – basándose en el uso.
REEMPLACE EL CONJUNTO DE HOJAS
ADVERTENCIA
Peligro con hojas filosas
Las hojas son filosas y pueden causar cortes. Manipule el
equipo con cuidado para evitar lesiones con las hojas filosas.
Lave las hojas nuevas con agua tibia jabonosa y enjuáguelas totalmente
para eliminar la delgada película protectora de aceite. Mantenga el
borde filoso lejos de usted al manipular las hojas.
1. Familiarícese con el diagrama de piezas de su equipo.
2. Retire el conjunto del cabezal de empuje:
Modelos de sobremesa. Deslice el cabezal de empuje hacia afuera
para retirarlo de las varillas guía.
Modelos de pared. Retire el bulón. Levante el mango y deslice el
cabezal de empuje hacia afuera para retirarlo de las varillas guía.
Vuelva a colocar el bulón en el orificio del conjunto del mango para
que no se pierda.
3. Suba los topes aproximadamente 2" (5,0 cm).
4. Afloje el tornillo de mano y retire cuidadosamente el conjunto de
hojas. Retire el conjunto de hojas de corte presionando hacia arriba
la parte inferior del lado del portahojas, donde se encuentra el
tornillo de mano. Deseche el conjunto de hojas antiguo.
5. Instale el nuevo conjunto de hojas introduciendo la lengüeta del
portahojas en la ranura de la base, y luego baje el portahojas al
interior de la posición asentada y a ras en la base. Apriete el tornillo
de mano.
6. Deslice los topes hacia abajo por las varillas guía para que hagan
contacto con el conjunto de la base. Coloque el conjunto del cabezal
de empuje sobre las varillas guía, baje lentamente dicho conjunto, y
revise el alineamiento del bloque del cabezal de empuje con respecto
a las hojas.
7. Lubrique las varillas guía con aceite mineral o Petrol-Gel tras usar el
equipo. No use aceite de cocina ya que se tornará pegajoso y puede
dañar permanentemente el equipo.
Manual para operadores del rebanador, cortador en cubos, segmentador y descarozador InstaCut™3.5 3
Page 12

SOLUCIÓN DE PROBLEMAS
Si el equipo no procesa alimentos de manera pulcra o les causa daños, es posible que las hojas estén desafiladas y deban reemplazarse.
Las hojas rotas, dobladas o melladas deben reemplazarse.
Problema Podría deberse a Curso de acción
Hoja rota Hojas desafiladas.
El cabezal de empuje no se
desliza fácilmente.
Las varillas guías están lubricadas de
manera inadecuada o insuficiente.
Cortes deficientes. Hojas desafiladas. Reemplace el conjunto de hojas.
No se puede empujar el
alimento.
Las hojas están desalineadas o se
instaló un bloque de empuje incorrecto.
Reemplace el conjunto de hojas. Inspeccione también el bloque de
empuje. Reemplácelo si está dañado.
Limpie y lubrique las varillas guía. Consulte la sección Limpieza.
Confirme que el bloque de empuje sea el correcto para el conjunto de
hojas y que no haya interferencia entre el bloque y el conjunto.
SERVICIO Y REPARACIÓN
En Vollrath.com encontrará las piezas que puedan ser reparadas.
Para evitar lesiones o daños materiales graves, no trate de reparar la unidad ni reemplazar un cable eléctrico por su cuenta. No envíe las unidades
directamente a The Vollrath Company LLC. Pida instrucciones a los Servicios de asistencia técnica de Vollrath.
Al comunicarse con los servicios, esté listo para proporcionar el número de artículo, número de modelo (si corresponde), número de serie y el
comprobante de compra que muestre la fecha en que adquirió la unidad.
CLÁUSULA DE GARANTÍA DE THE VOLLRATH CO. L.L.C.
Esta garantía no se aplica a los productos adquiridos para uso personal, familiar ni doméstico, y The Vollrath Company LLC no ofrece una garantía
por escrito a los compradores para dichos usos.
The Vollrath Company LLC garantiza los productos que fabrica o distribuye contra defectos en materiales y fabricación, según se especifica en
nuestra cláusula de garantía completa. En todos los casos, la garantía rige desde la fecha de compra original del usuario final que aparece en el
recibo. La garantía no cubrirá ningún daño que resulte del uso indebido, abuso, modificación o daños causados por el embalado incorrecto durante
la devolución para obtener servicio de reparación dentro del período de vigencia de la garantía.
Para obtener información de garantía, inscripción de productos y anuncios de productos nuevos, visite www.vollrath.com.
The Vollrath Company, L.L.C. Headquarters
1236 North 18th Street
Sheboygan, Wisconsin
53081-3201 USA
Main Tel: 800-624-2051 or 920-457-4851
Main Fax: 800-752-5620 or 920-459-6573
Canada Customer Service: 800-695-8560
Tech Services: techservicereps@vollrathco.com
www.vollrath.com
Pujadas
Ctra. de Castanyet,
132 P.O. Box 121
17430 Santa Coloma de Farners
(Girona) – Spain
Tel. +34 972 84 32 01
info@pujadas.es
©
2018 The Vollrath Company L.L.C. Núm. art. 2350022-1 ml 6/28/18
Vollrath of China
Vollrath Shanghai Trading
Limited
Room 201, Building A
Xin Yi Plaza
1618 Yi Shan Road
Shanghai, 201103
China, P.R.C.
Tel: +86-21-5058-9580
Vollrath de Mexico S. de R.L. de C.V.
Periferico Sur No. 7980 Edificio 4-E
Col. Santa Maria Tequepexpan
45600 Tlaquepaque, Jalisco |
Mexico
Tel: (52) 333-133-6767
Tel: (52) 333-133-6769
Fax: (52) 333-133-6768
 Loading...