

Page 1
1
model VPSP 10 000
Scp_Booster_Quick_Start_And_User_Guide-EN-A00
QUICK START GUIDE
Page 2

2
SmartCrystal™ Booster – Quick Start Guide
This section is independent of the rest of the manual. It is intended for
advanced users who want to install the SmartCrystal Pro™ Booster quickly
without reading all the information in the complete user-manual. For optimal
use of the product, it is recommended to read the manual.
Important recommendations for the installation of the SmartCrystal™ Pro Booster
The distance between the lens of the projector and SmartCrystal Pro™ Booster
polarizer must be at least 8 cm.
Minimum distance of the polarizer
Page 3
3
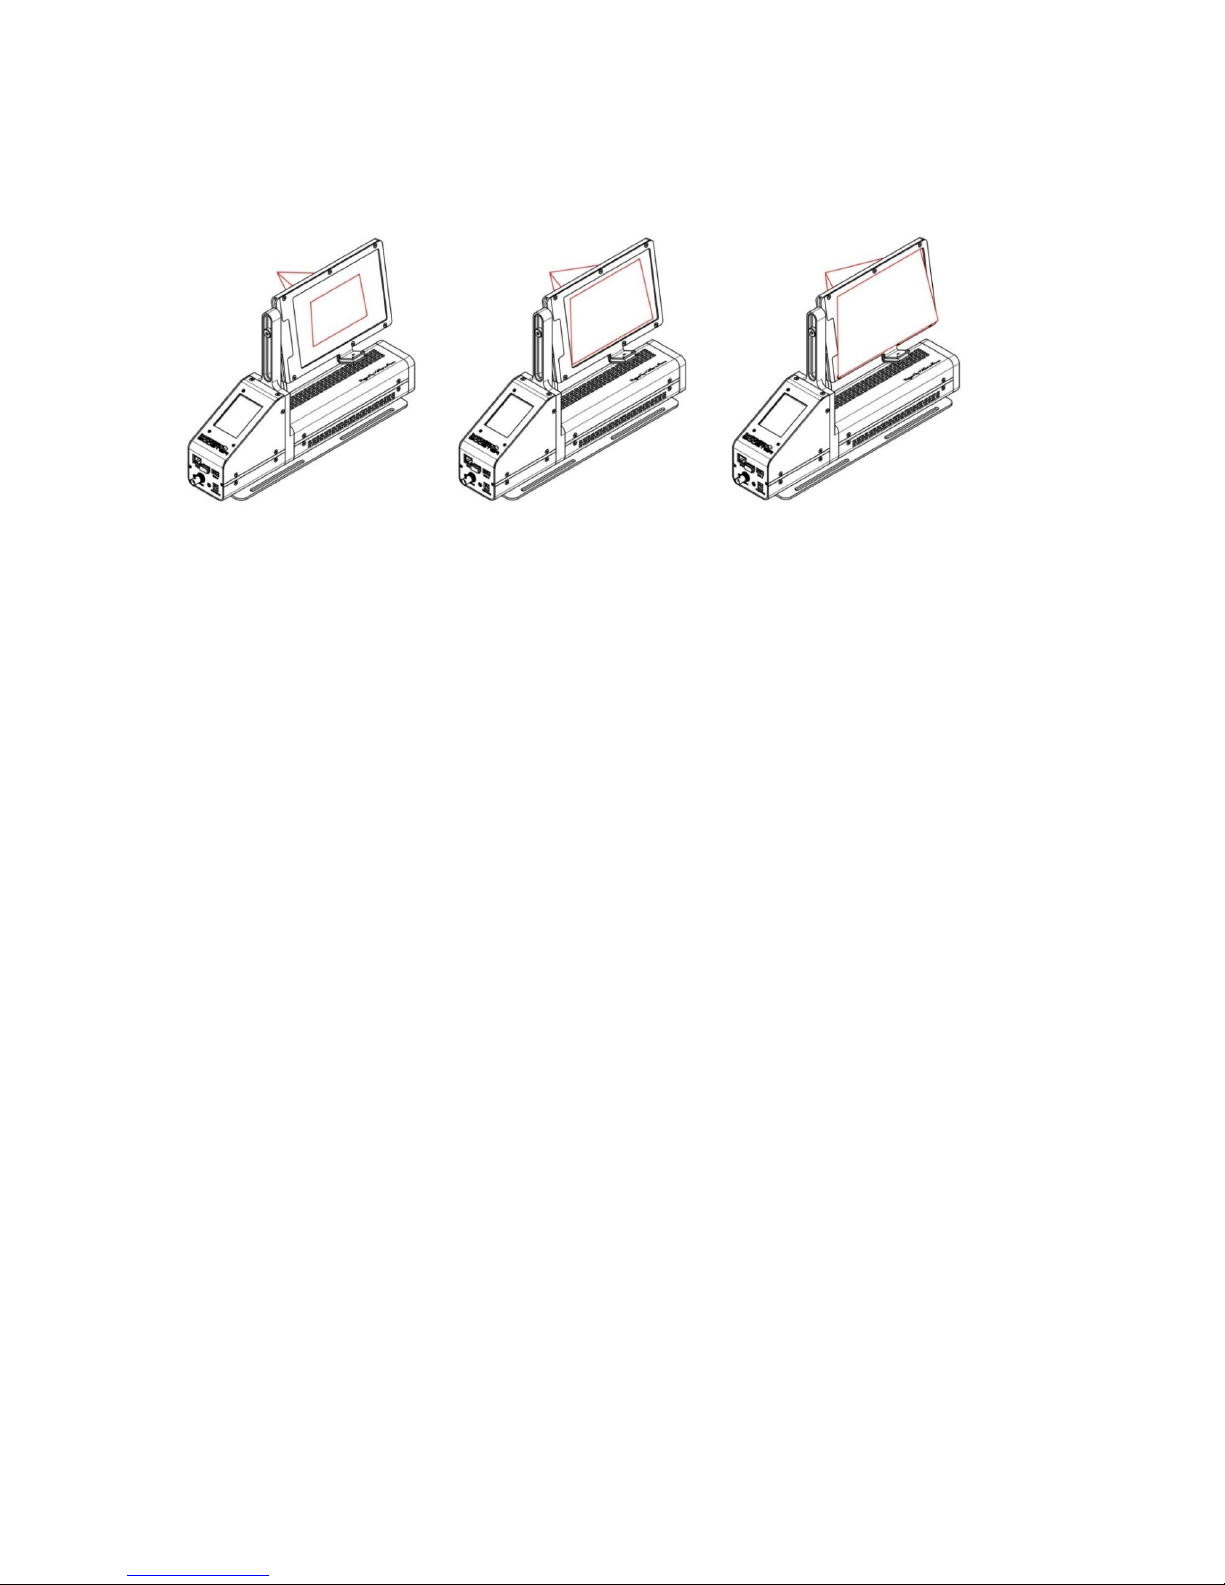
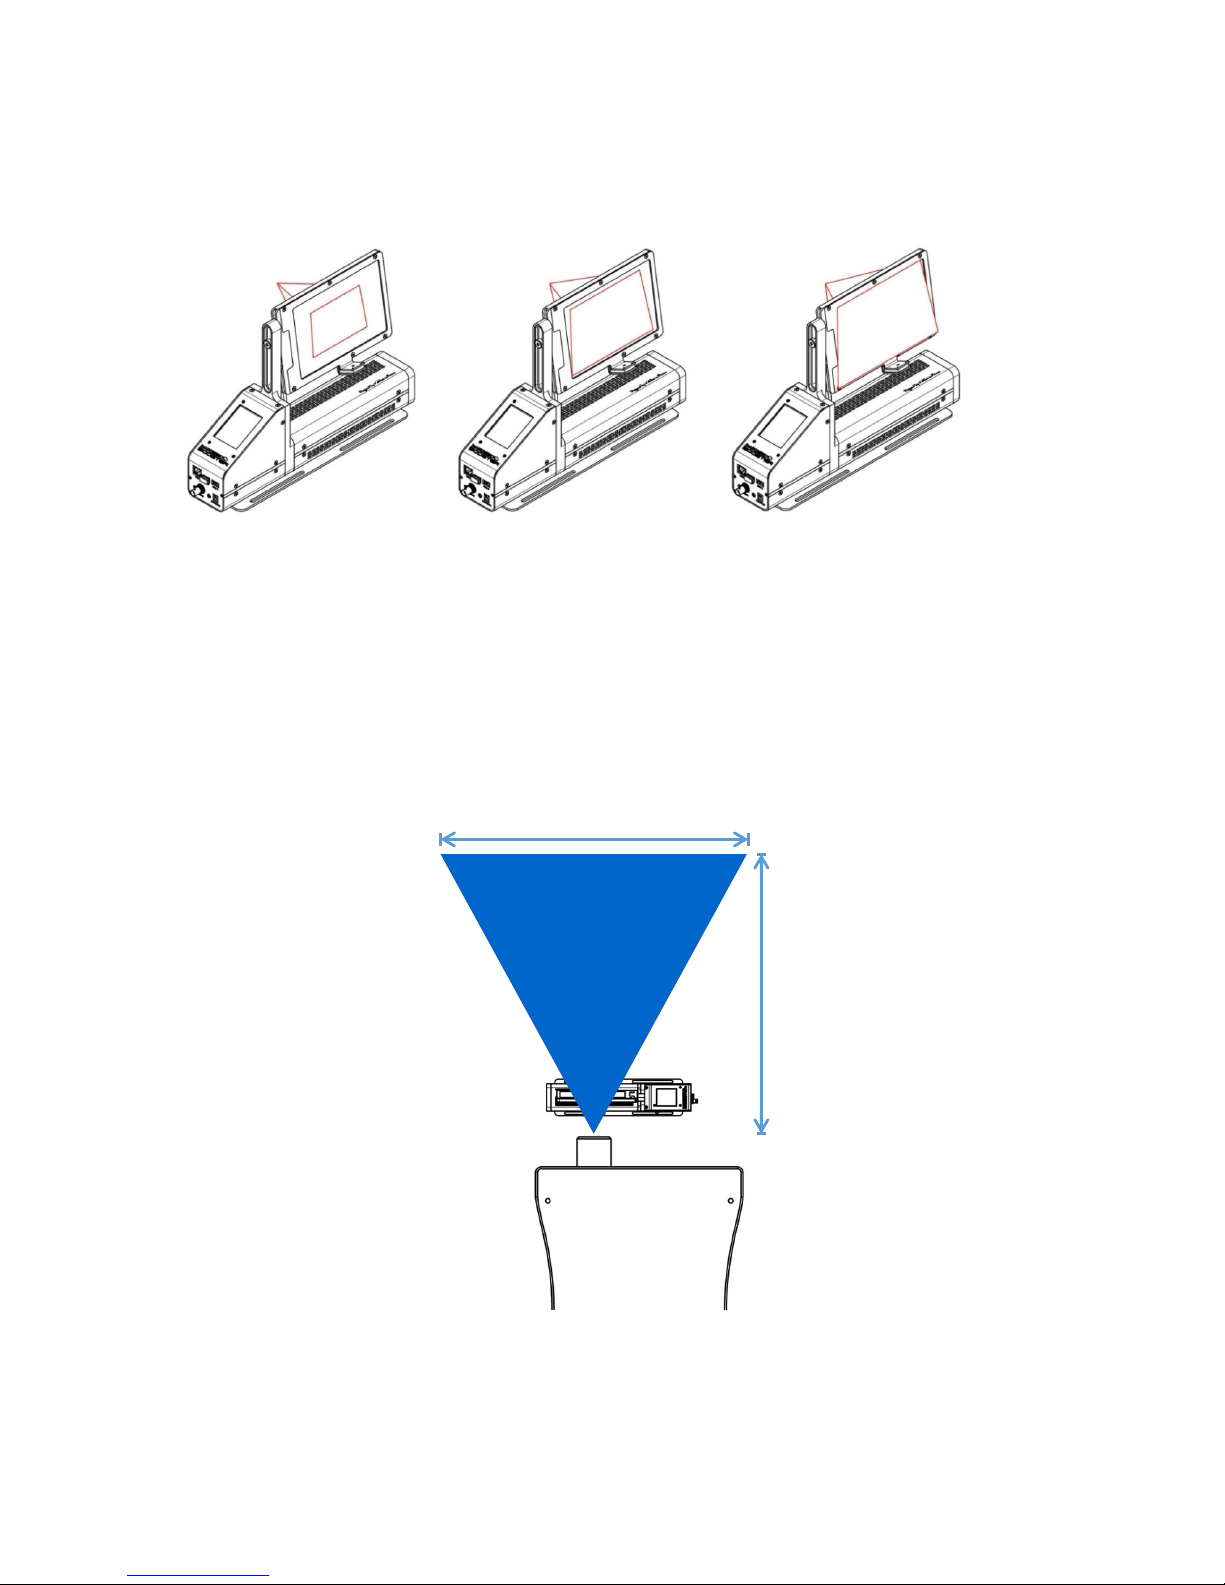
The SmartCrystal Pro™ Booster must be positioned such that light from the projector
that passes through the polarizer fills the largest possible width of the filter. (See figure
below)
The position of the frame is flexible. To raise / lower or tilt the frame, unscrew the
frame fixing screw using the supplied Allen wrench. Move the frame to the desired
position and re-tighten the screws.
Page 4

4
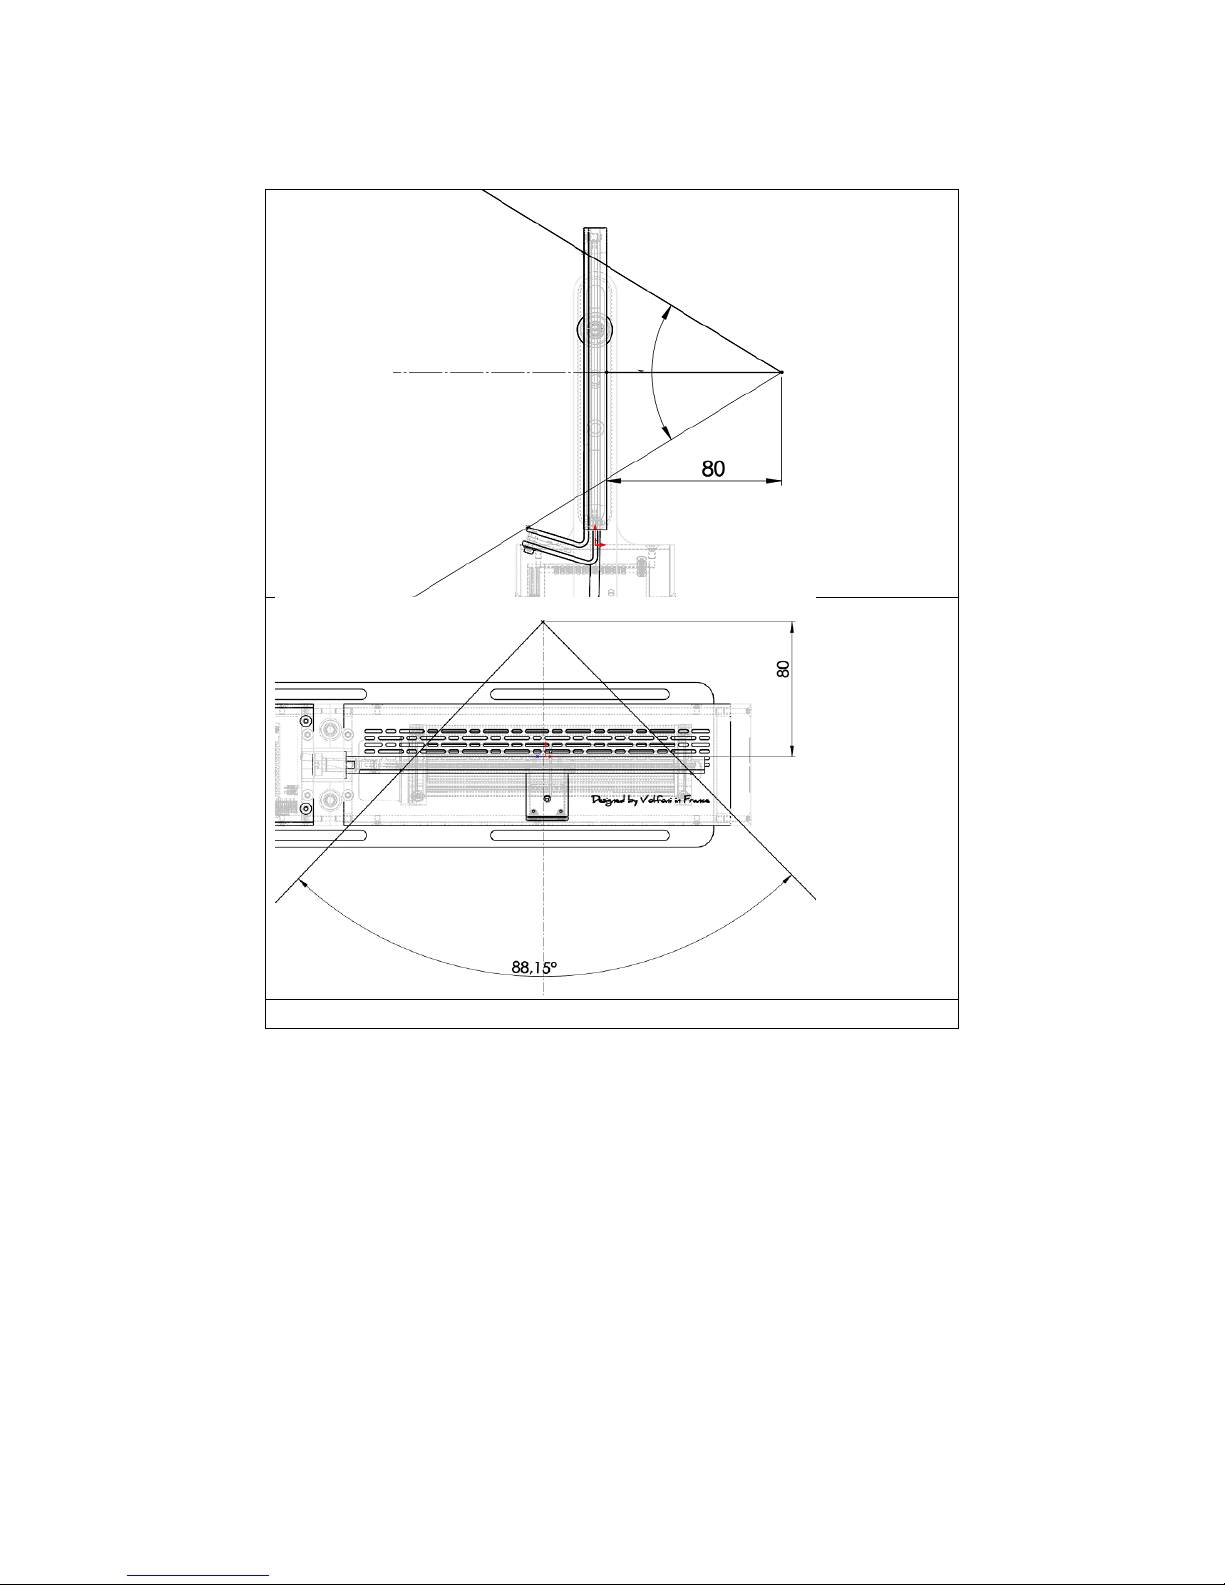
Projection configuration: « Throw Ratio » (TR)
Before making any installation, it is important to ensure that the device is compatible
with the configuration required. The "Throw Ratio" ("Throw Ratio ', TR) must satisfy the
following requirements:
THROW RATIO >= 1,2
40°
Page 5
5
Fixing & Position
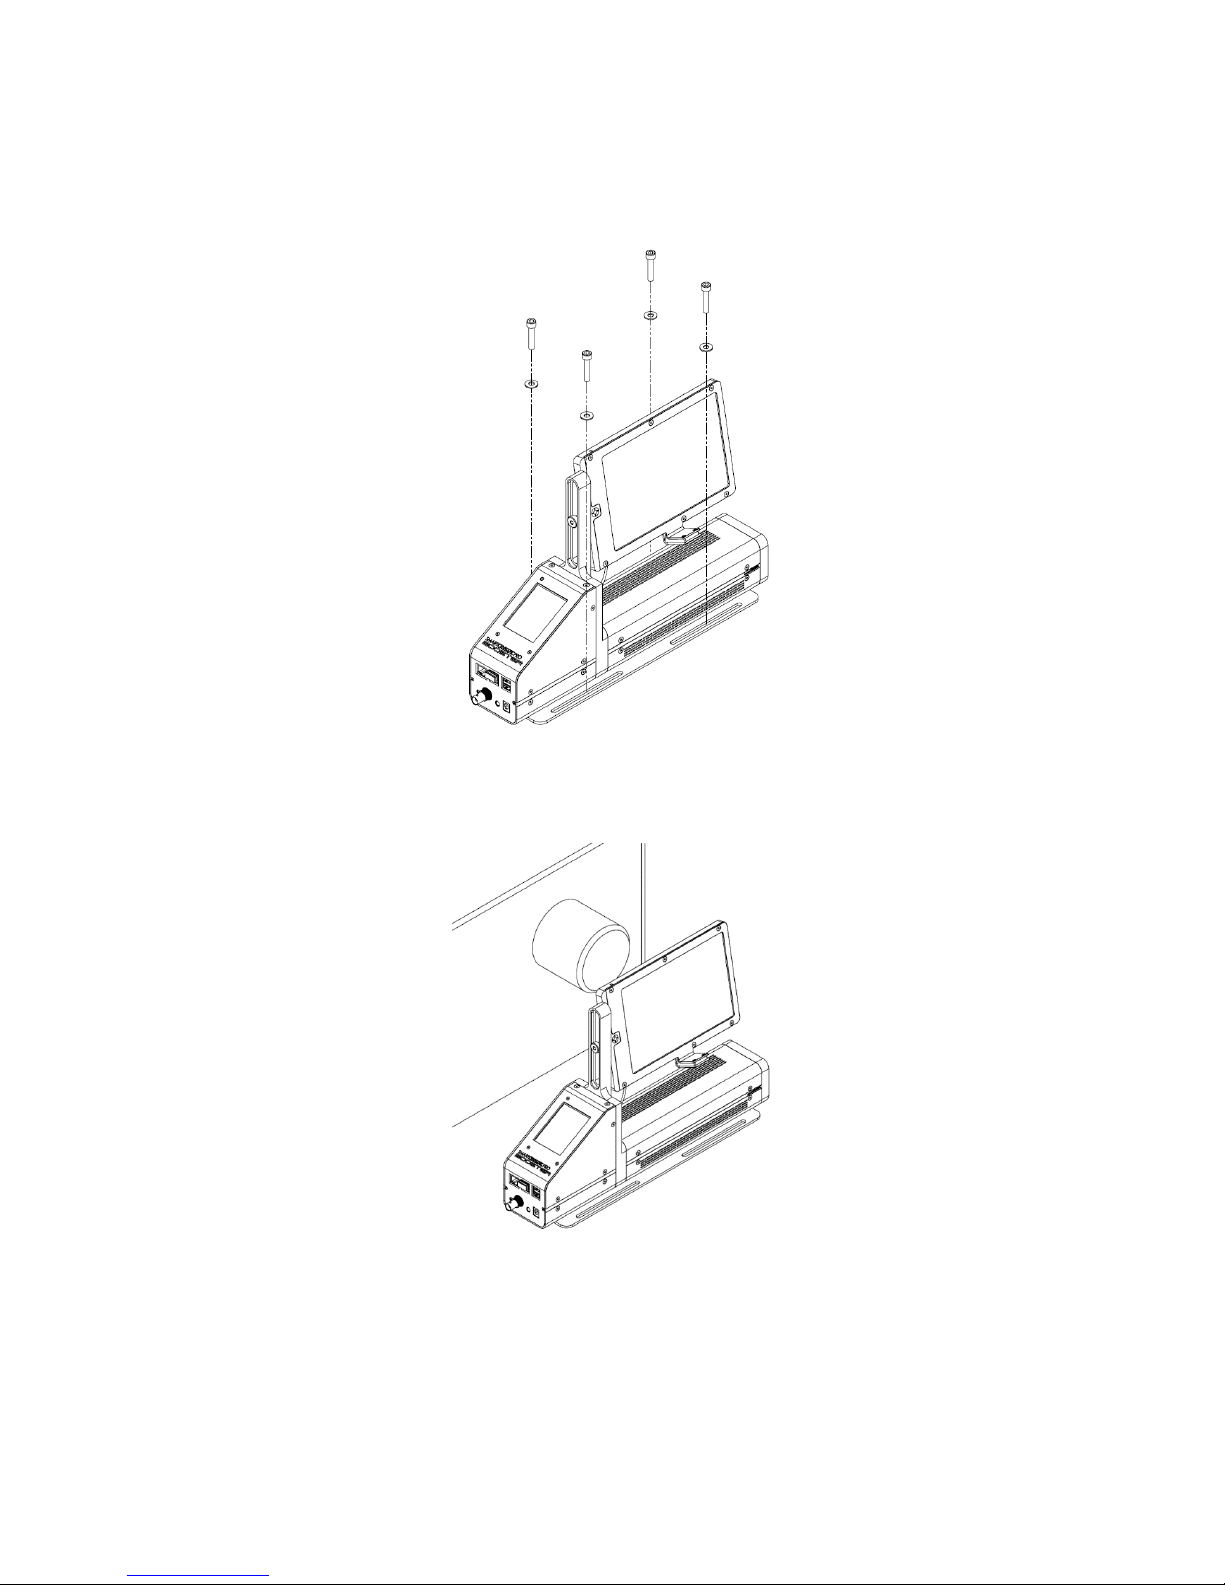
The SmartCrystal™ Pro Booster shall be placed on a stable surface and fixed
with 4 screws.
The SmartCrystal ™ Pro Booster should be placed in front of the projector lens.
There is a "Projector Side" label printed on the product that will indicate the
correct direction.
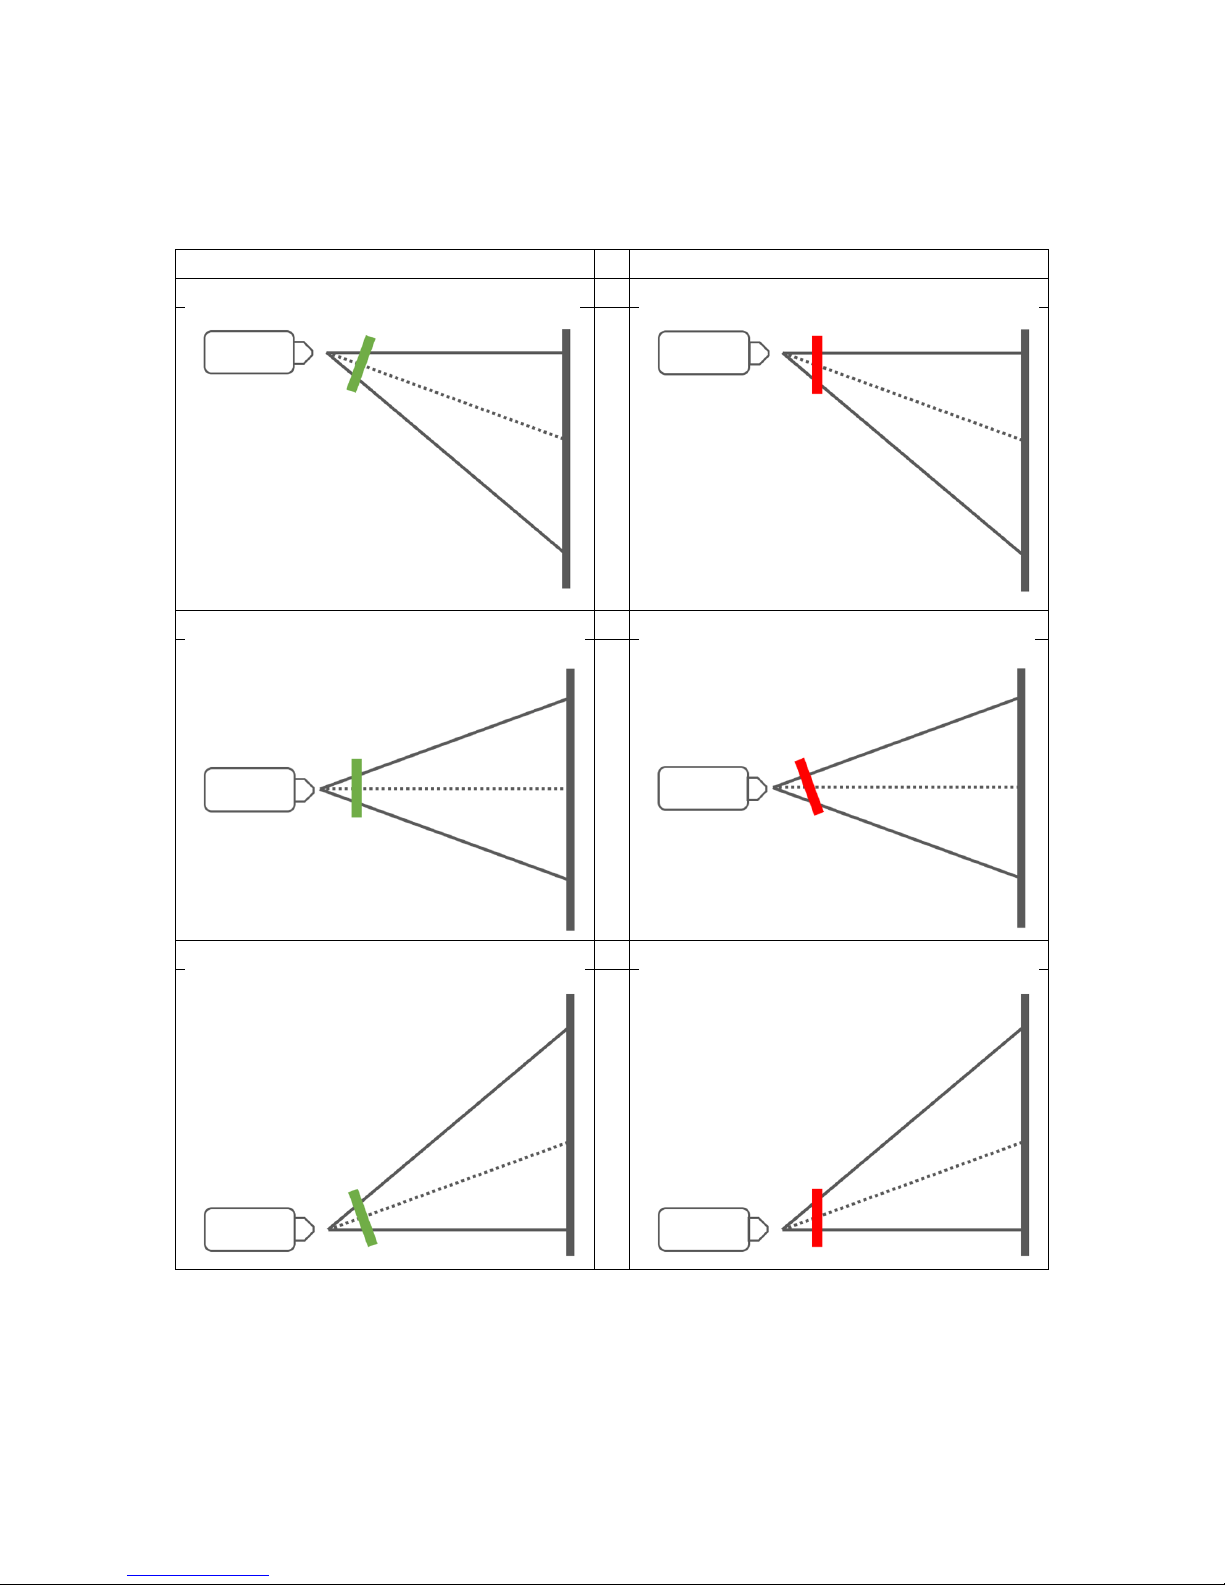
The polarizer of the window should be approximately perpendicular to the
axis of the luminous flux.
It is possible to fix the SmartCrystal Pro™ Booster to the ceiling. In this case it is
necessary to reverse the direction of the frame on its support (see "7.4
Installing in Ceiling" section).
Connections
Once started, no cable should be connected or disconnected from SmartCrystal Pro
™ Booster.
Before making any changes of the wiring configuration, it is essential to wait for a
complete shutdown of the SmartCrystal Pro ™ Booster using the ON / OFF button and
checking the LCD.
The first SmartCrystal Booster Pro ™ are delivered with a WiFi dongle connected to
one of its USB ports. The new devices have this WiFi dongle directly integrated in the
electronic board.
For the proper functioning of the product, it is essential to never disconnect the WiFi
dongle.
Connect the sync cable (BNC-BNC, BNC-3 pin MiniDIN) between the 3D sync
output on the projector and the 3D Sync Connector on the SmartCrystal™ Pro
Booster.
Plug-in the power cable and the Ethernet cable if necessary to SmartCrystal™
Pro Booster.
Turn the switch to ON.
Starting
After switching on the product an initialization phase of SmartCrystal™ Pro
Booster will commence which may last a few seconds. Thereafter, the system
will recognize the 3D synchronization and start operation automatically. The
SmartCrystal Pro ™ Booster settings can be optimized directly on the touch
screen. By briefly pressing one of the parameters, it is possible to access the
setup window for the given parameter.
Page 6

6
The software interface is also accessible from a remote computer via an
Ethernet connection and/or a smartphone connected via WIFI to the
SmartCrystal™ Pro Booster (see "9. USER INTERFACE").
Enjoy your brilliant 3D image!
Come visit
www.volfoni.com
Page 7
7
model VPSP 10 000
Scp_Booster_Quick_Start_And_User_Guide-EN-A00
USER GUIDE
Page 8

8
SUMMARY
1. PRODUCT OVERVIEW .......................................................................................................................... 9
2. REQUIREMENTS ..................................................................................................................................... 9
2.1. Silver Screen ................................................................................................................................. 9
2.2. Projector ........................................................................................................................................ 9
2.3. 3D Glasses..................................................................................................................................... 9
2.4. 3D Source and 3D Content ..................................................................................................... 10
3. MAIN CHARACTERISTICS OF SMARTCRYSTAL™ PRO BOOSTER ................................................. 10
4. SPECIFICATIONS ................................................................................................................................. 11
5. PACKAGE CONTENT OF THE SMARTCRYSTAL™ PRO BOOSTER ................................................. 12
6. PRESENTATIONS AND CONNECTORS FOR SMARTCRYSTAL™ PRO BOOSTER .......................... 13
7. INSTALLATION ...................................................................................................................................... 14
7.1. Important recommendations ................................................................................................. 14
7.2. Projector Settings....................................................................................................................... 16
7.3. Fixing & Position ......................................................................................................................... 17
7.4. Positioning of the SmartCrystal™ Pro Booster ...................................................................... 18
7.5. Ceiling mounting ....................................................................................................................... 19
8. USE THE SMARTCRYSTAL™ PRO BOOSTER ...................................................................................... 21
8.1. Connections ............................................................................................................................... 21
8.2. Start-up ........................................................................................................................................ 22
9. USER INTERFACE ................................................................................................................................. 24
9.1. Ethernet connection ................................................................................................................ 24
9.2. WIFI connection ........................................................................................................................ 24
9.3. User interface via remote PC / Smartphone ....................................................................... 25
10. LED SIGNIFICATION ........................................................................................................................ 27
11. SOFTWARE UPDATES ...................................................................................................................... 28
12. TROUBLESHOOTING ....................................................................................................................... 29
13. IMPORTANT SAFETY RECOMMENDATIONS ................................................................................ 30
14. SAFE USAGE .................................................................................................................................... 31
15. MAINTENANCE OF YOUR POLARIZATION MODULATOR ......................................................... 31
16. WARRANTIES AND COMPLIANCE ............................................................................................... 31
17. REGULATORY COMPLIANCE STATEMENTS ................................................................................. 31
18. CONTACTS ...................................................................................................................................... 33
Page 9

9
1. PRODUCT OVERVIEW
The SmartCrystal™ Pro Booster is another innovation in passive 3D technology by
Volfoni. It is a polarization modulator that is placed directly in front of the lens of a 3D
projector so as to generate 3D stereoscopic images on a compatible 3D screen
when using ultra-light passive glasses. The SmartCrystal™ Pro Booster is suitable for
professionals and the general public. It represents the ideal solution for 3D
presentations, shows, conferences, lectures, as well as for simulations and highquality visualizations.
The new polarizing technology « PiCell », allows rapid set up and optimal optical
performance, together with a clear and bright 3D image.
The SmartCrystal™ Pro Booster can be connected directly to any type of 3D input
and is compatible for projectors with power up to 32,000 lumens.
2. REQUIREMENTS
Your polarization modulator SmartCrystal™ Pro Booster, is part of a chain for the
projection of 3D content. It is necessary to also have a 3D source (3D Player), 3D
projector (3D Ready ™), 3D content, a silver screen and passive glasses with circular
polarization.
2.1. Silver Screen
In order to view a 3D image of the highest quality, a polarization preserving silver
screen specifically designed for 3D projection is required. If your screen is not
designed for 3D, you may experience an uncomfortable and blurry 3D image
possessing a high level of ghosting (crosstalk).
2.2. Projector
Most projectors are compatible with the SmartCrystal™ Pro Booster.
DLP projectors (Digital Light Processor) are particularly suitable for 3D projections
together with SmartCrystal™ Pro Booster. The projection technologies "LCD™" (Liquid
Crystal Display) and "LCoS™" (Liquid Crystal on Silicon) such as JVC's D-ILA™ and
Sony's SXRD™ generate pre-polarized light that may not be compatible with the
active polarization performed by the SmartCrystal™ Pro Booster. However, the
SmartCrystal™ Pro Booster may be adapted to JVC's D-ILA™, under certain
conditions. Please check with your dealer.
If your 3D projector is not compatible with the SmartCrystal™ Pro Booster, we
recommend using a classic white screen together with active shutter glasses, for
example EDGE™ RF from Volfoni. For more information on these products, please visit
our website: www.volfoni.com.
2.3. 3D Glasses
The SmartCrystal™ Pro Booster is compatible with all passive 3D glasses possessing
circular polarization. Discover our passive glasses on www.volfoni.com.
Page 10

10
2.4. 3D Source and 3D Content
For a 3D projection, it is necessary to have a media-player in order to stream 3D
stereoscopic images and 3D content (for example from a 3D BluRay™ or 3D
computer).
3. MAIN CHARACTERISTICS OF SMARTCRYSTAL™ PRO BOOSTER
QUALITY
New technology « PiCell »
Bright and crisp images (LEF 15,5 %)
Works with an image frequency up to 400Hz
Downloadable software for optimal performance
EFFICIENCY
Quick installation with all types of 3D projectors (only one projector required)
Connecting to a computer using an Ethernet cable or WIFI
Monitoring the polarizer’s temperature
Automatic adjustment of the fan speed according to the polarizer’s
temperature
Management of alerts in case of problems
Parameter logging for troubleshooting (frequency, temperature, polarity, etc)
Conforms with CE, FCC, PSE
COMFORT
Graphic display
Ceiling mounting
Ghosting less than 1.4%
Used together with ultra-light 3D polarized glasses
Compatible with Volfoni’s Premium passive 3D glasses (ref VPPG-01000) and
many others
Important: Do not use the 3D glasses as sunglasses.
Page 11
11
4. SPECIFICATIONS
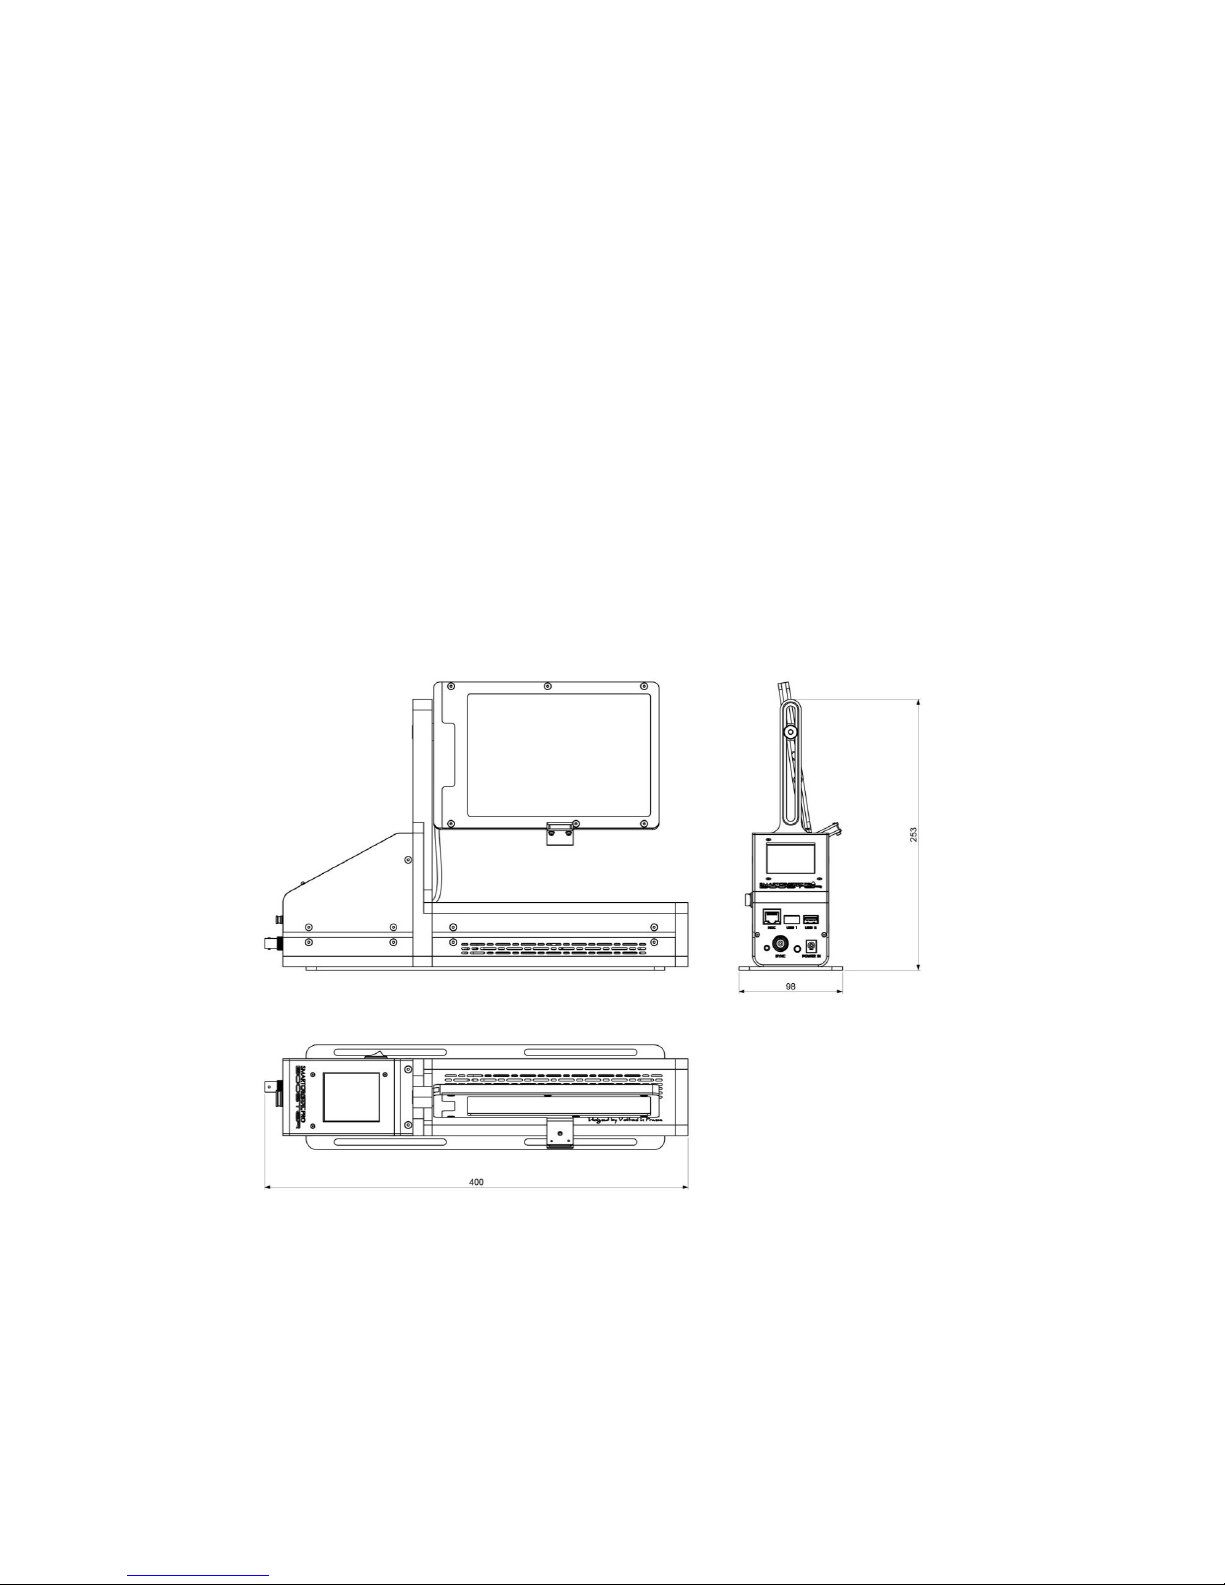
Window size : 171 x 116 mm
Maximum projector power : 32,000 lumens
Power supply : 110 / 240V - 50 / 60Hz
Power consumption : 15W
Maximum power of the projector lamp : 7kW
Maximum switching speed : 400Hz
Optical light efficiency (static LEF ) : 15,5 %
Optical light efficiency (dynamic LEF) : 14,5%
Upgradeable software for optimal 3D quality
Operating Temperature : 0°C to +40°C
Storage Temperature : -15°C to +55°C
Dimensions: Min 420x260x100 mm / Max 420x320x100 mm (L x W x H)
Weight : 6Kg
Lightweight aluminium black
Mounting Bracket
Certifications : CE, FCC, PSE
Page 12
12
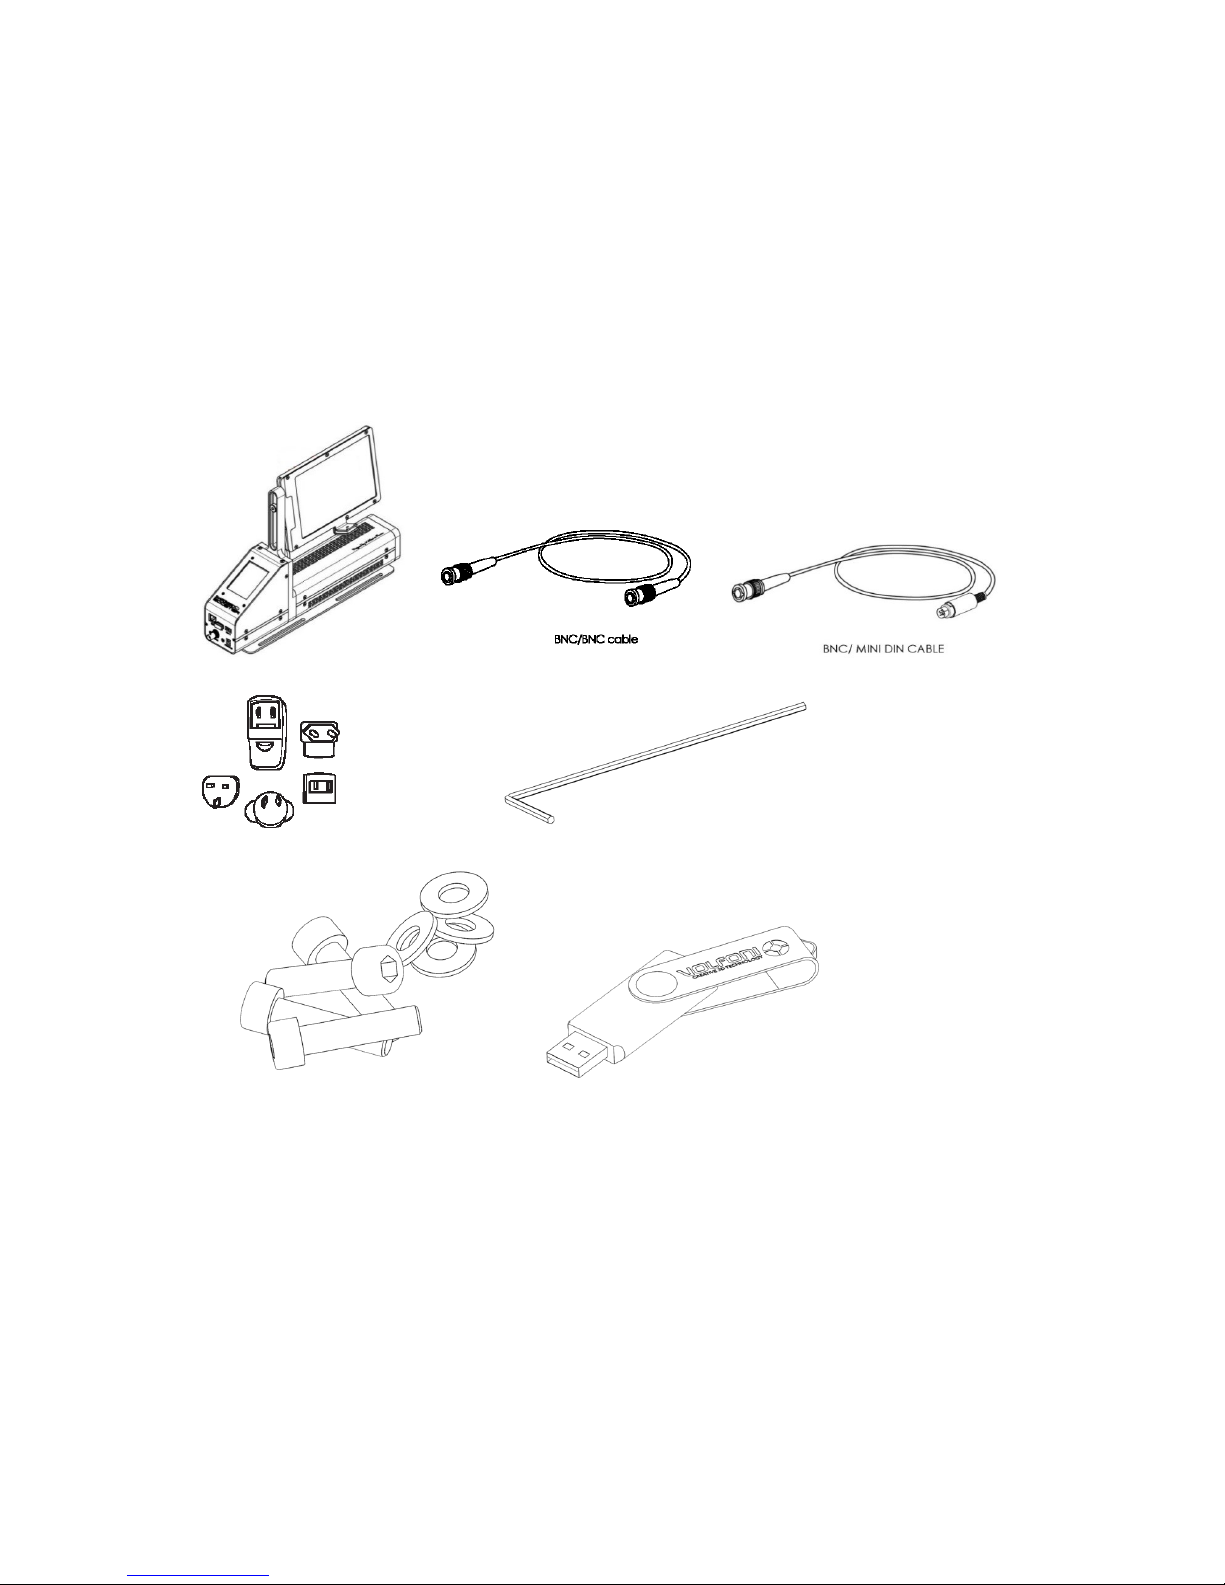
5. PACKAGE CONTENT OF THE SMARTCRYSTAL™ PRO BOOSTER
1. SmartCrystal™ Pro Booster
2. BNC Sync Cable
3. VESA Sync Cable
4. Power supply (110 / 240V) Adapter + EUR / US / UK / AUS
5. BTR4 Allen key
6. USB stick with User manual
1. 2. 3.
4. 5.
6. 7.
Page 13
13
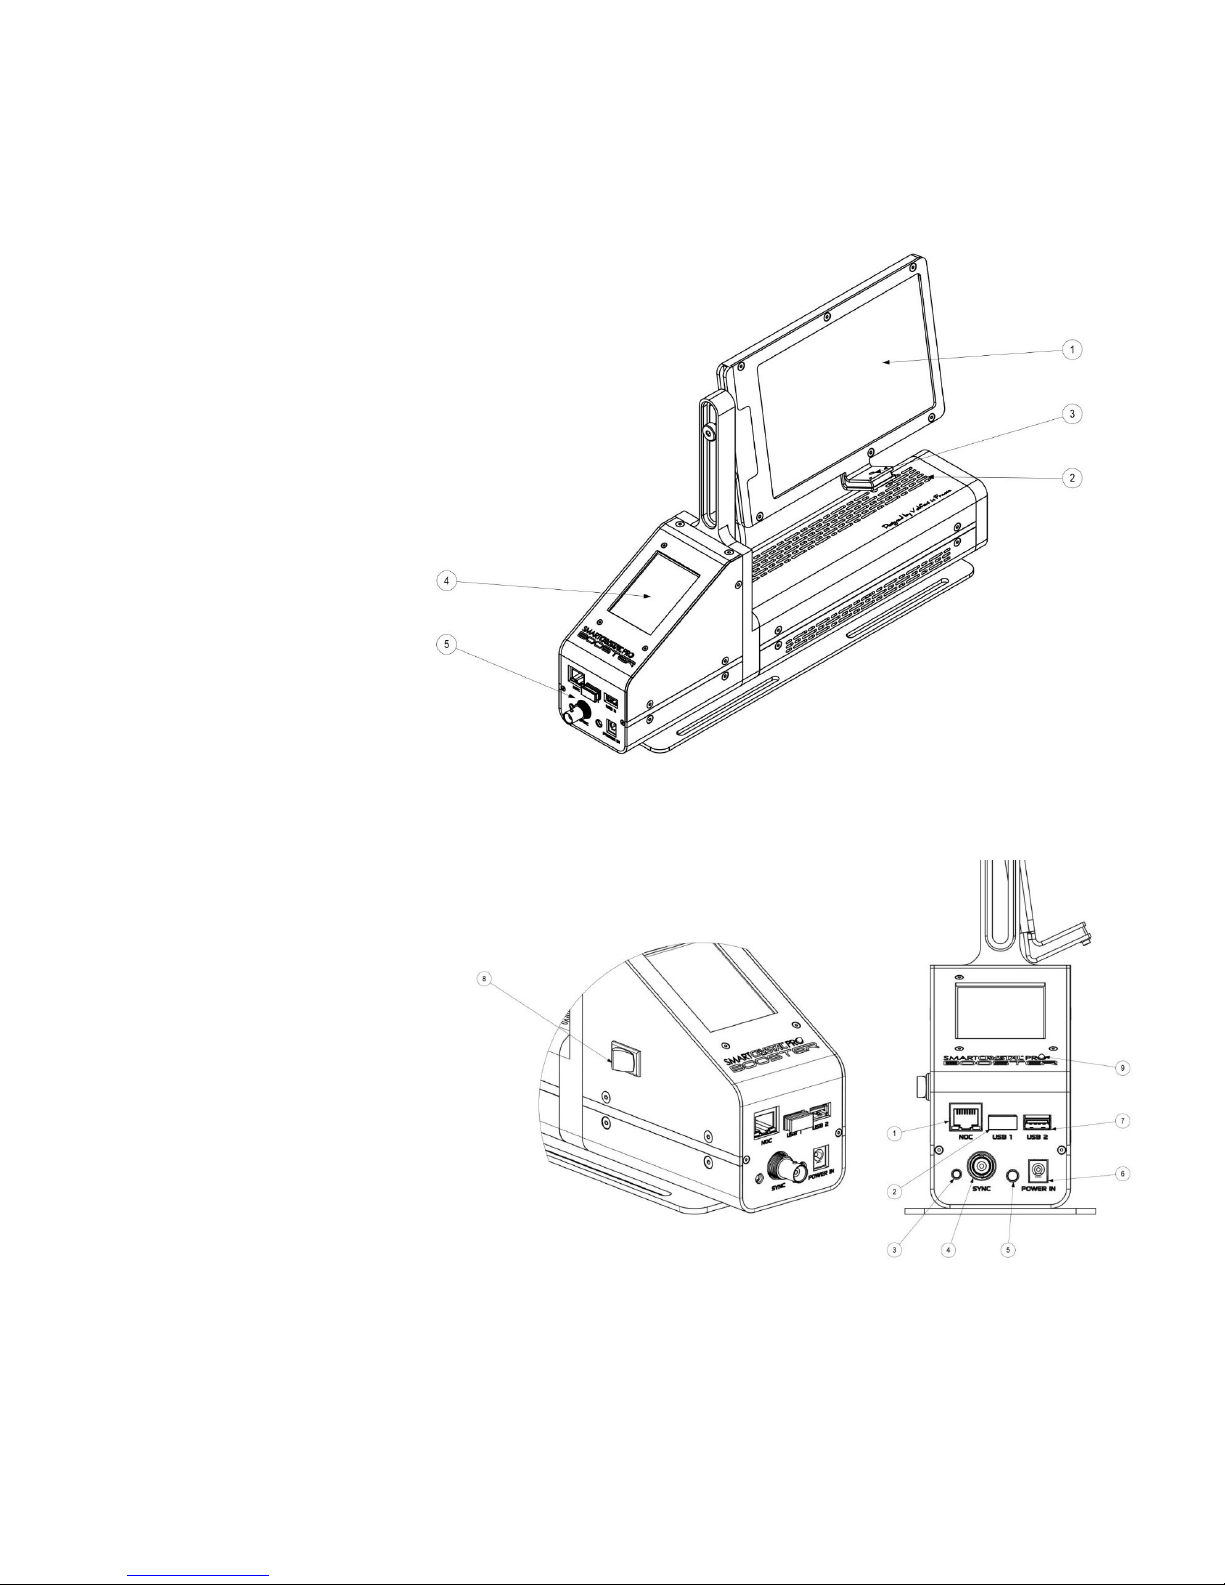
6. PRESENTATIONS AND CONNECTORS FOR SMARTCRYSTAL™
PRO BOOSTER
1. Polarizer
2. Fan
3. Temperature Sensors
4. Graphic display
5. Connectors
1. Ethernet connector
2. WIFI Dongle
3. Reset Button
4. BNC 3D Sync
5. LED power indicator
6. Power Connector
7. USB port
8. ON / OFF switch
9. LED synchronization indicator
Page 14
14
7. INSTALLATION
7.1. Important recommendations
Important recommendations for the installation of SmartCrystal™ Pro Booster
It is essential to comply with the following requirements to ensure the longevity of the
SmartCrystal™ Pro Booster and obtain optimal 3D projection.
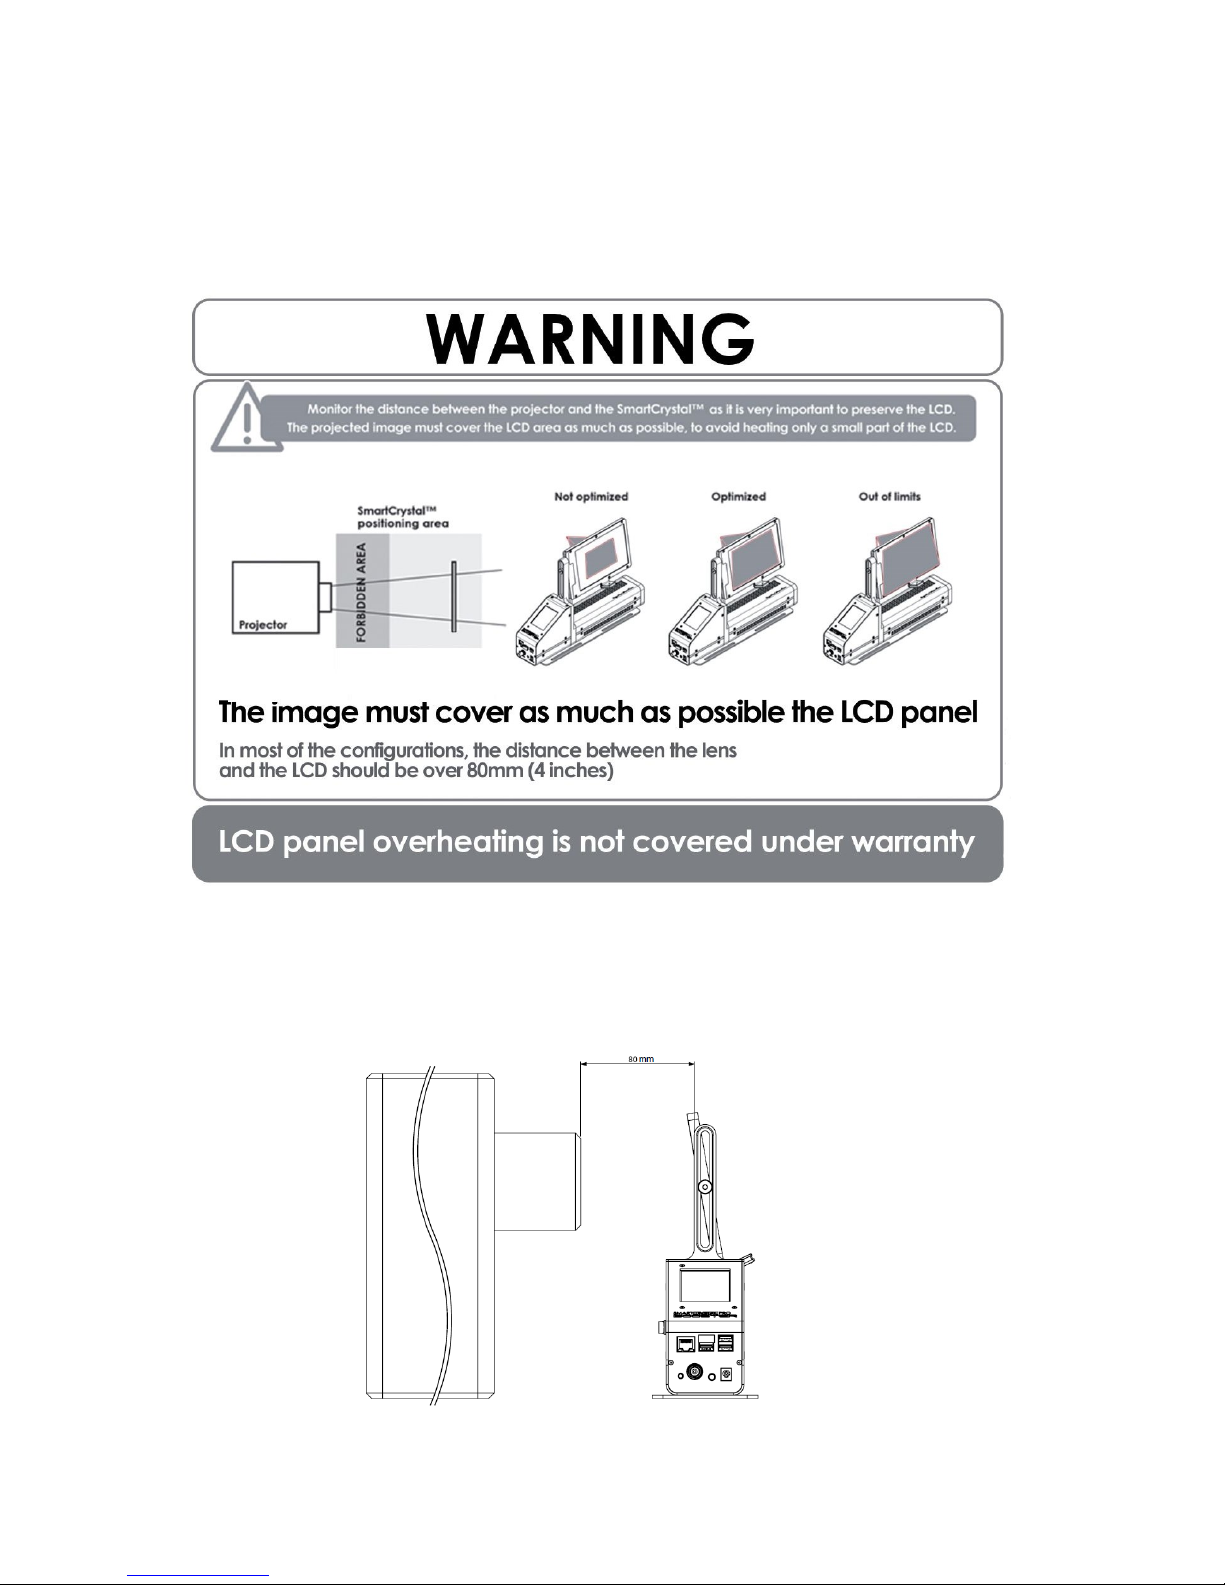
The distance between the lens of the projector and the SmartCrystal™ Pro Booster
polarizer must be at least 8 cm.
Page 15
15
L
l
Minimum distance of the polarizer
The SmartCrystal™ Pro Booster must be positioned such that light from the projector
passing through the polarizer fills the largest possible width of the filter (see illustration
below).
In a projection booth, the projection window should not depolarize the light.
The position of the frame is flexible. To raise / lower or tilt the frame, unscrew the
frame fixing screw using the supplied Allen wrench. Move the frame to the desired
position and re-tighten the screws.
7.2 Projection position: « Throw Ratio » (TR)
Before making any installation, it is important to ensure that the device is compatible
with the configuration required. The "Throw Ratio" ("Throw Ratio ', TR) must satisfy the
following requirements:
Configuring of the projection position view in top
TR = (distance between the projector and the polarizer, l) / (width of the screen, L)
Page 16
16
At this distance the throw ratio (TR) should meet the following criteria:
THROW RATIO >= 1,2
7.2. Projector Settings
The "Dark Time" should be adjusted to its minimum.
The "delay" should be adjusted to 0 µs.
40°
Page 17
17
7.3. Fixing & Position
The SmartCrystal™ Pro Booster shall be placed on a stable surface and fixed with 4
screws:
The SmartCrystal™ Pro Booster should be placed in front of the projector lens. There is
a "Projector Side" printed on the product that will indicate the correct direction.
Page 18
18
7.4. Positioning of the SmartCrystal™ Pro Booster
The polarizer of the window should be approximately perpendicular to the axis of the
light beam. This is indicated in the following illustrations:
Correct LCP-panel position
Wrong LCD-panel position
Ceiling mount
Tower mount
Table mount
Page 19
19
7.5. Ceiling mounting
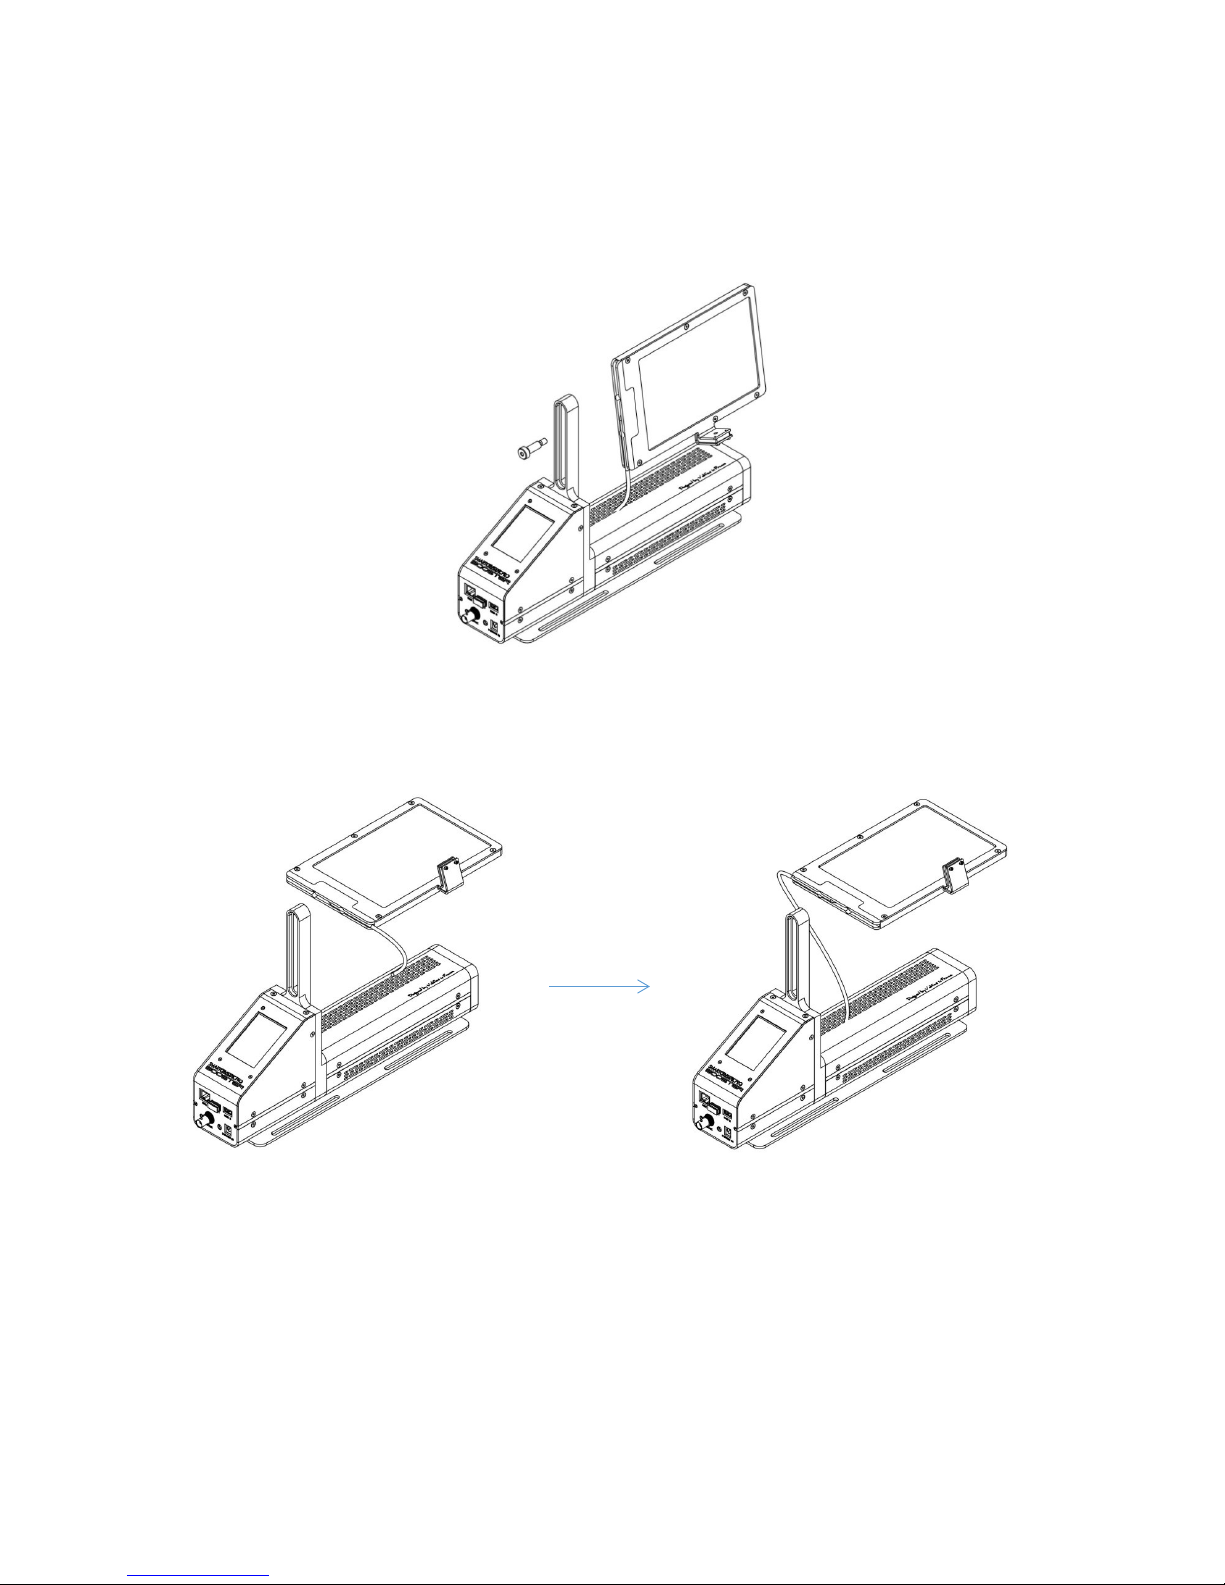
It is possible to fix the SmartCrystal™ Pro Booster to the ceiling.
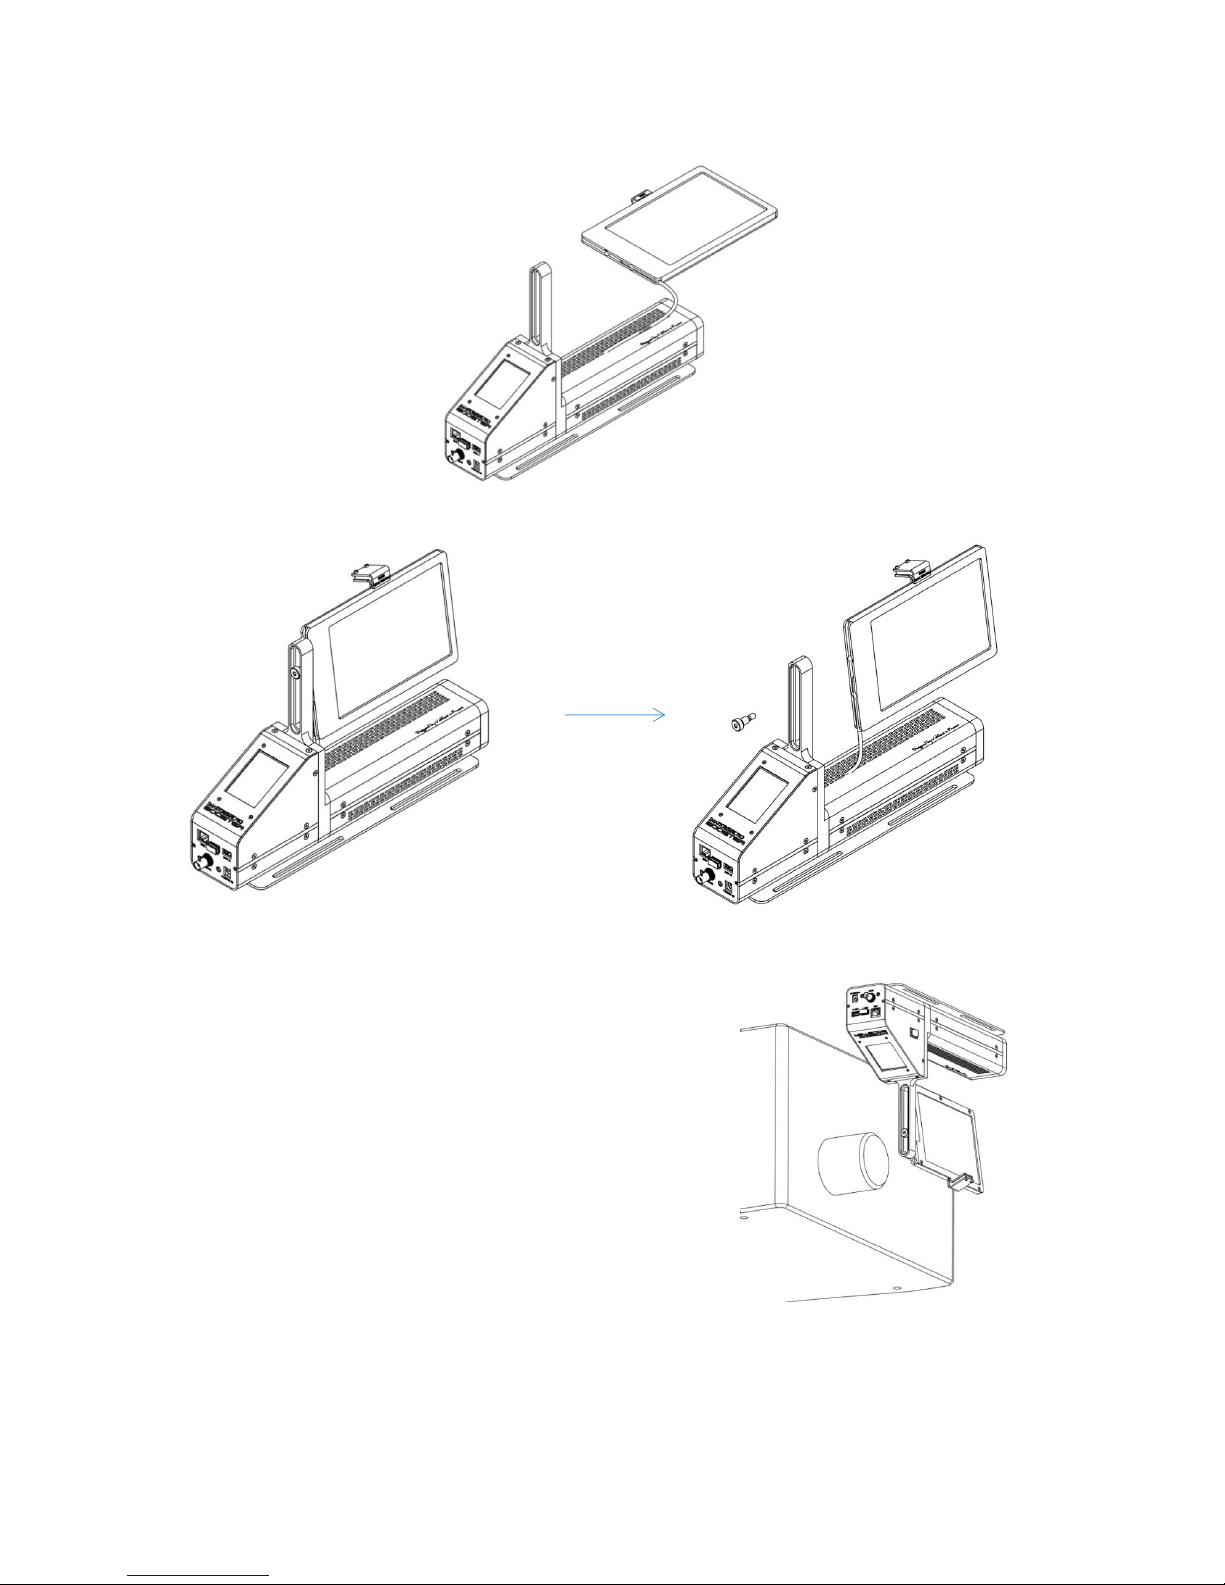
In this case you must position the LCD frame upside down as explained below:
Completely unscrew the frame holding screw
2. Remove the connecting cable from its holding track and re-position the cable to
the other side of the track.
Page 20
20
3. Turn the frame
4. Fix the frame with the holding screw.
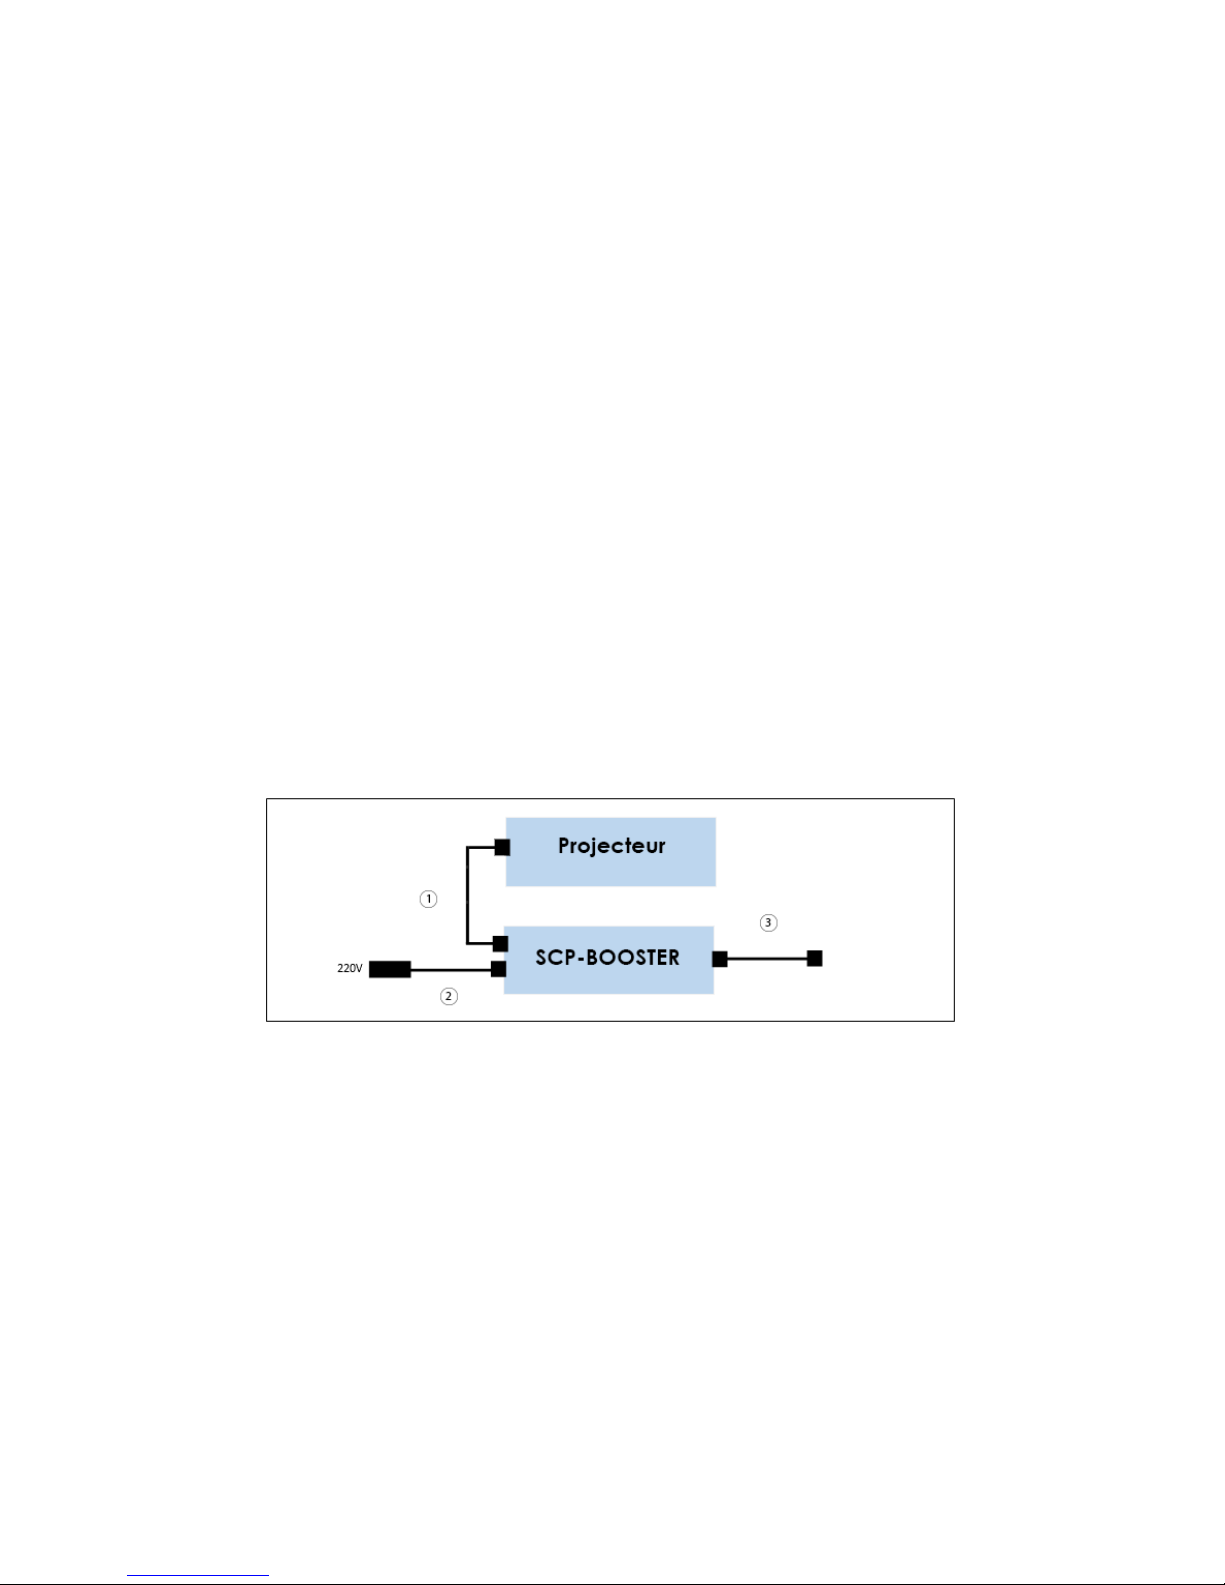
The SmartCrystal™ Pro Booster is now ready to be
mounted on the ceiling: the inscription "Projector
Side" should face the projector, the temperature
sensor should be at the bottom of the image.
Page 21
21
8. USE THE SMARTCRYSTAL™ PRO BOOSTER
8.1. Connections
For the installation it is necessary to use the external power cable supplied with the
system.
Once started, no cable should be connected or disconnected from
SmartCrystal™ Pro Booster.
Before making any change of the wiring configuration it is essential to wait for
a complete shut-down of the SmartCrystal™ Pro Booster using the ON / OFF
button and checking the LCD.
The first SmartCrystal Booster Pro ™ are delivered with a WiFi dongle
connected to one of its USB ports. The new devices have this WiFi
dongle directly integrated in the electronic board.
For the proper functioning of this product, it is essential to never disconnect
the WiFi dongle.
Connect the sync cable (BNC - BNC, BNC - 3 pin Mini DIN) between the 3D
sync output on the projector and the 3D Sync connector on the
SmartCrystal™ Pro Booster.
Plug-in the power cable and the Ethernet cable if necessary to the
SmartCrystal™ Pro Booster.
Turn the switch to ON
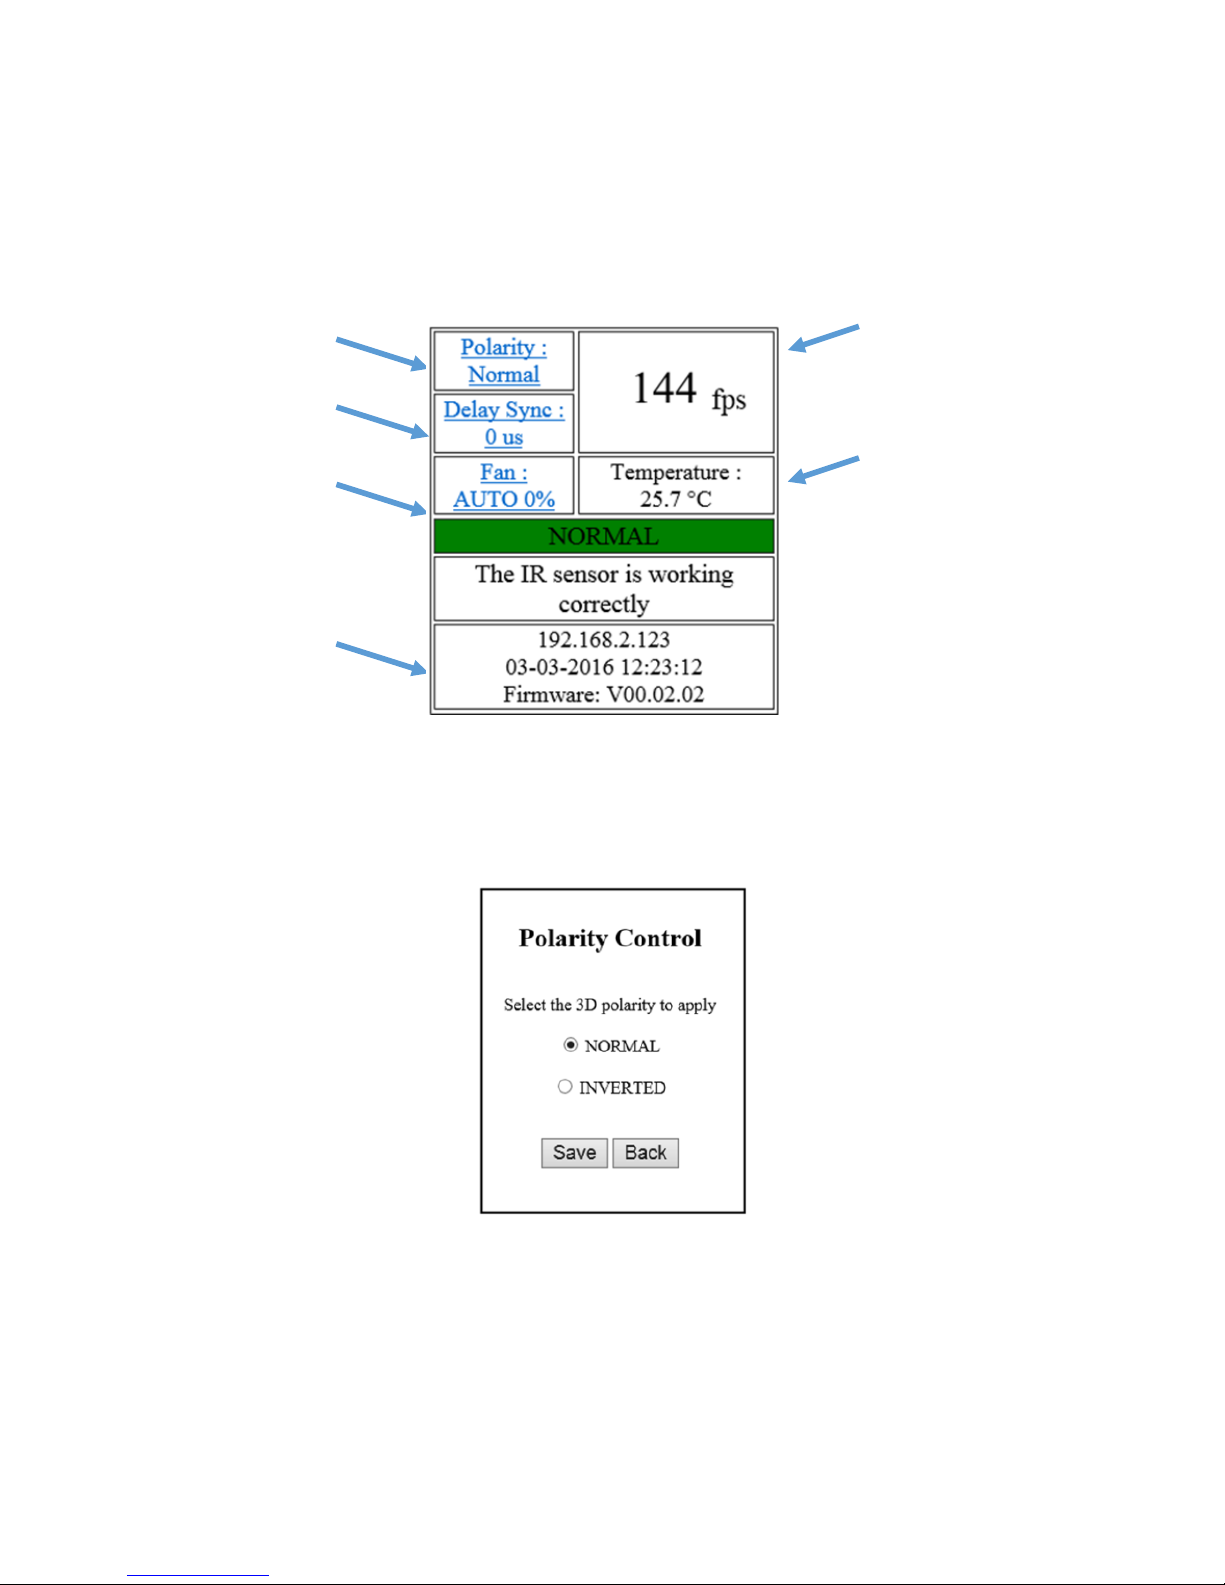
The connection of the system is shown in the following scheme:
1. 3D Sync Cable (BNC - BNC, BNC - 3 pin Mini DIN)
2. Power Cable
3. Ethernet Cable - Ethernet (if necessary)
Page 22
22
8.2. Start-up
After switching the SmartCrystal™ Pro Booster ON an initialization phase commences
which may last a few seconds Thereafter, the following screen appears on the
display:
For modifying the polarity (left/right image inversion) of the polarizer, press the box
"Polarity" and in the new window that appears, enter the polarity to apply. This may
be used to correct (left/right) image inversion.
5. Fan mode &
speed
4. Setting
the Sync
2. Setting polarity
(left/right)
6. System of data
of the
SMARTCRYSTAL™
1. Frequency of the
sync signal from the
projector
3. Current
temperature of
the polarizer
Page 23
23
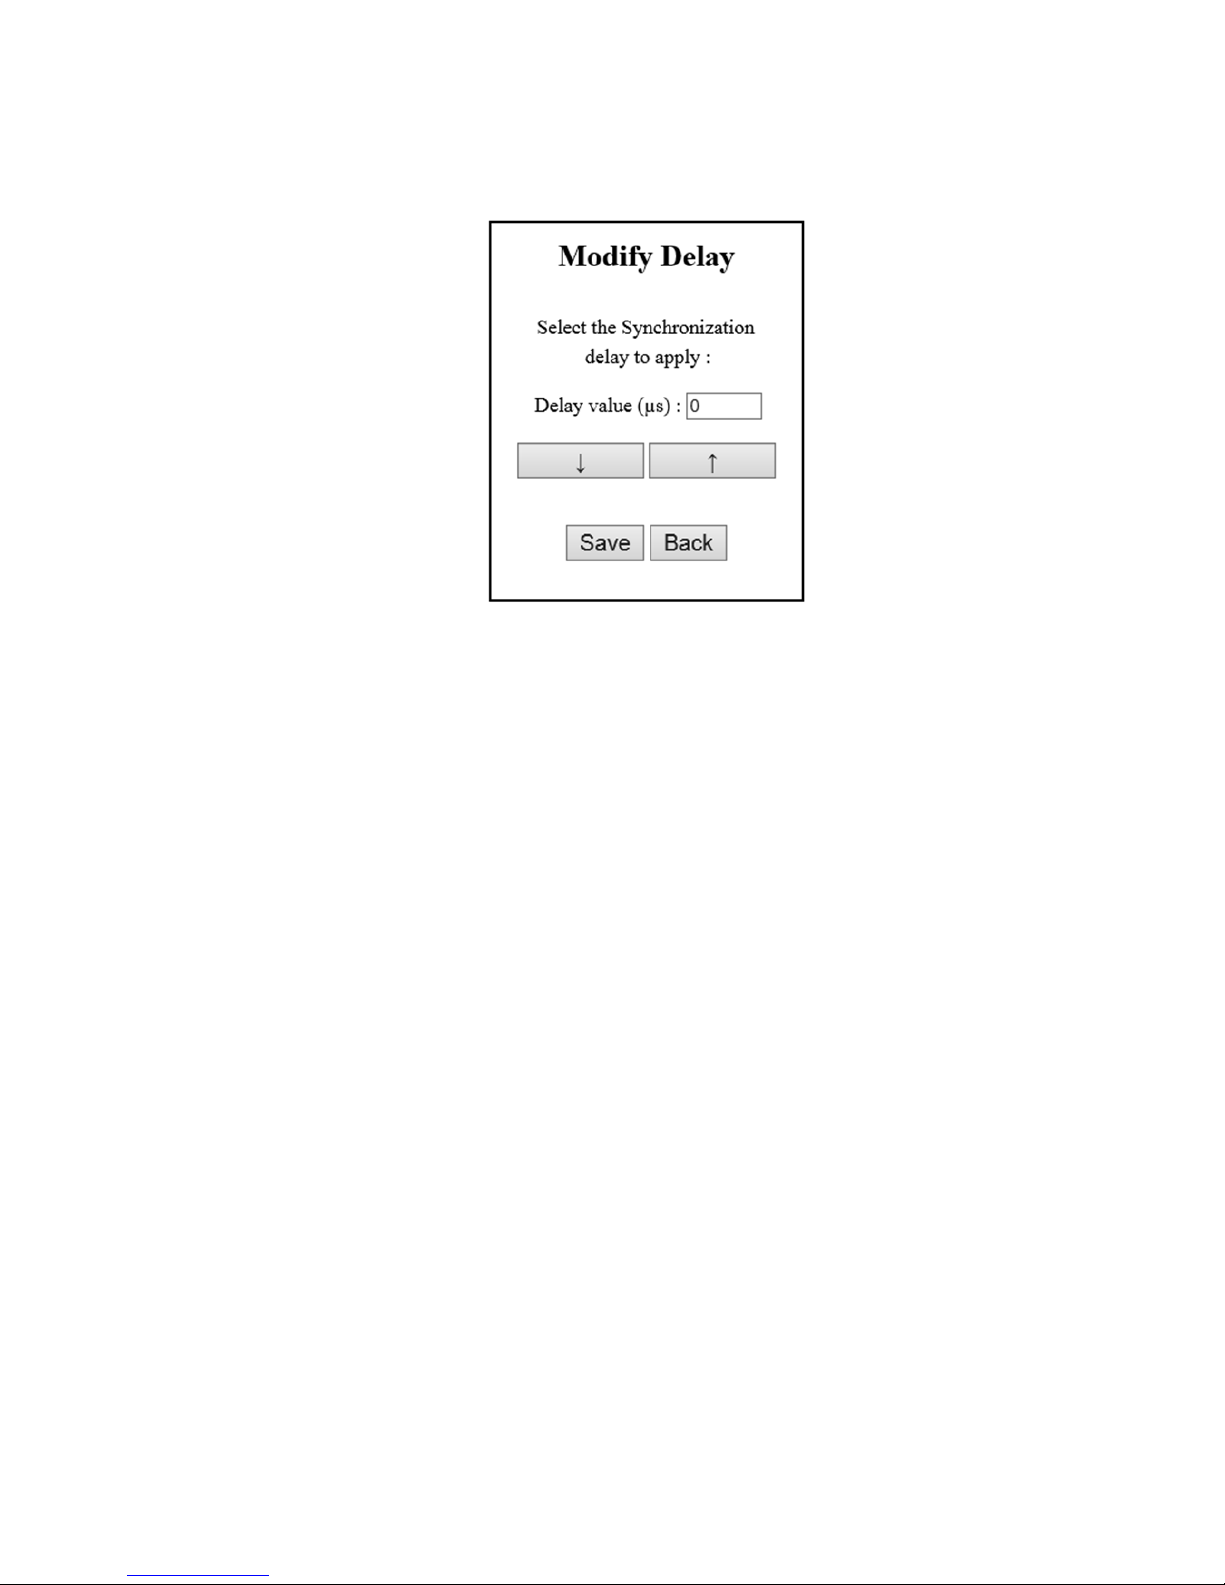
For modifying the duration of the Sync Delay, press the box "Delay Sync", set the new
value. Confirm with "OK":
The display will go into sleep mode (black) after a period of inactivity of 60 seconds.
To activate it again click with the pen on the screen.
Page 24
24
9. USER INTERFACE
It is possible to check and modify the operating parameters of the SmartCrystal™ Pro
Booster through its user interface.
The software interface is accessible from several supports:
The display on the SmartCrystal™ Pro Booster.
A remote computer by connecting to SmartCrystal™ Pro Booster connected
via Ethernet
A smartphone connected via WiFi to SmartCrystal™ Pro Booster
9.1. Ethernet connection
For a wired connection, the SmartCrystal™ Pro Booster is connected to a computer
using a RJ45 network cable. The computer should be configured with an IP address
in the same sub-network as the SmartCrystal™ Pro Booster. Please refer to the userinstructions "network settings" for your computer or ask your network administrator.
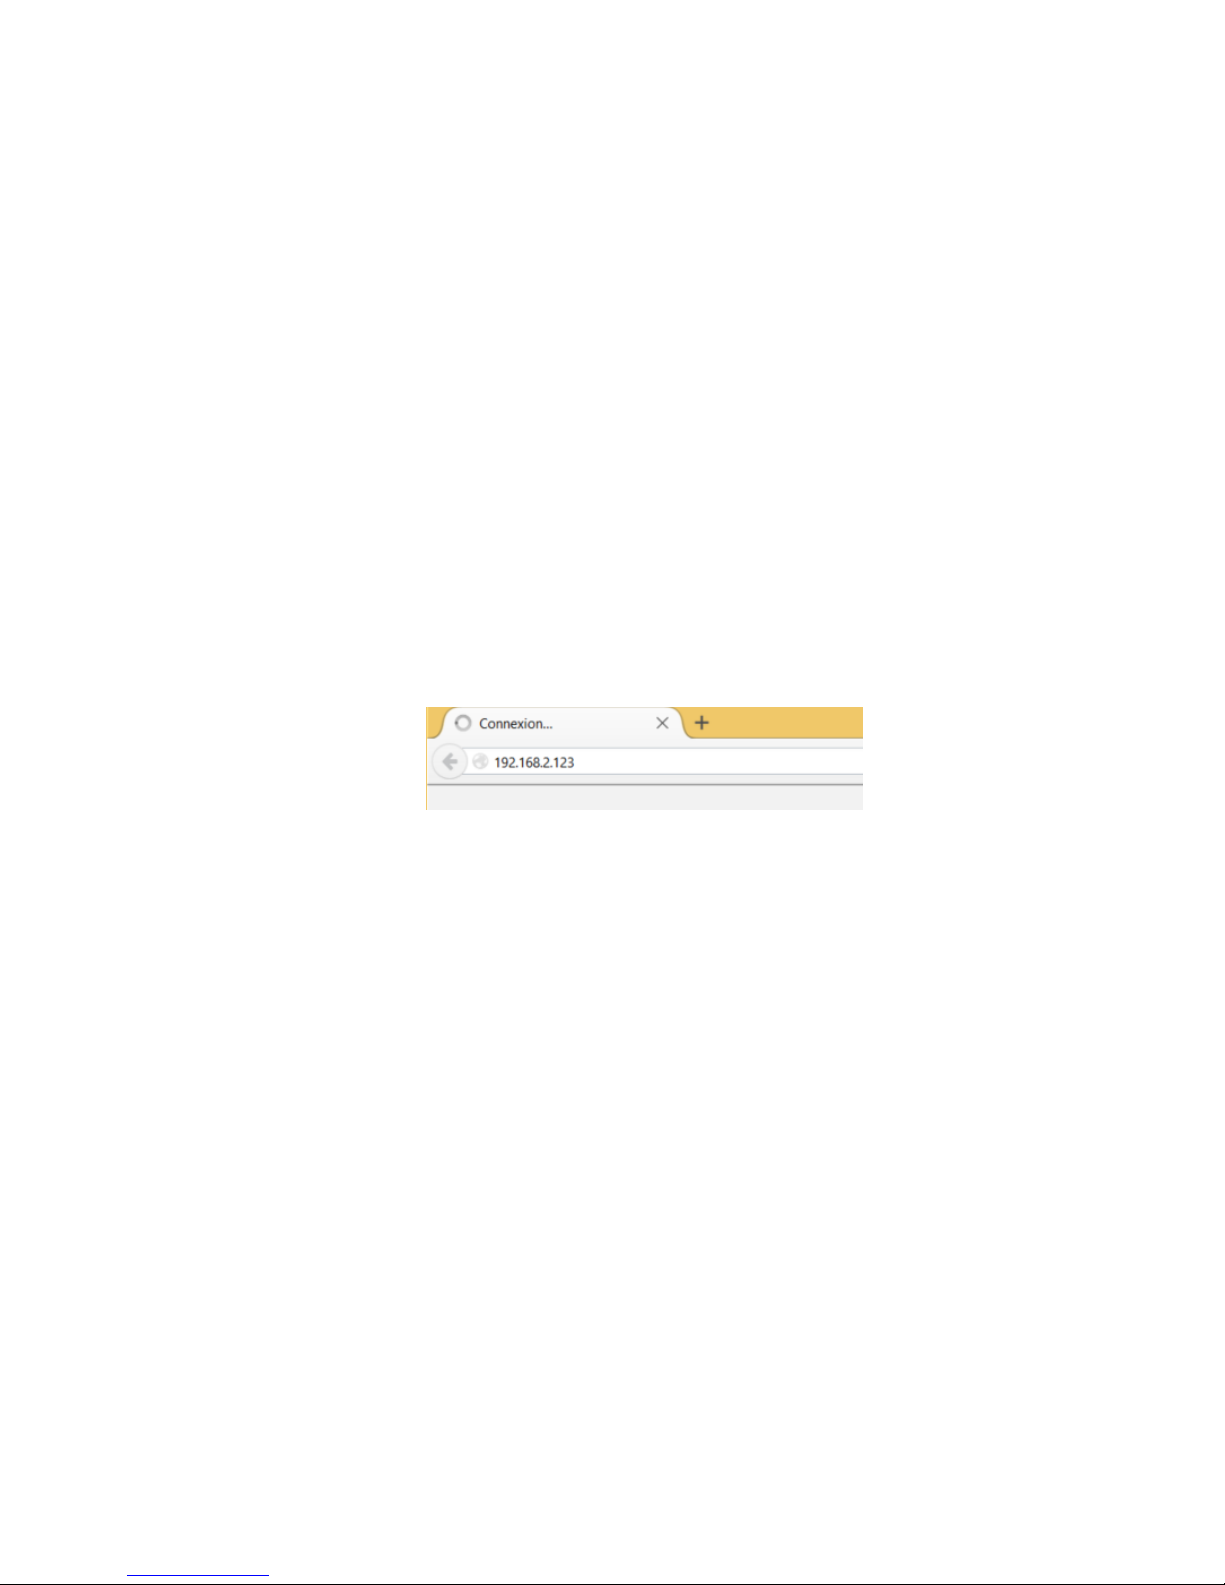
Using an internet browser, connect to the IP address of the Ethernet SmartCrystal Pro
™ Booster:
Default Ethernet Configuration:
Address: 192.168.2.123
Subnet: 255.255.0.0
9.2. WIFI connection
Connect your computer, tablet or smartphone to the WIFI hotspot SmartCrystal™ Pro
Booster according to procedure for your equipment. Enter the password when
prompted.
From your web browser, connect to the WIFI address of SmartCrystal™ Pro Booster.
WIFI default configuration:
Hotspot Name: VOLFONI_xxxxx (xxxxx is the product serial number)
Password: Volfon1RD
Address: 10.10.0.1
Page 25
25
9.3. User interface via remote PC / Smartphone
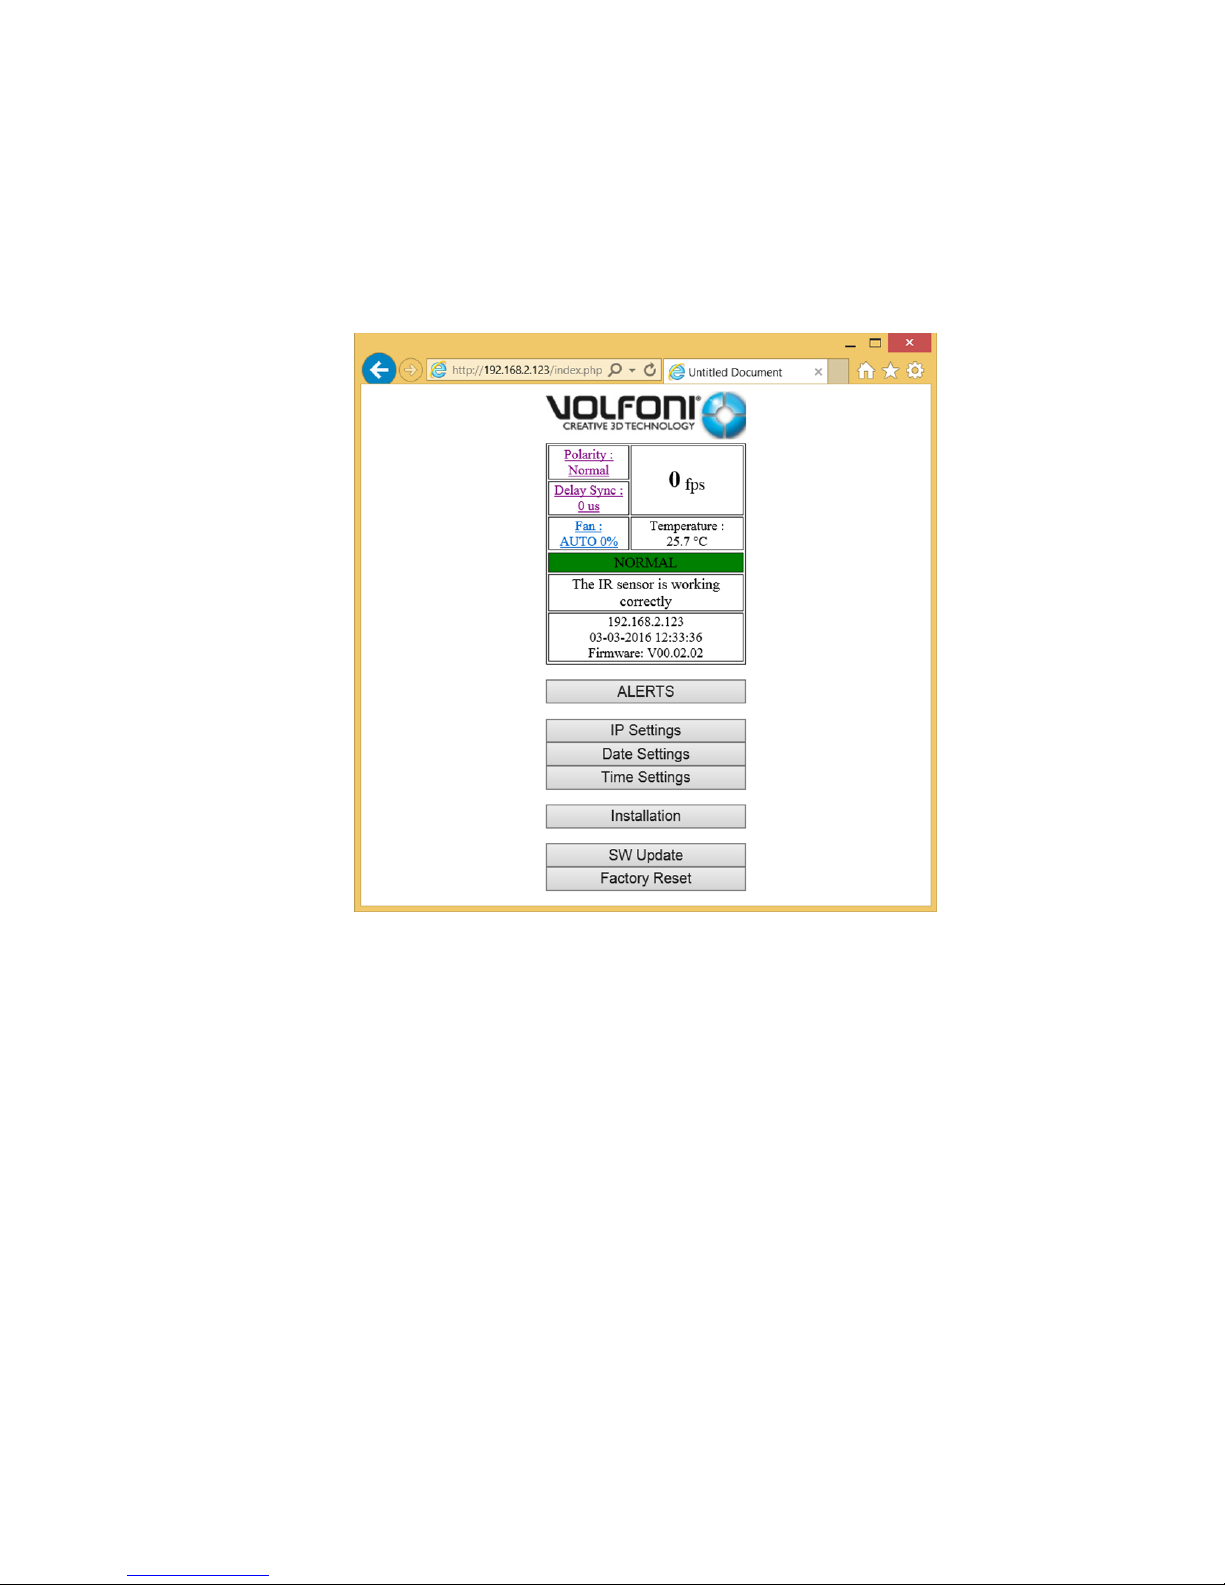
It is possible to access the user interface from a remote computer by running a web
browser to the IP address of the SmartCrystal™ Pro Booster.
The display in the browser is as follows:
Page 26
26
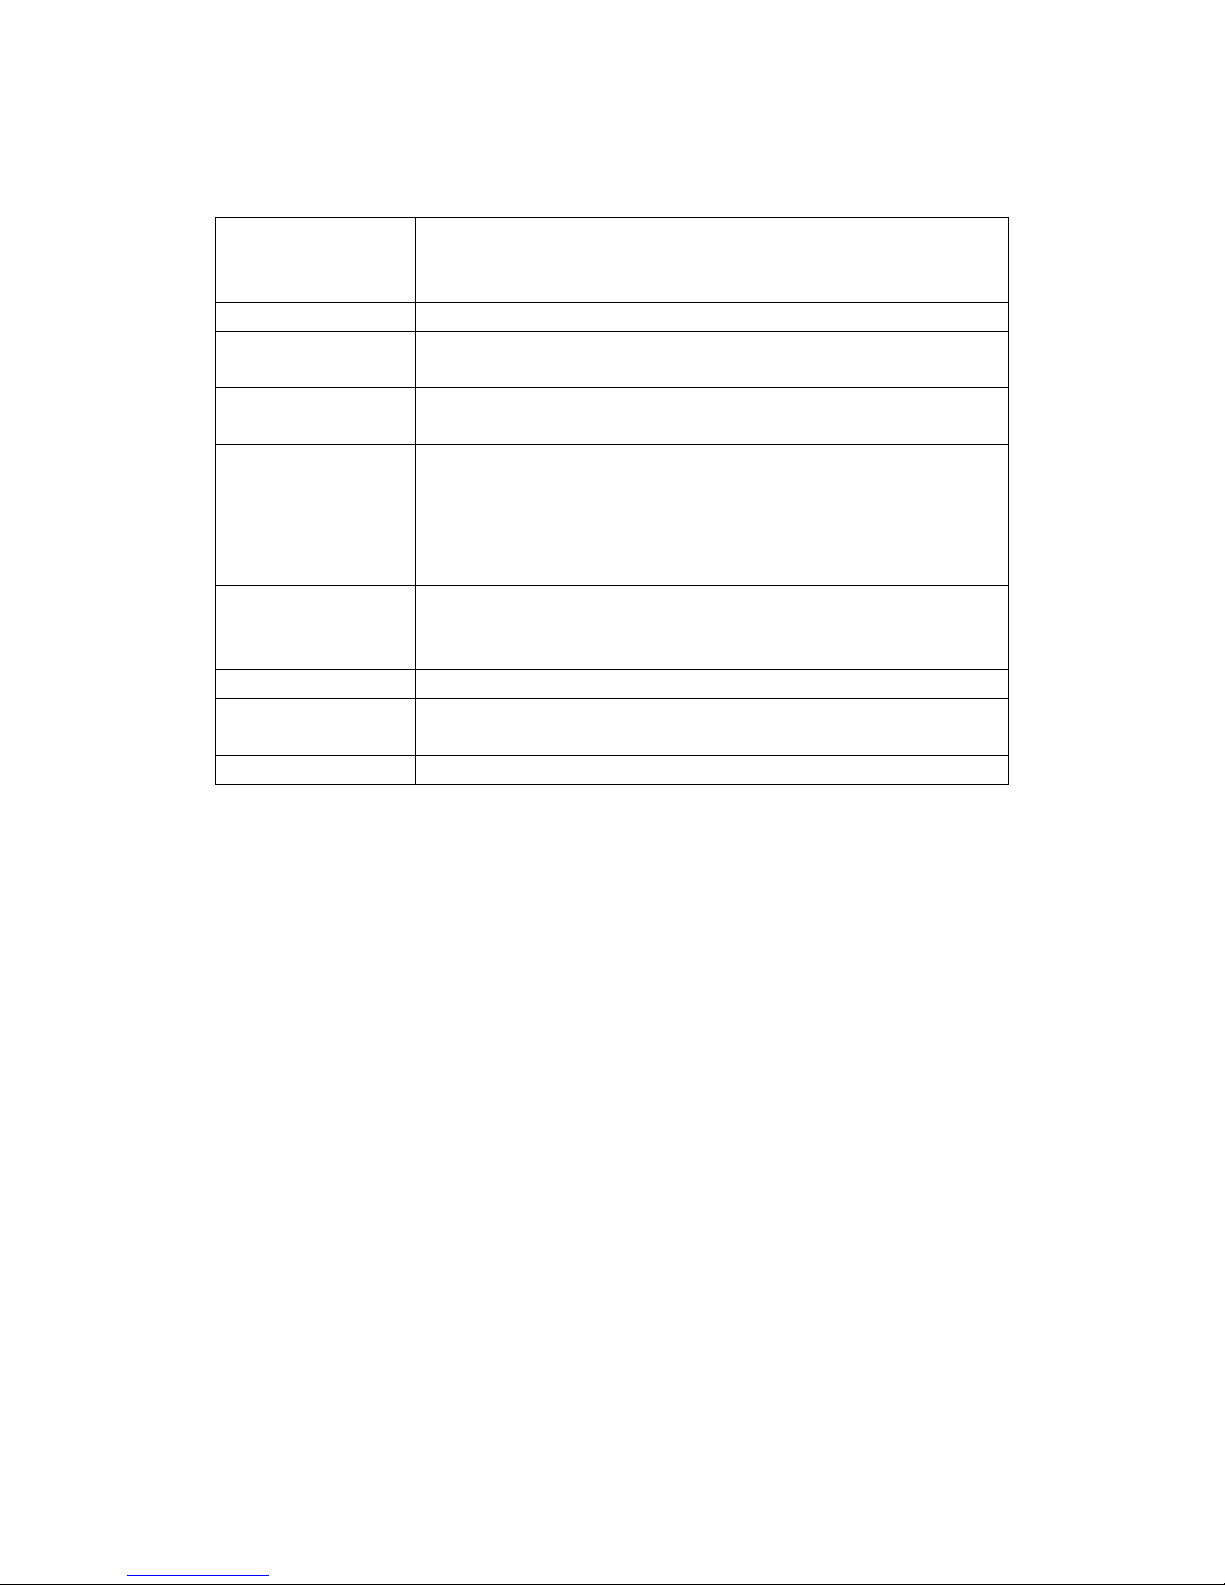
In addition to the display on the SmartCrystal™ Pro Booster, you can access various
feature settings. The available settings are:
Sync Delay
setting
Changes the product synchronization time.
Range : -5000 µs to +5000 µs
Precision : 100µs
IP settings
Changes the product network configuration.
Rotate 180 °
display
To reverse the display direction (up / down) in case of
ceiling mounting (upside down).
Date / Time
settings
Changes the time and date of the product.
Setting ON / OFF
control of the fan
Selects the mode of operation for the fan between 2
modes:
- ON: The fan is always ON and with 100% power
- Auto: The fan speed is dependent on the temperature
of the polarizer
Alarm settings
Determines the thresholds for the system alarms:
- LCD Temperature Threshold
- Dysfunction
Product Update
Updating one or more system features.
Log
Retrieve the log files stored on the system.
Log settings
Configure the logging parameters.
Page 27
27
10. LED SIGNIFICATION
2 LED indicators are present on the SmartCrystal™ Pro Booster:
A green LED next to the power connector indicates the operating status for
the SmartCrystal™ Pro Booster.
A white LED below the display shows the SmartCrystal™ Pro Booster
synchronization status.
ON
OFF
Green LED (nbr.5 p.7)
The unit is ON
The unit is OFF
White LED (nbr.9 p.7)
The device is synchronized
No synchronization detected
Page 28

28
11. SOFTWARE UPDATES
1. Copy the update file (file with the ".vol" extension) to the root directory of the
USB stick (for example the USB stick supplied with the SmartCrystal™ Pro
Booster).
2. Insert the USB stick into the port "USB 2" of the SmartCrystal™ Pro Booster.
3. From a smartphone or a remote computer, connect to the user interface of
your SmartCrystal™ Pro Booster and select "SW Update".
4. Wait for completion of the update.
5. Check on the display that the SW version number has been updated as
required.
6. Turn off the SmartCrystal™ Pro Booster.
7. Remove the USB stick.
8. Re-start the SmartCrystal™ Pro Booster.
Page 29
29
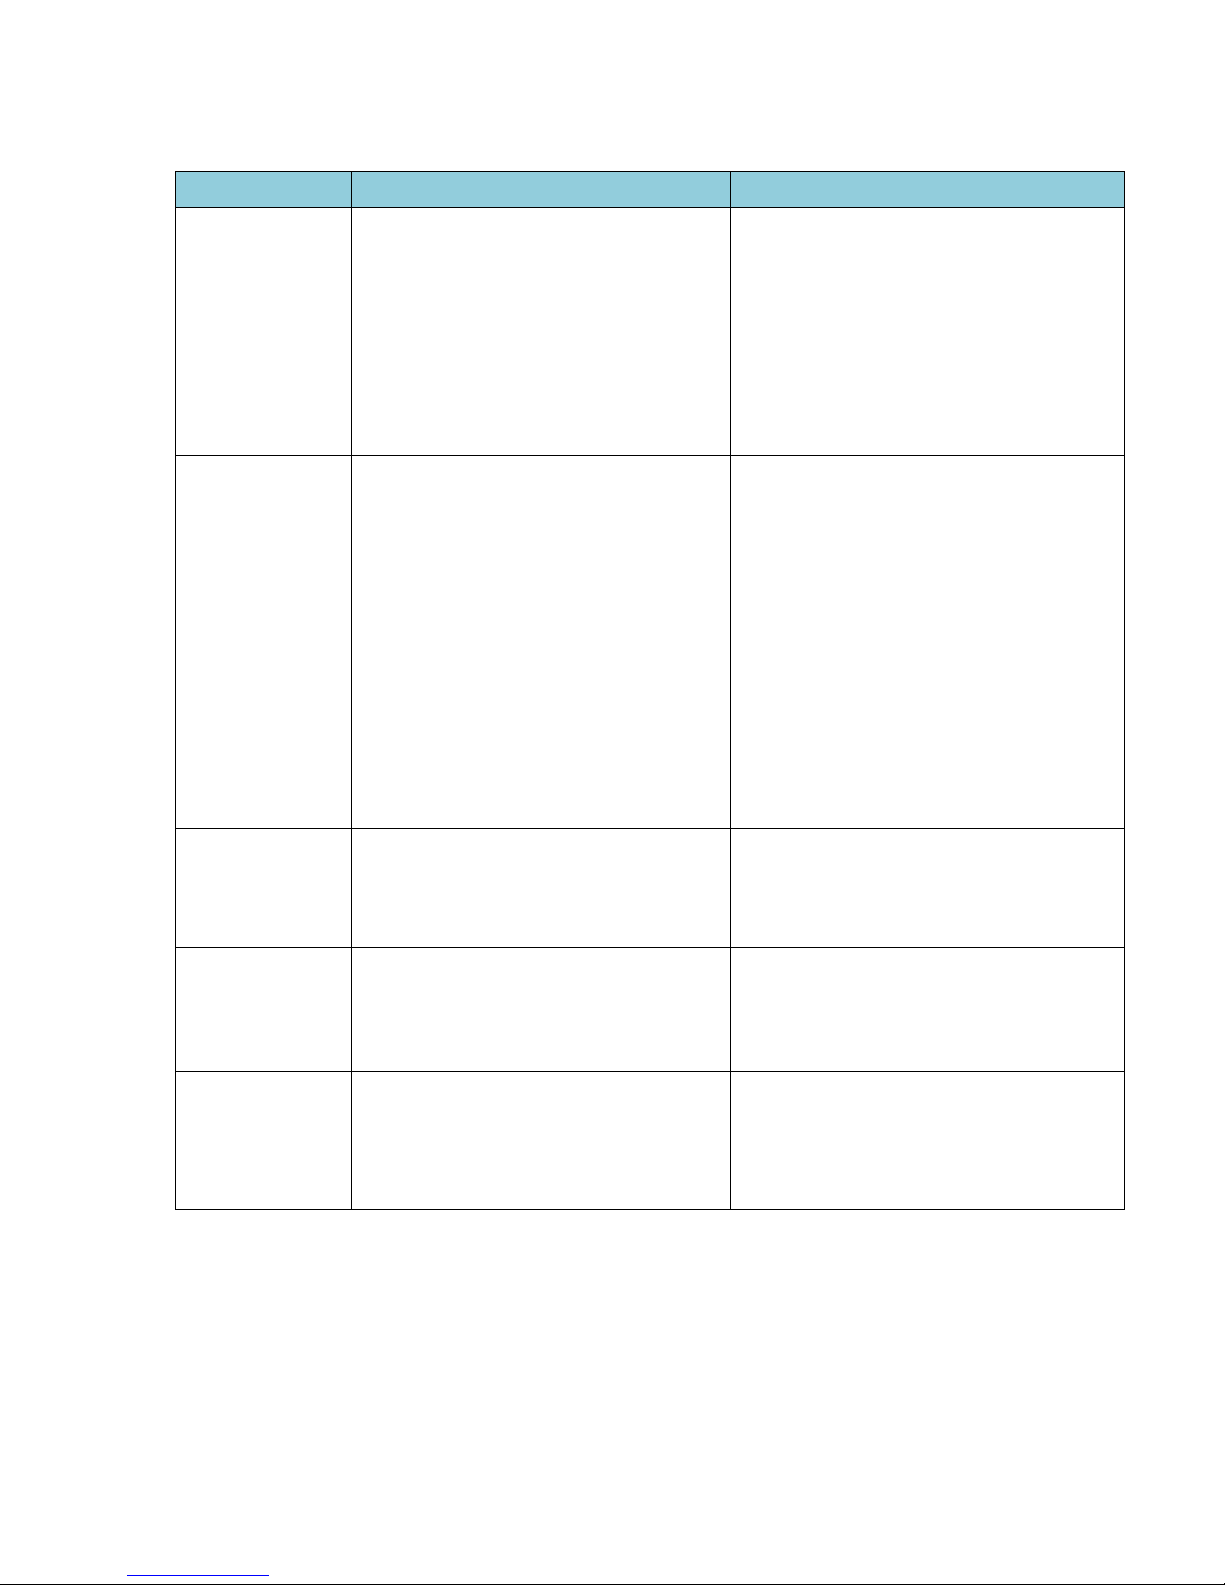
12. TROUBLESHOOTING
PROBLEM
POSSIBLE REASONS
SOLUTIONS
Hazy image,
poor contrast
The lens focus is wrong
The protective films on the front and back
sides of SmartCrystal™ Pro Booster have not
been removed
Presence of fingerprints or dirt on the lens
and/or on the polarizer
1. Fix the lens focus
2. Check if the protective films have
been removed
3. Clean the polarizer with the
appropriate equipment, i.e using
non-abrasive cloth.
No 3D effect
Problem with the silvered screen
Projector settings are not correct
The SmartCrystal™ Pro Booster is not
connected to the projector’s 3D
synchronization signal
The SmartCrystal™ Pro Booster is not
connected to the power
The projection window of the booth
depolarizes the light
1. Check if the screen is silver and
designed for 3D.
2. Check if the values 'Dark Time' and
'Delay' are configured correctly.
3. and 4. Check the connections of
SmartCrystal™ Pro Booster, the status
of the white LED indicator
synchronization with the 3D projector
and the green LED power indicator.
4. Remove the window to make sure it
does not change the polarization.
Too dark image
The power of the projector lamp is too low.
The lamp settings are not properly
adjusted.
1. and 2. Change the lamp settings.
The image seems
to be
in 3D but the
rendering
is uncomfortable
The direction of left / right polarization is
reversed on the projector.
2. Change the left / right direction (shift
from "Normal" to "reverse" or vice
versa) on the SmartCrystal™ Pro
Booster or the projector.
Flickering image
The content is not 3D.
The image frequency supplied by the
projector is incorrect.
3. Check if the content is in 3D
4. Check the frame rate provided by
the projector shown in the
SmartCrystal™ Pro Booster touch
screen (typically 144hz 120/60).
If you do not notice any improvement after checkingthe suggested solutions, please
contact your support team.
Page 30

30
13. IMPORTANT SAFETY RECOMMENDATIONS
If you are unsure about your vision, please check to verify your ability to see
stereoscopic 3D images.
Do not sit too close to the screen when watching 3D images.
Watching 3D may cause discomfort (such as eye strain, altered vision, fatigue,
nausea, light-headedness, dizziness, confusion, loss of awareness, convulsions,
cramps and/or disorientation) for some people. Volfoni recommends that you
take regular breaks when watching 3D content or playing 3D video games
until any such discomfort ends. If the discomfort persists, consult a doctor.
Certain types of TV images or video games that contain flashing patterns of
light may cause epilepsy symptoms for some viewers. If you or any member of
your family has a history of epilepsy, Volfoni strongly recommends that you
consult a physician before using this product.
Be aware of young children, especially those under six years old. Because
their vision is still under development, consult a doctor (such as a
paediatrician or eye doctor) before allowing young children to watch 3D.
If the product is broken, please keep broken pieces away from mouth and
eyes. Dispose of pieces in the designated areas for the disposal of special
waste.
Protect the 3D system from direct sunlight, heat, or water. Extreme conditions
may alter the product’s abilities.
Do not drop or modify the electrical or mechanical components of the 3D
system.
Do not leave the SmartCrystal™ Pro Booster turned ON when not in use.
Page 31

31
14. SAFE USAGE
Please, use the SmartCrystal™ Pro Booster in the specified voltage range
(240V) and only with the original power supply so as to preserve the maximum
lifetime of the product.
Please use and store your SmartCrystal™ Pro Booster in the temperatures
stated, see "Specifications".
The SmartCrystal™ Pro Booster should not be used with projectors of over
32,000 lumens, please see section "Specifications".
The SmartCrystal™ Pro Booster should not be placed closer than 80mm from
the projector lens, please see section "Installation".
15. MAINTENANCE OF YOUR POLARIZATION MODULATOR
There are no parts accessible by the user inside of the SmartCrystal™ Pro Booster. Be
careful not to apply force to the polarizing window. Try to avoid excessive shock and
vibration.
Use a non-abrasive clean-cloth or wipe to clean the 3D system and particularly the
polarization window to avoid scratches.
Always carry the polarization modulator in a rigid case to prevent scratches on the
window and also to avoid breaking the base of the product.
16. WARRANTIES AND COMPLIANCE
The Volfoni Group reserves the right to make changes in the hardware, packaging or
other documentation without prior written notice. The SmartCrystal™ Pro Booster is a
trademark owned by the Volfoni Group. All trademarks are the property of their
respective companies.
The SmartCrystal™ Pro Booster is warranted. Please refer to your order form to be
aware of the warrantee terms.
The system should be returned in its original box with original proof of purchase.
Volfoni does not warrant uninterrupted or error-free operation of the product.
17. REGULATORY COMPLIANCE STATEMENTS
FCC Notice Class B
This device complies with part 15 of the FCC Rules. Operation is subject to the
following two conditions: (1) This device may not cause harmful interference, and (2)
this device must accept any interference received, including interference that may
cause undesired operation.
This equipment has been tested and found to comply with the limits for a Class B
digital device, pursuant to part 15 of the FCC Rules.
These limits are designed to provide reasonable protection against harmful
interference in a residential installation.
Page 32

32
This equipment generates, uses and can radiate radio frequency energy and, if not
installed and used in accordance with the instructions, may cause harmful
interference to radio communications. However, there is no guarantee that
interference will not occur in a particular installation.
If this equipment does cause harmful interference to radio or television reception,
which can be determined by turning the equipment off and on, the user is
encouraged to try to correct the interference by one or more of the following
measures:
Reorient or relocate the receiving antenna.
Increase the separation between the equipment and receiver.
Connect the equipment into an outlet on a circuit different from that to which
the receiver is connected.
Consult the dealer or an experienced radio/TV technician for help.
Caution: Any changes or modifications not expressly approved by the party
responsible for compliance could void the user’s authority to operate the
equipment.
European Union - Disposal information:
This symbol means that according to local laws and regulations your product should
be disposed of separately from household waste. When this product reaches the
end of its life, take it to a collection point designated by local authorities. Some
collection points accept products for free. The separate collection and recycling of
your product at the time of disposal will help conserve natural resources and ensure
that it is recycled in a manner that protects human health and the environment.
This Class B digital apparatus complies with Canadian ICES-003.
The normal function of the product may be disturbed by strong Electro-Magnetic
Interference. If so, simply reset the product to resume normal operation by following
the instruction manual. In case the function could not resume, please use the
product in other location.
Page 33

33
18. CONTACTS
For more information, please contact Volfoni, we welcome you on:
www.volfoni.com
For technical problems contact:
[email protected]
Distributed in France by VOLFONI SAS
29 rue Jean Jacques Rousseau 75001 Paris, France
Distributed in Americas by VOLFONI Inc.
3450, Cahuenga Bd West, Unit 504, Los Angeles,
CA90068, USA
Distributed in Spain by VOLFONI Iberia, S.L.
4, Ronda Guglielmo Marconi, 46980 Paterna
(Valencia), Spain
Distributed in China by VOLFONI Ltd
2101, Tower One, Lippo Center, 89, Queensway, Hong Kong
 Loading...