

Volfoni ActivHub RF50, VPES-04100 User Manual

User Guide
Manuel d’utilisation
RF50
www.volfoni.com
model
VPES-04100


SUMMARY
1. PRODUCT OVERVIEW 4.
1.1 DESCRIPTION 4.
1.2 CONTENT OF THE ACTIVHUBTM RF50 KIT 5.
1.3 CONNECTORS AND FUNCTIONS 5.
1.4 REQUIREMENTS 5.
2. COMPATIBILITY 7.
3. USING YOUR ACTIVHUBTM RF50 8.
3.1 POWERING THE ACTIVHUBTM RF50 8.
3.2 SELECTING THE SYNCHRONIZATION SOURCE 8.
3.3 SELECTING THE EMISSION CHANNEL 9.
3.4 EXAMPLES OF SETUPS 9.
4. ADVANCED USES 12.
5. LED SIGNIFICANCES 12.
6. SOFTWARE UPDATES 13.
7. Q 13.
8. IMPORTANT SAFETY RECOMMENDATIONS 13.
9. MAINTENANCE OF THE ACTIVHUBTM RF50 14.
10. WARRANTY 14.
11. CONTACT 14.
12. REGULATORY STANDARDS 15.
3

1. PRODUCT OVERVIEW
1.1 Description
The ActivHubTM RF50 is an emitter used to wirelessly
synchronize 3D glasses with a 3D display system.
It can receive 3D synchronization via
- Wired link, typically VESA-DIN3 or BNC connectors
- Infra-Red link, from a wide variety of sources like 3DTVs
and 3D IR emitters
- DLP-link embedded in the 3D images of a 3D-ReadyTM
projector
It can transmit 3D synchronization via
- RF link from any 3D source.
- VESA Link (square signal 0-5V)
Its intelligent core allows it to be
- Automatically compatible with most 3D display brands
using IR synchronization
- Upgraded to new functions via volfoni’s website
- Loaded with custom-made software for specic
applications
It is especially suitable for
- Virtual Reality centers, thanks to its omnidirectional,
interference-free RF link
- Digital Content Creators, thanks to its selectable
12-channels RF Link
- 3D professionals, thanks to its industry-wide multi-brand
compatibility
4
1.2 Content of the ActivHubTM RF50 Kit
Your ActivHubTM RF50 kit includes;
- an ActivHubTM RF50 3D emitter
- a VESA-DIN3 to Jack 3.5 connection cable
- a BNC & USB to Jack 3.5 connection cable
- a USB-A to micro-USB cable for maintenance and power
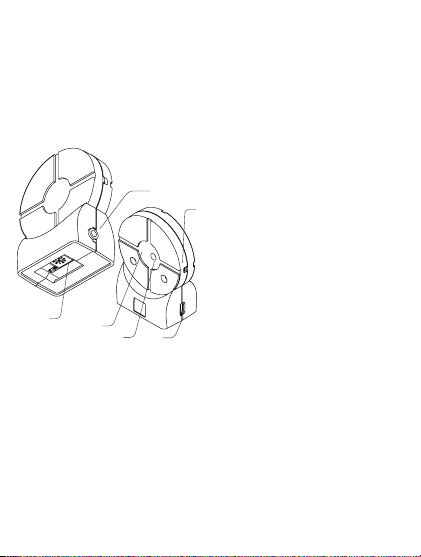
1.3 Connectors and Functions
2.
6.
1. USB connector
2. Jack 3.5 connector
3. IR reception window
4. DLP-LinkTM reception window
5.
3.
4.
5. Function selector
6. Power and Function LED
1.
1.4 Requirements
The ActivHubTM RF50 is a 3D signal emitter to be used with
active glasses to view 3D contents played on an active
3D display like 3D monitors, 3DTV or 3D projectors.
The ActivHubTM RF50 should receive the 3D synchronization
signal from an Infrared source, a DLP-linkTM compatible
3D projector, or a VESA-DIN3 or BNC connector. It can
transmit the 3D signal RF, in the following congurations.
5
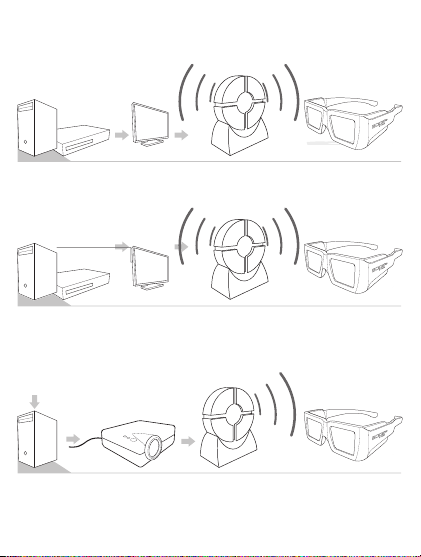
The ActivHubTM RF50 can transmit RF synchronization
when connected to a VESA or BNC cable
3D Content
Movie, sports...
3D Player
Computer, Blu-Ray...
Active 3D
display
ActivHUB
In=Wire, Out=RF
RF glasses
The ActivHubTM RF50 can transmit RF synchronization
when receiving an IR 3D signal.
3D Content
Movie, sports...
3D Player
Computer, Blu-Ray...
Active 3D
display
ActivHUB
In=Wire, Out=RF
RF glasses
The ActivHubTM RF50 can transmit RF synchronization
when receiving a DLP-Link 3D signal.
3D Content
Movie, sports...
ActivHUB
In=DLP, Out=RF
RF glasses
For complex installation please contact Volfoni technical
support, support@volfoni.com
6

2. COMPATIBILITY
Active 3D TV brands compatible with ActivHubTM RF50 in
IR mode :
Sony®, Panasonic®, LG®, Samsung®, Konka®, Hinsen®,
Arcelik®.
Computer 3D displays and systems compatible with
ActivHubTM RF50 in IR mode : Nvidia®, NuVision®,
Volfoni®.This includes selected ACER® and ASUS® 3D
monitors and laptops
Your ActivHubTM RF50 uses Volfoni’s proprietary RF 3D
mode.
The ActivHubTM RF50 is not compatible with 3D systems
using Bluetooth®, RF4CE or ZigBee RF protocols, like
the Samsung® Bluetooth® Displays and Glasses, or the
BitCaldron® RF Products
Using your ActivHubTM RF50 in DLP-Link 3D mode
The ActivHubTM RF50 is compatible with all 3D-ReadyTM
projectors with an active DLP-link function. The DLP-link
3D signal is an invisible light pulse embedded into the 3D
image projection. Refers to your projector user manual
regarding the procedure to activate the DLP-link signal.
Most DLP-based rear-projection 3DTV sold after 2005 are
DLP-link compatible.
Compatible 3D Glasses
The ActibHubTM RF50 is compatible with Volfoni 3D glasses.
The ActivHubTM RF50 is specically adapted to Volfoni 3D
glasses. You may nd more information about this glasses
on our website www.volfoni.com.
7

Using seemingly compatible, yet non-Volfoni, glasses
with the ActivHubTM RF50 will most likely generate timing
issues and degrade the 3D image quality, color delity,
sharpness and brightness. This may cause unwanted
eyestrain or fatigue.
These compatibility lists are indicatives. Due to possible
changes of protocol by manufacturers, Volfoni cannot
warranty compatibility with products previously cited
3. Using your ActivHubTM RF50
3.1 Powering the ActivHubTM RF50
The ActivHubTM RF50 gets its power either from
the Jack or micro-USB ports. Do not plug both
inputs to power-providing devices at once, this
may damage the ActivHubTM or the host systems.
The VESA port should be powered with either 5v or 12v. If
your VESA is not powered, then the ActivHubTM RF50 can
be powered via its USB port. In this case, make sure to use
an optional universal adapter rather than a powered USB
port on an electronic device.
3.2 Selecting the synchronization source
Synchronization source selection is automatic on the
ActivHubTM RF50. At power-on, synchronization sources
like VESA, DLP-LinkTM and IR, are automatically checked
by the ActivHubTM. As soon as any of these three signals is
detected, the ActivHubTM will focus exclusively on it until its
next full power cycle. To switch to another synchronization
source, you need to power off the ActivHubTM RF50.
8

The scan priority order is :
1.Wired 3D signal
2.DLP-link 3D signal
3.IR 3D signal
3.3 Selecting the emission channel
This option is only available with EDGETM VR and
ActivEyesTM Pro
The emission mode is selected by the function selector:
0 : Autotest mode
3 to E: RF channels
8 : Default RF channel
F: VESA channel
Please note that the position 1 and 2 are not to be used
in the ActivHubTM RF50.
3.4 Examples of setups
1.VESA-DIN3 > RF mode
1. Set the function selector to position 8.
2. Plug the Vesa or BNC connector to your 3D source
3. If using the BNC cable, plug its USB connector to a
power source.
4. Plug the Jack 3.5 connector to the ActivHubTM RF50.
5. Check the blue LEDs light up to signal power on.
6. Check the blue LEDs starts blinking twice every 3 sec.
Notes:
• The ActivHubTM RF50 blinking twice means a functional
signals 3D sync input and its RF transmission.
• If you experience interferences, or if you are using
many ActivHubTM RF50 in a single room or building, you
may choose another channel between 3 and E.
9

2. IR > RF mode
1. Set the function selector to position 8.
2. Plug the USB connector to a powered socket or an
optional adapter.
3. Plug the micro-USB connector to the ActivHubTM RF50.
4. Check the blue LEDs light up to signal power on.
5. Turn the IR reception window towards the IR 3D source
like the 3DTV.
6. Check the blue LEDs starts blinking twice every 3 sec.
7. Make sure you keep the IR reception window turned
toward the 3D source.
Notes:
• The ActivHubTM RF50 blinking twice means a functional
signals 3D sync input and its RF transmission.
• IR receiving mode requires a clear line-of-sight
between the ActivHubTM RF50 and the 3D source.
• If you experience interferences, or if you are using
many ActivHubTM RF50 in a single room or building, you
may choose another channel between 3 and E.
3. DLP®-link™ > RF mode
1. Set the function selector to position 8.
2. Plug the USB connector to a powered socket or an
optional adapter.
3. Plug the micro-USB connector to the ActivHubTM RF50.
4. Check the blue LEDs light up to signal power on.
5. Turn the DLP-link reception window towards the screen
or the projector.
6. Check the blue LEDs starts blinking twice every 3 sec.
7. Make sure you keep the DLP-linkTM reception window
turned toward the 3D image or source.
10
 Loading...