

User Guide
Manuel d’utilisation
model
VPEG-05010
www.volfoni.com

SUMMARY
1. REQUIREMENTS 4.
2. PRODUCT OVERVIEW 5.
3. DESCRIPTION OF THE ACTIVEYES 5.
4. QUICK START 6.
5. CHARGING BATTERY 6.
6. UPDATE YOUR ACTIVEYES PRO 7.
7. VOLFONI LOADER - PARAMETERS 8.
8. IR COMPATIBILITY 9.
9. RF COMPATIBILITY 10.
10. TROUBLESHOOTING 10.
11. SPECIFICATIONS 11.
12. LED SIGNIFICANCE 12.
13. IMPORTANT SAFETY RECOMMENDATIONS 12.
14. WARRANTY 13.
15. REGULATION 13.
16. PRECAUTION FOR USE 14.
17. CAUTION MAINTENANCE OF YOUR GLASSES 14.
18. MORE INFORMATION AND CONTACTS 15.
54
1. REQUIREMENTS
To use your ActivEyes Pro in active 3D mode you need
a 3D device playing 3D content on a 3D Display using
compatible IR synchronization.
2. PRODUCT OVERVIEW
Your 3D Glasses System by Volfoni includes one pair of
ActivEyes Pro 3D glasses and one ActivMe Pro electronic
receiver. Your ActivEyes Pro glasses, when connected
to the ActivMe Pro, are compatible with most 3D TV sets
using IR signals to control 3D glasses. The ActivMe Pro
receiver can be recharged and updated to new IR and
RF 3D protocols via its USB port.
If your ActivEyes Pro 3D Glasses are tted with Hybrid
ClearLenses, they will decode 3D from passive displays
too.
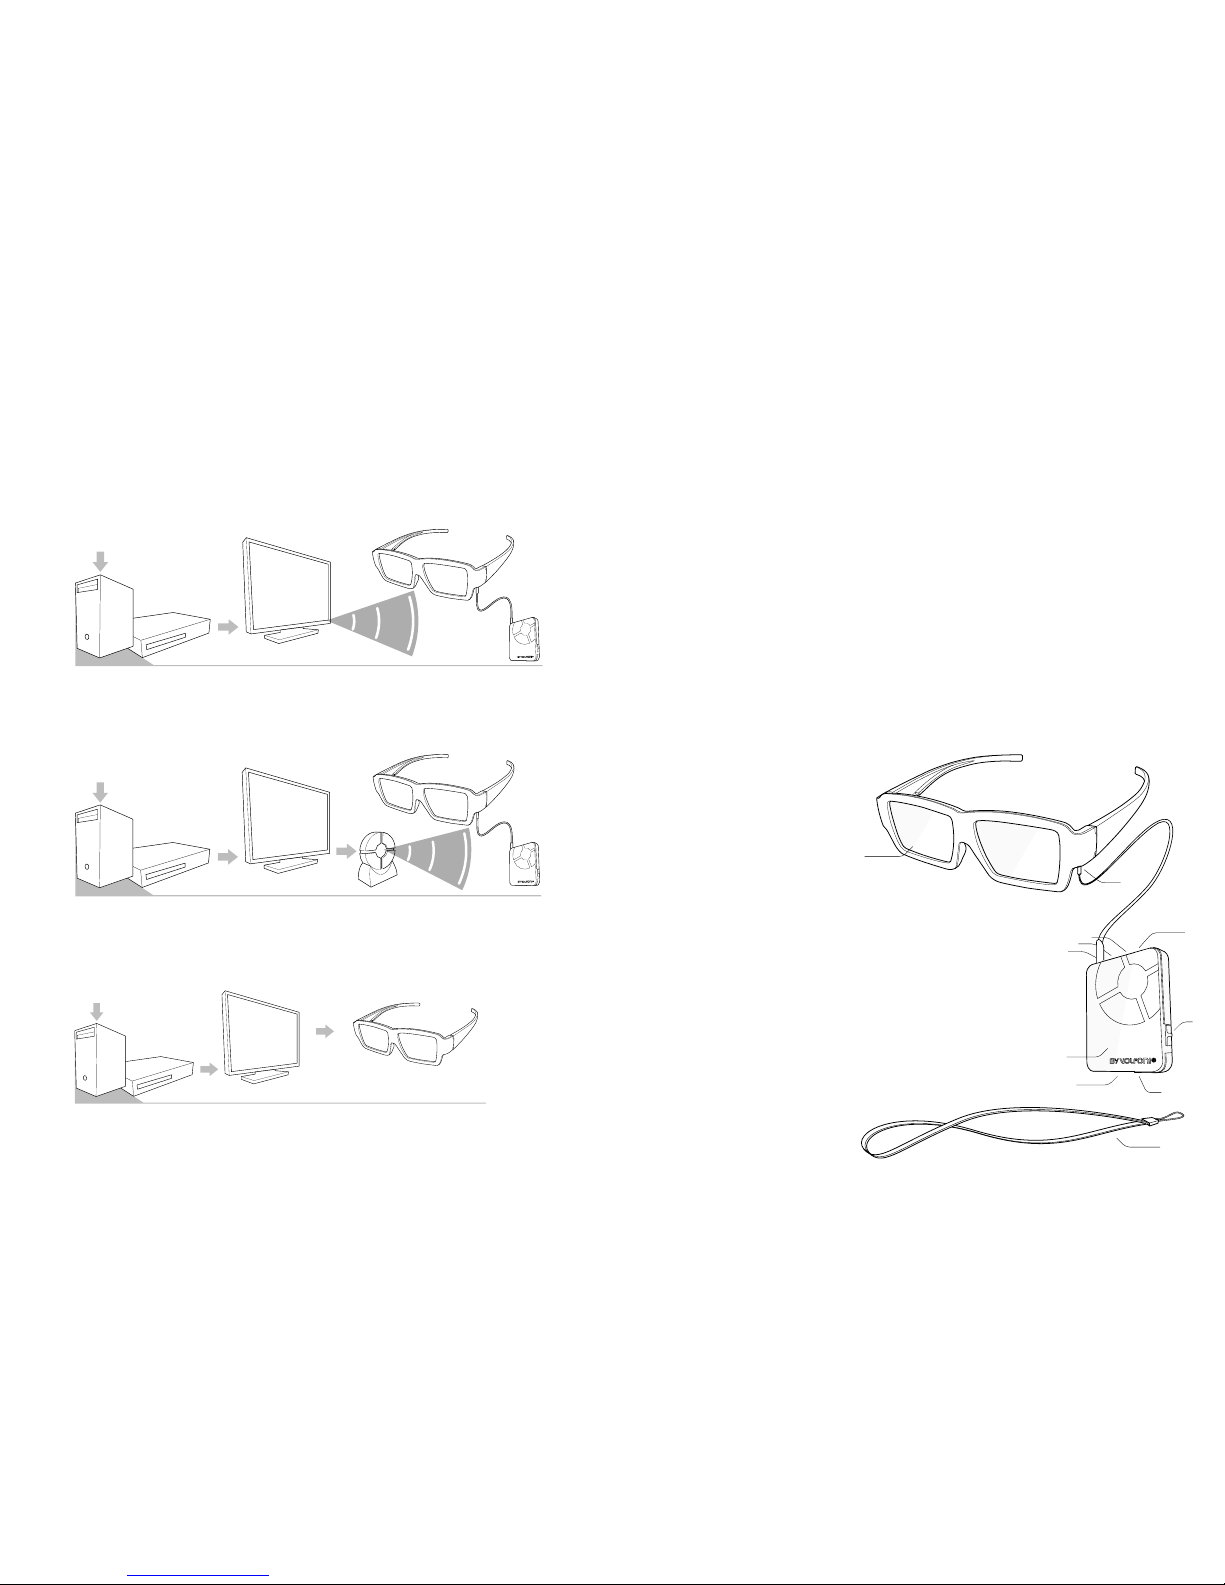
3. DESCRIPTION OF THE ACTIVEYES
The ActivEyes Pro eyewear includes:
1. Liquid Crystal shutter lens
2. Connection plug
If your 3D Display does not come with an IR emitter, you
may want to acquire one from its manufacturer, or plug
a Volfoni ActivHub RF50 to a 3D sync out
To use your ActivEyes Pro with hybrid lenses in passive 3D
mode, you need a 3D device playing 3D content on a
3D display using compatible circular light polarization.
3D Content
Movie, sports...
Active 3D
display
IR Beam
3D Player
Computer, Blu-Ray...
Active 3D
display
3D Content
Movie, sports...
ActivHub
Pro
3D Player
Computer, Blu-Ray...
Passive 3D
display
3D Content
Movie, sports...
3D Player
Computer, Blu-Ray...
5.
9.
6.
3.
4.
10.
7.
8.
11.
1.
2.
The ActivMe electronic driver
includes
3. Power selector [on-off ]
4. Function selector [1-2]
5. Action button [Press]
6. LED
7. IR window
8. Micro-USB computer plug
(charging and upgrading)
9. Micro-jack connection plug
for glasses
10. Holding clamp
11. Lanyard
76
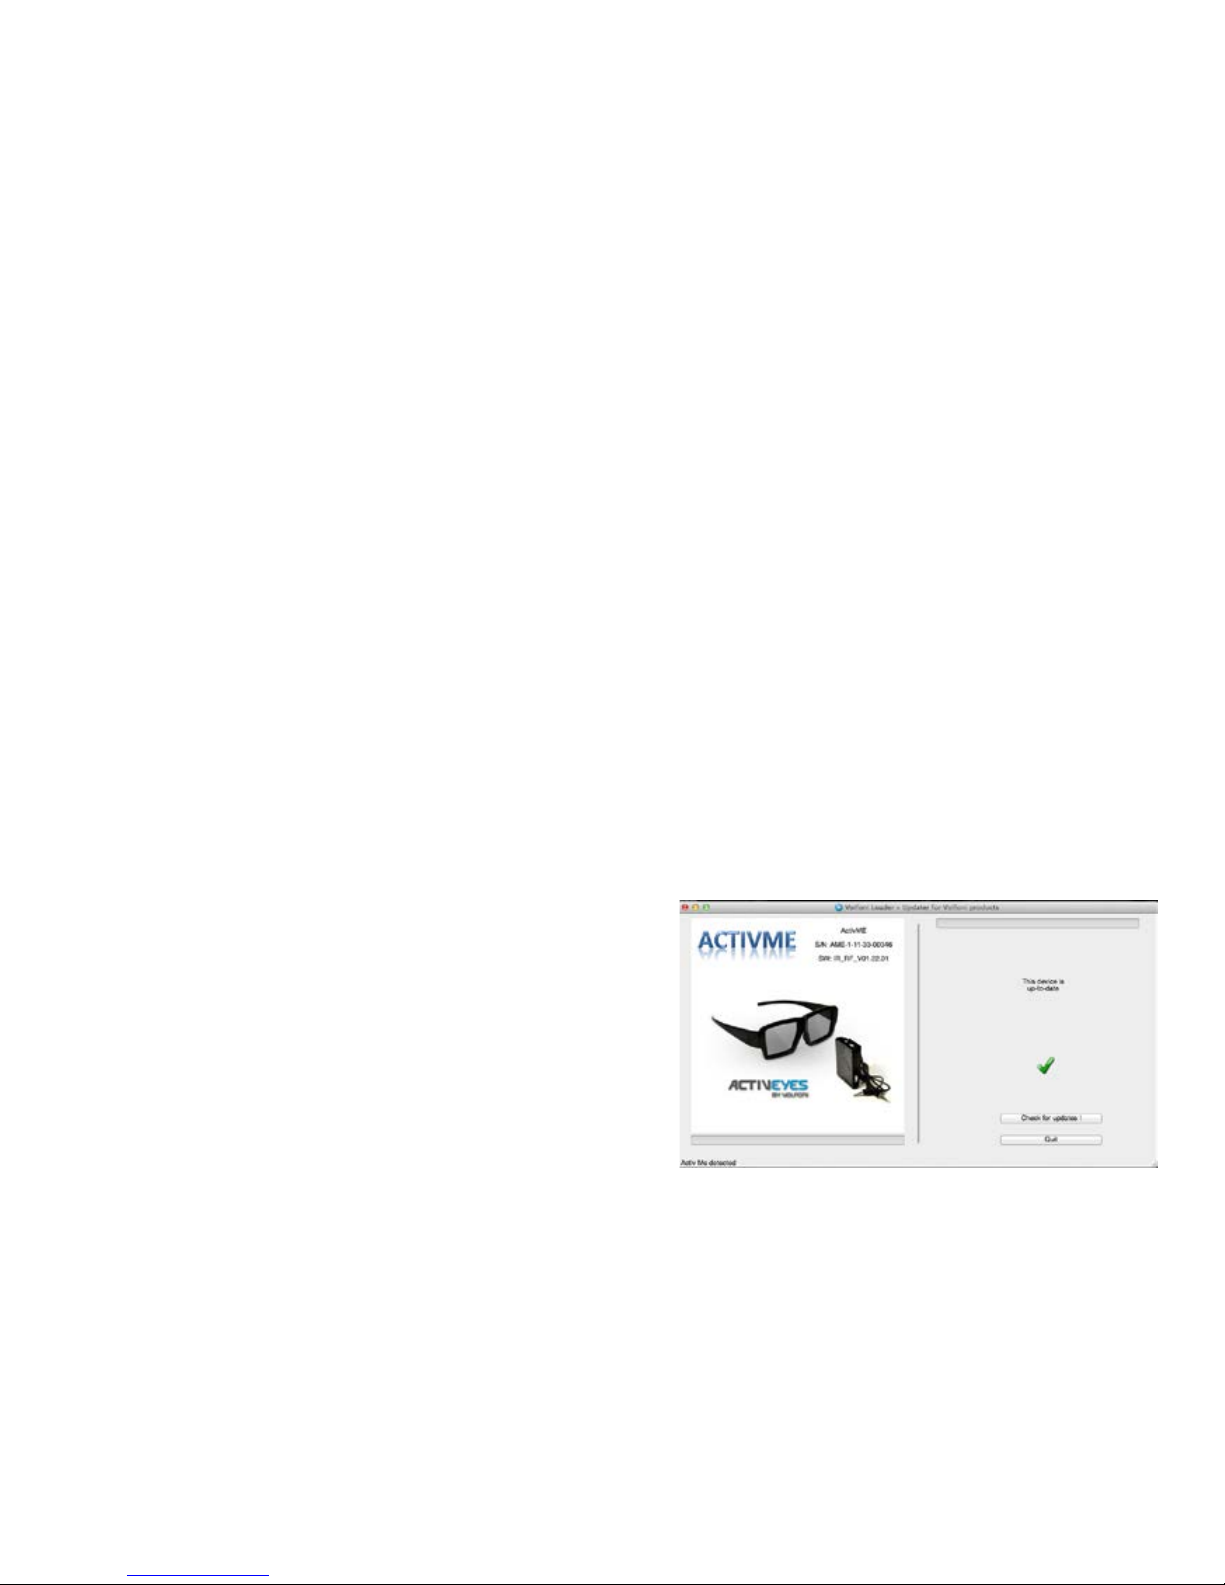
6. UPDATE YOUR ACTIVEYES PRO
Before using the ActivEyes Pro glasses, make sure you
have the latest version of software from our website.
For this purpose, please download the « Volfoni Loader
» software (http://www.volfoni.com/en/support) and
connect your glasses to your computer. Then start the
software and follow the instructions below.
- choose the menu “SUPPORT”
- choose “Upgradable Software”
- download the application “VOLFONI LOADER”
- connect your computer to the μUSB connector on
ActivMe with the USB/μUSB cable
- press and hold the button of the ActivMe, and switch
ON the ActivMe
- the LED of the ActivMe will light red
- verify that the application recognizes your system
- once you are connected, press the button “Check for
updates”
- download the lastest version
4. QUICK START
To watch active displays using your ActivEyes System in
universal infrared 3D mode :
1. Using the connection cable, plug the ActivEyes Pro to
the ActivMe Pro, and place the glasses on your head.
2. Check that the “function” selector on the ActivMe Pro
is on “1”.
3. Switch the power on. The glasses should blink once
each eye to signal that the system is up and running.
4. As soon as the IR or RF signal is identied and
interpreted, the glasses go into 3D mode. You can now
attach the ActivMe Pro to the front of your clothing or
attach to the lanyard, making sure that the IR window is
not obscured.
To watch passive displays (for VBAE-01000 models only) :
Simply wear your ActivEyes Pro. There’s no need to plug
or power on the ActivMe Pro.
5. CHARGING BATTERY
To charge the ActivMe Pro, plug it in using the Micro-USB
cable to any 5V USB power source (or computer). The
LED should go red until the battery is fully charged, then
the LED goes green, typically after 2.5 hours. The battery
is estimated to last 30 hours before needing a recharge.
Your ActivMe can operate while charging.
98
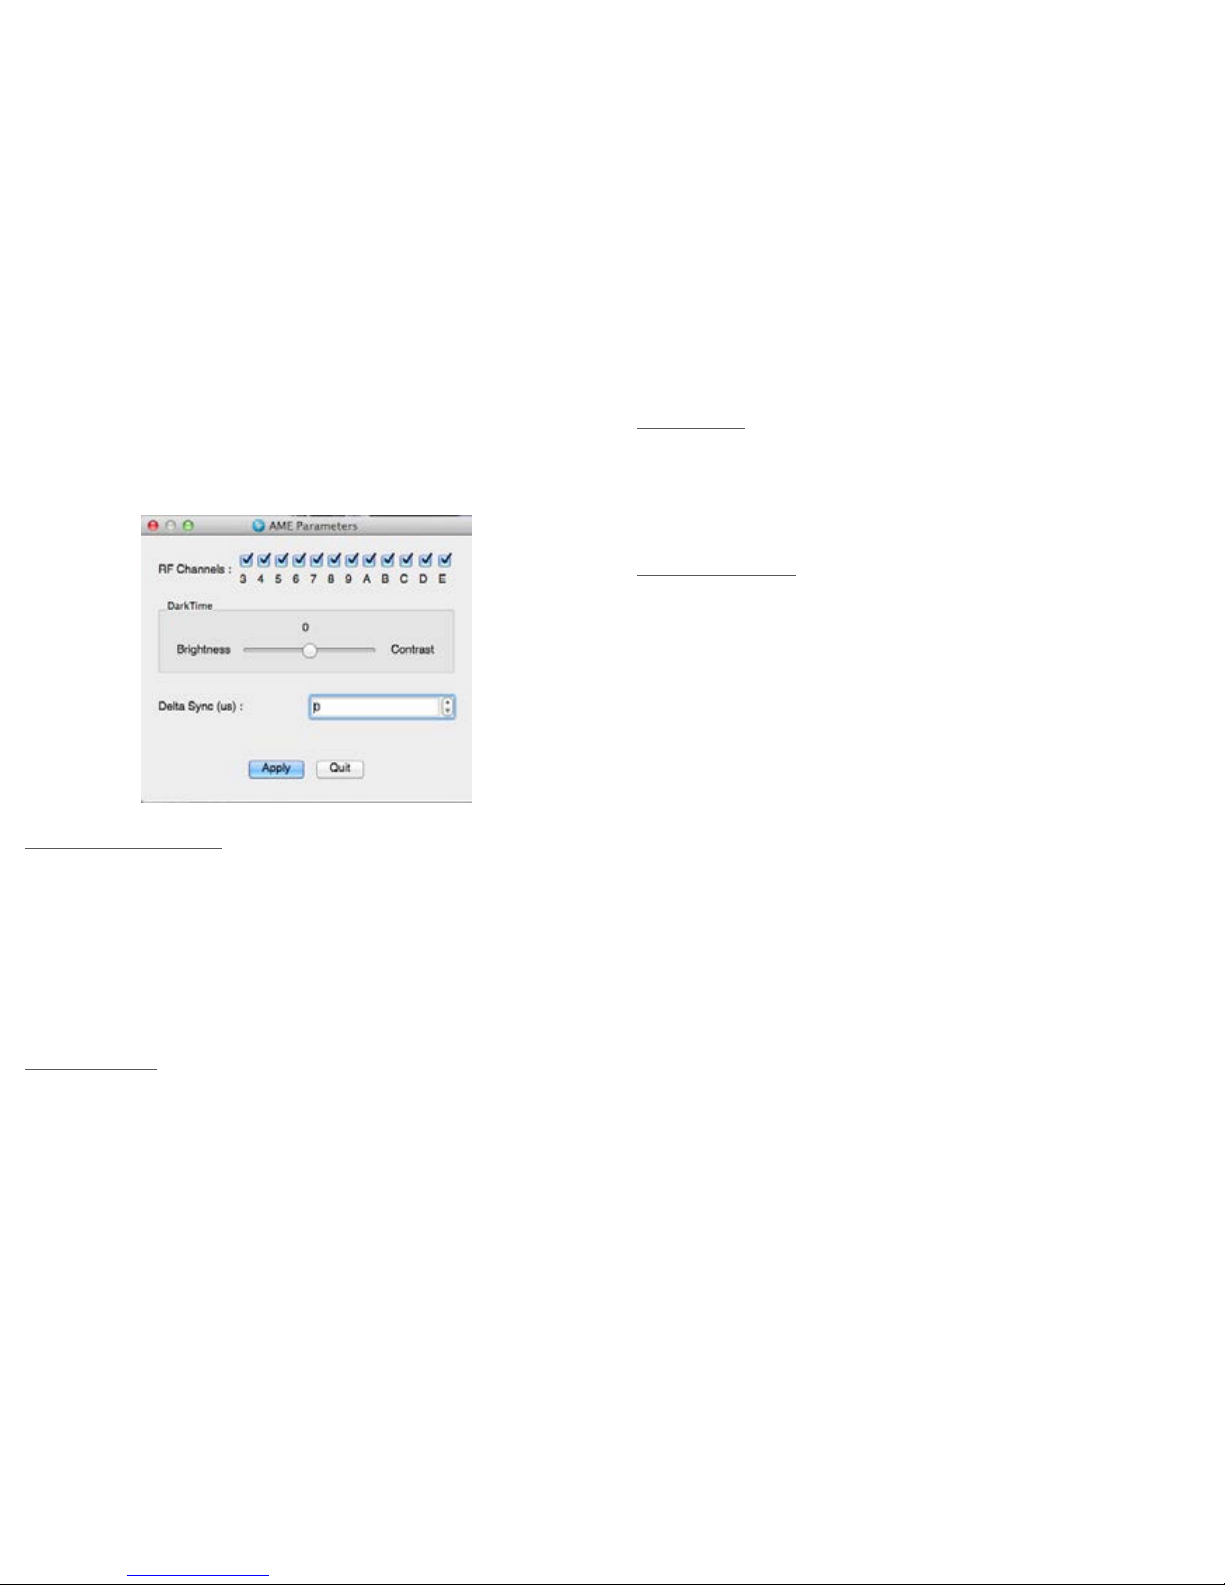
7. VOLFONI LOADER - PARAMETERS
You can access to this part by clicking on
“parameter” in the menu “edit” when your glasses
are connected
3D Synchronisation :
- Normal : In this conguration the glasses will receive a
normal 3D synch
- Inverted : In this conguration the glasses will receive a
reverse 3D sync
- 2D Left : In this conguration the glasses will show the
2D image left
- 2D Right : n this conguration the glasses will show the
2D image right
RF Channels :
Choose which channels the glasses will receive on this
switch position (you have to choose the same channel
on your ActivHub RF50)
Dark Time :
Allows you to change the value of DarkTime
The slider allows you to adjust the value between -4000
microseconds (better luminosity) and 4000 microseconds
(better contrast). The value applied is inscribed above
the slider (0 in this example)
Delta Sync (μs) :
Modify the sync offset (between -2000 and 2000
microseconds). Default = 0
8. IR COMPATIBILITY
The ActivEyes Pro glasses are compatible with all infrared 3D sync protocols currently available:
KONKA®
ARCELIK®
SHARP®
SONY® (*)
PANASONIC® (*)
LG®
MITSUBISHI®
SAMSUNG® (*)
NuVision
XPAND® (unencrypted)
HI-SENSE
®NVIDIA® (including “light boost”)
* Bluetooth® and Full HD3D™ not supported New IR
protocols entering the market will be available on the
Volfoni website via software update. Please refer to
part 6 of this user guide for updating the software of the
ActivEyes Pro

1110
9. RF COMPATIBILITY
Using your ActivEyes Pro in RF 3D mode :
ActivMe Pro is compatible with ActivHub RF50. It’s a
proprietary signal.
10. TROUBLESHOOTING
PROBLÈME SOLUTION
The jack plug may not be
all the way inserted in the
ActiveMe Pro or in the
glasses
Check the connection
jack
The IR signal is not
recognized
Check that your 3D
system is emitting IR
The IR signal is obscured Make sure ActivMe Pro
is facing the IR emitter
The IR signal is scrambled
by other sources like direct
sunlight
Reduce external light
The ActivMe Pro battery is
discharged
Plug the USB cable into
a power source and try
again
Your 3D display uses an IR
protocol not compatible
with Activeyes Pro
Check www.volfoni.
com for update
11. SPECIFICATIONS
ACTIVEYES PRO VPAE-02000 VPAE-01000
Lens technology ECB liquid crystal Hybrid ECB
Transmittance 35% 33%
Residual light 17% 16%
Contrast 200:1 200:1
Connector 4 points 2.5’’ jack
Weight 29g
ActivMe Pro (electronic driver) VPAE-03000
Receiver IR and RF
Connector μUSB and 4-points 2.5’’ jack
Power Battery type Lithium-ion
Operating time 30 hours
Operating conditions Operating 0° to 35° C
Storage -20° to 45° C
Relative humidity 5% to 95%
Height 50 mm
Width 41 mm
Depth 15 mm
Weight 21 g

1312
12. LED SIGNIFICANCE
- Flashing Green: Valid 3D signal detecte
- Red: Battery recharge
- Flashing Green/Orange: Viewing 3D and recharging
simultaneously
13. IMPORTANT SAFETY
RECOMMENDATIONS
- The ActivEyes Pro 3D glasses are not suitable for wear
when playing sports, driving vehicles, operating heavy
machinery, or doing outdoor activities. It should not be
used as sunglasses (no UV protection)
- If you are unsure about your vision, take a test to verify
your ability to see stereoscopic 3D images.
- Do not sit too close to the screen when watching 3D
images.
- Watching 3D may cause discomfort (such as eye
strain, altered vision, fatigue, nausea, lightheadedness,
dizziness, confusion, loss of awareness, convulsions,
cramps and/or disorientation) for some people. Volfoni
recommends that you take regular breaks when
watching 3D content or playing 3D video games until
the discomfort ends. If the discomfort persists, consult a
doctor.
- Certain types of TV images or video games that
contain ashing patterns of light may cause epilepsy
symptoms for some viewers. If you or any member of
your family has a history of epilepsy, Volfoni strongly
recommends that you consult a physician before the
use of this product.
- Be aware of young children, especially those under six
years old. Because their vision is still under development,
consult a doctor (such as pediatrician or eye doctor)
before allowing young children to watch 3D.
- Not for children’s use without proper adult supervision.
- If the product is broken, please keep broken pieces
away from mouth and eyes. Dispose of pieces
responsibly.
- Do not use 3D glasses in dangerous areas (such as
balconies and stairwells).
14. WARRANTY
Volfoni Group reserves the right to make changes in
the hardware, packaging or other documentation
without prior written notice. The ActivEyes Pro glasses are
a trademark of Volfoni Group. All trademarks are the
property of their respective companies.
The EDGE™ VR are warrantied. Please refer to your order
form to be aware of the warrantee terms. The system
should be returned in it original box with original proof
of purchase. Volfoni does not warrant uninterrupted or
error-free operation of the product.
15. REGULATION
European Union - Disposal information :
This symbol means that according to local lawsvand
regulations your product should be disposed of
separately from household waste. When this product
reaches the end of its life, take it to a collection point
designated by local authorities. Some collection points
accept products for free. The separate collection and

1514
recycling of your product at the time of disposal will
help conserve natural resources and ensure that it is
recycled in a manner that protects human health and
the environment.
- This Class B digital apparatus complies with Canadian
ICES-003.
16 . PRECAUTION FOR USE - 3D VIEWING
GUIDE-LINES
- The 3D glasses need to synchronize by infrared rays. For
this operation to work well, be aware of the following
instructions:
- The ActivMe Pro has to face the 3D Sync Transmitter. Remove all objects placed between the 3D glasses and
the 3D Sync Transmitter.
- Other infrared communication devices or lighting
equipment, residential heating equipment, etc..., may
interfere with the synchronization.
- Avoid watching 3D under uorescent lamp (50- 60HZ)
or wavelength lamp. Sometimes this can cause a small
amount of screen ickering.
17 . CAUTION MAINTENANCE OF YOUR
GLASSES
- Protect the 3D system from direct sunlight, heat, or
water. Extreme conditions may alter the product’s
abilities.
- Do not drop or modify the electrical or mechanical
components of the 3D system.
- Do not apply force to the lenses of the 3D system.
- Do not bend the product.
- Use a clean soft cloth when cleaning the 3D glasses to
avoid scratching, especially on the lens surface.
- Always transport your 3D glasses in a rigid case to avoid
scratching the lenses and to prevent the frames from
breaking.
- Do not submerge the ActivEyes Pro glasses or the
ActivMe Pro IR receiver in water.
18. MORE INFORMATION AND
CONTACTS
For more information, please contact Volfoni.
support@volfoni.com
logistics@volfoni.com
www.volfoni.com
Distributed in France by VOLFONI SAS
29 rue Jean Jacques Rousseau 75001 Paris, France
Distributed in Americas by VOLFONI Inc.
3450, Cahuenga Bd West, Unit 504, Los Angeles,
CA90068, USA
Distributed in Germany by VOLFONI GmbH
Erzgießereistraße 38, 80335 München, GERMANY
Distributed in Spain by VOLFONI Iberia, S.L.
4, Ronda Guglielmo Marconi, 46980 Paterna (Valencia),
Spain
Distributed in China by VOLFONI Ltd
2101, Tower One, Lippo Center, 89, Queensway, Hong
Kong

1716
SOMMAIRE
1. SPÉCIFICITÉS TECHNIQUES REQUISES 18.
2. DESCRIPTION 19.
3. COMPOSANTS 19.
4. DÉMARRAGE RAPIDE 20.
5. CHARGEMENT DE LA BATTERIE 20.
6. MISES À JOUR DU LOGICIEL 21.
7. VOLFONI LOADER - PARAMETERS 22.
8. PROTOCOLES IR COMPATIBLES 23.
9. COMPATIBILITÉ RF 24.
10. RÉSOLUTION DES PROBLÈMES 24.
11. SPECIFICATIONS 25.
12. SIGNIFICATION LED 26.
13. IMPORTANT: RECOMMANDATIONS DE SÉCURITÉ 26.
14. GARANTIE 27.
15. REGULATION 28.
16. PRÉCAUTIONS D’EMPLOI 28.
17. ATTENTION ENTRETIEN DE VOS LUNETTES 29.
18. CONTACTS 29.

1918
1. SPÉCIFICITÉS TECHNIQUES REQUISES
L’utilisation de votre ActivEyes Pro en mode 3D actif
nécessite un lecteur 3D diffusant un contenu 3D sur
un écran 3D utilisant une synchronisation Infrarouge
compatible.
2. DESCRIPTION
Votre système de lunettes 3D Volfoni comprend une
paire de lunettes 3D ActivEyes Pro et un récepteur
électronique ActivMe Pro. Vos lunettes ActivEyes Pro,
lorsqu’elles sont connectées à l’ActivMe Pro sont
compatibles avec la plupart des téléviseurs 3D utilisant
des signaux infrarouge pour contrôler les lunettes 3D. Le
récepteur électronique ActivMe Pro peut être rechargé
et mis à jour via son port USB. Si vos lunettes ActivEyes
Pro sont également équipées de verres hybrides, elles
décodent aussi la 3D des écrans passifs
3. COMPOSANTS
Les lunettes ActivEyes Pro :
1. Verres à cristaux liquides
2. Fiche de connexion
Si votre écran 3D ne dispose pas d’un émetteur
infrarouge, vous devez l’équiper d’un émetteur
compatible, ou d’un ActivHub Pro de Volfoni branché
sur sa prise VESA DIN3.
L’utilisation de votre ActivEyes Pro avec les verres
hybrides en mode 3D passif nécessite un lecteur 3D
diffusant un contenu 3D sur un écran à polarisation
circulaire compatible.
3D Content
Movie, sports...
Active 3D
display
IR Beam
3D Player
Computer, Blu-Ray...
Active 3D
display
3D Content
Movie, sports...
ActivHub
Pro
3D Player
Computer, Blu-Ray...
Passive 3D
display
3D Content
Movie, sports...
3D Player
Computer, Blu-Ray...
Le récepteur électronique ActivMe Pro
3. Interrupteur de mise en marche [on-off]
4. Sélecteur de fonction [1-2]
5. Bouton d’action [Presser]
6. Voyant lumineux
7. Récepteur infrarouge
8. Prise micro-USB (rechargement et mises
à jour)
9. Prise micro-jack de connexion aux
lunettes
10. Clip de maintien
11. Dragonne de tour de cou
5.
9.
6.
3.
4.
10.
7.
8.
11.
1.
2.

2120
6. MISES À JOUR DU LOGICIEL
Avant d’utiliser les lunettes ActivEyes Pro, soyez sûr
d’avoir la dernière version du logiciel disponible sur
notre site web. Pour se faire, téléchargez le logiciel «
Volfoni Loader » (http://www.volfoni.com/fr/support) et
connectez vos lunettes à votre ordinateur. Puis démarrez
le logiciel et suivez les instructions ci-dessous.
-Choisissez le menu « Aide »
-Choisissez « Vérier les mises à jour pour Volfoni Loader »
-Téléchargez l’application « Volfoni Loader »
-Connectez votre ordinateur à la connectique μUSB sur
l’ActivMe via son cable USB/μUSB
-Maintenez appuyé le bouton de l’ActiveMe et
commutez le bouton d’allimentation
-La LED de l’ActivMe s’allumera (en rouge)
-Vériez que l’application reconnait le système
-Une fois que vous êtes connecté, maintenez le bouton «
Vérier les mises à jour ! »
-Téléchargez la dernière version
4. DÉMARRAGE RAPIDE
Utilisation de votre système ActivEyes Pro pour regarder
en mode 3D Infrarouge sur un écran actif :
1. À l’aide du câble micro-jack, connectez vos ActivEyes
Pro à l’ActivMe Pro et chaussez vos lunettes.
2. Vériez que le sélecteur de fonction sur l’ActivMe Pro
soit sur position 1.
3. Mettez l’appareil sous tension. Les lunettes doivent
cligner une fois de chaque oeil pour signaler que le
système est opérationnel.
4. Dès que le signal IR est identié et interprété, les
verres passent en mode 3D. Vous pouvez désormais
clipser l’ActivMe Pro à l’avant de vos vêtements ou
le suspendre à l’aide de la dragonne de tour de cou.
Faites en sorte que la fenêtre Infrarouge soit tournée vers
votre télévision et ne soit pas obstruée.
Utilisation de votre système ActivEyes Pro pour regarder
un écran 3D passif pour le modèle VPAE-01000 : pour
regarder de la 3D sur un écran passif avec les modèles
hybrides, il suft de porter vos lunettes ActivEyes
Pro. Vous n’avez pas besoin d’allumer ou même de
brancher l’ActivMe Pro.
5. CHARGEMENT DE LA BATTERIE
Pour charger l’ActivMe Pro, branchez le à une source
USB 5V. Le voyant doit passer au rouge jusqu’à ce que
la batterie soit complètement chargée, généralement
au bout de 2 heures 30 min. Il devient alors vert et
l’autonomie de la batterie est estimée à 30 heures avant
de devoir être chargée à nouveau.

2322
7. VOLFONI LOADER - PARAMETERS
Cette partie est disponible en cliquant sur « paramètres »
dans le menu « Edition »
RF Channels :
Choisir le canal que les lunettes recevra (vous devez
choisir le même canal que sur votre ActivHub RF50)
Dark Time :
Vous permet de changer la valeur du dark time
Le slider vous permet d’ajuster la valeur entre -4000 ms
(meilleur luminosité) et 4000 ms (meilleur contraste).
La valeur est inscrite au dessus du slider (0 dans cet
exemple).
Delta Sync (μs) :
compensation du signal de synchronisation (entre -2000
et 2000 microsecondes). Défaut = 0
8. PROTOCOLES IR COMPATIBLES
L’ActivEyes Pro est capable de se synchroniser avec de
nombreuses marques. Les protocoles IR suivants sont
reconnus :
KONKA®
ARCELIK®
SHARP®
SONY® (*)
PANASONIC® (*)
LG®
MITSUBISHI®
SAMSUNG® (*)
NuVision
XPAND® (unencrypted)
HI-SENSE®
NVIDIA® (including “light boost”)
* Bluetooth® et Full HD3D™ non compatibles
Les nouveaux protocoles infrarouges entrant sur le
marché seront disponibles sur le site web volfoni via
la mise à jour du logiciel. Se référer à la partie 5 de
ce manuel pour mettre à jour le logiciel des lunettes
ActivEyes Pro.

2524
9. COMPATIBILITÉ RF
Utiliser votre ActivEyes Pro en mode RF 3D :
L’ActivMe Pro est compatible avec l’ActivHub RF50.
C’est un signal propriétaire.
10. RÉSOLUTION DES PROBLÈMES
PROBLÈME SOLUTION
La prise jack n’est peut être pas
tout à fait insérée dans le clip
ActivMe Pro ou dans les lunettes
Vérier la prise de
connexion jack
Le signal Infrarouge n’est pas
reconnu
Vérier que votre
système 3D émet en
Infrarouge
Le signal Infrarouge est occulté Mettre l’ActivMe Pro
face à l’émetteur IR,
vérier que la source
IR n’est pas occultée par un objet
Le signal Infrarouge est brouillé
par d’autres sources comme la
lumière directe du soleil
Réduire la lumière
solaire, tirer les
rideaux ou volets
La batterie de l’ActivMe Pro est
déchargée
Banchez le câble
USB à une source
d’alimentation.
Votre afchage 3D utilise
un protocole Infrarouge
incompatible avec ActivEyes
Pro
Vérier www.volfoni.
com pour les dernières mises à jour
11. SPECIFICATIONS
ACTIVEYES PRO VPAE-02000 VPAE-01000
Technologie des
cellules
Cristal liquide
ECB
ECB Hybride
Transmittance 35% 33%
Lumière résiduelle 17% 16%
Contraste 200:1 200:1
Connecteur 4 points 2.5’’ jack
Poids 29 g
ActivMe Pro (driver électronique) VPAE-03000
Récepteur IR et RF
Connecteur Micro USB et Jack 4-points 2.5’’
Allimentation Type de batterie Lithium-ion
Autonomie 30 hours
Conditions
d’opérations
Fonctionnement 0° to 35° C
Stockage -20° to 45° C
Humidité relative de 5% à 95%
Hauteur 50 mm
Largeur 41 mm
Epaisseur 15 mm
Poids 21 g

2726
12. SIGNIFICATION LED
- Clignote en vert: Signal 3D valide détécté
- Rouge : Batterie en chargement
-Clignote en Vert/Orange : Signal 3D détécté et
rechargement en simultané
13. IMPORTANT: RECOMMANDATIONS
DE SÉCURITÉ
- Les lunettes 3D ActivEyes Pro ne conviennent pas pour
les activités sportives, la conduite de véhicules ou de
machines, et toutes autres activités extérieures. Ne pas
utiliser les lunettes 3D ActivEyes comme lunettes de soleil.
- Si besoin, vériez vos capacités à voir les images
stéréoscopiques 3D en consultant votre médecin
ophtalmologiste ou votre opticien.
- Ne pas s’asseoir trop près de l’écran pendant que vous
visionnez des images 3D.
- Dans certaines conditions, visionner de la 3D peut
occasionner une gêne (telle que fatigue oculaire, vision
troublée, fatigue, nausées, étourdissements, vertiges,
confusion, perte de conscience, convulsions, crampes
et/ou désorientation) chez certaines personnes. Volfoni
vous recommande de faire des pauses régulières
pendant que vous visionnez de la 3D ou jouezà des jeux
vidéo en 3D. Si une gêne persiste, consultez un médecin.
- Certains types d’images ou de jeux vidéo contenant
des ash lumineux peuvent causer des symptômes
d’épilepsie chez certains téléspectateurs. Si vous ou un
membre de votre famille a des antécédents d’épilepsie,
Volfoni vous recommande vivement de consulter un
médecin avant l’utilisation de ce produit.
- Surveillez les enfants en bas âge, surtout ceux de moins
de six ans. Leur vision étant encore en développement,
il est recommandé de consulter un médecin (comme un
pédiatre ou un ophtalmologiste) avant de permettre à
de jeunes enfants de regarder des images 3D.
- Les enfants en bas-âge ne doivent pas utiliser ce
produit sans la supervision d’un adulte.
- Si le produit est cassé, veillez à garder les morceaux
brisés loin de la bouche et des yeux. Plutôt que de les
jeter avec les déchets courants, pensez à les recycler
avec vos déchets électroniques.
- Ne pas utiliser ces lunettes 3D dans des zones
potentiellement dangereuses, tels que les balcons ou les
cages d’escaliers.
14. GARANTIE
ActivEyes Pro et ActivMe Pro sont garantis pendant trois
à douze mois selon la législation locale. Les verres et le
récepteur doivent être retournés dans la boîte d’origine
avec la preuve d’achat originale. Les verres cassés ou
rayés ne sont pas couverts.
Volfoni ne garantit pas un produit ayant fonctionné de
manière ininterrompue et ne garantit pas un produit
sans dysfonctionnement occasionnel.

2928
15. REGULATION
Union Européenne - informations sur l’élimination :
Le symbole ci-dessus signie que vous devez vous
débarrasser de votre produit sans le mélanger avec les
ordures ménagères, selon les normes et la législation
de votre pays. Lorsque ce produit n’est plus utilisable,
portez-le dans un centre de traitement de déchets
agréé par les autorités locales. Certains centres
acceptent les produits gratuitement. Le traitement
et le recyclage séparé de votre produit lors de son
élimination aideront à préserver les ressources naturelles
et à protéger l’environnement et la santé des êtres
humains.
- Cet appareil numérique de la classe B est conforme à
la norme NMB-003 du Canada.
16 . PRÉCAUTIONS D’EMPLOI
Les lunettes 3D doivent être synchronisées par rayons
Infrarouge. Pour se faire, veillez à respecter les
instructions suivantes :
- L’ActivMe Pro doit être face au dispositif émettant le
signal Infrarouge, c’est-à-dire face au synchroniseur 3D.
- Veillez à ce qu’il n’y ait pas d’objet tiers entre les
lunettes 3D et l’émetteur de synchronisation.
- Les autres appareils de communication Infrarouge
ou l’équipement d’éclairage, appareils de
chauffage résidentiels, etc. peuvent interférer avec la
synchronisation. Évitez de regarder un programme 3D
sous une lampe uorescente. Parfois, cela peut causer
un léger scintillement de l’écran.
17. ATTENTION ENTRETIEN DE VOS
LUNETTES
- Protéger le système 3D de la lumière solaire directe, de
la chaleur ou de l’eau. Des conditions extrêmes peuvent
altérer les capacités du produit.
- Ne pas supprimer ou modier les composants
électriques ou mécaniques du système 3D.
- Ne pas appliquer de force sur les verres de vos lunettes
3D.
- Ne pas plier le produit.
- Utiliser un chiffon doux et propre pour nettoyer les
lunettes 3D et en particulier la surface du verre, pour
éviter de les rayer.
- Toujours transporter vos lunettes 3D dans un étui rigide
pour éviter de rayer ou casser les verres ou la monture.
- Ne pas plonger les ActivEyes Pro ou le récepteur
ActivMe Pro dans l’eau.
18. CONTACTS
Pour plus d’informations merci de contacter
Volfoni:
support@volfoni.com
logistics@volfoni.com
www.volfoni.com
Distribué en France par VOLFONI SAS
29 rue Jean Jacques Rousseau 75001 Paris,

30
France
Distribué en Amerique par VOLFONI Inc.
3450, Cahuenga Bd West, Unit 504, Los Angeles,
CA90068, USA
Distribué en Allemagne par VOLFONI GmbH
Erzgießereistraße 38, 80335 München, GERMANY
Distribué en Spain par VOLFONI Iberia, S.L.
4, Ronda Guglielmo Marconi, 46980 Paterna
(Valencia), Spain
Distribué en Chine par VOLFONI Ltd
2101, Tower One, Lippo Center, 89, Queensway,
Hong Kong
 Loading...