

Volanti Displays xx-4KT Series, 32-4KT, 55-4KT, 65-4KT Quick Manual

Specifications subject to change without notice
© 2019 Volanti Displays – Ver 2.3 17 Feb 2019 Page 1 of 18
4K (UHD) TOUCH SCREEN MONITORS
RS-232 Commands For Use With
RS-232 & Ethernet Connection
Models: xx-4KT
Sizes: 32”, 55”, 65”
Volanti 4k touch screen monitors have both RS-232 and Ethernet connection for remote
commands using an RS-232 protocol command set.
The following guide provides information relating to use of these commands:
• Network connection
• RS-232 connection
• Application software
• RS-232 command set
o Switch mount commands
o Audio & Image
o Picture in Picture related
o Backlight
o On screen display
o Other
• ASCII table
• Browser screen functions
• Contact details
Specifications subject to change without notice
© 2019 Volanti Displays – Ver 2.3 17 Feb 2019 Page 2 of 18
Network connection
Volanti 4k touch screen monitors have a RJ-45 Ethernet port for control and monitoring over a
network. This application note introduces the two user interface modes:
• Command line direct mode, works with remote applications.
• Browser based web server mode.
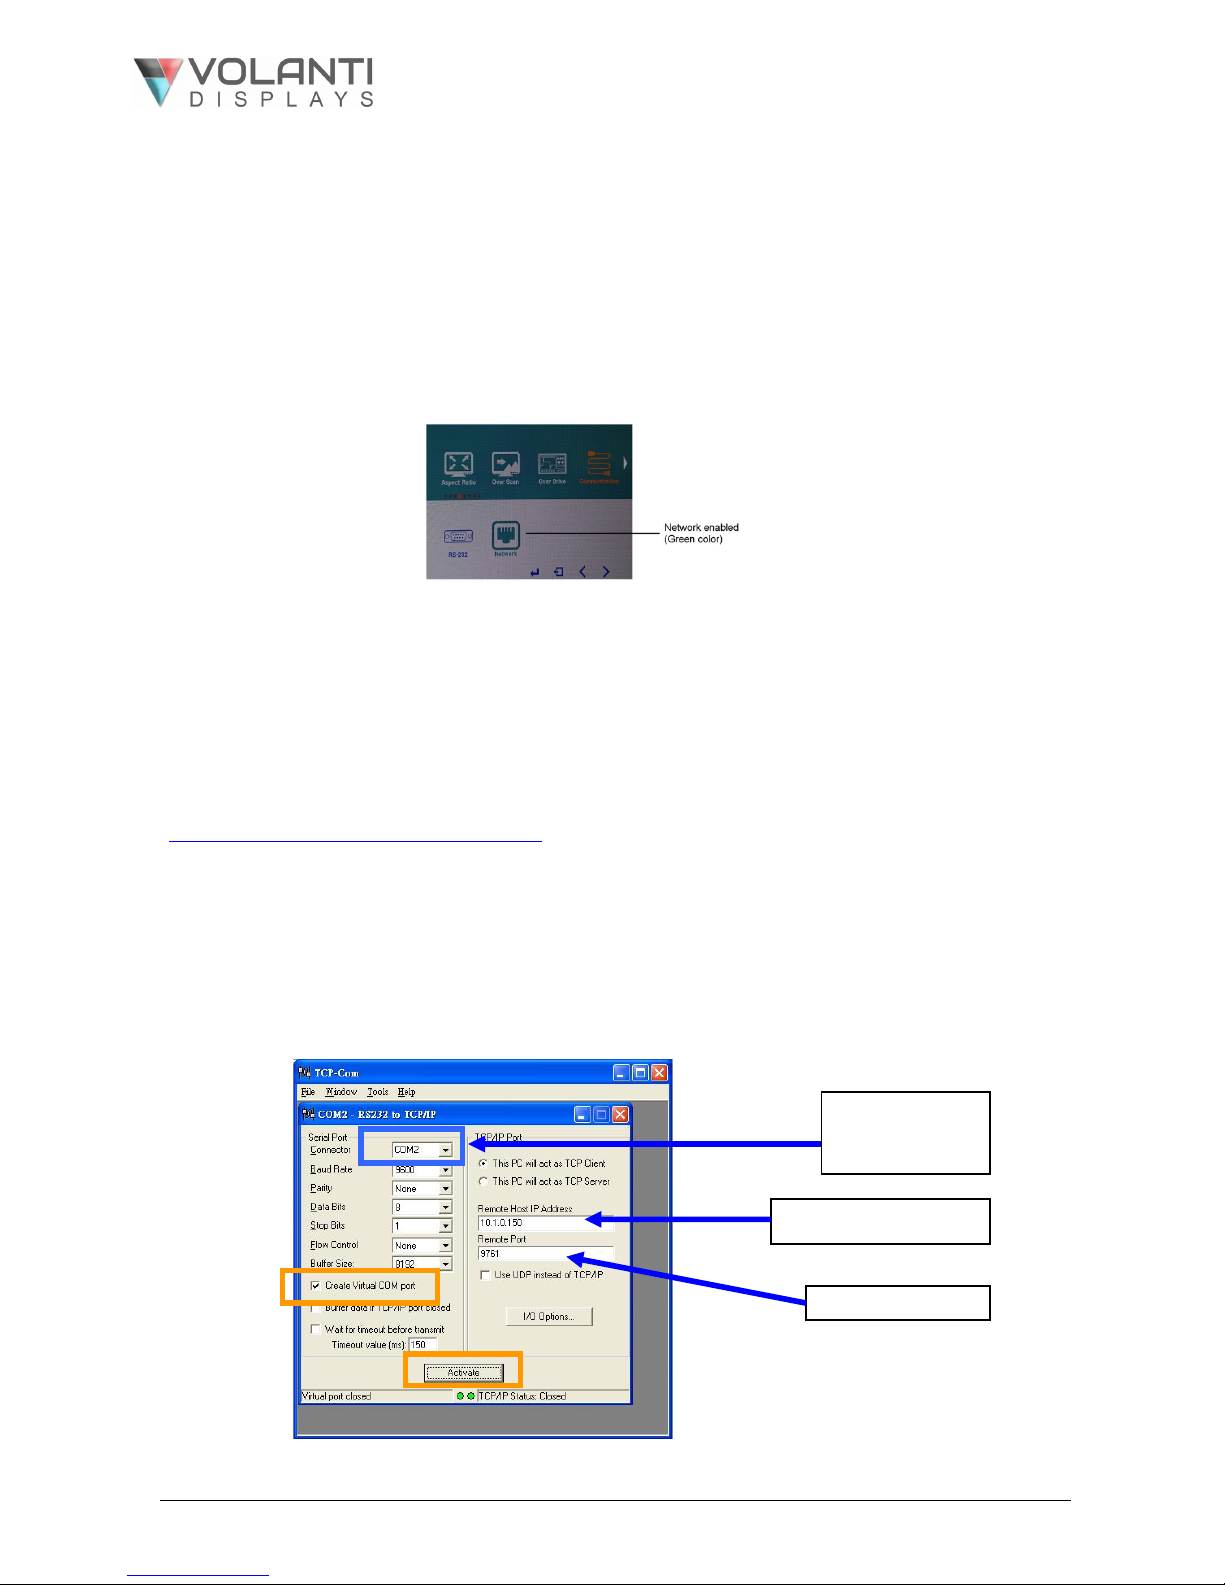
Before enter the above modes, make sure the Network option has been enabled in OSD menu
settings. On OSD menu, go to “Advanced” -> “Communication” -> “Network” -> Press Down key to
select and confirm. See below:
Network Connection – Quick Guide
For experienced users the following quick guide to trying out the network connection and functions
may be useful.
Command line direct mode: The RS-232 commands available are the same as documented in
Appendix III and writing a control application is very similar to the RS-232 type except the
commands must pass through the network. An alternative is to use an application written for RS-232
communication and use a virtual serial port program such as “TCP-COM”
(http://www.taltech.com/products/tcpcom.html)
This software can create “Virtual” RS-232 serial ports that are actually connections to a TCP/IP port.
This allows you to use existing Windows based serial communications software to send and receive
data across TCP/IP network. (Note: The 3
rd
party program is not warranted nor is it the responsibility of Digital View.)
Below are the example of using TCP-COM and serial communication software (e.g. Access Port) to
adjust the brightness value.
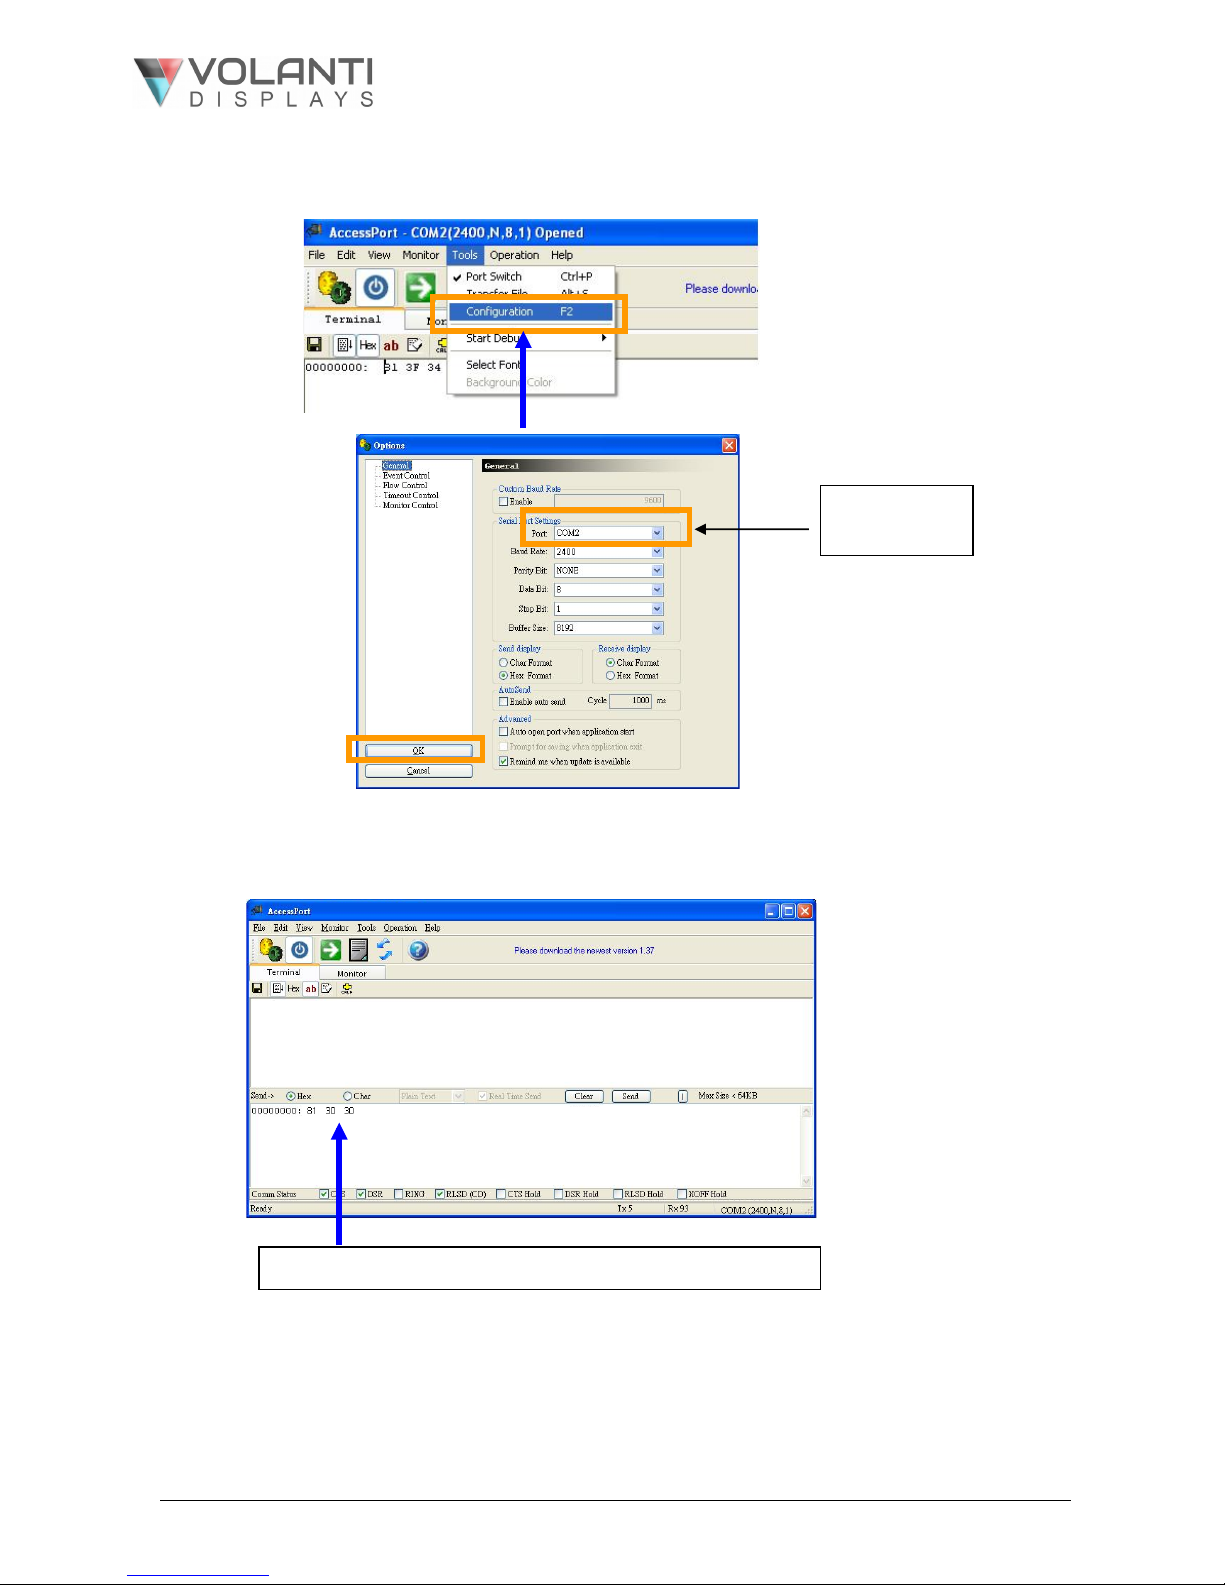
1. Open the “TCP-Com” program and set the following settings and then click activate.
Choose the COM
port without
occupied.
IP address of the monitor
Port is “9761”
Specifications subject to change without notice
© 2019 Volanti Displays – Ver 2.3 17 Feb 2019 Page 3 of 18
2. Open “AccessPort” serial communication software. Tick “Port Switch” and then go to “Tool” à
“Configuration” to follow the settings stated below :
3. Start to type RS-232 command under serial communication program (e.g AccessPort) to control the
monitor.
Some command examples:
C8 30 [Soft power off]
C8 31 [Soft power on]
81 36 34 [Adjust brightness to max. value]
98 50 31 [Jump to Display Port input]
Choose COM
port same as
TCP-COM
For example : Type “81 30 30” to adjust Brightness to min value. (0%)

Specifications subject to change without notice
© 2019 Volanti Displays – Ver 2.3 17 Feb 2019 Page 4 of 18
Browser based web server mode :
• Works with a normal network with DHCP, i.e. must use a router on LAN.
• Connect the 4k monitor to the LAN network and ensure power is on.
• Use the IP Locator utility available from the IP-60 web-page.
http://www.digitalview.com/media/downloads/IPLocator.zip (Windows only)
• Double click on the IP address in the IP Locator window, it will open the monitor browser
page in your default browser. Alternatively copy the IP address into your browser address
line.
• Test the functions that come up on the browser. The function list on browser can be found in
Appendix VII. (Some sensor functions might require alternative firmware version.)
• Summary of functions shown at the end of this guide.
For details, please refer to the separate application note.
Specifications subject to change without notice
© 2019 Volanti Displays – Ver 2.3 17 Feb 2019 Page 5 of 18
RS-232 connection
RS-232 Serial control (Baud rate 2400), 8 bits, 1 stop bit and no parity
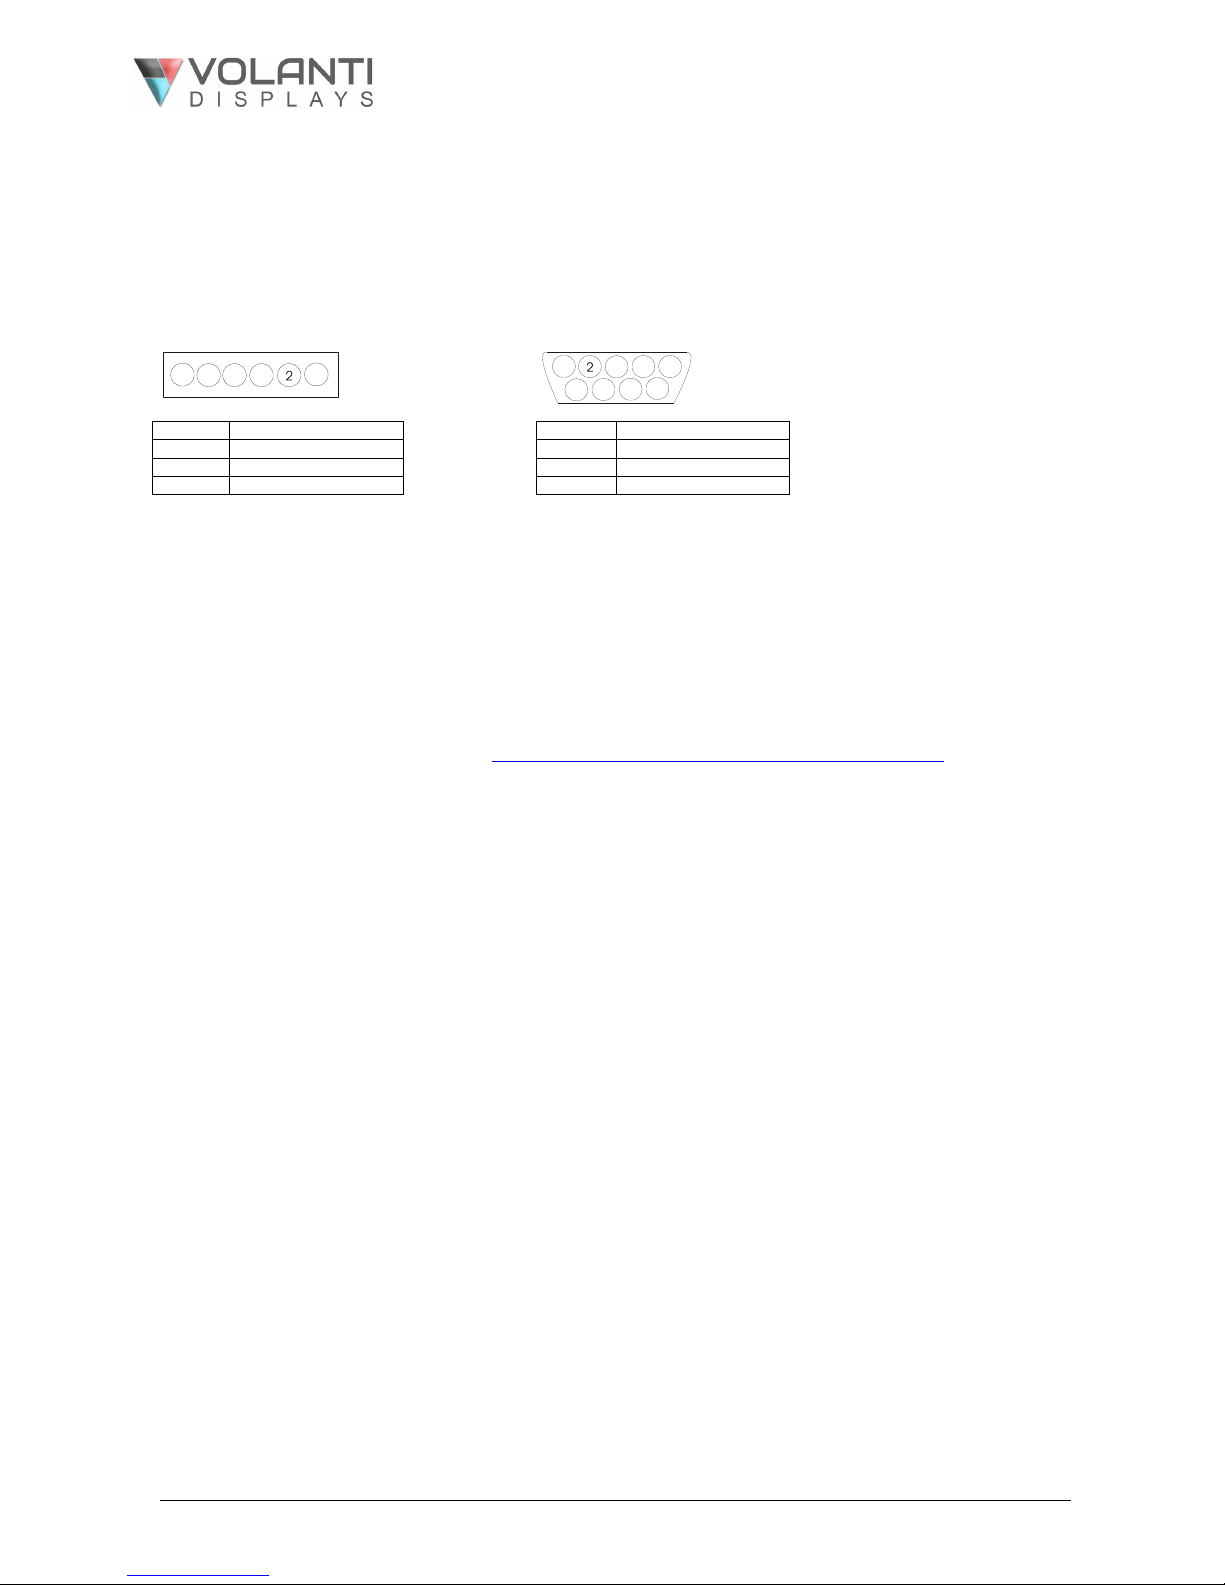
Physical connection :
Controller side Computer side
Connector interface : CN8 Connector interface : Serial port
Mating connector : JST XHP-6 Mating connector : DB9 Female
PIN#
Description
PIN#
Description
4
RS-232 Tx Data
2 RS-232 Rx Data
5
Ground
3 RS-232 Tx Data
6
RS-232 Rx Data
5
Ground
Remark :
(1) : RS-232 connection cable, 600mm P/N 426090200-3 can be ordered separately for connection.
Software connection :
The OSD function can be controlled through sending the RS-232 protocol.
The RS-232 program can be custom-made to fit for application or it can be used the serial control program, like Accessport, Telix or
Serial Utility program developed by DigitalView. Please contact your local support for information.
Software Applications
Digital View free to download software: https://www.digitalview.com/accessories/software.html
This includes applications for RS-232 connection, Network connection, IP locator, Demo source
code.
For custom software development please contact Volanti or an authorized reseller.
54
6
3
1
7
8
9
Mating face of CN8
Mating face of RS-232 DB9 Male
5 463
1
Specifications subject to change without notice
© 2019 Volanti Displays – Ver 2.3 17 Feb 2019 Page 6 of 18
RS-232 command set
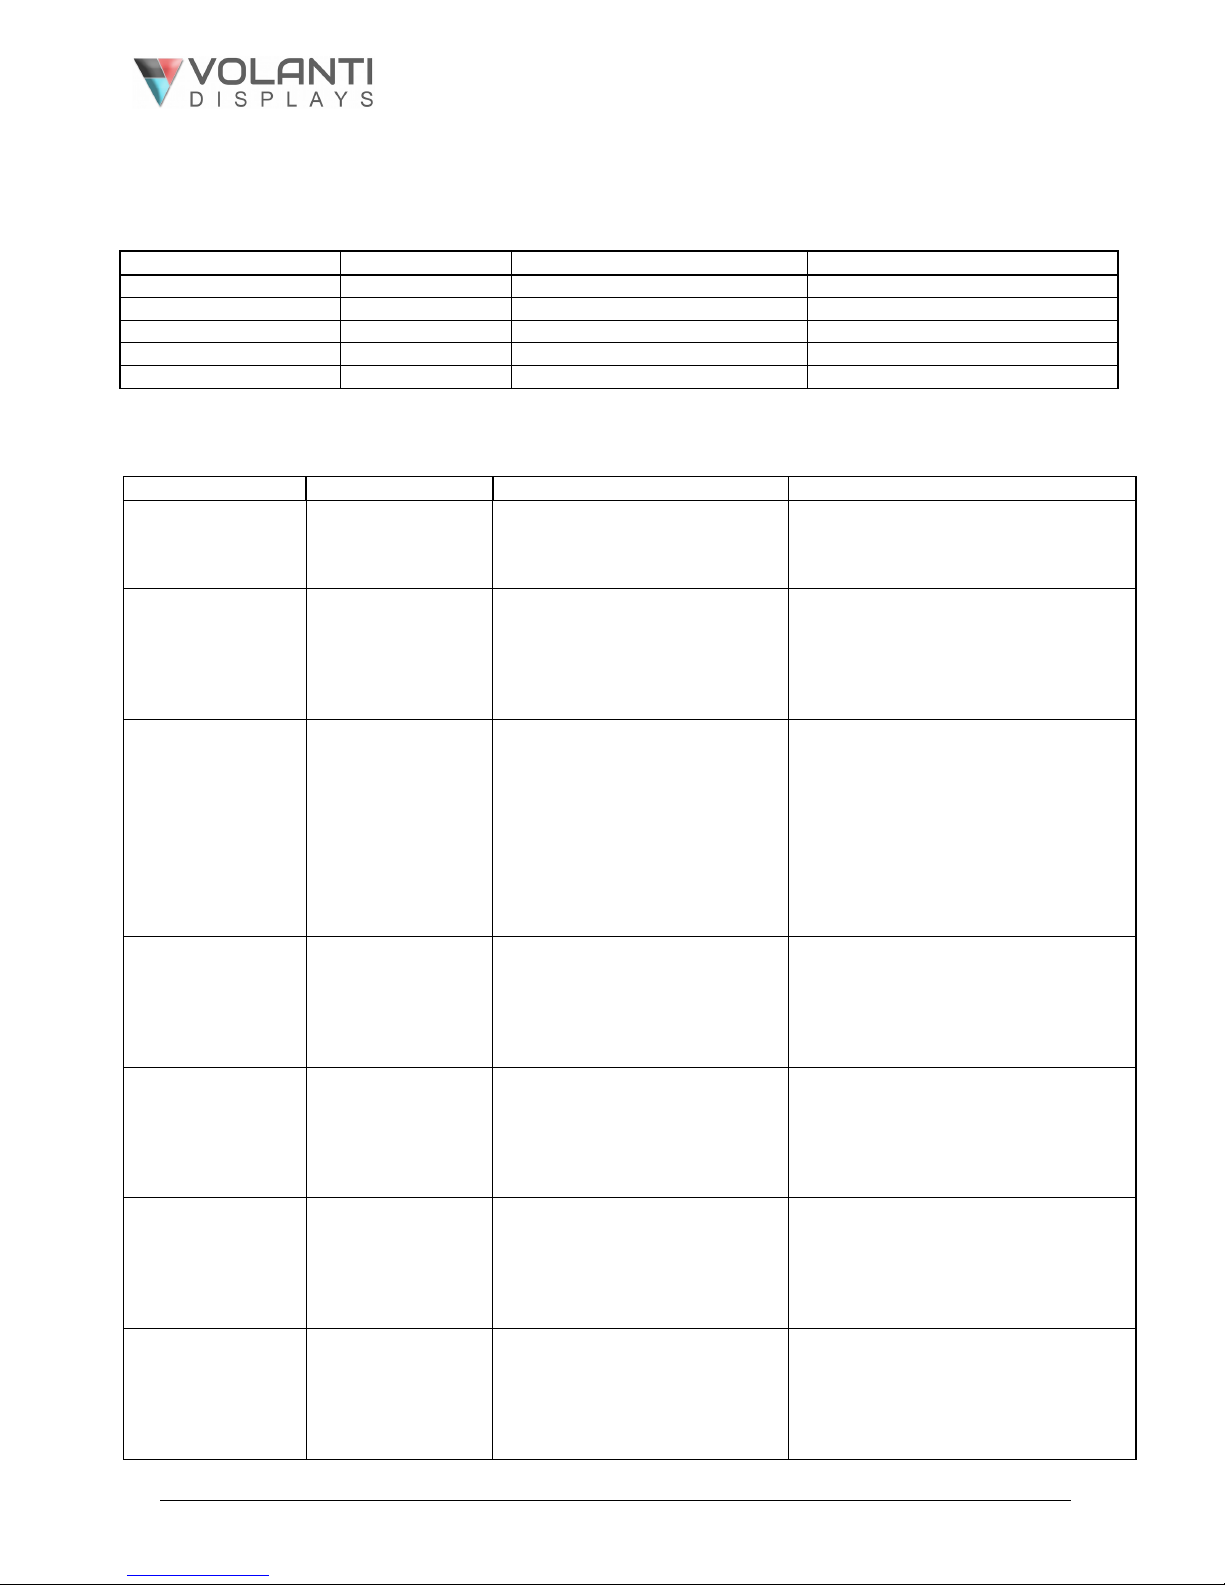
Commands to invoke switch mount control buttons
Function
Command
Description
Remark
Menu button
0xf7
Menu button pressed
Button equivalent
Select-down button
0xfa
Select-down button pressed
Button equivalent
Select-up button
0xfb
Select-up button pressed
Button equivalent
Right/+ button
0xfc
Right/+ button pressed
Button equivalent
Left/- button
0xfd
Left/- button pressed
Button equivalent
Audio & Image
Function
Command
Description
Acknowledge (if enabled)
Volume control left+right channel
0x80, “a” | “A”,
nn | “+” | “-” |
“r” | “R” |
“?”
Set audio (L+R) volume =
value/increment/decrement
Reset
Query
nn = 0x00~ 0x64 (0~100%)
Default: 0x32 (50%)
Volume control on/off (mute)
0x80, “m” | “M”,
“0” |
“1” |
“r” | “R” |
“?”
Disable audio output.
Enable audio output.
Reset
Query
“0” - audio off (mute).
“1” - audio on. (Default)
Audio selection
(in quad split PiP
mode)
0x80, “P”,
“n”
“?”
“r” | “R”
Select Audio Output
Query
Reset
“n” =
“0” - P1 (upper left picture) (Default)
“1” - P2 (lower left picture)
“2 ”- P3 (upper right picture)
“3” - P4 (lower right picture)
''A/a'' – Analog source
Note: P1~P4 audio source is available
when video source is either DP or
HDMI
Black level control
(acts similar to
brightness control
but does not affect
the backlight)
0x81,
nn | “+” | “-” |
“r” | “R” |
“?”
“m”
“n”
Set level =
value/increment/decrement
Reset
Query Current Source
Maximum query
Minimum query
nn = 0x00~ 0x64 (0~100%)
Default: 0x32 (50%)
Contrast control
0x82, “a” | “A”,
nn | “+” | “-” |
“r” | “R” |
“?”
“m”
“n”
Set contrast =
value/increment/decrement
Reset
Query
Maximum query
Minimum query
nn = 0x00~ 0x64 (0~100%)
Default: 0x32 (50%)
Color saturation
control
0x83,
nn | “+” | “-” |
“r” | “R” |
“?”
“m”
“n”
Set color saturation =
value/increment/decrement
Reset
Query
Maximum query
Minimum query
nn = 0x00~ 0x64 (0~100%)
Default: 0x32 (50%)
Hue control
0x84,
nn | “+” | “-” |
“r” | “R” |
“?”
“m”
“n”
Set tint =
value/increment/decrement
Reset
Query
Maximum query
Minimum query
nn = 0x00~ 0x64 (0~100%)
Default: 0x32 (50%)
 Loading...