

VOKKERO SQUADRA 8 USERS
QATAR
Mode d’emploi / User Guide version V1.1
209921A
VOKKERO
Adeunis-RF
283 rue Louis Néel - Parc Technologique Pré Roux
38920 CROLLES - France
Tel. : +33 (0)4 76 92 07 77 - Fax : +33 (0)4 76 04 80 87
www.vokkero.com wecare@vokkero.com

209921A VOKKERO SQUADRA 8 - QATAR - User guide version V1.1
2
Page
of 26
Préambule / Preamble / Präambel / Preambolo / Preámbulo
• Ce guide décrit les fonctionnalités du système Vokkero® Squadra, ses options et ses accessoires. Il explique comment le congurer
pour permettre une communication de type conférence entre plusieurs utilisateurs.
• This guide describes the functionality of the system Vokkero® Squadra, options and accessories. It explains how to congure it to allow
a conference-type communication between multiple users.
• Diese Anleitung beschreibt die Funktionalität des Systems Vokkero® Squadra, Optionen und Zubehör. Es erklärt, wie man es kongu-
rieren, um eine Konferenz-Art der Kommunikation zwischen mehreren Benutzern zu ermöglichen.
• Questa guida descrive la funzionalità del sistema Vokkero® Squadra, opzioni e accessori. E spiega come congurare in modo da
permettere una comunicazione di tipo conferenza tra più utenti.
• Esta guía describe la funcionalidad del sistema Vokkero® Squadra, opciones y accesorios. En él se explica cómo congurarlo para
permitir una comunicación de tipo conferencia entre múltiples usuarios.
• Aucun extrait de ce document ne pourra être reproduit ou transmis (sous format électronique ou papier, ou par photocopie) sans
l’accord d’Adeunis RF. Ce document pourra être modié sans préavis. Toutes les marques citées dans ce guide font l’objet d’un droit
de propriété intellectuelle.
• No part of this document may be reproduced or transmitted (in electronic or paper, or photocopying) without the agreement Adeunis
RF. This document may be changed without notice. All trademarks mentioned in this guide are the subject of intellectual property rights.
Adeunis RF.
• Kein Teil dieses Dokuments darf reproduziert oder übertragen werden (in elektronischer oder Papierform oder Fotokopie) ohne die
Zustimmung ADEUNIS RF. Dieses Dokument darf ohne vorherige Ankündigung geändert werden. Alle Marken in diesem Handbuch
erwähnt werden, sind Gegenstand des geistigen Eigentums.
• Nessuna parte di questo documento può essere riprodotta o trasmessa (in fotocopie elettronico o cartaceo, o), senza il consenso RF
ADEUNIS. Questo documento può essere modicato senza preavviso. Tutti i marchi citati in questa guida sono oggetto di diritti di
proprietà intellettuale.
• Ninguna parte de este documento puede ser reproducida o transmitida (en fotocopias electrónico o en papel, o) sin el acuerdo ADEU-
NIS RF. Este documento puede ser modicada sin previo aviso. Todas las marcas comerciales mencionadas en esta guía son el tema
de los derechos de propiedad intelectual.
ADEUNIS-RF
283, rue Louis Néel
38920 Crolles
France
Phone +33(0)4 76 92 07 77
Fax +33(0)4 76 08 97 46
Web www.VOKKERO.com
3
Page
of 26
EU Declaration of Conformity
WE
ADEUNIS RF
283 rue LOUIS NEEL
38920 Crolles, France
04.76.92.01.62
www.adeunis-rf.com
Declare that the DoC is issued under our sole responsibility and belongs to the following product:
Apparatus model/Product: Vokkero SQUADRA
Type: ARF7793AA, ARF7794AA, ARF7794BA, ARF7794CA,
ARF7795AA, ARF7795BA, ARF7795CA, ARF7782AA,
ARF7782BA
Object of the declaration:
The object of the declaration described above is in conformity with the relevant Union harmonisation
legislation:
Directive 2014/53/UE (RED)
The following harmonised standards and technical specifications have been applied:
Title: Date of standard/specification
EN 300 220-1 V2.3.1 2010/02
EN 300 220-2 V2.3.1 2010/02
EN 300422-1 V1.4.2 2011/08
EN 300422-2 V1.3.1 2011/08
EN 301 357-1&2 V1.4.1 2008/11
EN 60950-1 2006 +A11:2009+A1 :2010+A12 :2011
EN 301 489-1 v1.8.1 2008-04
EN 301 489-3 V1.4.1 2002-08
EN 62209-2 2010
EN 62311 2008
EN 55581 2012
EN 50563 & EN 50564 2011
Notified body:
(This statement of opinion is issued under the RTTE Directive)
LCIE Notified body number: 0081
Reference Number: 111140-634457
October, 13
th
, 2016 Monnet Emmanuel, Certification
Manager

209921A VOKKERO SQUADRA 8 - QATAR - User guide version V1.1
4
Page
of 26
Table of contents
Préambule / Preamble / Präambel / Preambolo / Preámbulo 2
Declaration of conformity 3
Introduction 7
Installation procedure for the system 7
1. Vokkero® Squadra terminal 8
1.1. Description of the screen icons (default settings) 8
1.2. Description of all the screen icons 8
1.3. Description of the terminal’s keys 9
1.4. Start-up of the terminal – Important information 9
1.5. Setting up the headset 9
2. Description of the congurator 9
2.1. Congurator 10
2.2. Description of the home screen 10
2.3. Main Menu 10
2.4. Viewing and modifying a terminal’s parameters 11
3. Warning about using frequencies 12
4. Automatic conguration of a Vokkero® Squadra system 12
4.1. Selecting a channel 12
5. Manual parameterisation of a Vokkero® Squadra system 13
5.1. Frequencies menu 13
5.1.1. Manual selection of a channel 13
5.2. Assigning a number to a system (Role menu) 14
5.3. Setting the systems in conference mode (encryption procedure) 14
6. Other sub-menus 16
6.1. The Update menu 16
6.2. The Conguration menu 17
6.2.1. Options 17
6.2.2. Sidetone 17
6.2.3. Speaker mode 18
6.2.4. Listening Selection 18
6.2.5. Far voices rejection 19
6.3. Advanced Settings menu 20
6.4. Admin Settings menu 22
6.5. Default settings 22
6.6. Congurator Settings menu 22
7. Functions directly accessible via the terminal 23
7.1. Adjusting the listening volume 23
7.2. Viewing the communication channel used 23

209921A VOKKERO SQUADRA 8 - QATAR - User guide version V1.1
5
Page
of 26
7.3. Viewing the terminals connected to the network 23
7.4. Modifying the role number 23
8. The charger 24
8.1. Technical specications 24
8.2. Powering the charger 24
8.3. Installing the terminals 24
8.3.1. The meaning of the congurator’s batteries icons 25
8.4. Placing the chargers and the congurator in series 25
8.5. Warnings 25
9. Troubleshooting – FAQ 26
10. Error messages 26
11. Document History 26

209921A VOKKERO SQUADRA 8 - QATAR - User guide version V1.1
6
Page
of 26
ENGLISH

209921A VOKKERO SQUADRA 8 - QATAR - User guide version V1.1
7
Page
of 26
Introduction
The operations described below enable you to implement your Vokkero® Squadra communication system quickly
and easily.
All the operations described are common to the versions of the Vokkero® Squadra terminal listed below:
VOKKERO SQUADRA QATAR VERSION
Note: Your product reference is to be found on the label on the back of your terminal’s casing.
The system consists of three main items:
• The terminal
• The congurator
• The charger
All the operating parameters of the Vokkero® Squadra system are managed by the congurator. This provides
access to the settings menus via a touch screen. In order to function, the congurator must be connected to one or
more chargers and the charger(s) must be connected to the power supply unit.
Installation procedure for the system
• Connect the congurator to the charger(s).
• Connect the power supply unit to the last charger (if several of them are in series).
• Connect the power supply unit to the mains.
• Connect the Vokkero® Squadra terminals as shown below.
Note 1: The order and the position of the terminals on the charger(s) is unimportant.
Note 2: If the purpose of the operation is solely to charge the terminals, then there is no need for the congurator.
Vokkero® Squadra terminal
Charger(s)
Power supply
Congurateur
209921A VOKKERO SQUADRA 8 - QATAR - User guide version V1.1
8
Page
of 26
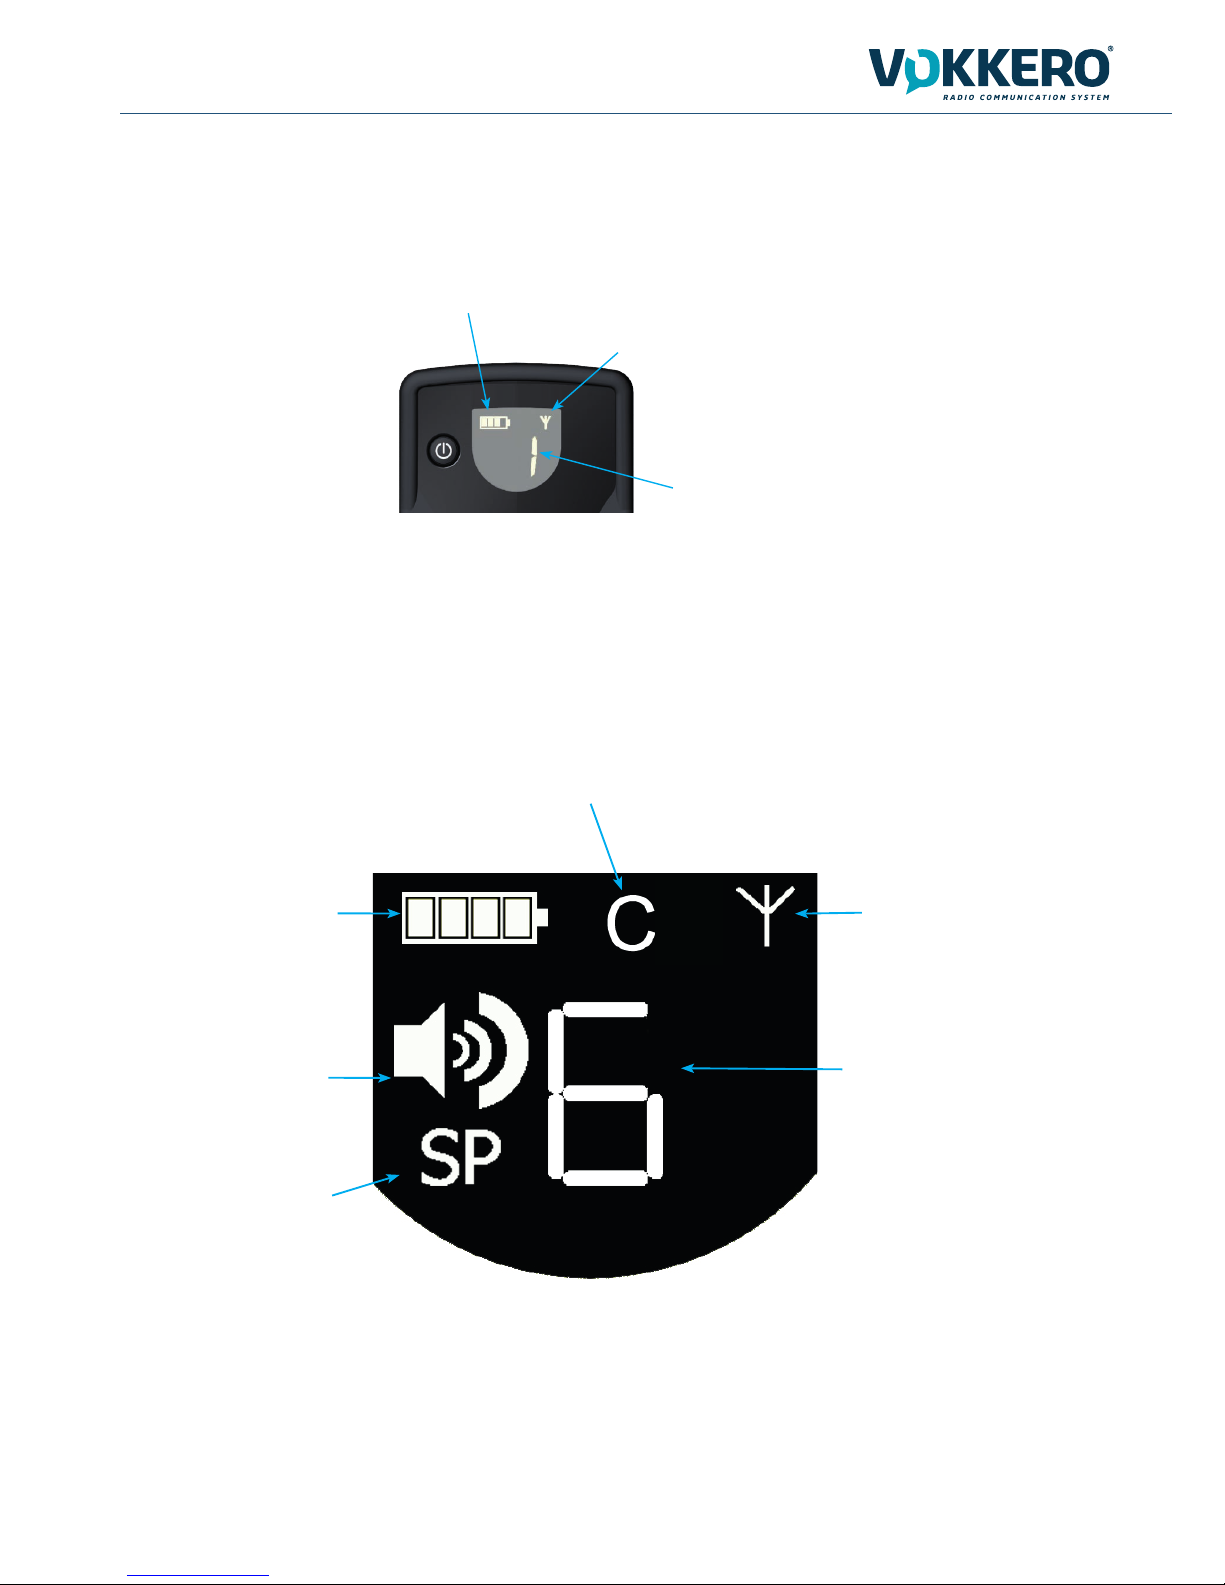
1.2. Description of all the screen icons
The terminal’s screen can display all sorts of information, as described below:
Role number
Indicate the role number in the audio conference
or the system listener «L» status
System status
The icon «Antenna» indicates that the terminal is
connected to a network.
Batterie level
1. Vokkero® Squadra terminal
1.1. Description of the screen icons (default settings)
The screen displays key information for the user when using his or her terminal.
Battery icon
Indicated the internal battery charge
status. 4 levels
Volume icon
Appears when volume setting is
modied. 11 levels
SP icon
Appears when the «Speaker
mode» has been activated
Icon «C»
Appears when the selected channel
is displayed
System status
The icon «Antenna» indicates that the
terminal is connected to a network.
Product ID (Role setting)
Species the device number in the conference or the listening (system listener).

209921A VOKKERO SQUADRA 8 - QATAR - User guide version V1.1
9
Page
of 26
On/O
Allows powering up, or shutdown of the terminal.
+/-
Allows direct access to
volume control or channel
selection. In the setup
menu of the device can
adjust the settings.
+/-
Allows direct access to
volume control or channel
selection. In the setup
menu of the device can
adjust the settings.
1.3. Description of the terminal’s keys
1.4. Start-up of the terminal – Important information
Before starting up your terminal, make sure that it has been properly charged using the
dedicated charger.
• To switch on the device, press the On/O key and keep pressing it until it starts up, and
then release the key.
• To switch o the device, press the On/O key and keep pressing it until it is turned o.
2. Description of the congurator
The congurator does not have a connector enabling it to be powered directly, and it does not have an On/O switch
either. To start it up, the congurator must be connected to one or more chargers. These must be powered from the
mains via the specic power supply unit supplied with the Vokkero® Squadra kit. The congurator is equipped with a
USB socket for updates, as well as a stylus which enables the touch screen to be used.
When the system is started up, the congurator displays the Vokkero logo, and then the home screen.
Note 1: All the parameters, including the volume setting, are retained when you switch o the device and they remain
the same when you switch the device back on.
Note 2: The terminal automatically places itself in the power-saving mode after a few seconds if it is not being used.
This mechanism places the terminal’s LCD screen on stand-by. To wake up the LCD screen, press any key on the
terminal.
1.5. Setting up the headset
The headset supplied with the Vokkero® Squadra kit
must be connected the socket located at the base of the
terminal. Check that the connector is well installed in the
housing and secure the connexion by pushing strongly on
the connector. A poor connection may cause audio quality
problems, or the impossibility to hear and / or listen.

209921A VOKKERO SQUADRA 8 - QATAR - User guide version V1.1
10
Page
of 26
«Quick conguration» Menu
Frequencies Menu
«Role» Menu
«Conguration» Menu
«Encryption» Menu
«Update» Menu
2.3. Main Menu
The main menu, which can be accessed via the home screen’s “Menu” button, gives access to 6 sub-menus:
• Quick conguration
• Frequencies
• Role
• Encryption
• Update
• Congurator settings
Title
Charger button : allows to
view the chargers chained
Charger n°2
Terminal slot
Battery level of the terminal
connected to slot n°5
Access button to the main
menu
Terminal connected to the
slot No. 2. This terminal has
number 3 role
2.2. Description of the home screen
Integrated stylus
Pull the slot to remove the
stylus from its housing.
USB connector
Allows to connect an USB
key when proceeding with
an update.
Touch screen
Displays the menus and
allows to modify the para-
meters of the terminals.
2.1. Congurator

209921A VOKKERO SQUADRA 8 - QATAR - User guide version V1.1
11
Page
of 26
2.4. Viewing and modifying a terminal’s parameters
You can view a terminal’s parameters from the congurator’s home screen.
Procedure:
• Using the stylus, click on a terminal.
• A window providing the terminal’s information will appear.
• Click on the «Modify» button to access to the parameters (see ¶ 6.2)
• Click on the “Escape” button in order to return to the home screen.
Information on terminal n°1
• Role : role number of the terminal in the audio
conference.
• Channel : frequency channel used and regulatory
information.
• Encryption : On or O.
• Sidetone : selected value.
• Speaker mode : On or O
• Listening selection : All (listen at all the terminals)
or Custom (selecting listening).
• Battery : status (charging or charged).
• Version : terminal software versions.

209921A VOKKERO SQUADRA 8 - QATAR - User guide version V1.1
12
Page
of 26
3. Warning about using frequencies
The Quick Conguration and Frequencies sub-menus provide access to the communication channels’ settings (radio
frequencies).
NB: Before using the device, please observe the legal provisions in force in your country. Please refer to the “CERTIFICATE OF TYPE APPROVAL” chapter at the end of this document.
You can parameterise the Vokkero® Squadra terminal on 3 dierent channels :
The frequencies for the various channels are as follows:
QATAR Class 1 channels:
• Q1 : 869.525 MHz (RF output power 100mW / 20dBm)
• Q2 : 864.500 MHz (RF output power 100mW / 20dBm)
• Q3 : 863.500 MHz (RF output power 100mW / 20dBm)
4. Automatic conguration of a Vokkero® Squadra system
Quick Conguration menu
Principle: the Quick Conguration menu makes it possible to very quickly congure all of the terminals connected to
the charger(s). The parameters required for operating the system (the encryption and the role number) are managed
automatically. The communication channel selection (radio frequency) remains manual. Note : the Quick conguration
mode does not modify the terminal parameters such as the volume, the sidetone level or le listening selection.
4.1. Selecting a channel
Procedure:
• In the main menu, click on the “Quick conguration” icon.
• A window will open, enabling the communication channel to be selected.
• Using the stylus, select the communication channel by clicking on it.
• Click on the “OK” button in order to validate it, or on “Escape” in order to exit from the sub-menu.
When the “OK” button has been clicked on, a window will appear conrming that the operation has been duly completed.
• Click on “OK” to return to the home screen.
The terminals can be removed from the charger(s) and be used. Note:when the terminals are removed from the char-
ger, they switch o automatically, you must switch them on to use them.

209921A VOKKERO SQUADRA 8 - QATAR - User guide version V1.1
13
Page
of 26
5. Manual parameterisation of a Vokkero® Squadra system
In the case of manual parameterisation of the Vokkero® Squadra system, in order to set up a conference, you need
to carry out the following operations:
• Dene the radio channel that will be used for the communications (Frequencies menu).
• Give each device a dierent number (Role menu).
• Pair up the devices in conference mode (Encryption menu).
5.1. Frequencies menu
5.1.1. Manual selection of a channel
Procedure:
• In the main menu, click on the Frequencies icon.
• A window will open, enabling the communication channel to be selected.
• Using the stylus, select the communication channel by clicking on it.
• Click on the “OK” button in order to validate it, or on “Escape” in order to exit from the sub-menu.
When the “OK” button has been clicked on, a window will appear conrming that the operation has been duly completed.
• Click on “OK” to return to the home screen.

209921A VOKKERO SQUADRA 8 - QATAR - User guide version V1.1
14
Page
of 26
5.2. Assigning a number to a system (Role menu)
To set up a conference, rstly you have to identify all the devices that will be taking part and give them a number
(role). A conference may be established between 2 to 8 devices, which will be identied by a number ranging from 1
to 8.
Note 1: One of the devices absolutely must have the number 1.
Note 2: Do not assign the same number to several devices, as this will prevent the conference from running smooth-
ly.
Procedure:
• In the main menu, click on the “Role” icon.
• A window will open, asking you to select the terminal that a role number must be assigned to. Click on the “OK”
button.
• Using the stylus, select the communication channel by clicking on it.
• A window will open, in which the terminal selected will be displayed.
• Using the “+” and “-” buttons, modify the role number (from 1 to 8 or “Listener” for a listening-only mode).
• Once the number has been selected, click on the “OK” button in order to validate it, or on “Escape” in order to
exit from the sub-menu.
When the “OK” button has been clicked on, a window will appear conrming that the operation has been duly completed.
• Click on “OK” to return to the home screen.
5.3. Setting the systems in conference mode (encryption procedure)
Principle: In order to communicate in secure mode, the devices must save an encryption key provided by the congurator.
This operation is required in order to enable all the devices to take part in a conference in secure mode.
IMPORTANT NOTE
In encrypted (secure) mode, a device cannot communicate with a system if the encryption procedure has not been
carried out. If you want to add a terminal to an existing system, you absolutely must carry out this procedure with all
the system’s devices (including devices congured in Listener mode).
Make sure that each of the following criteria are fullled before starting the operation:
• All the devices must use the same channel.
• Only one device should have the ID 1.
Procedure:
• In the main menu, click on the Encryption icon.
• The Network Encryption sub-menu will appear and enable you to select two types of procedures: Launch Encryption and Remove Encryption. Click on the “Launch Encryption” icon.
• A window will open and ask you to conrm the launching of this procedure.
• Click on “Yes”.

209921A VOKKERO SQUADRA 8 - QATAR - User guide version V1.1
15
Page
of 26
When the “Yes” button has been clicked on, a window will appear conrming that the operation has been duly completed.
• Click on “OK” to return to the Encryption menu.
• Click on “Escape” to return to the home screen.
The Encryption sub-menu also makes it possible to cancel an encryption procedure previously carried out on the
system.
This option may be useful when other Vokkero® Squadra terminals want to integrate the conference without having
the means of being parameterised by the congurator.
In this case, the act of cancelling the encryption procedure will make it possible to leave the channel used by the
system “open” and the other terminals will be able to participate in the conference (provided that they are all operating
on the same communication channel).
• In the main menu, click on the Encryption icon.
• The Network Encryption sub-menu will appear and enables two types of procedures to be selected: Launch
Encryption and Remove Encryption. Click on the Remove Encryption icon.
• A window will open and request conrmation of the launch of this procedure.
• Click on “Yes”.
When the “Yes” button has been clicked on, a window will appear conrming that the operation has been duly completed.
• Click on “OK” to return to the Encryption sub-menu.
• Click on “Escape” to return to the home screen.
Once these three stages (Frequency, Role, Encryption) have been completed, you can use your Vokkero® Squadra
communication system.

209921A VOKKERO SQUADRA 8 - QATAR - User guide version V1.1
16
Page
of 26
6. Other sub-menus
6.1. The Update menu
The Update menu makes it possible to carry out updates of the terminals and the congurator. In the event of a new
software version being made available (supplied by Adeunis RF), you will receive the software via e-mail (or it will be
available from the Web site) which you will have to load onto a USB key. This key will have to be connected to the
congurator via the USB port provided for that purpose.
Procedure: terminals upgrade
• In the main menu, click on the Update icon.
• A window will open that will ask you to select which item you want to update : TERMINAL or CONFIGURATOR.
• Using the stylus, select the item by clicking on it.
• Press the “Select” button
• A «warning» window appears mentionning that the terminals must remain plugged on the charger during the
procedure.
• Press OK
• The uploading procedure is launched and can run during several minutes.
• When the upload has been successfully executed, an info is displayed. Press OK.
• A nal window, summarizing the uploading process is displayed. Press Ok to return to the main menu screen.
To proceed with the upgrade of the congurator, follow the same procedure and choose «CONFIGURATOR» into the
rst display.
• When the upload is launched, the LCD display of the congurator becomes black.
• When the upload has been successfully done, the Congurator is restarting and shows the home screen.

209921A VOKKERO SQUADRA 8 - QATAR - User guide version V1.1
17
Page
of 26
6.2. The Conguration menu
The Conguration menu makes it possible to gain access to several settings parameters:
• Device option: Makes it possible to congure the terminal’s optional functions.
• Advanced Settings: Makes it possible to gain access to the terminal’s audio settings.
• Admin Settings: Inaccessible – Reserved for factory settings.
• Congurator Settings: These only relate to the congurator’s LCD screen.
6.2.1. Options
This menu makes it possible to gain access to three types of optional functions: Sidetone, Speaker Mode, and Listening Selection.
6.2.2. Sidetone
The Sidetone mode enables you to adjust the audio return level (enabling you to listen to your own voice) in your
headset (or earphone) speakers: 7 volume levels + the Mute mode are accessible.
Procedure:
• In the main menu, click on the Conguration icon.
• The Conguration sub-menu will appear. Click on “Options”.
• A window will open and ask you to select a terminal. Click on “OK”.
• Select a terminal by clicking on it.
• A window relating to the terminal’s options will appear.
• Select “Sidetone” and click on the “Modify” button.
• A window will open in which the terminal selected will be displayed.
• Using the “+” and “-” buttons, adjust the Sidetone level (from 1 to 7 or Mute).
• Once the value has been selected, click on the “OK” button in order to validate it, or on “Escape” in order to exit
from the sub-menu.
When the “OK” button has been clicked on, a window will appear conrming that the operation has been duly completed.
• Click on “OK” and then on “Escape” to return to the home screen.

209921A VOKKERO SQUADRA 8 - QATAR - User guide version V1.1
18
Page
of 26
6.2.3. Speaker mode
The Speaker Mode option enables use of one of the Vokkero® Squadra terminals as a “relay” to a PA system (or in
other words an audio system enabling public address messages). This system is frequently used by referees and
umpires in certain sports when they have to announce their decisions.
Note: This option can only be used when the accessory dedicated to it (a specic push-button) is used.
Procedure:
• In the main menu, click on the Conguration icon.
• The Conguration sub-menu will appear. Click on “Options”.
• A window will open and you will be asked to select a terminal. Click on “OK”.
• Select a terminal by clicking on it.
• A window relating to the terminal’s options will appear.
• Select “Speaker mode” and click on the “Modify” button.
• A window will open in which the terminal selected will be displayed.
• Using the “+” and “-” buttons, select “O” or “On”
• Once the value has been selected, click on the “OK” button in order to validate it, or on “Escape” in order to exit
from the sub-menu.
When the “OK” button has been clicked on, a window will appear conrming that the operation has been duly completed.
• Click on “OK” and then on “Escape” to return to the home screen.
6.2.4. Listening Selection
For each device (in Conference or Listener mode) , it is possible to select what device you want to listen to. The
default setting is for all devices to be selected.
Procedure:
• In the main menu, click on the Conguration icon.
• The Conguration sub-menu will appear. Click on “Options”.
• A window will open and you will be asked to select a terminal. Click on “OK”.
• Select a terminal by clicking on it.
• A window relating to the terminal’s options will appear.
When the «Speaker mode» is selected,
the letters «SP» appears on the LCD of
the terminal.

209921A VOKKERO SQUADRA 8 - QATAR - User guide version V1.1
19
Page
of 26
• Select “Listening select” and click on the “Modify” button.
Note: If the listening selection has already been modied, the word “Custom” will appear opposite the option. If all the
terminals are being listened to, “All” will appear opposite the option.
• A window will open in which all the terminals will appear. If the terminals are being listened to, a green abbreviation will precede their numbers. If the terminals are not being listened to, a red cross will precede their names.
• Using the stylus, select the terminals that should or should not be listened to.
• Once the selection has been made, click on the “OK” button in order to validate it, or on “Escape” in order to exit
from the sub-menu.
When the “OK” button has been clicked on, a window will appear conrming that the operation has been duly completed.
• Click on “OK” and then on “Escape” to return to the home screen.
6.2.5. Far voices rejection
The Far voices rejection Mode option enables to remove background voices in noisy environments. This system is
proposed with 4 set-ups : O, Soft ( soft background voices level), Medium (medium background voices level), Hard
(strong background voices level). The default setting is «Soft»
Note: if this option is ON, be careful that your microphone is perfectly positioned in front of your mouth.
Procedure:
• In the main menu, click on the Conguration icon.
• The Conguration sub-menu will appear. Click on “Options”.
• A window will open and you will be asked to select a terminal. Click on “OK”.
• Select a terminal by clicking on it.
• A window relating to the terminal’s options will appear.
• Select “Far voices rej.” and click on the “Modify” button.

209921A VOKKERO SQUADRA 8 - QATAR - User guide version V1.1
20
Page
of 26
• A window will open in which the terminal selected will be displayed.
• Using the “+” and “-” buttons, select “O, Soft, medium, hard»
• Once the value has been selected, click on the “OK” button in order to validate it, or on “Escape” in order to exit
from the sub-menu.
When the “OK” button has been clicked on, a window will appear conrming that the operation has been duly completed.
• Click on “OK” and then on “Escape” to return to the home screen.
6.3. Advanced Settings menu
Be aware of the fact that this menu is only intended for certain types of users (telecommunications equipment pool
managers, distributors, after-sales service technicians, etc.). Consequently, access to this menu requires an access
code available on demand from Adeunis RF.
The Advanced Settings menu enables access to four sub-menus:
• Mic. settings
• Gain-dB ADC mic
• Gain-dB DAC speaker
• AEC: Anti-echo
Principle:
The Vokkero® Squadra terminal has a function for detecting and automatically adjusting accessories, which makes it
possible to use numerous types of headsets and earpieces.
For automatic parameterisation, select “Automatic” from the Mic. Settings sub-menu; for manual parameterisation,
select “Manual”.

209921A VOKKERO SQUADRA 8 - QATAR - User guide version V1.1
21
Page
of 26
If the Manual mode is selected, you have the possibility of manually selecting the mic gain value, the speaker gain,
and the anti-echo.
• Mic Gain Values: 20 to -30.
• Speaker Gain Values: 20 to -42.
• Anti-echo values (AEC settings): 0 to 3.
IMPORTANT: Modifying values can greatly reduce the audio quality of your equipment if it is not carried out carefully.
Procedure common to the Advanced Settings menu:
• In the main menu, click on the Conguration icon.
• The Conguration sub-menu will appear. Click on “Advanced Settings”.
• A window will open and you will be asked to enter a PIN code.
• Once the code has been entered, another window will open and will ask you to select a terminal. Click on “OK”.
• Select a terminal by clicking on it.
• A window relating to the terminal’s advanced functions will appear.
• Select a function and click on the “Modify” button.
• A window will open in which the terminal selected will be displayed.
• Using the “+” and “-” buttons, modify the function selected.
• Once the value has been selected, click on the “OK” button in order to validate it, or on “Escape” in order to exit
from the sub-menu.
When the “OK” button has been clicked on, a window will appear conrming that the operation has been duly completed.
• Click on “OK” and then on “Escape” to return to the home screen.

209921A VOKKERO SQUADRA 8 - QATAR - User guide version V1.1
22
Page
of 26
6.4. Admin Settings menu
This menu is reserved for factory settings and cannot be accessed by users.
6.5. Default settings
This menu allows to restore factory settings to all terminals plugged on the congurator.
Procedure :
• In the main menu, click on the Conguration icon.
• The Conguration sub-menu will appear. Click on “Default Settings”.
• A warning window is asking for a conrmation.
• Click on «OK» icon to restore factory settings.
6.6. Congurator Settings menu
This menu provides access to settings specic to the congurator. Three parameters are adjustable:
• LCD screen backlight
• Language of the congurator: French or English
• LCD screen calibration
Procedure:
• In the main menu, click on the Conguration icon.
• The Conguration sub-menu will appear. Click on “Congurator Settings”.
• A window relating to the modiable parameters of the congurator’s LCD screen will appear.
• Using the stylus, modify the parameters desired and then click on “OK” in order to validate them and return to the
screen saver.

209921A VOKKERO SQUADRA 8 - QATAR - User guide version V1.1
23
Page
of 26
7. Functions directly accessible via the terminal
7.1. Adjusting the listening volume
The listening volume setting can be accessed directly via the Vokkero® Squadra terminal. There are
11 adjustable volume levels, ranging from a value of 0 to 10.
NB: The values 9 and 10 must be used with care, and only in very noisy environments.
Procedure:
• When using your terminal, use the “+” and “-” keys located on each side of your terminal in order
to adjust the listening volume level of your earpiece.
• The current level as well as the Speaker icon will be displayed on the terminal’s screen.
7.2. Viewing the communication channel used
The channel used by the Vokkero® Squadra terminal can be viewed on its LCD screen.
Procedure:
• Simultaneously press the terminal’s “+” and “-” keys for 3 seconds.
• The channel will be displayed as well as the abbreviation “C” if it is a Class 1 channel, or “C !” if
it is a Class 2 channel.
• After 5 seconds, the LCD will automatically return to the screen saver.
7.3. Viewing the terminals connected to the network
It is possible to view all of the terminals connected to the network created in such a way as to ensure
that all the parties involved are indeed at the conference.
Procedure:
• Simultaneously press the terminal’s “+” and “-” keys for 3 seconds.
• When the channel is displayed, press the “+” key once.
• Your terminal’s screen will then display all of the terminals connected to the network, as well as
the Antenna icon.
• When all the terminals have been displayed, the LCD will automatically return to the screen
saver.
7.4. Modifying the role number
In order to operate correctly, the audio conference absolutely must have a terminal whose role num-
ber is “1”.
If this terminal falls o-line (for example, due to a power supply problem or an operating fault), the
conference will no longer be possible. The “role number modication” function enables this situation
to be overcome by making it possible to modify a terminal’s role number by assigning it Role No. 1.
NB: This function should only be used if the terminal that has role No. 1 is no longer functioning and
the congurator is not accessible!
Procedure:
• Simultaneously press the terminal’s “+” and “-” keys for 3 seconds.
• When the channel is displayed, press the “+” key twice.
• Your terminal’s screen will then display the number “1” ashing on and o.
• In order to conrm the terminal’s shift to role 1, press the terminal’s “On/O” key.
• After conrmation, the LCD will return to the home screen.

209921A VOKKERO SQUADRA 8 - QATAR - User guide version V1.1
24
Page
of 26
8. The charger
The Vokkero® Squadra charger is a straightforward product that enables the terminals’ internal batteries to be rechar-
ged and enables the congurator to be powered.
Up to 3 chargers may be placed in series, thus enabling the simultaneous charging of 12 terminals.
A single power supply unit is required for powering the chargers in series and the congurator. Make sure you use the
power supply unit supplied by Adeunis RF when your Vokkero® Squadra kit is delivered.
Note: Depending on the intended use, the ARF7675AA battery charger is delivered with a European or North American power supply cable. For the other countries (European or elsewhere) requiring a specic power supply cable,
please use a mains plug that complies with local standards.
8.1. Technical specications
AC/DC power supply converter 100 to 240 V ~ 12Vdc - 5 A-50 to 60 Hz
Operating temperature 5°C to 40°C (41°F to 104°F)
Charging time 5 hours
Dimensions L 136 mm * H: 38 mm * D: 68 mm
Battery autonomy > 500 cycles
8.2. Powering the charger
• Connect the power supply unit to the socket located on the back of the charger.
• Connect the power supply unit to the mains.
• The charger is ready for use.
8.3. Installing the terminals
• Place the terminals in the positions designed for that purpose (4 per charger). Insert them vertically so that you
do not damage the connector.
• When the terminal is detected, charging will start. The terminal’s battery icon will rise incrementally, conrming
that the charging is in progress. If the relevant indicator light does not light up, check that the terminal has been
correctly positioned.
• If the congurator is connected to the charger, battery icons will appear alongside each of the terminals, indica-
ting the state of progress with the charging (cf. section 8.3.1).
• To remove the terminals from the charger, tilt them forward. Note:when the terminals are removed from the char-
ger, they switch o automatically, you must switch them on to use them.

209921A VOKKERO SQUADRA 8 - QATAR - User guide version V1.1
25
Page
of 26
8.3.1. The meaning of the congurator’s batteries icons
The recharge time is approximately 5 hours per terminal. Once the terminal’s battery has been recharged, the relevant icon will light up green.
A terminal may be left on the device, even after it has been fully charged.
Meanings of the icons:
Green: Charged battery.
Orange increasing incrementally: charging in progress.
Red: Battery fault; charging has stopped.
8.4. Placing the chargers and the congurator in series
Up to 3 chargers may be placed in series in such a way as to make it possible to charge up to 12 Vokkero® Squadra
terminals simultaneously.
A congurator may be associated with them.
Only one power supply is necessary.
Place the chargers on a at surface, with the front ends facing you. Bring the chargers together and position them so
that their mechanical parts match up. Lock the chargers to each other by pushing them rmly against one another. Do
the same for the congurator.
8.5. Warnings
• The disconnection system is the power cable, the socket-outlet shall be installed near the equipment and must
be easily accessible.
• Connecting the charging ARF7675AA on an IT system is only possible in Norway.
• For Finland, «Laite is liitettävä suojamaadoituskoskettimilla varustettuun pistorasiaan»
• For Norway: «Apparatet my tilkoples Jordet stikkontakt»
• For Sweden: «Apparaten Skall anslutas till jordat uttag»
• In the UK, the characteristic of the circuit assigned to apply is 13 A, and not 16 A.
• In Canada and the USA, the CHARACTERISTIC RATED CURRENT PROTECTION circuit chosen is 20 A.
• This charger must only be used with Vokkero® Squadra terminals. If the charger is used with any other batteries
or products whatsoever, there is a risk of an explosion and serious injuries occurring.
• After use, the batteries must be disposed of at an appropriate recycling centre. They must not be thrown away to
degrade in the environment.
• Do not short-circuit the batteries’ contacts.
• Do not open the terminals or the batteries.
• Do not expose the batteries to temperatures exceeding 100°C (212°F).
• This device was designed for indoor use.
• The room temperature when recharging must be between 5°C (41°F) and 40 °C (104°F):

209921A VOKKERO SQUADRA 8 - QATAR - User guide version V1.1
26
Page
of 26
• The terminals can be powered by an external power supplies other than the dedicated Vokkero SQUADRA ,pro-
vided that these are SELV circuits and Limited Power Sources for the purposes of sections 2.2 and 2.5 standards
IEC60950-1: 2005 + / A1 : 2009 and EN60950-1: 2006 + / A1: 2010 + / A11: 2009.
• This device must not be used by people (including children) whose physical, sensory or mental capacities are
reduced, or by those who are not acquainted with the methods required, unless they are helped by a guardian, or
someone who has already read the user instructions. Children must be watched in order to ensure that they do
not play with the device.
9. Troubleshooting – FAQ
Frequently encountered problems are presented below in order to help you solve them.
I am unable to communicate with other devices.
Make sure that all the devices are operating on the same channel.
Make sure that one of the devices has the number 01 as its ID.
Check the proper connexion of your headset.
The device is unable to connect to a conference.
Make sure that the encryption operation has been carried out on each of the devices so that you can take part in the
conference, especially if you have added a device since the conference started.
Do not assign the same number to several devices.
The device will not switch on.
Check that the battery is charged.
Communication is being jammed.
Another conference system must be operating in your one’s vicinity. Change channels in order to avoid jamming.
Make sure that all the terminals are identied using dierent numbers.
I hear crackling.
The microphone in one of the devices is probably damaged. Replace it.
I can hear myself speaking – there is an echo.
Check that the microphones in the various devices have a minimum distance of 10 metres between them.
10. Error messages
Communication error
When programming, a communication error is detected. Check that
terminals are correctly installed on
the charger (s).
Error - Support
The terminal set is not reco-
gnized by the congurator.
Check the rmware version
installed.
Error - Invalid products
Terminals installed are not
the same type (eg, Europe
vs US). Check the type of
products installed.
11. Document History
User Guide Version Contents
V 1.1 Update déclaration of conformity
V1.0 Document created
 Loading...