

VOKERA BeSMART Quick Start Manual
IT GUIDA RAPIDA
EN QUICK START GUIDE
TermosTaTo / ThermosTaT
cod. BeSM ART_GR rev. 0
11/16
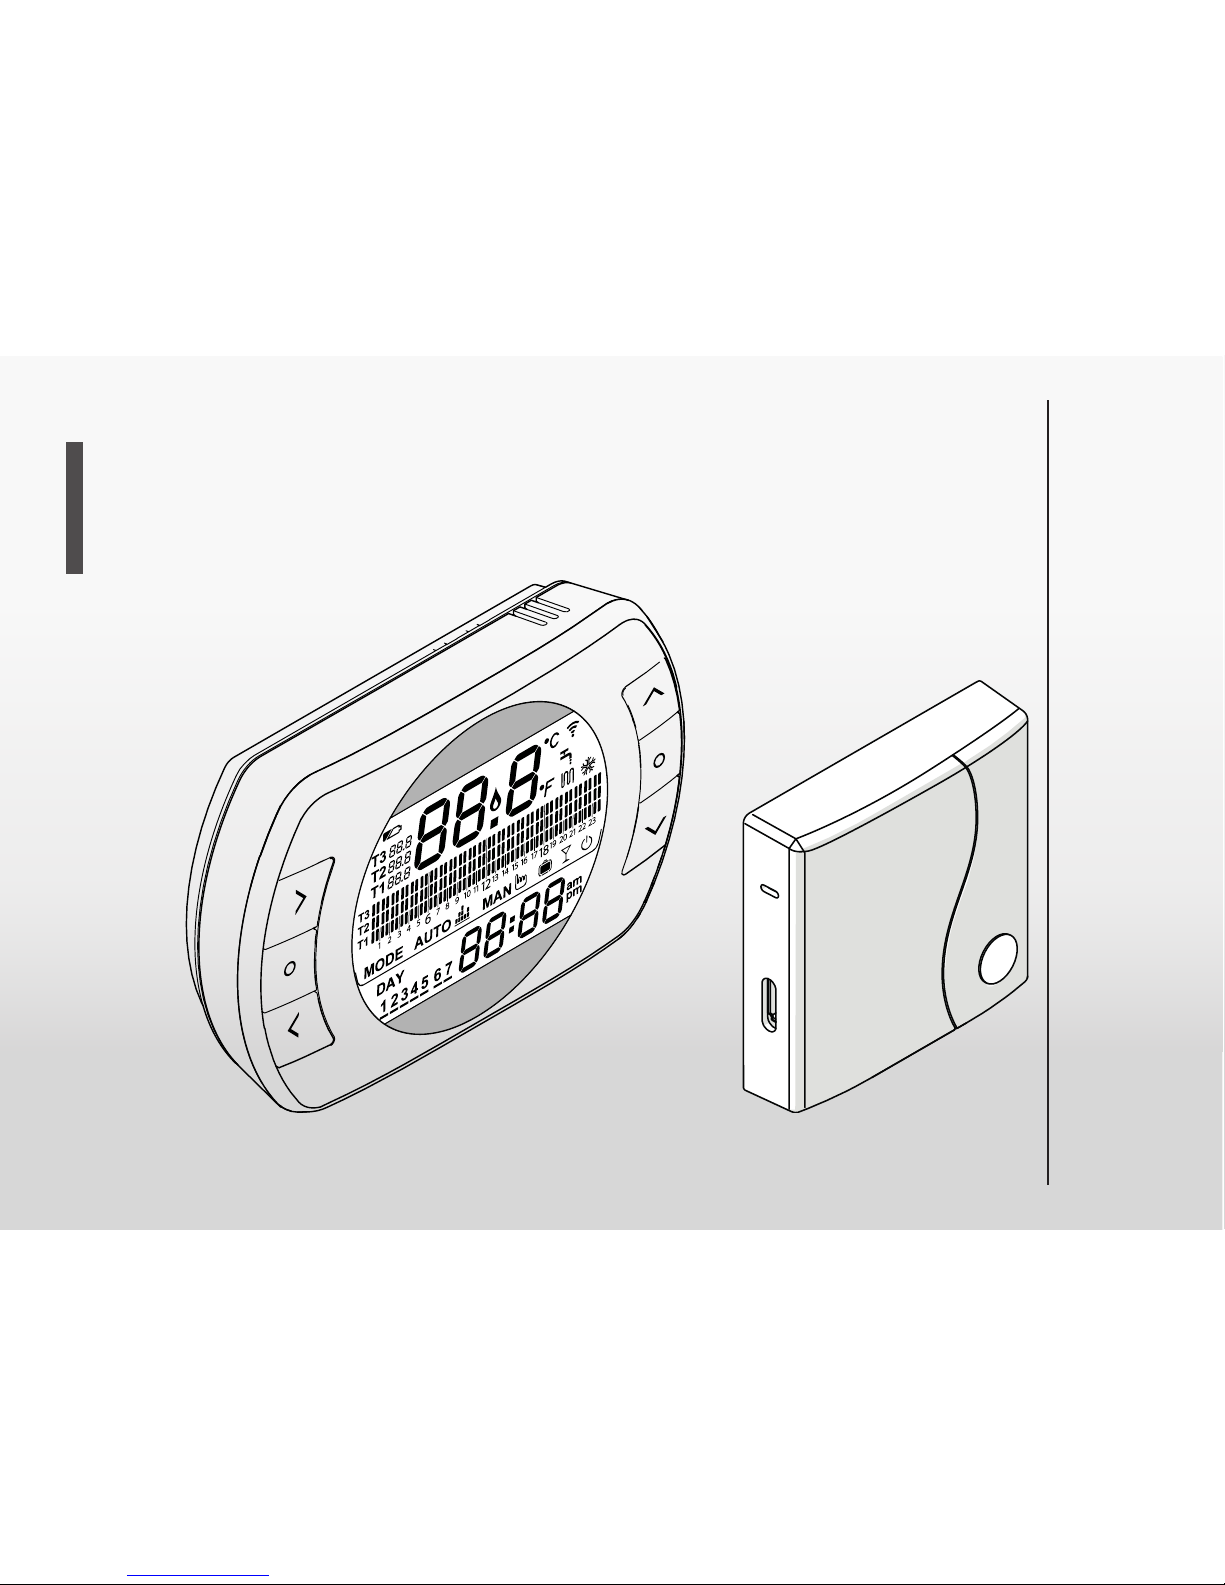
BeSMART
WPS/Smartlink
Outputs Boiler
SET
PROG
RESET
ESC
MODE
2
ENIT
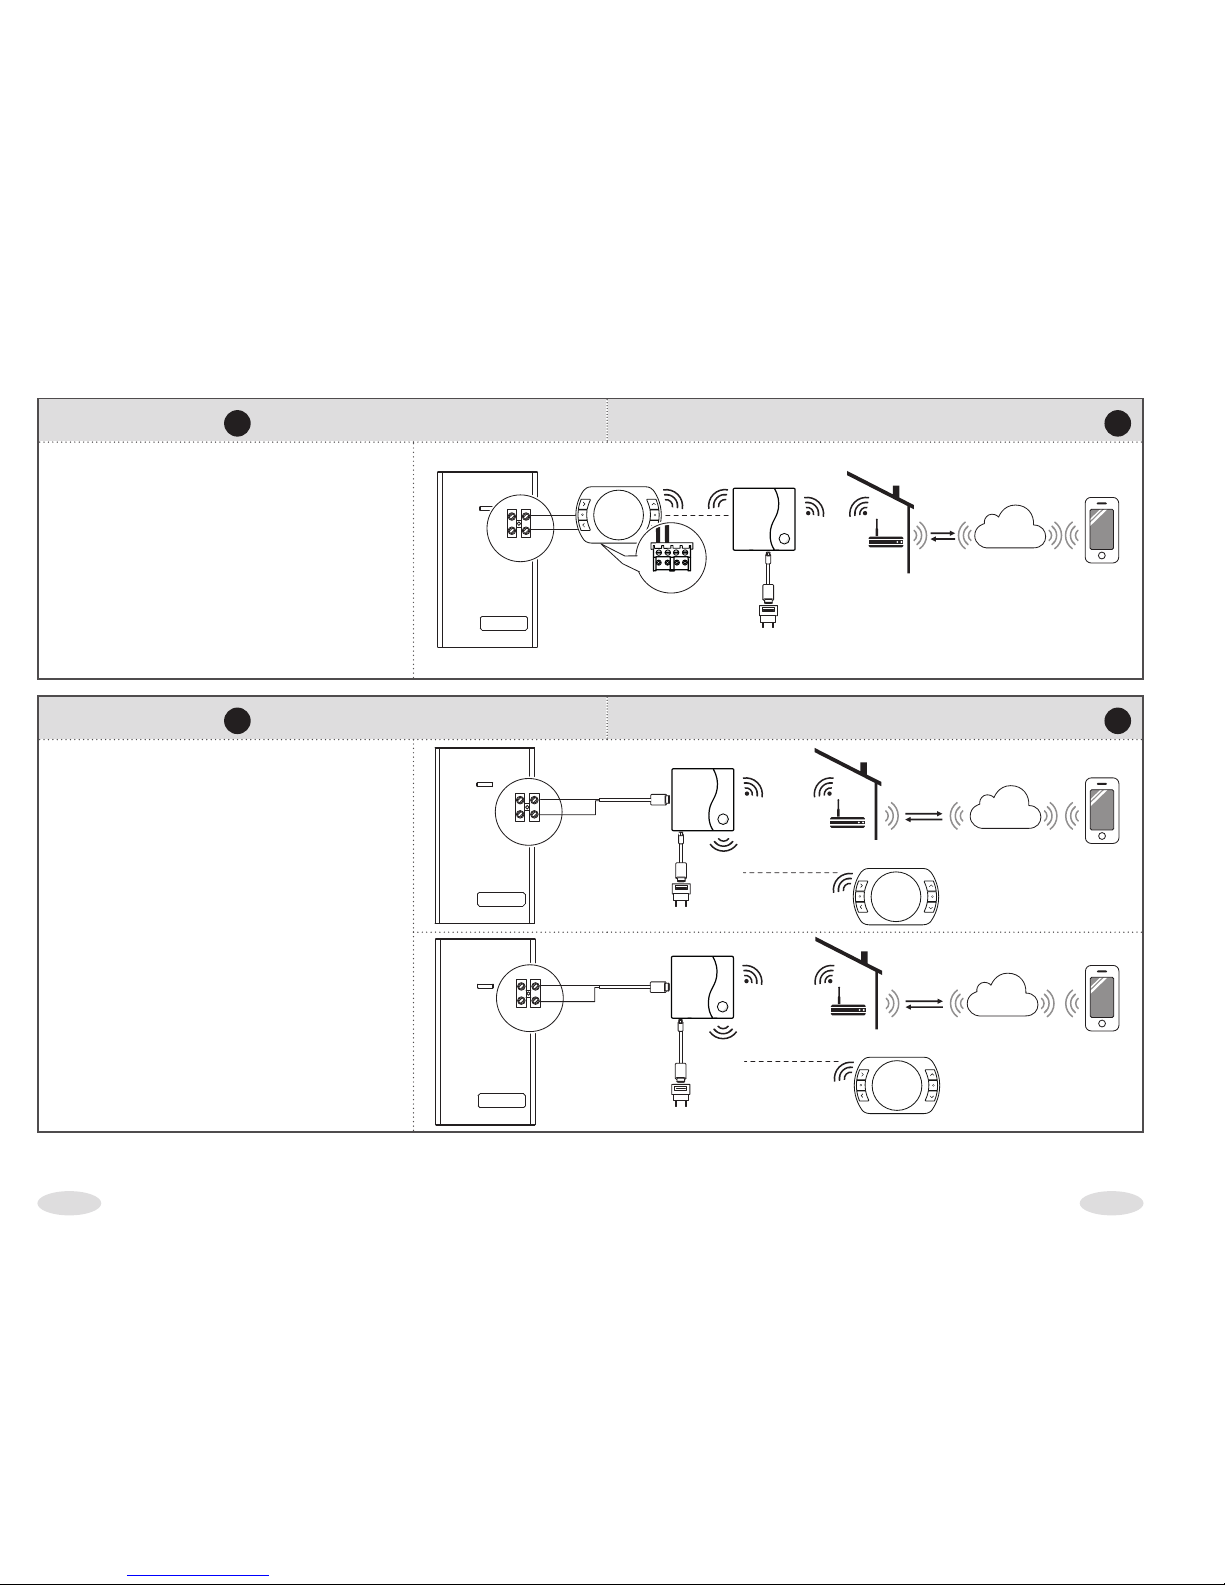
INSTALLAZIONE A INSTALLATION A
BeSMART: cablato in ON/OFF / Wi-
red ON/OFF
WiFi Box: NON cablato (solo alimentato) / Wireless (only main supply)
In questa congurazione l’installazione OTBus non è realizzabile. / In
this installation the OTBus conguration is not working.
WiFi Box
RF
internet
WiFi WiFi
230 V
TA
SET
PROG
RESET
ESC
MODE
BeSMART
BeSMART
server
TA
INSTALLAZIONE B INSTALLATION
B
BeSMART: NON cablato (wireless)/
NOT cabled (Wireless)
WiFi Box: Cablato/ Wired
TA
WiFi Box
BeSMART
serverinternet
WiFi WiFi
RF
RF
230 V
SET
PROG
RESET
ESC
MODE
BeSMART
WiFi Box
BeSMART
RF
SET
PROG
RESET
ESC
MODE
BeSMART
serverinternet
WiFi WiFi
230 V
RF
OT
Nota: per tutte le altre tipologie installative consultare il manuale installatore .
Note: ffor all other types of different installation refer to the installer manual.
3
ENIT
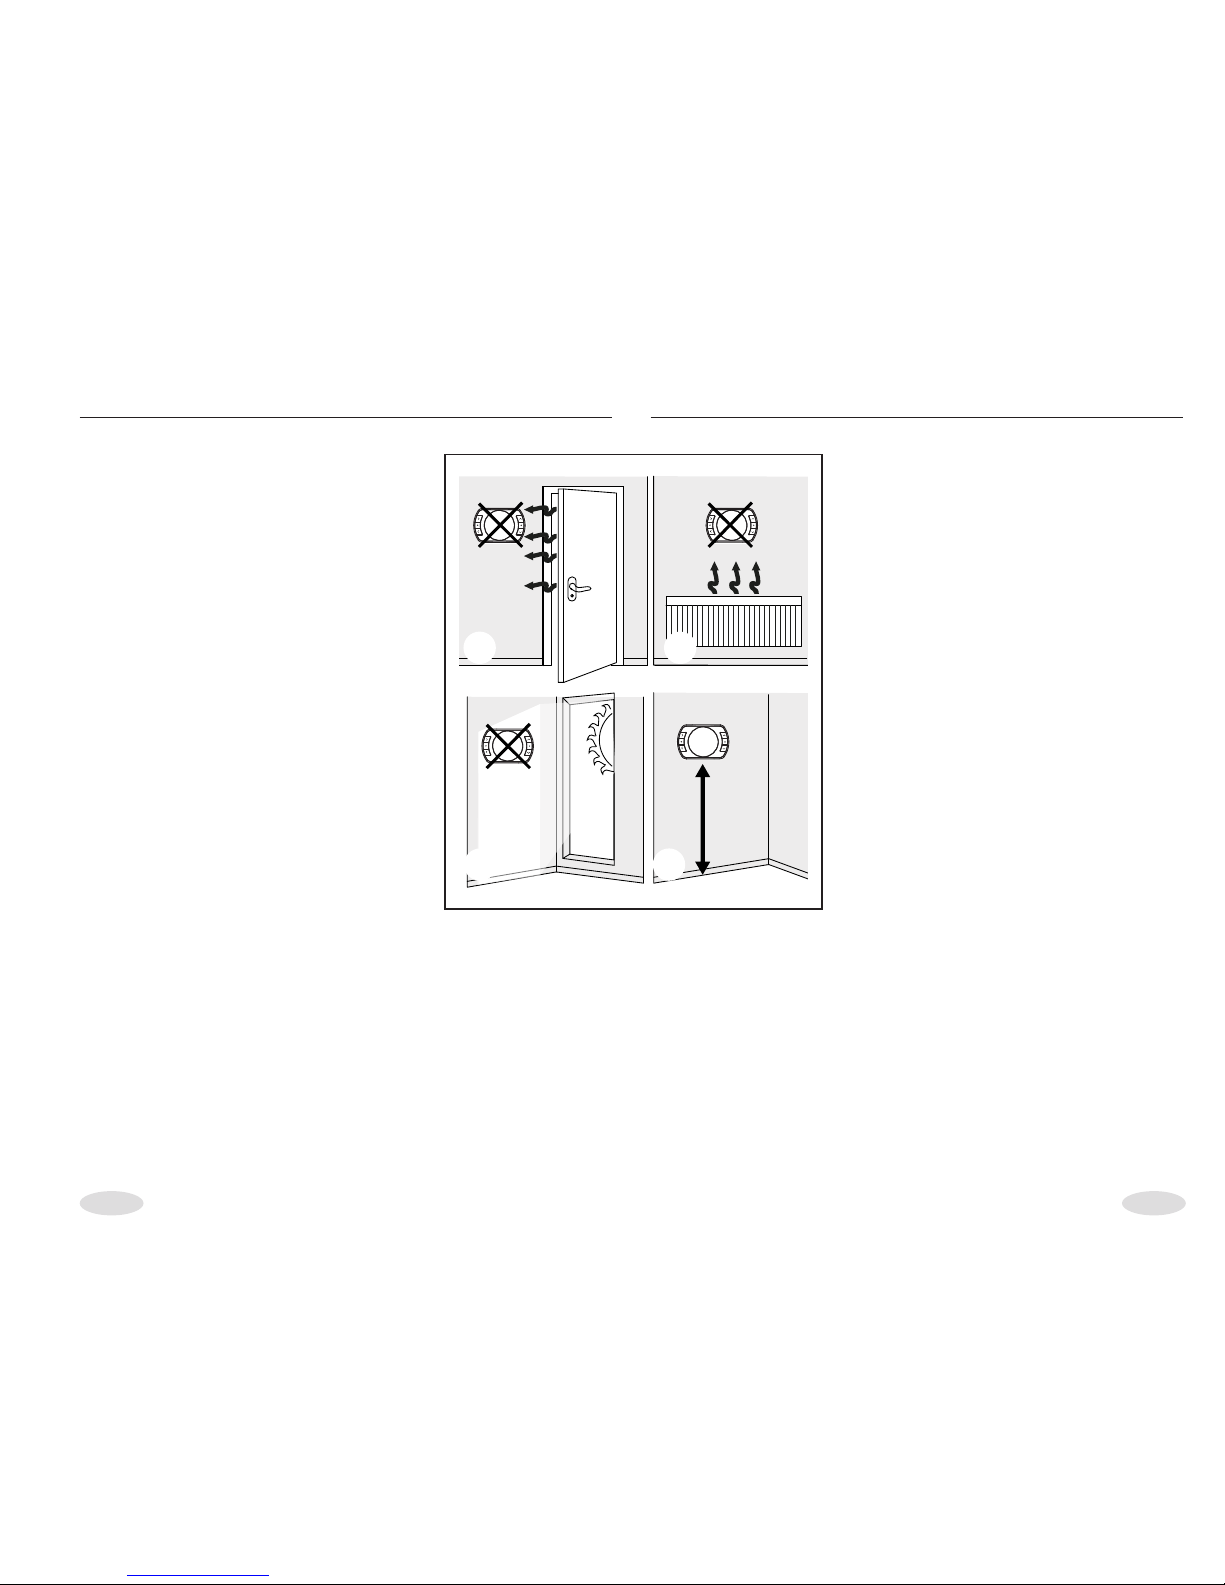
AVVERTENZE GENERALI GENERAL NOTICES
A Evitare correnti d’aria
B
Non installare sopra fonti di calore
C
Evitare luce diretta del sole
D
Posizionare ad altezza adeguata
Prima dell’installazione
•
Vericare che il termostato sia com-
patibile con la caldaia (consultare
manuale installatore caldaia).
• Il termostato BeSMART wireless
può essere installato ovunque, è tuttavia consigliabile stabilire il punto
più idoneo (vedi immagini correlate).
L’installazione wireless non necessita di cablaggio pertanto l’operazione risulta estremamente semplice.
•
Il termostato BeSMART
può essere
installato anche cablato in sostituzione di un qualsiasi termostato già
esistente, previa verica della compatibilità (consultare manuale installatore BeSMART).
•
Prima di procedere all’installazione
del modulo di comando della caldaia (WiFi Box) interrompere l’alimenta
-
zione della caldaia.
Sono necessari i seguenti attrezzi:
•
Cacciavite a croce
•
Piccolo cacciavite a taglio
•
Pinza e pinza spella li
A
Avoid draughty areas
B
Do not install above heat sources
C
Avoid direct sunlight
D
Install at the correct height
Before installation
•
Refer to the appliance manual
to ensure that the BeSMART
thermostat is compatible with your
boiler.
•
The BeSMART wireless thermostat
can be installed almost everywhere
within
the home, however please
refer to the adjacent diagrams
for guidance when deciding on a
suitable location.
•
The BeSMART thermostat can
also be used to replace an existing
hard-wired thermostat (please
check appliance manual to ensure
compatibility).
•
Switch off and isolate the appliance
and any external controls from the
electrical supply, before carrying out
the installation.
Tools required for the installation
•
Phillips screwdriver
•
Small at blade screwdriver
•
Combination pliers
SET
PROG
RESET
ESC
MODE
1,5m
SET
PROG
RESET
ESC
MODE
SET
PROG
RESET
ESC
MODE
SET
PROG
RESET
ESC
MODE
A B
C D
4
ENIT
INSTALLAZIONE A INSTALLATION A
SET
PROG
RESET
ESC
MODE
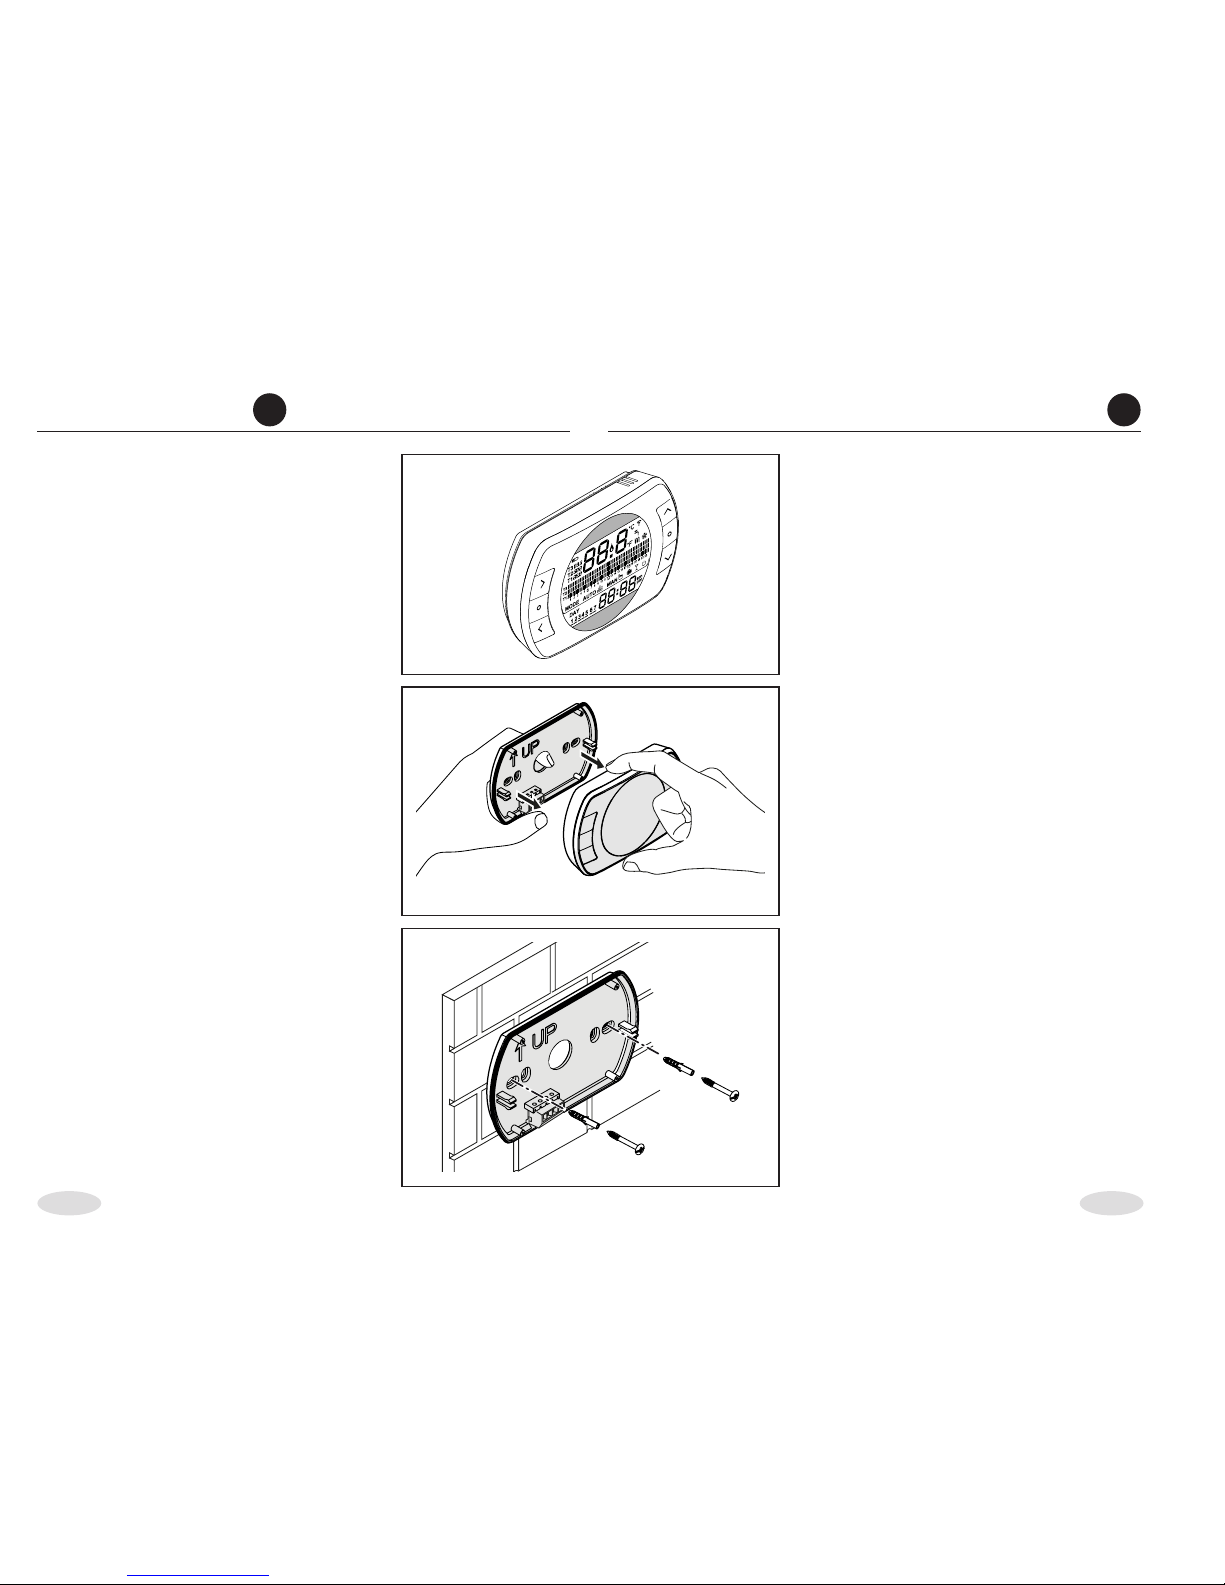
Installazione BeSMART
Se necessario rimuovere il vecchio
apparecchio.
9
Vericare la compatibilità (consultare manuale installatore
BeSMART) e procedere al collegamento.
Separare il BeSMART dalla sua base.
Fissare la base del BeSMART alla parete o alla scatola elettrica utilizzando
le viti a corredo (testa della vite dentro
propria sede).
BeSMART installation
If necessary remove the old
thermostat.
9
If its intended to re-use any
existing wiring; you should refer
to the appliance manual to
ensure compatibility .
Separate the BeSMART from the wall
plate.
Fix the wall plate to the wall using the
supplied screws (screw head inside
proper location).
5
ENIT
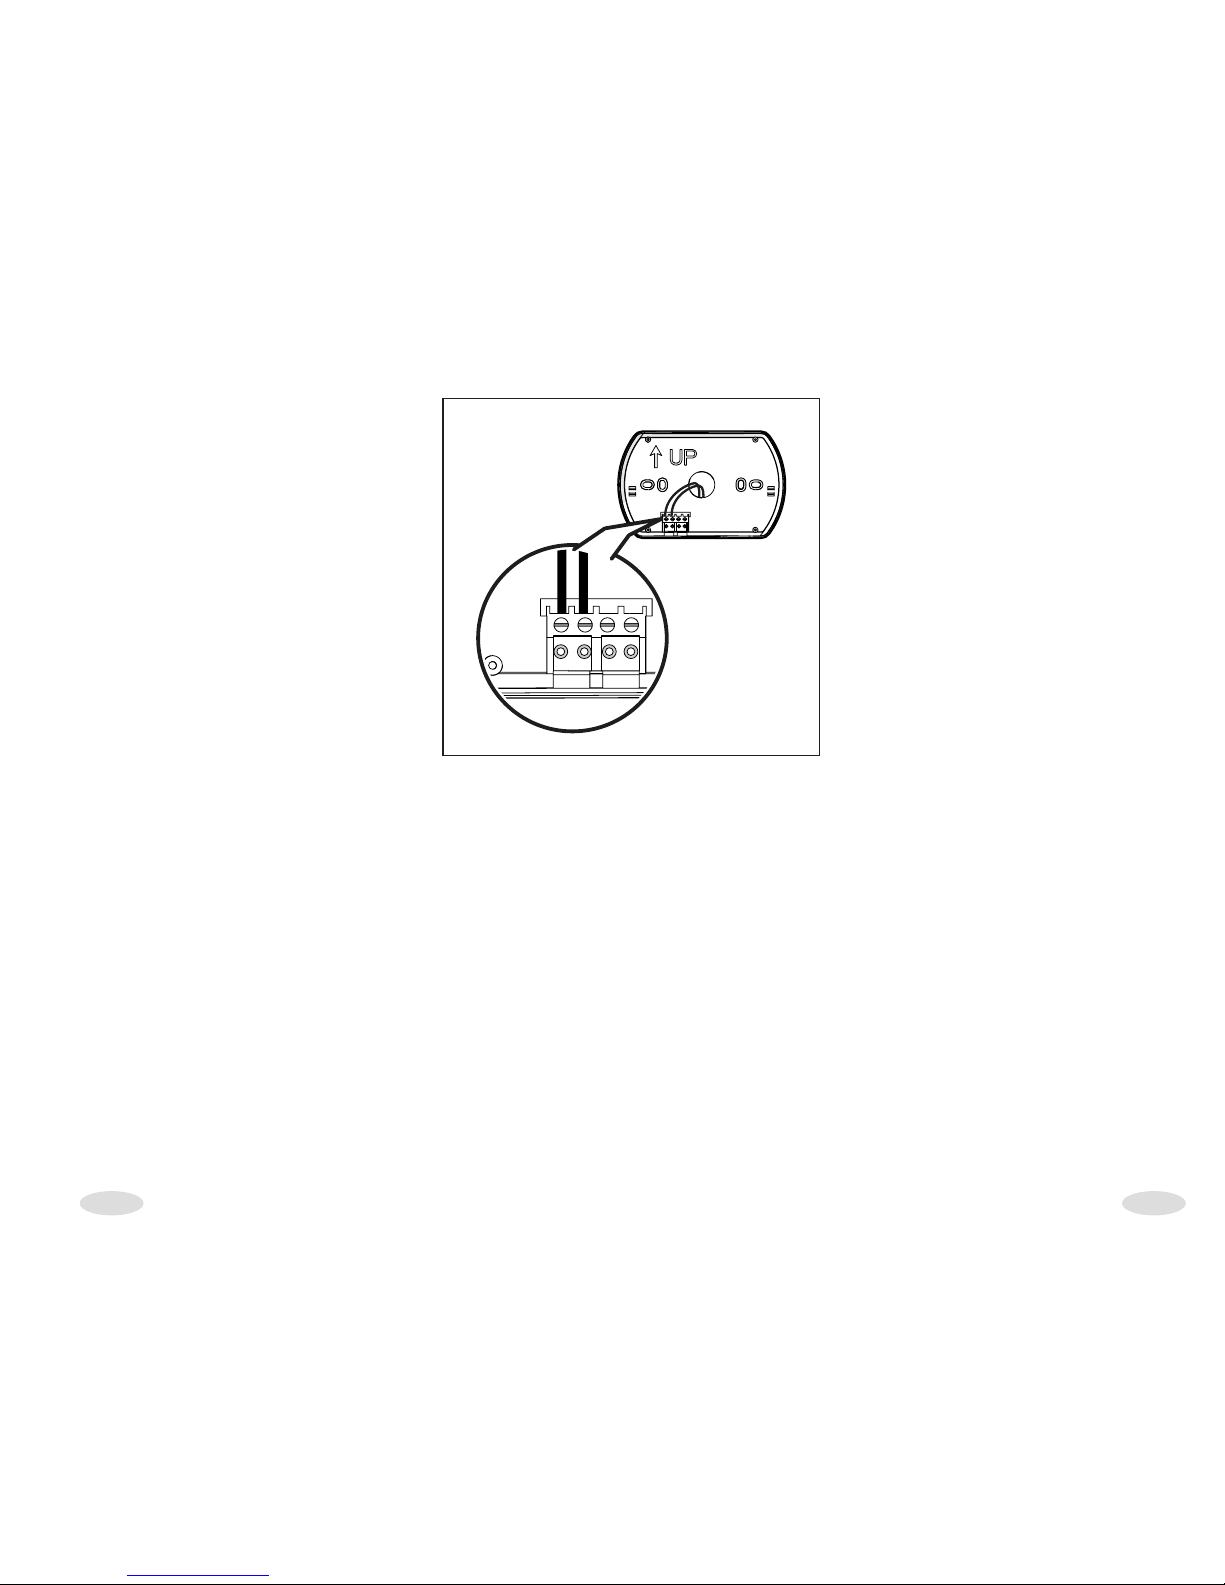
Collegare i cavi del termostato ambiente di caldaia o l’alimentazione
dell’eventuale valvola di zona al morsetto TA del BeSMART.
9
Per i collegamenti elettrici e le
speciche tecniche vi invitiamo
a consultare il manuale installatore del BeSMART.
If using as a hard-wired control;
connect the respective wiring to the
relevant terminals on the BeSMART
control.
9
Please refer to the appliance
installation manual and the
BeSMART manual for specic
information on hard-wired
connections.
TA
ON/OFF
6
ENIT
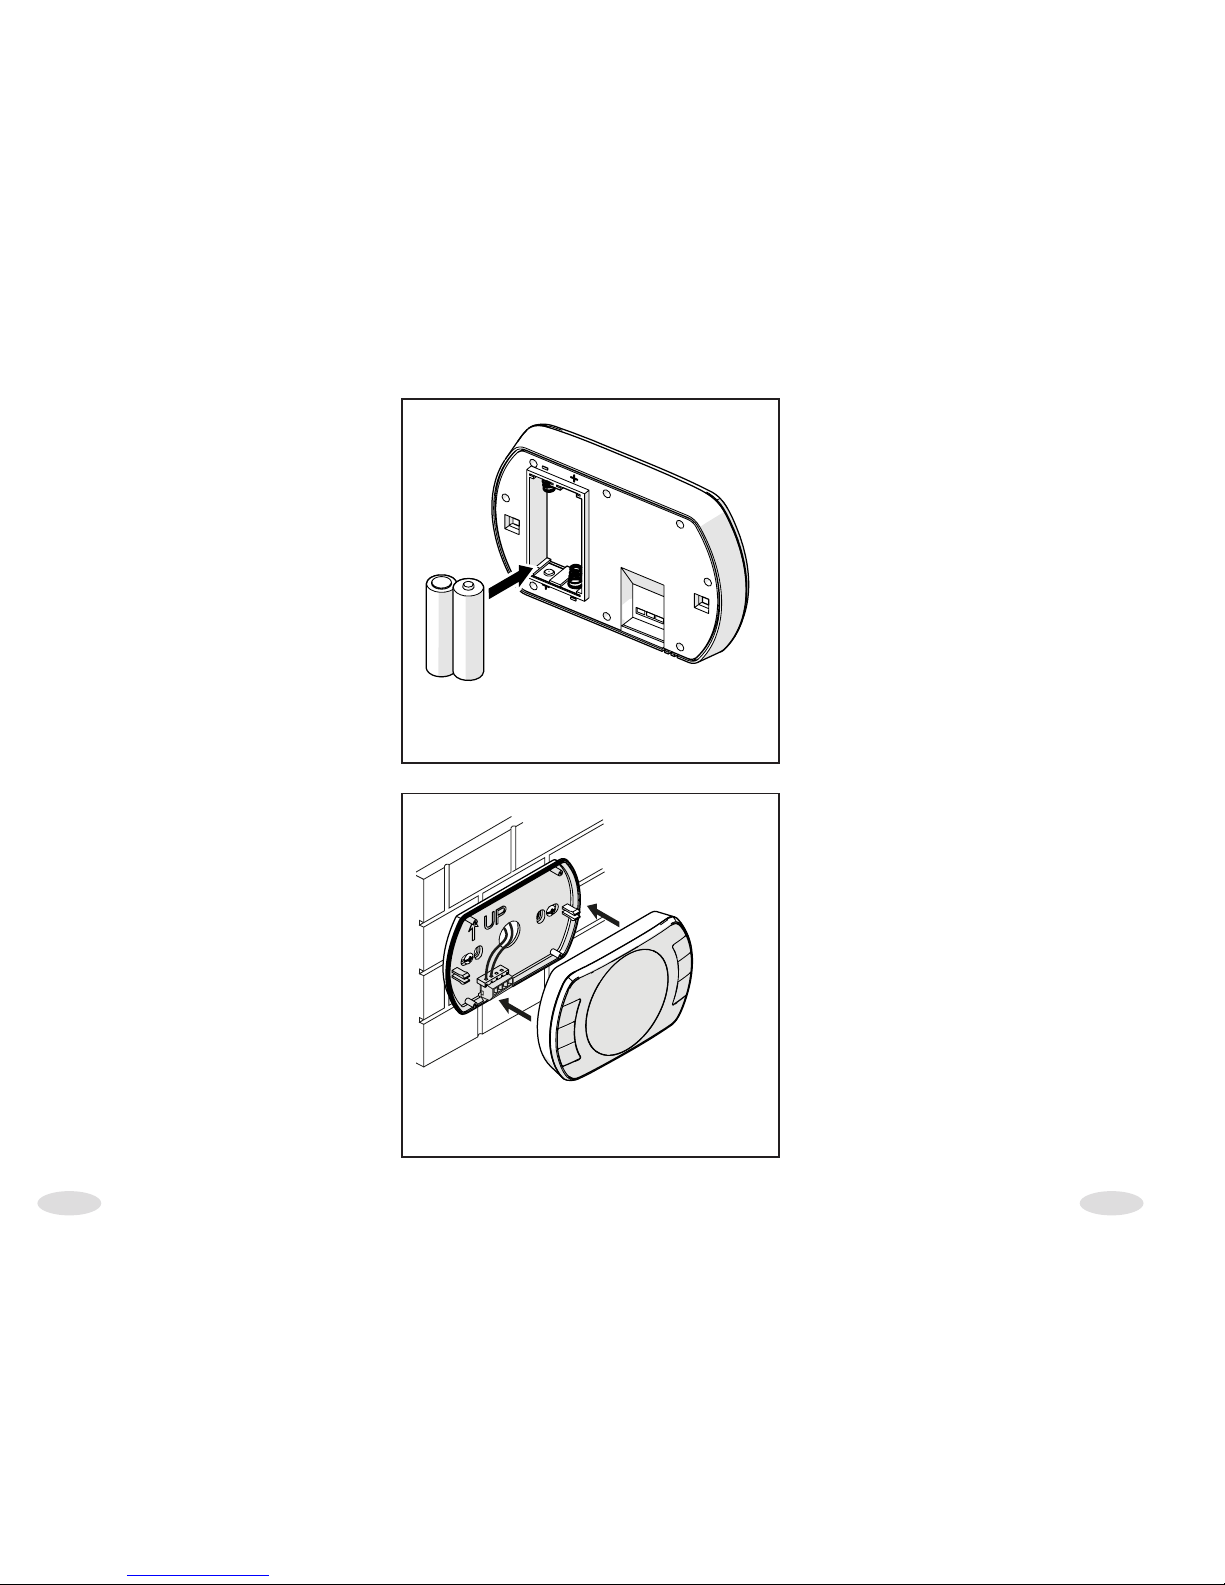
AA
AA
Inserire le due batterie di tipo AA fornite a corredo, nell’apposito alloggiamento.
9
Inserire le batterie con la corretta
polarità come indicato in gura.
Montare il BeSMART sulla sua base
semplicemente premendo leggermente sullo stesso.
Insert two ‘AA’ type batteries
(supplied), into the battery
compartment.
9
Insert the batteries, observing
the correct polarity as indicated.
Re-attach the BeSMART thermostat
to the wall plate by aligning and
then pressing rmly around the outer
edges.
 Loading...