

Page 1
Users
Instructions
THESE INSTRUCTIONS
TO BE RETAINED
BY USER
Vokèra is a licensed member of the Benchmark scheme
which aims to improve the standards of installation and
commissioning of domestic hot water systems in the UK.
AquaNova
Water heater
Page 2
2
Dear Customer
Y our AquaNova water heater incorporates the very latest gas water heating technology, and if cared for, will give years of
reliable use and efficiency .
Please therefore take some time to read these instructions carefully .
Do’s and don’t’ s
● Do ensure that you know how to isolate the appliance in an emergency
● Do ensure that you are familiar with the appliance controls
● Do ensure that your installer has completed the appliance log book
● Do not attempt to remove the appliance casing or gain internal access
● Do not hang clothes etc. over the appliance
● Do not forget to have the appliance serviced annually
Contents
Introduction Page
Dear customer 2
Do’s and don’t’s 2
Things you should know Page
1.1 Gas appliance 3
1.2 Electrical supply 3
1.3 Guarantee registration card 3
1.4 Benchmark log book 3
1.5 How does it work? 3
1.6 Diagnostic fault indicator 3
1.7 Led status indicator 3
1.8 Dimensions 3
1.9 Clearances required 3
Getting started Page
2.1 Before switching on 3
2.2 Appliance controls 3
2.3 Lighting the appliance 3
How to... Page
3.1 Reset the appliance 4
3.2 Understand the diagnostic fault codes 4
3.3 Shut down the appliance for short periods 4
3.4 Shut down the appliance for long periods 4
3.5 Care for the appliance 4
What if... Page
4.1 I suspect a gas leak 5
4.2 The status led is flashing red 5
4.3 The appliance is due its annual service 5
4.4 I need to call an engineer 5
INTRODUCTION
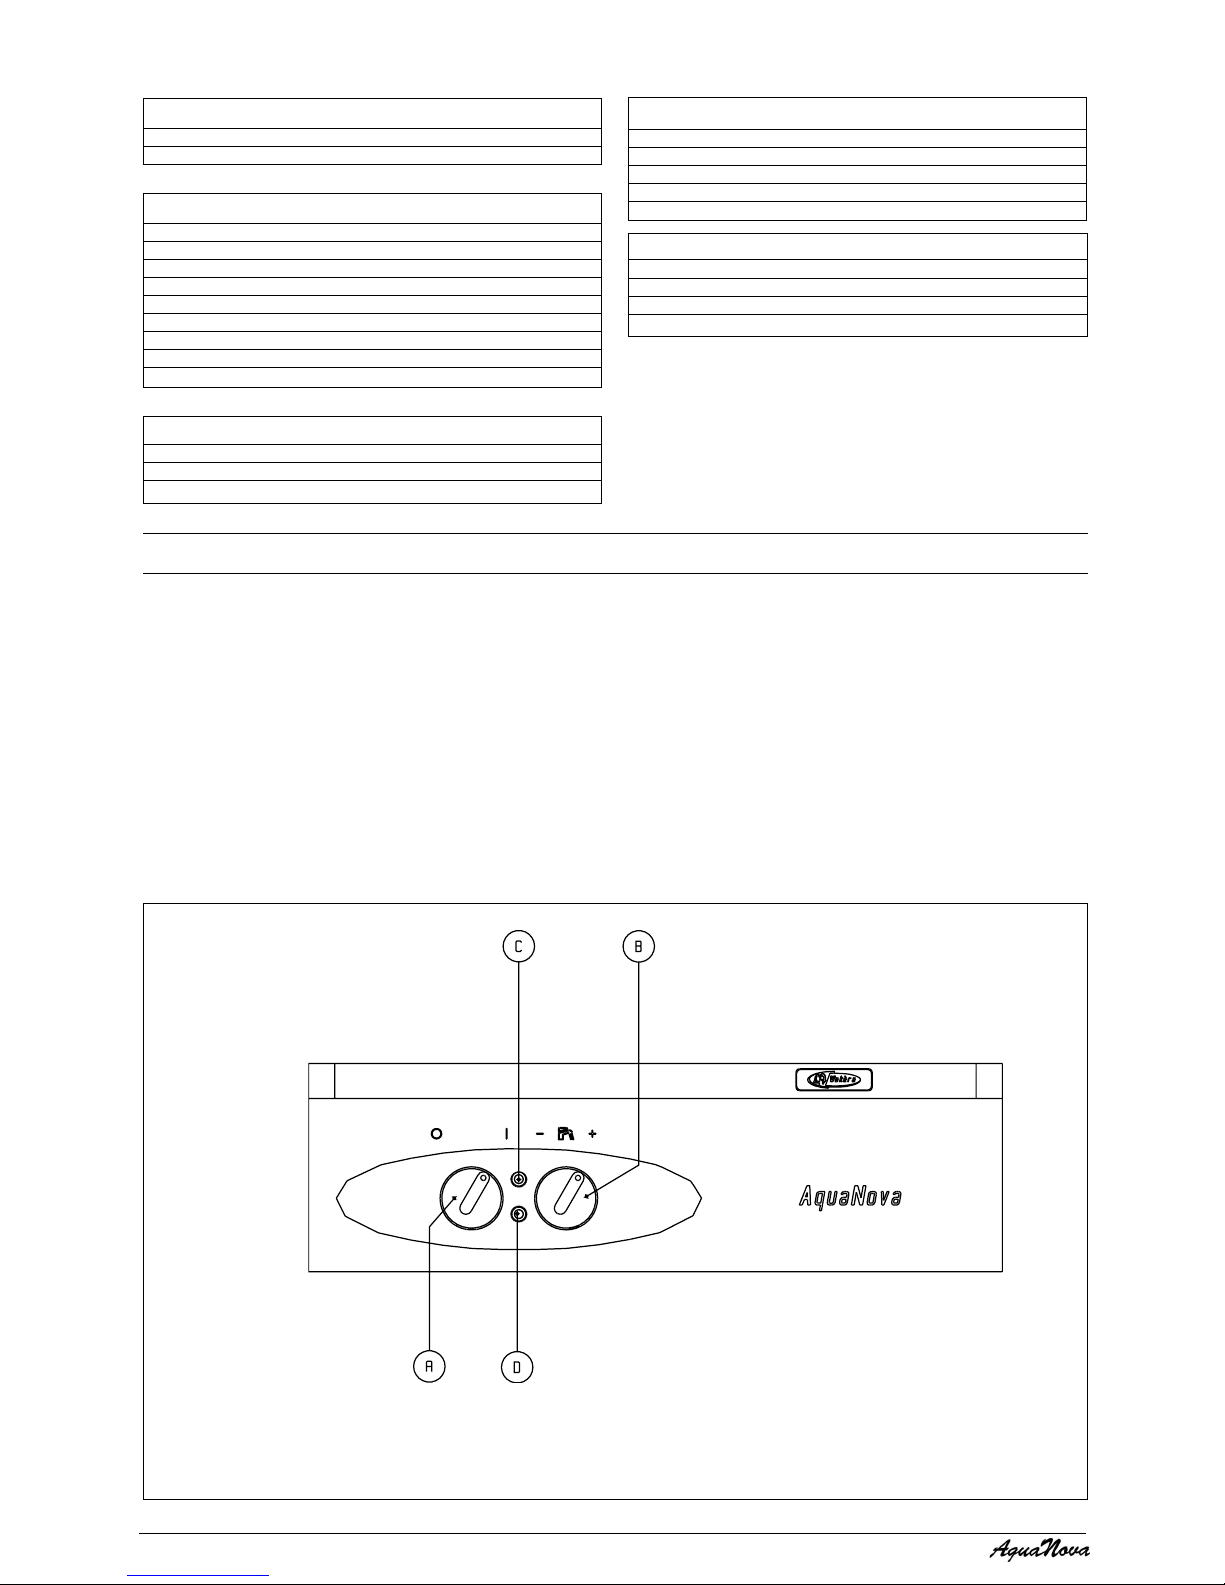
Fig. 1
A Selector switch
B Variable Thermostat
C Green LED
D Red LED
Page 3
3
THINGS YOU SHOULD KNOW
1.1 GAS APPLIANCE
Gas Safety (Installations and Use) Regulations. In
the interests of your safety and that of others it is a
legal requirement that all gas appliances are installed
and correctly maintained by a competent person
and in accordance with the latest regulations.
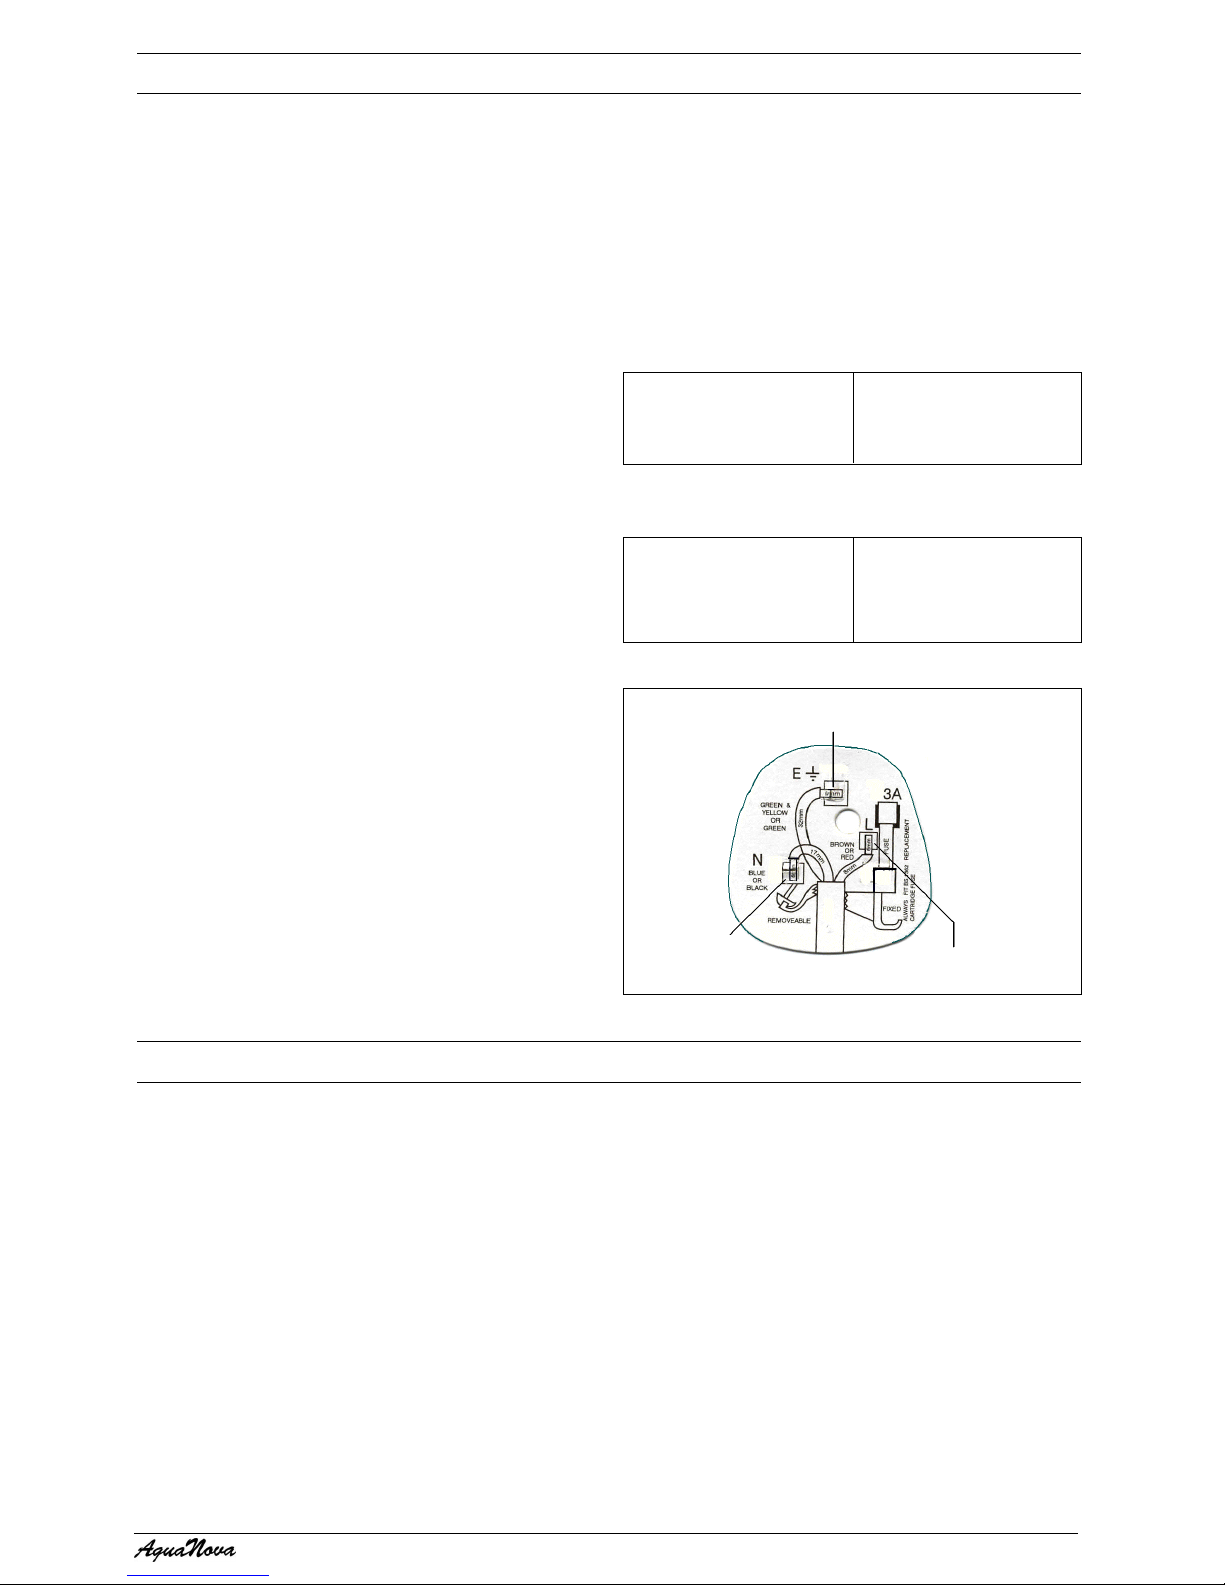
1.2 ELECTRICAL SUPPLY
Please ensure that this appliance has been properly
connected to the electrical supply by means of a
double pole isolator or un-switched socket, and that
the correct size of fuse (3 amp) has been fitted (see
fig.2).
Warning: this appliance must be earthed!
1.3 GUARANTEE REGISTRATION CARD
Please take the time to fill out your guarantee
registration card. The completed warranty card
should be posted within 30 days of installation.
1.4
BENCHMARK
LOG BOOK
The
Benchmark
Log Book is supplied with your
boiler. This important document must be
completed during the installation/commissioning
of your boiler. All CORGI Registered Installers
carry a CORGI ID card, and have a registration
number. Both should be recorded in your
Benchmark Log Book. You can check your
installer by calling CORGI direct on 01256 372300.
Failure to install and commission the appliance in
accordance with the manufacturers instructions
may invalidate the warranty. This does not affect
your statutory rights .
1.5 HOW DOES IT WORK?
Your AquaNova water heater is an instantaneous
gas water heater that operates to produce hot water
whenever a hot water outlet (tap) is opened.
The AquaNova will operate whenever a flow of
water, through the appliance is sensed.
The AquaNova lights electronically and does not
have a pilot light. In the unlikely event of a fault
developing with your appliance, the supply of gas to
the burner will be terminated automatically.
1.8 DIMENSIONS
HEIGHT
WIDTH
DEPTH
640 mm
400 mm
246 mm
1.9 CLEARANCES REQUIRED
ABOVE
BELOW
SIDES
FRONT
150 mm
150 mm
50 mm
600 mm
1.6 DIAGNOSTIC FAULT INDICATOR
In the unlikely event of a fault developing, the
AquaNova displays a unique fault indicator that
helps identify where the fault lies.
1.7 LED STATUS INDICATOR
The AquaNova is equipped with 2 led status
indicators that gives a visual indication of whether
the appliance is working normally or has developed
a fault.
Fig. 2
GETTING STARTED
2.1 BEFORE SWITCHING ON
Before switching the appliance on, please familiarise
yourself with:
● how to isolate the appliance from the gas, water
and electricity supplies;
● the appliance controls.
2.2 APPLIANCE CONTROLS (see fig. 1)
The appliance controls are situated on the front of
the appliance. The appliance has a mode switch,
variable thermostat. The mode switch has two
positions:
● OFF/RESET (0)
● ON (I)
The variable thermostat allows you to set the outlet
temperature between 40°C (min) and 65°C (max),
depending on the flow of water.
2.3 LIGHTING THE APPLIANCE
Ensure the gas and electrical supply to the appliance
are switched on.
Turn the mode switch to the “I” (ON) position. The
status indicator should be “green” if the status
indicator is flashing “red” refer to 3.2.
When a hot water outlet (tap) is opened, the appliance
will go through an ignition sequence, whereby the
burner will light.
If the appliance fails to ignite during the ignition
sequence, allow a period of two minutes before resetting.
To adjust the outlet temperature of the appliance
turn the thermostat knob clockwise to increase or
anti-clockwise to decrease.
When the appliance reaches the set temperature,
the burner will modulate to ensure temperature
stability.
Earth (Green/Yellow)
wire goes here
Neutral (Blue)
wire goes here
Live (Brown)
wire goes here
Page 4

4
3.1
HOW TO RESET THE APPLIANCE
When the led status indicator is flashing red, the
appliance will require to be reset manually. Using
the mode switch, turn it left to the “0” (off/reset
position) then turn it back to the “I” position (see also
3.2).
IMPORTANT
If the appliance requires to be reset frequently, it
may be indicative of a fault, please contact your
installer or Vokera Customer Service for further
advice.
3.2 DIAGNOSTIC INDICATORS
3.3 HOW TO SHUT DOWN THE SYSTEM FOR
SHORT PERIODS
The appliance can be shut down for short periods
by simply turning the selector switch to the off
position. It is also advisable to turn off the main
water supply to the house.
3.4 HOW TO SHUT DOWN THE SYSTEM FOR
LONG PERIODS
If the house is to be left unoccupied for any length
of time – especially during the winter – the system
should be thoroughly drained of all water.
The gas, water, and electricity supply to the
house should also be turned off. For more detailed
advice contact your installer.
3.5 HOW TO CARE FOR THE APPLIANCE
To clean the outer casing use only a clean damp
cloth. Do not use any scourers or abrasive
cleaners.
HOW TO...
Green LED
On for 1 second, off for 5
seconds
On
Off
On
Flashing on/off every 0,5
seconds
Flashing on/off every 0,5
seconds
Red LED
Off
Off
On
Flashing on/off every 0,5
seconds
Off
Flashing on/off every 0,5
seconds
Status
No request for hot water
Hot water request
Appliance lockout
Overheating
Internal fault
Internal fault
Action required
NONE
NONE
Ensure gas is turned on at
meter. Wait 2 minutes before
resetting
Allow to cool, if problem
persists, call engineer
Call engineer
Call engineer
Page 5

5
Advice for homeowners
Please contact Vokera Customer Services (0870
333 0220 (UK) or 05655057 (ROI) if you would
prefer a Vokera service engineer or agent to
service your appliance. Alternatively your local
CORGI registered engineer may be able to service
the appliance for you.
4.4 WHAT IF I NEED TO CALL AN ENGINEER
If you think your appliance may have developed
a fault, please contact your installer or Vokera
Customer Services (0870 333 0220 (UK) or
05655057 (ROI) have all your details to hand
including full address and postcode, relevant
contact numbers, and your completed appliance
log book.
WHAT IF...
4.1 WHAT IF I SUSPECT A GAS LEAK
If you suspect a gas leak, turn off the gas supply
at the gas meter, and contact your installer or
local gas supplier. If you require further advice
please contact your nearest Vokera office.
4.2 WHAT IF THE STATUS LED IS FLASHING
RED
If the red led is flashing it indicates that the
appliance has developed a problem, when this
happens the appliance automatically shuts down
and requires to be reset manually (see 3.1).
4.3 WHAT IF THE APPLIANCE IS DUE ITS
ANNUAL SERVICE
Advice for tenants only
Your landlord should arrange for servicing.
Page 6

6
Page 7

7
Page 8

Registered address:
Vokèra Ltd
Borderlake House
Unit 7 Riverside Industrial Estate
London Colney
Herts AL2 1HG
enquiries@vokera.co.uk
www.vokera.co.uk
www.vokera.ie
Sales, General Enquires
T 0844 391 0999
F 0844 391 0998
Vokèra Ireland
West Court, Callan
Co Kilkenny
T 056 7755057
F 056 7755060
Vokèra Limited reserve the right to change
specification without prior notice
Consumers statutory rights are not affected.
A Riello Group Company.
Company Reg No: 1047779
1 .dE - 40/81 - 13222001 .doC
 Loading...