

Page 1

VOIspeed V-IP400 User Manual
© VOI
SPEED LTD
.
User Manual
VOIspeed V-IP400
IP phone
1
Page 2

VOIspeed V-IP400 User Manual
© VOI
SPEED LTD
Content
1. Introduction ........................................................................................................... 3
2. Security information .............................................................................................. 3
2.1. How to use the telephone correctly..................................................................... 3
2.2. Qualified personnel ............................................................................................ 3
2.3. Accessories ........................................................................................................ 3
2.4. Waterproof guidelines ........................................................................................ 3
2.5. Connecting other devices ................................................................................... 3
2.6. Telephone position............................................................................................. 3
2.7. Connect the power supply .................................................................................. 4
2.8. Cleaning the device ............................................................................................ 4
2.9. Product Disposal ................................................................................................ 4
2.10. Product Warranty ........................................................................................... 5
3. General Information............................................................................................... 6
3.1. Components check list ....................................................................................... 6
3.2. General specifications ........................................................................................ 6
3.3. Before starting.................................................................................................... 6
3.4. Getting Started ................................................................................................... 7
4. Basic operations..................................................................................................... 9
5. Web configuration ................................................................................................12
5.1. Login ................................................................................................................13
5.2. Current state......................................................................................................14
5.3. Network ............................................................................................................15
5.4. VOIP.................................................................................................................16
5.5. Advanced configuration ....................................................................................17
5.6. Config Manager ................................................................................................22
5.7. Upgrade ............................................................................................................23
5.8. System management..........................................................................................24
6. Keyboard Configuration........................................................................................28
6.1. Enter the telephone menu ..................................................................................28
6.2. Network settings (IP address, Netmask) ............................................................28
6.3. Telephone startup in POST mode ......................................................................28
6.4. Address book ....................................................................................................28
.
2
Page 3

VOIspeed V-IP400 User Manual
© VOI
SPEED LTD
.
1. Introduction
We would like to thank you for your purchase and for having chosen one our products.
This manual provides general guidelines for a correct use of the product. In case you
require further information on this product or to receive technical assistance please visit our
website:
www.voispeed.com.
2. Security information
You will find listed below security rules that the user should follow when using this device.
Please comply with these guidelines to avoid taking unnecessary risks.
2.1. How to use the telephone correctly
Use the telephone only in the standard working position.
2.2. Qualified personnel
Any installations or repairs on the product should be carried out only by qualified and fully
trained personnel.
2.3. Accessories
Use only accessories that are fully approved by The Manufacturer. Do not connect to any
non compatible products.
2.4. Waterproof guidelines
The telephone is not waterproof. Avoid contact with liquids.
2.5. Connecting other devices
If you connect the telephone to other devices please read the user guide of the device first.
Do not connect the telephone to any non compatible products.
2.6. Telephone position
Avoid prolonged exposure to direct sunlight. Do not place the telephone near sources of
intense heat (e.g. radiators, fire, etc.) and near electronic equipment producing strong
magnetic fields (speakers, microwaves ovens, etc.). Do not install the telephone in humid
rooms and avoid contact with liquids. Do not expose the device to aggressive gas and do
not use the telephone in too dusty environments. Never use the telephone in presence of
any explosive gas (e.g. methane). Refrain from opening any parts of the V-IP400 and do
not touch the plugs with metal or sharp objects.
3
Page 4

VOIspeed V-IP400 User Manual
© VOI
SPEED LTD
.
2.7. Connect the power supply
Please make sure that the power supply complies with the voltage setting of your
equipment. If you have doubts about the voltage setting, please call the technical support.
Do not remove any devices that provide security. Always disconnect the telephone from
the power supply during storms. All maintenance work should be carried out by qualified
personnel.
2.8. Cleaning the device
We suggest cleaning the equipment only using a slightly dump cloth.
Product Disposal
2.9.
Our products are compliant with the European Directives 2002/95/CE, 2002/96/CE
and 2003/108/CE regarding the limitation of use of lead, mercury, cadmium,
chromium (VI) as well as some flame retardants and hazardous material within
electric and electronic equipment and disposal.
The sign above representing a crossed waste bin indicates that the product, once no longer
utilised, must be disposed of by separating it from normal waste. The user must ensure that
the product, once reached its end-life, is given to qualified organisations responsible for the
collection of electronic and electrical waste. The user may otherwise choose to return the
equipment to the manufacturer when purchasing a new equivalent device. In this case the
product returned must correspond to the one being purchased.
Suitable disposal of the equipment in accordance with relevant recycling guidelines helps
the environment and fosters sustainable development. Unlawful disposal of this equipment
is an offence and may lead to prosecution in accordance with the Country’s laws in which
the disposal takes place.
Correct disposal benefits us and the environment.
4
Page 5

VOIspeed V-IP400 User Manual
© VOI
SPEED LTD
.
2.10. Product Warranty
The Manufacturer (Harpax Srl.) warrants its products to be free from defects in material
and workmanship during the warranty period. The product is covered by warranty only if it
is used in compliance with the guidelines contained in this manual. This warranty will be
invalidated in case of manumission, wrong use of the product or accidental damage. This
product is compliant with CE regulations.
The warranty period starts from the date the product has been purchased (stated on the
invoice) and will last for twelve (12) months thereafter. If a product proves to be defective
in material or workmanship during the warranty period, The Manufacturer will, at its sole
discretion, repair or replace the product with a similar one (new or re-conditioned). The
replacement unit will be covered by a new warranty period that will last the remaining time
on the customer's original limited warranty. The old equipment substituted will
automatically become property of Harpax Srl.
In order to have access to the warranty the user must fill out the online form that can be
found on
support department on 01727 848186). The user must provide a valid invoice to claim
warranty on the product.
www.prontopbx.com or www.voispeedltd.com (please also contact the customer
2.10.1. Exclusions.
The warranty will be invalidated in the following cases:
Damages to any parts that are meant to ware out with time. No support,
maintenance or replacement will be provided for these components.
Damages resulting from using a wrong power supply.
Damages resulting from misuse or actions that do not comply with the guidelines of
this manual.
Damages resulting from lack of maintenance as advised by The Manufacturer.
Damages resulting from installing or using the product without complying with the
relevant standards (legal, health and safety, technical, etc.) that are in place in the
Country where the product is utilised.
Damages resulting from misuse, negligence, unauthorized product modification,
repair or attempted repair by anyone not authorized by The Manufacturer (including
the user) or failure to follow instructions supplied with the product.
Damages caused during product transportation or delivery due to insufficient or
inappropriate packaging.
Damages caused by accident, fire, water, any acts of nature, insufficient ventilation
or other causes that don not fall under the control of The Manufacturer.
Damages caused from any unintentional or deliberate human acts .
5
Page 6

VOIspeed V-IP400 User Manual
© VOI
SPEED LTD
.
Damages caused from manumission or in conjunction with warranty labels being
broken.
Damages to Software or any Hardware component not supplied by The
Manufacturer with the product.
This warranty is only valid within the European Community.
3. General Information
V-IP400 is a stand-alone device that requires no connection to a PC to make phone calls.
As well as providing the same features of a traditional telephone, V-IP400 supports both
data and voice through the IP network. V-IP400 guarantees clear and reliable voice quality
on an IP network. V-IP400 is fully compatible with SIP industry standard and can
interoperate with VOIspeed-based systems. The integrated switch allows you to connect
another IP device to a LAN.
3.1. Components check list
1. One V-IP400 (body)
2. One Handset
3. One Handset cable
4. One universal power adapter
5. Ethernet cable (3 m)
6. User manual
3.2. General specifications
Description V-IP400
Power supply 100-240VA/5VDC/60Hz
CPU 150MHz
LAN 10/100Base T RJ-45 per LAN Ports
PC 10/100Base T RJ-45 per PC
Power absorption 1.8W/1.4W
Preferred temperature 0 ~ 50°C
Preferred Humidity 5 ~ 65%
3.3. Before starting
Check if your LAN and your SIP server are correctly running before connecting the VIP400.
6
Page 7
VOIspeed V-IP400 User Manual
© VOI
SPEED LTD
.
NOTE: before using the telephone you need to configure at least one user in the Pronto
server. In this way the telephone will be able to login.
3.4. Getting Started
3.4.1. Connection
• Connect the LAN Ethernet port to the company switch/router/hub using an ethernet
UTP5 cable (not cross cable).
• Connect the PC Ethernet port to a PC using an Ethernet UTP5 cable (not cross
cable) in case you need to.
• Connect the power supply to the Power plug
This device is provided with ground connection. Use the device only in a fully earthed
electric system, with Residual Current Device (RCD) and relevant safety measures as
prescribed by law.
3.4.2. Display
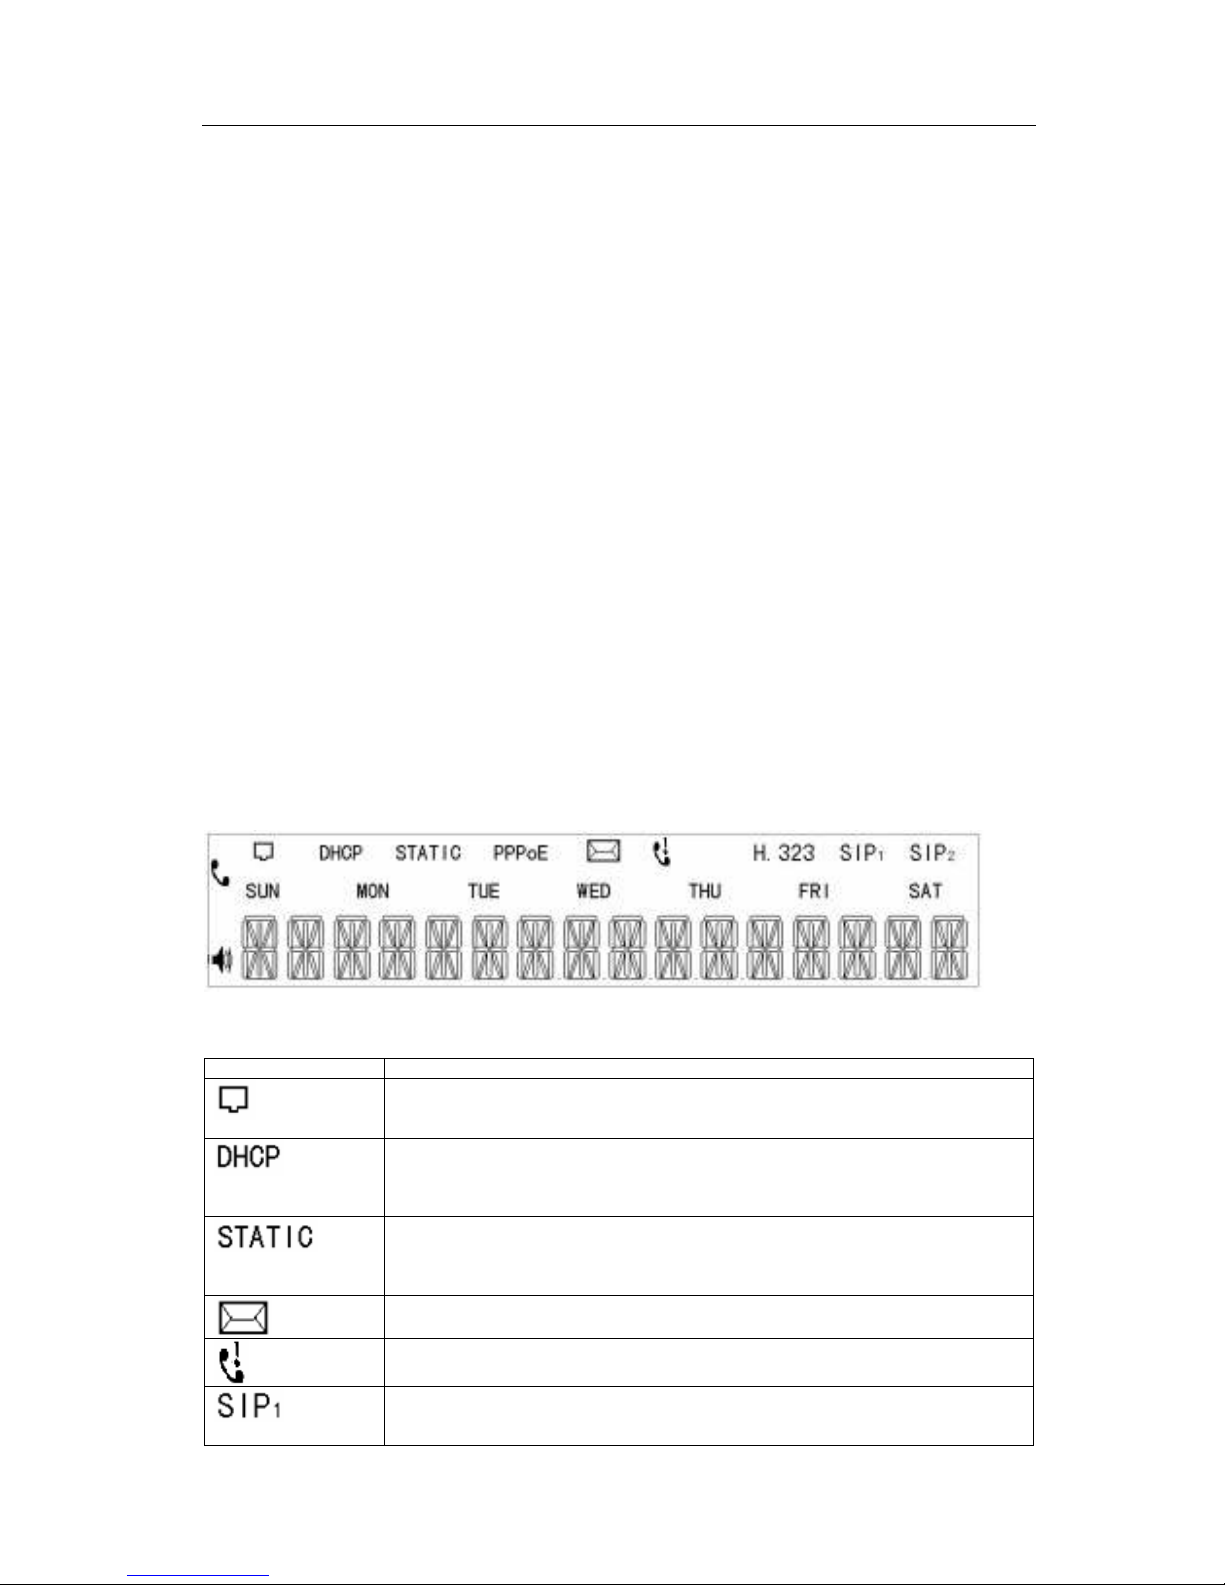
The V-IP400 telephone is provided with a backlit (green) LCD display. Please find below a
screenshot of the display with all segments being activated:
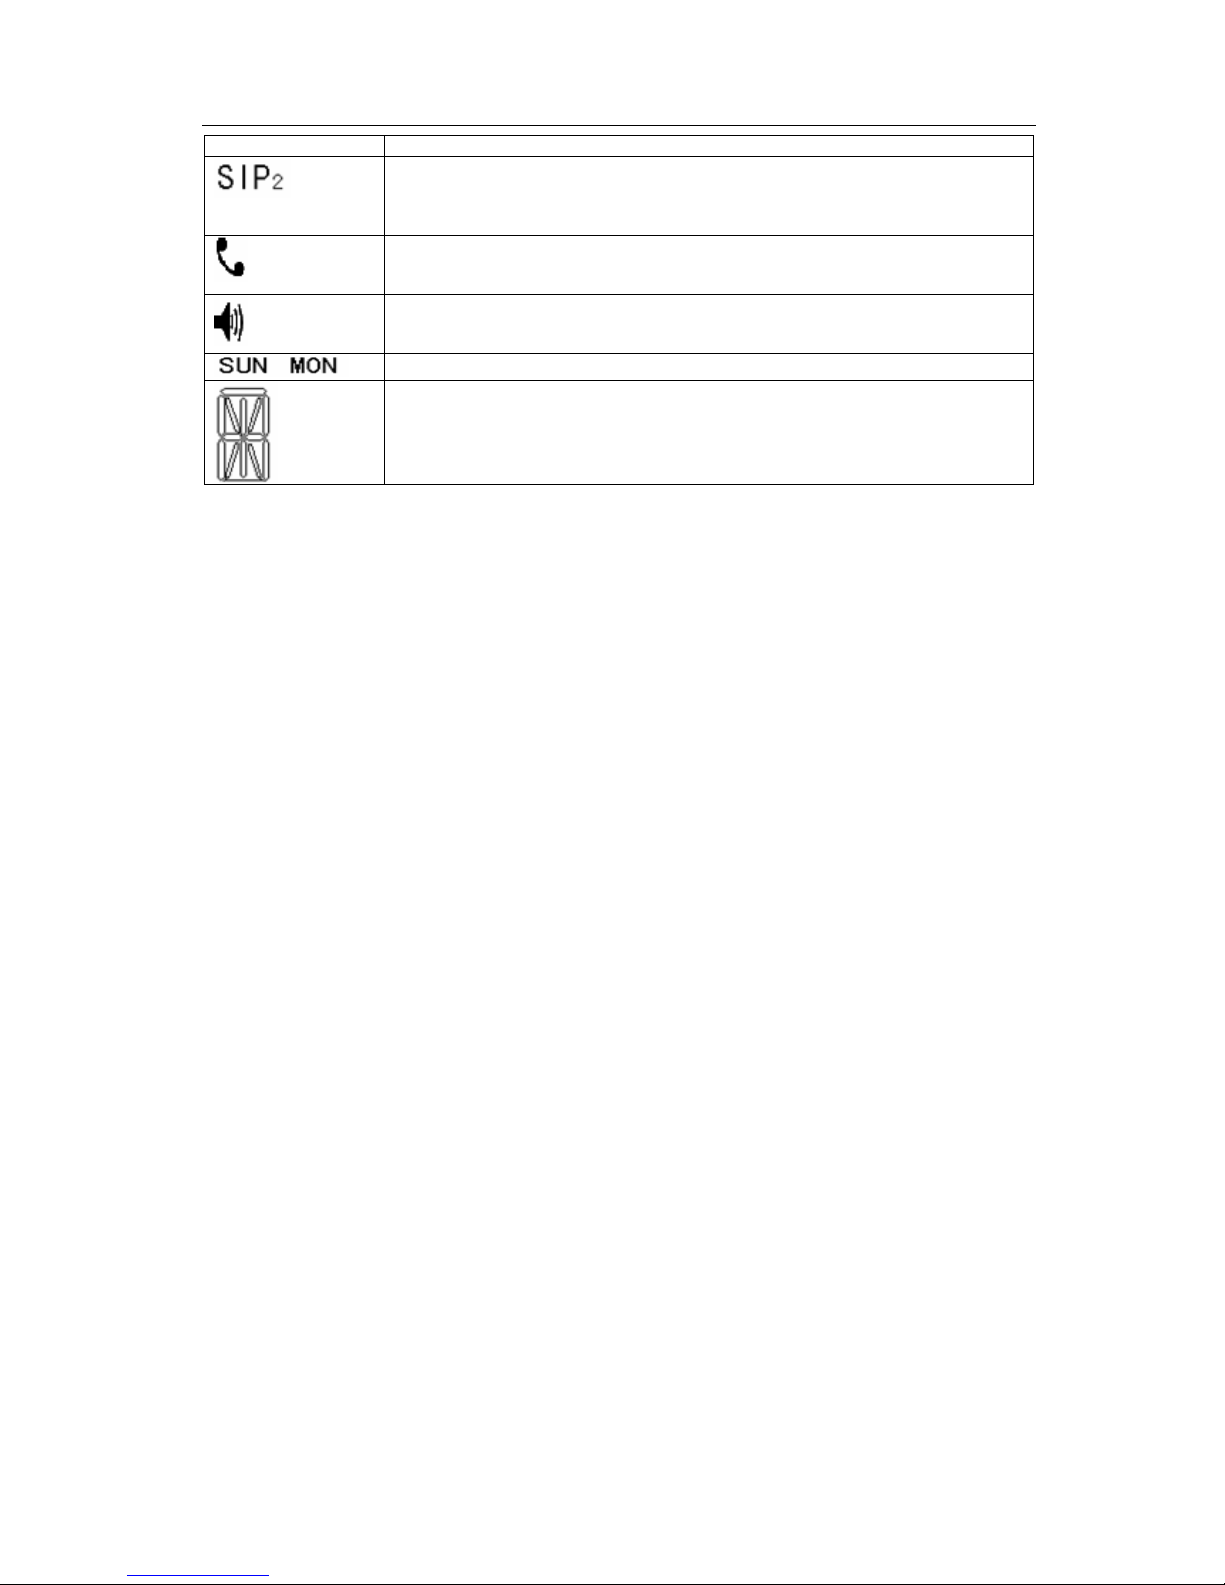
The table below lists all symbols meanings:
Icon LCD Icon Definitions
Network Status Icon:
BLINK Network bind failure
ON, Ethernet link is up.
Network Status Icon:
ON, the phone uses a dynamic IP address
BLINK, the phone should work with dynamic IP address but no DHCP server found
OFF, the phone uses a static IP address
Network Status Icon:
ON, the phone uses a static IP address
BLINK, failure assigning the IP address
OFF, the phone uses dynamic IP address
Message Status Icon:
BLINK, new message on the vocal box
Missed call display
BLINK, missed calls not yet listened.
SIP1 (Public sip server) register Status:
BLINK Registration enabled but the registration procedure fails
ON the telephone is logged in
7
Page 8
VOIspeed V-IP400 User Manual
OFF the SIP registration is disabled
SIP1 (Private sip server) register Status:
BLINK Registration enabled but the registration procedure fails
ON the telephone is logged in
OFF the SIP registration is disabled
Handset Status Icon:
ON handset is if off hook
OFF if on hook
Speakerphone Status Icon:
ON, the phone is in speakerphone mode
OFFthe phone is in idle status or in
Weekday Status Icon:
…
Numerical Numbers and Characters:
0 - 9
* # @
A, B, C, D, E, F, G, H, I, J, K, L, M, N, O, P, Q, R, S, T, U, V, W, X, Y, Z
© VOI
SPEED LTD
.
3.4.3. Key features
The V-IP400 provides the same functionalities of a traditional telephone. In addition, offers
a wide range of features when connected to VOIspeed.
Please find below a list of the telephone’s key features:
Switch ( supports DHCP or static IP)
Protocols supported: TCP/UDP/IP, HTTP, DHCP Client, FTP
VoIP protocols: SIP (RFC3261)
Voice coding: G.711 (A-law/U-law)
Configurable protocol ports (telnet, HTTP, FTP)
Features supported include: ID caller, Hold, Forward (blind/attended), Do not disturb
(DND), DTMF tones, Quick number (Hotline autodial, etc…)
Show user status (only when used in combination with VOIspeed)
Full duplex speakerphone, redial, call log, adjustable volume
Voice recording (only when used in combination with VOIspeed)
Standard encryption and authentication (DIGEST using MD5)
Telephone manual configuration (from keypad, web interface or Telnet) or up-loadable
from file through TFTP or HTTP
Upgrade via TFTP/FTP or HTTP server
Configurable syslog server
8
Page 9

VOIspeed V-IP400 User Manual
4. Basic operations
4.1.1. Getting familiar with the telephone’s keypad
© VOI
SPEED LTD
.
Please find below a quick description of the functions linked to each button:
Button Description
0 - 9, *, # Digit, star and ash keys are usually used to make phone calls
Sysinfo Display basic information, including extension, IP address and gateway address. Keep the
button pressed to show the information, press it again to show the next one
OK Enter (confirmation when browsing the telephone menu)
Exit Cancel (cancel when browsing the telephone menu)
MENU Access the menu when the telephone is in idle status
UP Go to previous item in the menu. If the telephone is in idle state you can adjust the
handset/speakerphone volume
DOWN Go to the next item in the menu. If the telephone is in idle state you can adjust the
handset/speakerphone volume
HOLD Puts the current call on hold
TRANSFER Transfer the active call to another number
REDIAL Redials the last dialled number or starts a new call from the address book or from the call
list
SPEAKER Enables speakerphone mode
DEL When dialling this key deletes the last digit, a call list entry, memory key associations, etc.
CALL LIST Shows the call list
REC During a conversation by pressing this key you can start recording the call; to stop
9
Page 10

VOIspeed V-IP400 User Manual
recording press REC button again. The recorded call is stored in the server
PLAY Opens the phone address-book
M1—M10 Press the M button to display the stored number; wait 5 seconds to go back or press EXIT.
If you need to change the memory key association, press DEL button to delete the old
number and enter the new number in 5 seconds, then press OK to confirm. Each memory
number should be configured in this way.
After setup, the lamps on the phone will display the state of each extension linked to the
memory buttons. When the loudspeaker is activated or the handset is lifted press a memory
button to call the associated extension.
The lamps will show the following states:
logged out or empty memory = off, free/idle = green,
busy = red, ringing = fast blinking amber,
divert = slow blinking green, pause = slow blinking red,
answer wait = red answering machine = amber
© VOI
SPEED LTD
.
4.1.2. How to place a call
You can start a call in several ways:
1. Lift the handset or press the SPEAKER button and then dial the number.
2. Lift the handset or press the SPEAKER button, press the REDIAL button if you
want to redial the last number called.
3. Lift the handset or press the SPEAKER button, and press a non null memory key.
4. Without lifting the handset, choose an entry in the address book (or call list) and
press REDIAL.
Once you have entered the number (points 1, 2) press the “#” key to start the call. The call
will be otherwise initiated after a pre-set timeout (you can set the timeout in the web
interface menu Advance – Digital Map).
Example
:
If you want to call 1001, lift the handset or press the SPEAKERPHONE button and then
dial 1001#.
4.1.3. Hold
Press the HOLD key (the display will show PLEASE DIAL). Press HOLD again to retrieve
the call. Note: if you hold the call for more than 10 seconds, you will hear a continuous
tone and the display will show PLEASE HANGUP. However, you can press HOLD again
to retrieve the call..
10
Page 11

VOIspeed V-IP400 User Manual
© VOI
SPEED LTD
.
4.1.4. Unattended Transfer (Blind transfer)
During a call, press TRANSFER (the display will show INPUT NUMBER), dial the
recipient number (press # to send the number or wait until the display shows PLEASE
HANGUP) or press a memory key button. The call will be automatically transferred and
you will be dismissed from the call.
4.1.5. Attended Transfer
During a call press HOLD (the display will show PLEASE DIAL). Dial the recipient
number, wait for an answer and, when you want to transfer, press TRANSFER. Before
transferring you can switch from one channel to the other pressing HOLD (the inactive call
will be put automatically on hold). If you no longer want to transfer the call, please select
any active call and press “#” or EXIT to close it.
11
Page 12
VOIspeed V-IP400 User Manual
© VOI
SPEED LTD
.
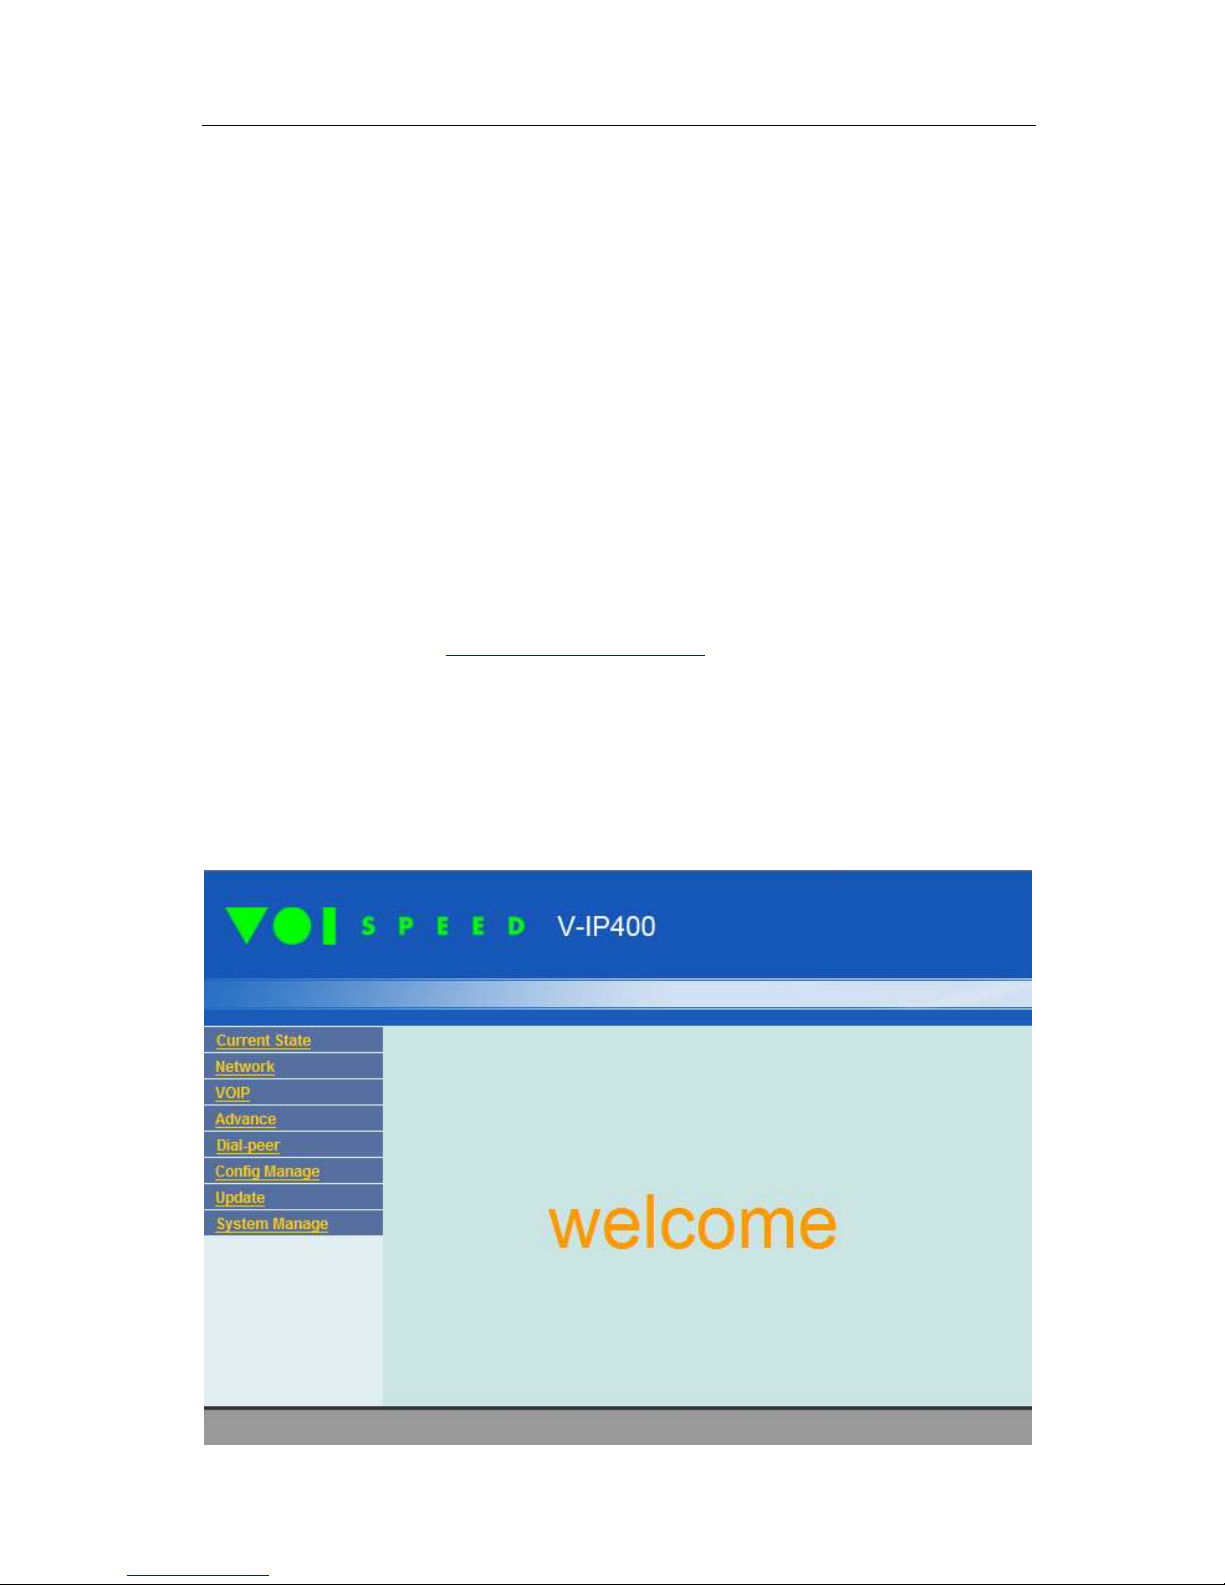
5. Web configuration
The V-IP400 Web Configuration Menu can be accessed typing the following URL in a web
browser:
DHCP server if present in your network. Press the “SYSINFO” button twice (and then
holding it) to see what is the current IP address of the phone. If no DHCP server is running
in your network, press key “1” (on the keypad) for 3 seconds in order to set the STATIC IP
mode. If you want to set the DHCP mode press key “2” (on the keypad) for 3 seconds. If
DHCP is disabled the default static IP address of the phone is 192.168.1.179.
If you want to change the V-IP400 IP address (nb: only in STATIC mode) enter the phone
Menu using the default password (123). Go to Network LAN IP and press “DEL”.
When “INPUT VALUE” string is displayed, insert the new IP address following this
format:
xxx*xxx*xxx*xxx. Example. 192*168*0*12.
In case the web-based login port of the phone is configured as a non-80 standard port, the
user will need to enter:
browser will display a 404 error otherwise.
Once you are on the web interface please remember to press “Apply” button when you
have finished modifying the settings. To save changes on the telephone’s flash memory
press the “Save” button (Config Manage Save Config).
To activate some of the changes (e.g. IP and memory key assignments) you need to restart
the telephone. Therefore, we suggest rebooting the telephone once you have completed the
configuration..
http://Phone-IP-Address. The default LAN IP address is given by an external
http://xxx.xxx.xxx.xxx:xxxx to access the web interface. The
12
Page 13
VOIspeed V-IP400 User Manual
© VOI
SPEED LTD
.
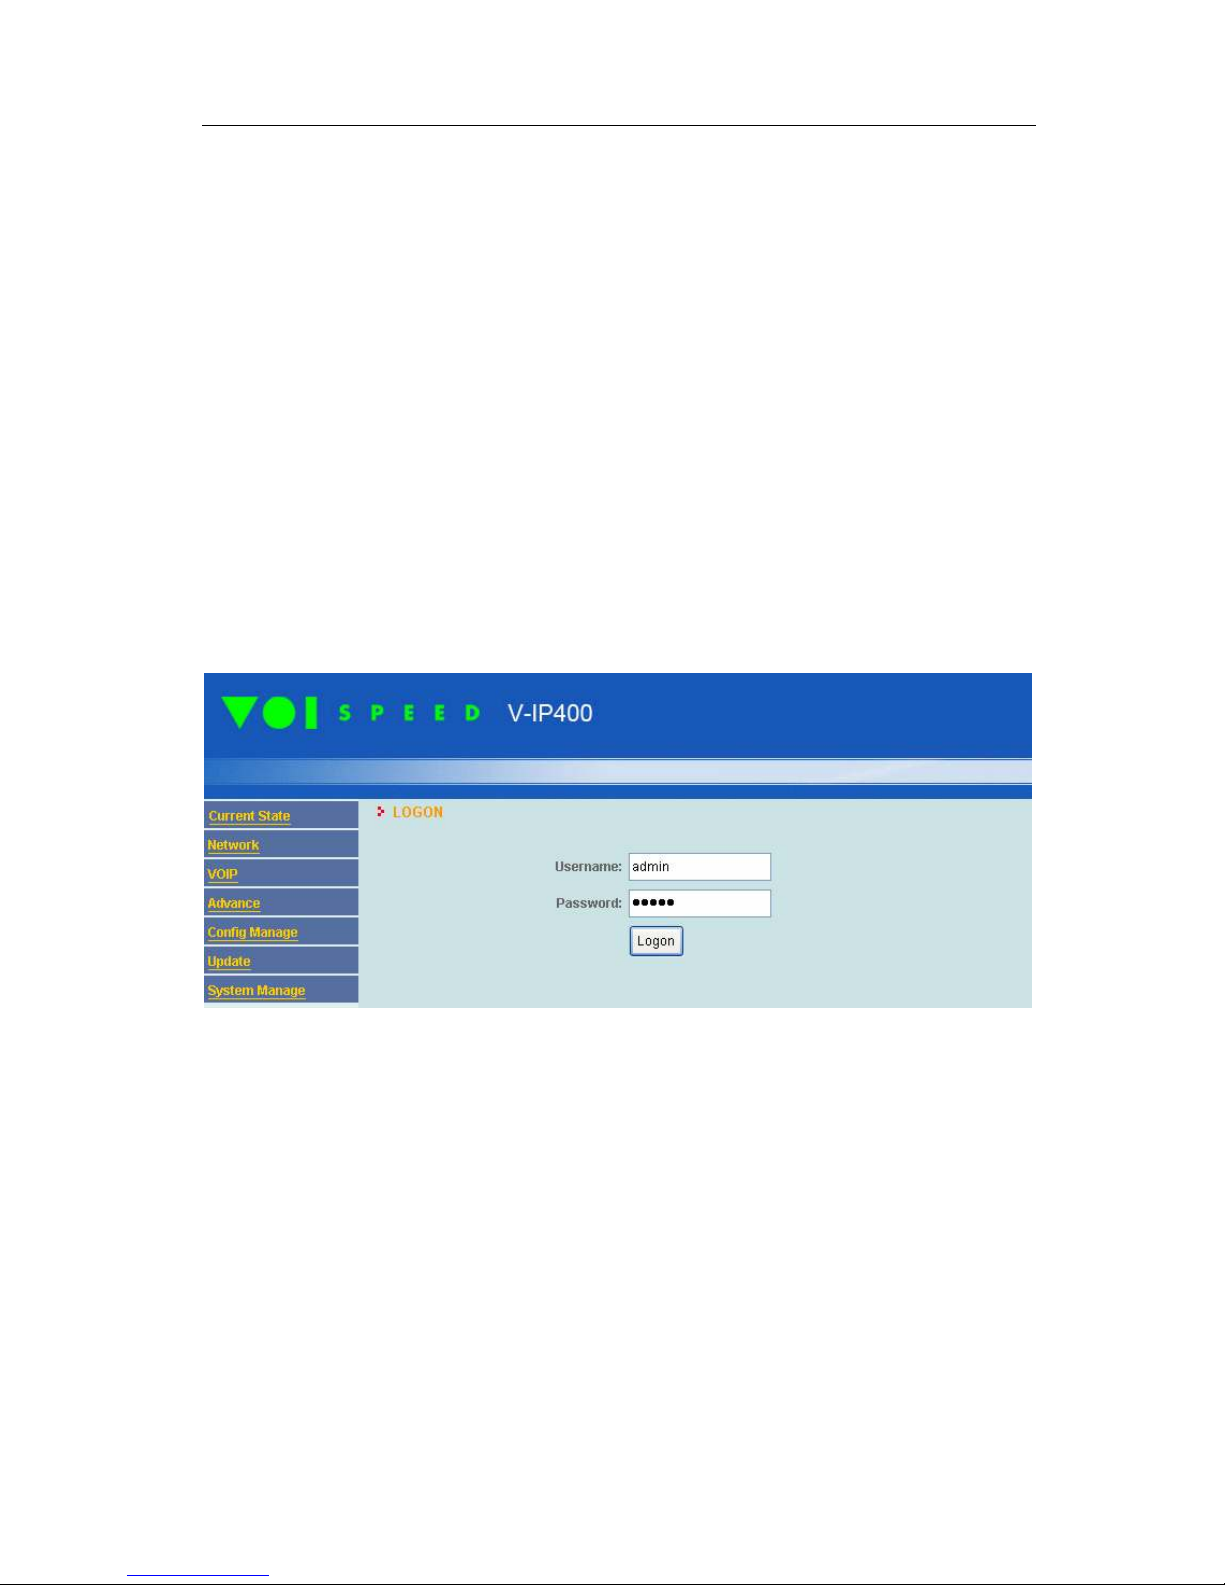
5.1. Login
In order to login the web interface you need to type the administrator username and
password. The administrator default login data are:
Username: admin,
Password: admin.
If you want to modify administrator username and password you can do so from the
System Manage Account config page.
Notes:
Press Enter or the Login button after you have entered the login data.
The login timeout is about 2 minutes. This means that if you don’t press any button for
more than 2 minutes, you will be required to login again and all settings that have not been
saved, will be lost.
13
Page 14
VOIspeed V-IP400 User Manual
5.2. Current state
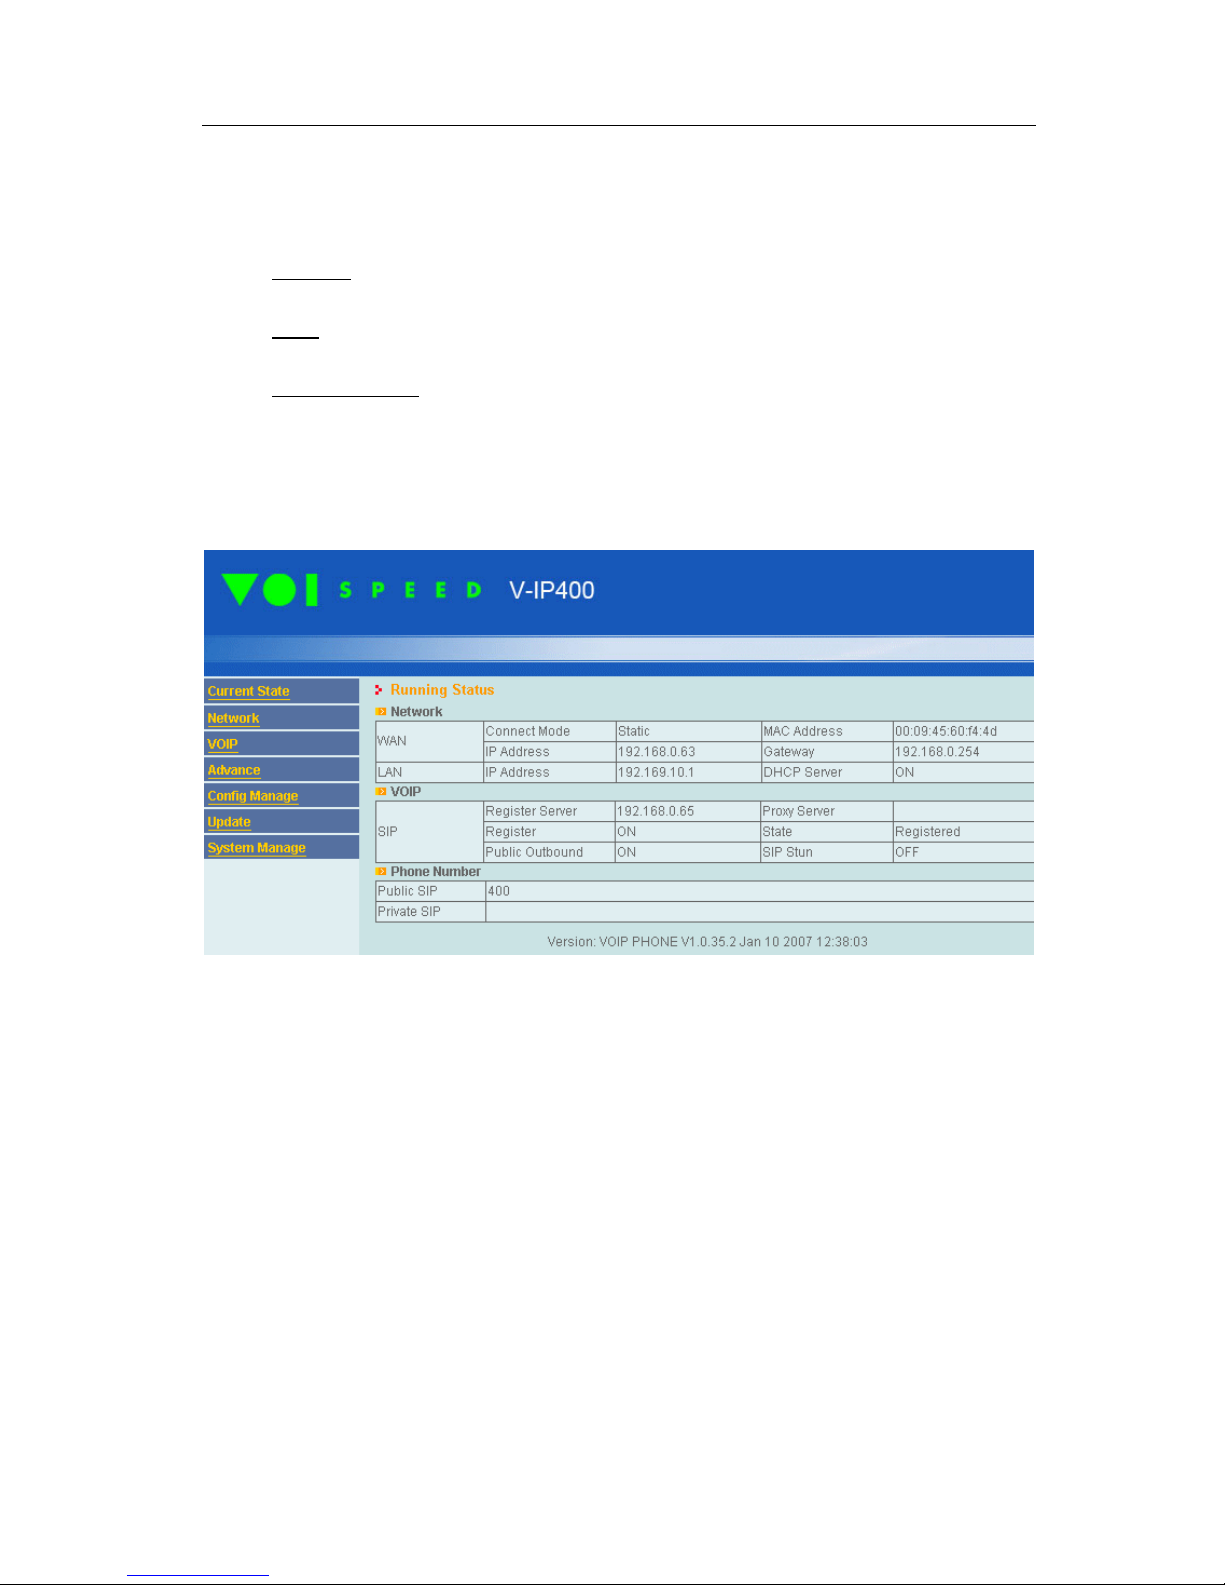
This page contains information about the telephone status:
Network
address and IP address.
VoIP
server IP address and registration status.
Phone Number
simultaneously login two SIP servers: a public server (menu VOIP SIP) and an
optional private server (menu Advance SIP).
Firmware version is on the bottom of the page.
includes V-IP400 network details: IP address type (static or DHCP), MAC
includes details concerning the SIP protocol (VOIP SIP), such as register
determines the V-IP400 phone number. The V-IP400 can
© VOI
SPEED LTD
.
14
Page 15
VOIspeed V-IP400 User Manual
© VOI
SPEED LTD
.
5.3. Network
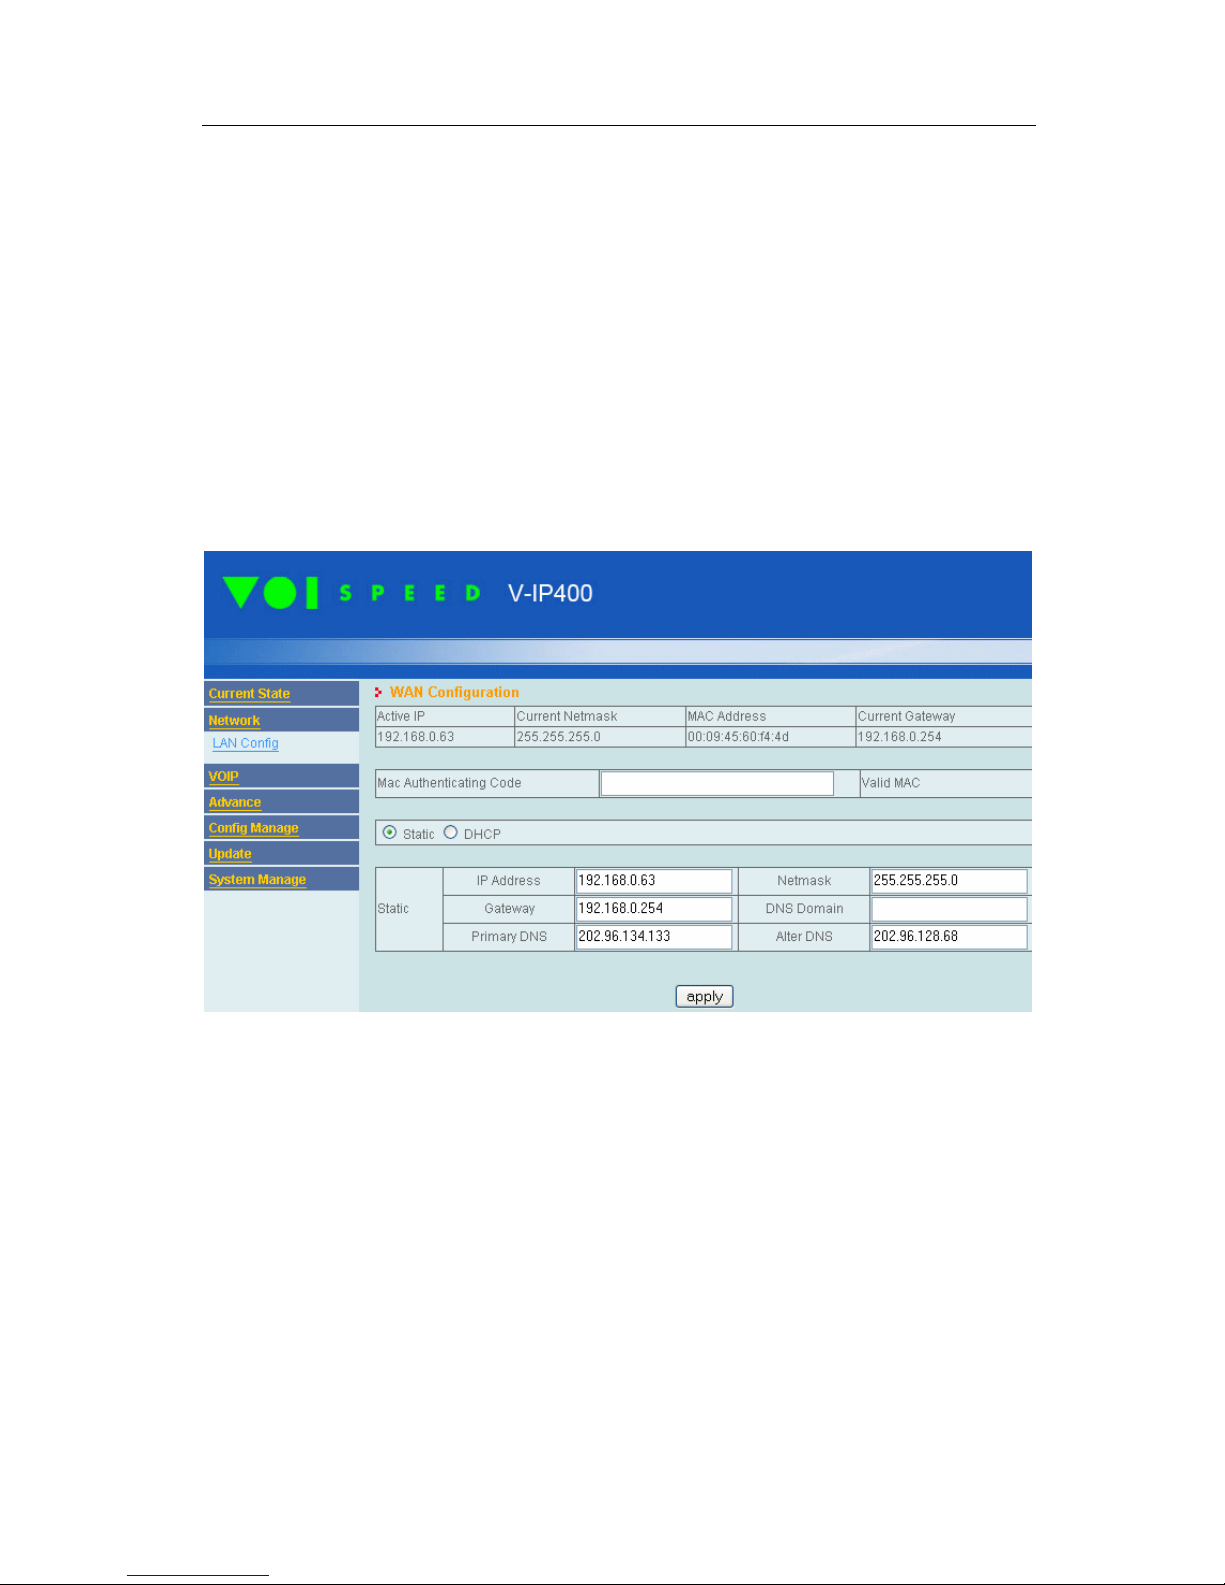
In this section the administrator must define the V-IP400 Network settings. Firstly, you
need to choose an IP address assignment mode (Static or Dynamic). This configuration is
generally done from the telephone’s keypad. When you select static IP address assignment,
you need to specify the phone IP address (generally private), the Netmask and the DNS
server IP address. When DHCP mode is selected, it is sufficient to specify DNS server IP
address.
The V-IP400 display shows the current IP address assignment mode.
The embedded switch doesn’t need to be configured. You can connect to the V-IP400 PC
port any IP device (PC, IP phone) with either a dynamic or static IP address.
15
Page 16
VOIspeed V-IP400 User Manual
© VOI
SPEED LTD
.
5.4. VOIP
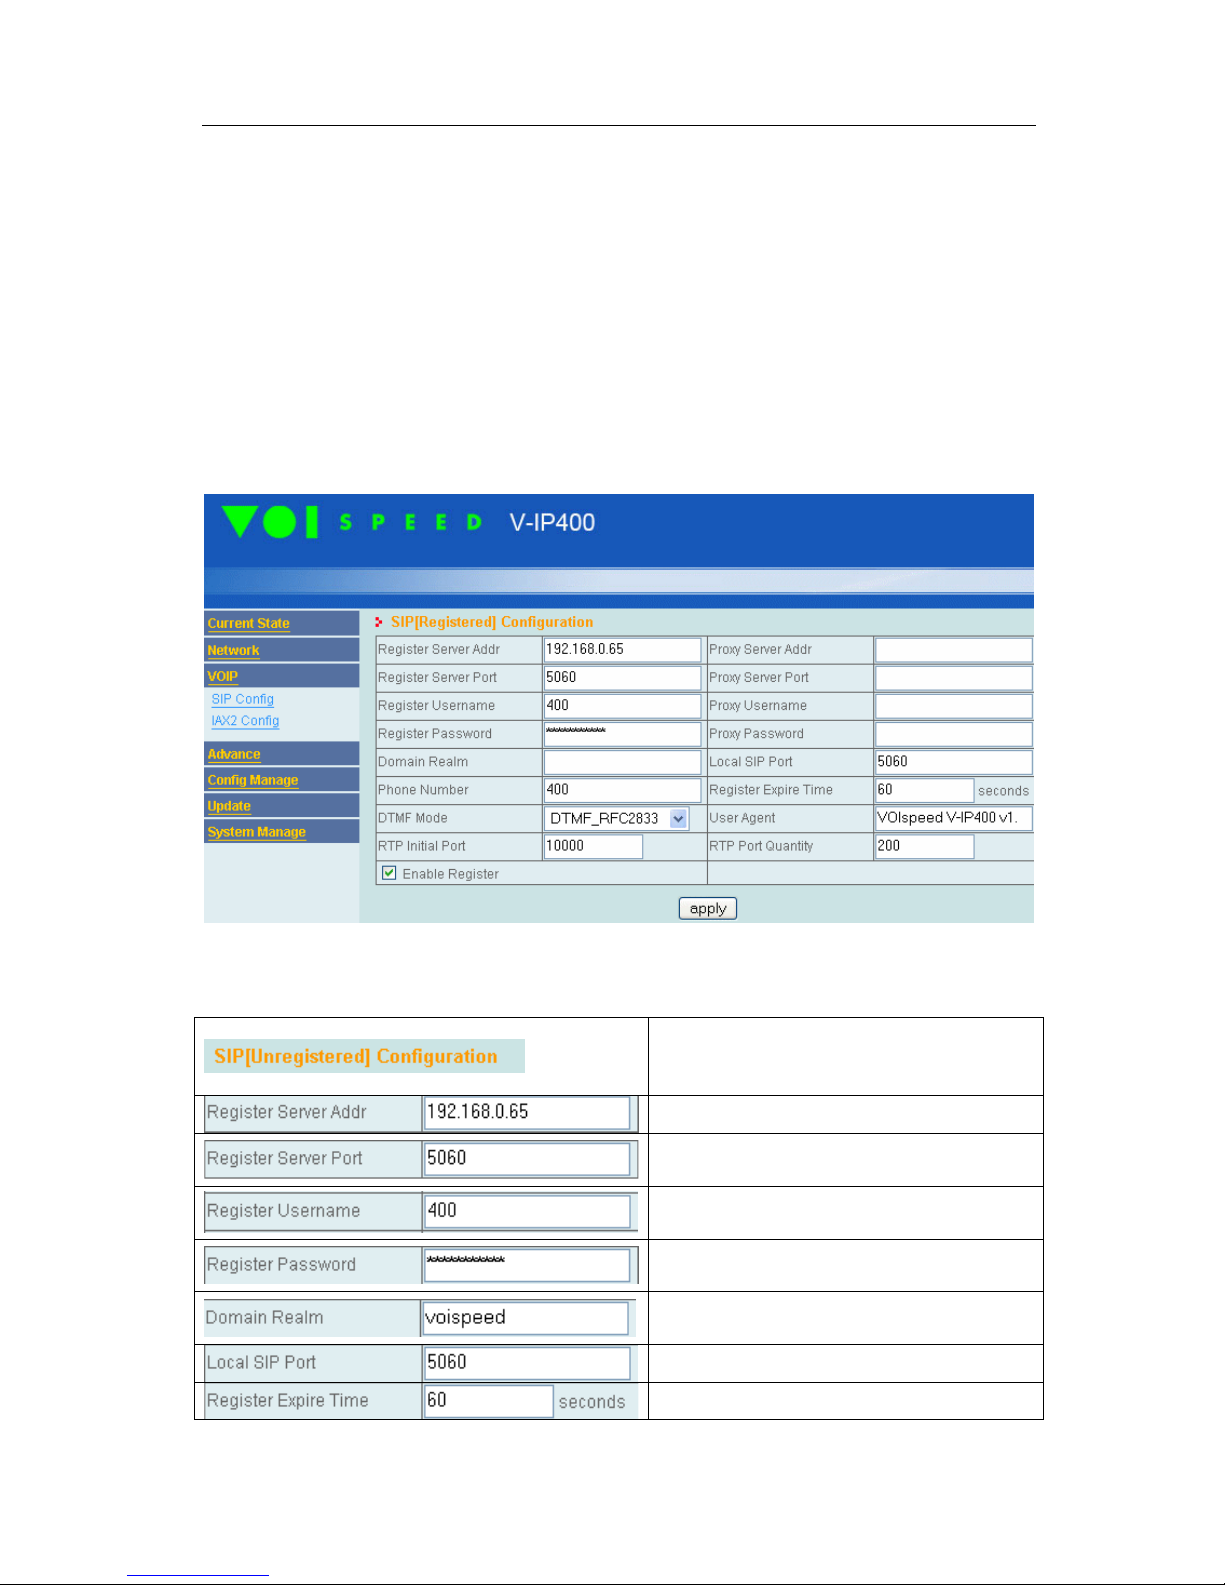
This page contains details required for logging into a SIP server. It is strongly
recommended to define PRONTO server as the main SIP server (a secondary SIP server
can be specified in the Advance VOIP page). If the V-IP400 telephone doesn’t login
into a SIP server, the user will not be able to use any V-IP400 features (including dialling
and receiving phone calls).
Before proceeding, you need to create a new user (that will be used to connect the IP
phone) in PRONTO server. Furthermore, you will need to enable all UDP traffic on port
5060 on the network firewalls. After this, you can enter all the details corresponding to the
new user you have just created in this window:
Details (only mandatory fields are described and listed below)
SIP registration status; if the registration
is successful it shows Registered, or
Unregistered otherwise.
Pronto server IP address.
SIP server destination UDP port (default
5060).
SIP username (the username of the
Pronto user).
SIP Password (the password of the
Pronto user).
Insert “voispeed” string (required during
SIP authentication).
SIP UDP source port (default 5060).
Registration expiry time.
16
Page 17
VOIspeed V-IP400 User Manual
© VOI
SPEED LTD
.
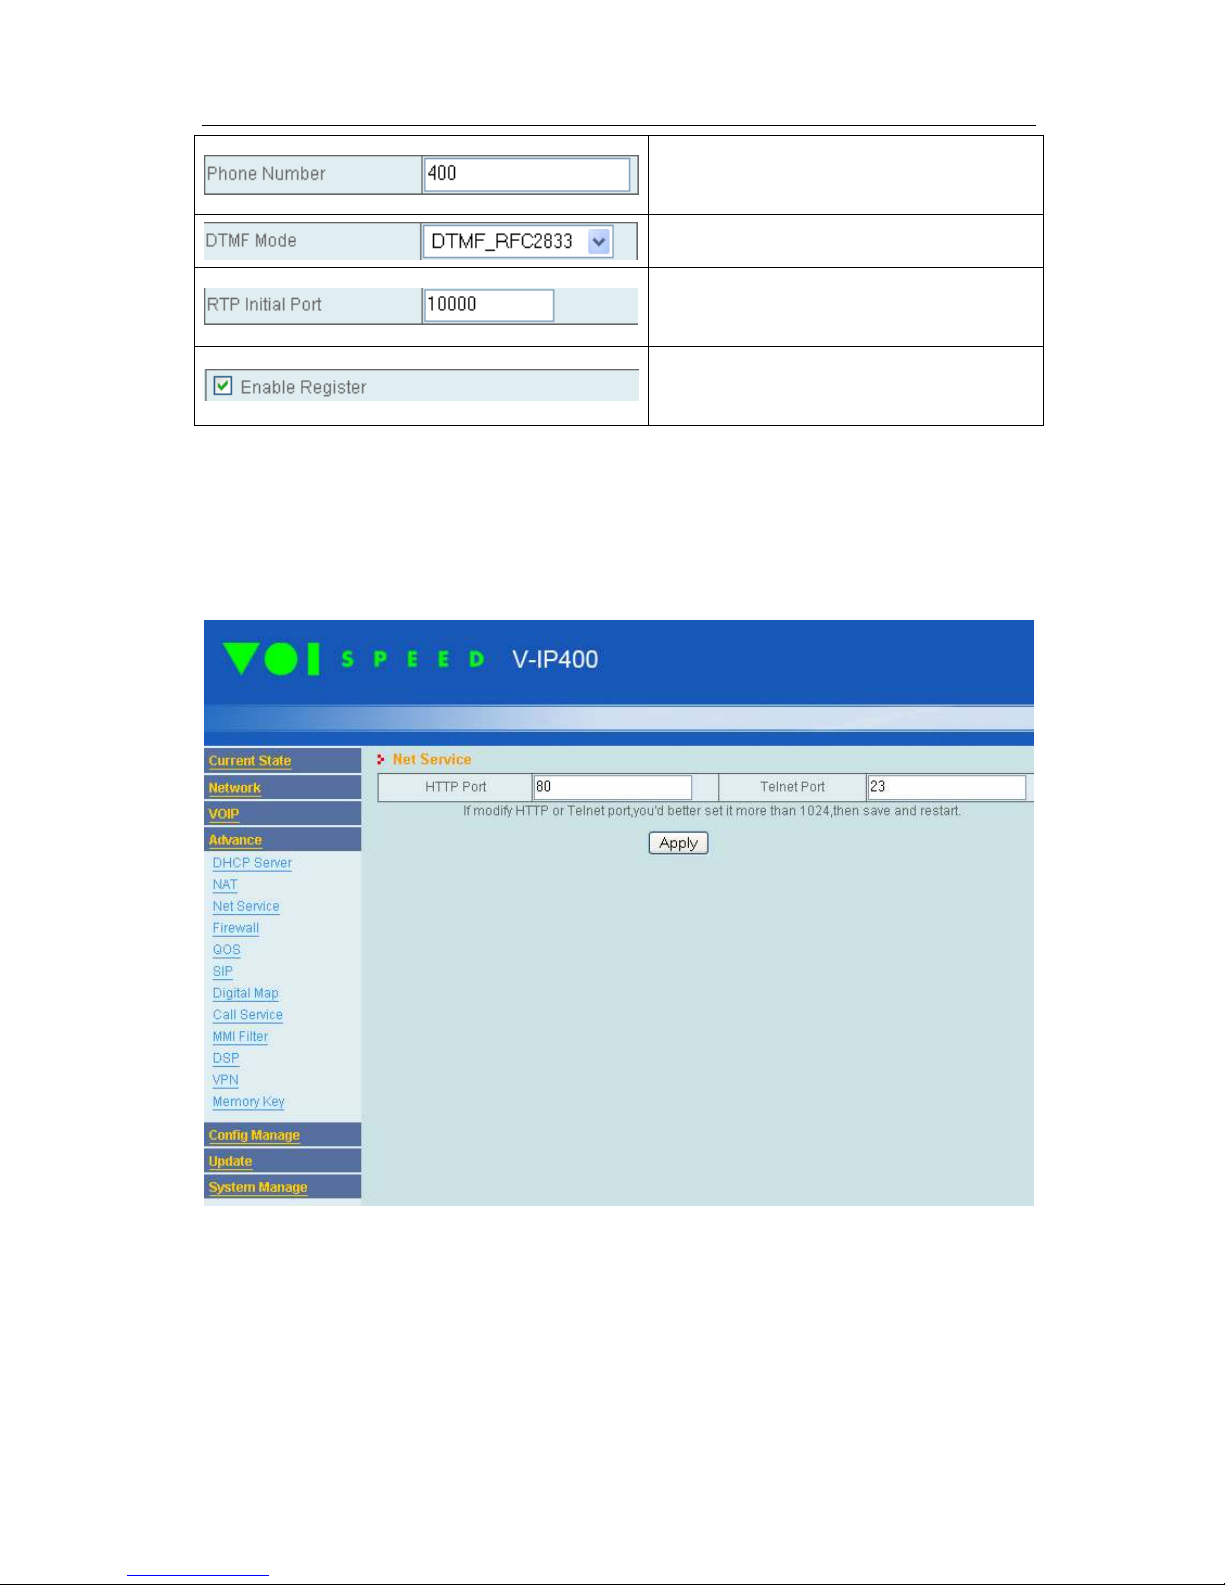
V-IP400 extension number (the
extension number defined for the new
user on PRONTO server).
DTMF send mode (Pronto server
supports RFC2833).
Start UDP port, this port is allocated for
the first conversation.
Enable/Disable registration procedure;
MUST BE ENABLED in conjunction
with PRONTO.
5.5. Advanced configuration
5.5.1. Net Service
In this section you can modify the HTTP port (web interface, default 80) and the Telnet
port (telnet protocol, default 23).
5.5.2. SIP
In this page you can setup a connection to a secondary SIP server. If you don’t use this
feature the “Enable Private Register” checkbox should not be checked.
17
Page 18
VOIspeed V-IP400 User Manual
5.5.3. Digital Map
© VOI
SPEED LTD
.
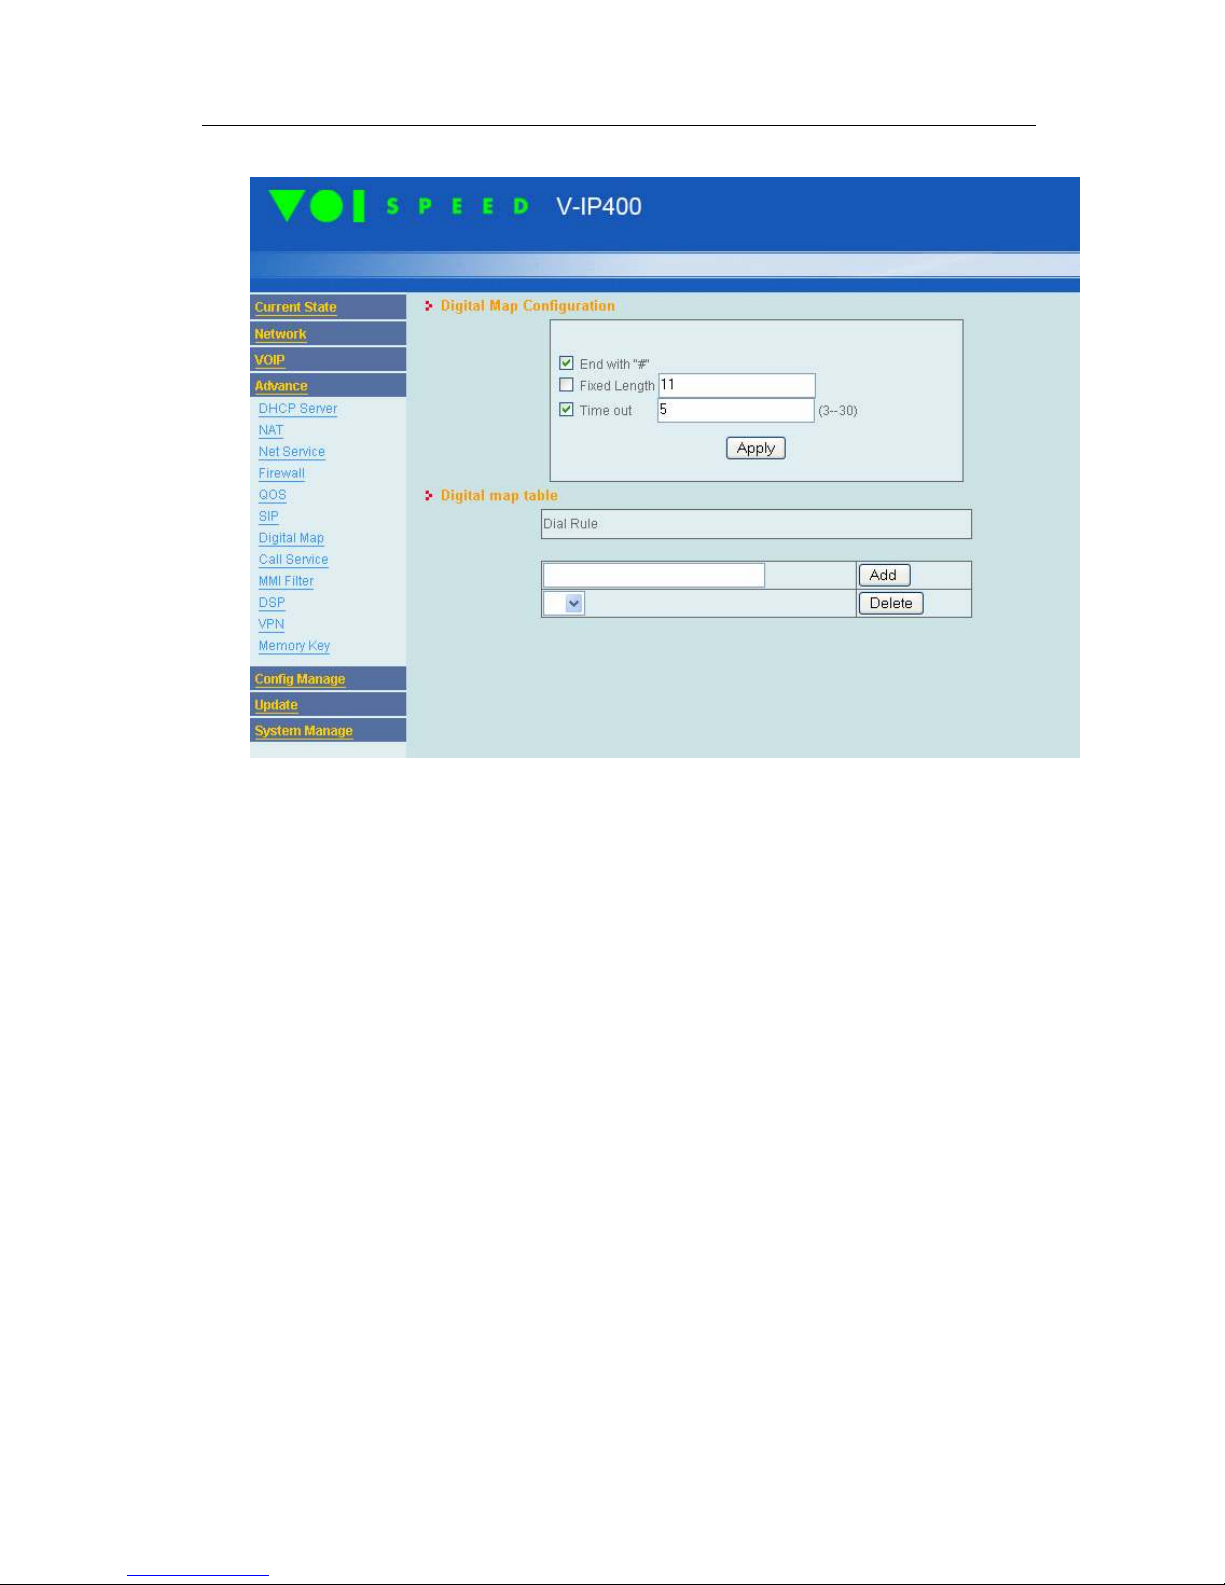
Digital Map Configuration
Digital map configuration define how the V-IP400 should begin each call.
Possible options are:
• Start a call with “#” (the telephone starts the call after pressing the ash key)
• Start a call after a fixed number of digits (for example 10 digits)
• Start a call after timeout from last digit elapses (for example ‘N’ seconds)
Digital map table
The “digital map table” lists a number of dial rules. As soon as the recipient‘s number
matches a V-IP400 dial rule, the call towards this number starts immediately, regardless of
what has been previously defined in the “digital map configuration”.
Example.
Let’s take the case of entering “500” in the digital map table as one of the dial rules. In this
case a new call to 500 starts immediately as soon as the user enters 500 on the telephone’s
keypad.
18
Page 19
VOIspeed V-IP400 User Manual
© VOI
SPEED LTD
.
Note: you will no longer be able to call 5001 or 500234, but you can call 123500 or
1500236.
To add a new Dial rule, write the number in the input box and press Add button. To delete a
Dial rule select the number and press the Delete button.
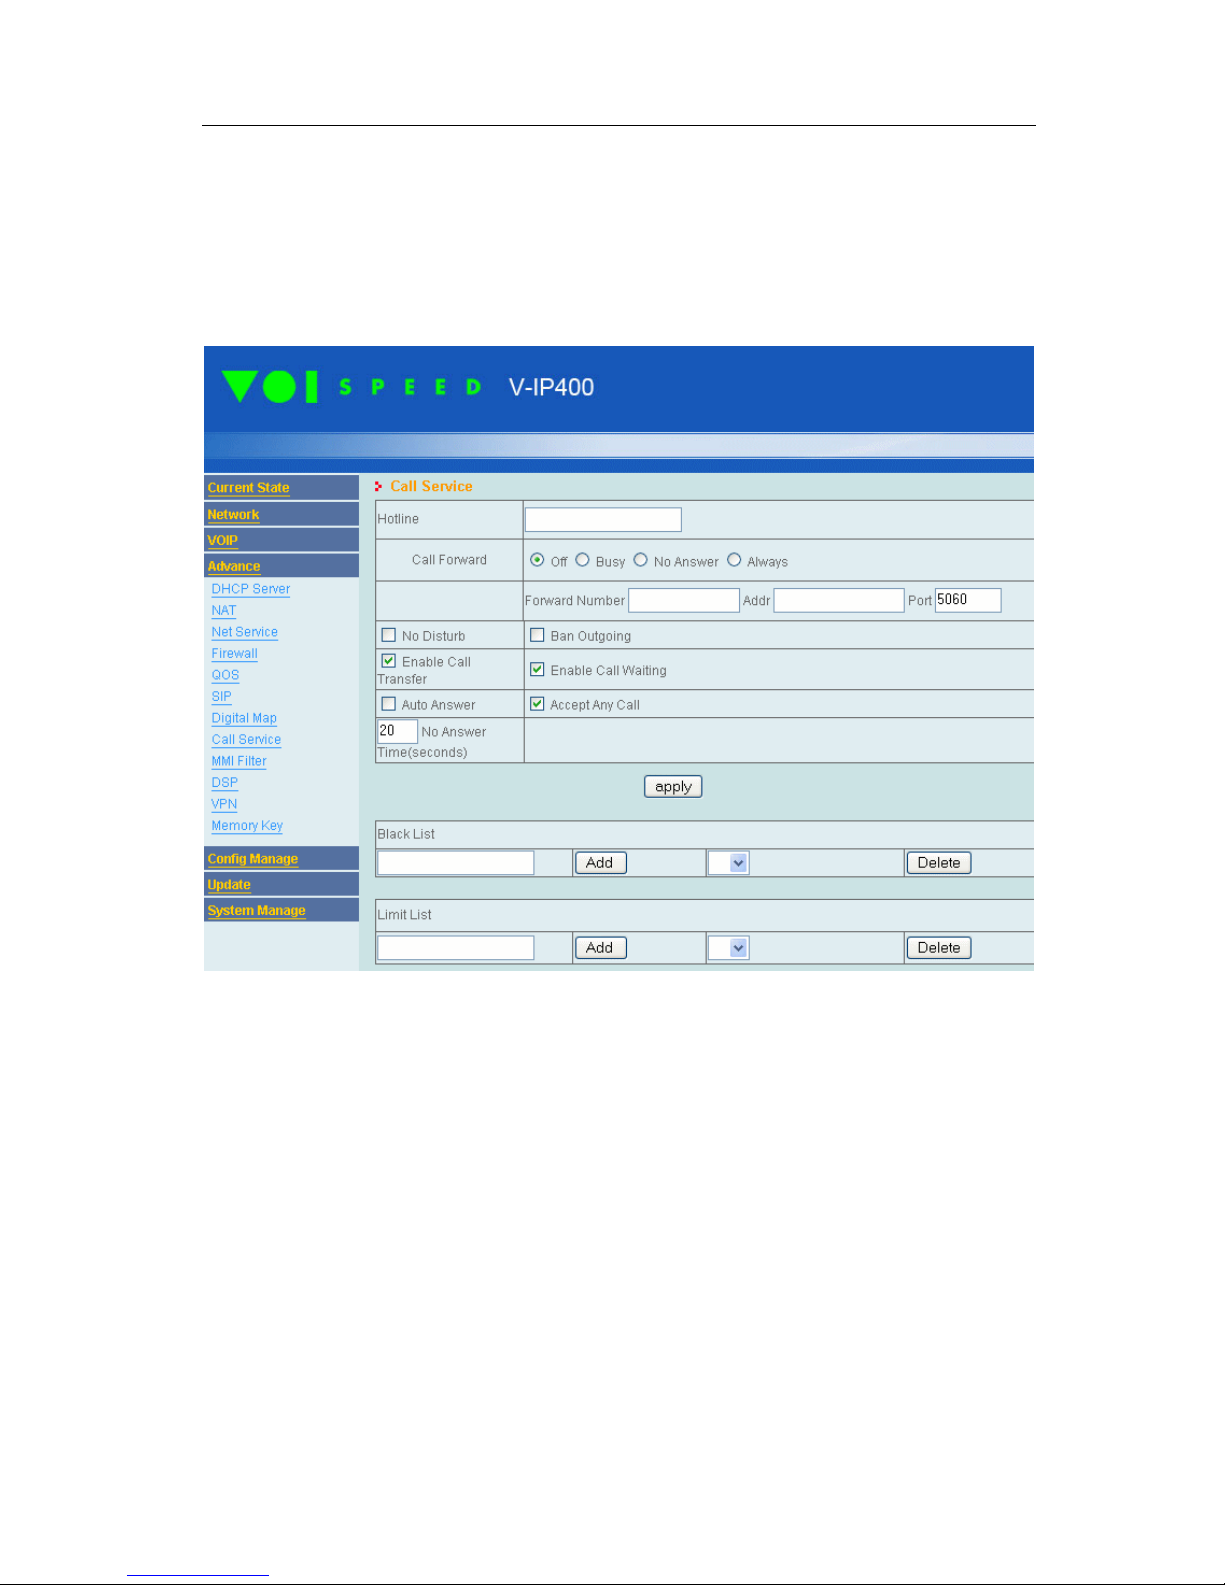
5.5.4. Call service
In this page you can Enable/Disable some V-IP400 services:
• Hotline: when you enter a phone number here, the V-IP400 will start a call to this
number as soon as the handset is lifted. This feature is particularly useful when all
outgoing calls must be routed through an IVR or an operator.
• Call forward: enables call transfer following particular events. Possible events
values are: Off, Busy, No answer (define no answer time), Always. In the Forward
Number field you need to specify the number you want to divert calls to.
• No disturb: enables/disables the don’t disturb feature (refusing all incoming calls).
• Ban outgoing: blocks all outgoing calls.
• Enable Call Transfer: enables/disables call transfer.
• Enable Call Waiting: enables/disables call waiting.
• Auto Answer: enables/disables automatic answer. When enabled the V-IP400
answers a new incoming call without ringing..
19
Page 20
VOIspeed V-IP400 User Manual
© VOI
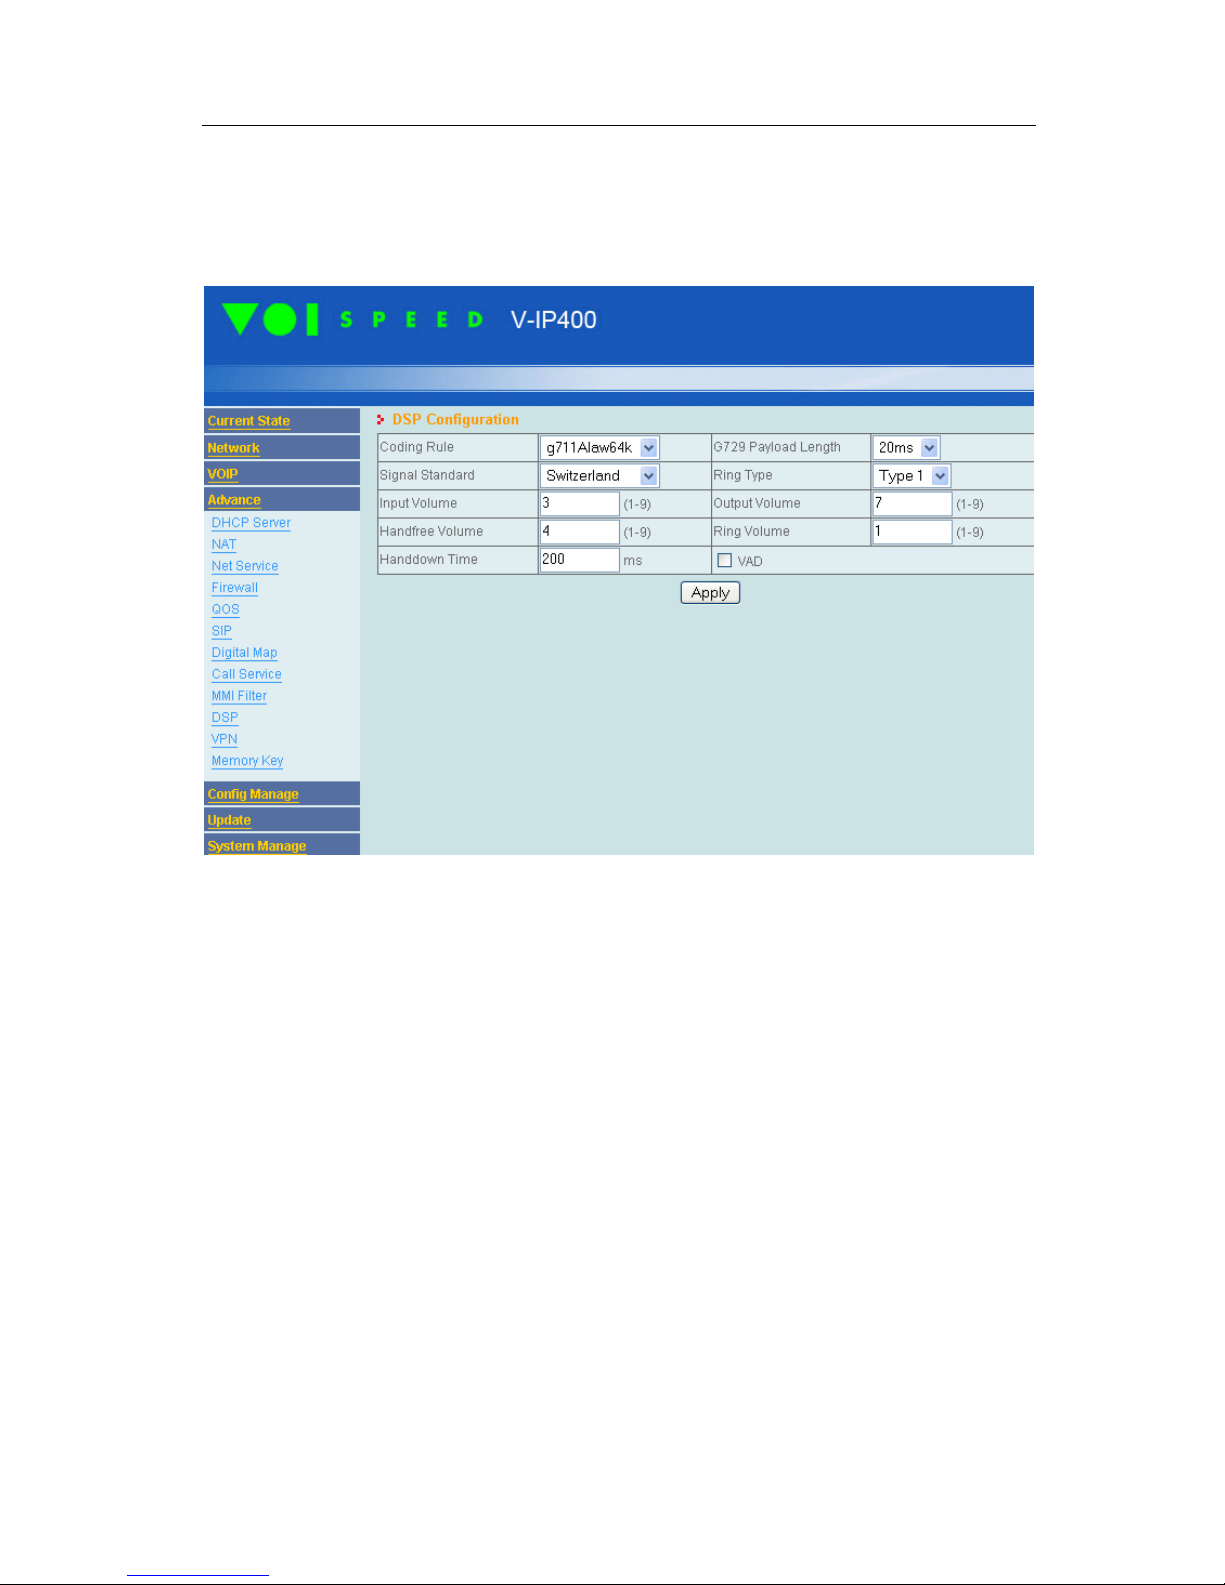
5.5.5. DSP
In this section you can configure the audio codec, signalling type and volumes.
SPEED LTD
.
You need to configure the following parameters when you you use Pronto:
• Coding Rule: codec used for calls.
Set G711Alaw64k with PRONTO
• Signal standard: signalling tone reproduced when the display shows “Please hang
up”
• Ring Type: select the preferred ring type
• Output Volume: handset playback volume
• Input Volume: handset microphone volume
• Handfree Volume: speakerphone playback volume
• Ring Volume: ring volume
• Handdown Time: the active call is released when the handset is replaced for a time
longer than “handdown time” (default value 200ms).
20
Page 21
VOIspeed V-IP400 User Manual
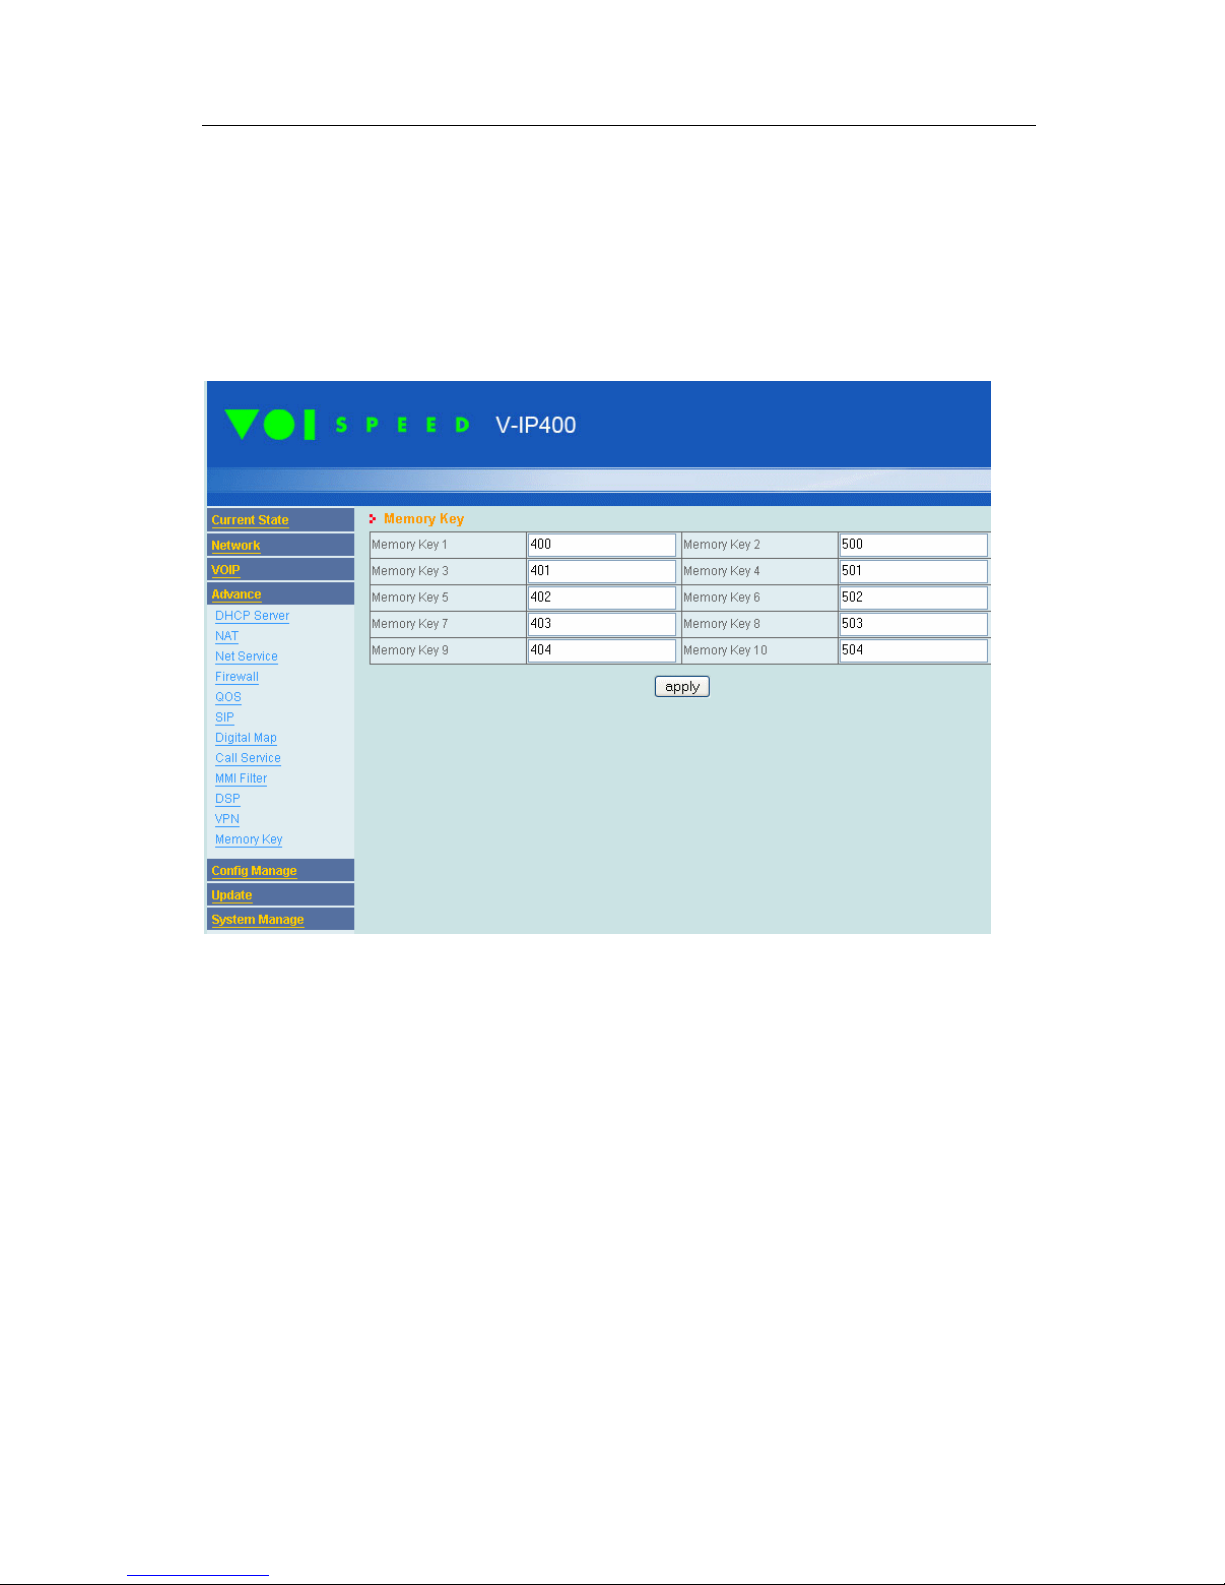
5.5.6. Memory Key
© VOI
SPEED LTD
.
Each V-IP400 telephone is provided with 10 configurable memory keys. These 10 keys can
be used as quick call buttons, allowing you to make new calls as well as showing (with
their lamps) the state of each user. Once you have configured the memory keys you need to
reboot the telephone (NB: remember to save the configuration before).
You don’t need to access the web interface to assign memory keys. The same operation can
be performed from the telephone keypad:
• Press the memory key button: if the button is already assigned to a user’s extension,
the extension number will be shown on the display. If no assignement is present the
display will show “NULL”.
• Press Del button: the display will show “INPUT VALUE”
• Type the extension’s number
• Press OK: the display will show “SAVING” and the extension number entered
• Press EXIT in order to go back to idle state
Read this only if the V-IP400 telephone is being used with a PRONTO server.
Each lamp next to a memory key shows the status of the associated extension. Following
below is a table containing the description of each colour:
21
Page 22
VOIspeed V-IP400 User Manual
© VOI
SPEED LTD
.
Not logged or empty memory key
Off
Free
Busy
Divert
Ringing
Pause
Vocalbox
Green
Red
Green slow-blinking
Amber quick-blinking
Red slow-blinking
Amber
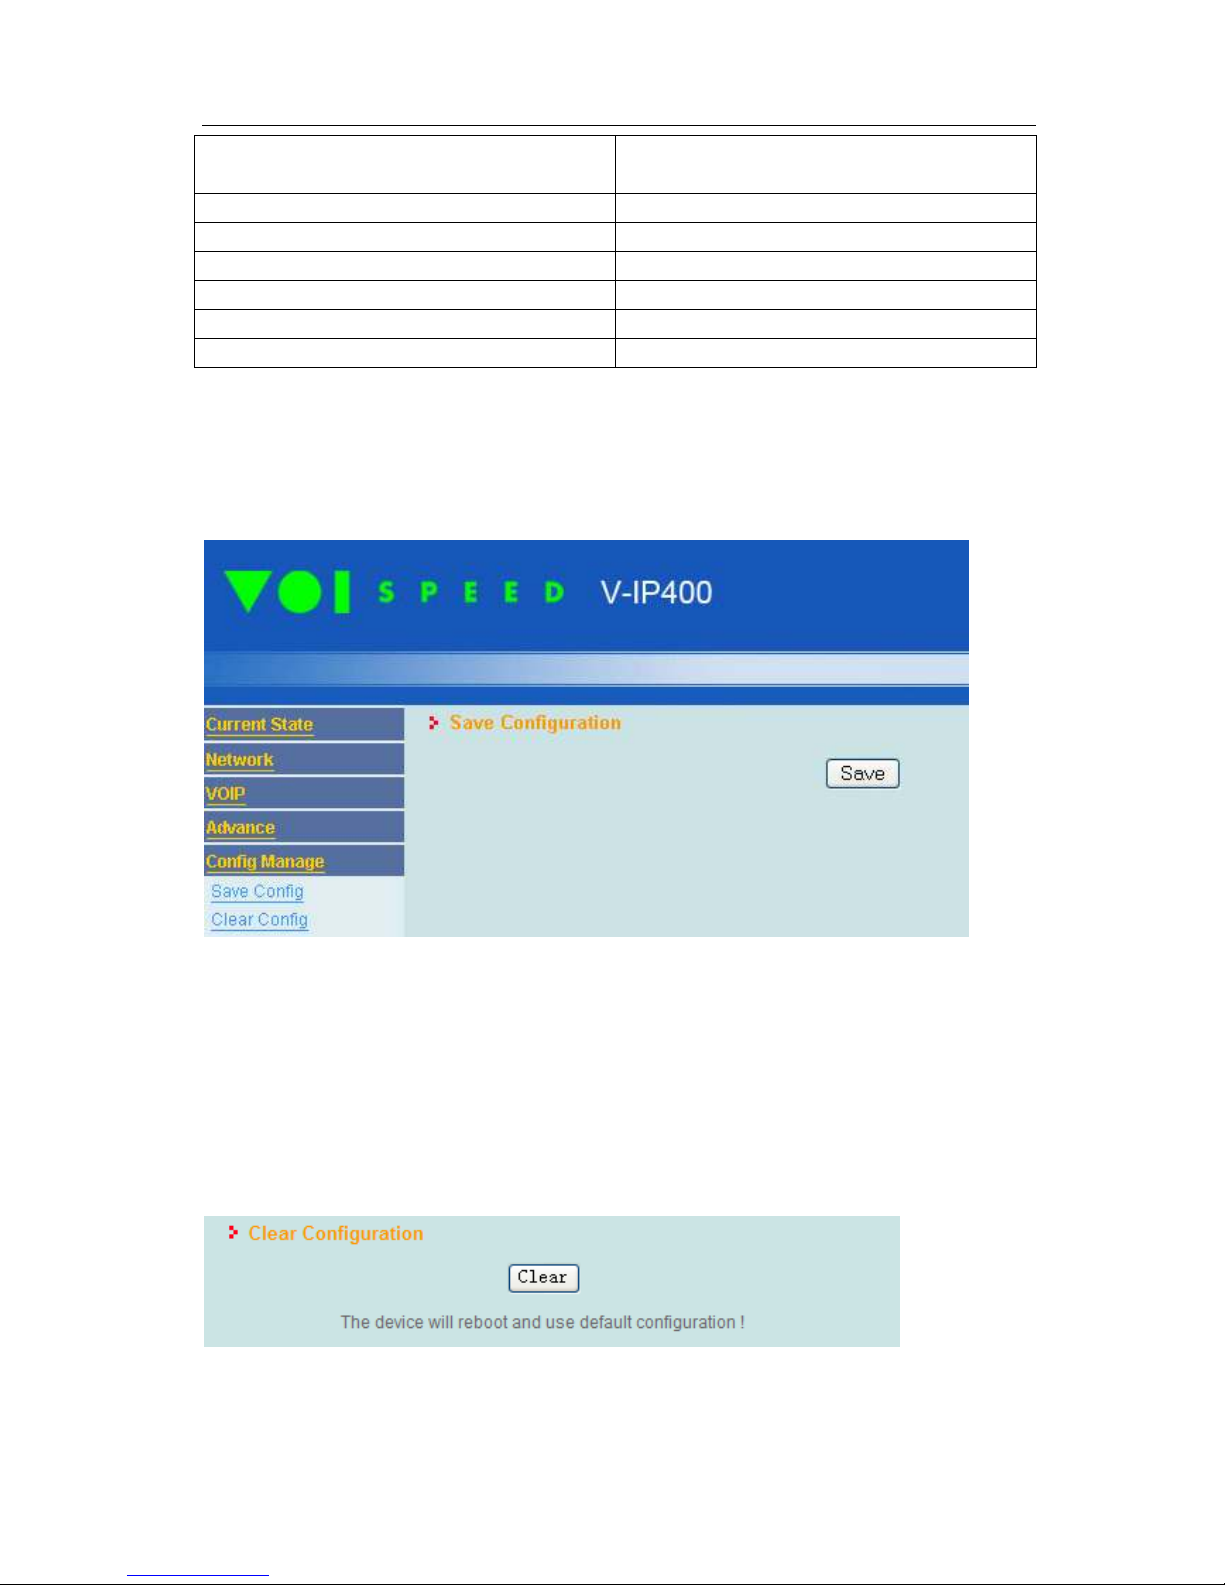
5.6. Config Manager
5.6.1. Save and Clear configuration
This menu contains Save and Clear configuration buttons.
The V-IP400 configuration must be saved pressing the Save button before rebooting. In
each page of the web interface you can apply the modified settings by pressing the Apply
button. If you don’t press any buttons within 2 minutes, the web interface will log you out
and all non-saved settings will be lost.
Press the “Clear” button if you want to RESET to the manufacturer’s original default
settings.
22
Page 23
VOIspeed V-IP400 User Manual
© VOI
SPEED LTD
.
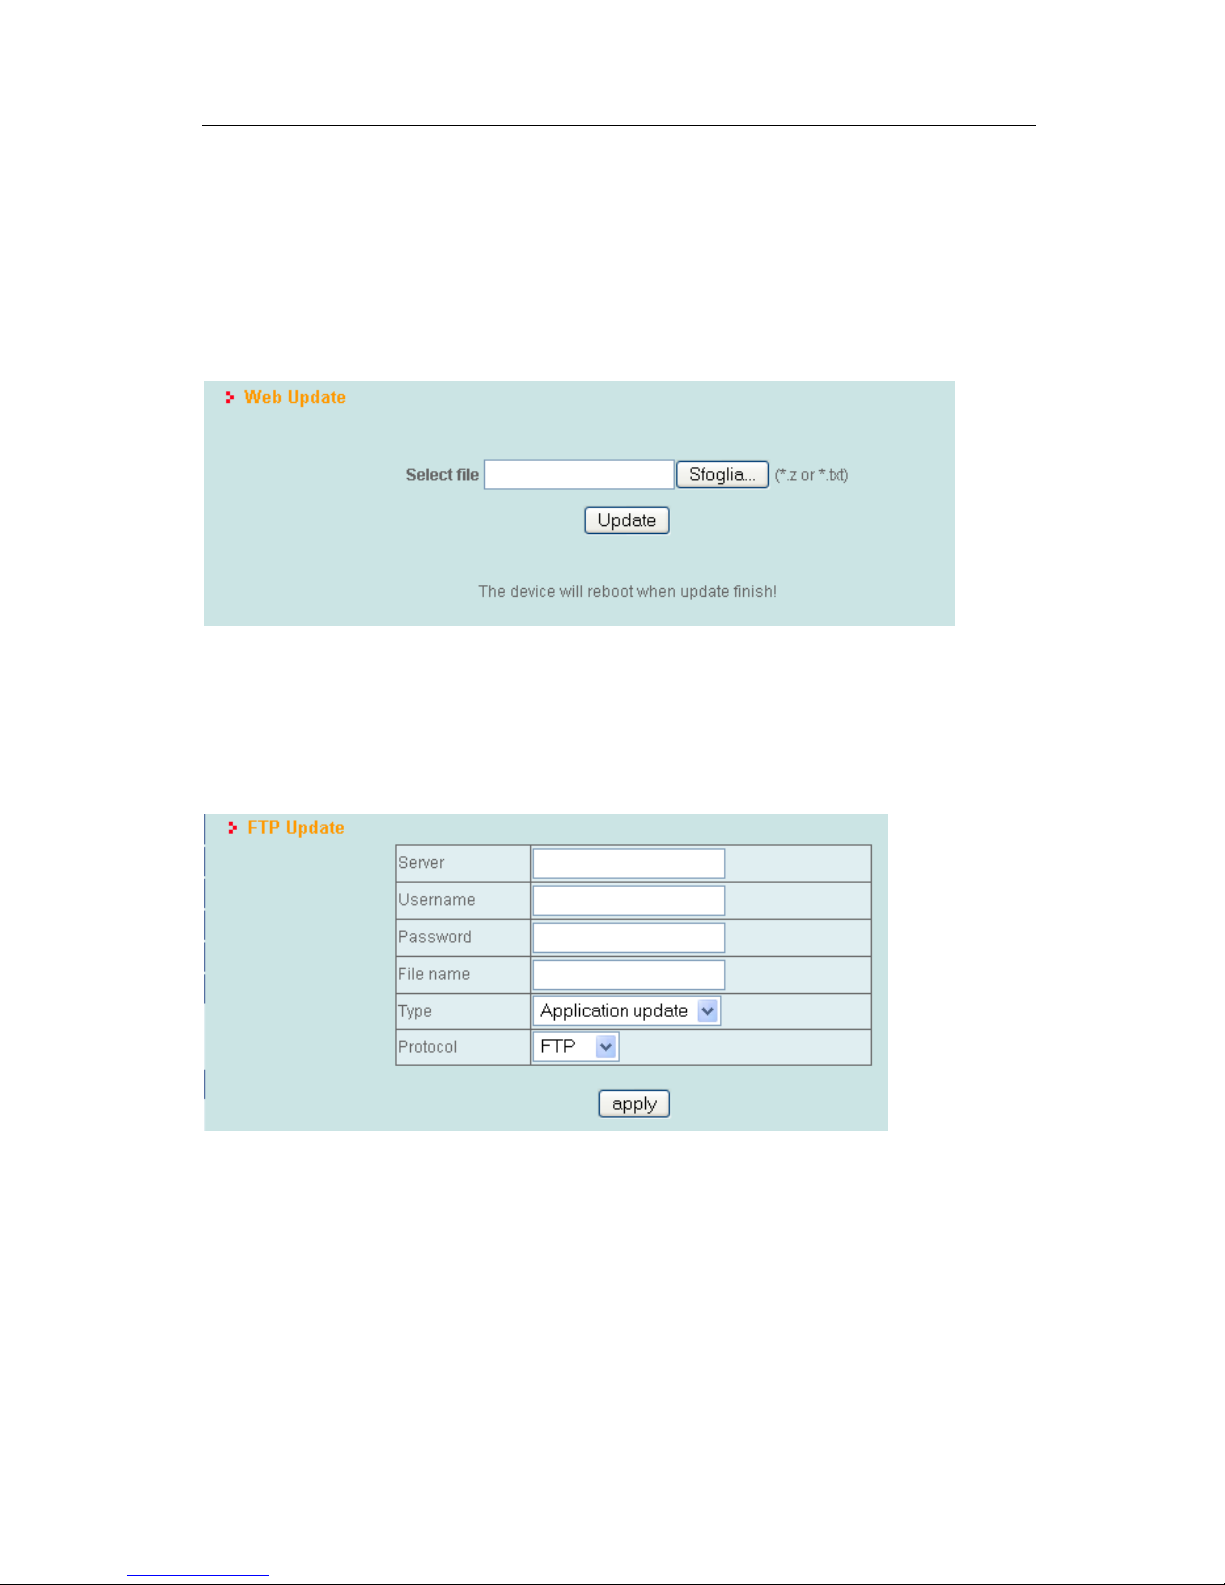
5.7. Upgrade
Web update
On this page in it possible to select the file (saved on your computer) containing firmware
or configuration upgrades. During the upgrade the display of the phone shows “Download”
and “Update”. Once the upgrade has been completed the phone will reboot automatically.
Download FTP/TFTP
You can import or export the configuration or load a new firmware using a FTP or TFTP
server. Press Apply once finished.
In order to connect to a FTP/TFTP server you need to specify:
• IP address of the FTP/TFTP server.
• Username and password of an FTP user. This information is not required when you
connect to a TFTP server.
• File name. Please note that firmware upgrade files have the “.z” extension whereas
config files have the “.cfg” extension.
• The action you want to perform: import/export configuration file, firmware
upgrade.
23
Page 24
VOIspeed V-IP400 User Manual
© VOI
SPEED LTD
.
• Protocol used.
5.8. System management
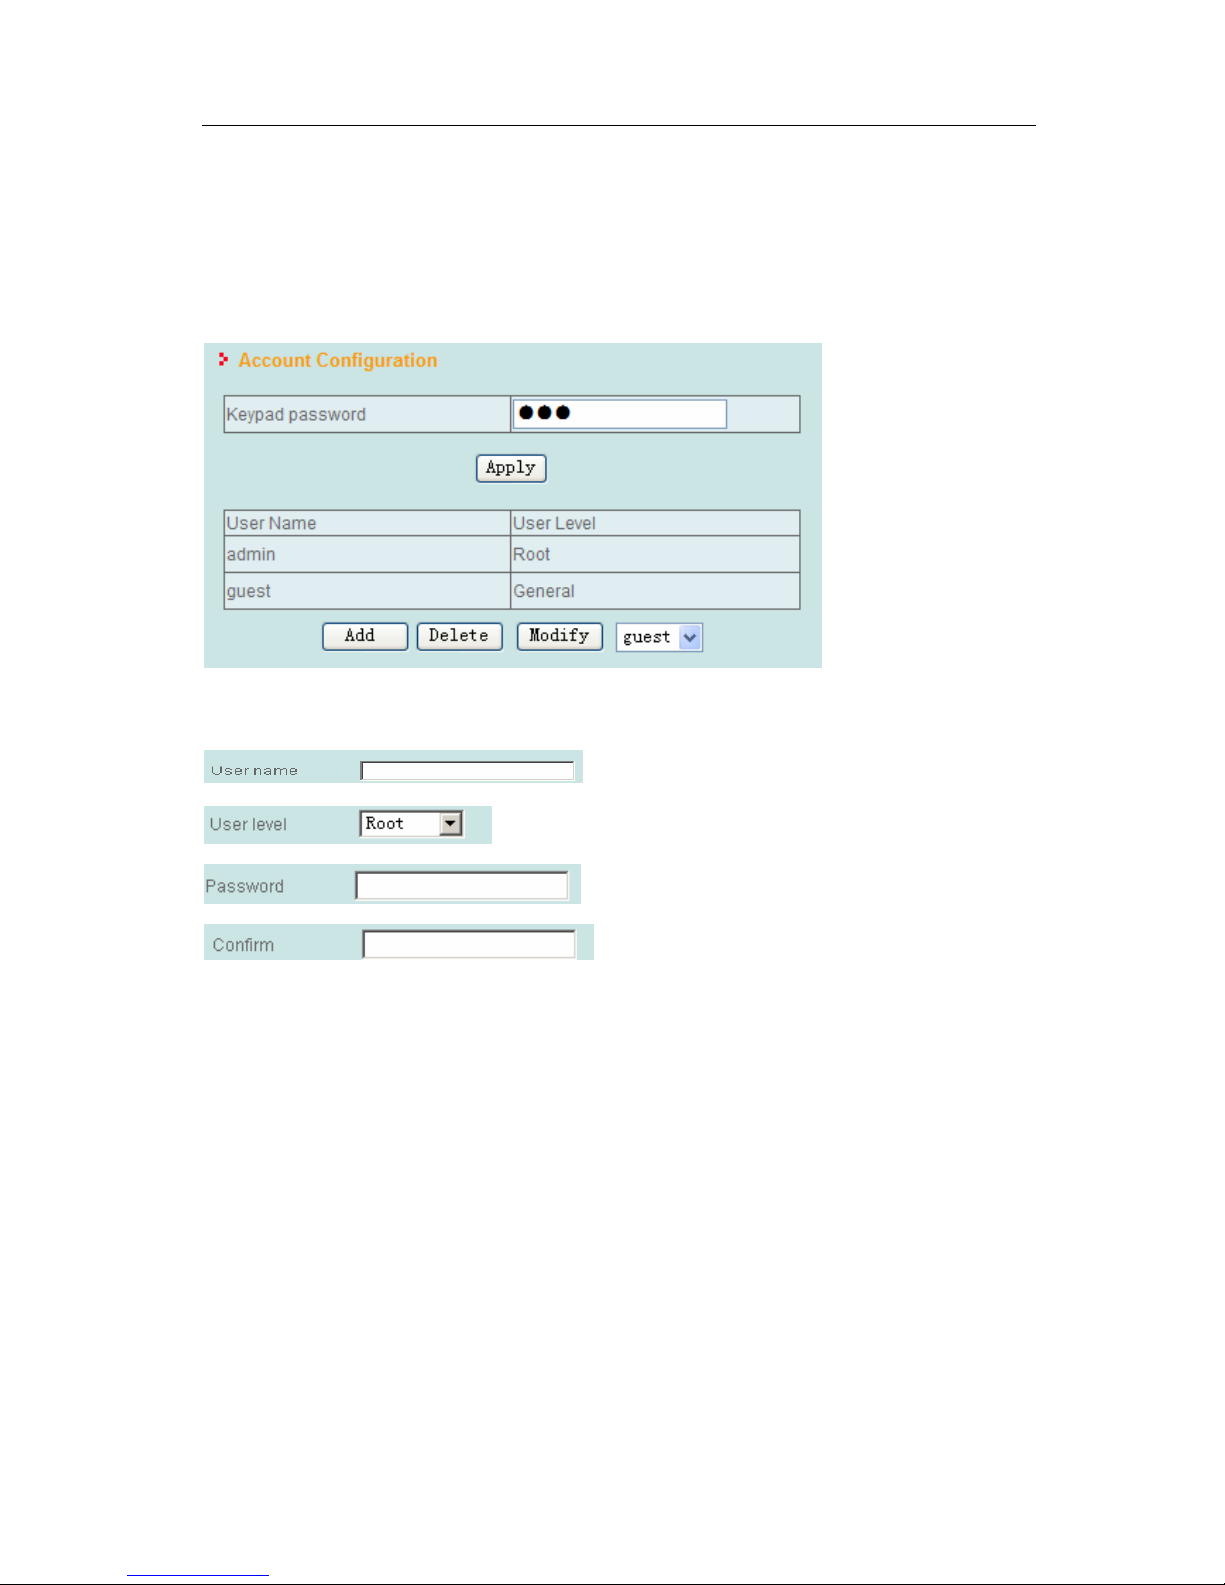
5.8.1. Account configuration
In this page the administrator can set username and password required to access the web
interface.
Description:
Add: to add a new account.
New username
User rights: Root =administrator, General = read-only user
User’s password
Confirm password
Delete: you first need to select the account and then press Delete to cancel the entry.
24
Page 25
VOIspeed V-IP400 User Manual
© VOI
SPEED LTD
.
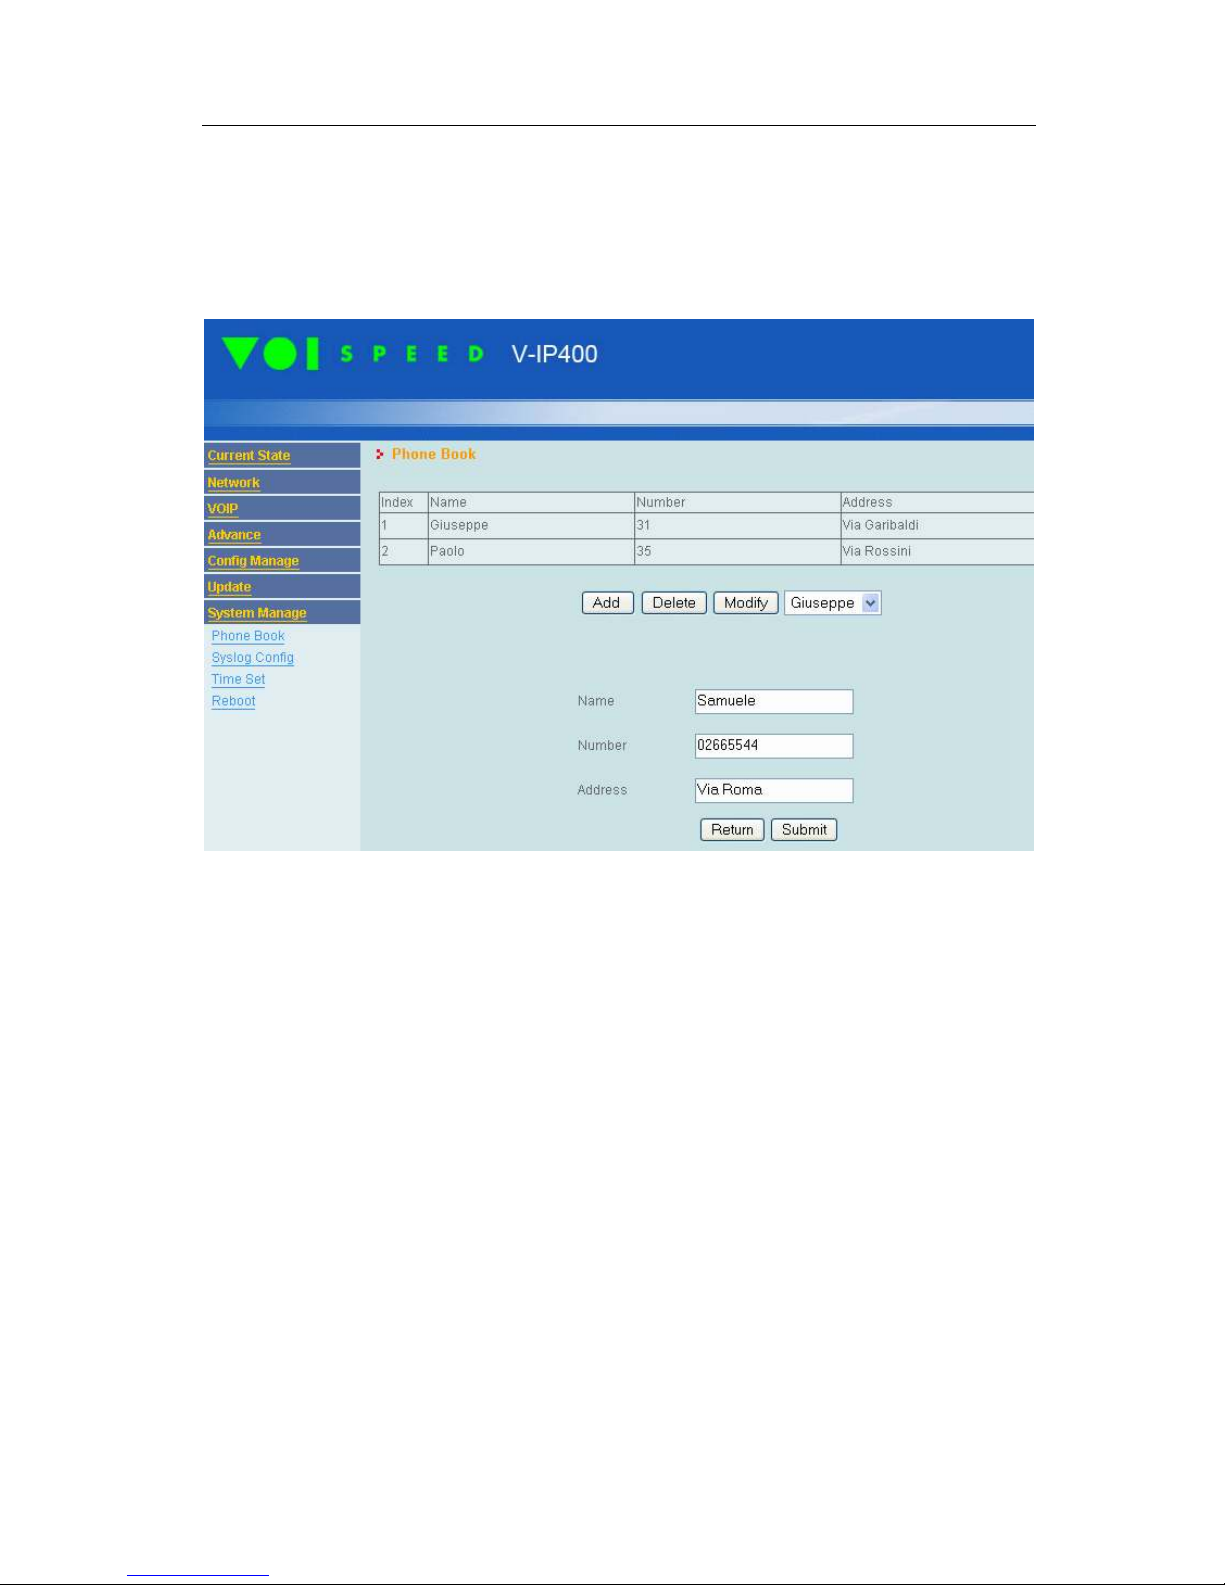
5.8.2. Phone Book
This page is used to manage the V-IP400 address book. The user can add a new entry
pressing the Add button, filling all contact fields (name, number and address) and pressing
the Submit button. Select a contact and press Delete when you want to delete a contact.
The user can access the phonebook from the keypad by pressing the Play button. Select the
ADD entry in the menu to enter a new contact name and number. Press OK to confirm. .
To delete a contact please select the contact in the list and press the ‘del’ button. Press OK
to confirm.
To search an entry in the address book: press PLAY and then Search. The search is based
on the contact’s name.
To call a number from the address book: select an entry (see above) and then press
REDIAL without lifting the handset. The call will start on loudspeaker.
25
Page 26
VOIspeed V-IP400 User Manual
© VOI
SPEED LTD
.
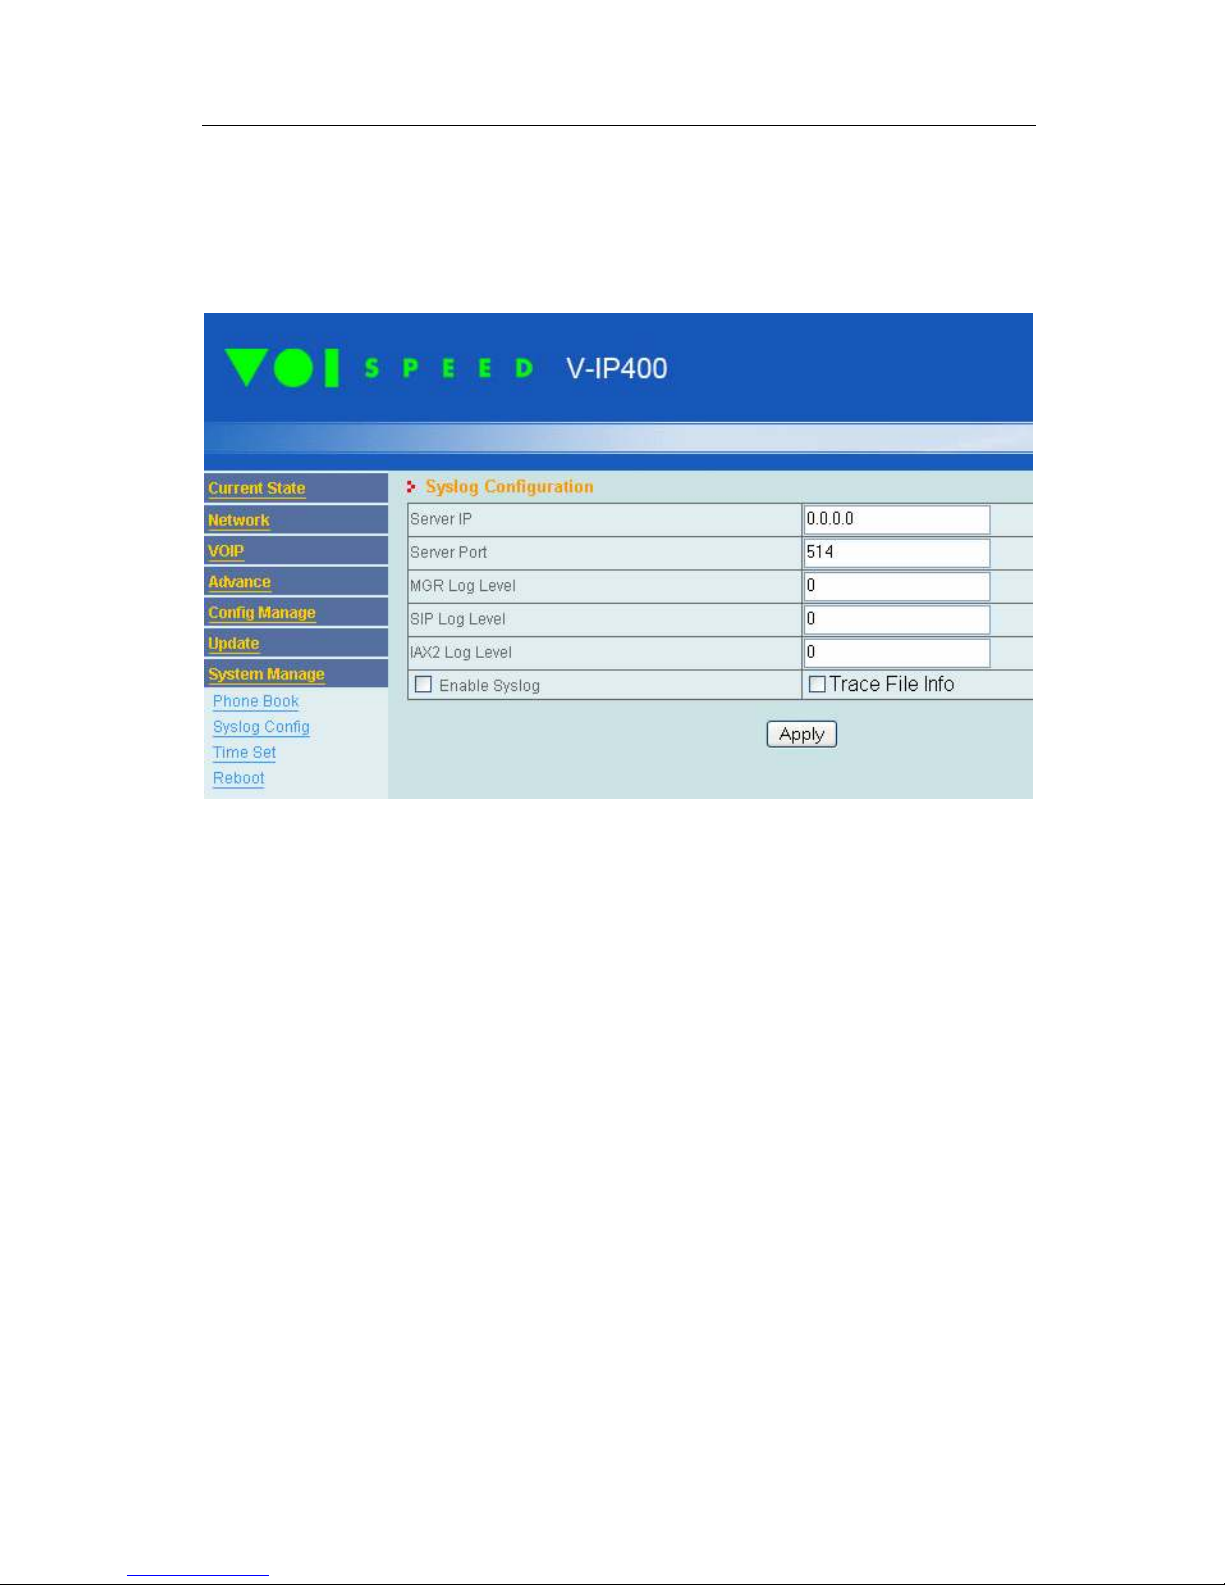
5.8.3. Syslog server
The V-IP400 can send information to a syslog server. We suggest enabling syslog (check
Enable syslog box) server only if you experience some problems or on explicit request of
the VOIspeed technical support. The syslog server must be running on a PC connected to
the same LAN that includes the V-IP400 phone.
In order to setup the connection between the V-IP400 and the syslog server you need to
enter these parameters:
• syslog server IP address
• the input UDP port for the server (default 514)
• MGR log level (0..7) defines the degree of detail for the call management log files.
• SIP log level (0..7) defines the degree of detail for the SIP protocol log files.
26
Page 27
VOIspeed V-IP400 User Manual
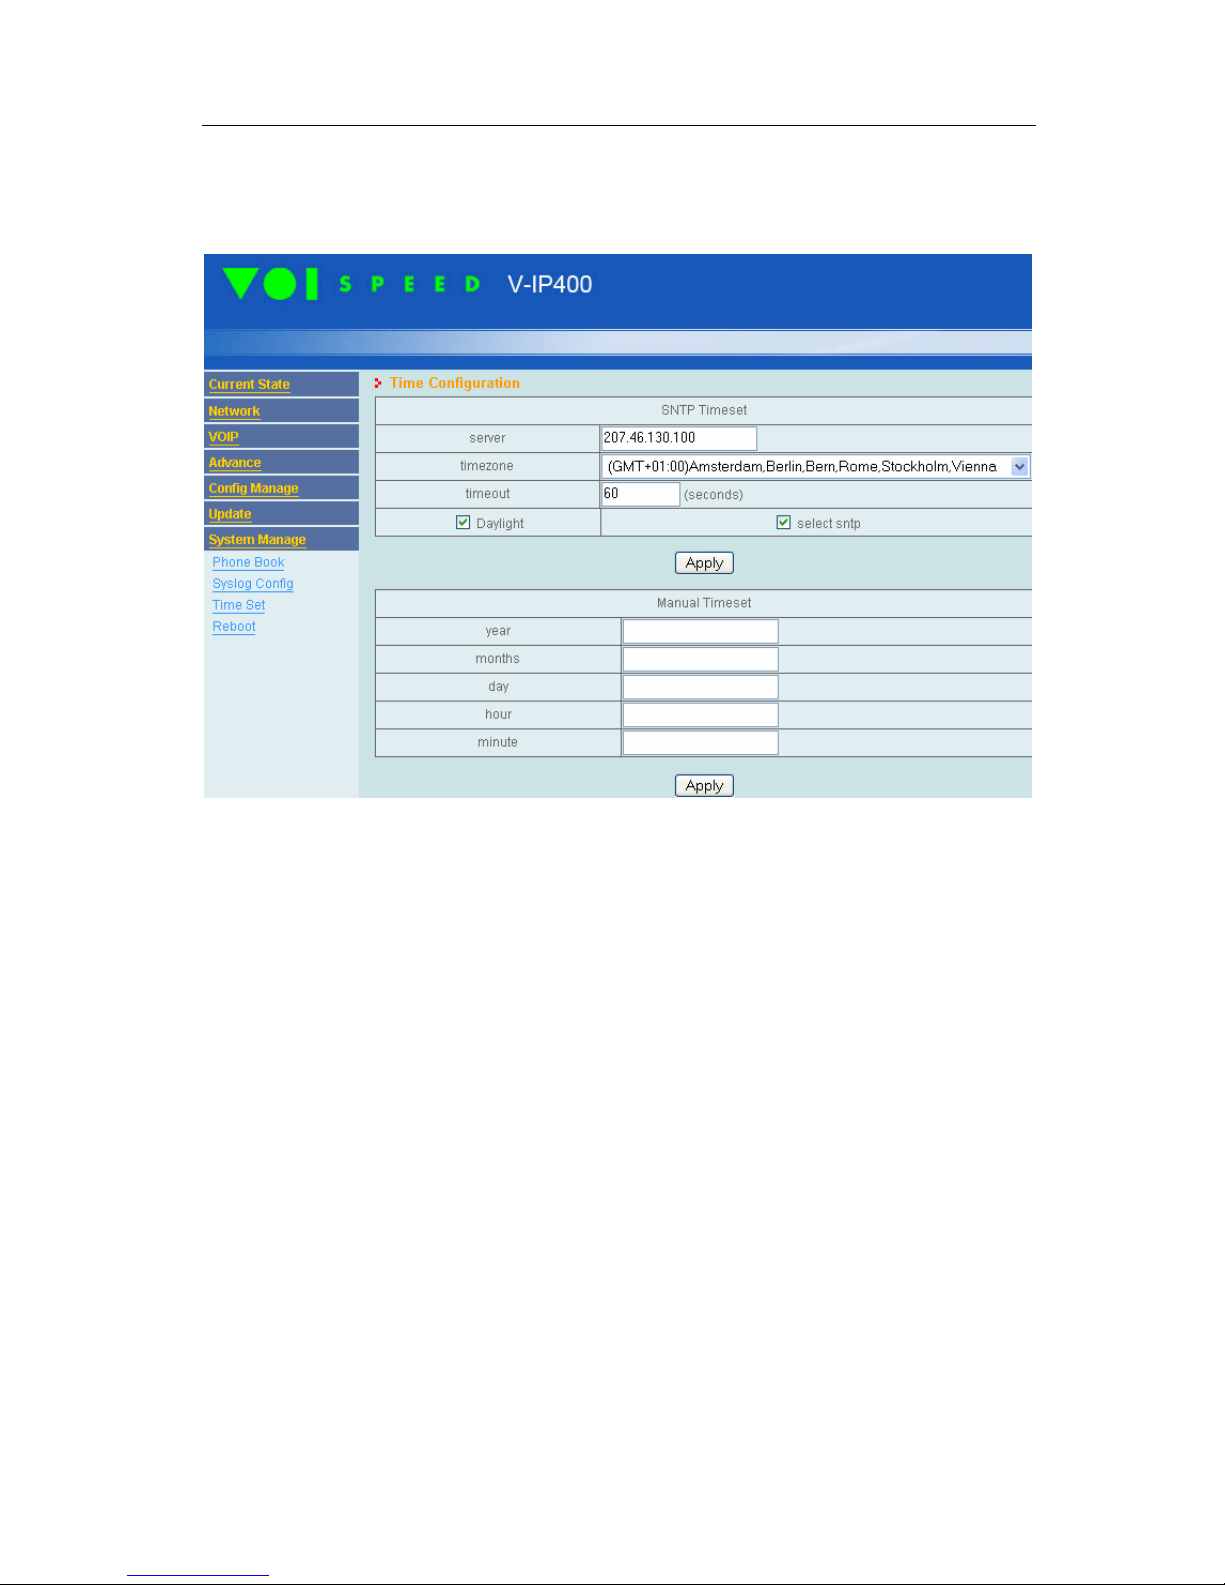
5.8.4. Time Configuration
This page contains all time and date settings.
© VOI
SPEED LTD
.
Time and date can be set manually or can be updated by a SNTP server.
Set time using an SNTP server
In case the phone has a static IP address and the administrator defines an SNTP server
hostname it is important to define a valid DNS server IP address in the V-IP400
configuration setting (“Network” section of the web interface). Furthermore, if the SNTP
server is running outside of your LAN, the administrator must enter a valid gateway IP
address in the web interface (“Network” section) to establish a connection between the
phone and the SNTP server.
In order to connect the V-IP400 with the SNTP server, the administrator should specify the
SNTP server hostname (or IP address), choose the proper time-zone (England GMT + 00),
enable Daylight, select the time acquisition timeout (default: 60 secs) and enable the select
sntp checkbox. At the end of the configuration press Apply.
Set time Manually
27
Page 28

VOIspeed V-IP400 User Manual
© VOI
SPEED LTD
.
The administrator can set manually the time for the V-IP400 and the telephone will use its
internal clock.
Note. Date and time are reset to their default value in case you enter the time manually and
the V-IP400 is rebooted.
6. Keyboard Configuration
6.1. Enter the telephone menu
In order to enter the configuration when the V-IP400 is in idle status: press the MENU
button, type the password (default 123) and press the OK. The user needs to press UP and
DOWN to browse through the submenus.
6.2. Network settings (IP address, Netmask)
When the V-IP400 is in idle status
• Press the ‘1’ on the keypad for 3 seconds to enable static IP mode (STATIC).
• Press the ‘2’ on the keypad for 3 seconds to enable dynamic IP mode (DHCP).
Only for STATIC IP mode
When the static IP mode is selected, go to Network LAN STATIC NET IP (in the
V-IP400 menu). To assign the IP address: press DEL and enter an IP address following this
syntax:
xxx*xxx*xxx*xxx.
Press OK to confirm.
Once you have assigned the IP address, press EXIT, enter Netmask menu and specify the
Netmask following the syntax above. Press OK to confirm.
6.3. Telephone startup in POST mode
The POST mode must be used only by expert personnel and allows the administrator to
reset, upgrade the phone and view the list of MAC addresses.
During the phone startup the administrator can choose if the phone needs to run in normal
or post mode. In order to enter post mode the administrator should press the ‘#’ key when
the phone is starting up (a row of # symbols is display during the bootup phase).
only one phone at a time can be used in post mode on the same network or there will
Note:
be a conflict. To have access to this mode from your PC, you need to have an IP address
with this format: 192.168.10.xx (the phone will acquire the address 192.168.10.1 on the
WAN port).
6.4. Address book
The V-IP400 can store up to 100 contacts in the address book. Pronto shared phone book
cannot be uploaded on the V-IP400. In order to add a new contact to the telephone’s
28
Page 29

VOIspeed V-IP400 User Manual
© VOI
SPEED LTD
.
address book: press PLAY, select ADD, and enter the details on the contact. If you want to
search a contact in the address book, select the SEARCH from the menu and type the first
few characters of the name. You can browse through the address book by selecting
CURRENT from the menu.
Further information about the V-IP400 telephone and more technical material can be
accessed on our websites:
www.prontopbx.com and www.voispeedltd.com
29
 Loading...