

VOIGTLANDER PROMINENT II Instructions For Use Manual

24 x 36 . 35
mm
Instructions
for
use

L
he
most
important
point
of
the
whole
booklet
of
instructions
is
on
this
page:
You
are
requested
to read
the
instructions
carefully,
and
to
make
yourself
familiar
with
the
manipulation
of
your
camera
before
you
start
taking
photographs
.
You
should
always
bear
in
mind
that
the
PROMI=
NENT
II
is a mechanical
precision
instrument
which
must
be
handled
with
feeling
and
understanding. It
will
repay
your
care
with
an
endless
number
of
beautiful
and
wonderfully
sharp
pictures.
VOIGTL~NDER
A. G.
BRAUNSCHWEIG

Contents
Page
Inserting the film
....
.. .. ..
. .
.. .. ..
..........
6-10
Unloading the
camera
...... ......
. . .
........
.
Changing
partly
exposed
films
.........
. .
....
.
Changing
lenses f =
50
mm
.....
............
.
Shutter'
Aperture . Brilliant-frame view
and
rangefinder
.......................
.
......
.
Snapshot focusing . .
..
..................
...
..
.
Holding the
camera
.........
. . ..............
.
Synchronised
flash shots
..............
..... .
Focar
lenses·
Proximeter
....
...•......
. .... .
Repro · Macro · Micro
...........
. . .
.. : ......
.
11
11
12
13-16
17
18
19-21
22-23
24-26
Turnit-3-viewfinder
.....
..
......
..
............
27
Fi
Iters
...
. . .
......
. .
.....
. . .
.............
..
. . .
28
Shots
against
the
light.
. .
...
..................
29
Aperture an'd depth of field
........
.
.........
30
Care
of
camera
and
lenses
31
2
PROMINENT
II
24 x 36·35
mm
2
4
5
6
7
8
9
10
11
12
13
14
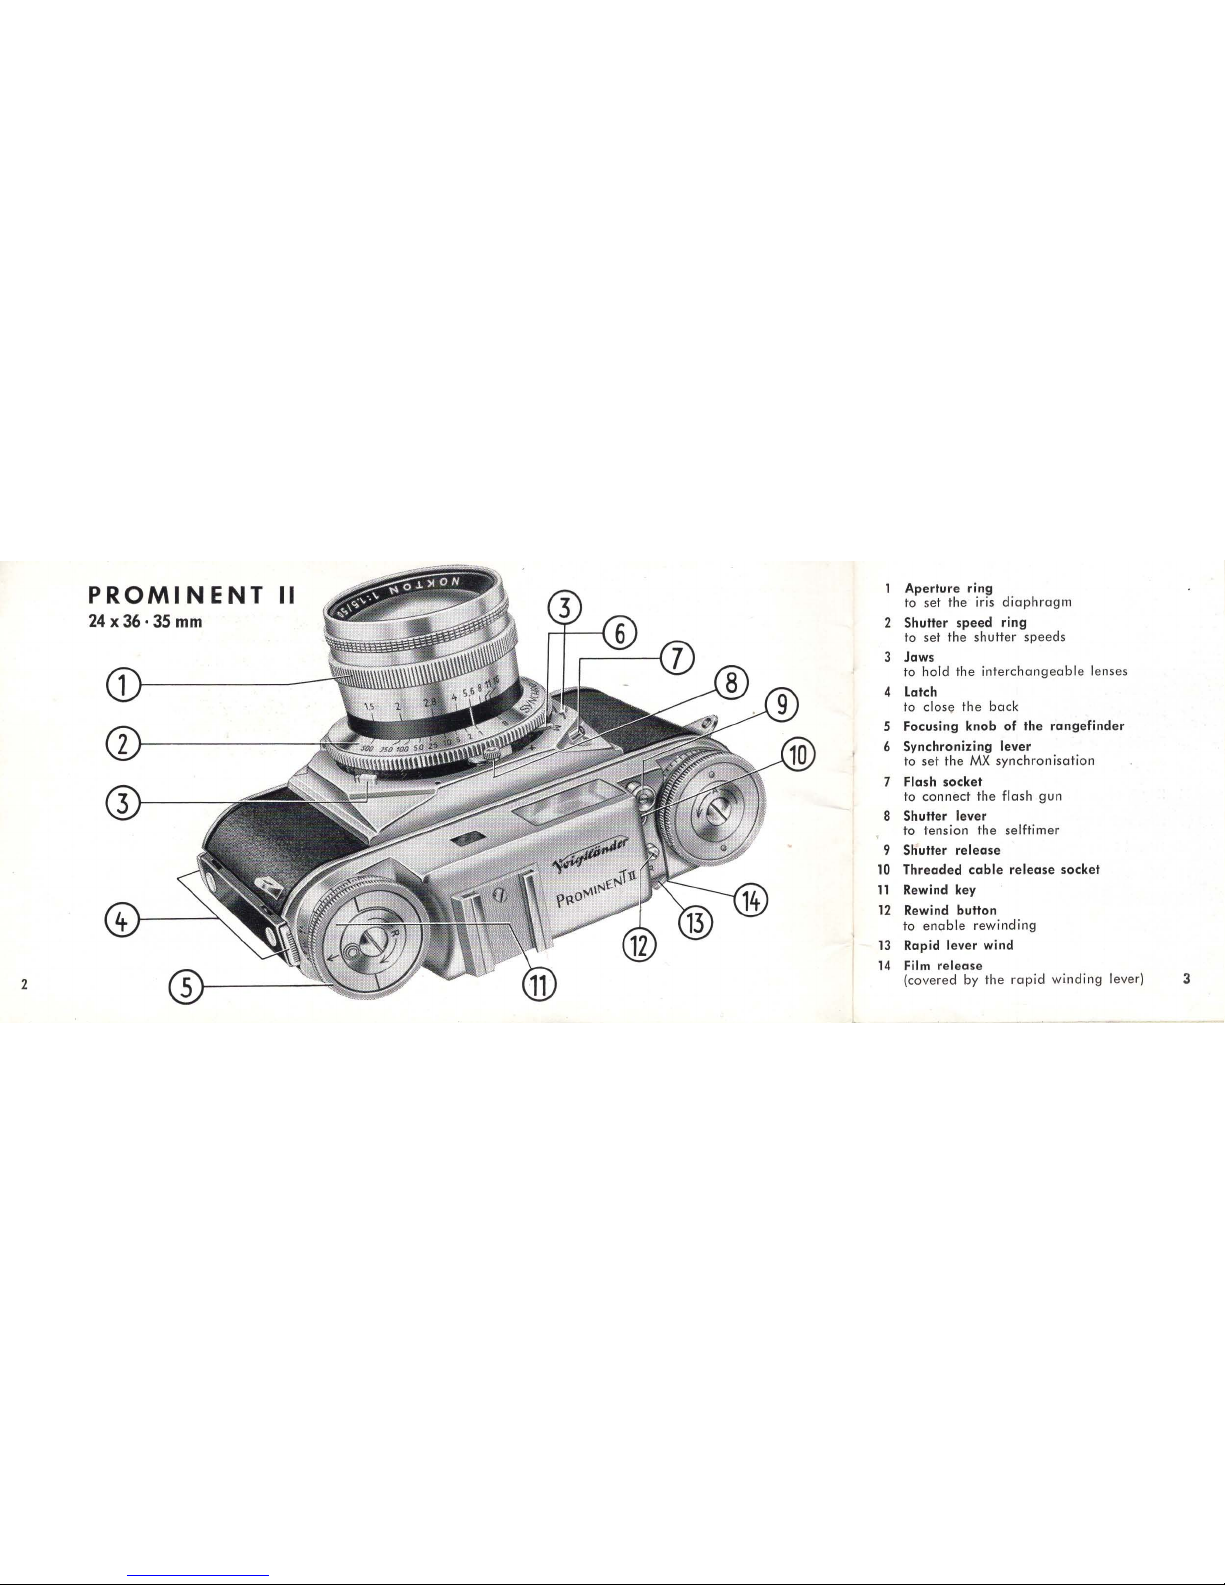
Aperture
ring
to
set
the
iris
diaphragm
Shutter
speed
ring
to
set
the
shutter
speeds
Jaws
to
hold
the
interchangeable
lenses
Latch
to
clos~
the
back
Focusing
knob
of
the
rangefinder
Synchronizing
lever
to
set
the
MX
synchronisation
Flash
socket
to
connect
the
flash
gun
Shutter
lever
to
lens
ion
the
self
timer
Shutter
release
Threaded
cable
release
socket
Rewind key
Rewind
button
to
enable
rewinding
Rapid
lever
wind
Film
release
(covered
by
the
rapid
winding
lever)
3
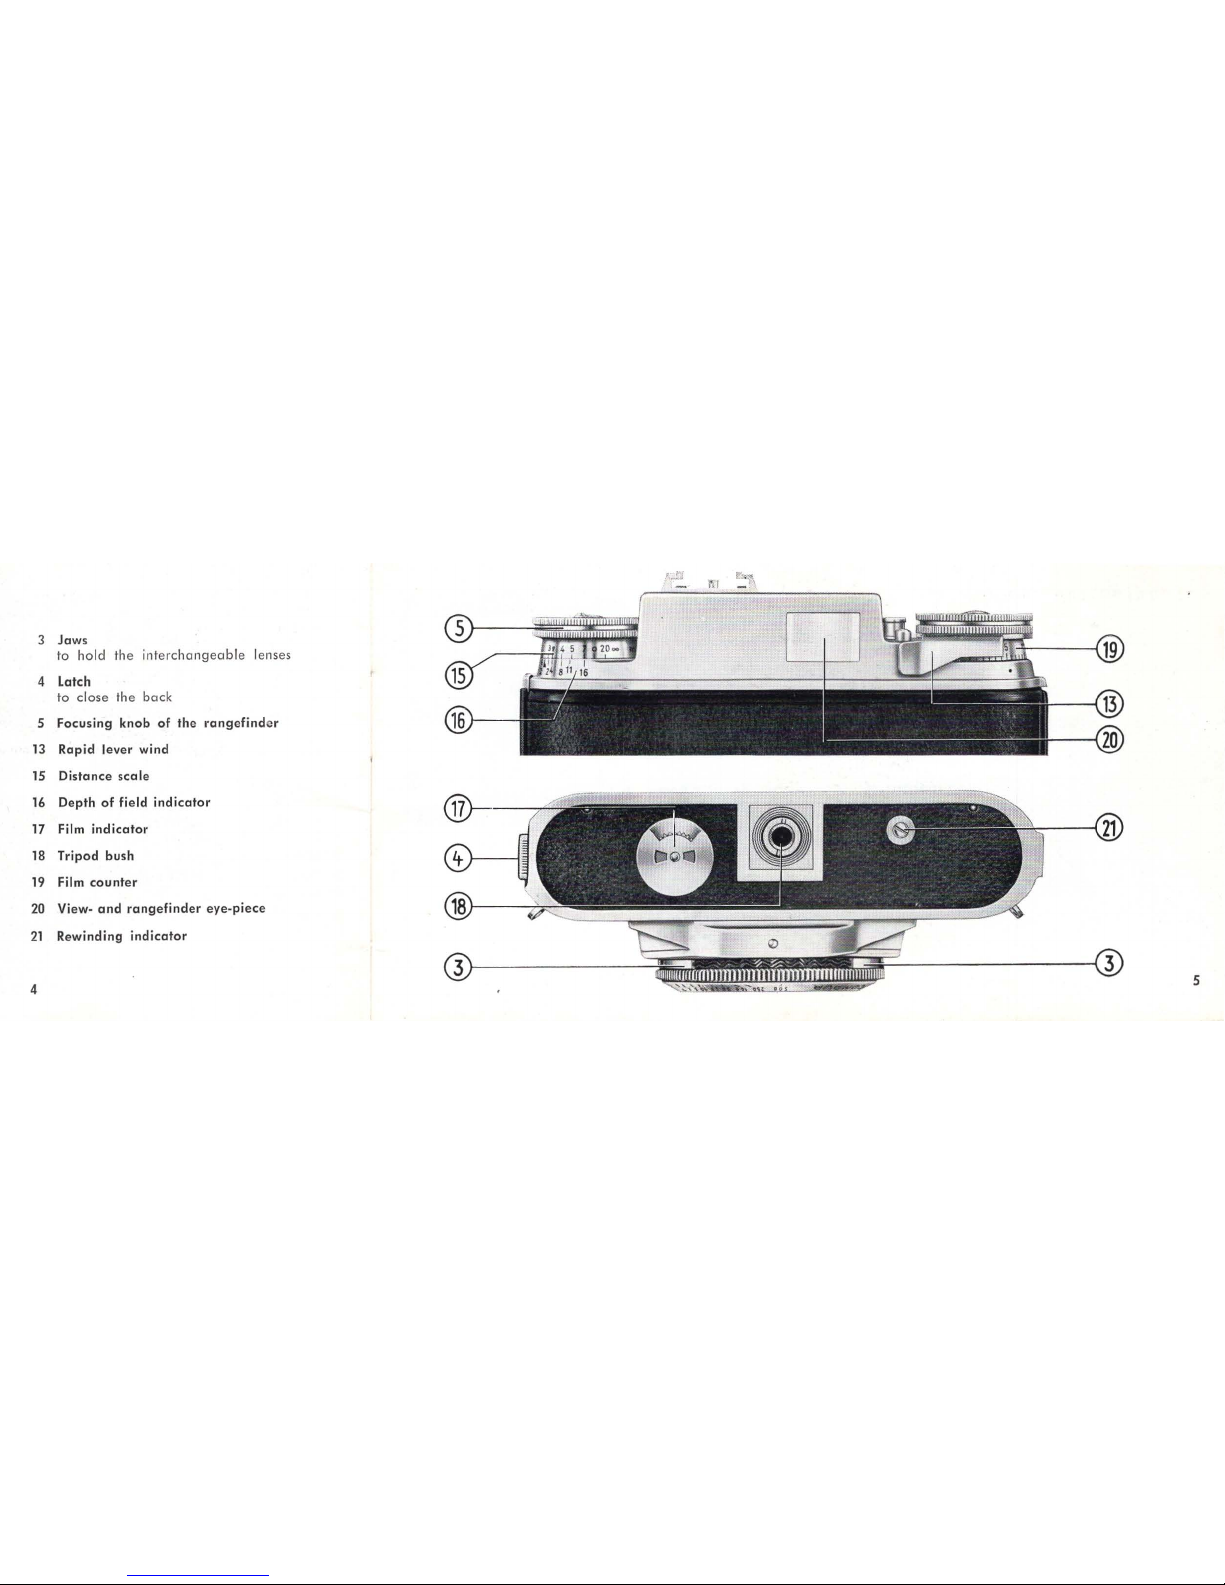
Jaws
to
hold
the
int
erchangeable
lenses
4
latch
to
close
the
back
Focusing
knob
of
the
rangefind
er
13
Rapid
lever
wind
15
Distance
scale
16
Depth
of
field
indicator
17
Film
indicator
18
Tripod
bush
19
Film
counter
20
View-
and
rangefinder
eye-piece
21
Rewind i
ng
indicator
4
5
5
6
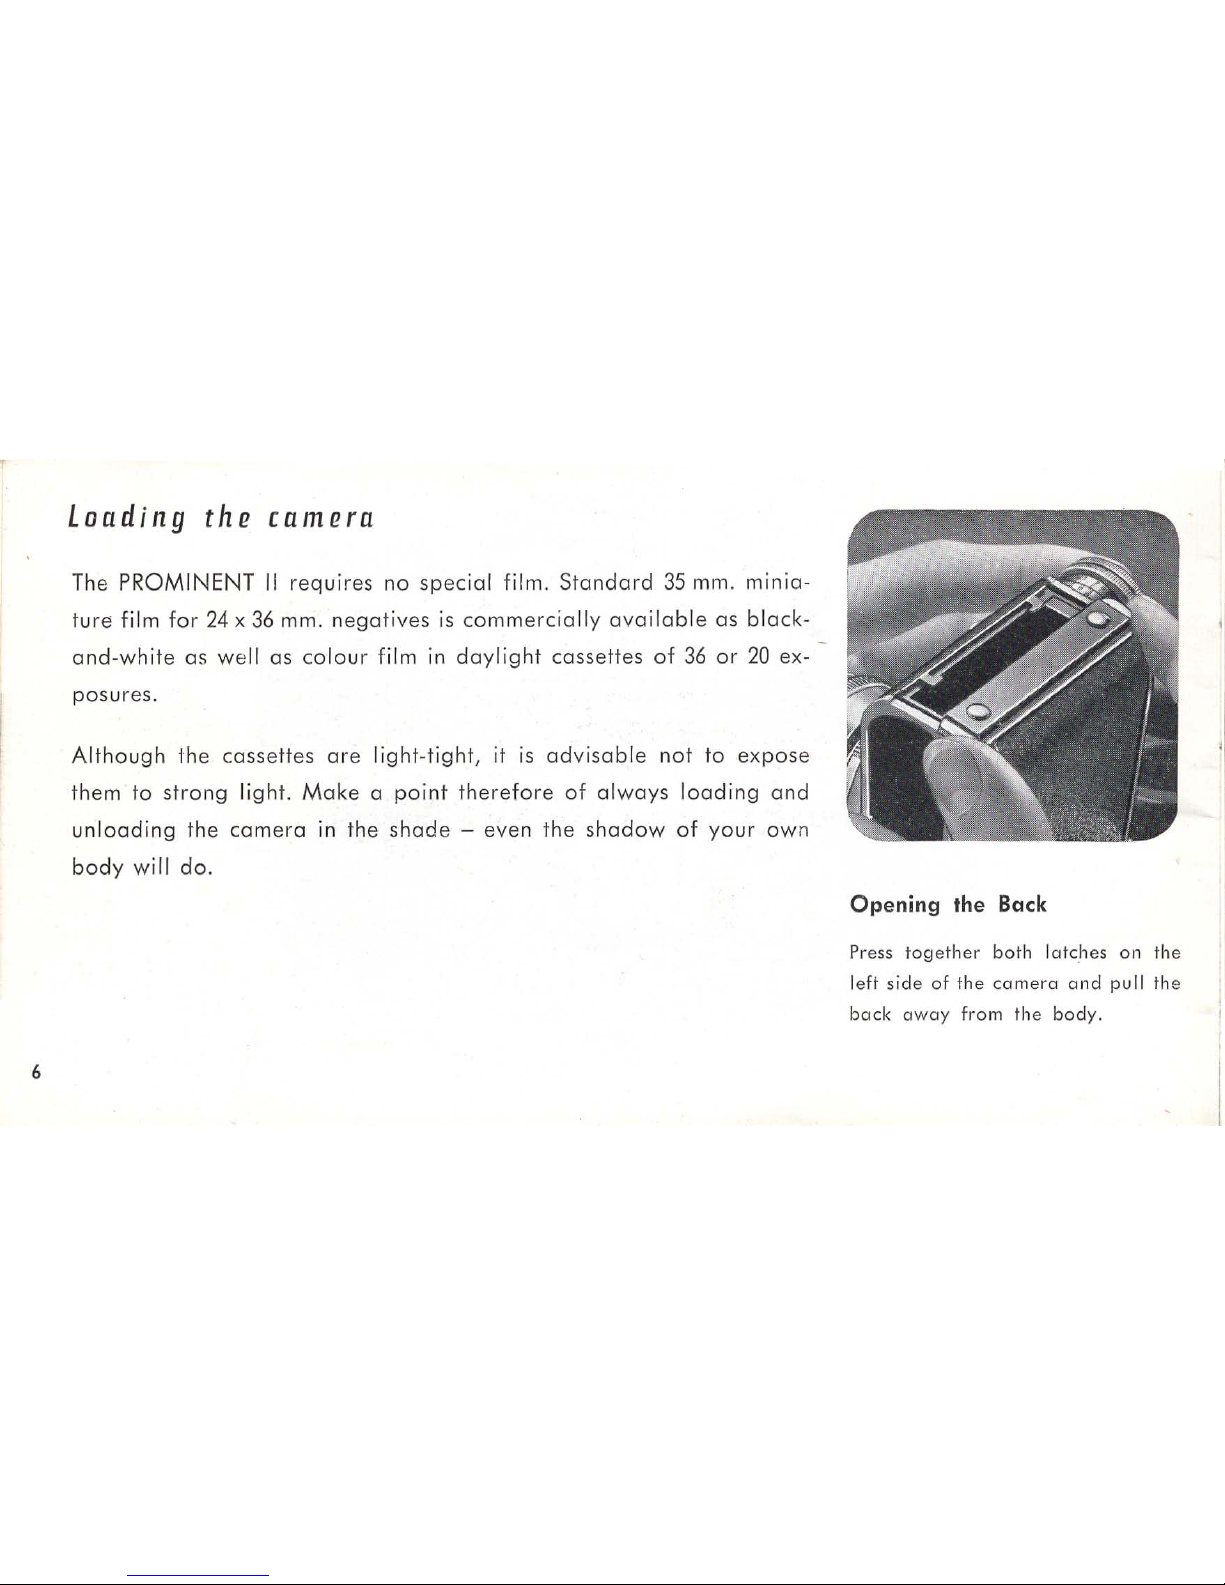
Loading the camera
The
PROMINENT
II
requires
no
special
film.
Standard
35
mm.
mInIa-
ture
film
for
24 x 36
mm. negatives
is
commercia
lly
availab
le
as black-
and-white
as
well
as
colour
film
in
daylight
cassettes
of
36
or
20
ex-
posures.
Although
the cassettes
are
light-tight,
it
is
advisable
not
to
expose
them to
strong
lig ht.
Make a point
therefore
of
always
loading
and
unl
oading
the
camera
in the
shade
- even the
shadow
of
your
own
body
will do
.
Opening
the Back
Pr
ess
together
bot
h l
atches
on
the
left
side
of
the
camera
and pull the
back
away from
the
body.

11
Rewind key
to
rewind
the
film.
Showing
the
handle
open
and
the
key pui-
l
ed
aut.
12
Rewind
botton
to
enable
rewinding
13
Rapid
lever
wind
19
Film
counter
22
Film
chamber
23
Film
guides
24
Film
Iransport
shoft
wit
h
two
sprocket wheels
which
must
engage
the
perforations
on
both
sides
of
the
film.
25
Take-up
spool
8
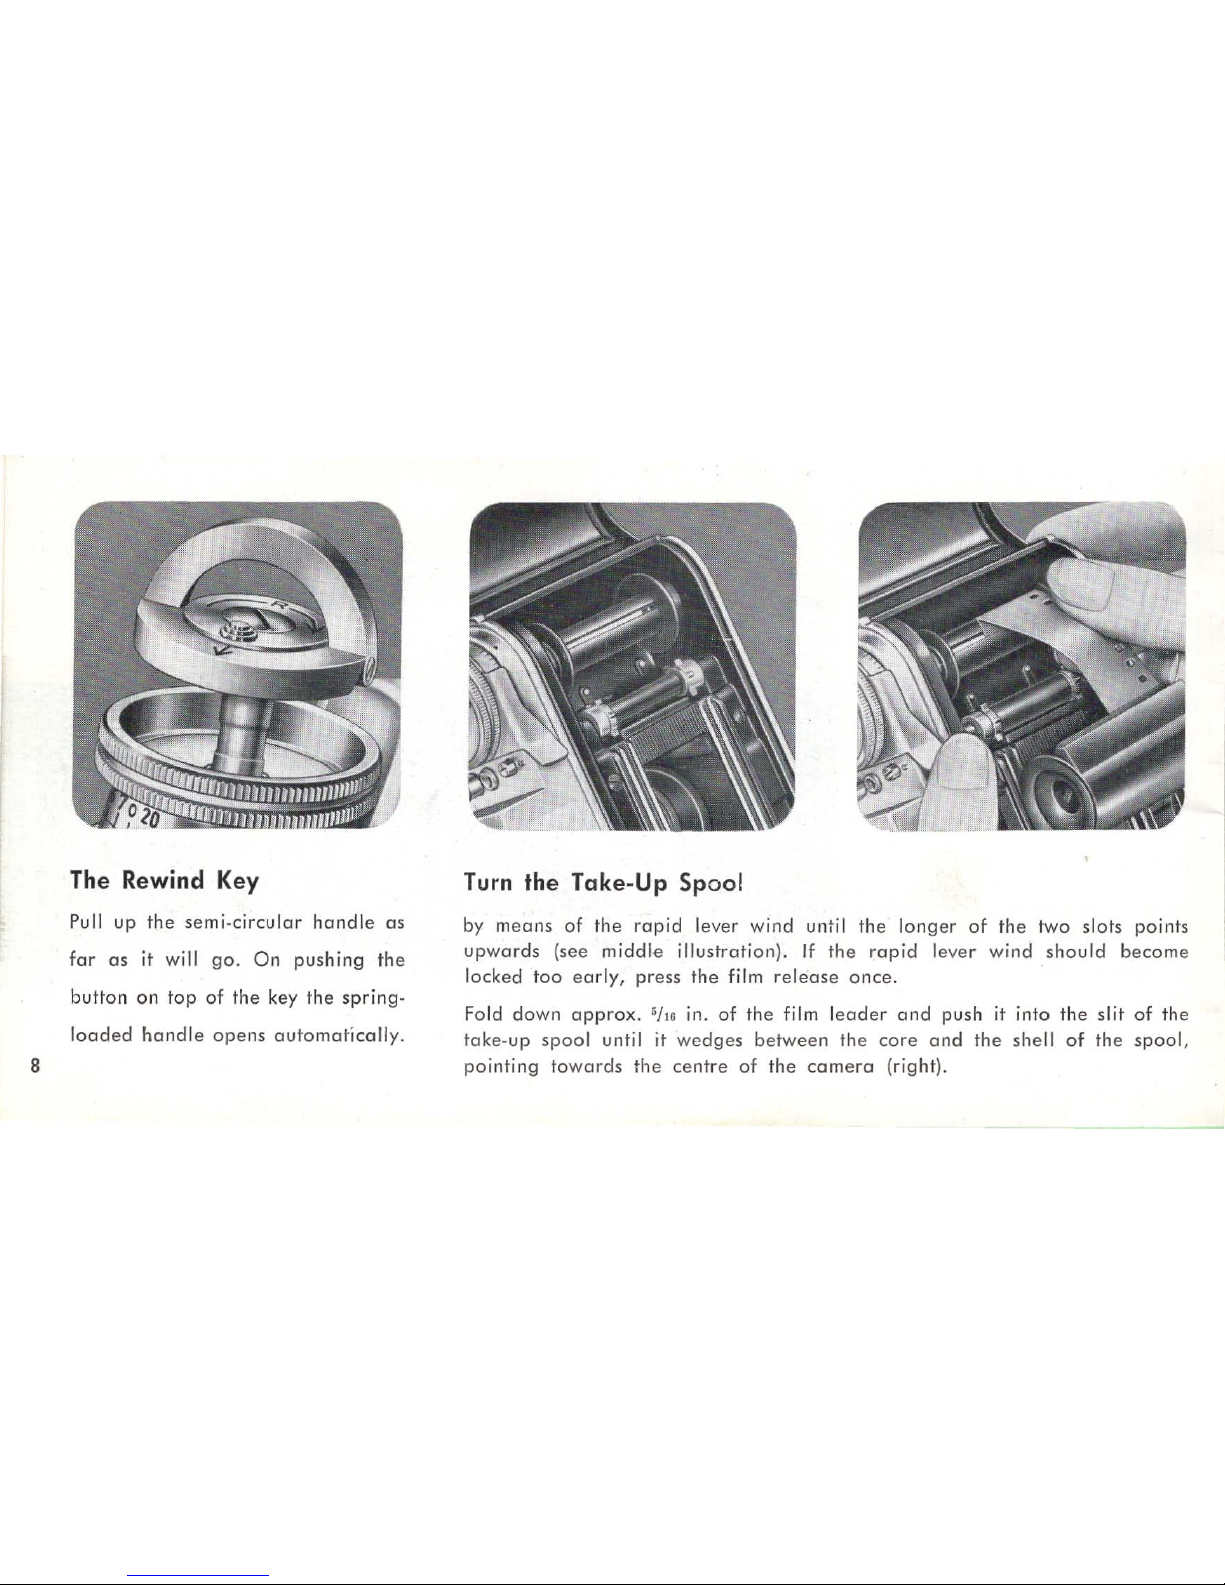
The
Rewind
Key
Pu
ll
up
the
semi-circular
hand
le
as
far
as
it will go_
On
pushing
the
button on top
of
the
key
the
spri
ng-
loaded
hand
le
opens
automatically.
Turn
the
Take-Up
Spool
by
means
of
the
rapid
lever
wind
until
the longer
of
the
two
slots points
upwards (see middle
illustration)
.
If
the
rapid lever
wind
should
become
locked
too
early,
press
the film
release
once.
Fold
down
approx.
,/"
in.
of
the
film
leader
and
push it into
the
slit
of
the
toke-up
spool
until it wedges
between
the
core
and
the
shell
of
the
spool
,
pointing
towards
the
centre
of
the
camera
(right).
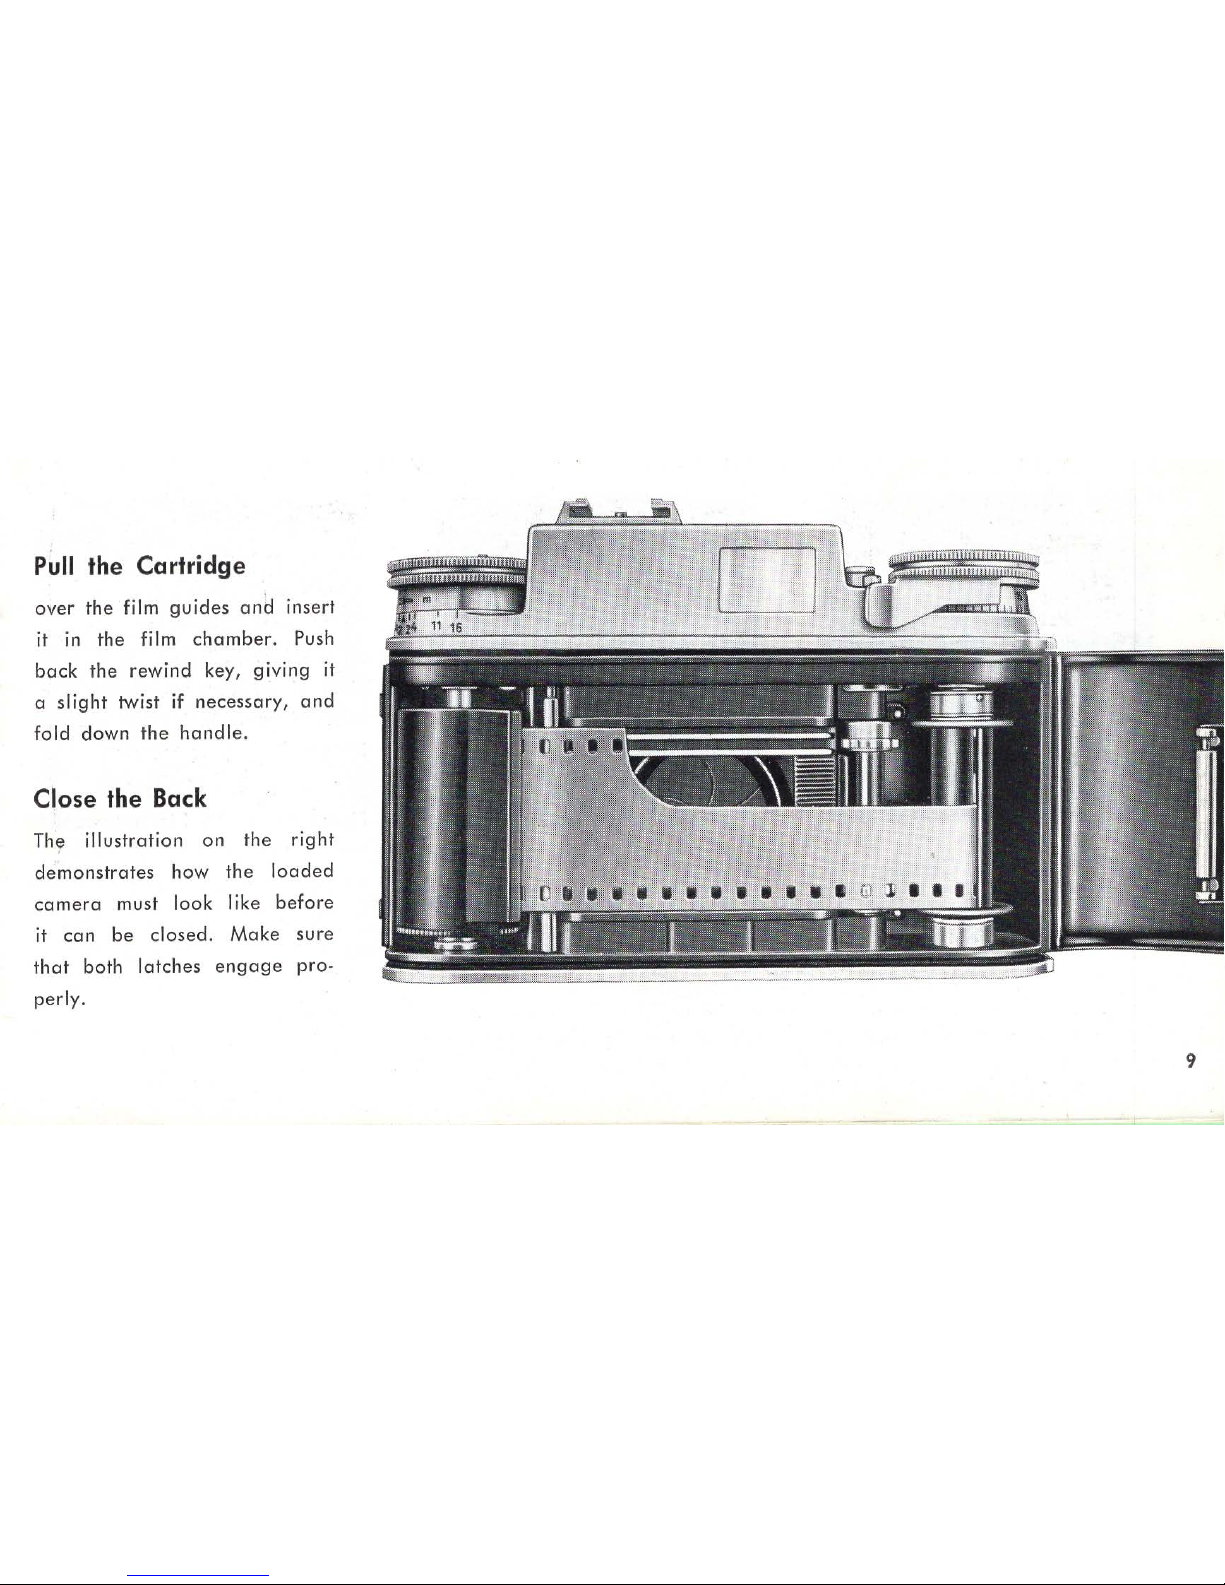
Pull
the Cartridge
over
the
film
guides
and
insert
it in
the
film
chamber
. Push
bock
the
rewind
key,
giving
it
a
slight
twist if
necessary,
and
fold
down
the
handle
.
Close the
Back
The
illustration
on
the
right
demonstrates
how
the
loaded
camera
must
look
like
before
it
can
be
closed.
Make
sure
that
both
latches
engage
pro-
perly.
9
Setting the
Film
Counter
Turn
the
rapid
winder
until it lacks (unless it
is
already
locked
). Then pull
it up
and
turn
the
counting
disc
to
set
the
letter F exactly
opposite
the
index
mark
(see
arrow
in
left illustration) .
Push
the
rapid
winder
back
again
until
it
fits
tight
on
top
of
the
counting
disc. Press
the
film
release
once
and
turn
the
rapid
winder
until it locks.
Repeat
this
once
more.
Now
the
index
mark
points
to
No.1
(see
illustration
10
on
the
right)
and
the
film
is
in
position
for
the
first
exposure
.
After Loading
set
the
film
indicator
on
the
base
plate
of
the
camera.
Choose
your
own
colour
code
for
the
different
films to help
you
r memory.
Please
nate:
The film
release
(15)
underneath
the
lever
of
the
rapid
wi
nder
(see
illustration
on
the
left)
is
used
in
practice
only
for
load
ing
and
changing
partly
exposed
films
(see
page
21). Do
not
use it for
rewinding.
 Loading...