

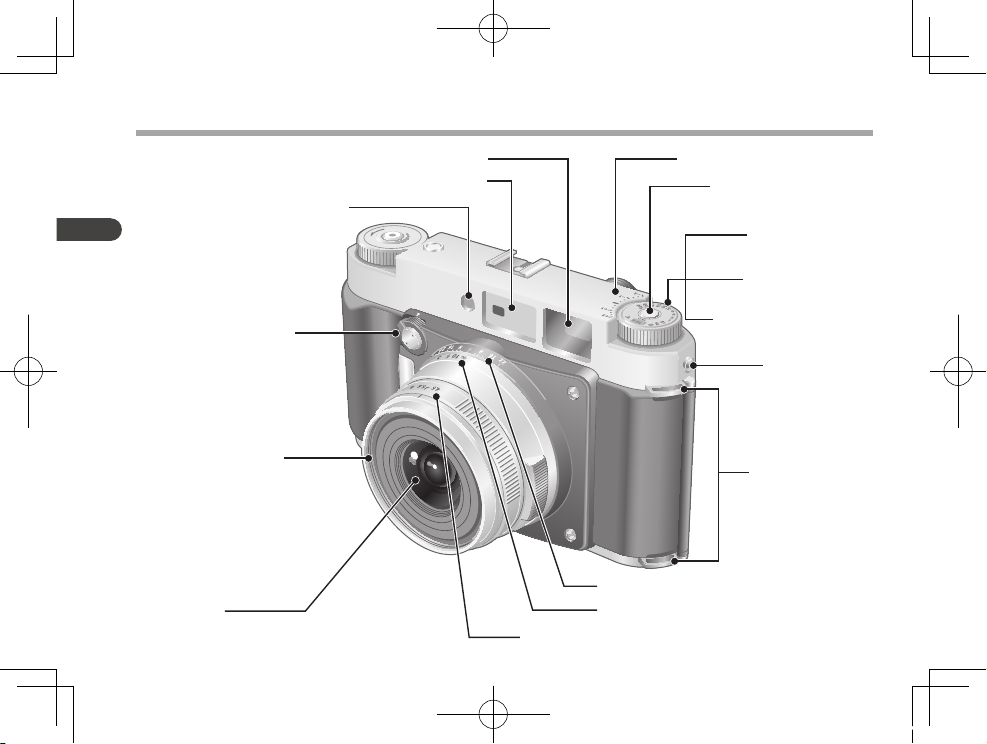
Power Switch
Lens
Bright Line Frame Illumination Window
Viewfinder Window
Synchro Contact
Depth of Field Index
Focusing Ring
Filter Mounting Screw
Rangefinder Window
Aperture Ring
Neck Strap Eyelets
Exposure Compensation Index
ISO/Filmspeed Dial
Exposure Compensation
Dial
Dial Lock Release Button
Shutter Speed Dial
8
English
Description of Controls
GF670W_TO_EFSC.indb 8 11.2.28 4:16:04 PM
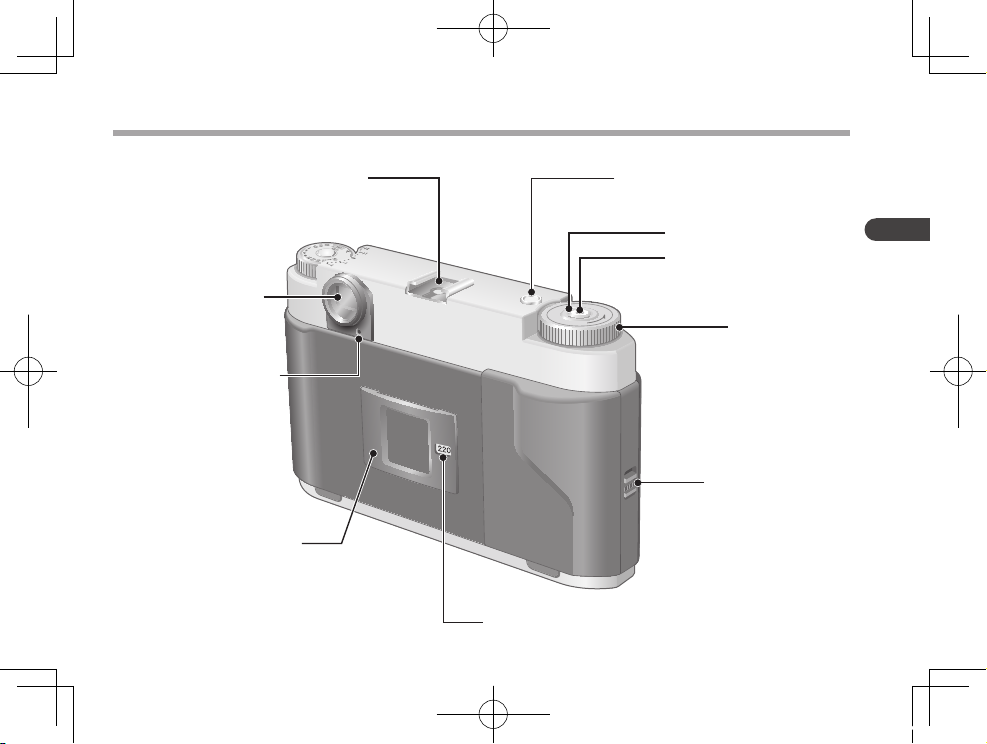
Film Type Indicator Window
Rangefinder Eyepiece
Shutter Opening Indicator
Back Door Lock Lever
Film Indicator Slot
Film Advance Dial
Shutter Release Button
Cable Release Screwthread
Frame Counter
Hot Shoe Contact/
Accessory Shoe
9
English
GF670W_TO_EFSC.indb 9 11.2.28 4:16:05 PM
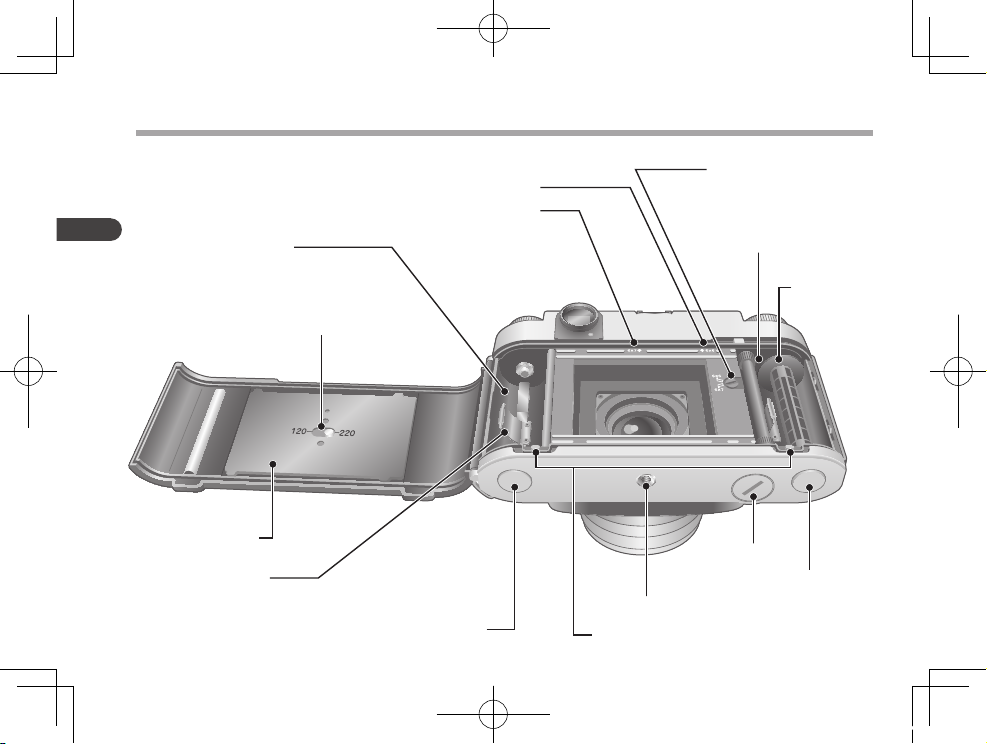
Start Mark (for 6X7)
Start Mark (for 6X6)
Film Spool Chamber
Film Type Selector
(120 or 220)
Film Spool
Pressure Spring
Film Pressure Plate
Film Loading Knob
Spool Release Buttons (Red)
Tripod Socket
Spool Release
Knob
Battery Chamber
Cover
Film Take-Up Spool
Chamber
Frame Size Selector
(6X6 or 6X7)
Film Take-Up
Spool
10
English
Description of Controls
GF670W_TO_EFSC.indb 10 11.2.28 4:16:05 PM
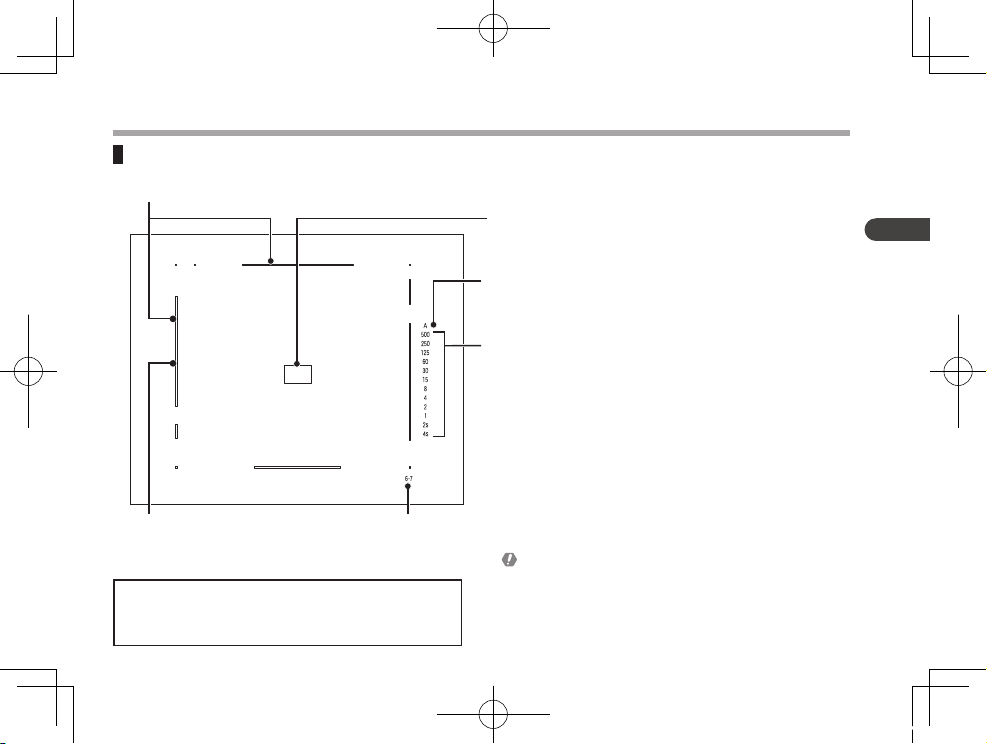
Bright Line Frame Frame Size Indicator
Shutter Speed Indicator
Aperture Priority AE Indicator
Rangefinder Patch
Moving Frame
When all the shutter speed indicators are illuminated,
or when none of them light up, low battery power may
be a concern.
11
English
Indicators in Viewfinder
When “500” indicator blinks rapidly, it means out of
measurment range due to over exposure.
When “4s” indicator blinks rapidly, it means out of
measurement range due to under exposure.
Adjust the aperture until the relative shutter speed
indicator is illuminated.
GF670W_TO_EFSC.indb 11 11.2.28 4:16:06 PM
12
English
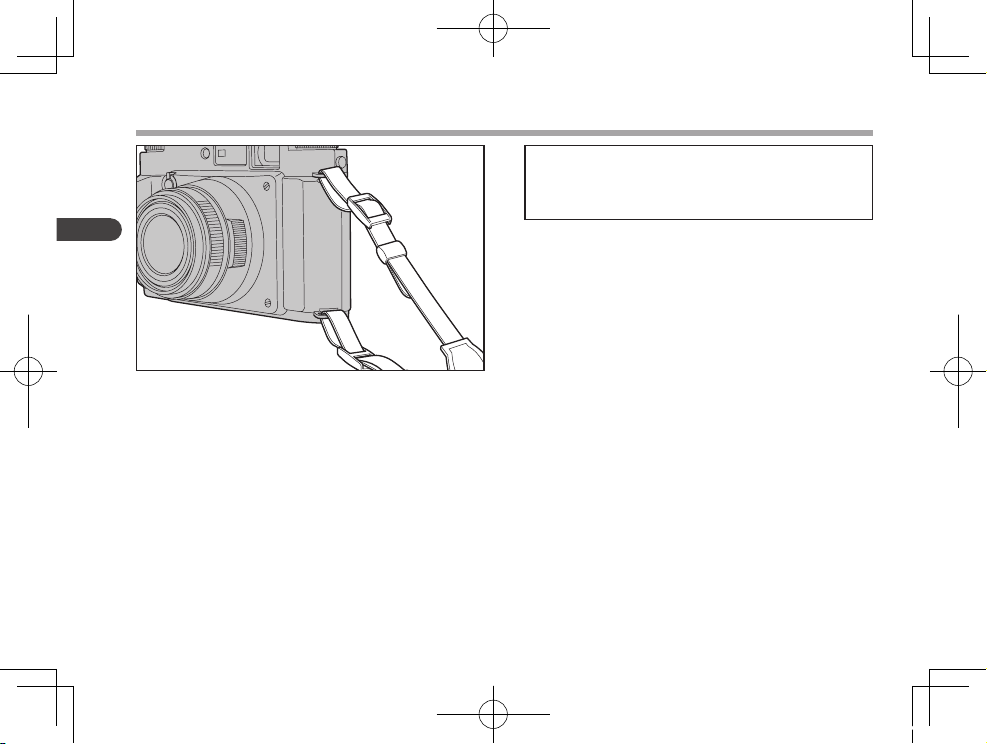
Attaching Neck Strap
]
When using a commercially available strap instead
of the supplied one, make sure it is strong enough
to use.
]
Do not use straps designed for cell-phones.
Attach the neck strap to the camera as illustrated.
GF670W_TO_EFSC.indb 12 11.2.28 4:16:07 PM

13
English
Attaching/Removing Finder Eyepiece
Turn the finder eyepiece clockwise to attach it.
Turn it counterclockwise when removing it.
GF670W_TO_EFSC.indb 13 11.2.28 4:16:07 PM
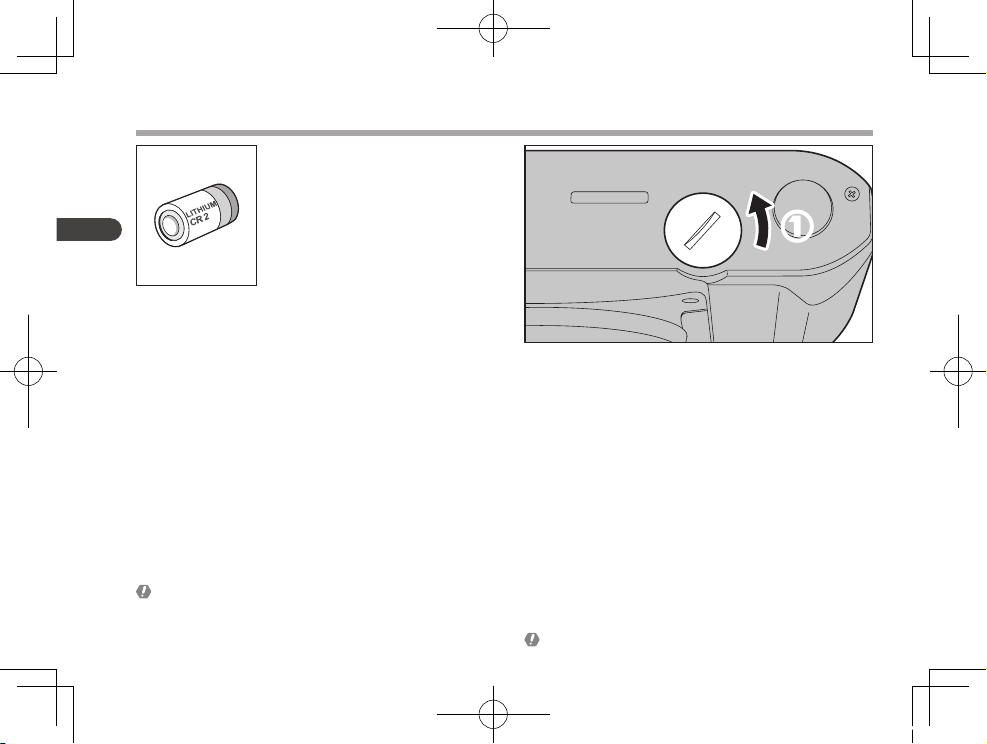
Turn the bat tery chamber cover counterclockwise
using a coin or something similar.
14
English
Inserting Battery
One CR2 (3V) lithium bat te ry is
used with this camera.
Turn the power switch off when replacing the battery.
Battery performance is impaired at low temperatures,
and may lead to significantly faster loss of bat tery
power. Prepare a ba cku p bat ter y kept at normal
temperature.
GF670W_TO_EFSC.indb 14 11.2.28 4:16:08 PM
3
2
15
English
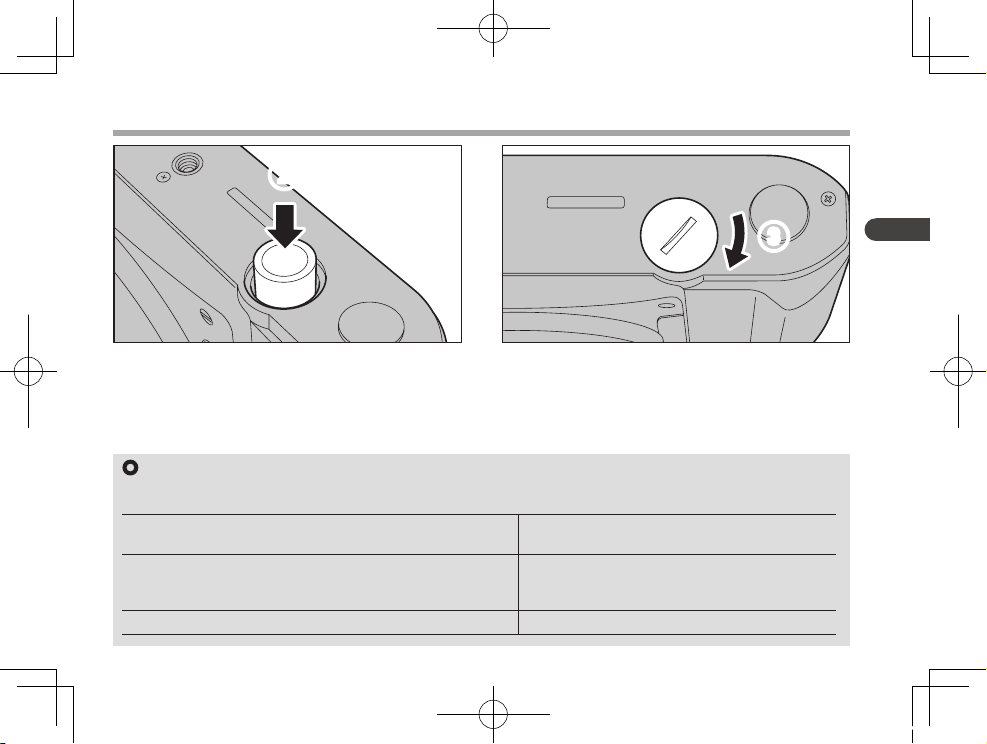
Inser t the batter y positive side + down into the
battery chamber.
3
Turn the battery chamber cover clockwise until it is
firmly closed.
Battery Check
The battery status may be checked by pressing the shutter release button halfway, and is indicated by the “A” and shutter speed
indicators in the viewfinder.
The “A” and /or shutter speed indicators are illuminated or blink
according to the exposure setting you selected.
The battery is fine.
The “A” and all shutter speed indicators are illuminated, and then,
the indicator(s) start blinking rapidly according to the exposure
setting you selected.
The battery is low. Replace the battery.
All indicators are illuminated, or none of indicators are illuminated. The battery is exhausted. Replace the battery.
GF670W_TO_EFSC.indb 15 11.2.28 4:16:09 PM
16
English
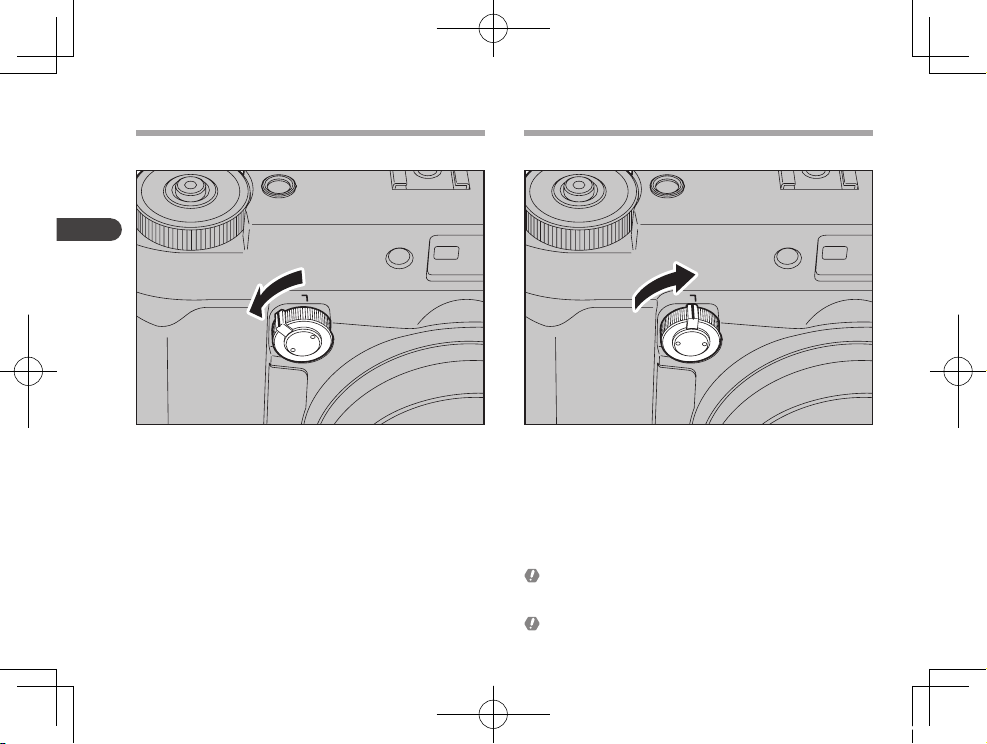
1
Turn the power switch counterclockwise to unlock.
\
The power will be switched ON, and camera readied
to shoot photos.
2
Turn the power switch clockwise, and align the white
line with “L” (Lock).
\
The power will be switched OFF, and the shutter
release button locked.
Power switch ON Power switch OFF
If the battery is removed when the shutter is open
during a long exposure or in Bulb setting, the shutter
will remain open.
Turn the power swi tch OFF when replac ing the
battery.
GF670W_TO_EFSC.indb 16 11.2.28 4:16:10 PM
17
English
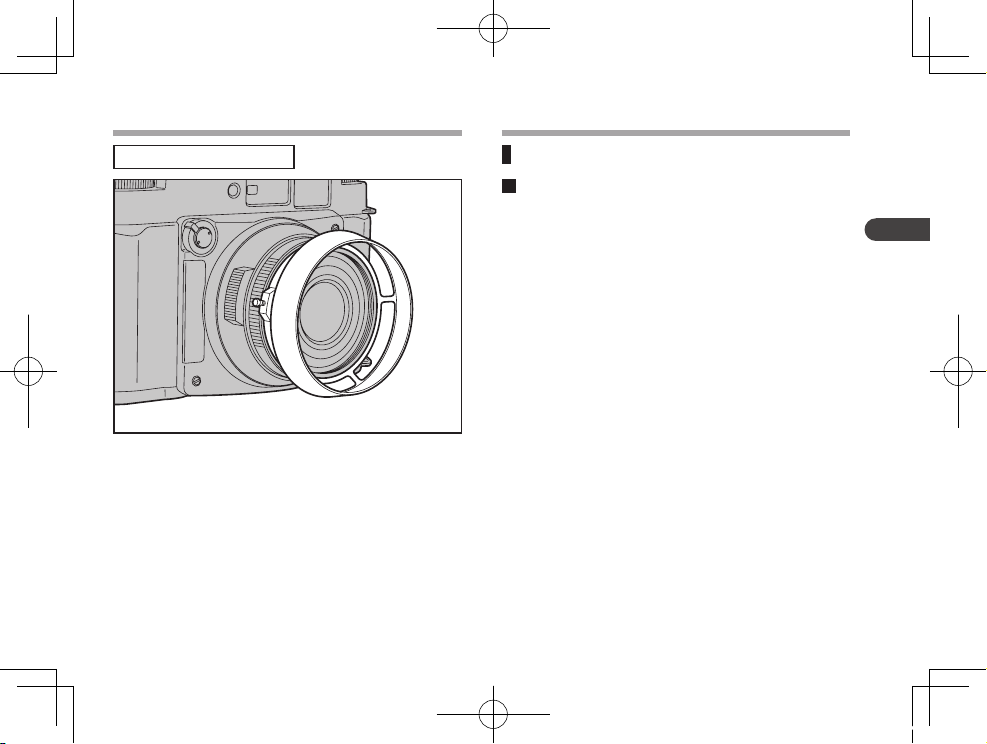
1
Loosen the lens hood mounting screw.
2
Mount the lens hood on the outer ring of the lens.
3
Tighten the lens hood mounting screw to lock the
lens hood onto the lens.
Attaching/Detaching Lens Hood
A lens hood is optional.
Filters
The filters usable for this camera
Use a 58mm diameter filter
]
layering of two filters or more will cause vignetting.
GF670W_TO_EFSC.indb 17 11.2.28 4:16:10 PM
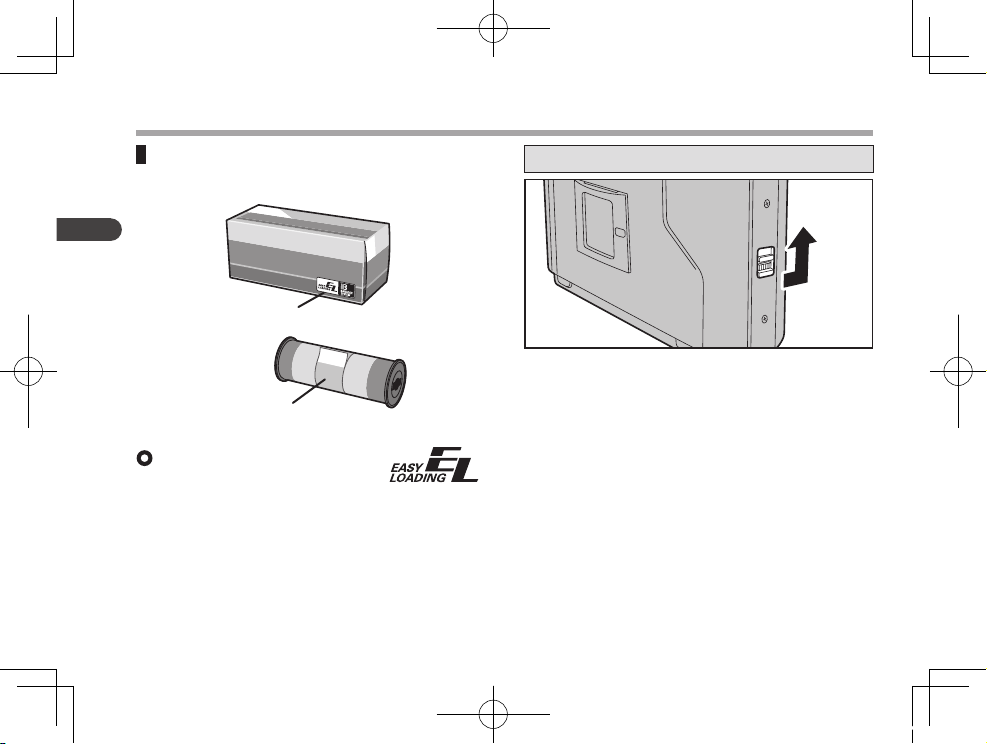
Easy Loading logo
Film
18
English
Easy Loading
With the Easy Loading system,
you ca n load film quickly and
easily by placing the hole on the film leader on the
hook in the spool slot. The Easy Loading system
prevents film slack and improper loading.
Loading Film
120/220 film to be used with this camera
Open/Close of the back door
1
To open the back door, slide the back door lock lever
to the front of the camera.
2
Move it upward as indicated by arrow.
3
When closing the back door, close it slowly and
gently until the lock clicks.
GF670W_TO_EFSC.indb 18 11.2.28 4:16:11 PM

Setting a film type
19
English
While pushing the film pressure plate down gently, slide
the film type selector to 120 or 220 according to the film
type being used.
\
T he fo cu si n g po in t an d fra m e co u n te r wil l
automatically be adjusted for the selected film type.
You can che ck the fil m type fro m the fil m type
indicator window on the back door.
Frame Counter
120 film 220 film
6X7 cm 10 20
6X6 cm 12 24
If you are using 120 half length film (6 shots at 6X6 cm,
5 shots at 6X7 cm), set the film type selector to 120.
However, the frame counter will not work with this
setting. After taking the sixth frame (fifth in 6X7 cm),
continue to release the shutter and wind the film roll
onto the film take-up spool.
GF670W_TO_EFSC.indb 19 11.2.28 4:16:12 PM

Selecting a frame size (6X7 cm, 6X6 cm)
20
English
Open the back door and switch the frame size selector
to set the desired size by using a coin or something
similar.
\
When you set the 6X6 cm size, masks appear at
both sides of the filmgate.
The frame counter and the bright line frame in the
viewfinder will change automatically with your film
size selection.
Loading Film
6X7 cm
GF670W_TO_EFSC.indb 20 11.2.28 4:16:14 PM

21
English
6X6 cm
GF670W_TO_EFSC.indb 21 11.2.28 4:16:15 PM

1
Open the back door and press the spool release buttons
(red).
\
Both knobs at the bottom will pop out.
2
Insert an empty film spool into the film take-up spool
chamber.
3
Push the spool release knob back in position.
22
English
Loading Film
GF670W_TO_EFSC.indb 22 11.2.28 4:16:16 PM

Alignment with start marks
Align the start mark on the film leader to the start mark on
the camera indicating the frame size.
4
Remove the tape on the film, then set the film in the
film spool chamber.
Push the film loading knob back in position.
4
23
English
6x7cm 6x6cm
GF670W_TO_EFSC.indb 23 11.2.28 4:16:16 PM

Use of the Fujifilm Easy
Loading film
Hook the small hole (5mm) of the film leader onto
the hook in the groove of the spool.
Confirm that the film leader is firmly attached and
held in place, and then wind the film with the film
advance dial until the start mark is aligned to the
mark on the camera.
Use of other 120-220 films
Insert the edge of the film leader into the wide
groove of the spool.
Push the end of the leader into the narrow slit of
the take-up spool until it protrudes.
Fold the protruding edge of the leader inwards.
Wind the film with the film advance dial slowly.
Make sure that the leader is firmly attached, and
then wind it up until the start mark is aligned to the
mark on the camera.
24
English
To avoid excessive slack in the film, lightly press the
film leader by finger and attach the film leader to the
take-up spool. Wind film up firmly.
Start mark of 220 film
The dotted line on the leader of the 220 film is not for
this camera. The line appears before the start mark of
this camera.
Do not used the dotted line as a start mark.
Loading Film
GF670W_TO_EFSC.indb 24 11.2.28 4:16:17 PM

Winding film to set the first frame
After loading the film and closing the back door, turn the
film advance dial until it stops to advance the film.
\
When the frame counter indicates “1", the camera is
ready for the first picture.
Do not release the shutter until the frame counter
indicates “1”, otherwise double exposure of the first
frame may occur.
Setting a film speed
1/3 step setting within ISO25-ISO3200 is possible.
Make sure to set a correct film speed for the film in use.
Make sure that the dial cli cks when sele cting the
speed, otherwise incorrect exposures may occur.
1
Pull up the film speed dial.
2
Turn the dial to set the correc t film speed (ISO)
value.
25
English
GF670W_TO_EFSC.indb 25 11.2.28 4:16:18 PM

Open the back door.
2
Press the spool release button at the film take-up
chamber.
3
Take out the film.
1
After finishing up your film, turn the film advance dial
until the film is completely on the take-up spool.
\
When the film leader is released from the film spool
in the film spool chamber, the film advance dial will
be lighter to turn.
Unloading film
2
3
2
26
English
Loading Film
GF670W_TO_EFSC.indb 26 11.2.28 4:16:18 PM

The film is wrapped with a protective backing paper,
however if the film is loose on the ro ll, it might be
exposed through gaps. Do not leave film in a bright
place. Load and unload film in a subdued light. Store
it in a dark place or a film shield bag.
4
4
Tape the film tightly with the end tape. Make sure the
film is not loose on the take-up spool.
Take out the spool from the film loading chamber and
place it in the film take-up chamber.
27
English
GF670W_TO_EFSC.indb 27 11.2.28 4:16:19 PM

28
English
Holding Camera
Hold the camera with both hands.
Focusing Range
0.7m -
A
Viewfinder Frame Coverage
90% at 3m
Field of view in the viewfinder and parallax
Compose the frame within the bright frame lines in the viewfinder.
\
The parallax is automatically corrected according to the focusing
distance set by the focusing ring on the lens. The subject within the
bright frame lines will be in the picture.
GF670W_TO_EFSC.indb 28 11.2.28 4:16:20 PM

When focu sin g, kee p you r
eyes center in the viewfinder.
Rangefinder Patch
1
Look through the viewfinder
and keep the subject you are
focusing on centered in the
bright line frame.
2
Turn the focusing ring.
3
Adjust the lens until the double image in the
rangefinder patch converges into one.
29
English
Focusing with IR film
The focusing point of the IR film differs from the one of the normal film. When
shooting with IR film, focus on the subject in the viewfinder, and then, adjust the
focusing point of the focusing ring to the red mark next to the indication “8” on the
depth of field index ring. The focusing will be corrected.
Focusing
3
GF670W_TO_EFSC.indb 29 11.2.28 4:16:21 PM

In order to avoid blurred picture, hold the camera
tightly and steadily, then press the shutter release
button gently.
Use a trip od and ca ble release wh en the shutter
speed is slower than 1/30 sec.
30
English
Shutter Release and Film Advance
When the frame counter indicates “1” or more, shutter will be released by pressing the shutter release button.
1
Press the shutter release button.
Shutter opening indicator
The red light is illuminated when shutter is open.
\
The start of exposure can be checked while
looking into the viewfinder.
GF670W_TO_EFSC.indb 30 11.2.28 4:16:22 PM

31
English
2
Turn the film advance dial counterclockwise until it
stops. Partial stroke may also be operated.
\
The frame counter indicator shows that film is now
advanced to the next frame.
]
The film advance dial can also be turned clockwise, but
will not advance the film.
Turn the film advance dial slowly. Rapid turning may
cause improper frame advance.
GF670W_TO_EFSC.indb 31 11.2.28 4:16:23 PM

Exposure Setting
32
English
Aperture Priority AE
Aperture Priority Auto Exposure (AE) Mode is available.
The camera will automatically select a proper shutter speed based on the lens aperture value and brightness of the subject.
Set the aperture to a full click stop, otherwise the proper exposure value might not be selected.
1
Set the shutter speed dial to the “A” indication.
\
When you set the sh utt er speed dia l to the “A”
indication, the dial will automatically lock.
2
Turn the aperture ring to select the desired F stop.
\
There is a half step between each of the F stops.
GF670W_TO_EFSC.indb 32 11.2.28 4:16:24 PM

33
English
Lit when the camera is on the Aperture Priority AE mode.
The shutter speed indicator's illuminated number shows
the selected shutter speed.
✽ Selected proper exposure value is set by the camera.
When “500” indicator blinks rapidly, it means out of
measurement range due to over exposure. When “4s”
indicator blinks rapidly, it means out of measurement
range due to under exposure.
Adjust the aperture until the relative shutter speed
indicator is illuminated.
While the shutter release button is pressed halfway, AE will be
locked.
While AE is locked, the measured exposure value will be kept.
Indicators in Viewfinder
]
When the shutter release button is pressed halfway
• LED will be lit in the viewfinder when the shutter release button is pressed halfway.
]
The LED will turn off af ter 10 seconds.
GF670W_TO_EFSC.indb 33 11.2.28 4:16:24 PM

Manual Exposure -Setting of Aperture and Shutter Speed-
1
While pressing the dial lock release button, turn the
shutter speed dial from the Auto Mode to the desired
speed.
2
Align the selected shutter speed indicator with the
index mark.
\
There are click stops on each of the shutter speeds.
<Aperture setting> <Shutter speed setting>
Align the F stop you selected to the index (white line) on
the lens.
\
There is a half step between each of the F stops.
Set the shutter speed at each click stop otherwise
proper shutter speed may not be set.
34
English
Exposure Setting
1
GF670W_TO_EFSC.indb 34 11.2.28 4:16:25 PM

Shutter speed indicator
The selected shutter speed is illuminated.
The A mark will not light up or flash during the manual exposure mode.
= When another shutter speed blinks while the selected speed is
illuminated, the exposure with the selected speed is incorrect. The
correct exposure is achieved with the blinking shutter speed.
Readjust shutter speed and/or aperture setting.
When “500” indicator blinks rapidly, it means out of measurement
range due to over exposure.
When “4s” indicator blinks rapidly, it means out of measurement
range due to under exposure.
Adjust the aperture until the relative shutter speed indicator is
illuminated.
Indicators in Viewfinder
]
When the shutter release button is pressed halfway
• LED will be lit in the viewfinder when the shutter release button is pressed halfway.
]
The LED will turn off af ter 10 seconds.
35
English
GF670W_TO_EFSC.indb 35 11.2.28 4:16:25 PM

1
Set the shutter speed dial to the “B” indication.
2
Shutter will remain open for as long as the shutter
release button is pressed.
Exposure Compensation
In the Apert ure Priorit y mode, you can compens ate
exposure.
The exposure can be adjusted within +/-2 range by 1/3
steps.
The exposure compensation is not available when
using the camera in the Manual Exposure Mode.
Align the “A” indication on the exposure compensation
dial to the desired value.
During the time the shutter remains open, there is no
power-drain on the batteries.
36
English
Character of light meter
This camera has the Center-Weighted-A verageMetering system.
“B” (Bulb) Setting
Exposure Setting
GF670W_TO_EFSC.indb 36 11.2.28 4:16:26 PM

When using a clip-on type small flash
All shutter speeds synchronize with flash.
Synchro Contact
When using a flash without hot shoe contacts
Connect a synchronizing cord to the synchro contact.Put the flash unit in the hot shoe contact.
37
English
Flash Photography
GF670W_TO_EFSC.indb 37 11.2.28 4:16:27 PM

Connecting Cable Release
Screw a cable release tip into the threaded hole in the
shutter release button.
38
English
GF670W_TO_EFSC.indb 38 11.2.28 4:16:27 PM

Depth of Field Indicator
0.7m 0.8m 0.9m 1.0m 1.2m 1.5m 2.0m 3.0m 5.0m 10m
A
F4.5
0.68 - 0.73 0.7 7 - 0.84 0.86 - 0 .95 0.94 - 1.0 6 1.12 - 1.30 1.37 - 1.6 7 1.76 - 2.33 2.47 - 3.84 3.6 5 - 8.04 5.6 8 - A12.83 -
A
F5.6
0.67 - 0.73 0.76 - 0. 85 0.85 - 0. 96 0.93 - 1.0 8 1.10 - 1.32 1.34 - 1.71 1.71 - 2.41 2.3 8 - 4.10 3.45 - 9.2 8 5.19 - A10.56 -
A
F8
0.66 - 0.75 0.74 - 0.87 0.83 - 0 .99 0.91 - 1.12 1.06 - 1.39 1.28 - 1.82 1.62 - 2.6 5 2.19 - 4.87 3. 05 - 14.82 4.32 - A7.43 -
A
F11
0.64 - 0.77 0.73 - 0 .90 0.8 0 - 1.03 0.88 - 1.17 1.02 - 1.47 1.22 - 1.98 1.51 - 3.0 3 1.9 9 - 6.41 2. 66 - A3.57 - A5.43 -
A
F16
0.62 - 0.81 0.70 - 0 .95 0.77 - 1.11 0.83 - 1.2 8 0.96 - 1.65 1.12 - 2.33 1.36 - 3 .99 1.73 - 13.72 2.21 - A2.79 - A3.77 -
A
F22
0.60 - 0. 86 0.67 - 1.03 0.73 - 1.22 0.78 - 1.4 3 0.89 - 1.9 3 1.03 - 2.98 1.2 2 - 6.53 1.50 - A1.84 - A2.21 - A2.78 -
A
Permissible circle of confusion : 0.05mm
39
English
When you are focusing on a given subject, objects in the foreground and background may appear out of focus depending
on the F stop in use.
For greater depth of field, the lens needs to be stopped down to a higher F stop number. To determine the exact depth of
field range at different aperture settings, the depth of field scale on the lens should be used.
For more details, please refer to the depth of field chart.
EBC FUJINON 55mm F4.5 Lens
GF670W_TO_EFSC.indb 39 11.2.28 4:16:28 PM

40
English
Type
6X7 type rangefinder camera
Film format
6X7 and 6X6 by selector switch
6X7 size : 56mm x 69mm, 6x6 size : 56mm x 56mm
Film
120/220 roll film
Frames
6X7 size : 120 - 10 shots, 220 - 20 shots
6X6 size : 120 - 12 shots, 220 - 24 shots
Lens
EBC FUJINON f=55mm 1:4.5
8 groups, 10 elements
Minimum Aperture
F22
Angle of view
6X7 size : 77°, 6X6 size : 72°
Focusing
Manually controled helicoid
Range
0.7m -
A
Finder
Coincidence type rangefinder with bright frame
Macro ratio
x 0.52
Base Length
37.2mm (effective base length - 19.3mm)
Automatic parallax correc tion
Viewfinder Frame coverage
90% at 3m
Diopter correction
Correction with an eyepiece diopter lens (using a 19mm thread)
Indicators in viewfinder
LED Exposure indication (A and Shutter speed)
]
At the Aperture Priority Auto Mode:
A and the shutter speed indicator, which shows the correct speed, are lit.
]
At the Manual exposure mode:
The shut ter speed indicator is lit when the exposure for the selected speed is correct.
The shut ter speed indicating other than the selected one blinks when the exposure is incorrect.
]
When the exposure is out of range, either “500” or “4s” blinks.
]
Batter y consumption warning : Indicator blinks rapidly.
Specifications
GF670W_TO_EFSC.indb 40 11.2.28 4:16:28 PM

41
English
Shutter opening indicator
LED light underneath the rangefinder eyepiece
Shutter
Electronically controled lens shutter
Shutter speed
B. 4s - 1/500sec.
Flash terminal
X synchronic contact and hot shoe synchronized with all shutter speed setting.
Exposure control
Center weighted average metering
Coupling range
EV1.3-18 (ISO 100)
Exposure Mode
The Aperture Priority Auto exposure, Manual exposure
AE lock : available by pressing shutter release button halfway
Exposure compensation
+/-2 by 1/3 steps
Film Speed
Manual : ISO25-3200 (by 1/3 steps)
Film Loading
Manual
Film winding
By the film advance dial
Advancing angle : Minimum 238°, Maximum 442°
Film counter
Additive type with auto reset.
Automatically switches to 120 or 220 t ype ac cording to the film type
indicated on the film pressure plate.
Battery
x1 CR2 Lithium battery
Others
Tripod socket, Cable shut ter release screwthread, Film indicator pocket
Size
178mm(W) x 109mm(H ) x 89mm(D)
Weight
1,100g (without battery)
]
The specifications and external appearance are subject to change without prior notice for the purpose of improvements.
GF670W_TO_EFSC.indb 41 11.2.28 4:16:28 PM
 Loading...