

Page 1

Voice Connection
AVM VER 6.xx Installation
and Maintenance Manual
VoiceTrak LLC
5089 C Bristol Industrial Way
Buford, GA 30518
770-945-1776
www.voicetrakvm.com
Page 2

contents
Introduction 1
Welcome to Voice Connection!................................................................................................. 1
Automated Attendant Features .................................................................................................. 1
Voice Mail Features................................................................................................................... 2
FAX on Demand........................................................................................................................ 3
V-Tree Structures.......................................................................................................................3
Hardware Installation (Rhetorex Voice Board) 4
Overview ...................................................................................................................................4
Board Installation.......................................................................................................................4
Assigning Port Addresses............................................................................................ 4
Changing Jumpers .......................................................................................................5
Installing the Board in the Computer...........................................................................5
Software Installation 6
Memory Management................................................................................................................7
Memory Management Software.................................................................................. 7
Memory Optimization Utilities ...................................................................................7
About the use of other utilities ....................................................................................8
Configuring the Voice Board Software 9
Accessing the Configure File..................................................................................................... 9
Main Menu .................................................................................................................. 9
Functions ................................................................................................................... 10
Ports........................................................................................................................... 10
Memory .....................................................................................................................11
File............................................................................................................................. 11
Symbols..................................................................................................................... 12
Resource Allocation ..................................................................................................12
Software Interrupt......................................................................................................12
Shared Memory ......................................................................................................... 12
Default Hook State ....................................................................................................12
Automatic Gain Control ............................................................................................ 13
Bus Mode ..................................................................................................................13
Hang-up Detection.....................................................................................................13
Whitenoise................................................................................................................. 13
Default Playback Gain............................................................................................... 13
Default Outdial Mode................................................................................................ 14
Default VOXLIMIT .................................................................................................. 14
Default Spikes ........................................................................................................... 14
Default Dropouts ....................................................................................................... 15
Country Dependent Defaults ..................................................................................... 15
Installation with the Telephone System 15
Connecting to the Telephone System ......................................................................................16
Programming the Telephone System....................................................................................... 16
Assigning the Extensions ..........................................................................................16
Telephone Ringing Assignments............................................................................... 16
Primary Answering Position......................................................................................16
Secondary Answering Position.................................................................................. 17
Page i
Page 3

Night Answering Position ........................................................................................17
Integration with the Telephone System ...................................................................................17
Signaling Information................................................................................................ 17
Programming the Sprint PROTEGE’ Telephone System........................................................ 18
Setting up a Voice Mail Group.................................................................................. 18
Call Handling Settings............................................................................................... 18
Identifying the Extensions......................................................................................... 18
C.O. Line Handling ...................................................................................................18
Using Voice Connection as a Recorded Announcement Device for UCD Groups... 19
Types of Mailboxes 19
Menu Mailbox ...........................................................................................................19
User Mailbox............................................................................................................. 20
Transfer Mailbox....................................................................................................... 20
Distribution Mailbox ................................................................................................. 20
Broadcast Mailbox ....................................................................................................20
Play Only Mailbox ....................................................................................................21
Audiotext Mailbox ....................................................................................................21
Directory Mailbox ..................................................................................................... 21
Combo Mailbox......................................................................................................... 21
Fax Mailbox ..............................................................................................................21
Interview Mailbox ..................................................................................................... 21
Recorded Announcement Mailbox............................................................................ 21
System Programming and Database Layout 22
Main Menu ..............................................................................................................................22
File............................................................................................................................. 22
Options ...................................................................................................................... 22
Windows.................................................................................................................... 22
Config........................................................................................................................ 23
System Programming...............................................................................................................24
System Parameters ....................................................................................................24
Mailbox Setup ...........................................................................................................27
Telephone Extensions................................................................................................ 28
Auto Attendant Greeting Setup (Sprint Protege’).....................................................29
Auto Attendant Greeting Setup (All other Systems) ................................................. 30
Stats ........................................................................................................................... 30
Mailbox Statistics ...................................................................................................... 31
Assigning and Editing Mailboxes............................................................................................ 31
Editing Mailboxes .....................................................................................................33
Fax Mailbox ..............................................................................................................34
Menu Mailbox ...........................................................................................................34
Audiotext Mailbox ....................................................................................................36
Play Only /Voice Announce Mailbox........................................................................37
User Mailbox............................................................................................................. 39
Transfer Mailbox....................................................................................................... 41
Distribution Mailbox ................................................................................................ 43
Broadcast Mailbox ....................................................................................................44
Directory Mailbox ..................................................................................................... 45
Combo Mailbox......................................................................................................... 46
Interview Mailbox ..................................................................................................... 48
Recorded Announcement Mailbox............................................................................ 49
Using the Copy Feature............................................................................................. 50
Assigning and Editing Extensions ........................................................................................... 51
Page ii
Page 4

Adding Extensions ....................................................................................................51
Deleting Extensions................................................................................................... 52
Editing Extensions..................................................................................................... 52
Recording System Greetings 54
Setting Up Interview Mailboxes .............................................................................................. 55
Recording Greetings and Questions .......................................................................... 55
Sample Greetings..................................................................................................................... 56
Menu Mailbox ...........................................................................................................56
Transfer Mailbox....................................................................................................... 56
User Mailbox............................................................................................................. 56
Assigning Main System Greetings 57
Mailbox Selection.................................................................................................................... 57
Creating and Assigning the Mailbox ....................................................................................... 59
Creating the Mailbox................................................................................................. 59
Assigning the Mailbox ..............................................................................................59
Recording the Greetings ..........................................................................................................60
Directory 60
Programming the Directory Mailbox....................................................................................... 60
Assigning Names to the Directory........................................................................................... 61
Recording Directory Information ............................................................................................61
Assigning the Directory Mailbox.............................................................................................62
USER NAMES ........................................................................................................................ 62
Maintenance Utilities 63
Re-Installing or Upgrading Software....................................................................................... 63
Database Backup .....................................................................................................................63
Examples 64
Primary Answering Position......................................................................................64
Secondary Answering Position.................................................................................. 64
Overflow Answering Position ................................................................................... 64
Multiple Applications................................................................................................65
Answering Service ....................................................................................................65
Applications 65
How to Determine the Correct Setup for Your Installation..................................................... 65
Gathering Information............................................................................................... 65
Planning the Layout...................................................................................................67
Examples .................................................................................................................................67
EXAMPLE ONE....................................................................................................... 67
EXAMPLE TWO...................................................................................................... 70
Fax on Demand 71
Fax Board Setup ......................................................................................................................72
Loading Documents to be Faxed ............................................................................................. 75
Receiving Faxed Documents from a FAX machine ................................................................ 75
Copying Files from a Floppy Disk...........................................................................................76
Page iii
Page 5

Creating Fax Mailboxes for documents copied from a Floppy Disk......................... 76
Sending Fax Documents.......................................................................................................... 77
Example one.............................................................................................................. 77
Example two.............................................................................................................. 77
Running Accucall 78
Generating the RING Tone .......................................................................................80
Generating the BUSY Tone.......................................................................................81
Generating the Reorder (Fast Busy) Tone................................................................. 81
Adding the Tones to the Filter Table......................................................................... 82
Saving the Tone File.................................................................................................. 82
User Guide 84
Introduction .............................................................................................................................84
Getting Started......................................................................................................................... 85
Configuring Your Mailbox for the First Time......................................................................... 85
About Your Password................................................................................................87
Accessing Your Mailbox ......................................................................................................... 87
Main User Menu........................................................................................................ 88
Retrieving Messages................................................................................................................ 89
Recording and Sending Messages ...........................................................................................90
Changing Your Password ........................................................................................................ 90
Changing Your Greeting.......................................................................................................... 90
To Record a New Greeting........................................................................................ 91
To Delete a New Greeting......................................................................................... 91
To Change the Active Greeting................................................................................. 91
Restoring Erased Messages ....................................................................................... 92
Managing Message Notification................................................................................ 92
Deactivating Message Notification ...........................................................................93
Activating Message Notification............................................................................... 93
Retrieving Messages when notified........................................................................... 93
Management of Distribution Lists ...........................................................................................93
Recording Your Name............................................................................................................. 94
Deleting a Broadcast Message................................................................................................. 94
SPECIAL INSTRUCTIONS FOR THE SPRINT PROTEGE'................................................ 95
Accessing Your Mailbox........................................................................................... 95
Retrieving Messages.................................................................................................. 95
To Record and Send a Message to Another Mailbox................................................ 95
To Record a Telephone Conversation ....................................................................... 95
Glossary of Terms 97
Index 101
Page iv
Page 6

Introduction
Welcome to Voice Connection!
Voice Connection is a full-featured automated attendant/voice mail system designed
to provide reliable service for small to medium-size businesses. The system utilizes
state-of-the-art voice processing technology and is expandable. Database
configuration is a snap! Not only does Voice Connection run in an easy-to-use
graphical interface to make system set-up fast, but it comes equipped with
comprehensive, easy to follow documentation, not to mention quick and friendly
customer support.
Major features include classes of mailboxes, message notification, in-band signaling
and Fax on Demand.
The following is a brief overview of Voice Connection's features. For more
information, detailed instructions about usage, etc., please consult the appropriate
chapter of the manual.
Automated Attendant Features
Automatic Greeting Change: Each port may be programmed with day
and night greetings that will automatically change at pre-programmed times.
Separate messages for each day of the week may also be recorded.
Automatic Voice Messaging: Calls transferred by the Automated
Attendant are set to be directed automatically to the voice messaging system under a
busy or no-answer condition. Callers are informed of the status and are given the
option to dial another extension or leave a message.
Call Screening: When this feature is activated, callers are prompted to state their
name after dialing the extension number. Voice Connection then calls the extension
and announces the caller to the called party. The called party has the option to
accept or reject the call. When a call is rejected, the caller is told there was no
answer and is given the option of leaving a message or dialing another extension.
Call Routing: Calls answered by Voice Connection may be routed to the correct
party or department easily and efficiently. A flexible database structure allows you
to create multiple level V-Tree menu structures. Callers with rotary phones, or
callers who elect to hold without action are automatically directed to the operator.
Directory: Callers are given the option of accessing a company directory. When
the directory is accessed, the caller is prompted to enter the first three letters of the
Introduction • 1
Page 7

name of the person they are trying to reach. Once entered, Voice Connection will
play back the name and extension number of all matches.
Separate Greetings by Port: Each port in the Voice Connection System may be
programmed to play a different greeting, allowing one system to be used by multiple
companies or departments.
User Programmable Greetings: Main system greetings may be recorded by the
user through any telephone. Multiple greetings may be recorded and easily activated
to handle special circumstances.
Voice Mail Features
Automatic Station Login: Depending on the telephone system, users may be
automatically connected to their mailboxes when calling from their extensions.
Beeper Notification: Voice Connection may be programmed to call and activate a
beeper when messages are present in the mailbox. This feature is particularly useful
for after-hours service applications.
Broadcast Message: Selected users may be given the authority to leave
Broadcast Messages. When a broadcast message is recorded, the message is
automatically played to all system users when they access their mailbox, making it
easy to keep an entire office informed and up to date.
Call Hold: Callers reaching a busy extension are given the option to hold. The
number and length of time the callers are allowed to hold are programmable.
Class of Mailbox: There are ten different types of mailboxes to choose from,
giving you the flexibility to customize your Voice Connection System for any
application.
Distribution Lists: Each user may assign up to five lists of 48 people each,
allowing the same message to be distributed automatically without recording a
separate message for each party.
Guest Mailboxes: Mailboxes may be assigned to clients or guests on a temporary
basis.
Message Forwarding: Retrieved messages may be forwarded to another mailbox,
allowing misdirected messages to be easily handled.
Message Only Mailboxes: Employees located in remote locations may be
assigned mailboxes allowing them to receive calls and maintain a presence at the
main office. Message Only mailboxes may also be assigned to selected clients or
vendors.
Message Waiting Light Activation: With many telephone systems, Voice
Connection will light the message-waiting lamp on the telephone when messages are
present in the user's mailbox.
Message Notification: Users may program their mailbox to call any telephone,
anywhere to notify them of messages.
Multiple Greetings: Up to three greetings may be recorded for any mailbox, any
one of which may be active at any time. The active greeting may be changed from
any telephone, anywhere.
Introduction • 2
Page 8

Multiple Contacts per Call: Users are given the option of dialing another
extension or mailbox after retrieving or leaving messages, allowing them to conduct
all of their business in the system with just one telephone call.
New / Saved Messages: Messages stored in the mailbox are automatically
classified as new or saved. When a message is retrieved, the user is given the option
to save or erase the message. When accessing their mailbox, users may choose to
retrieve new, saved, or all messages.
Password Security: Information in mailboxes is protected by a user-defined
password. The password may be changed at any time from any location.
Personal Greetings: Each mailbox user may record their own personal greeting
that will be played to callers when their extension is not answered or busy.
Play Only Mailbox: Mailboxes may be assigned as “Play Only”. This feature will
allow the user to play information to the caller but will not allow the caller to leave a
message.
Restore Erased Messages: Messages that are accidentally deleted may be
rescued during the calling session.
Rewind, Hold and Fast Forward: While listening to messages, users may
rewind, fast-forward or skip to the end of the message. Messages may also be
paused by the user, in case they are interrupted during retrieval .
Service Bureau: Voice Connection may be configured as a service bureau or
answering service with personal greetings for every user.
Skip Messages: While listening to messages, the user has the option to skip the
current message and go on to the next one.
Variable Length Password: Users may assign a private password for their
mailbox from one to four digits in length.
FAX on Demand
Information in text or graphic format may be stored in the Voice Connection System
and faxed to callers at their request.
With this feature, callers may direct themselves to receive product information,
shipping schedules, forms, consumer information...... The list is endless, and finding
access to the right information is easy with Voice Connection's V-Tree structure.
The automating of routine requests for information will have an immediate and
positive effect on cost savings and productivity, not to mention the improved image
and high level of customer service it will provide for any organization.
V-Tree Structures
V-Trees allow databases to be programmed so that information can be directed or
linked from one level to another without limitation. Voice Connection uses this
technology to allow the customer to tailor their system to their needs, create precise
call routing functions.
Introduction • 3
Page 9

Hardware Installation (Rhetorex Voice Board)
Overview
If you have purchased a turnkey
system, no hardware installation is
necessary.
Any modifications to a turnkey
system will risk voiding your
warranty.
Your Voice Connection System has been shipped with a voice board manufactured
by Rhetorex, Inc. The voice board acts as the interface between the telephone lines
and the Voice Connection system. Calls made to your voice mail system are
answered by the voice boards, which then signal the call processing system that a
call has been received. The call processing system then plays the appropriate
greeting message to the caller. The voice board supplies the tones for outgoing calls.
Call progress is also monitored by the voice board allowing it to detect ringing, busy
and disconnect signals from the telephone lines.
The voice boards are configured in both two and four port configurations, with each
port connected to one telephone line. The boards utilize industry-standard RJ14
connectors, allowing two telephone lines for each connector.
Follow steps outlined in this section when installing new voice boards or replacing
defective boards.
To order additional or replacement boards, call your local Voice Connection dealer.
Board Installation
Assigning Port Addresses
Voice boards are assigned addresses allowing them to communicate with the
computer. Each board installed in the system must be assigned a different address.
The boards are shipped from the factory with a default configuration for address 300.
The address may be changed, which means you must select the correct address for
the board you are installing and change the jumpers on that board to reflect the new
address.
The following table contains the correct address settings for the boards in your Voice
Connection System. If you are changing the address on the board, you are installing
select the correct address from the table and then refer to the section on changing
jumpers.
Hardware Installation (Rhetorex Voice Board) • 4
Page 10

Changing Jumpers
Referring to the figure below, locate the address jumpers on the voice board.
Refer to the above figures to correctly configure the jumpers for each board.
Connect the pins vertically with a jumper as shown.
Installing the Board in the Computer
Before installing the voice board in the computer make sure that the power is turned
off and that the power cord has been unplugged from the back of the computer.
1. Remove the screws from the back of the computer.
2. Carefully remove the cover.
3. Locate a free bus slot that has an ISA (Industry Standard Architecture) or EISA
(Enhanced Industry Standard Architecture) edge connector.
4. Carefully seat the board into the slot and fasten it into the computer. Make sure
the board is firmly seated and fastened. If you have any doubts as to the firmness of
Hardware Installation (Rhetorex Voice Board) • 5
Page 11

the connection, DO NOT TURN THE POWER ON. If necessary, remove the card
and re-seat it before continuing.
5. Replace the cover, the screws and all cords.
Note: When additional boards are added you MUST set the jumpers on the new
board and add the address to the configure file.
Software Installation
NOTE: If your Voice Connection system was purchased with all hardware installed
then the software has been pre-loaded on the hard drive and this section may be
skipped. If you have any questions about the configuration of this software, or wish
to change it in any way, please read this section first. ONLY MAKE CHANGES TO
THE SOFTWARE OR HARDWARE AFTER YOU HAVE READ THIS
SECTION.
If you have purchased a software or software and voice board package then you will
need to install the Voice Connection software on your hard drive. The software
installation should only be done after all hardware and voice boards have been
installed in the computer.
1. If the system does not have MS-DOS 6.22 installed then it must be installed
before proceeding. Install MS-DOS in a separate directory named DOS. Please
refer to the documentation received with your DOS software for proper installation.
2. Place the Voice Connection software disk 1 into the floppy drive.
3. From the root directory of the C: drive type A:\INSTALL.
4. The software will load automatically onto your hard drive. Follow the prompts
on the screen and change disks as necessary.
5. When all of the disks have been loaded, restart the computer by pressing the reset
button or turning power off and back on again.
6. The system will restart and the main screen of Voice Connection will be
displayed.
7. The database programming may now be entered.
Software Installation • 6
Page 12

Memory Management
If you have purchased a turnkey system the memory management software has been
installed and configured for your system. You do not need to make ANY changes in
this configuration.
If you are purchasing a kit, you must have a 486 or better computer (IBM-
compatible), a minimum of four (4) megabytes of RAM plus one (1) additional
megabyte for each additional port (i.e., an eight port system would need a minimum
of eight megabytes), and a hard drive with a minimum of 250 megabytes of free
space.
Your Voice Connection software is shipped with a default config.sys and
autoexec.bat file. These files will replace your existing config.sys and autoexec.bat
files when the software is installed. Your old config.sys and autoexec.bat files are
renamed to config.old and autoexec.old during the installation process.
Memory Management Software
Voice Connection requires a memory management software program to properly
allocate and manage the expanded memory installed in the computer. The default
configuration uses the memory manager included with MS-DOS Version 6.22. The
majority of computer systems available on the market should work with this
configuration. For increased performance, we recommend the memory management
software from Quarterdeck Office Systems, Inc. We have found Qemm386 versions
6 and up to work very well with Voice Connection.
Memory Optimization Utilities
Most memory management software programs include utilities to optimize DOS
memory. These programs place certain TSR programs and device drivers into upper
memory areas, thereby freeing more conventional memory for DOS based
applications. Though running these utilities will enhance the performance of your
Voice Connection system, there are certain precautions that should be taken to
prevent conflicts. Listed below are several recommendations for both Microsoft's
memory optimization utility, Memmaker, and Quarterdeck's Qemm386 Optimize
program.
MemMaker
1. Run MemMaker in the custom installation mode.
2. Select yes when you are prompted to specify if your programs use expanded
memory.
3. Do not select the 'High Scan' option.
4. Do not select the 'Scan Aggressively' option.
5. Do not select the 'Use Monochrome Region' option.
6. Run the MemMaker program.
7. After MemMaker has been run, use the DOS Edit command to view your
config.sys file. You will see a line in the file that begins
DEVICE=C:\DOS\EMM386.EXE
Software Installation • 7
Page 13

p
MAKE SURE THAT THIS LINE CONTAINS THE PARAMETERS
X=D000-DFFF
IF THIS PARAMETER IS NOT LISTED, THEN USE THE DOS EDITOR TO
ENTER IT. IF THIS LINE CONTAINS THE WORD "HIGHSCAN" THEN USE
THE DOS EDITOR TO DELETE THIS WORD.
8. Save the changes and exit the DOS editor.
9. Restart the computer. Voice Connection will load.
10. If Voice Connection does not start, review step 7, and rerun MemMaker.
QEMM386
1. Run the Optimize program. You may run the program in the express mode.
2. Do NOT activate the Stealth option.
3. After Optimize has been run, use the DOS edit command to view your config.sys
file. You will see a line in the file that begins
DEVICE=C:\QEMM\QEMM386.SYS
MAKE SURE THAT THIS LINE CONTAINS THE PARAMETERS
The installation of other Utility
rograms may void your warranty.
X=D000-DFFF NOVIDEOFILL BIX:Y BE:N
IF THESE PARAMETERS ARE NOT LISTED, USE THE DOS EDITOR TO
ENTER THEM.
4. QEMM386 version 7.X will add the following line to your config.sys file:
SHELL=C:\QEMM386\Loadhi.com /r:2 /res=XXXX /sqf C:\command.com C:\
/P
or
SHELL=C:\QEMM386\QEMM386.COM SQUEEZE....etc.
Remove these lines from your config.sys file if they appear.
5. Save the changes and exit the DOS editor.
6. Restart the computer. Voice Connection will load.
7. If Voice Connection does not start, review step 3 and rerun Optimize.
Note: Any other changes, modification or replacement of the default
AUTOEXEC.BAT and CONFIG.SYS files that come with Voice Connection will
result in degraded performance or possibly cause Voice Connection to malfunction
entirely. It is recommended that once the above changes have been made and Voice
Connection is up and running, the startup files be left alone.
About the use of other utilities
Please note that Voice Connection has already provided for disk caching. Therefore,
the use of another disk caching utility such as SmartDrive will not only degrade the
performance of your Voice Connection system but may cause it to become unstable
under heavy use. UNDER NO CIRCUMSTANCES CAN ANY DISK
COMPRESSION PROGRAM SUCH AS DRIVE SPACE BE INSTALLED.
Software Installation • 8
Page 14

Configuring the Voice Board Software
The Rhetorex voice board supplied with Voice Connection accesses a configuration
file that defines the port addresses and initialization parameters for all of the boards
in the system. This file is automatically installed during the software installation,
contains default settings and has been programmed for one voice board. The default
settings will work with the great majority of telephone systems. However, some fine
tuning may be necessary. This section is intended as a reference when updating is
necessary.
Accessing the Configure File
To load the configure file you must be at the DOS prompt in the Voicecon directory.
If the Voice Connection system is currently running, exit the program from the File
option on the main menu bar. If you are currently at a DOS prompt enter the
Voicecon directory by typing cd \voicecon.
Type configur.
The configur program will load and the Main Menu will be displayed.
Main Menu
The main menu screen is an informational screen that displays the initialization
parameters and I/O port addresses for all of the voice boards. The main menu screen
is divided into four windows that display information.
Configuring the Voice Board Software • 9
Page 15

SYMBOLS Displays system resource allocation parameters and channel
initialization.
MEMORY Displays memory allocation assignments.
FILE Displays PCPM tone and filter table assignments.
PORTS Displays the Rhetorex board port assignments.
Functions
A summary of the Main Menu functions is presented below. The sections that
follow present each function in detail.
SYMBOLS This function allows you to alter system resource assignments and
channel initialization parameters. F5 selects the Symbols screen.
MEMORY This function allows you to define and edit the memory allocation
assignments. F3 selects the Memory screen.
FILE This function allows you to define and edit the PCPM tone and filter table
assignments. F4 selects the Port screen.
VOICE RECOG This function allows you to define and edit the Voice Recognition
assignments. F7 selects the Voice Recognition screen.
EXIT The EXIT function terminates the CONFIGUR utility and returns you to the
DOS command line. F10 selects the Exit function.
Before exiting, you are prompted to save the configuration file. If you respond with
‘Yes’ the CONFIG file in the current directory is overwritten with the one just made.
If a CONFIG file does not exist, one is created. A ‘No’ response returns you to the
DOS command line without updating the CONFIG file.
Ports
The Rhetorex device driver requires that each Rhetorex board be assigned a unique
I/O port address and that the address of each board is defined in the CONFIG file.
The ports function allows you to edit up to 16 Rhetorex I/O port assignments.
Use the up and down arrow key to position the cursor on a port assignment to edit.
Enter the hexadecimal I/O port address of the Rhetorex board. Refer to Assigning
Port Addresses in the Board installation section for the proper address of each board
in the Voice Connection system.
Configuring the Voice Board Software • 10
Page 16

Memory
The Rhetorex device driver requires a block of memory in which to build a disk
buffer pool. The memory is normally assigned when the driver is loaded. This
function allows you to edit the disk buffer memory pool assignment.
The disk buffer pool should be allocated from EMS memory. The amount of
memory assigned to the buffer pool depends on the number of channels configured
in the system, the speed of the disk subsystem (including caching), the clock rate of
the CPU and the disk requirements of the application for logging statistics, databases
accesses, etc.
The maximum assignable buffer pool is 64K per channel. Memory allocated from
EMS memory is assignable in increments of 16K per channel, up to a maximum of
4096K. Allowing for increments of 16K times 4 ports would give you this range of
valid values: 64, 128, 192, or 256. Example: For a Four-Port system, at 16K per
port, the EMS Memory disk buffer pool would be set to a minimum of 64K (4 x
16K) or a maximum of 256K (4 x 64K). An Eight-Port system would have valid
values in the range of 128K to 512K, i.e., 128K, 256K, 384K, or 512K. Barring
unusual circumstances, the disk buffer pool may safely be increased to its
maximum.
Note: DOS memory should NEVER be allocated for the disk buffer pool. Leave
the REALMEMORY= entry in the Config file defaulted at zero (0).
Use the up and down arrow key to position the cursor on the memory assignment to
edit. Enter the size of the buffer pool in kilobytes (KB).
File
The Rhetorex device driver loads with a default PCPM tone and filter table for call
progress monitoring. The file function allows you to replace the Rhetorex default
tables with tables created from the AccuCall utility. Refer to the section on AccuCall
or to Appendix C. for details on running the AccuCall program.
Enter the file name of the Accucall utility tone and filter table. If the file does not
reside in the same directory with RHETOREX.EXE and VOICECNF.EXE, be sure
to specify the full path name.
Before returning to the Main Menu, this function verifies that the specified file
exists. If the file does not exist, a warning message is displayed. You can override
the warning message by responding with a "Yes" at the prompt.
Configuring the Voice Board Software • 11
Page 17

Assigning a tone and filter table file name creates entries in the CONFIG file for the
symbols TONETABLE= and FILTERTABLE=.
Symbols
The SYMBOLS function allows you to assign system resource allocation parameters
and channel initialization defaults.
Resource Allocation
The Rhetorex device driver (RHETDRV.EXE) requires five resources from the host
system:
1. Hardware interrupt level. This is assigned by the application during system
initialization.
2. Disk buffer pool. This is allocated through the MEMORY function.
3. I/O port address which is described in the PORTS function.
4. One software interrupt.
5. 4KB of unused address space for shared memory.
Software Interrupt
The software interrupt has been assigned in the Voice Connection program as 6e.
Do NOT change this setting. Changing this setting will cause Voice Connection
to malfunction.
Shared Memory
The Rhetorex device driver communicates with the voice board through shared or
dualported memory. The shared memory is a 4K block of memory that resides on
the Rhetorex board but appears in the host memory address space.
By default, the Rhetorex device driver uses address D000:0000. If this address space
is not available, assign an alternate address space.
Move the cursor to the display line that reads:
The default RDSP shared memory (DUALPORT) segment is d000:0000
This creates a CONFIG file entry for the symbol DUALPORT=. The shared
memory address is assignable on a 4K boundary between 80000 and FF000.
Default Hook State
By default, the Rhetorex device driver puts all telephone lines onhook when the
driver is loaded and when the system is halted. If you want the default state of the
telephone line to be offhook, position the cursor on the display line that reads.
The default telephone line HOOK state is ONHOOK
Press the spacebar to toggle the state to OFFHOOK. This sets the CONFIG file
symbol HOOK= to OFF.
Configuring the Voice Board Software • 12
Page 18

Automatic Gain Control
By default, Automatic Gain Control (AGC) is applied to the incoming audio signal.
If you do not want the incoming signal amplified by the Rhetorex device driver,
position the cursor on the display line that reads.
The default AGC state is ENABLED
Press the spacebar to toggle the state to DISABLED. This sets the symbol AGC= to
DISABLED.
Bus Mode
By default the Rhetorex hardware operates in 8-bit AT bus mode. For compatibility
with devices that operate in 16-bit bus mode, position the cursor on the display line
that reads.
The default AT bus mode is 8-BIT MODE
Press the spacebar to toggle the state to 16-BIT MODE.
Hang-up Detection
The Rhetorex device driver performs call progress monitoring on outbound
telephone calls by comparing the detected call progression signals to defined call
progression tones in the PCPM tone and filter tables. The Rhetorex device driver
can perform limited call progress monitoring during record, playback and DTMF
functions as well. Normally, call progression signals detected during these functions
signifies that a caller has disconnected. Call progression tones that indicate caller
disconnect are specified as type Terminating in the PCPM tone table.
By default the Rhetorex device driver looks for terminating type call progression
signals during record, playback and DTMF functions and terminates the call. To
disable this feature, position the cursor on the display line that reads.
The default PCPM hang-up detection state is ENABLED
Press the spacebar to toggle the state to DISABLED. This sets the symbol
HANGUP= to DISABLED.
Whitenoise
When pause compression is enabled, recorded silence is encoded by a pause
signature. During playback, this pause signature is expanded to recreate silence. By
default, expanded pause is played as a low level (-42db) of whitenoise. This
provides a more natural reproduction of the telephone line. However, the Rhetorex
device driver can expand pause as true silence (no signal).
To expand pause as silence, position the cursor on the display line that reads:
The default silence expansion state is WHITENOISE
Press the spacebar to toggle the state to SILENCE. This sets WHITENOISE= to
DISABLED.
Default Playback Gain
Normally the Rhetorex device driver plays back signals at the recorded level.
However, the Rhetorex device driver can amplify the recorded signal to play back
Configuring the Voice Board Software • 13
Page 19

louder or quieter than the original signal. The playback level is encoded by a
number between -8 and 8 where 0 is the normal level, -8 is the quietest level and 8 is
the loudest level. The default is 0.
To change the default playback gain, position the cursor on the display line that
reads:
The default playback gain setting is 0
Enter a playback level between -8 and 8. This sets the symbol GAIN= to that
playback level.
Default Outdial Mode
The Rhetorex device driver call progress monitoring can be optimized for detection
of VOICE or SIGNAL. Auto attendant and voice mail applications would normally
optimize for voice. This provides the quickest detection of call answered. Random
outdial applications should optimize for signal. This provides a longer signal
analysis interval to allow for a variety of call progression tones on the same call such
as ringback followed by intercept tones.
To change the default Rhetorex optimization, position the cursor on the display line
that reads:
The OUTDIAL function is optimized for detection of VOICE
Press the spacebar to toggle the state to SIGNAL. This sets the symbol OUTDIAL=
to SIGNAL.
When outdial is optimized for voice, then voice on the line can appear as a series of
spikes, dropouts and frequency shifts during call monitoring. The call monitoring
functions use these characteristics to report an answered call.
Default VOXLIMIT
VOXLIMIT provides a maximum threshold for undefined cadences. Call progress
monitoring continually matches the cadence of the current cycle with previous
cycles. If more than VOXLIMIT number of unmatched cycles are detected, the call
is presumed answered. The default value for VOXLIMIT is three.
To change the default VOXLIMIT, position the cursor on the display line that reads:
The default VOXLIMIT IS 3
Enter a limit value between 1 and 255. This sets the symbol VOXLIMIT= to that
limit value.
Default Spikes
SPIKES provides a maximum threshold for frequency shifts. During call
monitoring, voice sometimes trigger a filter detection. As more filters are enabled,
the number of different filter detections increases, without established cadences. If
more than SPIKES number of unestablished frequency changes are detected, the call
is presumed answered. The default value for SPIKES is six (6).
To change the default SPIKES, position the cursor on the display line that reads:
The default SPIKES is 6
Enter a limit value between 1 and 255. This sets the symbol SPIKES = to that limit
value.
Configuring the Voice Board Software • 14
Page 20

Default Dropouts
DROPOUTS provides a maximum threshold for lost cadences. During call
monitoring, voice appears as a number of short cadence dropouts (silence intervals)
on the energy detectors. If more than DROPOUTS number of lost cadence interval
are detected, the call is presumed answered. The default value for DROPOUTS is
six (6).
To change the default DROPOUTS, position the cursor on the display line that reads:
The default DROPOUTS is 6
Enter a limit value between 1 and 255. This sets the symbol DROPOUTS= to that
limit value.
Country Dependent Defaults
Regulations governing the timing and levels of signaling on telephone lines vary
from country to country. This requires different initialization defaults for some of
the Global Parameters that control signals on the telephone interface.
The standard Global Parameter defaults are initialized to values for the USA. To
change the Global Parameter defaults for the UK or JAPAN, position the cursor on
the display that reads:
The default HOST parameters are initialized for USA
Press the spacebar to toggle the state to USA, UK, or JAPAN. This sets the symbol
HOST=.
Installation with the Telephone System
Voice Connection is designed to work with telephone systems that are capable of
supporting industry-standard touch-tone telephones (2500 set), such as the ones
which, more likely than not, are installed in your home. Incoming lines from the
telephone company central office may also be plugged directly into the Voice
Connection system.
If you are installing Voice Connection with a business telephone system then the
following conditions must be met:
1. The telephone system must be capable of supporting industry standard 2500
telephones, either directly or through OPX circuits.
Installation with the Telephone System • 15
Page 21

s
2. The telephone system must be capable of placing a call on hold from the 2500 set
by momentarily depressing the hook switch or flash button.
3. After placing the call on hold, the telephone system must be able to transfer the
call to another extension by dialing the extension number.
4. If the Voice Connection system is to be used to direct callers (day or night) then
the telephone system must be capable of directing the incoming calls to ring on the
extensions assigned to the Voice Connection system.
5. The telephone system must have the ability of passing DTMF (touch-tone) signals
on internal calls.
Connecting to the Telephone System
Connections are made from the Voice Connection system to the telephone system
through standard RJ14 jacks. The voice boards are available in two and four port
configurations and have either one or two telephone connectors on the back of the
card. Each connector supports two ports. Plug the RJ14 from the telephone system
into one of these connectors. Repeat this operation for each connector on the Voice
Connection system.
Programming the Telephone System
Assigning the Extensions
Have the telephone system vendor provide the following from the telephone system.
1. Assign the extensions that will be connected to the Voice Connection system to
the proper extension ports (ports capable of supporting standard 2500 sets or OPX
circuits).
If your telephone system allows, make
ure that the extensions and UCD/Hunt
group is designated as a voice mail
group. This will help insure proper
integration signaling.
2. Assign the extensions to a linear hunt group. If the Voice Connection system is
to answer for more than one company or department, then a separate extension hunt
group will be needed for each application.
3. Assign the central office lines that are to be answered by the Voice Connection
system to ring at the extensions assigned to the Voice Connection system. Refer to
the section on Telephone Ringing Assignments, below.
Telephone Ringing Assignments
Voice Connection may be used to answer and direct calls to other extensions in the
telephone system. Their ringing assignments will vary from one application to
another.
Primary Answering Position
When Voice Connection is assigned a primary answering position, the telephone
system is programmed to direct all incoming calls to the Voice Connection System.
1. Program all of the incoming central office lines to ring the first extension
assigned to the hunt group.
Installation with the Telephone System • 16
Page 22

2. The DIL (Direct in Line), DID (Direct in Dial) or flexible ringing assignment
features in the telephone system are used to direct the ringing.
Secondary Answering Position
When assigned as a secondary answering position, all incoming calls are answered
by the attendant and then transferred to the proper extension in the telephone system.
Callers that wish to leave a message in the voice mail system are transferred to the
proper mailbox by the attendant. A separate telephone number may be assigned to
ring directly into Voice Connection so that a system user may retrieve their messages
directly. Voice Connection can also be used as an overflow answering position
when the operator is busy with another call.
1. Assign the telephone extensions connected to the Voice Connection system to the
linear hunt group previously created
2. Direct any central office lines that are to ring directly into Voice Connection to
ring the first extension in this group. Direct the remaining lines to ring the operator's
telephone.
3. The DIL (Direct in Line), DID (Direct in Dial) or flexible ringing assignment
features in the telephone system are used to direct the ringing.
4. If the Voice Connection is to be utilized as an overflow answering position,
program the central office lines to ring the first extension in the hunt group using the
delayed ringing feature in the telephone system.
Night Answering Position
The telephone system may be programmed to direct all calls to the Voice Connection
system at night and/or on weekends or holidays.
Integration with the Telephone System
The Voice connection system is capable of full integration with telephone systems
that provide in-band signaling. Full integration occurs when a call that has been
directed to an extension in the telephone system is automatically forwarded to the
Voice Connection system when the extension is busy or does not answer. When the
call is transferred to Voice Connection information is sent to tell the Voice
Connection system where the call came from. The Voice Connection system will
then automatically direct the call to the proper voice mailbox and the caller will hear
the personal greeting. Once a message has been recorded, the Voice Connection
system will light a message waiting light if provided.
In-band signaling is the ability of the telephone system to pass touch-tone
information with the call.
Signaling Information
Extension
Voice Connection will direct a call to a mailbox if the telephone system sends a
DTMF tone before or after the extension number from where the call was
transferred. For this feature to work properly the user’s mailbox number must be the
same as the extension number. Enter the digit string sent by your telephone system
Installation with the Telephone System • 17
Page 23

in the Auto Attendant System Parameters database screen. Refer to the System
Programming and Database Layout section of this manual.
Message Waiting Lamps
Voice Connection will activate and deactivate message waiting lights on telephone
sets if so equipped. Enter the activation and deactivation code in the database of the
Voice Connection system.
Programming the Sprint PROTEGE’ Telephone System
If you are installing Voice Connection with the Sprint PROTEGE’ telephone system,
the following program settings are recommended for full integration.
Setting up a Voice Mail Group
Setup a UCD group and program it with the following settings:
1. Set the Attribute for Integrated VM.
2. Identify the Member extension numbers that you will use in the Voice Mail UCD
group.
3. Select Linear Hunting.
4. You may leave the timers at their default settings or change them if necessary for
your application.
Call Handling Settings
Make the following changes in the Call Handling programming.
1. In Category 2 change the call abandon time for both active and held calls to
reflect the CPC signal time (if provided) sent by the C.O. in your area. This setting
will normally be between 300 and 600 milliseconds.
2. In Category 2 set the VM dialing ratio to 120 for both the Tone Time and the IntDgt Time.
3. In Voice Mail Function set the Prefix and Suffix Codes for both Call Transfer
and ICM/VM Button to blank (no entries).
4. In Voice Mail Function set the Disconnect Code to three stars (***).
Identifying the Extensions.
In the Extension section under Category 2 Port Type, set the extensions identified in
your Voice Mail UCD group to V.M.
C.O. Line Handling
Make the following changes in the C.O. Line programming section.
1. In Category 1, set Call Abandon to yes for all C.O. lines in your telephone
system.
2. In Ringing Position direct all C.O. lines to ring at the voice mail UCD hunt group
directory number. (UCD group 1 is 430). This will direct all incoming calls to be
Installation with the Telephone System • 18
Page 24

answered by the voice mail system. If you wish to use the voice mail as a secondary
answering position, then you must direct calls to the voice mail UCD group directory
number through alternate ringing position in the Ringing Position section of the
Protege' programming. If you wish the voice mail to answer only at night then
program the night ring to direct the calls to the voice mail UCD group directory
number.
Using Voice Connection as a Recorded Announcement Device for UCD Groups
The Sprint PROTEGE’ can direct calls to the Voice Mail system while the call is in
que for a UCD station. Each UCD group has two announcements available. If you
want to take advantage of this feature you must program the Overflow Destination in
the UCD group programming to direct the call to the voice mail UCD group
directory number. (UCD group 1 is 430.)
The PROTEGE’ will send a recorded announcement number to the Voice
Connection system when the overflow timer expires. Each of the 24 UCD groups
has two announcement numbers associated with the group. One for Overflow 1 and
one for Overflow 2. UCD group 1 sends 00 for Overflow 1 and 24 for Overflow 2.
UCD group 2 sends 01 for Overflow 1 and 25 for Overflow 2. This pattern will
continue all of the way to UCD group 24 which will send 23 for Overflow 1 and 48
for Overflow 2.
In the Voice Connection system you must program a Play Only/Voice Announce
mailbox for each recorded announcement number that will be sent by the
PROTEGE’ system. After creating the mailboxes, record the announcements that
you wish the caller to hear.
Once you have set up this feature, callers in que for a UCD station will be directed to
the appropriate announcement and returned to their place in the que after the
announcement is played.
Types of Mailboxes
The Voice Connection System allows the user to set up the database by choosing
mailbox types. There are ten types of mailboxes available and they may be linked to
provide complete flexibility in system design.
A complete explanation of the types and examples for their use follows:
Menu Mailbox
Menu mailboxes are designed to allow callers to make choices and select a choice
using a single digit. When a menu mailbox is accessed the caller will hear a greeting
Types of Mailboxes • 19
Page 25

listing the choices and the digit selection for each. The system manager programs
each choice to direct the caller to an extension or another mailbox.
Menu mailboxes may be used for initial greetings thereby giving the caller the option
of dialing “1” for sales, “2” for service, etc. Menu mailboxes may be linked to other
menu mailboxes, allowing the creation of elaborate tree structures. They may also
be linked to other types of mailboxes to allow the caller to receive information, leave
messages or dial extensions.
User Mailbox
User mailboxes are designed to play a greeting and take messages. This is the type
of mailbox that is assigned to each employee or system user. The mailbox is
generally assigned to an extension and the user's personal greeting is played when
the extension is busy or not answered. User mailboxes may also be assigned
separately and used by employees, vendors or customers who do not have an office
or telephone.
Each user mailbox has three greetings. Any greeting may be activated at any time by
the mailbox owner. Message notification to internal, external and beeper numbers is
provided, and in addition, each user mailbox may have five distribution lists of ten
mailboxes per list. The mailbox owner may also be given the option to leave a
broadcast message that will be delivered to all mailboxes on the system.
Transfer Mailbox
Transfer mailboxes are used to transfer callers directly to extensions. A greeting is
played and the mailbox waits for the caller to enter a pre-programmed number of
digits. Calls may be directed to extensions or other mailboxes. A transfer mailbox
may also be used for the main system greeting , when the callers are not given a
menu of choices but are allowed to directly dial an extension.
Distribution Mailbox
These mailboxes are assigned to owners of user mailboxes who wish to establish
distribution lists. Each distribution mailbox allows the user to enter a message that
will automatically be distributed to 48 other mailboxes.
Distribution mailboxes are commonly used by managers and department heads to
deliver the same message to multiple recipients without calling each individual
mailbox.
Broadcast Mailbox
A broadcast mailbox is similar to a distribution mailbox. However, messages that
are recorded in this mailbox are distributed to all user mailboxes in the system. Only
one broadcast mailbox per system is required.
Security is provided for accessing this mailbox. The broadcast mailbox is activated
through a user mailbox and that user must be assigned this privilege by the system
administrator.
Types of Mailboxes • 20
Page 26

Play Only Mailbox
Play only mailboxes are used to provide information to callers. Callers are not
allowed to leave messages but may be given the option to dial other extensions or
mailboxes.
Audiotext Mailbox
Audiotext mailboxes are traditionally used to provide extensive information to
callers. These mailboxes may be programmed to accept a different number of digits
than the transfer mailbox. This is particularly useful in applications that require the
caller to enter a ticket number to receive information about car repairs, disposition of
placed orders, elaborate tree structures, etc. Audiotext mailboxes do not allow
messages to be recorded.
Directory Mailbox
Directory mailboxes are used to allow the caller access to a system or department
directory. A directory mailbox allows the caller to enter the first three digits of a
name. The caller is then played a selection of names that match the letters entered
and the caller may then dial the extension.
Combo Mailbox
Combo mailboxes are a combination of a transfer mailbox and a menu mailbox.
This type of mailbox is normally used for main greetings and allows callers to enter
an extension number or select a menu item.
Fax Mailbox
Fax mailboxes are used to list the location of the file that will be faxed to the caller
when the mailbox is selected.
Interview Mailbox
Interview mailboxes allow you to ask the caller a series of questions and record their
answers. The answers may then be played back later. This feature is also referred to
as 'Forms' in some voice mail systems. Voice Connection can record up to 50
questions in an interview mailbox.
Recorded Announcement Mailbox
These mailboxes can also be used for recorded announcement messages for callers
waiting to be answered in a UCD group on the Protege’ or other telephone systems
that allow use of this feature. Recorded announcement mailboxes function the same
as Play Only mailboxes except no DTMF entry is allowed.
All mailboxes share some common features. Every mailbox is password protected.
Mailboxes that play greetings allow up to three greetings to be recorded. The length
of the greeting and the amount of time for message recording is controlled by each
individual mailbox. As an option callers may be allowed to dial other extensions or
mailboxes from each mailbox type.
Please refer to the programming section in this manual for complete details on how
to assign and program these mailboxes.
Types of Mailboxes • 21
Page 27

System Programming and Database Layout
This section outlines the programming and operation for the Voice Connection
system. To use the section properly, refer to the picture of the screen you are
programming and enter the information in each field referring to the explanations
given.
Main Menu
Note: This option is not available
until the SYSTEM PASSWORD has
been entered. ( click the mouse on
Password for system access under
config on the main menu. The Default
Password is "0".
The Main Menu is the initial screen that appears when Voice Connection is started.
All system programming and information begins with this screen. Placing the mouse
on each item will access the sub-menu for that item. The sections that follow detail
each item in the sub-menu and also contain detailed information about the associated
data entry screens.
File
About contains information about Voice Connection.
Quit Allows you to exit the Voice Connection program and access the Maintenance
Menu.
Options
Virtual Mem. Displays information about system memory. Used by technical
support.
Windows
Tile Displays a separate window for each voice port. The information displayed
within this window is used by technical support. This window configuration should
not be used when Voice Connection is in the normal operating mode.
System Programming and Database Layout • 22
Page 28

Icon Displays an icon for each port at the bottom of the screen. Pictures on the icon
will change from time to time. This window configuration should be displayed
under normal operating conditions.
Config
Note: No changes are permitted until the System Password has been Entered. The
default Password is "0". Click the mouse on Password for system access. The
following screen will appear.
Enter the Password and then click on Allow Access to enable system programming.
System Parameters Accesses the screen for system voice mail parameters. These
parameters are system wide settings that affect all mailboxes and their operation.
Mailbox Setup Accesses the screen for creating and editing mailboxes in the
system.
Telephone Extensions Access the screen for assigning and editing telephone
extension numbers.
Auto Attendant Greeting Setup Assigns the mailbox that will play the main
greeting when calls are answered by Voice Connection.
System Programming and Database Layout • 23
Page 29

System Programming
System Parameters
Note: Voice Connection is available pre-programmed for many popular telephone
systems. If you have specified a system, this information may have already been
entered.
Rings to Answer Enter the number of times the telephone lines connected to Voice
Connection will ring before the Automated Attendant answers the call.
Rings for No Answer Enter the number of times that an individual extension will
ring when Voice Connection performs a supervised transfer. When this number of
rings is reached, Voice Connection will reconnect to the caller and play the
appropriate greeting for the mailbox.
Nb. Auto Att. Lines Enter the number of voice ports present in your Voice
Connection system.
Operator’s Extension Enter the extension number for the telephone that you want
calls transferred to when a caller presses “0” for the operator. This may be any
extension in your telephone system.
System Password Enter a four digit number that will be used by the system
administrator to access and change system mailboxes. The number entered must
be followed by the pound (#) key. The default system password is 0#.
Nbr. Of Times to Hold Enter the number of times that you will allow callers to
hold for extensions that are busy. The call hold option is controlled on an individual
extension basis. Refer to the Assigning and Editing Extensions in this section of the
manual for details. Caution should be taken when assigning this parameter, to keep
System Programming and Database Layout • 24
Page 30

the amount of time that a voice port is busy to a minimum. The hold feature will
only work on supervised transfers.
Max Hold Time If the hold feature is activated, enter the amount of time before
Voice Connection will retry the busy extension. The hold feature will only work
on supervised transfers.
Notify Port No. Enter the number of the port that will handle the message
notification calls. This information is particularly important when message waiting
lights are to be activated, because many telephone systems require that the same
extension that turned on the light turn it off.
Outdial Prefix Enter the digit required by your telephone system to access central
office lines. Voice Connection uses these lines to place message notification calls to
beepers or external telephones and faxing information. The default code is 9. Enter
9 in this field unless you have programmed your telephone system for a different
code. If the telephone system has been programmed for a different code, enter the
code programmed (up to 3 digits) in this field.
System Broadcast Mailbox Enter the number of the mailbox that you will assign to
broadcast messages to all system users. If a message is left in this mailbox then all
users will hear the message when accessing their mailbox. The default setting is
999.
Mailbox / DID Size Enter the number of digits that callers will enter to access your
user mailboxes. Mailbox numbers larger or smaller than this parameter are not
affected when sent through system database programming. If your system is
receiving DID calls to Voice Connection then enter the number of digits that Voice
Connection receives from the DID circuits. This number is normally set at 3. Note:
If you set this number larger than the number dialed, a pound must be entered
after the last digit dialed.
Longest Message Record Time This is a global setting for the amount of time that
each message may be recorded before the system automatically cuts off the
recording. The number of seconds of recording time that you wish to allow is
entered here. This parameter may be overridden for an individual mailbox when the
mailbox is created. The default time for this parameter is 180 seconds.
Shortest Message Time Any message with a duration less than this setting Will
Not Be Saved. The default setting is 5 seconds.
Longest Greeting Time This parameter sets the global time in seconds that a
personal greeting may be recorded for each mailbox. The time entered here may be
overridden when the individual mailbox is created. The default setting for this
parameter is 60 seconds or 1 minute.
Pause Duration Enter the amount of time in milliseconds that the system will pause
and wait for dial tone, etc. 1000 milliseconds = 1 second. The scale used is 1 = 10
milliseconds. Therefore, the default amount of 100 is equal to one (1) second. The
time entered in here will represented by a comma (,) in database programming.
Refer to the section on Hold Sequences.
Flash Duration Enter the amount of time in milliseconds that your telephone
system requires for a hook flash. Refer to your telephone system documentation for
this information. Remember that a scale of 1 = 10 milliseconds is used.
System Directory Mailbox Enter the mailbox number created for the system
directory . The directory mailbox number must be entered before callers will have
access to the directory feature.
Directory Search By Last Name This is the default setting, and will allow callers
to enter the first three letters of a last name. Voice Connection will then look for a
System Programming and Database Layout • 25
Page 31

match based on the information entered in the last name field of the user mailboxes
that have been added to the directory. If you do not select this option, Voice
Connection will search for a match based on the first three letters of the first name
entered in the first name field of the user mailboxes and added to the directory.
Note: If you change the directory from one option to another, you must edit the
user mailboxes, delete the name from the directory, and then re-add the name
to the directory.
Volume Control This control is used to change the volume level of the Prompts.
The range is from 8 to -8; the default value is "0".
Your Comp. Name Enter the name of your company. The name that is entered
here will automatically appear on all faxes sent with the FAX option.
Telephone Extensions Start with Digit(s) Enter the first number used for calling
extensions. Entries in this field will block the use of these digits in the Combo and
Menu mailboxes.
Number of Retries Enter the number of times that Voice Connection will attempt
to notify a user that messages are present in their mailbox. Notification can be to an
internal number, external number or beeper. The setup for these numbers is covered
in the User Mailbox section of Assigning and Editing Mailboxes. This parameter
does not affect message waiting lamp activation.
Notify Time Interval Enter the number of minutes that Voice Connection will wait
between notification calls. Calls will no longer be made when messages have been
retrieved from the mailbox. The initial notification call is always made within one
minute from the time the message is received in the mailbox.
System Date & Time Enter Military Time (3:00 PM = 15:00)
Extension Size Enter the digit length of your extension numbers.
PBX Integration String Enter the string of DTMF digits that will be sent by the
telephone system before the extension number or mailbox number is transmitted. If
your telephone system does not send an integration string then leave this field blank.
Integ Delay Enter the time in seconds that Voice Connection will wait for In Band
Signaling information to be sent from the telephone system. For example, when the
telephone system is programmed to forward busy/no answer calls to the voice mail, a
string of DTMF digits will be sent to the voice mail when the voice mail answers the
call. This information is normally an integration string followed by the extension
number that forwarded the call. The voice mail system will then direct the call to the
proper user mailbox and a personal greeting will be played to the caller. This
information is normally sent within the first second.
Message Lamp On String Enter the information your telephone system requires to
turn on message waiting lamps. Use the prefix field if the telephone system requires
this information before the extension number, or the suffix field if the information is
required after the extension number is sent.
Message Lamp Off String Enter the information your telephone system requires to
turn on message waiting lamps. Use the prefix field if the telephone system requires
this information before the extension number, or the suffix field if the information is
required after the extension number is sent.
Extension Dialing Prefix/Suffix This parameter allows you to enter a string of
digits that can be sent as DTMF tones before or after Voice Connection dials the
extension number. If you have an application that requires this option, such as
overriding voice announced calls, enter the digit string in the field and then click the
mouse on the prefix or suffix button.
System Programming and Database Layout • 26
Page 32

Hold Sequences Before a call can be transferred by Voice Connection the call must
be placed on hold. This is accomplished by simulating a momentary interruption or
"hook flash". Once the call is placed on hold it must be retrieved before it can be
connected to the extension or hear recorded information.
On Hold Enter the information your telephone system requires to place a
call on hold. The ampersand (&) is the code to perform a hook flash and
the “W” represents a 2 second wait for dial tone. These are the default
settings and will work with the majority of telephone systems. Refer to
your telephone system documentation to verify. If your telephone system
requires something different then enter the information in the box provided.
Off Hold No Answer Enter the information your telephone system
requires to retrieve a call from hold when there is no answer at the
extension. The (&) represents a hook flash and the comma (,) represents a
pause. The default length of time for a pause is one second and may be
changed (refer to the section on Flash Duration). The default settings will
work with the majority of telephone systems. Refer to your telephone
system documentation.
Off Hold Busy Some telephone systems such as the AT&T System 25
require a different sequence to retrieve a call from an extension that is busy.
Refer to your telephone system documentation and enter the correct
information. The majority of telephone systems will use the same sequence
for both no answer and busy. This is the default setting for this parameter.
Mailbox Setup
Write Click the mouse on this button if the information entered is correct. The
information will automatically be entered into the system database.
Cancel Click the mouse on this button when you wish to exit this window without
saving new information to the database.
Add Button Click the mouse on this button when you want to create a new mailbox.
Refer to the section on Assigning and Editing Mailboxes.
System Programming and Database Layout • 27
Page 33

Delete Button Highlighting a mailbox listed in the window and clicking on this
button will cause the highlighted mailbox to be deleted.
Edit Button Highlighting a mailbox listed in the window and clicking the mouse on
this button will access the editing screen for the highlighted mailbox. Information
pertaining to that particular mailbox will be entered. Refer to the section on
Assigning and Editing Mailboxes for complete details on each mailbox type.
Copy Button Clicking on this button will bring up a screen that will allow you to
change the features for a group of user mailboxes.
Quit Button Clicking the mouse on this button will remove this window from the
screen.
Telephone Extensions
Add Button Click the mouse on this button to add a telephone extension to Voice
Connection. Refer to the section on Assigning and Editing Extensions.
Delete Button Click the mouse on the appropriate extension number and then click
on the delete button to delete the extension number from the database.
Edit Button Click the mouse on the appropriate extension number and then click
the edit button to change extension information. Refer to the section on Assigning
and Editing Extensions.
Quit Button Click the mouse on this button to remove this window from the screen.
System Programming and Database Layout • 28
Page 34

Auto Attendant Greeting Setup (Sprint Protege’)
When central office calls are directed to be answered by the automated attendant, the
Protege’ system will forward the trunk number with the call. This feature allows the
automated attendant to answer the call and play a greeting based on the trunk
number. This feature is unique in that calls requiring different greetings (such as
multiple companies) no longer have to be directed to a specific port in the call
processing system. A call can now be directed to any port and the appropriate
greeting will be played.
Trunk Group Enter the trunk group number as assigned in the Protege’ system.
Voice Connection automatically enters a one in the first trunk group field.
From To Enter the trunk numbers as assigned in the Protege’ system for the trunks
in this trunk group. Voice Connection automatically enters trunk number 700 to 799
in this field.
Sun — Sat Enter the mailbox number that will answer the call and play a main
greeting for the appropriate day. Greeting and time of day changes are programmed
in the mailbox. Refer to the section on Assigning and Editing Mailboxes. If a call is
received on a trunk that is not assigned on this screen the call will be routed to
the mailbox specified for trunk group one.
Write Button Click the mouse on this button if the displayed information is correct
and Voice Connection will automatically enter the information into the database.
Cancel Button Click the mouse on this button to exit this screen without saving
changes.
System Programming and Database Layout • 29
Page 35

Auto Attendant Greeting Setup (All other Systems)
With Voice Connection callers may be presented with different greetings for each
day of the week. The greetings are recorded in a mailbox and the mailbox is
assigned to the proper port. Each port or group of ports may have a different set and
schedule of greetings.
From To Enter the port numbers as assigned to answer the call for this specific
greeting.
Sun — Sat Enter the mailbox number that will answer the call and play a main
greeting for the appropriate day. Greeting and time of day changes are programmed
in the mailbox. Refer to the section on Assigning and Editing Mailboxes. If a call is
received on a port that is not assigned on this screen the call will be routed to
the mailbox specified for port one.
Write Button Click the mouse on this button if the displayed information is correct
and Voice Connection will automatically enter the information into the database.
Cancel Button Click the mouse on this button to exit this screen without saving
changes.
Stats
Mailbox Allows you to view the number of messages currently saved for each
mailbox and the status of the message.
Ports Shows the number of calls that have been received for each voice port
System Programming and Database Layout • 30
Page 36
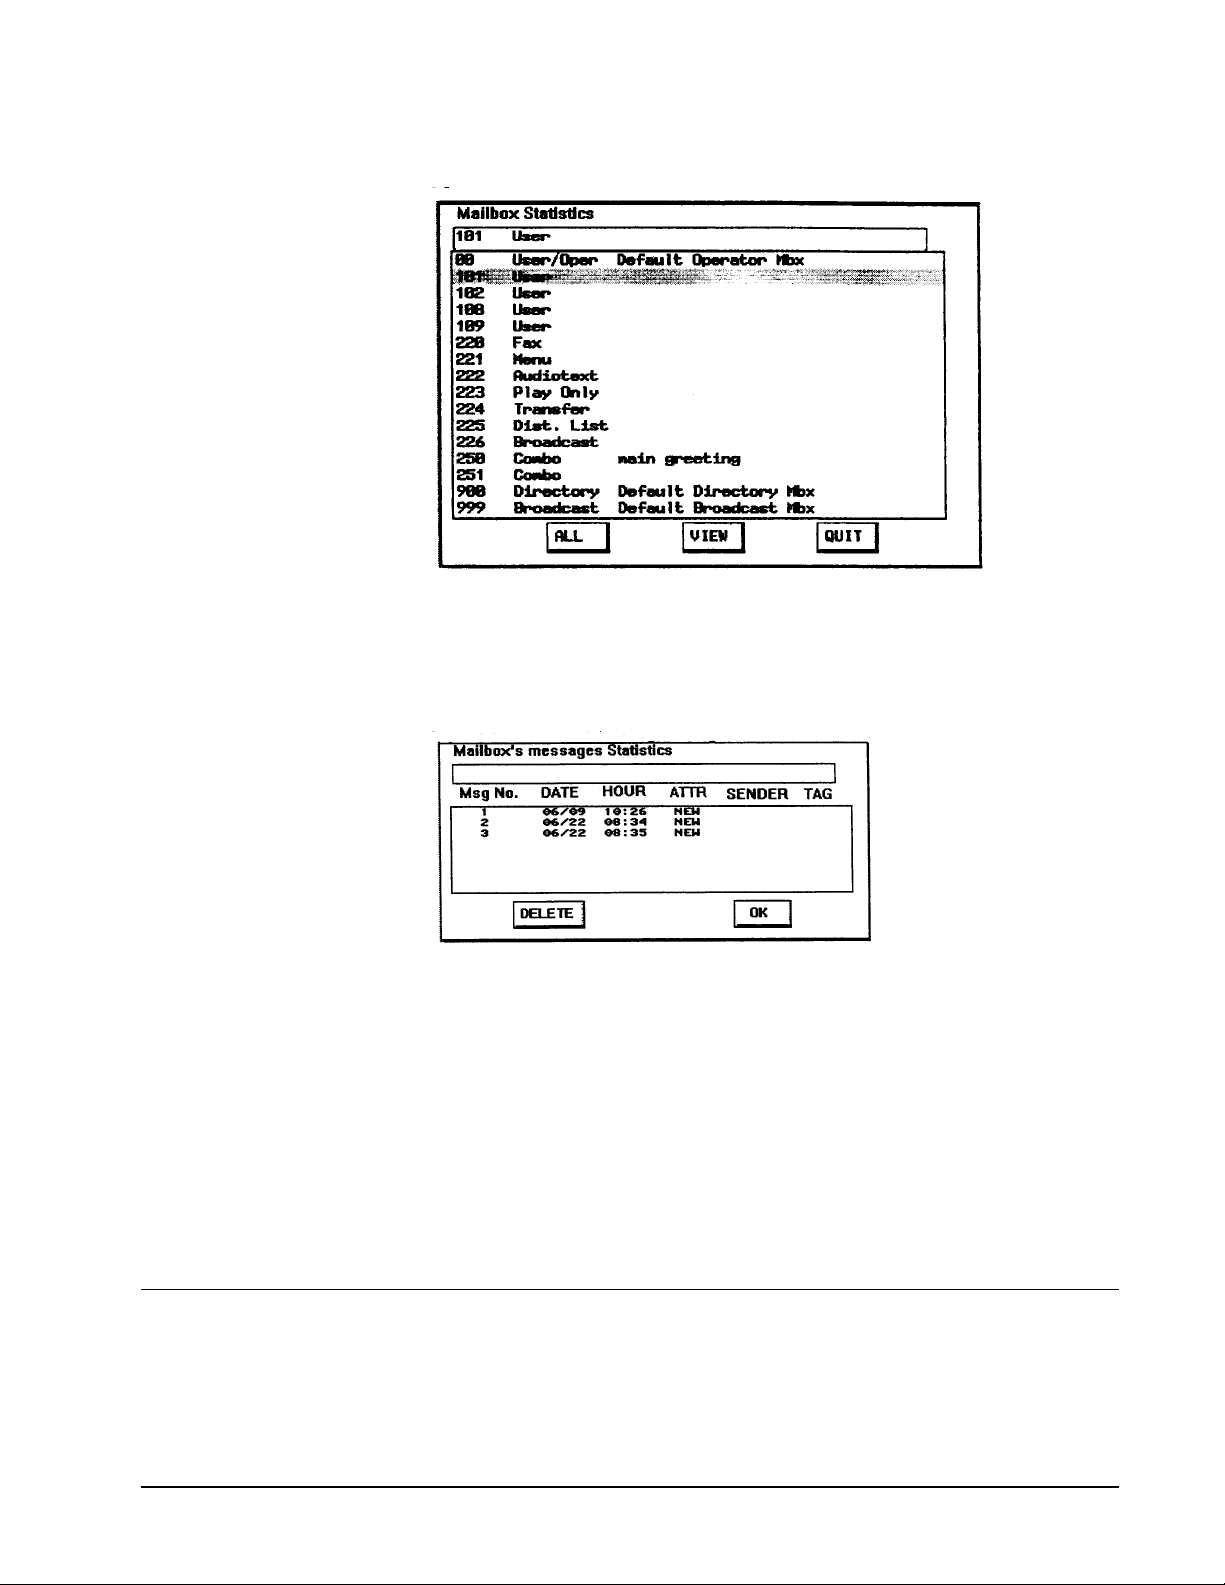
Mailbox Statistics
All Button Click the mouse on this button to view the combined statistics for all of
the mailboxes in the Voice Connection system.
View Button Click the mouse on a mailbox number and then click on View to see
the statistics for an individual mailbox. The following information will be displayed
.
Msg No. The number of the message in the order received.
Date The date the message was received.
Hour The time the message was received.
ATTR The attribute of the message (new or old).
Sender The extension number if the message was sent by another user.
Tag Any special flags that have been set for this message.
Delete Button Click the mouse on a message number and then click on delete to
erase the message.
OK Button Click on this button to exit this screen.
Assigning and Editing Mailboxes
This section will give you a detailed explanation of all data to be entered for each
type of mailbox. Each mailbox will be covered separately for easy reference.
System Programming and Database Layout • 31
Page 37

Access Mailbox Setup from the System Programming menu. The following screen
will be displayed.
Delete Button Highlight a mailbox number and click the mouse on the delete button
to delete the mailbox from the database. Voice Connection will ask for confirmation
before deleting.
Quit Button Click the mouse on this button to remove this window from the screen.
System Programming and Database Layout • 32
Page 38
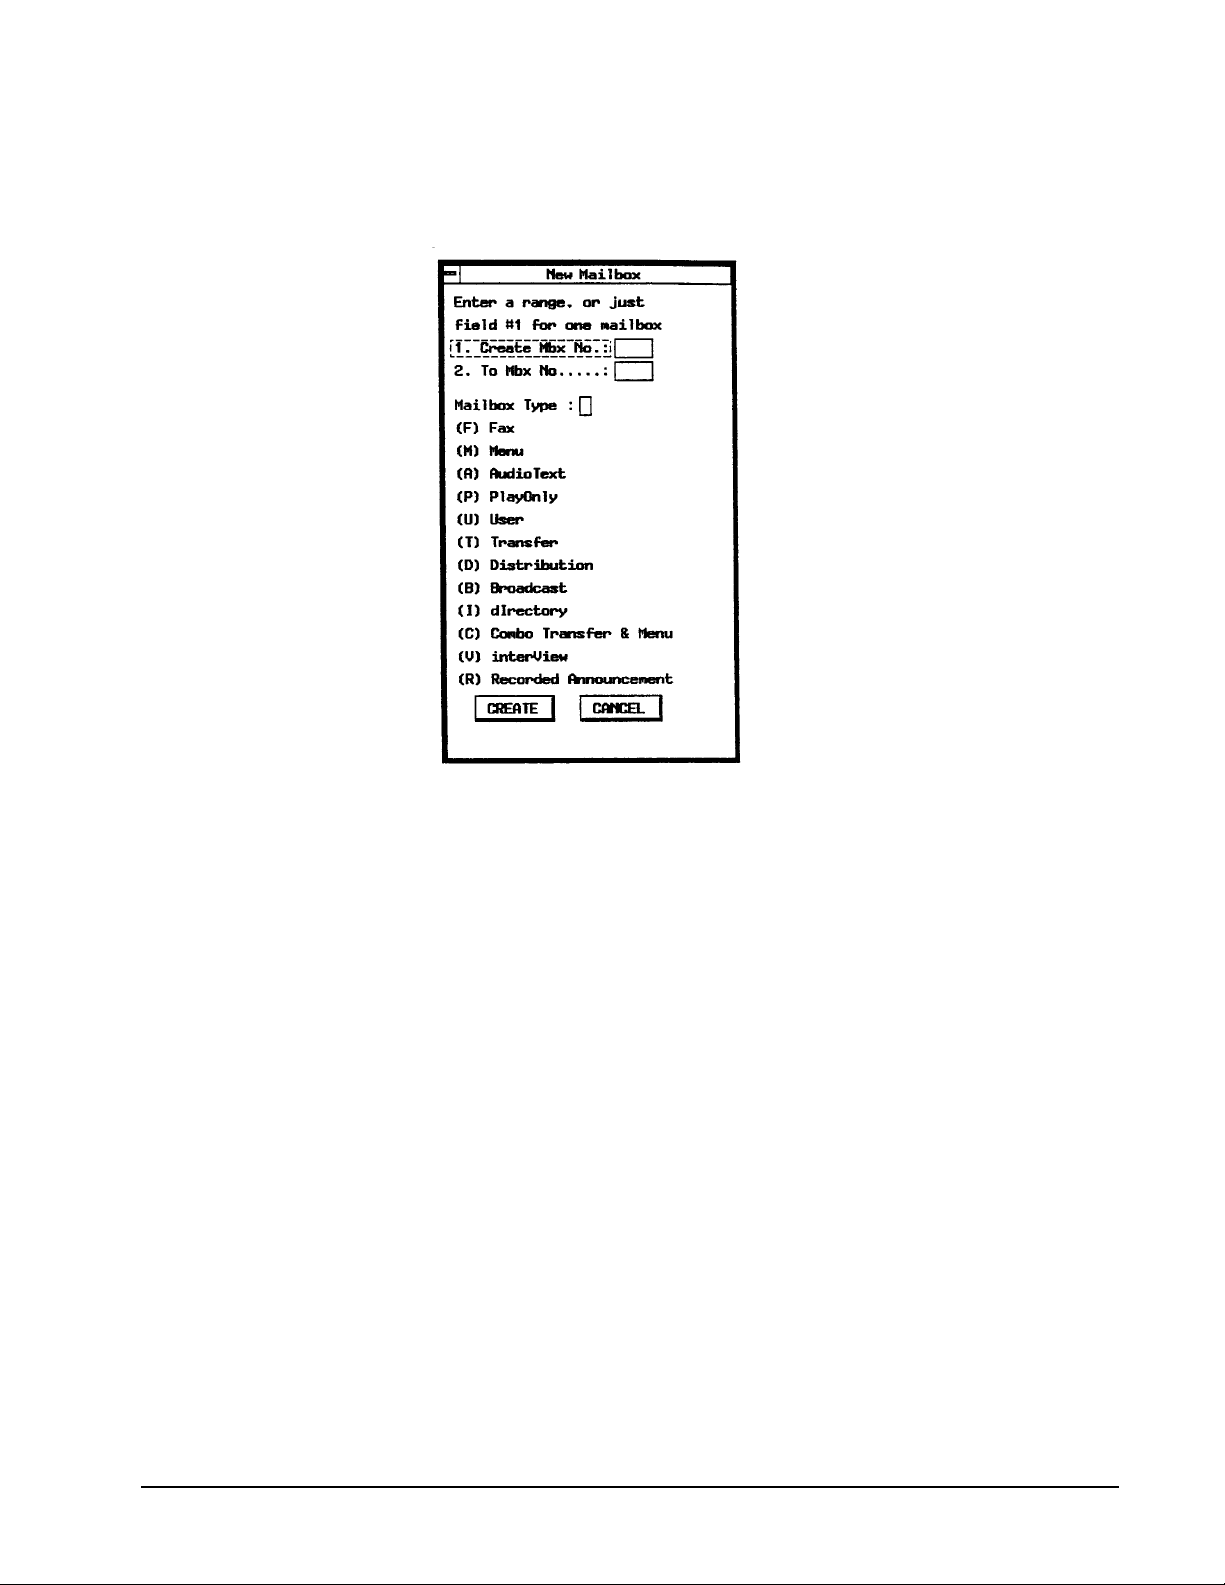
Add Button Click the mouse on the add button to assign a new mailbox and the
following screen will display.
Create MBX Number Enter the number of the mailbox that you are creating or the
starting mailbox number in a range of mailboxes
To MBX Number Enter the ending mailbox number if you are creating a range. If
only one mailbox of this type is being created, leave this field blank.
Mailbox Type Using the letter surrounded by parentheses enter the type of mailbox
that you are creating.
Create Button If the information is correct click the mouse on the Create button
and the mailbox will automatically be created and added to the system database.
Once created the mailbox number and type will appear in the window listing the
mailboxes.
Editing Mailboxes
After the mailbox has been created, programming information for the mailbox must
be entered into the database. Voice Connection accomplishes this through editing
screens. A separate screen is used for each mailbox. Each mailbox type has its own
unique screen.
All mailboxes share some common features. Every mailbox is password protected.
Mailboxes that play greetings allow up to three greetings to be recorded. The length
of the greeting and the amount of time for message recording is controlled by each
individual mailbox. As an option, callers may be allowed to dial other extensions or
mailboxes from each mailbox type.
Each type of mailbox and an explanation of the information to be entered follows.
System Programming and Database Layout • 33
Page 39

Note: This type of mailbox applies
only to Voice Connection systems that
are equipped with the Fax on Demand
option.
Fax Mailbox
Fax mailboxes are used to list the location of the file that will be faxed to the caller
when the mailbox is selected.
Operator No entry required.
Name Enter a reference name for this mailbox. The name you enter will appear in
the mailbox list window.
File Name Voice Connection will enter this information for you. If you choose to
enter a filename of a document copied into the system you must follow the format:
FAXBACK\[filename]
Max Greeting Length Does not apply.
Text/ASCII Document Click the mouse on this button if the file to be faxed is in a
text format. This type of FAX can only be sent to destinations equipped with a
CAM compatible fax board.
PCX Graphics Document Click the mouse on this button if the file to be faxed is a
single page document. If the file is to be faxed to an ordinary fax machine then this
type of file format must be selected.
PCX Multi-Page Document Click the mouse on this button if you are faxing a
multi-page document.
REFER TO THE FAX SECTION OF THIS MANUAL FOR AN
EXPLANATION OF THE REMAINING BUTTONS.
Menu Mailbox
Menu mailboxes are designed to allow callers to make choices using a single digit.
When a menu mailbox is accessed, the caller will hear a greeting listing the choices
and the digit selection for each. The system manager programs each choice to direct
the caller to an extension or another mailbox.
Menu mailboxes may be used for initial greetings thereby giving the caller the option
of dialing “1” for sales, “2” for service etc. Menu mailboxes may be linked to other
System Programming and Database Layout • 34
Page 40

Menu mailboxes, allowing the creation of elaborate tree structures. They may also
be linked to other types of mailboxes to allow the caller to receive information, leave
messages or dial extensions.
Operator Enter the extension where a call will be transferred when the caller
presses "O" for operator. This may be any extension in your telephone system.
Note: The default operator extension is defined in the System Parameters. No
entry is required unless you desire a different operator destination for this
mailbox. An entry here will override the default operator extension. This
feature can be used to direct calls to different attendants when the Voice
Connection is answering call for multiple companies. The feature can also be
used to direct calls to personal or departmental secretaries.
Name Enter the name of the mailbox. Information entered here will be displayed
when the mailbox is assigned elsewhere in the database and the verify button is
pressed.
Greeting Menu mailboxes can be used as main greetings or as part of a V-Tree
structure for directing callers. Voice Connection allows each menu mailbox to have
three greetings that may be controlled by time of day changes. Record the greetings
referring to the section on Recording System Greetings. When you record a new
greeting you may either activate the new greeting or leave the old greeting active.
The time of day will control which greeting is active. Enter the time of day (using a
24-hour clock) that the greeting will start playing and then enter the greeting number
to play. If only one time of day is entered then that greeting will play at all times. A
zero (0) is considered a blank field. GREETING NUMBER ONE (1) MUST BE
RECORDED AND WILL ACT AS THE DEFAULT GREETING IF NO TIME
OF DAY CHANGES ARE PROGRAMMED.
Override Greeting Number One of the greetings may be used as an override
greeting. When active this greeting will play regardless of the time of day. This
feature is useful for unusual circumstances, such as an early closing due to weather
or other emergency. To use this feature enter a greeting number in this box. The
greeting may be activated remotely from any telephone or by selecting the Override
Scheduled Greeting Times checkbox.
Max Greeting Length Enter the time in seconds that a greeting for this mailbox can
be recorded. Enter this information only if the global system wide setting for this
parameter needs to be overridden.
System Programming and Database Layout • 35
Page 41

Route Directly to MBX When this option has been selected and the extension
option Transfer calls directly to mailbox after hours has been selected, calls for
that extension will be transferred directly to the mailbox. ( see page 8-39 )
MBX/EXT Enter the destination mailbox or extension number where the caller will
be transferred when the associated DTMF key is pressed. Voice Connection allows
you to direct calls differently for each greeting. For example, if you want calls
directed differently during the day than at night, you would enter the extension
information under the appropriate greeting numbers for each.
Next Action Enter the destination where the call will be transferred if the caller
presses no keys. If nothing is entered in this box the caller will be transferred to the
operator. You may have a different next action for each greeting.
Verify Button When this button is clicked with the mouse the information typed in
the name field for the mailbox number assigned will display under Name.
Write Button Click the mouse on this button if the displayed information is correct
and Voice Connection will automatically enter the information into the database.
Cancel Button Click the mouse on this button to exit this screen without saving
changes.
Next Button Clicking the mouse on this button will automatically write the
information for this screen into the database and display the screen for the next
mailbox in numerical order.
Prev Button Clicking the mouse on this button will automatically write the
information for this screen into the database and display the screen for the previous
mailbox in numerical order.
Audiotext Mailbox
Audiotext mailboxes are traditionally used to provide extensive information to
callers. These mailboxes may be programmed to accept a different number of digits
than the transfer mailbox. This is particularly useful in applications that require the
caller to enter a ticket number to receive information about car repairs, disposition of
placed orders, elaborate tree structures and etc. Audiotext mailboxes do not allow
messages to be recorded.
System Programming and Database Layout • 36
Page 42

Operator Enter the extension where a call will be transferred when the caller
presses "O" for operator. This may be any extension in your telephone system.
Note: The default operator extension is defined in the System Parameters. No
entry is required unless you desire a different operator destination for this
mailbox. An entry here will override the default operator extension. This
feature can be used to direct calls to different attendants when the Voice
Connection is answering calls for multiple companies. The feature can also be
used to direct calls to personal or departmental secretaries.
Name Enter a reference name for the information recorded in this mailbox. Any
information entered in this field will be displayed when the mailbox is assigned
elsewhere in the database and the verify button is pressed.
Number of Digits Expected Enter the number of digits that are expected if the
caller will be given the option to access additional information. If nothing is entered
in this field then no digit entry by the caller will be accepted.
Next Action Enter the mailbox or extension number where the caller will be
transferred if no digits are entered. Leaving this field blank will send the call to the
operator.
Options On Does not apply.
Mailbox Active Does not apply.
Greeting 1, 2, 3 This mailbox can have 3 greetings any one of which may be active.
Refer to the section on Recording Greetings.
Max Greeting Length Enter the length in seconds that the Greeting can be
recorded. Note: Enter information in this field only if the system-wide global
parameter for this setting is not long enough.
Write Button Click the mouse on this button if the displayed information is correct
and Voice Connection will automatically enter the information into the database.
Cancel Button Click the mouse on this button to exit this screen without saving
changes.
Next Button Clicking the mouse on this button will automatically write the
information for this screen into the database and display the screen for the next
mailbox in numerical order.
Prev Button Clicking the mouse on this button will automatically write the
information for this screen into the database and display the screen for the previous
mailbox in numerical order.
Play Only /Voice Announce Mailbox
Play only mailboxes are used to provide information to callers. Callers are not
allowed to leave messages but may be given the option to dial other extensions or
mailboxes. These mailboxes can also be used for recorded announcement messages
for callers waiting to be answered in a UCD group when the telephone system
allows.
System Programming and Database Layout • 37
Page 43

f
Caution: Do not activate any greeting
rom this screen until the greeting has
been recorded.
Operator Enter the extension where a call will be transferred when the caller
presses "O" for operator. This may be any extension in your telephone system.
Note: The default operator extension is defined in the System Parameters. No
entry is required unless you desire a different operator destination for this
mailbox. An entry here will override the default operator extension. This
feature can be used to direct calls to different attendants when the Voice
Connection is answering calls for multiple companies. The feature can also be
used to direct calls to personal or departmental secretaries.
Name Enter a reference name for the information recorded in this mailbox. Any
information entered in this field will be displayed when the mailbox is assigned
elsewhere in the database and the verify button is pressed.
Next Action Enter the mailbox or extension number where the caller will be
transferred. Leaving this field blank will terminate the call if the Options On field is
not active.
Options On Click the mouse in this box if you want the caller to be given the option
of dialing another extension after listening to the information contained in this
mailbox. Note: Information entered in the next action field takes priority over
this option. If there is no entry in next action and this option is active, the caller
will be given the option to dial another extension. If there is no entry in next
action and this option is not active, the call will be terminated.
Mailbox Active Does not apply.
Greeting 1, 2, 3 This mailbox can have 3 greetings any one of which may be active.
Refer to the section on Recording Greetings. Caution: Do not activate any
greeting from this screen until the greeting has been recorded.
Max Greeting Length Enter the length in seconds that the Greeting can be
recorded. Note: Enter information in this field only if the system wide global
parameter for this setting is not long enough.
Write Button Click the mouse on this button if the displayed information is correct
and Voice Connection will automatically enter the information into the database.
Cancel Button Click the mouse on this button to exit this screen without saving
changes.
System Programming and Database Layout • 38
Page 44

Next Button Clicking the mouse on this button will automatically write the
information for this screen into the database and display the screen for the next
mailbox in numerical order.
Prev Button Clicking the mouse on this button will automatically write the
information for this screen into the database and display the screen for the previous
mailbox in numerical order.
User Mailbox
User mailboxes are designed to play a greeting and take messages. This type of
mailbox is assigned to each employee or system user. The mailbox is generally
assigned to an extension and the user's personal greeting is played when the
extension is busy or not answered. User mailboxes may also be assigned separately
and used by employees, vendors or customers who do not have an office or
telephone.
Each user mailbox has three greetings. Any greeting may be activated at any time by
the mailbox owner. Message notification to internal, external and beeper numbers is
also provided. Additionally each user mailbox may have five distribution lists of ten
mailboxes per list. The mailbox owner may also be given the option to leave a
broadcast message that will be delivered to all mailboxes on the system.
Operator Enter the extension where a call will be transferred when the caller
presses "O" for operator. This may be any extension in your telephone system.
Note: The default operator extension is defined in the System Parameters. No
entry is required unless you desire a different operator destination for this
mailbox. An entry here will override the default operator extension. This
feature can be used to direct calls to different attendants when the Voice
Connection is answering calls for multiple companies. The feature can also be
used to direct calls to personal or departmental secretaries.
Before changing the name the original
name must be deleted form the
Directory.
System Programming and Database Layout • 39
Last Name Enter the last name of the person or department assigned to this
mailbox. Information entered in this field can be added to the company directory
and will be displayed when assigned elsewhere in the database and the verify button
is pressed.
Page 45

p
If this field is blank, then the default
assword is pound (#).
If no personal greeting is recorded the
default greeting will play.
First Name Enter the first name of the person assigned to this mailbox. Information
in this field can be added to the directory if the Directory search by first name option
is selected in the Directory setup screen
Password Enter a 4 digit password that the user will enter to retrieve messages and
perform mailbox maintenance. You may leave this field blank allowing the user to
assign their own password.
Notify On With this option the Voice Connection system will notify you when
messages are present in your mailbox. This option is automatically active when the
mailbox is created. Click the mouse on this to deactivate message notification.
Play Default Greeting When active callers will hear a default greeting after hearing
the personal greeting recorded for this mailbox and before messages are recorded. If
you do not want this greeting to play, allowing messages to be recorded immediately
after the personal greeting is played, then you must deactivate this feature.
Add to the Directory Click the mouse on this button to add the information entered
in the name field to the company directory.
The information is added to the directory the firs time this button is pressed.
Pressing this button after the information has been added will cause an error
message to display. You must delete the information before changing.
Only one notification number can be
active at a time.
Del From Directory Click the mouse on this button to delete the information from
the directory.
Use Message Waiting Lamp When this feature is activated, the Voice Connection
system will light the message waiting lamp on the telephone extension entered into
the internal notification field. This option is activated when the mailbox is created.
Click the mouse on this button to deactivate this feature.
Internal Notify Number Enter the extension number that Voice Connection will
call when messages are present in this mailbox. If the message waiting lamp option
is active, the telephone will not ring.
External Notify Number Enter the external telephone number that Voice
Connection will call when messages are present in this mailbox. The number
entered here can be any telephone number anywhere. Use the comma (,) to indicate
a pause. Note: Do not include a prefix such as 9 for obtaining a C.O. Line. Any
prefix, if required should be assigned in the Voice Mail System Parameter
screen.
Beeper Number Enter the telephone number of the beeper Voice Connection will
call if messages are present in this mailbox. Use the comma (,) to indicate a pause.
When this feature is entered from the user's telephone, Voice Connection
automatically enters 8 commas and the mailbox number. (Some pager companies
may require more or less pause time). Voice Connection will automatically hang
up after the call is made. Note: Do not include a prefix such as 9 for obtaining a
C.O. Line. Any prefix, if required, should be assigned in the Voice Mail System
Parameter screen.
Active Buttons Click the mouse on the button for the active notification number.
Next Action Enter the destination where the caller will be transferred if no keys are
pressed. If nothing is entered, the caller will be given the option menu to dial
another extension or transfer to the operator. If the word HANG is entered then
Voice Connection will hang up after the message is delivered.
Play Broadcast Message(s) When active this option allows users to receive system
broadcast messages. This option is automatically activated when the mailbox is
System Programming and Database Layout • 40
Page 46

Do not activate any greeting from this
screen until the greeting has been
recorded.
Distribution list 6 is used only when
this user has Broadcast Privileges.
Caution should be taken when
assigning this privilege to users.
created. Click the mouse on this button to deactivate this feature and prevent the
user from receiving broadcast messages.
Retrieve Messages in LIFO Order Voice Connection gives you the option to
retrieve your messages in Last In First Out (LIFO) order or First In First Out (FIFO)
order. The FIFO option is automatically set when the mailbox is created. Click on
this button to deactivate FIFO and activate LIFO.
Auto Purge Messages for this MBX Voice Connection will automatically delete
old messages stored for more than a user-defined number of days. By default, this
option is active, and messages are deleted after 14 days.
Purge Messages Older Than Enter the number of days before old messages will
automatically be deleted. The default setting is 14.
Greeting 1, 2, 3 This mailbox can have 3 greetings, any one of which may be
active. The user will record their own personal greeting.
Max Greeting Length Enter the length in seconds that the Greeting can be
recorded. Note: Enter information in this field only if the system-wide global
parameter for this setting is not long enough.
Max Message Record Length Enter the length in seconds that a message can be
recorded. Note: Enter information in this field only if the system-wide global
parameter for this setting is not long enough.
Distribution List Each user mailbox can have up to 5 different distribution lists.
Each list can contain up to 48 mailboxes. This feature allows a user to record a
message and the message will be distributed to every mailbox on the list. In the
fields provided, enter the distribution list mailbox number for each list. Refer to the
section on Distribution Mailbox.
Verify Button When this button is clicked with the mouse the information typed in
the name field for the distribution mailbox number assigned will display under
Name.
Write Button Click the mouse on this button if the displayed information is correct
and Voice Connection will automatically enter the information into the database.
Cancel Button Click the mouse on this button to exit this screen without saving
changes.
Next Button Clicking the mouse on this button will automatically write the
information for this screen into the database and display the screen for the next
mailbox in numerical order.
Prev Button Clicking the mouse on this button will automatically write the
information for this screen into the database and display the screen for the previous
mailbox in numerical order.
Transfer Mailbox
Transfer mailboxes are used to transfer callers directly to extensions. A greeting is
played and the mailbox waits for the caller to enter a pre-programmed number of
digits. Calls may be directed to extensions or other mailboxes. A transfer mailbox
may also be used for the main system greeting, when the callers are not given a menu
of choices but are allowed to directly dial an extension.
System Programming and Database Layout • 41
Page 47

Operator Enter the extension where a call will be transferred when the caller
presses "O" for the operator. This may be any extension in your telephone system.
Note: The default operator extension is defined in the System Parameters. No
entry is required unless you desire a different operator destination for this
mailbox. An entry here will override the default operator extension. This
feature can be used to direct calls to different attendants when the Voice
Connection is answering calls for multiple companies. The feature can also be
used to direct calls to personal or departmental secretaries.
Name Enter a reference name for the information recorded in this mailbox. Any
information entered in this field will be displayed when the mailbox is assigned
elsewhere in the database and the verify button is pressed.
Number of Digits Expected Enter the number of digits that the caller is expected to
enter.
Greeting Transfer mailboxes can be used as main greetings or as part of a V-Tree
structure for directing callers. Voice Connection allows each transfer mailbox to
have three greetings that may be controlled by time of day changes. Record the
greetings referring to the section on Recording System Greetings. When you record
a greeting you may either activate the new greeting or leave the old greeting active.
The time of day will control which greeting is active. Enter the time of day (using a
24-hour clock) that the greeting will start playing and then enter the greeting number
to play. If only one time of day is entered then that greeting will play at all times. A
zero (0) is considered a blank field. GREETING NUMBER ONE (1) MUST BE
RECORDED AND WILL ACT AS THE DEFAULT GREETING IF NO TIME
OF DAY CHANGES ARE PROGRAMMED.
Override Greeting Number One of the greetings may be used as an override
greeting. When active this greeting will play regardless of the time of day. This
feature is useful for unusual circumstances, such as an early closing due to weather
or other emergency. To use this feature enter a greeting number in this box. The
greeting may be activated remotely from any telephone or by selecting the Override
Scheduled Greeting Times checkbox.
Route Directly to MBX When this option has been selected and the extension
option Transfer calls directly to mailbox after hours has been selected, calls for
that extension will be transferred directly to the mailbox. ( see page 8-39 )
System Programming and Database Layout • 42
Page 48

Next Action Enter the mailbox or extension number where the caller will be
transferred if no digits are entered. Leaving this field blank will send the call to the
operator. A different next action may be entered for each greeting.
Max Greeting Length Enter the length in seconds that the Greeting can be
recorded. Note: Enter information in this field only if the system wide global
parameter for this setting is not long enough.
Write Button Click the mouse on this button if the displayed information is correct
and Voice Connection will automatically enter the information into the database.
Cancel Button Click the mouse on this button to exit this screen without saving
changes.
Next Button Clicking the mouse on this button will automatically write the
information for this screen into the database and display the screen for the next
mailbox in numerical order.
Prev Button Clicking the mouse on this button will automatically write the
information for this screen into the database and display the screen for the previous
mailbox in numerical order.
Distribution Mailbox
These mailboxes are assigned to owners of user mailboxes who wish to establish
distribution lists. Each distribution mailbox allows the user to enter a message that
will automatically be distributed to 48 other mailboxes.
Distribution mailboxes are commonly used by managers and department heads to
deliver the same message to multiple recipients without calling each individual
mailbox.
Operator No entry required.
Name Enter the name of this distribution list. Information entered in this field will
be displayed when this mailbox is referenced elsewhere in the database and the
verify button is pressed.
Mailbox Enter the mailbox numbers where messages recorded for this distribution
list will be delivered.
System Programming and Database Layout • 43
Page 49

Verify Button When this button is clicked with the mouse the information typed in
the name field for the mailbox number assigned will display under Name.
Write Button Click the mouse on this button if the displayed information is correct
and Voice Connection will automatically enter the information into the database.
Cancel Button Click the mouse on this button to exit this screen without saving
changes.
Next Button Clicking the mouse on this button will automatically write the
information for this screen into the database and display the screen for the next
mailbox in numerical order.
Prev Button Clicking the mouse on this button will automatically write the
information for this screen into the database and display the screen for the previous
mailbox in numerical order.
Broadcast Mailbox
A broadcast mailbox is similar to a distribution mailbox. However, messages that
are recorded in this mailbox are distributed to all user mailboxes in the system. Only
one broadcast mailbox per system is required.
Security is provided for accessing this mailbox. The broadcast mailbox is activated
through a user mailbox, and that user must be assigned this privilege by the system
administrator.
A broadcast mailbox is used to deliver recorded messages to every user on the
system. Use of this privilege is controlled in the user mailbox screen. This mailbox
must be created so that it can be assigned. However, no editing entries other than the
name are necessary. The allowable recorded length of the message can be controlled
through an entry in the message length field. The default setting is 180 seconds.
Operator No entry required.
Name Enter the name of this distribution list. Information entered in this field will
be displayed when this mailbox is referenced elsewhere in the database and the
verify button is pressed.
Write Button Click the mouse on this button if the displayed information is correct
and Voice Connection will automatically enter the information into the database.
Cancel Button Click the mouse on this button to exit this screen without saving
changes.
System Programming and Database Layout • 44
Page 50

Next Button Clicking the mouse on this button will automatically write the
information for this screen into the database and display the screen for the next
mailbox in numerical order.
Prev Button Clicking the mouse on this button will automatically write the
information for this screen into the database and display the screen for the previous
mailbox in numerical order.
Directory Mailbox
Directory mailboxes are used to allow the caller access to a system or department
directory. A directory mailbox allows the caller to enter the first three digits of a
name. The caller is then played a selection of names that match the letters entered
and the caller may then dial the extension.
Operator Enter the extension where a call will be transferred when the caller
presses "0" for the operator. This may be any extension in your telephone system.
Note: The default operator extension is defined in the system parameters. No
entry is required unless you desire a different operator destination for this
mailbox. An entry here will override the default operator extension. This
feature can be used to direct calls to different attendants when the Voice
Connection is answering calls for multiple companies. This feature can also be
used to direct calls to personal or departmental secretaries.
Name Enter the name of this mailbox. Information entered here will be displayed
when this mailbox is referenced elsewhere in the database and the verify button is
pressed.
Password Does not apply.
Number of Digits Expected Enter the number of digits in your extension numbers.
Greeting 1, 2, 3 This mailbox may have up to 3 greetings any one of which may be
active. This mailbox has a default greeting recorded that will ask the caller to enter
the first three letters of the last name. If this greeting applies to your installation then
no further greetings need to be recorded. Note: Do not activate any greeting for
this mailbox until the greeting has been recorded. DO NOT ENTER ANY
GREETING IF YOU WOULD LIKE THE SYSTEM GREETING TO PLAY.
System Programming and Database Layout • 45
Page 51

THE SYSTEM GREETING ASKS CALLERS TO ENTER THE FIRST
THREE LETTERS OF THE LAST NAME.
Max Greeting Length Enter the length in seconds that the Greeting can be
recorded. Note: Enter information in this field only if the system-wide global
parameter for this setting is not long enough.
Write Button Click the mouse on this button if the displayed information is correct
and Voice Connection will automatically enter the information into the database.
Cancel Button Click the mouse on this button to exit this screen without saving
changed information.
Next Button Clicking the mouse on this button will automatically write the
information for this screen into the database and display the screen for the next
mailbox in numerical order.
Prev Button Clicking the mouse on this button will automatically write the
information for this screen into the database and display the screen for the previous
mailbox in numerical order.
Combo Mailbox
Combo mailboxes are a combination of a transfer mailbox and a menu mailbox.
This type of mailbox is normally used for main greetings and allows callers to enter
an extension number or select a menu item.
Operator Enter the extension where a call will be transferred when the caller
presses "O" for the operator. This may be any extension in your telephone system.
Note: The default operator extension is defined in the System Parameters. No
entry is required unless you desire a different operator destination for this
mailbox. An entry here will override the default operator extension. This
feature can be used to direct calls to different attendants when the Voice
Connection is answering calls for multiple companies. The feature can also be
used to direct calls to personal or departmental secretaries.
System Programming and Database Layout • 46
Page 52

Name Enter the name of the mailbox. Information entered here will be displayed
when the mailbox is assigned elsewhere in the database and the verify button is
pressed.
Greeting Combo mailboxes can be used as main greetings or as part of a V-Tree
structure for directing callers. Voice Connection allows each combo mailbox to have
three greetings that may be controlled by time of day changes. Record the greetings
referring to the section on Recording System Greetings. When you record a greeting
you may either activate the greeting or leave the old greeting active. The time of day
will control which greeting is active. Enter the time of day (using a 24 hour clock)
that the greeting will start playing and then enter the greeting number to play. If only
one time of day is entered then that greeting will play at all times. A zero(0) is
considered a blank field. GREETING NUMBER ONE (1) MUST BE
RECORDED AND WILL ACT AS THE DEFAULT GREETING IF NO TIME
OF DAY CHANGES ARE PROGRAMMED.
Override Greeting Number One of the greetings may be used as an override
greeting. When active this greeting will play regardless of the time of day. This
feature is useful for unusual circumstances, such as an early closing due to weather
or other emergency. To use this feature enter a greeting number in this box. The
greeting may be activated remotely from any telephone or by selecting the Override
Scheduled Greeting Times checkbox.
Mailbox Active Does not apply.
Max Greeting Length Enter the time in seconds that a greeting for this mailbox can
be recorded. Enter this information only if the global system wide setting for this
parameter needs to be overridden.
Route Directly to MBX When this option has been selected and the extension
option Transfer calls directly to mailbox after hours has been selected, calls for
that extension will be transferred directly to the mailbox. ( see page 8-39 )
MBX/EXT Enter the destination mailbox or extension number where the caller will
be transferred when the associated DTMF key is pressed. Digits entered in the
telephone extension field in the Automated Attendant System Parameter screen will
be blocked for entry on this screen. This allows callers to enter extension numbers
or a menu selection. Voice Connection allows you to direct calls differently for each
greeting. For example, if you want calls directed differently during the day than at
night, you would enter the extension information under the appropriate greeting
numbers for each.
Next Action Enter the destination where the call will be transferred if the caller
presses no keys. If nothing is entered in this box the caller will be transferred to the
operator. A different next action may be programmed for each greeting.
Verify Button When this button is clicked with the mouse the information typed in
the name field for the mailbox number assigned will display under Name.
Write Button Click the mouse on this button if the displayed information is correct
and Voice Connection will automatically enter the information into the database.
Cancel Button Click the mouse on this button to exit this screen without saving
changes.
Next Button Clicking the mouse on this button will automatically write the
information for this screen into the database and display the screen for the next
mailbox in numerical order.
Prev Button Clicking the mouse on this button will automatically write the
information for this screen into the database and display the screen for the previous
mailbox in numerical order.
System Programming and Database Layout • 47
Page 53

Interview Mailbox
For Detailed instructions on Interview Mailboxes, see Recording System Greetings.
Interview mailboxes allow you to ask the caller a series of questions and record their
answers. The answers may then be played back later. Voice Connection can record
up to 50 questions in an interview mailbox.
Operator Enter the extension where a call will be transferred when the caller
presses "O" for the operator. This may be any extension in your telephone system.
Note: The default operator extension is defined in the System Parameters. No
entry is required unless you desire a different operator destination for this
mailbox. An entry here will override the default operator extension. This
feature can be used to direct calls to different attendants when the Voice
Connection is answering calls for multiple companies. The feature can also be
used to direct calls to personal or departmental secretaries.
Name Enter the name of the mailbox. Information entered here will be displayed
when the mailbox is assigned elsewhere in the database and the verify button is
pressed.
Password Enter a 4 digit password that the user will enter to retrieve messages and
perform mailbox maintenance. You may leave this field blank allowing the user to
assign their own password.
Play Default Greeting When active, callers will hear a default greeting after
hearing the personal greeting recorded for this mailbox and before messages are
recorded. If you do not want this greeting to play, allowing messages to be recorded
immediately after the personal greeting is played, then you must deactivate this
feature.
Next Action Enter the destination where the call will be transferred if the caller
presses no keys. If nothing is entered in this box the caller will be transferred to the
operator. A different next action may be programmed for each greeting.
Greeting 1, 2, 3 This mailbox can have 3 greetings any one of which may be active.
Refer to the section on Recording Greetings. Caution: Do not activate any
greeting from this screen until the greeting has been recorded.
Max Greeting Length Enter the length in seconds that the Greeting can be
recorded. Note: Enter information in this field only if the system-wide global
parameter for this setting is not long enough.
System Programming and Database Layout • 48
Page 54

Max Message Record Length Enter the length in seconds that a message can be
recorded. Note: Enter information in this field only if the system-wide global
parameter for this setting is not long enough.
Write Button Click the mouse on this button if the displayed information is correct
and Voice Connection will automatically enter the information into the database.
Cancel Button Click the mouse on this button to exit this screen without saving
changes.
Next Button Clicking the mouse on this button will automatically write the
information for this screen into the database and display the screen for the next
mailbox in numerical order.
Prev Button Clicking the mouse on this button will automatically write the
information for this screen into the database and display the screen for the previous
mailbox in numerical order.
Recorded Announcement Mailbox
Recorded Announcement only mailboxes are used to provide information to callers.
Callers are not allowed to leave messages. These mailboxes can also be used for
recorded announcement messages for callers waiting to be answered in a UCD group
when the telephone system allows.
Operator No entry required.
Name Enter the name of the mailbox. Information entered here will be displayed
when the mailbox is assigned elsewhere in the database and the verify button is
pressed.
Greeting 1, 2, 3 This mailbox can have 3 greetings any one of which may be active.
Refer to the section on Recording Greetings. Caution: Do not activate any
greeting from this screen until the greeting has been recorded.
Max Greeting Length Enter the length in seconds that the Greeting can be
recorded. Note: Enter information in this field only if the system wide global
parameter for this setting is not long enough.
System Programming and Database Layout • 49
Page 55

Next Action Enter the destination where the call will be transferred if the caller
presses no keys. If nothing is entered in this box the caller will be transferred to the
operator. A different next action may be programmed for each greeting.
Options On Does not apply.
Mailbox Active Does not apply.
Write Button Click the mouse on this button if the displayed information is correct
and Voice Connection will automatically enter the information into the database.
Cancel Button Click the mouse on this button to exit this screen without saving
changes.
Next Button Clicking the mouse on this button will automatically write the
information for this screen into the database and display the screen for the next
mailbox in numerical order.
Prev Button Clicking the mouse on this button will automatically write the
information for this screen into the database and display the screen for the previous
mailbox in numerical order.
Using the Copy Feature
You may change the features of one user mailbox or a group of user mailboxes with
the Copy feature. To activate this feature click the mouse on the Copy Button on the
mailbox setup screen. The following screen will be displayed.
1. Enter the mailbox number or range of numbers in fields one and two. If you are
only changing the features of one mailbox then no entry is needed in field number
two.
2. Select the features that you would like active for this mailbox or group of
mailboxes. If the feature is checked active the feature will be activated in the
mailboxes. If the feature is not checked as active the feature will be deactivated in
the mailboxes. Caution: Changing the features here will override the present
settings in the mailboxes.
3. Click on the Change button to change the features.
4. Click on the Cancel button to exit without making changes.
System Programming and Database Layout • 50
Page 56

Assigning and Editing Extensions
Before Voice Connection can transfer a call to an extension in the telephone system,
you must assign the extension number in the database. Several options are available
that allow flexibility in the way the call is handled by the automated attendant
portion of Voice Connection.
Access Telephone Extensions from the System Programming menu. The following
screen will be displayed.
Add Button Used when new extensions are to be added to the database.
Delete Button Used when extensions are to be deleted from the database.
Edit Button Used to change the parameters for an extension.
Quit Button Closes this window.
The following screens are accessible form this screen.
Adding Extensions
Add Button Click the mouse on the add button to assign a new extension number.
Extension Enter the extension number to be assigned or the first extension in a
range of extensions.
To Extension Enter the number of the last extension number in the range of
extensions. Leave this field blank if only one extension is being created.
Mailbox Enter the user mailbox number where callers will be sent if there is no
answer or the station is busy. If a range of extension numbers is being created the
System Programming and Database Layout • 51
Page 57

mailbox number for each extension will be the same as the extension number. Enter
NA if no mailbox is to be associated with this extension.
Always blind transfer Select this option if you wish calls to this extension to be
transferred without supervision. Some telephone systems will recall to the voice mail
on a busy or no answer condition and send the appropriate information to Voice
Connection to insure that the call is placed into the mailbox associated with this
extension.
Enable Call Screening Select this option if you want calls transferred to this
extension to be screened. THIS OPTION WILL ONLY WORK IF A
SUPERVISED TRANSFER IS PERFORMED.
Allow hold for busy (when supervised transfer) Select this option if you want the
caller to be given the option to hold when encountering a busy condition at the
extension. THIS OPTION WILL ONLY WORK IF A SUPERVISED
TRANSFER IS PERFORMED.
Play Options Menu No Answer (when supervised transfer) Under normal
operation a caller will be connected directly to the voice mailbox and hear the
personal greeting when an extension does not answer. If the caller does not wish to
leave a message they may press zero and receive other options. As an option Voice
Connection can be configured to inform the caller that the extension is not answering
and at that time be given the option to leave a message or dial another extension. If
you wish to activate this option click the mouse button on this box. THIS OPTION
WILL ONLY WORK IF A SUPERVISED TRANSFER IS PERFORMED.
Transfer Calls Directly to MBX, after hours When this option has been selected
and the Route Directly to MBX option has been selected, calls for that extension
will be transferred directly to the mailbox. ( This option is available in Menu,
Combo, and Transfer mailboxes Only. )
Create Click the mouse on this button if the displayed information is correct and
Voice Connection will automatically enter the information into the database.
Cancel Button Click the mouse on this button to exit without adding the extension
to the database.
Deleting Extensions
Highlight an extension number and click the mouse on the delete button to delete the
extension from the database. Voice Connection will ask for confirmation before
deleting.
Editing Extensions
Edit Button Highlight an extension number and click the mouse on the edit button.
Selecting this option will allow you to change the extension dialing parameters.
System Programming and Database Layout • 52
Page 58

Mailbox Enter the user mailbox number where callers will be sent if there is no
answer or the station is busy.
Always blind transfer Select this option if you wish calls to this extension to be
transferred blindly or unsupervised. Many telephone systems will recall to the voice
mail on a busy or no answer condition and send the appropriate information to Voice
Connection to insure that the call is placed into the mailbox associated with this
extension.
Enable Call Screening Select this option if you want calls transferred to this
extension to be screened. THIS OPTION WILL ONLY WORK IF A
SUPERVISED TRANSFER IS PERFORMED.
Allow hold for busy (when supervised transfer) Select this option if you want the
caller to be given the option to hold when encountering a busy condition at the
extension. THIS OPTION WILL ONLY WORK IF A SUPERVISED
TRANSFER IS PERFORMED.
Play Options Menu No Answer (when supervised transfer) Under normal
operation a caller will be connected directly to the voice mailbox and hear the
personal greeting when an extension does not answer. If the caller does not wish to
leave a message they may press zero and receive other options. As an option, Voice
Connection can be configured to inform the caller that the extension is not answering
and at that time be given the option to leave a message or dial another extension. If
you wish to activate this option click the mouse button on this box. THIS OPTION
WILL ONLY WORK IF A SUPERVISED TRANSFER IS PERFORMED.
Transfer Calls Directly to MBX, after hours When this option has been selected
and the Route Directly to MBX option has been selected, calls for that extension
will be transferred directly to the mailbox. (This option is available in Menu,
Combo, and Transfer mailboxes Only.)
Cancel Button Click the mouse on this button to exit this screen without saving
changed information.
Write Button Click the mouse on this button if the displayed information is correct
and Voice Connection will automatically enter the information into the database.
System Programming and Database Layout • 53
Page 59

Recording System Greetings
Voice Connection comes with system prompts already recorded. However, greetings
or prompts for system mailboxes such as menu and transfer must be recorded at the
time of installation. Though these greetings may be recorded from any telephone,
you are required to enter Voice Connection as the system manager to record them.
1. Call the Voice Connection system.
2. When your call is answered, press the star (*) key.
3. Voice Connection will prompt you for your mailbox number.
Note: Do NOT enter your Mailbox Number.
4. Press the pound (#) key.
5. You will be asked to enter the system password.
6. Enter the current password (The default password is 0#).
If you have changed the system password, you must enter the new password at
this time. The pound (#) key MUST be pressed after the password has been
entered.
7. Select one (1) to Edit System Mailboxes.
8. Enter the number of the system mailbox that you wish to record.
9. Press one (1) to record a new greeting.
10. Start recording at the beep. Press pound (#) when finished.
11. You may then:
Press (1) to review your greeting;
Press (2) to save your greeting;
Press (3) to re-record your greeting.
Make sure you accept the greeting and activate the greeting before you exit.
13. You will then be returned to the Main System Manager Menu.
14. Repeat this procedure for each greeting to be recorded.
Refer to the section Assigning System Greeting Mailboxes for further information.
Voice Connection allows you to record three greetings for each mailbox, any one of
which may be active at a time. If you wish to record additional greetings or activate
a different greeting, follow the above procedures to access the mailbox. Make the
proper choice at the menu.
Recording System Greetings • 54
Page 60

Setting Up Interview Mailboxes
Interview Mailboxes ask the caller a series of questions that may then be retrieved
later by accessing the mailbox. You may have as many interview mailboxes as you
like, and may record up to fifty questions in each one. Detailed instructions about
setting up Interview mailboxes from beginning to end follow.
1. At the Voice Connection main screen click Config, then Mailbox Setup.
2. From Mailbox setup, click on the Add button.
3. Enter the interview mailbox number, and then enter 'V' under Mailbox Type.
4. Click on the Create button.
5. Highlight the Mailbox by clicking on it, and then click the Edit button.
6. Enter the name of the Mailbox under the name field, and, if you wish to override
the system-wide defaults, enter your desired maximums (in seconds) under the Max
Greeting Length and Max Message Length. Only do this if either the questions or
the answers are going to be particularly long; otherwise, you may leave these fields
blank.
7. If you want the caller to go somewhere besides the Main Menu when they are
done, enter the extension you wish them to go to in the Next Action field.
You may record over previously
recorded questions by entering the
question number and recording at the
beep.
8. Click on the Write button.
Voice Connection does come with system prompts already recorded, including a
default greeting for the Interview Mailbox. You may still wish to record your own,
though; it is recommended that you listen to the default greeting first.
Recording Greetings and Questions
Even if you do not decide to change the default greeting for the Interview mailbox,
you still need to record the questions. Detailed instructions for both of these actions
follow.
1. Call the Voice Connection system, and access the Interview mailbox.
2. When the default greeting begins, press the pound (#) key.
3. You will be prompted for your password.
4. Enter the current password (the default is #).
5. Select four (4) to Record a New Greeting.
1. Select your greeting number (One through Three).
2. Record your new greeting, and press (#) when you are done.
3 You will be returned to the Interview mailbox's Main Menu.
6 If you want to record the questions, press two (2).
7 To record question one, press (1). For question two, press (2), etc.
Starts speaking at the beep and press the pound (#) key when you are
finished recording. When you have recorded all of your questions,
press the star (*) key to exit to the main menu of the Interview
Mailbox.
Recording System Greetings • 55
Page 61

Sample Greetings
Provided in this section are examples of some typical greetings that may be recorded
and used in the Voice Connection system. Sample greetings are given for Menu
mailboxes and Transfer mailboxes for both the day and night. A sample greeting is
also given for a User mailbox.
Menu Mailbox
Day greeting
"Thank you for calling Ace Computers. For Sales, press One, for Service, press
Two, to dial an extension number, press Three. Press Pound for a company
directory. Press Zero for the operator, or hold and you will be transferred to the
operator."
Night Greeting
"Thank you for calling Ace Computers. Our business hours are 9 AM to 5 PM,
Monday through Friday. If you need emergency service, please press One, to dial an
extension, press Two. Press Pound for a company directory, or press Zero or stay
on the line to leave a message at the message center."
Transfer Mailbox
Day Greeting
"Thank you for calling Ace Computers. If you are calling from a touch-tone
telephone and know the extension number of the party you wish to reach, please
enter it now. Otherwise, press pound for a company directory, press zero for the
operator or hold and you will be connected."
Night Greeting
"Thank you for calling Ace Computers. Our business hours are from 9 AM to 5 PM,
Monday through Friday. You may dial an extension number or press pound for a
company directory. If you would like to leave a message at the message center,
please press Zero, or hold and you will be connected."
User Mailbox
"Hi, this is John Smith, extension 101. I am unable to answer your call at this time,
so please leave your name, number, and a brief message, and I will return your call
as soon as possible. Thank you."
Recording System Greetings • 56
Page 62

Assigning Main System Greetings
The main system greeting (the one callers hear when Voice Connection answers)
must be assigned to each port. Greetings must be assigned for day and night as well
as days of the week. With Voice Connection you have the flexibility to assign a
different greeting to each port. Different greetings may be assigned for different
days or time of day.
Main greetings are generally assigned to Combo Mailboxes, Menu Mailboxes or
Transfer Mailboxes. In this section you will find a description for assigning
mailboxes and greetings for each of these types of mailboxes.
Mailbox Selection
Before you select the type of mailbox for your main greeting, you must first
determine how the calls will be routed after the call has been answered by the Voice
Connection system. Each type of mailbox offers you different options. A brief
description of each follows.
Transfer Mailbox Transfer mailboxes give callers the option to enter the extension
number for the desired party, to dial the operator, or to access the company directory.
If the caller chooses not to enter any information, they will be routed to the
destination entered in the Next Action field of the transfer mailbox. This destination
is normally the attendant's extension.
Assigning Main System Greetings • 57
Page 63

Menu Mailbox Menu Mailboxes offer the caller a choice of items (e.g., for Sales
press One, for Service press Two, etc.) that, when selected, will automatically route
the caller to the proper extension or mailbox. While the caller also has the option to
either dial the operator or access the company directory, they cannot dial directly in
to an extension, being limited to the menu of choices that the mailbox has been
programmed with. If the caller chooses not to enter any information, they will be
routed to the destination entered in the Next Action field, the same as for a Transfer
Mailbox.
Combo Mailbox Combo Mailboxes combine the features of both the Transfer and
Menu mailboxes. Callers may elect to dial an extension number or select from a list
of choices, while also having the option to dial the operator, or access a company
directory. If the caller chooses not to enter any information, they will be routed to
the destination entered in the Next Action field.
Assigning Main System Greetings • 58
Page 64

Creating and Assigning the Mailbox
Creating the Mailbox
After you have selected the type of mailbox that will act as your main greeting, you
will need to create, edit, assign and record the greetings for the mailbox.
1 Select Mailbox Setup from the Config Menu.
2 When the mailbox listbox appears click the mouse on ADD.
3 Assign a number for the mailbox.
4 Enter the type of mailbox to be created.
5 Create the mailbox.
After you have created the mailbox, select EDIT and enter the appropriate
information. Refer to the section on System Programming and Database Layout for
an explanation of the fields.
Assigning the Mailbox
After the mailbox has been created, it must be assigned as the main greeting for each
port or trunk number.
1. Select Auto Attendant Greeting Setup from the Config Menu.
2. Enter the appropriate range of ports or trunk numbers.
3. Enter the appropriate mailbox that will act as the main greeting for each day of
the week.
4. Click the mouse on the Write button.
Assigning Main System Greetings • 59
Page 65

p
b
Recording the Greetings
Refer to the section of this manual on Recording System Greetings and record the
greetings for each mailbox that has been assigned as a main greeting.
You must record at least one greeting
(greeting number one) for each
mailbox. If no time of day changes are
entered, then greeting number one will
lay at all times.
Make sure you enter the time in a 24
hour format (5pm is 1700).
When this greeting is activated, it will
override all time of day changes and
continue to play until deactivated.
Each of the three types of mailboxes allows three greetings to be recorded. These
greetings may be automatically activated and deactivated based on the time of day.
A common practice is to record the day greeting as greeting number one and the
night greeting as greeting number two. The beginning time for normal business
hours and greeting one is entered on the first line. The ending time for the normal
usiness hours and the starting time of greeting number two is entered on the second
line. If the normal hours are from 9 AM to 5 PM then greeting one will play from 9
AM to 5 PM and greeting two will play from 5 PM until 9 AM the next morning.
If desired, greeting number three may also be used. Voice Connection allows you to
have 3 greetings with 4 different time of day changes for each mailbox.
One of the greetings may be used as an override greeting. When active, this greeting
will play regardless of the time of day. This feature is useful for unusual
circumstances, such as an early closing due to weather or other emergency. To use
this feature, enter a greeting number in the Override greeting box (normally greeting
number 3). You may now call, record, and activate this greeting at any time from
any telephone.
Directory
For callers that do not know which extension number to dial, Voice Connection has a
directory feature. If this feature is activated, callers are given the option to access the
directory by pressing the pound (#) key on their telephone. The caller will then be
prompted to enter the first three letters of their party’s name.
Programming the Directory Mailbox
Before the directory feature can be used a directory mailbox must be created.
1. Select Config, Mailbox Setup.
2. Click the mouse on the Add button.
3. Enter the mailbox number and select “I” for type.
4. Create the mailbox by clicking the Create button.
5. Once the mailbox has been created, highlight the mailbox number on the list and
click edit.
6. When the mailbox screen appears, enter the mailbox name in the Name field
Directory • 60
Page 66

7. In the Digits Expected field, enter a number from 1 to 9.
The number you enter here must be equal to the number of digits in your extension
numbers.
8. Do not enter any other information at this time.
9. Click on the Write button to exit.
Assigning Names to the Directory
Please make every effort to assign the
same number to the mailbox and
extension. If the user does not have an
extension then any mailbox may be
used.
After the directory mailbox has been created and programmed, the names must be
added. This is accomplished in two steps. First the names will be entered by editing
the user mailboxes and then the names and extension numbers will be recorded.
Refer to the section on Recording Directory Information.
1. Select Config, Mailbox Setup.
2. Highlight the first user mailbox displayed.
3. Click on the Edit button.
4. If you have not already done so, enter the user name in the Name field. Enter the
last name first, if the directory is to be accessed by last name, or the first name first if
the directory is to be accessed by first name.
5. Click the mouse on the Add To Directory button.
6. The name will automatically be added to the directory.
7. Repeat the above steps for all user mailboxes.
To change a directory listing from one name to another, you must first delete the
old name from the directory. To do this, you must follow all the steps up to
number three, above, and then, instead of clicking on the Add To Directory button,
click on the Delete From Directory button. Then, enter the new name in the
appropriate fields, and click on the Add To Directory button.
Recording Directory Information
The directory information must now be recorded for playback to the caller. To do
this you must access the Voice Connection as the system manager.
1. Call the extension number that is assigned to the Voice Connection System.
2. When the system answers, press the star key. When the system asks for a
mailbox number, press the pound key.
3. You will then be prompted to enter the system password. You must enter a
pound after entering the system password.
4. Once the password is entered, you will be given a menu of choices.
5. Choose “Record Directory Information.” You will then be prompted for a
mailbox number.
6. Enter the number of the mailbox for the user that is to be listed in the directory.
Directory • 61
Page 67

7. When you hear the tone, record the information for this user (e.g., "For John
Smith dial 123").
8. Press any key after the information has been recorded to stop recording.
9. You will then be prompted for the next mailbox number.
Repeat the above steps for all names to be added to the directory.
Assigning the Directory Mailbox
Before Voice Connection can access a directory, the directory mailbox must be
assigned.
1. Select System Parameters from the Config Menu.
2. Enter the directory mailbox number
3. The directory may be searched by first or last name; the default option is last
name. If you desire to have the directory search by first name you must click on the
Select box to deactivate the last name search. Then you must edit the user mailboxes
by removing and then re-adding all of the names to the directory.
USER NAMES
The default recording for the directory will ask the caller to enter the first 3 letters of
the last name. The digit 1 is used for Q and Z. If this prompt is acceptable then no
further action needs to be taken.
If the default prompt, is not acceptable then a new prompt may be recorded for this
mailbox. Refer to the section on Recording System Greetings for this procedure.
Voice Connection allows the mailbox owner or the system manager to record the
name associated with this mailbox. Mailbox owners may record their name by
pressing <9> when listening to the user menu.
System managers may record names by accessing Voice Connection and entering the
system password. When the menu is played, select <3> and enter the mailbox
number at the prompt. Record the name for that mailbox after the beep.
Once the names have been recorded the caller will hear the name after dialing the
extension number (e.g., “Transferring to John Smith.”).
Directory • 62
Page 68

Maintenance Utilities
Re-Installing or Upgrading Software
The main program for the Voice connection system has been loaded at the factory
and initial software installation is unnecessary; however, in the unlikely event of
catastrophic failure (power surge, equipment malfunction, etc.), each system is
supplied with a set of back-up diskettes. Also, future enhancements in the software
will be provided to you on a set of diskettes with full instructions on the installation
procedure.
In the event that it becomes necessary to re-install or update the system software,
please use the following procedure:
1. Click on the Quit option of the Main Menu bar.
2. The Voice Connection system will ask for confirmation.
3. Select 'Yes'.
4. If you are prompted to "Compress Disk Now and Reboot?" choose No.
A menu with several options will appear. If you are upgrading the
software, select Upgrade and follow the prompts on the screen. If
you are reinstalling the software, select Re-Install and follow the
prompts on the screen.
Database Backup
Backup of the system database is highly recommended, after the initial database
programming is complete. Additional backups should be performed after every
change in the database information. To make backup copies, perform the following
steps:
1. Click the mouse on the 'Quit' button on the Main Menu screen.
2. The Voice Connection system will ask for confirmation.
3. Select 'Yes'.
4. If you are prompted to "Compress Disk Now and Reboot?" choose 'No'.
When the Voice Connection Maintenance Menu appears, select Backup (1 or 2,
depending) and follow the instructions on the screen.
Maintenance Utilities • 63
Page 69

Examples
Primary Answering Position
When Voice Connection is configured as the primary answering position, all calls
received by the telephone system are directed to Voice Connection. Voice
Connection answers the calls and plays a greeting. The callers may then direct
themselves to the proper extension or department within the organization. If the
called party does not answer, then the caller will be given the option of leaving a
message.
Under this configuration, the incoming C.O. lines are in one Hunt Group and all lines
are programmed to ring the Voice Connection extensions via the DIL or Flexible
ringing assignment features. In the event that all Voice Connection extensions are
busy, the telephone system should be programmed to direct the incoming calls to
another extension via the delayed ringing feature.
Secondary Answering Position
Some companies prefer to have first time callers answered by an operator. In this
case, the Voice Connection system is configured as a secondary answering position.
Regular callers and employees can be given another number that is answered by
Voice Connection where they can be directed to the desired extension and leave a
message when the called party does not answer. The operator has the ability to
transfer callers to the correct mailbox when the requested party does not answer.
Under this configuration, the incoming C.O. lines are divided into two Hunt Groups.
One group is assigned to ring at the operator's telephone while the other group is
assigned to ring at the Voice Connection extensions. Both DIL and Flexible ringing
assignments can be used to accomplish this.
Overflow Answering Position
With this option, all incoming calls are answered by the operator. However, should
the operator not answer a call within a pre-set amount of time the call is answered by
the Voice Connection system.
Under this configuration, the incoming C.O. lines can be in one Hunt Group.
However, do not forget that unless at least one line is programmed to be answered by
the Voice Connection system, employees outside of the office cannot call directly
into Voice Connection to check their messages. Therefore, it is advisable to have
incoming C.O. lines in more than one group.
Examples • 64
Page 70

Multiple Applications
Voice Connection may be configured to answer calls for more than one company or
department. Each port within Voice Connection can be programmed to play a
different greeting.
Under this configuration, incoming C.O. lines are divided into the number of Hunt
Groups necessary to accomplish the multiple applications.
Answering Service
Voice Connection can be used as an answering service remotely or within an office
that sub-leases space to tenants for a varying period.
Under this configuration, tenants or customers are assigned DID numbers that
terminate in the Voice Connection system. When a call is received and answered,
the caller hears the personal greeting of the individual.
Applications
How to Determine the Correct Setup for Your Installation
Call flow through Voice Connection is an important consideration. First, you must
determine what your applications are and then select the proper flow for each
application. If your system is poorly set up, people risk being sent in circles without
ever being able to talk to anyone, or even to get where it is they need to go for the
information they want! A system which is properly set up will not only handle calls
more efficiently, but create a much more professional image, while a poorly set up
system can cause frustration and loss of clientele. From the initial greeting to the
time your client hangs up the line, everything in the system should be clear, concise,
and should quickly get your callers where they need to go.
Gathering Information
Talk to as many people in your organization as possible. Ask questions. Find out
how they handle telephone calls; ask for their opinions on how they would like to
have their calls processed. Taking the time to do this before programming the
system can save you a good deal of effort once the system is installed.
The following questions are intended as a general guide for you to follow when you
gather your information:
Do you want Voice Connection to answer all calls?
Applications • 65
Page 71

Do you want the receptionist to answer all calls?
Do you want Voice Connection or the receptionist to answer overflow calls?
Do you want your employees to call the voice mail system directly?
Are all of your calls screened before they are transferred?
If the receptionist will answer all calls, do you want the caller to be given the option
of leaving a message or to be transferred to the voice mail?
Will your telephone system transfer calls directly to the voice mail and pass
information on where the call came from?
Does your telephone system have message waiting lights on the telephones?
Can you light the message waiting light by dialing a touch tone code?
If message-waiting lamps can be activated, do you want Voice Connection to light
them when messages are present in the user's mailbox?
How are your service calls handled after hours?
Do service people have beepers?
Do any other employees have beepers?
How many departments does your organization have?
Do you want calls to be transferred directly to any of these departments?
Is there any repetitive information, such as hours, schedules or directions, that callers
request frequently?
Would you like Voice Connection to handle these calls?
Do any of the routine requests (such as product info) require material to be faxed?
Are there any other applications for Voice Connections Fax On Demand option?
Do you have outside salespeople?
Do you have outside service people? How are they dispatched?
When calls are answered by Voice Connection, do you want the callers to be played
a menu of choices, or do you want them to only dial an extension or the operator?
Would you like callers to access a company directory?
Will Voice Connection answer calls for more than one company?
Are there any audiotext applications (applications that require callers to enter digits
to obtain information)?
Do you want callers to receive a different greeting after hours or on weekends?
Do you want callers to be given a menu of choices when they call after hours?
If the receptionist answers calls during the day, do you want Voice Connection to
answer them at night?
Do you have any customers, clients or vendors that you would like to have a mailbox
on your system?
Do your department managers or supervisors sometimes need to distribute the same
information to all of their people?
Applications • 66
Page 72

Examples
Planning the Layout
After you have gathered the necessary information sketch out a flowchart of the call
flow and fill in the programming sheets. When selecting mailbox numbers, it is
easier to keep them straight if you use a block of numbers for each type (100-199
menu, 200-299 user, etc.). Note: Always determine the numbering scheme for
the user mailboxes first. It is strongly suggested that you assign users the same
mailbox number as their telephone extension number. Examine your flowchart
and decide which type of mailbox should be used for each step. It may help to
review the section on Mailbox Types at this time.
Caution: Voice Connection gives you complete flexibility in chaining mailboxes
together. Care should be taken to insure that callers are not placed in loops
with no exit.
In this section, two examples of typical installations will be given. In the first
example, the Voice Connection system will be used as a Primary Answering
Position and callers will be given a menu of choices. In the second example, Voice
Connection will be used as a Secondary Answering Position during business hours
and as a primary answering position for all other times. Employees with user
mailboxes can call the system directly to retrieve messages. When calls are
answered by Voice Connection, callers will be allowed to dial an extension or the
operator.
EXAMPLE ONE
ACE Computers is a large computer company that sells both hardware and software.
They also provide service on equipment. The company wants the Voice Connection
system to answer all calls 24 hours a day.
Callers will be given a choice to dial an extension, connect to sales or service,
receive product information via voice or fax, access a company directory or dial the
operator. Hardware sales is located at extension 120 and software sales at extension
125. Service calls are taken at extension 130. ACE would also like service
customers to be able to check on the status of their system without tying up the
technical department.
Step One
Draw a flowchart sketch of the layout and identify what type of mailbox to use for
each step.
Applications • 67
Page 73

Step Two
Assign mailbox numbers for all types and identify extension numbers for locations
that will receive calls from the menu structure. In our example, the telephone
extensions are numbered from 100 to 199. We will start by assigning the user
mailboxes first, using the same numbering scheme.
Pencil in the mailbox and extension numbers on your sketch.
Step Three
Draw a flowchart sketch of the layout and identify showing the type of mailbox and
the mailbox number or extension number for each selection.
Step Four
Enter the information into the Voice Connection system.
The information must now be entered into the Voice Connection database. Referring
to the section on System Programming and Database Layout, enter the
information from the programming sheets. When you have finished, refer to the
section on Assigning and Editing Mailboxes and create all of the mailboxes for the
system, using the programming work sheet for Mailbox Assignments as a guide for
this step. After the mailboxes have been created, edit each one by entering the
appropriate information. Refer to the Menu Mailbox Worksheet and the information
in the Assigning and Editing Mailboxes section during this step. Finally, refer to
the section on Assigning and Editing Extensions and enter the telephone extension
information.
Step Five
Write out all of the system greetings and record them.
Menu Mailbox 200 (Main Greeting)
"Thank you for calling ACE Computers. For Sales, press One, for Service, press
Two, to dial an extension, press Three, for product information, press Four. Press
pound for a company directory, press Zero for the operator, or just stay on the line
and you will be connected."
Menu Mailbox 201 (Sales)
"For hardware sales, press One. For software sales, press Two."
Applications • 68
Page 74

Menu Mailbox 202 (Service)
"To check the status of your item being serviced, press One. To place a service call,
press Two."
Menu Mailbox 203 (Product information)
"To receive FAX information, press One. To listen to product descriptions, press
Two."
Audiotext Mailbox 500 (Invoice number)
"Please enter the last four digits of your service ticket number."
Menu Mailbox 204 (FAX information)
"For product 1, press One. For product 2, press Two."
Menu Mailbox 205 (Voice information)
"For product 1, press One. For product 2, press Two. For product 3, press Three."
Play Only Mailbox 1001 (Product 1 information)
"The ACE Pentium 175 is packaged as a complete turn-key system. Included is a 3
1/2" 2.88 meg floppy drive, a ten-speed CD-ROM, a 2 gigabyte hard drive, 512 k
pipeline cache, 32 megs of RAM, and a 20" XGA monitor."
Similar recordings may be made for other product information. Mailboxes reserved
for service status may be recorded as the need dictates.
Step Six
Program the telephone system.
Programming the telephone system for this example is simple and straight forward.
Since Voice Connection is answering all calls, 24 hours a day, we only need to make
two program changes.
Assign the telephone extensions connected to Voice Connection to a hunt group.
When extensions are placed in a hunt group calls sent to the group will go to the first
extension in the group that is not busy. This allows calls to be answered by any free
port on the Voice Connection system. Only when all extensions in the hunt group
are busy does the telephone system return a busy. Your incoming lines from the
telephone company work the same way.
Program the incoming lines (C.O. lines) from the telephone company to ring the first
extension in the hunt group assigned (connected to Voice Connection) in step
number one. This can be accomplished by assigning all of the incoming lines as
Direct In Lines (DIL) to ring at the first extension in the hunt group. If the telephone
system does not have a DIL feature then program all of the incoming lines to ring the
first extension in the hunt group with the Flexible Ringing Assignment feature.
Note: Some telephone systems may not have a hunt group feature or it may be
difficult to assign all incoming lines to ring at one extension. If you encounter this
problem then try assigning each incoming line to ring a different extension attached
to Voice Connection. C.O. line one to port one, C.O. line two to port two, etc. After
you run out of ports, start over (C.O. line five to port one etc.).
Applications • 69
Page 75

EXAMPLE TWO
FBN, Inc. is a smaller company that wants all calls answered by the receptionist
during business hours. They would like Voice Connection to answer the calls during
non-business hours. Employees should be able to dial directly into the voice mail
system from outside of the office. Callers wishing to leave messages will be
transferred into the voice mail by the receptionist. After hours callers may dial an
extension, or leave messages in a company mailbox.
Step One
Draw a flowchart sketch of the layout and identify each type of mailbox, showing the
mailbox number and/or extension number for each selection.
Step Two
Enter the information into the Voice Connection system.
The information must now be entered into the Voice Connection database. Referring
to the section on System Programming and Database Layout, enter the information
from the programming sheets. When you have finished, refer to the section on
Assigning and Editing Mailboxes and create all of the mailboxes for the system,
using the programming worksheet for Mailbox Assignments as a guide for this step.
After the mailboxes have been created, edit each one by entering the appropriate
information. Refer to the Assigning and Editing Mailboxes section during this step.
Finally, refer to the section on Assigning and Editing Extensions and enter the
telephone extension information.
Step Three
Write out all of the system greetings and record them.
Mailbox 300 Main Greeting (transfer)
"Thank you for calling FBN, Inc. If you are calling from a touch-tone telephone and
know the extension number of the party you wish to reach, enter it now. Press pound
for a company directory. Press Zero for the operator or stay on the line and you will
be connected."
Mailbox 301 Night Greeting (transfer)
"Thank you for calling FBN, Inc. Our business hours are from 8:30 AM to 5:30 PM,
Monday through Friday. If you are calling from a touch-tone telephone you may dial
an extension number at this time. Press pound for a company directory, or hold and
you will be connected to the main message center."
Applications • 70
Page 76

Step Four
Program the telephone system.
Because the system will answer differently during business hours than non-business
hours and provide backup for the operator, the telephone system in this example
requires more programming than the first example.
Assign the extensions connected to Voice Connection to a hunt group as in example
one.
The telephone system will have a feature called Day Mode and Night Mode. This
feature allows you to make different telephones ring during the day than at night. In
the day mode, program all of the incoming lines to ring at the operator's extension
If the telephone system has a Delayed Ring Assignment feature, then program the
first extension connected to Voice Connection as a delayed ringing assignment.
With this feature, calls that ring at the operators extension longer than a preset
amount of time will also ring on the extension assigned to Voice Connection. Voice
Connection will answer the call, thereby acting as a backup for the operator.
In the Night Mode, program all of the incoming lines to ring the first extension
connected to Voice Connection. To accomplish this, use the same features as
outlined in step two of example one.
In our example, employees will be calling directly into Voice Connection to retrieve
their messages. To accomplish this, we need to assign one or more incoming lines to
ring at Voice Connection in both the day and night mode. Employees will call this
line. The line may be assigned to ring using the same features as outlined in step two
of example one. Note: It is best to assign incoming lines that are not in the same
central office hunt group as the lines being answered by the operator.
Otherwise, some calls that normally would go to the operator may be answered
by Voice Connection.
Fax on Demand
If your Voice Connection system is equipped with the FAX on Demand option,
callers may have information faxed directly to them from the Voice Connection
system. The information that is faxed may be text file or a graphic file that has been
faxed into the Voice Connection system.
A complete set of documentation for the fax board installed in your system has been
included. Please take the time to review this information and become familiar with
its operation.
Fax on Demand • 71
Page 77

Fax Board Setup
If your Voice Connection fax option was installed at the factory, then your fax board
has been installed and configured for your system. If you are installing the fax board,
please refer to the documentation included with the board for installation
instructions.
When configuring the fax software several options need to be set. Factory installed
boards have these options preset and they should work with the great majority of
installations. Should changes be necessary please consult your fax board
documentation or call your dealer or Voice Connection customer support. Boards not
installed at the factory will require some minor changes to the default configuration
installed by the installation program. Listed below are the proper settings.
All of the option tables that are listed are accessed through the Advanced Setup
routine. To access this routine exit the Voice Connection system by clicking the
mouse on the quit option under the files menu and selecting yes at the confirm
prompt.
• Select Configure FAX Software Options from the menu that appears.
• After pressing the return key two more times you will be presented with the
main OPTIONS menu.
• Move the cursor to Advanced setup and press return. The following menu will
appear.
• Move the cursor to Advanced setup and press return.
Fax on Demand • 72
Page 78

The following screens represent the proper configuration for the Voice Connection
fax board settings.
Fax on Demand • 73
Page 79

Fax on Demand • 74
Page 80

Loading Documents to be Faxed
Documents may be loaded into the Voice Connection system from a FAX machine
or by copying the files directly from a floppy disk.
Receiving Faxed Documents from a FAX machine
1. Create a FAX mailbox.
2. Edit the FAX mailbox just created.
3. Enter the name for this mailbox in the Name text box.
4. Enter the Fax Filename in the Fax File Name text box. The following
format must be used: FAXBACK\[filename].
5. Select the PCX Multi-Page Document Option.
6. Click the mouse on the Enable Receiving Faxes Button.
7. From your fax machine dial the number assigned to the fax modem.
8. When the fax has been received, click the mouse on the Disable Receiving
Faxes Button
Fax on Demand • 75
Page 81

9. Click the mouse on the Assign Fax to Mbx Button.
10. Click the mouse on the Write, Next or Previous Button.
11. Repeat these steps for each fax mailbox.
Copying Files from a Floppy Disk
Files to be faxed may be copied into the Voice Connection system from a floppy
disk. This gives you the ability to create or copy text documents from another
computer and fax them directly from Voice Connection. Make sure that text files are
in a standard ASCI text format. You may also fax PCX graphic files.
Exit Voice Connection. When you reach the Maintenance Menu place the floppy
disk in the floppy drive and type CD FAXBACK and press the enter key. The
prompt should now read C:\VOICECON\FAXBACK. Now enter the command
COPY A: [filename]. Press enter and the file will be copied to Voice Connection
faxback directory.
You may now restart Voice Connection and create the fax mailbox for this
document.
Creating Fax Mailboxes for documents copied from a Floppy Disk
Before the document can be faxed from Voice Connection, a fax mailbox must be
created to identity the document.
1. Select Config, Mailbox setup.
2. Select ADD and enter the mailbox number you wish to use.
3. Select FAX for mailbox type and create the mailbox.
4. After the mailbox has been created, highlight the mailbox number and click
on the edit button.
5. Enter the name for this mailbox in the Name text box.
6. In the Fax File Name text box, type the name of the file to be faxed using
the following format. C:\FAXBACK\[filename] and press return.
8. It is not necessary to enter any additional information.
Fax on Demand • 76
Page 82

Sending Fax Documents
Once the FAX documents have been created, the Voice Connection system must be
programmed to send the FAX when a request is received from a caller. The caller
should be led to the appropriate document through a menu structure that is clear and
simple to follow. There are many ways to accomplish this task, listed below are two
examples and the procedure for each.
Example one
Voice Connection callers are played a menu of choices. Press one for sales, press
two for service, Press 3 for product information, etc. After selecting 3 for product
information the caller will be played another menu. Press one to receive fax
information, press two to order an information package. When one is selected to
receive fax information the caller is played another menu. Press one for product A,
press two for product B, etc. After selecting a product, the caller will be prompted to
enter their fax telephone number. Once entered the number will be played back to the
caller for verification. When the caller verifies that the number is correct, the
document will be faxed.
Programming example one
1. Create menu mailboxes for the main greeting, information request and
products.
2. In the main greeting mailbox, assign the mailbox number for information
request at DTMF digit 3.
3. In the information request mailbox, assign the mailbox number for products
at DTMF digit 1.
4. In the product mailbox, assign the fax mailbox for each product at the
appropriate DTMF digit.
Example two
This example assumes that the callers have a reference number to enter for the fax
they are requesting. When a call is received, the caller will be played a menu of
choices. One of which will be to receive fax documents. When the caller selects the
fax option, they will be prompted to enter the document number. After entering the
number they will be asked for their fax telephone number and verification. The
document requested will be faxed to them.
Programming example two
1. Assign a menu mailbox for the main greeting.
2. Assign a transfer mailbox for document selection.
3. In the menu mailbox, enter the mailbox number for the transfer mailbox
next to the appropriate DTMF digit.
4. Assign fax mailboxes for each document.
5. The fax mailbox number then becomes the document number that the caller
enters.
Fax on Demand • 77
Page 83

Running Accucall
If your telephone system is an ESP, Vodavi, Sprint Protege, Sprint Protege 32,
Panasonic D1232, or a Comdial Digitech, then the only thing which needs to be done
to configure your Rhetorex voice board properly is to load the appropriate file and
tone table.
1. Type CONFIGUR at the C:\VOICECON prompt
2. Press the <F4> key.
3. When you are prompted for the filename, type m
• ESP. TON for the ESP telephone system VODAVI.TON for the
Vodavi telephone system
• PROTEGE' TON for the Sprint Protege telephone system
• PR032.TON for the Sprint Protege 32 telephone system, or
• ACCUCALL.TON for the Comdial Digitech or Panasonic D1232
telephone system
4. Then press <F 10> twice, once to exit to the Main Menu, and again to exit
the configuration program entirely. When it asks if you wish to save your
changes, type Y, and it will return you to the DOS prompt.
5. Reboot your machine.
If your telephone system is NOT one of the above, then you will need to run Acccall,
and configure your voice board manually. To do this, the Voice Mail system needs to
be connected to your telephone system, and you will need at least one extension
which you have immediate access to, and which can be temporarily dedicated to
your use.
1. Either type in ACCUCALI at the C:\VOICECON prompt, or choose the
Accucall option from the maintenance menu. You will then see a screen like
this:
Running Accucall • 78
Page 84

2. From Accucall’s Main Menu, press <F5>. The following screen will
appear.
3. Using the tab or arrow keys to move from field to field, verify that, under
the box labeled
RUN/AUTO RUN PARAMETERS:
• The Hardware Interrupt is set at 3;
• The Outdial channel number is set to the correct port, i.e.,
that which is connected to the telephone system.
4. Verity that, under the box labeled CHANNEL PAEAMETERS:
• The GLITCH is set to 90;
• The SPIKE is set to 120.
5. You may also wish to set the Use Internal Speaker setting to YES, so that
you may monitor the status of Accucall's tests.
Running Accucall • 79
Page 85

6. Press <F7>to save the current configuration, then <F1O> to exit to the Main
Menu.
7. From the Main Menu, press <F6>; this will take you to a screen which will
look like this
Generating the RING Tone
1. In the field labeled TELEPHONE NO., enter the number of the extension
which is dedicated to your use, and which is easily accessible. DO NOT
ANSWER THE TELEPHONE WHEN IT RINGS.
2. From this screen, press <F9> to start.
3. At this point, you should see the messages "GOING OFF-HOOK", followed
by "WAITING FOR DIALTONE" and "DIALING NUMBER" in the
FREQUENCIES DETECTED box. If you do not, or if you receive a beep
along with the error message "TELEPHONE LINE CONNECTED???"
press the <ESC> key twice. Verify that the lines to the Voice Mail machine
and to the extension which you are using are properly connected. If they
are, then go back under Setup (<F5>) and verity that all of the above-named
settings are correct.
4. Once a frequency has been logged correctly, press <F8> to add the tone.
You will then see a screen that looks like this:
Running Accucall • 80
Page 86

4. Name the tone RING. Depending on the cadence of the tone, Accucall will
select either RING1 or RING2 as the tone type. Do not change this
selection.
5. Once again using either the <TAB> or the arrow keys to change fields and
the <spacebar> to toggle between options, verity that:
• Terminating is set to NO;
• Cadence is set to NO;
• PCPMCODE is set to 8.
6. Press <FS> twice. Once you have been prompted that the tone has been
added, press <F1O> to return to the AUTORUN screen.
Generating the BUSY Tone
1. Leaving the parameters from before intact, Auto-Run Accucall again
(<F9>), but this time, take the extension which you are calling off the hook,
first. Leaving it off the hook, press <F9> to run Accucall again, then, once
Accucall has stopped running, press <F8> to enter the Tone Editing screen'
just as before.
2. Name this tone BUSY, once again allowing Accucall to assign the type.
3. Using the arrow keys to change fields and the <spacebar> to toggle between
options, verity that:
• Terminating is set to NO,
• CADENCE is set to NO:
• PCPMCODE is set to 7.
4. Using <F8> twice to add the tone, return to the AUTORUN screen (<F6>).
Generating the Reorder (Fast Busy) Tone
1. This time, set the Telephone. No. parameter to the extension number which
the voice mail port is connected to (e.g., if port 1 is connected to extension
218, then set the Telephone No. to 218).
2. Once this is done, press <F9>. If the PC speaker option was enabled, you
should shortly hear what sounds like a fast busy signal, otherwise known as
a reorder tone.
Running Accucall • 81
Page 87

3. If there are no error messages, and the tone is logged correctly, press <F8>
and go into the tone-editing screen.
4. Name the tone REORDER
5. Leave the type at default.
6. Using the arrow keys to move between fields and the <spacebar> to toggle
between choices, verity that:
• TERMINA'IING is set to YES;
• CADENCE is set to NO;
• PCPMCODE is set to 11.
7. Press <F8> to save the tone as before.
8. Before leaving the tone editor, note the frequency listed for the tones. Write
it down in preparation for Adding tones to the Filter Table, below.
9. Press <F1O> to return to the Main Menu.
Adding the Tones to the Filter Table
1. From the Main Menu, press <F3> to go to the Filter Table.
2. Type in the frequency of the tones from number 8, above, in the Filters box.
3. Press <F10> to return to the main menu.
Saving the Tone File
1. From the Main Menu, press <F7> for FILE.
2. Type a filename with a TON extension (e.g., MYPHONE.TON).
3. Press <FS> to save the file, and you will be automatically returned to the
Main Menu.
4. Exit the Main Menu by pressing <F 10>, and then answering "Y' at the
prompt.
5. Type CONFIGUR at the C:\VOICECON prompt. You should see a screen
like this:
Running Accucall • 82
Page 88

6. Press <F4> to go under FILE.
7. Type in the name of you file when prompted to (e.g. MYPHONE.TON).
3. Press <F1O> twice: once to return to the Main Menu, and the second time
to exit CONFIGUR When prompted whether or not to save current changes,
answer “'Y”, and you will be returned to a DOS prompt.
9. Reboot your machine.
Running Accucall • 83
Page 89

User Guide
Introduction
Welcome to Voice Connection.' Your new voice mail system has been designed to
provide you with the latest features in call-processing technology in an easy-to-use
format. Voice Connection offers you enhanced connectivity in your business. The
ability to easily tailor your mailbox for your own needs. Including convenience in
retrieving your messages, and most of all, security and peace of mind that all of your
messages are getting to you, no matter where in the world you are, and all with a
minimum of effort. Voice Connection has many user-friendly features, including:
• Access to your messages from anywhere in the world
• The ability to personalize your mailbox with up to three different greetings
• The convenience of message notification
• Easy-to-follow, menu-prompted message management
• Message forwarding to other users on the system
• The ability to edit messages
• An easy-to-use directory, listing users by either their first or last names
• The security of being able to choose and change your own personal password
• Message distribution, allowing you to send a message to virtually any number of
other system users, without having to record it more than once.
• A date and time stamp for each message
Plus many additional features, all of which were specifically designed to make things
simpler and more hassle-free for you, the user.
User Guide • 84
Page 90

Getting Started
As a user on the Voice Connection system, you have been assigned a mailbox
number by your system administrator; the system administrator is the person to
contact if you have any questions about the operation of your system.
Access to Voice connection is simple: from inside the office, simply dial the
extension number, which has been assigned for Voice Connection; when outside the
office, simply dial in on a regular seven-digit telephone number. Once you have
reached Voice Connection, just follow the instructions in the Accessing Your
Mailbox section of this manual. There is certain information you will need to access
your messages, and in the interest of safekeeping, we recommend you write it below,
and keep this manual in a safe place. Please note that the default password for your
mailbox is pound (#).
1. The Internal telephone number for Voice Connection is ___________.
2. The External telephone number for Voice Connection is __________.
3. My Mailbox number is ____________.
4. My Password is ______________.
5. The System Administrator is ______________ at extension _________.
When you access your mailbox for the first time, you will want to do the following:
1. Record a new personal greeting.
2. Enter your own password.
3. Record your name for the user directory.
Once you have done these three things, your mailbox will be up and ready to go.
Configuring Your Mailbox for the First Time
Below are instructions that will make it easy for you to set your mailbox up for the
first time. Follow everything closely and you won't have any problems at all. The
first thing you should do after accessing your mailbox is set your password; after
that, you should record your greeting, and then record your name. Remember, if at
any time you wish to back up to the previous menu, all you have to do is press the
star (*) key. If at any time you wish to exit, pressing three stars in a row (***) will
allow you to exit from Voice Connection. It is recommended that you read these
instructions once through in their entirety before commencing. If you have any
difficulties, please contact your system administrator.
1. Dial the number assigned to Voice Connection. If you are inside the office
this will typically be an extension number; from outside the office, you will
User Guide • 85
Page 91

be dialing a regular seven-digit telephone number to connect to Voice
Connection.
Note: If no private outside number has been assigned to Voice Connection, you may
call the main office number and have the attendant transfer you into the Voice
Connection system.
2. When Voice Connection answers, press the star (*) key and enter your
mailbox number.
3. Since you have not yet recorded your greeting, you will hear a prompt
asking you to leave a message. Press the pound (#) key the moment you
hear the prompt.
4. You will then be prompted for your password. Once again, press the pound
(#) key.
5. You will now be in the Main Menu of your mailbox. Press three (3).
6. When prompted to, enter your new password. It should be four digits long.
7. You will be asked to re-enter your password for verification reasons. Do so
when prompted.
Note: If
entered, then your password will not be changed from the default, which is a pound
(#).
8. You should hear "Your password has been changed", followed by the Main
9. From the Main Menu of your mailbox, press four (4). You will then be
10. You will then be asked to enter the greeting number. Press one (1).
11. At the tone, record your own greeting. When you are done, press the pound
12. You will then be given the option to review the greeting, save the greeting,
13. If you are satisfied with the greeting you have recorded, then press two (2)
you do not do this, or do not enter the same password as you initially
Menu of your mailbox. If you do not, repeat steps 5 through 7 until you hear
confirmation that your password has been accepted.
given the options to Record a New Greeting, Delete a Greeting, or Change
the Active Greeting. Press one (1) to Record a New Greeting.
(#) key.
or re-record the greeting. If you are not satisfied with the greeting you just
recorded, simply press three (3) and start speaking when you hear the tone.
If you wish to review it, do so, and you will be given the same three options
once it is done playing.
to save the greeting. After this, you will be asked to press one (1) to make
the new greeting active. Do so. Note: If you do not, it will not be activated,
and will not play. Once you have done this, you will find yourself back in
the Main Menu of your mailbox.
14. From the Main Menu, press nine (9). You will be prompted to record your
name at the tone.
15. Once you have done so, press pound (#). You will then be returned to the
Main User Menu.
16. Your setup is complete.
User Guide • 86
Page 92

About Your Password....
Your password is what protects your privacy, and the privacy of those who leave
messages in your mailbox. Although you may leave your password at the default (#),
we strongly recommend that you enter your own personal password. Entering an
obvious one (e.g., 1234 or the like) is also advised against. Choosing four entirely
random digits is the best, and periodically changing your password is also an
excellent way to maximize security.
Accessing Your Mailbox
The following is a routine guide as well as a reference for normal mailbox
maintenance, message retrieval, message management, setting up message
notification, etc. Depending upon your telephone system, the instructions which
follow directly below will most likely be used by you every time you wish to access
your mailbox, whether to retrieve messages, change your greeting, or access a
distribution group. If your telephone system is a Protege', then see the section
Special Instructions For the Sprint Protege'.
If you have any questions, please contact your system administrator.
1. Dial the Voice Connection number.
2. Once Voice Connection answers, press the star (*) key and then, when
prompted to, enter your mailbox number.
3. Once you hear your personal greeting start to play, press the pound (#) key.
3. You will then be prompted to enter your password. Do so. You will then
hear the Main User Menu for your mailbox.
User Guide • 87
Page 93

Main User Menu
Send Message
1
2
3
Change Password Retrieve Messages
Change Greeting Restore Messages
4
5
6
Notification
7
8
9
Record Name
Distribution Lists
Previous Menu
*
0
#
All the functions of your mailbox can be accessed from the Main User Menu. This
Menu allows you to retrieve messages, send those messages or ones you've recorded
to other users on the system, manage your message notification, manage your
distribution lists, and record your name. The Main User Menu also allows you to
record your own outgoing greeting. You can record up to three different greetings for
your mailbox, and you may change your active greeting at any time.
A Distribution List allows you to record and send the same message to several
mailboxes. Each user can have up to five distribution lists with 48 mailboxes per list.
Message notification allows Voice Connection to let you know when you have
received a message, whether by blinking a light on the telephone in your office, or by
notifying your own personal pager!
Erase the wrong message by accident? Voice Connection can handle that, too,
because it comes equipped with the capability to quickly and, most importantly,
easily restore messages that have been erased.
Voice Connection also allows you to set your own password, thereby insuring not
only exclusivity of access to your mailbox for you, but also guaranteeing the privacy
of those leaving messages for you.
User Guide • 88
Page 94

Retrieving Messages
1. Access Voice Connection, and enter your mailbox's Main User Menu.
2. Press one (1) to retrieve messages.
You will then be given four more options.
• Press (1) to retrieve New Messages
• Press (2) to retrieve Old Messages
• Press (3) to retrieve All Messages
• Press (*) to return to previous menu
Once you have selected an option, Voice Connection will announce the number of
messages, old and new, which you have in your mailbox, and then it will begin to
play them back, one at a time.
During message playback, you may use your keypad to control the flow of the
message, like this:
• Press (1) to rewind one second
• Press (4) to rewind five seconds
• Press (7) to the start of the message
• Press (3) to fast-forward one second
• Press (6) to fast-forward five seconds
• Press (9) to fast forward to the end of the message
• Press (5) to pause
• Press (*) or (#) to skip the message
After each message is finished, you will hear the date and time followed by these
options.
• Press (1) to save the message
• Press (2) to play the previous message
• Press (3) to replay the message
• Press (4) to erase the message
• Press (5) to forward the message to another user's mailbox
• Press (*) to return to the previous menu
User Guide • 89
Page 95

Recording and Sending Messages
1. From the Main User Menu press two (2).
2. Enter the mailbox number.
3. Record the message at the tone.
4. Press the pound (#) key when you are done. You will then be offered the
following options:
• Press (1) to review the message
• Press (2) to send the message
• Press (3) to re-record the message
• Press (*) to return to the previous menu
Changing Your Password
Never use star (*) or pound (#) as part
of your password. If you do you will
not be able to access your mailbox.
If you have not already changed your password, do so now. The default password is
pound (#), and although you may continue to use this password, we strongly
recommend that you enter your own. Changing your password periodically is also a
very good idea. The more often you change it, the more secure your mailbox. Your
password should be four digits long, and should be numeric characters only.
1. From the Main User Menu, press three (3).
2. Enter your new password when prompted.
3. Re-enter the same password as before, for verification. Note: If you do not
enter the same number twice, your password will remain the same.
4. Always remember that the pound (#) is the default password, and that if
nothing has been done to the system yet, that will be your password when
you first access your mailbox.
Changing Your Greeting
To re-record a greeting you must first
delete the old greeting and then record
a new greeting.
This feature is used to record or change your outgoing greeting. Voice Connection
supports up to three greetings, one active and two inactive. You may change your
active greeting at any time from any telephone.
User Guide • 90
Page 96

1. From the Main User Menu, press four (4).
2. You will be given the following options:
• Press one (1) to Record a new greeting
• Press two (2) to Delete a greeting
• Press three (3) to Change the active greeting
• Press * to return to the Main Menu
To Record a New Greeting
1. Enter the number of the greeting that you wish to record. Remember, if the
greeting already exists, you will be prompted to delete the old greeting first.
2. Record your greeting at the tone.
3. Press the pound (#) when you are done.
4. You will then be given the following options:
• Press (1) to review the greeting
• Press (2) to save the greeting. If you choose this, you will be given two
more options:
1. Press (1) to make the new greeting active. NOTE: If you do not press (1),
your greeting will not play.
2. Press (2) to leave the old greeting active.
3. Press (3) to re-record the greeting.
4. Press (*) to return to the previous menu.
To Delete a New Greeting
1. Enter the number of the greeting that you wish to delete.
2. The greeting will play, and then you will be prompted to confirm the
deletion. To confirm, press (1). If you do not want to delete this greeting,
then press (*) to return to the previous menu.
To Change the Active Greeting
Only one of your three greetings can be played at a time. If you wish to make
another greeting active, but don't wish to delete it, then you may simply change the
greeting. This feature allows you to temporarily change your greeting, but without
having to go through the work of deleting and then recreating it later. With this
feature, changing your active greetings can be done in less than half a minute!
1. Enter the number of the greeting that you wish to make active.
2. Press the (*) button if you wish to return to the previous menu without
changing your active greeting.
User Guide • 91
Page 97

Restoring Erased Messages
Accidentally delete the wrong message? Decide that you wanted to keep a message
just moments after you've erased it? Voice Connection can automatically restore it
with just the press of a key. Just press (6) while in the Main User Menu.
Important: If you wish to restore an erased message, you MUST do it before exiting
your mailbox. Once you exit, you will no longer be able to restore erased messages.
Managing Message Notification
Voice Connection will call and let you know when you have messages either by
lighting a message waiting light, calling an internal (office) telephone, an external
telephone, or your personal pager.
Note: For any external notification, whether an actual telephone line or a personal
pager, you can enter up to 28 digits in the appropriate field.
After pressing (7) from the Main User Menu, you will be given the following
options:
1. Press (1) to change message notification number
2. Press (2) to deactivate message notification
3. Press (3) to activate message notification
If you select one (1), to change your notification number, you will be given the
following options:
1. To change your internal number, press (1) and then enter your internal
telephone number (normally your extension number), plus the (#) key.
2. To change your external notification number, press (2) and then enter your
new external notification number, plus the (#) key. This can be any number
including long distance.
3. To change your pager number, press (3) and then enter your pager number
plus the (#) key. When you are paged, your pager will display your
mailbox number.
Note: Do not enter an access number, such as (9). Voice Connection will take care
of this for you.
User Guide • 92
Page 98

Deactivating Message Notification
Selecting this option will turn off your message notification. Just press (2).
Activating Message Notification
Selecting this option will turn on your message notification. Just press (3). You will
be given three options:
1. To turn on internal notification, press (1).
2. To turn on external notification, press (2).
3. To turn on pager notification, press (3).
Retrieving Messages when notified
If you do not retrieve your messages, Voice connection will continue trying to notify
you. The number of times Voice Connection will try to notify you and the amount of
time between notification attempts are both set by the system administrator. Once the
messages have been retrieved, Voice Connection will remove you from the
notification list, turn off your message-waiting lamp if enabled.
If you using external notification and you answer your telephone when Voice
Connection calls, you will be prompted to enter your password. After you have
entered you password, you will be placed in the Main User Menu, and then you may
retrieve your messages in the regular manner.
Management of Distribution Lists
With this feature you can record and send the same message to several mailboxes at
one time. This feature allows you to pass information along to members of your
staff or others in your department with even greater ease and speed. Each user can
have up to five distribution lists with 48 mailboxes per list.
A broadcast message is a message distributed to every mailbox on the Voice
Connection system and will automatically play when system users access their
mailboxes. Because this is used primarily to distribute emergency or urgent
information, this option is not usually available for every mailbox, but is assigned by
your system administrator. If your mailbox is enabled for broadcast (something
which must be done by your system administrator), you can send a message to every
single user on the system just by choosing distribution list number 6 (see below).
Note: Broadcast messages will continue to play until erased by the system
administrator.
User Guide • 93
Page 99

1. From the Main User Menu, press (8).
2. Record the message you wish to distribute.
3. Press the pound (#) key, and you will then be given three options:
• Press one (1) to review the message.
• Press two (2) to send the message. You will then need to enter the
• Press three (3) to re-record the message.
Recording Your Name
Once your name is recorded, whenever anyone is transferred to your mailbox or
extension, they will be prompted with "Transferring to [your name]".
To record your name:
1. From the Main User Menu, press (9).
2. Record your name at the tone and press (#) when you are done. You will
then be automatically returned to the Main User Menu.
number of the distribution list (1-5, or 6 for broadcast).
Deleting a Broadcast Message
Your system administrator is the only person who can delete a broadcast message.
The proper procedure for deleting a broadcast message is:
1. Using the mouse, click the part of the toolbar that says "Stats".
2. From Stats, click on Mbx Message Status".
3. Click once on the Broadcast Mailbox (the default broadcast mailbox is
999).
4. Click on the View button.
5. Click on the message.
6. Click on the Delete button.
-OR-
1. Call the Voice Connection System.
2. Press (*) twice.
3. Enter the system password.
4. Press (1) to edit system mailboxes.
5. Enter the number of the Broadcast mailbox (the default broadcast mailbox
is (999).
5. Retrieve and then delete the message.
User Guide • 94
Page 100

SPECIAL INSTRUCTIONS FOR THE SPRINT PROTEGE'
The Sprint Protege' telephone system provides the user with many unique integration
features that will greatly simplify the use of Voice Connection.
Accessing Your Mailbox
To access your mailbox and record new greetings, change your password, record
your name or use other features:
1. Press your Voice Mail key. It should be unlit.
2. Enter your password.
3. Press the star (*) key.
4. You may now select options from the Main User Menu.
Retrieving Messages
When new messages are present in your mailbox, your voice mail key will light.
1. Press your lighted Voice Mail key.
2. Enter your password.
3. Your new messages will now be played.
To Record and Send a Message to Another Mailbox
1. Press your Voice Mail key. It should be unfit.
2. Enter your password
3. Enter the mailbox number that is to receive the message.
4. Record your message. Press pound (#) when you have finished recording.
To Record a Telephone Conversation
If you wish to record your conversation with an outside party, press your unfit Voice
Mail key. The Protege's system will then establish a conference call with the Voice
Connection system. Voice Connection will play a beep tone and begin recording the
conversation into your mailbox.
When the conversation is complete, you may then access your mailbox and retrieve
the recording of the conversation.
Note: Only attempt to record conversations after they have been established.
Pressing any key during recording will terminate the recording. Long periods of
silence will also terminate the recording.
User Guide • 95
 Loading...