

Voice Systems Data Filer, genius Operating Manual
VOICE
SYSTEMS
DATA FILER
Manuale Operativo
Operating Manual
PAGE SOURCE CONFIRM
REAL TIME ADJ.REAL
TIME ADJ.EDIT
TOOLS MODE
VOLUME
RECSTOPPLAYPAUSEFFREW
CONTROLS FUNCTION KEYSFUNCTION
KEYS
F4 F5 F6
F3F2F1
PREV. NEXT DISK MEMORY ESC ENTER
TEMPOTRANSPMUTELYRICSSONGTRACKLIST
DISK FILES MIDI SYSTEM T. INFO SONG LIST
DATA FILER
D
A
T
A
E
N
T
R
Y
D
A
T
A
E
N
T
R
Y
VOICE SYSTEMS
CAUTION
RISK OF ELECTRIC SHOCK
DO NOT OPEN
WARNING! TO REDUCE THE DANGER OF ELECTRIC SHOCK:
DO NOT REMOVE COVER (OR BACK)
DO NOT EXPOSE THIS APPLIANCE TO RAIN OR MOISTURE
NO USER SERVICEABLE PARTS INSIDE
REFER SERVICING TO QUALIFIED SERVICE PERSONNEL
This simbol is intended to
alert the user to the presence
of important operating and
maintenance (servicing)
instructions in the literature
accompanying the appliance.
This simbol is intended to alert
the user to the presence of
uninsulated “dangerous
voltage“ within the product’s
enclouser that may be of
sufficient magnitude to
constitute a risk of electronic
shock to persons.
“INSTRUCTIONS PERTAINING TO A RISK OF FIRE,
ELECTRIC SHOCK, OR INJURY TO PERSONS“
IMPORTANT SAFETY INSTRUCTIONS
“INSTRUCTIONS
PERTAINING TO A RISK OF FIRE,
ELECTRIC
SHOCK, OR INJURY TO PERSONS“
IMPORTANT
SAFETY INSTRUCTIONS
WARNING: When using electric products, basic precautions should always be fallowed,
including the following:
1) Read all instructions before using the product.
2) To reduce risk of injury, close supervision is necessary when product is used near
children.
3) Do not use this product near water – for example, near a batnub, washbowl, kitchen
sink, in a wet basement, or near a swimming pool, or the like.
4) This product, either alone or in combination with an amplifier and headphones or
speakers, may be capable of producing sound levels that could cause permanent
hearing loss. Do not operate for a long period of time in high volume level or at a level
that is unconfortable. If you experience any hearing loss or ringing in the ears, you
should consult an audiologist.
5) This products should be located away from heat sources such as radiators, heat
register, or other products that produce heat.
6) The power supply cord of the instrument should be unplugged from the outlet when left
unused for a long period of time.
7) Care should be taken so that objects do not fall and liquids are not spilled into the
enclosure of the instrument.
8) The products should be serviced by qualified personnel when:
a. The power supply cord or the plug has been demaged; or
b. Objects have fallen, or liquid has been spilled into the product; or
c. The products has been exposed to rain; or
d. The products does not appear to operate normally or exibist a marked
change in performance; or
e. The products has been dropped, or the enclosure demaged.
9) Do not attemp to service the product beyond that described in the user-maintenance
instructions. All other servicing should be referred to qualified personnel.

DATA FILER
CONTENTS
95
1. IMPORTANT NOTES ........................................................................................................... 97
1.1 Looking after the product .................................................................................................97
1.2 Notes about the instrument.............................................................................................. 97
1.3 Notes about the manual...................................................................................................98
2. MAIN CHARACTERISTICS ..................................................................................................99
2.1 The Genius’s structure ....................................................................................................99
2.2 Data format......................................................................................................................99
3. CONTROLS AND CONNECTIONS ................................................................................... 100
3.1 The front panel...............................................................................................................100
3.2 The floppy disk driver..................................................................................................... 102
3.3 The rear panel................................................................................................................ 103
4. CONNECTIONS ................................................................................................................. 104
5. PLAYING BACK SONGS.................................................................................................... 105
5.1 The Main Page............................................................................................................... 105
5.1.1 Error messages ..................................................................................................... 108
5.2 Use the [REW] and [FF] keys ........................................................................................ 109
5.3 Multitask Song Selection (Song Next field) .................................................................... 110
5.4 Directory function...........................................................................................................111
5.5 Displaying the lyrics of the song .................................................................................... 112
6. REAL TIME FUNCTIONS ................................................................................................... 114
6.1 Lyrics .............................................................................................................................114
6.2 Track muting.................................................................................................................. 115
6.2.1 Mute Setup ............................................................................................................. 115
6.3 Trasposing the key......................................................................................................... 116
6.3.1 Transpose Setup.................................................................................................... 116
6.4 Setting the metronome tempo ....................................................................................... 117
6.4.1 T empo Setup..........................................................................................................117
7. RECORDING SONG .......................................................................................................... 118
7.1 Foreword ....................................................................................................................... 118
7.2 Starting recording ..........................................................................................................118
7.3 Saving the recording...................................................................................................... 119
7.3.1 Error messages ..................................................................................................... 120
8. SYSTEM UTILITIES ........................................................................................................... 121
8.1 Disk ...............................................................................................................................121
8.1.1 Format ................................................................................................................... 122
8.1.2 Quick Format ......................................................................................................... 123
8.1.3 File Sort.................................................................................................................. 124
8.1.4 FD Label................................................................................................................. 125
8.1.5 FD Copy................................................................................................................. 126
8.1.6 Info .........................................................................................................................130
8.1.7 Error messages - Disk section .............................................................................. 131
8.2 Files ...............................................................................................................................134
8.2.1 Copy....................................................................................................................... 134
8.2.2 Delete.....................................................................................................................139

DATA FILER
96
8.2.3 Rename ................................................................................................................. 140
8.2.4 Check..................................................................................................................... 141
8.2.5 Error messages - Files section.............................................................................. 143
8.3 MIDI functions ................................................................................................................ 145
8.3.1 Out Router ............................................................................................................. 145
8.3.2 In Filter ...................................................................................................................147
8.3.3 Out Filter ................................................................................................................ 148
8.3.4 karaoke Out............................................................................................................ 149
8.3.5 Sync In ................................................................................................................... 149
8.3.6 Sync Out ................................................................................................................ 150
8.4 System .......................................................................................................................... 151
8.4.1 Contrast ................................................................................................................. 151
8.4.2 Foot Switch ............................................................................................................ 152
8.4.3 Start-Up Mode ........................................................................................................ 152
8.4.4 Sys Info .................................................................................................................. 153
8.4.5 Play Mode............................................................................................................... 154
8.4.6 Mem. Compact ...................................................................................................... 155
8.5 The Track Info functions................................................................................................. 156
9. EDIT ..................................................................................................................................... 157
9.1 Edit Song ....................................................................................................................... 157
9.1.1 Edit Song - Transposer .......................................................................................... 158
9.1.2 Edit Song - Tempo.................................................................................................. 159
9.1.3 Edit Song - Track Transposer ................................................................................ 159
9.1.4 Edit Song - Track Mute........................................................................................... 160
9.1.5 Edit Song - T emporary play.................................................................................... 161
9.1.6 Edit Song - Saving the modifications ..................................................................... 161
9.2 Edit Track....................................................................................................................... 163
9.2.1 Edit Track - Program Change & Bank Select......................................................... 164
9.2.2 Edit Track - Volume & Pan ..................................................................................... 165
9.2.3 Edit Track - Expression.......................................................................................... 167
9.2.4 Edit Track - Velocity................................................................................................ 167
9.2.5 Edit Track - Reverb ................................................................................................168
9.2.6 Edit Track - Chorus ................................................................................................ 169
9.2.7 Edit Track - Temporary play ................................................................................... 169
9.2.8 Edit Track - Saving the modifications ..................................................................... 170
9.2.9 Error messages - Edit section ............................................................................... 172
10. LIST ....................................................................................................................... ............ 174
10.1 Creating a List.............................................................................................................. 174
10.2 Saving the List ............................................................................................................. 176
10.3 Playing a List................................................................................................................ 177
10.3.1 Error messages - Play List .................................................................................. 177
10.4 Modifying a List ............................................................................................................ 178
10.5 List file management ................................................................................................... 178
APPENDIX...............................................................................................................................179
Updating the operating system ............................................................................................ 179
Operating system failure ..................................................................................................... 18 1
Adding flash memory expansion.......................................................................................... 181
Sound List............................................................................................................................ 183

DATA FILER
1. IMPORTANT NOTES
1.1 LOOKING AFTER THE PRODUCT
1.2 NOTES ABOUT THE INSTRUMENT
97
• Do not apply excessive force to the structures and controls (knobs, switches, etc.).
• Protect the instrument from heavy stresses both during transport and in use. The instrument
should be transported in its original packaging or an equivalent.
• Do not place the Genius close to heat sources, in damp or dusty places or close to strong
magnetic fields.
• When possible, do not place the instrument close to units which produce strong
interference, such as radios, TV sets monitors, etc....
• Never insert foreign bodies or liquids of any kind inside the equipment.
• For cleaning, use only a soft cloth or compressed air; never use detergents, solvents or
alcohol.
• When disconnecting the cables from the sockets, ensure you take hold of the connector
and not the cable itself; when winding cables, do not allow knots or twists to form.
• Do not expose the instrument to direct sunlight.
•
Always use good quality screened cables. In addition, when disconnecting the cables
from the sockets, ensure you take hold of the connector and not the cable itself; when
winding cables, do not allow knots or twists to form
• Before making the connections, make sure that the other units (especially amplification
and diffusion systems) you are about to connect are switched off. This will prevent noisy
or even hazardous signal peaks.
IMPORT ANT!
The Genius is equipped with a “direct-to-disk” reading system which plays the song
while it is being read from the disk; this considerably reduces the loading times and
ensures quicker operation when file playback is started. However , this reading system
requires special care during extraction of the disk when it is being used by the system,
to avoid breaks in playback, system errors and damage to the drive reading heads.
Users are therefore strongly advised:
•
NOT TO REMOVE the disk during performance of the song, during disk formatting,
during file reading or writing, during editing operations when the song being modified

DATA FILER
98
resides on the floppy disk, or during the performance of lists resident on the disk.
Also, never extract the disk when the instrument is in “system busy” condition, i.e.
when the name of the song resident on the floppy disk is displayed in brackets ().
•
ONLY TO REMOVE the disk when the disk drive LED is off. When the current
operation requires extraction of the disk wait for the prompt, which will appear on
the display.
•
NOT TO SWITCH OFF the instrument when a writing operation (copy, rename,
delete, memory compact) is in progress on the Flash Memory.
In order to obtain the best performance from the instrument, it is important to:
• Use only good quality floppy disks. Pay special attention to looking after floppy disks,
taking care not to place them close to heat sources or magnetic fields (monitors, speakers,
etc..) or in damp and dusty environments. Bear in mind that given the nature of the directto-disk system, the instrument must have error-free disks if it is to give the best performance.
• Make backup copies of floppy disks periodically , since the direct-to-disk system causes
greater wear of the disk’s magnetic medium than other systems.
With regard to the type of files to be used, bear in mind that:
• The Genius only uses standard MIDI files (extension *.MID) resident on floppy disks
formatted in accordance with the MS-DOS
standard. Files with different extensions will
not be processed.
• The system supports up to 16 tracks. If a format 1 MIDI file exceeds the permitted number
of tracks, an error will be shown on the display .
• The Genius recognises the format of any lyrics on the song, identifying the copyright of the
MIDI file producer . It is therefore important to use the permitted types of Karaoke without
converting the format. In addition, do not use more than one text coding mode within the
same file.
1.3 NOTES ABOUT THE MANUAL
• T ake good care of this manual.
• Read all the information provided in this manual carefully . Y ou will avoid wasting time and
obtain the best performance from the instrument.
• Codes or numbers in square brackets ([]) indicate the names of buttons on the instrument’s
panel or connectors on the rear.
For example, [L YRICS] indicates the L YRICS button.
• The contents of the display video pages are provided purely as guideline and may differ
from what actually appears on the display .

DATA FILER
2. MAIN CHARACTERISTICS
99
2.1 THE GENIUS’S STRUCTURE
The Genius is a MIDI Data Filer , meaning a device capable of reading MIDI files and playing
them back in audio format thanks to its own internal sound generator.
For a clearer idea of how it works, we can divide the Genius into two sections: a file
management section, which from now on we will call the
Data Player
, and a generation system,
called the
Sound Generator
.
The
Data Player
section reads the data saved on the floppy disk or in the internal flash memory
and sends them to the
Sound Generator
section or to the [MIDI OUT] port. As well as this, this
section manages all the device’s internal programming, including the functions for management
of the songs, of the sequences of songs contained on the floppy disk or in the internal memory ,
and all the functions for editing the songs themselves, such as their deletion, memorisation
and modification.
The
Sound Generator
section, on the other hand, converts the data received from the
Data
Player
section into audio signals, and thus into music, bearing in mind the timbre and dynamic
of every single note. This section is able to reproduce 353 sounds and 17 Drum Kits, and is
poly-timbric on 16 parts (16 different timbres can be played simultaneously) each distributed
on one track, meaning one MIDI channel. The maximum polyphony (the number of notes
which can be played simultaneously) is 32. What’s more, the Sound Generator has a
multieffects unit containing ambient effects (reverb and echo) and modulation effects (chorus
and flanger).
Another important feature of the Genius is that it has an internal memory which at the time of
purchase offers memorisation capacity from 8 MByte to 32 MByte. This allows you to save
the songs used most often and play them back by just recalling them from this internal memory
section, without having to load a floppy disk containing the songs required every time.
Another advantage of the flash memory is quicker loading of the songs being performed than
with a floppy disk driver .
2.2 DATA FORMAT
The Genius floppy disk driver is able to take 3.5” floppy disks in DD (720 KByte) and HD
(1.44 MByte) formats, formatted in accordance with the MS-DOS standard. If the files
contained in these two sections are to be interpreted by the instrument during reading, they
must comply with the MIDI file (*.MID) standard in formats 0 and 1. During recording of
MIDI data from an external source, the result will be saved in the form of MIDI standard file in
format 0.
In order to be interpreted correctly by the instrument, MIDI files must belong to the GENERAL
MIDI standard.
DATA FILER
3. CONTROLS AND CONNECTIONS
3.1 THE FRONT P ANEL
100
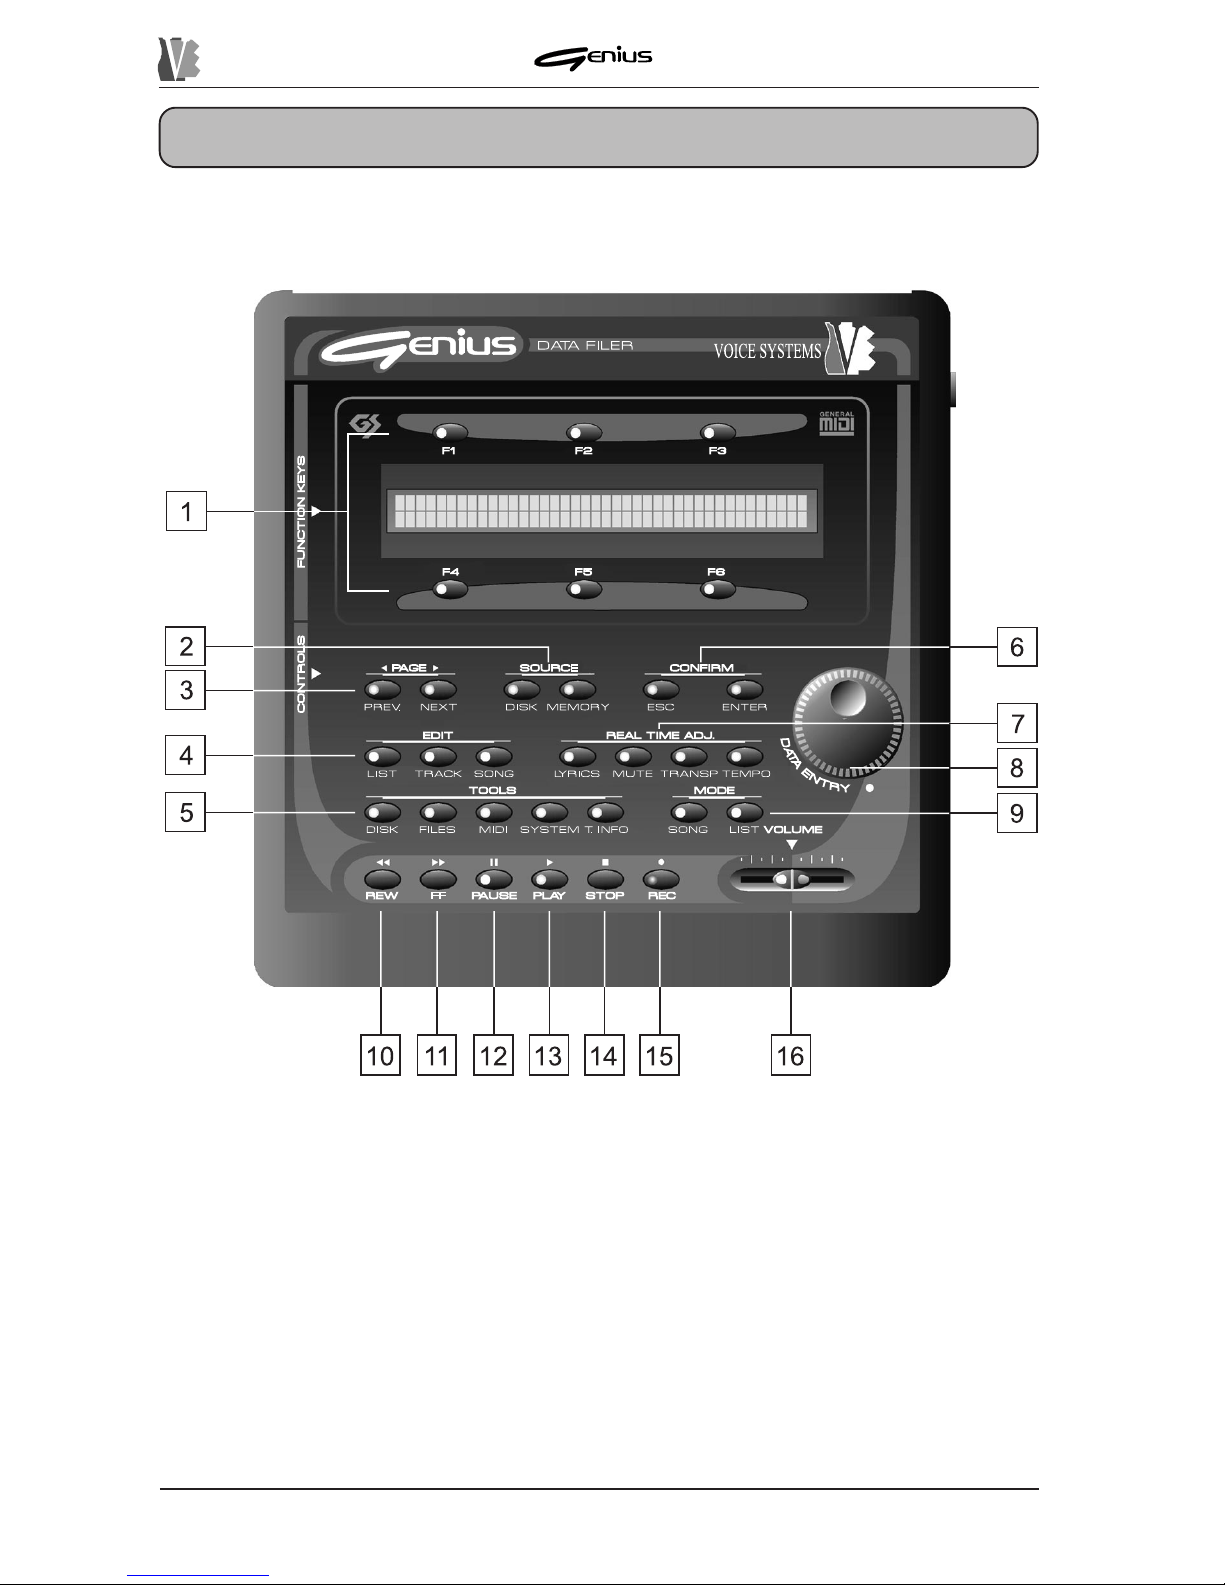
1. FUNCTION KEYS: these buttons can be used to select the functions or options selected
on the display in line with the button concerned. When the LED of the key is on, the key is
enabled.
2. SOURCE section: you can use these buttons to select the unit in which the files to be used
for the play , editing, copy or deletion functions are saved.
O [DISK]: selects the floppy disk inserted in the drive as currently active memory unit.
The key is not enabled if the drive is empty or the disk inserted is not
acceptable.
o [MEMORY]: enables the management of the data resident in the internal memory .

DATA FILER
101
3. PAGE section: this section contains the buttons used for displaying the display pages
when more than one page is present. When a button is active, its LED will be constantly on.
o [PREV.]: selects the page before the one currently shown on the display .
o [NEXT]: selects the next page.
4. EDIT section: this group of buttons enables the modifications which can be saved on the
selected file.
o [LIST]: allows the creation/modification of Lists.
o [TRACK]: enables the function for modification of single tracks of the song.
o [SONG]: enables the function for modification of the song’s general parameters
(Transposer , Tempo, etc...).
5. TOOLS section: section containing the buttons used to activate the instrument’s utility
functions, including:
o [DISK]: recalls the functions for management of the mass memory (internal memory
and floppy disk). The functions present in this section include formatting, File Sort,
disk copy , etc...
o [FILES]: recalls the functions for management of the files present in the internal memory
or on the floppy disk (copy , delete, rename, etc...).
o [MIDI]: management of the MIDI functions and ports.
o [SYSTEM]: recalls the instrument’s general set-up functions.
o [T.INFO]: displays the main parameters of the tracks contained in the song being
performed.
6. CONFIRM section: these buttons are used to confirm or abort the procedure when the
system requests this.
o [ESC]: abort.
o [ENTER]: confirm.
7. REAL TIME ADJ. section: the buttons in this section allow the user to make real-time
modifications to the song being performed; these changes cannot be memorised.
o [LYRICS]: enables display of the lyrics of the song (the key is not active if the song
does not contain text information).
o [MUTE]: disables playback of one or more tracks.
o [TRANSP .]: activates the transposition of songs to different keys.
o [TEMPO]: varies the metronome tempo for playback.
T o set up each of the functions referred to above, press the relative button and keep it pressed.
8. Encoder [DA T A ENTRY] : dynamic encoder for file selection or for modifying the values of
the selected parameters.
9. MODE section: these buttons can be used to select the type of file required for playback.
o [SONG]: for the selection of the individual songs (*.MID files).
o [LIST]: for the selection of Lists (pre-arranged sequences of songs).

DATA FILER
102
10. [REW] button: allows rapid reversing by bar pointing.
1 1. [FF] button: allows rapid forward scanning by bar pointing.
12. [P AUSE] button: stops playback temporarily.
13. [PLA Y] button: starts the performance.
14. [STOP] button: stops the performance.
15. [REC] button: enables the recording procedure.
16. [VOLUME] slider: regulation of the instrument’s volume.
3.2 THE FLOPPY DISK DRIVER
1.: LED displaying reading/writing status of the floppy disk. Never extract the disk when
the LED is on.
2.: button for extracting the floppy disk from the drive.
DATA FILER
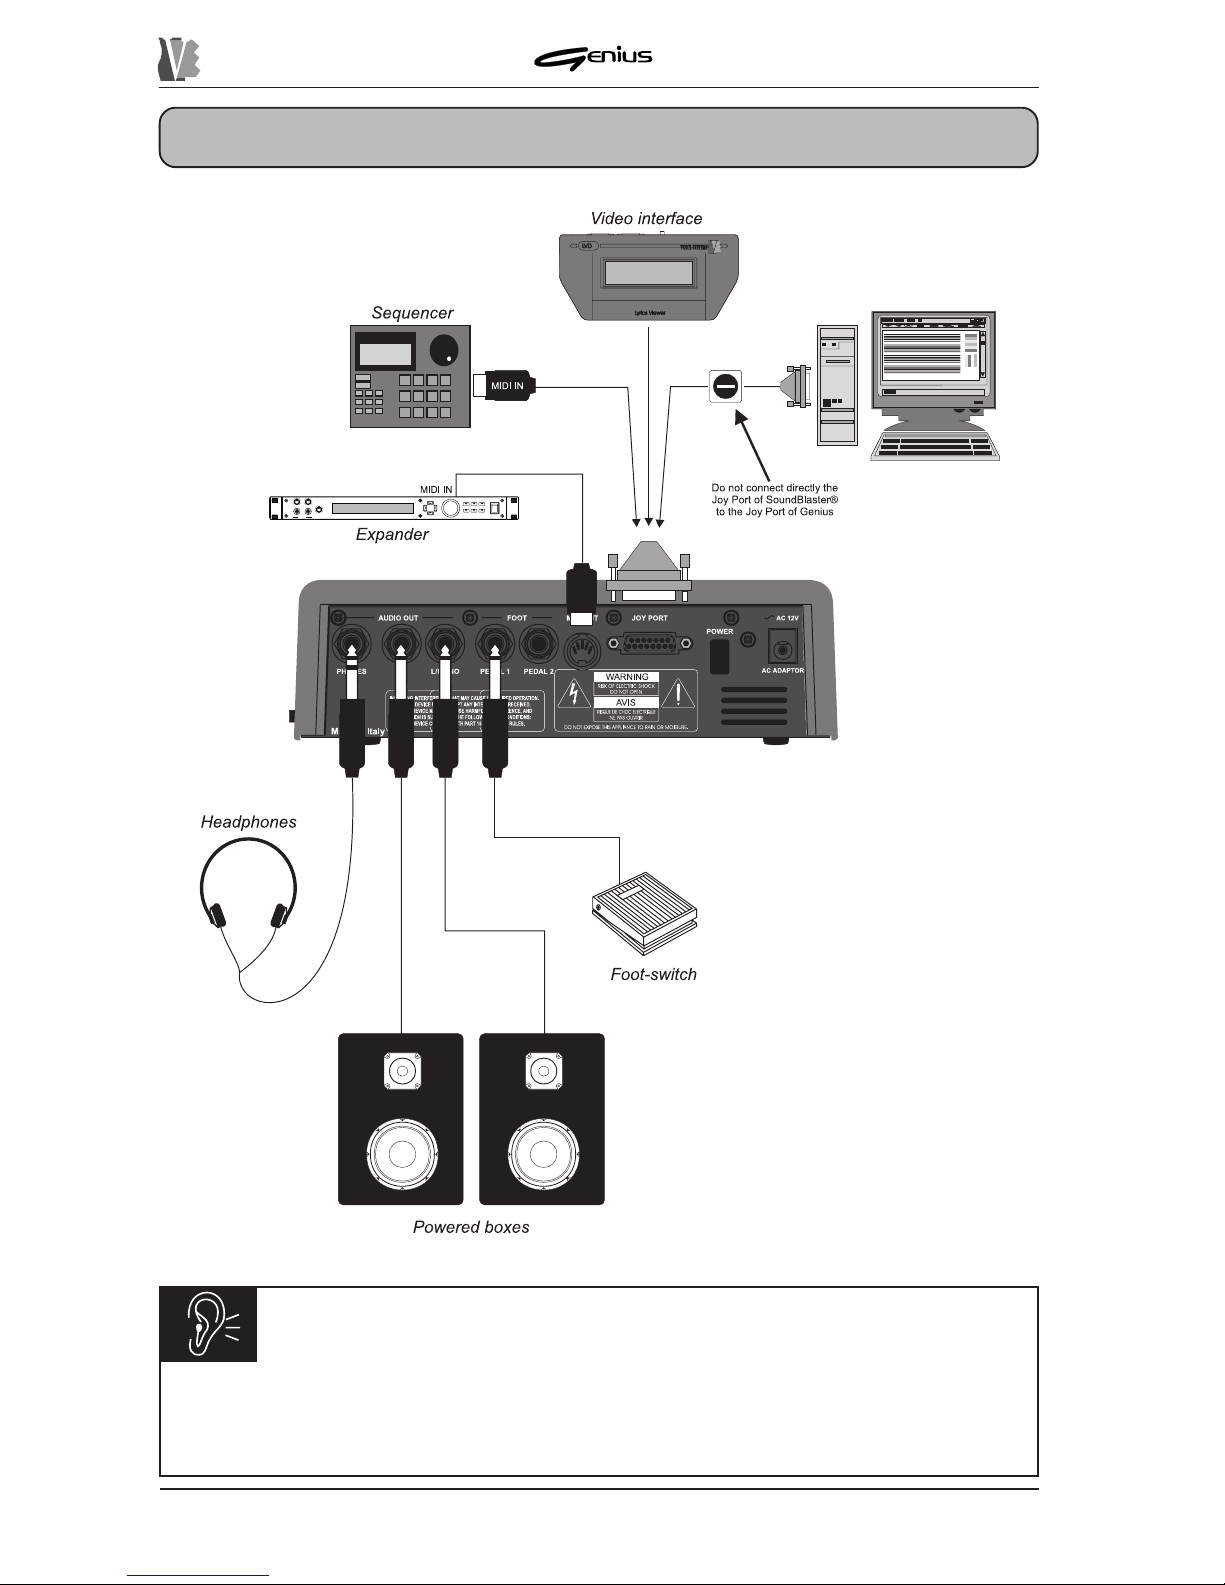
3.3 THE REAR P ANEL
103
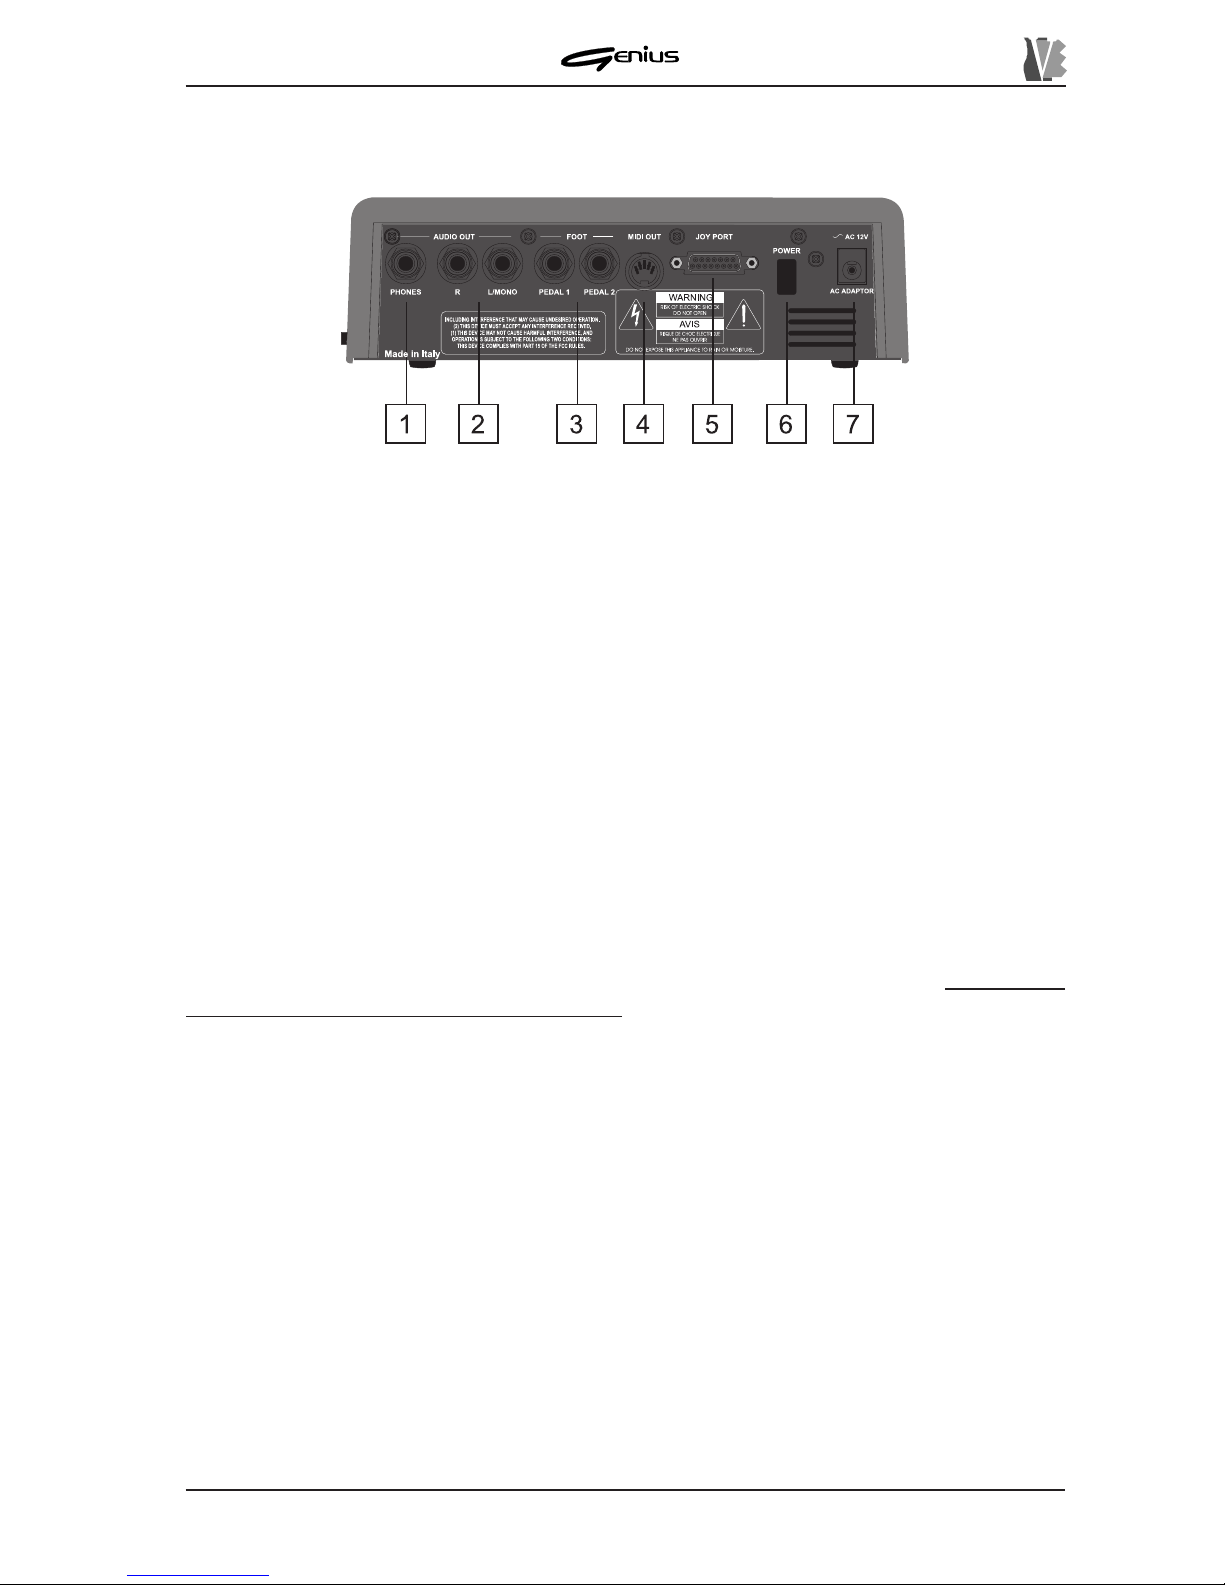
1. AUDIO OUT section: the section contains the outputs of the signal generated by the
Genius’s internal sound card.
o [PHONES]: connector for connection of stereo headphones. Only headphones with
impedance of at least 100Ω should be used.
o AUDIO OUT [R] and [L/MONO]: connect the cables leading from your amplification
system to these connectors. If a mono signal is used, connect to the [L/MONO]
connector only .
2. FOOT section: contains the connectors for connection of the optional foot-switch pedals
whose functions can be set in the SYSTEM section of the instrument. T o avoid damage to the
Genius’s internal components, it is important to use only pedals with normally open contact.
4. [MIDI OUT] port: output port for the MIDI data generated by the Genius.
5. [JOY PORT] connector: this connector can be used to connect the optional peripherals
such as the video interface, the additional graphic display , etc. to the Genius. It can also be
used to equip the instrument with a MIDI IN port using a Joy-to-MIDI lead.
Refer to the
connections section for further details on this.
6. [POWER] switch: switch for turning the instrument on and off.
7. [AC ADAPTER] connector: connect the connector leading from the power supply adapter
provided to this connector.
DATA FILER
4. CONNECTIONS
104
CAUTION!
ü
The Joy Port-to-MIDI adapter must have internal optoisolator.
ü
If the Joy Port has an additional parallel connector on the adapter, this must not be
used for connecting peripherals.
DATA FILER
5. PLA YING BACK SONGS
5.1 THE MAIN P AGE
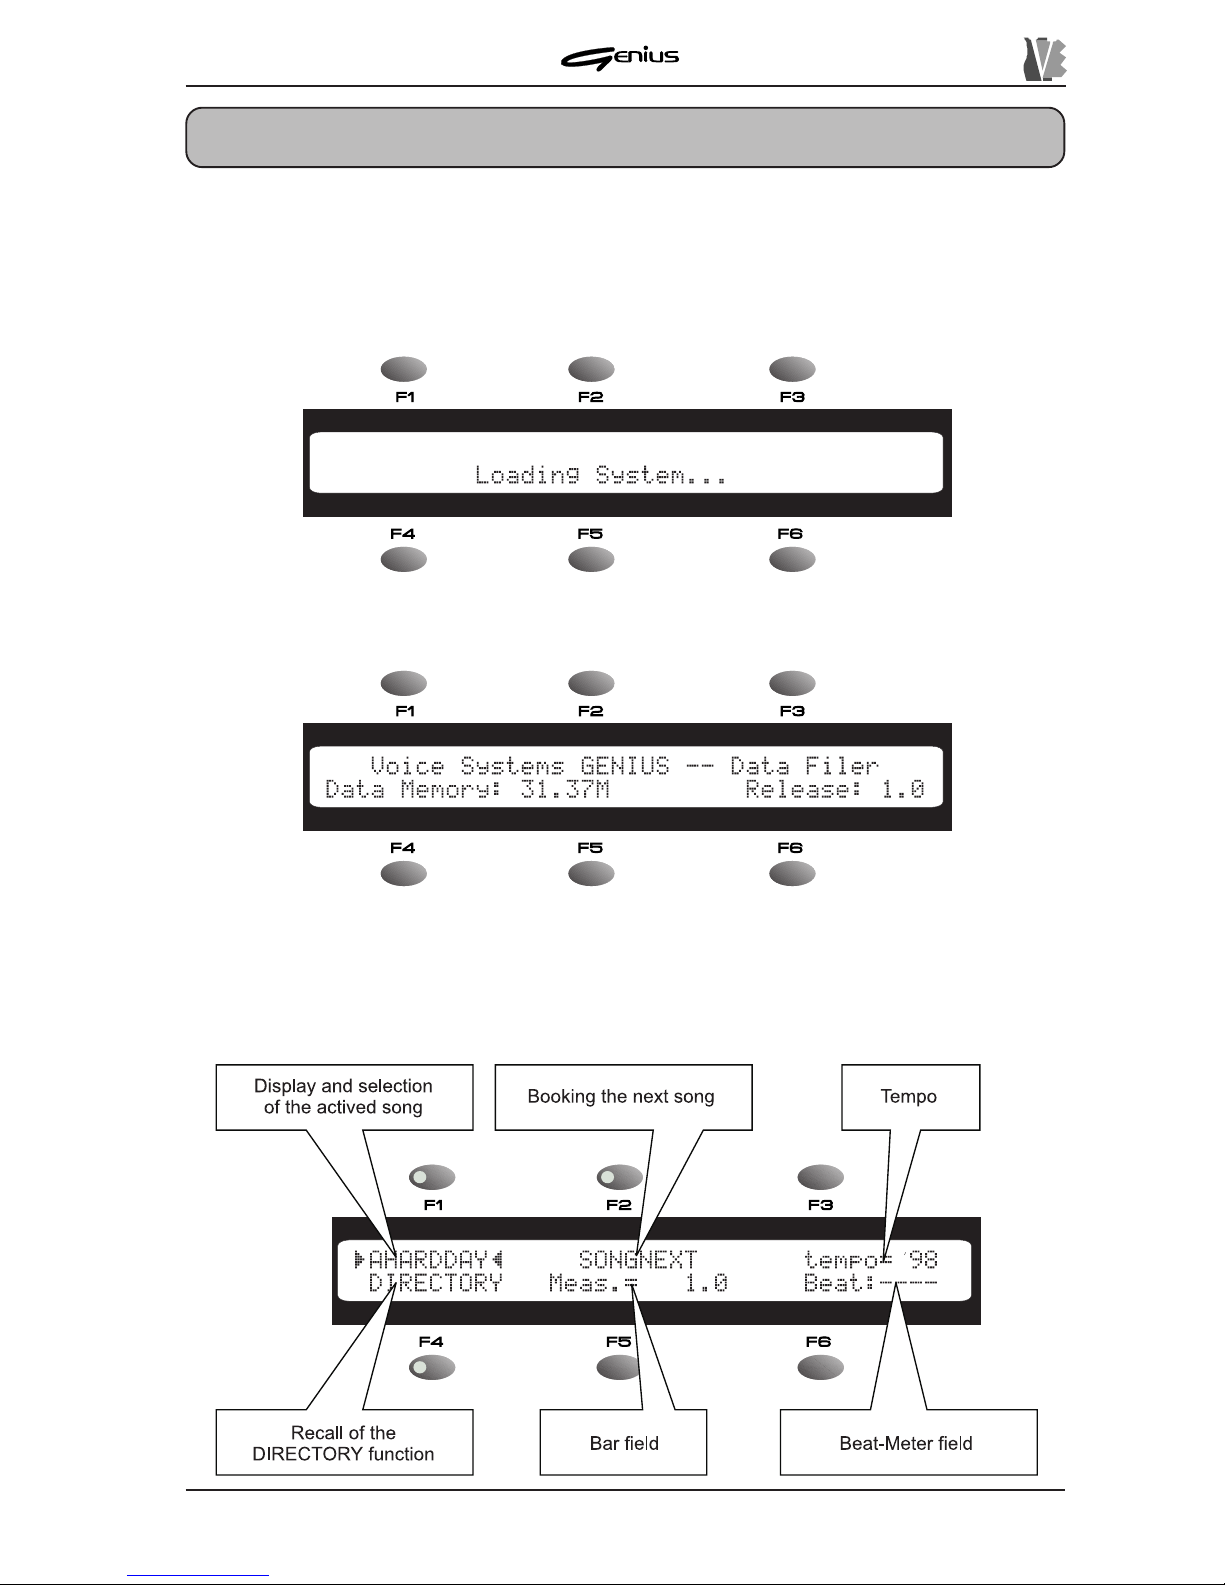
After making all the connections correctly , switch on the Genius; the display will first show the
information relating to activation of the software:
then the presentation video page:
which gives information about the total size of the internal memory and the software version
currently installed on the instrument. For further information about these data refer to point
8.1.6. After a few moments, the main operating page called the MAIN P AGE will be displayed.
105
DATA FILER
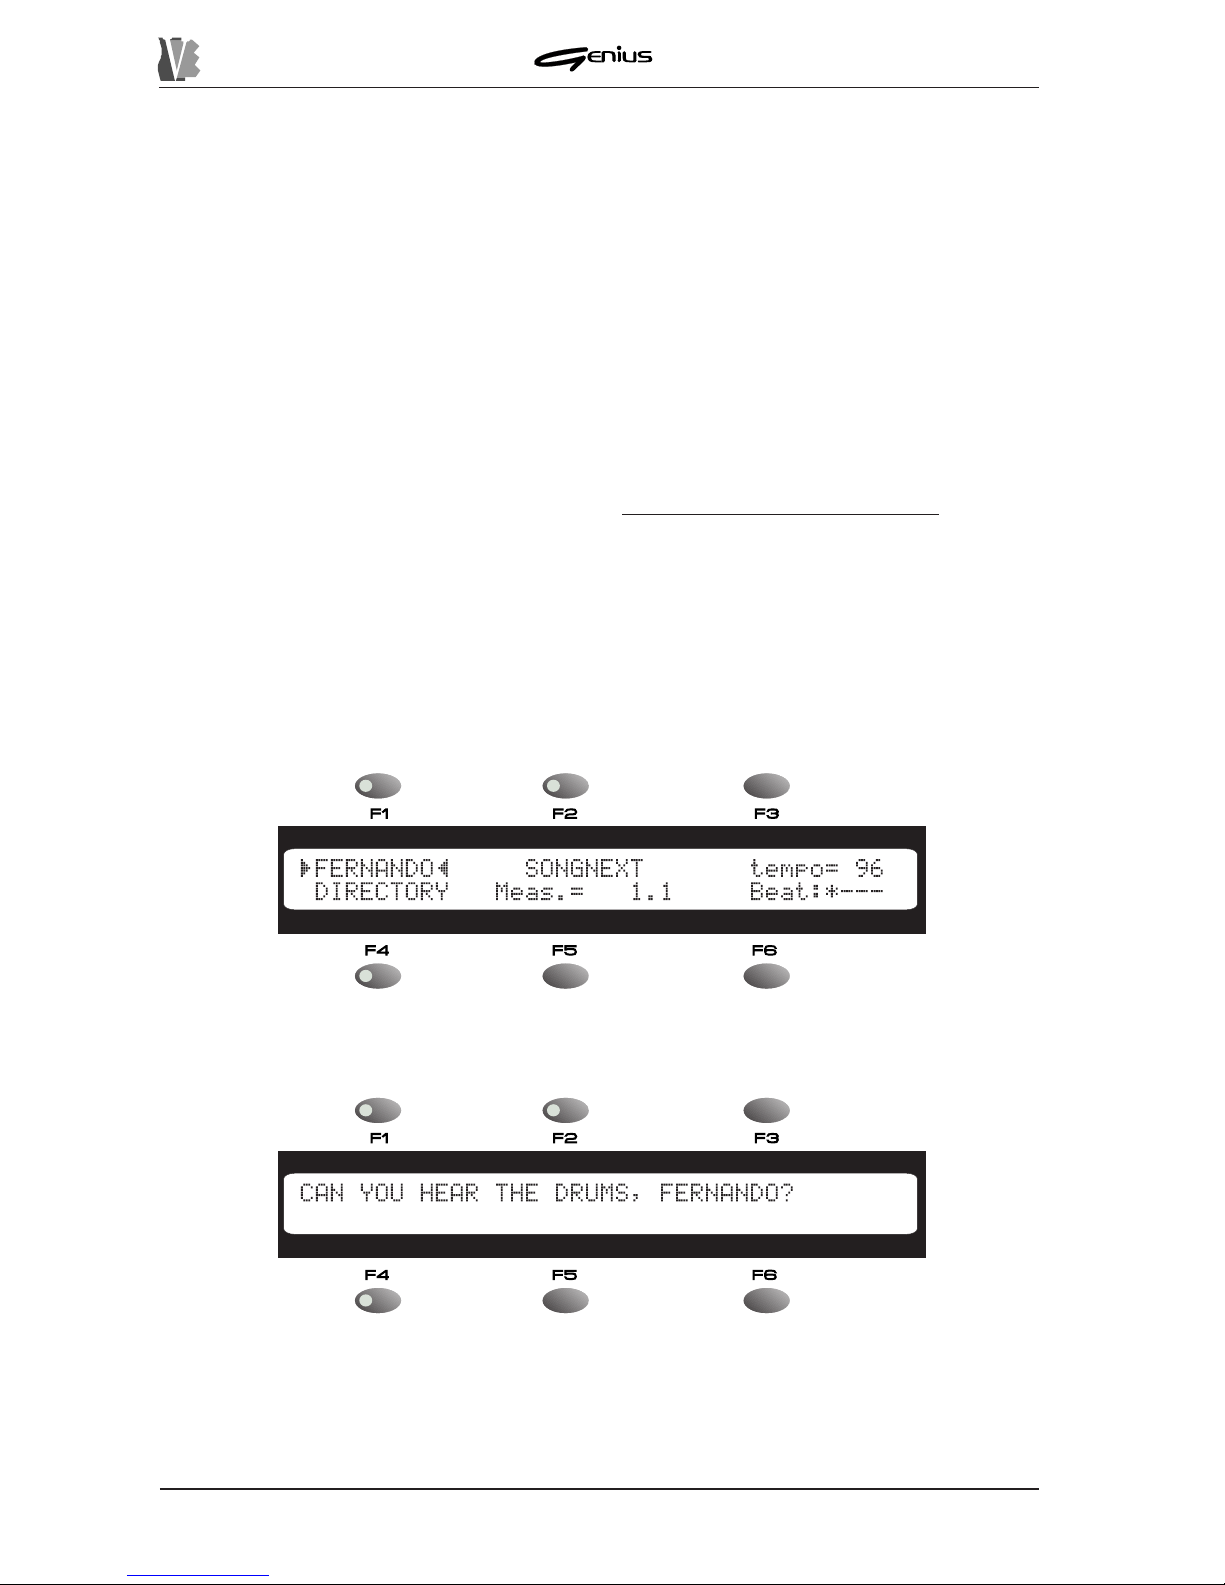
INFORMATION ABOUT DISPLAY FIELDS
As the illustration above indicates, the display shows six fields, in line with the six function
keys. Each field may identify:
ü
A variable field: identified by illumination of the LED of the function key in line with
the field concerned, this contains a value which can be set by the user. When this
field is selected with the associated function key (in the video page shown above
[F1] to select the song required and [F2] to select the
SONGNEXT
field), the encoder
can then be used to vary the relative value. Selection of the field is displayed by
means of the two markers (the and ª symbols), which locate at either end of the
field to be modified.
ü
A display field: displays a status or an outcome (in the video page shown above,
the
tempo, Meas.
and
Beat
fields). Since it simply displays a given value, this
field cannot be selected by means of the function keys (the LED is off).
ü
A direct selection field: displays the function associated to the relative function key
(the LED of which is on) which will be selected automatically when the same key is
pressed (in the video page shown above, the
DIRECTORY
field).
N.B.: the information given with regard to the display of fields on the screen applies for
any video page displayed. You should therefore refer to it on all occasions.
CAUTION!
ü
If there is no floppy disk in the drive or if it is not valid (e.g. not formatted), pressing
the [DISK] button has no effect.
ü
The song name displayed is the same as the name of the file without extension.
The Genius handles the file name in accordance with the MS-DOS standard, which
allows no more than 8 characters. If the file exceeds this limit, the long names rule
will be applied, using the “
µ
” character followed by a consecutive number indicating
the number of files in the memory with that name.
106
The field in line with the [F1] button displays the song currently active.
If a memory unit which does not contain song files is selected, the field will show the message
EMPTY
.
At switch-on, the first song in the internal memory will always be loaded. You can use the
encoder to scroll through the songs contained in the internal memory .
If you wish to perform a song resident on a floppy disk, insert the disk in the drive and press
the [DISK] button. Y ou can use the encoder as described above to select the song you require,
and then confirm the selection with the [ENTER] key . Pressing [ESC] during the selection
aborts the operation.
DATA FILER
107
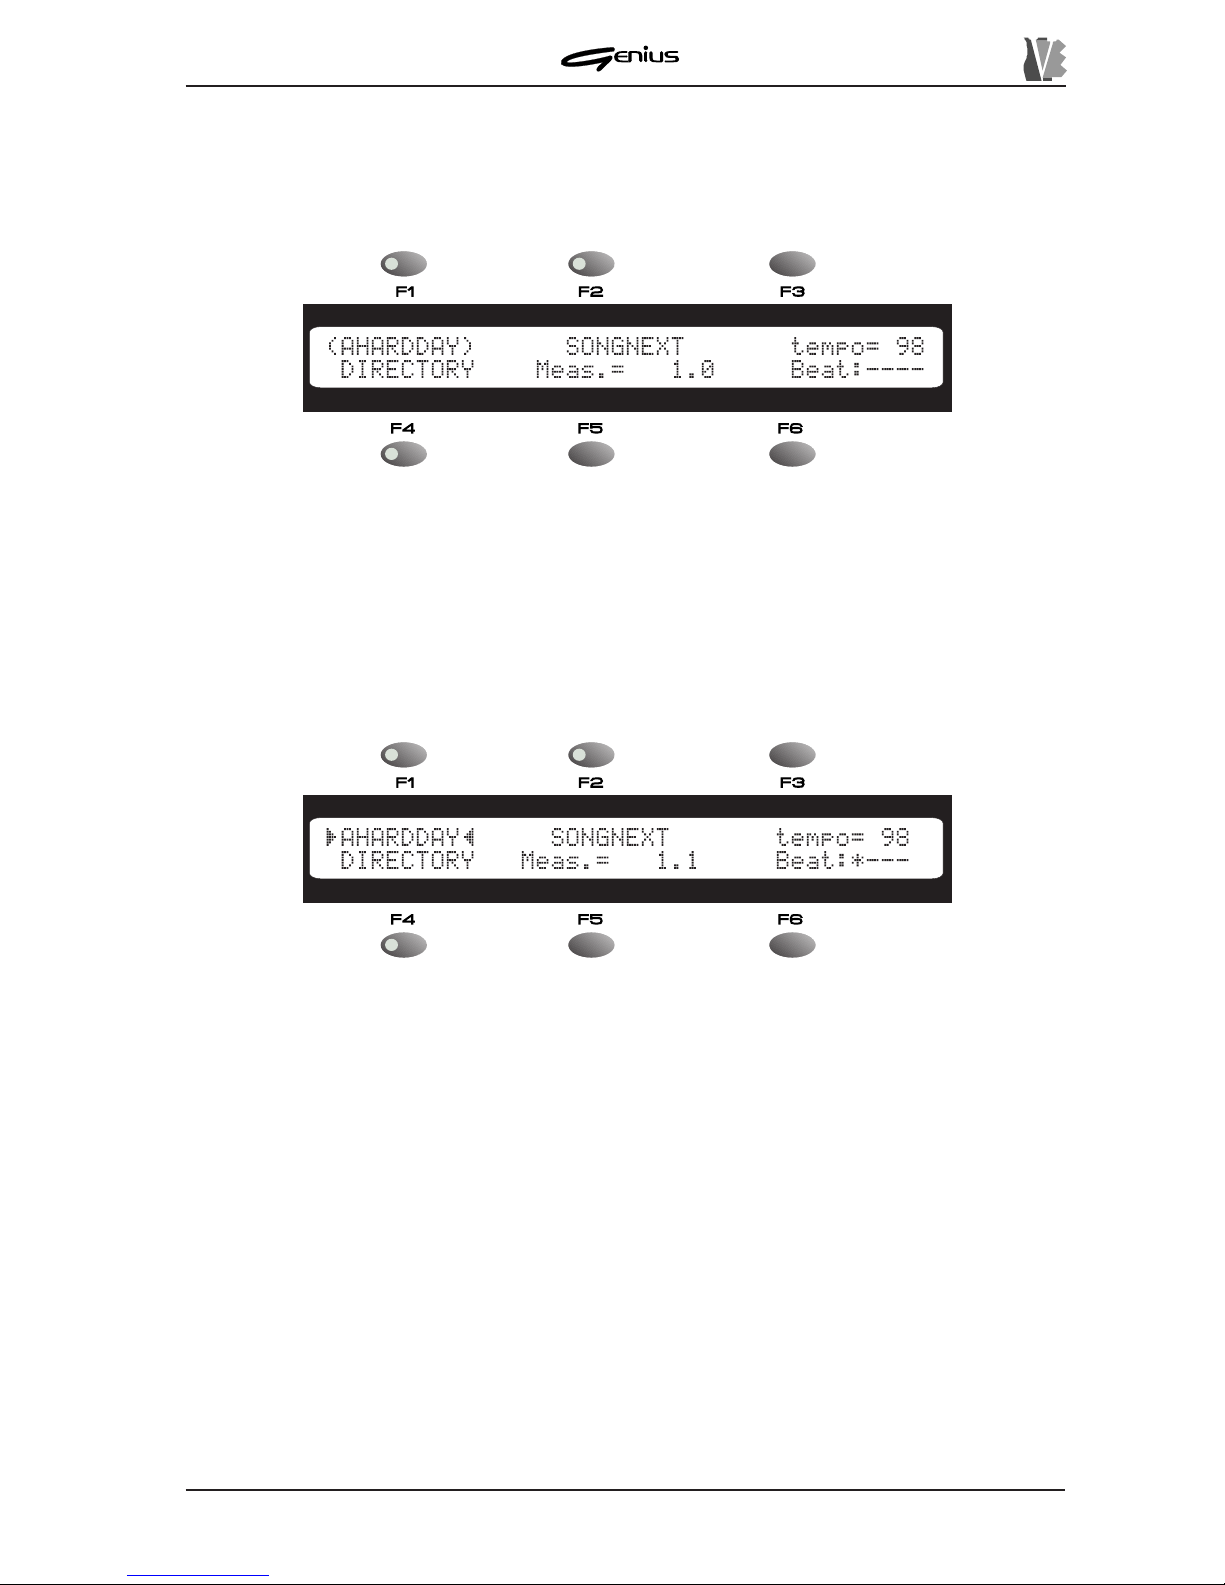
Press the [MEMORY] key to select the internal memory .
If you then press the [ENTER] key when selecting a new song, the instrument will load the
song, displaying a round bracket at either end of the file name.
The round brackets indicate a system busy condition. The time taken to load a file is very
short, but longer waits are possible in case of format 1 Midifiles and especially in those
containing Lyrics metaevent text.
When the usual markers (
and
ª
) appear , the song can be played back. When the [PLAY]
key in the CONTROLS section is pressed, the key LED will illuminate and playback of the
song will start.
The third field (
tempo
) is for display only (in fact, the LED of the [F3] key is off) and indicates
the metronome tempo, in BPM (Beats Per Minute), of the song currently selected.
Y ou can use key [F5] to select the DIRECTORY function, which allows display of the contents
of the unit currently active on the screen (see point 5.5).
The two next fields display the bar (
Meas.
Field) and a beat-meter (
Beat
field) of the song
being played. Since both these fields are for display only, the LEDs of the function keys
associated to them are off.
During playback of one song you can select another (present in the same memory unit) by
simply selecting it and activating it using the encoder and the [ENTER] button. In this case,
the song in progress will be interrupted and the new one played immediately without waiting
for the [PLA Y] button to be pressed.
To abort the new selection press [ESC]. However, you are advised to use the
SONGNEXT
field for selecting songs during playback; otherwise, the instrument may malfunction due to
overloading of the [MIDI OUT] port.
DATA FILER
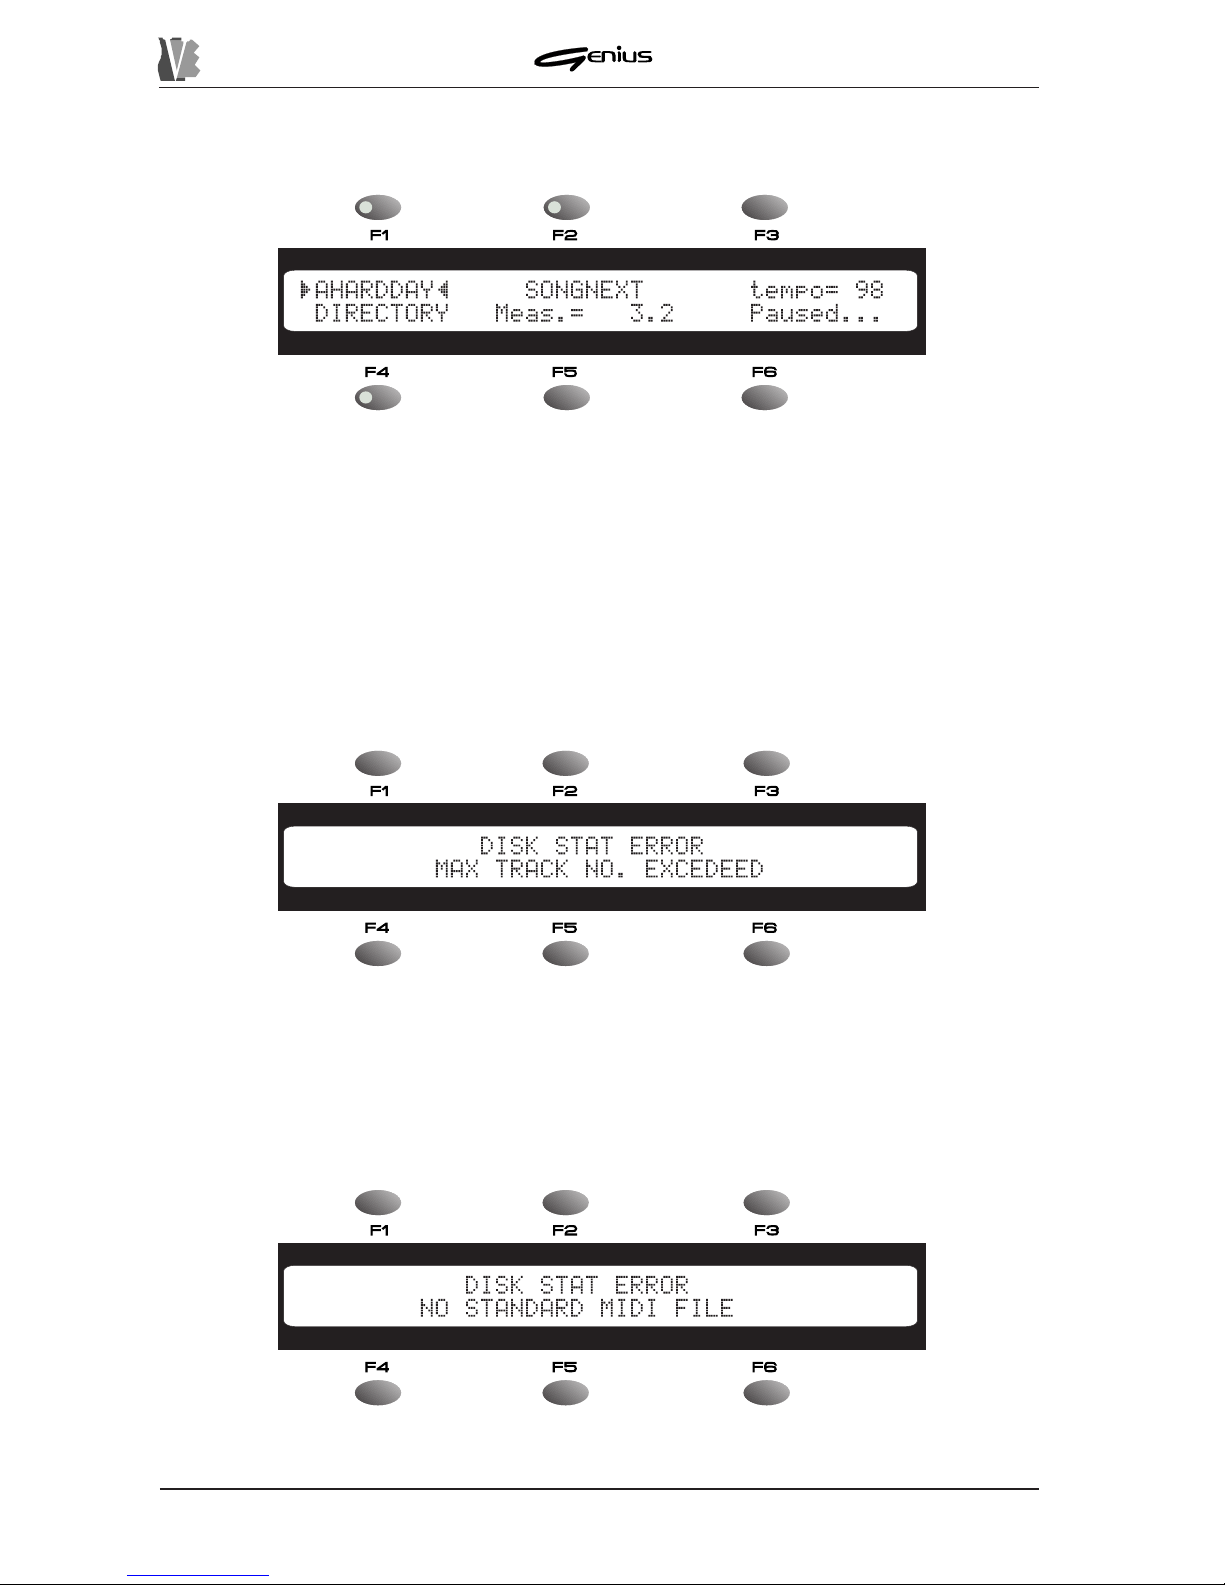
Pressing the [STOP] key will stop playing of the song, while if [P AUSE] is pressed the playback
is interrupted and the display will show:
5.1.1 ERROR MESSAGES
MAX TRACK NO. EXCEEDED ERROR
When type 1 Midifiles are used, if the song contains more than 16 tracks it cannot be performed
and the display will show the message:
Press [ESC] to return to song selection.
NO STANDARD MIDI FILE ERROR
If the file selected for loading does not belong to the MIDI File Standard coding or is unusable
for any reason (e.g. part of the disk damaged) the following message will be displayed:
108
where you can see the message
Paused...
indicating that the song being played has
been interrupted. When the [PLA Y] or [PAUSE] button is pressed, the playback will restart
from the point where it was interrupted.
DATA FILER
N.B.: in view of the special features of the Direct-to-Disk reading system, disks in perfect
condition should be used; any errors inside the file may cause sudden breaks in performance.
Never remove the floppy disk if it contains the musical backing being played.
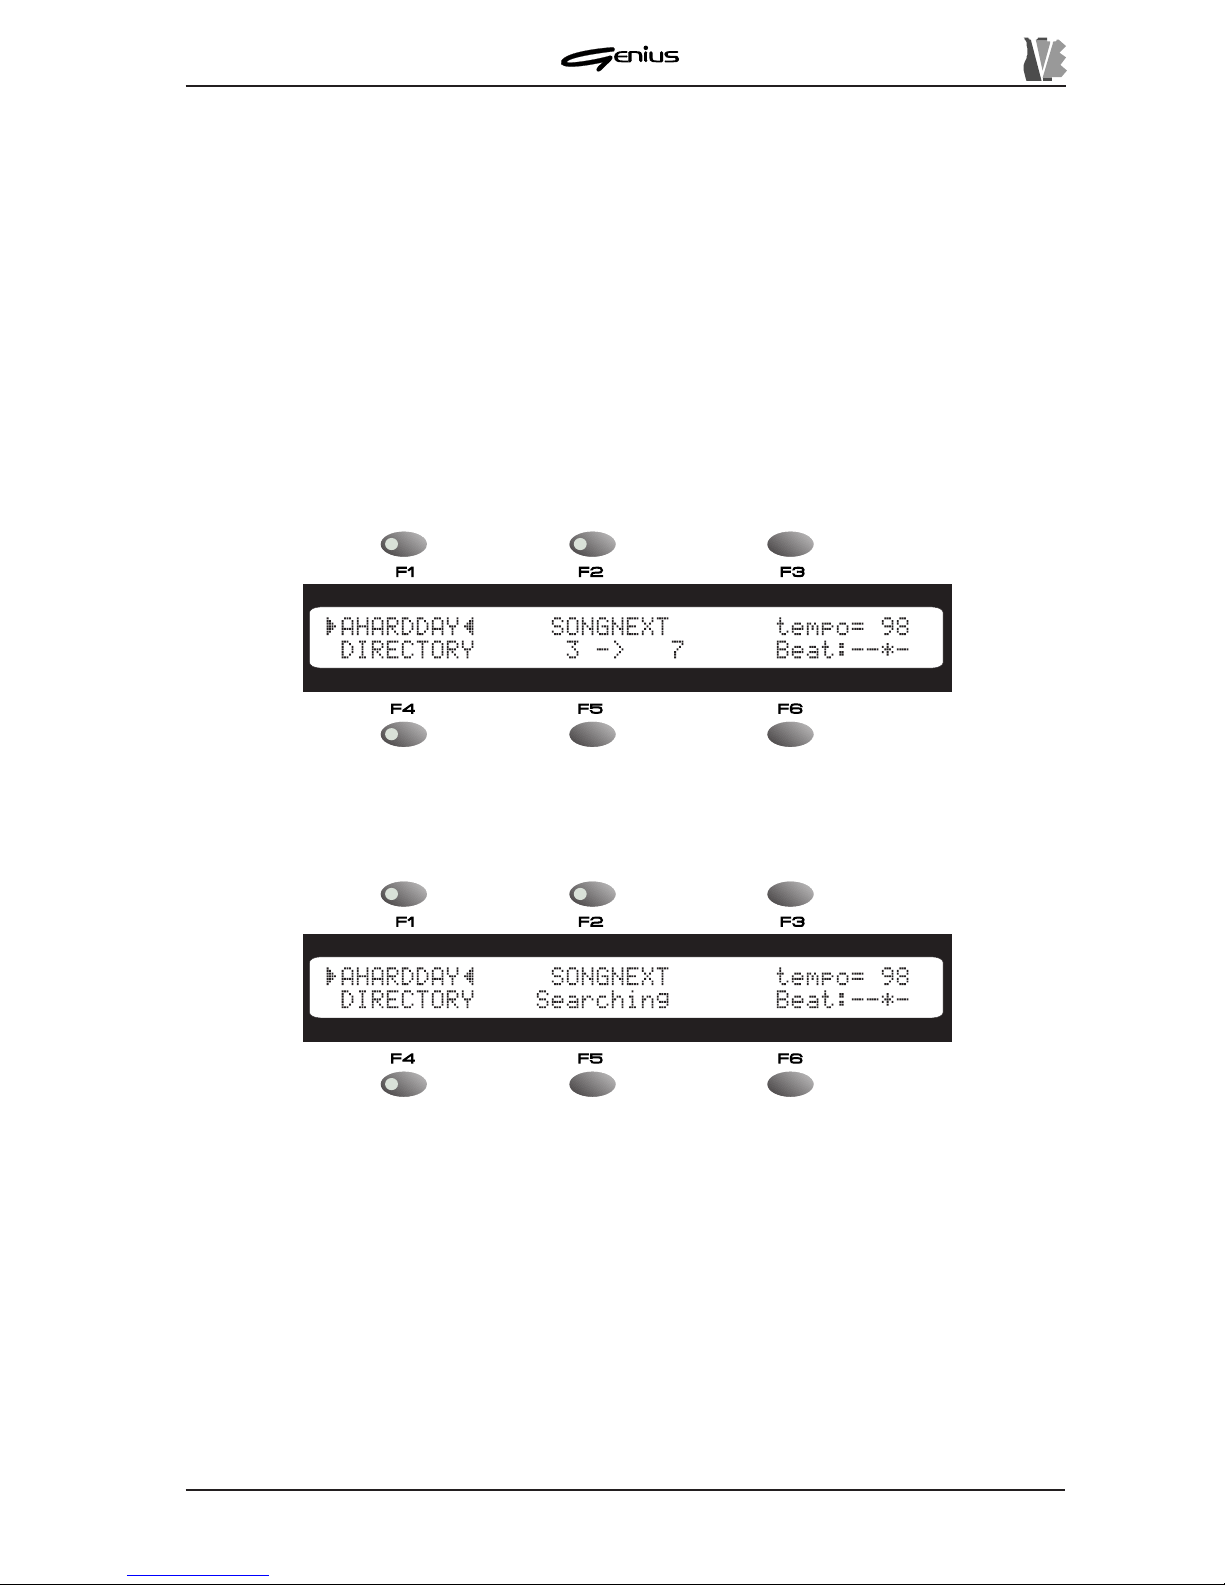
5.2 USING THE [REW] AND [FF] KEYS
The [REW] (Rewind) and [FF] (Fast Forward) keys on the device panel can be used to locate
a given bar number inside the active song.
These keys work in exactly the same way as the keys of the same names found on an ordinary
tape recorder; the [FF] key provides a forward search, while the [REW] performs a backward
search.
Therefore, when the [FF] or [REW] key is pressed, the display shows both the number of the
current bar and the number of the destination bar next to the
Meas.
field.
109
When the key is released, the GENIUS will start the search for the bar number required; the
playback will be interrupted and the display will show:
Once the destination bar is reached, playback of the song will restart automatically . Note that
the time taken to reach the required bar depends on the characteristics of the song (file
format, number of tracks, presence of lyrics, etc...).
A given bar number can be found both during playback (play status) and in pause or stop
status. Once the desired bar is reached:
ü If the device was in STOP status, it will locate on the chosen bar and wait for the [PLA Y]
key to be pressed in order to restart performance of the song from the chosen point;
ü If the initial status was P AUSE, once it has located on the bar required the device will wait
for the [P AUSE] or the [PLA Y] key to be pressed;
DATA FILER
11 0
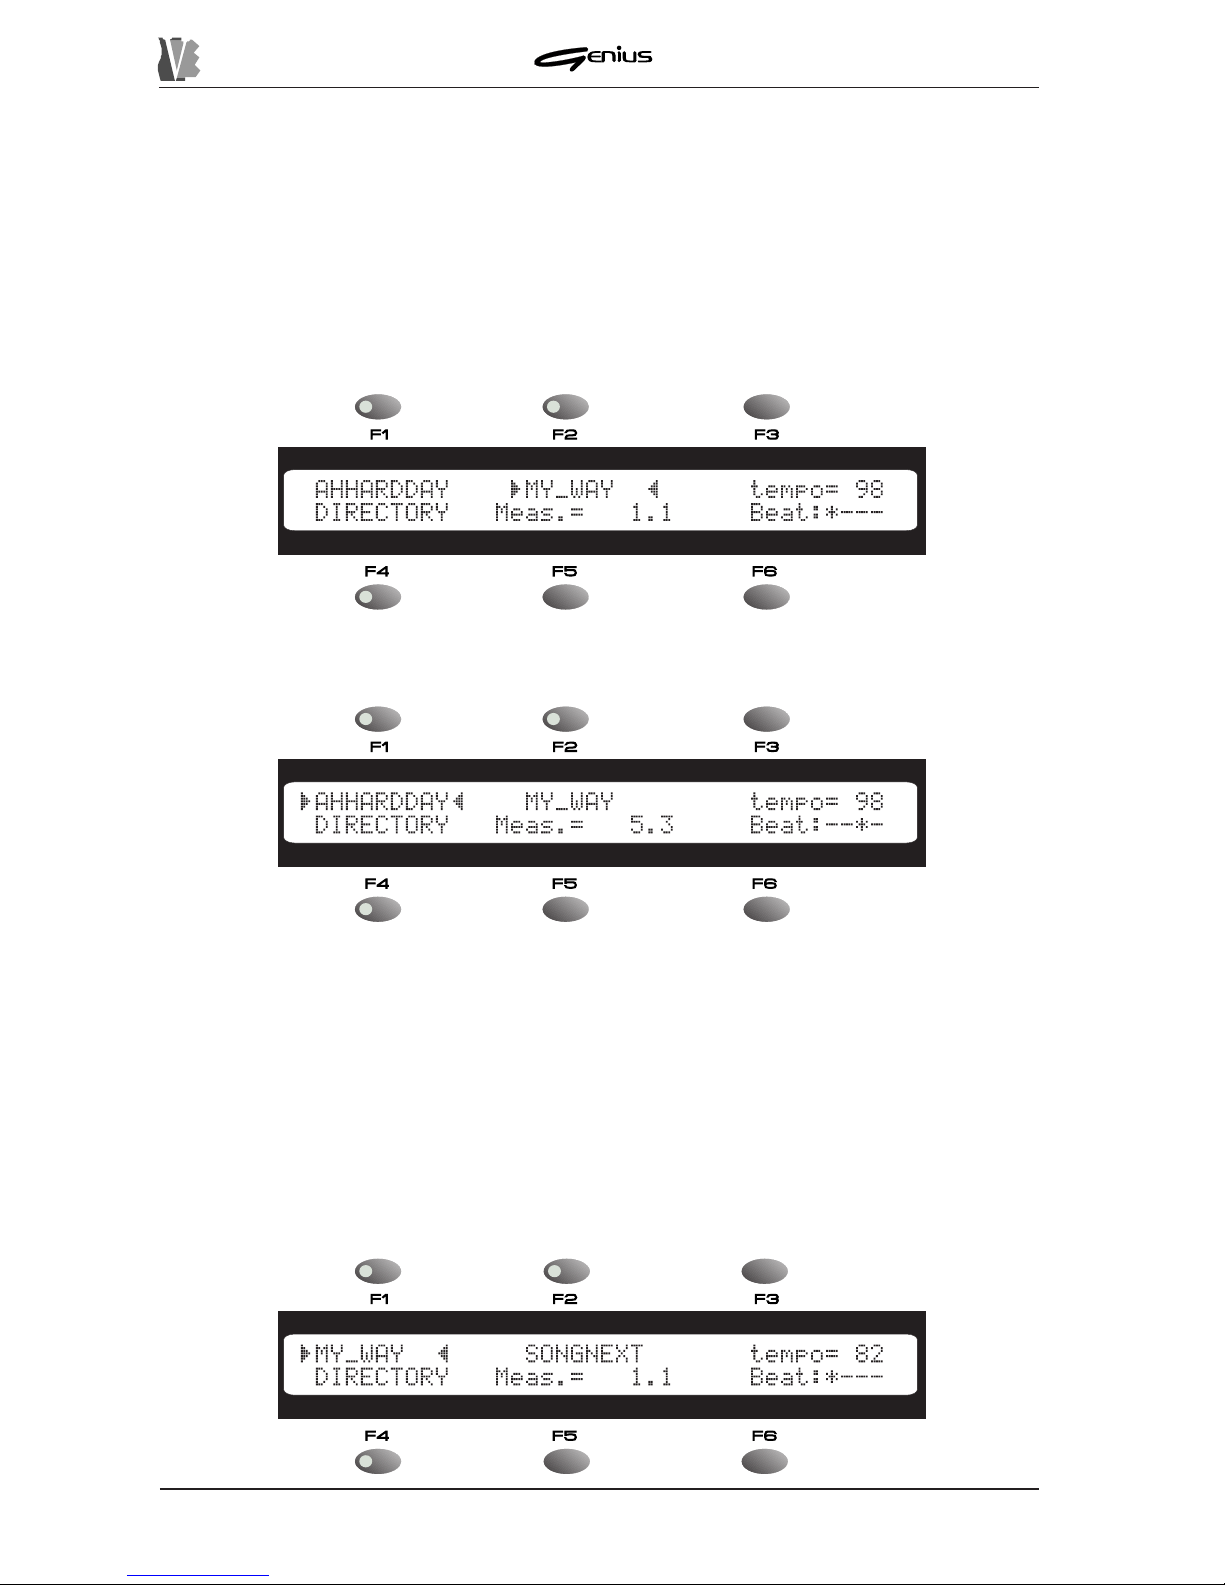
5.3 MUL TIT ASK SONG SELECTION (SONG NEXT FIELD)
MUL TITASK SONG SELECTION (M.S.S.) means the possibility of booking the song after
the one being played. T wo types of M.S.S. are possible, both during Play and in Stop condition.
The setup procedure for this function is identical regardless of which option is use.
We will now take a look at the Multitask Song Selection setting procedure.
During playback of a song, press the [F2] key to select the
SONGNEXT
field. Use the encoder
to select the song required.
and press [ENTER] to confirm or [ESC] to abort.
Once the operation has been confirmed, the markers will again select the current song field.
T o change the song booked, simply press the [F2] key and repeat the operations described
above.
While this is not possible for the song currently being played, in the
SONGNEXT
field the user
can change the active unit. When the encoder is moved on the
SONGNEXT
field, the Genius
will automatically activate the unit currently selected (floppy disk or internal memory), but the
SOURCE buttons can then be used to change the unit of memory containing the song of your
choice.
At the end of the song being played (either because it has come to its natural end, or because
the [STOP]) button has been pressed) the booked song will be performed automatically .
DATA FILER
111
The
SONGNEXT
field will now be made available for a new selection.
To modify the booked song before it is played, simple select the
SONGNEXT
field again
(button F2]) and set the song of your choice (pressing [ENTER] to confirm all settings).
The user can also opt between the conditions in which the song is played automatically or by
pressing the [PLA Y] key (see PLA Y MODE utility in the TOOLS section, point 8.4.6).
N.B.: If the song booked is resident on the floppy disk, when the disk is removed from the
drive the selection will be lost.
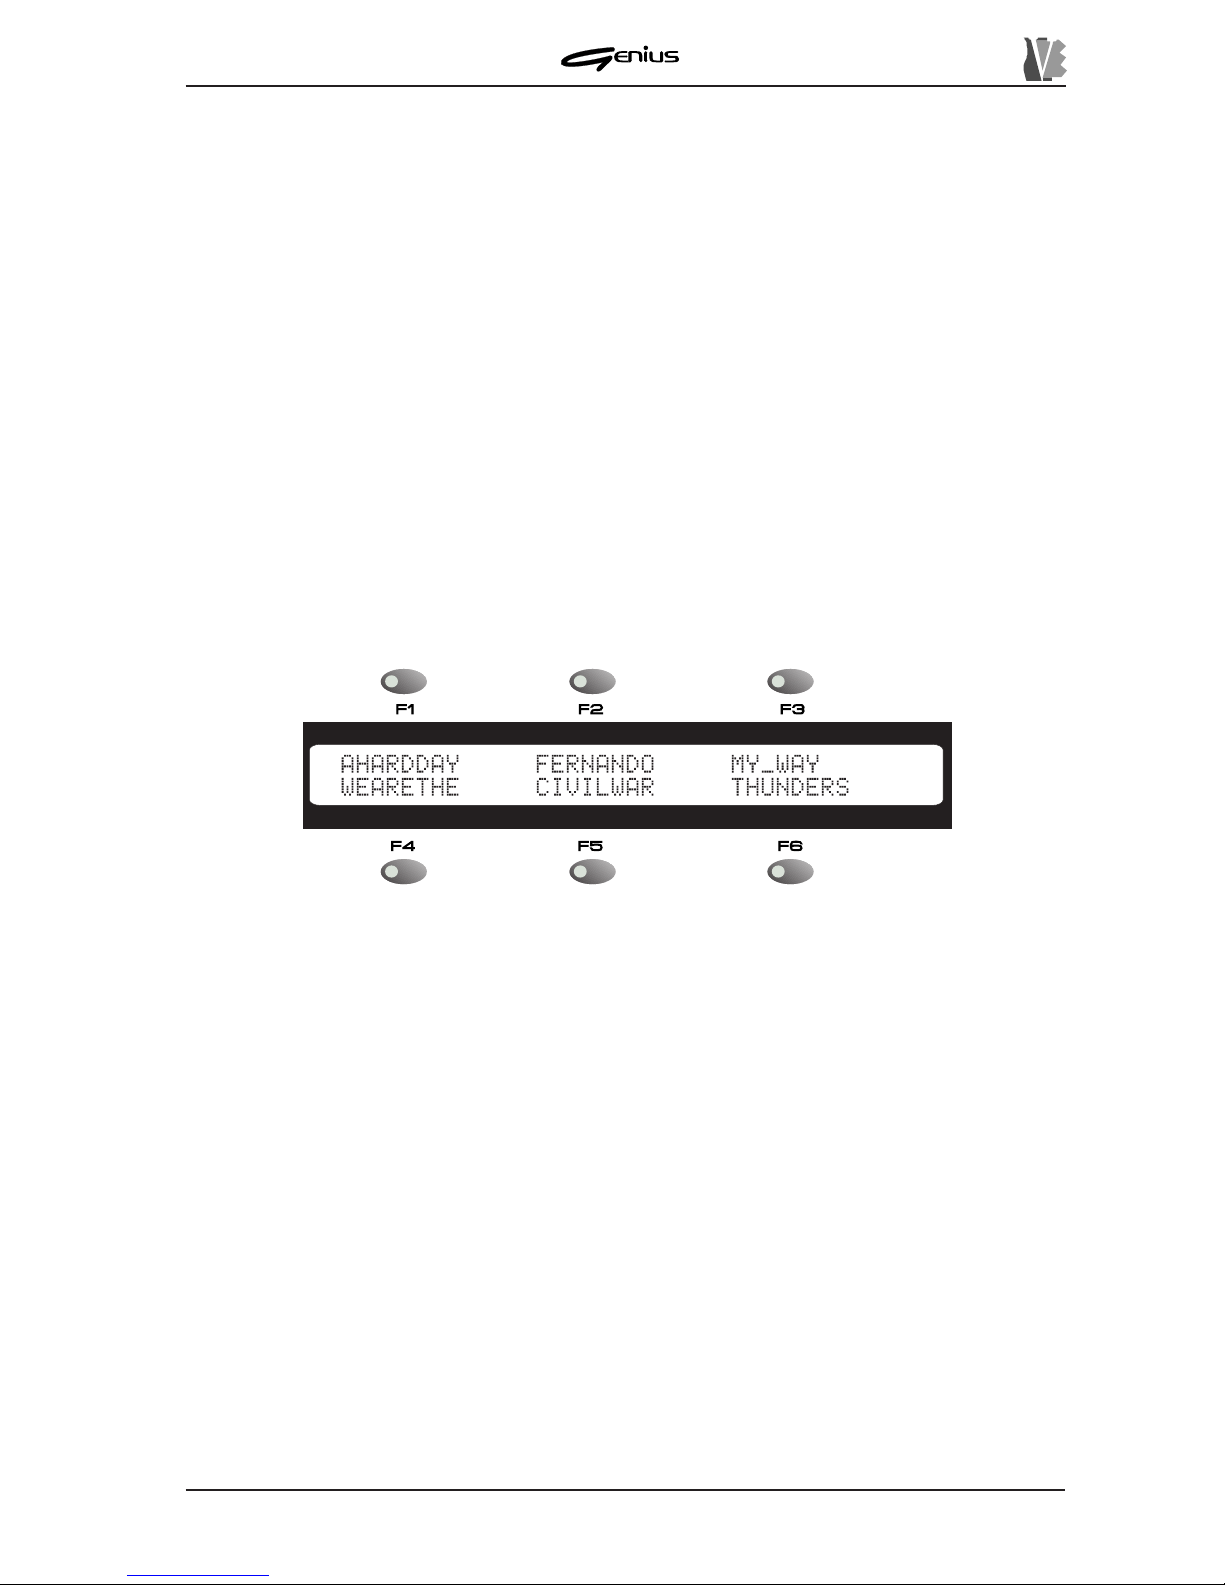
5.4 DIRECT ORY FUNCTION
The DIRECTORY function allows the contents of the unit currently active to be shown on the
display in groups of 6 files at a time.
As well as the display function, the DIRECTORY function allows the song required to be
selected directly from the list.
From the familiar MAIN PAGE video, press the [F4] function key (
DIRECTORY
field); the
display will show the contents of the current unit:
A unit almost always contains more than six files, and so additional files will be displayed by
means of pages after the current page. T o display further pages, use the [NEXT] key to display
pages after the one currently displayed and/or the [PREV .] key to select previous pages. The
LEDs on these keys indicate whether or not there are pages before the one displayed (LED
of the [PREV] key on) and/or pages after it (LED of the [NEXT] key on).
You can use the function keys corresponding to the files displayed to select the song you
require. When the operation is over , the display will again show the MAIN PAGE. The selection
can be confirmed or aborted using the [ENTER] or [ESC] button.
If, for example, from the video page above shown you wish to select the “FIRST” song, press
the [F2] function key .
The DIRECTORY function is active both for the song currently selected and for the SONG
NEXT field.
DATA FILER
11 2
5.5 DISPLA YING THE LYRICS OF THE SONG
The Genius allows display of the lyrics of the song being played back on the screen by means
of the L YRICS function. Naturally , the lyrics of a given song can only be displayed if the lyrics
information is present in the permitted formats in the file.
The Genius recognises the following formats:
ü L yric coding in the form of MIDI codes (M-LIVE® standard)
ü Coding of lyrics and chords in accordance with the SOL TON® standard
ü Coding of lyrics and breakdown into syllables in accordance with Lyrics metaevents
(Standard TUNE1000®, GENERALMUSIC® SMF , Y AMAHA®)
N.B.: The Genius recognises the format of any lyrics on the song, identifying the copyright of
the MIDI file producer . It is therefore important to use the permitted types of Karaoke without
converting the format. In addition, do not use more than one text coding mode within the
same file.
If the song contains lyrics information recognised by the instrument, when playback starts the
Lyrics function is enabled automatically. The LED of the [LYRICS] key illuminates and the
display will show the text of the song, which can also be broken down into syllables with the
aid of upper/lower case letters if the file envisages this type of information.
After starting playback of a song from the MAIN P AGE,
the display will start to show the lyrics of the song synchronised with the musical backing.
If the file envisages breakdown into syllables, this will be displayed with the aid of uppercase
letters:

DATA FILER
113
During display of the lyrics, the user can return to display of the MAIN P AGE by pressing the
[L YRICS] button.
press the [L YRICS] button to return to display of the lyrics:
Note that the L yrics function will be automatically disabled if the system needs to display the
MAIN P AGE (pressing of one of the REAL TIME ADJ. keys, selection of a song, etc...). In all
cases, this function will be deactivated at the end of the song.
For the setting of the L YRICS function, see point 7.1.
DATA FILER
6. REAL TIME FUNCTIONS
Thanks to the REAL TIME ADJ section of the front panel, the Genius makes available some
important functions in Real Time. In other words, they can be activated during playback of a
song, thus giving the considerable advantage of very quick application, of great help when
making temporary changes to the songs being performed. To make the modifications
permanent, use the Edit procedures described in section. 9
6.1 LYRICS
As described in point 5.5, the Genius allows the user to show the lyrics of the song being
played on the display by pressing the [L YRICS] key .
The user can also instruct the Genius to ignore any Karaoke information present in the file.
When the Lyrics function is disabled, performance during loading is enhanced; this is
especially useful when the Genius is used with no need for display of the lyrics.
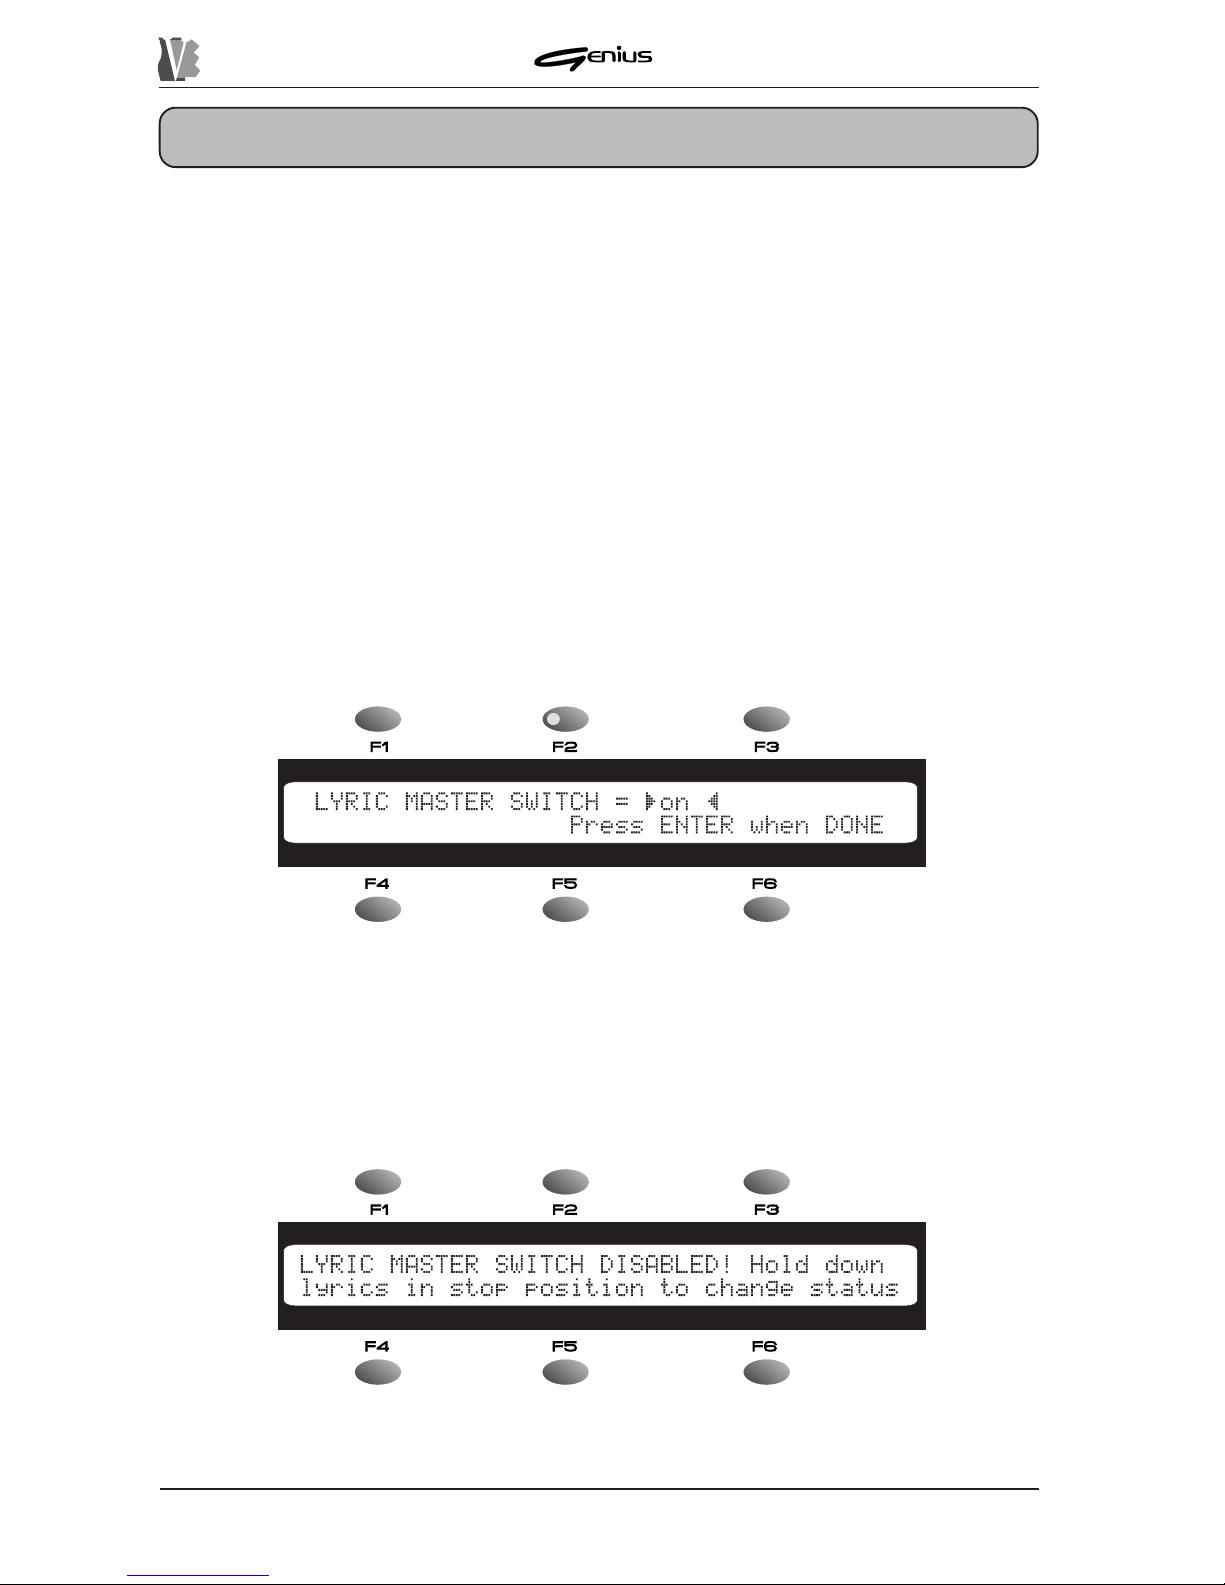
The function concerned is called the L YRICS MASTER SWITCH: to display the settings of
this function, from the Stop condition keep the [L YRICS] key pressed for at least two seconds,
after which the display will show:
Y ou can now use the encoder to enable (
LYRICS MASTER SWITCH = ON
) or disable
(
LYRICS MASTER SWITCH =OFF
) the Lyrics function. As the display indicates, when
the selection has been made press the [ENTER] key to confirm all settings. Press [ESC] to
abort the operation.
If the user attempts to recall the L yrics function when it is disabled, the display will show:
114
indicating that the Karaoke function cannot be activated, and advising you to set the Master
Switch by keeping the [L YRICS] key in stop condition to access the function setup phase.
DATA FILER
115
6.2 TRACK MUTING
The Mute function allows performance of one or more tracks to be eliminated from the
performance during playback of a song. This means that any note events on the track to be
eliminated will be filtered, i.e. the instrument assigned to them will not be heard.
As for the other REAL TIME ADJUST functions, pressing the [MUTE]) key quickly activates
(LED on) and/or deactivates (LED off) the current function, while pressing it for longer gives
access to the setting page of the function itself.
6.2.1 MUTE SETUP
The MUTE SETUP function allows the user to set which tracks will be disabled when the
Mute function is activated.
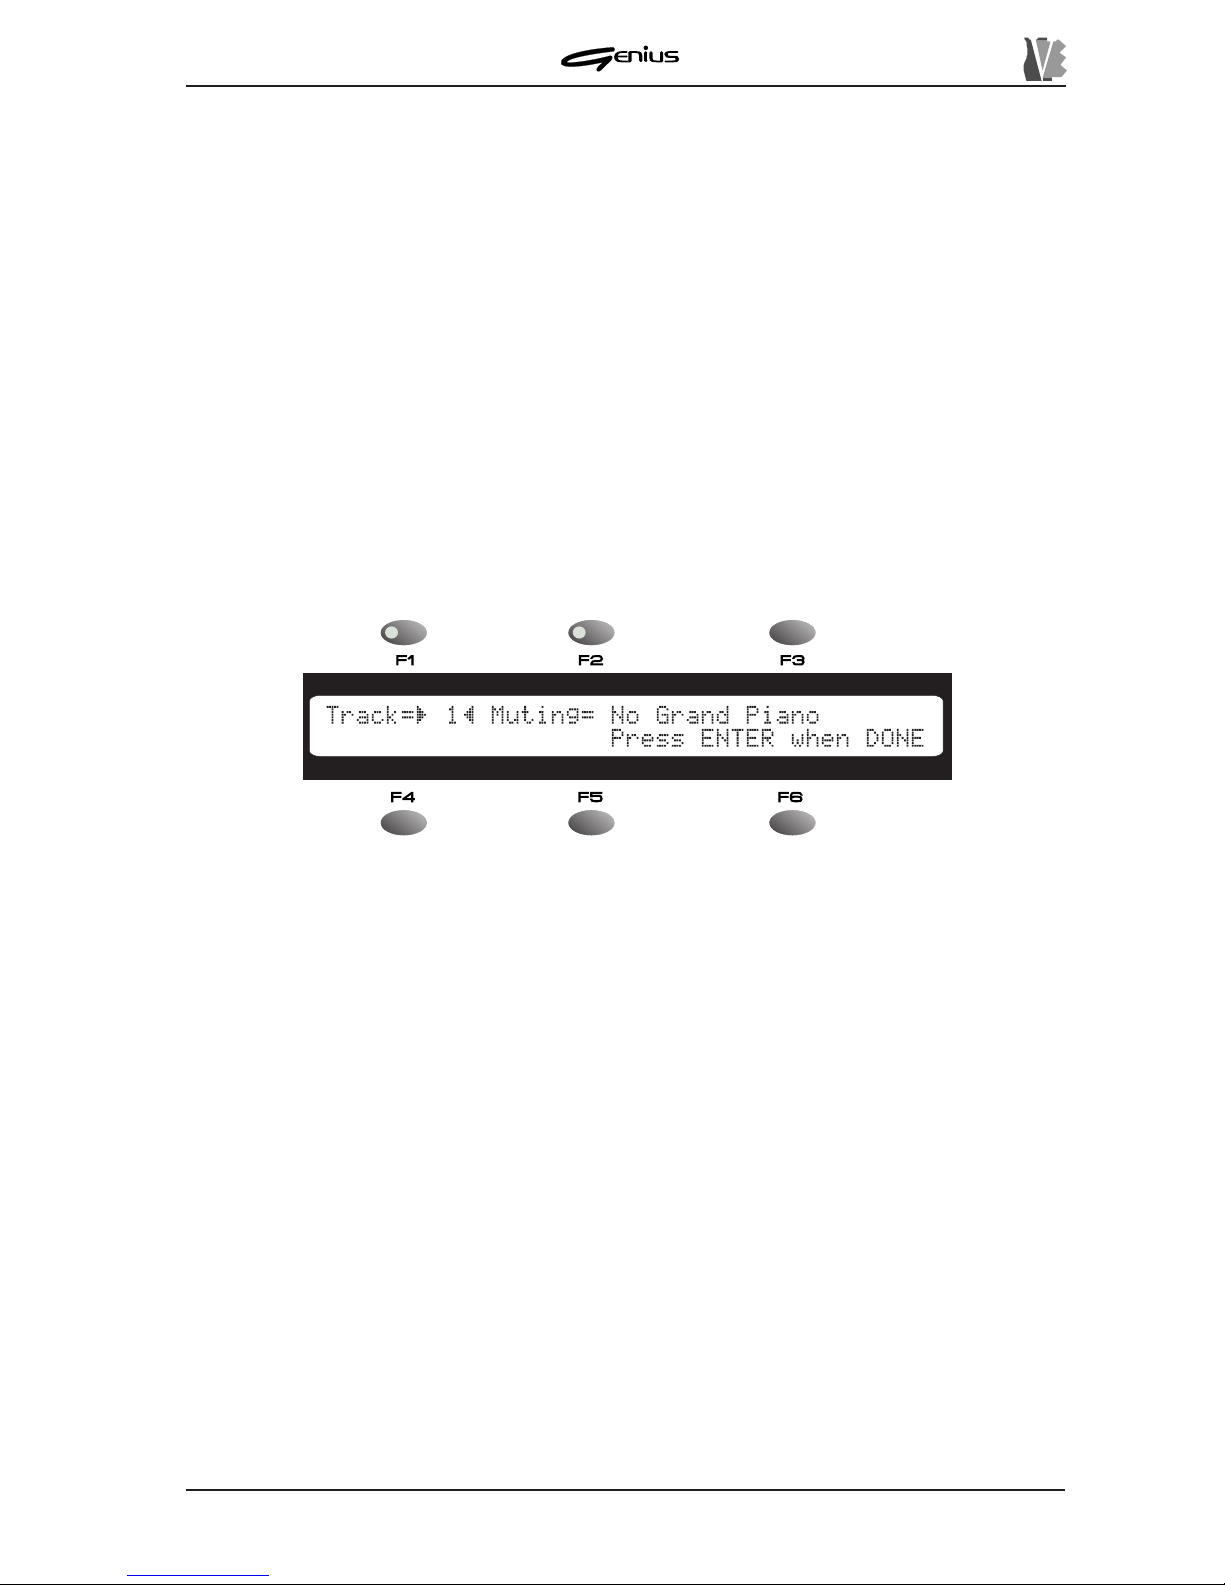
When the [MUTE] key is pressed for 2 seconds, the display will show the
MUTE SET-UP
page, relating to the settings of the function of the same name:
The
Track
field, next to the [F1] key (it can therefore be selected using this key) allows the
user to set which of the 16 tracks will be affected by the Mute operation.
The second field (selected using key [F2]) allows the user to choose whether to eliminate
from the playback (
Muting=YES
) or to retain (
Muting=NO
) the track specified by means
of the
Track
parameter .
The third field, for display only, shows the name of the timbre associated to the Program
Change (General MIDI table) currently present in the selected track. Since the Genius is a
reader with Direct-to-Disk reading system, the value of the Program Change refers to the bar
currently selected (first line of the song) when the instrument is in Stop condition). The value
-
indicates that the datum is not set in accordance with the standard commands (it might be
defined by means of exclusive system messages).
This video page allows the user to set more than one MIDI channel (T rack) in Mute status, and
whenever it is selected by means of the
Track
field its status will be displayed on the basis
of the current condition.
After the [ENTER] key is pressed the new setup will be memorised and can be enabled or
disabled by pressing the [MUTE] button quickly . By default, track n. 4, normally used for the
melody line of the song (Lead), is set in Muting status. Pressing the [ESC] key aborts the
modifications.
DATA FILER
11 6
6.3 TRANSPOSING THE KEY
This function allows the user to change the key of the song being played, or in other words to
transpose the notes being played on all the tracks (the MIDI channels) by a number of semitones
which can be set by the user , except for the drum kit track.
This track (normally number 10, called the DRUM TRACK) must not normally be transposed
as this may cause the playing of drum timbres different from those originally envisaged, which
might interfere with the beat of the musical backing.
As for the other REAL TIME ADJUST functions, pressing the [TRANSP.] key quickly activates
(LED on) and/or deactivates (LED off) the current transposition.
Naturally , with the LED of the [TRANSP.] button off, the song will be played in the original key
envisaged in the file.
6.3.1 TRANSPOSE SETUP
We have seen that the transposition can be activated by pressing the [TRANSP .] button quickly .
The TRANSPOSE SETUP function allows the user to set the number of semitones by
which the song will be transposed when this function is active.
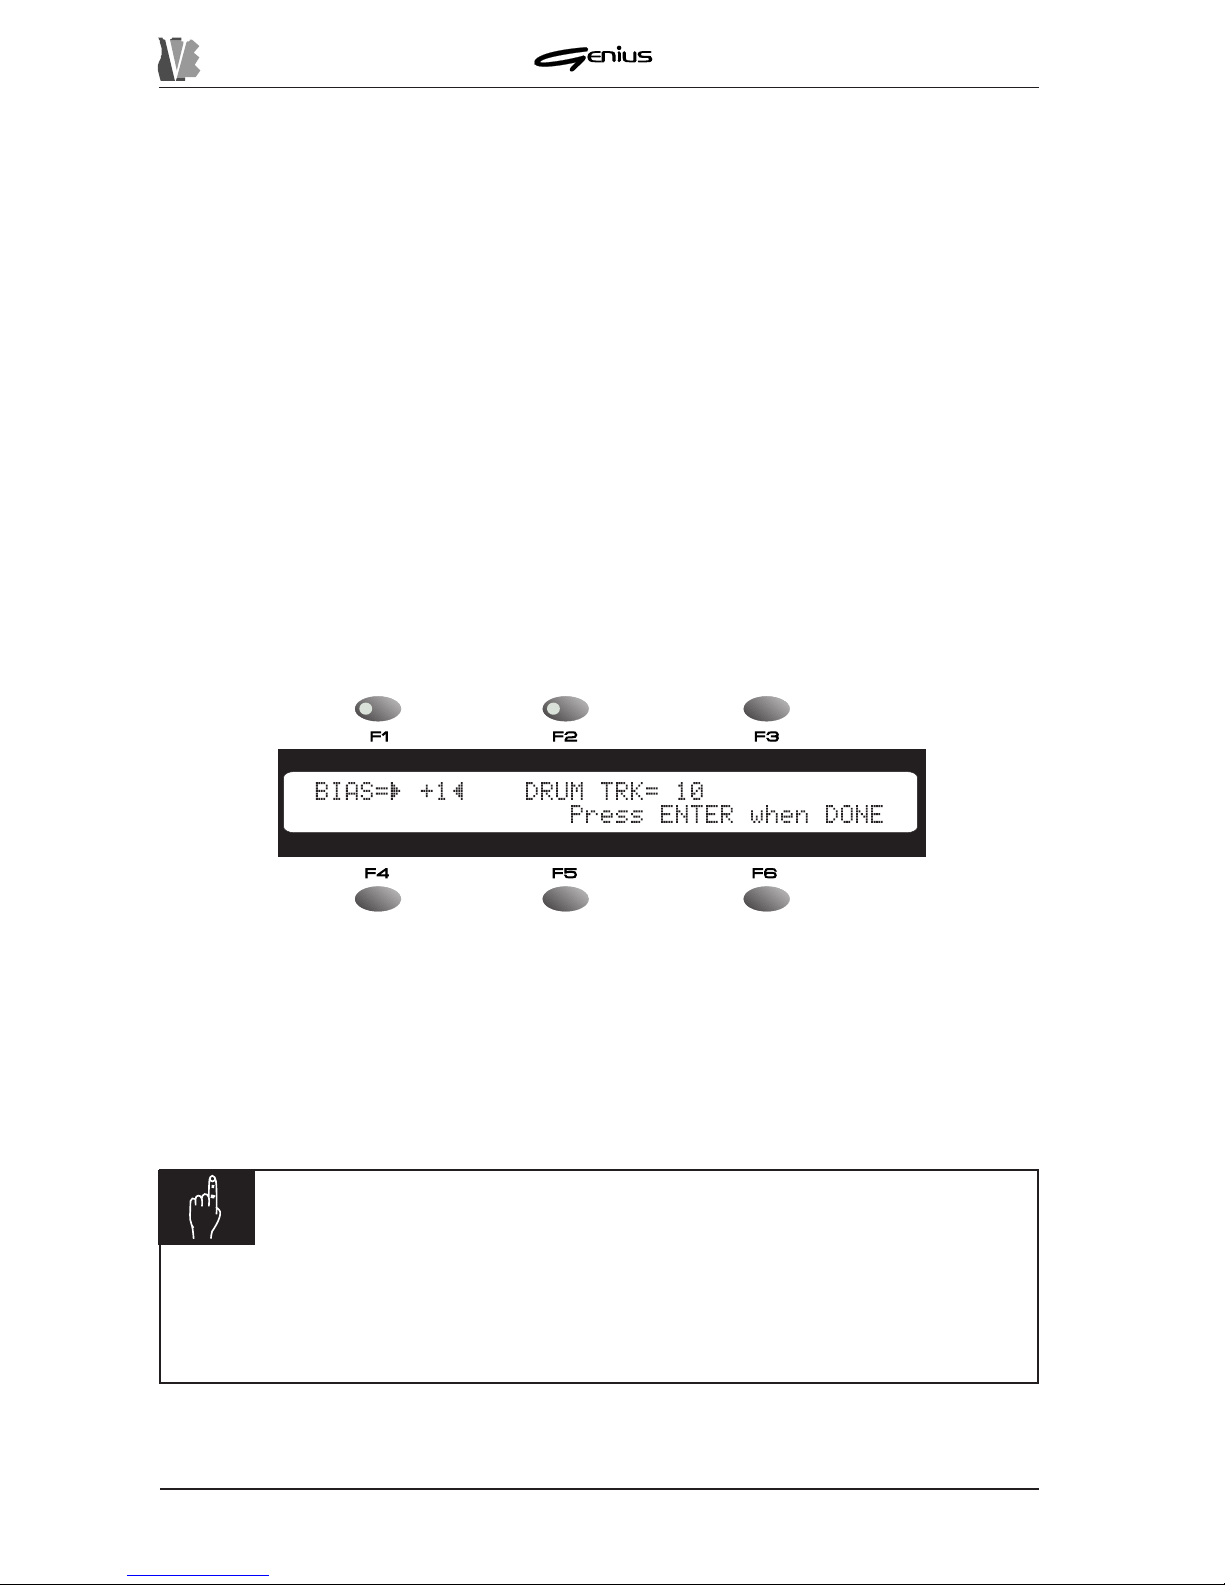
When the [TRANSP.] key of the REAL TIME ADJ. section is kept pressed for about two
seconds, the display will show:
The
BIAS
field next to the [F1] key sets the value of the transposition, when active, within a
range of ±12 semitones.
The
DRUM TR.
field sets which is to be the drum track, which will not be transposed. Users
are urged to take special care when assigning the DRUM TRACK.
Once the desired settings have been made, if [ENTER] is pressed they are accepted and
saved, and the display will again show the MAIN P AGE.
NOTE
ü
The chords eventually displayed with not be transposed.
ü
A parameter value BIAS=0 means there will be no transposition, even with the
function active.
DATA FILER
6.4 SETTING THE METRONOME TEMPO
The Tempo function allows the user to vary the metronome tempo of a song being played.
As for the other REAL TIME ADJUST functions, pressing the [TEMPO] key quickly activates
(LED on) and/or deactivates (LED off) the variation in tempo which can be set in the Tempo
Setup function, while keeping the key pressed for a longer time accesses the video page for
setting the variation in tempo to be implemented.
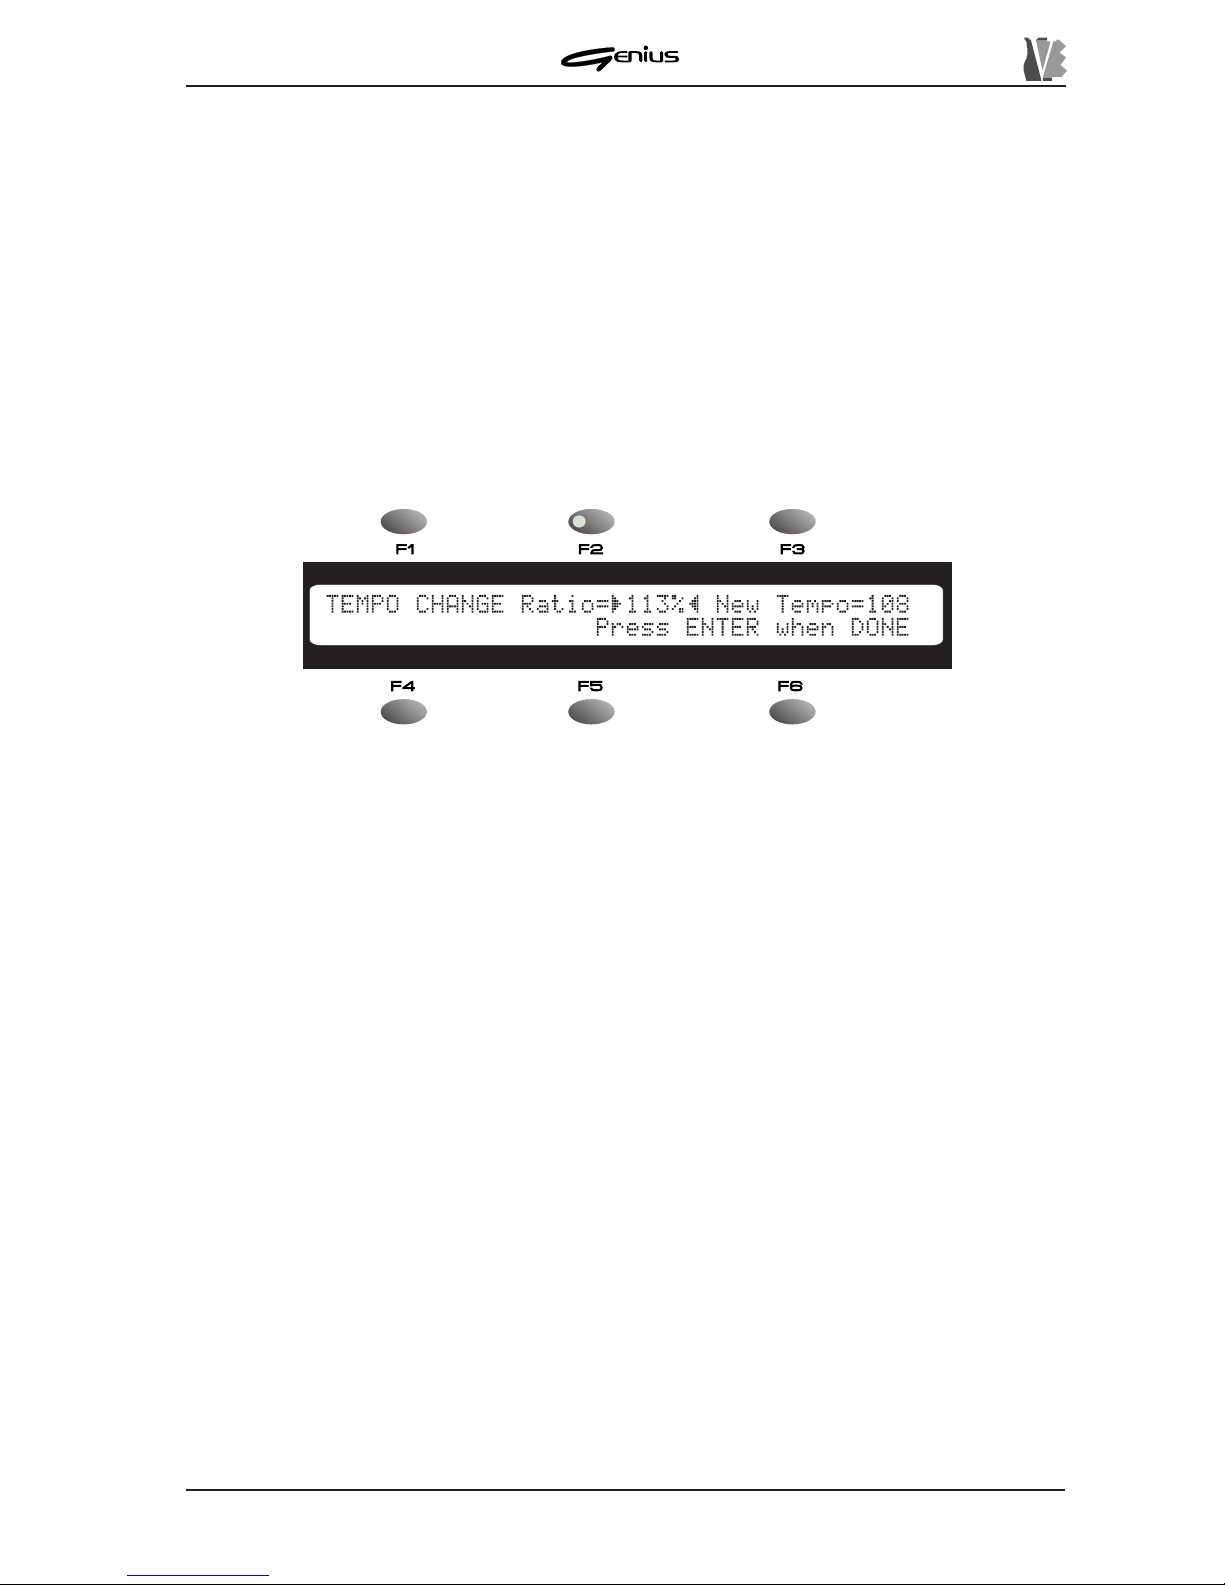
6.4.1 TEMPO SETUP
To access the Tempo Setup function keep the [TEMPO] button pressed for about 2 seconds
and the display will show the video page:
117
The
TEMPO CHANGE Ratio
field allows the user to regulate the variation not in the
absolute metronome tempo but in a calculation percentage, in order to guarantee a proportional
variation even in case of “rallentandos” or “accelerandos” envisaged during performance of
the song.
Note that the
TEMPO CHANGE Ratio
field represents the percentage calculation the
instrument will make to establish the new bpm value. In this case, a ratio of 100% means that
the new tempo will be equal to 100% of the original value, so there will be no change. The
possible bpm values cover a range from 50 to 250.
T o simplify the setting of the new bpm value, the
NEW TEMPO
field will display the outcome
of the calculation of the variation made.
As the display indicates, if [ENTER] is pressed the new value is accepted and, during playback
of the song, the variation will be implemented whenever the [TEMPO] key is pressed.
DATA FILER
7. RECORDING SONG
7.1 FOREWORD
As well as playing back songs in Standard MIDI File 0 and 1 format (see point 2.2), the
Genius is also able to record the MIDI events received on the MIDI IN port, made available
with the aid of an optional Joy-to-MIDI adapter (see section 4). Once recorded, these data
can be saved in the form of Standard MIDI Files both on a floppy disk and in the internal
memory .
Bear in mind that the instrument does not allow any over-recording (total or partial), so if you
wish to replace a recorded song you will have to delete the song in question and record
another.
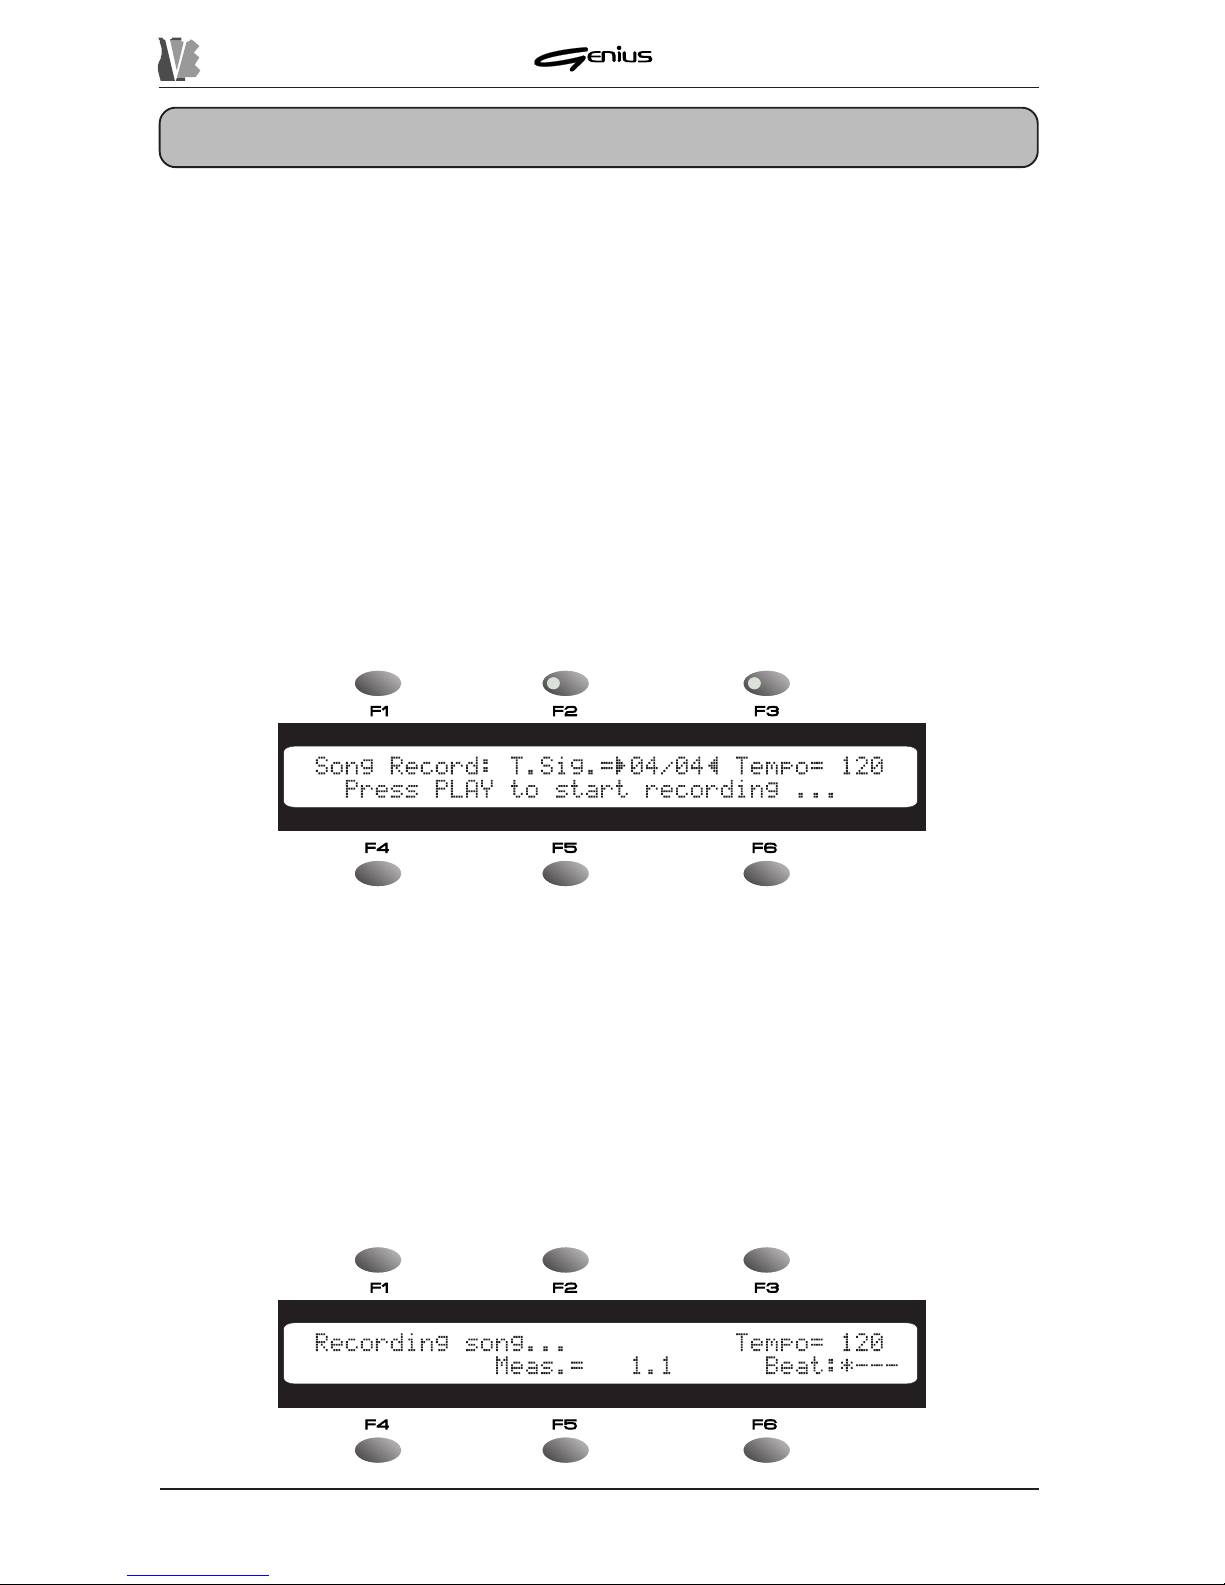
7.2 ST ARTING RECORDING
After making the connections correctly , press the [REC] key; the key LED will illuminate and
the display will show the following video page:
118
This video page contains the following fields:
o
T.Sig.
(can be selected using the [F2]) function key) – allowing the encoder to be
used to set the Time Signature of the song to be recorded. The possible values are: 3/8,
6/8, 9/8, 12/8, 2/4, 3/4, 4/4, 5/4, 6/4, 7/4 and 9/4.
o
Tempo
(can be selected using the [F3]) function key) – allowing the user to set the
metronome tempo of the new song in a range from 50 to 250 bpm (Beats per Minute).
After setting the values of the parameters to your requirements, press the [PLA Y] button to
start the recording of [ESC] to abort.
Once the [PLA Y] key has been pressed, the Genius will start to record the data present at the
MIDI IN port of the optional adapter and the display will show:
DATA FILER
As the screen shows, the
Recording Song
field warns the user that the Genius is recording
the data, the
Tempo
field indicates the metronome tempo with which the song is being
recorded, and the
Meas.
and
Beat
fields display the bar number reached and the beat
scan.
During recording, the [P AUSE] key can be pressed to suspend the procedure; it can then be
restarted from the point where it was interrupted by pressing the same key or the [PLA Y] key .
The LED of the [P AUSE] key illuminates to indicate that the system is in pause condition.
Pressing the [STOP] button terminates the recording phase.
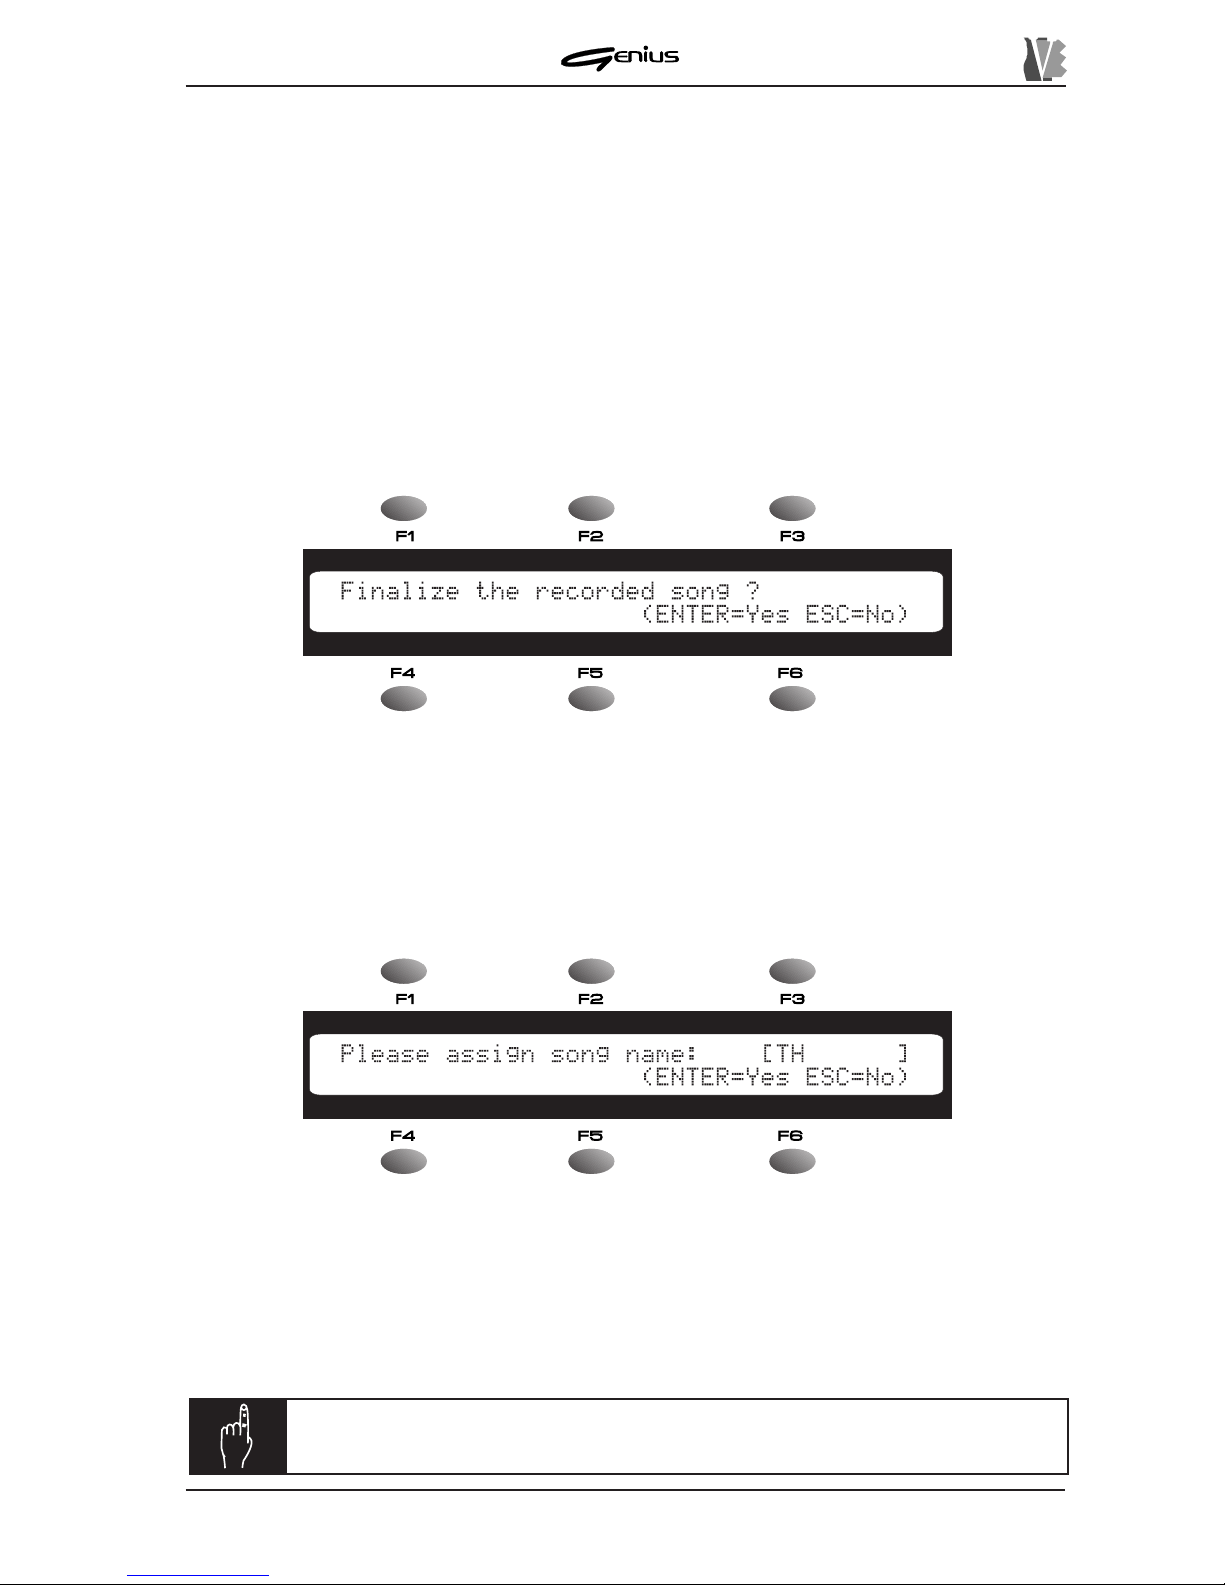
7.3 SA VING THE RECORDING
At the end of the recording, the system asks whether or not the user wishes to memorise the
song just created: the display will therefore show:
As the display indicates, if [ENTER] is pressed the recording will be acquired, while if the
user presses [ESC] all the recorded data will be deleted and the display will again show the
MAIN P AGE. If no data have been received during the recording the Finalize prompt will not
be displayed and the system will return straight to the MAIN P AGE.
Pressing [ENTER] confirms the procedure, and the system then prompts assignment of the
name to the new song (*.MID file name):
119
NOTE:
if the file has been saved in the internal memory, it will be placed at
the end of the list of files already present.
T o specify the name of the new file, use the [PREV.] and [NEXT] buttons to move the cursor
backwards or forwards respectively . The encoder can also be used to enter the characters to
be used to form the name of the file, bearing in mind that no spaces are permitted. Then use
the SOURCE section buttons to select the memory unit where the song is to be saved, ([DISK]
or [MEMORY]). Remember that the [DISK] key will not be active if the floppy disk is not inserted
or not formatted. Then press [ENTER] to save or [ESC] to abort.
DATA FILER
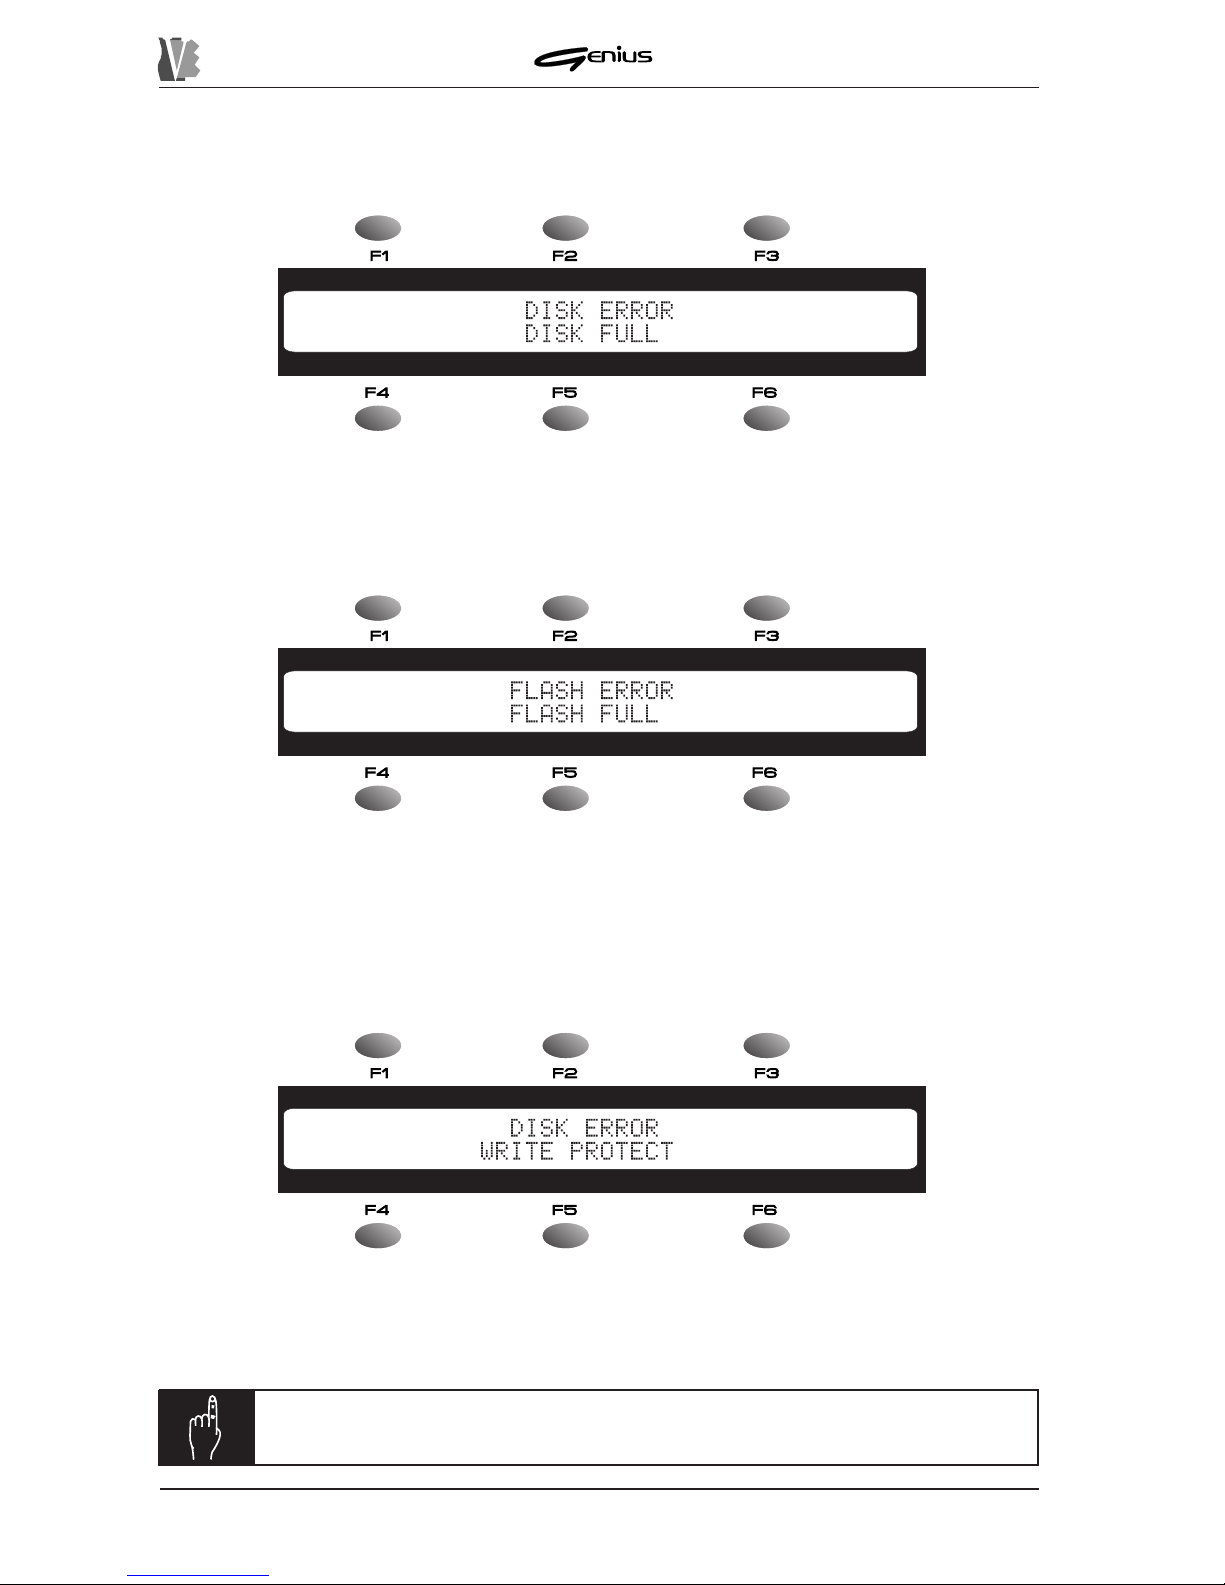
7.3.1 ERROR MESSAGES
DISK ERROR – DISK FULL
There is not enough room on the disk to save the song recorded. Press [ESC] to return to the
Finalize prompt, then replace the disk or select the internal memory .
FLASH ERROR – FLASH FULL
You have attempted to save the file on a floppy disk with write-protection. Press [ESC] to
return to the Finalize prompt, then remove the protection and repeat the memorisation
procedure.
N.B.:
do not remove the floppy disk if the drive LED is on.
120
There is not enough space in the memory to save the song recorded. Press [ESC] to return to
the Finalize prompt, then insert a disk or save the song on the floppy disk. Then free space in
the internal memory (see sections 8.2.2 and 8.4.6) where the file concerned can be copied
(see section 8.2.1).
DISK ERROR – WRITE PROTECT
DATA FILER
8. SYSTEM UTILITIES
121
The system utilities, found in the TOOLS section of the front panel, are accessory functions
not closely linked to the playback and recording of songs, but which are a useful backup to
the operations the Genius offers.
Unlike the functions in the REAL TIME ADJ. section, the TOOLS can only be recalled in Stop
condition.
The only exception is the P ART INFO function described in point 8.5.
The TOOLS section is divided into five sections corresponding to the buttons on the panel,
as follows:
o DISK: access to the general disk and internal memory functions (formatting, copying whole
floppy disks, etc....).
o FILES: accessory functions relating to the files (single and multiple copy , delete, rename,
etc...).
o MIDI: settings relating to the instrument’s general MIDI functions (Out Router, MIDI filters,
synchronisation, etc...).
o SYSTEM: accessory functions relating to the system (display , pedal control, etc.).
o PA RT INFO: information about the status of the main data relating to the tracks being
played.
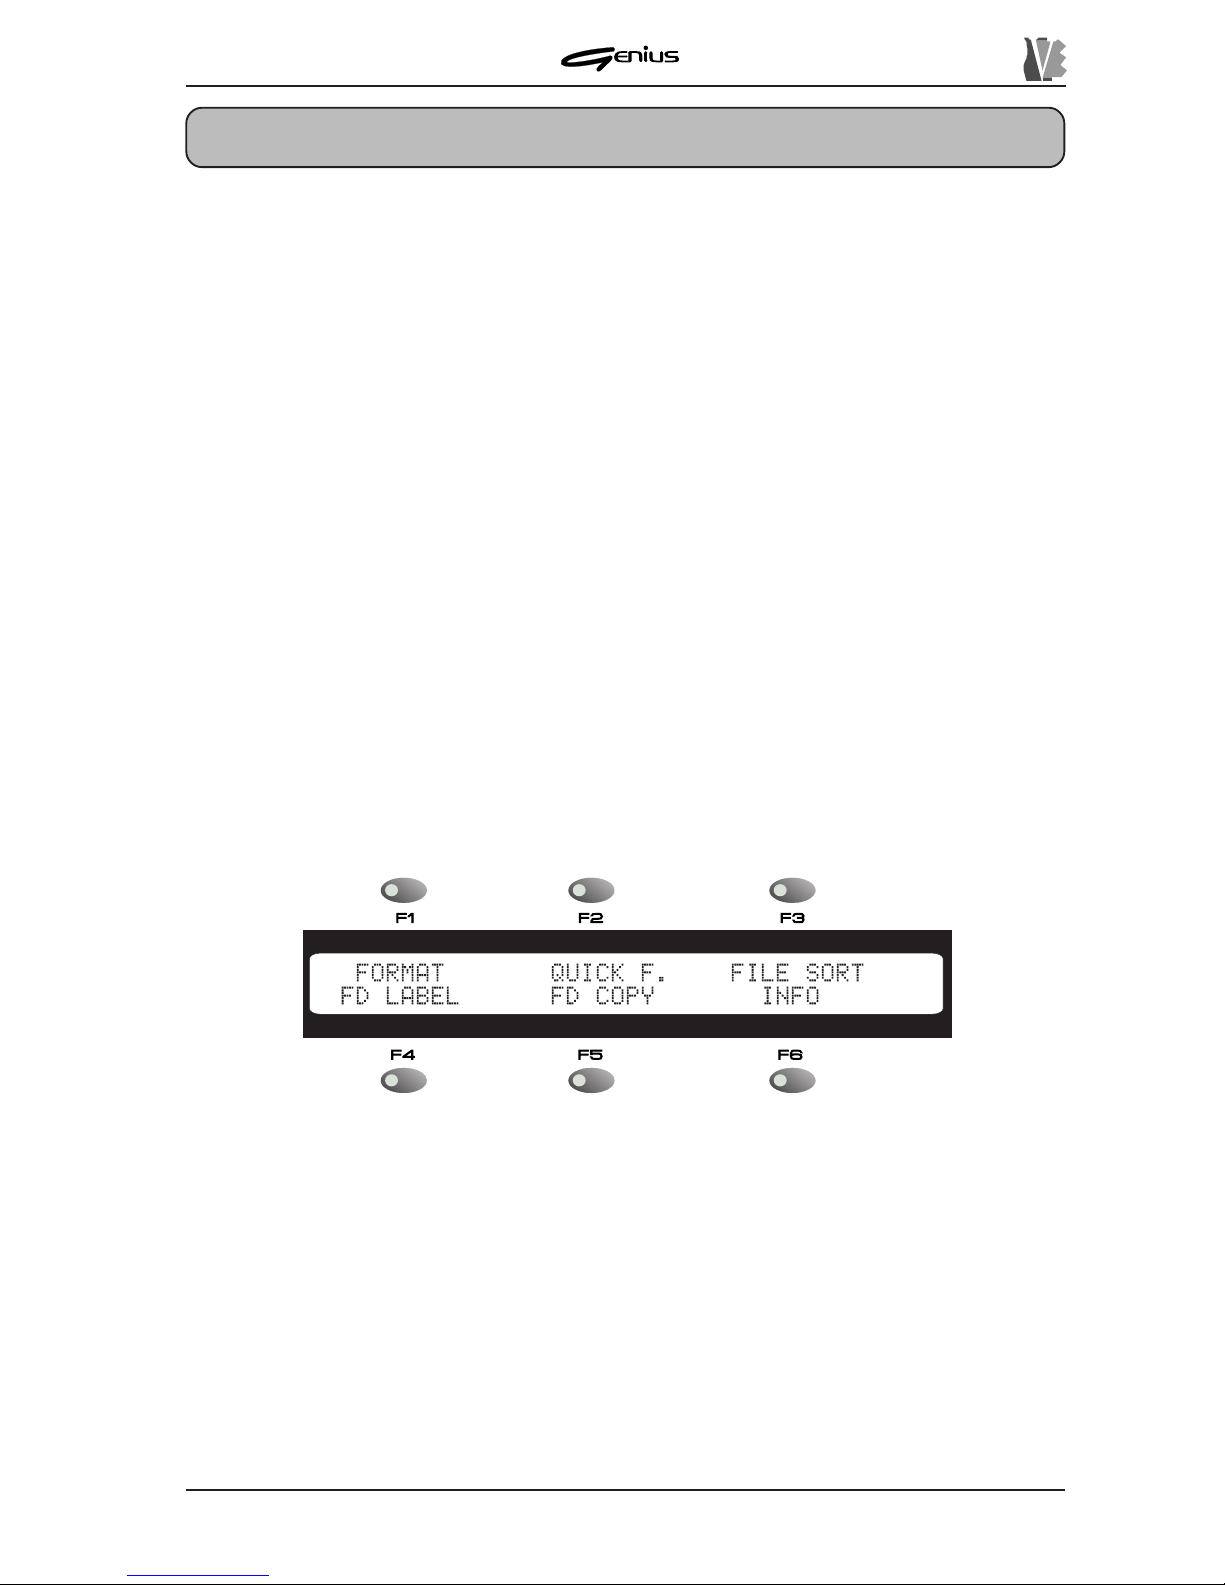
8.1 DISK
When the [DISK] key in the TOOLS section is pressed, the display will show:
The functions available are:
o
FORMAT
: selected by pressing the [F1] key , starts the procedure for formatting the disk
inserted in the floppy disk driver , or the internal flash memory.
o
QUICK F
(Quick Format): [F2], starts the procedure for quick formatting of the floppy
disk.
o
FILE SORT
: [F3], recalls the function for sorting the files contained in the selected unit.
o
FD LABEL
(Floppy Disk Label) [F4], can be used to change the label of the floppy disk
inserted.
o
FD COPY
(Floppy Disk Copy): [F5], recalls the procedure for copying a whole floppy
disk onto another or into the internal memory .
o
INFO
: [F6], displays the main informative data about the floppy disk inserted or the internal
memory .
DATA FILER
T o exit from this function press [ESC] or [DISK] and the display will return to the MAIN P AGE;
otherwise, use the selection keys referred to above to access the various functions of the
TOOLS section.
8.1.1 FORMAT
Each freshly-purchased floppy disk must be formatted before use for writing songs. The
Genius formats floppy disks in MS-DOS® format, meaning that these disks can also be used
with Personal Computers or Sequencers.
The internal flash memory can also be formatted, to delete all the files memorised in it.
122
WARNING!
Bear in mind that when a floppy disk or the internal memory is formatted, all the data
memorised will be lost irretrievably. When the internal memory is formatted, the data
relating to the system software will not however be deleted.
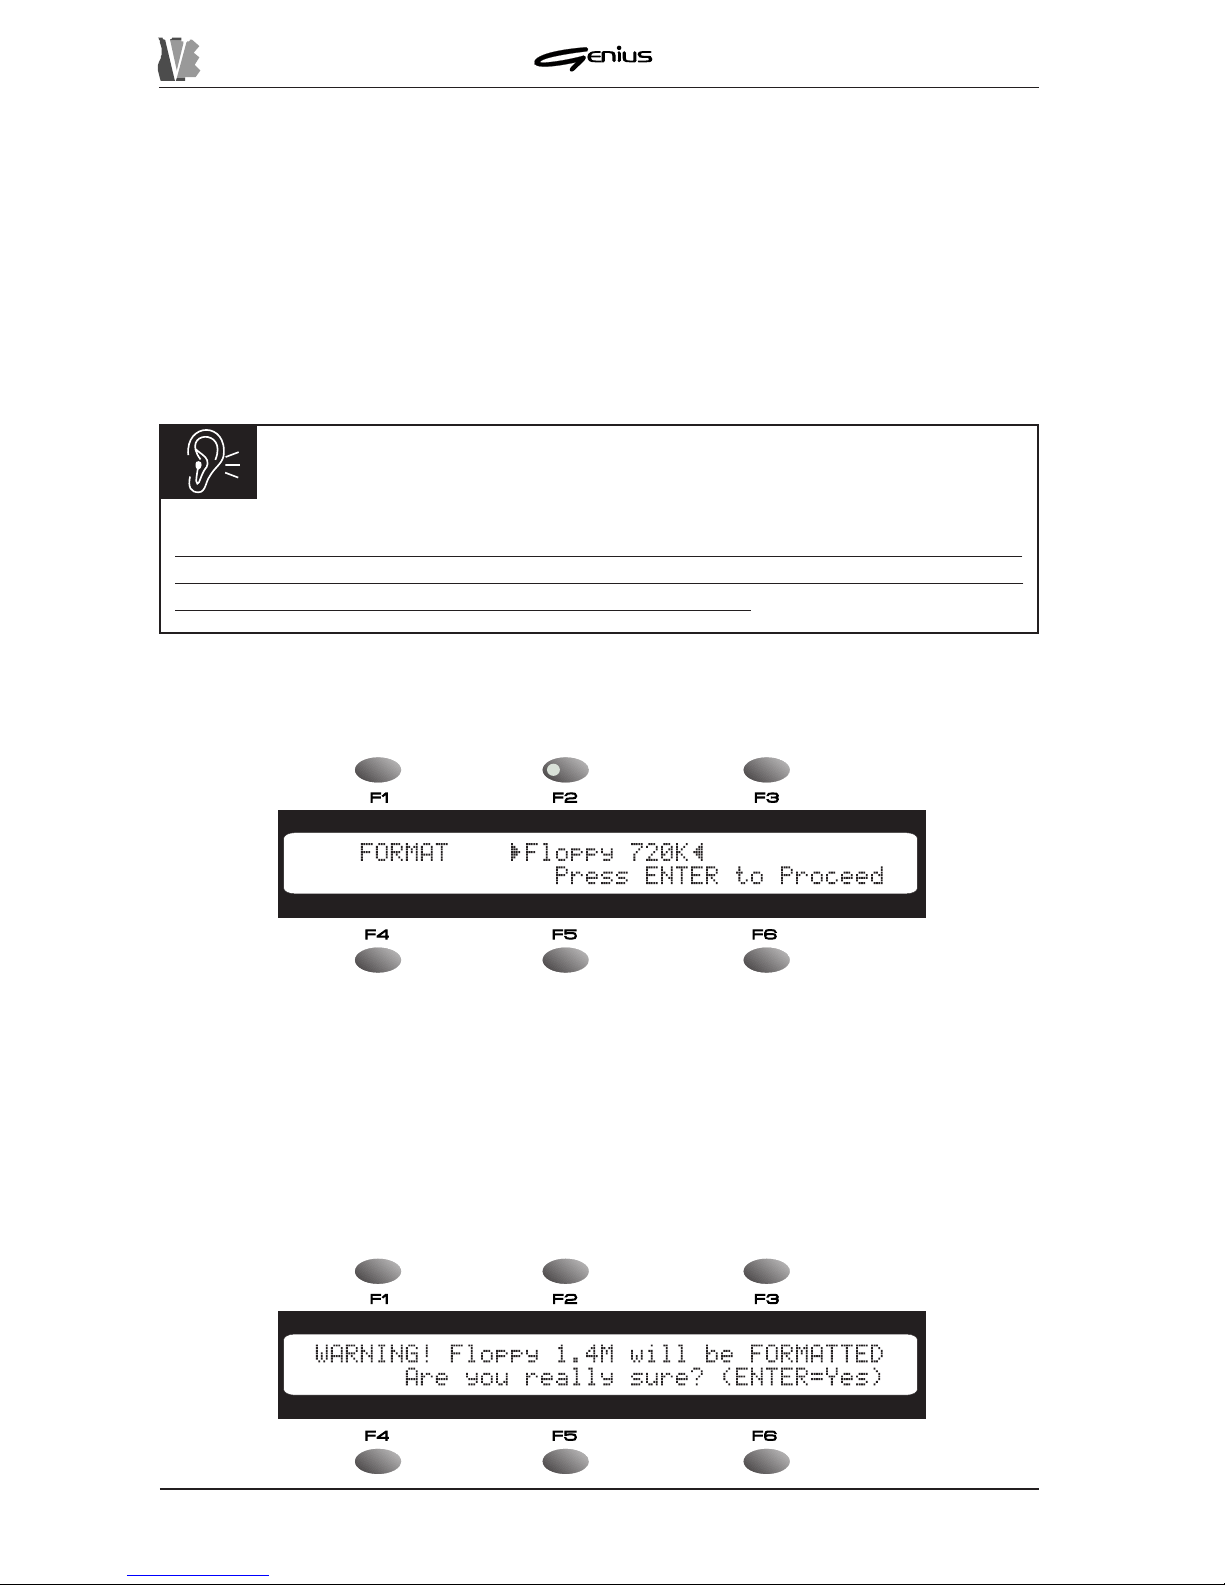
We will now take a look at the formatting procedure.
From the DISK menu press the [F1] function key; the display will show:
Use the encoder to select the unit you wish to format, chosen from:
o
Floppy 720K
: formatting of Double Density (DD) floppy disk of 720 Kbytes.
o
Floppy 1.4M
: formatting of High Density (HD) floppy disk of 1.44 Mbytes.
o
Memory
: formatting of the internal flash memory (capacity measured automatically).
Now insert the floppy disk to be formatted.
Press the [ENTER] key to start the formatting procedure and the display will show:
 Loading...