

Page 1
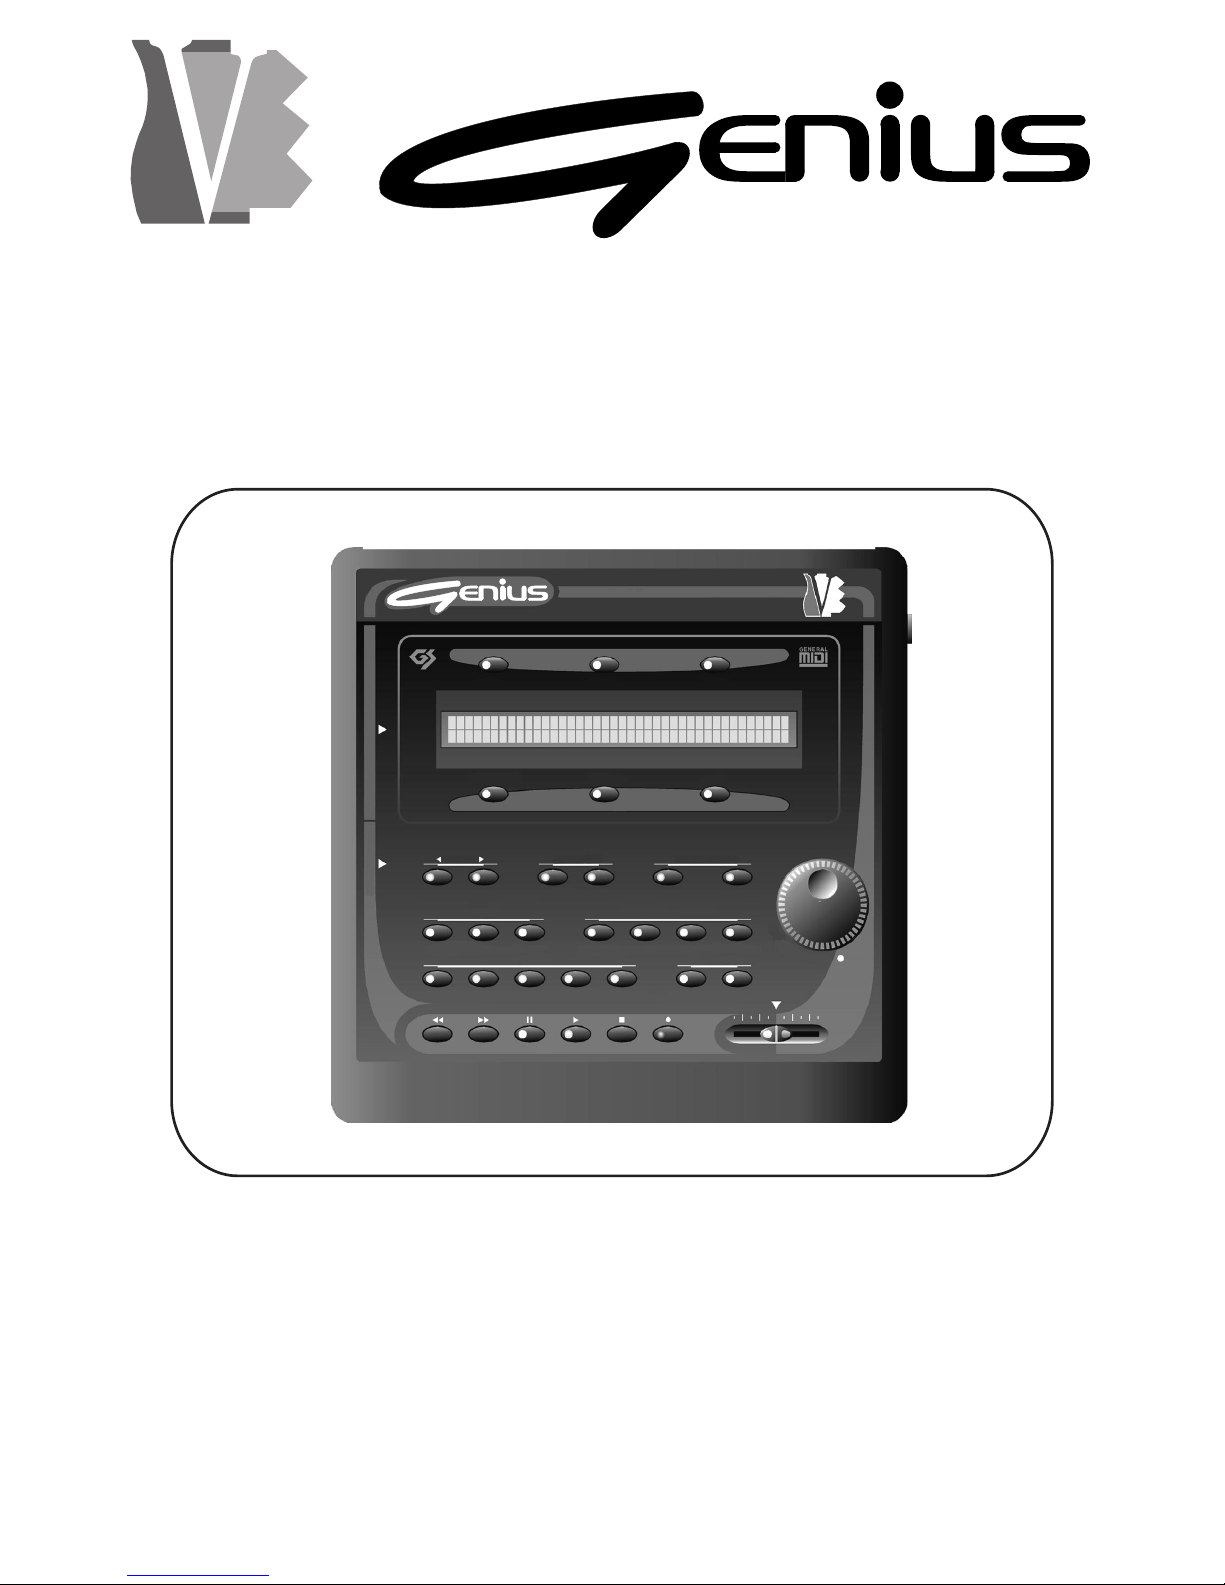
VOICE
SYSTEMS
DATA FILER
Manuale Operativo
Operating Manual
PAGE SOURCE CONFIRM
REAL TIME ADJ.REAL
TIME ADJ.EDIT
TOOLS MODE
VOLUME
RECSTOPPLAYPAUSEFFREW
CONTROLS FUNCTION KEYSFUNCTION
KEYS
F4 F5 F6
F3F2F1
PREV. NEXT DISK MEMORY ESC ENTER
TEMPOTRANSPMUTELYRICSSONGTRACKLIST
DISK FILES MIDI SYSTEM T. INFO SONG LIST
DATA FILER
D
A
T
A
E
N
T
R
Y
D
A
T
A
E
N
T
R
Y
VOICE SYSTEMS
Page 2
CAUTION
RISK OF ELECTRIC SHOCK
DO NOT OPEN
WARNING! TO REDUCE THE DANGER OF ELECTRIC SHOCK:
DO NOT REMOVE COVER (OR BACK)
DO NOT EXPOSE THIS APPLIANCE TO RAIN OR MOISTURE
NO USER SERVICEABLE PARTS INSIDE
REFER SERVICING TO QUALIFIED SERVICE PERSONNEL
This simbol is intended to
alert the user to the presence
of important operating and
maintenance (servicing)
instructions in the literature
accompanying the appliance.
This simbol is intended to alert
the user to the presence of
uninsulated “dangerous
voltage“ within the product’s
enclouser that may be of
sufficient magnitude to
constitute a risk of electronic
shock to persons.
“INSTRUCTIONS PERTAINING TO A RISK OF FIRE,
ELECTRIC SHOCK, OR INJURY TO PERSONS“
IMPORTANT SAFETY INSTRUCTIONS
“INSTRUCTIONS
PERTAINING TO A RISK OF FIRE,
ELECTRIC
SHOCK, OR INJURY TO PERSONS“
IMPORTANT
SAFETY INSTRUCTIONS
WARNING: When using electric products, basic precautions should always be fallowed,
including the following:
1) Read all instructions before using the product.
2) To reduce risk of injury, close supervision is necessary when product is used near
children.
3) Do not use this product near water – for example, near a batnub, washbowl, kitchen
sink, in a wet basement, or near a swimming pool, or the like.
4) This product, either alone or in combination with an amplifier and headphones or
speakers, may be capable of producing sound levels that could cause permanent
hearing loss. Do not operate for a long period of time in high volume level or at a level
that is unconfortable. If you experience any hearing loss or ringing in the ears, you
should consult an audiologist.
5) This products should be located away from heat sources such as radiators, heat
register, or other products that produce heat.
6) The power supply cord of the instrument should be unplugged from the outlet when left
unused for a long period of time.
7) Care should be taken so that objects do not fall and liquids are not spilled into the
enclosure of the instrument.
8) The products should be serviced by qualified personnel when:
a. The power supply cord or the plug has been demaged; or
b. Objects have fallen, or liquid has been spilled into the product; or
c. The products has been exposed to rain; or
d. The products does not appear to operate normally or exibist a marked
change in performance; or
e. The products has been dropped, or the enclosure demaged.
9) Do not attemp to service the product beyond that described in the user-maintenance
instructions. All other servicing should be referred to qualified personnel.
Page 3

DATA FILER
CONTENTS
95
1. IMPORTANT NOTES ........................................................................................................... 97
1.1 Looking after the product .................................................................................................97
1.2 Notes about the instrument.............................................................................................. 97
1.3 Notes about the manual...................................................................................................98
2. MAIN CHARACTERISTICS ..................................................................................................99
2.1 The Genius’s structure ....................................................................................................99
2.2 Data format......................................................................................................................99
3. CONTROLS AND CONNECTIONS ................................................................................... 100
3.1 The front panel...............................................................................................................100
3.2 The floppy disk driver..................................................................................................... 102
3.3 The rear panel................................................................................................................ 103
4. CONNECTIONS ................................................................................................................. 104
5. PLAYING BACK SONGS.................................................................................................... 105
5.1 The Main Page............................................................................................................... 105
5.1.1 Error messages ..................................................................................................... 108
5.2 Use the [REW] and [FF] keys ........................................................................................ 109
5.3 Multitask Song Selection (Song Next field) .................................................................... 110
5.4 Directory function...........................................................................................................111
5.5 Displaying the lyrics of the song .................................................................................... 112
6. REAL TIME FUNCTIONS ................................................................................................... 114
6.1 Lyrics .............................................................................................................................114
6.2 Track muting.................................................................................................................. 115
6.2.1 Mute Setup ............................................................................................................. 115
6.3 Trasposing the key......................................................................................................... 116
6.3.1 Transpose Setup.................................................................................................... 116
6.4 Setting the metronome tempo ....................................................................................... 117
6.4.1 T empo Setup..........................................................................................................117
7. RECORDING SONG .......................................................................................................... 118
7.1 Foreword ....................................................................................................................... 118
7.2 Starting recording ..........................................................................................................118
7.3 Saving the recording...................................................................................................... 119
7.3.1 Error messages ..................................................................................................... 120
8. SYSTEM UTILITIES ........................................................................................................... 121
8.1 Disk ...............................................................................................................................121
8.1.1 Format ................................................................................................................... 122
8.1.2 Quick Format ......................................................................................................... 123
8.1.3 File Sort.................................................................................................................. 124
8.1.4 FD Label................................................................................................................. 125
8.1.5 FD Copy................................................................................................................. 126
8.1.6 Info .........................................................................................................................130
8.1.7 Error messages - Disk section .............................................................................. 131
8.2 Files ...............................................................................................................................134
8.2.1 Copy....................................................................................................................... 134
8.2.2 Delete.....................................................................................................................139
Page 4

DATA FILER
96
8.2.3 Rename ................................................................................................................. 140
8.2.4 Check..................................................................................................................... 141
8.2.5 Error messages - Files section.............................................................................. 143
8.3 MIDI functions ................................................................................................................ 145
8.3.1 Out Router ............................................................................................................. 145
8.3.2 In Filter ...................................................................................................................147
8.3.3 Out Filter ................................................................................................................ 148
8.3.4 karaoke Out............................................................................................................ 149
8.3.5 Sync In ................................................................................................................... 149
8.3.6 Sync Out ................................................................................................................ 150
8.4 System .......................................................................................................................... 151
8.4.1 Contrast ................................................................................................................. 151
8.4.2 Foot Switch ............................................................................................................ 152
8.4.3 Start-Up Mode ........................................................................................................ 152
8.4.4 Sys Info .................................................................................................................. 153
8.4.5 Play Mode............................................................................................................... 154
8.4.6 Mem. Compact ...................................................................................................... 155
8.5 The Track Info functions................................................................................................. 156
9. EDIT ..................................................................................................................................... 157
9.1 Edit Song ....................................................................................................................... 157
9.1.1 Edit Song - Transposer .......................................................................................... 158
9.1.2 Edit Song - Tempo.................................................................................................. 159
9.1.3 Edit Song - Track Transposer ................................................................................ 159
9.1.4 Edit Song - Track Mute........................................................................................... 160
9.1.5 Edit Song - T emporary play.................................................................................... 161
9.1.6 Edit Song - Saving the modifications ..................................................................... 161
9.2 Edit Track....................................................................................................................... 163
9.2.1 Edit Track - Program Change & Bank Select......................................................... 164
9.2.2 Edit Track - Volume & Pan ..................................................................................... 165
9.2.3 Edit Track - Expression.......................................................................................... 167
9.2.4 Edit Track - Velocity................................................................................................ 167
9.2.5 Edit Track - Reverb ................................................................................................168
9.2.6 Edit Track - Chorus ................................................................................................ 169
9.2.7 Edit Track - Temporary play ................................................................................... 169
9.2.8 Edit Track - Saving the modifications ..................................................................... 170
9.2.9 Error messages - Edit section ............................................................................... 172
10. LIST ....................................................................................................................... ............ 174
10.1 Creating a List.............................................................................................................. 174
10.2 Saving the List ............................................................................................................. 176
10.3 Playing a List................................................................................................................ 177
10.3.1 Error messages - Play List .................................................................................. 177
10.4 Modifying a List ............................................................................................................ 178
10.5 List file management ................................................................................................... 178
APPENDIX...............................................................................................................................179
Updating the operating system ............................................................................................ 179
Operating system failure ..................................................................................................... 18 1
Adding flash memory expansion.......................................................................................... 181
Sound List............................................................................................................................ 183
Page 5
DATA FILER
1. IMPORTANT NOTES
1.1 LOOKING AFTER THE PRODUCT
1.2 NOTES ABOUT THE INSTRUMENT
97
• Do not apply excessive force to the structures and controls (knobs, switches, etc.).
• Protect the instrument from heavy stresses both during transport and in use. The instrument
should be transported in its original packaging or an equivalent.
• Do not place the Genius close to heat sources, in damp or dusty places or close to strong
magnetic fields.
• When possible, do not place the instrument close to units which produce strong
interference, such as radios, TV sets monitors, etc....
• Never insert foreign bodies or liquids of any kind inside the equipment.
• For cleaning, use only a soft cloth or compressed air; never use detergents, solvents or
alcohol.
• When disconnecting the cables from the sockets, ensure you take hold of the connector
and not the cable itself; when winding cables, do not allow knots or twists to form.
• Do not expose the instrument to direct sunlight.
•
Always use good quality screened cables. In addition, when disconnecting the cables
from the sockets, ensure you take hold of the connector and not the cable itself; when
winding cables, do not allow knots or twists to form
• Before making the connections, make sure that the other units (especially amplification
and diffusion systems) you are about to connect are switched off. This will prevent noisy
or even hazardous signal peaks.
IMPORT ANT!
The Genius is equipped with a “direct-to-disk” reading system which plays the song
while it is being read from the disk; this considerably reduces the loading times and
ensures quicker operation when file playback is started. However , this reading system
requires special care during extraction of the disk when it is being used by the system,
to avoid breaks in playback, system errors and damage to the drive reading heads.
Users are therefore strongly advised:
•
NOT TO REMOVE the disk during performance of the song, during disk formatting,
during file reading or writing, during editing operations when the song being modified
Page 6
DATA FILER
98
resides on the floppy disk, or during the performance of lists resident on the disk.
Also, never extract the disk when the instrument is in “system busy” condition, i.e.
when the name of the song resident on the floppy disk is displayed in brackets ().
•
ONLY TO REMOVE the disk when the disk drive LED is off. When the current
operation requires extraction of the disk wait for the prompt, which will appear on
the display.
•
NOT TO SWITCH OFF the instrument when a writing operation (copy, rename,
delete, memory compact) is in progress on the Flash Memory.
In order to obtain the best performance from the instrument, it is important to:
• Use only good quality floppy disks. Pay special attention to looking after floppy disks,
taking care not to place them close to heat sources or magnetic fields (monitors, speakers,
etc..) or in damp and dusty environments. Bear in mind that given the nature of the directto-disk system, the instrument must have error-free disks if it is to give the best performance.
• Make backup copies of floppy disks periodically , since the direct-to-disk system causes
greater wear of the disk’s magnetic medium than other systems.
With regard to the type of files to be used, bear in mind that:
• The Genius only uses standard MIDI files (extension *.MID) resident on floppy disks
formatted in accordance with the MS-DOS
standard. Files with different extensions will
not be processed.
• The system supports up to 16 tracks. If a format 1 MIDI file exceeds the permitted number
of tracks, an error will be shown on the display .
• The Genius recognises the format of any lyrics on the song, identifying the copyright of the
MIDI file producer . It is therefore important to use the permitted types of Karaoke without
converting the format. In addition, do not use more than one text coding mode within the
same file.
1.3 NOTES ABOUT THE MANUAL
• T ake good care of this manual.
• Read all the information provided in this manual carefully . Y ou will avoid wasting time and
obtain the best performance from the instrument.
• Codes or numbers in square brackets ([]) indicate the names of buttons on the instrument’s
panel or connectors on the rear.
For example, [L YRICS] indicates the L YRICS button.
• The contents of the display video pages are provided purely as guideline and may differ
from what actually appears on the display .
Page 7

DATA FILER
2. MAIN CHARACTERISTICS
99
2.1 THE GENIUS’S STRUCTURE
The Genius is a MIDI Data Filer , meaning a device capable of reading MIDI files and playing
them back in audio format thanks to its own internal sound generator.
For a clearer idea of how it works, we can divide the Genius into two sections: a file
management section, which from now on we will call the
Data Player
, and a generation system,
called the
Sound Generator
.
The
Data Player
section reads the data saved on the floppy disk or in the internal flash memory
and sends them to the
Sound Generator
section or to the [MIDI OUT] port. As well as this, this
section manages all the device’s internal programming, including the functions for management
of the songs, of the sequences of songs contained on the floppy disk or in the internal memory ,
and all the functions for editing the songs themselves, such as their deletion, memorisation
and modification.
The
Sound Generator
section, on the other hand, converts the data received from the
Data
Player
section into audio signals, and thus into music, bearing in mind the timbre and dynamic
of every single note. This section is able to reproduce 353 sounds and 17 Drum Kits, and is
poly-timbric on 16 parts (16 different timbres can be played simultaneously) each distributed
on one track, meaning one MIDI channel. The maximum polyphony (the number of notes
which can be played simultaneously) is 32. What’s more, the Sound Generator has a
multieffects unit containing ambient effects (reverb and echo) and modulation effects (chorus
and flanger).
Another important feature of the Genius is that it has an internal memory which at the time of
purchase offers memorisation capacity from 8 MByte to 32 MByte. This allows you to save
the songs used most often and play them back by just recalling them from this internal memory
section, without having to load a floppy disk containing the songs required every time.
Another advantage of the flash memory is quicker loading of the songs being performed than
with a floppy disk driver .
2.2 DATA FORMAT
The Genius floppy disk driver is able to take 3.5” floppy disks in DD (720 KByte) and HD
(1.44 MByte) formats, formatted in accordance with the MS-DOS standard. If the files
contained in these two sections are to be interpreted by the instrument during reading, they
must comply with the MIDI file (*.MID) standard in formats 0 and 1. During recording of
MIDI data from an external source, the result will be saved in the form of MIDI standard file in
format 0.
In order to be interpreted correctly by the instrument, MIDI files must belong to the GENERAL
MIDI standard.
Page 8
DATA FILER
3. CONTROLS AND CONNECTIONS
3.1 THE FRONT P ANEL
100
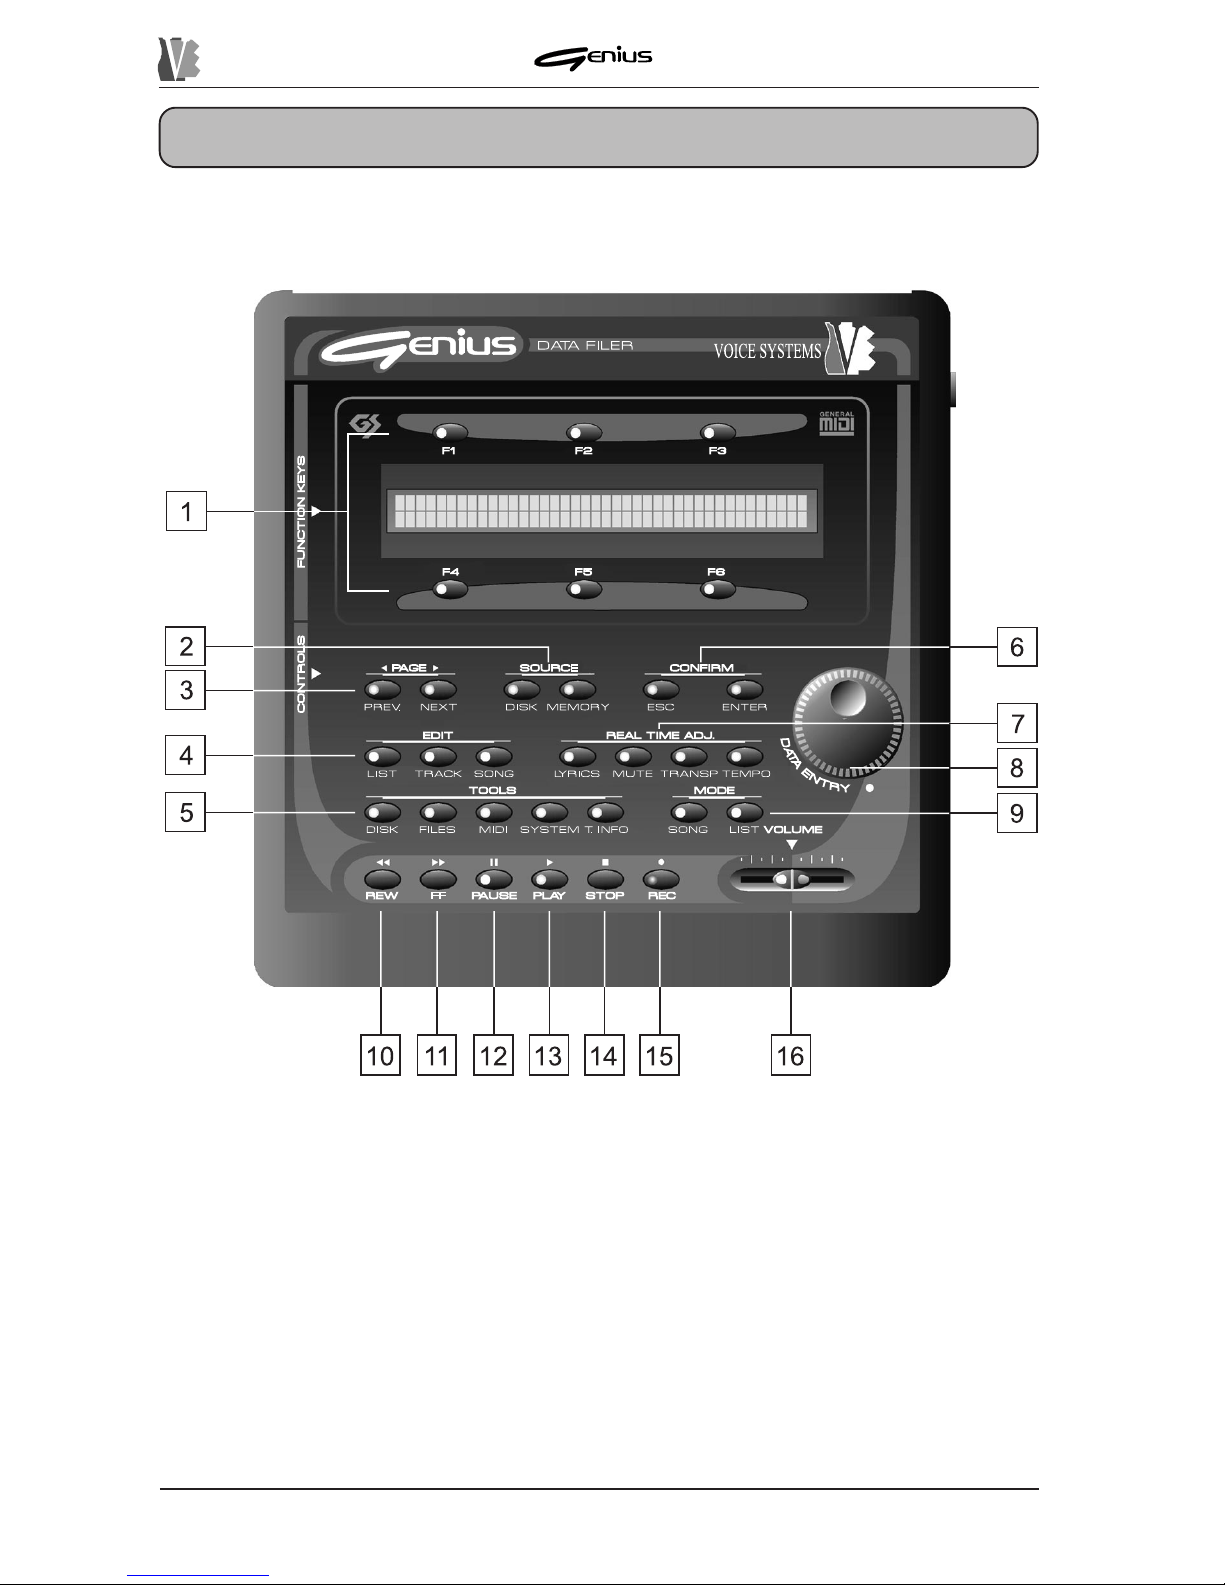
1. FUNCTION KEYS: these buttons can be used to select the functions or options selected
on the display in line with the button concerned. When the LED of the key is on, the key is
enabled.
2. SOURCE section: you can use these buttons to select the unit in which the files to be used
for the play , editing, copy or deletion functions are saved.
O [DISK]: selects the floppy disk inserted in the drive as currently active memory unit.
The key is not enabled if the drive is empty or the disk inserted is not
acceptable.
o [MEMORY]: enables the management of the data resident in the internal memory .
Page 9

DATA FILER
101
3. PAGE section: this section contains the buttons used for displaying the display pages
when more than one page is present. When a button is active, its LED will be constantly on.
o [PREV.]: selects the page before the one currently shown on the display .
o [NEXT]: selects the next page.
4. EDIT section: this group of buttons enables the modifications which can be saved on the
selected file.
o [LIST]: allows the creation/modification of Lists.
o [TRACK]: enables the function for modification of single tracks of the song.
o [SONG]: enables the function for modification of the song’s general parameters
(Transposer , Tempo, etc...).
5. TOOLS section: section containing the buttons used to activate the instrument’s utility
functions, including:
o [DISK]: recalls the functions for management of the mass memory (internal memory
and floppy disk). The functions present in this section include formatting, File Sort,
disk copy , etc...
o [FILES]: recalls the functions for management of the files present in the internal memory
or on the floppy disk (copy , delete, rename, etc...).
o [MIDI]: management of the MIDI functions and ports.
o [SYSTEM]: recalls the instrument’s general set-up functions.
o [T.INFO]: displays the main parameters of the tracks contained in the song being
performed.
6. CONFIRM section: these buttons are used to confirm or abort the procedure when the
system requests this.
o [ESC]: abort.
o [ENTER]: confirm.
7. REAL TIME ADJ. section: the buttons in this section allow the user to make real-time
modifications to the song being performed; these changes cannot be memorised.
o [LYRICS]: enables display of the lyrics of the song (the key is not active if the song
does not contain text information).
o [MUTE]: disables playback of one or more tracks.
o [TRANSP .]: activates the transposition of songs to different keys.
o [TEMPO]: varies the metronome tempo for playback.
T o set up each of the functions referred to above, press the relative button and keep it pressed.
8. Encoder [DA T A ENTRY] : dynamic encoder for file selection or for modifying the values of
the selected parameters.
9. MODE section: these buttons can be used to select the type of file required for playback.
o [SONG]: for the selection of the individual songs (*.MID files).
o [LIST]: for the selection of Lists (pre-arranged sequences of songs).
Page 10
DATA FILER
102
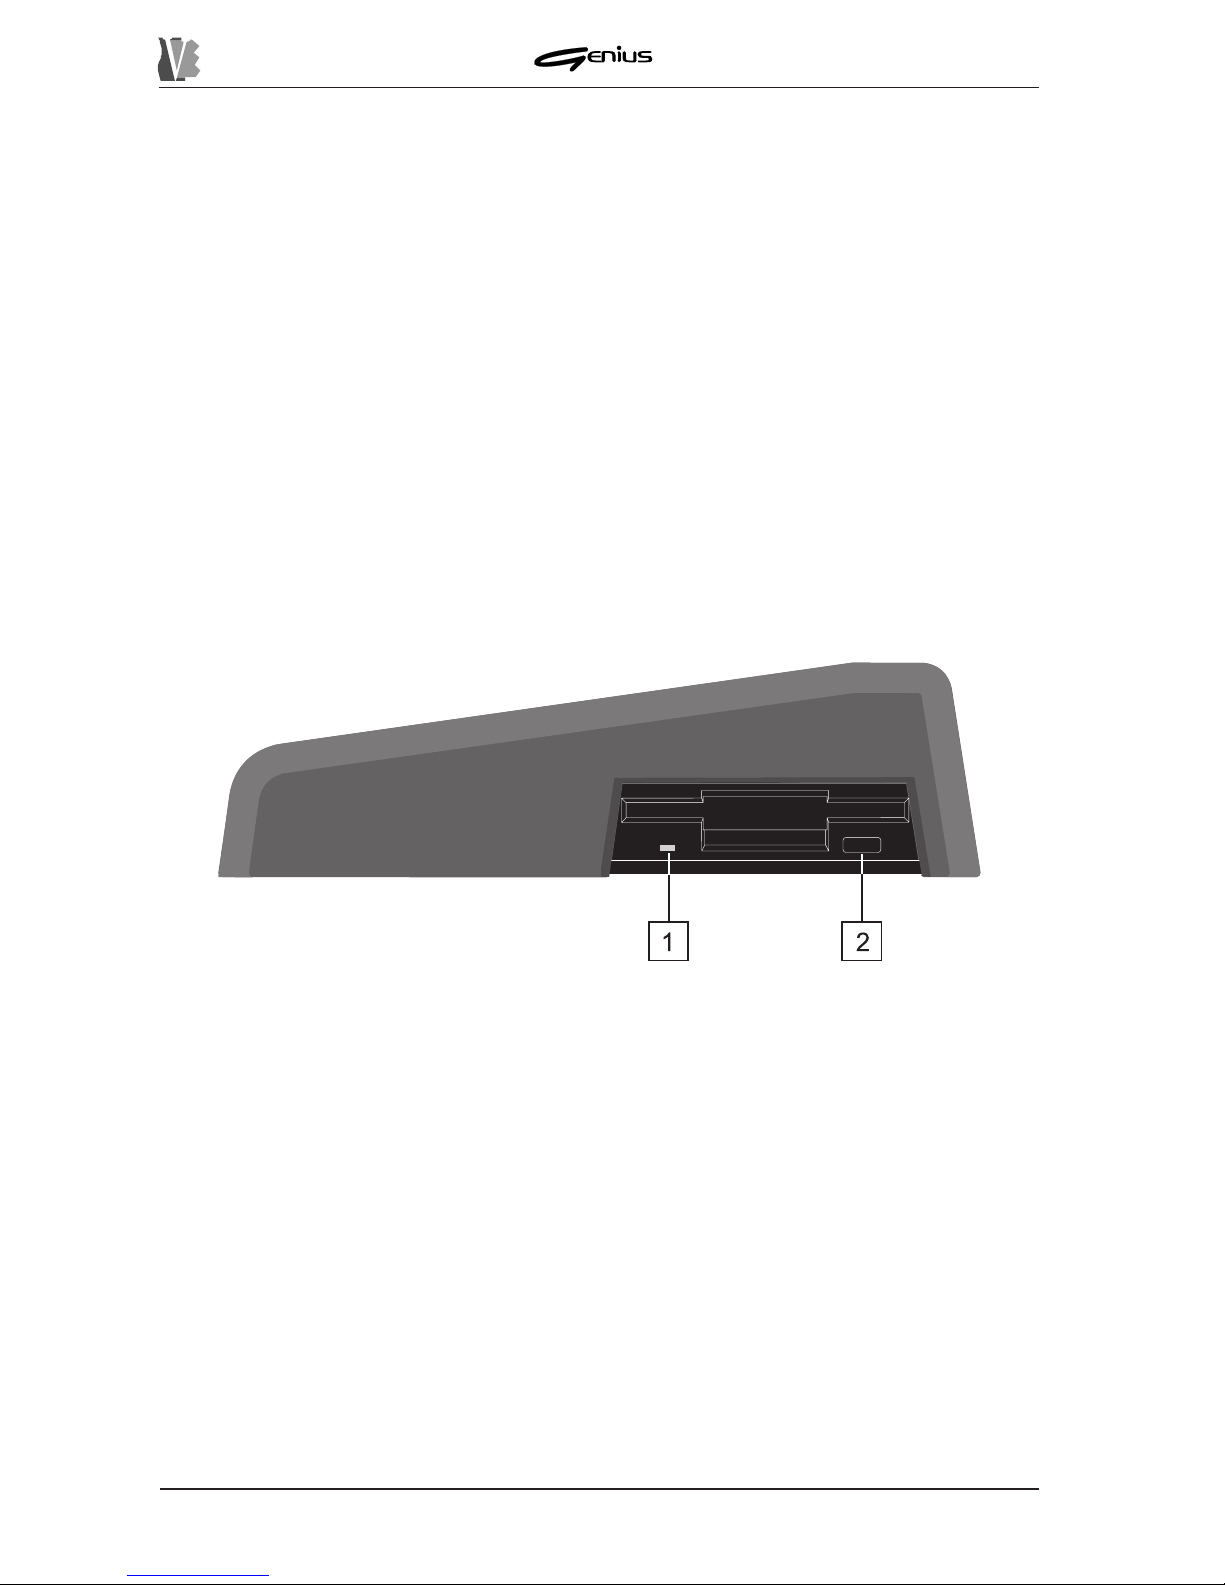
10. [REW] button: allows rapid reversing by bar pointing.
1 1. [FF] button: allows rapid forward scanning by bar pointing.
12. [P AUSE] button: stops playback temporarily.
13. [PLA Y] button: starts the performance.
14. [STOP] button: stops the performance.
15. [REC] button: enables the recording procedure.
16. [VOLUME] slider: regulation of the instrument’s volume.
3.2 THE FLOPPY DISK DRIVER
1.: LED displaying reading/writing status of the floppy disk. Never extract the disk when
the LED is on.
2.: button for extracting the floppy disk from the drive.
Page 11
DATA FILER
3.3 THE REAR P ANEL
103
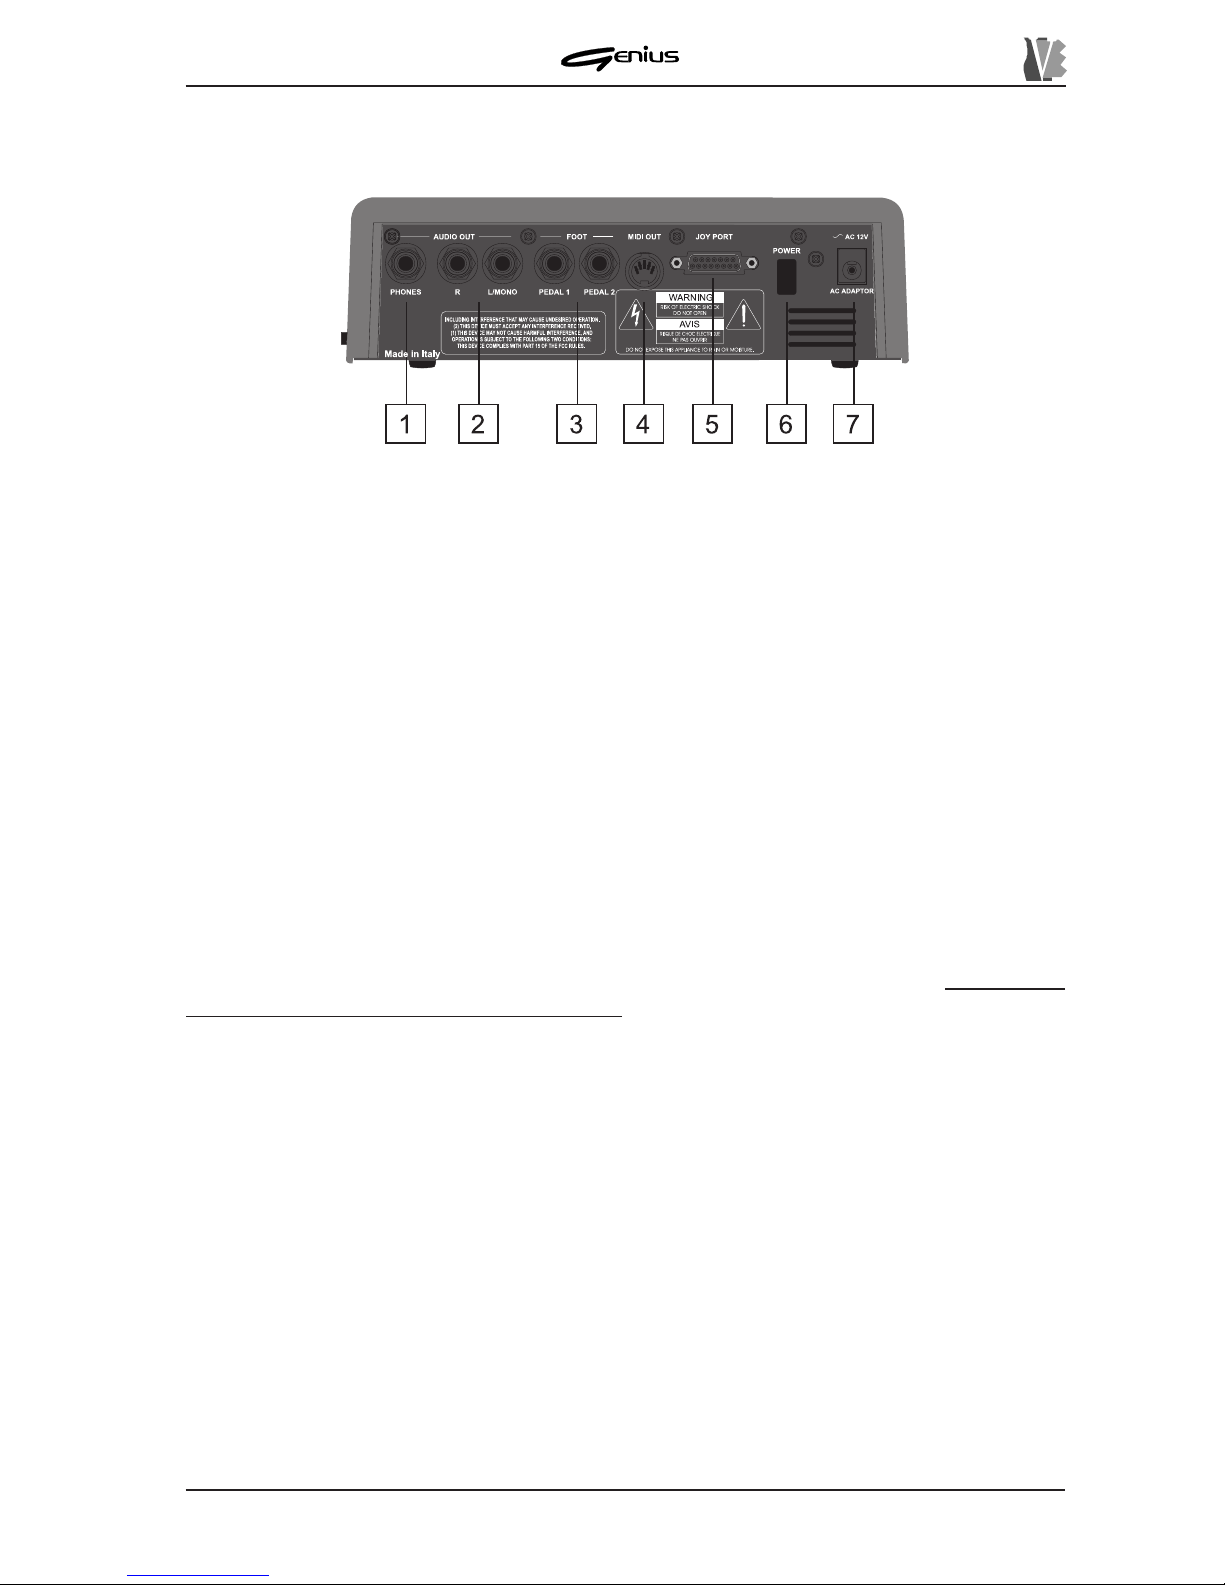
1. AUDIO OUT section: the section contains the outputs of the signal generated by the
Genius’s internal sound card.
o [PHONES]: connector for connection of stereo headphones. Only headphones with
impedance of at least 100Ω should be used.
o AUDIO OUT [R] and [L/MONO]: connect the cables leading from your amplification
system to these connectors. If a mono signal is used, connect to the [L/MONO]
connector only .
2. FOOT section: contains the connectors for connection of the optional foot-switch pedals
whose functions can be set in the SYSTEM section of the instrument. T o avoid damage to the
Genius’s internal components, it is important to use only pedals with normally open contact.
4. [MIDI OUT] port: output port for the MIDI data generated by the Genius.
5. [JOY PORT] connector: this connector can be used to connect the optional peripherals
such as the video interface, the additional graphic display , etc. to the Genius. It can also be
used to equip the instrument with a MIDI IN port using a Joy-to-MIDI lead.
Refer to the
connections section for further details on this.
6. [POWER] switch: switch for turning the instrument on and off.
7. [AC ADAPTER] connector: connect the connector leading from the power supply adapter
provided to this connector.
Page 12
DATA FILER
4. CONNECTIONS
104
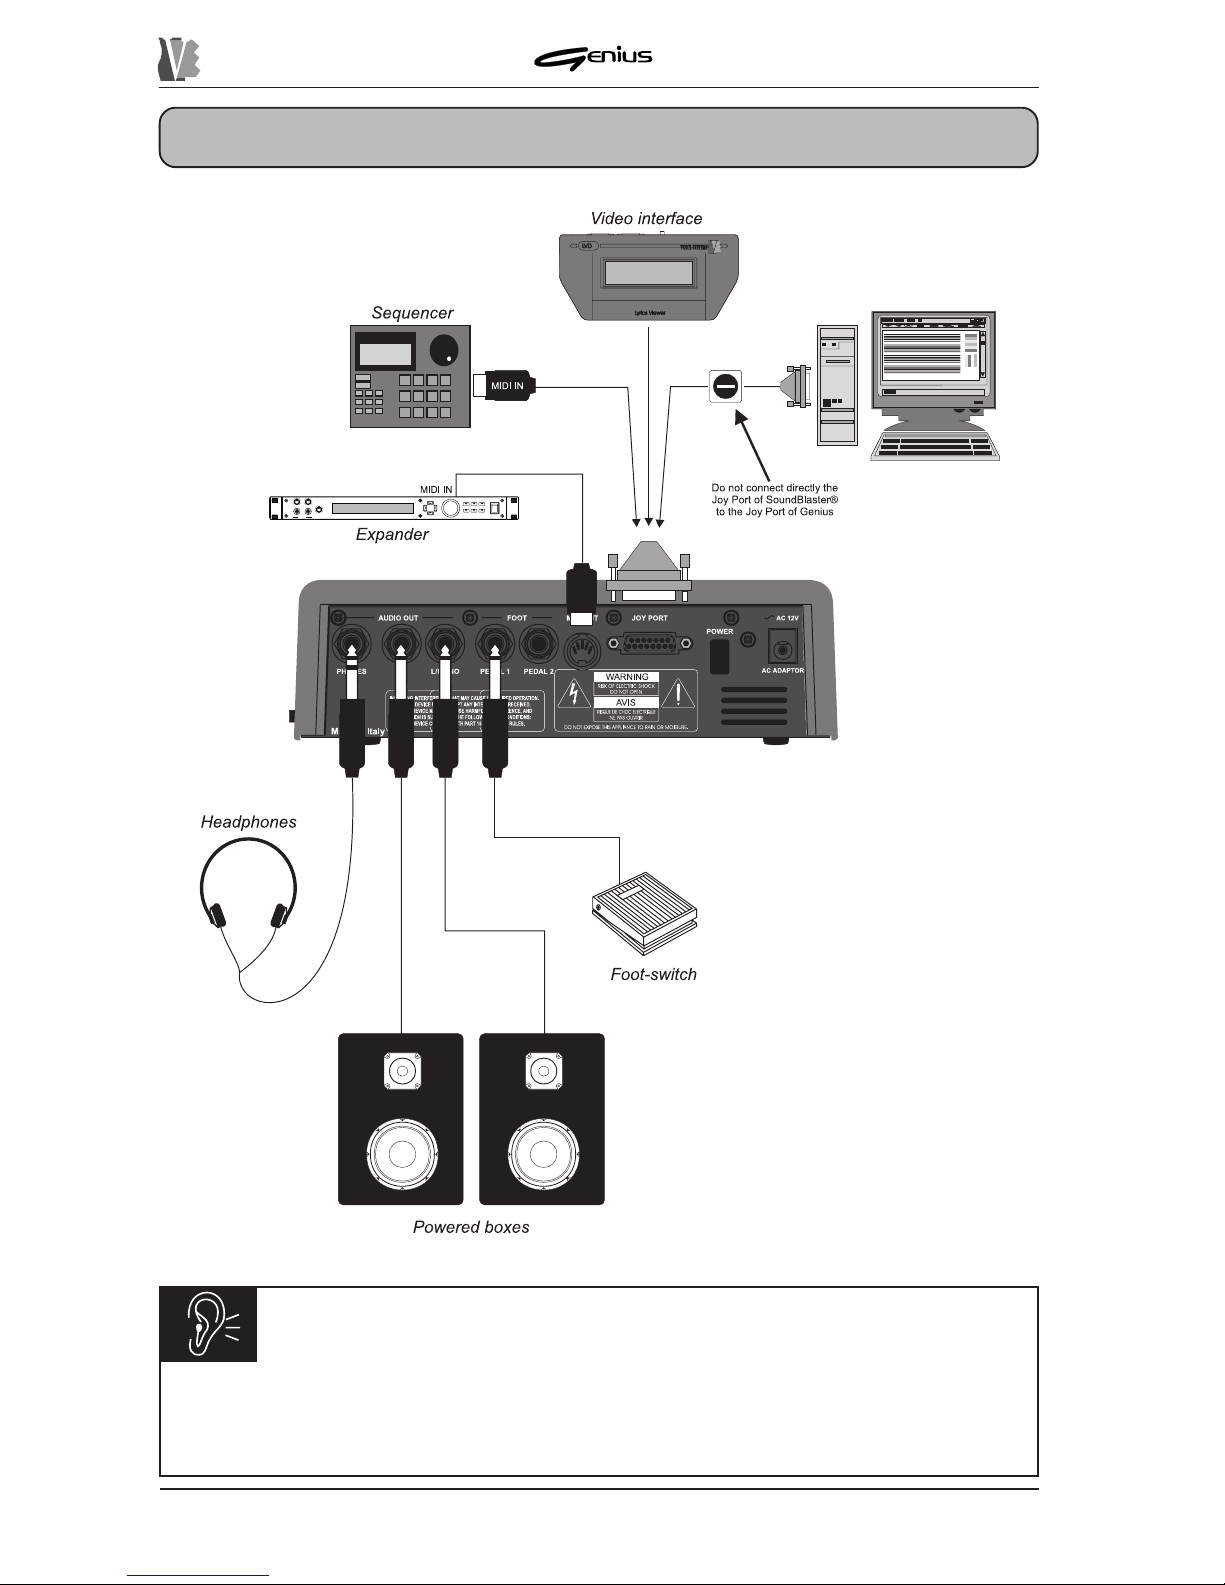
CAUTION!
ü
The Joy Port-to-MIDI adapter must have internal optoisolator.
ü
If the Joy Port has an additional parallel connector on the adapter, this must not be
used for connecting peripherals.
Page 13
DATA FILER
5. PLA YING BACK SONGS
5.1 THE MAIN P AGE
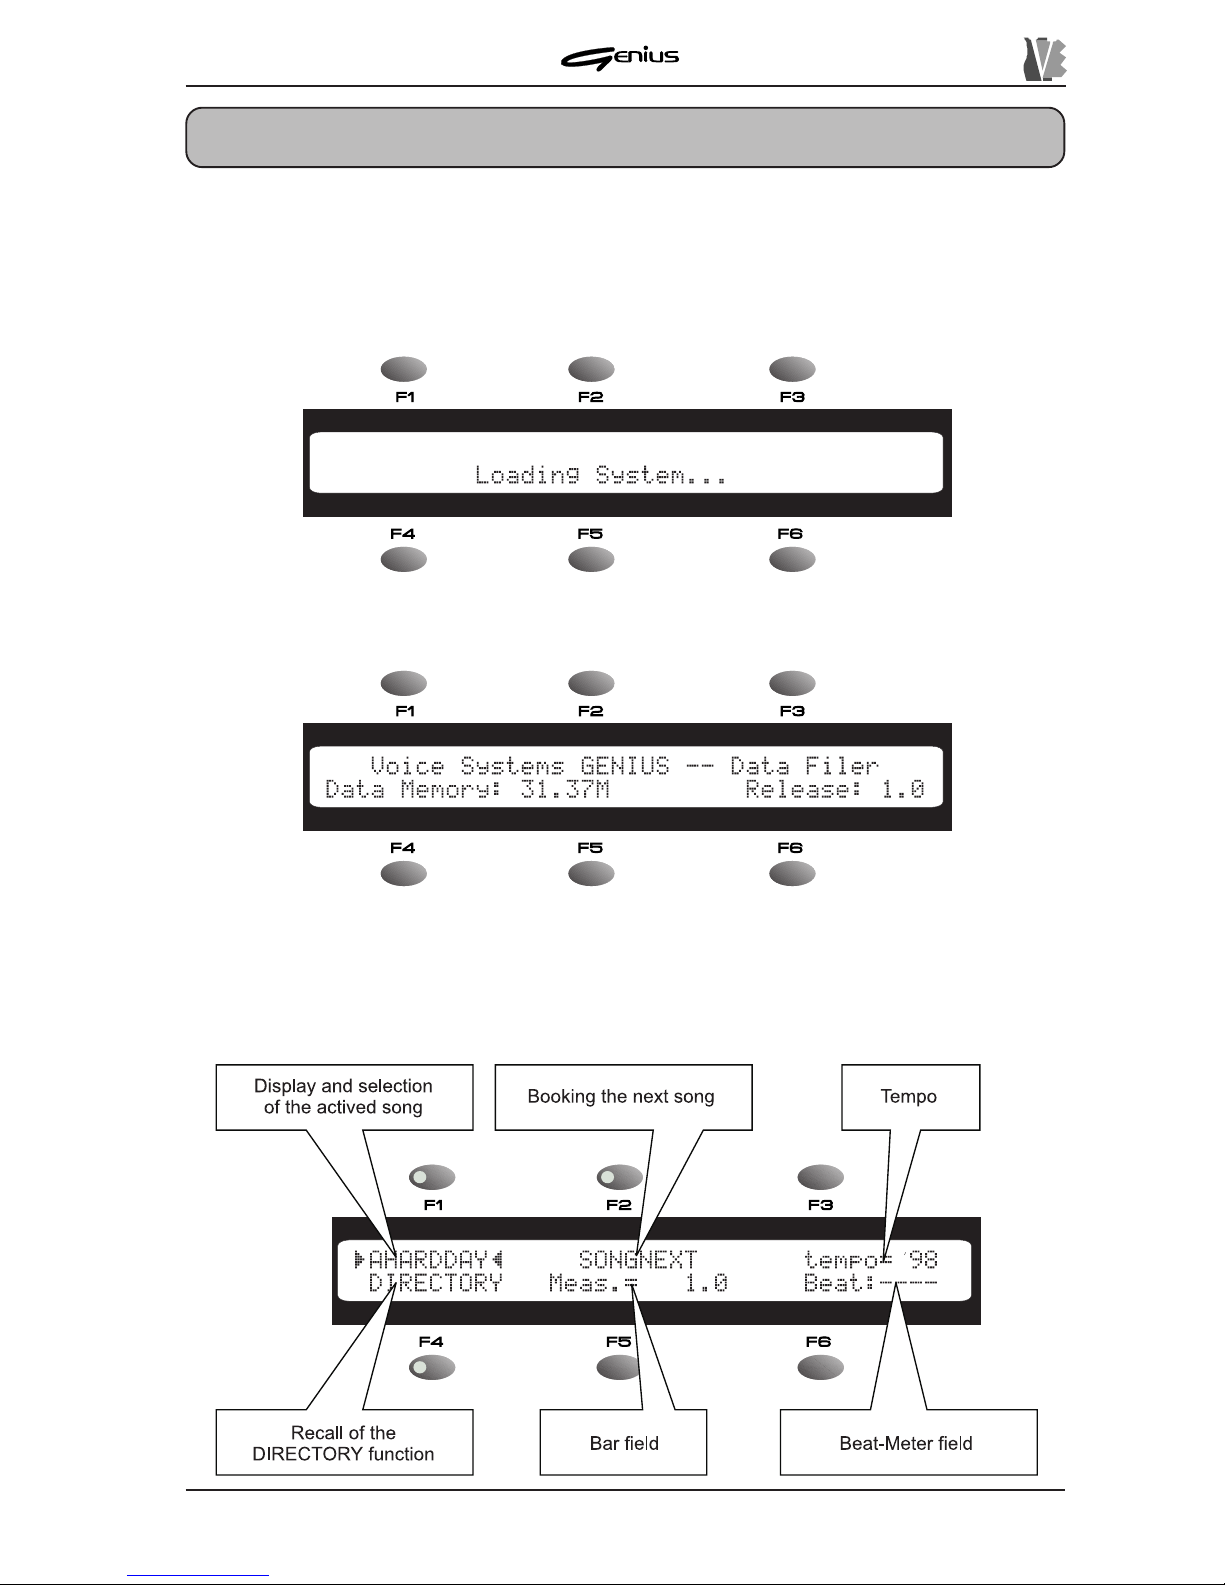
After making all the connections correctly , switch on the Genius; the display will first show the
information relating to activation of the software:
then the presentation video page:
which gives information about the total size of the internal memory and the software version
currently installed on the instrument. For further information about these data refer to point
8.1.6. After a few moments, the main operating page called the MAIN P AGE will be displayed.
105
Page 14
DATA FILER
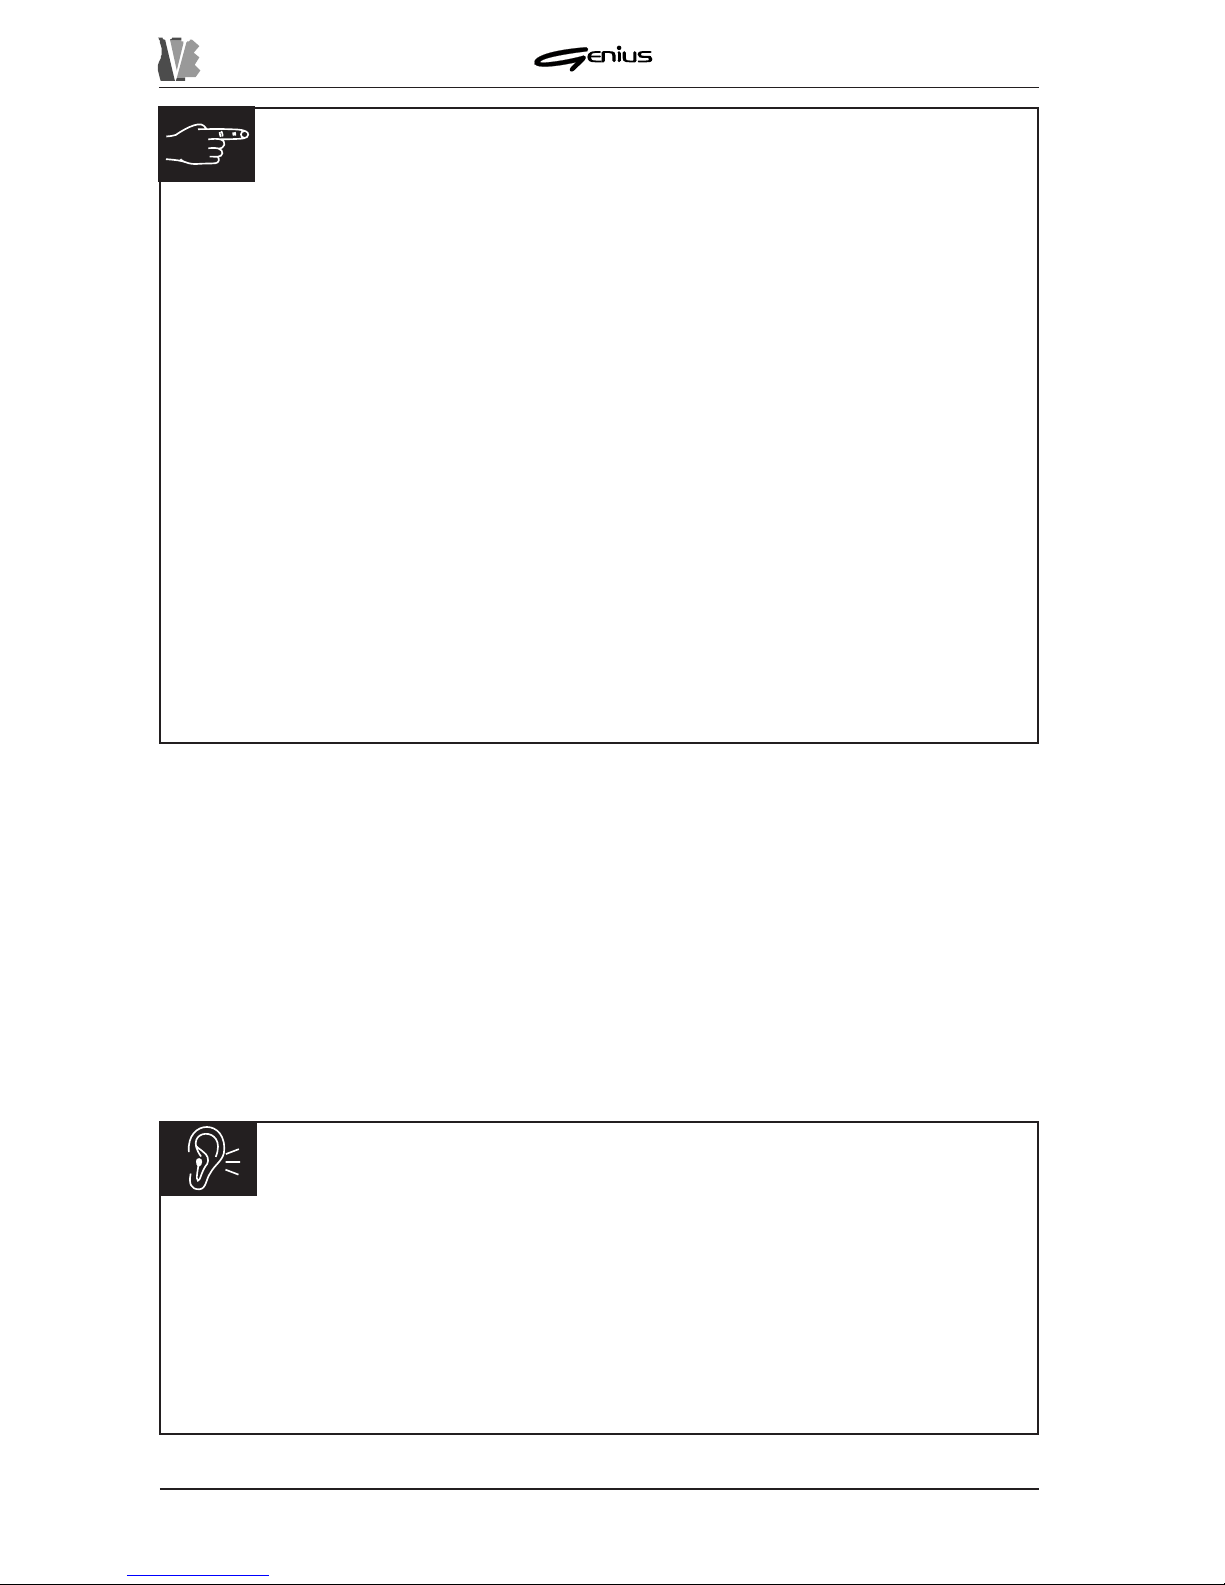
INFORMATION ABOUT DISPLAY FIELDS
As the illustration above indicates, the display shows six fields, in line with the six function
keys. Each field may identify:
ü
A variable field: identified by illumination of the LED of the function key in line with
the field concerned, this contains a value which can be set by the user. When this
field is selected with the associated function key (in the video page shown above
[F1] to select the song required and [F2] to select the
SONGNEXT
field), the encoder
can then be used to vary the relative value. Selection of the field is displayed by
means of the two markers (the and ª symbols), which locate at either end of the
field to be modified.
ü
A display field: displays a status or an outcome (in the video page shown above,
the
tempo, Meas.
and
Beat
fields). Since it simply displays a given value, this
field cannot be selected by means of the function keys (the LED is off).
ü
A direct selection field: displays the function associated to the relative function key
(the LED of which is on) which will be selected automatically when the same key is
pressed (in the video page shown above, the
DIRECTORY
field).
N.B.: the information given with regard to the display of fields on the screen applies for
any video page displayed. You should therefore refer to it on all occasions.
CAUTION!
ü
If there is no floppy disk in the drive or if it is not valid (e.g. not formatted), pressing
the [DISK] button has no effect.
ü
The song name displayed is the same as the name of the file without extension.
The Genius handles the file name in accordance with the MS-DOS standard, which
allows no more than 8 characters. If the file exceeds this limit, the long names rule
will be applied, using the “
µ
” character followed by a consecutive number indicating
the number of files in the memory with that name.
106
The field in line with the [F1] button displays the song currently active.
If a memory unit which does not contain song files is selected, the field will show the message
EMPTY
.
At switch-on, the first song in the internal memory will always be loaded. You can use the
encoder to scroll through the songs contained in the internal memory .
If you wish to perform a song resident on a floppy disk, insert the disk in the drive and press
the [DISK] button. Y ou can use the encoder as described above to select the song you require,
and then confirm the selection with the [ENTER] key . Pressing [ESC] during the selection
aborts the operation.
Page 15
DATA FILER
107
Press the [MEMORY] key to select the internal memory .
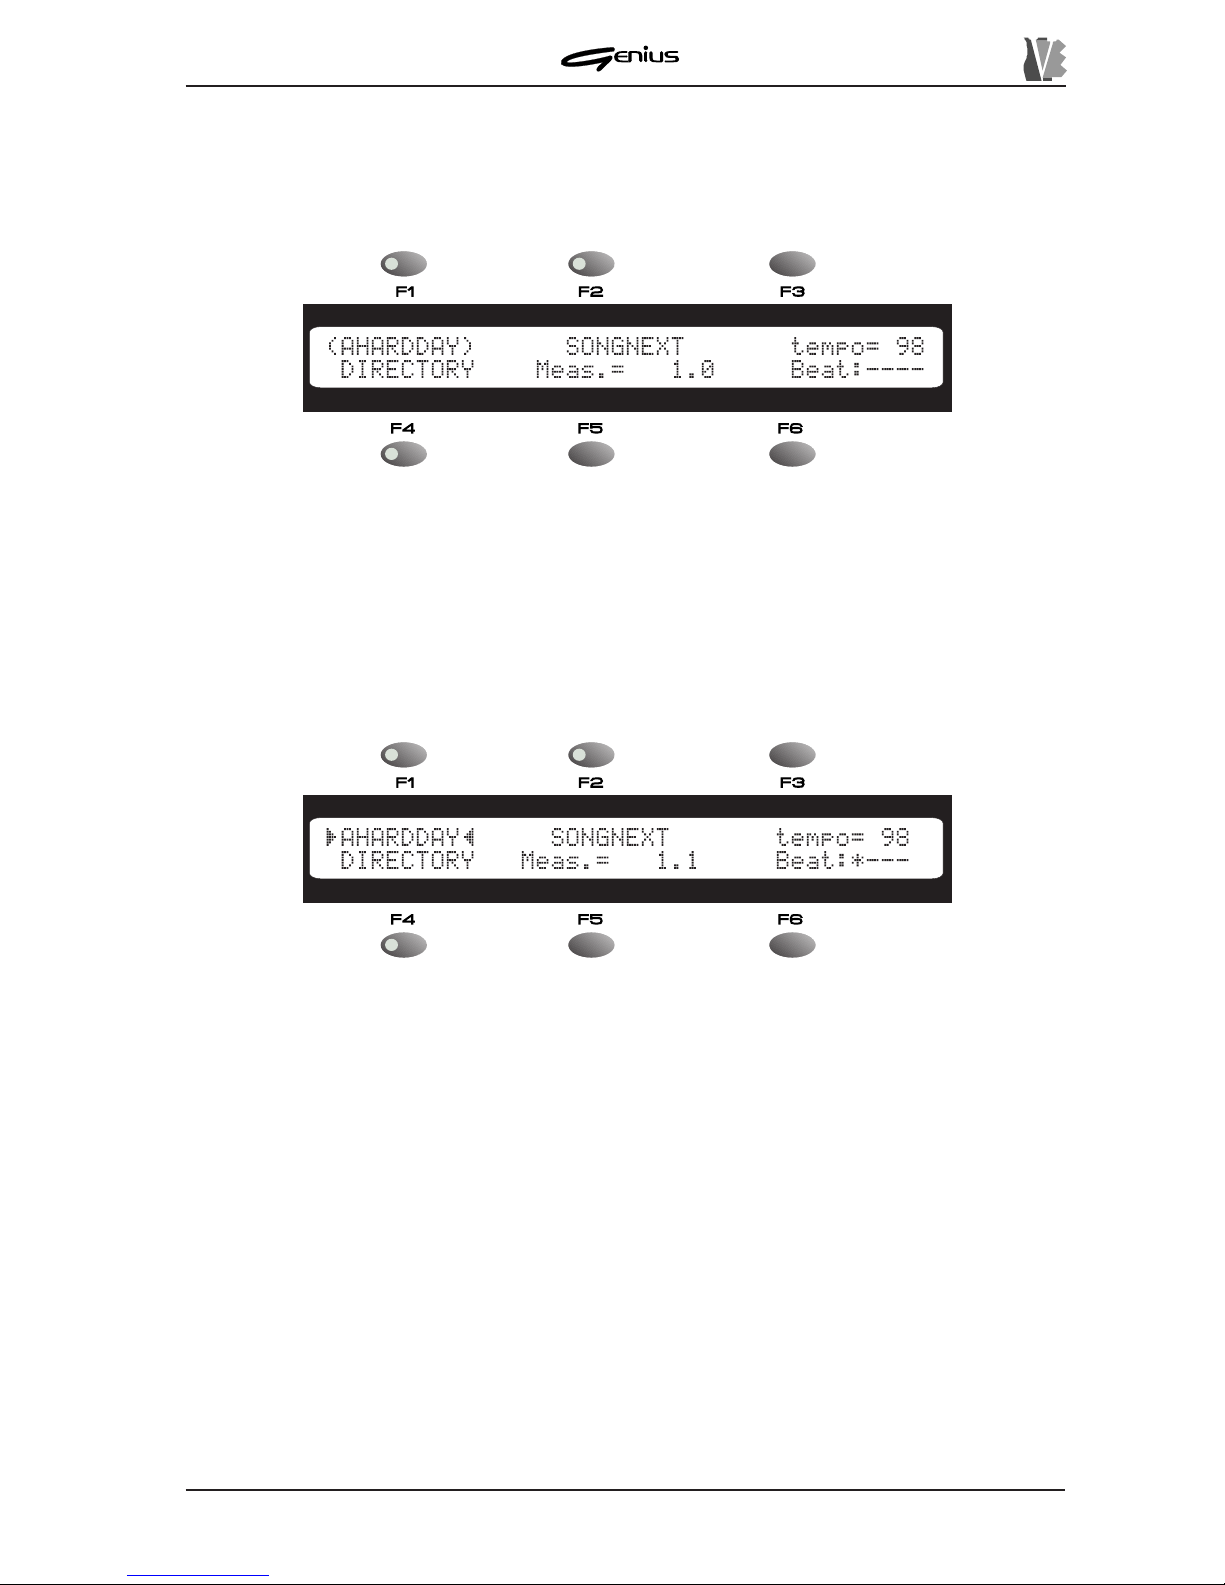
If you then press the [ENTER] key when selecting a new song, the instrument will load the
song, displaying a round bracket at either end of the file name.
The round brackets indicate a system busy condition. The time taken to load a file is very
short, but longer waits are possible in case of format 1 Midifiles and especially in those
containing Lyrics metaevent text.
When the usual markers (
and
ª
) appear , the song can be played back. When the [PLAY]
key in the CONTROLS section is pressed, the key LED will illuminate and playback of the
song will start.
The third field (
tempo
) is for display only (in fact, the LED of the [F3] key is off) and indicates
the metronome tempo, in BPM (Beats Per Minute), of the song currently selected.
Y ou can use key [F5] to select the DIRECTORY function, which allows display of the contents
of the unit currently active on the screen (see point 5.5).
The two next fields display the bar (
Meas.
Field) and a beat-meter (
Beat
field) of the song
being played. Since both these fields are for display only, the LEDs of the function keys
associated to them are off.
During playback of one song you can select another (present in the same memory unit) by
simply selecting it and activating it using the encoder and the [ENTER] button. In this case,
the song in progress will be interrupted and the new one played immediately without waiting
for the [PLA Y] button to be pressed.
To abort the new selection press [ESC]. However, you are advised to use the
SONGNEXT
field for selecting songs during playback; otherwise, the instrument may malfunction due to
overloading of the [MIDI OUT] port.
Page 16
DATA FILER
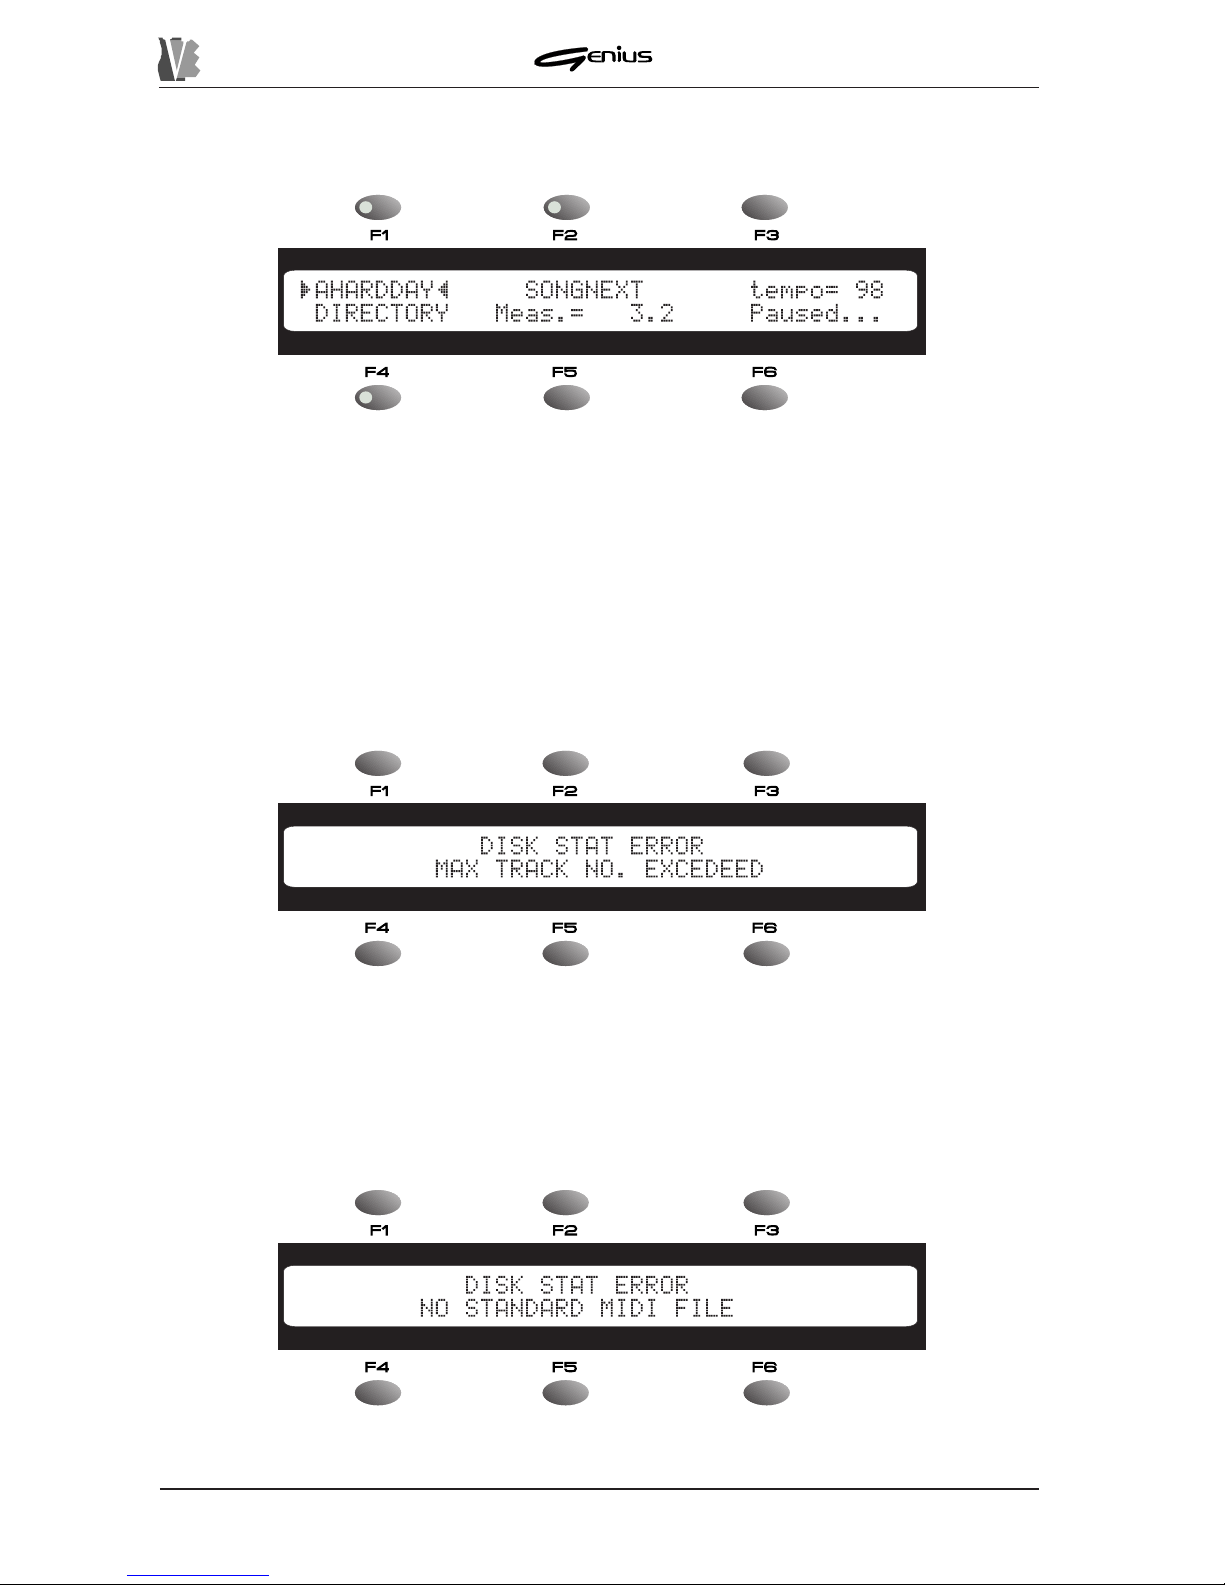
Pressing the [STOP] key will stop playing of the song, while if [P AUSE] is pressed the playback
is interrupted and the display will show:
5.1.1 ERROR MESSAGES
MAX TRACK NO. EXCEEDED ERROR
When type 1 Midifiles are used, if the song contains more than 16 tracks it cannot be performed
and the display will show the message:
Press [ESC] to return to song selection.
NO STANDARD MIDI FILE ERROR
If the file selected for loading does not belong to the MIDI File Standard coding or is unusable
for any reason (e.g. part of the disk damaged) the following message will be displayed:
108
where you can see the message
Paused...
indicating that the song being played has
been interrupted. When the [PLA Y] or [PAUSE] button is pressed, the playback will restart
from the point where it was interrupted.
Page 17
DATA FILER
N.B.: in view of the special features of the Direct-to-Disk reading system, disks in perfect
condition should be used; any errors inside the file may cause sudden breaks in performance.
Never remove the floppy disk if it contains the musical backing being played.
5.2 USING THE [REW] AND [FF] KEYS
The [REW] (Rewind) and [FF] (Fast Forward) keys on the device panel can be used to locate
a given bar number inside the active song.
These keys work in exactly the same way as the keys of the same names found on an ordinary
tape recorder; the [FF] key provides a forward search, while the [REW] performs a backward
search.
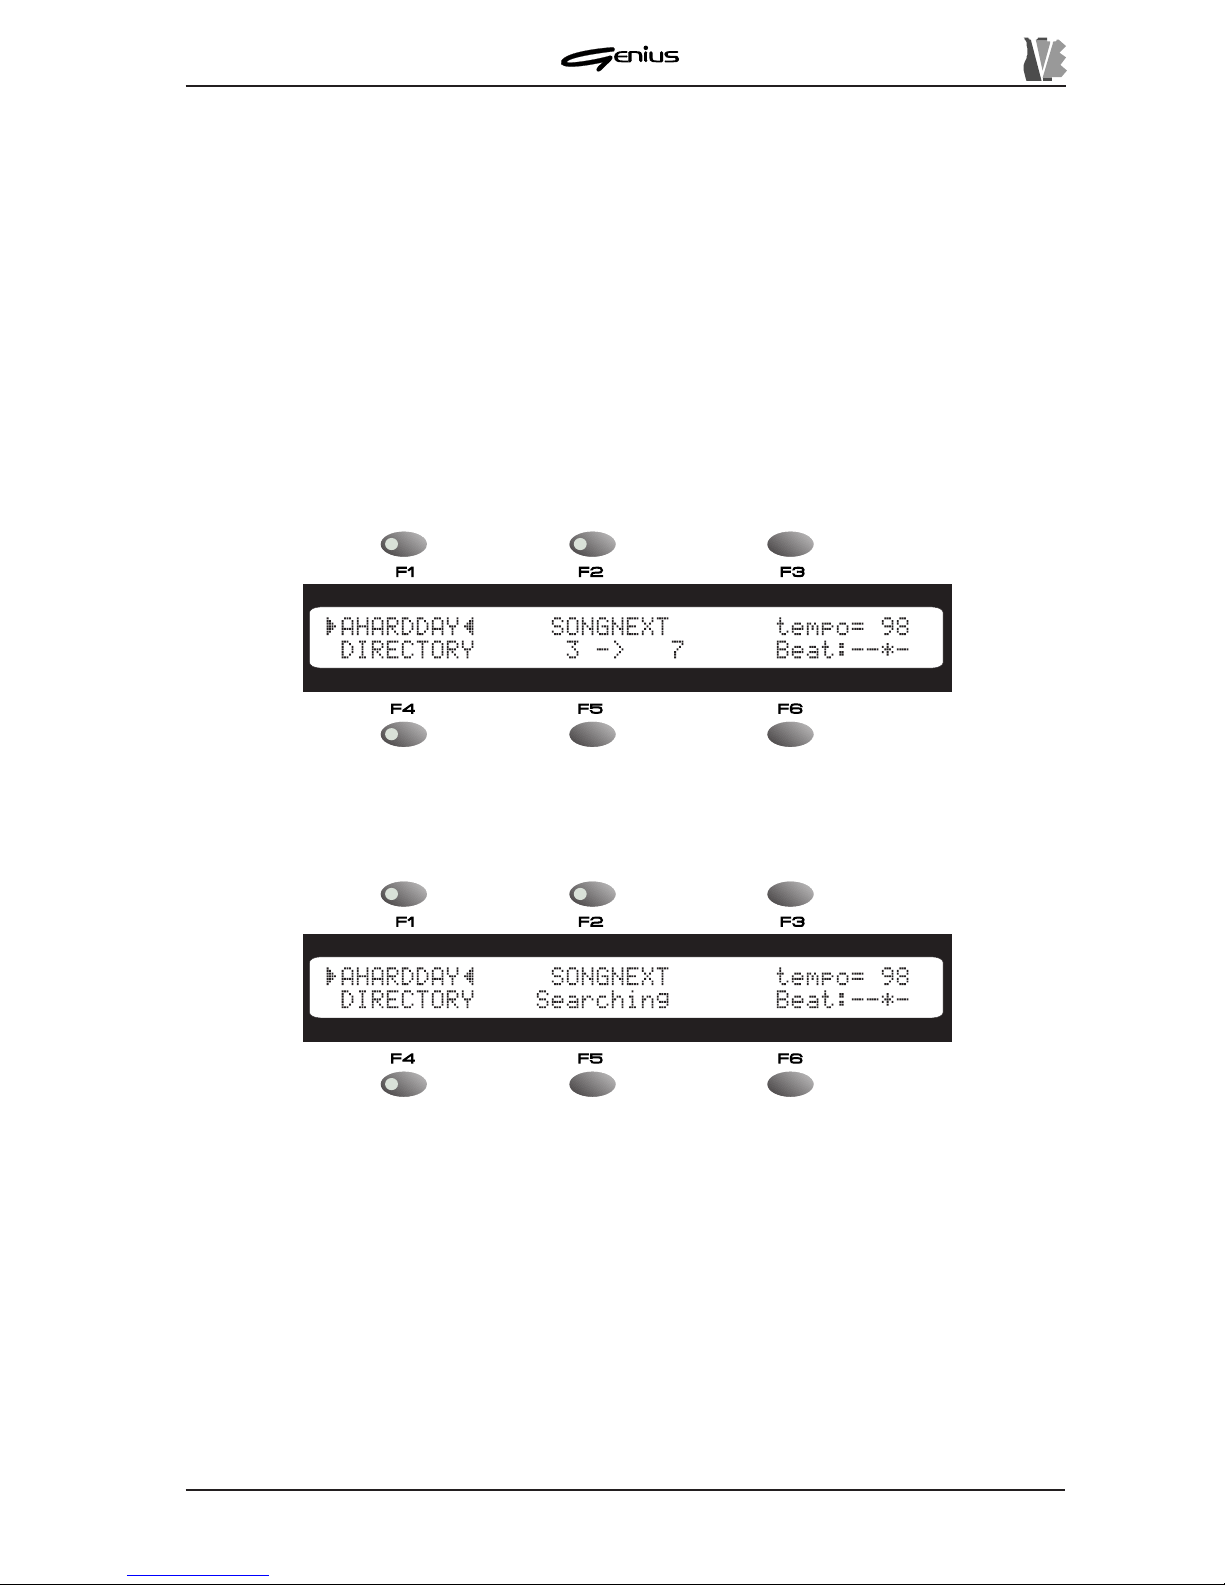
Therefore, when the [FF] or [REW] key is pressed, the display shows both the number of the
current bar and the number of the destination bar next to the
Meas.
field.
109
When the key is released, the GENIUS will start the search for the bar number required; the
playback will be interrupted and the display will show:
Once the destination bar is reached, playback of the song will restart automatically . Note that
the time taken to reach the required bar depends on the characteristics of the song (file
format, number of tracks, presence of lyrics, etc...).
A given bar number can be found both during playback (play status) and in pause or stop
status. Once the desired bar is reached:
ü If the device was in STOP status, it will locate on the chosen bar and wait for the [PLA Y]
key to be pressed in order to restart performance of the song from the chosen point;
ü If the initial status was P AUSE, once it has located on the bar required the device will wait
for the [P AUSE] or the [PLA Y] key to be pressed;
Page 18
DATA FILER
11 0
5.3 MUL TIT ASK SONG SELECTION (SONG NEXT FIELD)
MUL TITASK SONG SELECTION (M.S.S.) means the possibility of booking the song after
the one being played. T wo types of M.S.S. are possible, both during Play and in Stop condition.
The setup procedure for this function is identical regardless of which option is use.
We will now take a look at the Multitask Song Selection setting procedure.
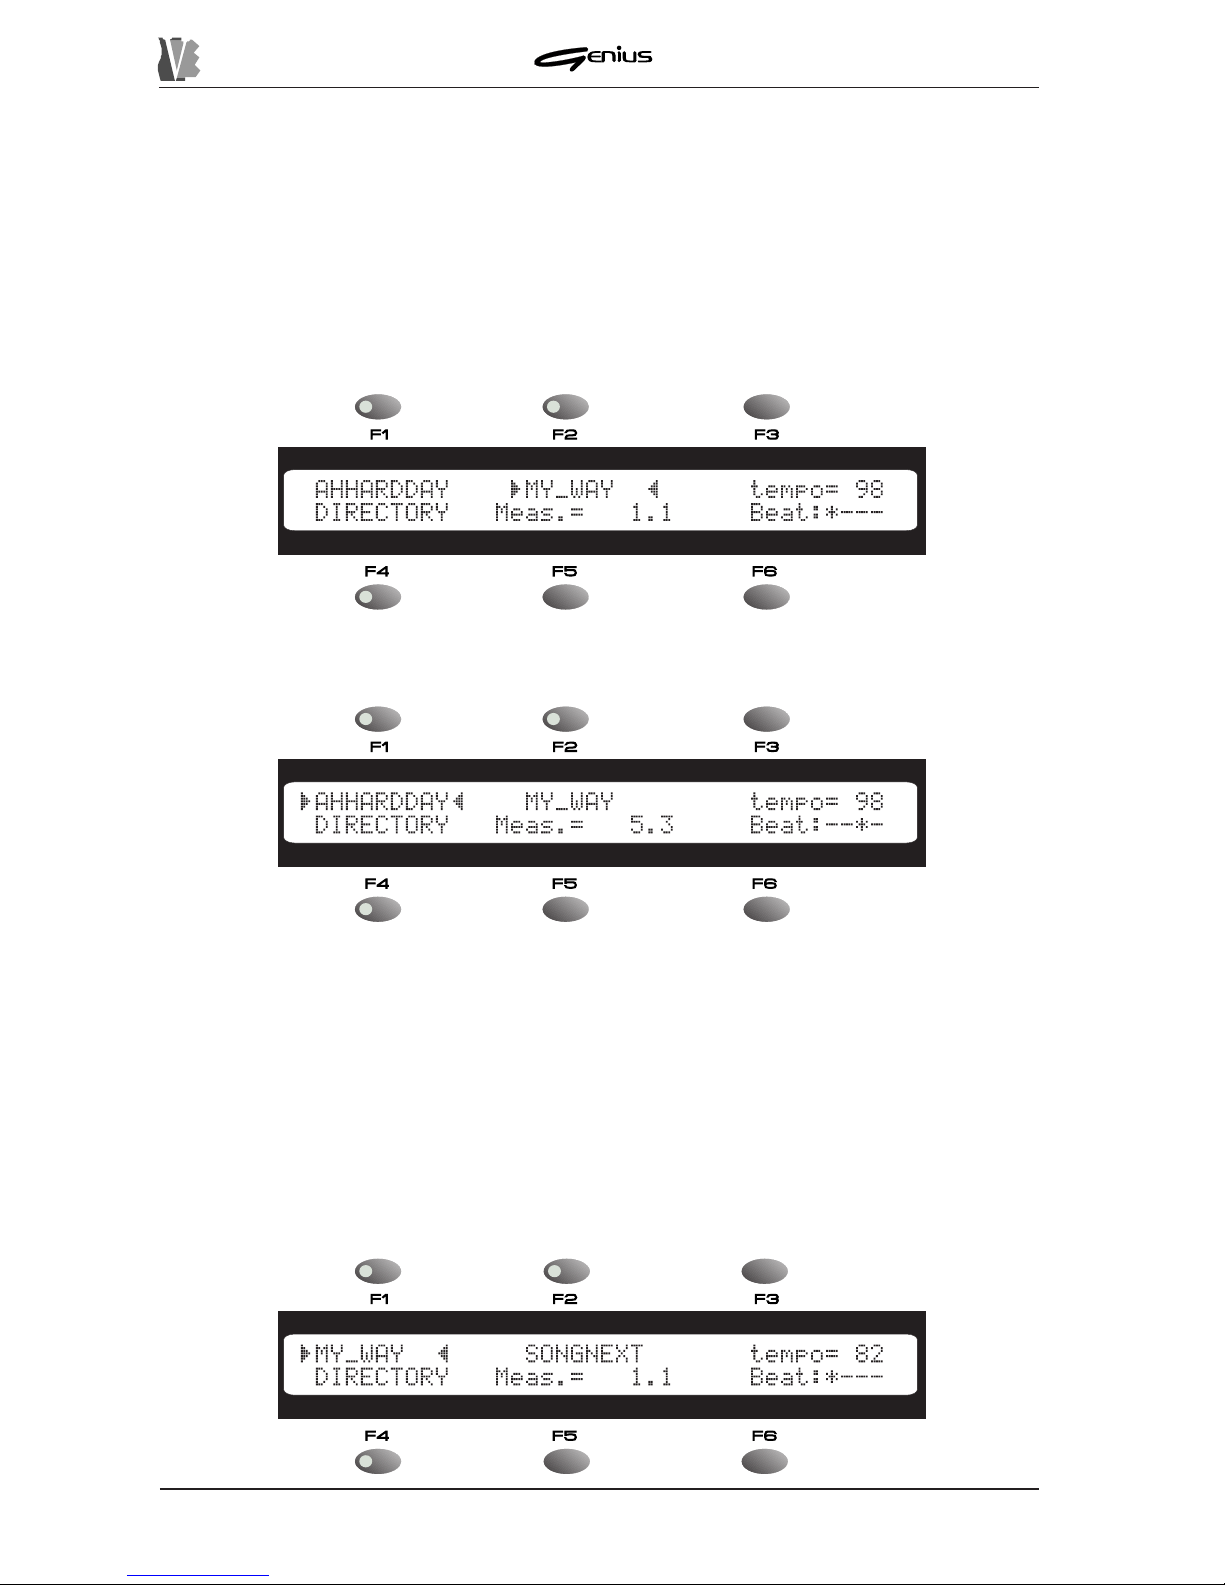
During playback of a song, press the [F2] key to select the
SONGNEXT
field. Use the encoder
to select the song required.
and press [ENTER] to confirm or [ESC] to abort.
Once the operation has been confirmed, the markers will again select the current song field.
T o change the song booked, simply press the [F2] key and repeat the operations described
above.
While this is not possible for the song currently being played, in the
SONGNEXT
field the user
can change the active unit. When the encoder is moved on the
SONGNEXT
field, the Genius
will automatically activate the unit currently selected (floppy disk or internal memory), but the
SOURCE buttons can then be used to change the unit of memory containing the song of your
choice.
At the end of the song being played (either because it has come to its natural end, or because
the [STOP]) button has been pressed) the booked song will be performed automatically .
Page 19
DATA FILER
111
The
SONGNEXT
field will now be made available for a new selection.
To modify the booked song before it is played, simple select the
SONGNEXT
field again
(button F2]) and set the song of your choice (pressing [ENTER] to confirm all settings).
The user can also opt between the conditions in which the song is played automatically or by
pressing the [PLA Y] key (see PLA Y MODE utility in the TOOLS section, point 8.4.6).
N.B.: If the song booked is resident on the floppy disk, when the disk is removed from the
drive the selection will be lost.
5.4 DIRECT ORY FUNCTION
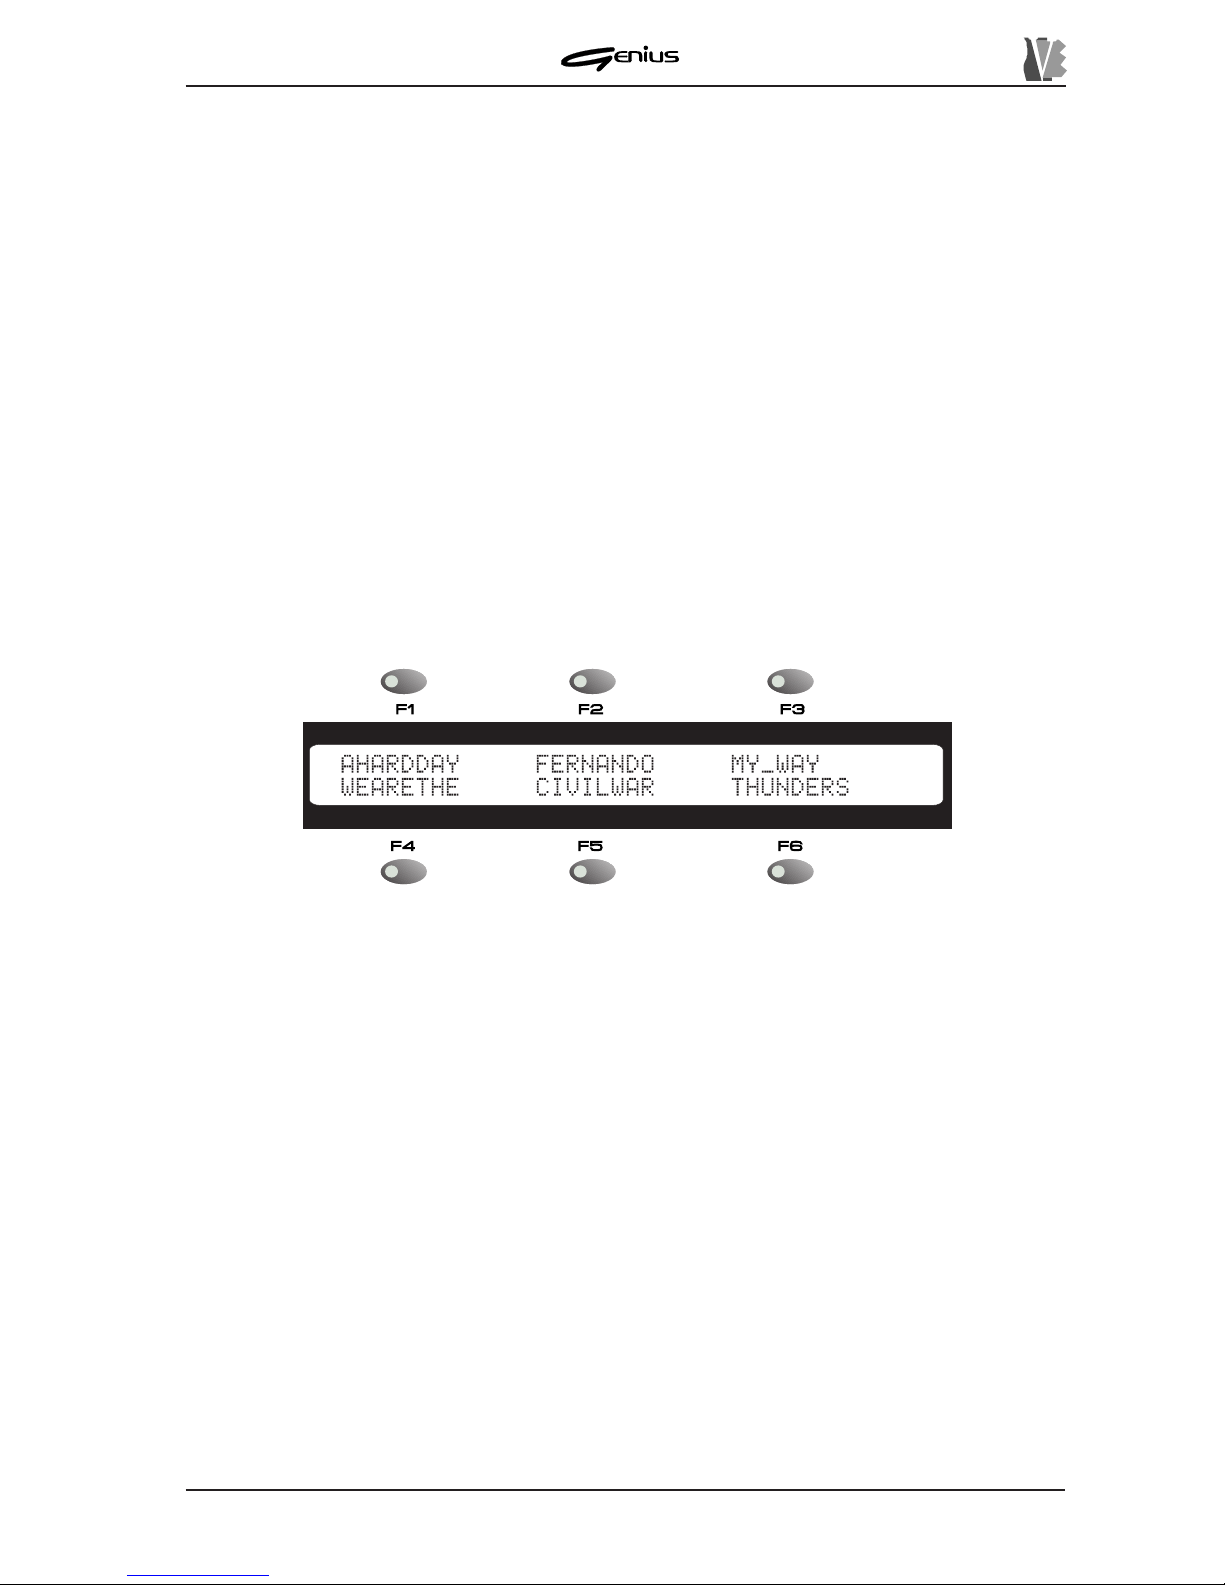
The DIRECTORY function allows the contents of the unit currently active to be shown on the
display in groups of 6 files at a time.
As well as the display function, the DIRECTORY function allows the song required to be
selected directly from the list.
From the familiar MAIN PAGE video, press the [F4] function key (
DIRECTORY
field); the
display will show the contents of the current unit:
A unit almost always contains more than six files, and so additional files will be displayed by
means of pages after the current page. T o display further pages, use the [NEXT] key to display
pages after the one currently displayed and/or the [PREV .] key to select previous pages. The
LEDs on these keys indicate whether or not there are pages before the one displayed (LED
of the [PREV] key on) and/or pages after it (LED of the [NEXT] key on).
You can use the function keys corresponding to the files displayed to select the song you
require. When the operation is over , the display will again show the MAIN PAGE. The selection
can be confirmed or aborted using the [ENTER] or [ESC] button.
If, for example, from the video page above shown you wish to select the “FIRST” song, press
the [F2] function key .
The DIRECTORY function is active both for the song currently selected and for the SONG
NEXT field.
Page 20
DATA FILER
11 2
5.5 DISPLA YING THE LYRICS OF THE SONG
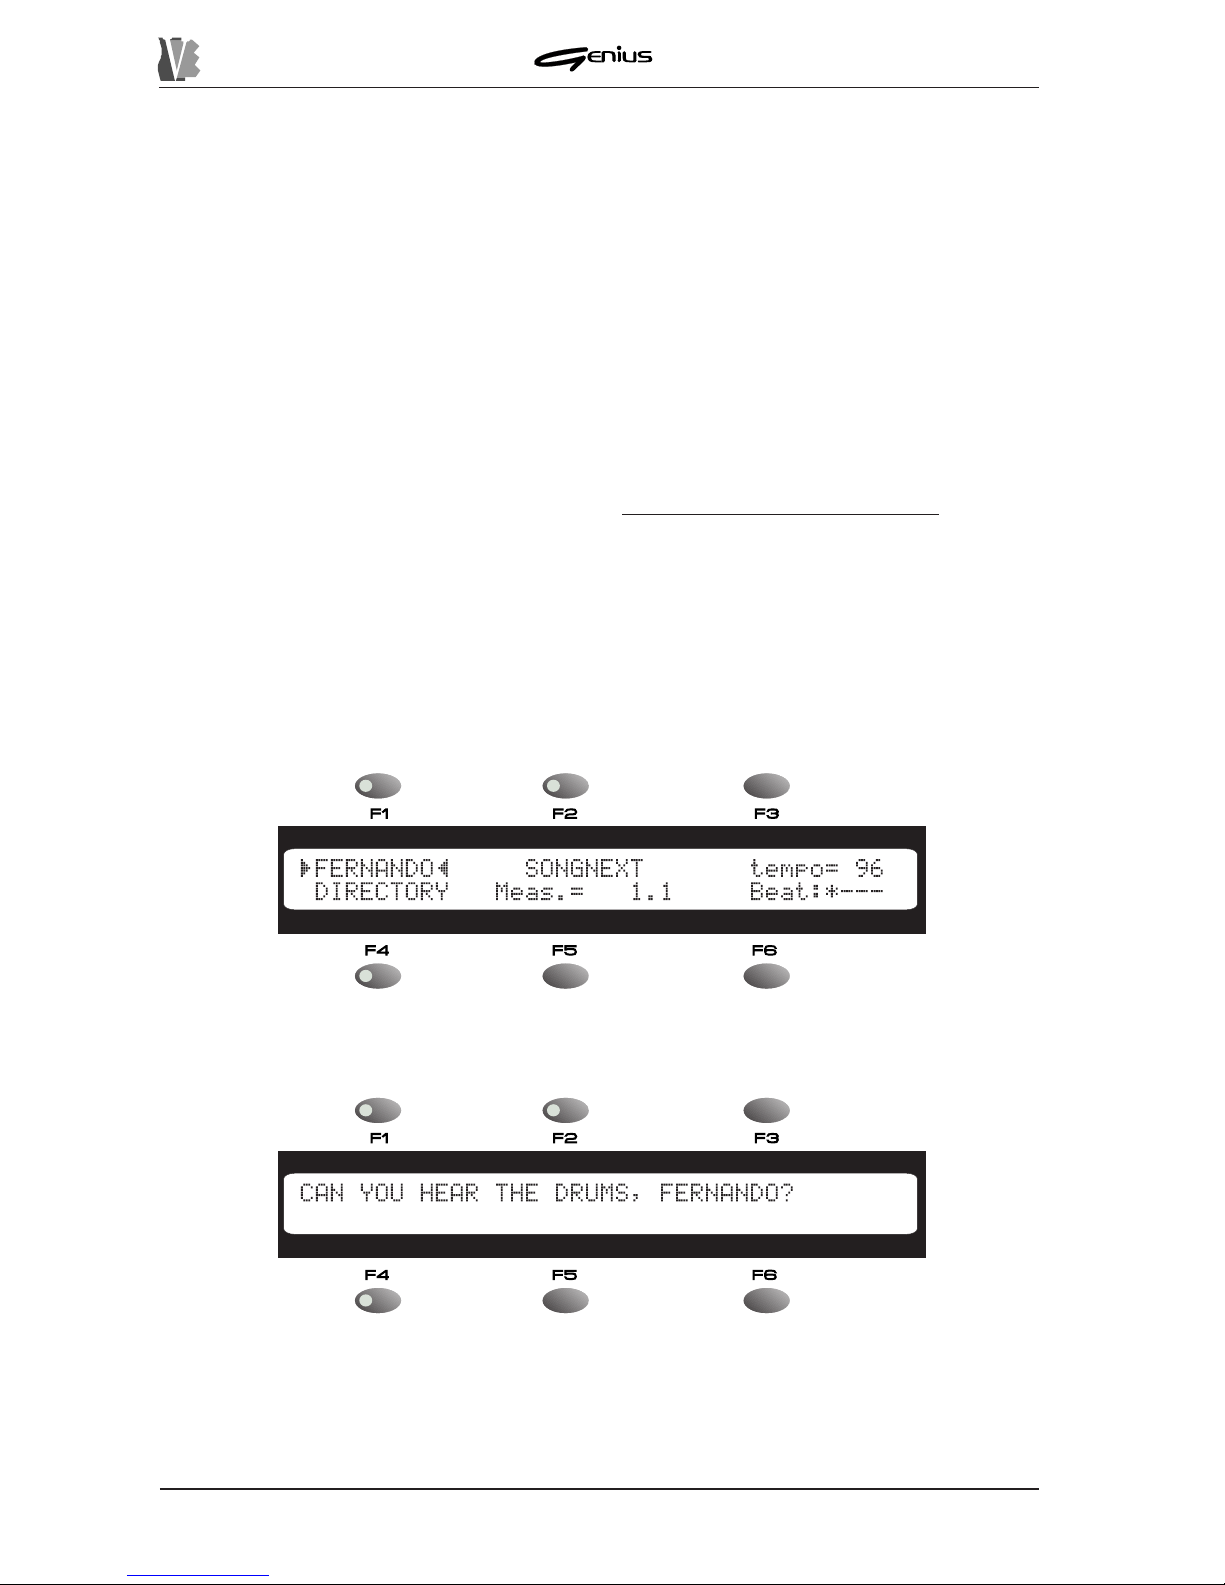
The Genius allows display of the lyrics of the song being played back on the screen by means
of the L YRICS function. Naturally , the lyrics of a given song can only be displayed if the lyrics
information is present in the permitted formats in the file.
The Genius recognises the following formats:
ü L yric coding in the form of MIDI codes (M-LIVE® standard)
ü Coding of lyrics and chords in accordance with the SOL TON® standard
ü Coding of lyrics and breakdown into syllables in accordance with Lyrics metaevents
(Standard TUNE1000®, GENERALMUSIC® SMF , Y AMAHA®)
N.B.: The Genius recognises the format of any lyrics on the song, identifying the copyright of
the MIDI file producer . It is therefore important to use the permitted types of Karaoke without
converting the format. In addition, do not use more than one text coding mode within the
same file.
If the song contains lyrics information recognised by the instrument, when playback starts the
Lyrics function is enabled automatically. The LED of the [LYRICS] key illuminates and the
display will show the text of the song, which can also be broken down into syllables with the
aid of upper/lower case letters if the file envisages this type of information.
After starting playback of a song from the MAIN P AGE,
the display will start to show the lyrics of the song synchronised with the musical backing.
If the file envisages breakdown into syllables, this will be displayed with the aid of uppercase
letters:
Page 21

DATA FILER
113
During display of the lyrics, the user can return to display of the MAIN P AGE by pressing the
[L YRICS] button.
press the [L YRICS] button to return to display of the lyrics:
Note that the L yrics function will be automatically disabled if the system needs to display the
MAIN P AGE (pressing of one of the REAL TIME ADJ. keys, selection of a song, etc...). In all
cases, this function will be deactivated at the end of the song.
For the setting of the L YRICS function, see point 7.1.
Page 22
DATA FILER
6. REAL TIME FUNCTIONS
Thanks to the REAL TIME ADJ section of the front panel, the Genius makes available some
important functions in Real Time. In other words, they can be activated during playback of a
song, thus giving the considerable advantage of very quick application, of great help when
making temporary changes to the songs being performed. To make the modifications
permanent, use the Edit procedures described in section. 9
6.1 LYRICS
As described in point 5.5, the Genius allows the user to show the lyrics of the song being
played on the display by pressing the [L YRICS] key .
The user can also instruct the Genius to ignore any Karaoke information present in the file.
When the Lyrics function is disabled, performance during loading is enhanced; this is
especially useful when the Genius is used with no need for display of the lyrics.
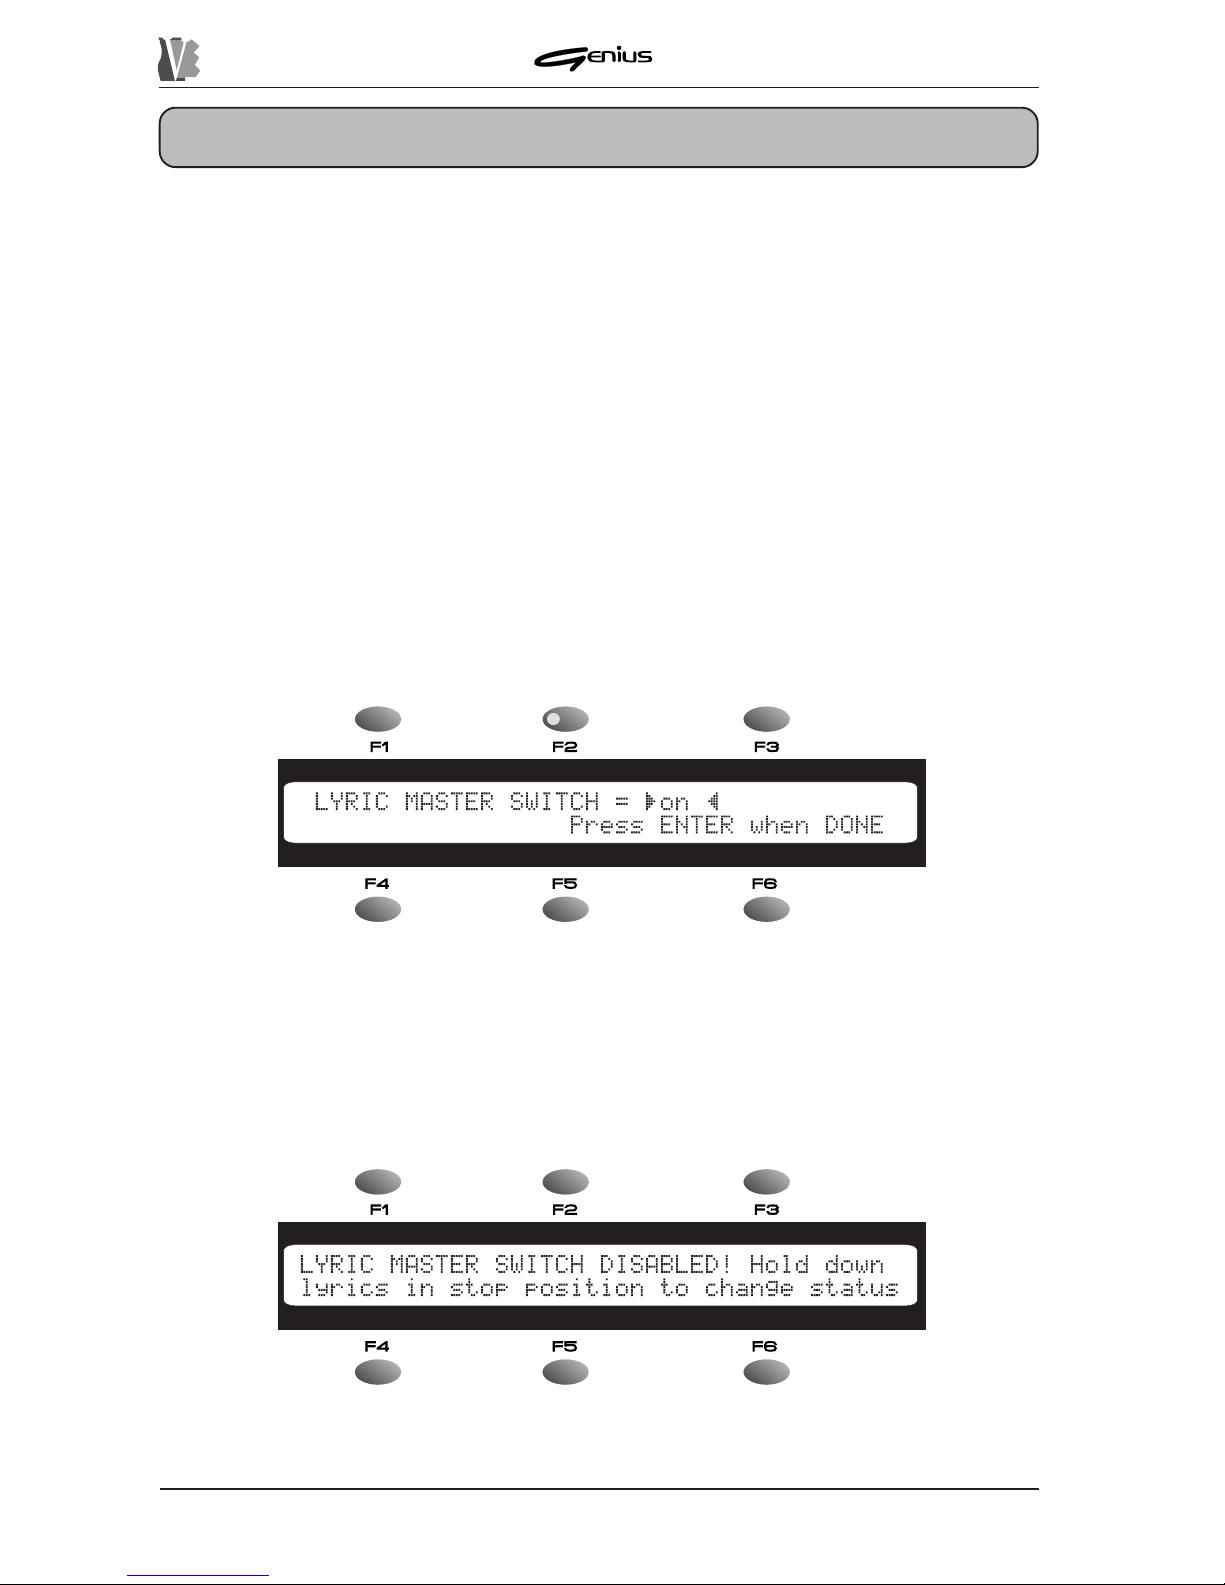
The function concerned is called the L YRICS MASTER SWITCH: to display the settings of
this function, from the Stop condition keep the [L YRICS] key pressed for at least two seconds,
after which the display will show:
Y ou can now use the encoder to enable (
LYRICS MASTER SWITCH = ON
) or disable
(
LYRICS MASTER SWITCH =OFF
) the Lyrics function. As the display indicates, when
the selection has been made press the [ENTER] key to confirm all settings. Press [ESC] to
abort the operation.
If the user attempts to recall the L yrics function when it is disabled, the display will show:
114
indicating that the Karaoke function cannot be activated, and advising you to set the Master
Switch by keeping the [L YRICS] key in stop condition to access the function setup phase.
Page 23
DATA FILER
115
6.2 TRACK MUTING
The Mute function allows performance of one or more tracks to be eliminated from the
performance during playback of a song. This means that any note events on the track to be
eliminated will be filtered, i.e. the instrument assigned to them will not be heard.
As for the other REAL TIME ADJUST functions, pressing the [MUTE]) key quickly activates
(LED on) and/or deactivates (LED off) the current function, while pressing it for longer gives
access to the setting page of the function itself.
6.2.1 MUTE SETUP
The MUTE SETUP function allows the user to set which tracks will be disabled when the
Mute function is activated.
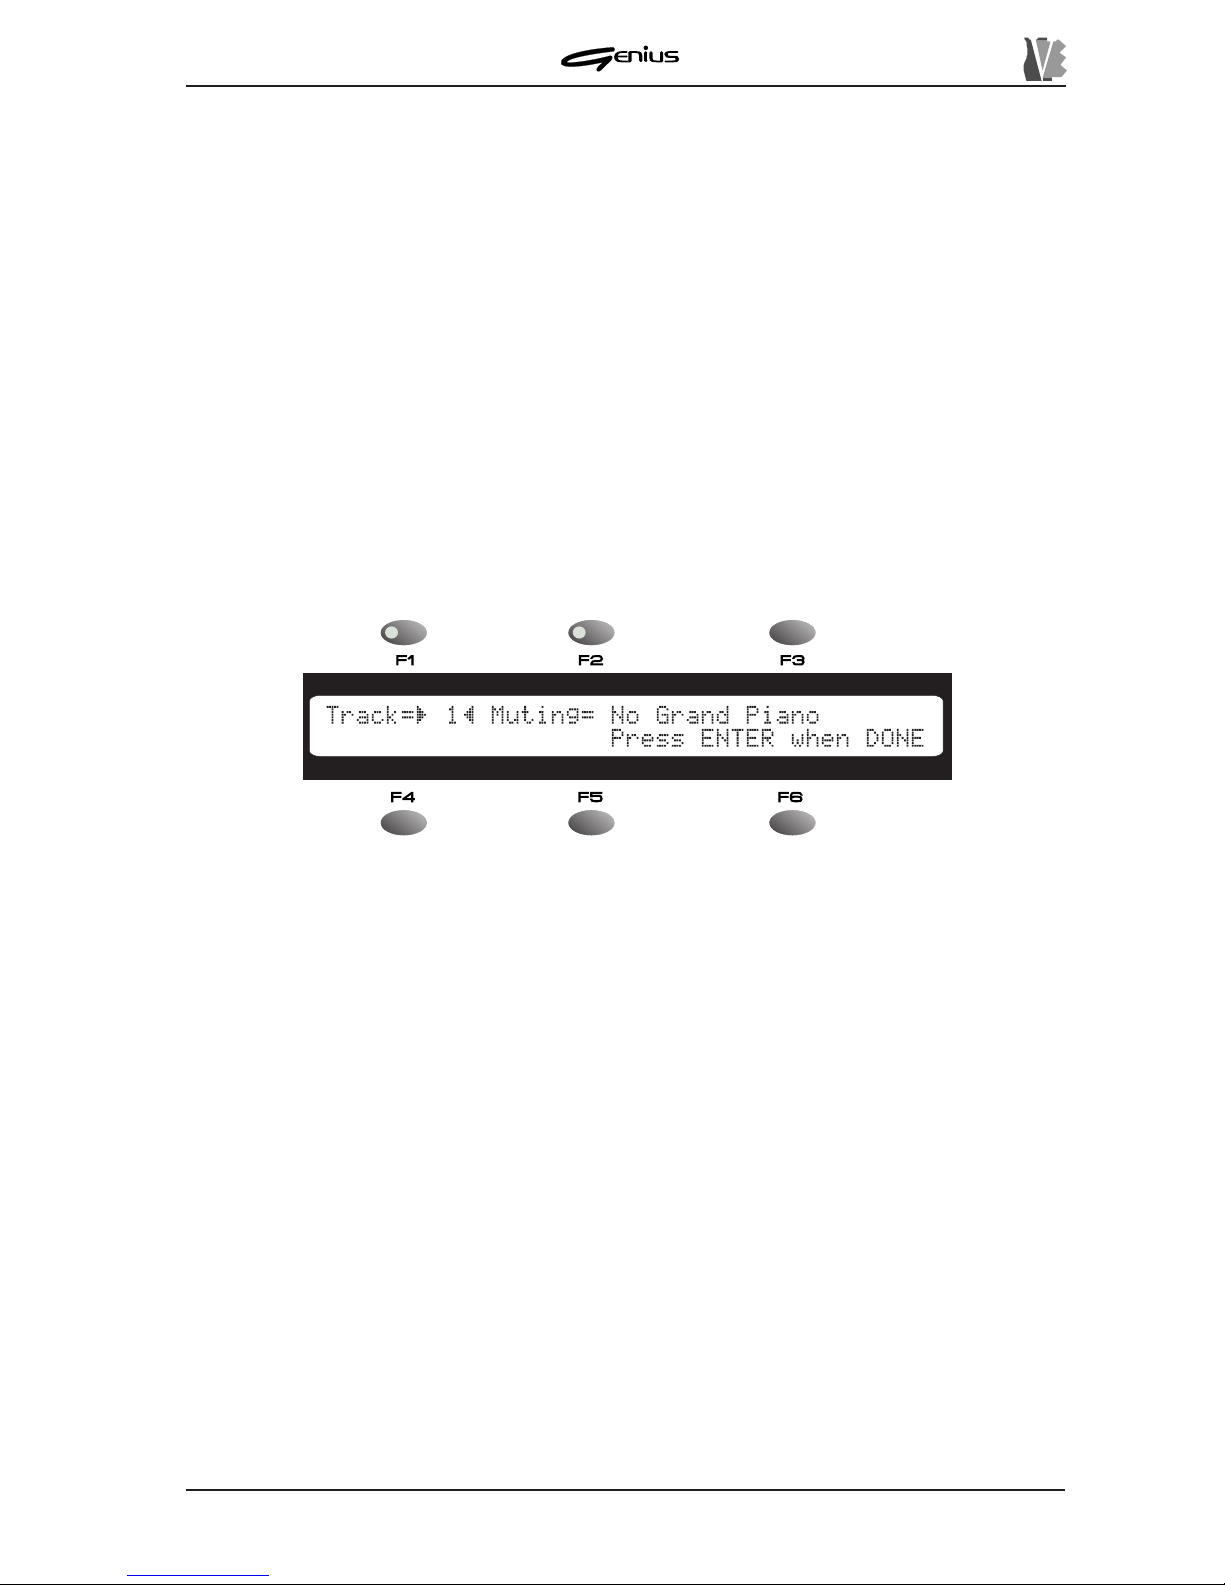
When the [MUTE] key is pressed for 2 seconds, the display will show the
MUTE SET-UP
page, relating to the settings of the function of the same name:
The
Track
field, next to the [F1] key (it can therefore be selected using this key) allows the
user to set which of the 16 tracks will be affected by the Mute operation.
The second field (selected using key [F2]) allows the user to choose whether to eliminate
from the playback (
Muting=YES
) or to retain (
Muting=NO
) the track specified by means
of the
Track
parameter .
The third field, for display only, shows the name of the timbre associated to the Program
Change (General MIDI table) currently present in the selected track. Since the Genius is a
reader with Direct-to-Disk reading system, the value of the Program Change refers to the bar
currently selected (first line of the song) when the instrument is in Stop condition). The value
-
indicates that the datum is not set in accordance with the standard commands (it might be
defined by means of exclusive system messages).
This video page allows the user to set more than one MIDI channel (T rack) in Mute status, and
whenever it is selected by means of the
Track
field its status will be displayed on the basis
of the current condition.
After the [ENTER] key is pressed the new setup will be memorised and can be enabled or
disabled by pressing the [MUTE] button quickly . By default, track n. 4, normally used for the
melody line of the song (Lead), is set in Muting status. Pressing the [ESC] key aborts the
modifications.
Page 24
DATA FILER
11 6
6.3 TRANSPOSING THE KEY
This function allows the user to change the key of the song being played, or in other words to
transpose the notes being played on all the tracks (the MIDI channels) by a number of semitones
which can be set by the user , except for the drum kit track.
This track (normally number 10, called the DRUM TRACK) must not normally be transposed
as this may cause the playing of drum timbres different from those originally envisaged, which
might interfere with the beat of the musical backing.
As for the other REAL TIME ADJUST functions, pressing the [TRANSP.] key quickly activates
(LED on) and/or deactivates (LED off) the current transposition.
Naturally , with the LED of the [TRANSP.] button off, the song will be played in the original key
envisaged in the file.
6.3.1 TRANSPOSE SETUP
We have seen that the transposition can be activated by pressing the [TRANSP .] button quickly .
The TRANSPOSE SETUP function allows the user to set the number of semitones by
which the song will be transposed when this function is active.
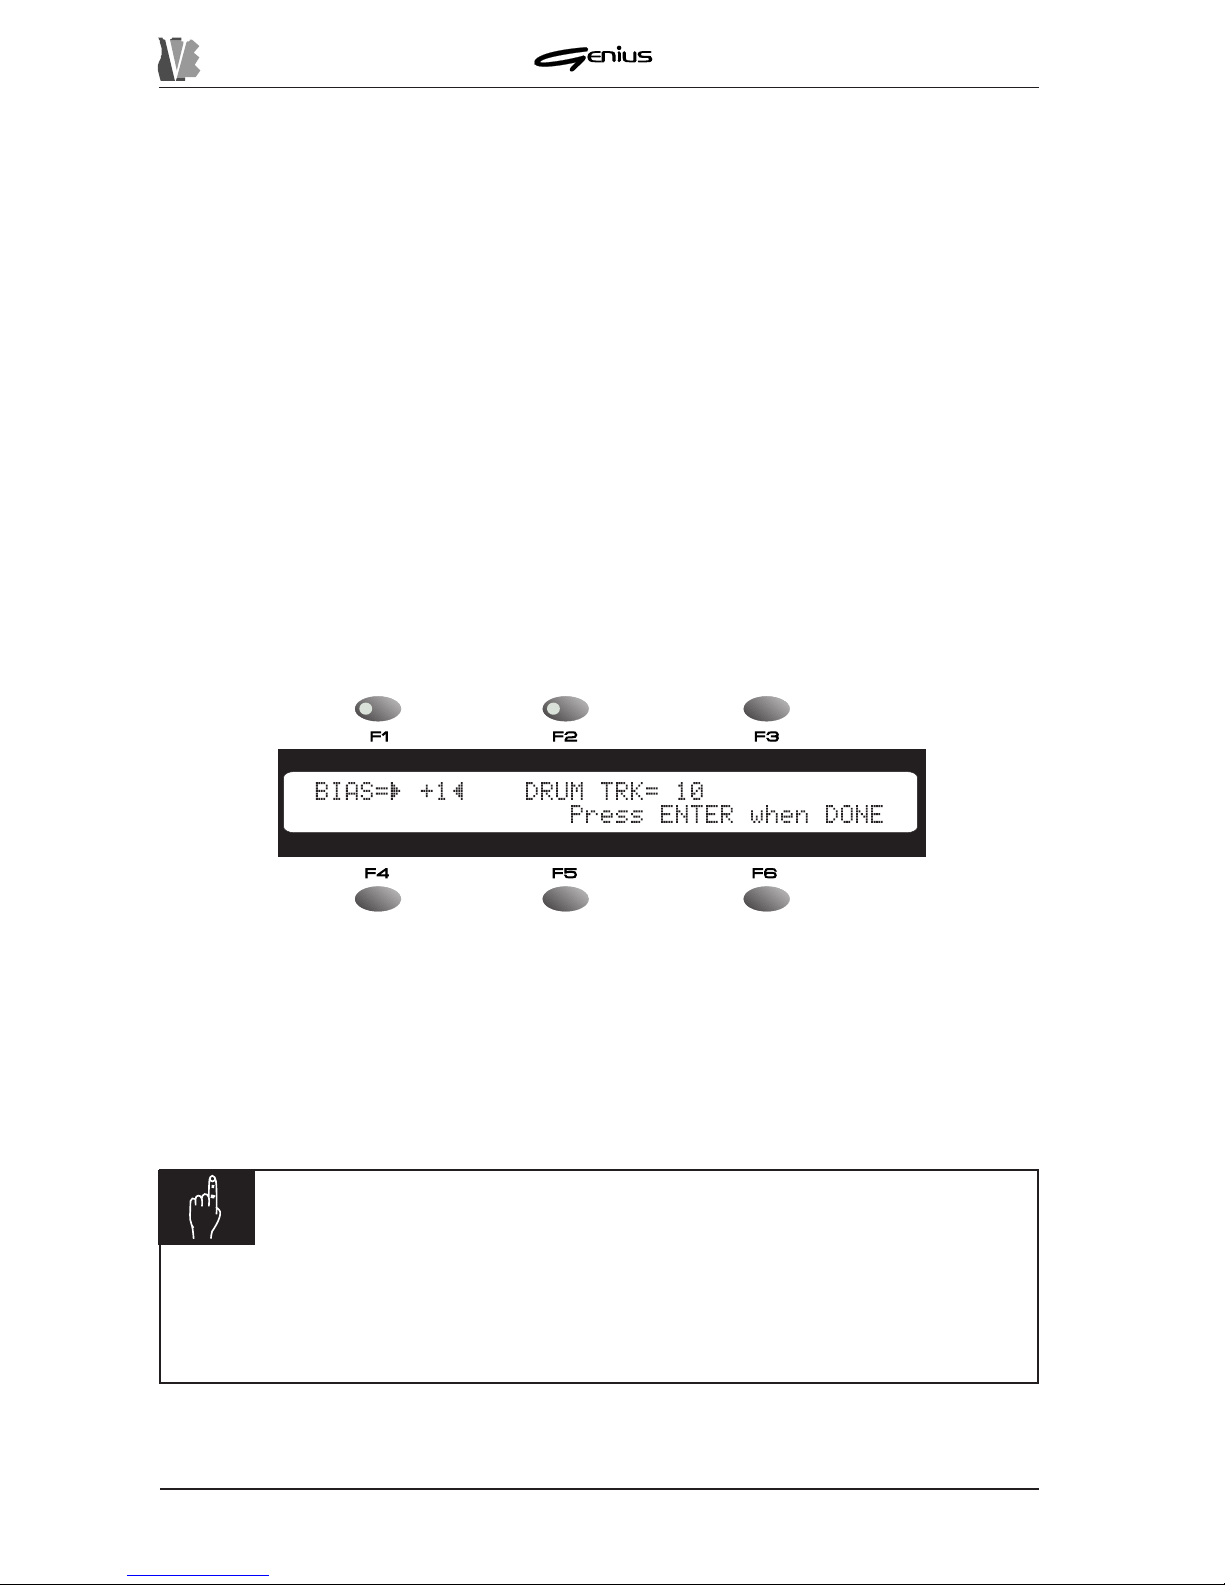
When the [TRANSP.] key of the REAL TIME ADJ. section is kept pressed for about two
seconds, the display will show:
The
BIAS
field next to the [F1] key sets the value of the transposition, when active, within a
range of ±12 semitones.
The
DRUM TR.
field sets which is to be the drum track, which will not be transposed. Users
are urged to take special care when assigning the DRUM TRACK.
Once the desired settings have been made, if [ENTER] is pressed they are accepted and
saved, and the display will again show the MAIN P AGE.
NOTE
ü
The chords eventually displayed with not be transposed.
ü
A parameter value BIAS=0 means there will be no transposition, even with the
function active.
Page 25
DATA FILER
6.4 SETTING THE METRONOME TEMPO
The Tempo function allows the user to vary the metronome tempo of a song being played.
As for the other REAL TIME ADJUST functions, pressing the [TEMPO] key quickly activates
(LED on) and/or deactivates (LED off) the variation in tempo which can be set in the Tempo
Setup function, while keeping the key pressed for a longer time accesses the video page for
setting the variation in tempo to be implemented.
6.4.1 TEMPO SETUP
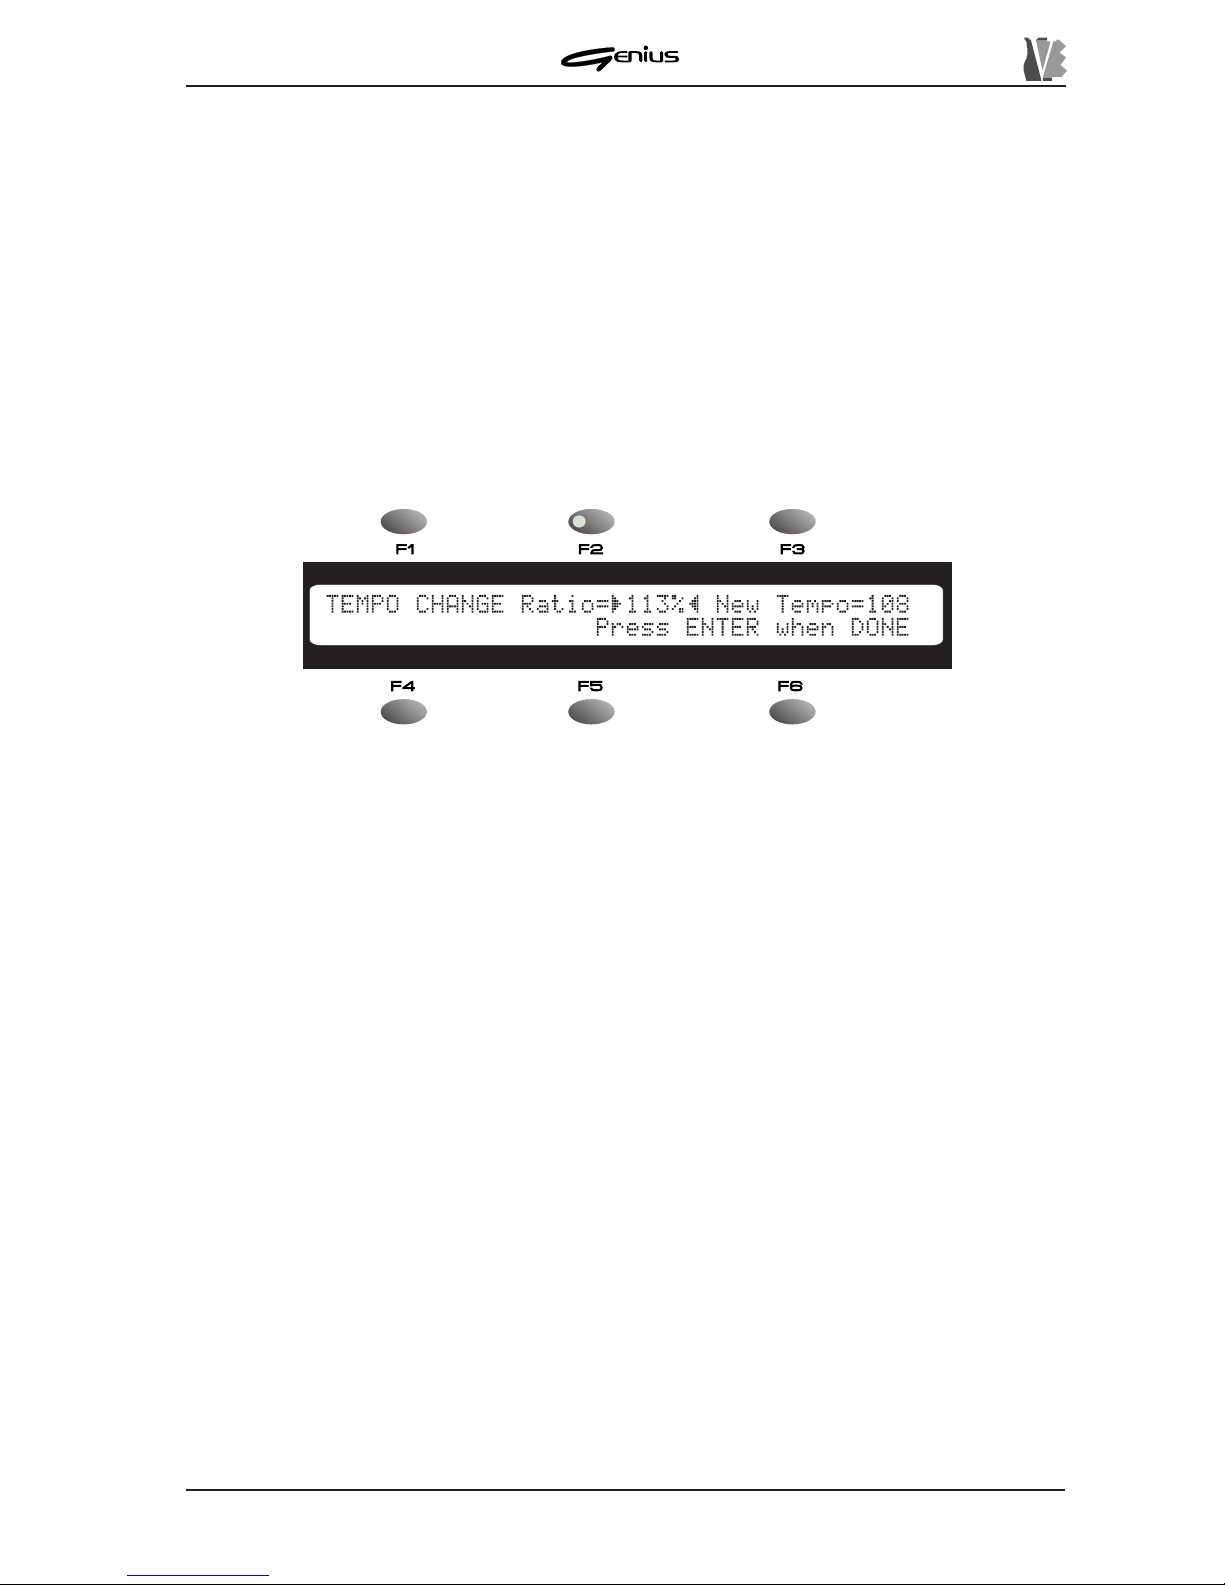
To access the Tempo Setup function keep the [TEMPO] button pressed for about 2 seconds
and the display will show the video page:
117
The
TEMPO CHANGE Ratio
field allows the user to regulate the variation not in the
absolute metronome tempo but in a calculation percentage, in order to guarantee a proportional
variation even in case of “rallentandos” or “accelerandos” envisaged during performance of
the song.
Note that the
TEMPO CHANGE Ratio
field represents the percentage calculation the
instrument will make to establish the new bpm value. In this case, a ratio of 100% means that
the new tempo will be equal to 100% of the original value, so there will be no change. The
possible bpm values cover a range from 50 to 250.
T o simplify the setting of the new bpm value, the
NEW TEMPO
field will display the outcome
of the calculation of the variation made.
As the display indicates, if [ENTER] is pressed the new value is accepted and, during playback
of the song, the variation will be implemented whenever the [TEMPO] key is pressed.
Page 26
DATA FILER
7. RECORDING SONG
7.1 FOREWORD
As well as playing back songs in Standard MIDI File 0 and 1 format (see point 2.2), the
Genius is also able to record the MIDI events received on the MIDI IN port, made available
with the aid of an optional Joy-to-MIDI adapter (see section 4). Once recorded, these data
can be saved in the form of Standard MIDI Files both on a floppy disk and in the internal
memory .
Bear in mind that the instrument does not allow any over-recording (total or partial), so if you
wish to replace a recorded song you will have to delete the song in question and record
another.
7.2 ST ARTING RECORDING
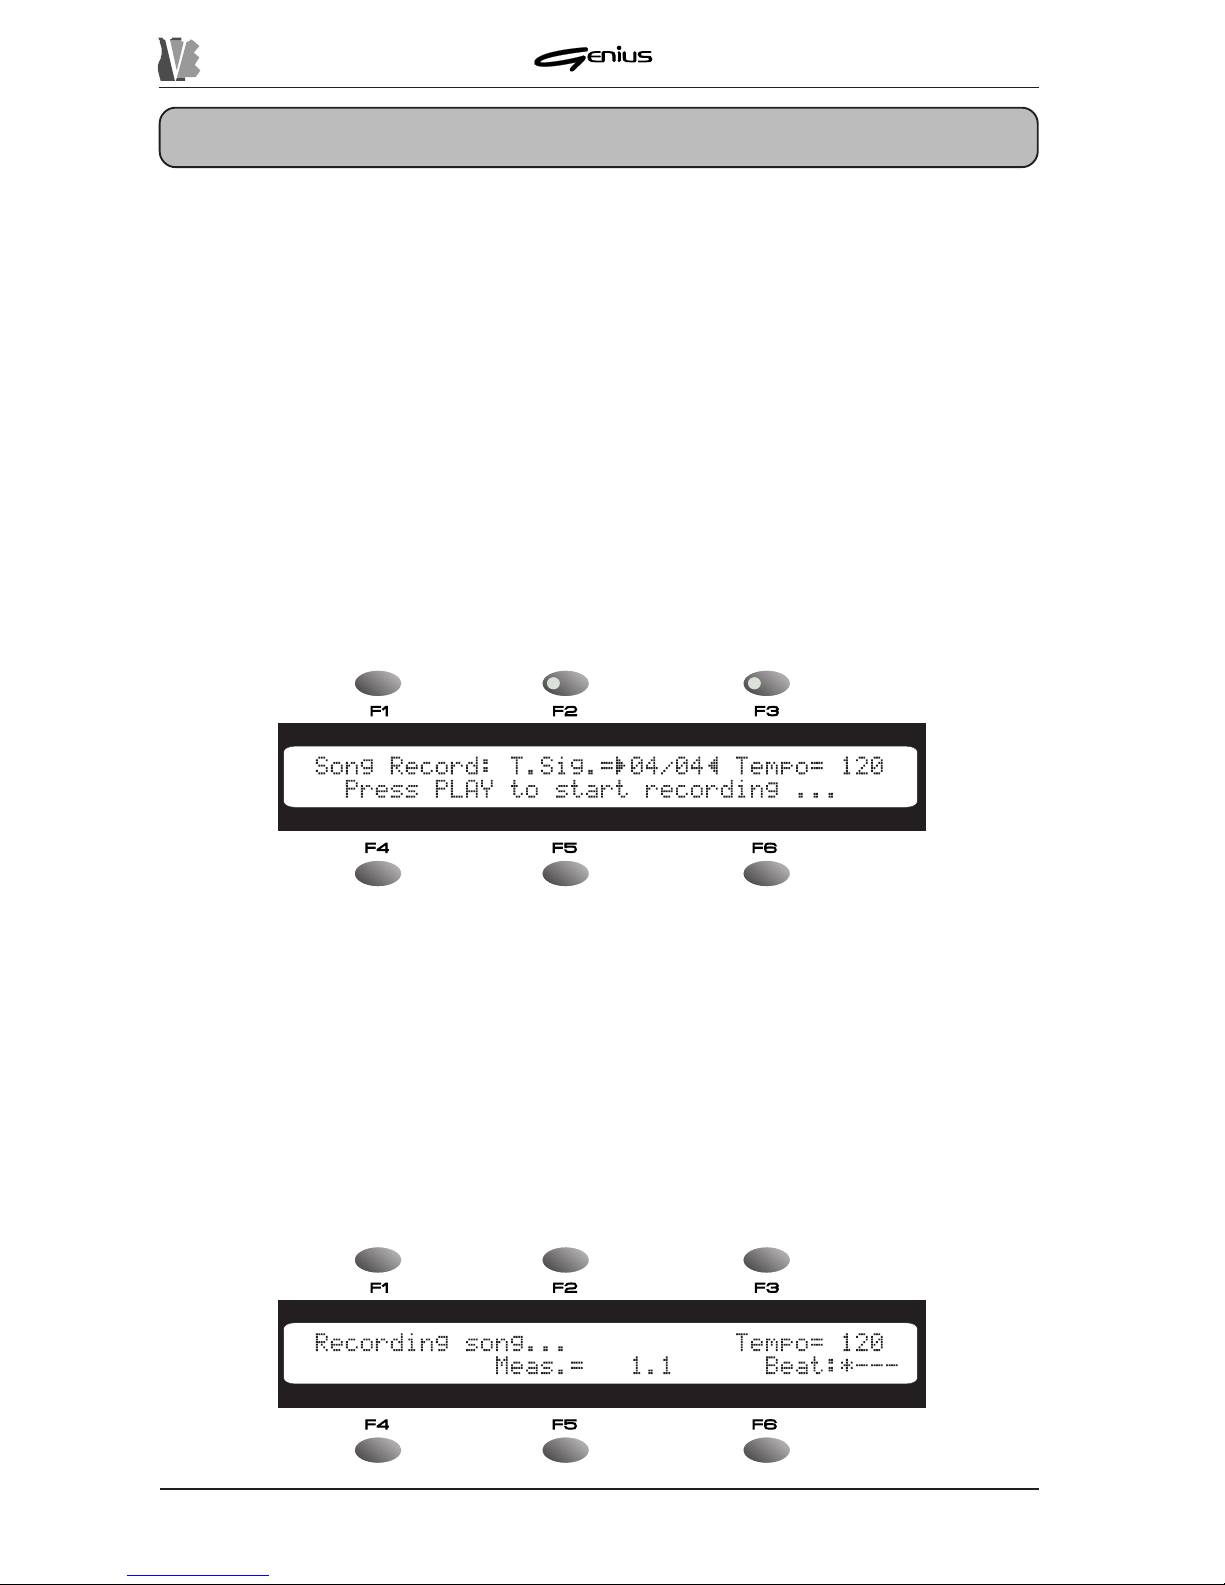
After making the connections correctly , press the [REC] key; the key LED will illuminate and
the display will show the following video page:
118
This video page contains the following fields:
o
T.Sig.
(can be selected using the [F2]) function key) – allowing the encoder to be
used to set the Time Signature of the song to be recorded. The possible values are: 3/8,
6/8, 9/8, 12/8, 2/4, 3/4, 4/4, 5/4, 6/4, 7/4 and 9/4.
o
Tempo
(can be selected using the [F3]) function key) – allowing the user to set the
metronome tempo of the new song in a range from 50 to 250 bpm (Beats per Minute).
After setting the values of the parameters to your requirements, press the [PLA Y] button to
start the recording of [ESC] to abort.
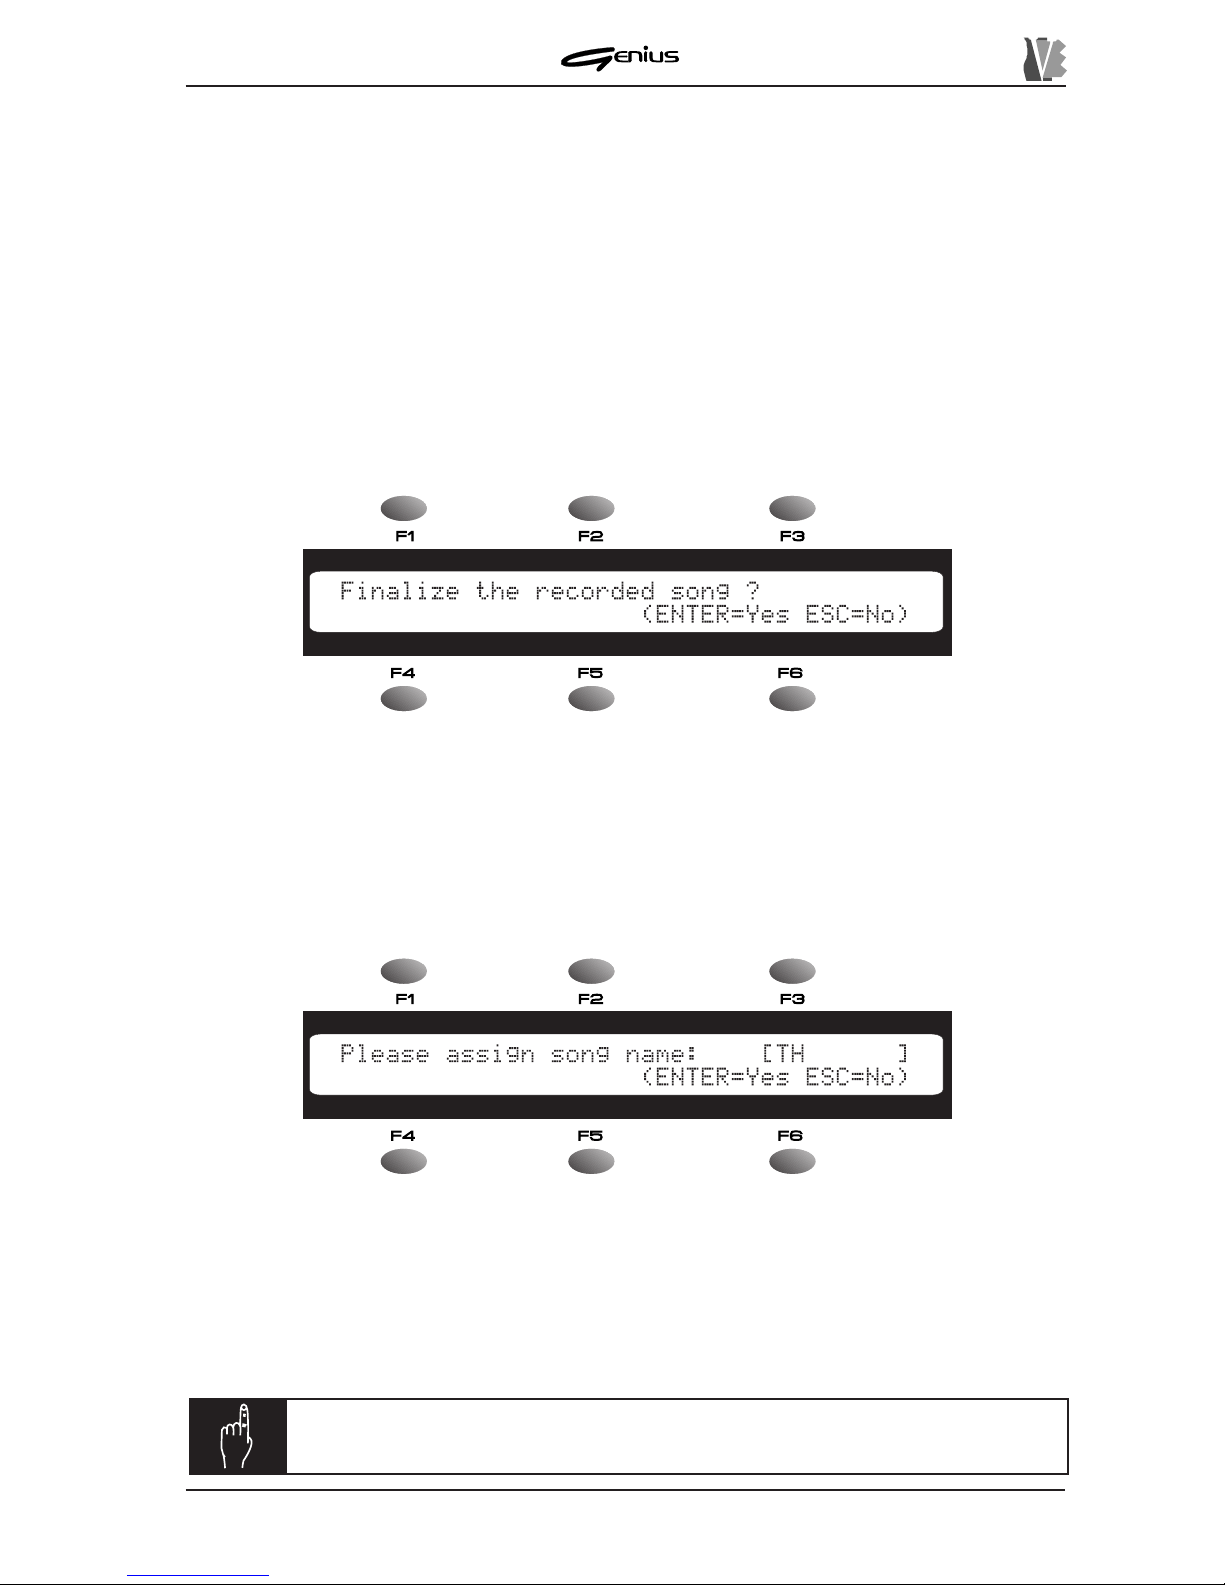
Once the [PLA Y] key has been pressed, the Genius will start to record the data present at the
MIDI IN port of the optional adapter and the display will show:
Page 27
DATA FILER
As the screen shows, the
Recording Song
field warns the user that the Genius is recording
the data, the
Tempo
field indicates the metronome tempo with which the song is being
recorded, and the
Meas.
and
Beat
fields display the bar number reached and the beat
scan.
During recording, the [P AUSE] key can be pressed to suspend the procedure; it can then be
restarted from the point where it was interrupted by pressing the same key or the [PLA Y] key .
The LED of the [P AUSE] key illuminates to indicate that the system is in pause condition.
Pressing the [STOP] button terminates the recording phase.
7.3 SA VING THE RECORDING
At the end of the recording, the system asks whether or not the user wishes to memorise the
song just created: the display will therefore show:
As the display indicates, if [ENTER] is pressed the recording will be acquired, while if the
user presses [ESC] all the recorded data will be deleted and the display will again show the
MAIN P AGE. If no data have been received during the recording the Finalize prompt will not
be displayed and the system will return straight to the MAIN P AGE.
Pressing [ENTER] confirms the procedure, and the system then prompts assignment of the
name to the new song (*.MID file name):
119
NOTE:
if the file has been saved in the internal memory, it will be placed at
the end of the list of files already present.
T o specify the name of the new file, use the [PREV.] and [NEXT] buttons to move the cursor
backwards or forwards respectively . The encoder can also be used to enter the characters to
be used to form the name of the file, bearing in mind that no spaces are permitted. Then use
the SOURCE section buttons to select the memory unit where the song is to be saved, ([DISK]
or [MEMORY]). Remember that the [DISK] key will not be active if the floppy disk is not inserted
or not formatted. Then press [ENTER] to save or [ESC] to abort.
Page 28
DATA FILER
7.3.1 ERROR MESSAGES
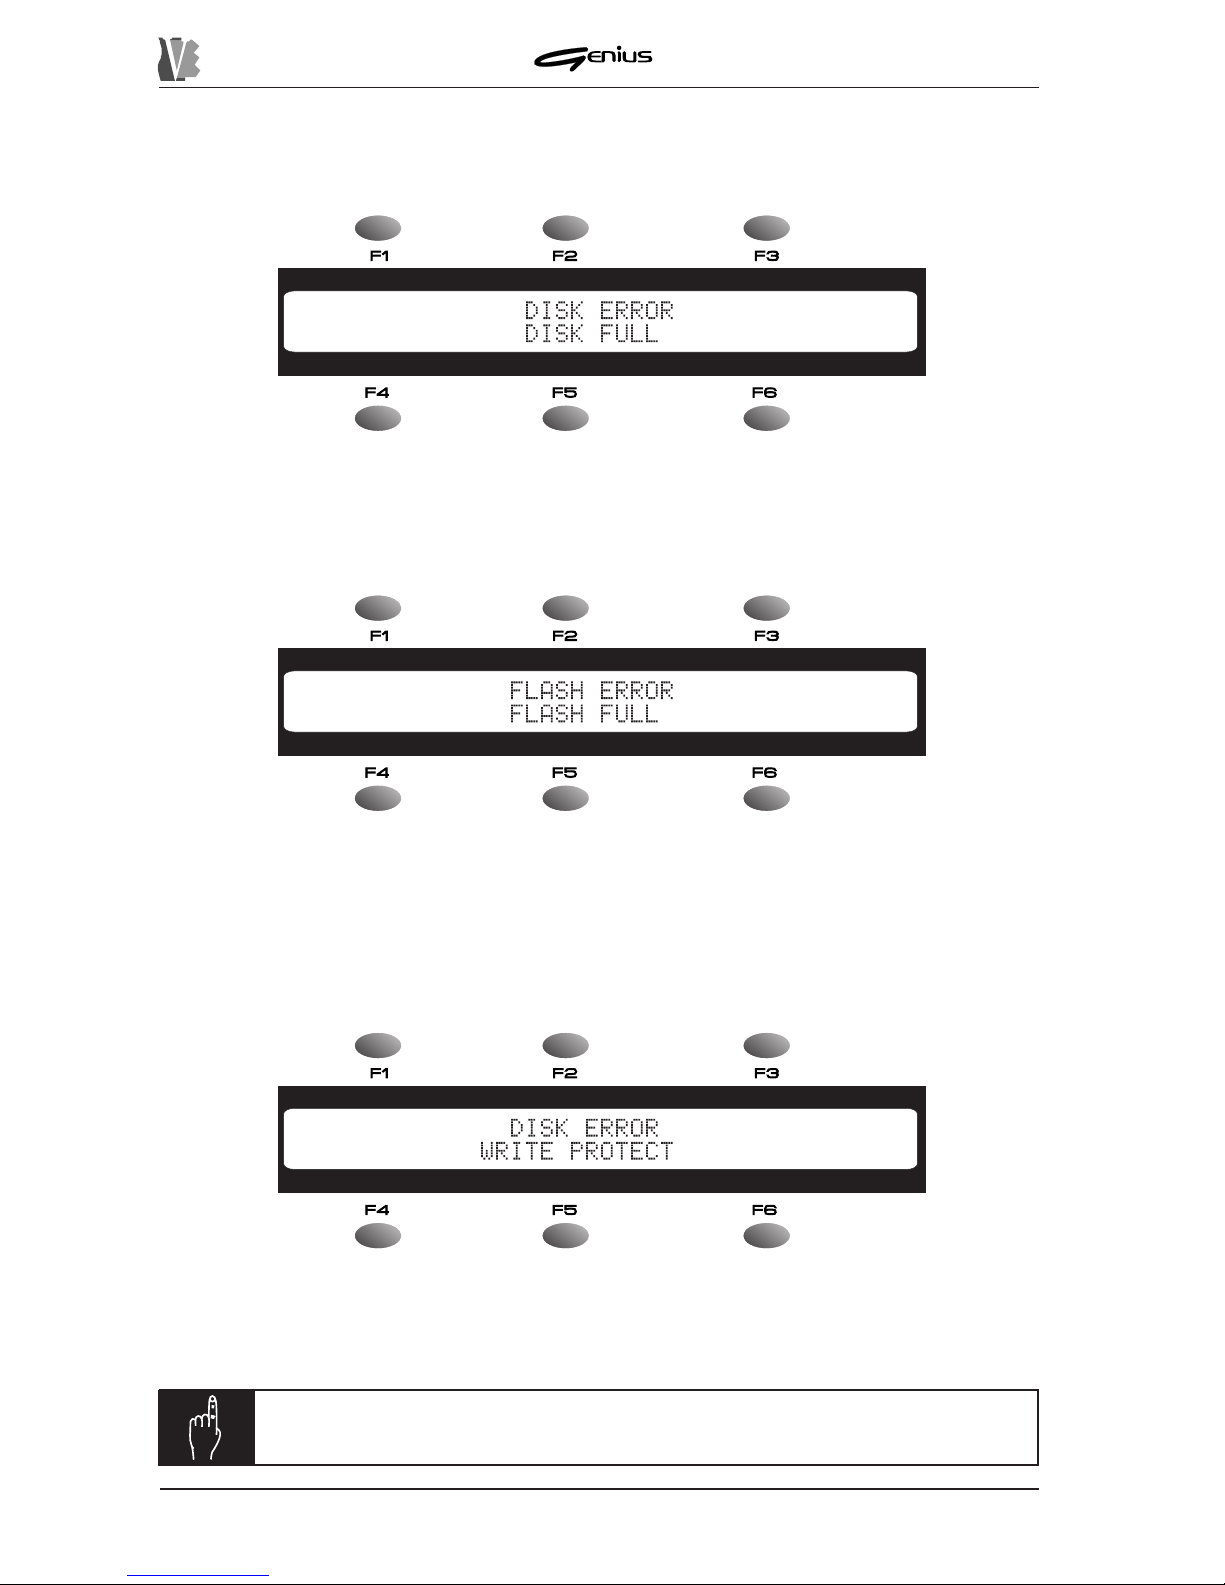
DISK ERROR – DISK FULL
There is not enough room on the disk to save the song recorded. Press [ESC] to return to the
Finalize prompt, then replace the disk or select the internal memory .
FLASH ERROR – FLASH FULL
You have attempted to save the file on a floppy disk with write-protection. Press [ESC] to
return to the Finalize prompt, then remove the protection and repeat the memorisation
procedure.
N.B.:
do not remove the floppy disk if the drive LED is on.
120
There is not enough space in the memory to save the song recorded. Press [ESC] to return to
the Finalize prompt, then insert a disk or save the song on the floppy disk. Then free space in
the internal memory (see sections 8.2.2 and 8.4.6) where the file concerned can be copied
(see section 8.2.1).
DISK ERROR – WRITE PROTECT
Page 29
DATA FILER
8. SYSTEM UTILITIES
121
The system utilities, found in the TOOLS section of the front panel, are accessory functions
not closely linked to the playback and recording of songs, but which are a useful backup to
the operations the Genius offers.
Unlike the functions in the REAL TIME ADJ. section, the TOOLS can only be recalled in Stop
condition.
The only exception is the P ART INFO function described in point 8.5.
The TOOLS section is divided into five sections corresponding to the buttons on the panel,
as follows:
o DISK: access to the general disk and internal memory functions (formatting, copying whole
floppy disks, etc....).
o FILES: accessory functions relating to the files (single and multiple copy , delete, rename,
etc...).
o MIDI: settings relating to the instrument’s general MIDI functions (Out Router, MIDI filters,
synchronisation, etc...).
o SYSTEM: accessory functions relating to the system (display , pedal control, etc.).
o PA RT INFO: information about the status of the main data relating to the tracks being
played.
8.1 DISK
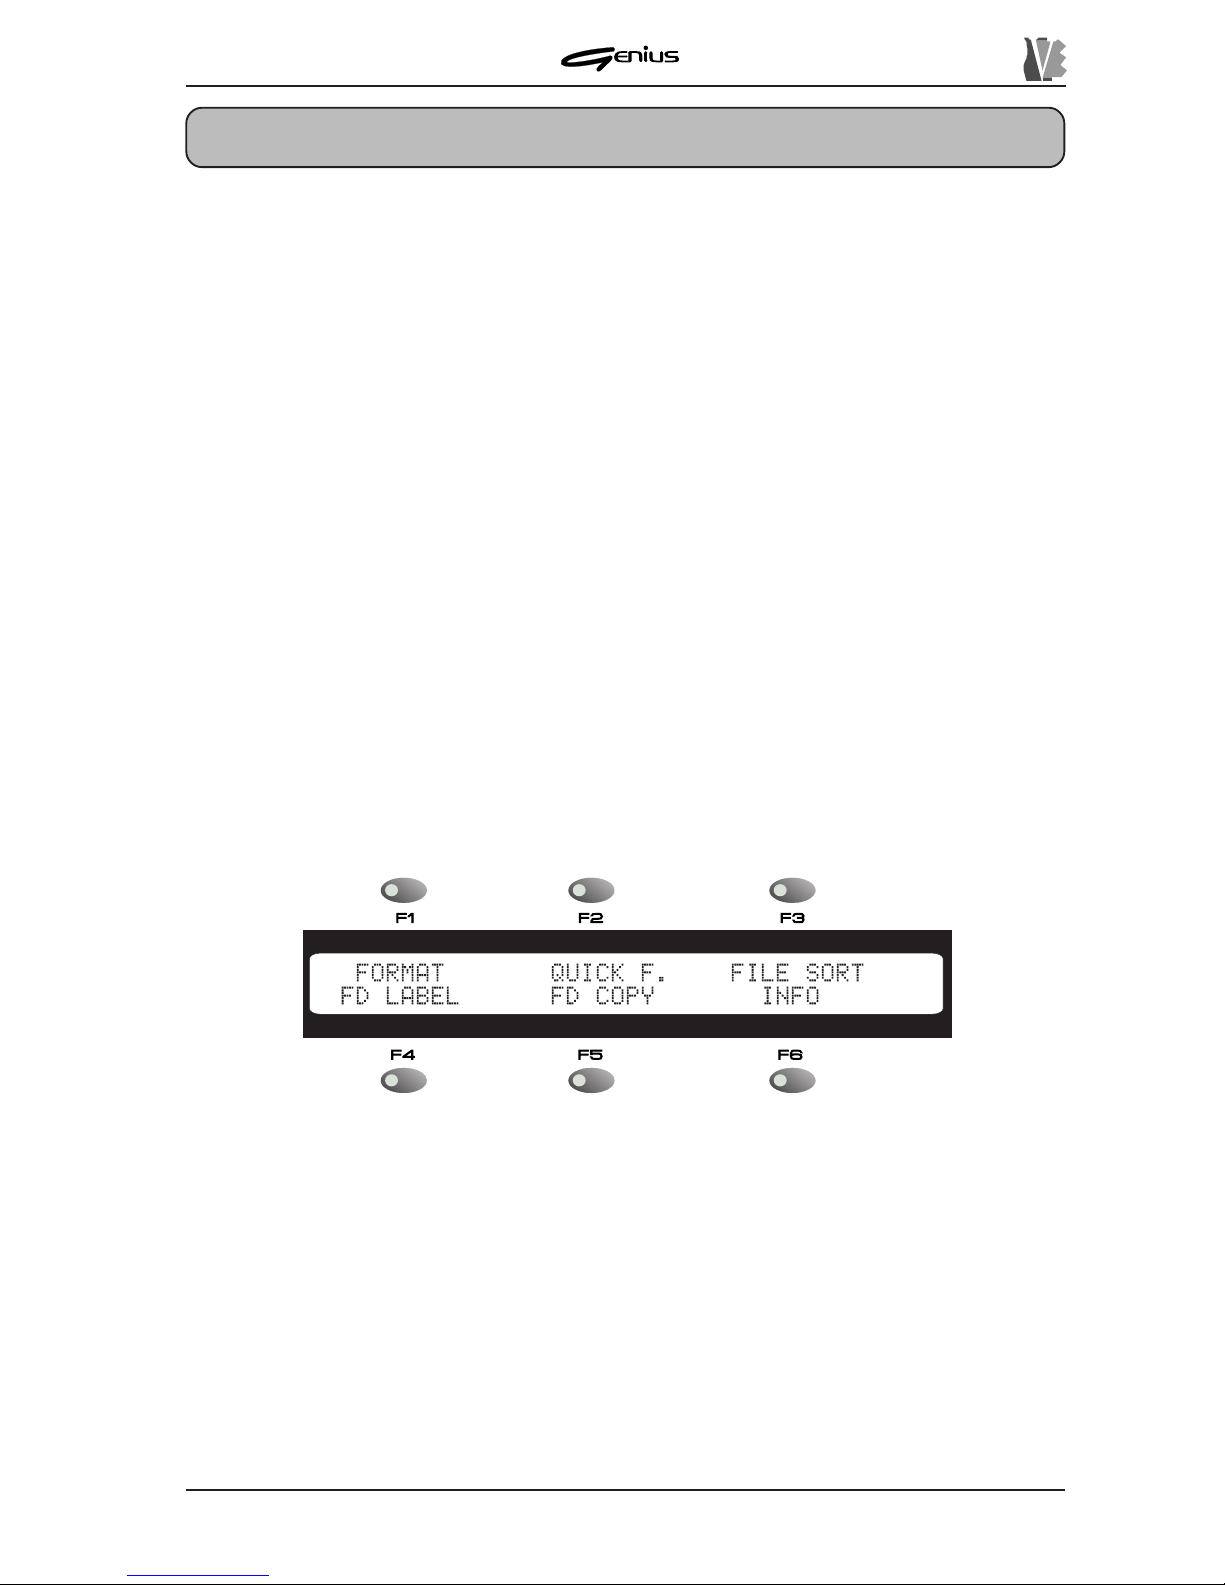
When the [DISK] key in the TOOLS section is pressed, the display will show:
The functions available are:
o
FORMAT
: selected by pressing the [F1] key , starts the procedure for formatting the disk
inserted in the floppy disk driver , or the internal flash memory.
o
QUICK F
(Quick Format): [F2], starts the procedure for quick formatting of the floppy
disk.
o
FILE SORT
: [F3], recalls the function for sorting the files contained in the selected unit.
o
FD LABEL
(Floppy Disk Label) [F4], can be used to change the label of the floppy disk
inserted.
o
FD COPY
(Floppy Disk Copy): [F5], recalls the procedure for copying a whole floppy
disk onto another or into the internal memory .
o
INFO
: [F6], displays the main informative data about the floppy disk inserted or the internal
memory .
Page 30
DATA FILER
T o exit from this function press [ESC] or [DISK] and the display will return to the MAIN P AGE;
otherwise, use the selection keys referred to above to access the various functions of the
TOOLS section.
8.1.1 FORMAT
Each freshly-purchased floppy disk must be formatted before use for writing songs. The
Genius formats floppy disks in MS-DOS® format, meaning that these disks can also be used
with Personal Computers or Sequencers.
The internal flash memory can also be formatted, to delete all the files memorised in it.
122
WARNING!
Bear in mind that when a floppy disk or the internal memory is formatted, all the data
memorised will be lost irretrievably. When the internal memory is formatted, the data
relating to the system software will not however be deleted.
We will now take a look at the formatting procedure.
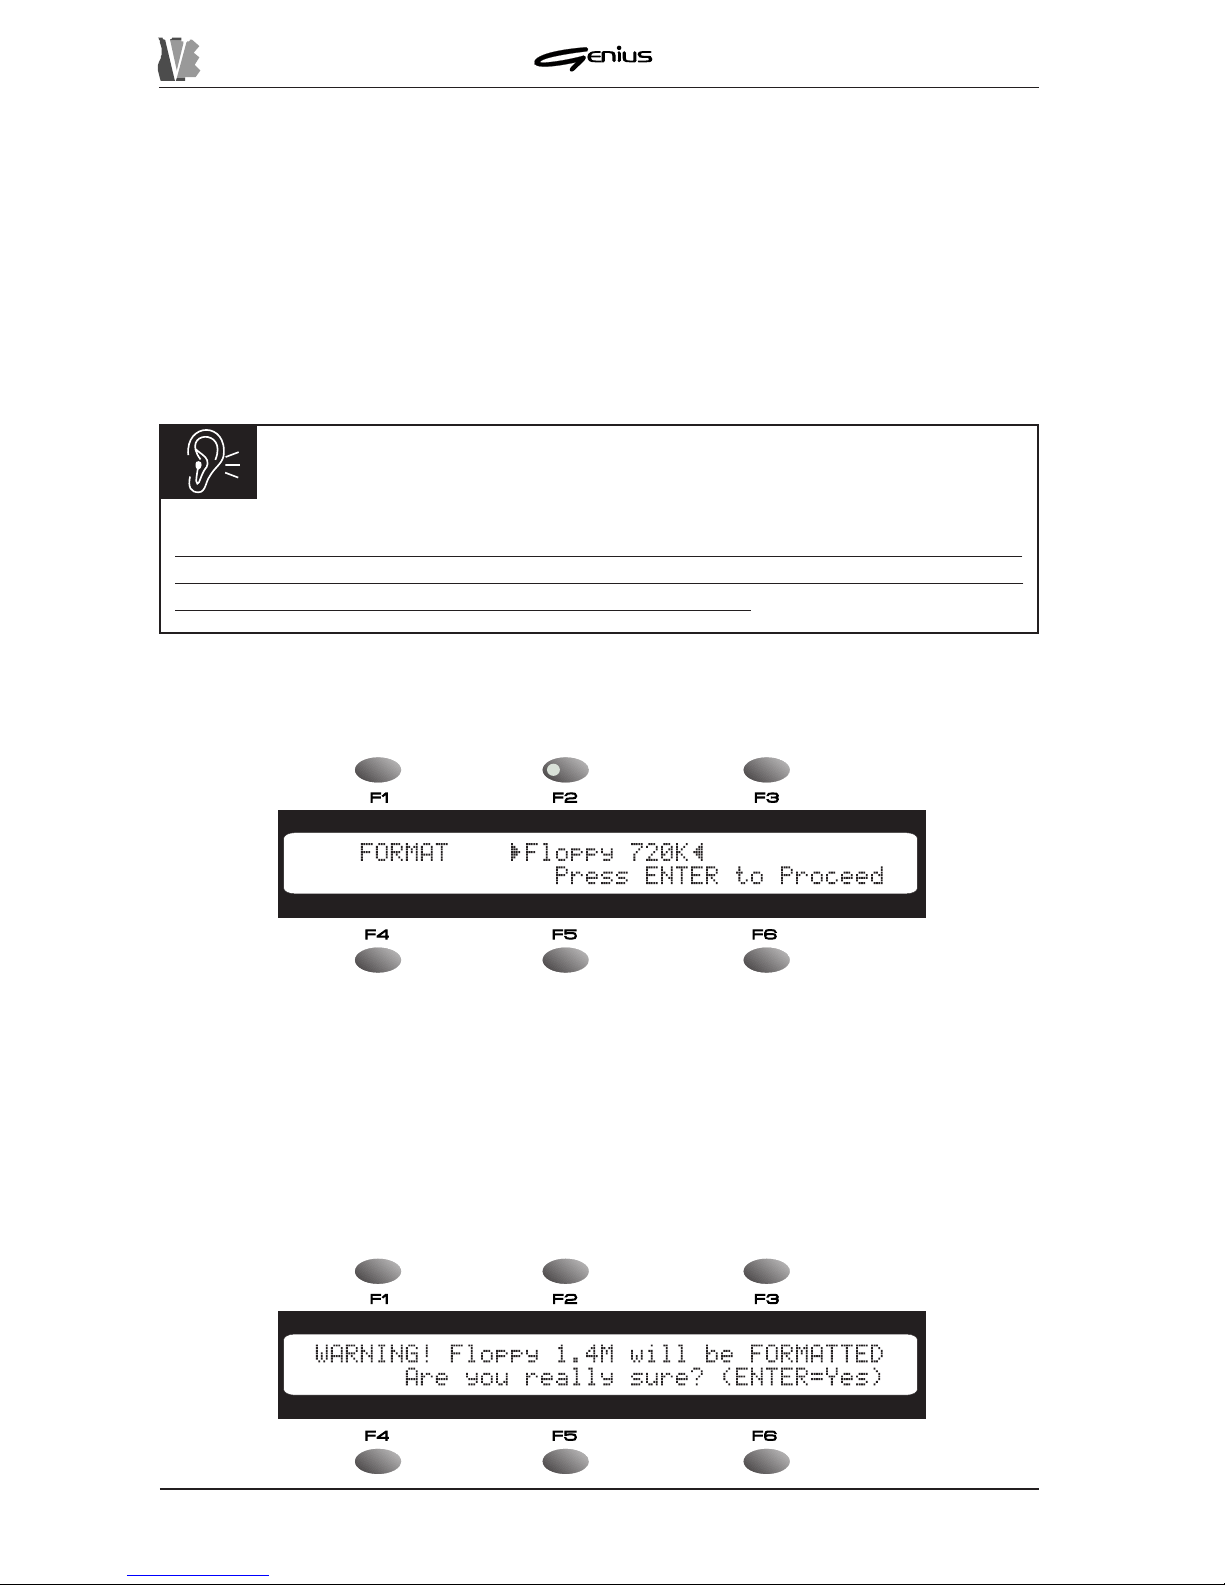
From the DISK menu press the [F1] function key; the display will show:
Use the encoder to select the unit you wish to format, chosen from:
o
Floppy 720K
: formatting of Double Density (DD) floppy disk of 720 Kbytes.
o
Floppy 1.4M
: formatting of High Density (HD) floppy disk of 1.44 Mbytes.
o
Memory
: formatting of the internal flash memory (capacity measured automatically).
Now insert the floppy disk to be formatted.
Press the [ENTER] key to start the formatting procedure and the display will show:
Page 31
DATA FILER
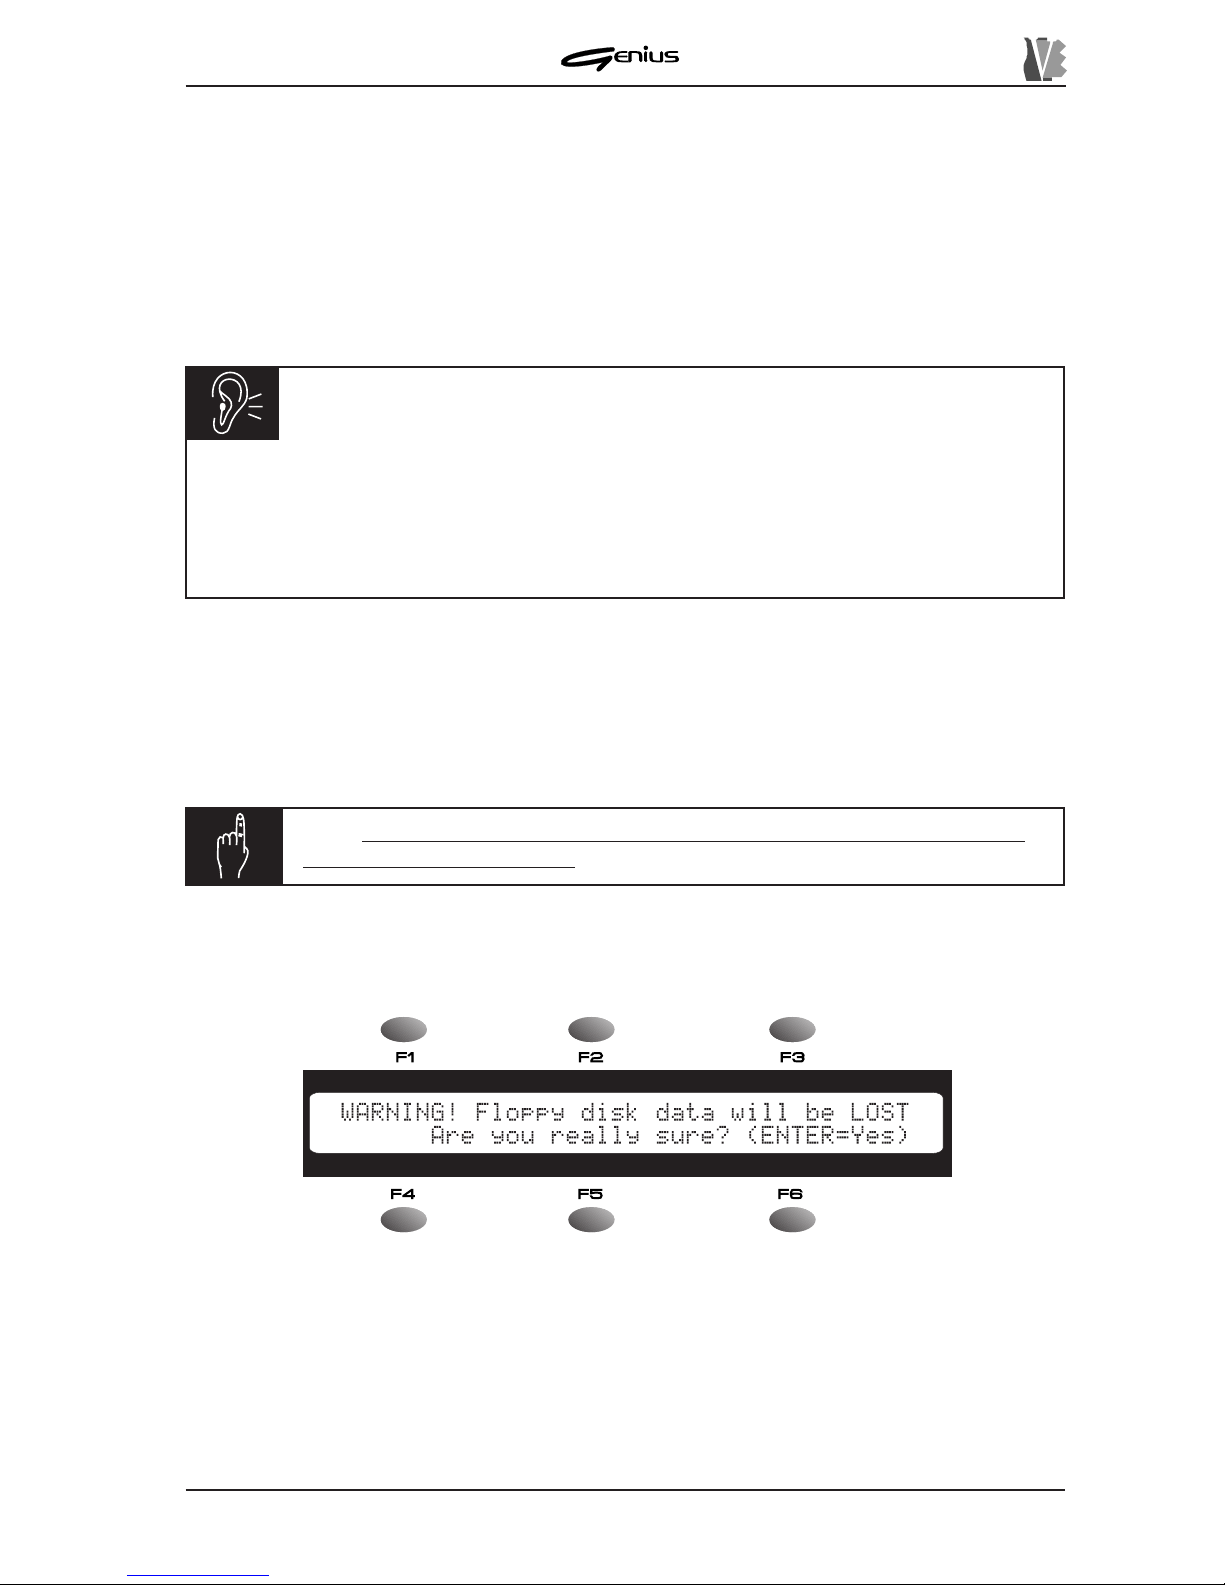
At this point, the Genius requests further confirmation to proceed, and as the display indicates,
pressing the [ENTER] key will start the formatting procedure. If the [ESC] key is pressed the
operation will be aborted and the display will return to the FORMA T page.
If confirmation is given, the instrument will proceed with formatting of the floppy disk, and a
video page will indicate the percentage of formatting completed.
Until the operation is completed the instrument will ignore any operation carried out on the
panel, after which the display will return to the Format video page.
8.1.2 QUICK FORMAT
The QUICK FORMA T procedure allows rapid deletion of all the files on a floppy disk which is
already formatted.
From the DISK menu, use the [F2] function key to select the
QUICK F
field; the display will
show:
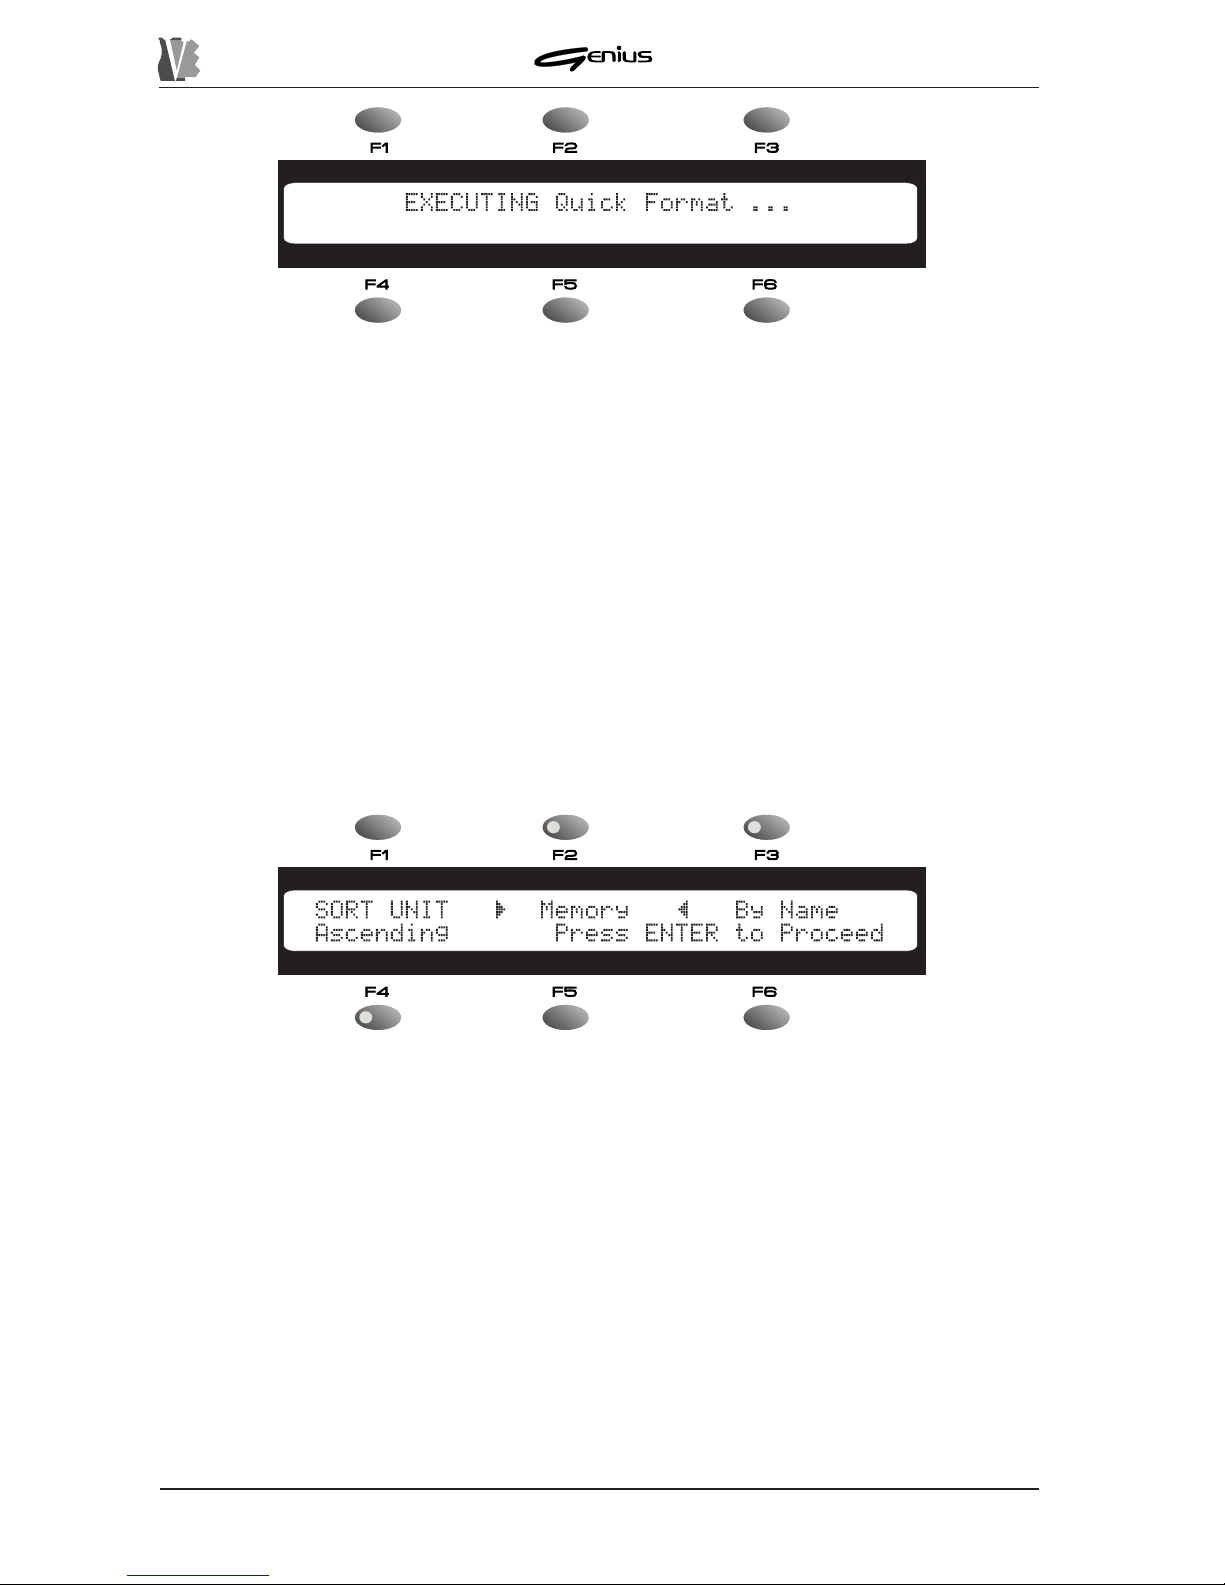
If the [ENTER] key is pressed, the Genius will proceed with the floppy disk quick formatting
procedure; if [ESC] is pressed, the procedure will be aborted.
When the procedure is confirmed the display will show the video page on the next page.
N.B.:
Bear in mind that this function will also delete all the data saved on
the floppy disk irretrievably.
123
CAUTION!
ü
Do not switch the instrument off during formatting of the internal flash memory . This
might damage the control software.
ü
When formatting a floppy disk, do not extract the disk during the procedure.
ü
When formatting a floppy disk, take care to select the correct capacity .
Page 32
DATA FILER
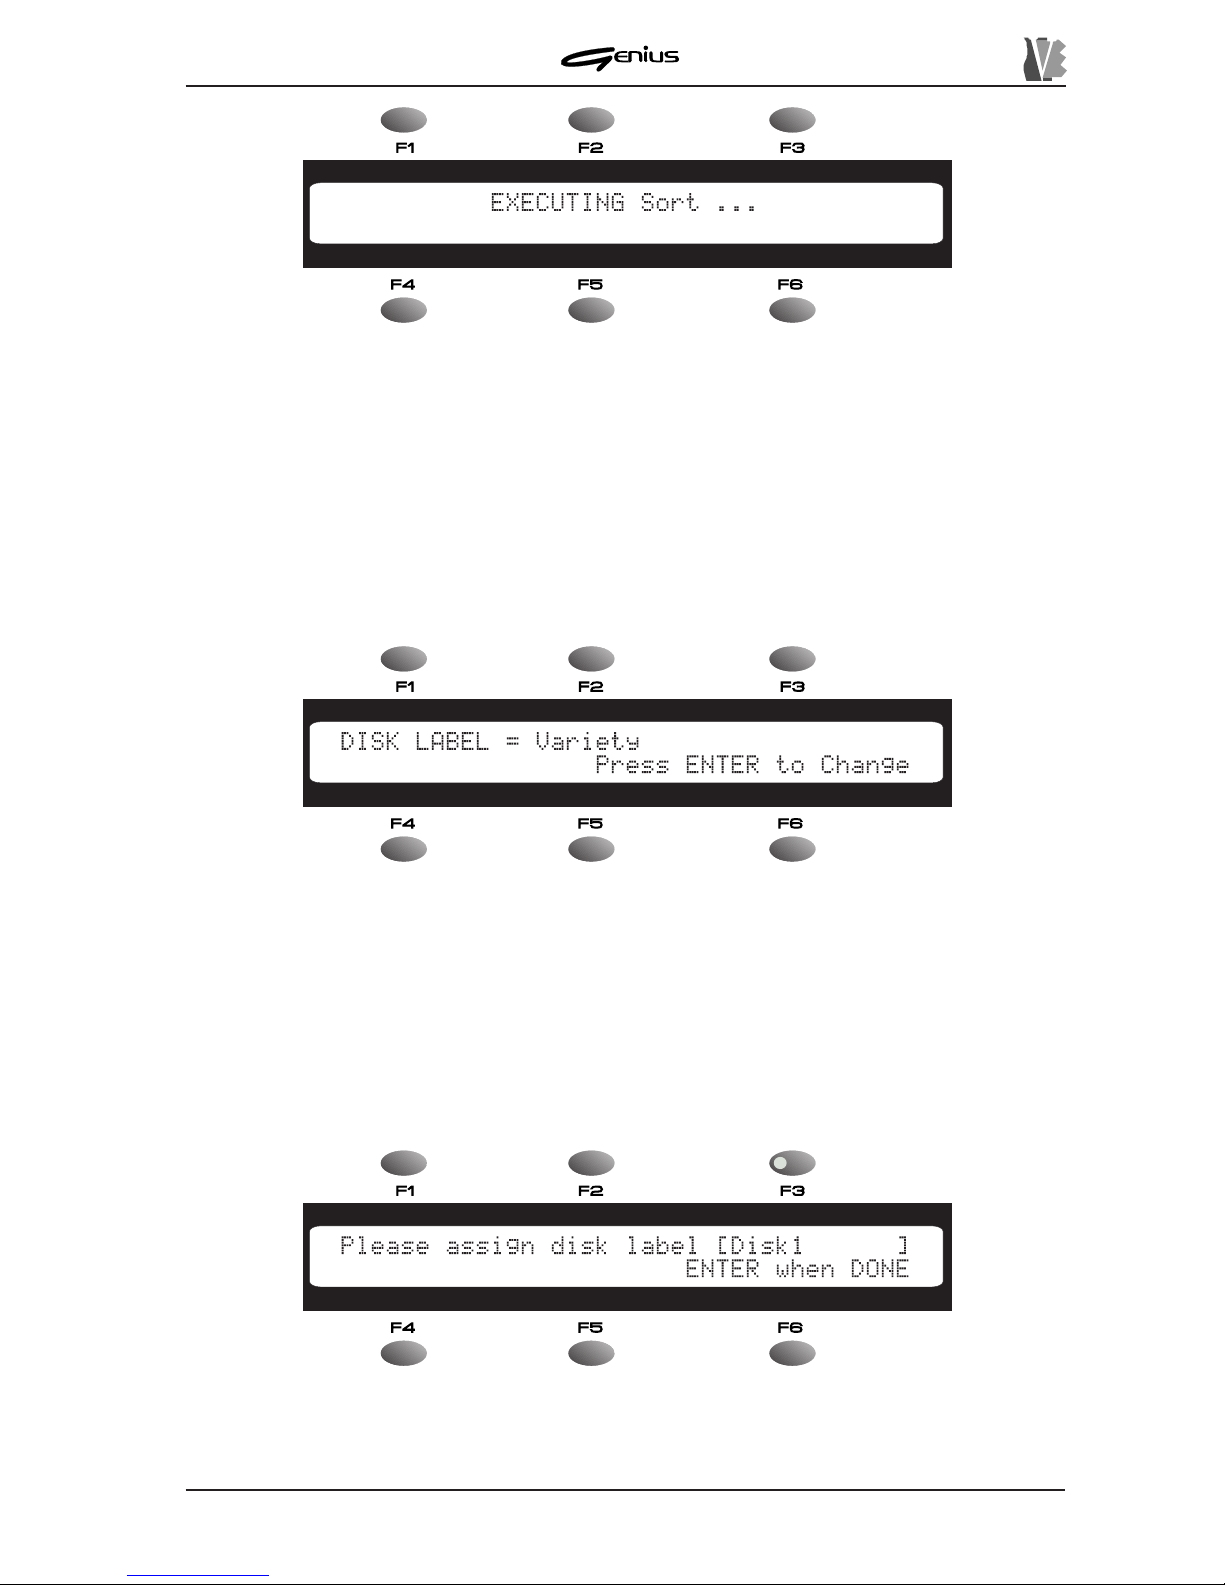
The user fields available are the following:
o
Floppy Disk or Memory
: selectable using the [F2] function key – this field allows
the user to define the memory unit to be Sorted, with the aid of the encoder .
o
By Name or By Size
: [F3] – sets the way in which the files are to be arranged, i.e.
in alphabetical order (By Name) or by size.
o
Ascending or Descending
: [F4] – sets whether the files are to be sorted in
ascending or descending order.
After having set all the parameters required, press the [ENTER] key: the Genius will sort the
files contained in the selected unit and memorise the modifications. Pressing the [ESC] key
will abort the operation and the display will return to the main video page of the Disk menu.
If the procedure is confirmed, during performance of the Sorting procedure the display will
show:
124
pending completion of the operation.
If you have confirmed the floppy disk quick formatting procedure but there is no disk in the
drive, the display will signal that there is no disk present by displaying: DISK NOT IN DRIVE!
The same error will be displayed if a Quick Format is attempted on a “virgin” floppy disk.
If the floppy disk has write protection, the display will show: DISK Write Protected! In both
cases, the procedure concerned will be abandoned immediately .
8.1.3 FILE SORT
The FILE SOR T function allows the files in a given unit, whether floppy disk or internal memory,
to be arranged in a way decided by the user.
From the DISK menu, select the
FILE SORT
menu using key [F3]; the display will show the
video page:
Page 33
DATA FILER
8.1.4 FD LABEL
The FD LABEL function allows the user to change the label (name) of the floppy disks inserted
in the drive. This can be useful when the user has an archive of songs on various floppy disks,
since it allows them to be identified without having to scroll through their contents in the
MAIN
P AGE
.
T o activate this function, from the DISK menu, press the [F4] key associated to the
FD LABEL
field. The video page relating to this function comprises:
The
DISK LABEL
field displays the name of the floppy disk currently present in the drive.
T o change the label assigned to the floppy disk, press the [ENTER] key . Otherwise, you can
press the [ESC] key to abandon this function and return to display of the DISK menu. If the
floppy disk is not inserted in the drive, the
DISK LABEL
field will be empty and the [ENTER]
button will be deactivated.
If [ENTER] is pressed with a disk inserted, the display will show the following video page:
125
Y ou can use the encoder (choice of letter) and the P AGE key (cursor movement) to make up
the new floppy label. This label can be no more than 1 1 characters long.
Page 34
DATA FILER
Once the operation is concluded, the usual procedure applies, as shown by the display:
pressing the [ENTER] key confirms the operation, while pressing the [ESC] key aborts the
current procedure.
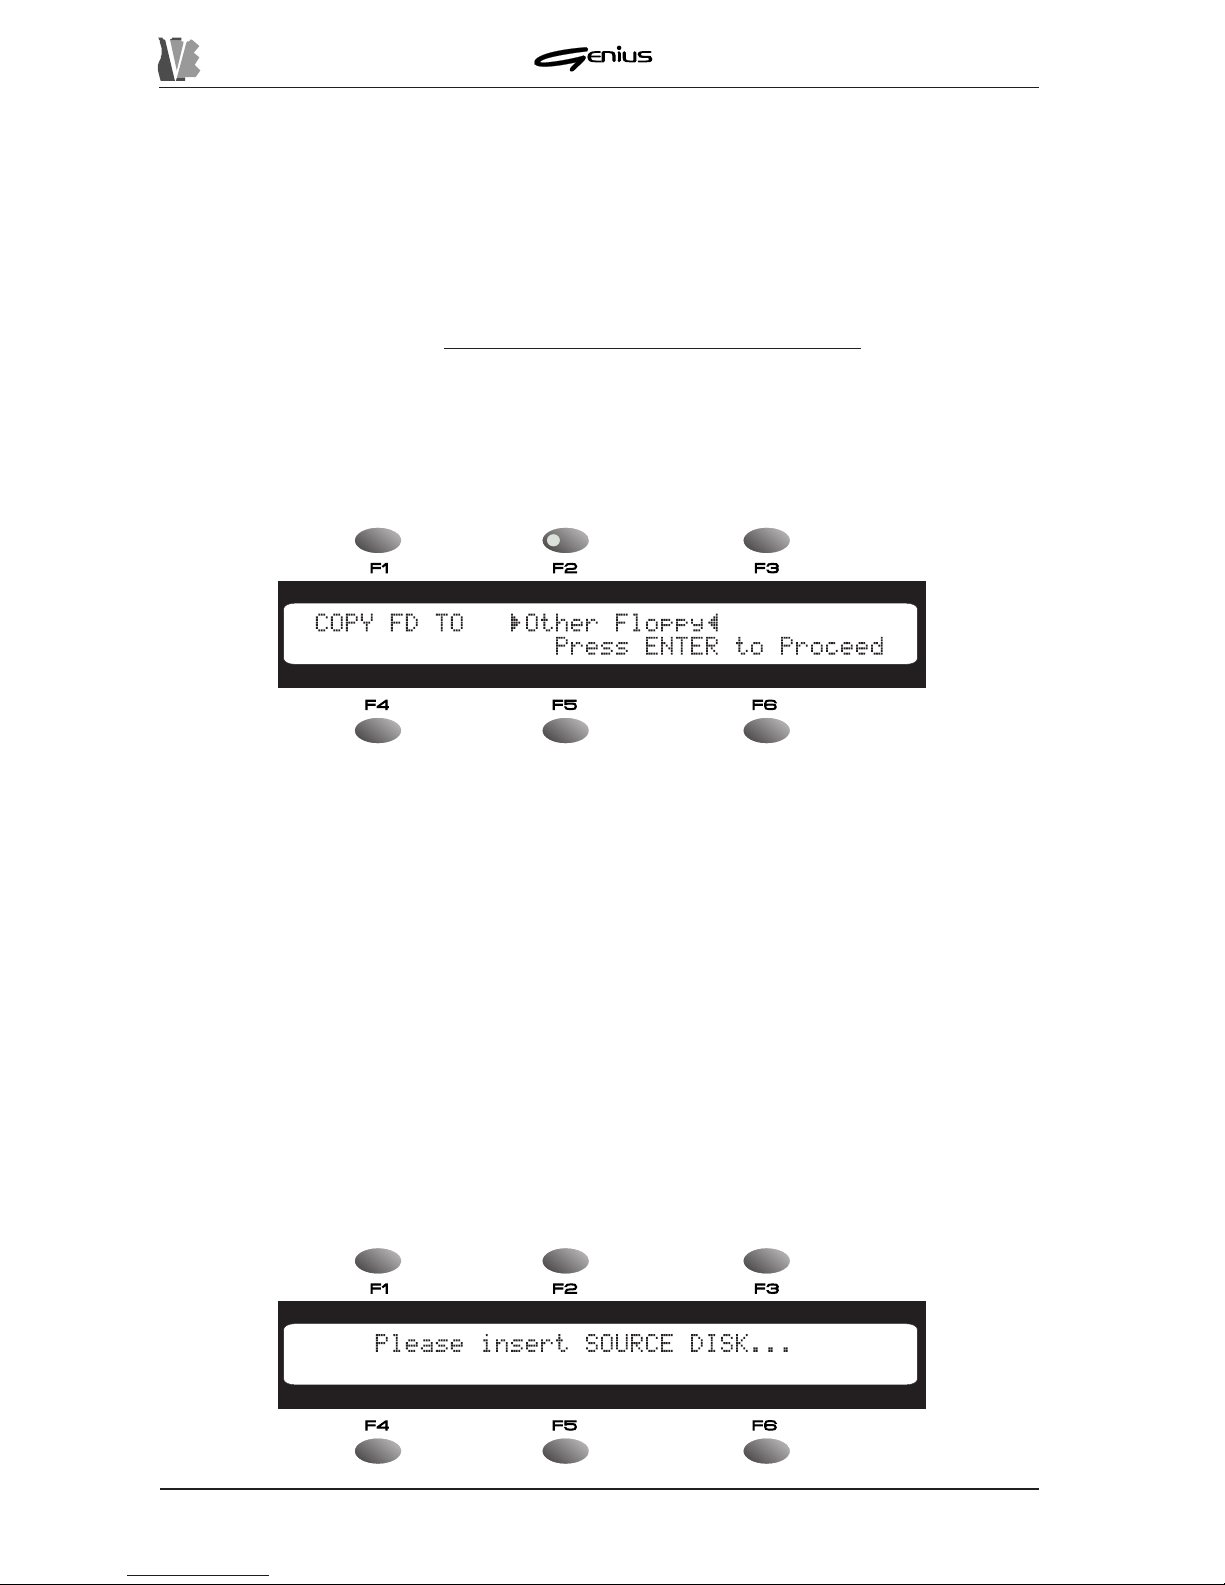
8.1.5 FD COPY
The Genius allows you to copy the contents of a whole floppy disk onto another disk or into
the internal flash memory . In case of disk-to-disk copying, the system will implement a physical
copying procedure, therefore
the two disks must have the same capacity . The procedure for
copying a whole floppy disk into the instrument’s internal memory is different: in this case, the
instrument will only copy the files which apply to it.
T o access the Disk Copy function, from the DISK menu, press the [F5] function key; the display
will show the video page relating to this function:
The
COPY FD TO
field envisages the following copying procedures:
o
Other Floppy
: copy from floppy disk to floppy disk of the same capacity .
o
Memory
: copy from floppy disk to internal memory .
As always, use the encoder for the selection procedure.
Pressing [ENTER] will start the procedure, while if [ESC] is pressed the display will return to
the previous video page.
FLOPPY TO FLOPPY COPY
We will now see how to make a copy of one floppy disk on another .
Note that this procedure will automatically overwrite all the files present in the destination
floppy disk.
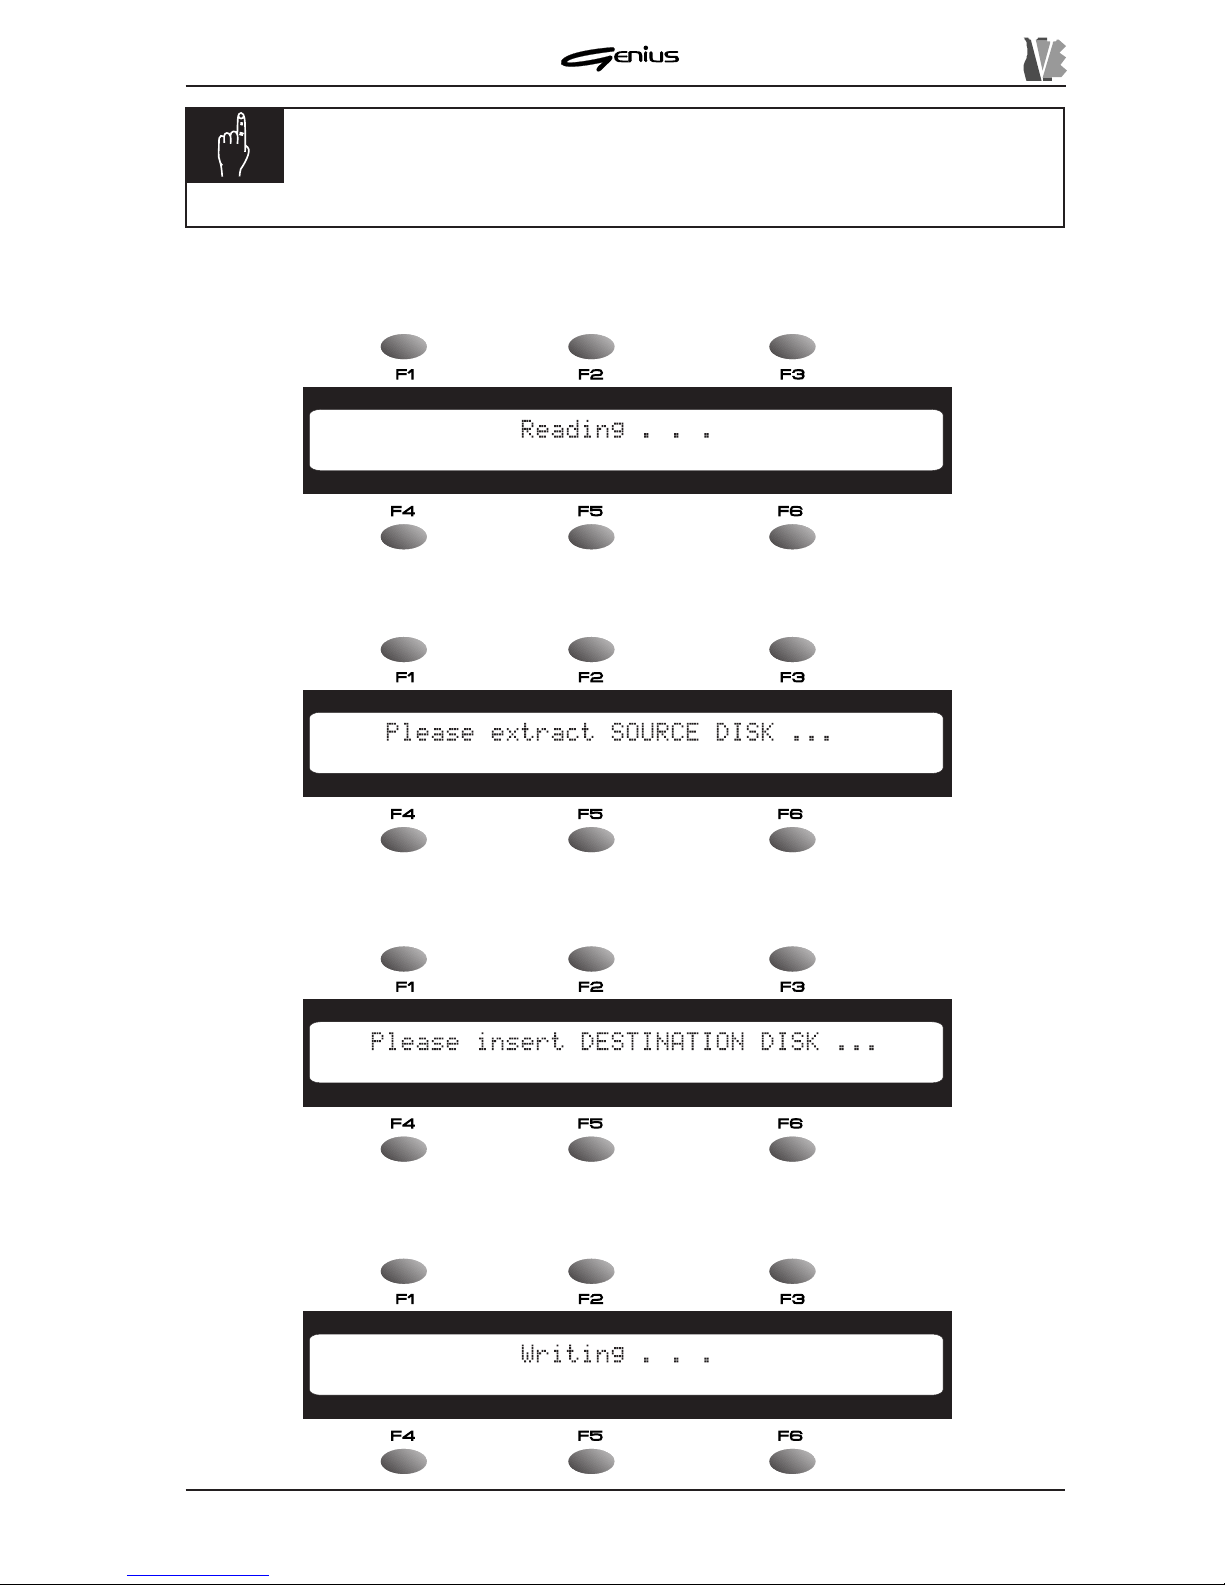
If [ENTER] is pressed from the video page described previously , the instrument will proceed
to read the disk inserted in the drive earlier.
If the drive is empty , the display will prompt you to insert the floppy disk:
126
Page 35
DATA FILER
N.B.:
if this video page continues to displayed even after a floppy disk has
been inserted in the drive, this means that the system does not recognise it
(the disk is not formatted or not valid).
After checking the source disk, the instrument will proceed to read the data:
When reading is complete, the system will prompt you to remove the source disk:
Remove the disk and wait for the prompt to insert the destination disk:
Once the disk has been inserted, the system will proceed to write the data:
127
Page 36
DATA FILER
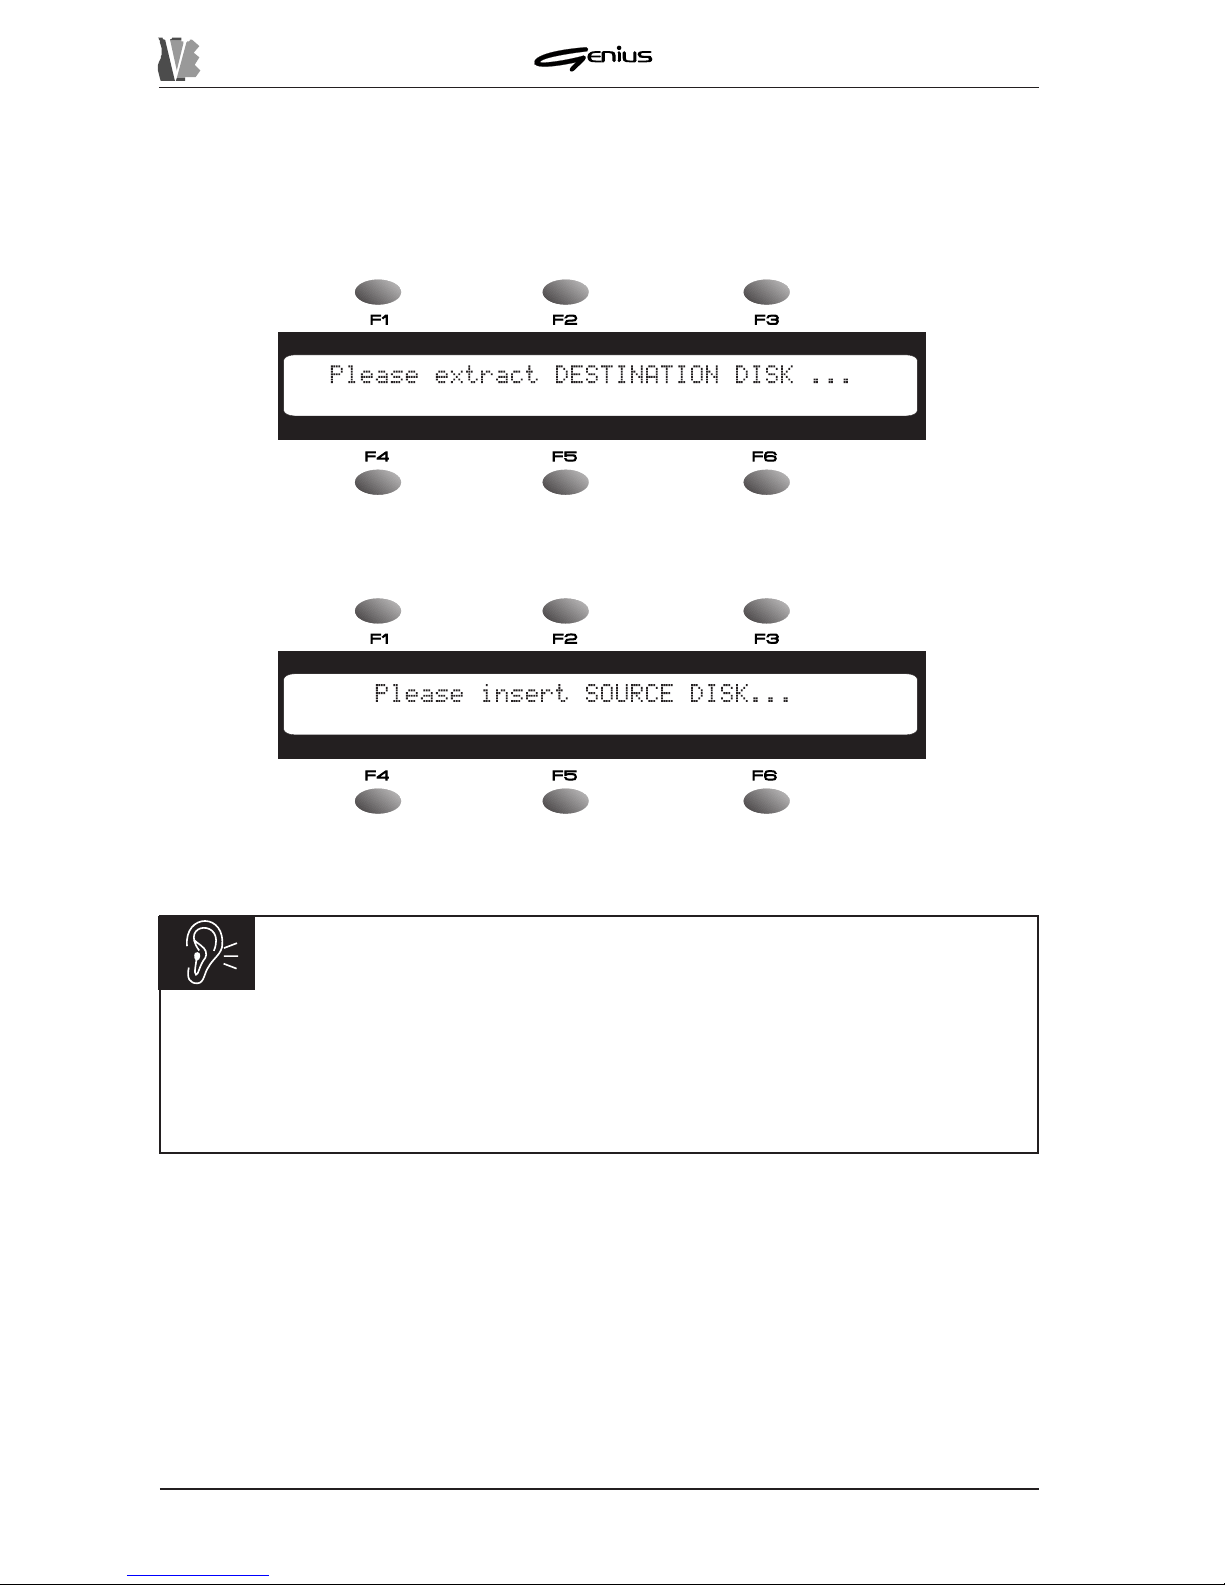
Since this is a physical copy , the whole of the disk is copied regardless of the quantity of data
memorised. This cannot be done in a single pass, so the instrument will request a number of
SOURCE – DESTINA TION cycles in order to complete the operation.
The instrument will therefore prompt you to remove the destination disk:
and re-insert the source disk:
Repeat the operations described until the display shows the message
COMPLETED
.
WARNING!
Users are urged to take special care over disk removal and insertion, which must only
be carried out when the instrument displays the relative prompt. This is because it takes
a short time for the drive heads to locate in a safe position. If the floppy disk is inserted
before the system prompt, remove it again and wait for the prompt.
During reading and/or writing [ESC] can be pressed to interrupt the copying operation.
The display will show the message ABORTING IN PROGRESS for the time taken to close
any files open.
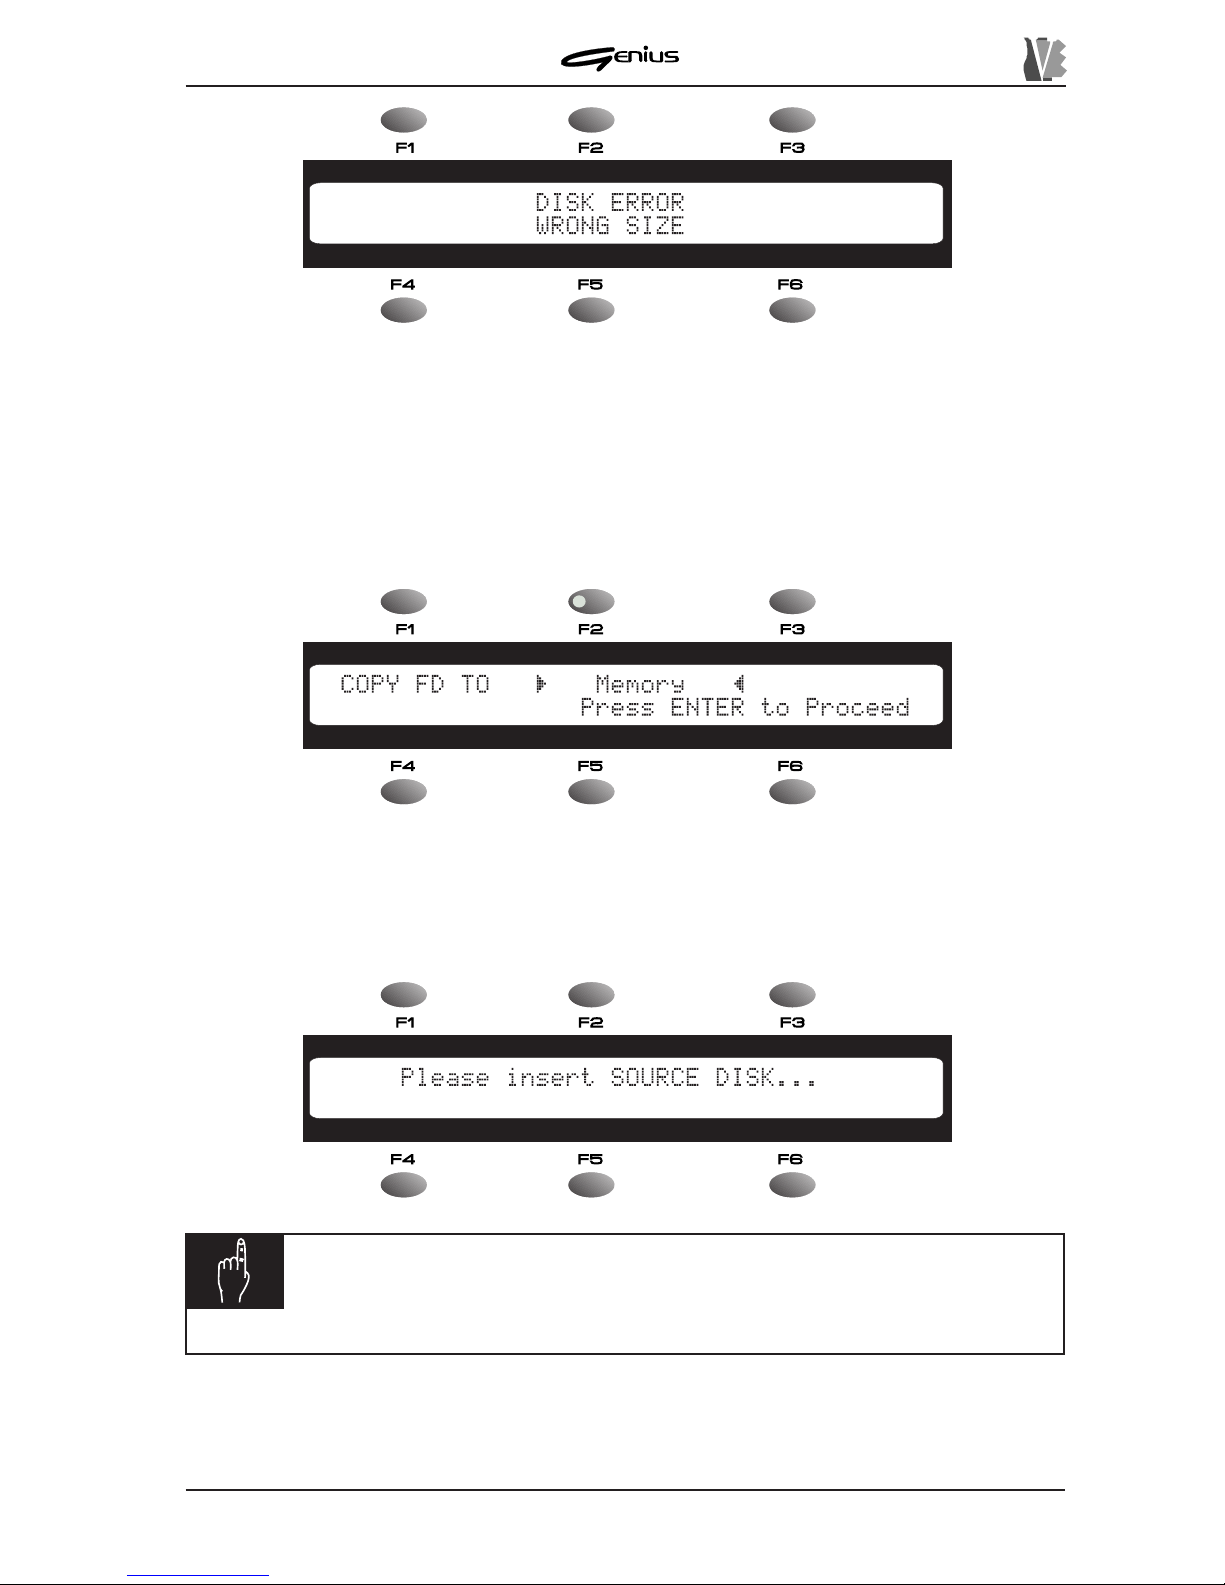
As we have said, in case of disk-to-disk copying, the system needs floppy disk of the same
capacity. If the destination is of different format from the source, the display will show the
following message:
128
Page 37
DATA FILER
FLOPPY TO MEMOR Y COPY
We have described how to copy one floppy disk onto another. We will now look at the
procedures used to make a copy of a floppy disk in the internal memory . Unlike the previous
type of copy procedure, in the FLOPPY TO MEMORY procedure only the files appropriate to
the instrument will be considered as valid for copying.
From the main video page of the DISK COPY function:
use the encoder to set the
COPY FD TO
field in the
Memory
mode.
If [ENTER] is pressed, the instrument will proceed with reading of the floppy disk inserted in
the drive whose data are to be copied; if no disk is inserted, the display will prompt you to
insert one in the drive:
N.B.:
if this video page continues to displayed even after a floppy disk has
been inserted in the drive, this means that the system does not recognise it
(the disk is not formatted or not valid).
Here again, pressing the [ESC] key will abort the procedure.
129
Page 38
DATA FILER
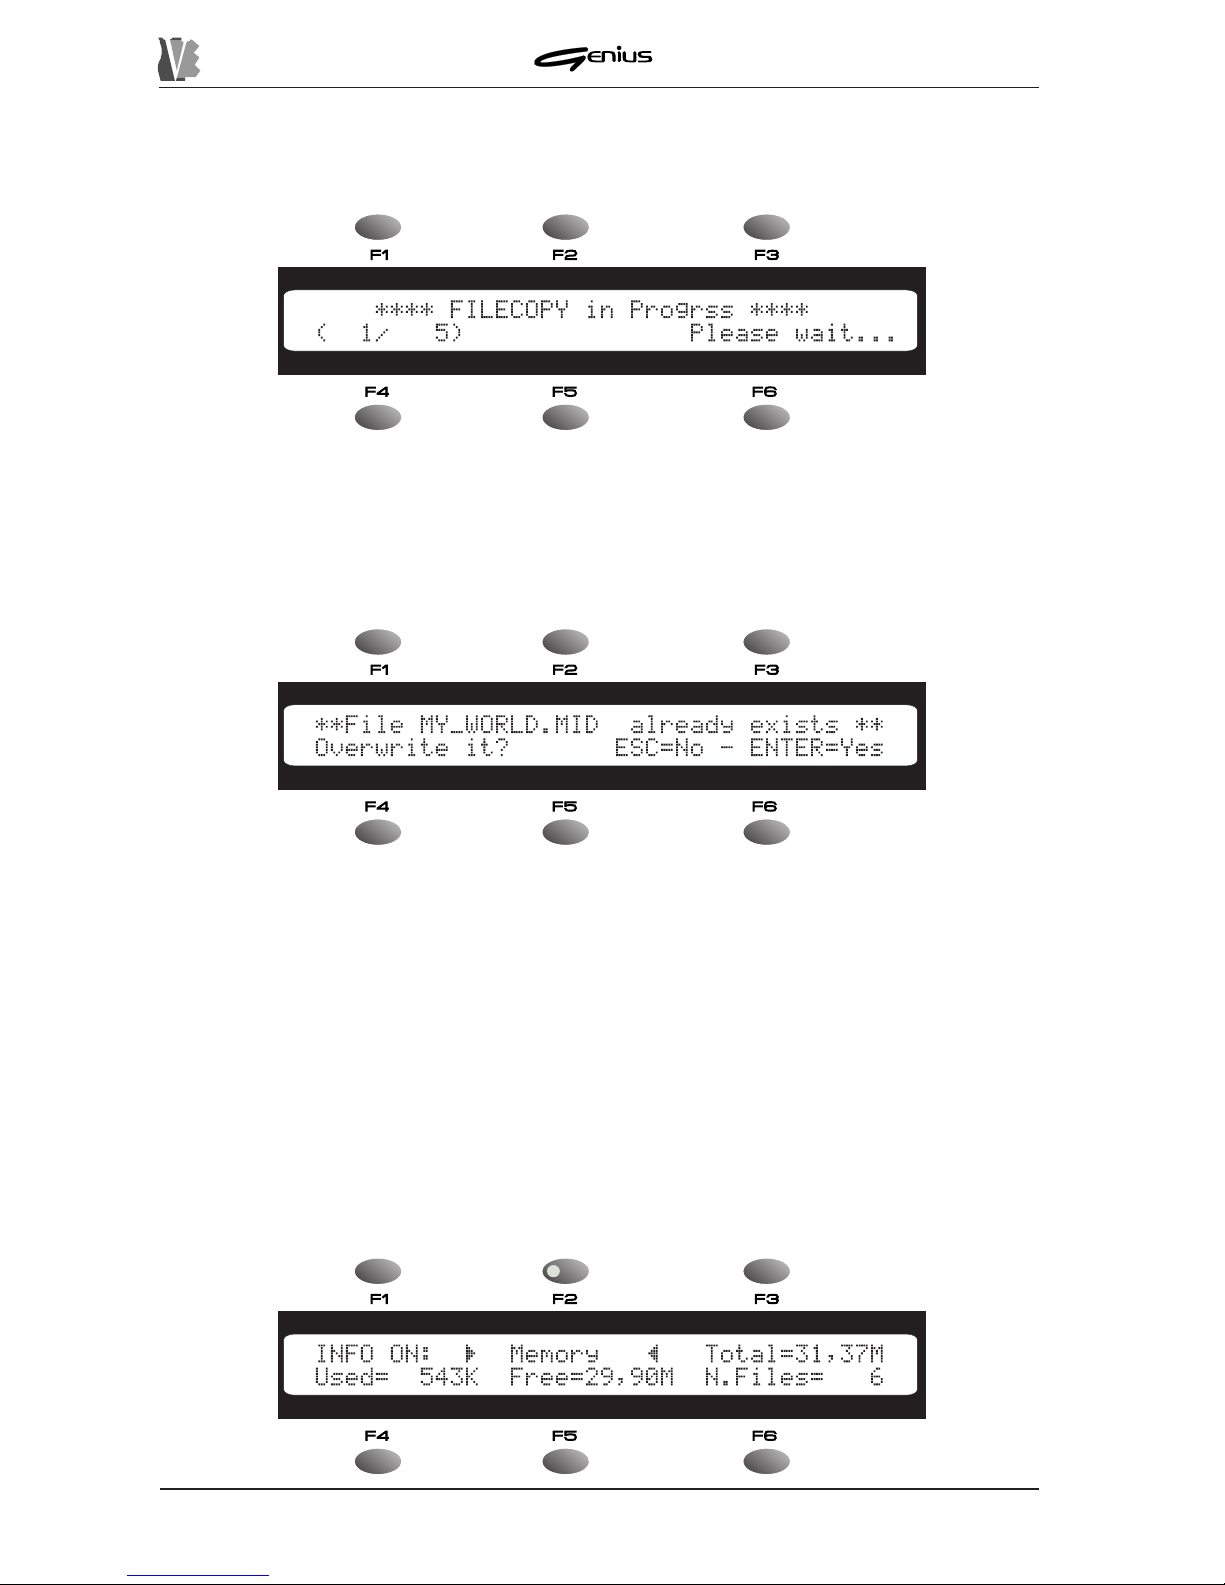
Once the source disk has been inserted, the Genius will proceed to read it, and will automatically
write the data it contains in the internal memory .
This procedure will be displayed by the following video page:
The
(nn/nn)
field displays the number of files copied in relation to the total number on the
disk.
For greater convenience, the Genius checks whether the file being copied is already present
in the internal memory . If this is the case, the display will show:
as a request whether to proceed with overwriting of the file: press [ENTER] to confirm or
[ESC] to ignore the file and continue with those which follow .
Note that no check on existence of the file is made in case of disk-to-disk copying. In this
case, any files already present are overwritten.
When the operation is complete, the message
COMPLETED
will appear on the display for a
few moments.
8.1.6 INFO
The INFO allows the user to display the main data relating to the internal memory or the floppy
disk inserted. This allows you to keep constantly up to date on the amount of memory occupied
and available, and the number of files memorised.
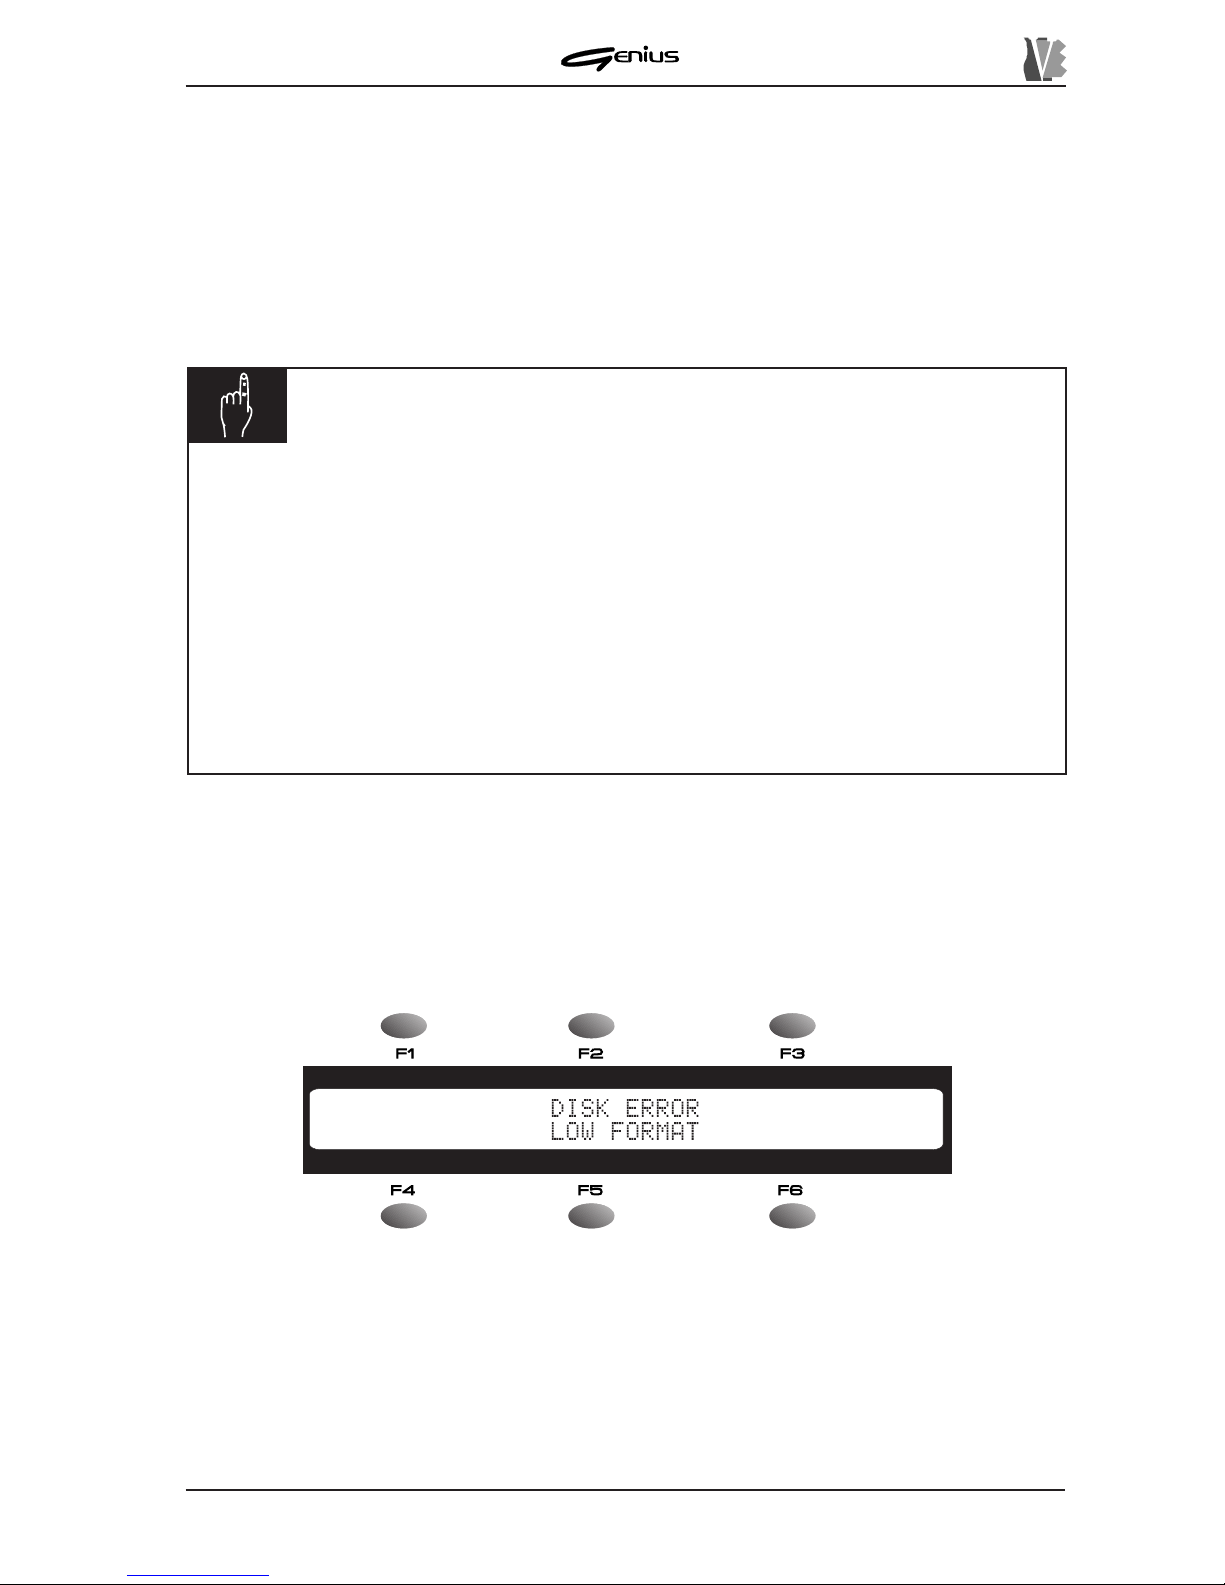
The INFO video page comprises:
130
Page 39
DATA FILER
The preselected field, next to the [F2] function key , allows you to use the encoder to select the
memory until about which you require information. The display parameters are:
o
Total
: displays the amount of user memory installed in the unit or the capacity of the
disk inserted.
o
Busy
: indicates the amount of memory occupied.
o
Free
: displays the amount of memory still available.
o
Files N
: indicates the number of files in the selected memory unit.
T o exit from this function, press the [ESC] key and the display will return to the main page of
the TOOLS section, DISK option.
8.1.7 ERROR MESSAGES – DISK SECTION
DISK ERROR – LOW FORMAT
The error occurs during formatting operations if the capacity of the disk inserted is not as
selected. The error is also displayed if the floppy disk contains serious errors in its magnetic
medium.
IMPORTANT NOTE
ü
If there is no floppy disk in the drive or the disk inserted is not recognised, the data
relating to this peripheral will be set with the value 0K.
ü
The data relating to the total capacity of the floppy disk are displayed as a real value
calculated with a multiplication factor of 1KByte = 1024 Bytes. Therefore:
1) A 720KByte floppy disk formatted in MS-DOS® actually contains 730,112
Bytes, or 713KBytes.
2) A 1.44MByte floppy disk formatted in MS-DOS® has a real capacity of
1.38MBytes.
ü
The data relating to the total internal memory differ from that installed by the space
occupied by the operating system (about 700KBytes).
131
Page 40
DATA FILER
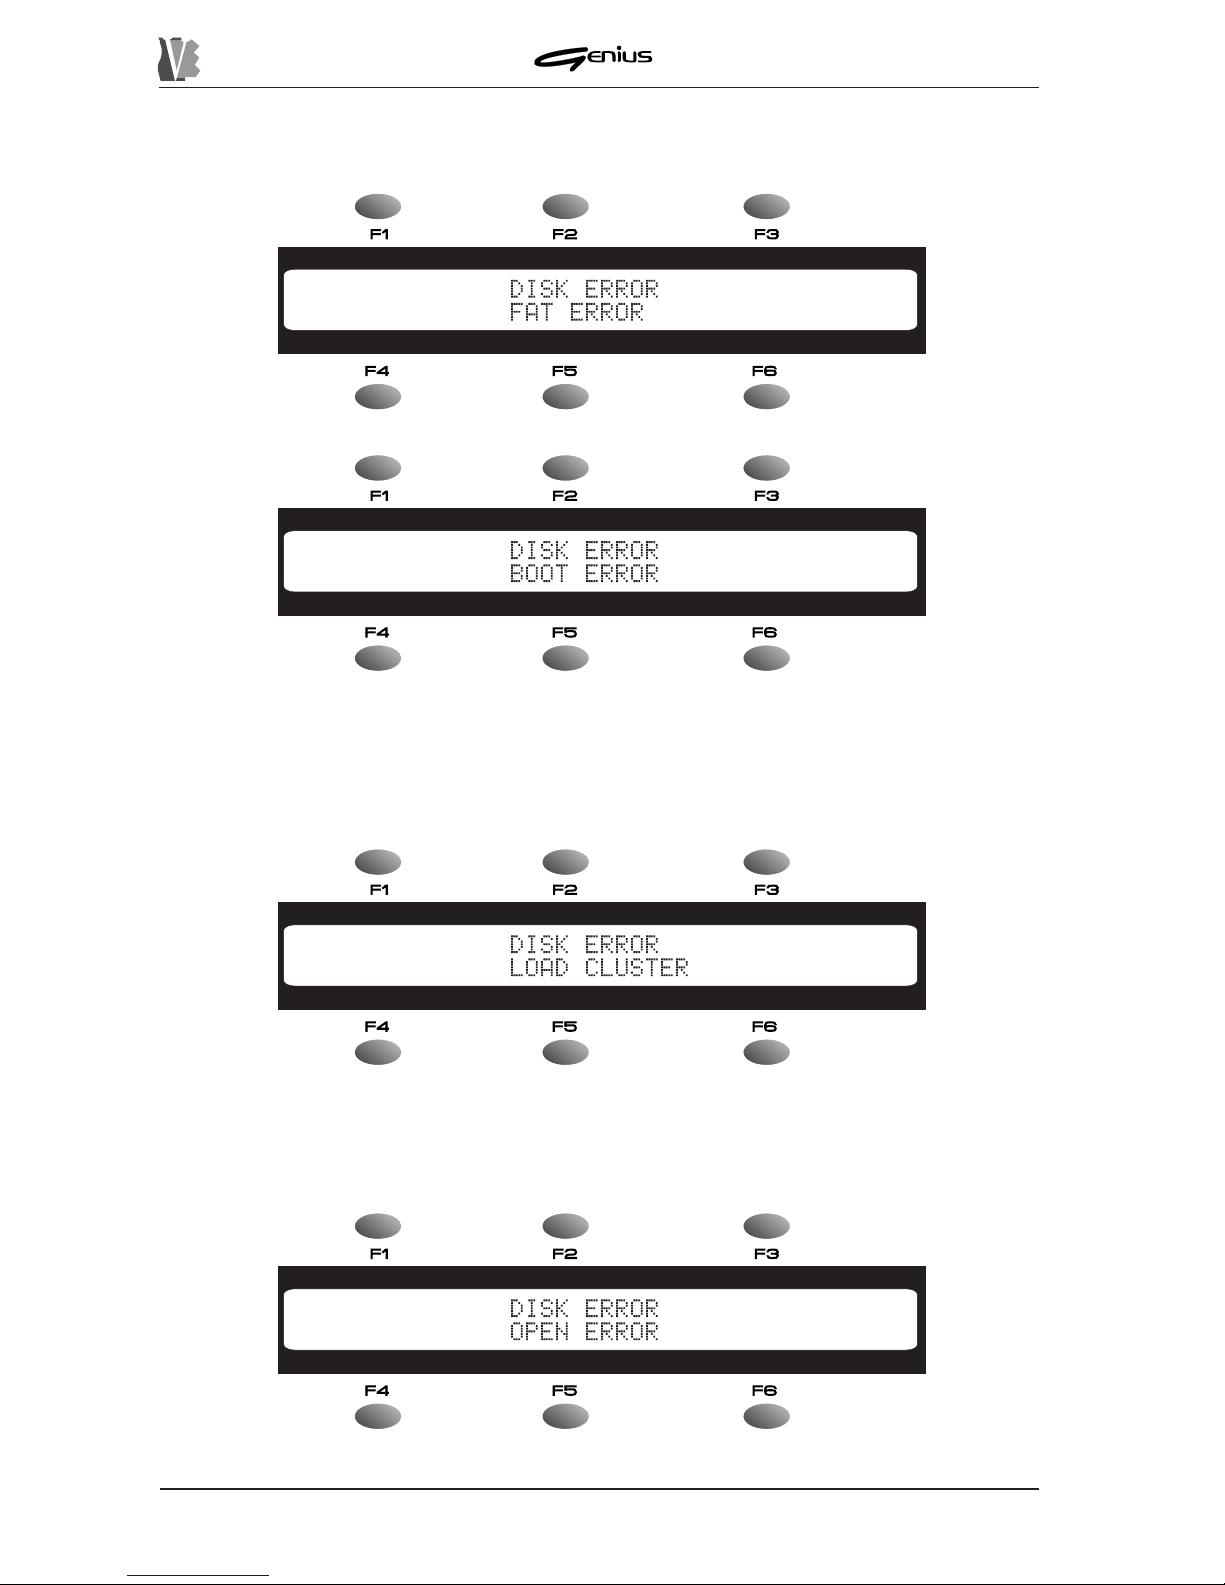
DISK ERROR – FAT ERROR
DISK ERROR – BOOT ERROR
The magnetic medium of the disk is seriously damaged in the system areas. Replace the
floppy disk.
DISK ERROR – LOAD CLUSTER
A reading error has occurred due to a damaged cluster on the disk. The file is not legible.
DISK ERROR – OPEN ERROR
132
Page 41
DATA FILER
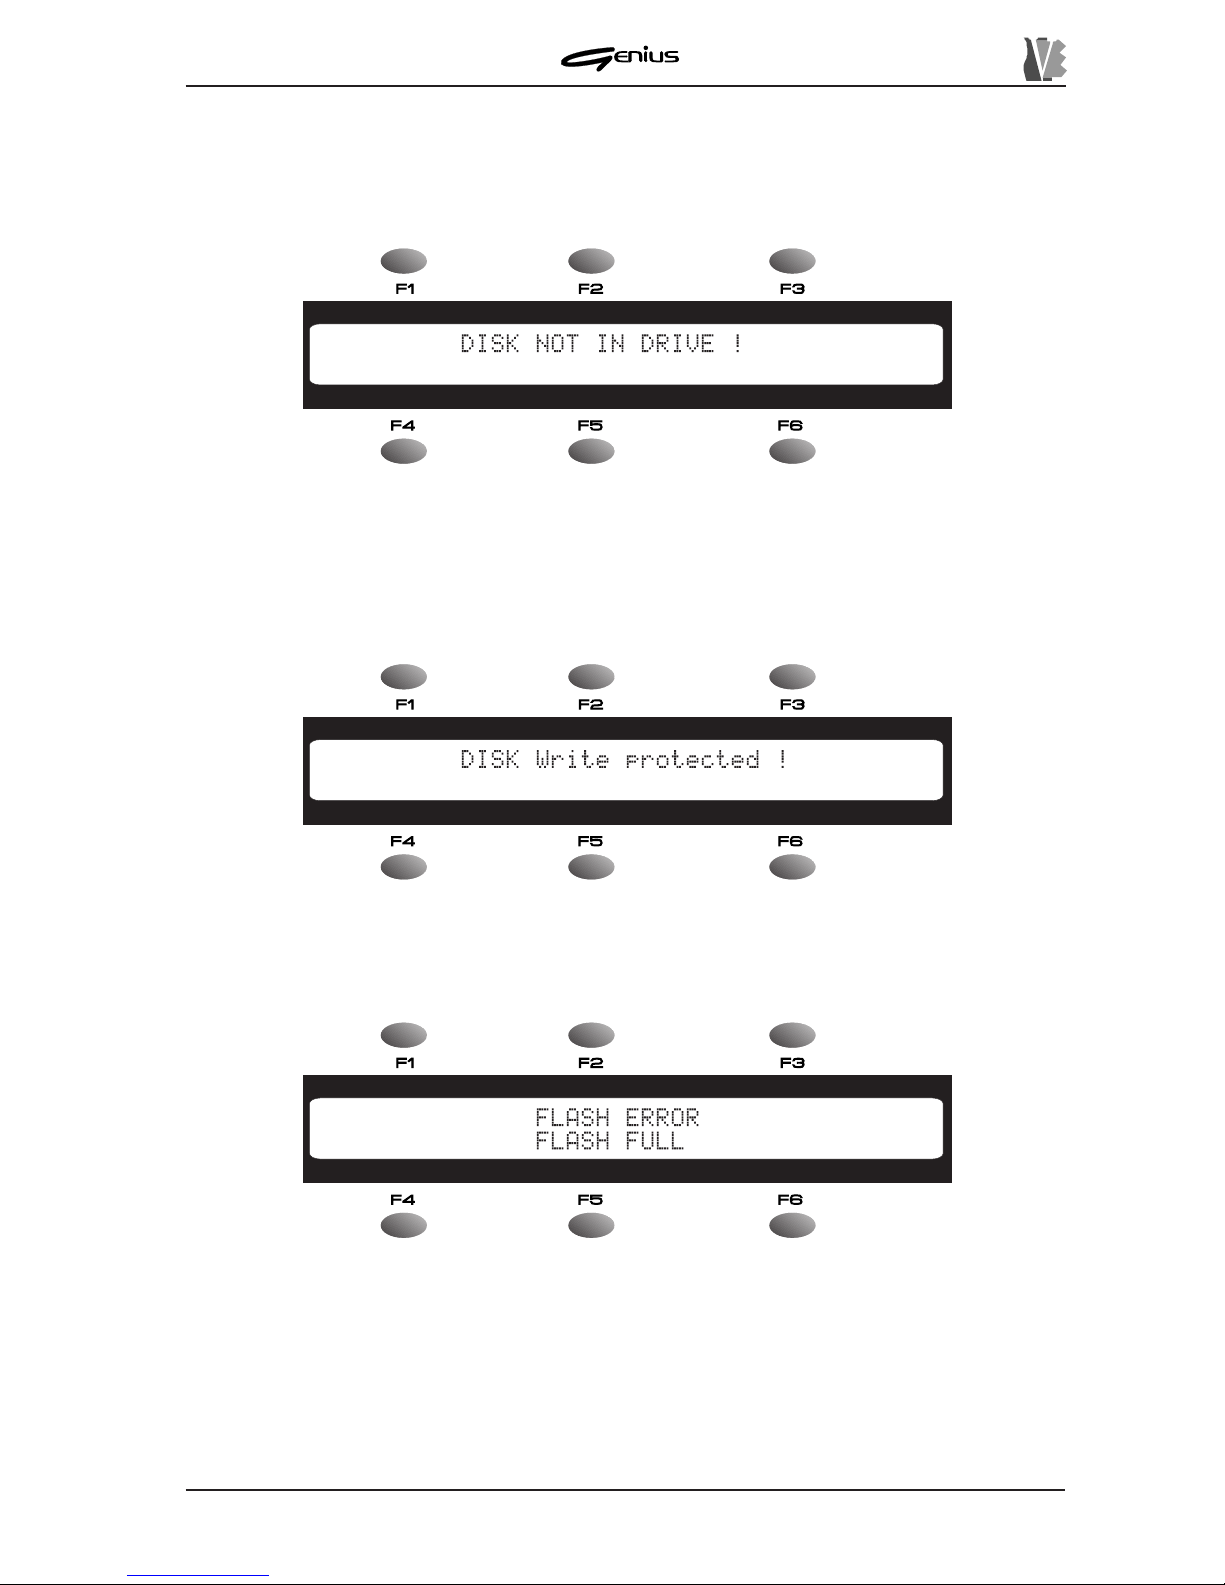
A serious error has occurred during reading/writing on the disk. Very probably, the disk’s
magnetic medium is damaged.
DISK NOT IN DRIVE!
Y ou have attempted a floppy disk operation with no disk inserted. If the disk is inserted, wait
a few moments (to allow the instrument to acquire the floppy disk) and then retry the procedure.
Also try removing and re-inserting the disk.
DISK WRITE PROTECTED!
The floppy inserted has write protection: extract the disk and remove the protection.
FLASH ERROR – FLASH FULL
There is not enough room in the memory to save any more files. Press [ESC] to return to the
previous video page.
Then free space in the internal memory (see point 8.2.2 - Delete Files and point 8.4.7 –
Memory Compact).
133
Page 42
DATA FILER
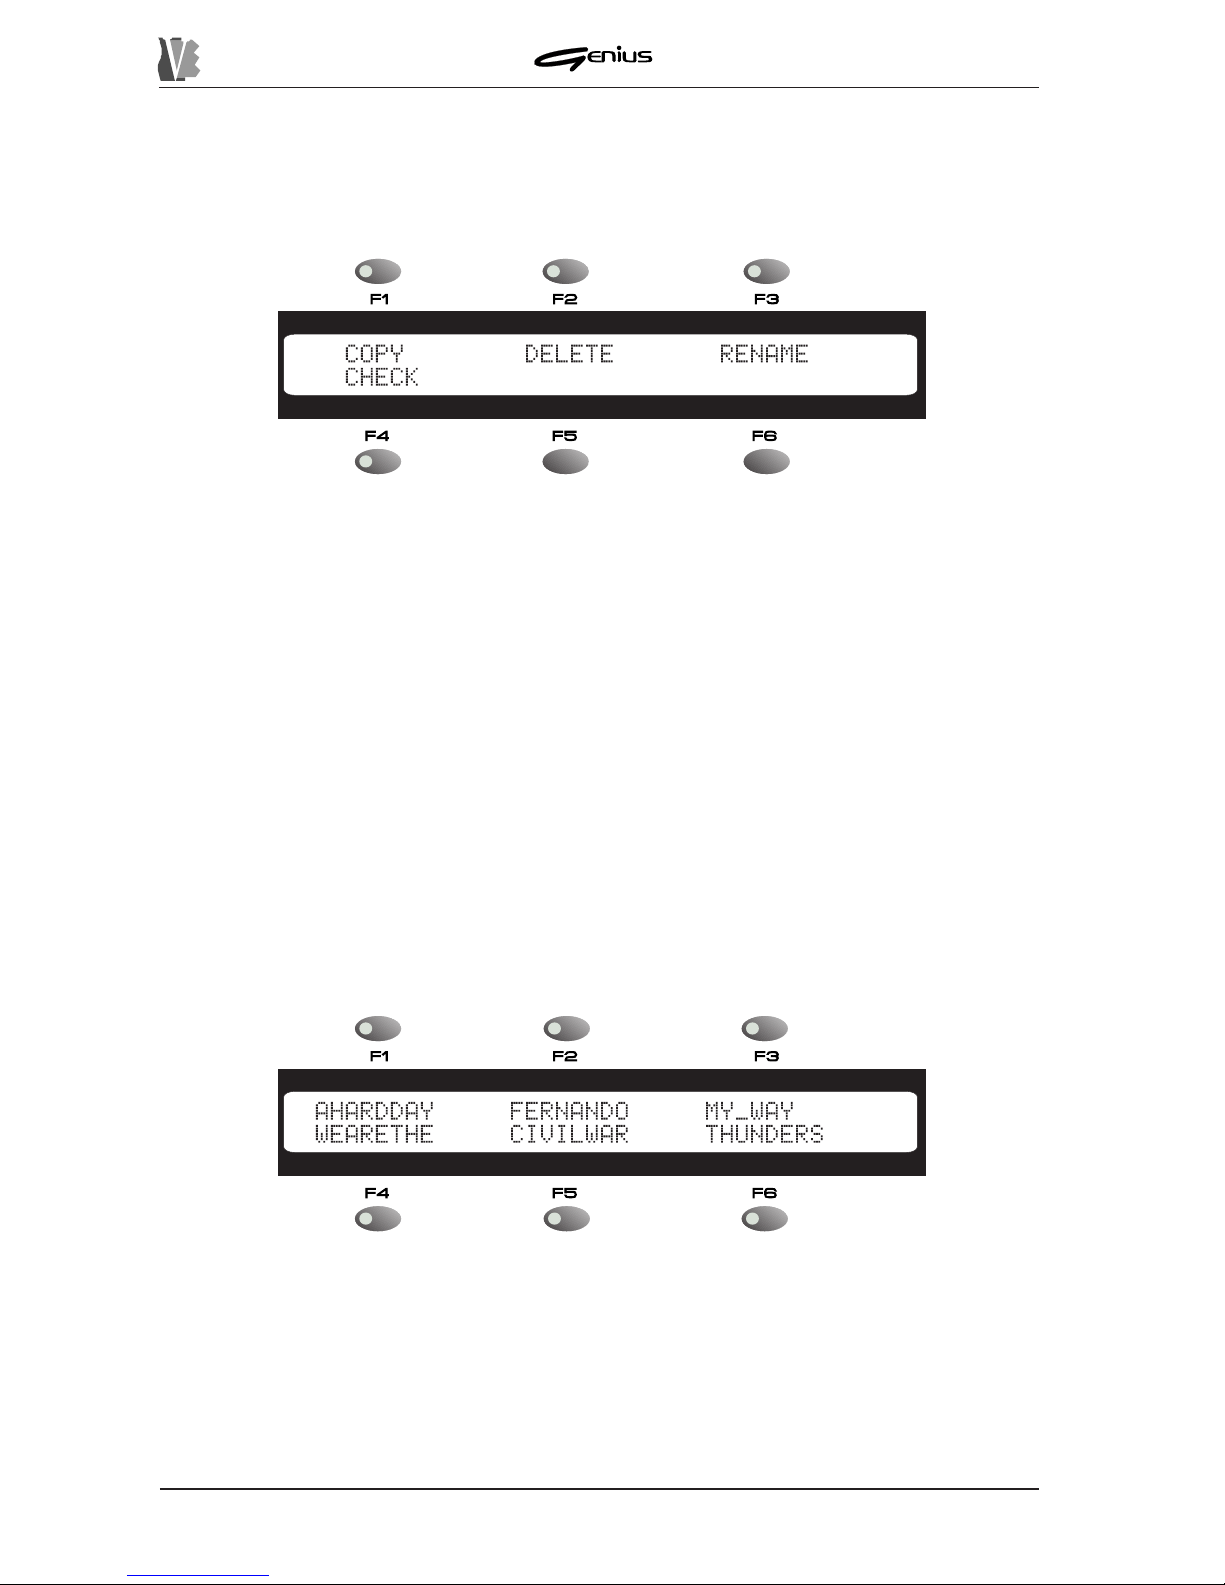
8.2 FILES
Pressing the [FILES] key of the TOOLS section will give access to the section for management
of the individual files. The display will show the following video page:
The procedures relating to the files are:
o
COPY
: can be selected using the [F1] function key, procedure for copying given files.
o
DELETE
: [F2], deletion of specific files.
o
RENAME
: [F3], enables the procedure for renaming individual files.
o
CHECK
: [F4], procedure for displaying and checking the main characteristics of the
selected file.
8.2.1 COPY (FILE)
The COPY function allows one or more files to be copied from one memory unit to another.
For example, you can copy a file (or more than one) saved in the internal memory onto a
floppy disk, or files resident in one floppy disk to another , etc.
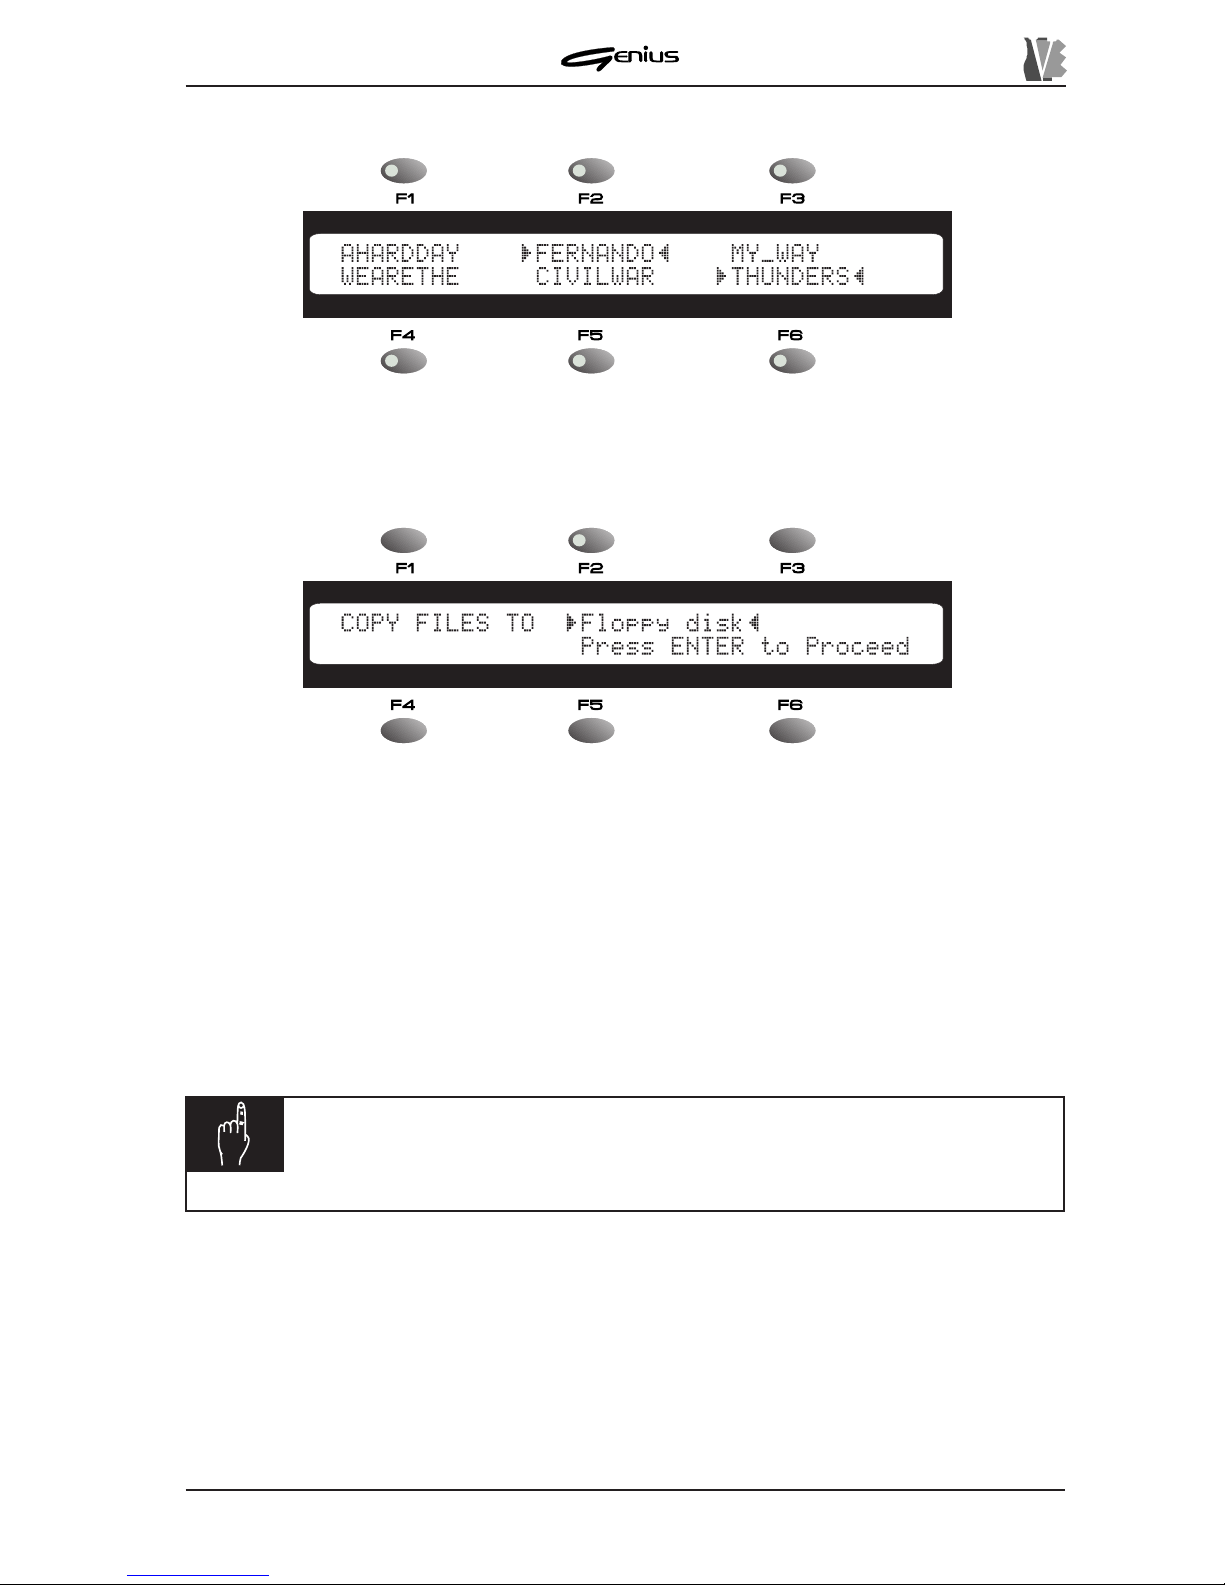
From the FILES menu, press the [F1] function key. The Genius will enable the function
concerned and display the DIRECTORY video page (described in point 5.5) relating to the
unit currently selected and/or the unit selected by means of the keys of the front panel SOURCE
section.
Y ou can also use the [SONG] and [LIST] keys of the MODE section to select the types of files
of the same names (the LIST files are discussed in section 10),
Y ou can use the [PREV .] and [NEXT] buttons to scroll through the pages of the file if there are
more than 6 pages.
Y ou can now use the function keys associated to the files to select the ones you wish to copy .
When the file is selected, it will be identified by the
and ª markers at each end.
134
Page 43
DATA FILER
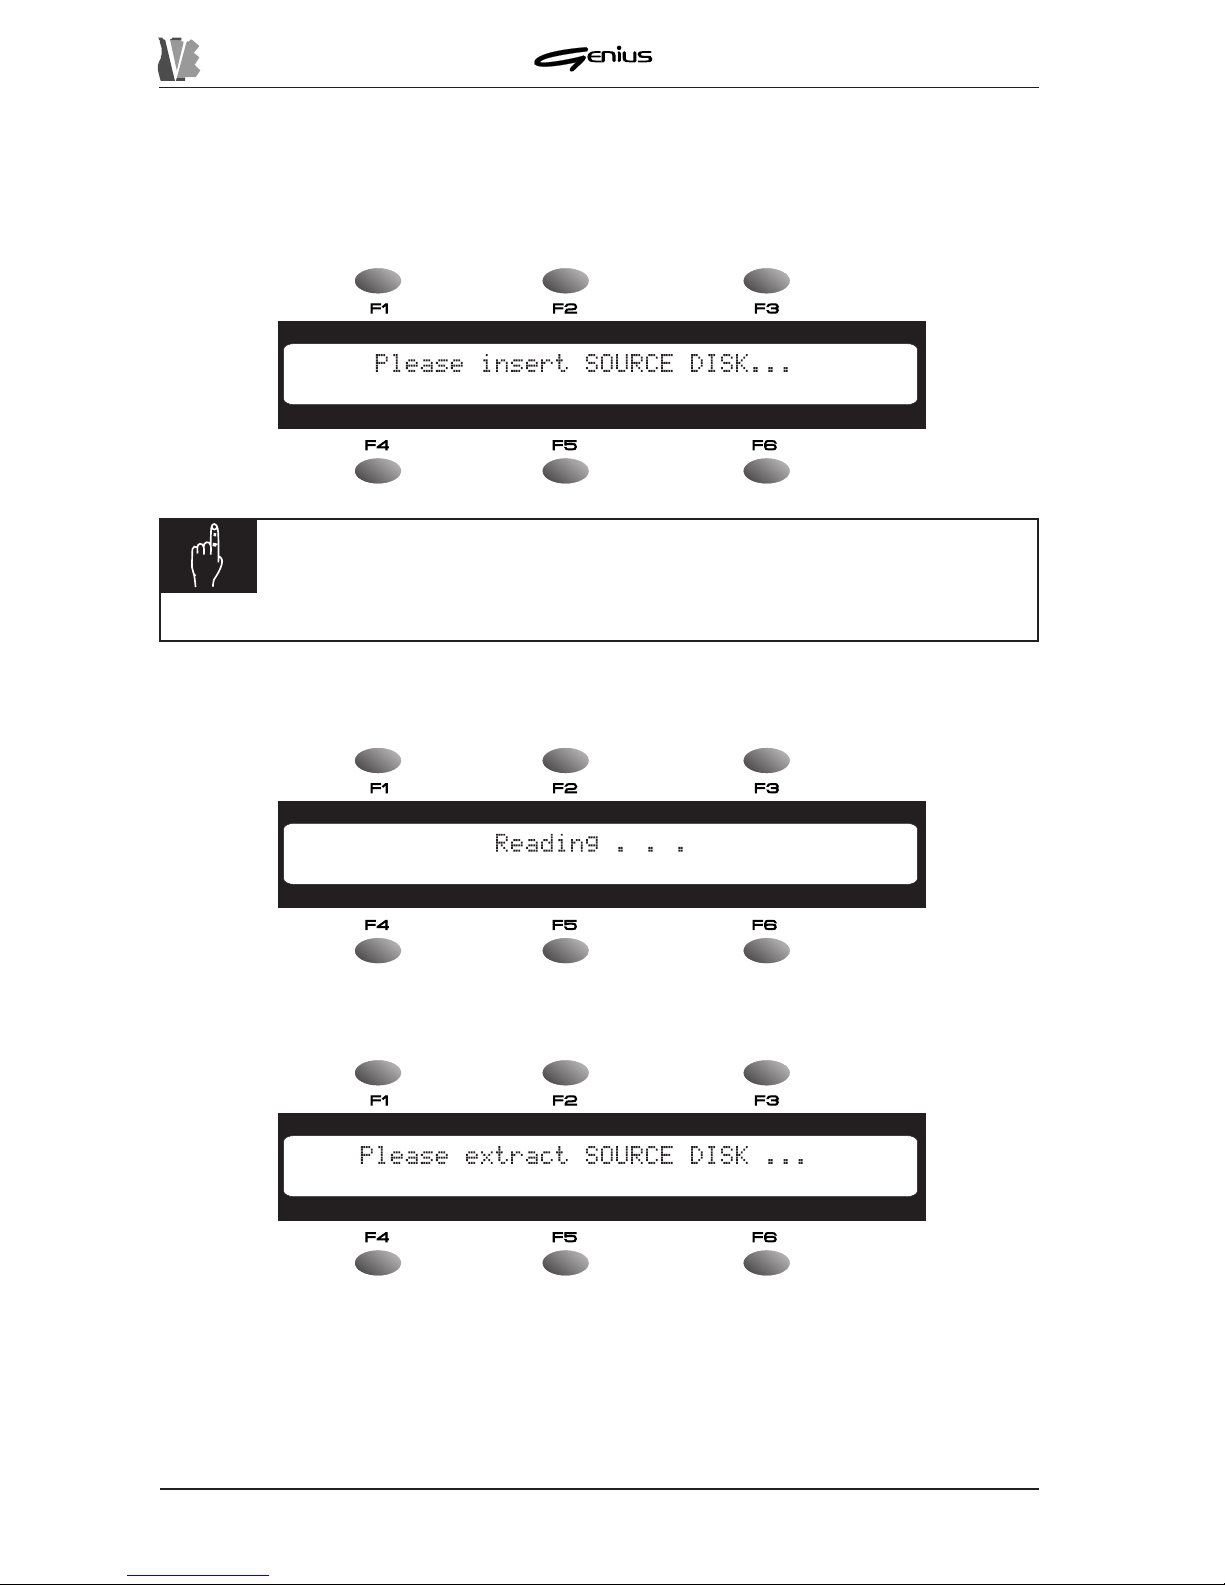
After selecting the files you wish to copy , press the [ENTER] key to start the copying procedure.
The display will show:
Y ou can use the
COPY FILES TO
field to select the destination memory unit, i.e. where the
selected files will be memorised.
If you use the encoder to select the
Floppy Disk
option, you will save the selected files
on a floppy disk inserted in the drive; if you opt for the
Memory
option you will direct the files
concerned to the internal memory .
As the display states, pressing the [ENTER] key will start the copying procedure, while if the
selected songs are not really the ones you require, pressing the [ESC] key will abort the
operation in progress and the display will return to the DIRECTORY video pages.
135
T o deselect the file, press the relative function key again.
NOTE:
it is not possible to copy files from memory to memory. If the unit
selected as source is
Memory
the only option possible in this field is
Floppy
Disk
.
Page 44
DATA FILER
COPYING FILES FLOPPY TO FLOPPY
If the files to be copied are resident on a floppy disk and the
Floppy Disk
option has
been selected, pressing [ENTER] from the video page described previously will start reading
of the floppy inserted in the drive.
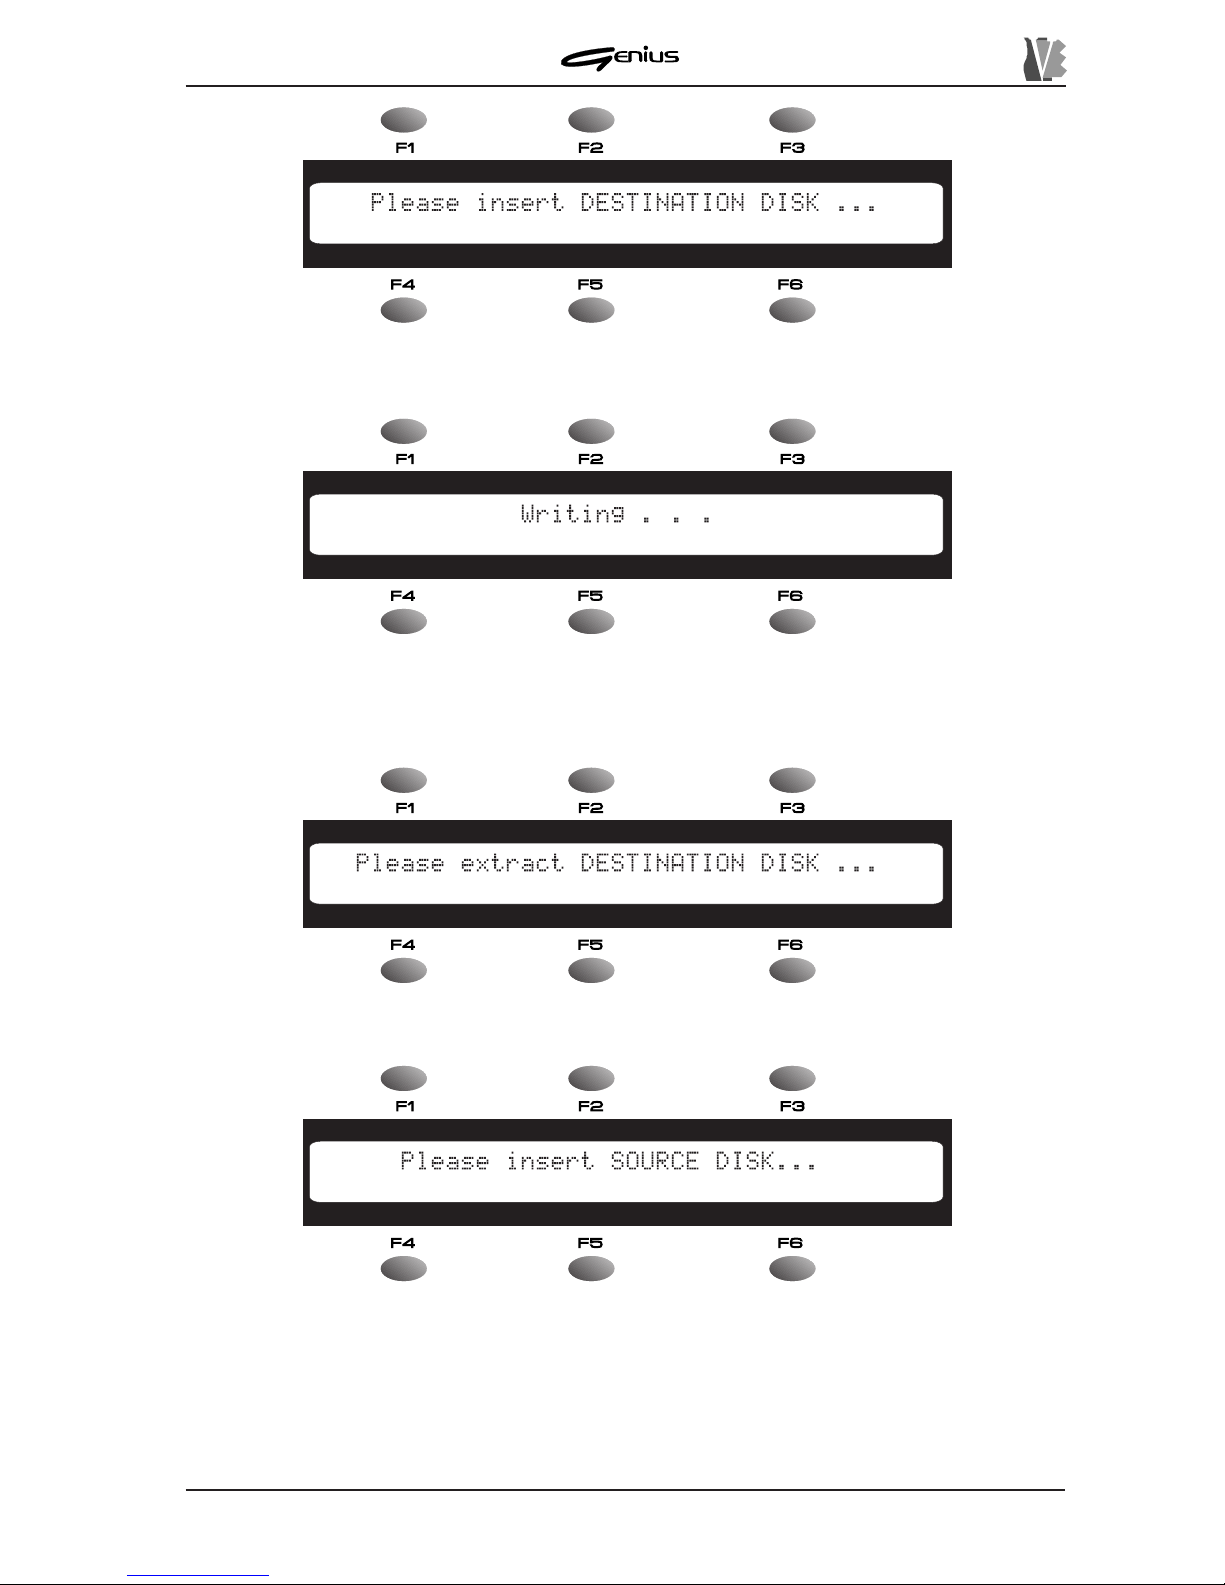
If the drive is empty , the display will prompt you to insert the disk:
N.B.:
if this video page continues to displayed even after a floppy disk has
been inserted in the drive, this means that the system does not recognise it
(the disk is not formatted or not valid).
After checking the source disk, the instrument will proceed to read the data:
When reading is complete, the system will prompt you to remove the source disk:
Remove the disk and wait for the prompt to insert the destination disk.
136
Page 45
DATA FILER
Once the disk has been inserted, the system will proceed to write the data:
Depending on the files selected, the instrument may require more than one SOURCE –
DESTINA TION cycle to complete the operation.
Extract the destination disk:
and re-insert the source disk:
whenever the instrument gives the relative prompt.
When the operation is complete, the message
COMPLETED
will appear on the display for a
few moments.
Press [ESC] to return to display of the FILES menu.
137
Page 46
DATA FILER
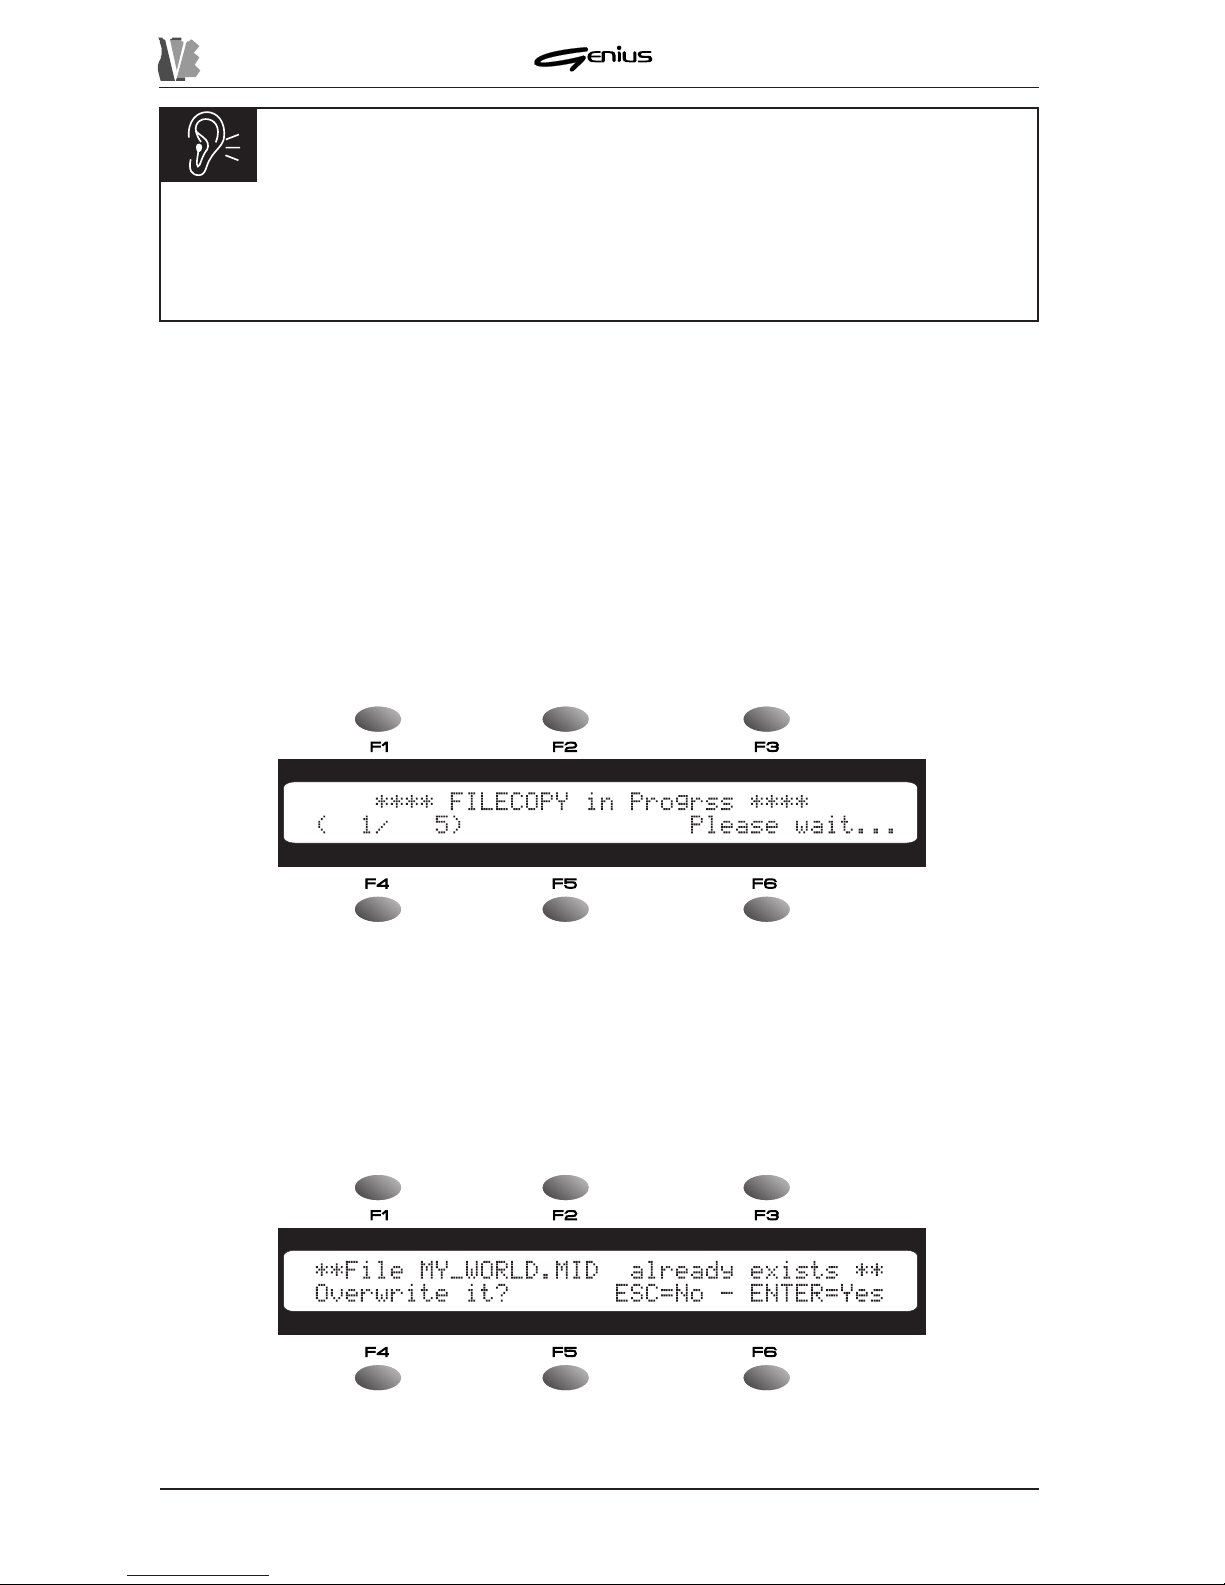
During reading and/or writing [ESC] can be pressed to interrupt the copying operation. The
display will show the message ABORTING IN PROGRESS for the time taken to close any
files open.
During disk to disk copying of files, if the file is already present in the destination unit, it will be
overwritten.
COPYING FILES FLOPPY TO MEMOR Y – MEMORY TO FLOPPY
If the unit of destination of the files selected for copying is not the same as the source unit
(copying files from floppy disk to memory or memory to floppy disk, when [ENTER] is pressed
the instrument will automatically proceed with the reading and writing operations; the display
will show:
Here again, pressing the [ESC] key will abort the procedure.
The
(nn/nn)
field displays the number of files copied in relation to the total number selected.
For greater convenience, the Genius checks whether the file being copied is already present
in the destination. If this is the case, the display will show:
CAUTION!
Users are urged to take special care over disk removal and insertion, which must only
be carried out when the instrument displays the relative prompt.
This is because it takes a short time for the drive heads to locate in a safe position. If the
floppy disk is inserted before the system prompt, remove it again and wait for the prompt.
138
as a request whether to proceed with overwriting of the file: press [ENTER] to confirm or
[ESC] to ignore the file and continue with those which follow .
Page 47
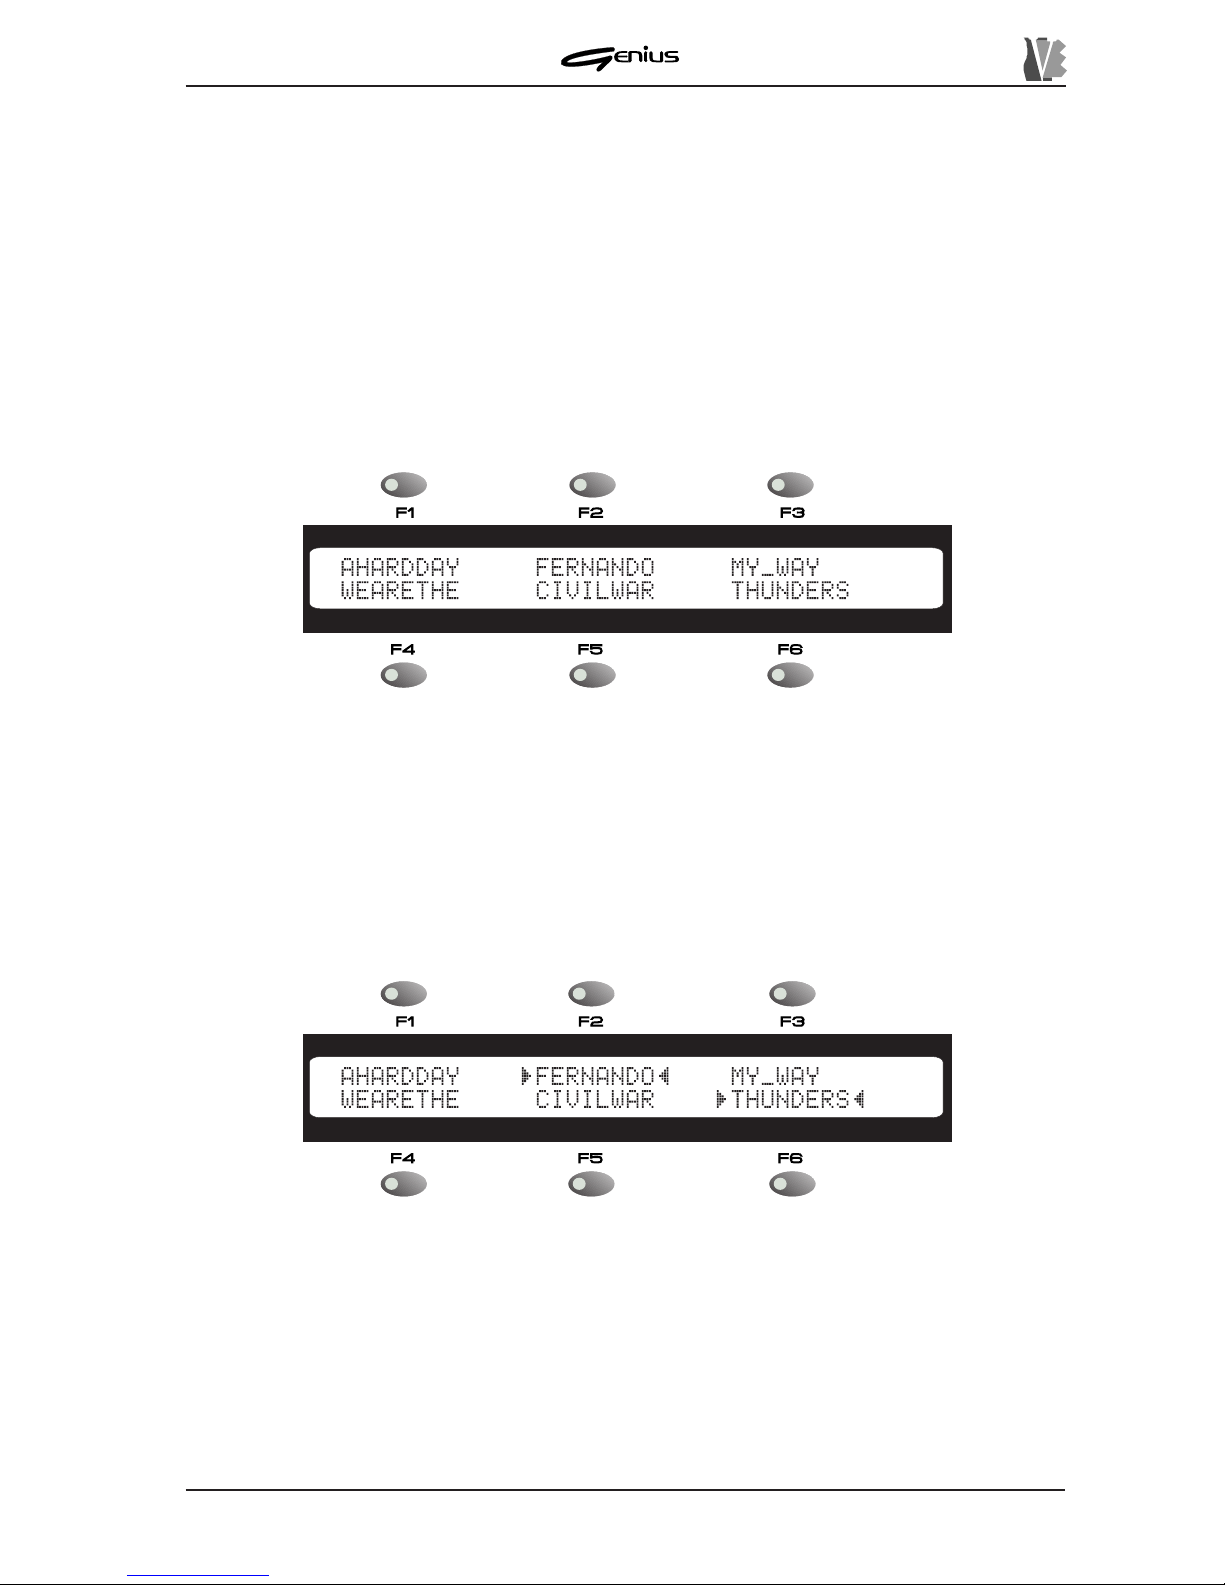
DATA FILER
Note that no check on existence of the file is made in case of disk-to-disk copying. In this
case, any files already present are overwritten.
When the operation is complete, the message
COMPLETED
will appear on the display for a
few moments.
Press [ESC] to return to display of the FILES menu.
8.2.2 DELETE
The DELETE function allows you to delete one or more files present in a given memory unit.
From the FILES menu, press the [F2] function key to select the
DELETE
field. The display
will show the DIRECTORY video page, which will display the files in the memory unit required,
selected using the SOURCE keys on the front panel:
Remember that the [DISK] button will not be active if there is no floppy disk in the drive.
Y ou can use the [SONG] and [LIST] keys of the MODE section to display the two types of files,
and the [PREV .] and [NEXT] buttons to scroll through the pages containing the files saved in
the selected memory unit.
Y ou can now use the function keys associated to the files to select the ones you wish to copy .
When the file is selected, it will be identified by the
and ª markers at each end. T o deselect
the file, press the relative function key again.
There is no limit on the number of files which can be selected; moreover, once you have
made the selections you require in one page, you will be able to display additional pages and
make further selections without aborting those you have already made.
After selecting the files you wish to delete, press the [ENTER] key to start the deletion
procedure. T o abort the operation, press the [ESC] key.
139
Page 48
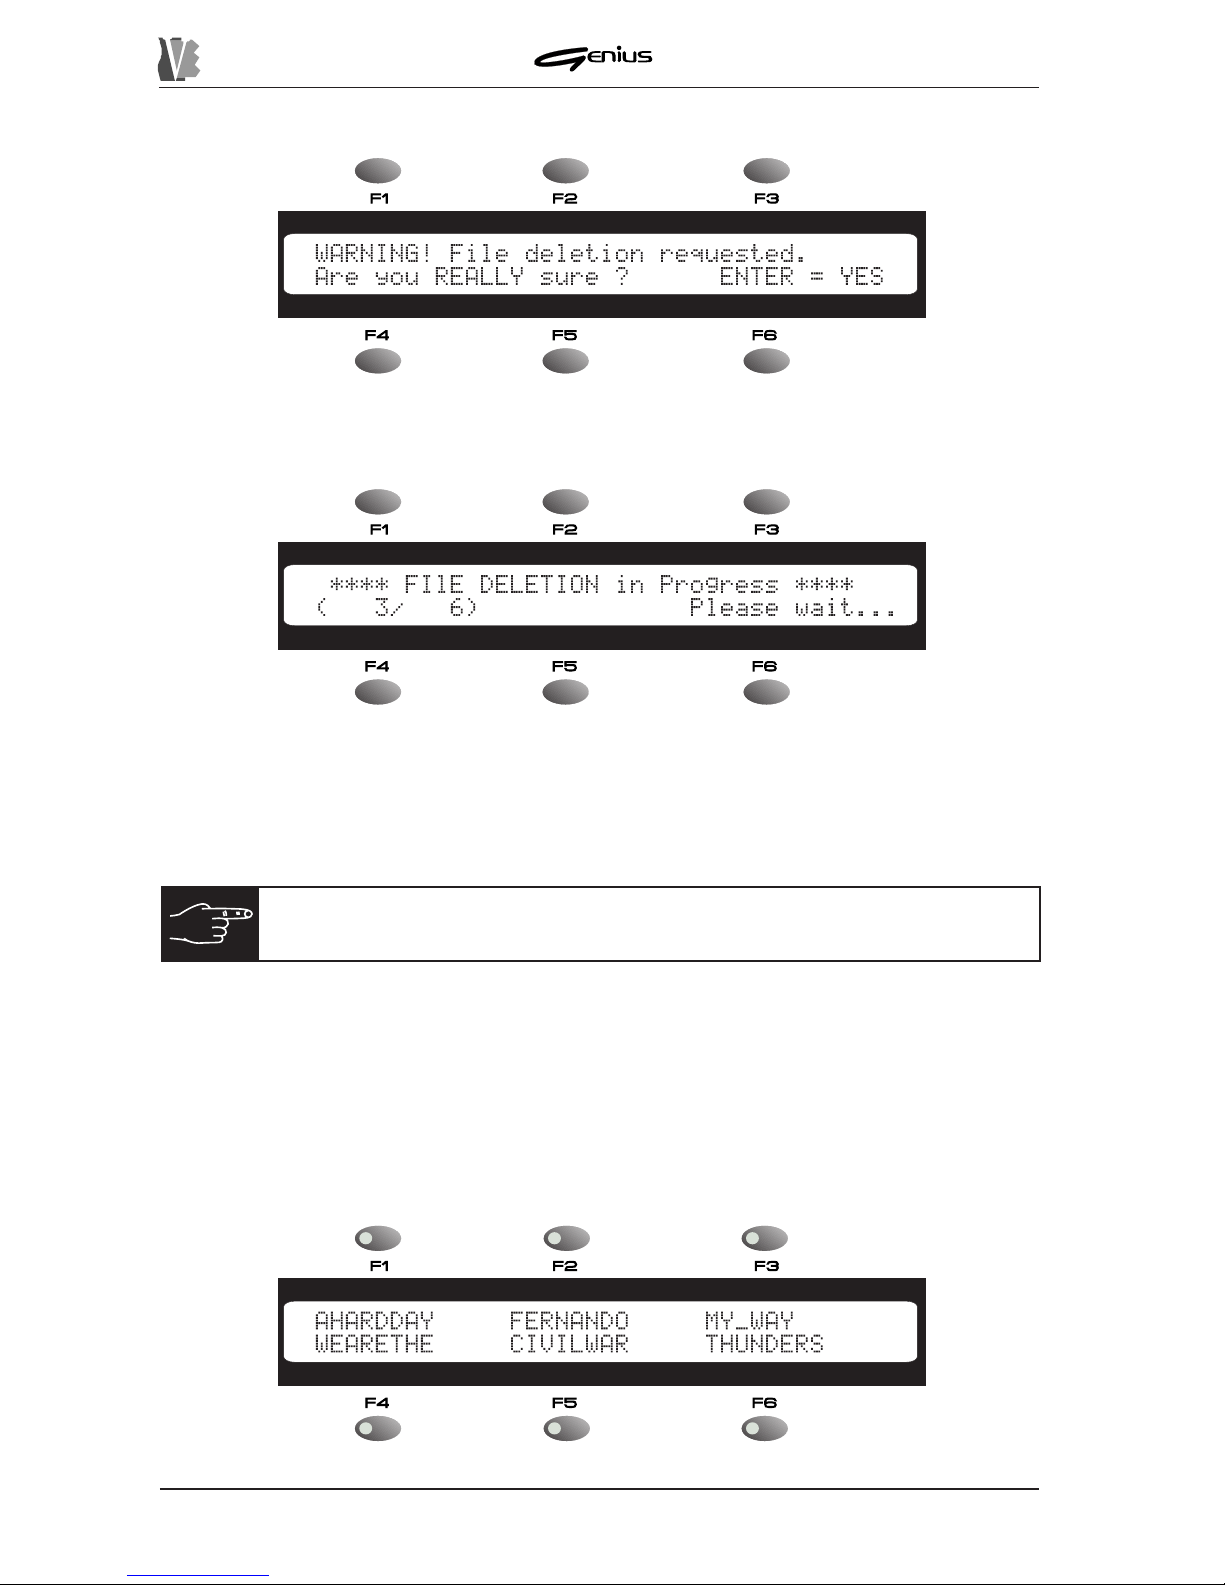
DATA FILER
Once [ENTER] has been pressed, the display will show the following video page.
in which you can confirm deletion of the files already selected.
If the operation is confirmed, for a few moments the display will show:
The
(nn/nn)
option displays the number of files deleted in relation to the total number
selected for deletion. When the operation is complete, the display will show the
COMPLETED
message for a few moments.
Press [ESC] to return to display of the FILES menu.
8.2.3 RENAME
Another operation possible on individual files is RENAME, which can be used to change the
name of files saved on a floppy disk or in the internal memory .
From the FILES menu, use the [F3] function key to select the RENAME function. The display
will show the DIRECTORY video page:
140
NOTE:
also refer to section 8.4.6 covering Memory Compact for the
procedures for updating the space available in the internal flash memory
.
Page 49
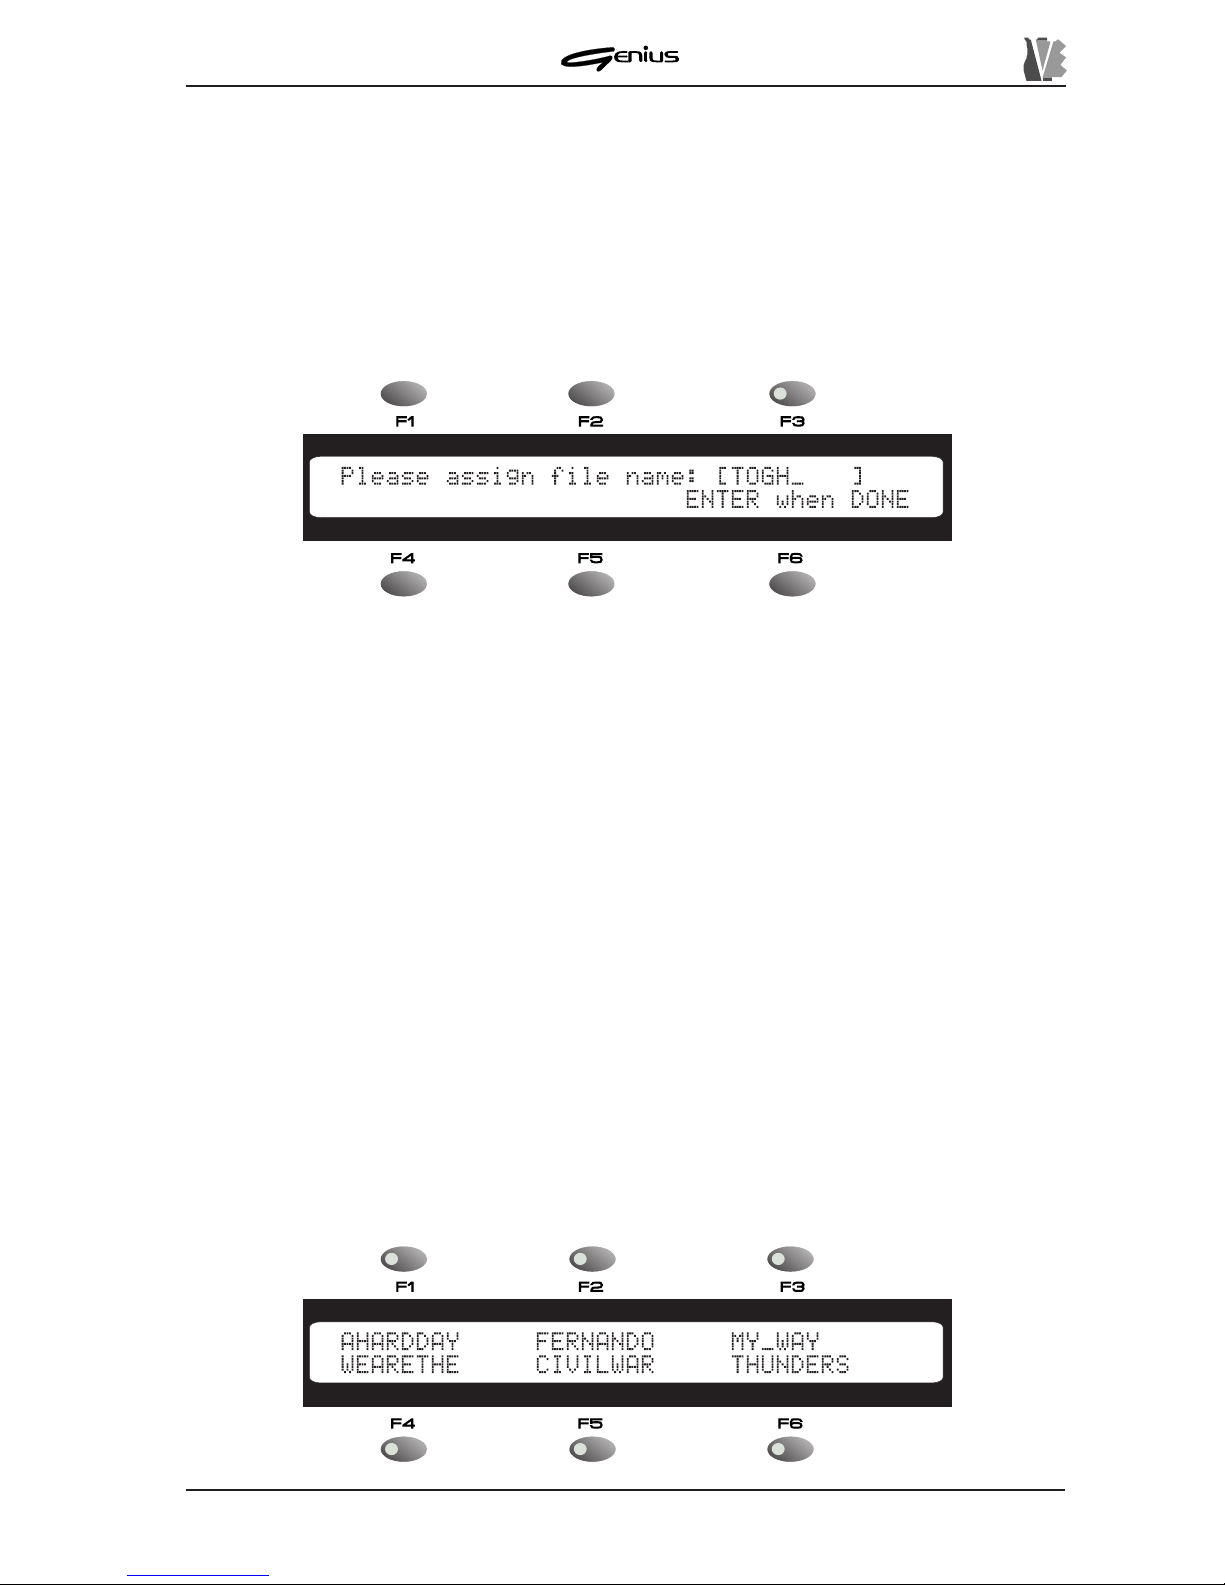
DATA FILER
Y ou can use the keys in the SOURCE section of the front panel to select the memory unit for
which you wish to display the list of files present.
The [SONG] and [LIST] keys in the front panel MODE selection allow you to display the two
types of files, while you can use the [PREV .] and [NEXT] keys to display the pages containing
the files saved in the selected memory unit.
Otherwise, pressing the [ESC] key will abort the operation.
You can now use the function keys to select the file you wish to rename, and immediately
display the video page:
On the display , the current name appears in the field between square brackets. Then use the
encoder to select the letter required and the [PREV .] and [NEXT] keys to move around inside
the field. Bear in mind that the name cannot contain blank spaces; if necessary , use the “_”
(underscore) symbol.
After building up the new name, use the [ENTER] key to confirm the operation, or press the
[ESC] key to abort the current function.
When the operation is complete, the display will show the
COMPLETED
message for a few
moments.
Press [ESC] to return to display of the FILES menu.
If a file in the internal memory is renamed, it will be automatically moved to the end of the list.
If necessary , carry out the Sort procedures (point 8.1.3) to rearrange the files.
8.2.4 CHECK
The CHECK FILE function allows the user to show the main characteristics of a file, such as
its size, number of tracks, file type, etc., on the display . If the file selected is a List the number
of steps present will be displayed.
From the FILES menu, select the CHECK function using function key [F4].
The display will show the DIRECTORY video page relating to the unit and type of file selected.
141
Page 50
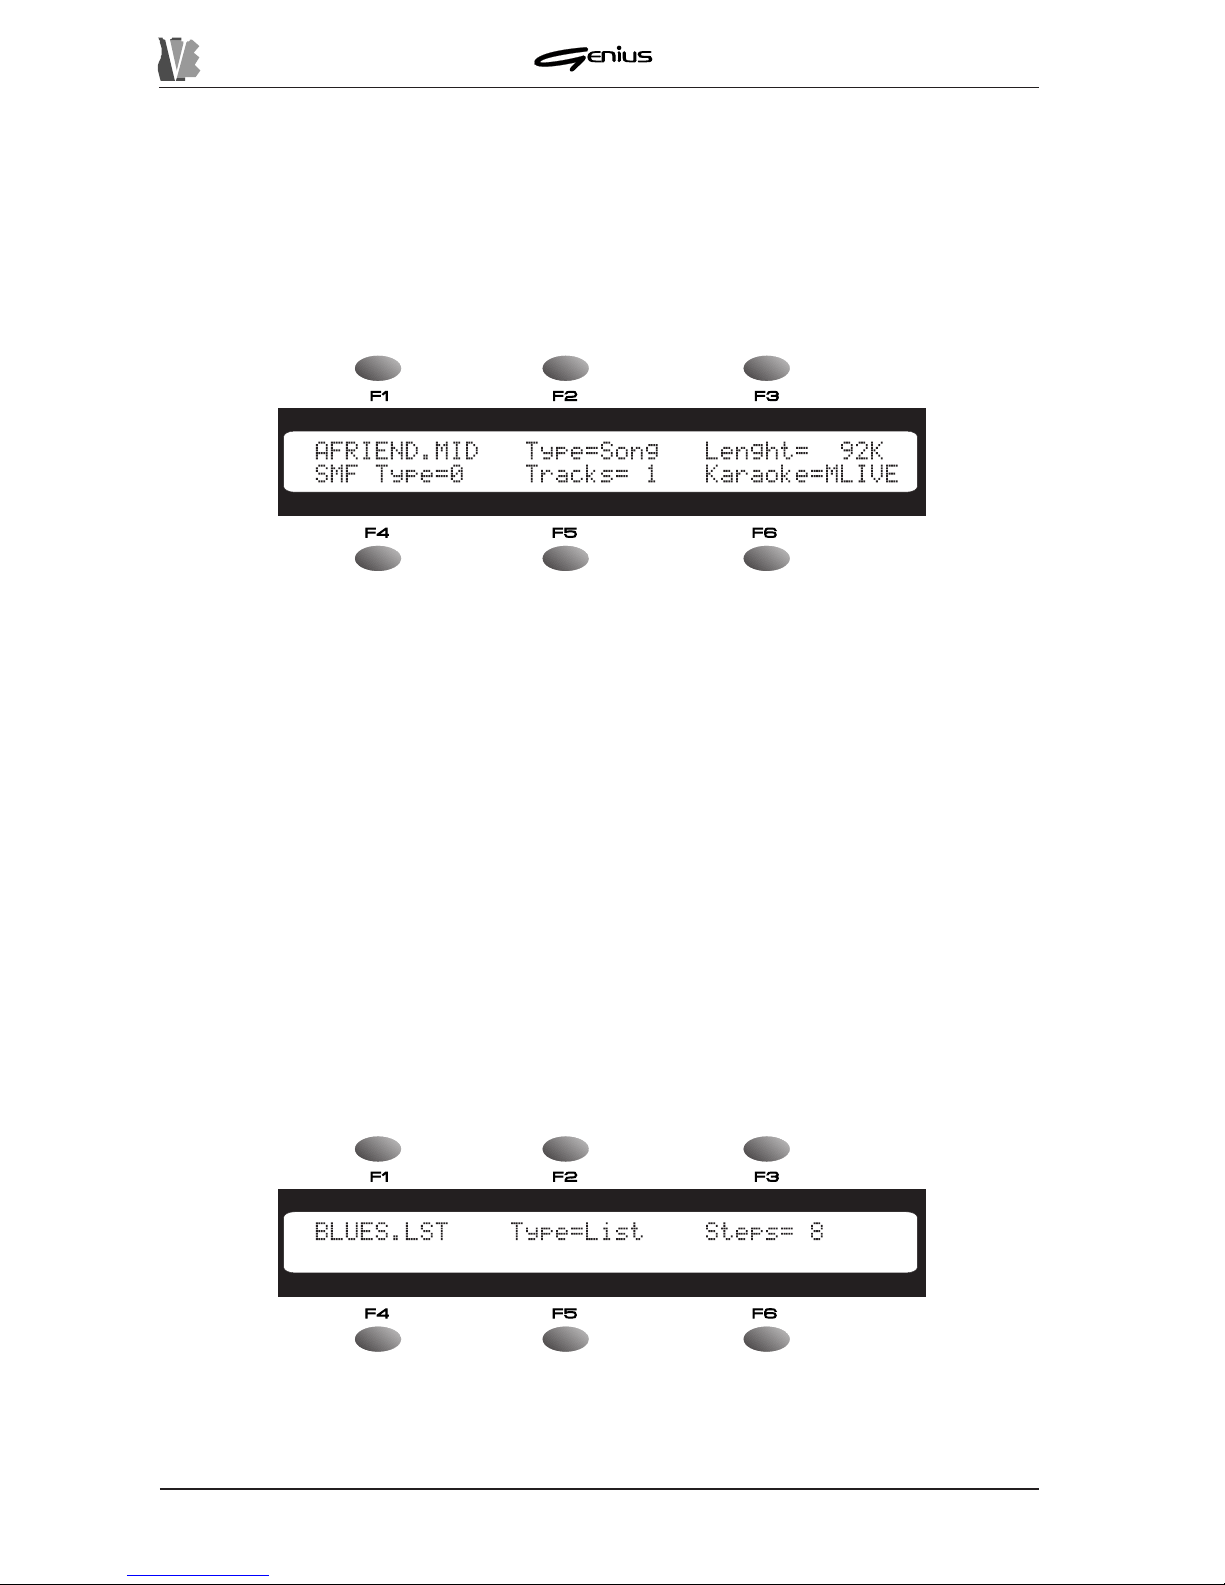
DATA FILER
Refer to the buttons in the SOURCE and MODE sections for selection of the unit and the type
of file required.
Y ou can now use the [P AGE] buttons and function keys to select the file for which you wish to
display the information; pressing the [ESC] key will abort the operation.
The information displayed varies depending on the type of file selected. If you have selected
a song, the display will show:
The fields on the display are the following:
o The first field, next to the [F1] function key, displays the name of the file.
o
Type
: displays the file type, i.e. whether it is a song (
Type=Song
) or a List
(
Type=List
).
o
Length
: indicates the size of the selected file in KBytes.
o
SMF Type
: indicates about the format of the SMF (whether type 0 or type 1).
o
Tracks
: displays the number of tracks the file contains.
o
Karaoke
: indicates the type of Karaoke, using the following codes:
TUNE
: TUNE 1000®
GEM
: GENERALMUSIC®
SOLT
: SOL TON®
MLIVE
: M-LIVE®
YAMA
: YAMAHA®
NONE
: lyrics information not present or not recognised.
If the file is a List, on the other hand, the display will show:
Containing the following fields:
o The first field, next to the [F1] function key, displays the name of the file.
142
Page 51
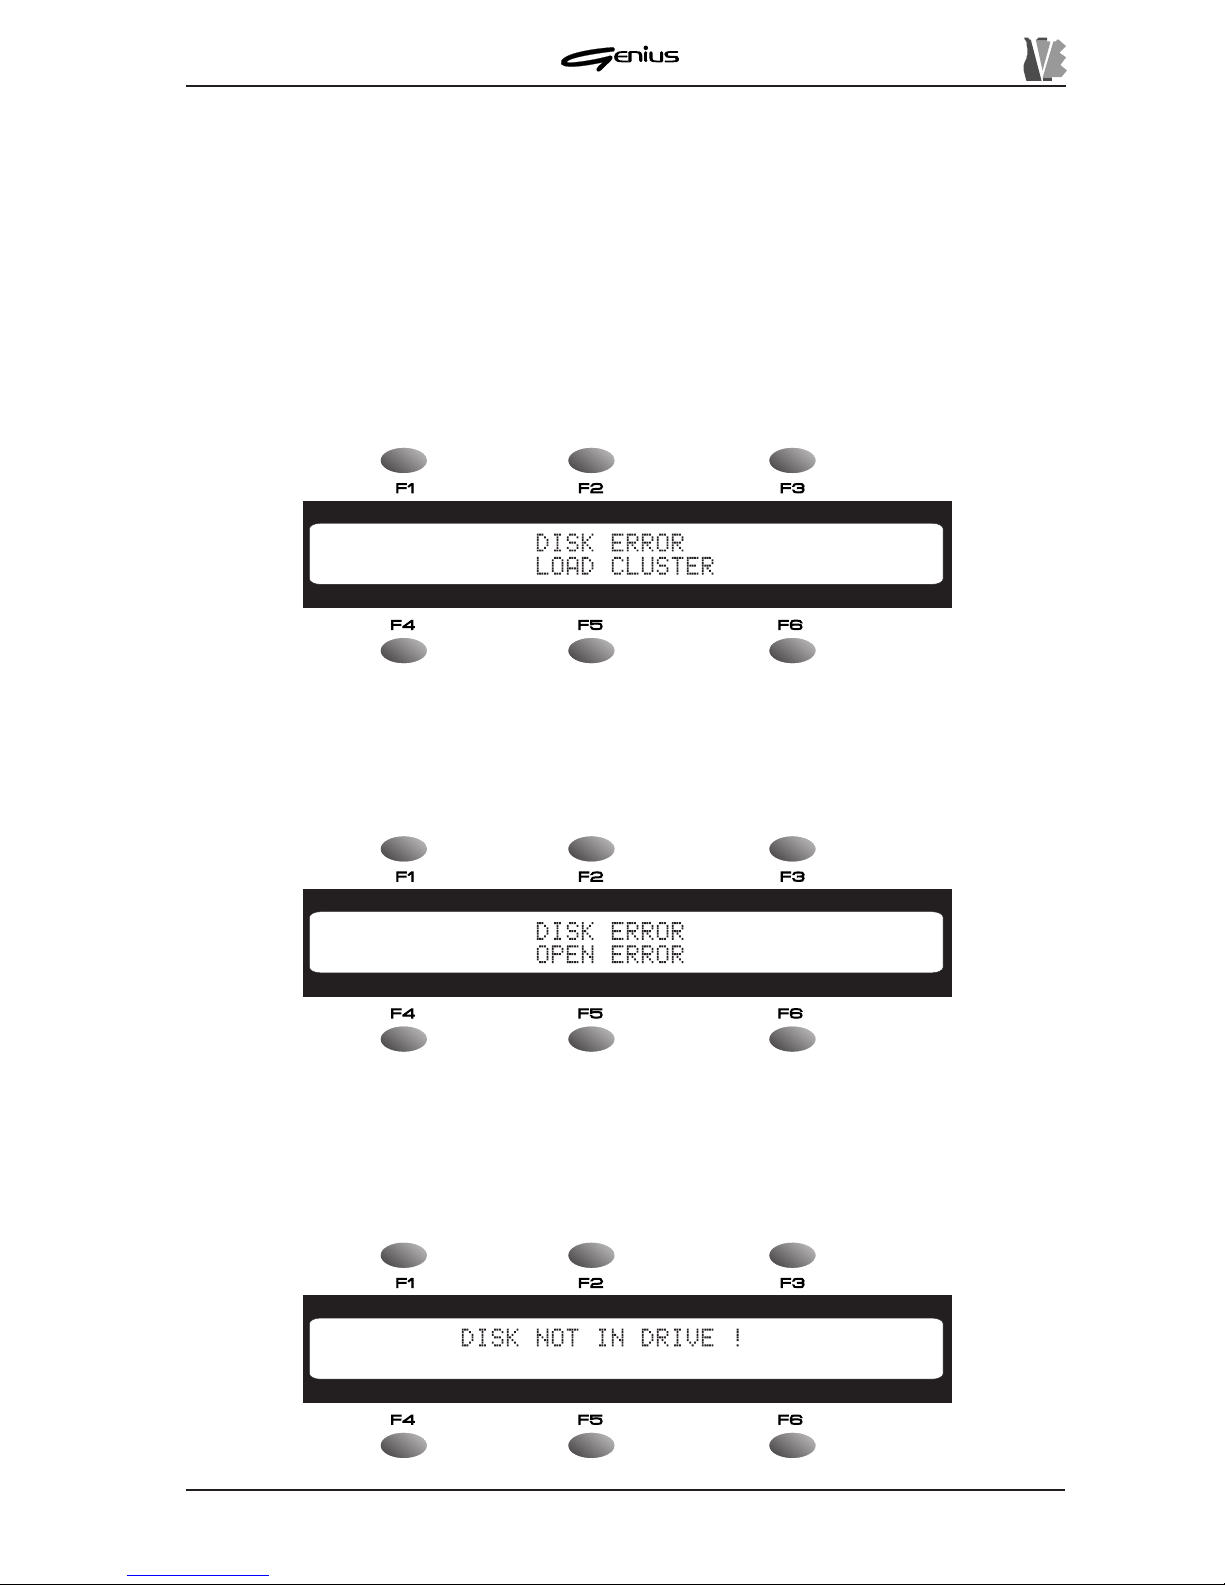
DATA FILER
o
Type
: displays the file type, i.e. whether it is a song (
Type=Song
) or a List
(
Type=List
).
o
Steps
: indicates the number of steps of which the List consists, or in other words the
number of songs it contains.
If the [ESC] key is pressed, either from the song or from the List video page, the display will
exit from the CHECK FILE function and return to the TOOLS video page, FILES option.
8.2.5 ERROR MESSAGES – FILES SECTION
DISK ERROR – LOAD CLUSTER
A reading error has occurred due to a damaged cluster on the disk. The file is not legible.
DISK ERROR – OPEN ERROR
A serious error has occurred during reading/writing on the disk. Very probably, the disk’s
magnetic medium is damaged.
DISK NOT IN DRIVE!
143
Page 52
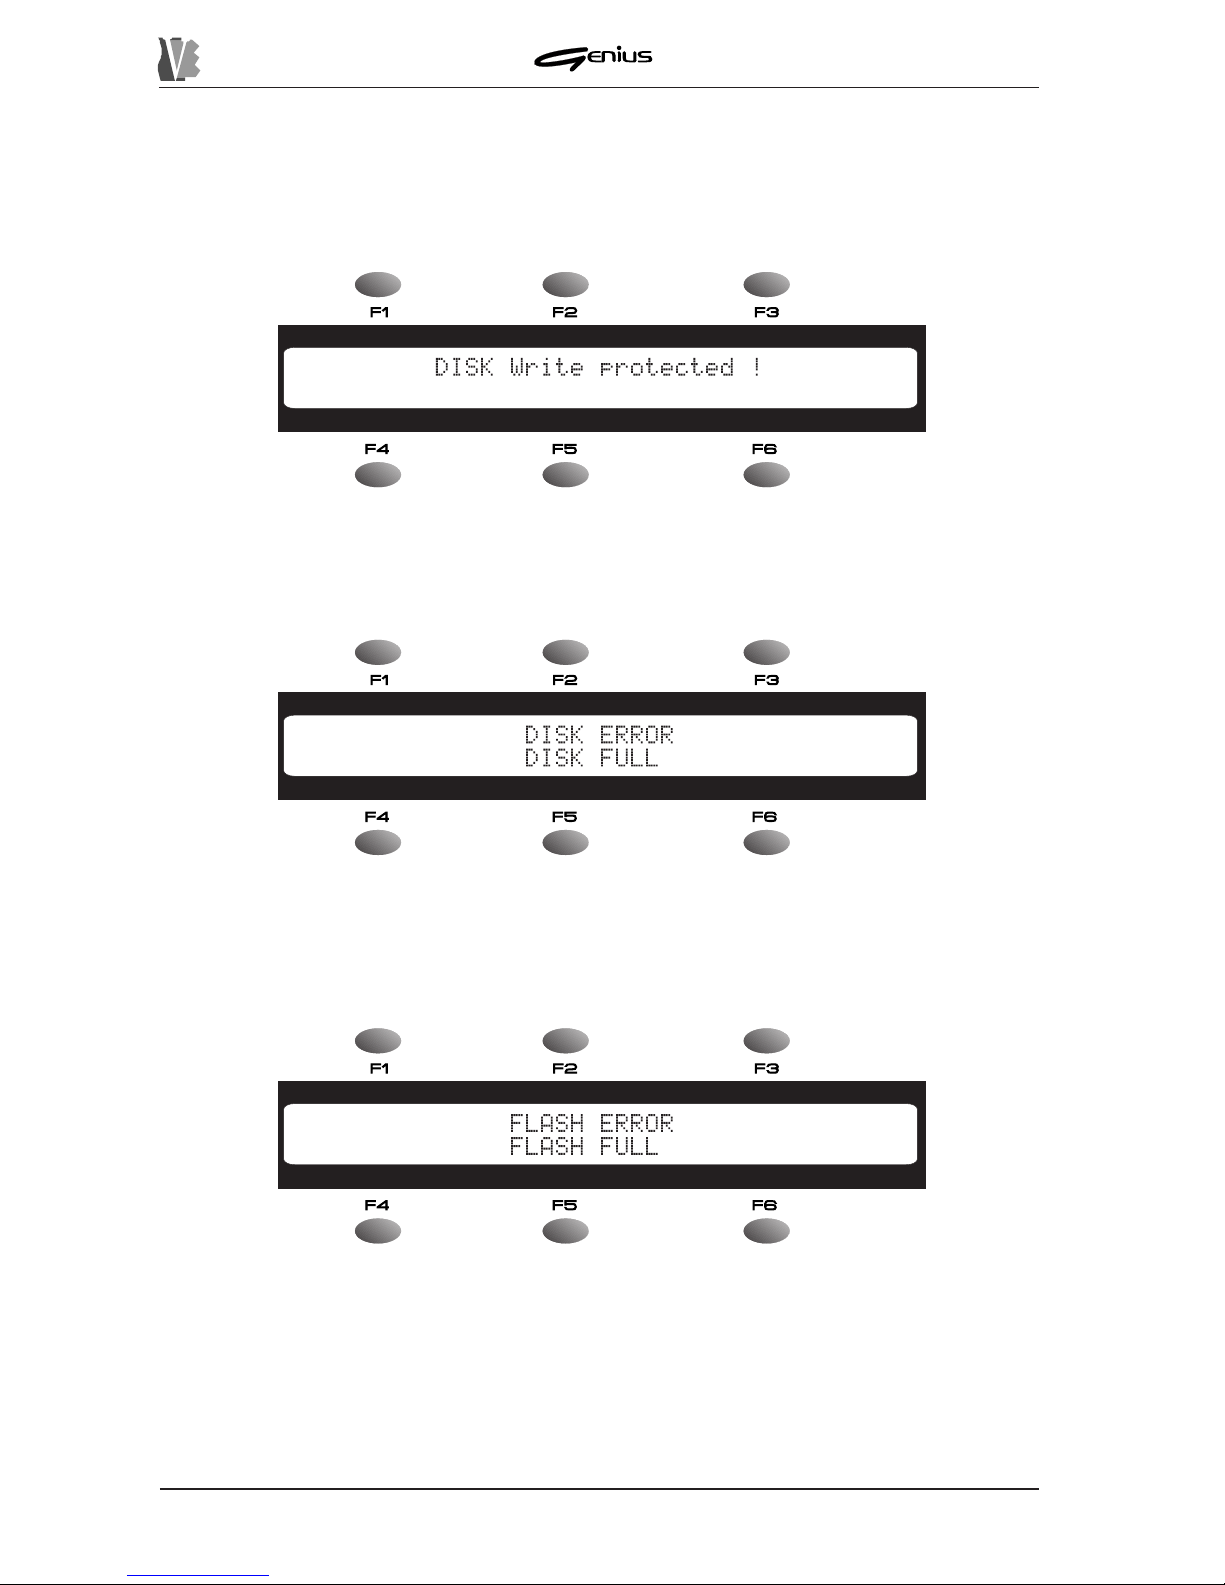
DATA FILER
Y ou have attempted a floppy disk operation with no disk inserted. If the disk is inserted, wait
a few moments (to allow the instrument to acquire the floppy disk) and then retry the procedure.
Also try removing and re-inserting the disk.
DISK WRITE PROTECTED!
The floppy inserted has write protection: extract the disk and remove the protection.
DISK ERROR – DISK FULL
There is not enough room on the disk to complete the operation in progress. Replace it or
free some space.
FLASH ERROR – FLASH FULL
There is not enough room in the memory to save any more files. Press [ESC] to return to the
previous video page.
Then free space in the internal memory (see point 8.2.2 - Delete Files and point 8.4.6 –
Memory Compact).
144
Page 53
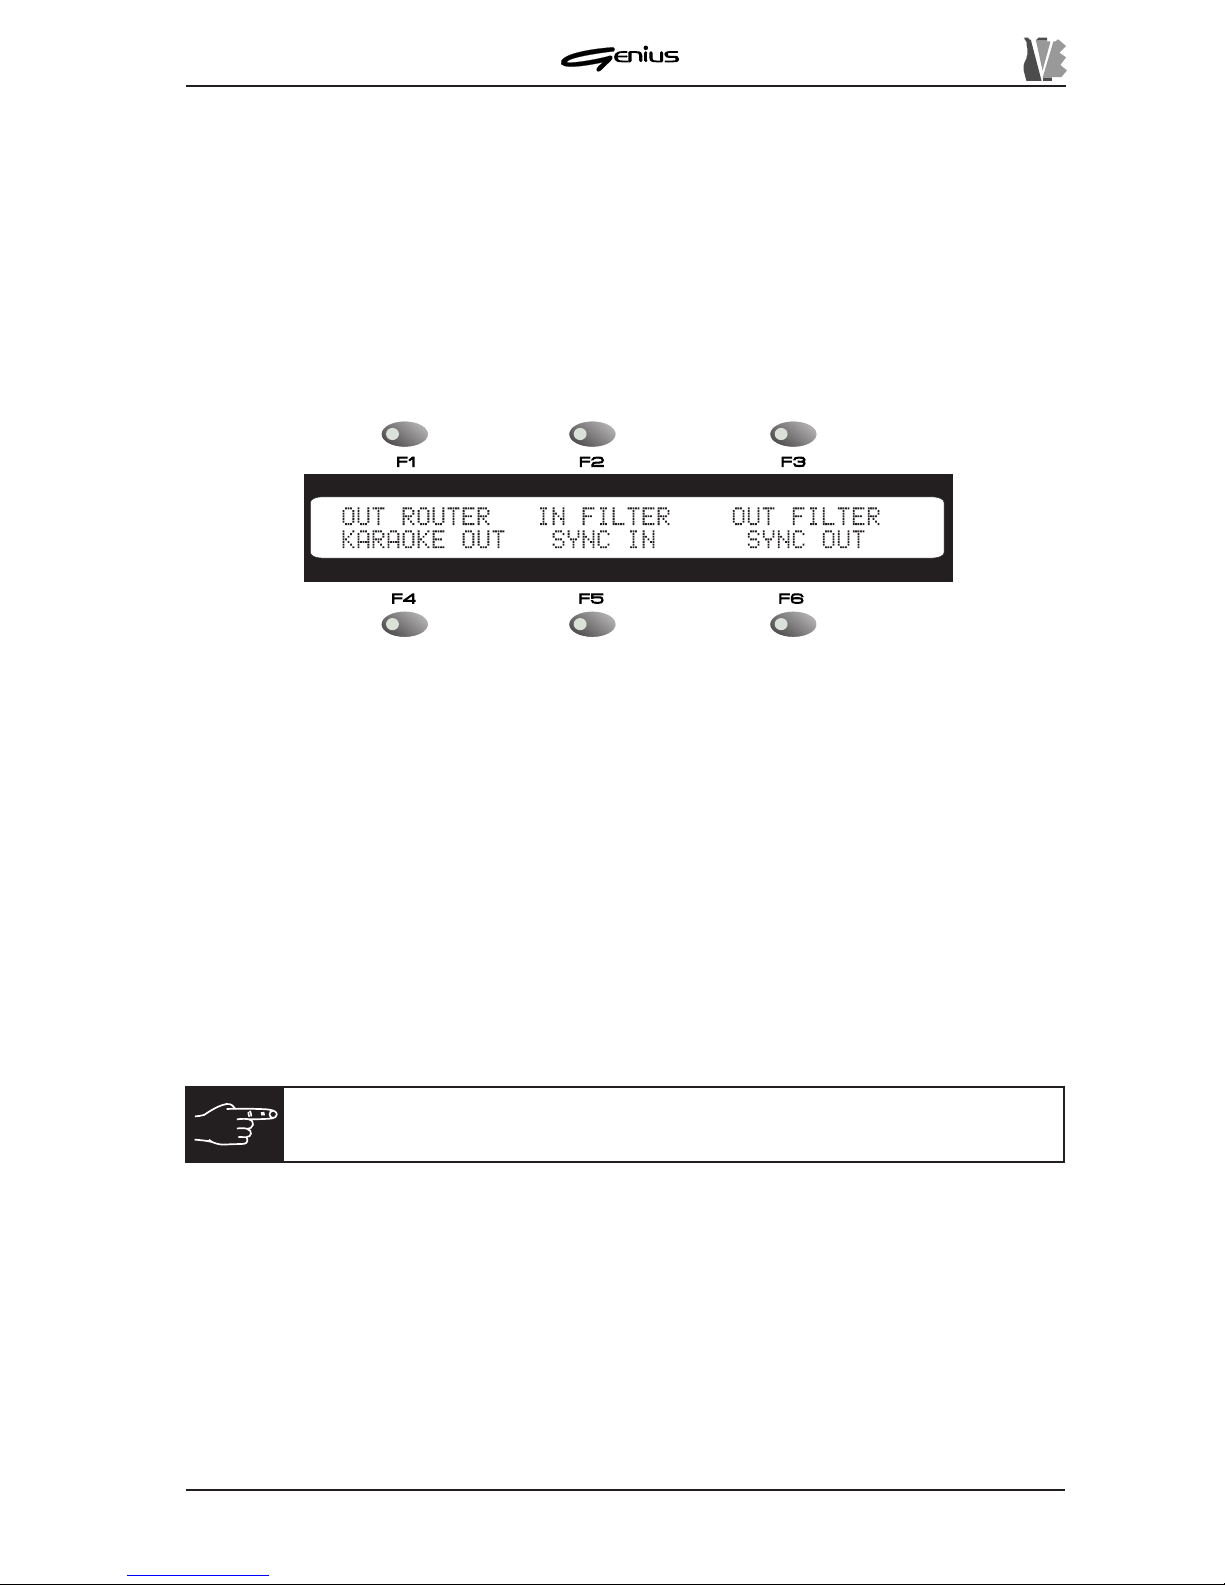
DATA FILER
8.3 MIDI FUNCTIONS
The MIDI function of the TOOLS section, which can be activated using the key of the same
name, allows you to set up all the instrument’s MIDI parameter , such as the output Router ,
input and/or output MIDI filters, synchronisation setting, etc..
Note that the settings made in this section affect the correct playback of the songs, even if
they are reproduced exclusively by the internal sound generator.
Once the [MIDI] key has been pressed, the display will show the video page:
containing the following direct selection fields:
o
OUT ROUTER
: selectable by means of the [F1] function key – sets the track (MIDI channel)
to which the MIDI data generated by the song being played are to be directed.
o
IN FILTER
: [F2] – sets the MIDI fitler for the data entering the instrument on the MIDI IN
port connected to the [JOY PORT].
o
OUT FILTER
: [F3] – sets the MIDI filters for the data addressed to the internal sound
generator and/or the MIDI OUT port.
o
KARAOKE OUT
: [F4] – defines whether or not the MIDI data relating to the Karaoke are
to be sent to the [MIDI OUT] port.
o
SYNC IN
: [F5] – defines which synchronisation messages received at the MIDI IN port
are to be interpreted by the instrument.
o
SYNC OUT
: [F6] – sets which synchronisation messages are to be sent to the [MIDI
OUT] port.
8.3.1 OUT ROUTER
The OUT ROUTER function allows you to specify whether the data relating to each track
(corresponding to its own MIDI channel) are to be sent to the internal sound generator, to the
MIDI OUT port, or to both.
From the MIDI section main menu, illustrated previously , use the [F1] function key to select the
OUT ROUTER function.
N.B.:
every modification made to the parameters relating to this section will
be saved automatically inside the operating system.
145
Page 54
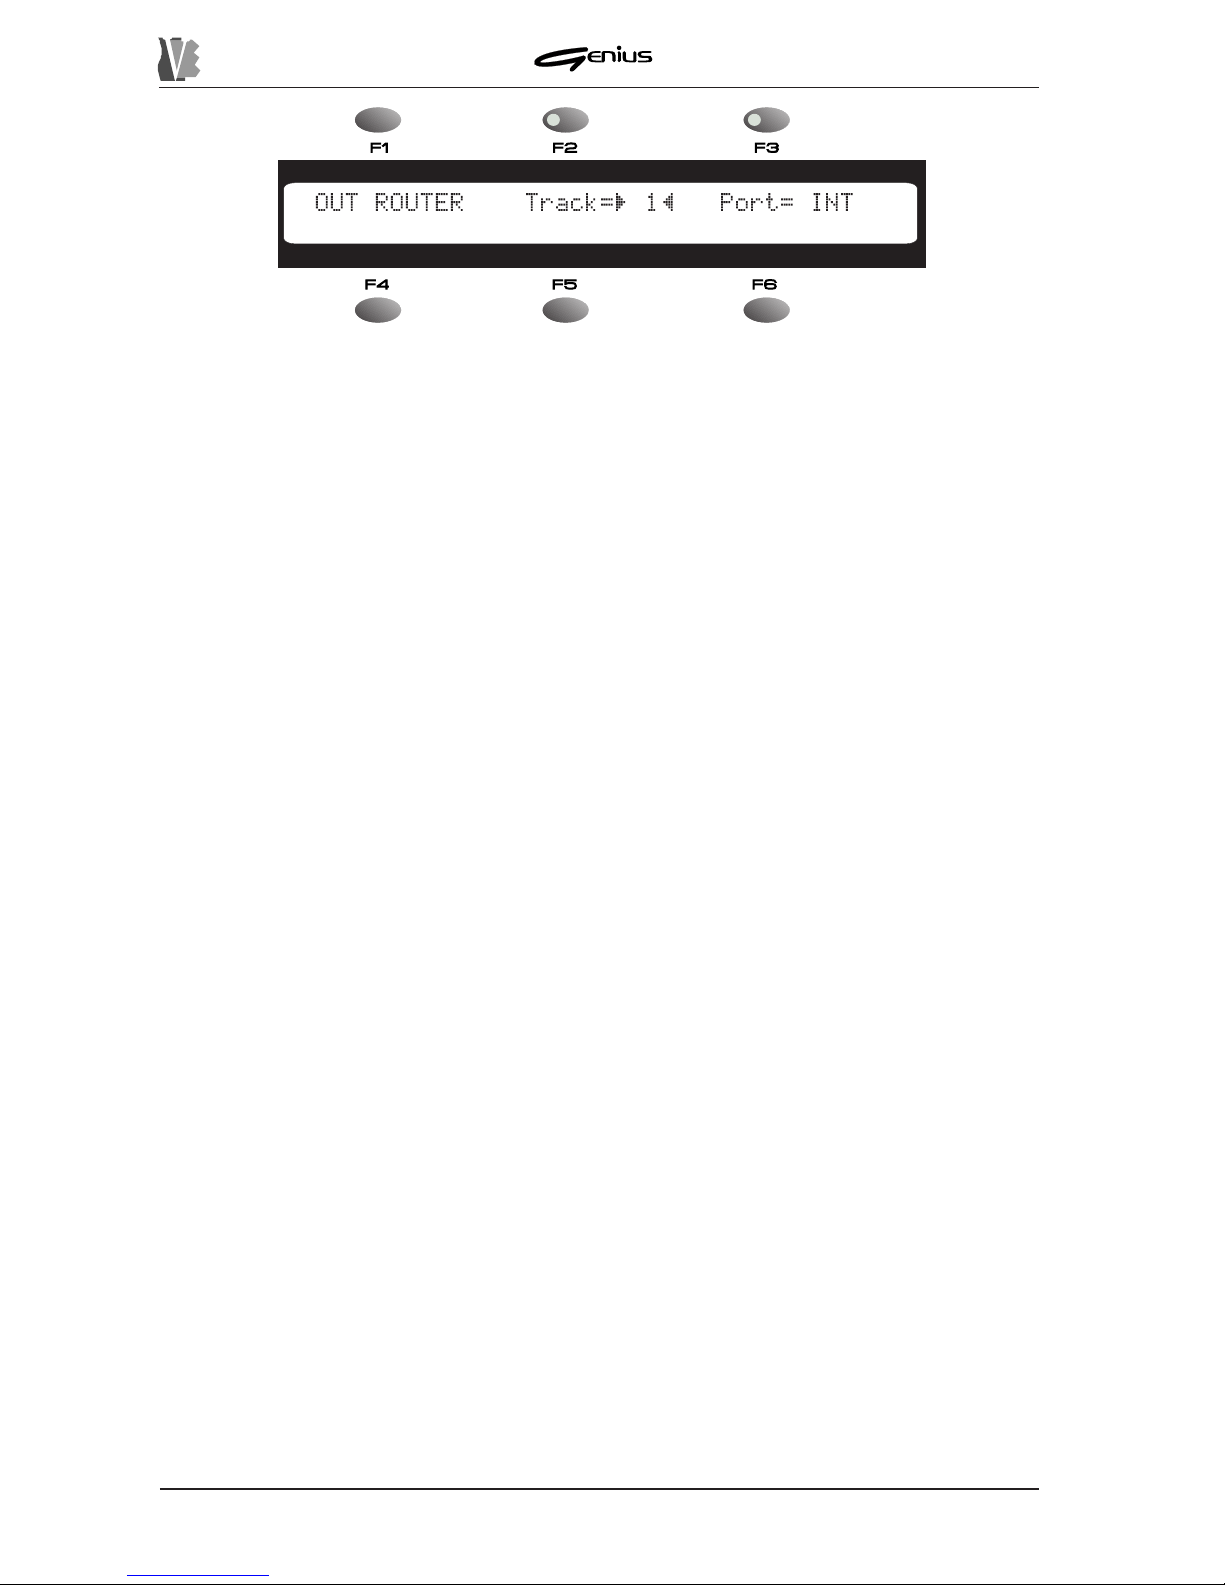
DATA FILER
146
Y ou can use the
Track
field, with the aid of the [F2] function key , to select the track (from 1
to 16) the contents of which you intend to display .
The current association will be displayed in the
Port
field. T o change the association, press
the [F3] function key; you can turn the encoder to choose from the following options:
o
Port=INT
, the data relating to the selected track are sent only to the internal sound
generator (default condition).
o
Port=EXT
, the data relating to the track are sent only to the [MIDI OUT] port.
o
Port=BOTH
. the track data are sent both to the internal sound generator and to the
[MIDI OUT] port.
o
Port=NONE
, with this setting the data relating to the track are not sent. The selected
track will therefore be eliminated from the playback.
When the operation is complete, the [ESC] key can be pressed to exit from the video page in
question; all the modifications will be saved automatically . On exit from the function, the current
song will be reloaded to implement the modifications made to it.
TYPES OF MIDI MESSAGES
• Note messages: message relating to the note to be performed.
• Program Change: this message is used for selection of the timbres to be applied on
each track. Once you know the correspondence between the number assigned to the
memory and the Program Change number , you can select the type of sound you require.
Refer to the appendix to this manual for details of the Program Change ð Timbre
assignations.
• Control Change: control messages used to add expression to the performance, allowing
setting of the parameters of the timbre, including for example the volume (CC n.7), the
amount of reverb (CC n.91), activation of the Damper pedal (CC n.64), etc...
If Control Change n.°91 is received, for example, the instrument will apply the specified
amount of reverb effect to the sound.
• System Exclusive system messages sent as strings of bytes which affect the general
settings of the sound generator or regulations not possible with other commands.
• Real Time: high priority messages used for command or synchronisation operations.
These messages include the MIDI CLOCK (synchronisation of two or more devices
connected together on the same time base), and ST ART , ST OP and CONTINUE messages
for remote control of the instrument’s functions.
Page 55
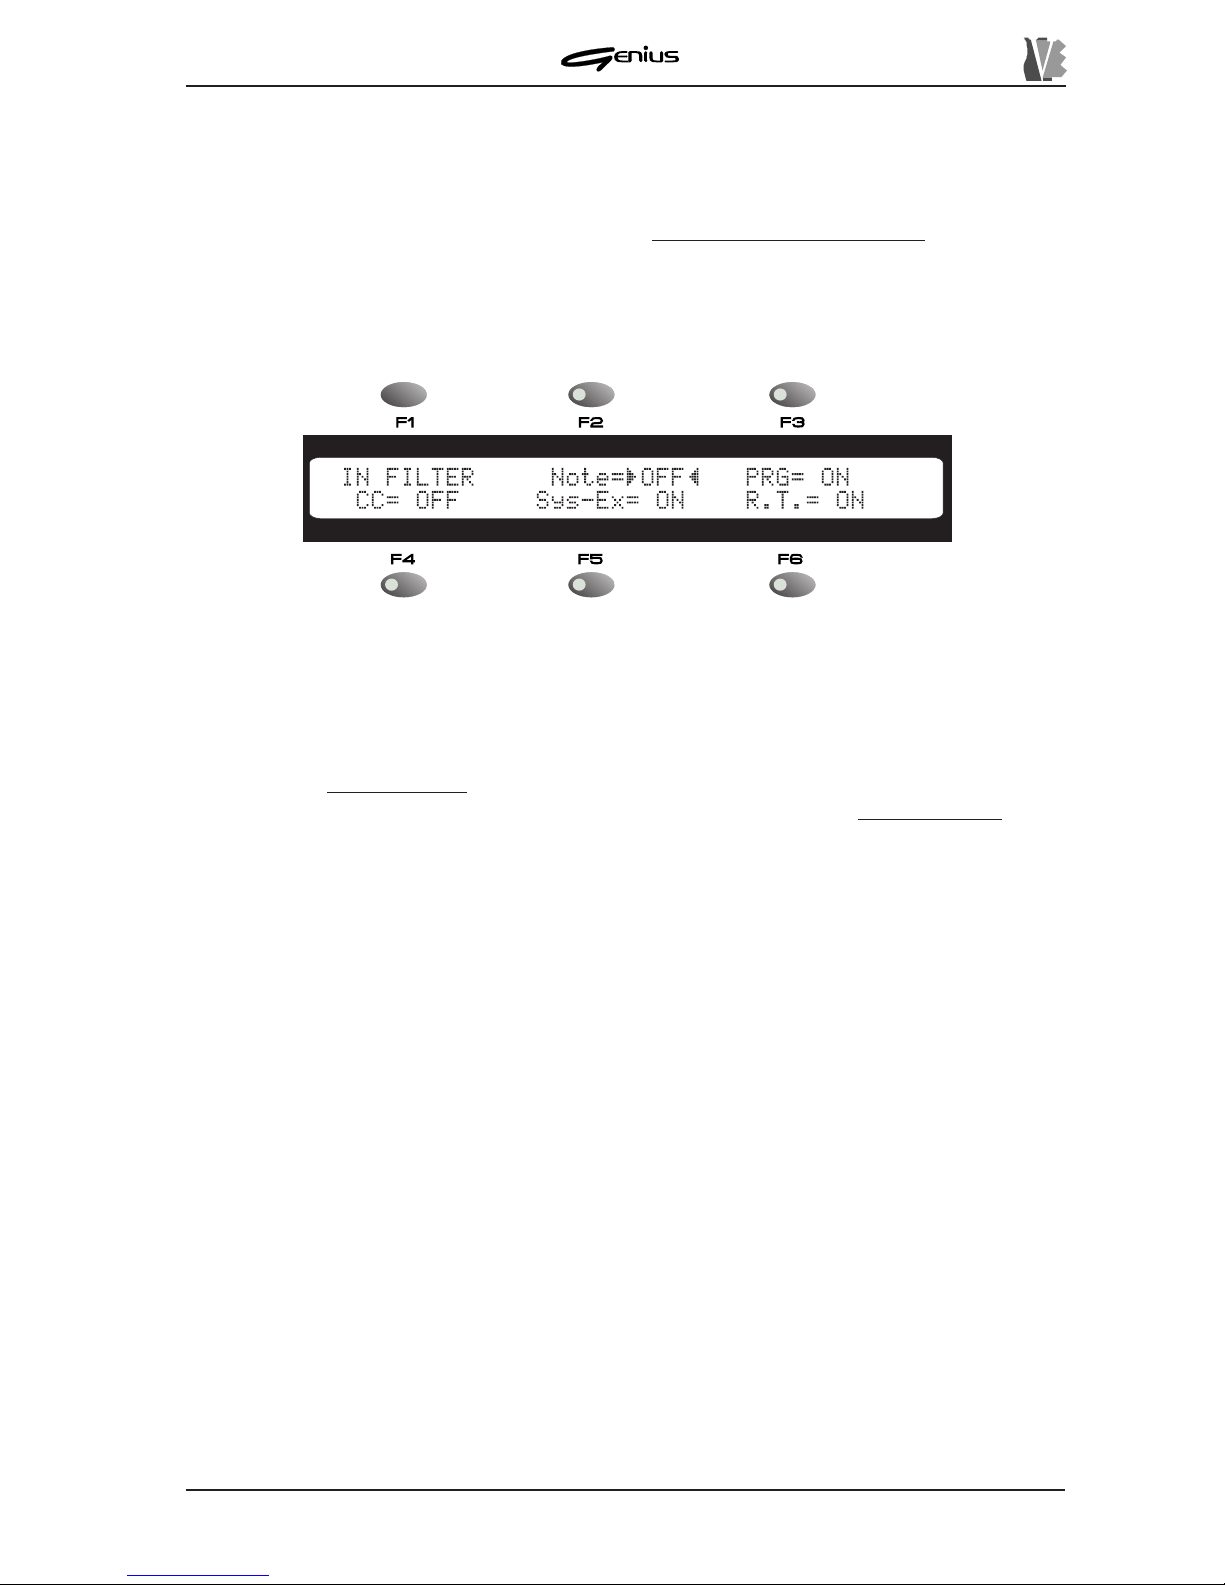
DATA FILER
8.3.2 IN FILTER
The IN FIL TER function is provided to filter specific MIDI messages reaching the MIDI IN port
(if any) connected to the JOY PORT .
The filters are of global type, meaning that they
act on all the MIDI channels for the type of
message assigned to them.
From the MIDI section menu, select the IN FIL TER function using the [F2] function key; the
display will show:
147
Y ou can use the fields in this video page, selectable using the function keys associated to
them, to set the behaviour of the filters. Using the encoder, you can modify their status in
accordance with the following rule:
ü Filter ON: the type of message to which the filter refers is filtered, meaning that these
messages
will be ignored by the system.
ü Filter OFF: the type of message is not filtered, so these messages
are interpreted by the
instrument.
The types of message to which the filter can be applied are the following:
o
Note
: selectable by means of the [F2] function key – enables/disables the filter on the
note incoming messages (Note On and Note Off).
o
PRG
: [F3] – enables/disables the filter on the incoming Program Changes (timbre
definition).
o
CC
: [F4] – enables/disables the filter on the incoming Control Changes (control messages).
o
Sys-Ex
: [F5] – enables/disables the filter on the System Exclusive Messages (used as
setup data) received.
o
R.T.
: [F6] – enables/disables the filter on the Real Time (synchronisation) messages.
After making the desired settings, press the [ESC] key and the modifications made will be
saved automatically . On exit from the function, the current song will be reloaded.
Page 56
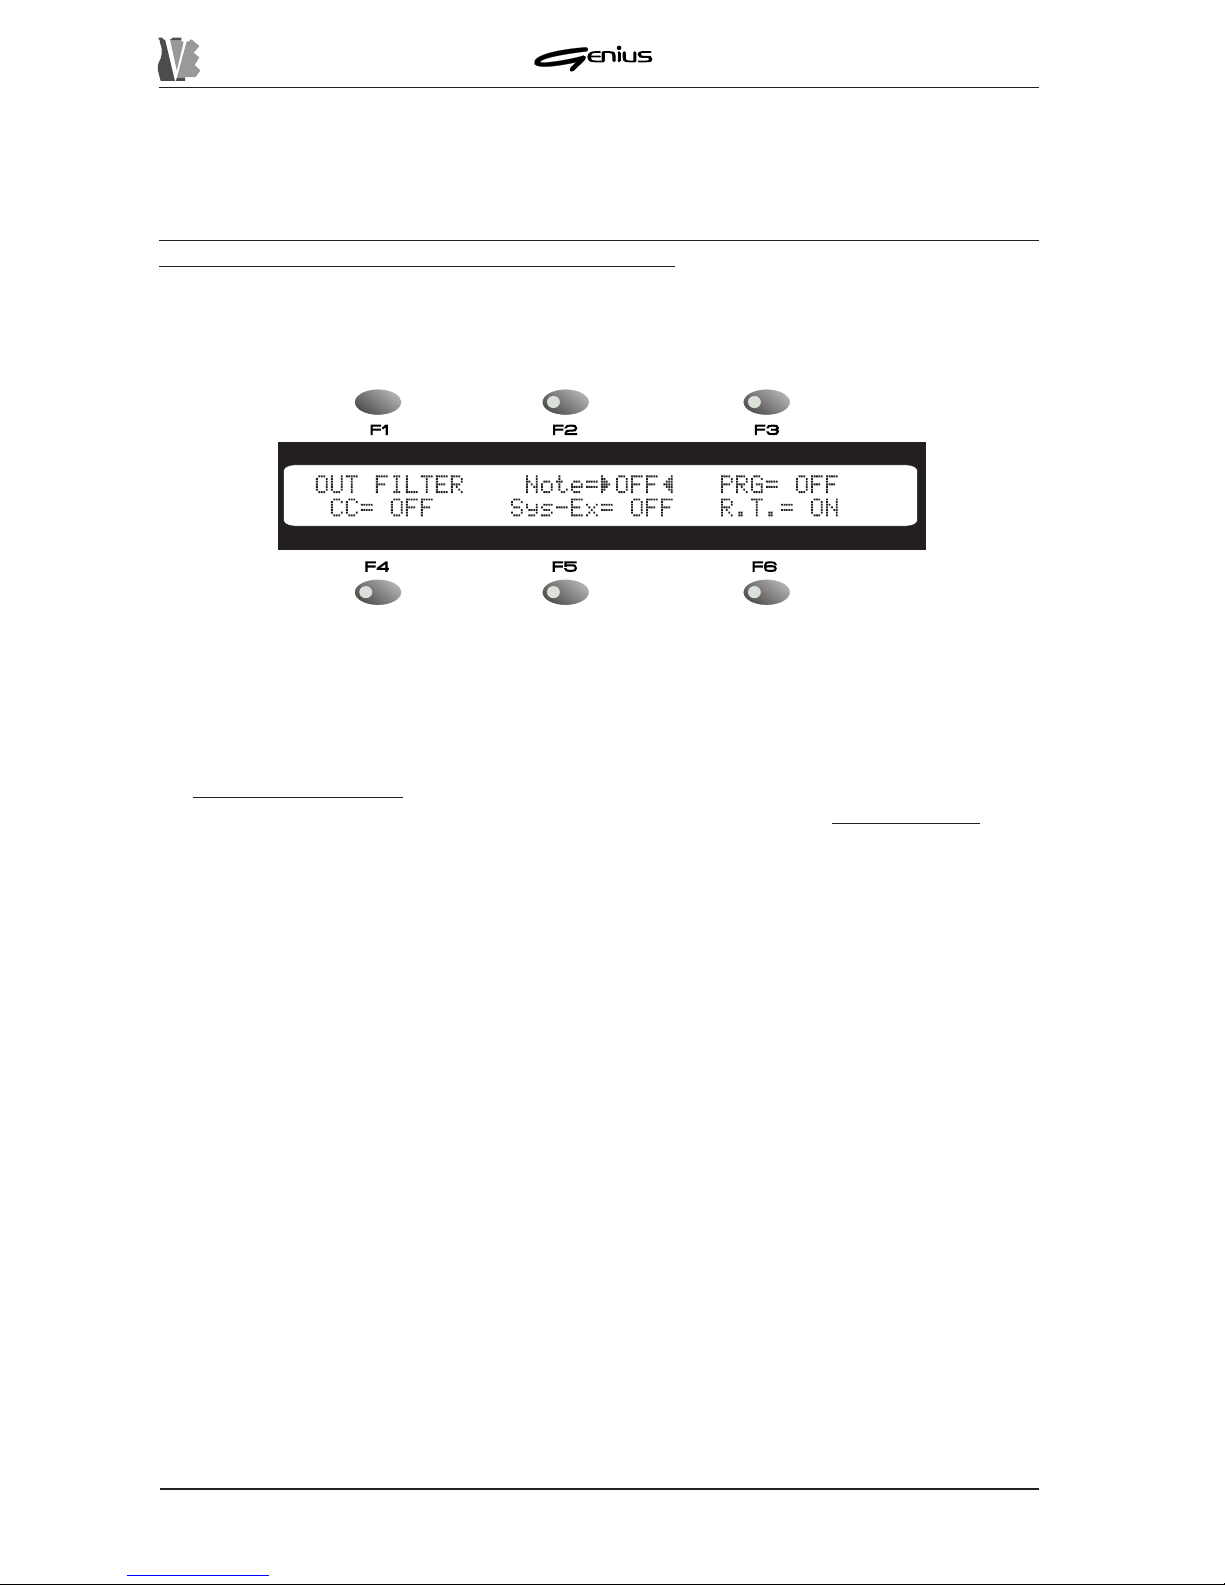
DATA FILER
8.3.3 OUT FILTER
The OUT FIL TER, similar to the IN FILTER, allows you to set the operating modes of the filters
on the MIDI messages transmitted by the instrument.
Filtering a message means that it will not be transmitted on any channel (any track), either to
the internal sound generator or to the [MIDI OUT] port.
To access this function, from the MIDI menu, select the
OUT FILTER
field using the [F3]
function key; the display will show the video page:
148
Y ou can use the fields in this video page, selectable using the function keys associated to
them, to set the behaviour of the filters. Using the encoder, you can modify their status in
accordance with the following rule:
ü Filter ON: the type of message to which the filter refers is filtered; these messages therefore
will not be transmitted.
ü Filter OFF: the type of message is not filtered, so these messages
are transmitted to the
[MIDI OUT] port.
The types of message to which the filter can be applied are the following:
o
Note
: selectable by means of the [F2] function key – enables/disables the filter on the
outgoing note messages (Note On and Note Off).
o
PRG
: [F3] – enables/disables the filter on the outgoing Program Changes (timbre definition).
o
CC
: [F4] – enables/disables the filter on the outgoing Control Changes (control messages).
o
Sys-Ex
: [F5] – enables/disables the filter on the System Exclusive Messages (used as
setup data) transmitted.
o
R.T.
: [F6] – enables/disables the filter on the Real Time (synchronisation) messages.
The modifications made to this section affect correct playback of songs.
After making the desired settings, press the [ESC] key and the modifications made will be
saved automatically . On exit from the function, the current song will be reloaded.
Page 57
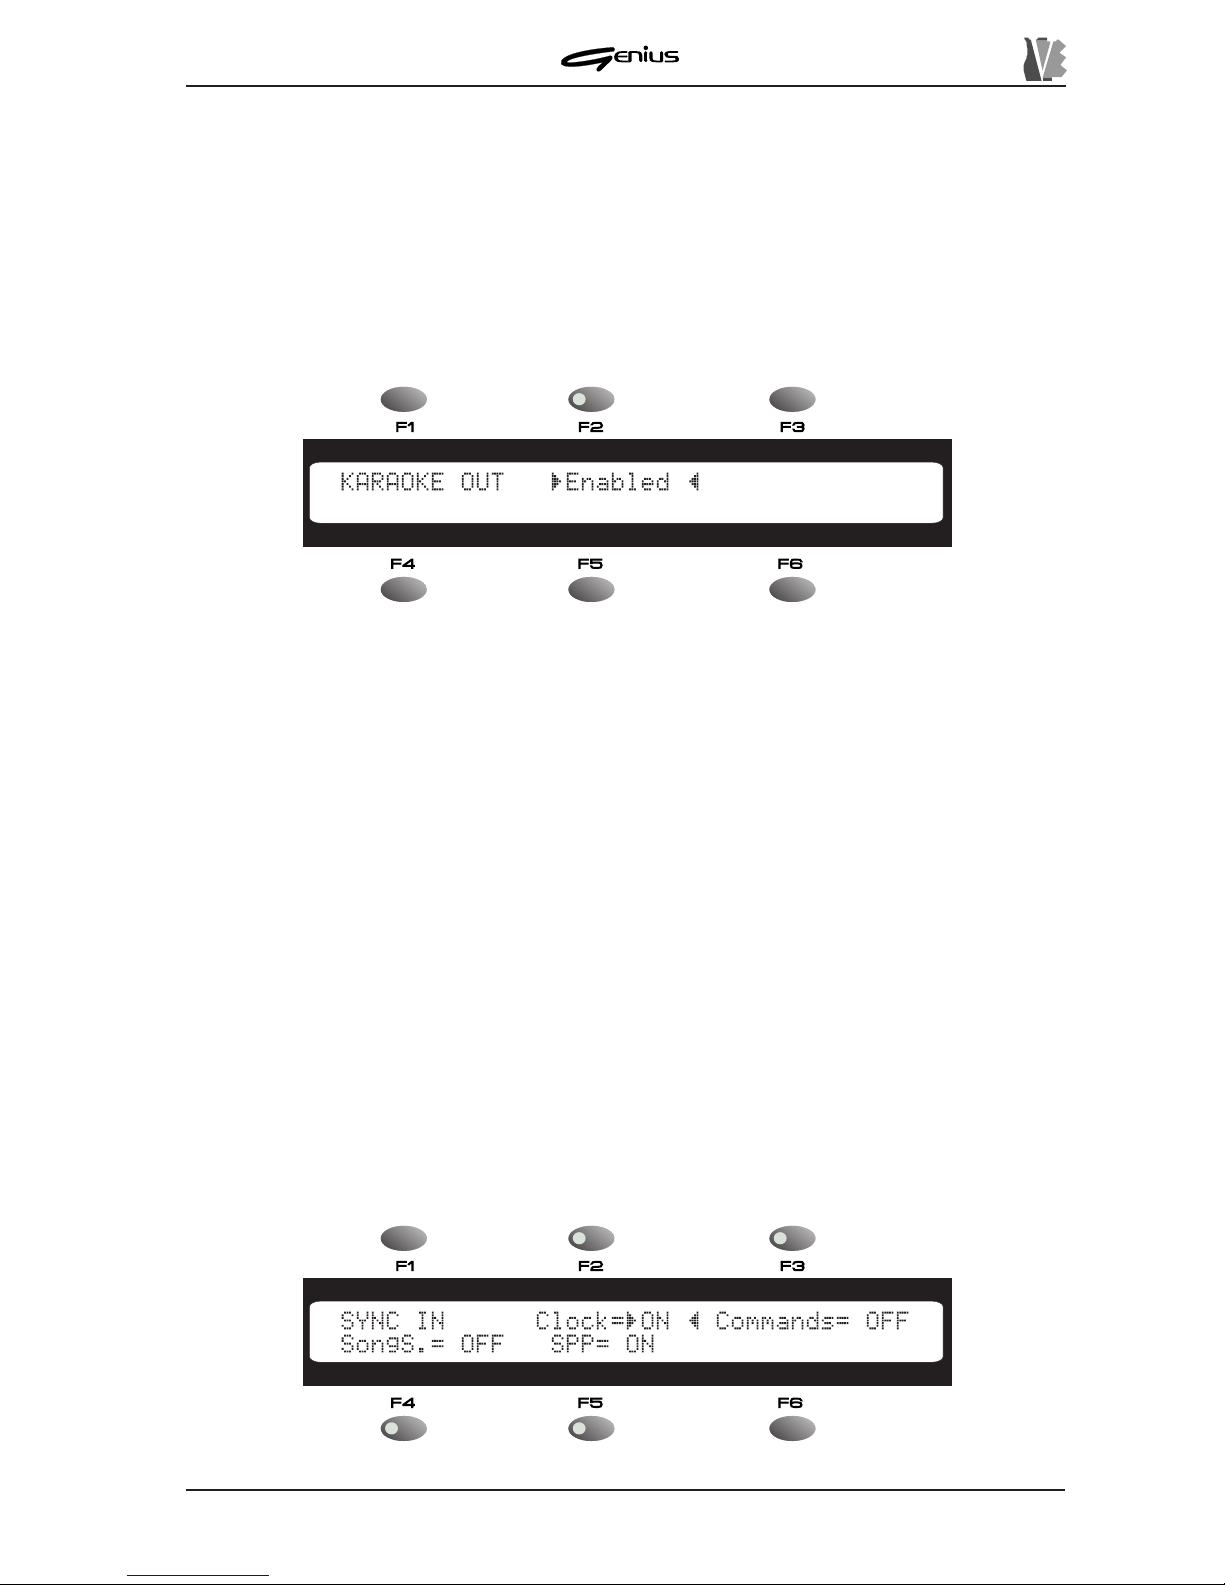
DATA FILER
8.3.4 KARAOKE OUT
This function allows you to enable to disable the transmission of the MIDI data relating to the
Karaoke on the [MIDI OUT] port. Transmission of these data must only be enabled with
optional peripherals connected.
T o access this setting, from the MIDI menu press the [F4] function key to select the
KARAOKE
OUT
field.
The display will then show the video page:
Y ou can use the encoder to enable (
Enabled
) or disable (
Disabled
) the transmission
of the MIDI messages relating to the Karaoke on the [MIDI OUT] port.
After making the desired settings, press the [ESC] key and the modifications made will be
saved automatically .
8.3.5 SYNC IN
In point 8.3.2. we have seen that specific incoming MIDI messages can be filtered, or ignored.
The IN FILTER function can be used in this way to apply a general filter to the Real Time
messages.
The SYNC IN function allows you to select which of the Real Time messages relating to the
synchronisation, present on the MIDI IN port connected to the [JOY PORT], you wish the Genius
to interpret.
Note that the enabling of synchronisation messages is located downstream of the filter on the
messages received: therefore, if the Real Time messages filter is set as ON, the
synchronisation settings will have mp effect.
From the MIDI menu use the [F5] function key to select the
SYNC IN
field.
149
Page 58
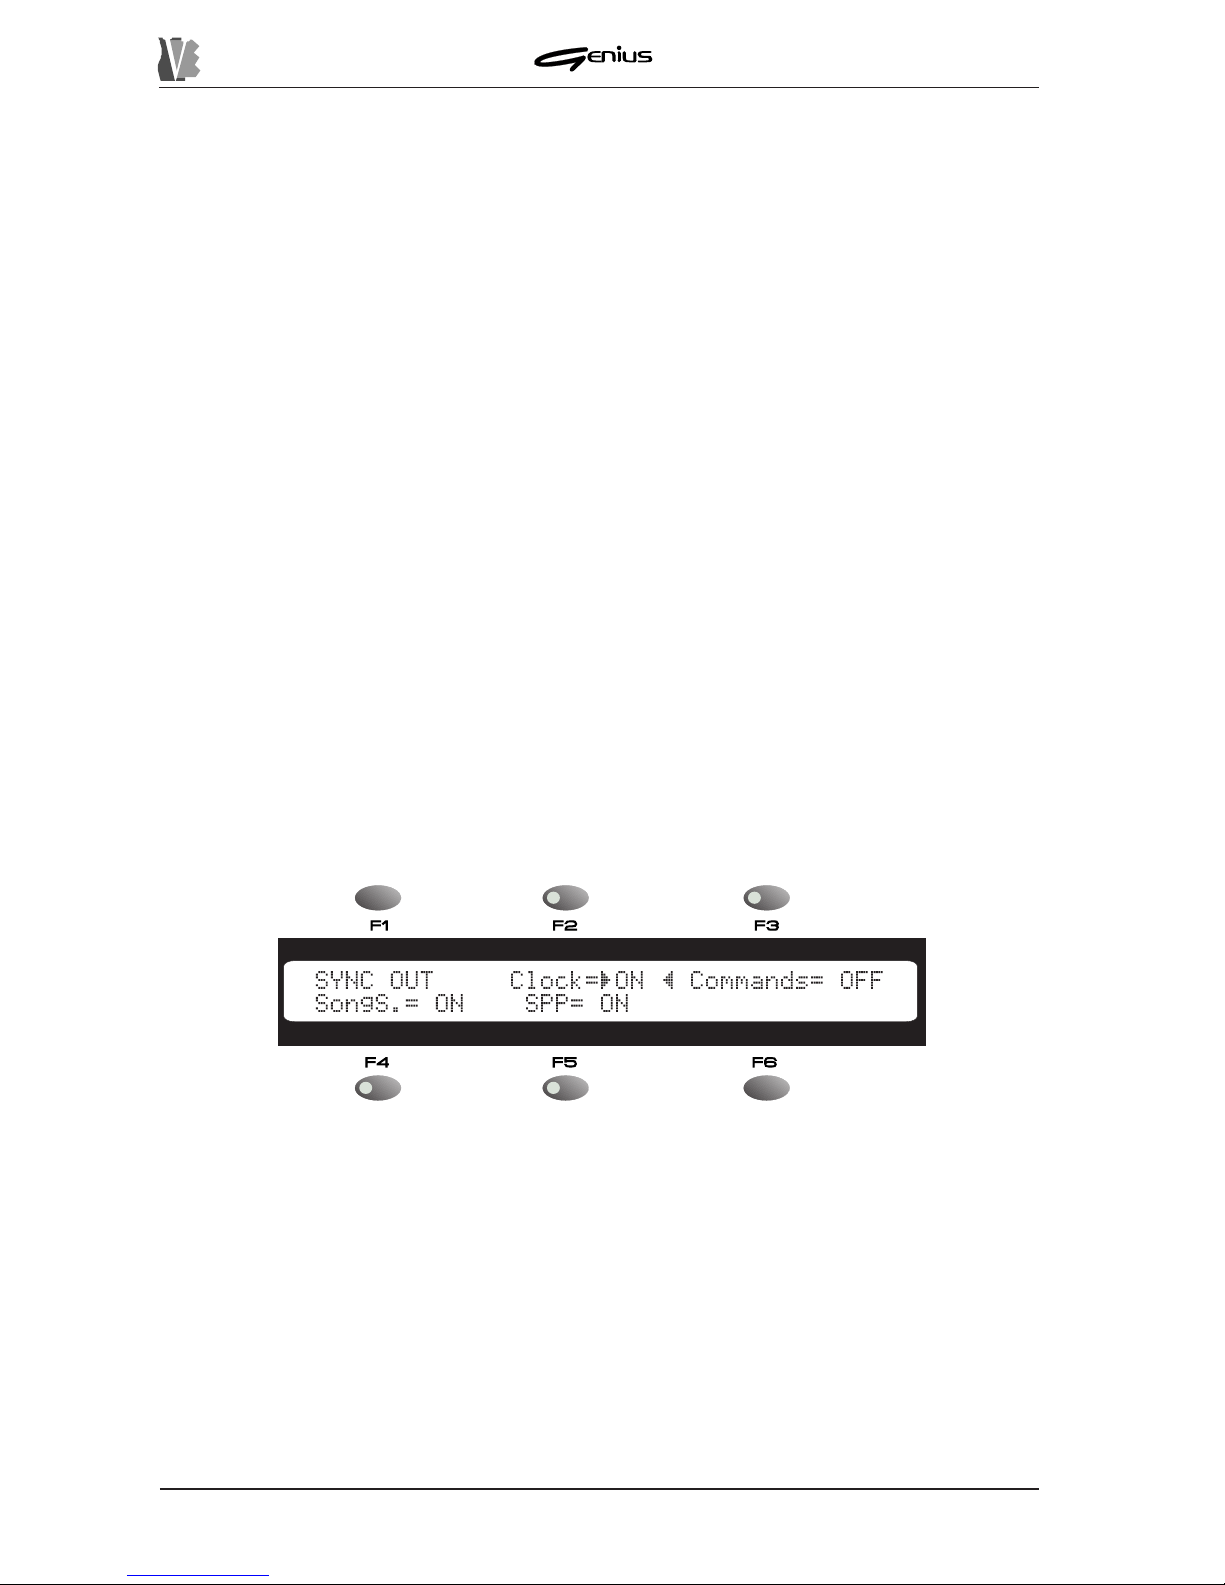
DATA FILER
150
Y ou can use this video page to enable the messages it describes, thus:
ü Message=ON: message interpreted.
ü Message=OFF: message ignored.
The messages are:
o
Clock
: selectable using the [F2] function key – enables/disables reception of the MIDI
CLOCK. If this message is not present at the input, the instrument will refer to its own
internal Clock; otherwise, the
Tempo
field of the MAIN P AGE will be automatically updated
to the bpm value of the transmitter instrument.
o
Commands
: [F3] – enables / disables reception of the MIDI ST ART , ST OP and PAUSE/
CONTINUE messages.
o
Song S.
: [F4] – reception of the SONG SELECT message, allowing selection of the
number of the active song.
o
Spp
: [F5] – reception of the SONG POSITION POINTER message for remote search for
the bars of the selected song.
8.3.6 SYNC OUT
By a procedure similar to the SYNC IN function, the SYNC OUT function allows you to enable
the transmission of given synchronisation messages.
Pay special attention to the status of the output filters (OUT FILTER) for the Real Time
messages. Enabling the filter will prevent transmission of any synchronisation messages.
From the MIDI menu select the
SYNC OUT
field using the [F6] function key; the display will
show the video page:
Y ou can use the function keys and the encoder to enable (ON status) or disable (OFF status)
transmission of the following messages:
o
Clock
: selectable using the [F2] function key – enables/disables transmission of the
MIDI CLOCK.
o
Commands
: [F3] – transmission of the ST ART , STOP and P AUSE/CONTINUE messages.
o
Song S.
: [F4] – transmission of the SONG SELECT message.
o
Spp
: [F5] – transmission of the SONG POSITION POINTER message.
After making the desired settings, press the [ESC] key and the modifications made will be
saved automatically .
Page 59
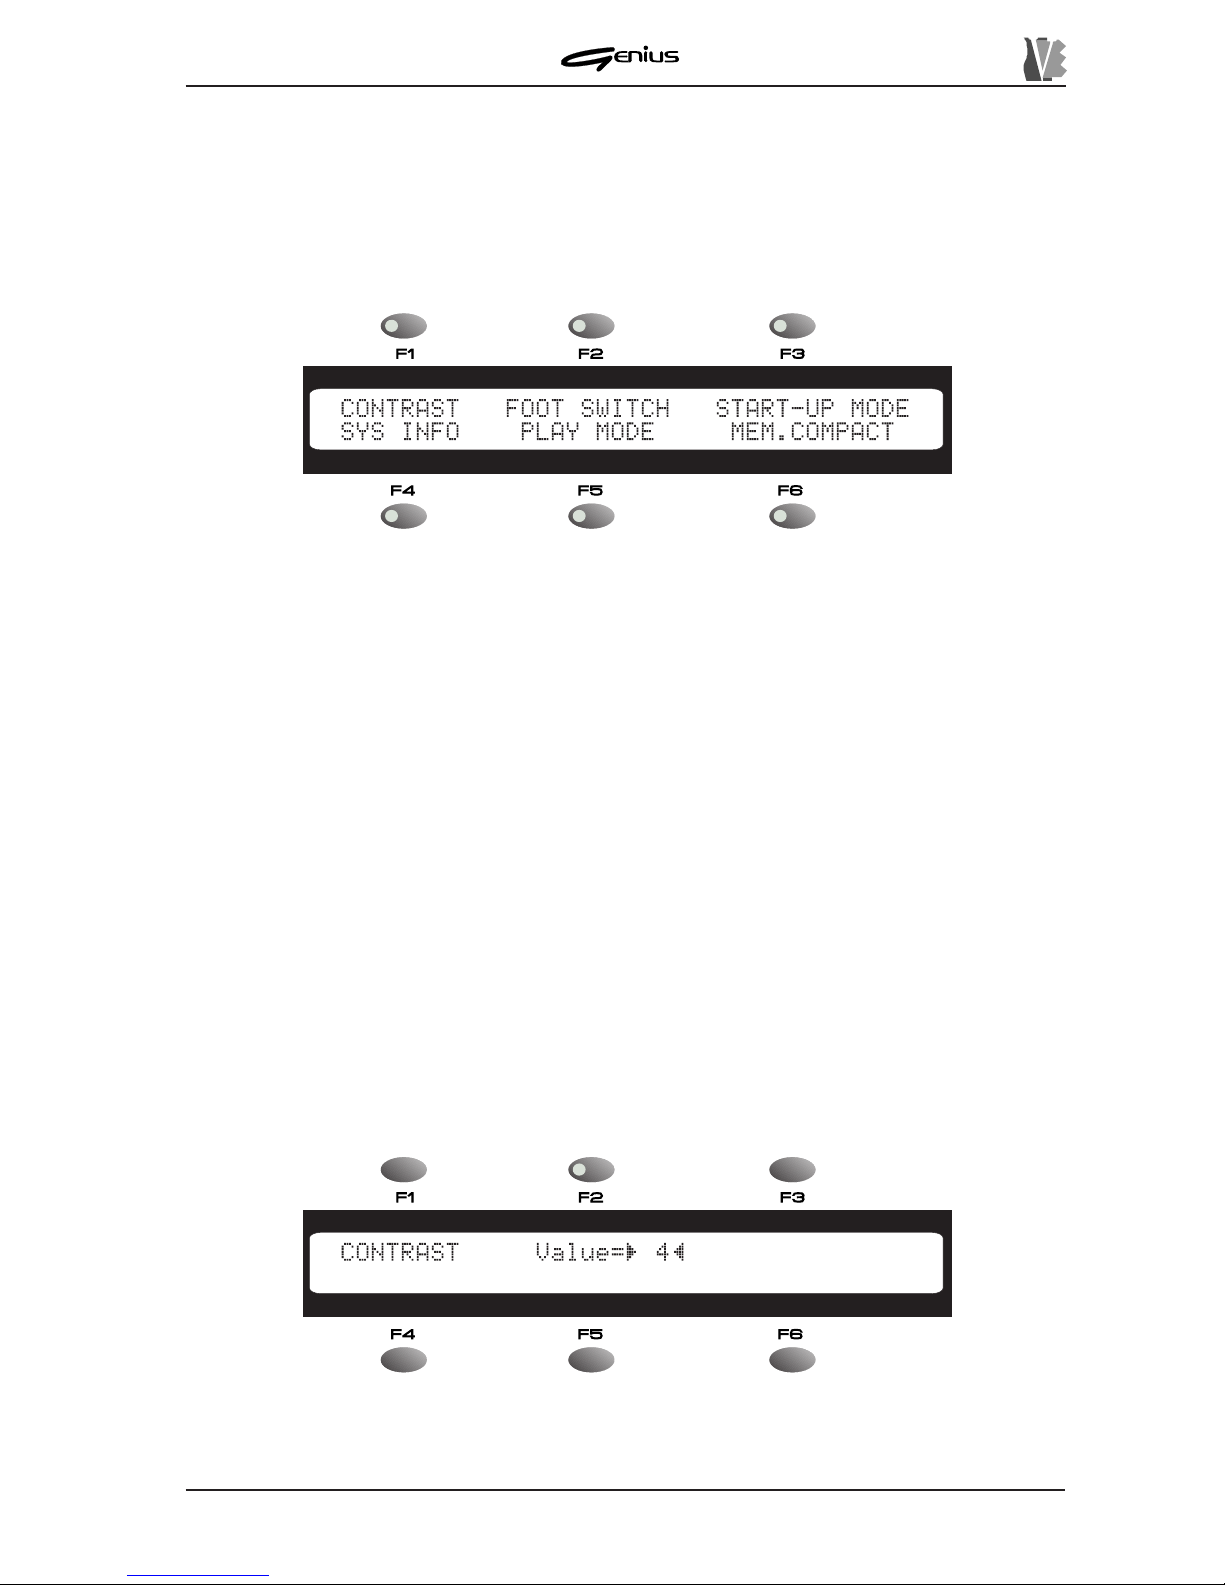
DATA FILER
8.4 SYSTEM
The SYSTEM function of the TOOLS section allows you to make all the general settings of the
instrument, such as adjustment of the display contrast, assignment of given functions to the
pedals, switch-on mode, etc...
When the [SYSTEM] key is pressed, the display will show:
containing the following functions:
o
CONTRAST
: recalled using the [F1] function key – allows adjustment of the display contrast.
o
FOOT-SWITCH
: [F2] – assignment of functions to the optional pedal switches.
o
START-UP MODE
: [F3] – definition of the machine switch-on procedures.
o
SYSTEM INFO
: [F4] – gives information about the main characteristics of the system,
such as the total size of the internal memory and the software release currently installed.
The Factory Settings procedure can also be carried out.
o
PLAY MODE
: [F5] – allows definition of the Play mode, i.e. the mode for playback of the
Song Next.
o
MEM.COMPACT
: [F6] – allows compacting of the internal memory .
Depending on the software release installed, pressing the [NEXT] button will give access to
the settings relating to the operational peripherals. Refer to the user manuals supplied with
the peripherals for further information.
8.4.1 CONTRAST
From the SYSTEM, using the [F1] function key you can select the
CONTRAST
field, allowing
you to set the display contrast value as you prefer, in a range of values between 0 and 15.
151
Page 60
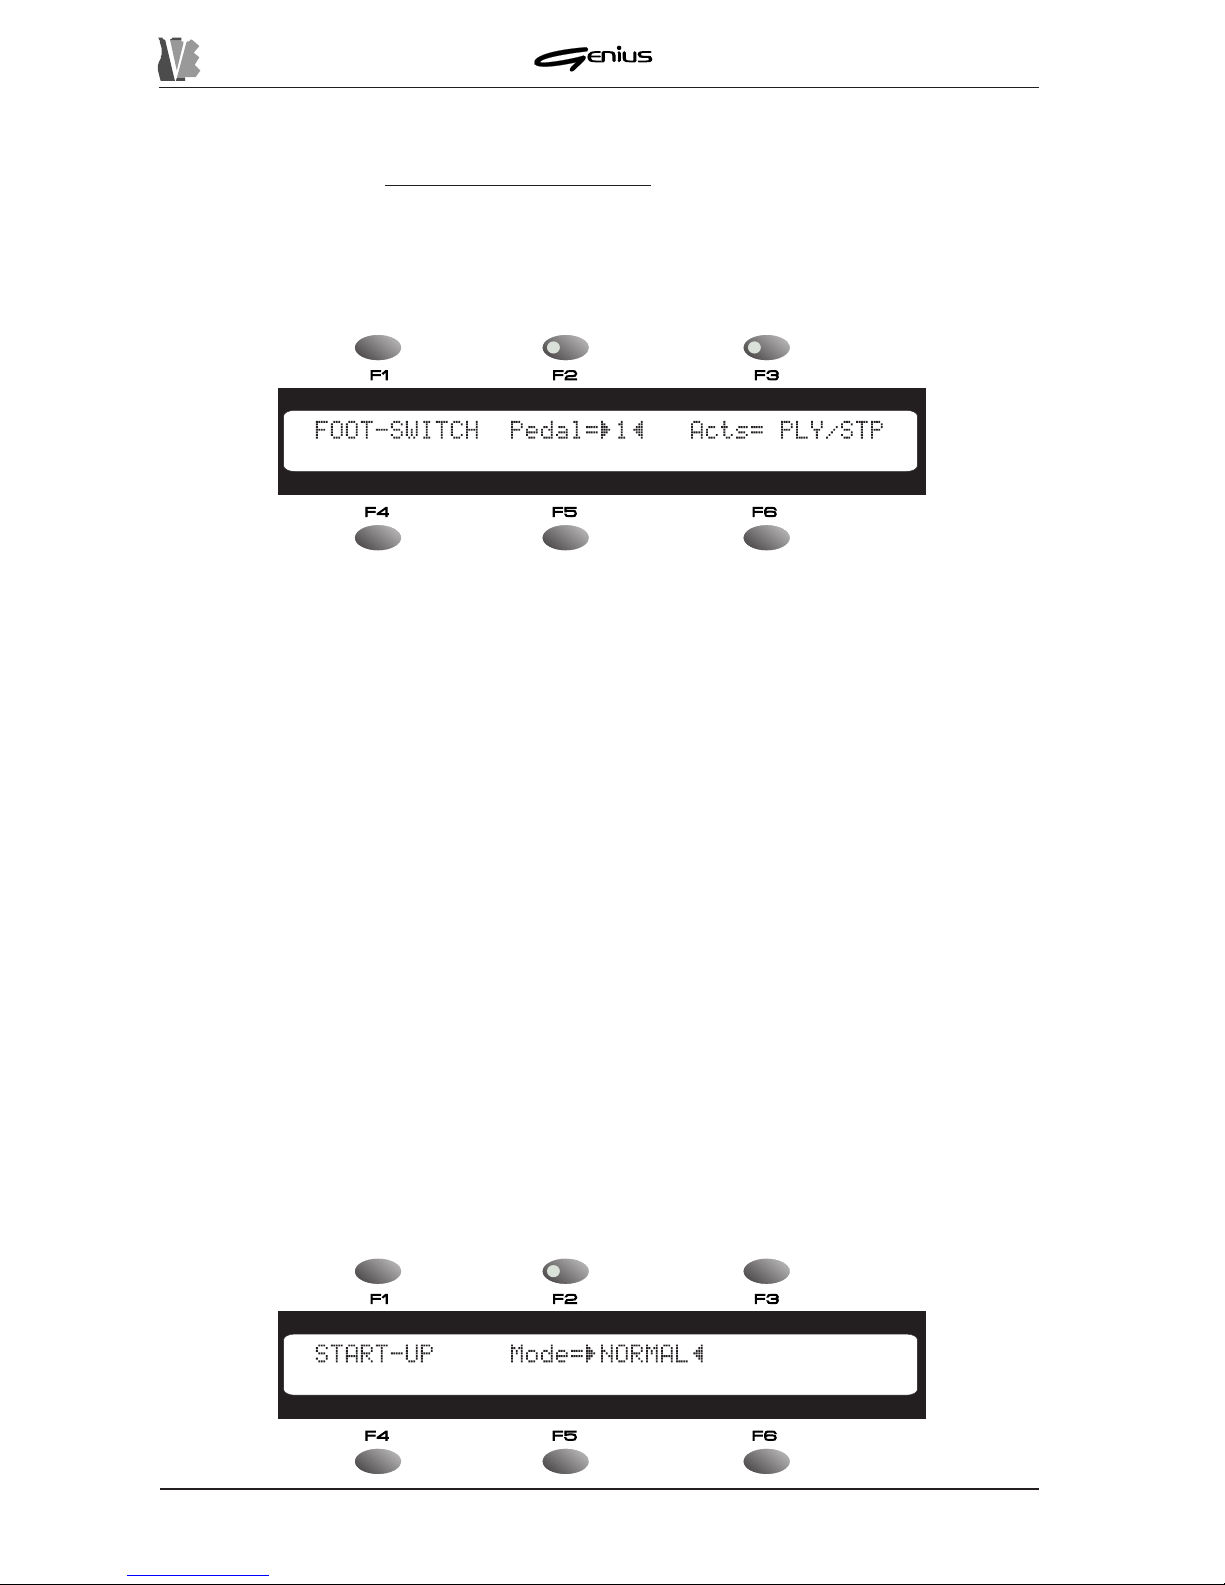
DATA FILER
8.4.2 FOOT SWITCH
Two footswitch pedals with normally open contact can be connected to the instrument by
means of the FOOT [PEDAL1] and [PEDAL2] connectors.
This section allows you to set the way the instrument will respond to pressing of the pedal.
When the [F2] function key is pressed, the display will show:
In the
Pedal
field, selectable with the [F2] function key, you can use the encoder to set the
pedal (1 or 2) to which you intend to assign a given function by means of the
Acts
field
([F3]). The functions which can be assigned to each pedal are as follows:
o
Ply/Stp
: whenever the enabled pedal is pressed, the instrument switches in cyclic
mode between Play and Stop. Pedal-controlled operation will also be displayed by the
status of the LEDs on the [PLA Y] and [STOP] keys.
o
Pau/Cnt
: whenever the pedal enabled for this function is pressed, the instrument will
activate – in cyclic mode - the P AUSE function (momentary interruption of song playback)
and the CONTINUE function (restart of the interrupted playback).
o
SONG+
: whenever the pedal is pressed, the song after the one currently active will be
selected.
o
SONG-
: whenever the pedal is pressed, the song before the one currently active will be
selected.
o
KARAOKE
: pressing the pedal emulates use of the [L YRICS] key .
o
PANIC
: when the pedal concerned is pressed, a sequence of MIDI Panic messages will
be generated autonomously. This is especially useful for re-initialising the sound
generators in case of sudden malfunctions in the MIDI connection or errors in the file
being played.
After making the desired settings, press the [ESC] key to confirm the modifications and exit
from the function.
8.4.3 START-UP MODE
152
Page 61
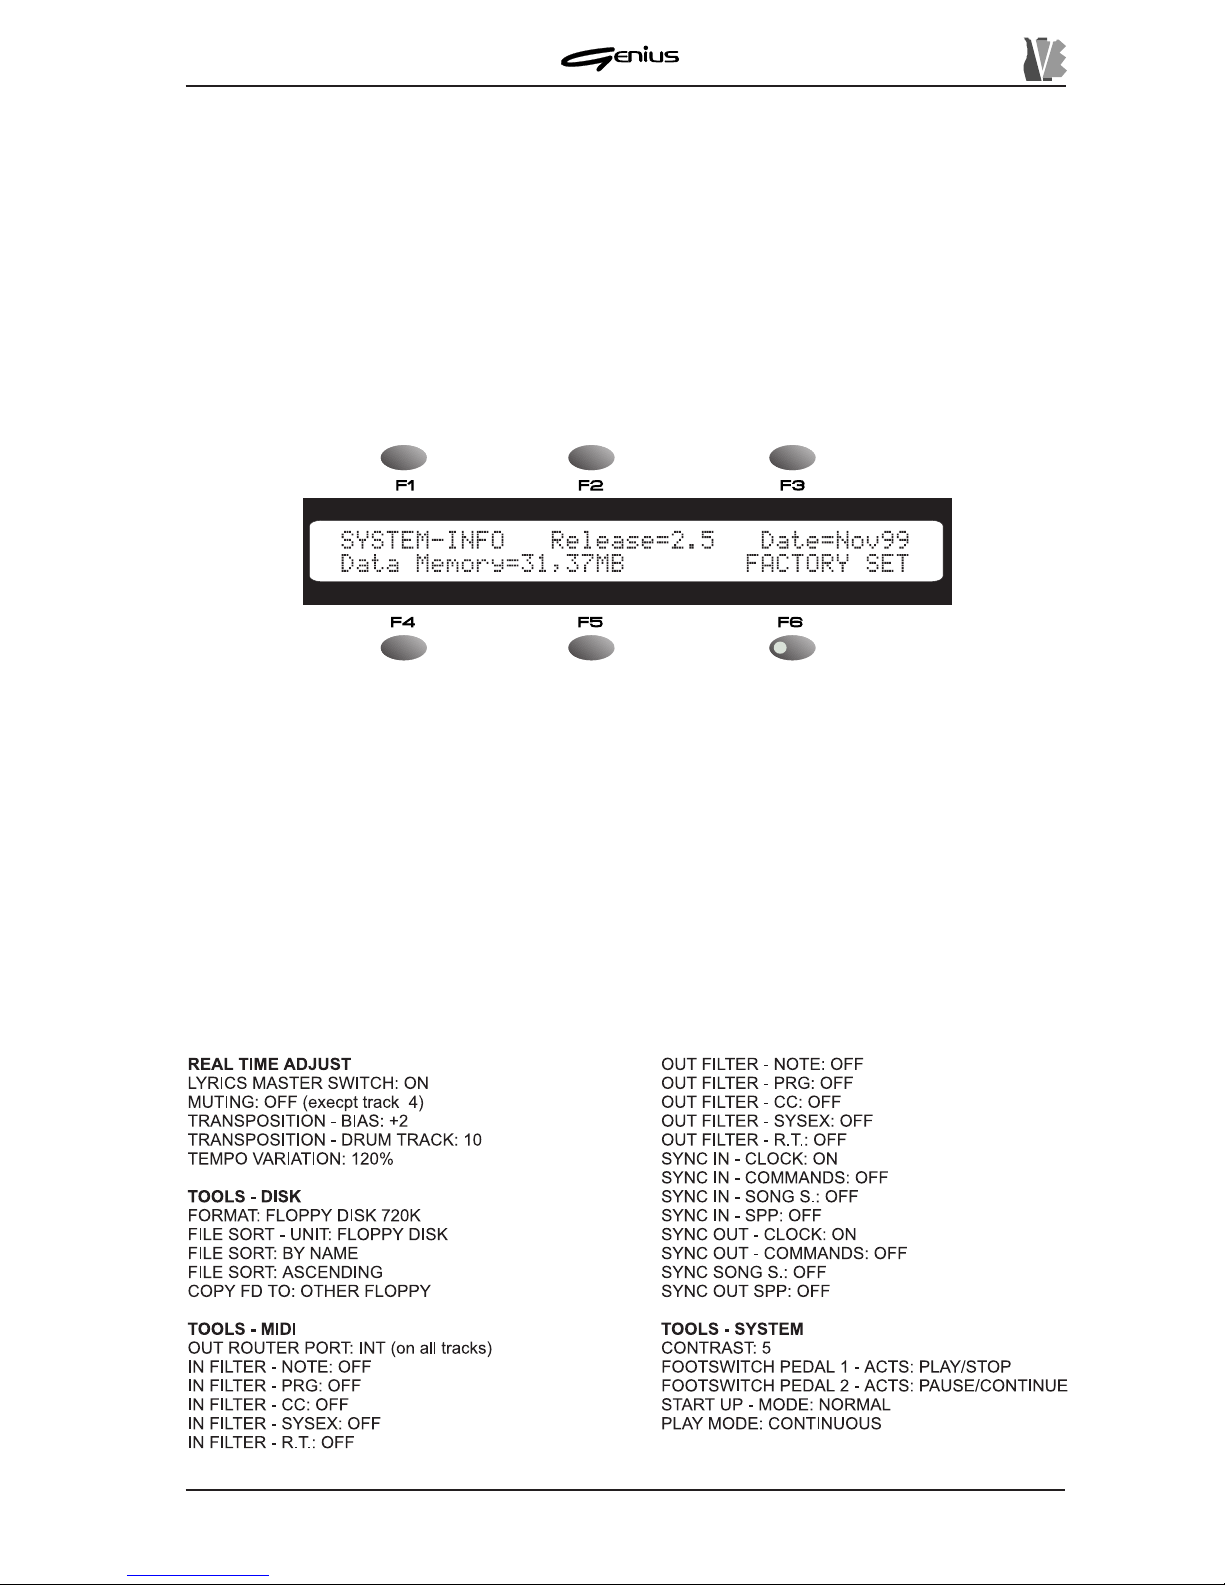
DATA FILER
The ST ART-UP MODE function allows you to set the instrument’s switch-on mode, meaning
whether , at start-up, the display is to show the presentation page (
Normal
) or move directly
to the
MAIN PAGE
(
Fast
).
8.4.4 SYS INFO
This function allows you to display the main characteristics of the system, such as the quantity
of memory installed and the system software version installed on the Genius, with the relative
date of creation.
From the SYSTEM menu, use the [F3] function key to select the
SYSTEM INFO
field; the
display will show:
containing the following fields:
o
Release
: displays the release of the operating system currently installed on the system.
o
Date
: displays the date of creation of the operating system.
o
Data Memory
: indicates the amount of user memory installed in the system (memory
installed – space occupied by the operating system).
F A CTORY SET
The Factory Setting function is used to restore the instrument’s original settings, meaning
that all the modifications made by the user will be eliminated.
The parameters will be set up as described in the table below:
153
Page 62
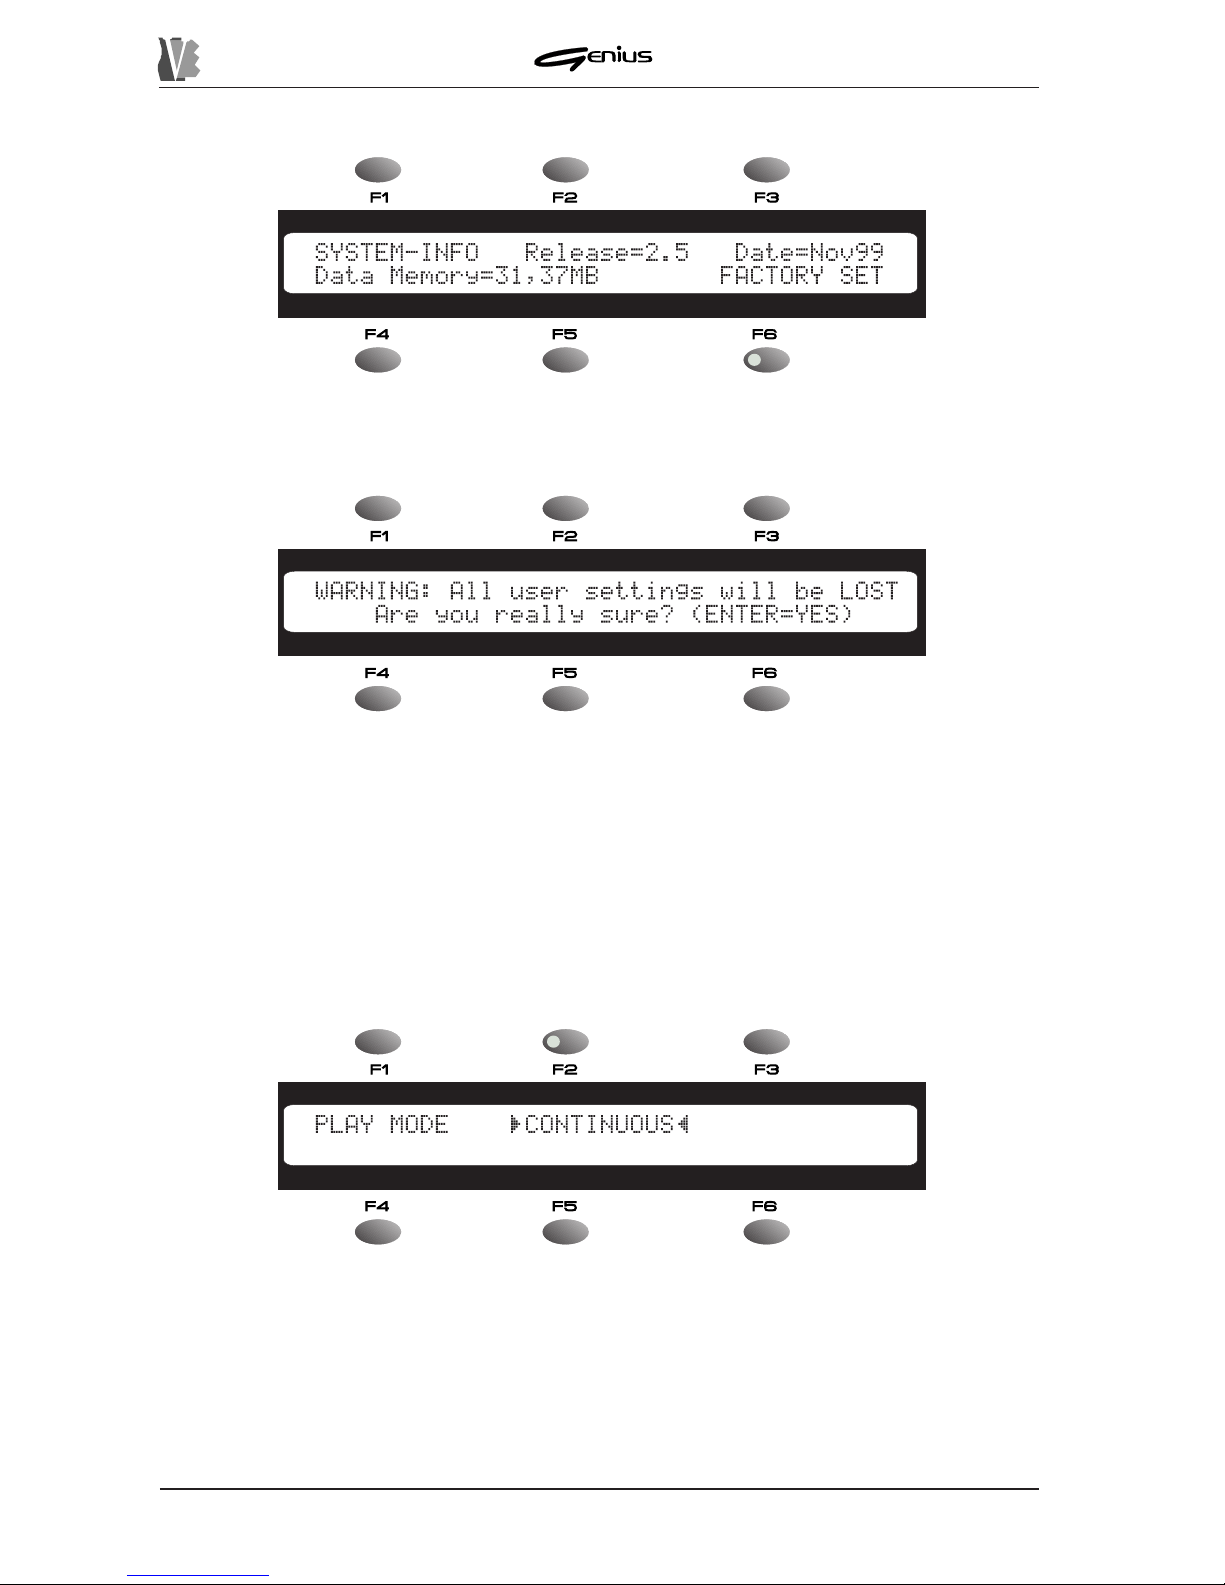
DATA FILER
From the SYSTEM-INFO video page:
press the [F6] function key to activate the Factory Settings procedure.
The display will show the following video page.
informing you that the modifications you make to the system will be lost irretrievably . However,
the files saved in the internal memory will be retained.
When the procedure is complete, the machine will automatically perform a reboot.
8.4.5 PLAY MODE
The PLAY MODE function allows you to set the procedures for automatic playback of the
songs booked in the
SONGNEXT
field of the MAIN PAGE
.
When the
PLAY MODE
field is selected from the SYSTEM menu the display will show:
Y ou can use the encoder to set this parameter as:
o
Continuous
: in this condition, the songs booked will be played automatically . At the
end of the current song, whether natural or forced by pressing the [STOP] button, any
songs booked will be loaded and played automatically .
o
Single
: in this case the song booked will be loaded but has to be started by pressing
the [PLA Y] button.
154
Page 63
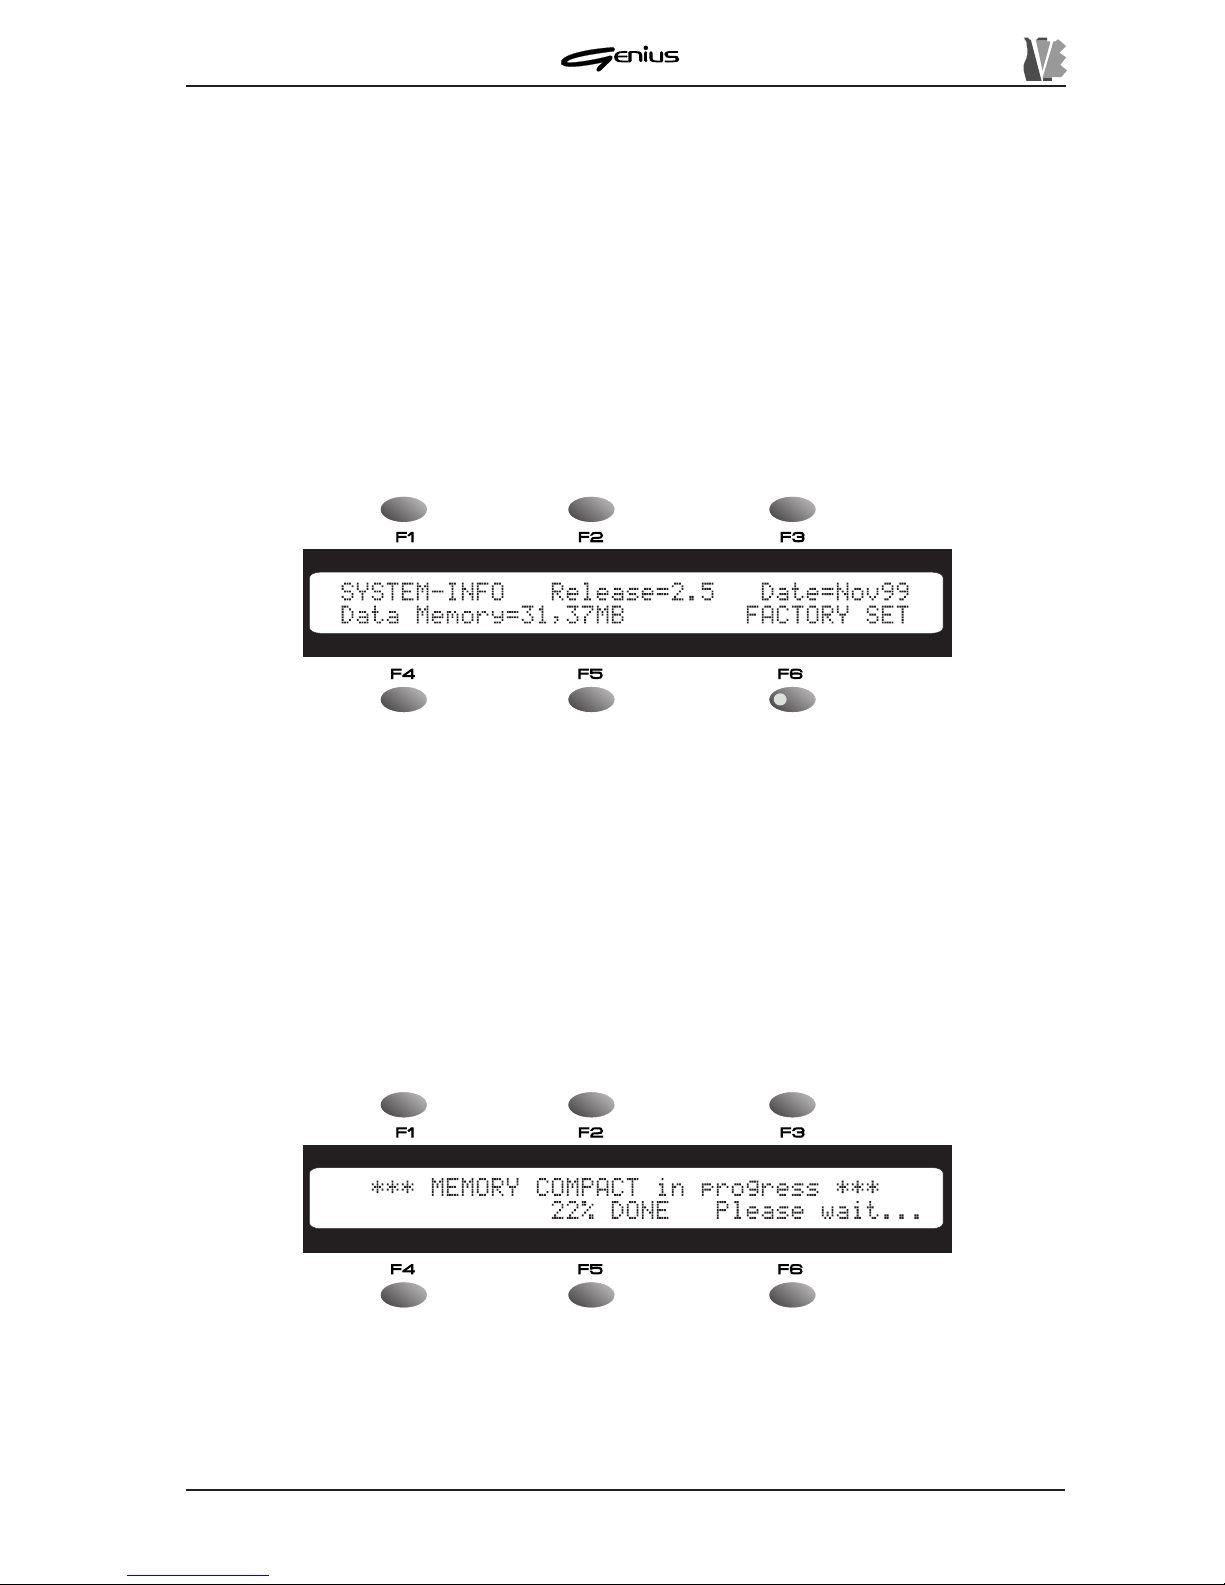
DATA FILER
8.4.6 MEM. COMPACT
In view of the special hardware characteristics of the Genius’s internal flash memory , when a
file is deleted or modified the amount of memory available is not updated. T o make the free
space available, the MEMORY COMP ACT procedure has to be carried out.
WHEN TO CARRY OUT THE MEMORY COMPACT PROCEDURE
The Memory Compact procedure must be carried out when space needs to be cleared in the
internal memory (e.g. Memory Full errors). In general, this procedure is advisable when the
memory capacity allocated but not used exceeds one third of the total memory .
For information about the quantity of memory allocated (not available but unused), display the
INFOS video page of the DISK section (point 8.1.6) for the memory , and subtract the Used
and Free values from the T otal value.
CARRYING OUT THE MEMORY COMPACT PROCEDURE
Depending on the quantity of memory installed and the number of files present, this operation
might take several minutes. Y ou should therefore only carry out this operation in when really
necessary .
Also note that the Memory Compact procedure will automatically sort the contents of the
memory in ascending alphabetical order .
When the [F6] function key is pressed from the SYSTEM menu, the instrument will request a
confirmation to proceed (
Are You Sure ?
).
If confirmation is given, the system will display:
A progress percentage will indicate the progress made with the Memory Contact procedure.
When the operation is complete, the SYSTEM menu will be displayed.
155
Page 64
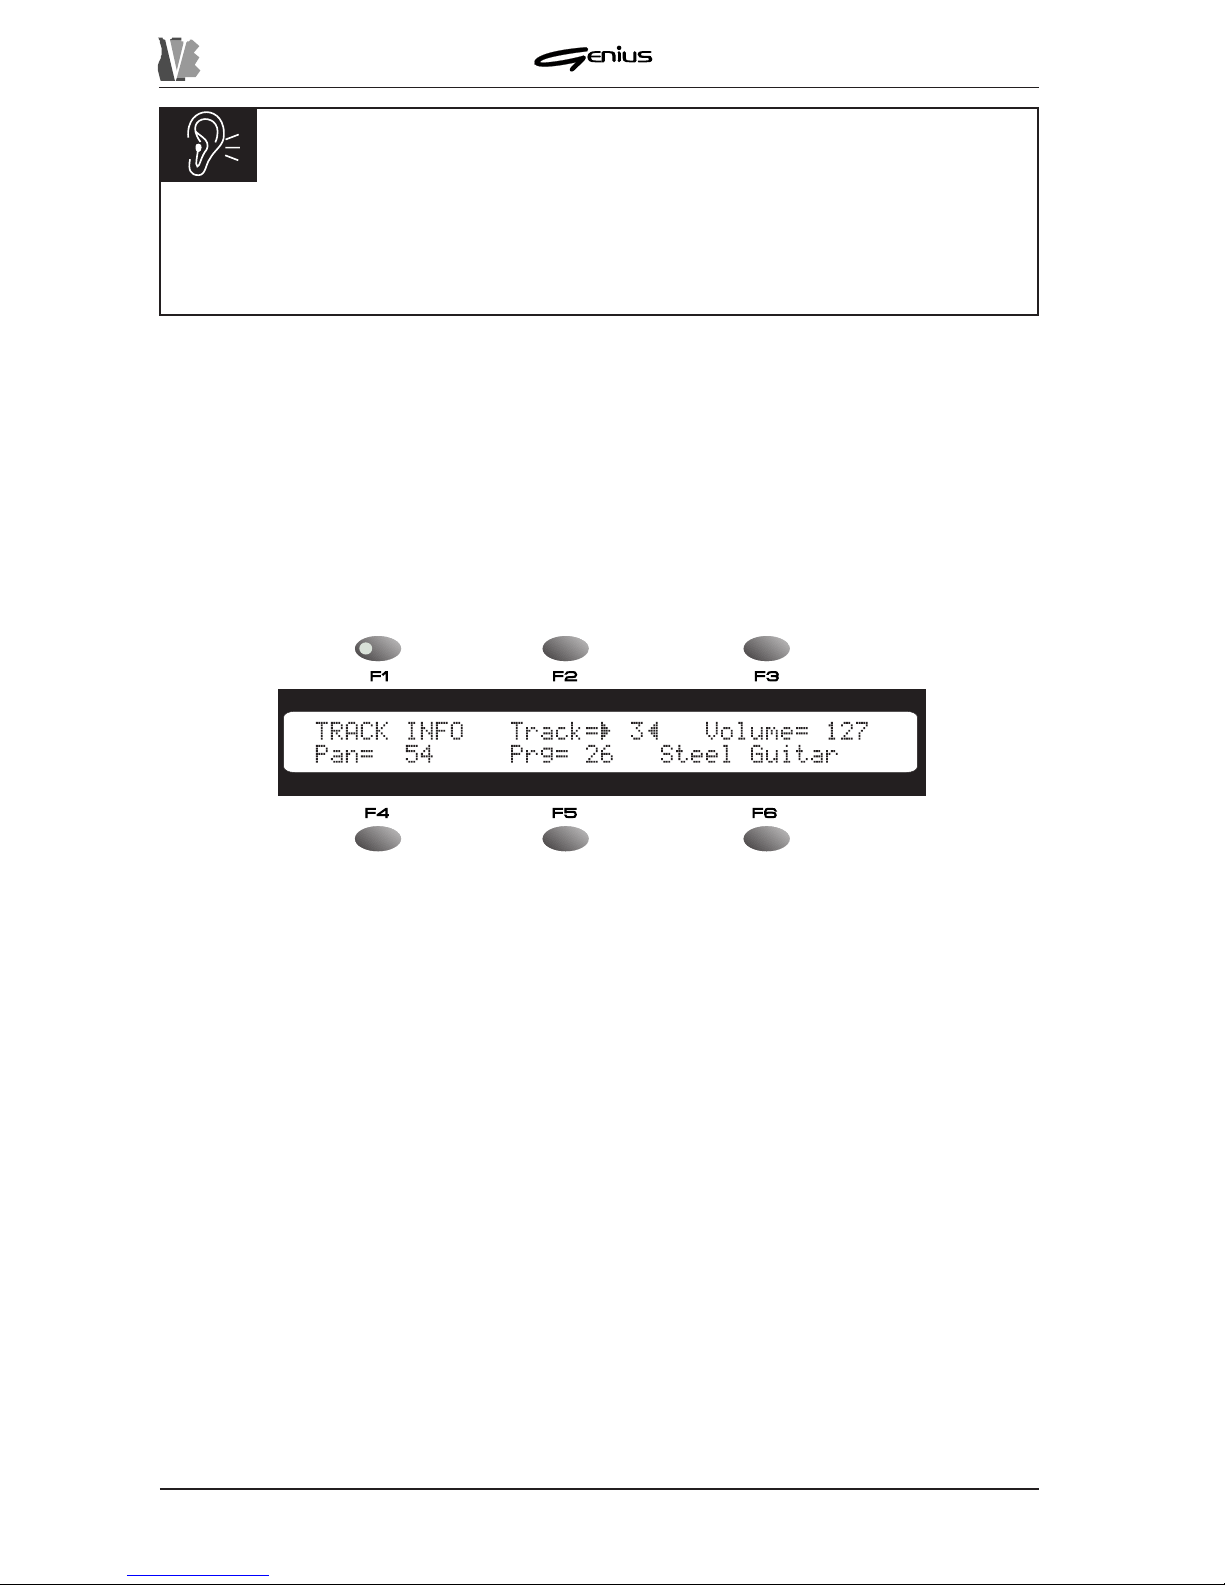
DATA FILER
CAUTION!!
Never switch the instrument off during Memory Compact operations. In this case, all
the contents of the internal memory, including the operating system, will be lost
irretrievably.
8.5 THE TRACK INFO FUNCTION
The TRACK INFO function allows the user to obtain the main parameters for each individual
track in the song being played.
One important feature of this function is that it can be recalled in real time. By pressing the
[P ART INFO] key in the TOOLS section, the function can also be made active both in instrument
STOP status and in PLA Y status, i.e. during performance of a song.
When this is done, the display will show the video page:
containing the following fields:
o
Track
: this field allows the user, by means of the encoder, to select the track (MIDI
channel) for which the information is to be displayed.
o
Prg
: displays the number of the Program Change active and the number of the associated
timbre in accordance with the General MIDI standard on the selected track.
o
Volume
: displays the current value of the track volume.
o
Pan
: displays the Pan-Pot value.
o
Rv
: displays the level of the reverb effect.
o
Ch
: displays the level of the Chorus effect.
As we now know , the Genius implements a Direct-to-Disk reading system which reads the
data during playback. It is therefore obvious that the data may vary (e.g. the Volume) during
the Play . Also note that in the Stop position this function will only display the data relating to
the first line of the selected song. The value
---
indicates that the value is not defined in
accordance with the standard commands (it might be set by means of exclusive system
messages).
When the [ESC] key or the [P AR T INFO] key is pressed, the display will return to the MAIN
P AGE.
156
Page 65
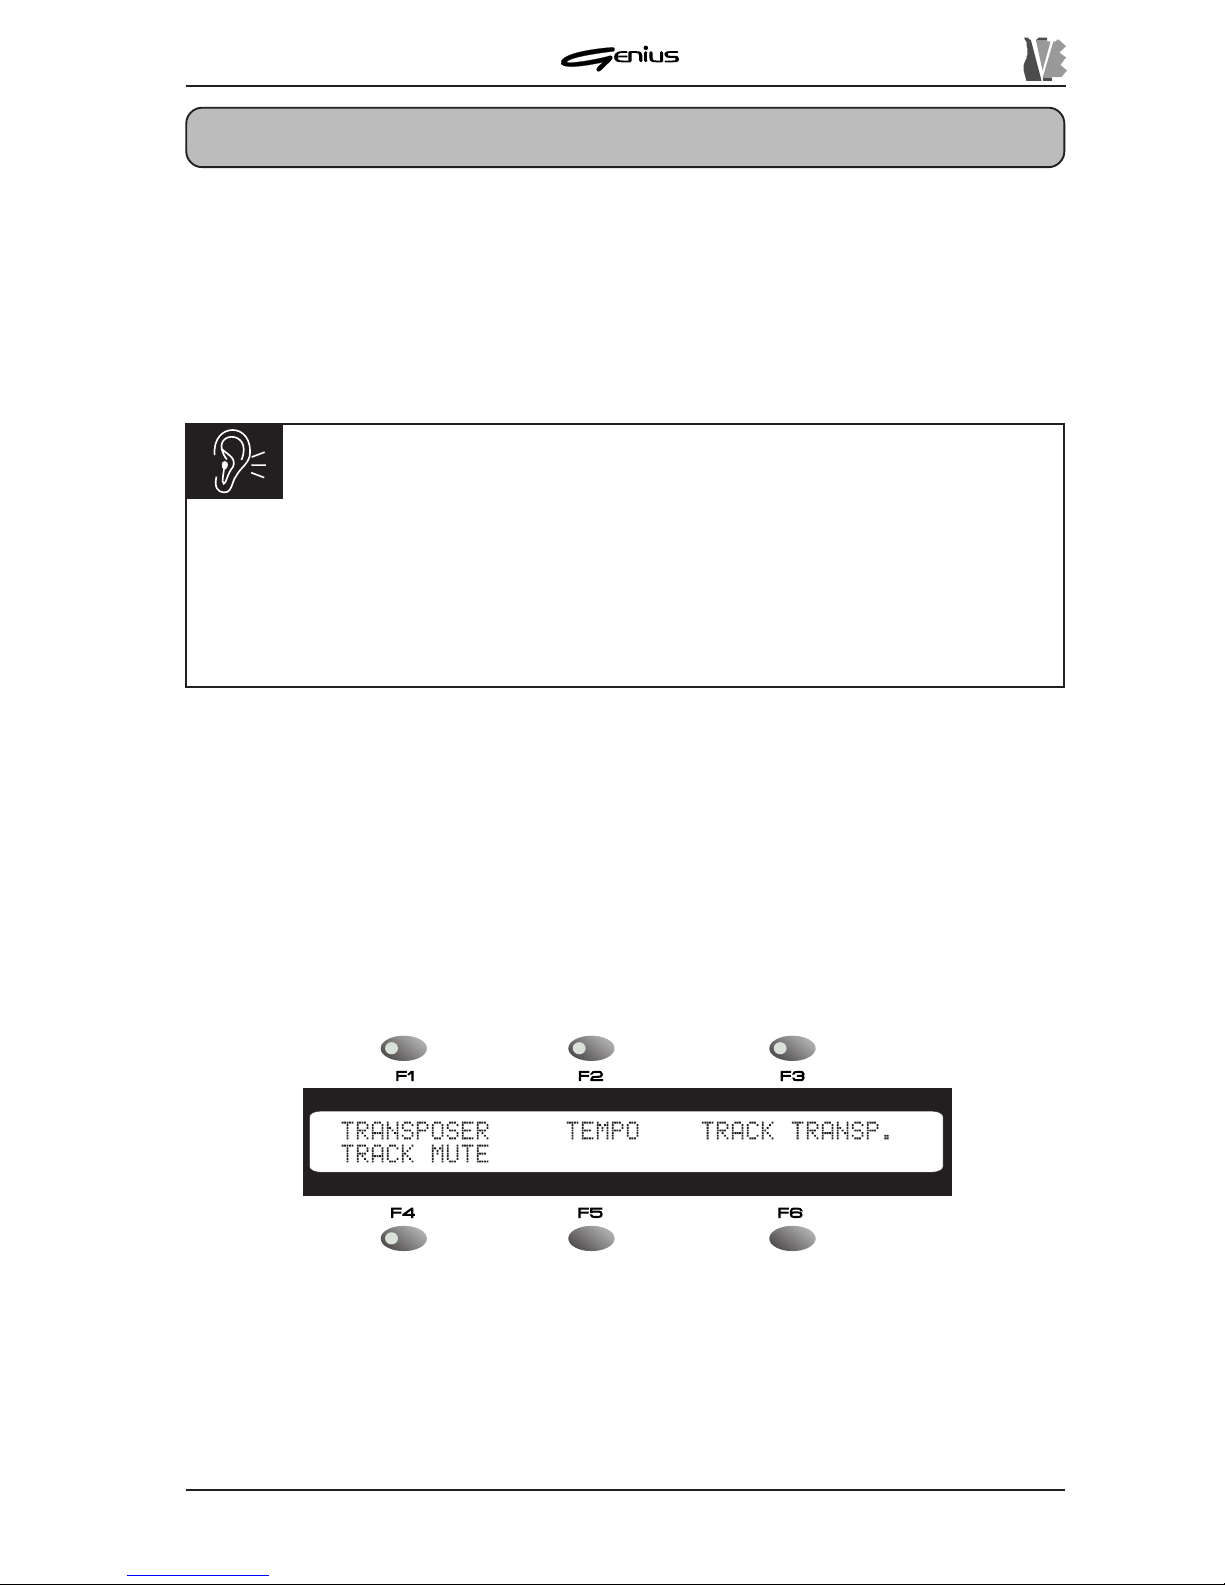
DATA FILER
9. EDIT
In the REAL TIME ADJ section (point 6) we have seen that the Genius is able to modify a
number of the characteristics of the song currently selected. The Real Time modifications
can be activated in real time, but they cannot be saved differently for each song.
The purpose of the EDIT section is to allow the user to modify the overall parameters and
those of each individual track of each song and to save them (whether the song file is on a
floppy disk or in the internal memory).
As well as this the EDIT section contains the EDIT LIST function, used to create lists of songs
which can be played in an automated sequence once they have been recalled.
9.1 EDIT SONG
By means of the EDIT SONG function, the Genius allows the user to modify the overall
parameters of a song. He can therefore perform transpositions, modify the metronome tempo
or delete tracks. Naturally , these modifications can be saved.
Select the song you wish to modify and press the [SONG] key of the EDIT section on the front
panel. The display will show the menu of the EDIT SONG function:
containing the following procedures:
o
TRANSPOSER
: selectable using the [F1] function key – enables the procedure for
transposition of the whole song.
o
TEMPO
: [F2] – allows modification of the metronome tempo of the song.
o
TRACK TRANSP.
: [F3] – procedure for transposing individual tracks.
o
TRACK MUTE
: [F4] – allows specific tracks to be excluded from the playback.
157
IMPORTANT NOTES
ü
The EDIT functions can only be recalled in STOP condition. The modifications will
refer to the song currently active, i.e. the one in the field corresponding to key [F1] in
the MAIN PAGE.
ü
When the EDIT functions are accessed, the REAL TIME ADJUST functions are
deactivated.
Page 66
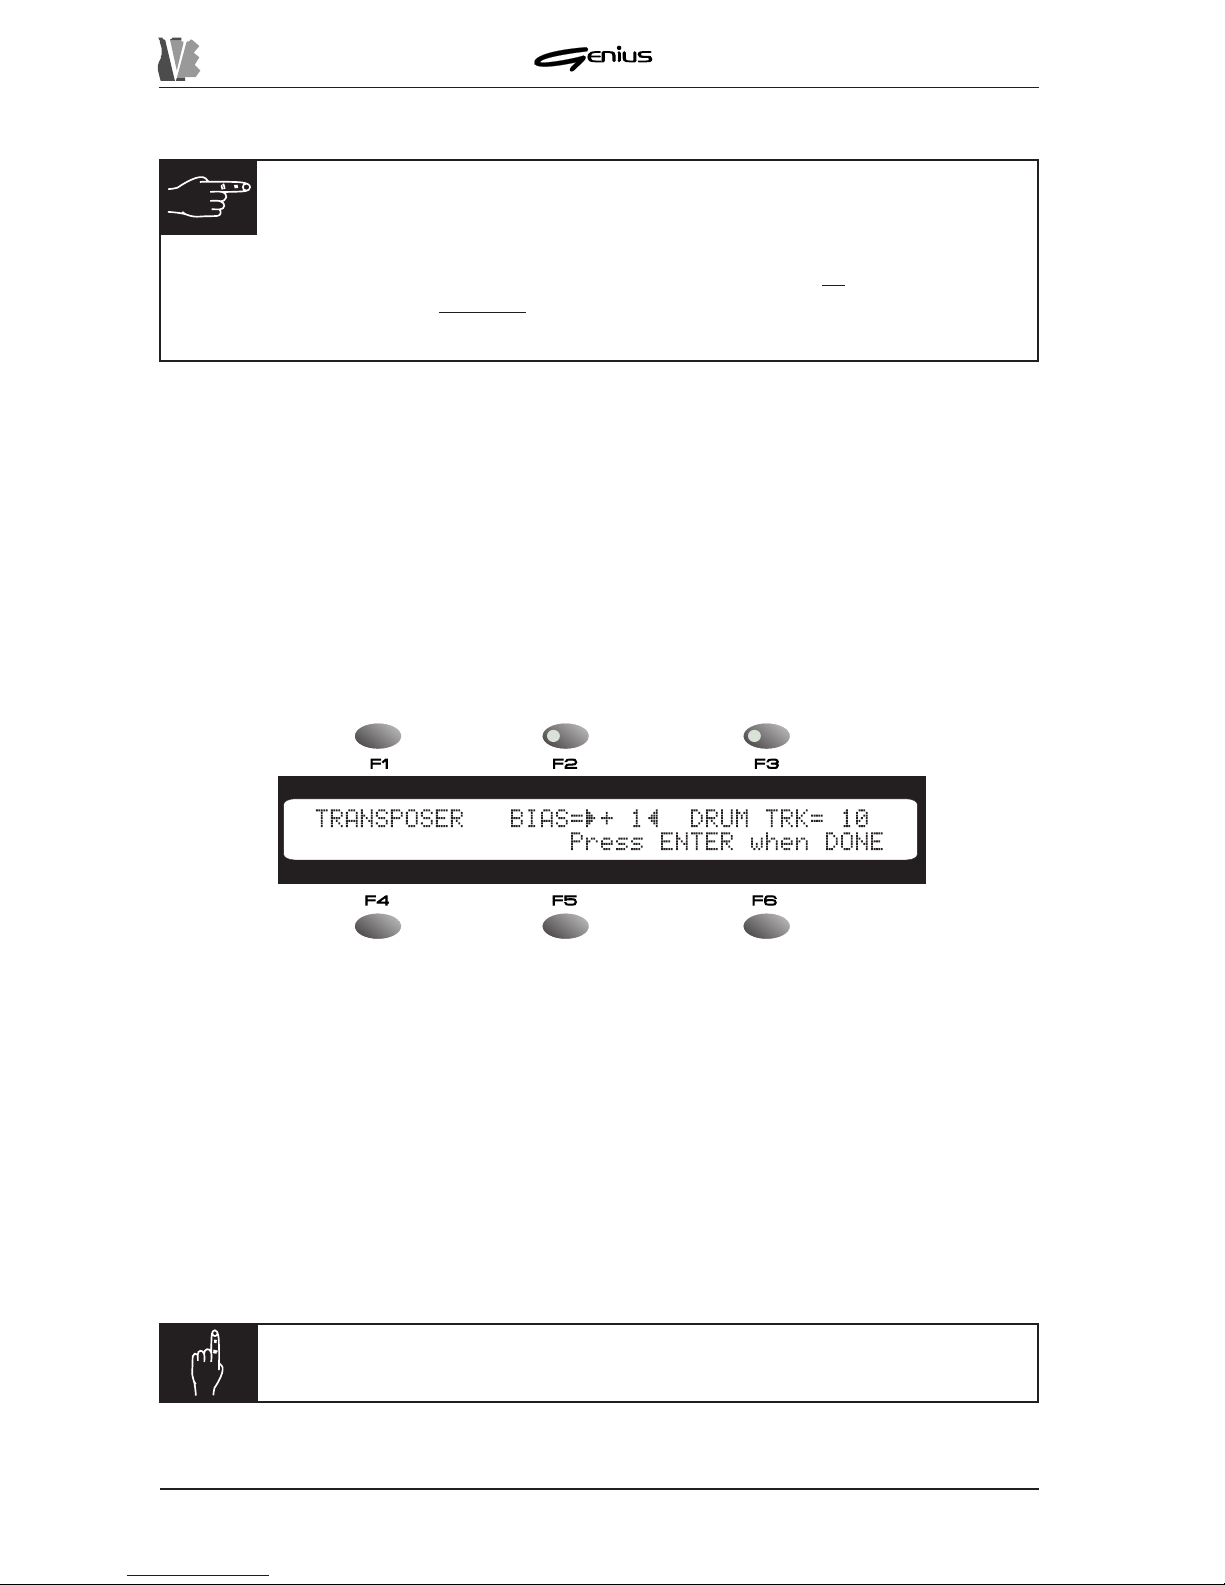
DATA FILER
When the [ESC] key is pressed, the instrument will return to the MAIN P AGE.
9.1.1 EDIT SONG - TRANSPOSER
The TRANSPOSER function allows you to transpose all the tracks of a song (for the whole of
its duration) by +/- 12 semitones, with the exception of the track used for the drum kit timbres
(DRUM TRACK).
After selecting the song you wish to modify from the MAIN P AGE (whether resident on floppy
disk or in the memory) recall the EDIT SONG - TRANSPOSER function by pressing the [F1]
function key in the EDIT SONG menu.
The display will show:
Y ou can use the
BIAS
parameter (function key [F2]) to set the transposition value, while the
DRUM TRK
field ([F3]) allows you to specify which is to be the Drum Track, i.e. the track
which must not be transposed.
As the display describes, when the [ENTER] key (its LED is flashing) is pressed, the
modifications will be accepted and saved in the temporary memory area, pending definitive
memorisation when you exit from the EDIT SONG function (see point 9.1.6).
Pressing the [ESC] key will abort the operation; in both cases, the display will return to the
EDIT SONG function menu.
Y ou can also listen to the song with the modifications made before saving it by simply pressing
the [PLA Y] button. For more information, refer to point 9.1.5 relating to the temporary Play
function.
N.B.:
The chords eventually displayed with not be transposed.
158
A PIECE OF ADVICE.
In case of complex songs, recalculation of the songs with the modifications
made and the relative saving procedure (which we will discuss below) may
take several minutes. You are therefore recommended to make all the modifications
you require on this section
and then carry out the saving procedure at the end (and not
save each modification as made).
Page 67
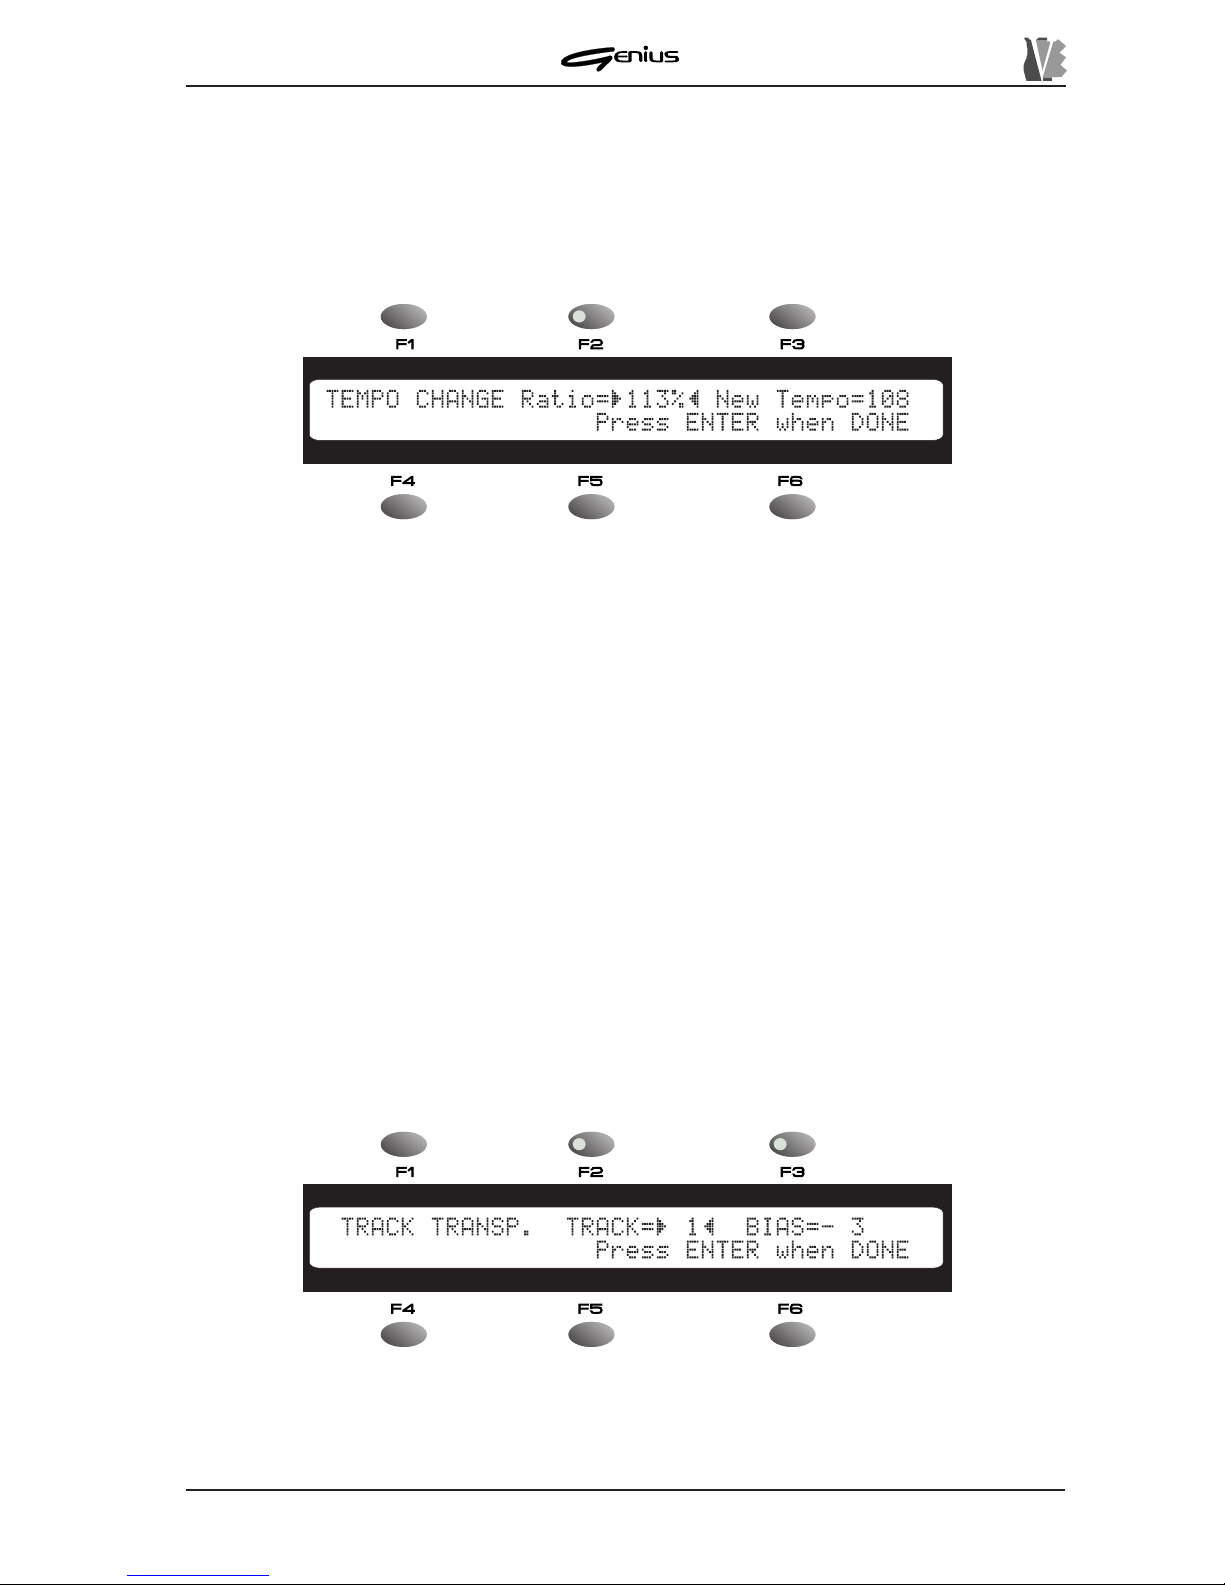
DATA FILER
9.1.2 EDIT SONG – TEMPO
The EDIT SONG – TEMPO procedure allows you to modify the metronome tempo of the
active song. After selecting the song you require, press the [SONG] button in the EDIT section
and then key [F2] associated to the
TEMPO
field.
The display will show:
The
TEMPO CHANGE Ratio
field allows the user to regulate the percentage recalculation
of the tempo to be applied to the entire song. A percentage modification is used in order to
guarantee a proportional variation even in case of “rallentandos” or “accelerandos” envisaged
during performance of the song. A
TEMPO CHANGE Ratio
value of 100% means that in
this case the new tempo will be equal to 100% of the original value, so there will be no change.
The possible bpm values cover a range from 50 to 250.
T o simplify the setting of the new bpm value, the
NEW TEMPO
field will display the outcome
of the calculation of the variation made.
As the display indicates, when [ENTER] is pressed the modifications will be accepted and
memorised in the temporary memory area. Refer to point 9.1.6 for definitive saving of the
modified song. If the [ESC] key is pressed, the modification will be aborted.
9.1.3 EDIT SONG – TRACK TRANSPOSER
The TRACK TRANSPOSER allows individual transposition of each track in the song within a
maximum range of +/- 12 semitones.
From the EDIT SONG menu, use the [F3] function key to select the
TRACK TRANSP.
field;
the display will show the video page:
159
Y ou can use the
TRACK
field to select the track you wish to transpose.
The
BIAS
field, selected using the [F3] function key, allows you to set the transposition of the
track specified with the
TRACK
parameter .
Page 68
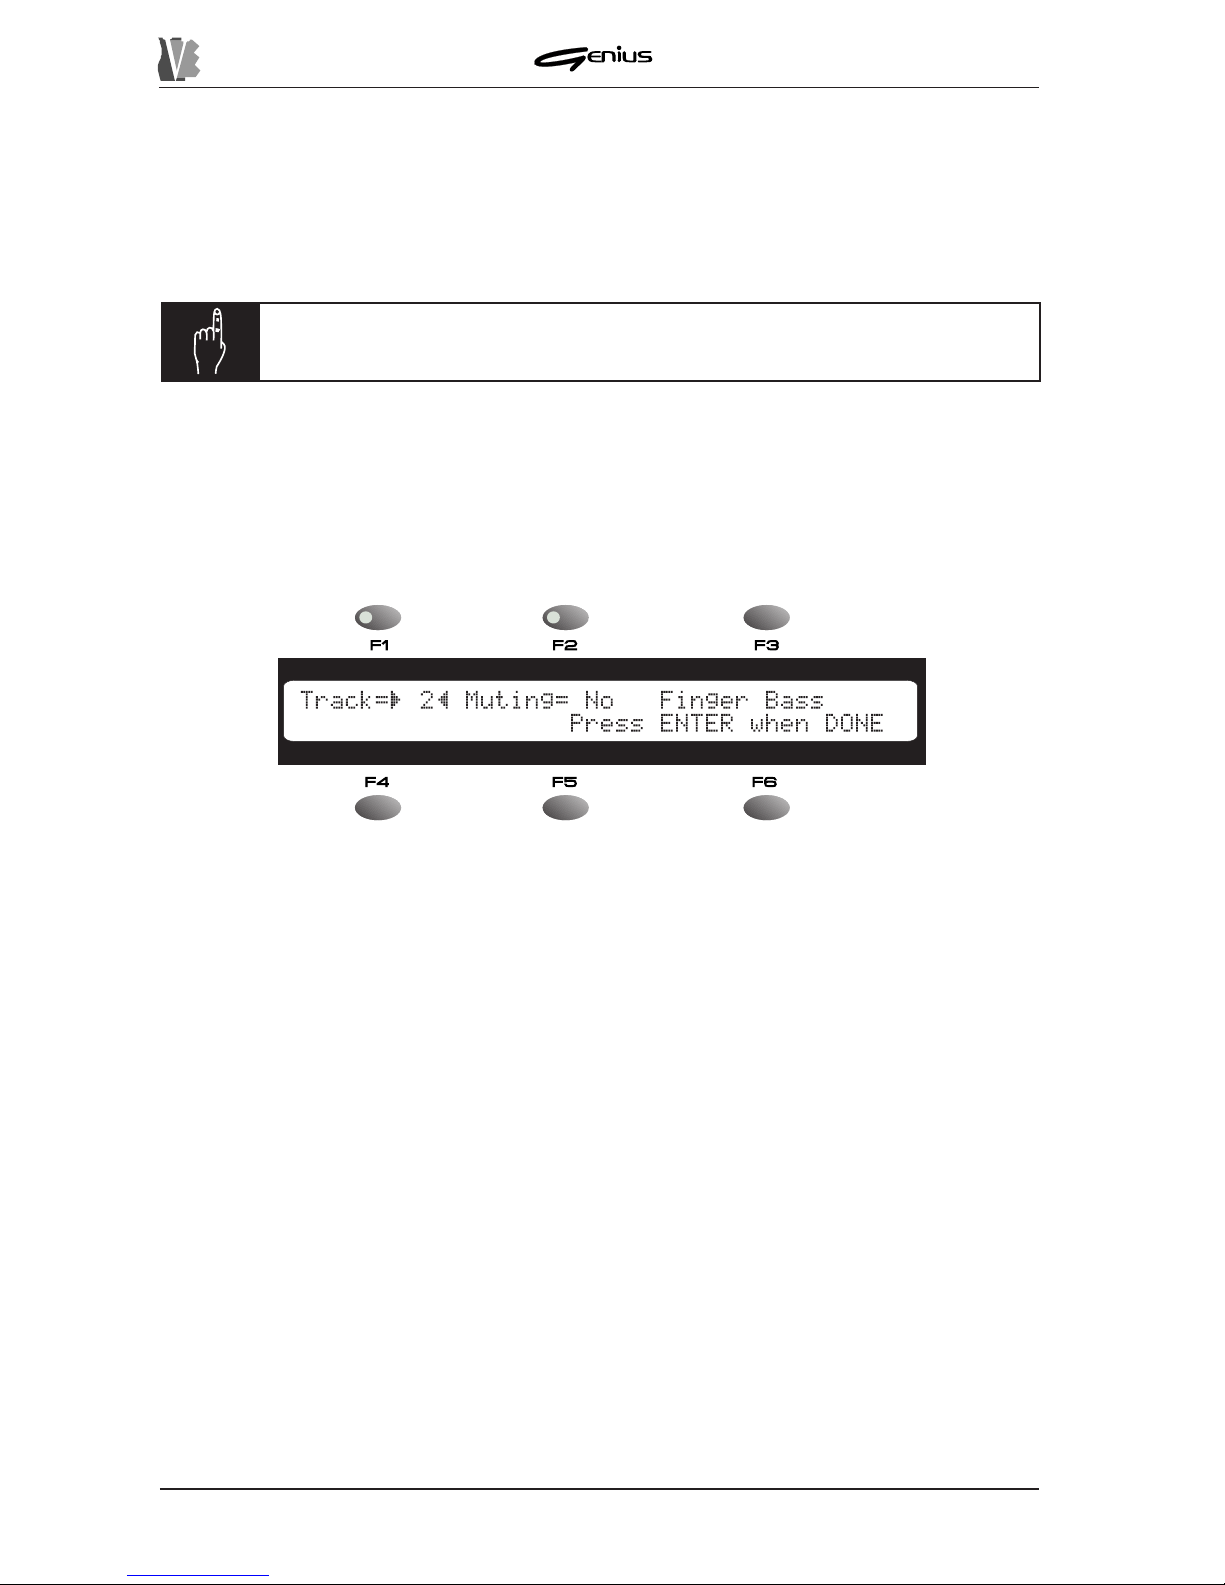
DATA FILER
Use the encoder to change the value of the parameters.
When the procedure is complete, press the [ENTER] key to confirm or [ESC] to abort the
modifications, after which the menu of the EDIT SONG function will be displayed. Y ou can
use the temporary Play procedure (point 9.1.5) to listen to the modifications made before
memorising them definitively by exiting from the EDIT SONG function.
9.1.4 EDIT SONG – TRACK MUTE
The EDIT SONG – MUTE TRACK procedure allows the user to set the track whose note
events are to be deleted from the selected song; this procedure leaves the track in question
permanently without audible events.
The
Track
field, next to the [F1] key allows the user to set which of the 16 tracks will be
affected by the Mute operation.
The second field ([F2]) allows the user to choose whether to eliminate from the playback
(
Muting=YES
) or to retain (
Muting=NO
) the track specified by means of the
Track
parameter.
The third field, for display only, shows the name of the timbre associated to the Program
Change (General MIDI table) currently present in the selected track. Since the Genius is a
reader with Direct-to-Disk reading system, the value of the Program Change refers to the bar
currently selected (first line of the song when the instrument is in Stop condition). The value
-
--
indicates that the datum is not set in accordance with the standard commands (it might
be defined by means of exclusive system messages).
This video page allows the user to set more than one MIDI channel (T rack) in Mute status, and
whenever it is selected by means of the
Track
field its status will be displayed on the basis
of the current condition.
When the [ENTER] key is pressed the new setup will be activated and the result of the change
can be listened to using the temporary Play function. Here again, the modifications are
temporary and will be saved on file following the procedure described in point 9.1.6.
160
N.B.:
The chords eventually displayed with not be transposed.
Page 69
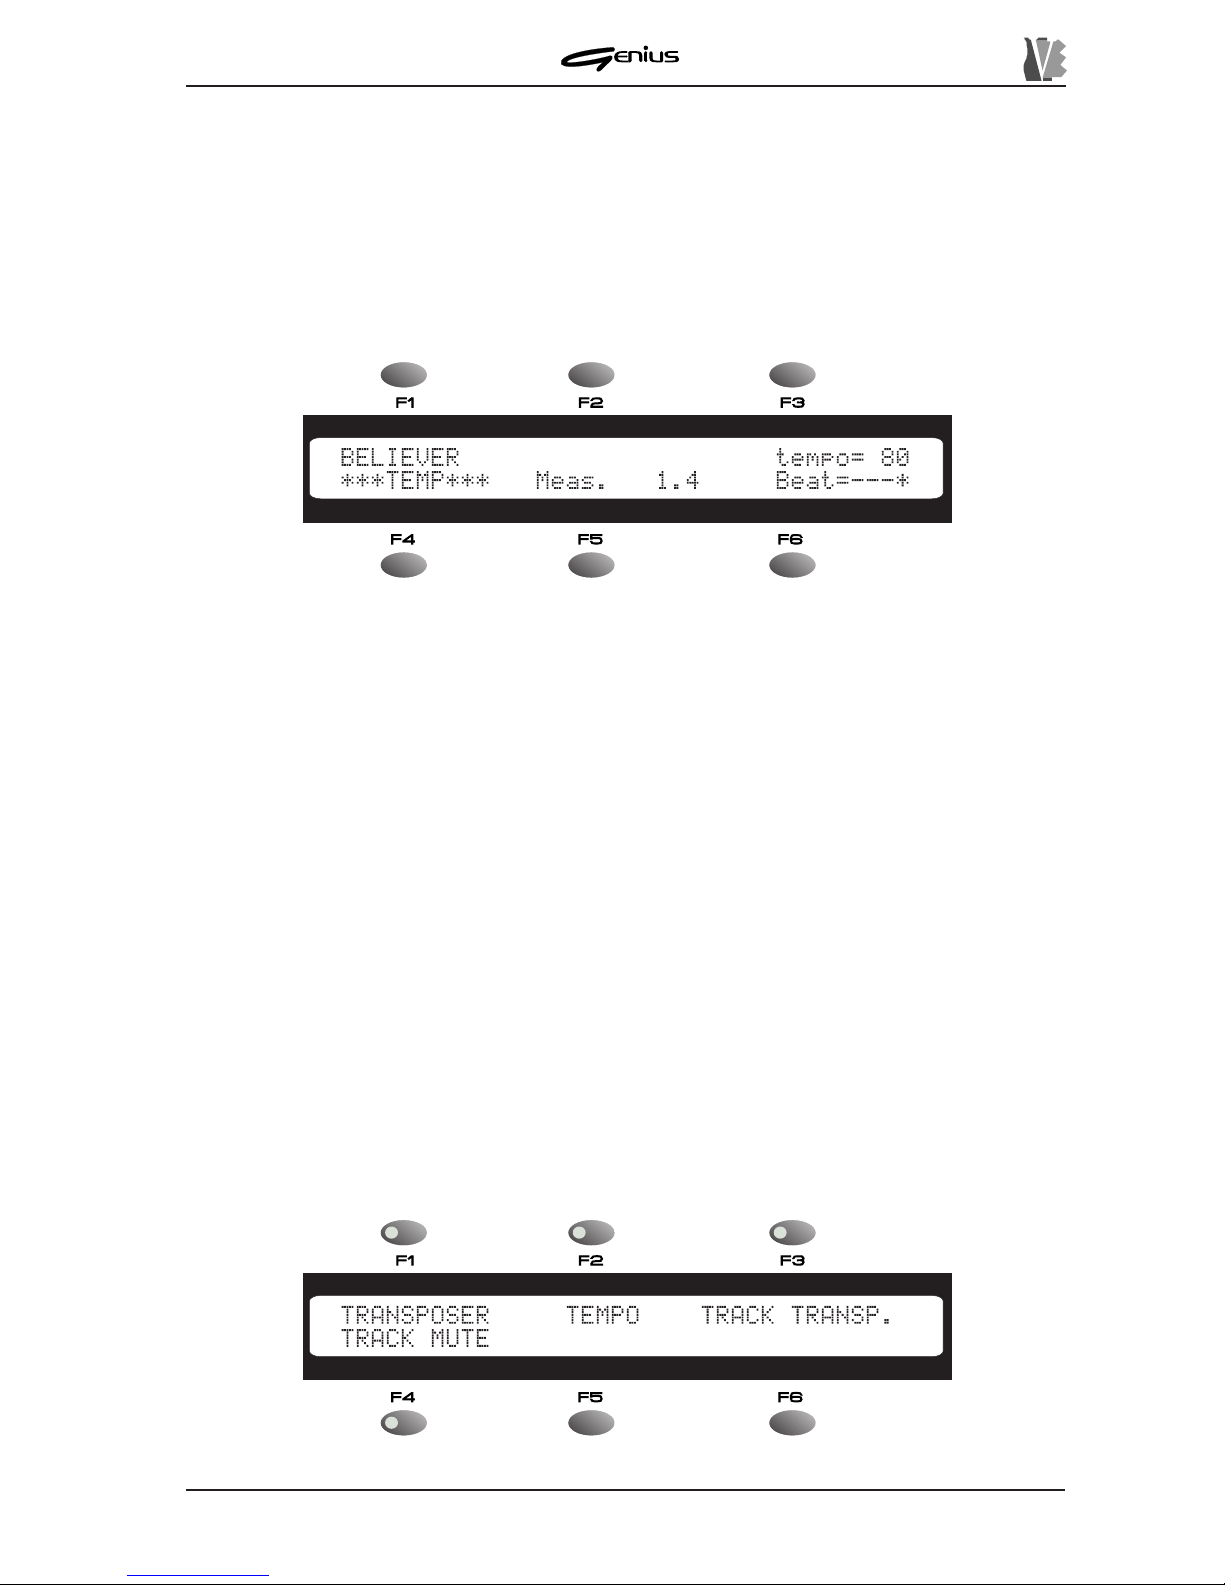
DATA FILER
9.1.5 EDIT SONG – TEMPORARY PLAY
The Genius allows the user to listen to the song modified using the EDIT SONG functions,
before it is definitively saved; you can therefore listen to the changes you have made and
assess their effectiveness before saving them.
When the [PLA Y] key is pressed from any EDIT SONG menu function, the instrument will play
the provisional version of the song and the display will show:
The field next to the [F1] function key contains the name of the song being played using the
temporary function. This condition will be displayed by the
***TEMP***
field.
The other three fields have the same function as the MAIN P AGE.
As during normal playback of a song, during the temporary play function you can use the
[REW] and [FF] keys to locate a given bar number within the song. T o stop the playback for a
moment, use the [P AUSE] key .
Press the [STOP] key to abort the TEMPORARY PLAY function and return to the previous
video page.
During the temporary Play , the display will also show any lyric information the song contains;
press the [L YRICS] key to disable the display .
9.1.6 EDIT SONG – SAVING THE MODIFICATIONS
We have described how to make the modifications to the main parameters of a song and
how to play it back in its temporary form.
At this point, you can decide whether to go ahead and save the song definitively or to abandon
the EDIT SONG function, aborting all the modifications made.
After making all the modifications you require from the EDIT SONG menu:
161
Page 70
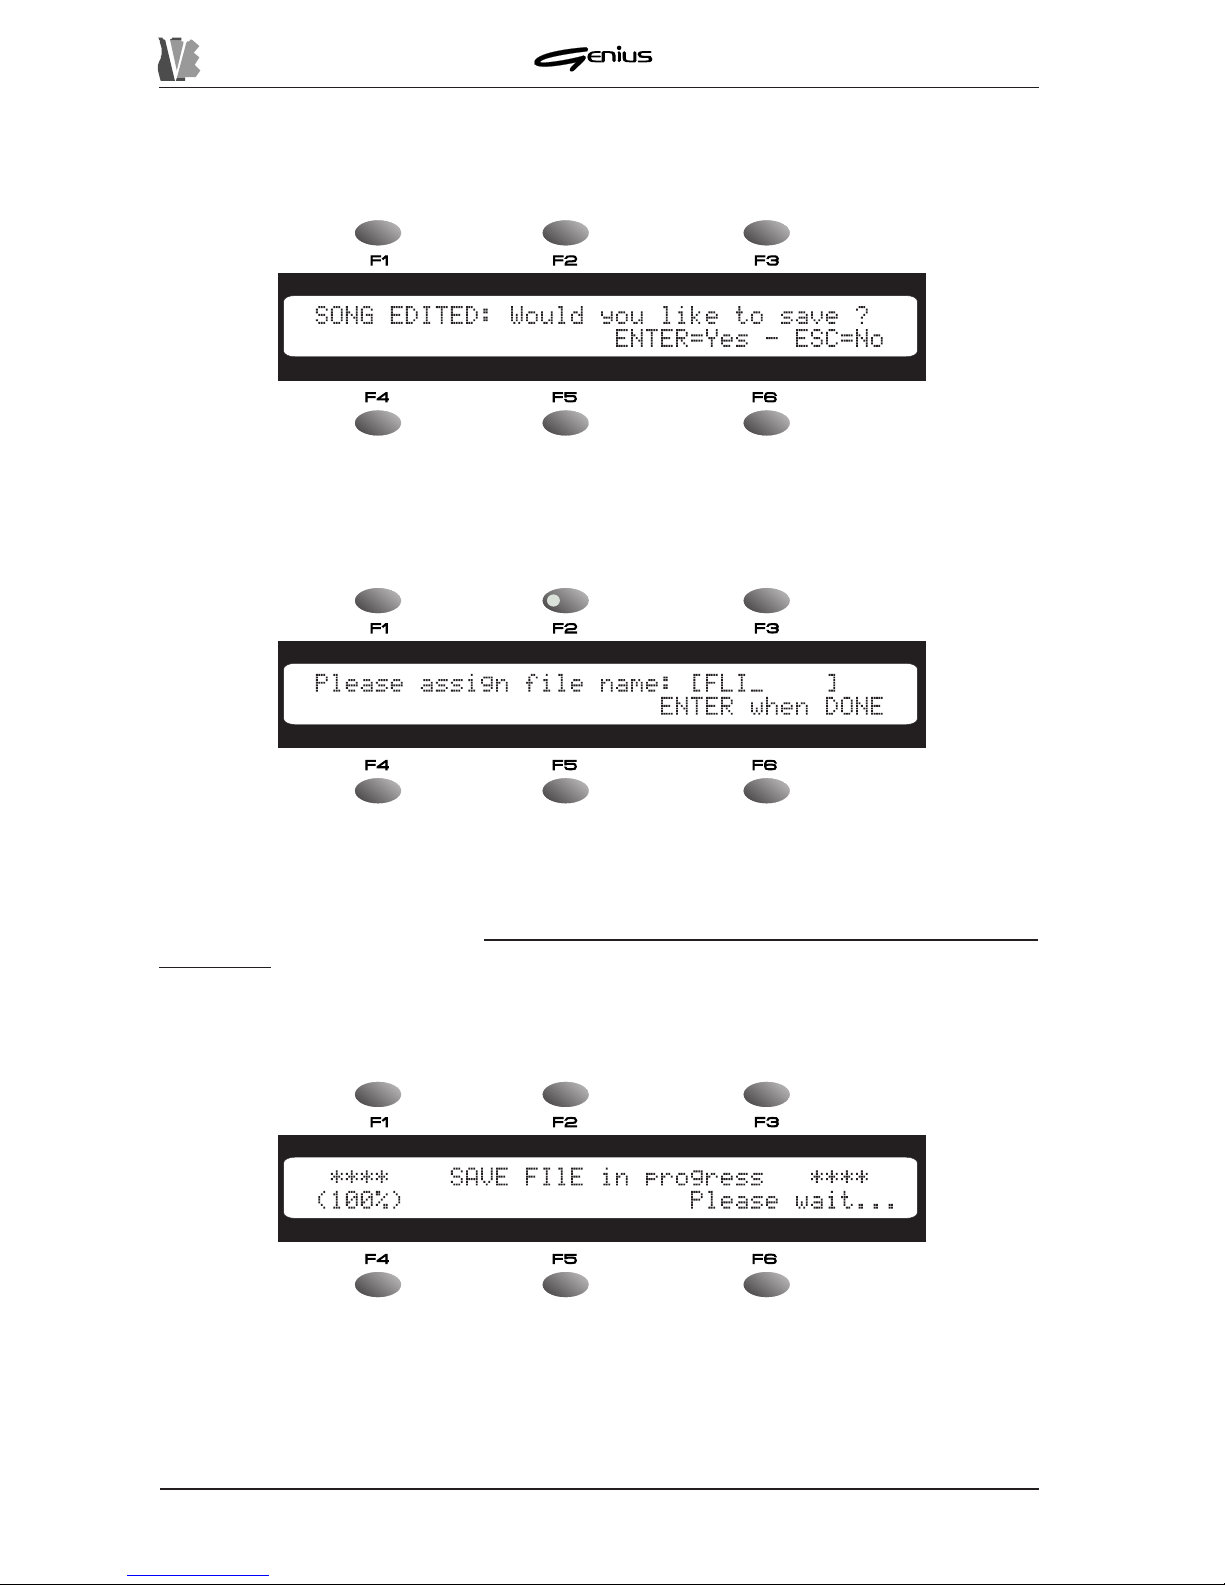
DATA FILER
press the [ESC] button. The display will show the prompt to proceed with saving the song.
Pressing the [SONG] button (EDIT section) the display will show the MAIN P AGE and all the
modifications will be lost.
Pressing [ESC] will abort the memorisation operation, meaning that the modifications made
will be lost. If [ENTER] is pressed, the instrument will prompt you to assign a new name to the
modified song.
When the video page is accessed, the name assignment field will show the original name of
the file. The encoder (letter choice) and the P AGE keys (cursor movement) can be used to
assign a new name, while you can use the SOURCE keys to specify the unit (disk or internal
memory) where it will be saved.
If the same file name is retained, the original file will be
overwritten.
When the procedure is complete press the [ENTER] key and the instrument will recalculate
the events contained in the song in accordance with the modifications made. The display will
show:
A progress indicator shown on the display will indicate the point reached. Depending on the
characteristics of the file, the operation might take a few minutes.
When the operation is complete, the system will proceed to write the file.
162
Page 71
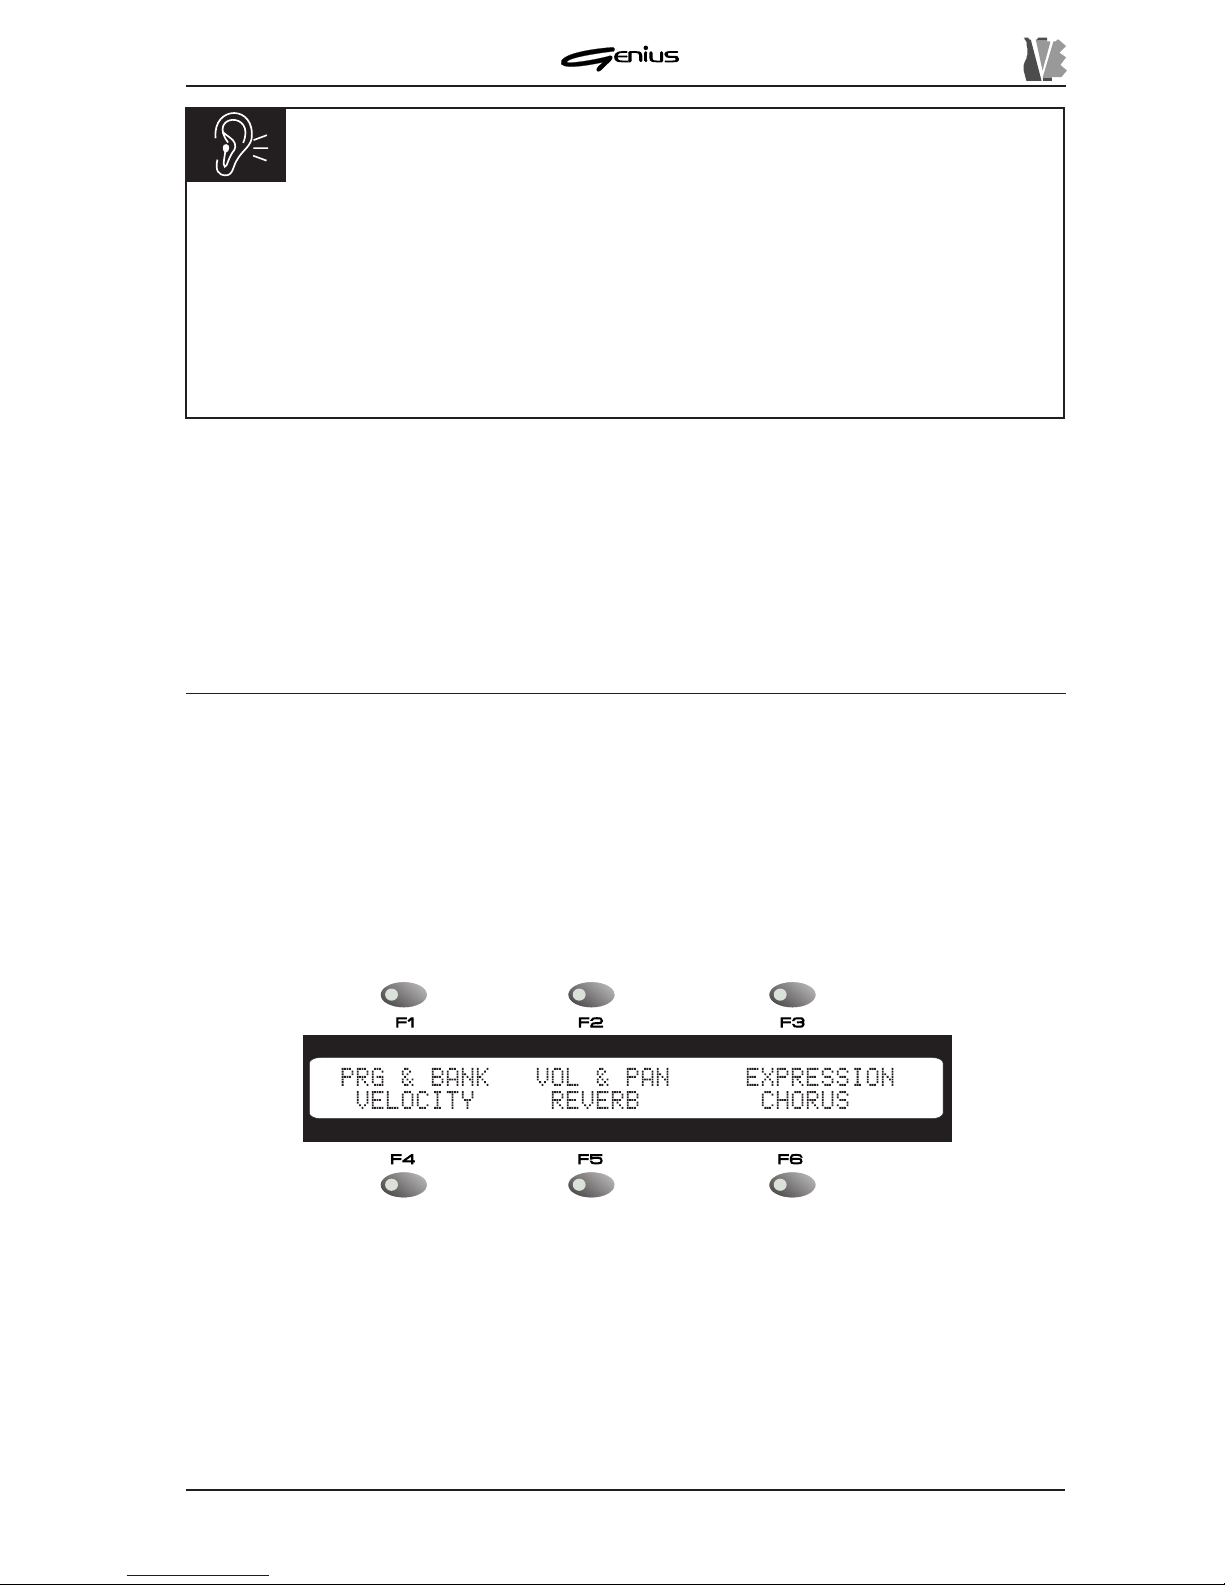
DATA FILER
IMPORTANT NOTES
ü
When songs resident on a floppy disk are edited, the disk cannot be removed. If
this occurs, the current edit operation will be aborted.
ü
Before modifying files resident in the internal memory or on disk make sure that
there is enough room for the new file to be written, even if it is to be rewritten, because
temporary files are generated in the memory.
ü
In case of type 1 SMF the progress indicator will refer to the track being recalculated,
so the scanning provided might not be linear.
9.2 EDIT TRACK
The EDIT TRACK function, recalled using the [TRACK] key in the EDIT section, allows the
user to make modifications within each track in the song.
This means modifications can be made to the volume, the Program Change and the Control
Changes it contains, the levels of the reverb and Chorus effects, etc..
What’s more, the variations are made in a given range of bars chosen by the user.
As for the EDIT SONG function, the EDIT TRACK function can only be recalled in Stop condition.
Y ou should always first make all the modifications you require and then proceed to save the
song (point 9.2.8) because depending on the complexity of the file, it might take a few minutes
to recalculate the song events. If you wish to evaluate the modifications made, use the temporary
Play function.
Starting from the
MAIN P AGE use the encoder or the DIRECTORY function to select the song
you wish to modify and press the [ENTER] button. When loading is complete, press the
[TRACK] key of the TOOLS section. The display will show:
163
containing the following functions:
o
PRG & BANK
: selectable using the [F1] function key – it allows the user to vary the
Program Change and Bank Selects in the selected track.
o
VOL & PAN
: [F2] – modifies the volume and Pan-Pot in the selected track.
o
EXPRESSION
: [F3] – setting of the value of Control Change 1 1 relating to the expression
control.
o
VELOCITY
: [F4] – modifies the dynamic of the notes present in the selected track.
o
REVERB
: [F5] – allows regulation of the amount of the reverb effect.
Page 72
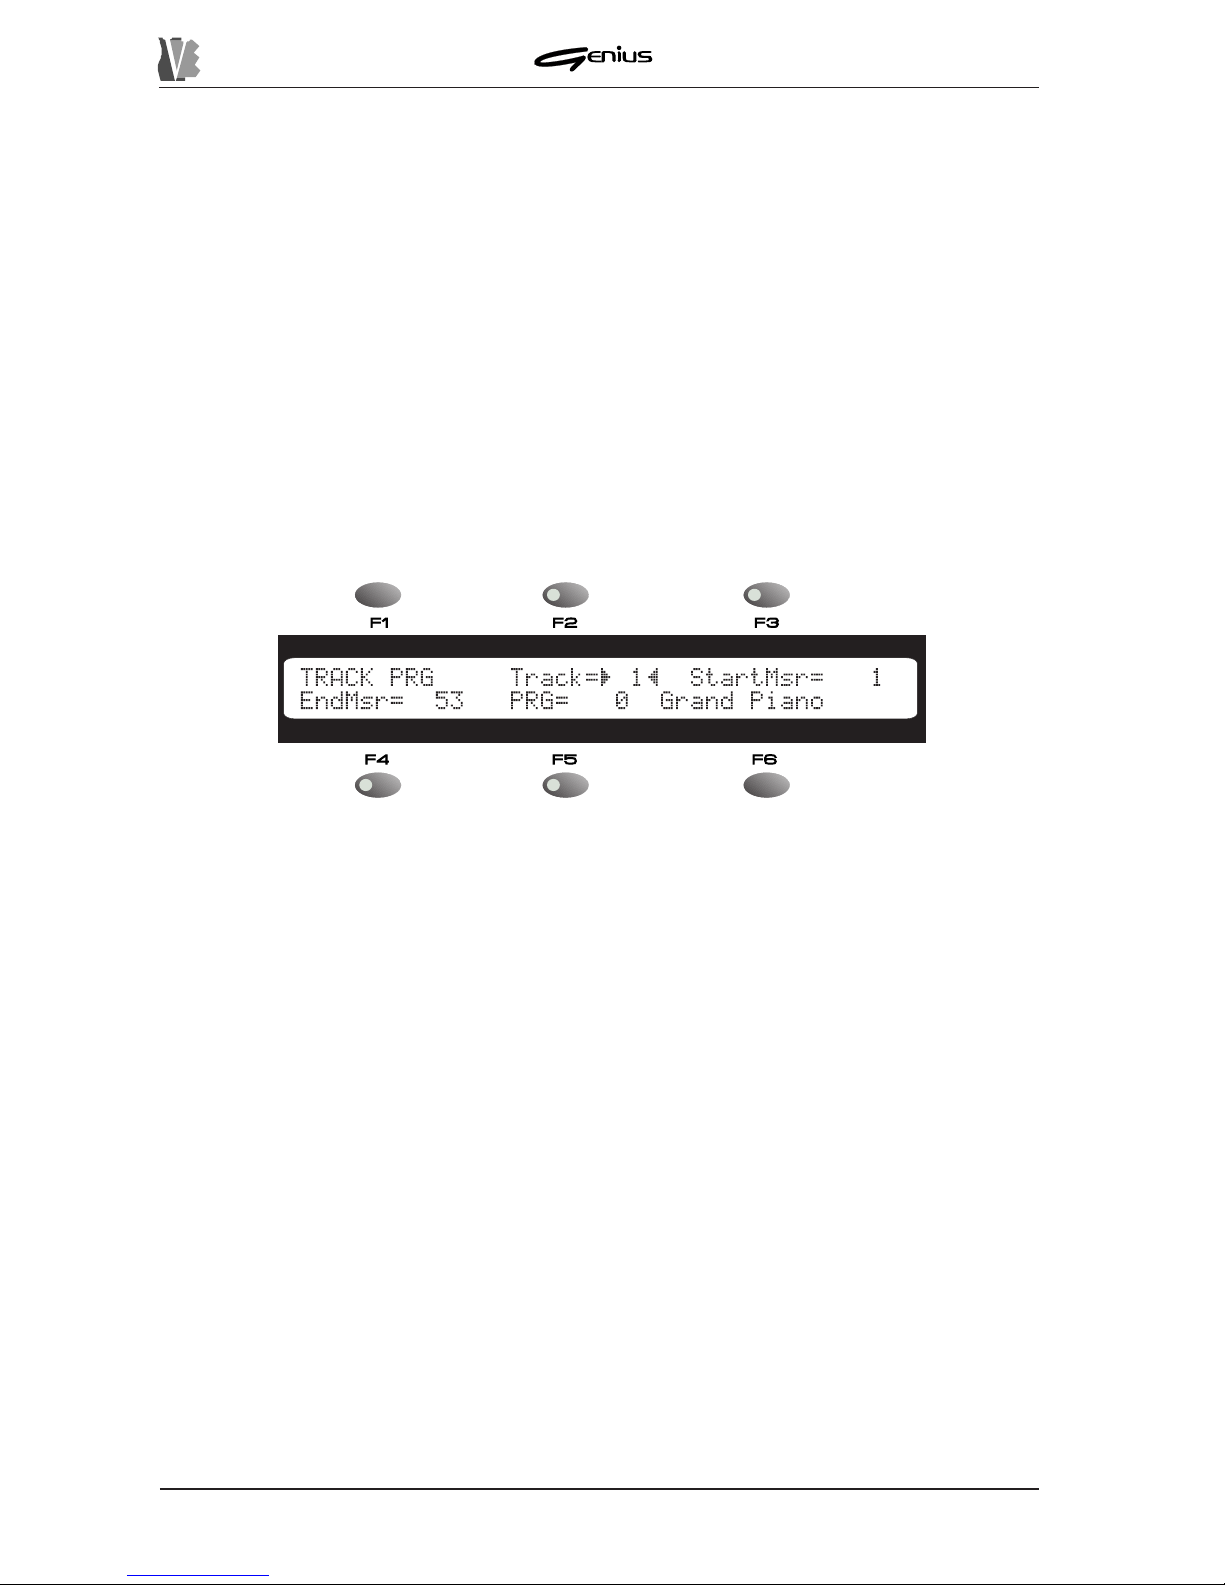
DATA FILER
o
CHORUS
: [F6] – allows regulation of the amount of the Chorus effect.
If the [ESC] key is pressed the instrument will leave the EDIT SONG menu and display the
MAIN P AGE.
9.2.1 EDIT TRACK – PROGRAM CHANGE & BANK SELECT
The PRG & BANK function allows you to assign a Program Change, and therefore a timbre,
and the values of the Bank Select Control Changes MSB (CC 0) and SLB (CC 32), which
can be used to select further timbres assigned to the same Program Change, to a specific
track.
Refer to the appendix to this manual for details of the Bank Select and Program Change
codes for selection of the timbre desired.
From the EDIT TRACK menu, press the [F1] function key; the display will show the first of the
two video pages relating to the function concerned:
164
containing the following programming parameters, which can be modified using the encoder
and selected using the function keys described below:
o
Track
: selectable using the [F2] function key – allows the user to specify the track in
which the Program Change is to be modified.
o
StartMsr
: [F3] – identifies the number of the first bar from which the Program Change
is to be modified.
o
EndMsr
: [F4] – identifies the number of the last bar in which the modification is to be
eliminated.
o
PRG
: [F4] – sets the number of the Program Change which is to replace the one currently
in use in the track concerned.
o
PIANO 1
(in the example illustrated): field for display only next to the [F6] function key,
indicates the timbre associated to the Program Change selected by means of the
PRG
parameter.
N.B.: the association does not consider the Bank Select codes.
Bear in mind that if the Start Measure and End Measure values are identical, the Genius will
leave the track unchanged (no modification to the track marker). In this condition, the field in
line with the [F6] button shows the message
(unmodified)
. Use this method to abort
any modifications made before saving.
Use the function keys and the encoder to select the values desired: you can listen to the effect
of the modifications by means of the temporary Play function recalled by pressing the [PLA Y]
button.
Page 73
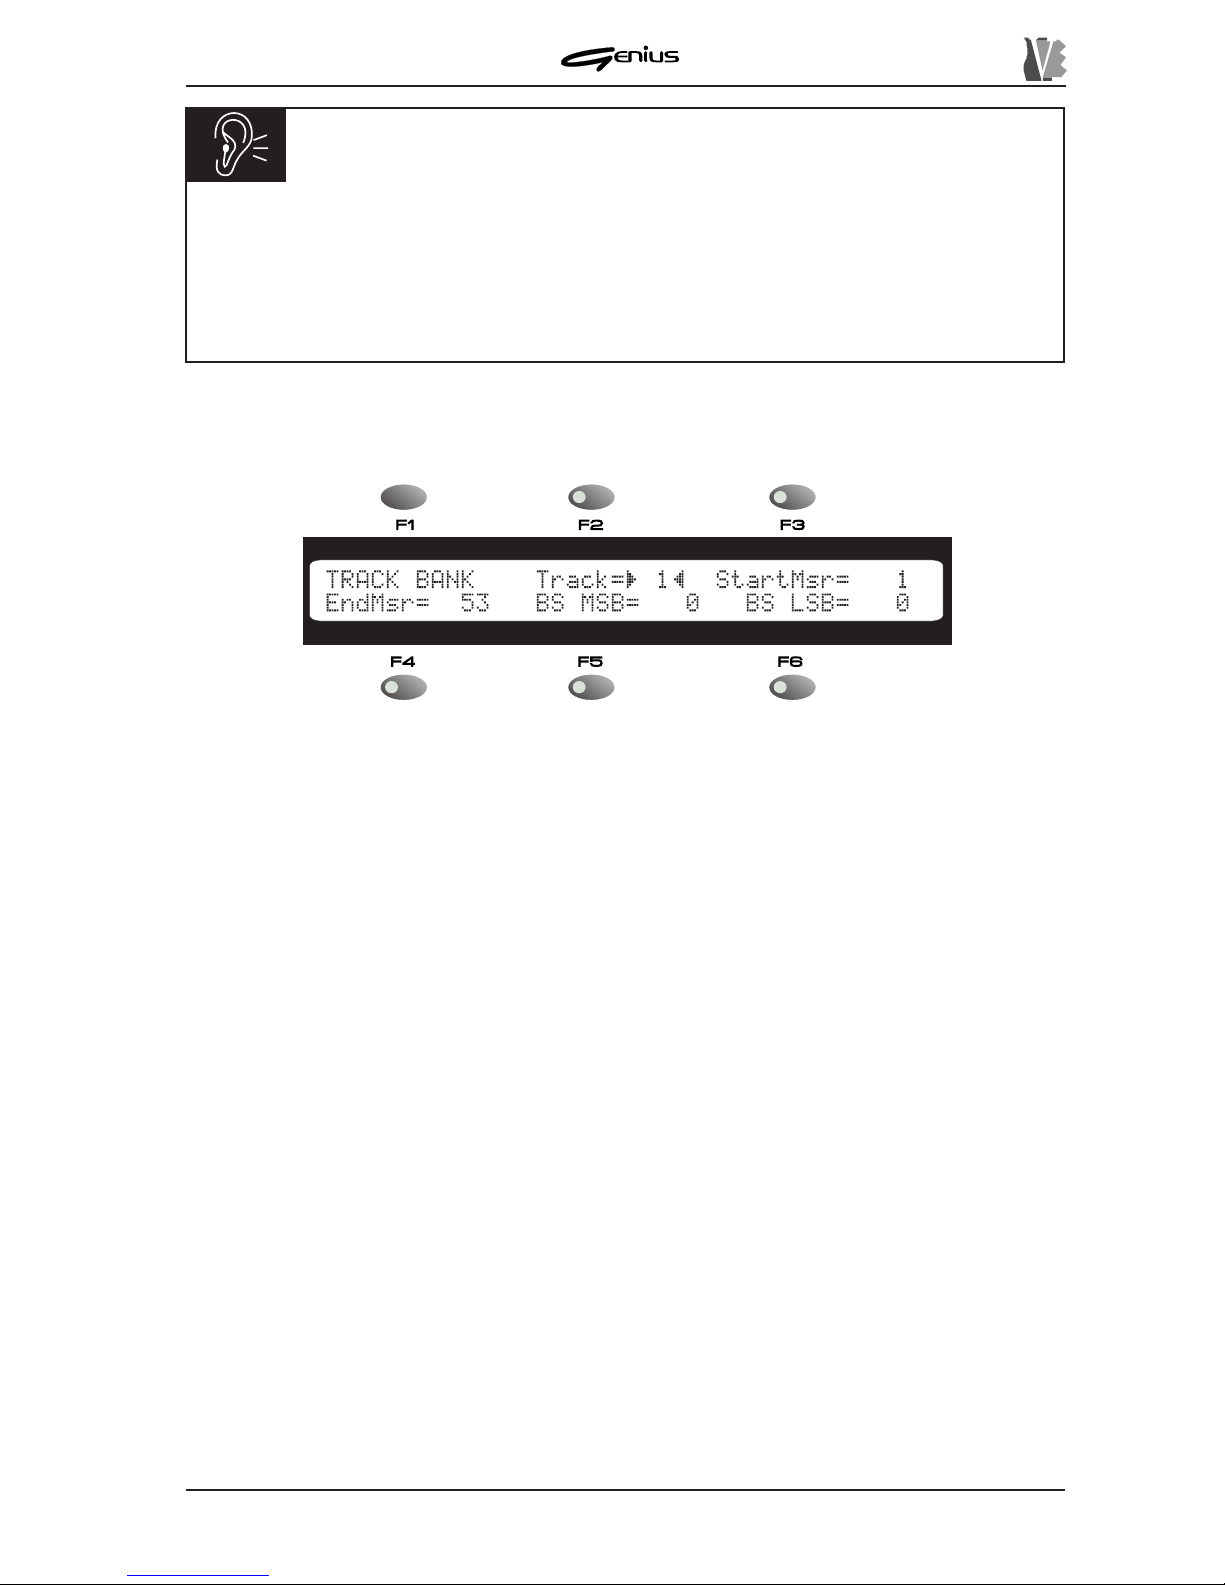
DATA FILER
containing the following parameters:
o
Track
: selectable using the [F2] function key – allows the user to specify the track in
which the values of the Bank Select Control Changes are to be modified.
o
StartMsr
: [F3] – identifies the number of the first bar from which the Bank Select is to
be changed.
o
EndMsr
: [F4] – identifies the number of the last bar in which the modification is to be
eliminated.
o
BS MSB
: [F5] – allows the user to enter the new value of Bank Select MSB (CC 0).
o
BS LSB
: [F6] – allows the user to set the new value of Bank Select LSB (CC 32).
As for PG selection, here again the fields which select the range of bars within which the
modification is to be made must not be identical if the modification is to be effective. If the two
values are the same the display will show the symbols
-
for the Bank Select fields, indicating
that no modification will be made to the messages concerned.
As for the previous video page (which can be displayed by pressing the [PREV .] key), pressing
the [ENTER] key confirms the modifications, while if the [ESC] key is pressed they will be
aborted. In both cases, the display will return to the EDIT TRACK menu. Press the [PLA Y]
button to use the temporary play function.
9.2.2 EDIT TRACK – VOLUME & PAN
Another EDIT TRACK menu function is VOL & P AN, used to adjust the volume level and the
distribution of the signal across the stereophonic panorama for each track. This is done
using Control Changes 7 (Main V olume) and 10 (P AN).
CAUTION!
ü
At the end of the modification range (from bar to bar) the Genius will restore the
original Program Change value.
ü
The first bars of SMF backings often contain system exclusive Reset codes, which
might annul the Program Change modifications; in this case, the modification range
must be set to start from bar 2.
165
T o access the Bank Select variations, press the [NEXT] key . The display will show the video
page:
Page 74
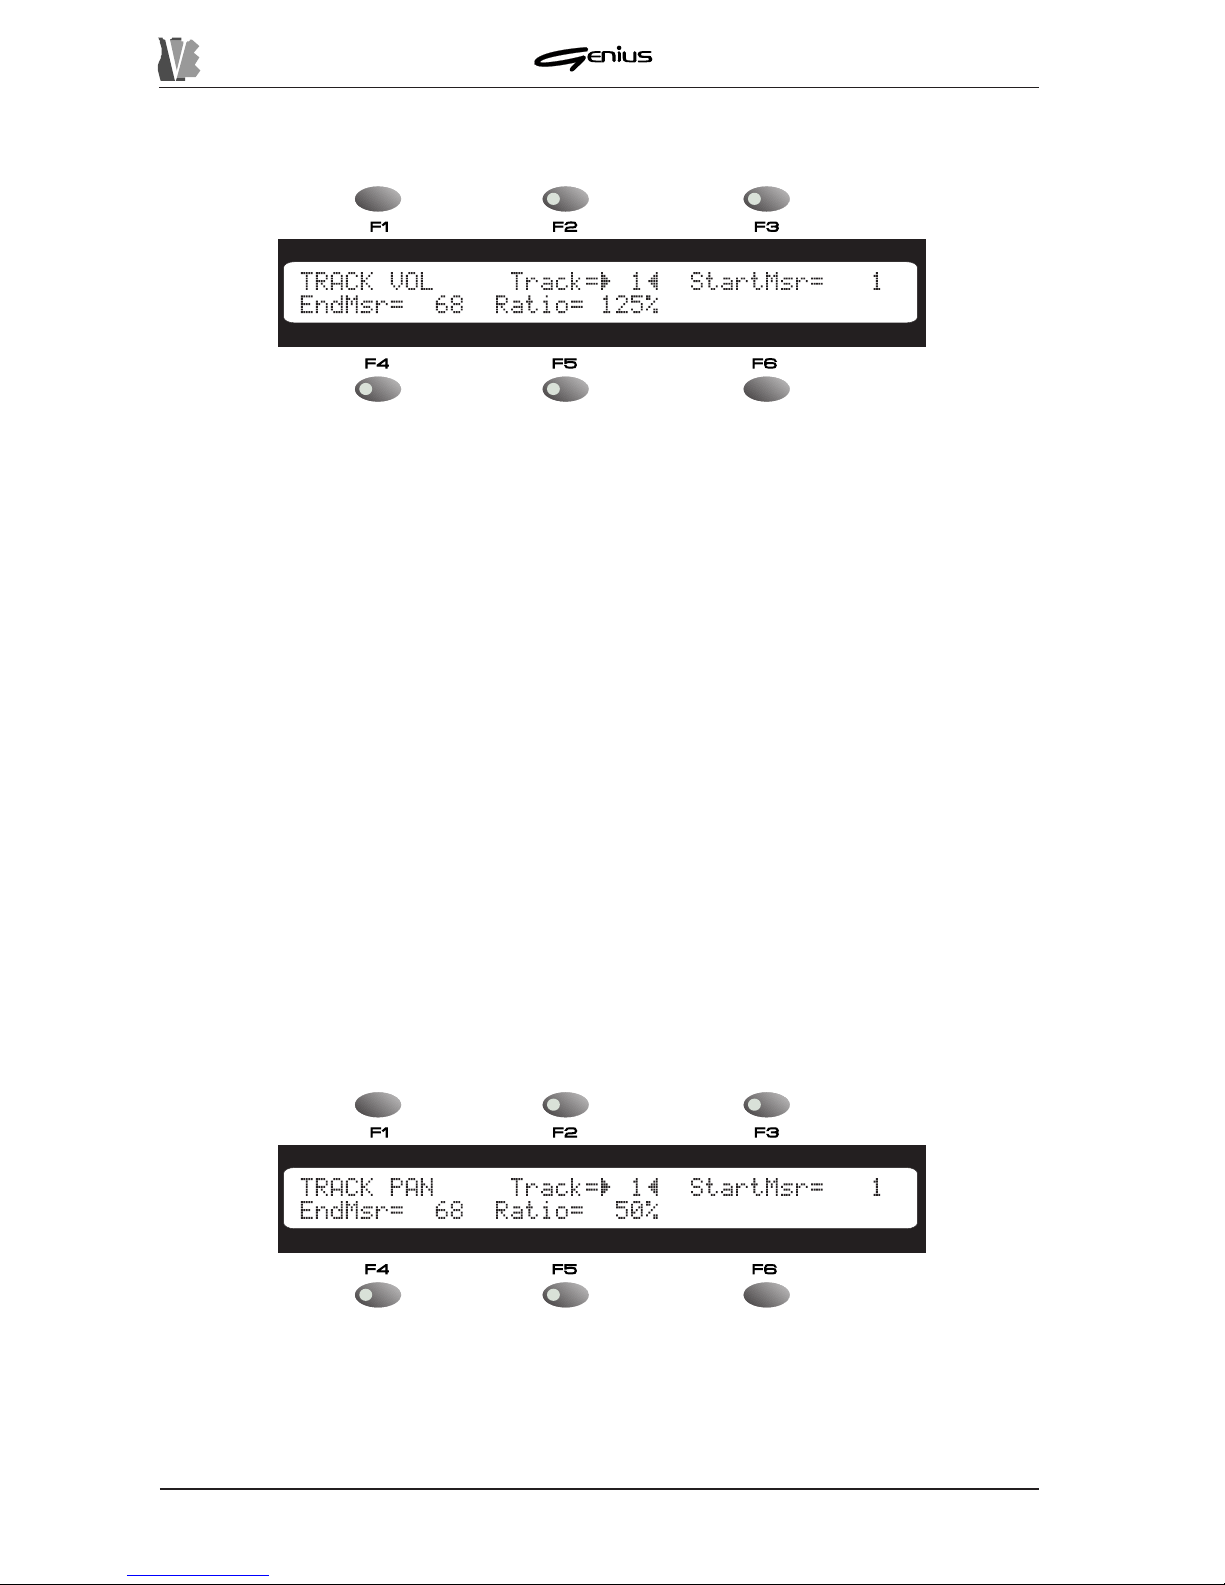
DATA FILER
From the above menu, press the [F2] function key, assigned to the
VOL & PAN
field; the
display will show the first video page of the function, relating to the volume control:
featuring the following parameters which can be selected using the function keys and modified
using the encoder:
o
Track
: selectable using the [F2] function key – allows the user to specify the track to
which the changes in volume are to apply .
o
StartMsr
: [F3] – identifies the number of the first bar from which the volume is to be
varied.
o
EndMsr
: [F4] – identifies the number of the last bar in which the volume is to be varied.
o
Ratio
: [F5] – sets the relative percentage variation for the volume level in the track in
question within the selected range of bars.
In order to maintain the variations in volume originally set in the song, the Genius applies the
rule of relative editing, which involves a percentage rescaling of the data in the track. Since
the editing takes place in relation to the original value, if the Ratio value is set at 100% then
the new value will be equal to 100% of the existing value, while a setting of 200% will double
it. If the permitted values are exceeded the maximum and minimum values will be forced.
Here again, since the function is displayed on two pages, the LED of the [NEXT] key in the
PAGE section will be illuminated, indicating the presence of another page. T o confirm the
modification of the volume and return to display of the EDIT TRACK menu, press the [ENTER]
key . Otherwise, to abort the modifications, press the [ESC] key.
The second page of the VOL & P AN function will be the following:
As can be seen, the two video pages in the section are virtually identical.
Y ou should therefore refer to the procedures already described for modification of the volume,
bearing in mind that the control modified here relates to the Pan-Pot.
166
Page 75
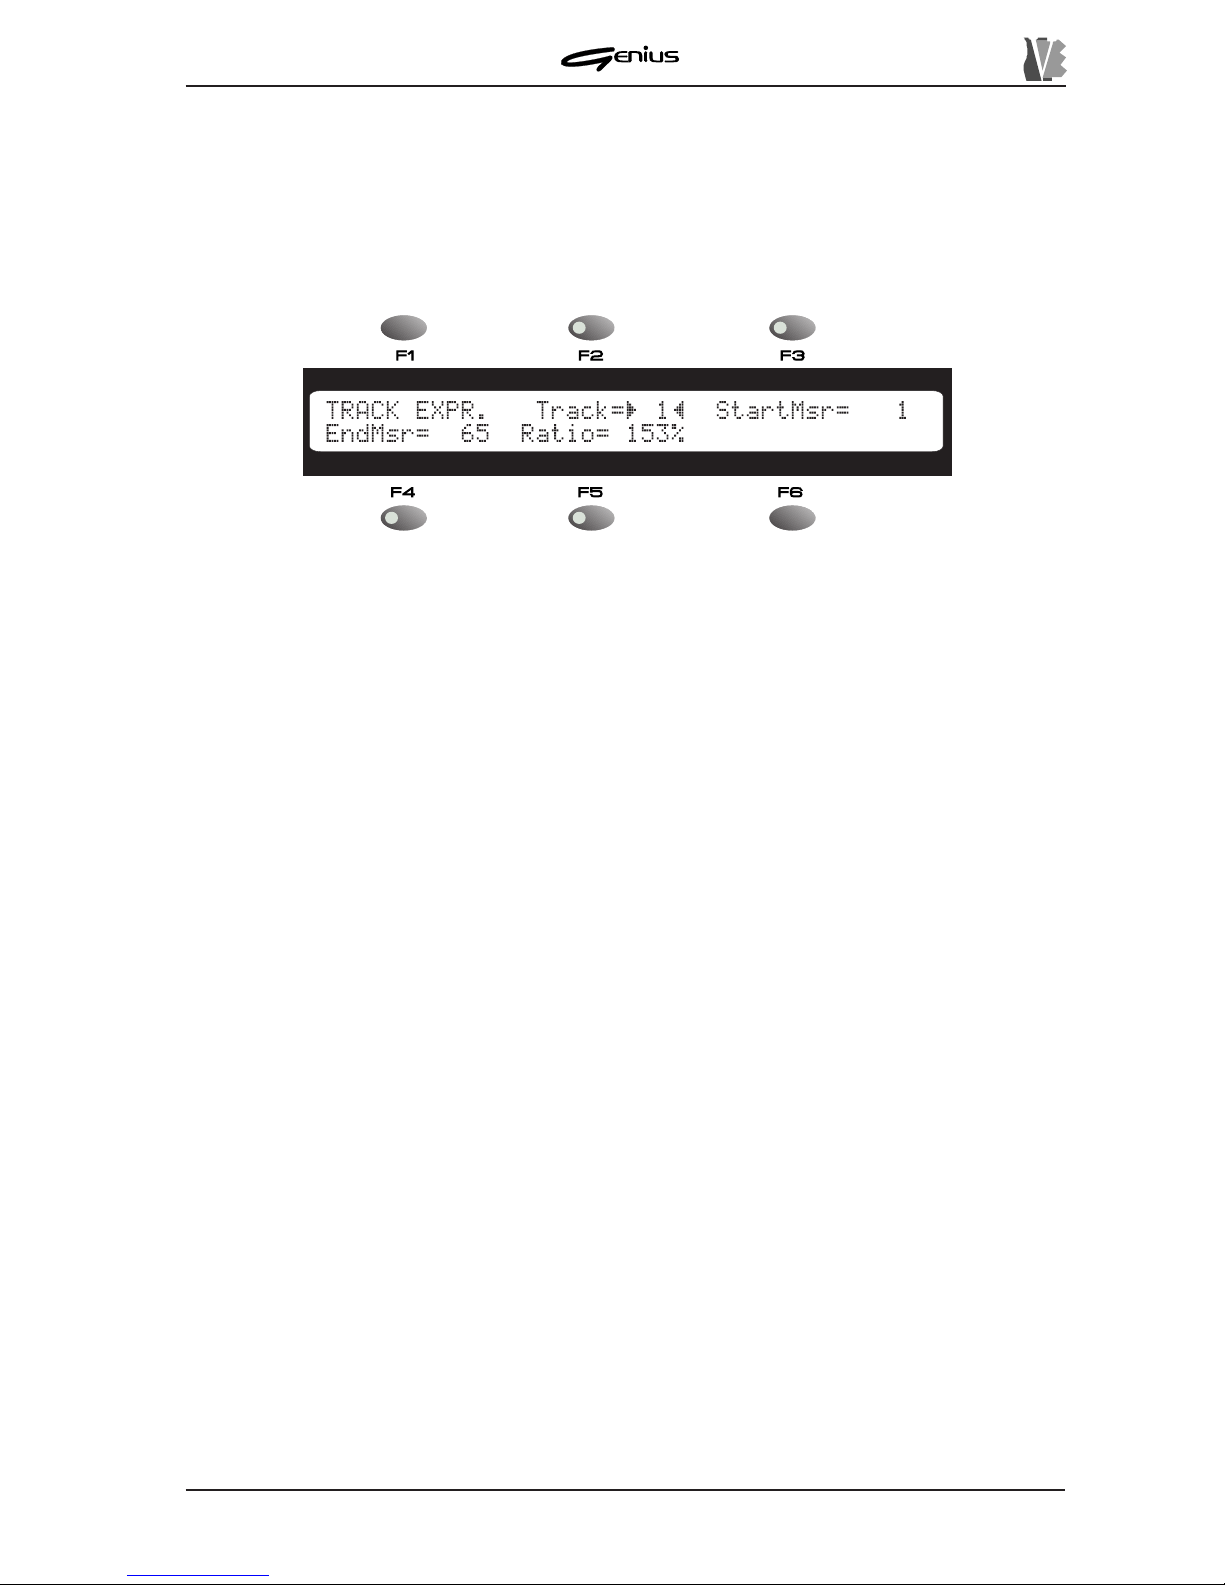
DATA FILER
9.2.3 EDIT TRACK – EXPRESSION
The EXPRESSION function allows you to regulate the expression control relating to the
individual tracks. Modifying this control therefore modifies the value of Control Change 1 1.
From the EDIT TRACK video page, press the [F3] function key and the display will show the
video page:
in which we can see the usual edit parameters, modifiable using the encoder:
o
Track
: selectable using the [F2] function key – allows the user to specify the track on
which the expression control is to be modified.
o
StartMsr
: [F3] – identifies the number of the first bar from which the variation is to be
made.
o
EndMsr
: [F4] – identifies the number of the last bar in which the variation is to be made.
o
Var.
: [F5] – allows modification of the value of the expression control in the track in
question and in the set range of bars.
As for other functions relating to the CCs, the Genius applies a percentage rescaling of the
data in order to retain the variations of the controls within the track. Since the editing is in
relation to the original value, if the Ratio value is set at 100% the new value will be equal to
100% of the existing value, while if 50% is selected the new value will be halved.
When the procedure is complete the modifications made can be confirmed by pressing the
[ENTER] key, while if [ESC] is pressed they will be aborted. In both cases, when the user
exits from the function just described the display will return to the EDIT TRACK menu.
9.2.4 EDIT TRACK – VELOCITY
The VELOCITY function allows regulation of the dynamic of the notes present in a track and
within a range of bars set by the user.
The MIDI information concerning the note to be played also contains the value of the dynamic,
meaning the pressure applied by the performer to the key of a hypothetical keyboard instrument.
Here again, in order to retain the original expression, the Genius applies the relative editing
rule, consisting of a percentage rescaling of the dynamic data in the track and within the
range of bars set. Although the Genius allows Ratio values up to 200% (doubling the velocity
value), once the maximum possible limit is reached the value will remain unchanged.
This function can be recalled from the EDIT TRACK menu, using the [F4] function key,
associated to the
VELOCITY
field:
167
Page 76
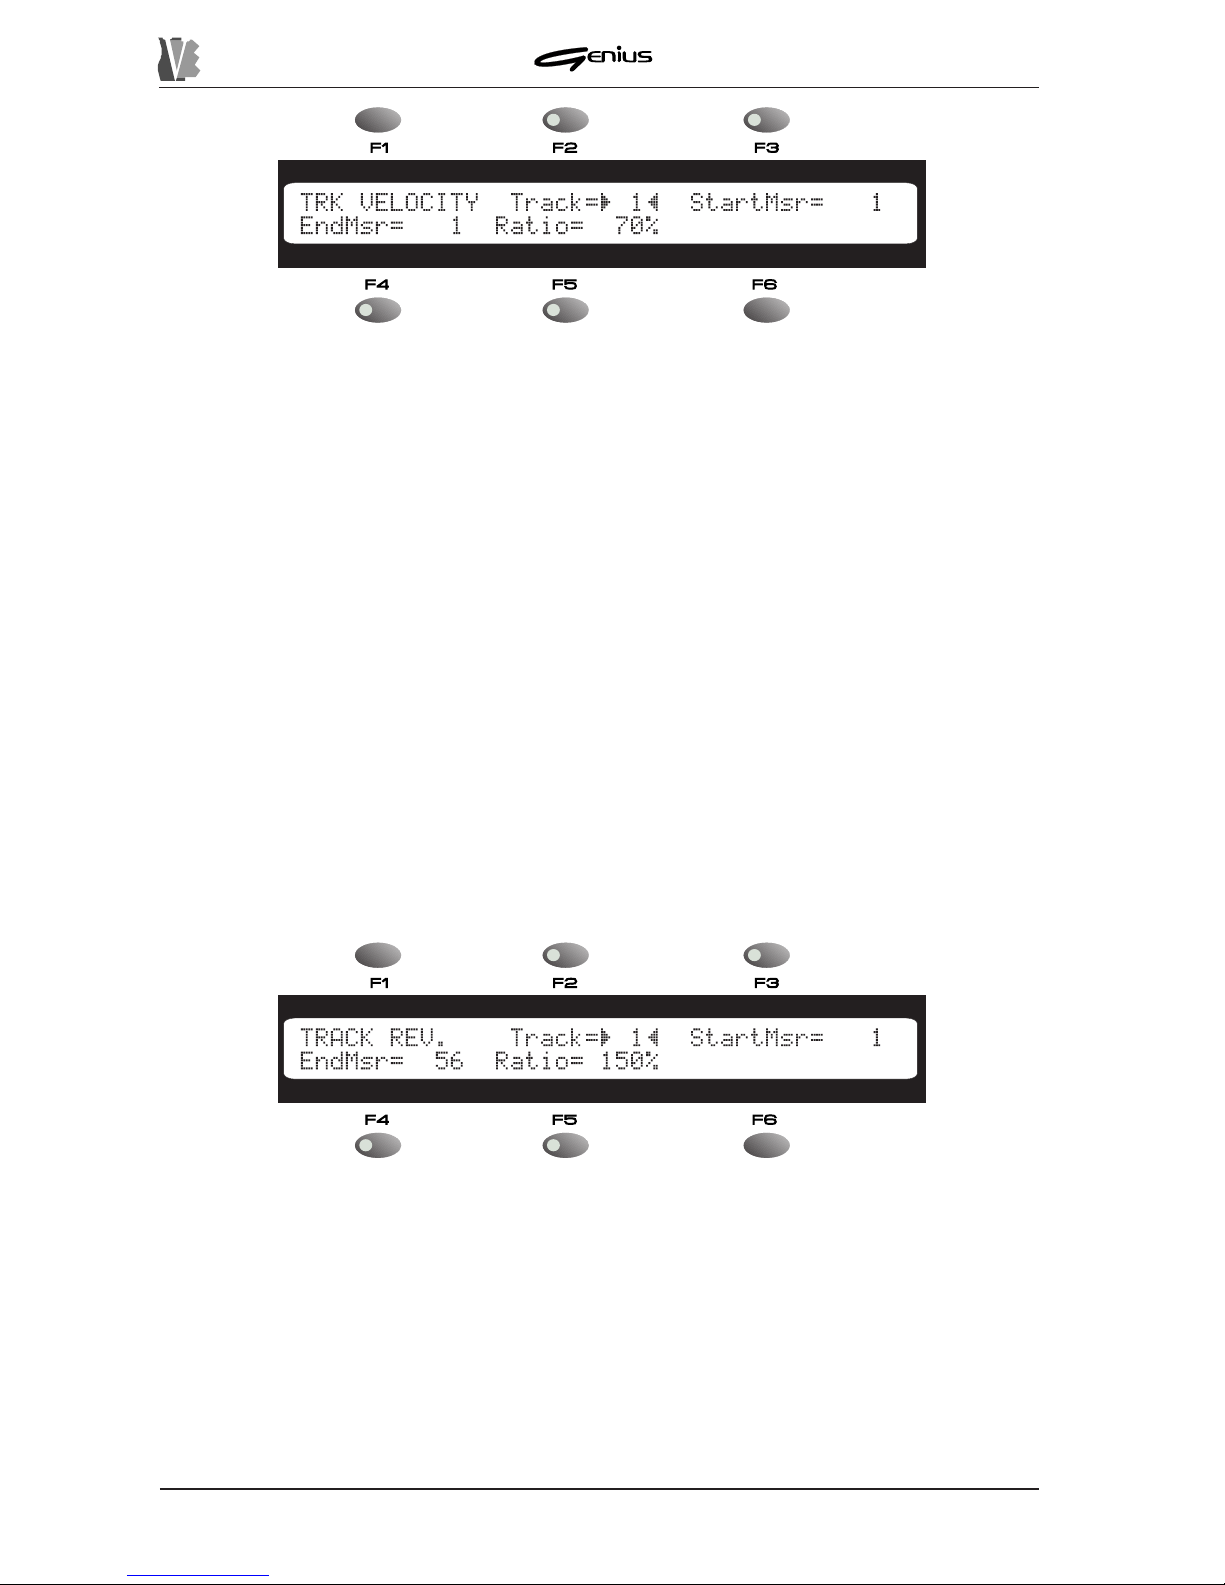
DATA FILER
The page contains the following programming parameters:
o
Track
: selectable using the [F2] function key – allows the user to specify the track on
which the note velocity is to be modified.
o
StartMsr
: [F3] – identifies the number of the first bar from which the variation in velocity
is to be made.
o
EndMsr
: [F4] – identifies the number of the last bar in which the variation in velocity is to
be made.
o
Var.
: [F5] – allows modification of the value of the control relating to the velocity of the
notes in the track in question and in the set range of bars.
Refer to the previous point with regard to the percentage modification of the value.
9.2.5 EDIT TRACK – REVERB
The REVERB function can be used to modify the value of Control Change 91, which sets the
amount of the reverb effect in a specific track.
T o activate the REVERB function, press the [F5] function key; the display will show the following
video page:
168
As for all the other video pages relating to other functions for editing individual tracks, the
programming parameters are the following:
o
Track
: selectable using the [F2] function key – allows the user to specify the track on
which the level of the reverb effect is to be modified.
o
StartMsr
: [F3] – identifies the number of the first bar from which the variation in the
reverb level is to be made.
o
EndMsr
: [F4] – identifies the number of the last bar in which the variation in the reverb
level is to be made.
Page 77
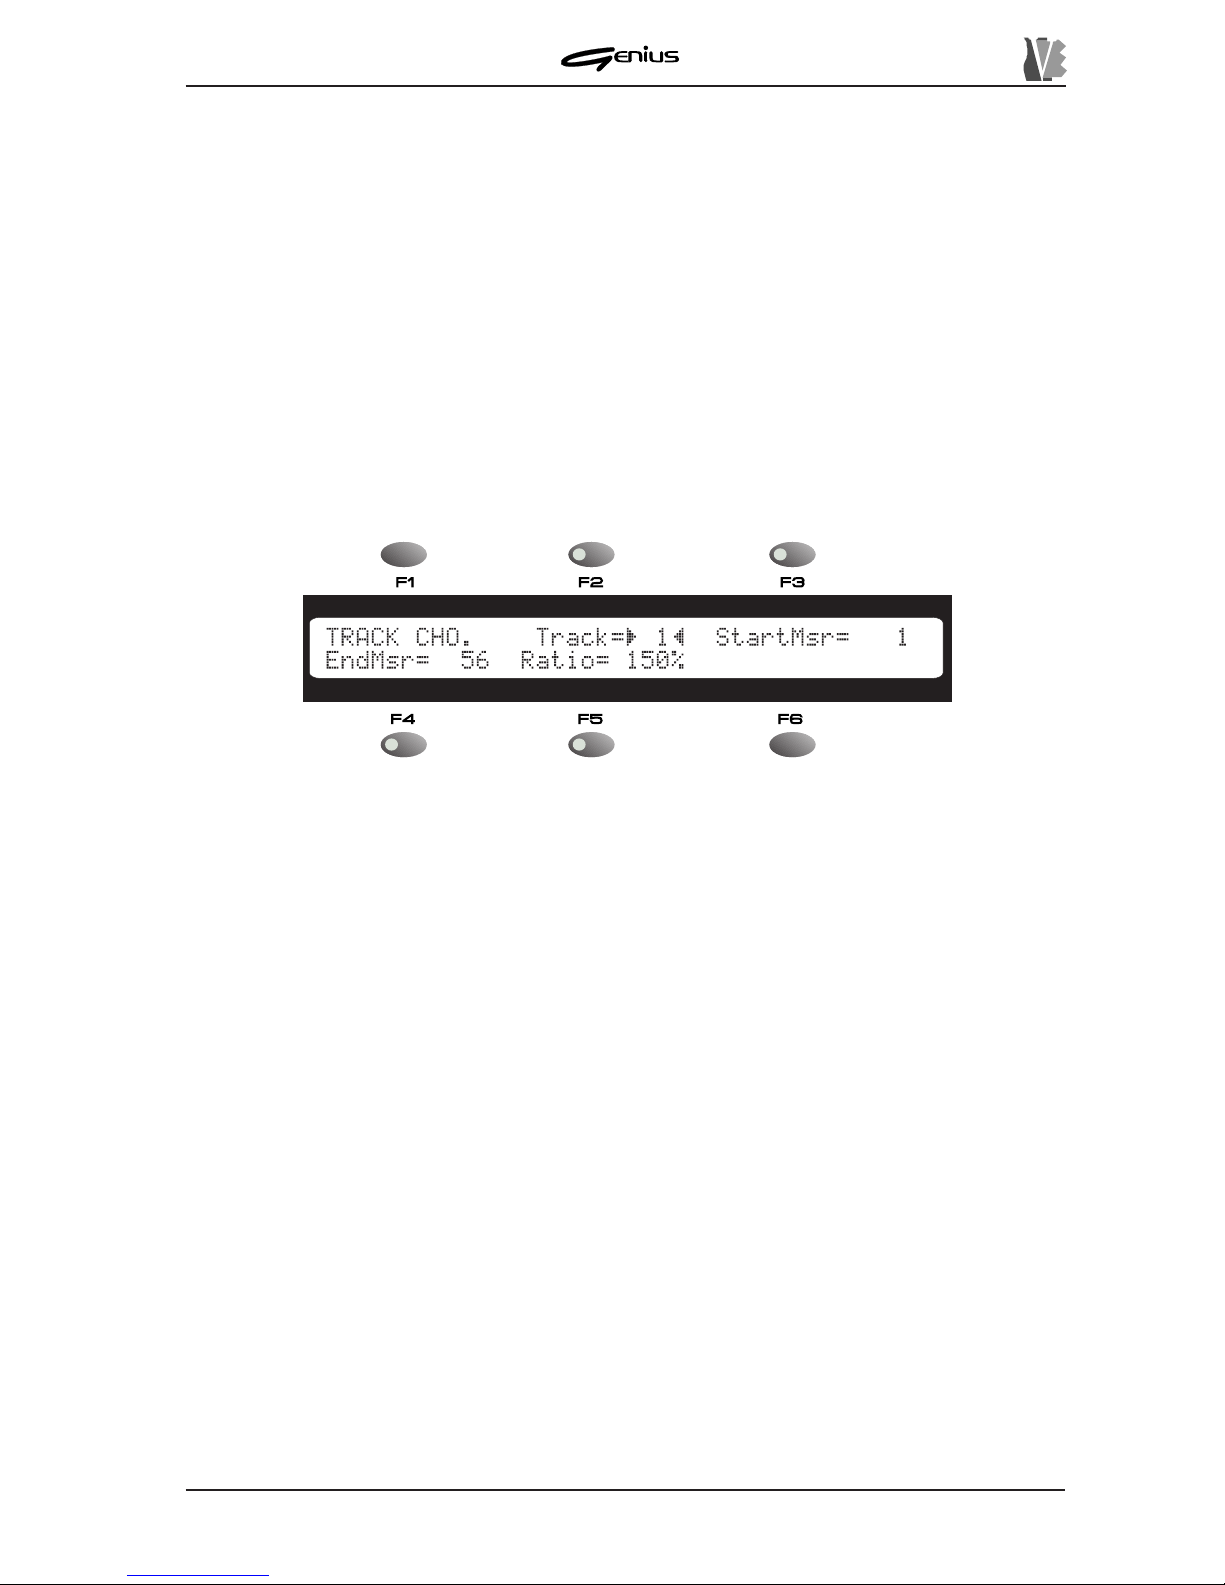
DATA FILER
169
As for the functions described previously , the Genius uses the rule of relative editing, which
involves a percentage rescaling of the data in the track. This is in order to retain the variations
in the level of the effect set in the song originally . If the permitted values are exceeded, the
maximum and minimum values will be forced.
9.2.6 EDIT TRACK – CHORUS
The CHORUS function is another function allowing modification of the level of an effect. Y ou
can use it to regulate the amount of the modulation effect present in a given track.
After selection of the
CHORUS
field from the EDIT TRACK menu, the display will show the
following video page:
containing the following fields:
o
Track
: selectable using the [F2] function key – allows the user to specify the track on
which the level of the chorus effect is to be modified.
o
StartMsr
: [F3] – identifies the number of the first bar from which the variation in the
chorus effect level is to be made.
o
EndMsr
: [F4] – identifies the number of the last bar in which the variation in the effect
level is to be made.
o
Var.
: [F5] – sets the percentage modification of the value of the control relating to the
chorus effect in the track in question and in the set range of bars.
Refer to the information provided in the previous point with regard to percentage modification
of the value.
9.2.7 EDIT TRACK – TEMPORARY PLAY
As for the EDIT SONG function, EDIT TRACK also allows the song which has been modified
to be played in order to assess the changes made, before the new form is definitively
memorised.
If the [PLA Y] key is pressed from any EDIT TRACK page, the instrument will play the song in
accordance with the modifications made.
The display will show the video page illustrated on the next page.
o
Var.
: [F5] – allows modification of the value of the control relating to the reverb effect in
the track in question and in the set range of bars.
Page 78
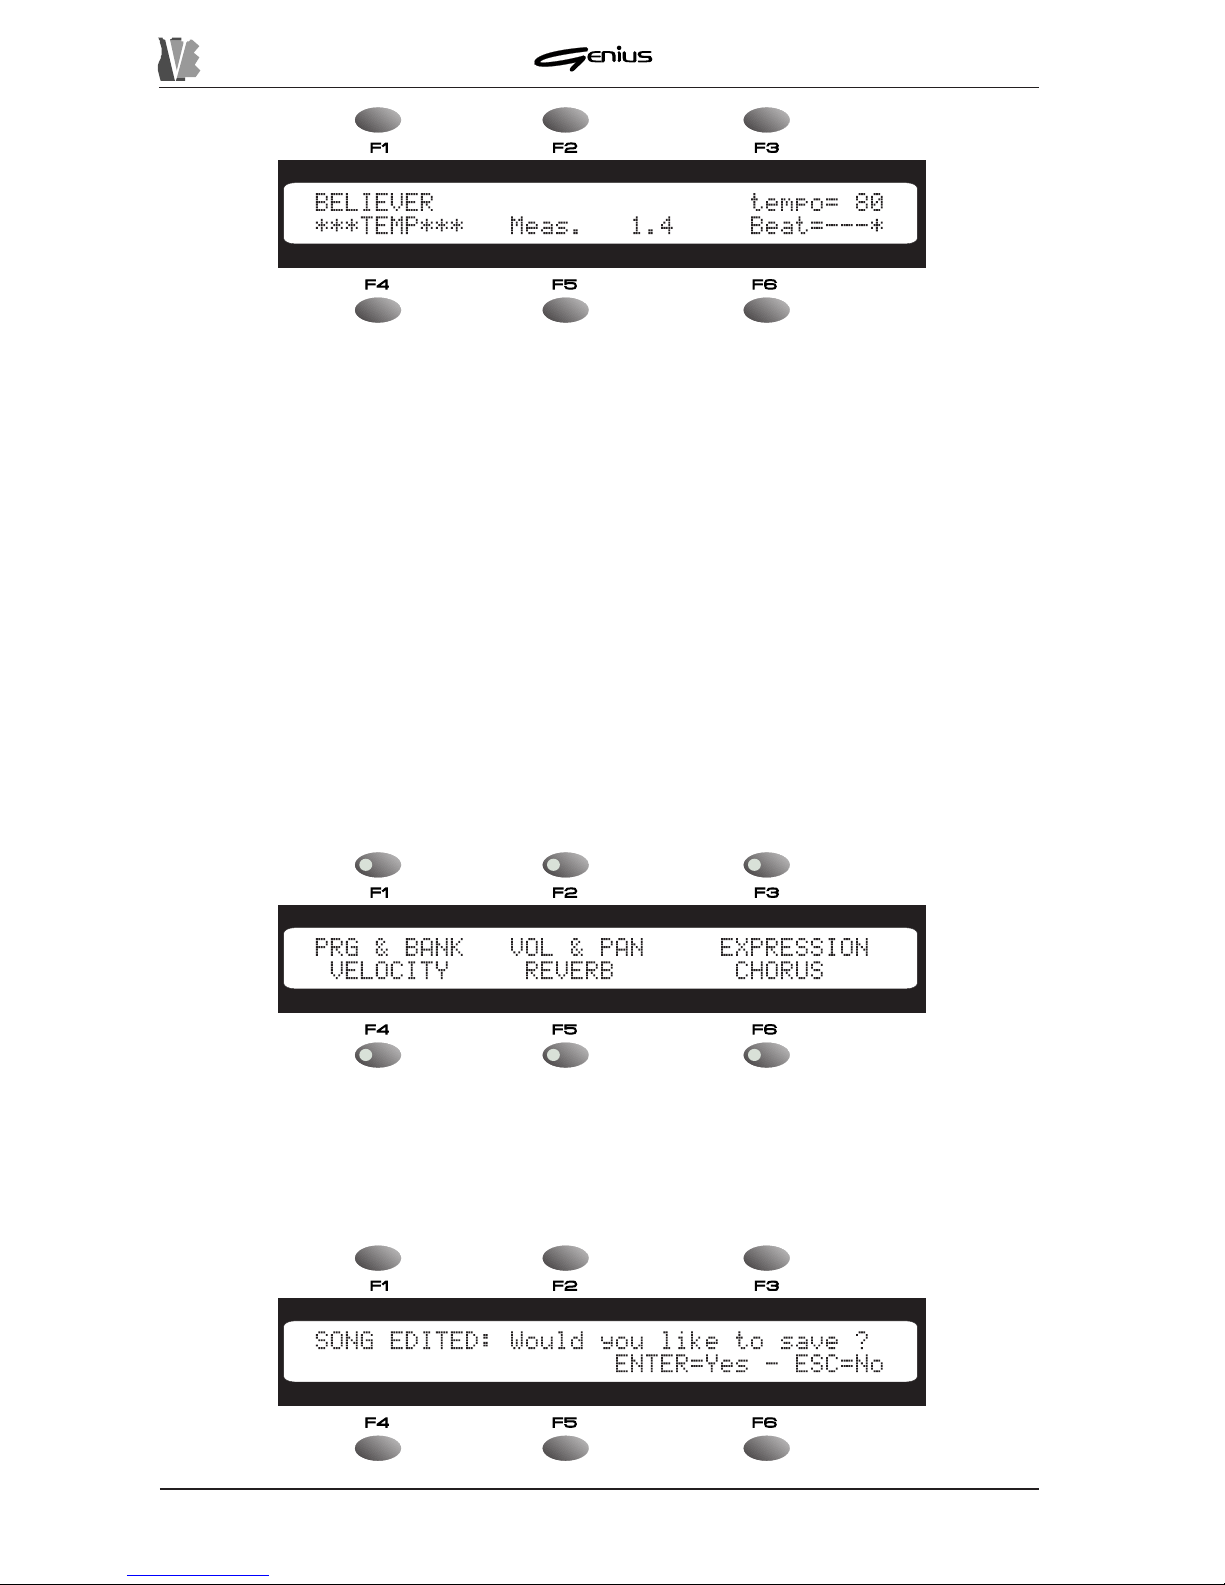
DATA FILER
The field next to the [F1] function key contains the name of the song on which the temporary
Play is being carried out. This condition will be displayed by the field next to the [F4] function
key.
As during normal playback of a song, during temporary Play you can use the [REW] and [FF]
keys to locate a given bar number within the song. To stop the playback for a moment, use the
[P AUSE] key .
Press the [STOP] key to abort the TEMPORAR Y PLA Y function and return to display of the
function before the temporary Play operation.
9.2.8 EDIT TRACK – SAVING THE MODIFICATIONS
After making the modifications you require in the EDIT TRACK section, and checking and
approving the results, you can save the song either by overwriting the existing version or by
creating a new song.
From the EDIT TRACK menu:
if the [EDIT TRACK] key is pressed, the display will return to the MAIN PAGE and the
modifications made will be lost, while if the [ESC] key is pressed the instrument will perform
a check and if it detects modifications by the user it will suggest the saving operation, by
showing the following video page:
170
Page 79
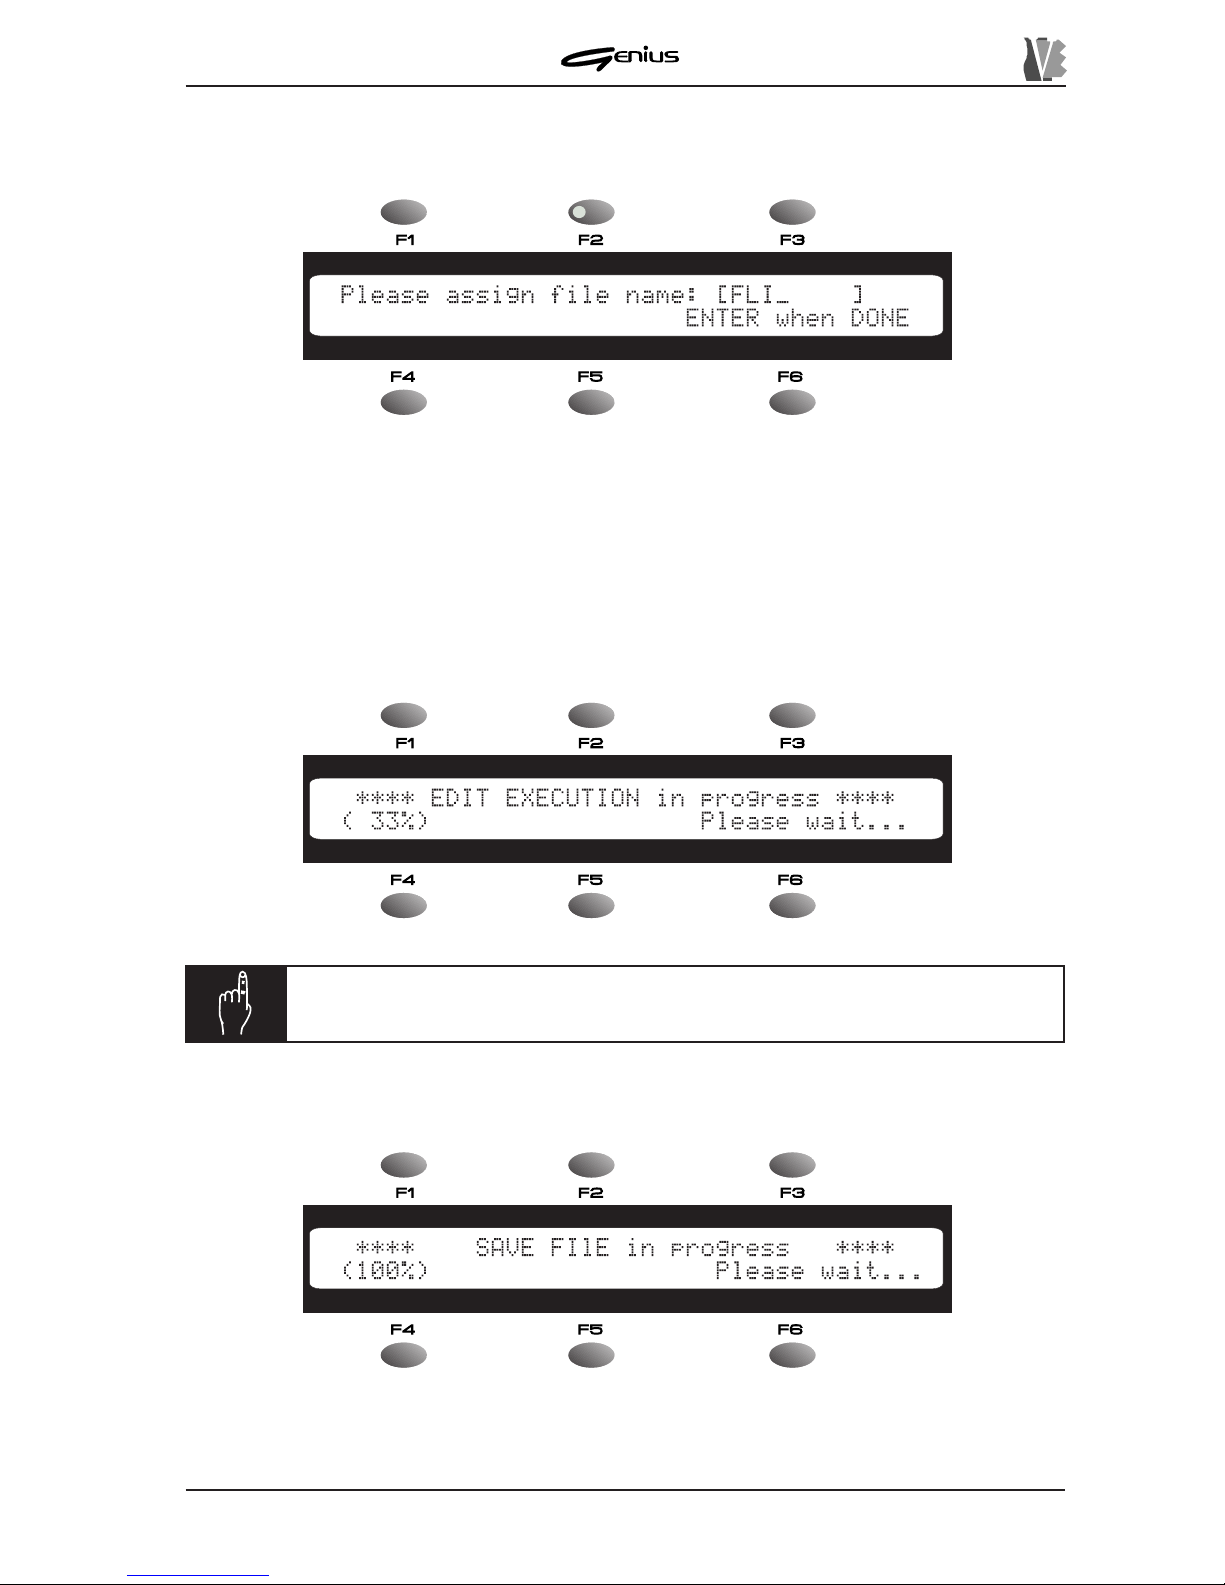
DATA FILER
As the display indicates, if the [ENTER] key is pressed, the Genius will prompt the user to
enter the file name, suggesting the existing name:
The encoder (for letter selection) and the P AGE section keys (for moving the cursor) can be
used to assign a new name to the song to be saved, while you can use the SOURCE section
keys to specify the memory unit in which the new song will be saved. Naturally , if the name is
left unchanged the file will be overwritten.
When the procedure is complete press the [ENTER] key and the instrument will recalculate
the events in accordance with the modifications made. A progress indicator will indicate the
point reached.
N.B.:
in case of type 1 SMF the progress indicator will refer to the track being
recalculated, so the scanning provided might not be linear.
171
When the operation is complete, the system will save the song in the selected memory unit.
Page 80
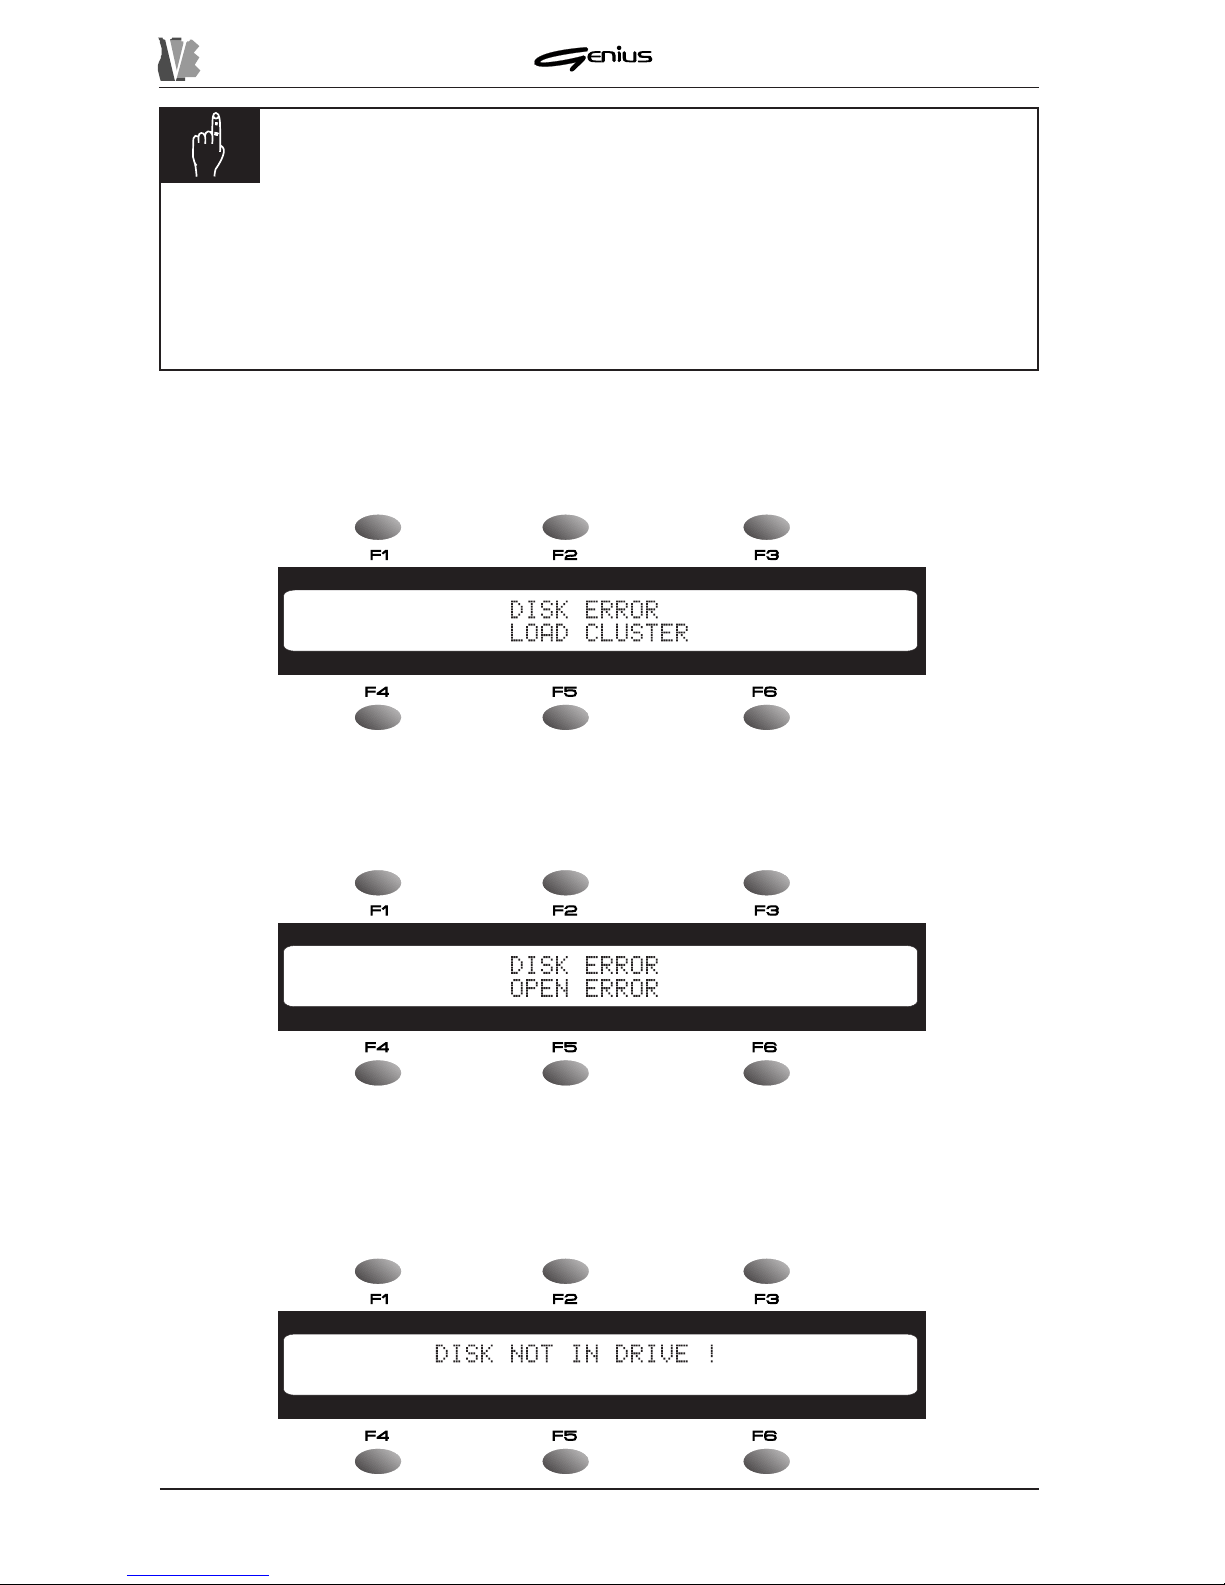
DATA FILER
IMPORTANT NOTES
ü
When songs resident on a floppy disk are edited, the disk cannot be removed. If
this occurs, the current edit operation will be aborted.
ü
Before modifying files resident in the internal memory or on disk, make sure that
there is enough room for the new file to be written, even if it is to be rewritten, because
temporary files are generated in the memory.
9.2.9 ERROR MESSAGES – EDIT SECTION
DISK ERROR – LOAD CLUSTER
A reading error has occurred due to a damaged cluster on the disk. The file is not legible.
DISK ERROR – OPEN ERROR
A serious error has occurred during reading/writing on the disk. Very probably, the disk’s
magnetic medium is damaged. Editing of the song is not possible.
DISK NOT IN DRIVE!
172
Page 81
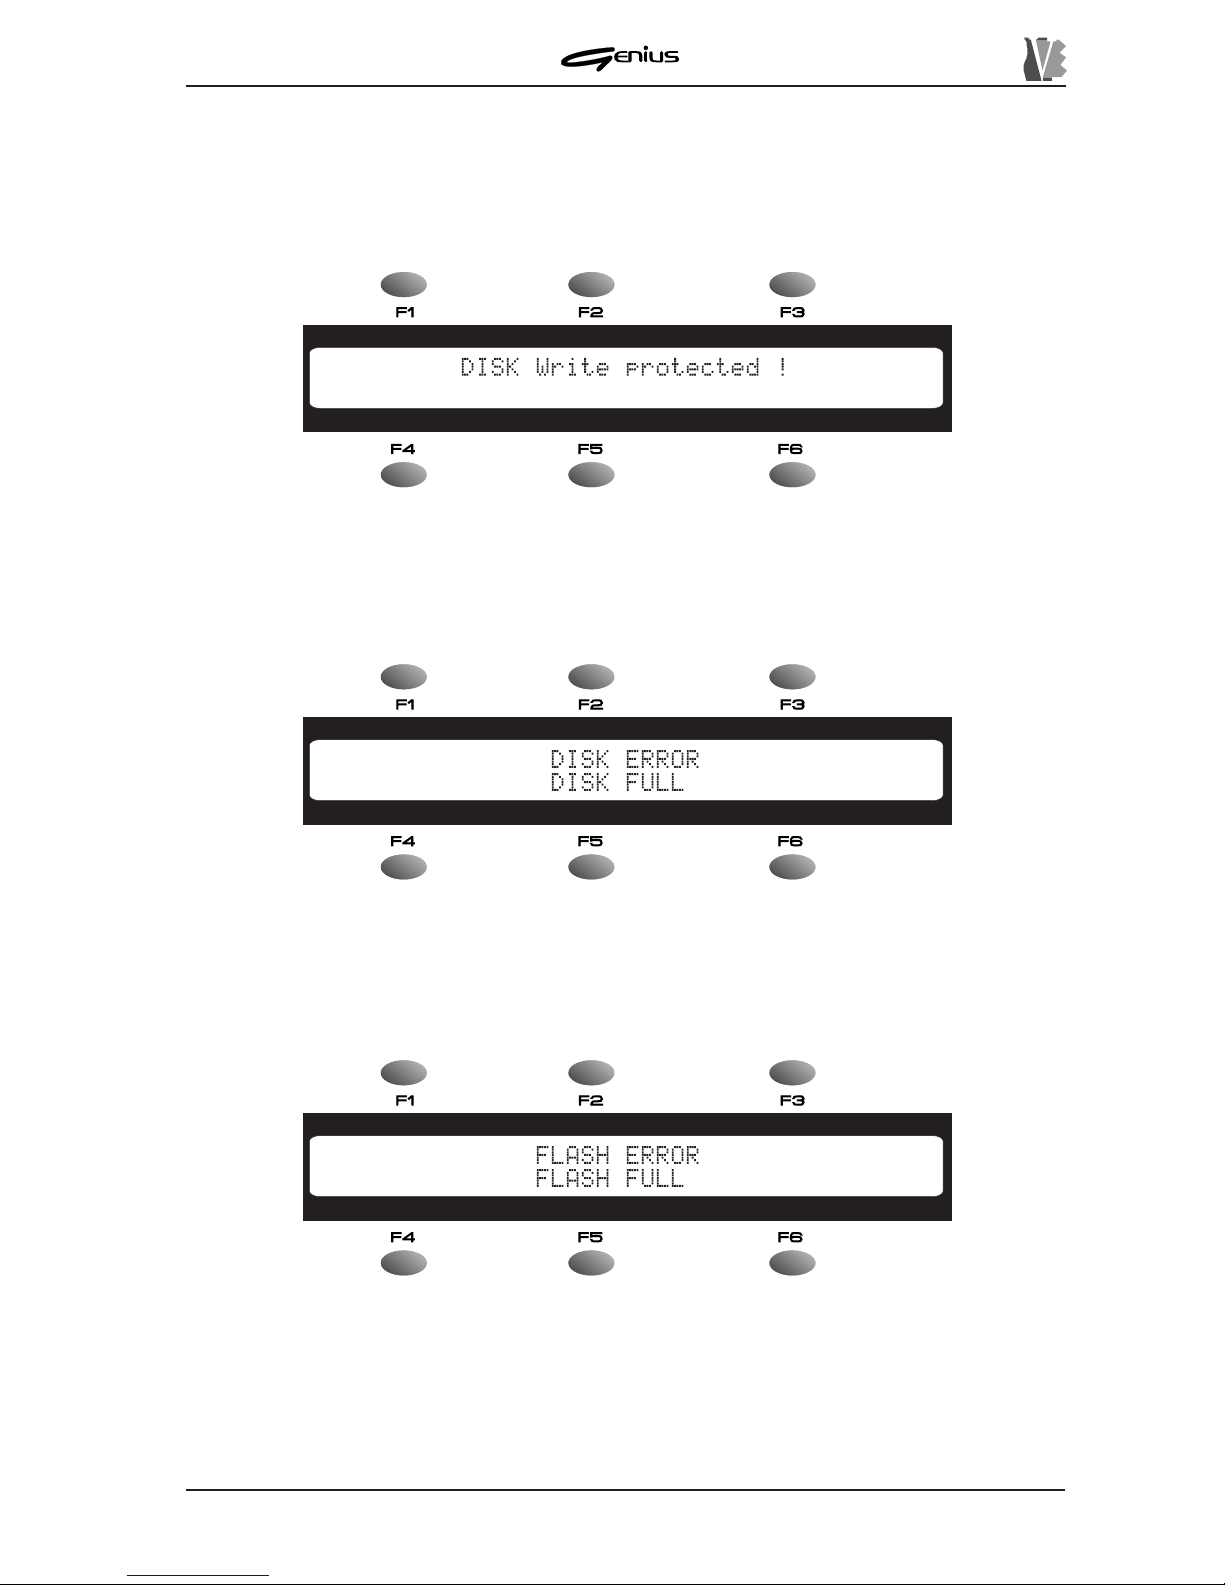
DATA FILER
Y ou have attempted a floppy disk operation with no disk inserted. If the disk is inserted, wait
a few moments (to allow the instrument to acquire the floppy disk) and then retry the procedure.
Also try removing and re-inserting the disk.
DISK WRITE PROTECTED!
The floppy inserted has write protection: extract the disk, remove the protection and repeat
the editing operations.
DISK ERROR – DISK FULL
There is not enough room on the disk to complete the operation in progress. Replace it or
free some space.
FLASH ERROR – FLASH FULL
There is not enough room in the memory to save any more files. Press [ESC] to return to the
previous video page.
Then free space in the internal memory (see point 8.2.2 - Delete Files and point 8.4.7 –
Memory Compact). After this, repeat the file editing operations.
173
Page 82
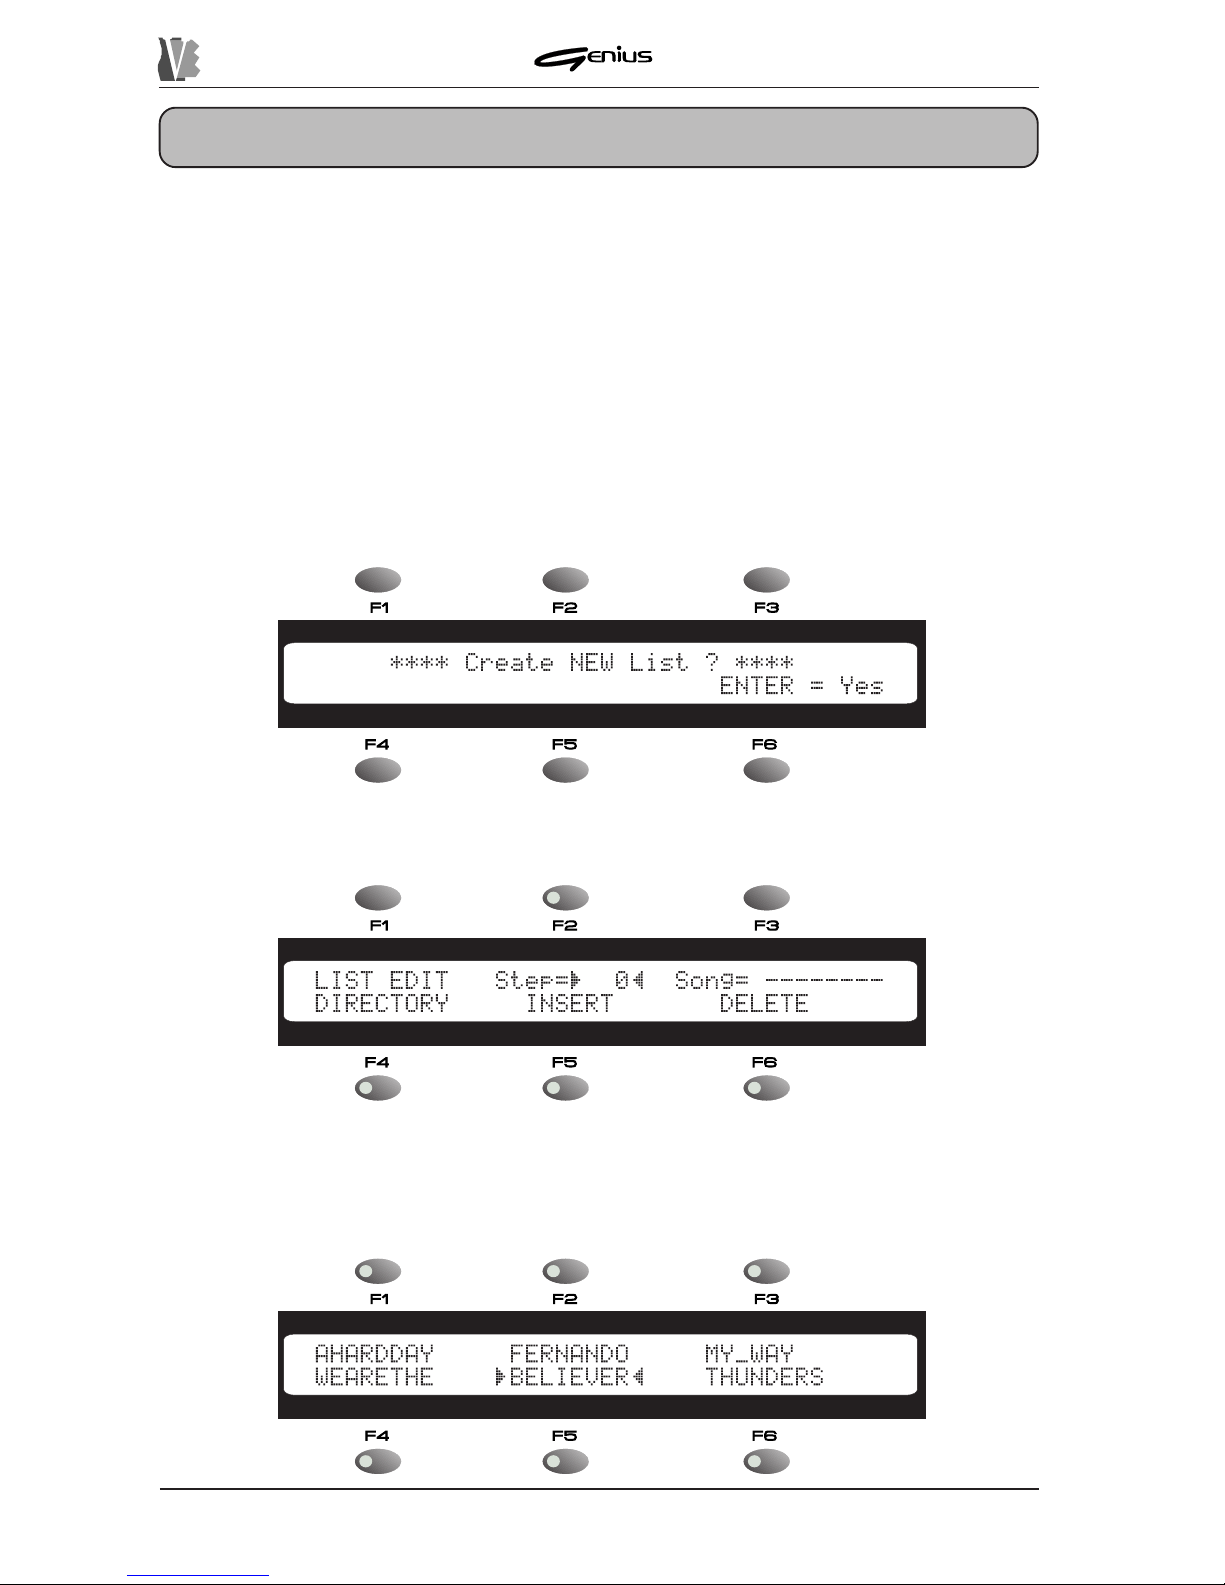
DATA FILER
10. LIST
A LIST is a pre-arranged sequence of songs which the instrument will load and play back
automatically one after the other . This sequence can be programmed by the user and saved
in the form of a LIST file (extension.LST).
Lists created using the Genius consist of STEPS, each containing the information relating to
each song to be performed, such as the name of the file and its location in the memory units.
Each list of songs can contain up to 64 steps, meaning it can combine up to 64 songs.
10.1 CREA TING A LIST
Make sure that the LED of the [SONG] button in the MODE section is on, meaning that a song
is selected. From the Stop condition press the [LIST] key in the EDIT section. The display will
show:
174
Then press [ENTER] to create a new LIST ; the system will then display the video page:
The
Step
field shows the number of the step to which the song of choice is to be associated.
The
DIRECTORY
function, selectable using the [F4] function key , will display the contents
of the memory unit currently active.
Page 83
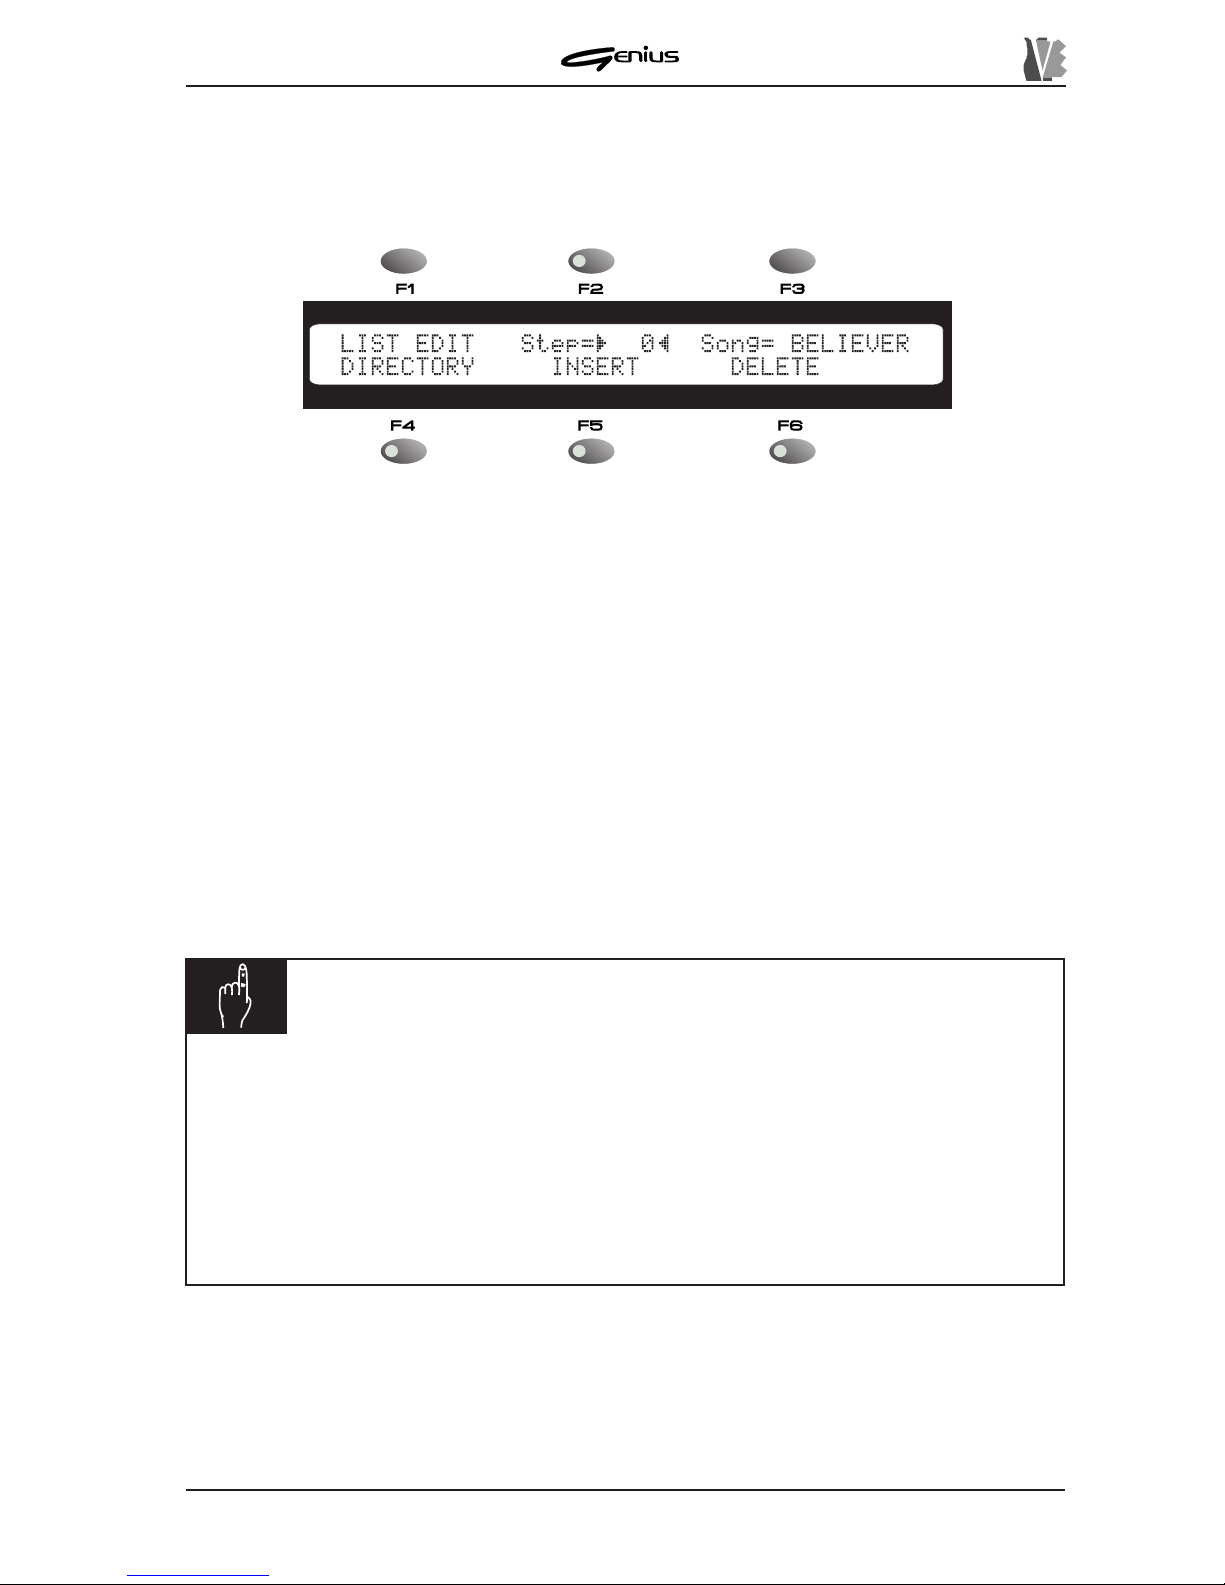
DATA FILER
Y ou can use the [P AGE] keys to scroll through the contents of the unit and press the function
key relating to the song to create the assignment. Y ou can also change memory unit (Memory
or Floppy Disk): during performance of the List the Genius will automatically change the active
unit. When the selection has been made, the display will return to the video page:
The
Song
field will display the name of the song associated to the step.
T o enter a subsequent step press the [F5] function key corresponding to the
INSERT
function;
the next step will now be created and a new song can be associated to it using the DIRECTORY
function.
Repeat the procedure described above to create all the steps required.
Y ou can scroll through the assignments using the encoder and change them by activating the
DIRECTORY function on the step to be modified. If a step is inserted between two existing
steps, the Genius will create an empty step (to which a song can then be associated) after the
one selected with the encoder . All subsequent steps will be shifted one place.
The
DELETE
function ([F6] function key) deletes the selected step and shifts all subsequent
steps one place.
Remember that pressing the [ESC] button exits from the EDIT LIST function with consequent
loss of the associations created.
NOTES
ü
Before the floppy drive can be activated, the disk must be inserted and recognised
by the system.
ü
The first step in a List must be assigned to a song since it acts as marker for the
List created.
ü
As we have seen, steps can be created with songs resident on units different from
the active unit. If the List contains songs resident on a floppy disk, make sure that
the disk is inserted during its performance.
175
Page 84
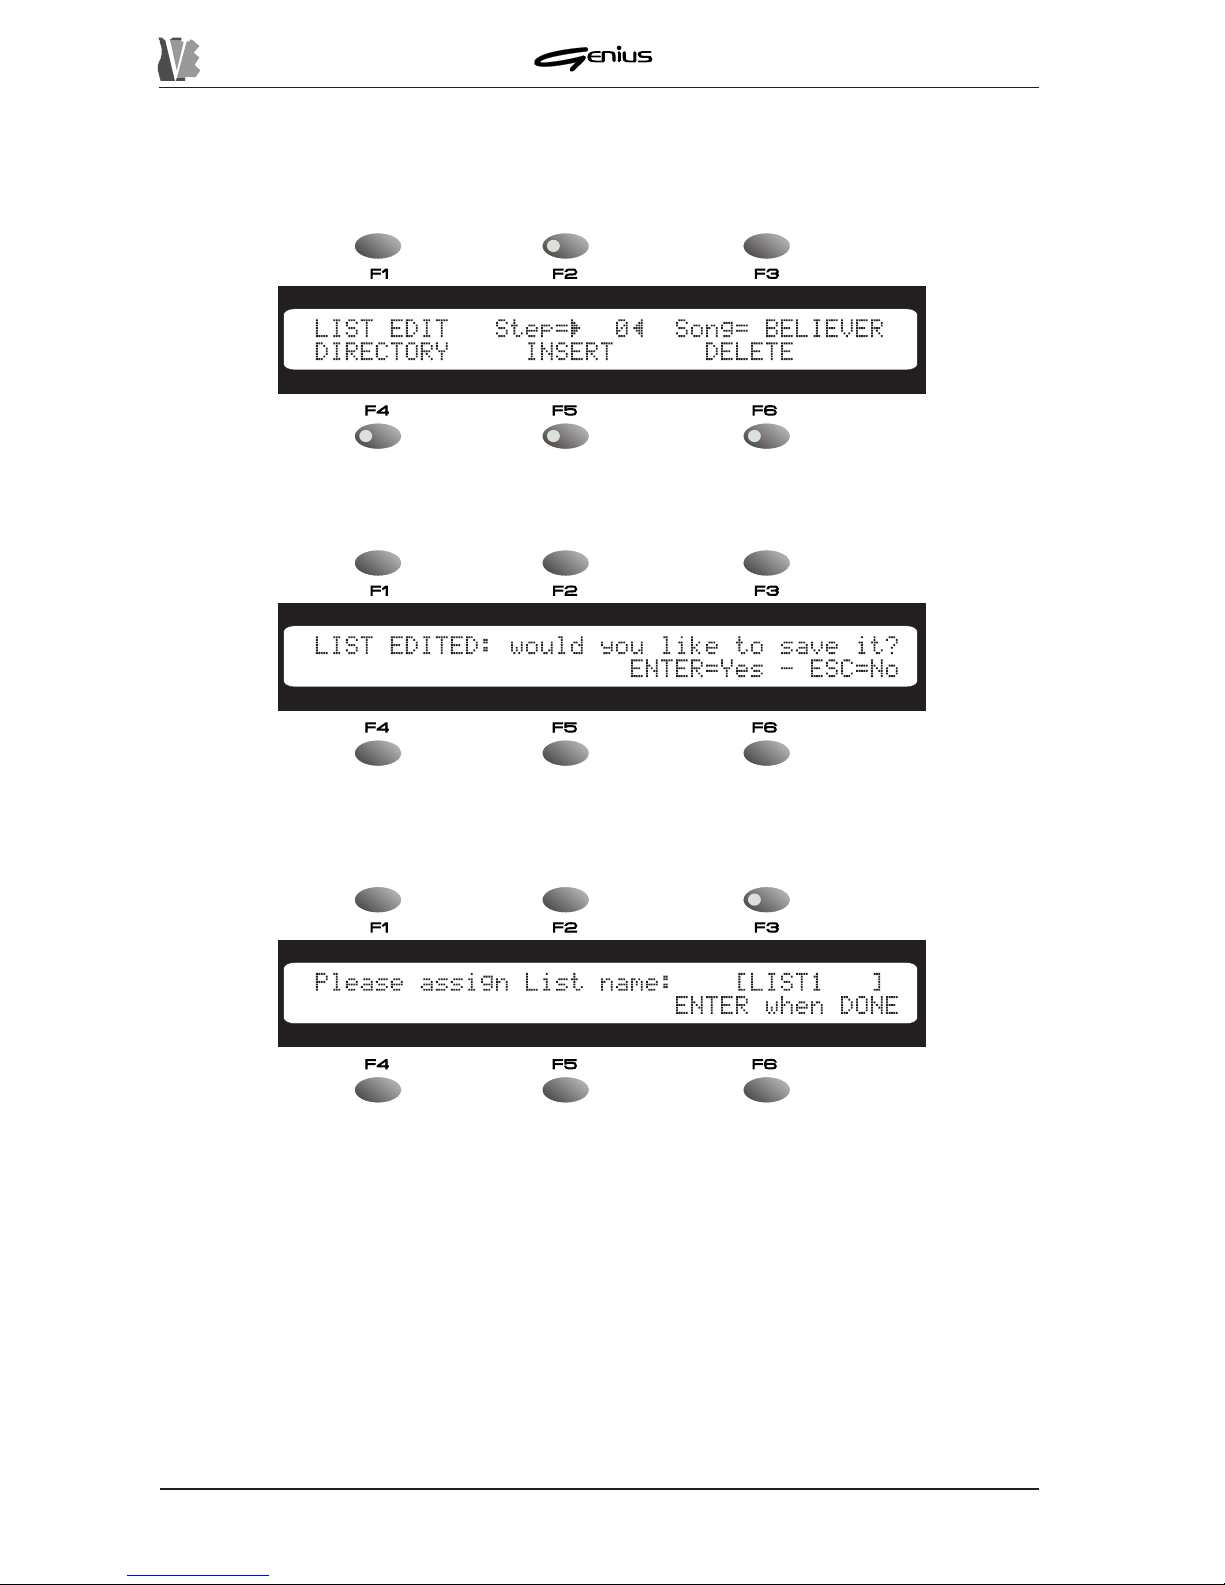
DATA FILER
10.2 SA VING THE LIST
From the EDIT LIST main page:
press the [ENTER] button; the display will show the video page:
as prompt for proceeding with the saving operation. Press [ENTER] and the video page for
assigning the name to the List will be displayed.
Y ou can use the SOURCE buttons to select the unit which is to contain the list created. Naturally,
for access to the DISK option the floppy disk must be inserted and recognised.
Y ou can use the encoder to scroll through the characters and the P AGE buttons to position
the cursor . Blank spaces cannot be inserted between the characters.
Press [ENTER] to conclude the procedure.
For the error video pages relating to List saving, refer to point 7.3.1.
176
Page 85
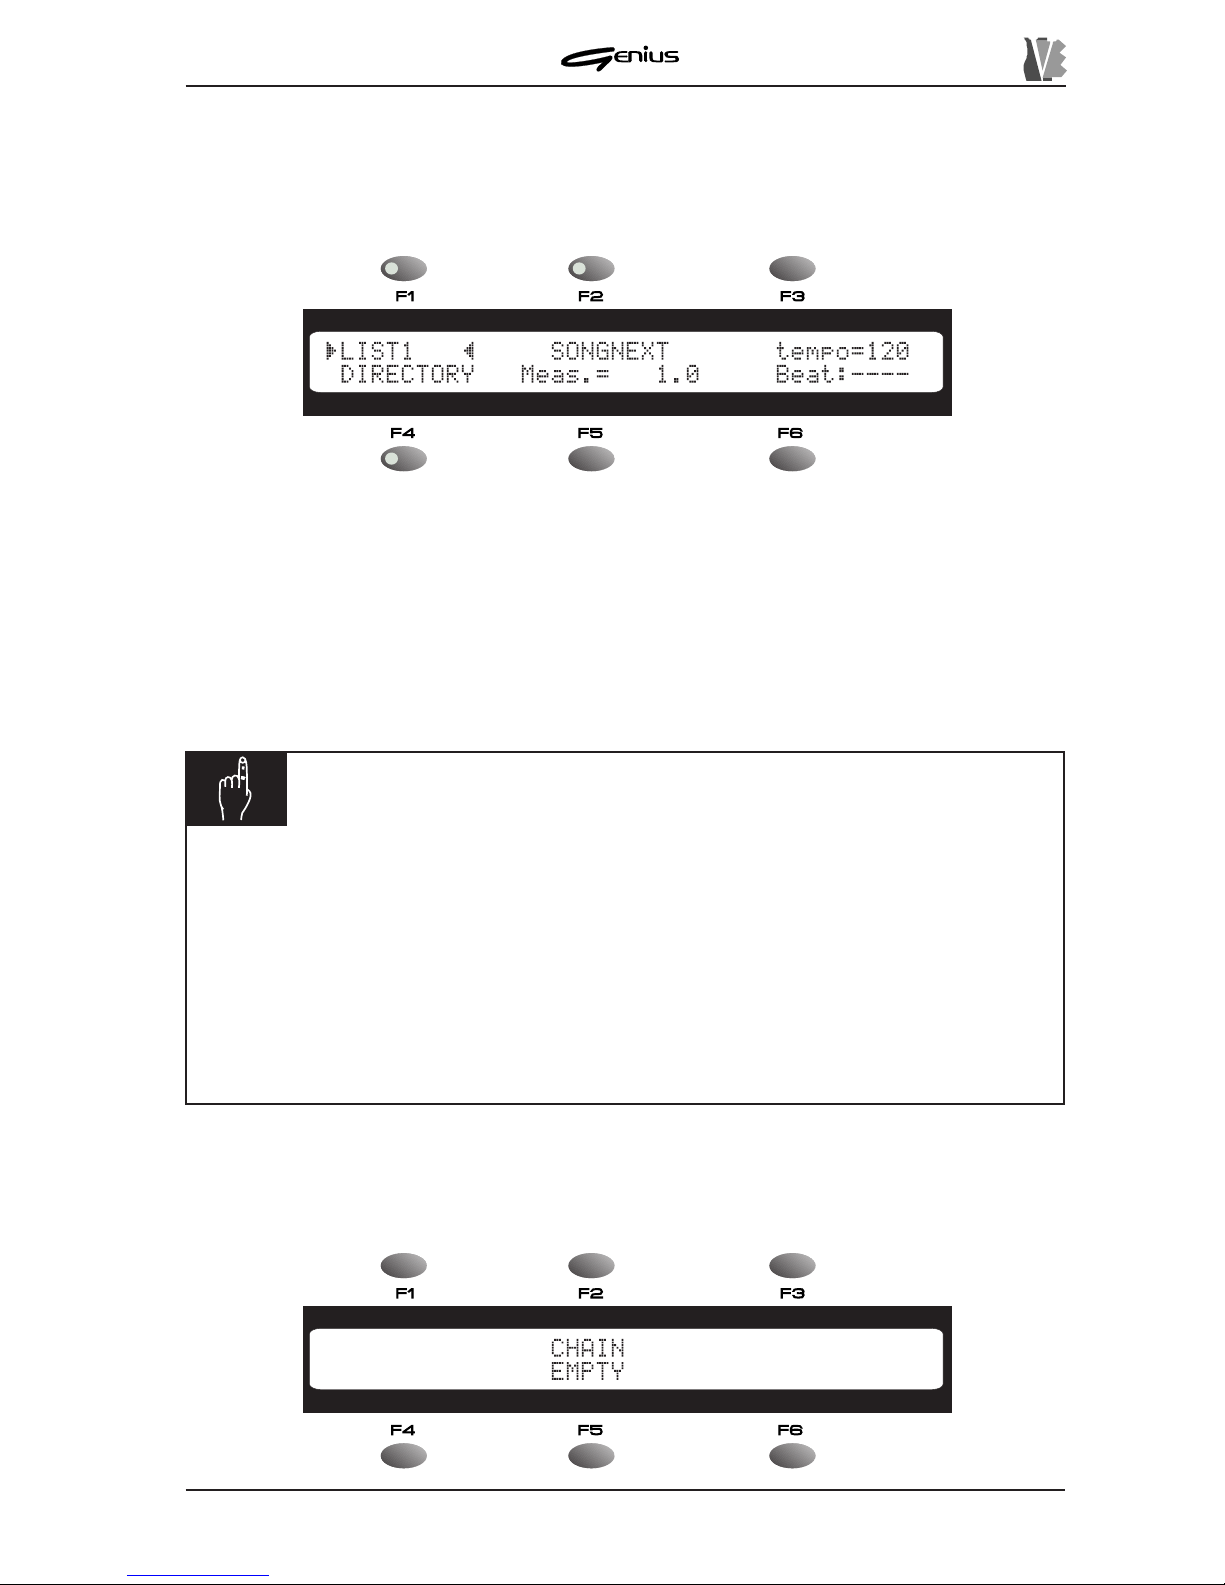
DATA FILER
10.3 PLA YING A LIST
Once the List has been created, it can be recalled from the MAIN P AGE by simply pressing
the LIST] button in the MODE section.
The first List on the active unit will be displayed on the selection field. The user can scroll
through the Lists present using the encoder or by means of the DIRECTORY function which in
this case will only display the files relating to this category (the songs are not displayed).
Once the List required has been selected, press [ENTER] to load it and then [PLA Y] to perform
it.
If the active unit does not contain any Lists, the selection field will display the message
EMPTY
.
See point 5.1.1 for information about the error video pages relating to performance of the
songs contained in Lists.
10.3.1 ERROR MESSAGES – PLAY LIST
CHAIN EMPTY
NOTES
ü
The List may be selected both in the field next to the [F1] button and in the
SONGNEXT
field. In this second case the List will be played automatically at the
end of the current song.
ü
If a song is booked in the
SONGNEXT
field during performance of a List, it will be
played not at the end of the List but as soon as the current step is completed.
ü
If the List resides on a floppy disk, do not extract the disk during performance of the
List.
ü
If some steps of the List envisage songs on a floppy disk which is not inserted, the
relative steps will be skipped.
177
Page 86
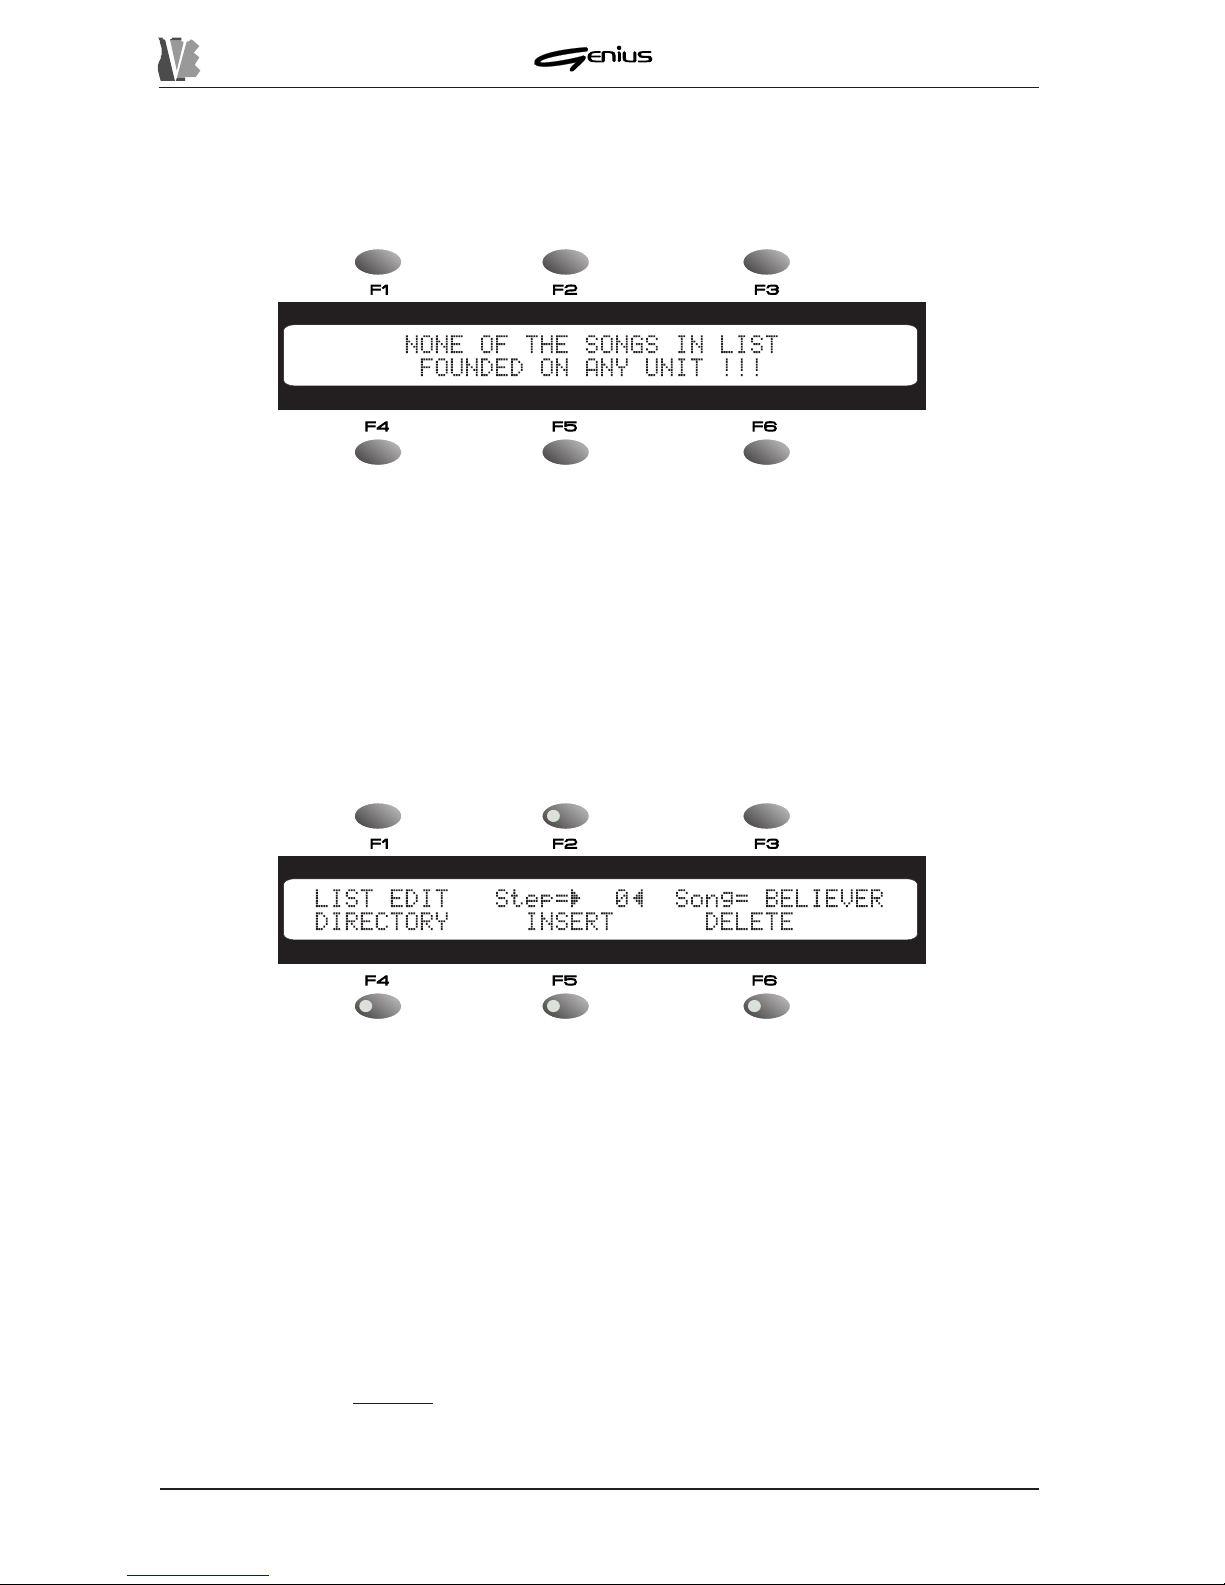
DATA FILER
The selected List does not contain any assigned steps or the first step is empty . Check the
contents of the List using the operations for modification of the existing List (point 10.4).
SONG NOT FOUND
After this, scroll through the steps present using the encoder . T o modify an assignment created,
press the [F4] key and use the DIRECTORY function to create the new assignment.
Y ou can also use the INSERT and DELETE functions to add or delete steps (see point 10.1).
Now save the List (point 10.2) bearing in mind that if the original name of the List is retained
the List will be overwritten. Here again, if the modified List is saved in the internal memory , it
will be placed at the end of the sequence of existing lists.
10.5 LIST FILE MANAGEMENT
This manual has shown us how to copy , rename and delete song files (*.MID files). The same
procedures are also
identical for the List files made available during this operation by pressing
the [LIST] button in the MODE section. Press [SONG] in the same section to return to
management of the *.MID files.
178
None of the songs in the List is found to be present in the system (e.g. they have been deleted
after creation of the List). It is also possible that the contents of the List refer to a floppy disk
with no disk or the wrong disk present.
10.4 MODIFYING A LIST
T o modify an existing List, select it in the MAIN P AGE and load it into the performance memory
by pressing the [ENTER] key . Then press the [LIST] button in the EDIT section to display its
contents.
Page 87
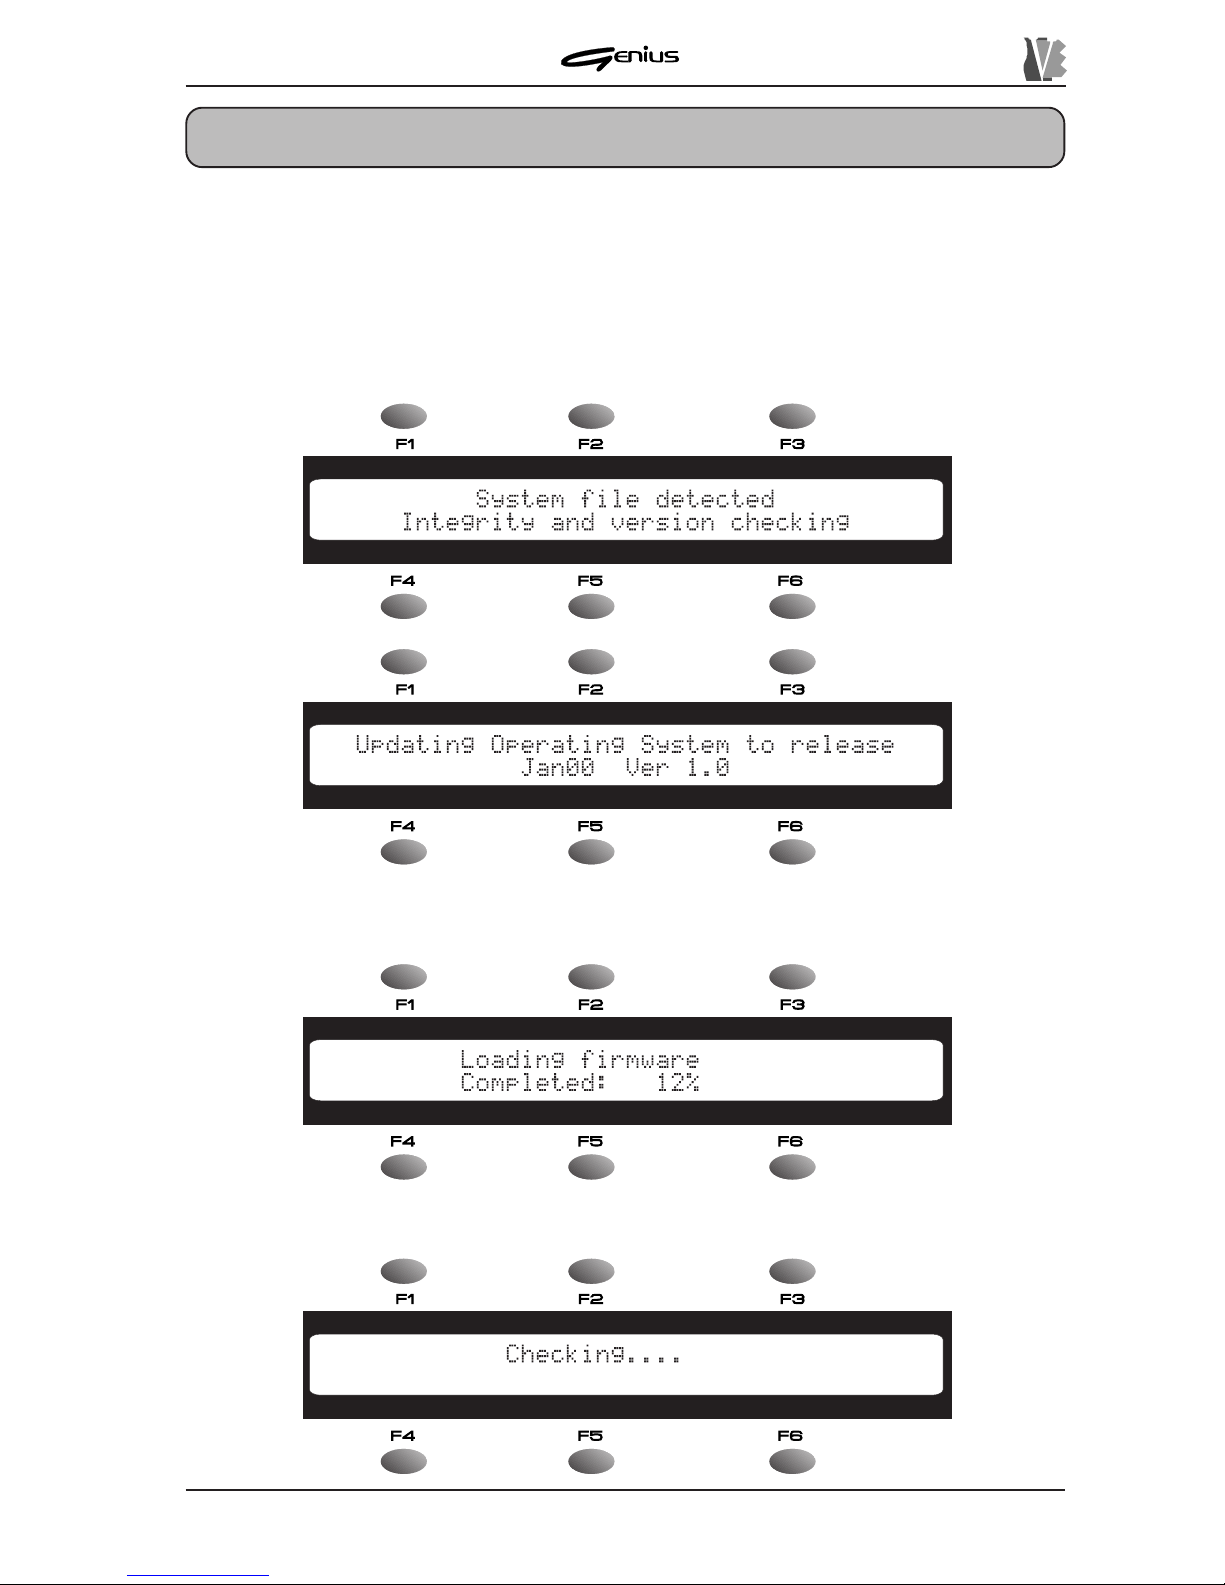
DATA FILER
APPENDIX
UPDA TING THE OPERA TING SYSTEM
The Genius operating system is resident in the instrument’s internal memory. Updating to
later releases is simple and immediate.
Switch off the instrument and insert the floppy disk containing the file with the new operating
system: then switch on the instrument and the display will show:
After this, the instrument will proceed to load the new release. The display will show the video
page:
At this point, a check on the loaded file for damage will follow .
179
Page 88
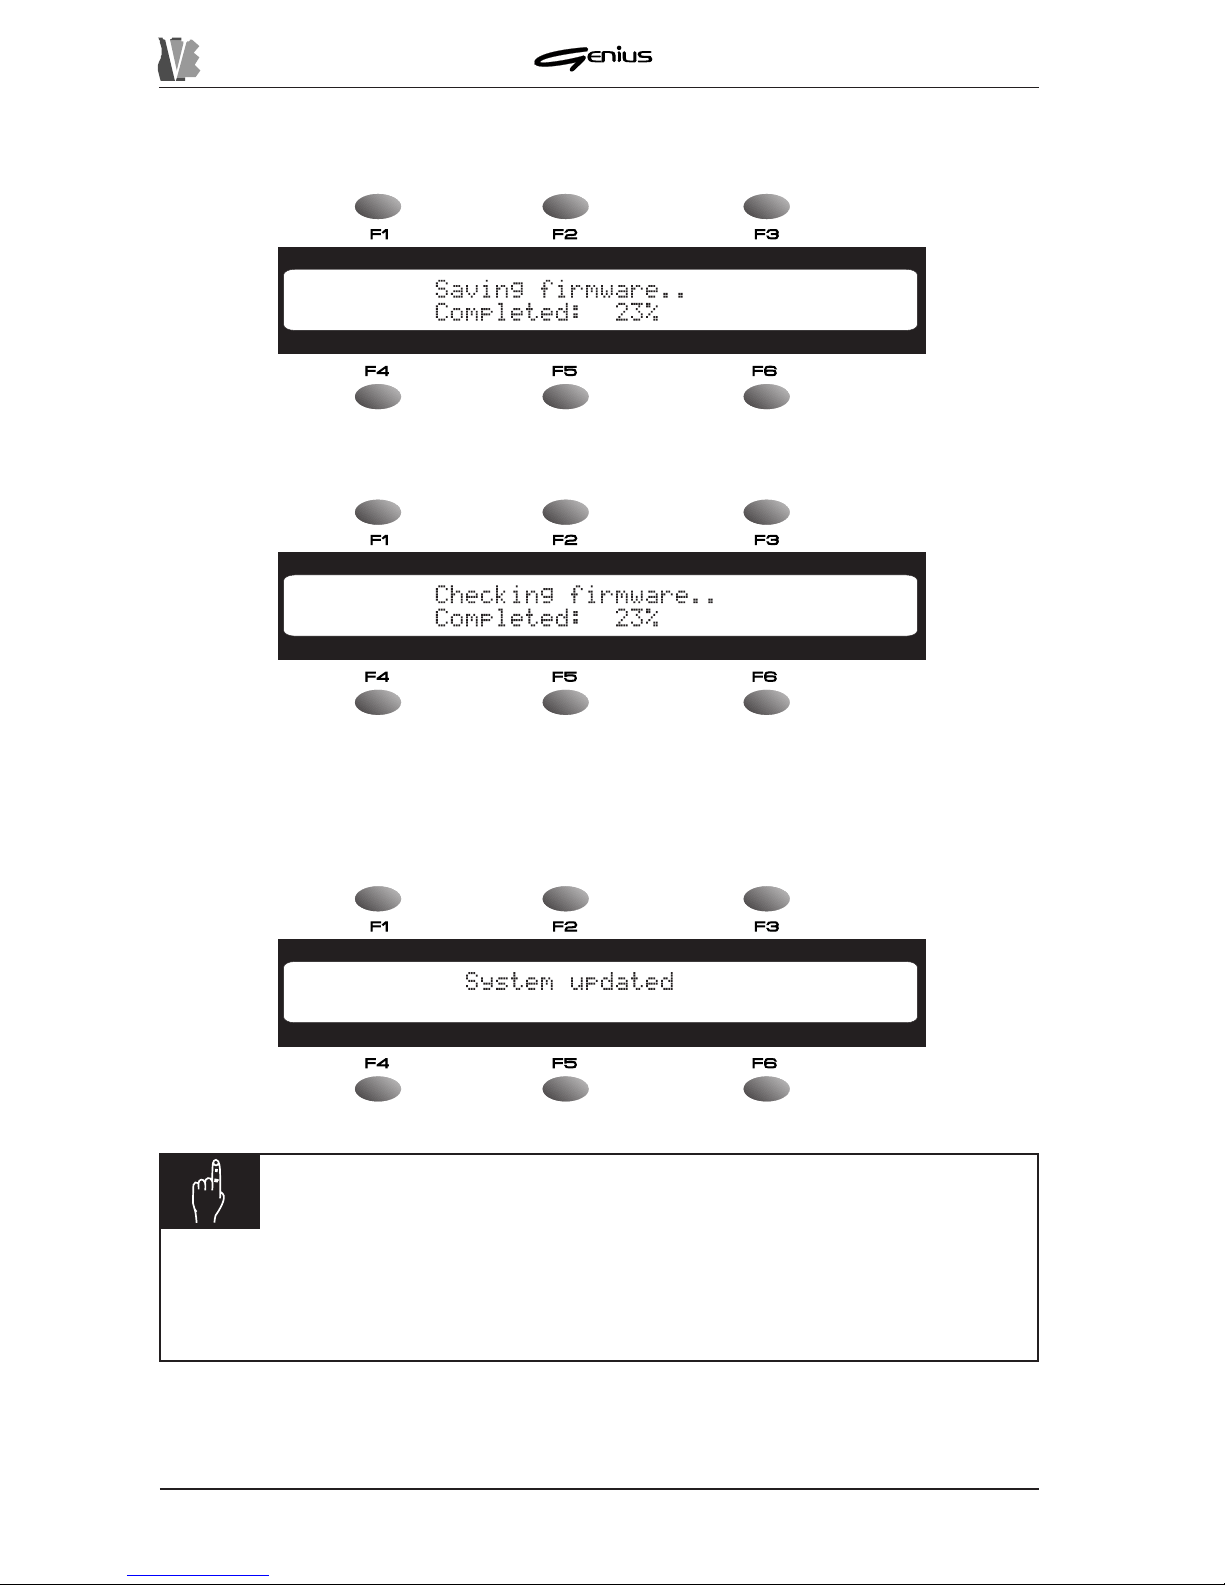
DATA FILER
After the check, the instrument will save the new firmware definitively in the its own internal
memory:
and then check it again:
The saving and verification procedures are very delicate phases in which the instrument is
virtually without an operating system. It is therefore essential NOT TO SWITCH THE
INSTRUMENT OFF during these phases.
When the procedure has been concluded correctly , the display will show the video page:
NOTES
ü
The file containing the operating system is called Datafile.sys. Never rename it.
ü
If the message SYSTEM FILE ERROR is displayed during the update, the floppy
disk medium is damaged or the update file contains data which are not valid.
180
Page 89
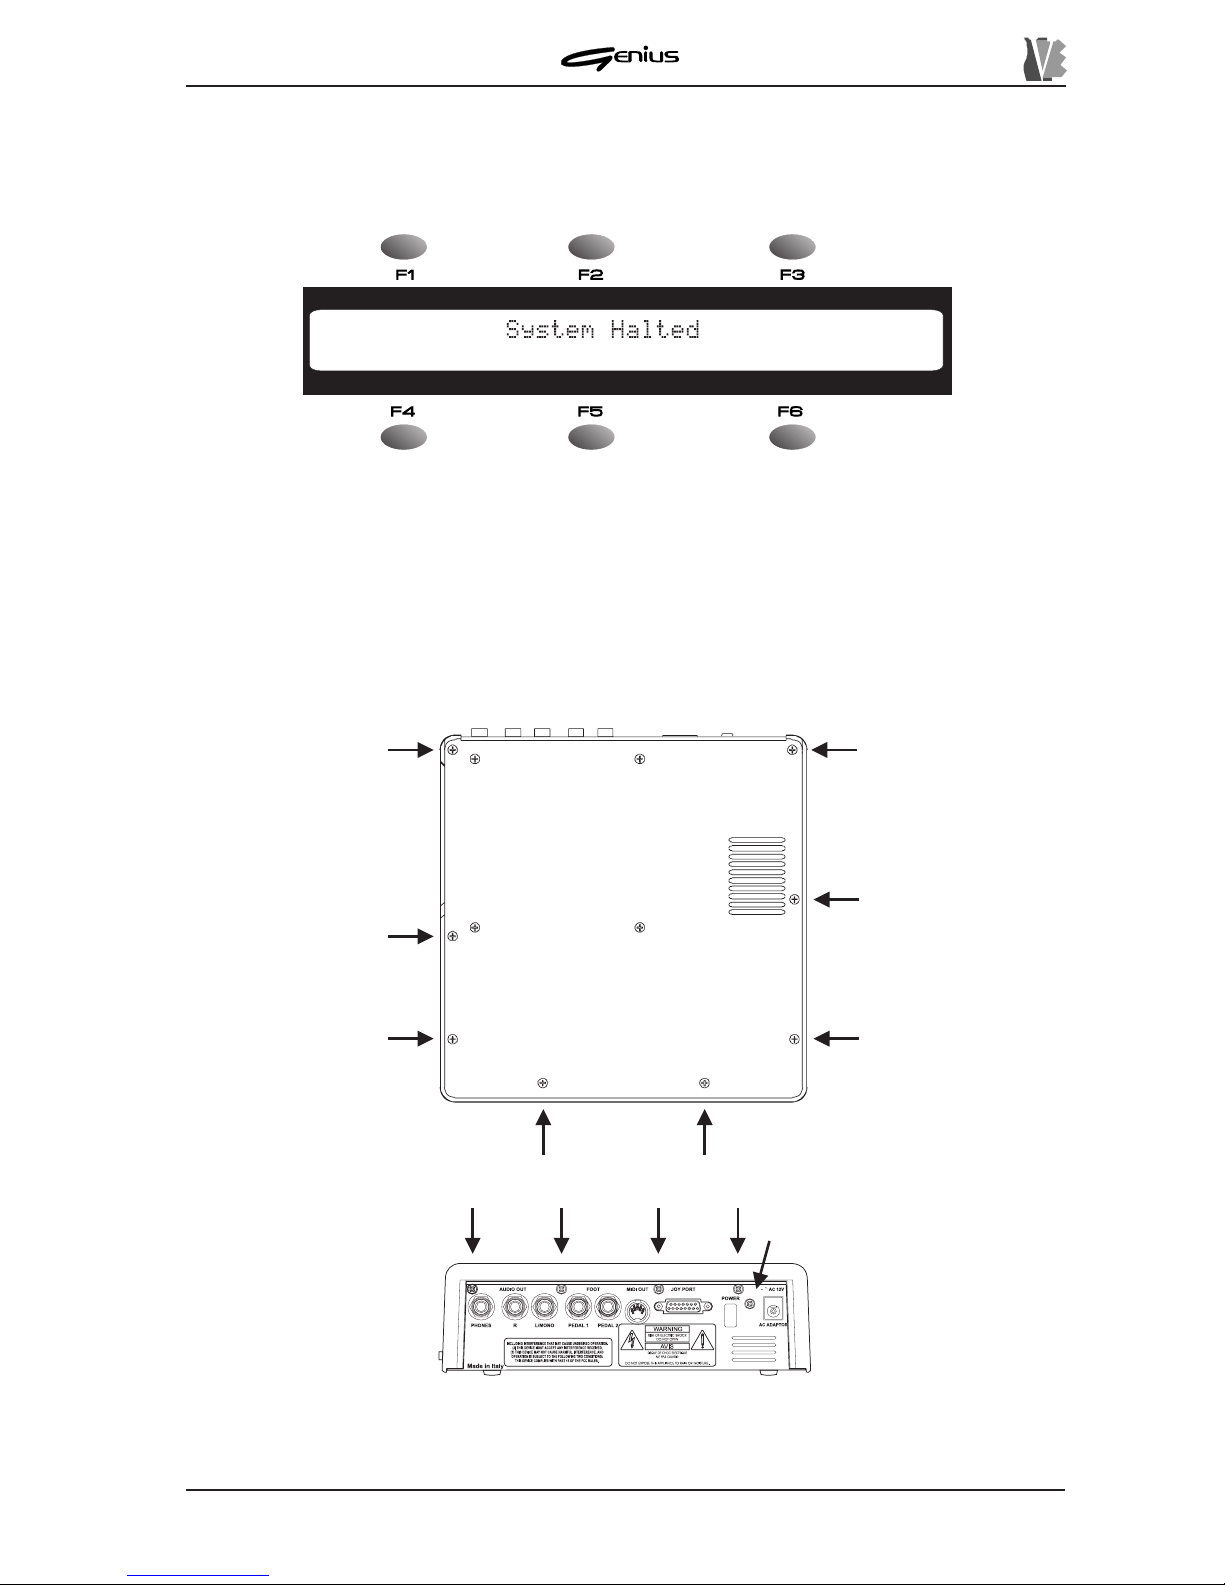
DATA FILER
OPERA TING SYSTEM F AILURE
If the following video page appears when the instrument is switched on:
the instrument’s operating system is damaged or not present: reinstall the operating system
using the procedures described in the previous point. If the operation is not concluded
successfully , contract an authorised V oice Systems service centre.
ADDING FLASH MEMORY EXP ANSIONS
T o open the instrument, remove the screws shown in the diagram:
181
Page 90
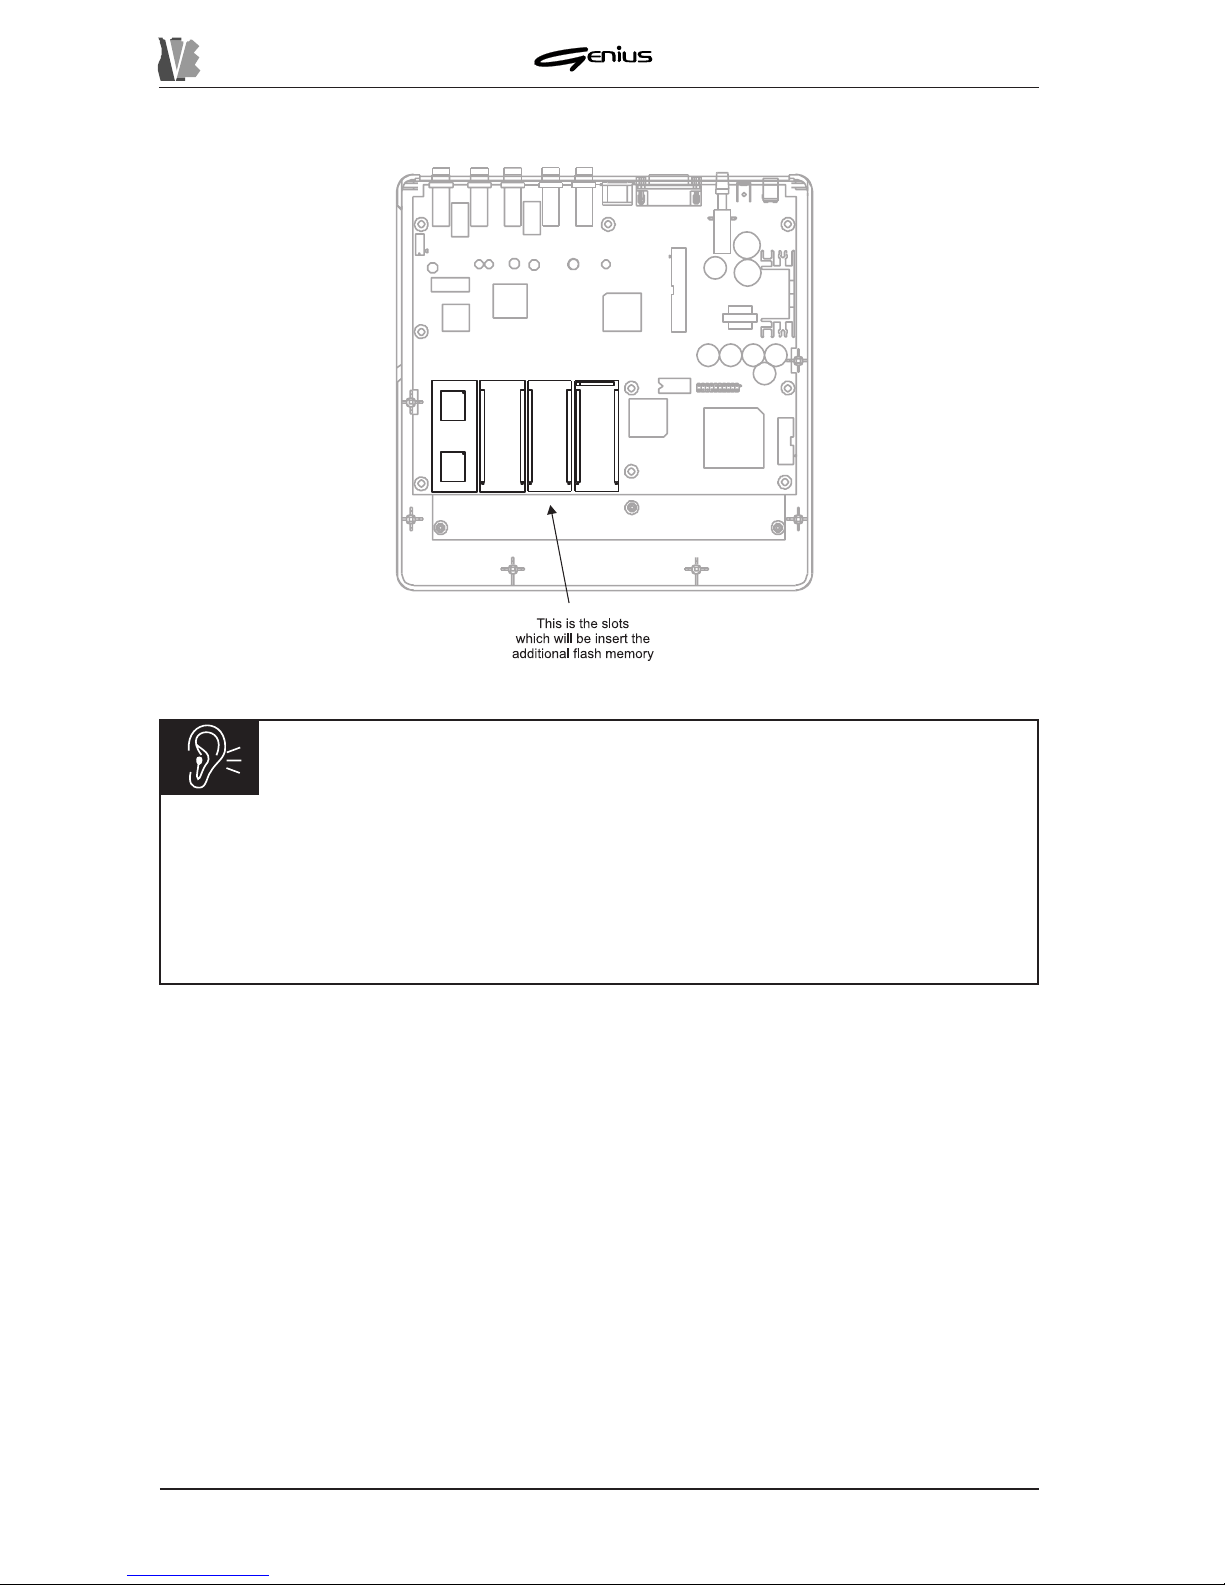
DATA FILER
CAUTION!
ü When inserting the memory expansions take great care that they are the correct way
round. The cards are printed with a white circle; insert the expansion so that this reference
coincides with the circle printed on the board.
ü Insert the expansions in sequence from left to right. Never leave empty slots between
two expansions.
182
Then insert the expansions.
Page 91
DATA FILER
SOUND LIST
MAIN SOUND – GENERAL MIDI
(all channels except 10)
PG GENERAL MIDI PG GENERAL MIDI PG GENERAL MIDI PG GENERAL MIDI
0
Grand Piano
32
Acoustic Bass 1
64
Soprano Sax
96
Rain
1
Bright Piano
33
Finger Bass
65
Alto Sax 1
97
Soundtrack
2 E. Grand Piano 34 Pick Bass 66 Tenor Sax 98 Crystal
3
Honky Tonk
35
Fretless 1
67
Baritone Sax
99
Atmosphere 1
4
Electric Piano 1
36
Slap Bass 1
68
Oboe
100
Brightness
5 Electric Piano 2 37 Slap Bass 3 69 English Horn 101 Goblins
6 Harpsichor d 1 38 Synth Bass 1 70 Bassoon 102 Echoes
7
Clavinet
39
Synth Bass 2
71
Clarinet 1
103
Sci-fi
8
Celesta
40
Violin 1
72
Piccolo
104
Sitar
9 Gloken 41 Viola 73 Flute 105 Banjo
10
Music B ox
42
Violoncello
74
Recorder
106
Shamisen
11
Vibes
43
Double Bass
75
Pan Flute
107
Koto 1
12
Marimba
44
Tremolo Strings
76
Blow Bottle
108
Kalimba
13 Xylopon 45 Pizzicato 77 Shakuhachi 109 Bag Pipe
14
Chimes
46
Harp
78
Wistle
110
Fiddle
15
Dulcime r
47
Timpani
79
Oca r i na
111
Shanai
16 Drawbar Organ 48 String Ensamble 1 80 Square 1 112 Tinkle Bell
17 Jazz Organ1 49 String Ensamble 2 81 Sawtooth 1 113 Agogo
18
Rock Organ 1
50
Synth Strings 1
82
Calliope
114
Steel Drum
19
Church Organ 1
51
Synth Strings 2
83
Chiff
115
Woodblock
20 Reed Organ 52 Choir Aa h 84 Charang 116 Taiko Drum
21 Musette 53 Voice Ooh 85 Voice 117 Melodic Tom 1
22
Harmonica
54
Syn Voice
86
Fifths
118
Synth Drum 1
23
Tango Accordion
55
Orchestra Hit
87
Bass Lead 1
119
Reverse Cymbal
24 Nylon Guitar 56 Trumpet 1 88 Fantasy 1 120 Guitar Fretnoise
25
Steel Guitar
57
Trombone 1
89
Warm Pad
121
Breath Noise
26
Jazz Guitar
58
Tuba
90
Polysynth
122
Seashore
27
Clean Guitar 1
59
Mute Trumpet
91
Choir
123
Bird Tweet
28 Muted Guitar 60 French Horn 1 92 Bowed 124 Telephone 1
29
Overdrive Guitar
61
Brass
93
Metallic
125
Helicopter
30
Distort. Guitar
62
Syn Brass 1
94
Halo
126
Applause
31
Guitar Harmonics
63
Syn Brass 2
95
Sweep
127
Gunsho t
183
Page 92
DATA FILER
SOUND VARIATION
(all channels except 10)
PG GENERAL MIDI
Bank Select
MSB
1st VARIATIO N
Bank Select
MSB
2nd VARIATION
Bank Select
MSB
3rd VARIATION
0 Grand Piano 8 Piano 1w 10 Piano 1d
1
Bright Piano
2
E. Grand Piano
3
Honky Tonk
4 Electric Piano 1 8 Detune El. Piano 1 16 Electric Piano 1v 24 60's Electric Piano
5
Electric Piano 2
8
Detune El. Piano 2
16
Electric Piano 2v
6
Harpsi chord 1
8
Coupled Hps.
24
Harpsi o
7 Clavinet
8
Celesta
9
Gloken
10
Music B ox
11 Vibes
12
Marimba
13
Xylopon
14 Chimes 8 C hurch Bell 9 Carill on
15 D ulc ime r
16
Drawbar Organ
8
Detune Organ 1
16
60's Organ 1
32*
Organ 4
17
Jazz Organ1
8
Detune Organ 2
32*
Organ 5
18 Rock Organ 1
19
Church Organ 1
8
Church Organ 2
16
Church Organ 3
20
Reed Organ
21
Musette
8
Accordion (italia n)
22 Harmonica
23
Tango Accordion
24
Nylon Guitar
8
Ukelele
16
Nylon Guitar o
32*
Nylon Guitar 2
25 Steel Guitar 8 12 Strings Guitar 16 Mandolin
26
Jazz Guitar
8
Hawaiian Guitar
27
Clean Guitar 1
8
Chorus Guit ar
28
Muted Guitar
8
Funk Guitar
16
Funk Guitar 2
29 Overdrive Guitar
30
Distort. Guitar
8
Feedback Guitar
31
Guitar Harmonics
8
Guitar Feedback
32 Acoustic Bass 1
33 Finger Bass 8 Finger Bass 2
34
Pick Bass
8
Picked Bass 2
35
Fretless 1
36 Slap Bass 1
37
Slap Bass 3
38
Synth Bass 1
1
Syn Bass 101
8
Synth Bass 3
39
Synth Bass 2
8
Synth Bass 4
16
Rubber Bass
40 Violin 1 8 Slow Violin
41
Viola
42
Violoncello
43 Double Bass
44
Tremolo Strings
45
Pizzicato
46
Harp
47 Timpani
48
String Ensamble 1
8
Orchestra
49
String Ensamble 2
50 Synth Strings 1 8 Syn Strings 3
51 Synth Strings 2
52
Choir Aah
32*
Choir Aahs 2
53
Voice Ooh
54 Syn Voice 8 Synth Voice 2
55
Orchestra Hit
32*: this variations obtain also with Bank Select MSB=24
184
Page 93
DATA FILER
PG GENERAL MIDI
Bank Select
MSB
1st VARIATIO N
Bank Select
MSB
2nd VARIATION
Bank Select
MSB
3rd VARIATION
65 Alto Sax 1
66
Tenor Sax
67
Baritone Sax
68
Oboe
69 English Horn
70
Bassoon
71
Cl arinet 1
72 Piccolo
73
Flute
74
Recorder
75
Pan Flute
76 Blow Bottle
77
Shakuhachi
78
Wistle
79 Ocarina
80 S quare 1 1 Square 2 8 Sine Wave
81
Sawtooth 1
1
Saw
8
Doctor Solo
82
Calliope
83 Chiff
84
Charang
85
Voice
8
Lead Voice 2
86
Fifths
87 Bass Lead 1
88
Fantasy 1
89
Warm Pad
90 Polysynth
91
Choir
8
Pad Choir
92
Bowed
93
Metallic
94 Halo
95
Sweep
96
Rain
97 Soundtrack
98 Crystal 1 Syn Mallet
99
Atmosphere 1
100
Brightness
8
Brightness 2
101 Goblins 8 Goblins 2
102
Echoes
1
Echo Bell
2
Echo Pan
103
Sci-fi
104
Sitar
1
Sitar 2
105 Banjo
106
Shamisen
107
Koto 1
8
Taisho Koto
108 Kalimba
109
Bag Pipe
110
Fiddle
111
Shanai
112 Tinkle Bell
113
Agogo
114
Steel Drum
115 Woodblock 8 Castanes
116 Taiko Drum 8 Concert BD
117
Melodic Tom 1
8
Melodic Tom 2
118
Synth Drum 1
8
808 Tom
9
Electric Perc 1
119 Reverse Cymbal
185
Page 94
DATA FILER
DRUM SET TABLE (MIDI channel 10)
186
Prog 1:
HQ STD SET1
Prog 2 :
HQ STD SET2
Prog 9:
HQ ROOM SET
Prog 17:
HQ POWER SET
Prog 25:
HQ ELEC. SET
27 - D#1
High Q
28 - E1
Slap
29 - F 1 Scratch Push
30 - F #1
Scratch Pull
31 - G1
Sticks
32 - G#1
Square Click
33 - A1
Metronome Cl ic k
34 - A#1 Metronome Bell
35 - B1
HQ STD1 Kick2 HQ STD2 Kic k2 HQ Room Kic k2 HQ Power Kick2 HQ Elect Kick2
36 - C2
HQ STD1 Kick1 HQ STD2 Kic k 1 HQ Room Kic k1 HQ Power Kick1 HQ Elect Kick1
37 - C#2
Side Stick
38 - D2
HQ STD1 Snare1 HQ STD2 Snare1 HQ ROOM Snare1 Gated Snare E lec SD
39 - D#2 Hand Cl ap
40 - E2
Snare Drum2 HQ STD Snare2 HQ Room Snare1 HQ Power Snare1 HQ Elec S nare1
41 - F 2
HQ Low Floor Tom HQ Power Low Tom2 HQ Power Low Tom2 Elec Low Tom2
42 - F #2
Clos e d Hi Hat [EXC1]
43 - G2 HQ High Floor Tom HQ Power Low Tom1 H Q Power Low Tom1 E lec Low Tom1
44 - G#2 Pedal Hi Hat [EXC1]
45 - A2
HQ Low Tom HQ Power Mid Tom2 HQ Power Mid Tom2 Elec Mid Tom2
46 - A#2
Open Hi H at [EXC1]
47 - B2
HQ Low Mid Tom HQ Power Mid Tom1 HQ Power Mid Tom1 Elec Mid Tom1
48 - C3 HQ Hi Mid Tom HQ Power High Tom2 HQ Power High Tom2 Elec High Tom2
49 - C#3
Crash Cymbal 1
50 - D3
HQ High Tom HQ Power High Tom 1 HQ Power High Tom1 elec High Tom1
51 - D#3
Ride Cymbal1
52 - E3
Chinese Cymbal Reverse Cym bal
53 - F 3 Ride Bell
54 - F #3
Tambourine
55 - G3
Sp la s h Cy mba l
56 - G#3
Cowbell
57 - A3
Crash Cymbal 2
58 - A#3 Vibras lap
59 - B3
Ride Cymbal 2
60 - C4
Hi Bongo
61 - C#4
Low Bongo
62 - D4
Mute High Conga
63 - D#4 Open High Conga
64 - E4
Low Conga
65 - F 4
High Timbale
66 - F #4
Low Timbale
67 - G4 High Agogo
68 - G#4 Low Agogo
69 - A4
Cabasa
70 - A#4
Maraca s
71 - B4
Short Whistle [EXC2]
72 - C5 Long Whistle [EXC2]
73 - C#5
Short Guiro [EXC3]
74 - D5
Long Guiro [EXC3]
75 - D#5
Claves
76 - E5
High Wood Block
77 - F 5 Low Wood Bl ock
78 - F #5
Mute Cuica [EXC4]
Page 95
DATA FILER
Prog 2 6 :
HQ TR 808 SET
Prog 2 7 :
HQ DANC E SET
Prog 3 3 :
JAZ Z SE T
Prog 4 1 :
BRUSH
Prog 4 9 :
ORCHESTRA
Prog 5 7 :
SFX SET
27 - D#1 C lo sed Hi Hat *
28 - E1
P e dal Hi Ha t *
29 - F1 Open Hi Hat *
30 - F#1
Ride Cymbal *
31 - G1
*
32 - G#1
*
33 - A1 *
34 - A#1
*
35 - B1
HQ 909 BD HQ Dance Kick Jazz BD2 Jazz BD2 Concert BD2 *
36 - C2
HQ 808 BD HQ Elec Kick2 Jazz BD1 Jazz BD1 Concert BD1 *
37 - C#2
808 Rim Shot
38 - D2
808 Snare Drum HQ Dan ce Snare1 Brush Tap Concert SD *
39 - D#2
Brush Slap Castanets High Q
40 - E2 HQ 909 Snare HQ Dance Snare1 Brush Swirl Concert SD Slap
41 - F2
808 Low T om 2 Elec Low Tom2 Timpani F Scratch Push
42 - F#2 808 CHH [EX C1] 808 CH H [EXC1] Timpani F# Scratch Pull
43 - G2
808 Low T om 1 Elec Low Tom1 Timpani G Sticks
44 - G#2 808 CHH [EXC1] 808 CH H [EX C1] Timpani G# Square Click
45 - A2
808 Mid Tom2 Elec Tom2 Timpani A M etronom e Click
46 - A#2 808 OHH [EXC1 ] 808 OHH [EXC1] Timpani A# Metronome Bell
47 - B2
808 Mid Tom1 Elec Mid Tom1 Timpani B Guitar Slide
48 - C3
808 Hi Tom2 Elec Hi Tom2 Timpani C G t C ut Noise (down)
49 - C#3
808 Cymbal Timpani C# Gt Cut Noise (up)
50 - D3 808 Hi Tom1 Elec Hi Tom1 Timpani D Double Bass Up
51 - D#3
Timpani D# Key C lick
52 - E3
Reverse Cymbal Timpani E Laughing
53 - F3 Timpani F Screaming
54 - F#3
Punch
55 - G3 He a rt Beat
56 - G#3
808 Cowbell Footsteps1
57 - A3 Concert Cymbal2 Footsteps2
58 - A#3
Applause
59 - B3 Concert Cymbal1 Door Creaking
60 - C4
Door Closing
61 - C#4
808 High Conga Wind Chime
62 - D4
808 Mid Conga Car Engine Start
63 - D#4 808 Low Conga Car Pass
64 - E4
Car Breaking
65 - F4
Car Pass
66 - F#4
Car C rash
67 - G4
Police Sire n
68 - G#4
Train
69 - A4
Jet Take -o ff
70 - A#4 808 Maracas Helicopter
71 - B4
Startsh ip
72 - C5 Gun Shot
73 - C#5
Machinegun
74 - D5 Lasergu n
75 - D#5
808 Claves Explosion
76 - E5 Do g
77 - F5
Horse Gallop
78 - F#5
Birds
187
Page 96
DATA FILER
Prog 65:
STAN DARD SET
Prog 73:
ROOM SET
Prog 81:
POWER SET
Prog 89:
ELECTR. SET
Prog 9 0 :
TR-808 SET
27 - D#1
High Q
28 - E1
Slap
29 - F 1 Scratch Pus h
30 - F #1
Scratch Pull
31 - G1
Sticks
32 - G#1
Square Click
33 - A1
Metronome Click
34 - A#1 Metronome Bell
35 - B1
Kick Drum2 /Jazz BD2
36 - C2
Kick Drum1/Jazz BD1 Power Kick Elec BD 808 Bass Drum
37 - C#2
Side Stick 808 Rim Shot
38 - D2
Snare Drum1 Gated Snare El ec SD 808 Snare Drum
39 - D#2 Ha nd Clap
40 - E2
Snare Drum2 Gated Snare
41 - F 2
Low Floor Tom Room Low Tom2 Room Low Tom2 Elec Low Tom2 808 Low Tom2
42 - F #2
Closed Hi Hat [EXC1] 808 CHH [EXC1]
43 - G2 High Floor Tom Ro om Low Tom1 Room Low Tom1 Elec Low Tom1 808 Low Tom1
44 - G#2 Pedal H i Hat [EXC1] 808 CHH [EX C 1]
45 - A2
Low Tom Room Mid Tom2 Room Mid Tom2 Elec Mid Tom2 808 Mid Tom2
46 - A#2
Open Hi Hat [EXC1] 808 CHH [EXC1]
47 - B2
Low Mid Tom Room Mid Tom1 Room Mid Tom1 Elec Mid Tom1 808 Mid Tom1
48 - C3 Hi Mid Tom Room Hi Tom2 Room Hi Tom2 Elec Hi Tom2 808 Hi Tom2
49 - C#3
Crash Cymbal 1 808 Cymbal
50 - D3
High Tom Room Hi Tom1 Ro om Hi Tom1 Elec Hi Tom1 808 Hi Tom1
51 - D#3
Ride Cymbal1
52 - E3 Chinese Cymbal Reverse Cymbal
53 - F 3
Ride Be ll
54 - F #3
Tambourine
55 - G3
Splash Cymbal
56 - G#3
Cowbell 808 Cowbell
57 - A3 Crash Cymbal 2
58 - A#3
Vibraslap
59 - B3
Ride Cymbal 2
60 - C4
Hi Bongo
61 - C#4 Low Bongo
62 - D4 Mute High Conga 808 High Conga
63 - D#4
Open High Conga 808 Mid Conga
64 - E4
Low Conga 808 Low Conga
65 - F 4
High Timbale
66 - F #4 Low Timbale
67 - G4
High Agogo
68 - G#4
Low Agogo
69 - A4
Cabasa
70 - A#4
Maracas
71 - B4 Short Whistle [EXC2]
72 - C5
Long Whistle [EXC2]
73 - C#5
Short Guiro [EXC3]
74 - D5
Long Guiro [EXC3]
75 - D#5
Claves 808 Cl aves
76 - E5 High Wood Block
77 - F 5
Low Wood Block
78 - F #5
Mute Cuica [EXC4]
79 - G5 Open Cuica [EXC4]
80 - G#5 Mute Tria ngle [EX C 5]
81 - A5
Open Triangle [EXC5]
82 - A#5
Shaker
83 - B5
Jingle B e ll
188
Page 97
MIDI IMPLEMENTATION CHART – Sound Generator Section -
Voice Systems GENIUS
Date: 25/01/2000
Data Filer Version: 1.0
FUNCTION ... TRANSMITTED RECOGNIZED REMARKS
BASIC DEFAULT
CHANNEL CHANGED
X
X
1-16
X
MODE Default
Messages
Altered
X Mode 3
NOTE
NUMBER True Voice
X 0-127
VELOCITY Note ON
Note OFF
X
X
O
X
AFTER Key’s
TOUCH Ch’s
X
X
O
O
PITCH BENDER
X O
CONTROL 0-1
CHANGE 5-7
10-11
64-67
80-81
91
93
99
101
120-121
123
126-127
X
X
X
X
X
X
X
X
X
X
X
X
O
O
O
O
O
O
O
O
O
O
O
O
PROGRAM
CHANGE True #
X O
0-127
SYSTEM EXCLUSIVE
O O
SYSTEM Song Pos
COMMON Song Sel
Tune
X
X
X
X
X
X
SYSTEM Clock
REAL TIME Commands
X
X
X
X
AUX Local On-Off
MESSAGES All note Off
Active Sense
Reset
X
X
X
X
X
O
X
O
Mode 1: Omni On, Poly Mode 2: Omni On, Mono O = YES
Mode 3: Omni Off, Poly Mode 4: Omni Off, Mono X = NO
Page 98
MIDI IMPLEMENTATION CHART – Data Filer Section -
Voice Systems GENIUS
Date: 25/01/2000
Data Filer Version: 1.0
FUNCTION ... TRANSMITTED RECOGNIZED REMARKS
BASIC DEFAULT
CHANNEL CHANGED
1-16
X
1-16
X
MODE Default
Messages
Altered
Mode 3
NOTE
NUMBER True Voice
0-127 0-127
(1)
VELOCITY Note ON
Note OFF
O
O
O
O
AFTER Key’s
TOUCH Ch’s
O
O
O
O
(1)
PITCH BENDER
O O
CONTROL 0-127
CHANGE
O O
(1)
PROGRAM
CHANGE True #
O O
(1)
SYSTEM EXCLUSIVE
O O
(1)
SYSTEM Song Pos
COMMON Song Sel
Tune
O
O
O
O
(1) (2)
(1) (2)
SYSTEM Clock
REAL TIME Commands
O
O
O
O
(1) (2)
(1) (2)
AUX Local On-Off
MESSAGES All note Off
Active Sense
Reset
O
X
X
O
X
X
NOTES:
(1) = Can be switched ON or OFF – See MIDI FILTER Section
(2) = If SYNC is enabled – See MIDI SYNC Section
Mode 1: Omni On, Poly Mode 2: Omni On, Mono O = YES
Mode 3: Omni Off, Poly Mode 4: Omni Off, Mono X = NO
Page 99
NOTE: This equipment has been tested and found to comply with the limits for a Class B
digital Device, persuant to Part 15 if the FCC Rules. These limits are designed to provide
reasonable protection against harmful interference in a residential installation. This equipment
generates, uses and can radiate radio frequency energy and, if not installed and used in
accordance with the instruction, may cause harmful interference to radio comunications.
However, there is no guarantee that the interference will not occur in a particular installation. If
this equipment does cause harmful interference to radio or television reception, which can be
determinated by turning the equipment off and on, the user is encuraged to try to correct the
interference by one or more of the following measures:
- Reorient or relocate the receiving antenna.
- Increase the separation between the equipment and receiver.
- Connect the equipment into an outlet on a circuit different from that to which the receiver
is connected.
- Consult the dealer or an experienced Radio/Tv technician for help.
The user is cautioned that any changes or modification not expressly approved by the party
responsable for compliance could void the user’s authority opearate the equipment.
Page 100

Sales Division: Via Belvedere Fogliense 8, I-47836 Mondaino (RN) Italy
tel.+39-0541-981700 - fax +39-0541-869605 -
e-mail: [email protected] - Internet: www.viscount-organs.com - www.viscount.it
Distribution for Italy: TITAN MUSIC S.A.
Strada Genghe di Atto, 80 - 47031 Acquaviva – Repubblica di San Marino
tel.0549-999164 - fax 0549-999490
e-mail: [email protected] - Internet: www.viscount-organs.com - www.viscount.it
 Loading...