

VOGUE GPS600 Users Manual

User Manual (GPS 600)
Dear honored customer,
Thank you for purchasing our portable GPS navigation
device PC329. To obtain the best performance and safety,
please read this manual carefully and thoroughly before
operating. And please keep this manual for future
reference.

Contents
Thank for use
1.1Function features ……………………………………………………………………………1
1.2 The use of the Manual ………………………………………………………………………1
Basic use
2.1 Port defination ……………………………………………………………………………2
…………………………………………………………………………………………………… .3
2.2 Charge the navigation and power supply …………………………………………………3
2.2.1 Power supply...................................................................................................3
2.2.2 Use of travel charger.......................................................................................3
2.2.3 Use of car charger...........................................................................................4
2.3 Basic use …………………………………………………………………………………4
2.3.1 Battery switch..................................................................................................4
2.3.2 Power key ......................................................................................................4
2.3.3 Reset...............................................................................................................5
2.3.4 use the fixed bracket ........................................................................................5
...………………………………………………………………………………………………5
2.3.5 Use the antenna..............................................................................................6
2.3.6 Hand-writing Pen.............................................................................................6
2.3.7 Use the Volume knob.......................................................................................6
… ..…………………………………………………………………………………………….7
2.3.8 Use of SD/MMC Memory Card ........................................................................7
2.3.9 Hot key..........................................................................................................10
2.4 Connect with computer ………………………………………………………………………8
2.5 Main interface and main functions ………………………………………………………8
..……………………………………………………………………………………………….… 9
2.6 Care and maintenace ……………………………………………………………….……..9
………………………………………………………….……………………………………… 10
Navigation function
3.1 Required reading before use … ………………..………………………………….……10
Media
4.1 Music function Features ………………………………………………………….…….11
4.2 Music Interface Operation ………………………………………………………….…….12
……………………………………………………………………………………………… …13

……………………………………………………………………………………………… …14
5.1 Photo viewer function features ………………………………………………………….15
5.2 Photo viewer interface and operation …………………………………………………….15
……………………………………………………………………………………………… …16
……………………………………………………………………………………………… …17
6.1 Ebook function features
……………………………………………………………….188
6.2 Ebook interface and operation
………………………………………………………….188
……………………………………………………………………………………………… …19
……………………………………………………………………………………………… … 20
7.1 Video function Features ……………………………………………………………….20
7.2 Video interface and operation ………………………………………………………….20
……………………………………………………………………………………………… … 21
……………………………………………………………………………………………… … 22
Bluetooth
8.1 Functio features…………………………………………………………………………..22
8.2 Interface and operation…………………………………………………………………..22
8.2.1Phone keypad interface………………………………………………………………..23
……………………………………………………………………………………………… … 24
8.2.2 Calling interface………………………………………………………………………..24
8.2.2.1 Outgoing call interface………………………………………………………………24
8.2.2.2 Call fall interface……………………………………………………………………..24
8.2.2.3 Active call interface…………………………………………………………………..25
8.2.3 Incoming call interface……………………..…………………………………...……..26
……………………………………………………………………………………………… … 27
8.2.4 Call record interface……………………………………………………………………27
8.2.5 Pari interace…………………………………………………………………………….28
8.2.6 Attribute interface……………………………………………...……………………….29
8.2.6.1 Set pincode interface………………………………………………………………..29
……………………………………………………………………………………………… … 30
8.2.7 Paired devices interface………………………………………………………………30
System set
9.1 Volume …………………………………………………………………………………….31
……………………………………………………………………………………………… … 32
9.2 Power …………………………………………………………………………………….33
9.3 Backlight ……………………………………………………………………………….33
……………………………………………………………………………………………… … 34
9.4 Date and time
33………………………………………………………………………….34
9.5 Language ……………………………………………………………………………….35
8.6 Sysem Info. ……………………………………………………………………………….35
……………………………………………………………………………………………… … 36

……………………………………………………………………………………………… … 37
Appendix
Trouble Shooting……………………………………………………………………….………38
Technical Specifications……………………………………………………………...……….39

FCC WARNING
This device complies with Part 15 of the FCC Rules. Operation is
subject to the following two conditions:
(1) this device may not cause harmful interference, and
(2) this device must accept any interference received, including interference that may cause
undesired operation.
This device must be installed to provide a separation distance of at least 20 cm from all persons
and must not be collocated or operating in conjunction with any other antenna or transmitter.
NOTE: The manufacturer is not responsible for and radio or TV interference caused by
unauthorized modifications to this equipment. Such modifications could void the user’s authority
to operate the equipment.

1.1 Function feathers
Thank you for using GPS PC329, whose main function is navigation. It also supports
Video Player, Audio Player, Picture Viewer, photo taking and E-book.
ü The main processor is ARM9 400M CPU with high performance and low
consumption.
ü Friendly user interface: simple and easy to operate.
ü Power management: make sure the product works more stably and continuously.
ü Date transmission: Connect with computer through Microsoft ActiveSync.
ü High quality receiver: Accurate positioning: Supply desirable navigation service for
you.
ü Good entertainment companion: MP3 and MP4 to release yourself.
No matter when you are riding, driving, walking or waiting for a meeting, you can use
it. Its perfect entertainment system will make your life and work colorful.
1.2 The use of the Manual
To bring the navigator into full play and to know all the details about the operation, please
read the User Manual carefully.
You can see the supplementary information as follows during using:
【Note】:The explanation and description about a subject
【connected information】: The further information about a subject
【points for attention】:Some warnings or suggestions that you should pay more attention
to. Please take it seriously and follow the operation, or it will bring destructive effect to
others and you.
1
4
8
11 12
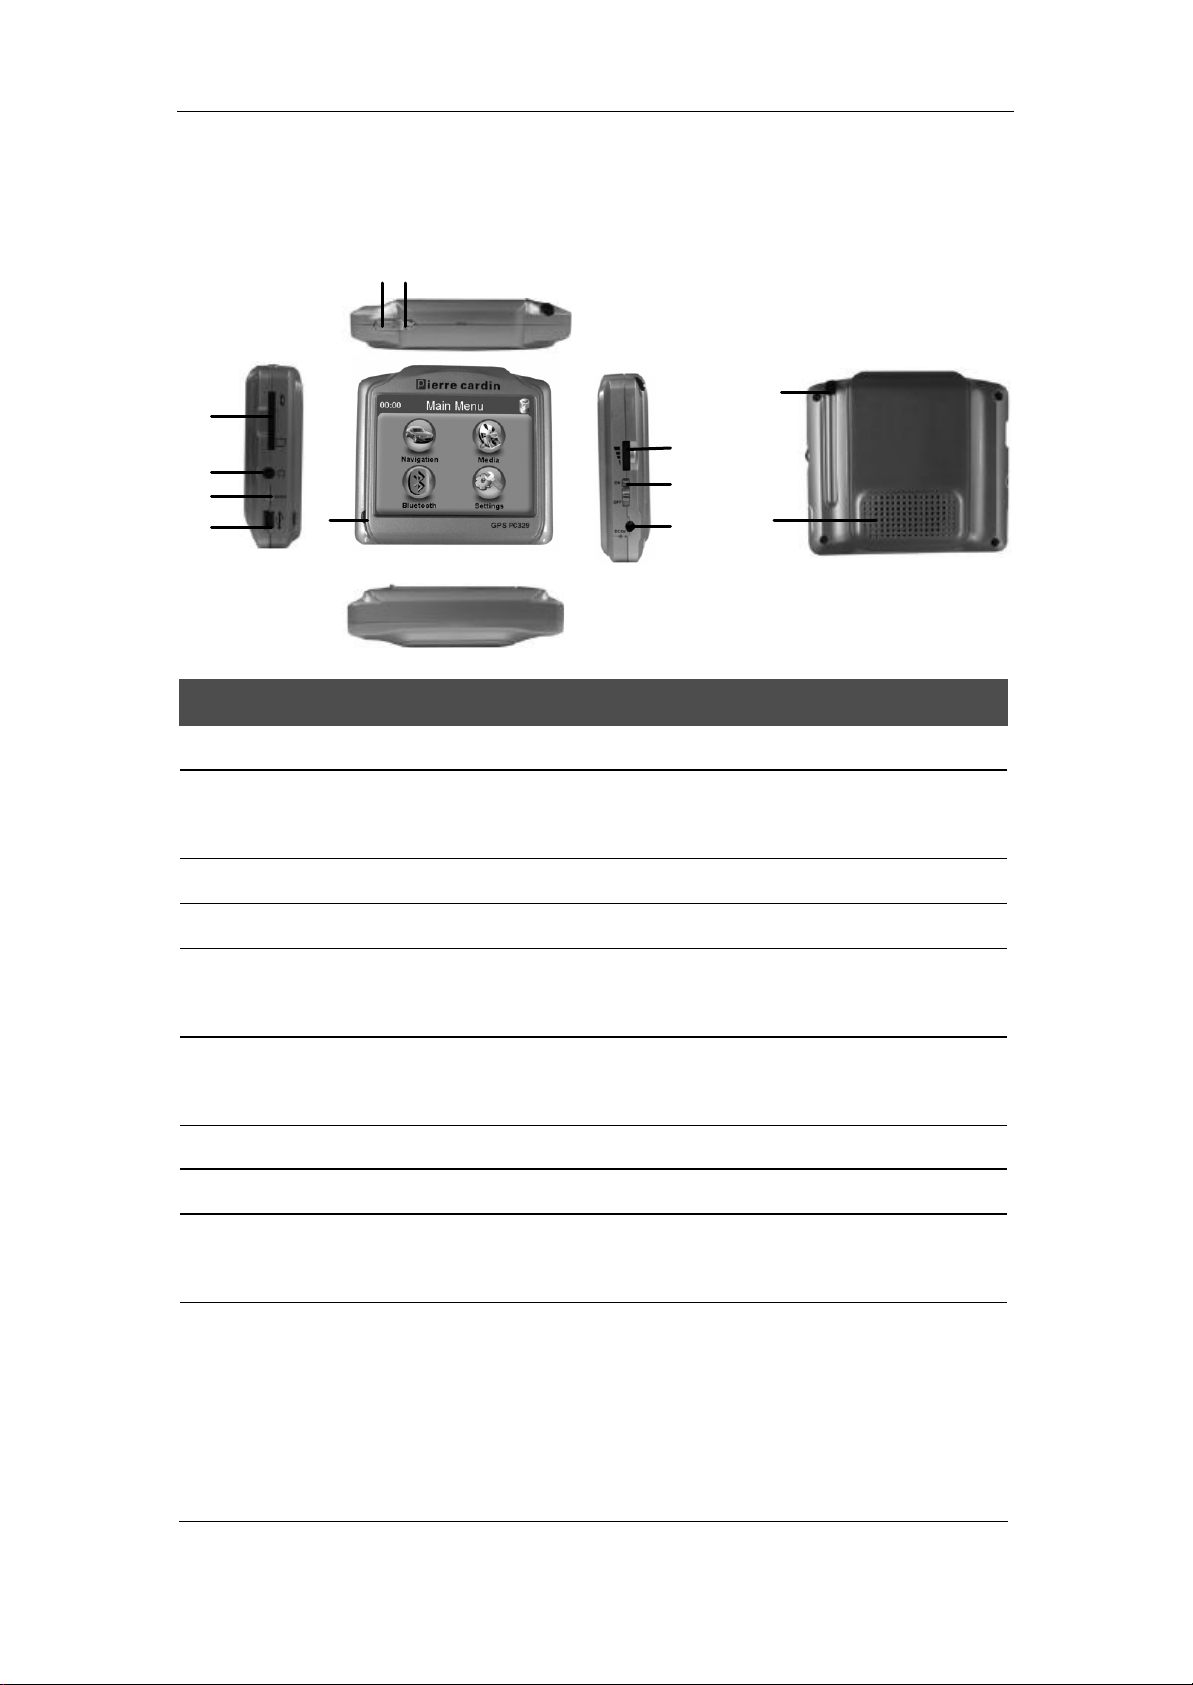
2.1 Port Definition
10
9
1 2
3
7
1 Menu Key Return to the main interface
2
3 Volume knob Amplify or lower the sound
4 Battery switch Turn upward is on, downward is off
5
6 Charging
6
Power Key
DC IN hole
indicator
Opening the Player/let the system enter the dormant
state,reduces the battery capacity to lose
Connecting with portable/car changer to charge the
device
Display charging state, red LED display, lighting red is to
be charging, green is to charge full
5
7 USB Socket Using USB cable to connect this device to your PC
8 Reset Resetting the device
9
Earphone hole
10 SD/MMC card
slot
Output tonic train signal to earphone, when connecting
the exterior earphone to use
Within the memory card, the needed procedure and the
map are included in the system. Please do not take out on
the way in using. [Note] If you draw out the memory card
no carefully, can appear the wrong card material news,
please inserting the memory card, activating the system.
2

11 Internal speaker Tonic train signal output
12 Hand-writing pen
By using hand-writing pen directly click to choose the
project or the data -in on the screen
2.2 Charge the navigation and power supply
Before using the navigation, please charge the battery fully with the matched charger.
2.2.1Power supply
The navigator has two ways to supply power: from the battery and from the power
resources.
When the GPS navigator does not connect with the charger, it gets power from the
Li-ion battery. The sign on the upper right corner [ ] and the sign [ ] in the
power setting interface are to show how much power is left.
When the GPS navigator connects with the charger, the power is supplied from the
power resources.
【Note】The GPS navigator use the inbuilt and unchangeable Li-ion battery to supply
power. Generally speaking (eg, the backlight is low), it can last for around 10 hours when
it is charged fully. Usually, the battery supply duration depends on how you’ll use the
device. Some functions including audit, video and intensified backlight may shorten the
power supply duration obviously.
【Points for attention】It uses inbuilt and unchangeable Li-ion battery. In order to avoid fire
or burn, do not disassemble, puncture, and bump the battery or throw it into fire or water
for the battery can burst, explode or release dangerous chemicals.
2.2.2 Use of travel charger
When you use the GPS for the first time, please make sure to charge the battery with
the supporting charger.
1: Connect the DC plug of the charger with the power socket at the right of the module.
2: Connect the other end of the charger with the power socket to supply power and at the
same time to charge the battery.
3

【NOTE】When it is in charging, the red light is on. Please don’t pull the charger until the
battery is full. And when the battery is full, the light will turn green. Please charge the
battery in time when the power is insufficient or used up.
2.2.3 Use of Car Charger
1: Please connect one end of the car charger to the power socket at the right of the GPS
Module.
2: Connect the other end of the charger with the car socket to supply power and at the
same time to charge the battery.
【NOTE】Do insert the equipment into the car charger after the car is started so as to
prevent the instant current resulting from the immediate starting of the car from impacting
and damaging the equipment.
2.3 Basic use
2.3.1 Battery Switch
The power is controlled by the battery switch at the right of the equipment.
Push the switch upward to supply power normally through the battery or Power
source.
Push the switch downward to cut off the power. Then the system cannot work
normally.
【Note】When the battery is shut off,it just stops supplying the power to the system. At the
same time you can charge the battery.
【Connected information】If you do not use the Module for a long time, please shut off the
battery to save power, then you can use it for a longer time.
2.3.2 Power key
The power is also controlled by the power key [ ]at the top of the equipment。
When the power key is turned off, the device enters the dormant state, which saves power
and maintains the same interface until you use it next time.
4

1. Switch on the machine
Before beginning, Please check if the battery is full or connect with power source; the
battery switch is upward. [ ].
Push the button [ ] on the top of the module to turn on the machine.
【Points for attention】When you bring the module from one place to aother,you can only
use it when the machine is adapted to the environment, because the great humidity
fluctuation may lead to a short circuit.
2. Switch off the machine
Before you finish the usage, please push the button [ ] on the top of the module to
shut the machine off. Then the system enters “sleep” state. It will maintain the same
interface until you use it next time.
2.3.3 Reset
If there is no reaction to the system, please reset it through the following two ways:
1. Please push the reset key at the right of the equipment with the Hand-writing pen to
reset the system.
2. Push the battery switch to downward to shut off the power and then push it upward to
reset the system.
【Connected information】The system may have no reaction in the following situations:
1. It will be delay or cease moving while changing the interface. The interface cannot
change smoothly.
2. It takes a long time to carry out one operation when you choose one function.
3: The equipment cannot turn on when you push the power switch.
【Points for attention】If the system have no reaction, please reset the system through the
reset key or battery switch,but then it will lose the information that has not been saved.
Please make a copy of the data at other place.
2.3.4 Use the fixed bracket
The fixed bracket includes a bracket and a holder. When you use the enquipment, you
5

should fix it on the dashboard which is under the windscreen in the front of the car.
【Points for attention】When using the equipment, please choose the fixed place carefully.
Do not put it on the position that possibly blocks driver’s view. Do not place the equipment
at will without being fixed. Do not fix it on the place the safety airbag is located in. Do not
put it in the area that belongs to the expansion area of the saf ety airbag.
2.3.5 Use the antenna
Using the antenna can improve the receiver’s quality. When you use it, please insert one
end to the slot at the right of the Module, and the other end touching the car roof.
【Note】The quality of the signal receiver, locating speed and locating stability will affect
the navigation, so we suggest that you use the antenna if you use the equipment when
you are driving.
【Points for attention】If the car is covered by a whole set of heat insulation paper, please
place the antenna on the top of the car roof passing through the window. When you close
the window, please be careful not to press the antenna.
2.3.6 Hand-writing Pen
1. Single click
Click the screen one time with the pen point.
2. Double clicks
Click the screen two times with the pen point at a high speed.
3. Drag
Touch the screen with the pen point and drag the touched item to the desired direction.
【Note】The use of broken hand-writing pen, ball-point pen or any sharp objects can
easily scratch the LCD screen. So, please use the fine hand-writing pen. Don’t use the
Hand-writing Pen with broken pen point.
2.3.7 Use the volume knob
There are ten grades volume for the system
(From silence to the maximum)
6
1:.Amplify the volume: Push the volume knob at the right of the module to the top and then
release it. It will go back automatically. The volume will be amplified one grade when you
push the knob each time.
2: Reduce the volume: Push the volume knob at the right of the module to the bottom and
then release it. It will go back automatically. The volume will be reducing one grade when
you push the knob each time.
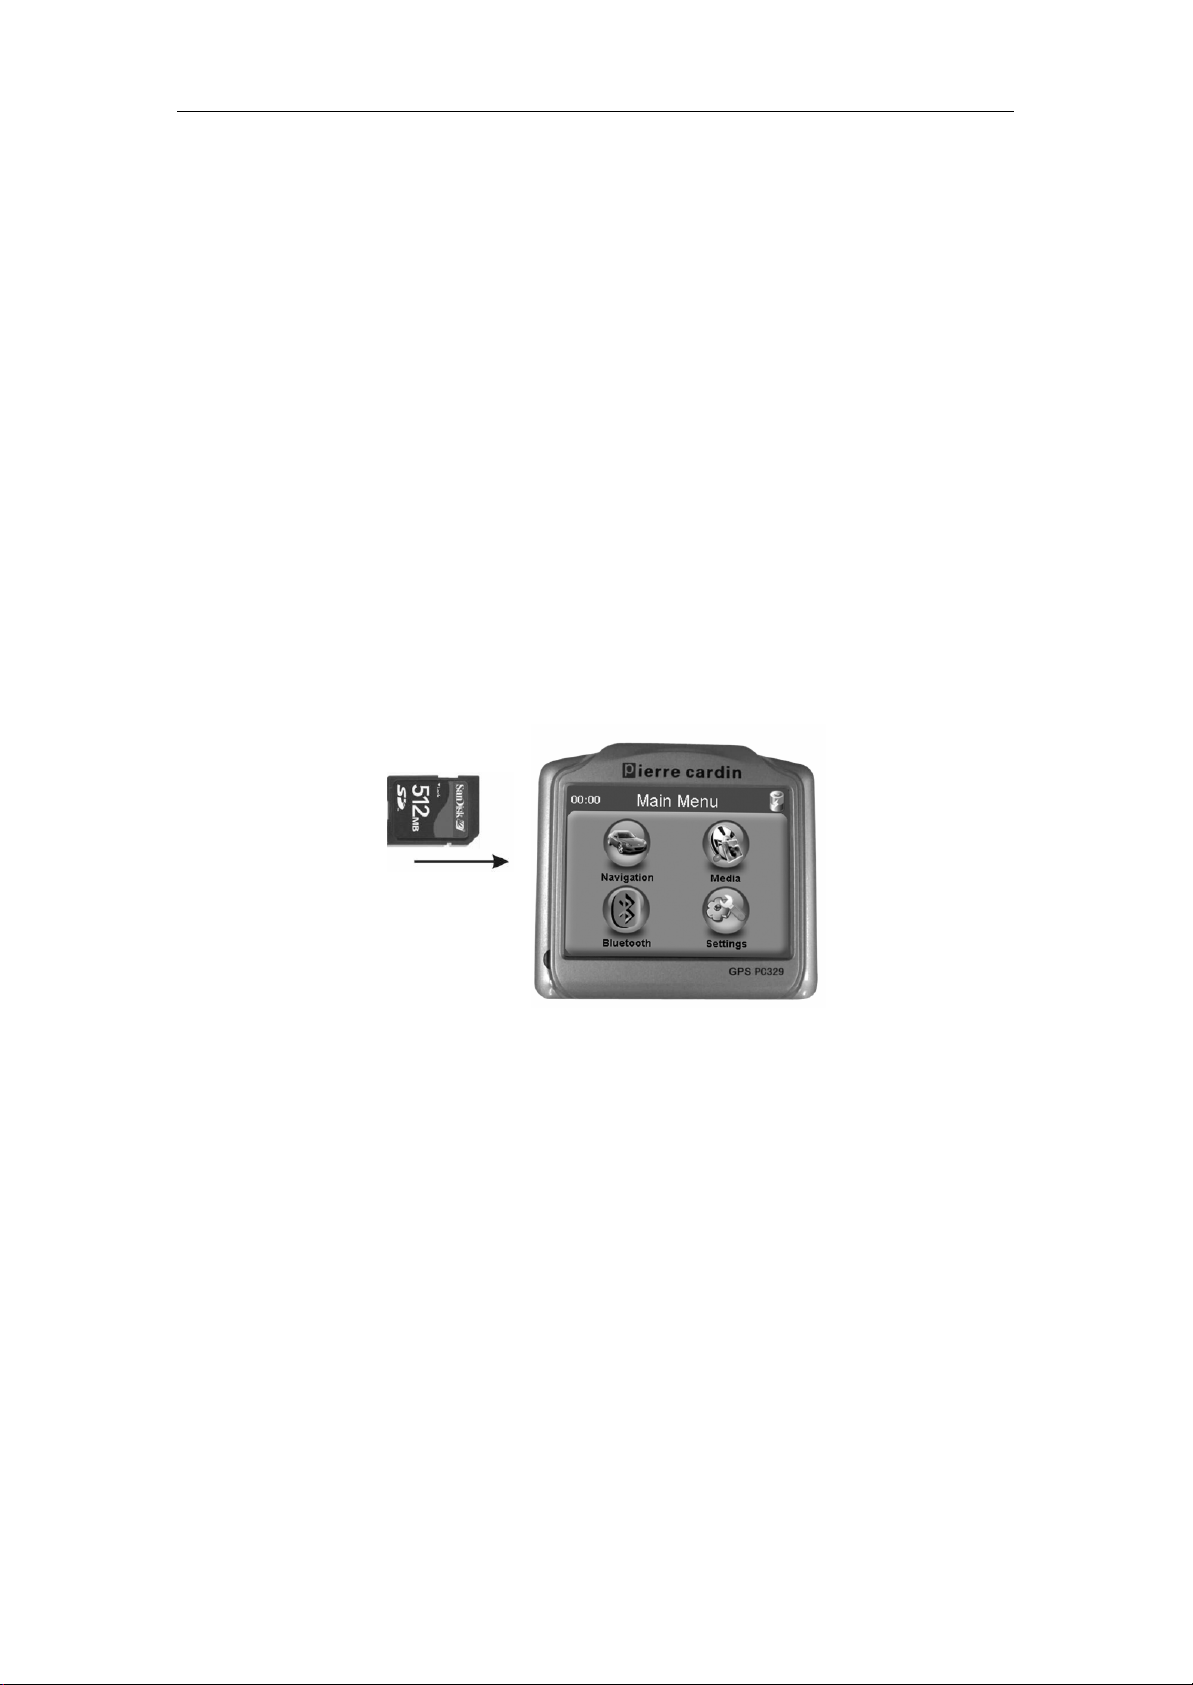
2.3.8 Use of SD/MMC Memory Card
The SD/MMC memory card contains the map software, map data, media files ect.Please
insert it into the slot in a correct way.
【Note】Do not take the SD/MMC Memory card out when it is navigating or playing any
file.
【Note】
Do not put much pressure on it or bend it and prevent it from being dropped or pumped.
Do not use it or store it in high temperature and high humidity and do not expose the
SD/MMC Card under direct sunshine and high temperature; Place the card far from the
liquid and corrosive objects.
Please insert the SD/MMC Card into the slot in a correct way carefully to prevent from
damaging,
7

2.4 Connect with computer
The module can connect with the computer through the MIMI USB slot. You can copy files
between them. And you can also copy data to computer and restore them to SD Card
when you need.
1. Please make sure the equipment is in working state.
2. Connect the MINI USB slot [ ] of the USD wire with the MINI USD slot of the
GPS module and the standard USD slot [ ] with the USD Ho st of the computer.
3. When connection is finished, the computer will identify the device automatically;
The Module will finish the operation and change over to the interface of connecting
with the computer.
4. After the commutation, please remove the MINI USB wire, then the interface will
change to the previous interface.
【Points for attention】Data security; Before you update the system, please make a copy
of the data to an external storage device. We are not responsible for the lost or damaged
information.
【Note】When the navigator is connecting with the computer, it will stop other operation.
【Points for attention】If you make the following operations while the navigator is
connecting with the computer, the data will be lost:
1. Remove the MINI USD slot.
2. Push the power key to turn off the equipment.
3. Use the reset key or battery switch to reset the system.
4. Click the close button at the upper right corner.
2.5 Main Interface and main functions
1. Main Interface:
8
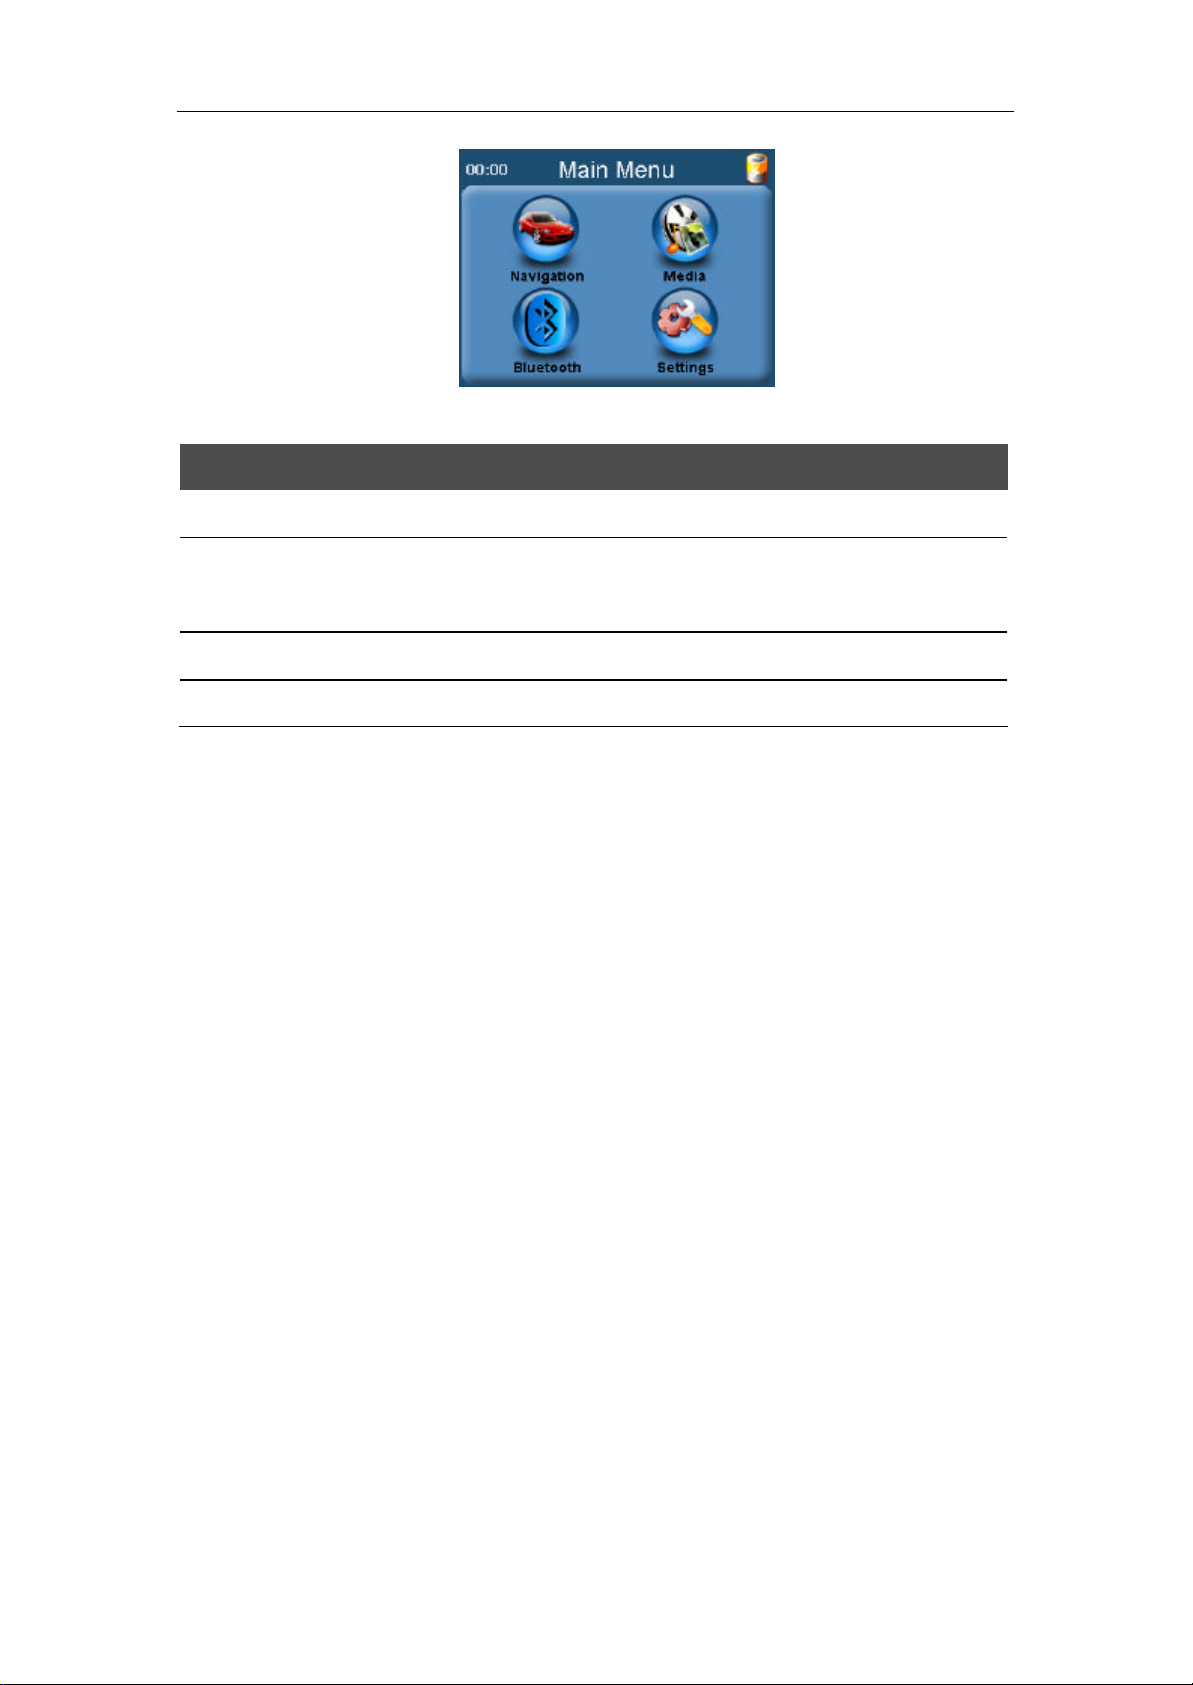
2:Functions:
Navigation
supply the reference for navigation
Media Include music, photo, audio and E-book four functions. Click “media”
to enter the four included functions respectively.
Bluetooth Bluetooth function: hands-free calling, built-in Bluetooth connection.
Settings Volume, Power, Backlight, Date and time, Language, and Sys Info.
2.6 Care and Maintenance
In order to guarantee the normal operation and use life, please pay attention to the
following when you use this equipment.
Keep dryness
This product is non-waterproof. So it will cause serious problems if the
components of this equipment encounter the water spray and immersion.
No drop
It will cause equipment serious damage if it encounters intense impact and shock.
Avoid temperature shock
Please put the equipment into airproof plastic bag before temperature shock. It will
form vapor clotting suddenly from cold room to warm room. The clotted water may
destroy cause the equipment malfunction.
Far away from the intense magnetic field
Please make sure that the equipment is far away from the intense electromagnetic
radiation or the intense magnetic field equipment when use or storage.
Suitable operating temperature
0~40°C is the most suitable operating temperature for the equipment. Please don’t
use it out of this temperature range.
9
 Loading...