

Page 1
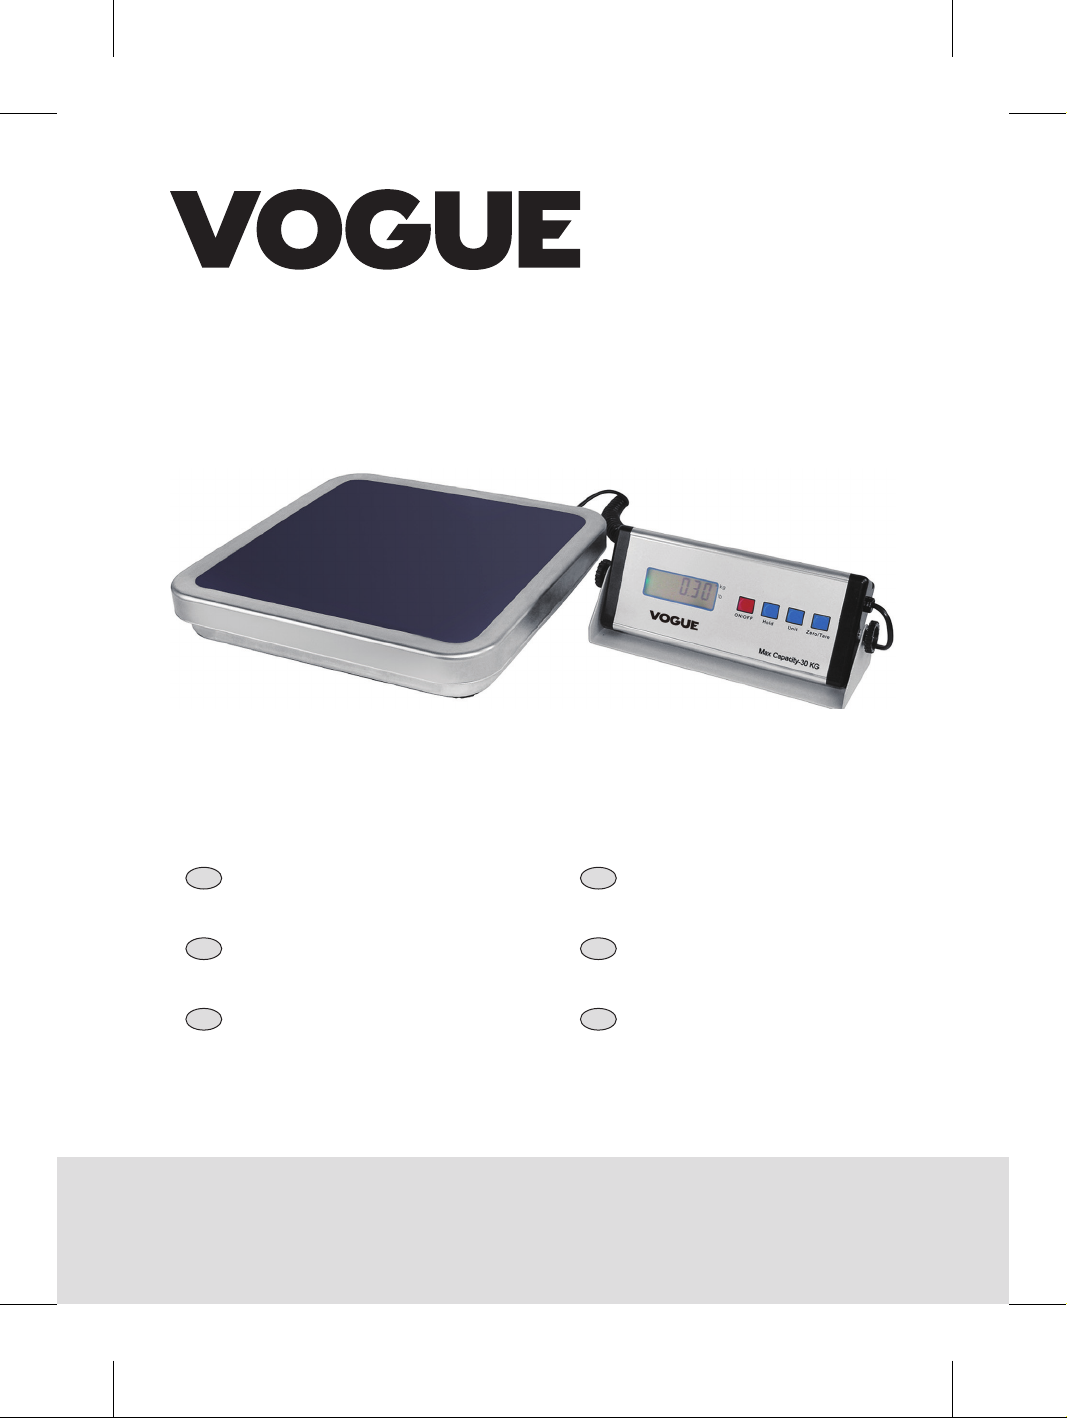
Digital Bench
Scale
Instruction manual
Elektronische
NL
Keukenweegschalen
Handleiding
Balance de cuisine
FR
électronique
Mode d'emploi
Elektronische
DE
Küchenwaage
Bedienungsanleitung
4
6
8
Bilancia da cucina
IT
elettronica
Manuale di istruzioni
Balanzas de Cocina
ES
Electrónicas
Manual de instrucciones
Balança electrónica de
PT
cozinha
Manual de instruções
10
12
14
Model • Modèle • Modell • Modello • Modelo • Malli:
CD564
Page 2
EN
Setup
1. Position the appliance on a flat, stable surface.
2. Adjust the feet of the appliance to make it level, use a spirit level if necessary.
It is important that the scale is level to ensure accuracy.
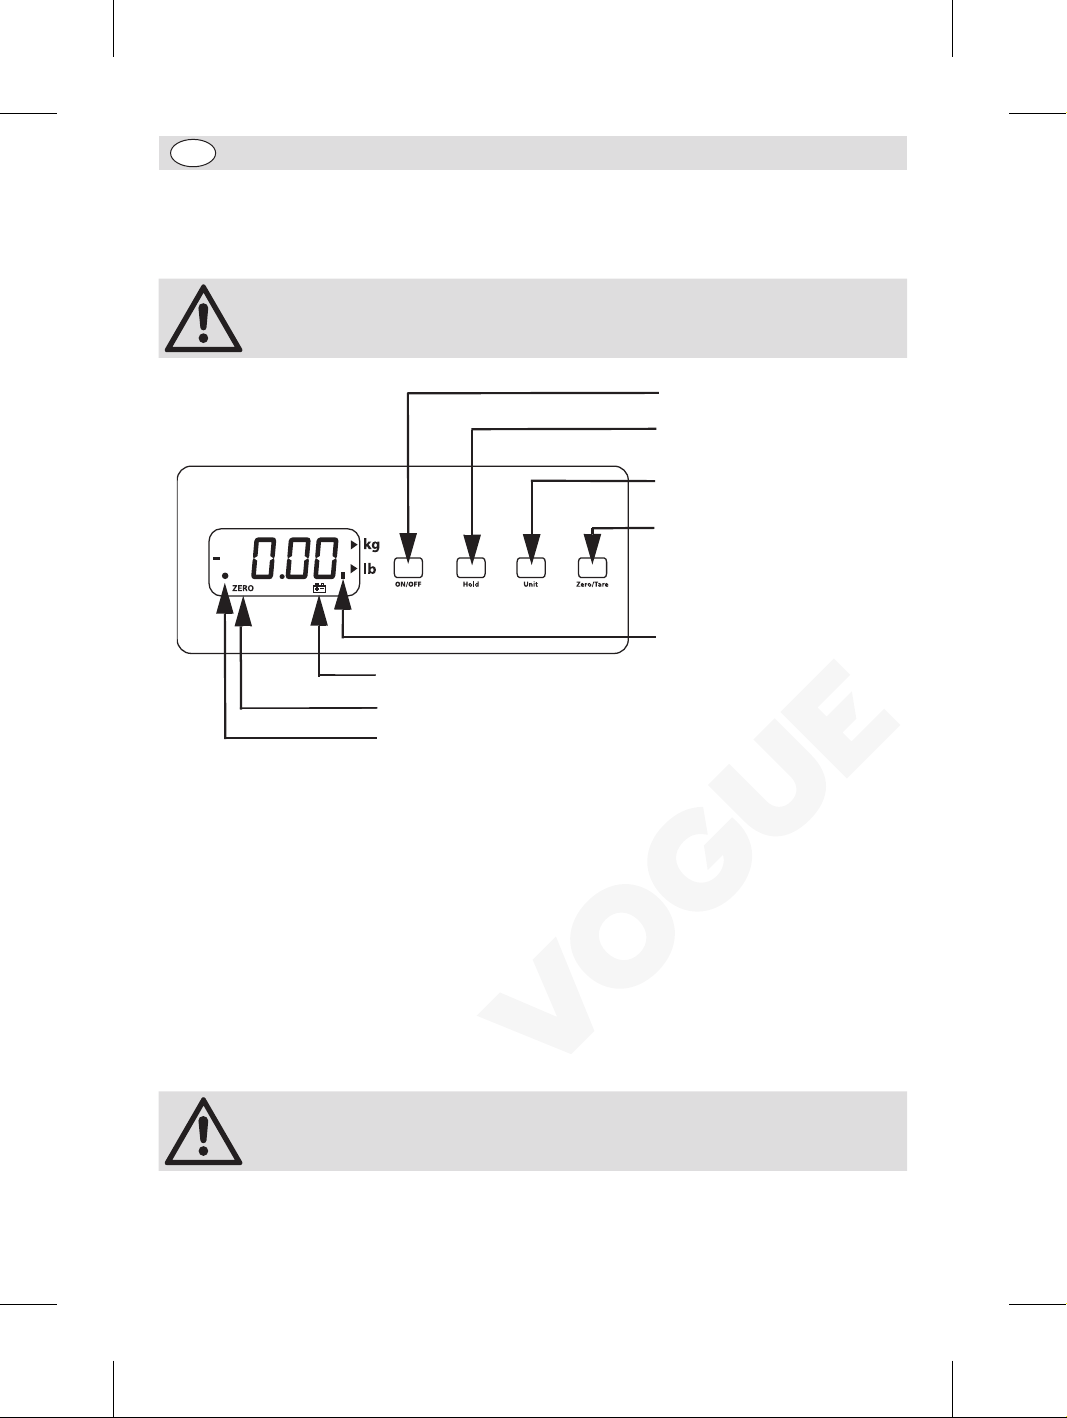
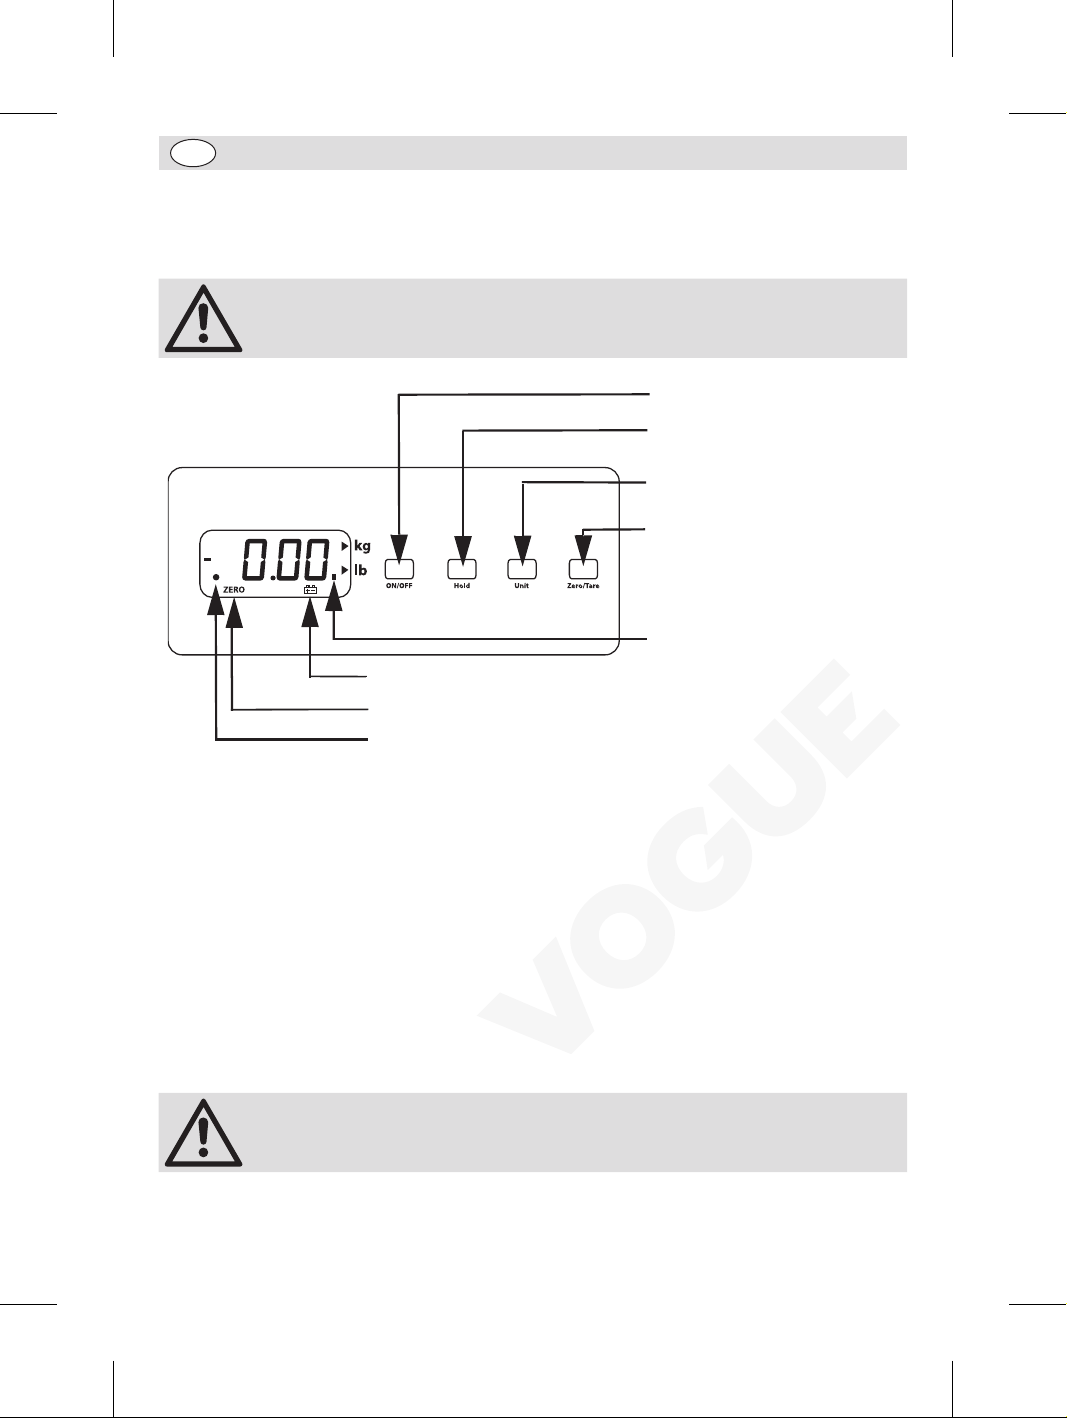
Low battery indicator
ZERO indicator
Hold indicator
Press to turn ON or OFF
Press to HOLD reading
Press to alternate between
Metric (kg) and Imperial (lb)
Press to Tare (set the scale to
zero).
Stable reading indicator
Features
To enter the features mode:
• Press the ON/OFF button such that the scale is switched OFF.
• Press and hold the HOLD button then press the ON/OFF button whilst keeping the HOLD button
depressed. Release both buttons, the display should show either “A_ON” or “A_OFF”.
To allow the scale to switch off automatically:
• Press the ZERO/TARE button and the display will cycle between “A_ON” (automatic switch off is On)
and “A_OFF” (automatic switch off is Off).
To have the display backlight On:
• Press the HOLD button, the display should show either “L_ON” or “L_OFF”.
• Press the ZERO/TARE button and the display will cycle between “L_ON” (backlight On) and “L_OFF”
(backlight Off).
Note: The HOLD button will cycle between the Auto Switch Off and Backlight
functions.
Once complete, Press the ON/OFF button to save the settings.
2
Page 3
EN
Cleaning, Care & Maintenance
• Remove the batteries (if fitted) and/or unplug the adaptor before cleaning or if the scale is to be left
unused for an extended period of time.
• Clean the weighing tray with warm, soapy water.
• Dry thoroughly after washing.
• Do not immerse the scale in water.
• Always unplug the adaptor when not in use to prevent over heating.
Calibration
Calibration requires an accurate 30kg weight.
• Press the ON/OFF button such that the scale is switched OFF.
• Press and Hold the ZERO/TARE button then press the ON/OFF button whilst keeping the ZERO/TARE
button depressed. Release both buttons, the display should show a four digit value.
• Wait for the Stable reading indicator to be displayed then press the UNIT button. “Save0” should be
displayed.
• Place a 30kg weight on the scale and wait for the Stable reading indicator to be displayed. Press the
UNIT button and “Save1” should be displayed.
• Calibration is complete, remove the weight and Press the ON/OFF button to save the settings.
• If the calibration does not appear accurate repeat the process ensuring that the scale is placed on a
level surface.
Technical Specifications
Model Power
CD564 9V Adaptor
or
6 x 1.5V AA Batteries
Weigh Pan
Dimensions
315 x 325mm 20g (1oz) 30kg (66lbs) 10g (0.5oz)
Minimum
Weight
Maximum
Weight
Measuring
Increments
Compliance
The WEEE logo on this product or its documentation indicates that the product must not
be disposed of as household waste. To help prevent possible harm to human health and/
or the environment, the product must be disposed of in an approved and environmentally
safe recycling process. For further information on how to dispose of this product correctly,
contact the product supplier, or the local authority responsible for waste disposal in your
area.
VOGUE parts have undergone strict product testing in order to comply with
regulatory standards and specifications set by international, independent, and
federal authorities.
VOGUE products have been approved to carry the following symbol:
All rights reserved. No part of these instructions may be produced or transmitted in any form or by any means, electronic,
Every effort is made to ensure all details are correct at the time of going to press, however, VOGUE reserve the right to
mechanical, photocopying, recording or otherwise, without the prior written permission of VOGUE.
change specifications without notice.
3
Page 4
NL
Installatie
1. Plaats het apparaat op een vlakke en stabiele ondergrond.
2. Pas de stelvoetjes aan om het apparaat te nivelleren. Gebruik indien nodig een waterpas.
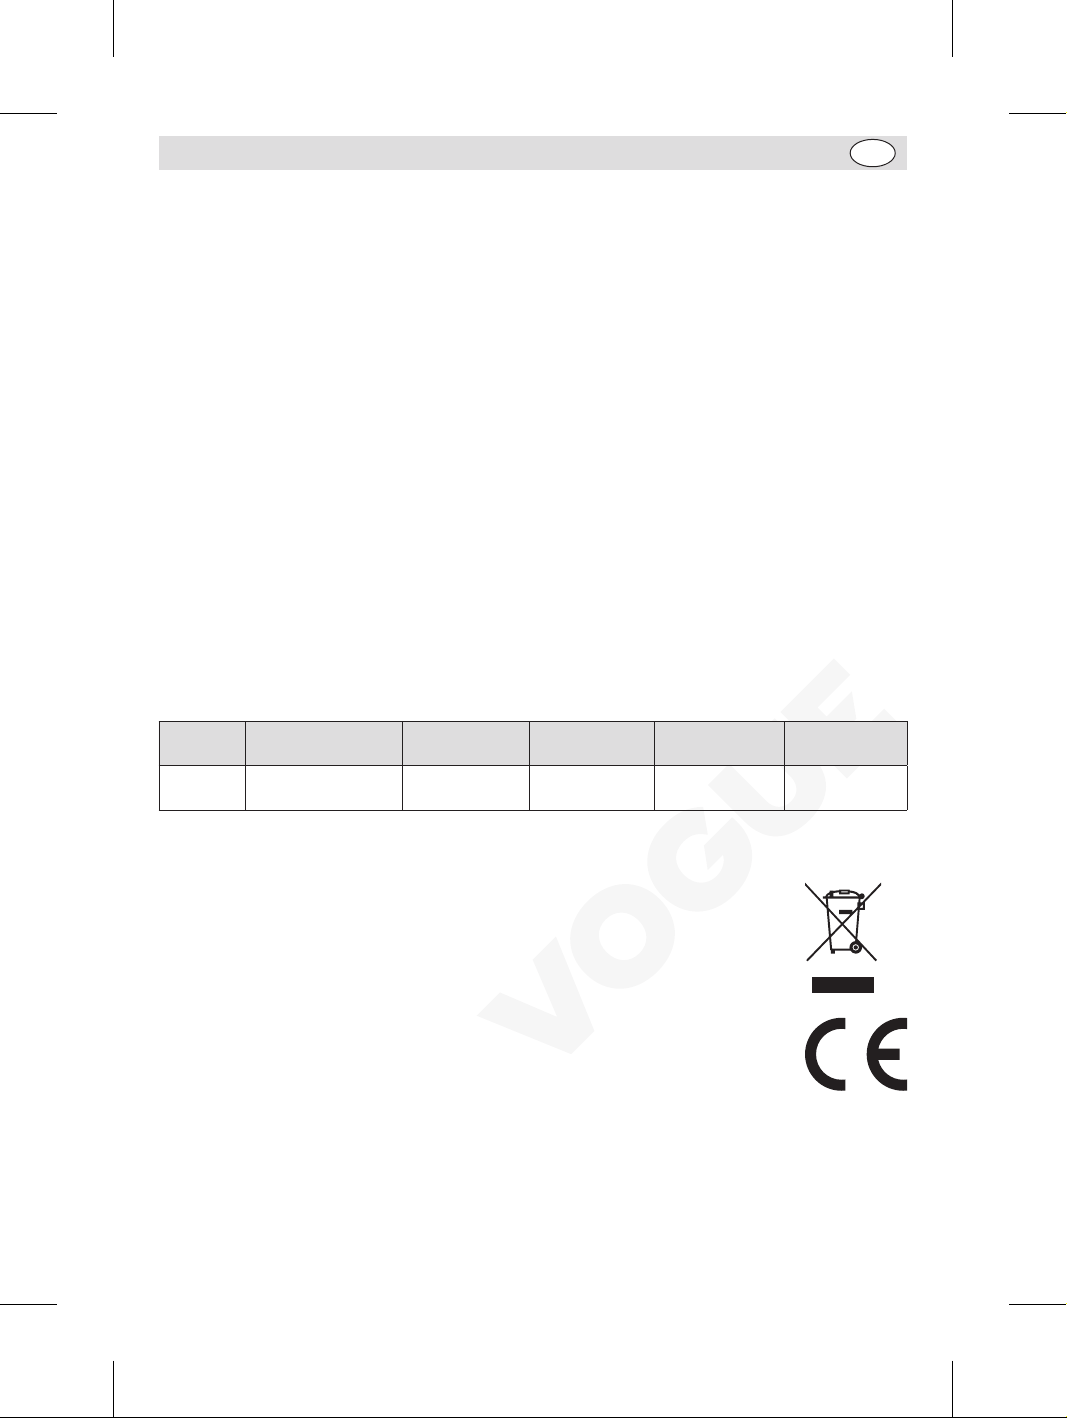
Opmerking: voor een nauwkeurige meting is het belangrijk dat de weegschaal
waterpas staat.
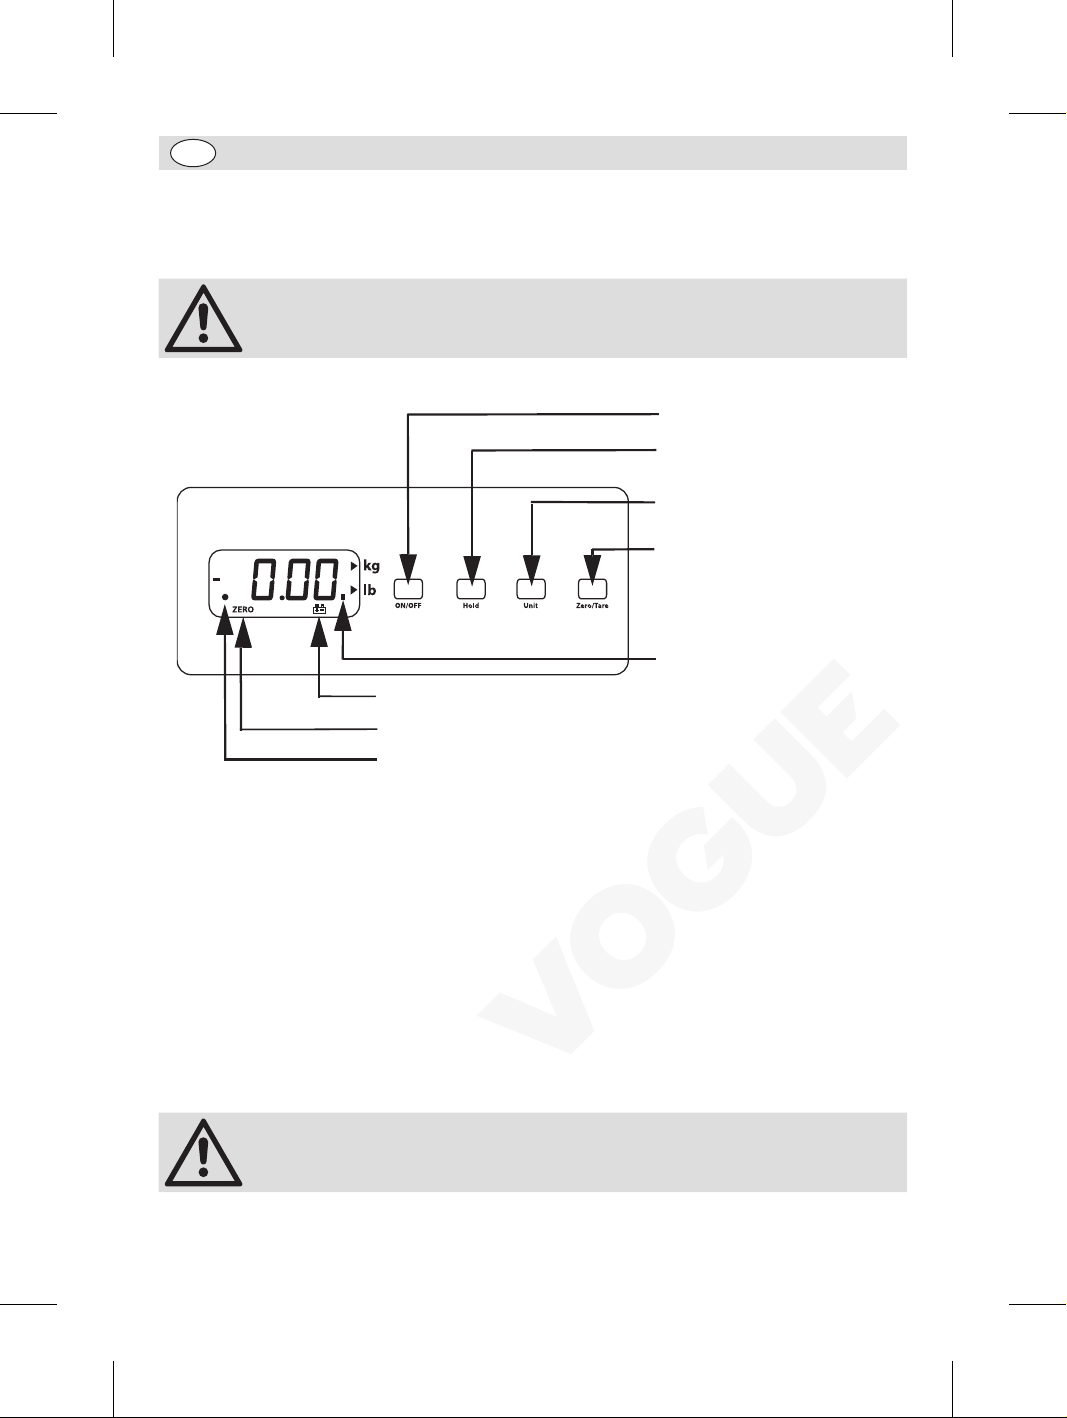
Indrukken om aan (ON) of uit
(OFF) te zetten
Indrukken om de meting te
stoppen
Indrukken om over te schakelen
tussen metrische (kg) en Engelse
(lb) afmetingen
Indrukken om de weegschaal te
tarreren (op nul te zetten)
Stabiele meetindicator
Batterij laag indicator
ZERO-indicator
Houd de indicator vast
Kenmerken
Om het kenmerkenmenu te openen:
• Druk op de ON/OFF-knop om de weegschaal uit te schakelen.
• Druk en houd de HOLD-knop ingedrukt en druk tegelijkertijd op de ON/OFF-knop. Laat beide knoppen
los, het display toont “A_ON” of “A_OFF”.
Opdat de weegschaal automatisch uitschakelt:
• Druk op de ZERO/TARE-knop en het display schakelt tussen de weergave “A_ON” (automatische
schakelaar is aan) en “A_OFF” (automatische schakelaar is uit).
Om het achtergrondlicht van het display in te schakelen:
• Druk op de HOLD-knop, het display toont “L_ON” of “L_OFF”.
• Druk op de ZERO/TARE-knop en het display schakelt tussen de weergave “L_ON” (achtergrondlicht
aan) en “L_OFF” (achtergrondlicht uit).
Opmerking: met de hold-knop schakelt u tussen de automatische
uitschakelfunctie en de functie van het achtergrondlicht.
Als u klaar bent, drukt u op de ON/OFF-knop om de instellingen op te slaan.
4
Page 5
NL
Reiniging, zorg & onderhoud
• Vóór reiniging of wanneer u de weegschalen gedurende een langere periode niet gaat gebruiken,
dient u de batterijen (indien geplaatst) te verwijderen en/of de adapter los te koppelen.
• Reinig de weegplaat met warm zeepwater
• Na reiniging goed drogen
• De weegschaal niet in water dompelen
• Om oververhitting te voorkomen dient u altijd de adapter uit het stopcontact te halen wanneer u het
apparaat niet gebruikt
Uitbalanceren
De uitbalancering vereist een gewicht van exact 30 kg.
• Druk op de ON/OFF-knop om de weegschaal uit te schakelen.
• Druk en houd de ZERO/TARE-knop ingedrukt en druk vervolgens op de ON/OFF-knop. Laat beide
knoppen los, het display dient een waarde van vier cijfers weer te geven.
• Wacht totdat de indicator stabiele meting wordt weergegeven en druk tegelijkertijd op de UNIT-knop.
“Save0” dient op het display te verschijnen.
• Plaats het gewicht van 30 kg op de weegschaal en wacht totdat de indicator stabiele meting wordt
weergegeven. Druk op de UNIT-knop en “Save1” dient op het display te verschijnen.
• De uitbalancering is voltooid, verwijder het gewicht en druk op de ON/OFF-knop om de instellingen
op te slaan.
• Wanneer de uitbalancering niet correct lijkt, voer dan opnieuw de procedure uit en zorg dat de
weegschaal op een vlakke ondergrond staat.
Technische specificaties
Model Vermogen
CD564 9V adapter of
6 x 1,5V AA batterijen
Afmetingen
weegplaat
315 x 325mm 20g (1oz) 30kg (66lbs) 10g (0,5oz)
Minimum
Gewicht
Maximum
Gewicht
Meetverhogingen
Productconformiteit
Het WEEE-logo op dit product of bijbehorende documentatie geeft aan dat het product
niet onder huisvuil valt en als zodanig ook niet mag worden verwerkt. Ter preventie
van mogelijke gevaren voor de gezondheid van personen en/of voor het milieu,
dient men dit product in overeenstemming met het voorgeschreven en milieuveilige
recyclingproces als afval te verwerken. Raadpleeg uw productleverancier of uw plaatselijk
afvalverwerkingsbedrijf voor meer informatie over de juiste afvalverwerking van dit
product.
De onderdelen van VOGUE producten hebben strenge producttesten ondergaan om te
voldoen aan wettelijke regels en specificaties die door internationale, onafhankelijke en
landelijke overheden worden voorgeschreven.
VOGUE producten zijn goedgekeurd en voorzien van het volgende symbool:
Alle rechten voorbehouden. Het is verboden om deze handleiding, hetzij volledig of gedeeltelijk, elektronisch of mechanisch
te reproduceren, kopiëren, op opslagmedia op te slaan of op enigerlei wijze over te dragen, zonder voorafgaande
Wij hebben er alles aan gedaan om er zeker van te zijn dat op publicatiedatum van de handleiding alle details correct zijn,
desondanks, behoudt VOGUE het recht voor om specificaties zonder aankondiging te wijzigen.
goedkeuring van VOGUE.
5
Page 6
FR
Préparation
1. Posez l’appareil sur une surface plane et stable
2. Réglez les pieds de l’appareil pour le mettre de niveau, avec un niveau à bulle si nécessaire.
Remarque : la précision du pesage n’est pas garantie si la balance n’est pas de
niveau.
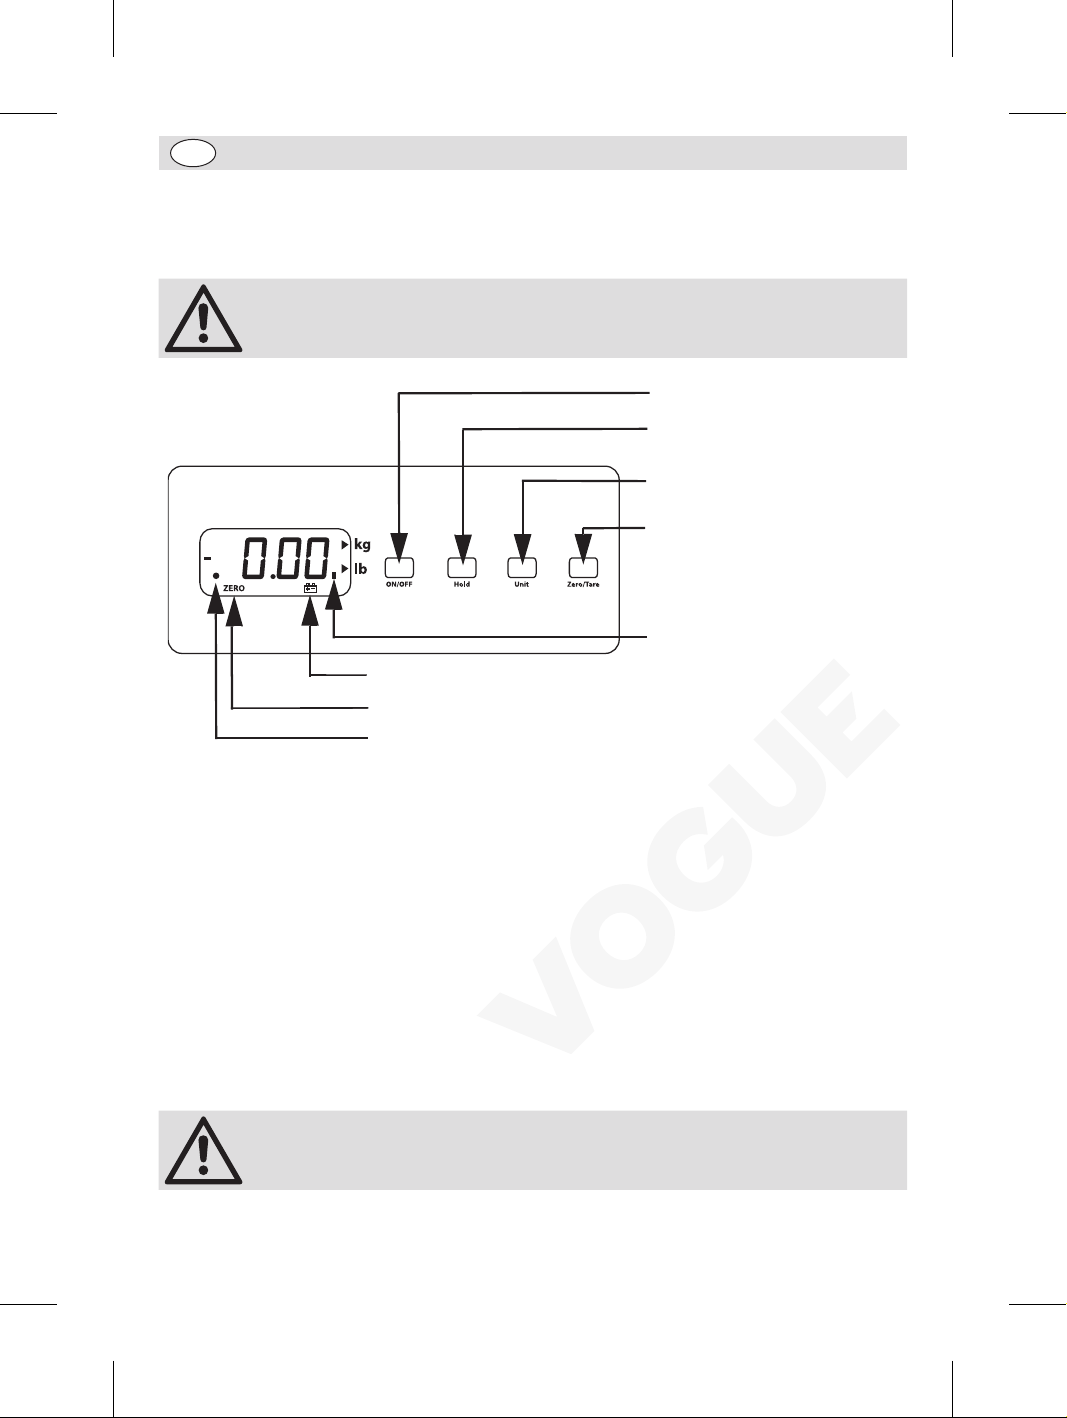
Appuyez pour allumer ou éteindre
Appuyez pour MAINTENIR le
relevé
Appuyez pour passer du système
métrique (kg) au système impérial
(lb) et vice-versa
Appuyez pour appliquer la tare
(mettre la balance à zéro)
Témoin de relevé stabilisé
Témoin d’épuisement des piles
Témoin Zéro
Témoin Hold (maintien du relevé)
Caractéristiques
Pour accéder au mode caractéristiques :
• Appuyez sur le bouton MARCHE / ARRÊT pour éteindre la balance.
• Appuyez sur et maintenez enfoncé le bouton HOLD, puis appuyez sur le bouton MARCHE / ARRÊT
tout en continuant à appuyer sur le bouton HOLD. Relâchez les deux boutons. L’affichage devrait
porter l’indication « A_ON » ou « A_OFF ».
Pour que la balance s’éteigne automatiquement:
• Appuyez sur le bouton ZÉRO / TARE ; l’affichage passe de « A_ON » (arrêt automatique activé) à
« A_OFF » (arrêt automatique désactivé) ou vice-versa.
Pour activer le rétroéclairage de l’affichage :
• Appuyez sur le bouton HOLD ; l’affichage devrait porter l’indication « L_ON » ou « L_OFF ».
• Appuyez sur le bouton ZÉRO / TARE ; l’affichage passe de « L_ON » (rétroéclairage activé) à
« L_OFF » (rétroéclairage désactivé) ou vice-versa.
Remarque : Le bouton HOLD permet de passer de la fonction d’Arrêt
automatique à la fonction de Rétroéclairage et vice-versa.
À la fin des réglages, appuyez sur le bouton MARCHE / ARRÊT pour enregistrer les paramètres.
6
Page 7
FR
Nettoyage, entretien et maintenance
• Retirez les piles (si montées) et / ou débranchez l’adaptateur avant de nettoyer l’appareil ou si la
balance ne doit pas servir pendant un certain temps.
• Nettoyez le plateau de pesage à l’eau savonneuse tiède.
• Séchez minutieusement la balance après nettoyage.
• Ne pas immerger la balance
• Veillez à toujours débrancher l’adaptateur hors service, pour éviter tout risque de surchauffe.
Étalonnage
L’étalonnage de cet appareil exige le recours à un poids de trente kilos exactement.
• Appuyez sur le bouton MARCHE / ARRÊT pour éteindre la balance.
• Appuyez sur et maintenez enfoncé le bouton ZÉRO / TARE, puis appuyez sur le bouton MARCHE /
ARRÊT tout en continuant à appuyer sur le bouton ZÉRO / TARE. Relâchez les deux boutons ; une
valeur à quatre chiffres devrait s’afficher.
• Attendez que le témoin de relevé stabilisé s’affiche, puis appuyez sur le bouton UNIT. Le message
« Save0 » devrait s’afficher.
• Placez un poids de 30 kilos sur la balance et attendez que le témoin de relevé stabilisé s’affiche.
Appuyez sur le bouton UNIT ; le message « Save1 » devrait s’afficher.
• L’étalonnage est terminé. Retirez le poids et appuyez sur le bouton MARCHE / ARRÊT pour enregistrer
les paramètres.
• Si l’étalonnage vous paraît faux, répétez le processus en veillant à bien placer la balance sur une
surface plane.
Spécifications techniques
Modèle Alimentation
CD564 Adaptateur 9 volts ou
6 piles de 1,5 volt
Dimensions du
bac de pesage
315 x 325mm 20g (1oz) 30kg (66lbs) 10g (0,5oz)
Poids
minimum
Poids
maximum
Graduation
Conformité
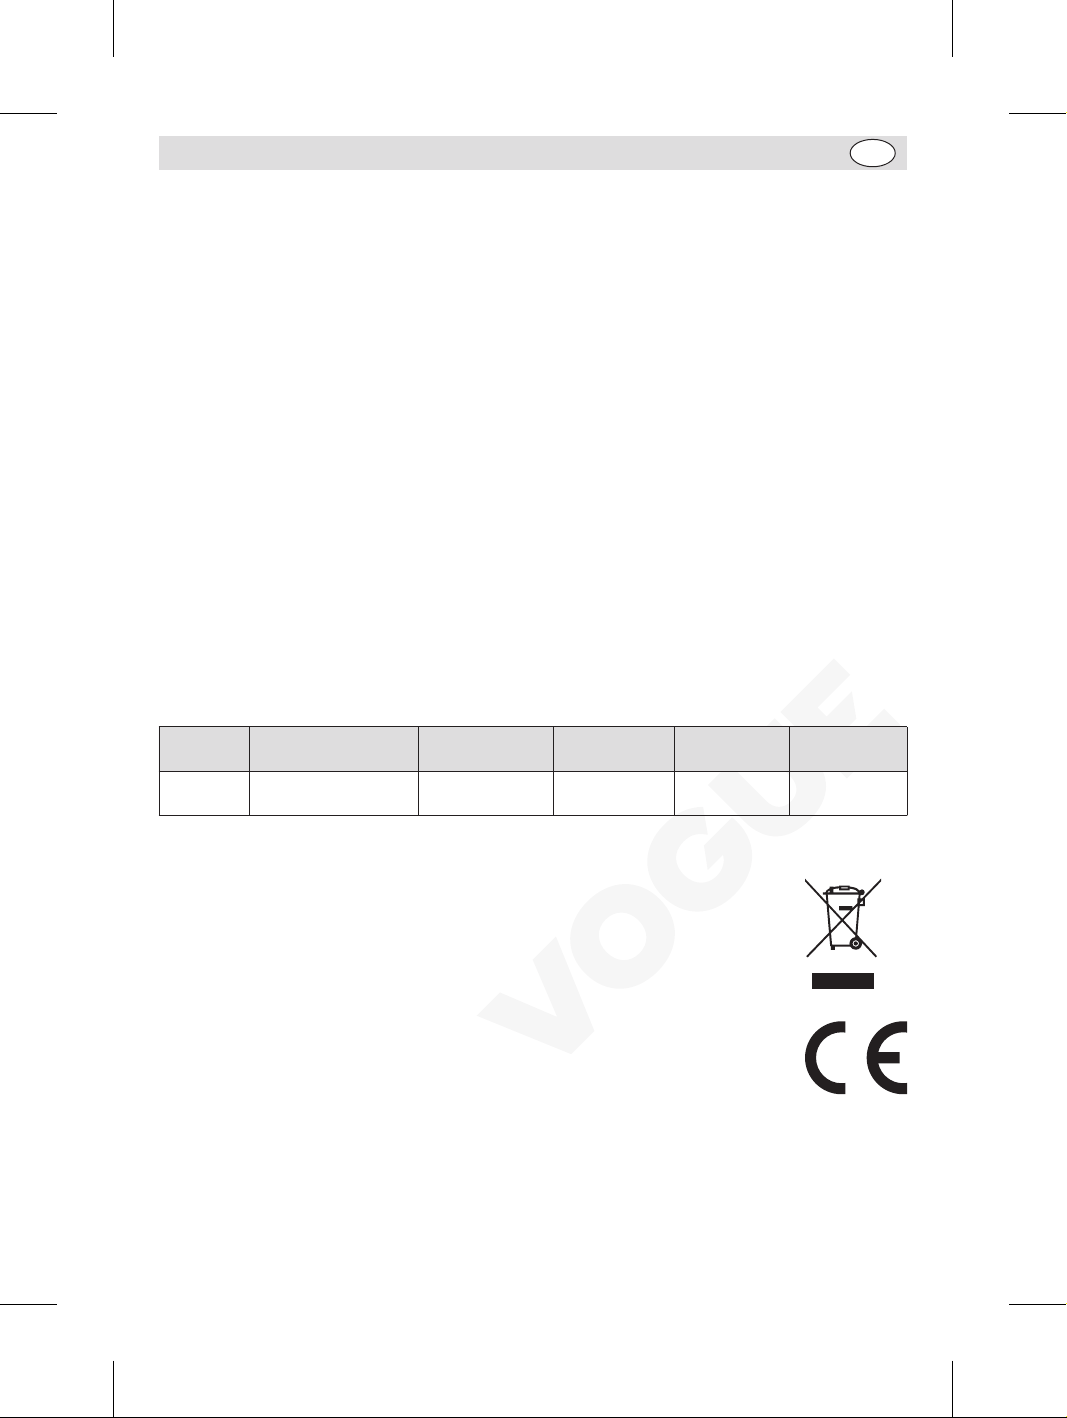
Le logo WEEE qui figure sur ce produit ou sa documentation indique qu’il ne doit pas
être mis au rebut avec les ordures ménagères. Pour éviter qu’il ne présente un risque
pour la santé humaine et / ou écologique, confiez la mise au rebut de ce produit à un
site de recyclage agréé respectueux de l’environnement. Pour de plus amples détails sur
la mise au rebut appropriée de ce produit, contactez le fournisseur du produit ou l’autorité
responsable de l’enlèvement des ordures dans votre région.
Les pièces VOGUE ont été soumises à des tests rigoureux pour pouvoir être déclarées
conformes aux normes et spécifications réglementaires définies par les autorités
internationales, indépendantes et fédérales.
Les produits VOGUE ont été déclarés aptes à porter le symbole suivant :
Tous droits réservés. La production ou transmission, partielles ou intégrales, sous quelque forme que ce soit ou par n’importe
quel moyen, tant électronique que mécanique, sous forme de photocopie, d’enregistrement ou autre de ce mode d’emploi
Nous nous efforçons, par tous les moyens dont nous disposons, de faire en sorte que les détails contenus dans le présent
mode d’emploi soient corrects en date d’impression. Toutefois, VOGUE se réserve le droit de changer les spécifications de
sont interdites sans l’autorisation préalablement accordée par VOGUE.
ses produits sans préavis.
7
Page 8
DE
Einrichtung
1. Das Gerät auf eine ebene, stabile Fläche stellen.
2. Die Gerätefüße so einstellen, dass das Gerät gerade steht. Bei Bedarf eine Wasserwaage verwenden.
Hinweis: Die Wasserwaage muss unbedingt waagerecht sein, sonst kann das
Gerät nicht präzise eingestellt werden.
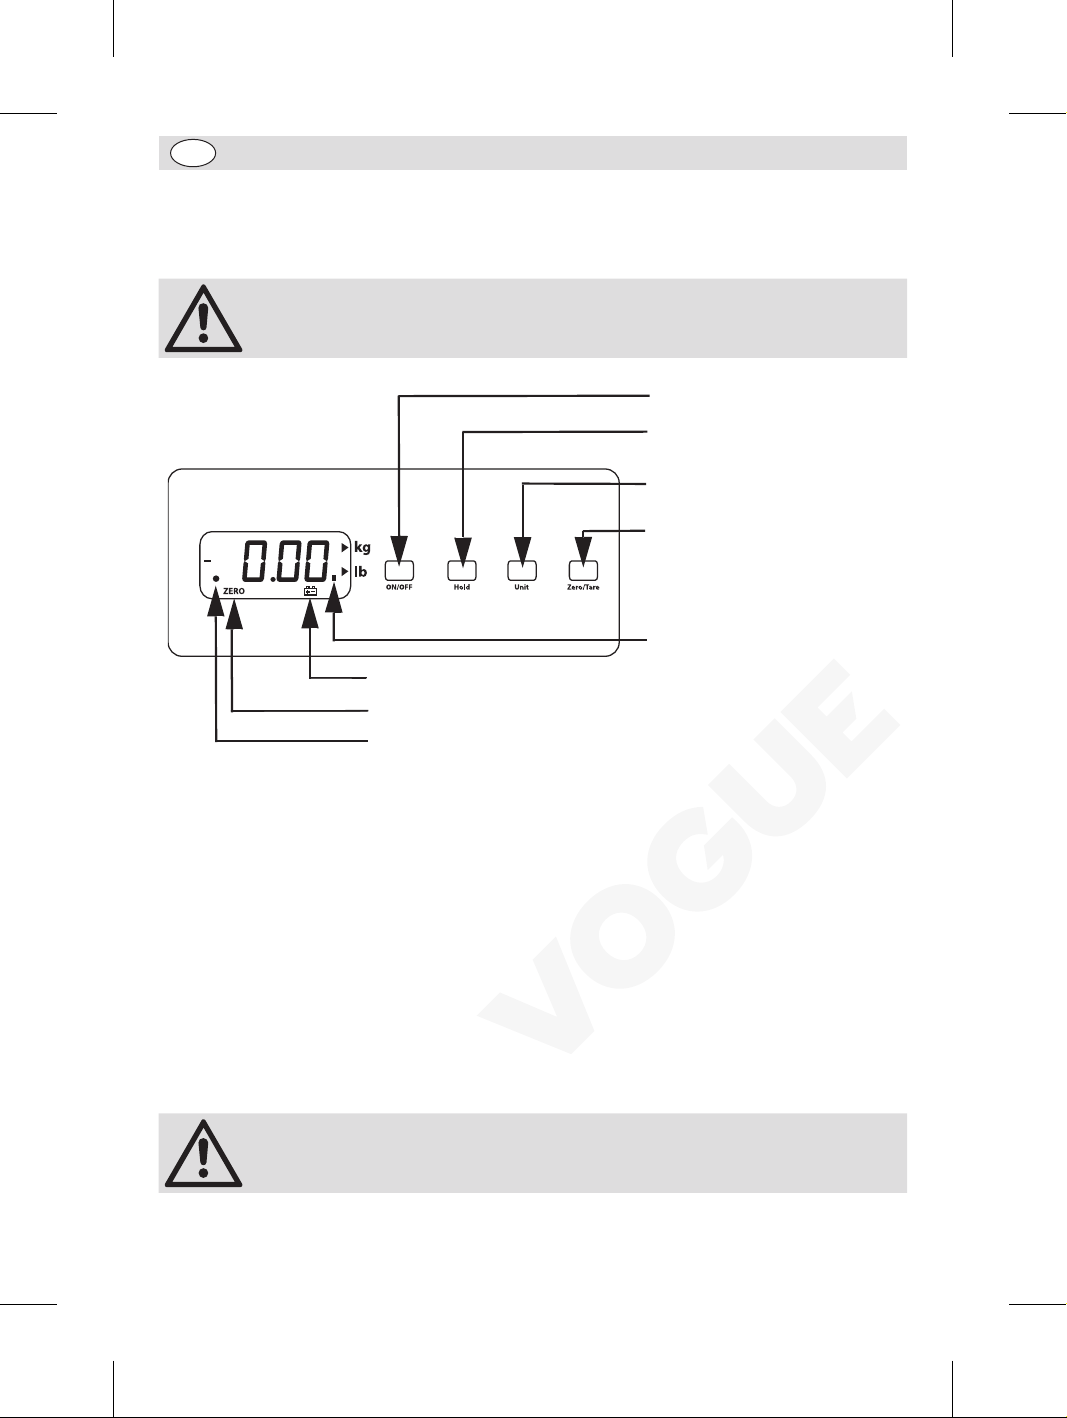
Zum EIN- oder AUS-Schalten
drücken
Drücken, damit Wert
EINGEBLENDET bleibt
Zum Wechsel zwischen metrisch
(kg) und Imperial (lb) drücken
Für Tara drücken (Zurückstellen
der Waage auf Null)
Anzeige für stabilen Ablesewert
Batteriestandsanzeige
NULL-Anzeige
Halteanzeige
Funktionen
Wechsel in den Funktionsmodus:
• Die EIN-/AUS-Taste drücken, um die Waage AUSzuschalten.
• Die HALTE-Taste gedrückt halten und dann die EIN-/AUS-Taste drücken. Dabei die HALTE-Taste weiter
gedrückt halten. Beide Tasten loslassen. Das Display sollte jetzt entweder „A_ON“ oder „A_OFF“
anzeigen.
Zum automatischen Abschalten der Waage:
• Die Taste NULL/TARA drücken, damit das Display zwischen „A_ON“ (automatische Abschaltung ist
aktiviert) und „A_OFF“ (automatische Abschaltung ist deaktiviert) wechselt.
Einschalten der Display-Hintergrundbeleuchtung:
• Die HALTE-Taste drücken. Das Display sollte jetzt entweder „L_ON“ oder „L_OFF“ anzeigen.
• Die Taste NULL/TARA drücken, damit das Display zwischen „L_ON“ (Hintergrundbeleuchtung an) und
„L_OFF“ (Hintergrundbeleuchtung aus) wechselt.
Hinweis: Die HALTE-Taste wechselt zwischen den Funktionen „automatische
Abschaltung“ und „Hintergrundbeleuchtung“.
Anschließend die EIN-/AUS-Taste drücken, um die Einstellungen zu speichern.
8
Page 9
DE
Reinigung, Pflege und Wartung
• Batterien entfernen (sofern vorhanden) bzw. den Adapterstecker vor der Reinigung (oder wenn die
Waage über längere Zeit nicht verwendet wird) ziehen.
• Die Waagschale mit einer warmen Seifenlösung reinigen.
• Nach dem Waschen gründlich trocknen.
• Die Waage nicht in Wasser eintauchen.
• Nach dem Gebrauch stets den Adapterstecker ziehen, um ein Überhitzen zu vermeiden.
Kalibrieren
Zum Kalibrieren ist ein exaktes 30-kg-Gewicht erforderlich.
• Die EIN-/AUS-Taste drücken, um die Waage AUS zuschalten.
• Die NULL-/TARA-Taste gedrückt halten und dann die EIN-/AUS-Taste drücken. Dabei die NULL-/TARATaste weiter gedrückt halten. Beide Tasten loslassen. Das Display sollte jetzt einen vierstelligen Wert
anzeigen.
• Darauf warten, bis die Anzeige für einen stabilen Lesewert aufleuchtet und dann die EINHEITEN-Taste
drücken. Es sollte „Save0“ eingeblendet werden.
• Ein 30-kg-Gewicht auf die Waage legen und warten, bis die Anzeige für einen stabilen Lesewert
eingeblendet wird. Die EINHEITEN-Taste drücken. Es sollte „Save0“ eingeblendet werden.
• Damit ist der Kalibriervorgang abgeschlossen. Das Gewicht abnehmen und die EIN-/AUS-Taste
drücken, um die Einstellungen zu speichern.
• Wenn die Kalibrierung nicht präzise erscheint, den Prozess wiederholen und dabei sicherstellen, dass
die Waage eben steht.
Technische Spezifikationen
Modell Leistung
CD564 9V Adapter oder
6 Batterien 1,5V
Maße der
Waagschale
315 x 325mm 20g (1oz) 30kg (66lbs) 10g (0,5oz)
Mindestgewicht Höchstgewicht Messeinheiten
Konformität
Das WEEE-Logo an diesem Produkt oder in der Dokumentation weist darauf hin, dass
das Produkt nicht mit dem normalen Hausmüll entsorgt werden darf. Um potenziellen
Gesundheits- bzw. Umweltschäden vorzubeugen, muss das Produkt durch einen
zugelassenen und umweltverträglichen Recyclingprozess entsorgt werden. Ausführliche
Informationen zur korrekten Entsorgung dieses Produkts erhalten Sie von Ihrem
Produktlieferanten oder der für die Müllentsorgung in Ihrer Region zuständige Behörde.
Alle VOGUE-Produkte werden strengen Tests unterzogen, um die Einhaltung von
Normen und Spezifikationen internationaler und nationaler Behörden und unabhängiger
Organisationen zu gewährleisten.
VOGUE-Produkte dürfen durch folgendes Symbol gekennzeichnet werden:
Alle Rechte vorbehalten. Diese Anleitung darf ohne vorherige schriftliche Genehmigung von VOGUE weder ganz noch
teilweise in irgendeiner Form oder auf irgendeinem Wege - einschließlich elektronischer, mechanischer Verfahren, durch
Es werden alle Anstrengungen unternommen um sicherzustellen, dass alle Angaben bei der Drucklegung korrekt sind.
Fotokopieren, Aufnahme oder andere Verfahren - vervielfältigt oder übertragen werden.
VOGUE behält sich jedoch das Recht vor, Spezifikationen ohne Vorankündigung zu ändern.
9
Page 10
IT
Montaggio
1. Posizionare l’apparecchio su una superficie in piano e stabile.
2. Regolare i piedi dall’apparecchio al fine di mantenerlo perfettamente orizzontale, se necessario
utilizzando una livella a bolla d’aria.
Nota: per garantire la precisione della pesata, la bilancia deve essere posizionata
su un piano perfettamente orizzontale.
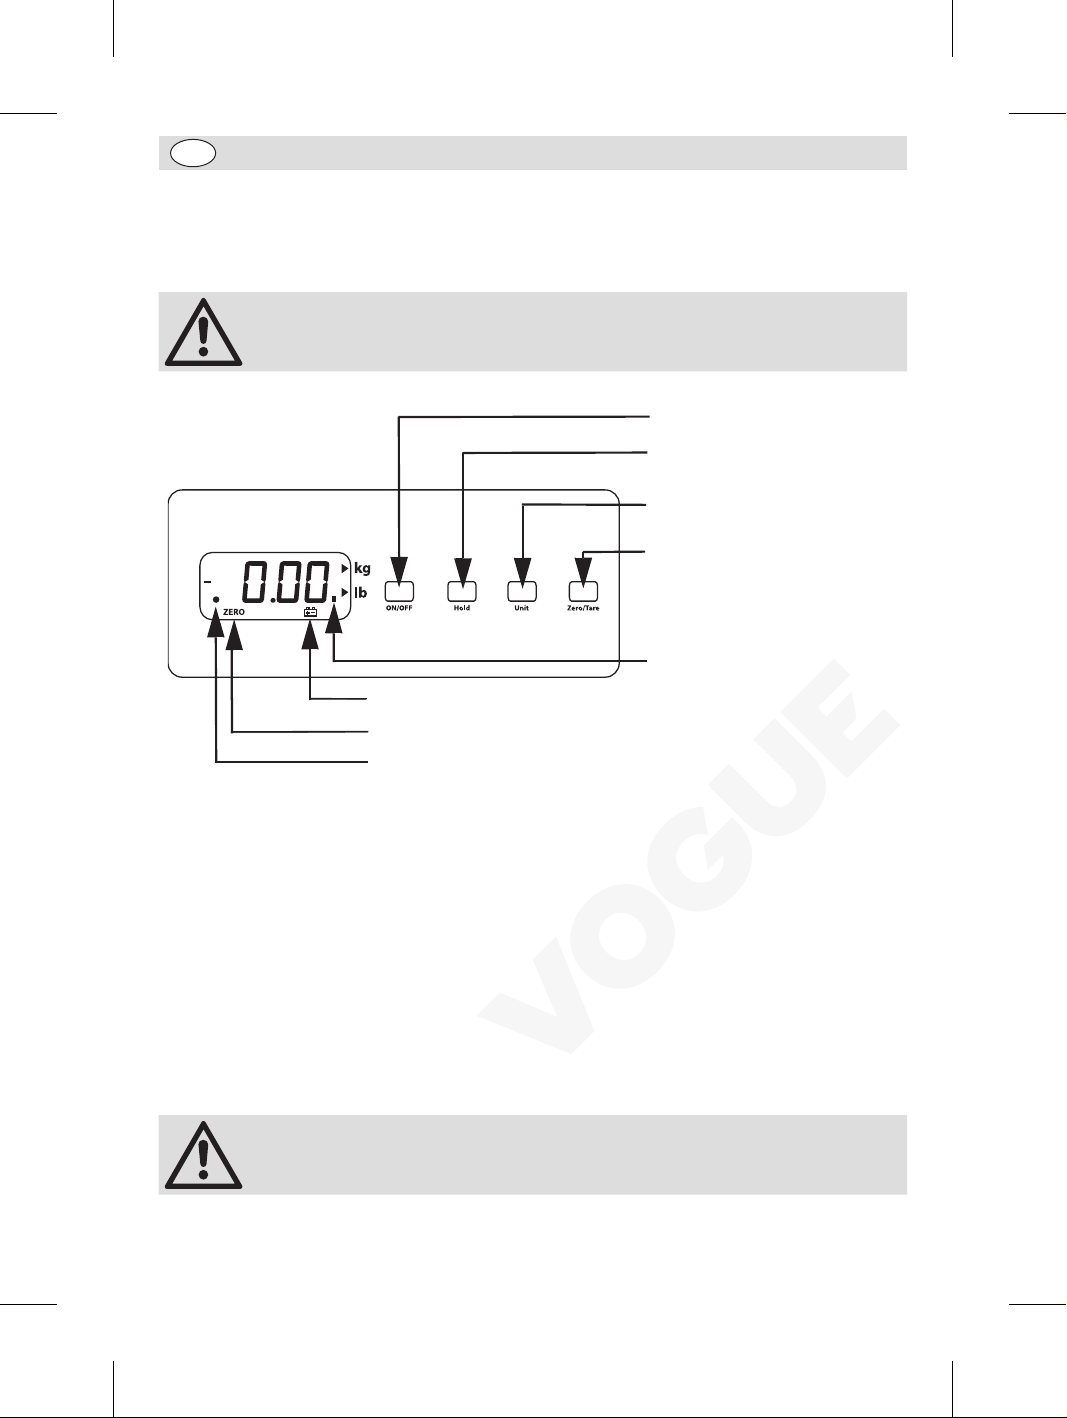
Premere per accendere o
spegnere
Premere per mantenere
visualizzata la lettura
Premere per alternare le
misurazioni tra valori metrici
(chilogrammi) e imperiali (libbre).
Premere per tarare (imposta la
bilancia su zero)
Indicatore lettura stabile
Spia basso livello batteria
Spia ZERO
Spia mantenimento visualizzazione
Funzioni
Per inserire la modalità funzioni:
• Premere il pulsante ON/OFF per spegnere la bilancia.
• Premere senza rilasciare il pulsante HOLD quindi premere il pulsante ON/OFF mentre si tiene premuto
il pulsante HOLD. Rilasciare entrambi i pulsanti, il display visualizza “A_ON” oppure “A_OFF”.
Per consentire lo spegnimento automatico della bilancia:
• Premere il pulsante ZERO/TARE (zero/tara). Il display alterna “A_ON” (spegnimento automatico
attivato) e “A_OFF” (spegnimento automatico disattivato).
Per attivare la retroilluminazione del display:
• Premere il pulsante HOLD; il display visualizza “L_ON” oppure “L_OFF”.
• Premere il pulsante ZERO/TARE. Il display alterna “L_ON” (retroilluminazione attivata) e “L_OFF”
(retroilluminazione disattivata).
Nota: il pulsante HOLD alterna la funzione spegnimento automatico disattivato
e la funzione retroilluminazione.
Al termine, premere il pulsante ON/OFF per salvare le impostazioni.
10
Page 11
IT
Pulizia e manutenzione
• Rimuovere le batterie (se inserite) e/o scollegare l’alimentatore prima di pulire o se la bilancia non
sarà utilizzata per un periodo prolungato di tempo.
• Pulire il piatto di pesata con acqua saponata calda.
• Asciugare completamente dopo il lavaggio.
• Non immergere la bilancia in acqua.
• Per prevenire il surriscaldamento, scollegare sempre l’alimentatore quando non viene utilizzato.
Taratura
La taratura richiede un peso di 30 kg.
• Premere il pulsante ON/OFF per spegnere la bilancia.
• Premere senza rilasciare il pulsante ZERO/TARE quindi premere il pulsante ON/OFF mentre si tiene
premuto il pulsante ZERO/TARE. Rilasciare entrambi i pulsanti. Il display visualizza un valore a quattro
cifre.
• Attendere che l’indicatore lettura stabile venga visualizzato quindi premere il pulsante UNIT (unità).
Viene visualizzato “Save0”.
• Collocare un peso di 30 kg sulla bilancia e attendere che venga visualizzato l’indicatore lettura stabile.
Premere il pulsante UNIT, viene visualizzato “Save1”
• La taratura è completata. Rimuovere il peso e premere il pulsante ON/OFF per salvare le impostazioni.
• Se la taratura non appare accurata, ripetere il processo verificando che la bilancia sia posizionata su
una superficie in piano.
Specifiche tecniche
Modello Alimentazione
CD564 Alimentatore 9V oppure
6 batterie da 1,5V
Dimensioni
piatto
315 x 325mm 20g (1oz) 30kg (66lbs) 10g (0,5oz)
Peso minimo Peso massimo
Incrementi di
misurazione
Conformità
Il logo WEEE riportato su questo prodotto o sulla relativa documentazione indica che il
prodotto non può essere smaltito come normale rifiuto domestico. Per evitare possibili
danni alla salute e/o all’ambiente, il prodotto deve venire smaltito utilizzando una
procedura di riciclaggio approvata e sicura per l’ambiente. Per ulteriori informazioni su
come smaltire in maniera corretta questo prodotto, contattare il fornitore del prodotto o
l’ente locale responsabile per lo smaltimento dei rifiuti.
I componenti VOGUE sono stati sottoposti a un rigoroso collaudo ai fini della conformità
agli standard e alle specifiche normative previste dalle autorità internazionali,
indipendenti e federali.
I prodotti VOGUE sono autorizzati a esporre il seguente simbolo:
Tutti i diritti riservati. È vietata la riproduzione o la trasmissione in alcuna forma, elettronica, meccanica, mediante
fotocopiatura o altro sistema di riproduzione, di qualsiasi parte delle presenti istruzioni senza la previa autorizzazione
Le informazioni contenute sono corrette e accurate al momento della stampa, tuttavia VOGUE si riserva il diritto di
modificare le specifiche senza preavviso.
scritta di VOGUE.
11
Page 12
ES
Montaje
1. Posicione el aparato en una superficie plana y estable.
2. Ajuste el pie del aparato para nivelarlo, use un nivel de burbuja si es preciso.
Nota: Es importante que las balanzas estén niveladas para garantizar la
precisión.
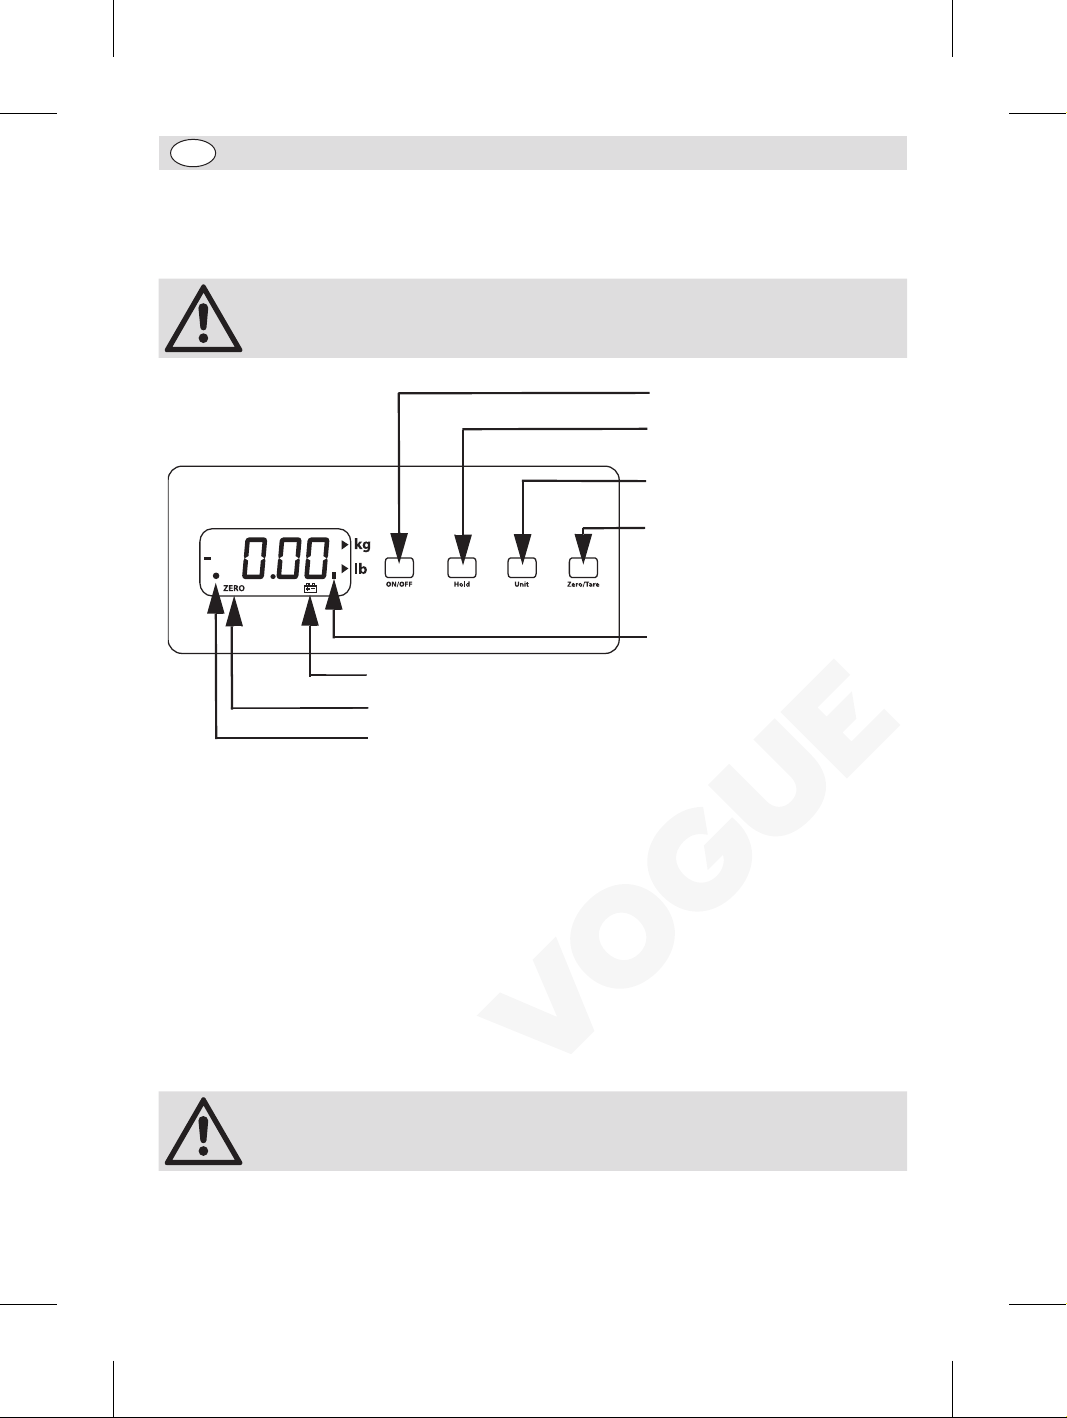
Indicador de batería baja
Indicador ZERO
Indicador HOLD
Pulse para encender o apagar
Pulse para MANTENER la lectura
Pulse para alternar entre el
sistema métrico (kg) y el
imperial (lb)
Pulse para configurar la tara
(ajustar la balanza a cero)
Indicador de lectura establer
Funciones
Para entrar en el modo Funciones:
• Pulse el botón ON/OFF para apagar la balanza.
• Mantenga pulsado el botón HOLD y a continuación pulse el botón ON/OFF al mismo tiempo. Suelte
ambos botones, en la pantalla debería leerse “A_ON” o “A_OFF”.
Para permitir que la balanza se apague automáticamente:
• Pulse el botón ZERO/TARE y la pantalla alternará entre “A_ON” (desconexión automática activada) y
“A_OFF” (desconexión automática desactivada).
Para activar la retroiluminación de la pantalla:
• Pulse el botón HOLD, en la pantalla debería leerse “L_ON” o “L_OFF”.
• Pulse el botón ZERO/TARE y la pantalla alternará entre “L_ON” (retroiluminación activada) y “L_OFF”
(retroiluminación apagada).
Nota: El botón HOLD alterará entre las funciones de desconexión automática y
retroiluminación.
Cuando haya terminado, pulse el botón ON/OFF para guardar la configuración.
12
Page 13
ES
Limpieza, cuidado y mantenimiento
• Saque las pilas (si es el caso) y/o desenchufe el adaptador antes de la limpieza o si la balanza no va a
utilizarse durante un largo periodo de tiempo.
• Limpie la bandeja con agua caliente y jabón.
• Séquela bien después de lavarla.
• No sumerja la balanza en agua.
• Desenchufe siempre el adaptador cuando no se use para prevenir el sobrecalentamiento.
Calibrado
Para el calibrado se necesita un peso exacto de 30 kg.
• Pulse el botón ON/OFF para apagar la balanza.
• Mantenga pulsado el botón ZERO/TARE y a continuación pulse el botón ON/OFF al mismo tiempo que
ZERO/TARE. Suelte ambos botones, la pantalla debería mostrar un número de cuatro dígitos.
• Espere a que aparezca el indicador de lectura estable y pulse entonces el botón UNIT. Debería
aparecer el texto “Save0”.
• Coloque un peso de 30 kg sobre la balanza y espere a que aparezca el indicador de lectura estable.
Pulse el botón UNIT; debería aparecer el texto “Save1”.
• El calibrado ya ha finalizado, retire el peso y pulse el botón ON/OFF para guardar la configuración.
• Si el calibrado no parece preciso, repita el proceso asegurándose de que la balanza esté colocada
sobre una superficie uniforme y nivelada.
Especificaciones técnicas
Modelo Potencia
CD564 Adaptador 9V o
Pilas 6 x 1,5V
Dimensiones de la
placa de pesaje
315 x 325mm 20g (1oz) 30kg (66lbs) 10g (0,5oz)
Peso mínimo Peso máximo
Incrementos de
medición
Cumplimiento
El logotipo WEEE en este producto o su documentación indica que no debe eliminarse
como un residuo doméstico. Para ayudar a prevenir posibles daños a la salud humana y/
o el medio ambiente, el producto debe eliminarse en un proceso de reciclaje aprobado
y medioambientalmente seguro. Para obtener más información sobre cómo eliminar
correctamente este producto, póngase en contacto con el proveedor del mismo o la
autoridad local responsable de la eliminación de residuos en su zona.
Las piezas VOGUE han pasado estrictas pruebas de productos para cumplir las
especificaciones y normas reguladoras establecidas por las autoridades internacionales,
independientes y federales.
Los productos VOGUE han sido autorizados para llevar el símbolo siguiente:
Reservados todos los derechos. Puede estar prohibida la reproducción o transmisión en cualquier forma o por cualquier
medio electrónico, mecánico, de fotocopiado, registro o de otro tipo, de cualquier parte de estas instrucciones sin la
Se ha hecho todo lo posible para garantizar que todos los datos son correctos en el momento de su publicación; sin
embargo, VOGUE se reserva el derecho a modificar las especificaciones sin que medie notificación previa.
autorización previa y por escrito de VOGUE.
13
Page 14
PT
Instalação
1. Coloque o aparelho numa superfície plana e estável.
2. Ajuste os pés do aparelho para o nivelar, utilize um instrumento de nivelamento caso necessário.
Nota: Para assegurar pesagens exactas, é necessário que as balanças estejam
niveladas.
Prima para LIGAR ou DESLIGAR
Prima para colocar a leitura em
PAUSA
Prima para alternar entre as
medidas métricas (kg) e as
medidas imperiais (libras)
Prima para Avaliar a tara (definir
as balanças a zero)
Indicador de leitura estável
Indicador de bateria fraca
Indicador ZERO
Indicador de pausa
Funcionalidades
Para entrar no modo de funcionalidades:
• Prima o botão ON/OFF (LIGADO/DESLIGADO) de forma que as balanças sejam DESLIGADAS.
• Mantenha premido o botão HOLD (PAUSA) e depois prima o botão ON/OFF (LIGADO/DESLIGADO)
com o botão HOLD (PAUSA) premido. Solte ambos botões, o ecrã deve mostrar “A_ON” ou “A_OFF”.
Para permitir que as balanças sejam desligadas automaticamente:
• Prima o botão ZERO/TARE (ZERO/AVALIAR TARA) e o ecrã irá variar entre “A_ON” (desligamento
automático ligado) e “A_OFF” (desligamento automático desligado).
Para ligar a retro iluminação do e:
• Prima o botão HOLD (PAUSA), o ecrã deve mostrar “L_ON” ou “L_OFF.
• Prima o botão ZERO/TARE (ZERO/AVALIAR TARA) e o ecrã irá variar entre “L_ON” (retro iluminação
ligada) e “L_OFF” (retro iluminação desligada).
Nota: O botão HOLD (PAUSA) irá variar entre as funções de Desligamento
automático desligado e Retro iluminação.
Uma vez concluído, prima o botão ON/OFF (LIGAR/DESLIGAR) para guardar as definições.
14
Page 15
PT
Limpeza, Cuidados e Manutenção
• Retire as pilhas (caso colocadas) e/ou desligue o adaptador antes da limpeza, ou se não utilizar a
balança durante períodos de tempo prolongados.
• Limpe a base de pesagem com água quente e sabão.
• Seque o aparelho cuidadosamente após a limpeza.
• Não mergulhe a balança em água.
• Desligue sempre o adaptador quando a balança não estiver a ser utilizada, a fim de evitar o
sobreaquecimento.
Calibração
A calibração requer um peso exacto de 30 kg.
• Prima o botão ON/OFF (LIGADO/DESLIGADO) de forma que as balanças sejam DESLIGADAS.
• Mantenha premido o botão ZERO/TARE (ZERO/AVALIAR A TARA) e depois prima o botão ON/OFF
(LIGADO/DESLIGADO) com o botão ZERO/TARE (ZERO/AVALIAR TARA) premido. Solte ambos botões,
o ecrã deve apresentar um valor de quatro dígitos.
• Aguarde que o indicador de leitura estável seja apresentado e depois prima o botão UNIT (UNIDADE).
Deve ser apresentado.
• Coloque um peso de 30 kg nas balanças e aguarde que o indicador de leitura estável seja
apresentado. Prima o botão UNIT (UNIDADE) e deve ser apresentado “Save1”.
• A calibração está concluída, retire o peso e prima o botão ON/OFF (LIGADO/DESLIGADO) para
guardar as definições.
• Se a calibração não parecer precisa, repita o processo certificando-se de que as balanças estejam
colocadas numa superfície nivelada.
Especificações técnicas
Modelo Alimentação
CD564 Adaptador 9 V ou
6 pilhas de 1,5 V
Dimensões da placa
de pesagem
315 x 325mm 20g (1oz) 30kg (66lbs) 10g (0,5oz)
Peso mínimo Peso máximo
Incrementos de
pesagem
Conformidade
O logótipo WEEE neste produto ou a sua documentação indicam que o produto não deve
ser tratado como lixo doméstico. Para ajudar a prevenir possíveis danos para a saúde
humana e/ou ambiente, o produto deve ser eliminado de acordo com um processo
de reciclagem aprovado e seguro para o ambiente. Para mais informação sobre como
eliminar este produto correctamente, contacte o fornecedor do mesmo ou as autoridades
locais responsáveis pela eliminação de desperdícios na sua área.
As componentes VOGUE foram submetidas a testes rigorosos a fim de cumprirem
as normas e especificações legais determinadas pelas autoridades internacionais,
independentes e nacionais.
Os produtos VOGUE foram aprovados e trazem o seguinte símbolo:
Todos os direitos reservados. É proibida a reprodução electrónica ou mecânica, ou por qualquer outro meio copiar, guardar
em meios digitais ou transmitir a terceiros estas instruções, seja parcialmente ou na sua totalidade, sem a autorização
Nós nos esforçamos para que no dia de publicação deste manual todos os pormenores sejam correctos, no entanto, a
VOGUE tem o direito de alterar as especificações sem aviso prévio.
prévia de VOGUE.
15
Page 16
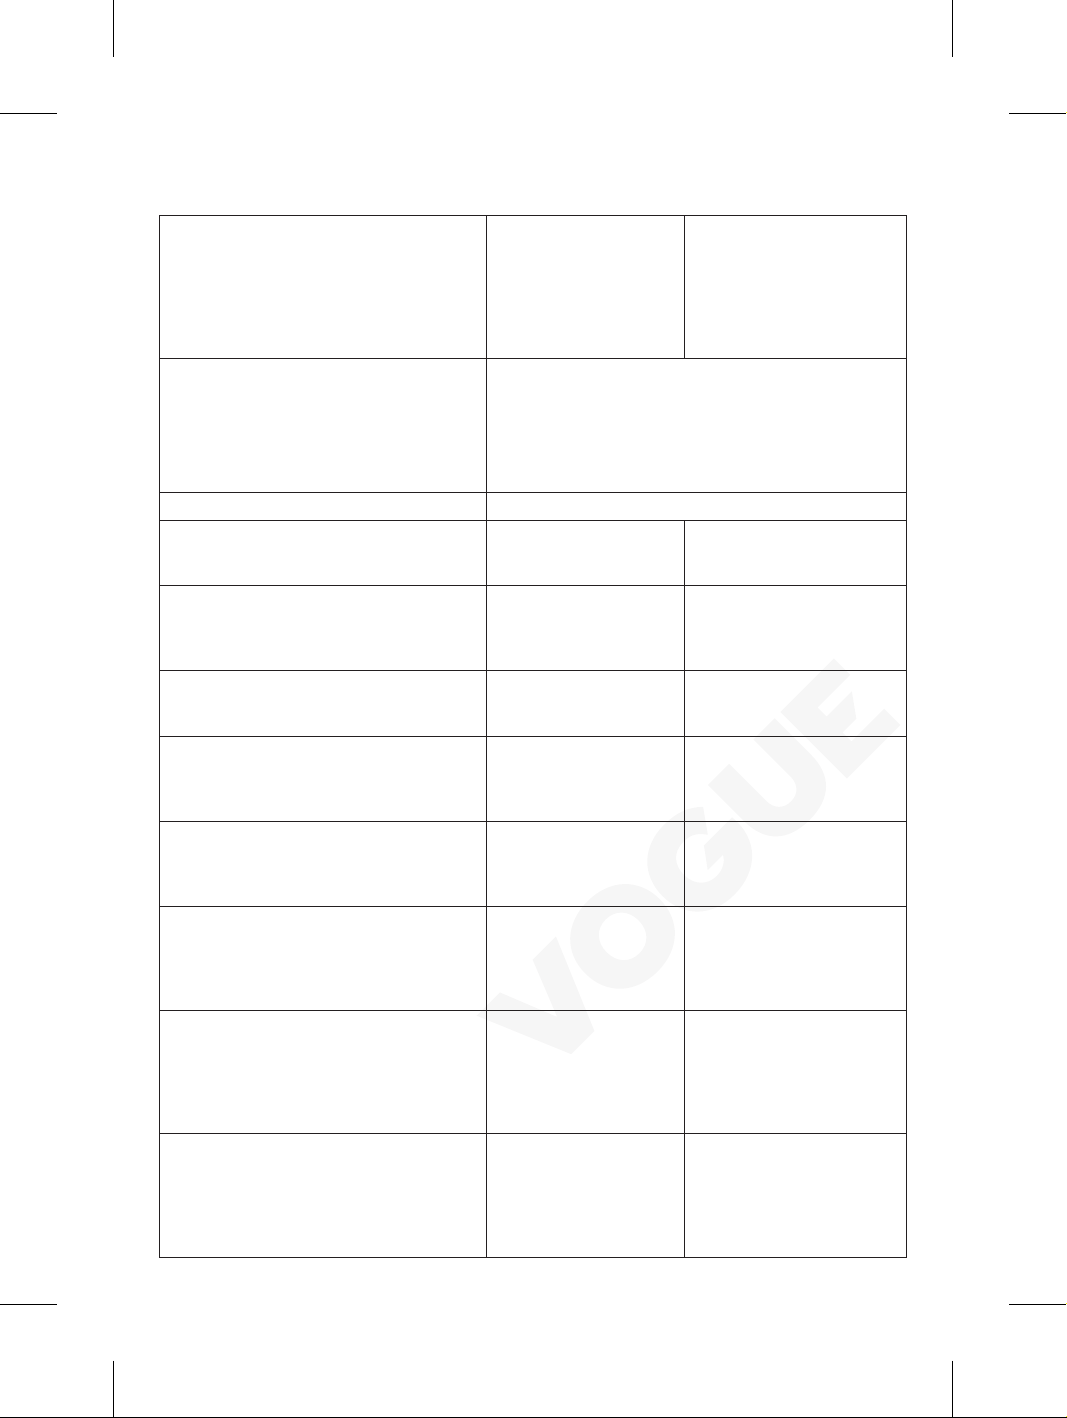
Technical Specifications for the adaptor
Information published / Informatie
gepubliceerd / Information publiée /
Veröffentlichte Informationen / Informazioni
pubblicate / Información publicada /
Informação publicada
Manufacturer's name or trade mark,
commecial registration number and address
Model identifier QZT-0900100
Input voltage / Ingangsspanning / Tension
d’entrée / Eingangsspannung / Frequenza
CA di ingresso / Tensión de entrada /
Input AC frequency / Ingang ACfrequentie / Fréquence d’entrée AC / ACEingangsfrequenz / Frecuencia AC de
entrada / Frequência de entrada AC
Output voltage / Uitgangsspanning / Tension
de sortie / Ausgangsspannung / Tensione di
uscita / Tensión de salida / Tensão de saída
Output current / Uitgangsstroom /Courant
de sortie / Ausgangsstrom / Corrente di
uscita / Corriente de salida / Corrente de
saída
Output power / Uitgangsvermogen /
Puissance de sortie / Ausgangsleistung
/ Potenza di uscita / Potencia de salida /
Potência de saída
Average active efficiency /Gemiddelde
actieve efficiëntie / Efficacité active moyenne
/ Durchschnittlich aktive Effizienz / Efficienza
attiva media / Eficiencia activa media /
Eficiência média activa
Efficiency at low load (10%) / Efficiëntie
bij lage belasting (10%) / Efficacité à faible
charge / Effizienz bei geringer Last (10 %) /
Efficienza a basso carico (10%) / Eficiencia a
baja carga (10%) / Baixa eficiência de carga
(10%)
No-load power consumption /
Stroomverbruik zonder belasting /
Consommation d’énergie sans charge /
Lastfreier Stromverbrauch / Consumo a
vuoto / Consumo de energía en vacío / Sem
consumo de energia de carga
Value and precision /
Waarde en precisie /
Valeur et précision /
Wert und Präzision /
Valore e precisione /
Valor y precisión / Valor e
precisão
Manufacturer: Shenzhen Quanzhengtong Technology Co.,
Ltd
Commecial registration No.: 91440300697101599U
Address: Floor 2, Buliding 7, Sanlian Songyuantou
Industrial Park, Buji subdistrict, Longgang District,
Shenzhen City, Guangdong Province, China
100-240 V
50/60 Hz
9.0 V
0.1 A
0.9 W
64.43 %
/ %
0.09 W
Unit / Eenheid / Unité /
Einheit / Tensione di ingresso
/ Unidad / Unidade
Page 17
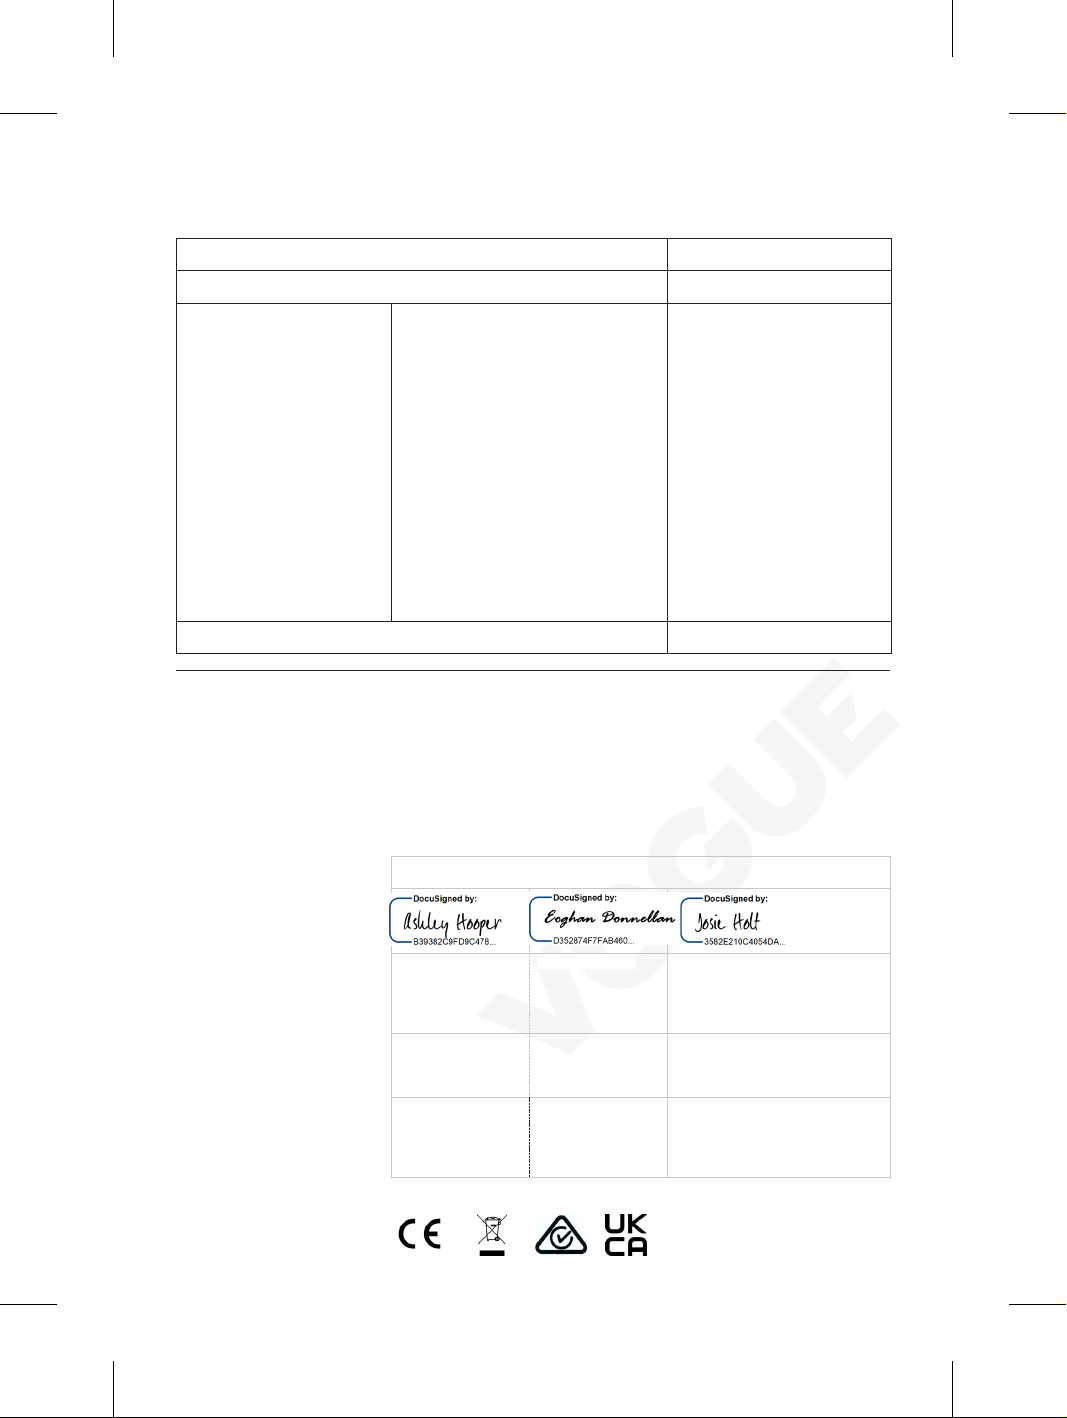
DECLARATION OF CONFORMITY
• Conformiteitsverklaring • Déclaration de conformité • Konformitätserklärung • Dichiarazione di conformità •
Equipment Type • Uitrustingstype • Type d'équip ement • Gerätetyp
• Tipo di apparecchiatura • Tipo de equipo • Tipo de equipamento
Model • Modèle • Modell • Modello
• Modelo • Malli
Electric Scale - 30kg Capacity
CD564 (& -E -A)
Application of Territory Legislation
Low Voltage Directive (LVD) - 2014/35/EU
Directive 2011/65/EU
Electrical Safety
Producer Name • Naam fabrikant • Nom du producteur • Name des Herstellers
• Nome del produttore • Nombre del fabricante • Nome do fabricante
Date • Data • Date • Datum • Data •
Fecha • Data
30th March 2021
Signature • Handtekening •
Full Name • Volledige naam • Nom
Ashley Hooper
Eoghan Donnellan
Josie Holt
Position • Functie • Fonction •
Technical & Quality
Commercial Manager/
Commercial Manager/ Responsible
Producer Address • Adres fabrikant •
• Morada do fabricante
Fourth Way,
United Kingdom
42 North Point
Ireland
15 Bagdally Road,
• Declaración de conformidad • Declaração de conformidade
& Council Directives(s)
Toepassing van Europese
Richtlijn(en) • Application de la/des
directive(s) du Conseil • Anwendbare
EU-Richtlinie(n) • Applicazione delle
Direttive
• Aplicación de la(s) directiva(s) del
consejo • Aplicação de directiva(s) do
Conselho
Electrical Equipment (Safety) Regulations 2016
EN 61347-1:2015
EN 61347-2-13:2014
EN 62493:2015
Electro-Magnetic Compatibility (EMC) Directive
2014/30/EU - recast of 2004/108/EC
Electromagnetic Compatibility Regulations 2016
(S.I. 2016/1091)
EN 61326-1:2013
EN 61547:2009
EN 55015:2013 +A1:2015
EN 55014-2:2015
EN 61000-3-2: 2014
EN 61000-3-3: 2013
Restriction of Hazardous Substances Directive
(RoHS) 2015/863 amending Annex II to
AS/NZS 61347.1:2016
AS/NZS 61347.2.13:2013
Electromagnetic Compatibility
EN 61326-1:2013
EN 61547:2009
EN 55015:2013 +A1:2015
EN 55014-2:2015
EN 61000-3-2: 2014
EN 61000-3-3: 2013
VOGUE
I, the undersigned, hereby declare that the equipment specified above conforms to the above Territory Legislation, Directive(s) and
Standard(s).
Ik, de ondergetekende, verklaar hierbij dat de hierboven ges pecificeerde uitrusting goedgekeurd is volgens de bovenstaande Richtlijn(en) en
Standaard(en).
Je soussigné, confirme la conformité de l'équipement cité dans la présente à la / aux Directive(s) et Norme(s) ci-dessus
Ich, der/die Unterzeichnende, erkläre hiermit, da ss das oben angegebene Gerät der/den oben angeführten Richtlinie(n) und Norm(en) entspricht.
Il sottoscritto dichiara che l'apparecch iatura di sopra specificata è conforme alle Direttive e agli Standard sopra riportati.
El abajo firmante declara por la presente que el equipo ar riba especificado está en conformidad con la(s) directiva(s) y estándar(es) arriba
mencionadas.
Eu, o abaixo-assinado, declaro que o equipamento anteriormente especifi cado está em conformidade com a(s) anterior(es) Directiva(s) e
Norma(s)
Signature • Unterschrift Firma •
Firma • Assinatura
et prénom • Vollständiger Name •
Nome completo • Nombre completo
• Nome por extenso
Position • Qualifica • Posición •
Função
Adresse du producteur • Anschrift
des Herstellers • Indirizzo del
produttore • Dirección del fabricante
Manager
Avonmouth,
Bristol,
BS11 8TB
Importer
Business Park
New Mallow Road
Cork
Supplier
Campbelltown
NSW 2560
Page 18
UK
+44 (0)845 146 2887
Eire
NL 040 – 2628080
FR 01 60 34 28 80
BE-NL 0800-29129
BE-FR 0800-29229
DE 0800 – 1860806
IT N/A
ES 901-100 133
Page 19

Page 20

CD564_ML_A5_v7_20210719
 Loading...