

Page 1
FULDA / GENF / GENEWA
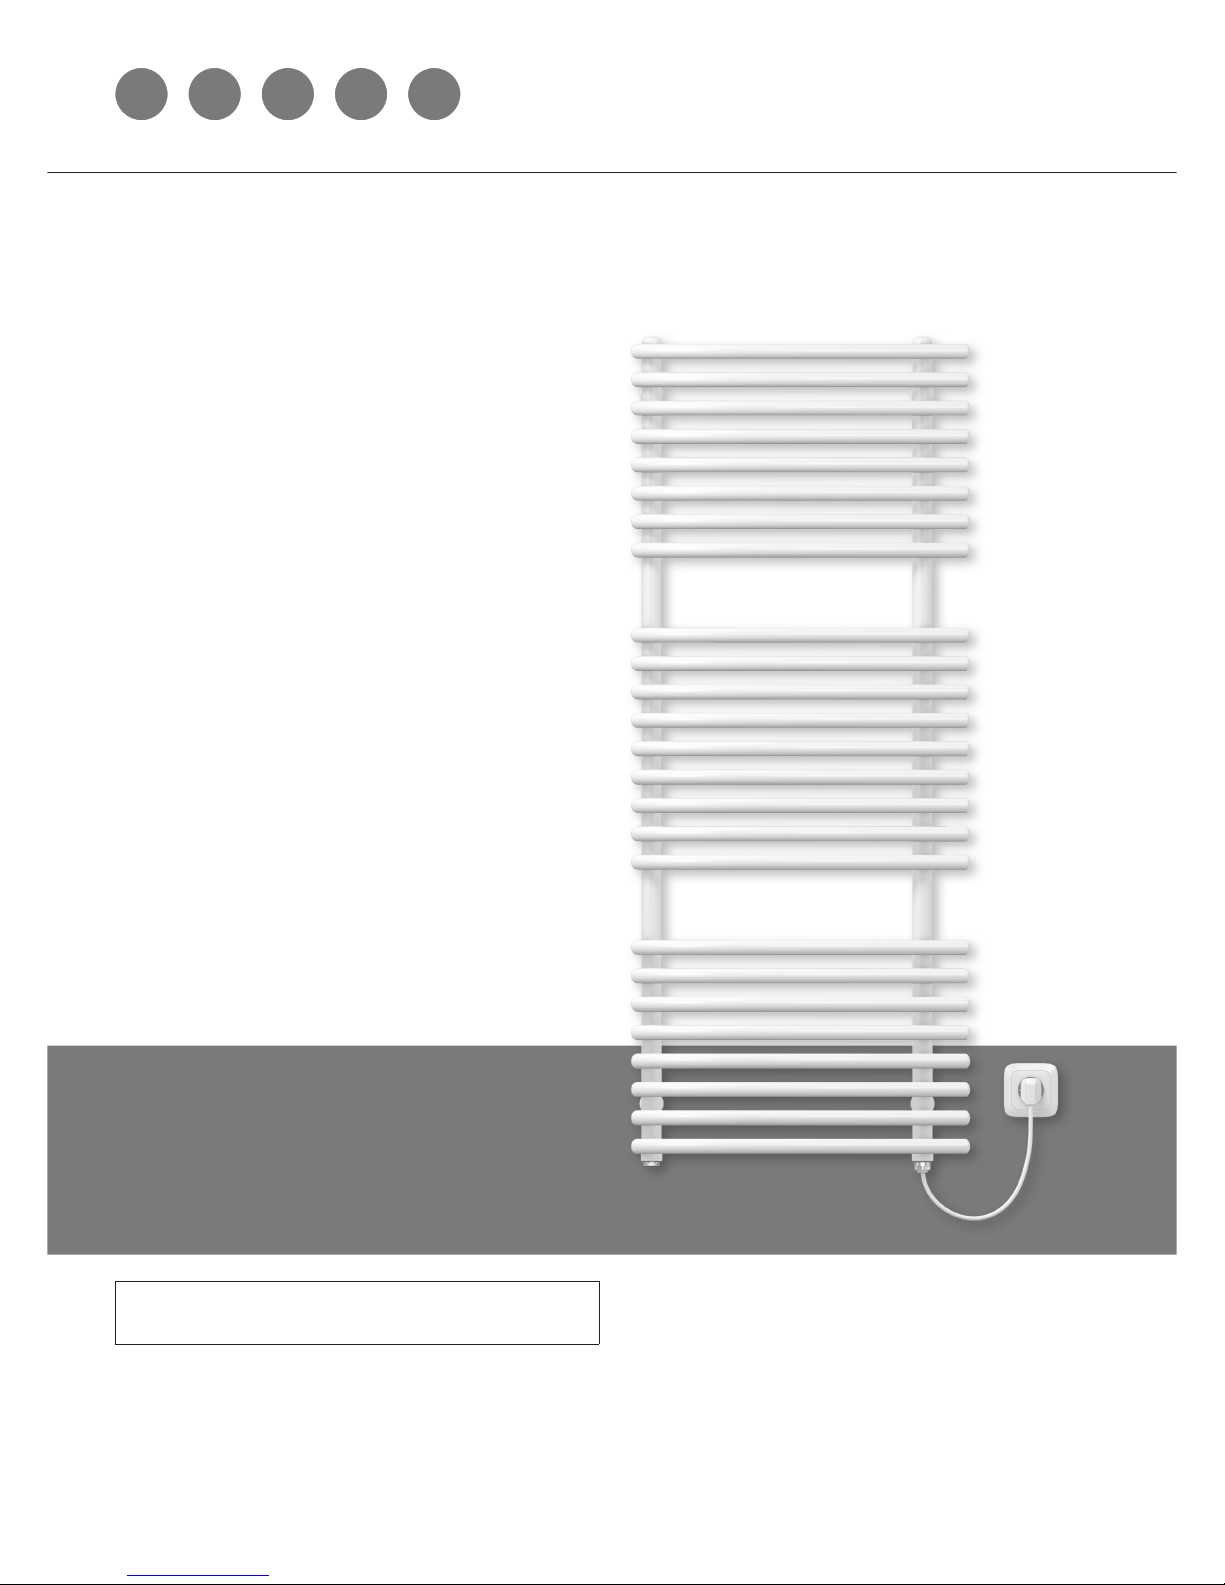
DESIGNHEIZKÖRPER
ELEKTROAUSFÜHRUNG
ELECTRICAL DESIGN
RADIATORS
MONTAGE- UND
BEDIENUNGSANLEITUNG
ASSEMBLY AND OPERATING
MANUAL
DGEPZMA00G
GB F PL ROD
Page 2
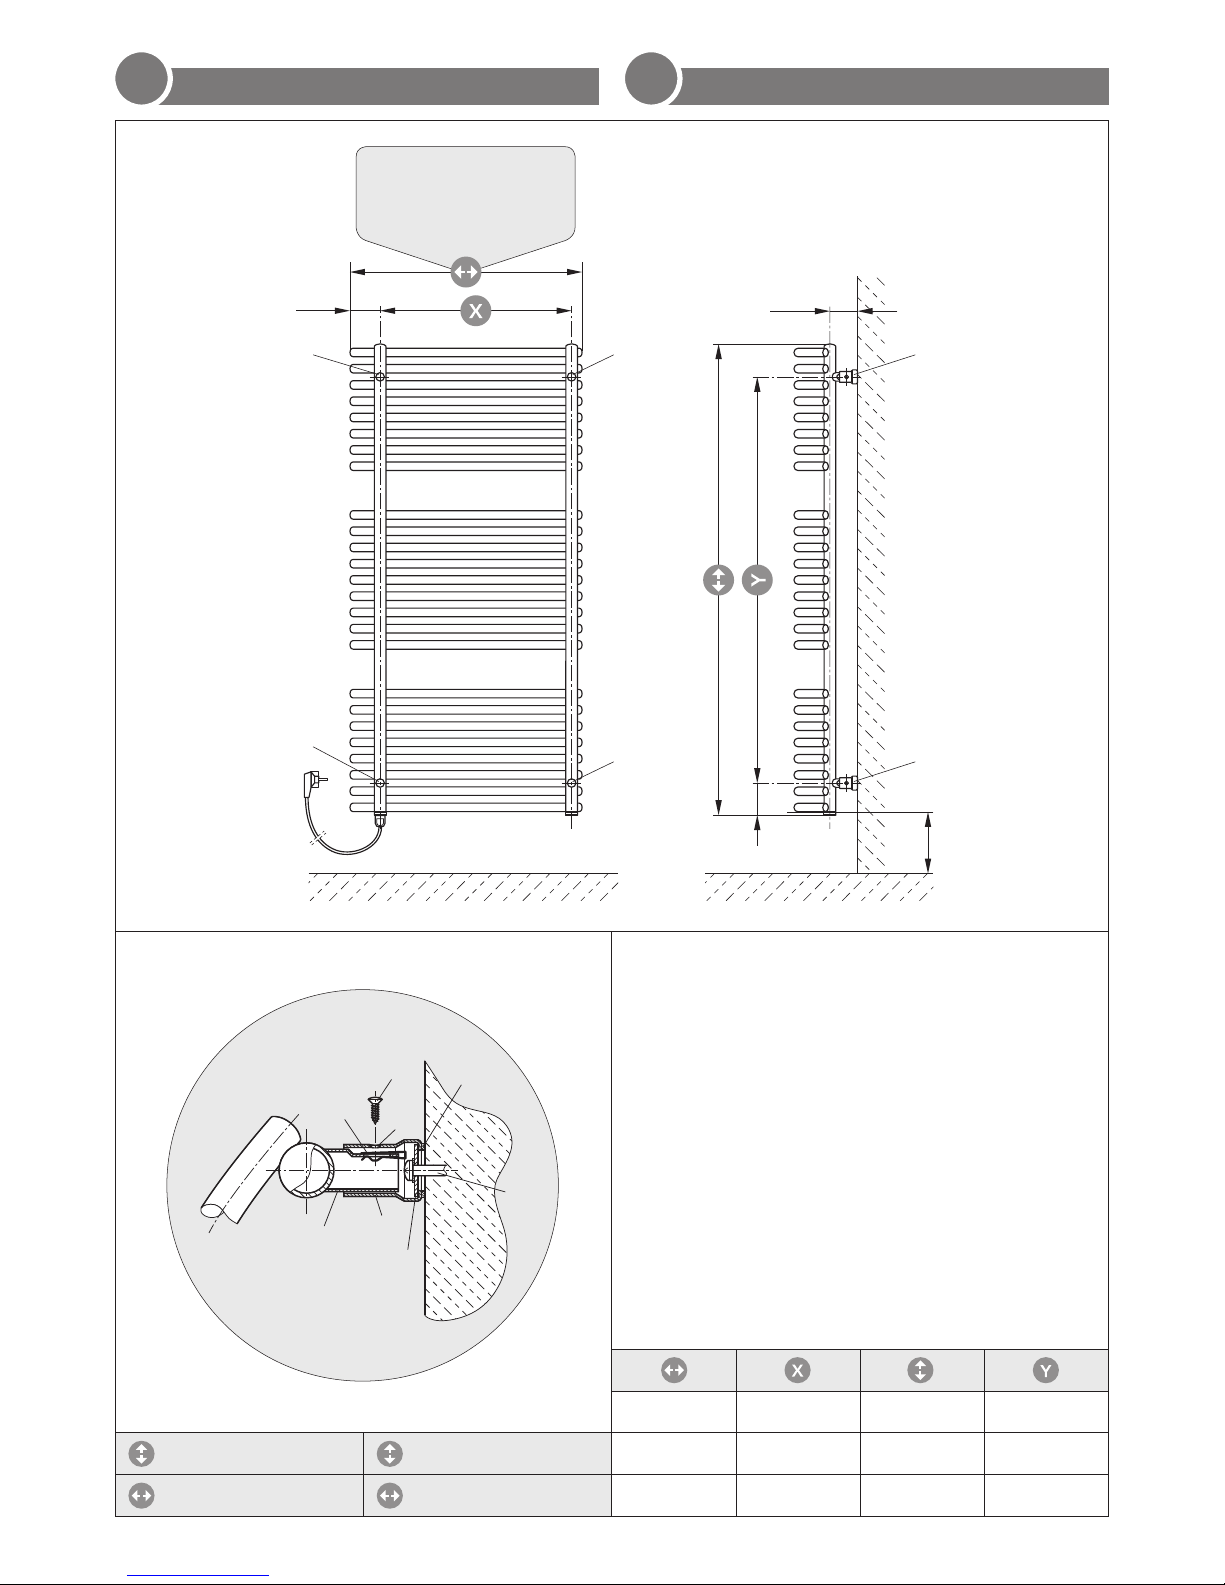
500 400 758 588
Bauhöhe Total height 600 495 1220 1050
Baulänge Total length 1766 1596
2
1
5
7
3
6
4
8
HEIZKÖRPERABBILDUNGEN
D
RADIATOR ILLUSTRATIONS
GB
ACHTUNG !
Heizkörperrückansicht
ATTENTION !
Back of radiator
84
64 - 76
A
A
A
A
A
A
ca. 75
*
Abb. 1
Abb. 2
Page 3

Die Installation und Inbetriebnahme Ihres Designheizkörpers FULDA/GENF
Elektroausführung ist von einer zugelassenen Fachfirma durchzuführen.
Bei der Installation sind die einschlägigen Normen bzw. die nationalen
Sicherheitsvorschriften wie ÖVE- und VDE-Bestimmungen zu beachten.
Vor Montagebeginn berücksichtigen Sie bitte die unter „WICHTIGE HIN-
WEISE“ angeführten Wand- bzw. Bodenabstände.
Bei der Montage von Heizkörpern ist zu beachten, dass die Befestigung von
Heizkörpern so dimensioniert wird, dass sie für die bestimmungsgemäße Verwendung und vorhersehbarer Fehlanwendung geeignet ist. Hierbei sind insbesondere die Verbindung mit dem Baukörper sowie dessen Beschaffenheit, die
Geeignetheit des Montagezubehöres und die möglichen Belastungen nach
erfolgter Montage zu prüfen.
WANDMONTAGE (Abb. 1 und 2): Aufstecken der beigepackten Blechmuttern 1 auf die Montagestutzen 2 (Abb. 2).
Anreißen, bohren der Löcher A - Bohrer ø10 - und setzen der Dübel entsprechend den Aufhängungsmaßen - (Abb. 1).
Empfehlung:
Messen Sie bitte vorher zur Heizkörperidentifizierung die Abstandsmaße der Montagestutzen 2 (Abb. 1 u. Abb. 2) nach.
Nach Bedarf (Wandbeschaffenheit) sind die beigepackten Kunststoffbeilagen 3 auf die Wandfüße 4 zu kleben (Abb. 2). Bitte auf saubere
Klebestellen achten.
Befestigung der Wandfüße 4 und diese waagrecht ausrichten, wobei die
Senklochbohrungen 5 in den Wandfüßen nach außen stehen müssen. Dabei
sollen die Wandmontageschrauben 6 in der Mitte der Langlöcher der Wandfüße montiert werden. (Es wird empfohlen, das Abstandsmaß der montierten
Wandfüße vor der Heizkörperwandmontage zu kontrollieren.)
Wandmontage des Heizkörpers: Die Montagestutzen 2 werden in die
Wandfüße 4 gesteckt und mittels Blechschraube 7 miteinander verbunden.
Durch das Langloch im Montagestutzen kann der Wandabstand zur vertikalen Ausrichtung des Heizkörpers variiert werden. Verstellmöglichkeiten
der Wandfüße in Baulängen- bzw. Bauhöhenrichtung sind durch das Langloch in der beweglichen Scheibe 8 im Wandfuß gegeben.
Das Wandmontagekonzept ist ein auf fertige Wände konzipiertes
System.
Folgende Normen sind bei der Montage der Heizkörper unbedingt
einzuhalten:
• DIN 55900: Sprühbereich in Nassräumen
• VDI 2035: Vermeidung von Schäden in Warmwasserheizungsanlagen
• DIN 18017 Teil 3: Lüftung von Bädern und Toiletten ohne Fenster
• EN 14336: Heizungsanlagen in Gebäuden, Installationen und Abnahme
der Warmwasserheizungsanlagen
Bei Verwendung dieser Heizkörper zur Raumbeheizung, muss bauseitig ein
programmierbares Temperaturregelgerät gemäß ÖKO-Design-Richtlinie
2018 verwendet werden.
INSTALLATION / MONTAGE FULDA/GENF ELEKTROAUSFÜHRUNG
D
HEIZKÖRPERBESCHREIBUNG
D
Die Elektroheizkörper der Familie FULDA/GENF sind elegante Design-Badezimmerheizkörper, mit eingebauter Elektroheizung. Das temperaturabhängige PTC-Heizelement regelt die Temperatur der Wärmeträgerflüssigkeit im Gerät eigenständig durch Veränderung des elektrischen
Widerstandes.
Der gleichbleibende hohe Qualitätsstandard unterliegt einer laufenden
Eigen- und Fremdüberwachung.
Your electrical designer radiator FULDA/GENF must be installed and commissioned by an authorised company.
All relevant installation standards and national safety regulations such as
the ÖVE and VDE regulations must be complied with.
Before starting installation work please take into account the wall and floor
distances described in the „IMPORTANT INFORMATION“.
For the correct installation of radiators it is essential that the fixing of the
radiator is carried out in such a way that it is suitable for intended use AND
predictable misuse. A number of elements need to be taken into consideration including the fixing method used to secure the radiator to the wall, the
type and condition of the wall itself, and any additional potential forces or
weights, prior to finalising installation.
WALL INSTALLATION (Abb. 1 and 2): Place the sheet metal screws 1
provided on the mounting connections 2 (Abb. 2).
Mark and drill the holes A - drill ø10 - and position the dowels according to
the suspension dimensions - (Abb. 1).
Recommendation:
First verify the distance between the mounting connections 2 (Abb. 1
and 2) in order to identify the radiator.
If necessary, (wall condition) stick the plastic shims 3 on the wall feet 4
(Abb. 2). Please ensure that the adhesion surfaces are clean.
Fix the upper wall feet 4 in a horizontal position making sure that the countersunk holes 5 in the wall feet are facing outwards. The wall mounting
screws 6 should be mounted in the centre of the oblong holes of the wall
feet. (We recommend that you check the distance between the mounted
wall feet before mounting the radiator on the wall.)
Mounting the radiator on the wall: Put the mounting connections 2 in
the wall feet 4 and screw them together with the sheet metal screws 7. The
wall space can be varied by the oblong hole in the mounting connection.
The length and height of the wall feet can be adjusted by means of the
oblong hole in the movable washer
8
in the wall feet.
The wall mounting concept is a system designed for completed walls.
The following standards must be adhered to when installing radiators:
• DIN 55900: Spraying area in wet rooms
• VDI 2035: Prevention of damage in water heating installations
• DIN 18017 Part 3: Ventilation of bathrooms and toilets without windows
• EN 14336: Heating systems in buildings. Installation and commissio ning of water based heating systems
When using these radiators for space heating, must have a programmable
temperature controller on site according to ECO-Design-Guideline 2018.
The electrical radiators from the FULDA/GENF range are elegant designer
bathroom radiators with integrated electrical heating rods. The tempera
ture-dependent PTC heating element regulates the temperature of the
heat transfer fluid in the device independently by changing the electrical
resistance.
The consistently high quality standards are subject to continual internal
and external controls.
INSTALLATION / ASSEMBLY FULDA/GENF ELECTRICAL RADIATORS
GB
DESCRIPTION OF RADIATOR
GB
Radiator Sizes, total
length x total height
[mm]
PTC-Electrical heating for
heat transfer fluid 60 °C
500 x 1220 400
600 x 1220 600
600 x 1766 900
Heizkörperdimension,
Baulänge x Bauhöhe
[mm]
PTC-Elektroheizelement bei
Wärmeträgerflüssigkeit 60 °C
500 x 1220 400
600 x 1220 600
600 x 1766 900
Page 4
INSTALLATION / MONTAGE FULDA/GENF
RADIATEURS ÉLECTRIQUES
F
INSTALACJA I MONTAŻ GRZEJNIKÓW FULDA-E/GENEWA-E
PL
DESCRIPTION DU RADIATOR
F
OPIS GRZEJNIKA
PL
L’installation et la mise en service de votre radiateur électrique FULDA/
GENF doivent être réalisées par une entreprise spécialisée autorisée.
Lors de l’installation, il faut veiller lors de l’installation aux normes en vigueur et aux consignes de sécurité nationales en matière telles que les
dispositions ÖVE et VDE.
Avant de commencer le montage, veuillez tenir compte des distances au
sol ou au mur indiquées dans „REMARQUES IMPORTANTES“.
Pour une parfaite installation des radiateurs, il est primordial que la fixation
du radiateur soit effectuée de manière appropriée pour l’utilisation prévue ET toute mauvaise utilisation prévisible. Un certain nombre d’éléments
doivent être pris en considération avant de réaliser l’installation comme le
type et la qualité de la fixation entre le radiateur et le mur, le type et l’état
du mur lui-même ainsi que les charges possibles après le montage.
FIXATION AU MUR (Abb. 1 et 2): Insérer les écrous métalliques fournis 1
dans les manchons de montage 2 (Abb. 2).
Tracer et percer les orifices A - foret ø10 et fixer les chevilles en fonction
des dimensions prévues pour la suspension - (Abb. 1).
Recommandations:
Prière de mesurer les espacement des tubulures de montage 2 au
préalable en vue de déterminer le modèle du radiateur (Abb. 1 et 2).
Au besoin (en fonction de l’état du mur), coller les rondelles de calage en
plastique 3 aux supports muraux 4 (Abb. 2). Veuillez à ce que les emplacements de collage soient propres.
Fixation des montants muraux 4 et aligne-ment horizontal de ces montants, avec les orifices de décharge 5 dans les montants muraux tournés
vers l’extérieur. Les vis de montage mural 6 doivent être montées au centre des trous longitudinaux des montants muraux. (Il est recommandé de
contrôler l’écart entre les montants muraux montés, avant de procéder au
montage mural du radiateur.)
Montage mural du radiateur: les manchons de montage 2 sont insérés
dans les montants muraux 4, ces deux éléments étant réunis avec la vis à
tôle 7. Le trou longitudinal que présente le manchon de montage permet
de faire varier l’écart entre le mur et le radiateur.
Le trou longitudinal pratiqué dans le disque mobile 8 du montant mural
permet de régler les montants muraux en longueur ou en hauteur.
Le concept de montage mural a été développé pour des murs terminés.
Les normes suivantes doivent être respectées lors du montage du
radiateur:
• DIN 55900: Pulvérisation dans les pièces humides
• VDI 2035: Prévention des dommages dans les installations avec sys tèmes de chauffage à eau chaude
•
DIN 18017 Partie 3: Ventilation des salles de bains et des toilettes sans fenêtres
• EN 14336: Système de chauffage dans les bâtiments, Installation et com-
missionnement des systèmes de chauffage à eau
Lors de l‘utilisation de ces radiateurs pour le chauffage des locaux, doit
avoir un contrôleur de température programmable sur place selon
ECO-Design-Guideline 2018.
Les radiateurs électriques de la famille FULDA/GENF sont des radiateurs
de salle de bains de forme élégante, à chauffage électrique intégré. L’élément de chauffe PTC qui agit en fonction de la température régule de
façon autonome la température de l’eau dans le radiateur en modifiant la
résistance électrique.
Nous contrôlons et faisons contrôler en permanence le niveau constant de
la qualité de nos produits.
Dimensions du radiator
[mm]
PTC-Chaffage électrique pour
liquide caloporteur 60° C
500 x 1220 400
600 x 1220 600
600 x 1766 900
Instalacja i uruchomienie grzejnika dekoracyjnego FULDA-E/ GENEWA-E
w wersji elektrycznej powinno zostać wykonane tylko przez uprawnioną do
tego firmę. Należy również uwzględnić obowiązujące obecnie normy i przepisy. Podłączenie instalacji należy przygotować uwzględniając wymiary
grzejnika oraz jego podłączenia.
Podłączenie instalacji należy przygotować uwzględniając wymiary grzejnika
oraz jego podłączenia. Przed przystąpieniem do prac należy zapoznać sie z
uwagami zamieszczonymi w dziale „WAŻNE WSKAZÓWKI”.
W celu zapewnienia prawidłowej instalacji grzejników ważne jest wykonanie mocowania grzejnika w sposób, który jest zgodny z przeznaczeniem
grzejnika i w sposób zapobiegający jego nieprawidłowemu użytkowaniu.
Przed końcową instalacją należy wziąć pod uwagę między innymi metodę
mocowania grzejnika do ściany, rodzaj i stan ściany do której będzie mocowany grzejnik oraz wszystkie potencjalne siły i obciążenia.
MONTAŻ NA ŚCIANIE Nasadki metalowe 1 osadzić we wsporniki montażowe 2 (Abb. 2) - oznaczyć żądaną pozycję A.
Za pomocą wiertła ø10 wywiercić otwory i zamontować w nich kołki rozporowe (Abb. 1).
Wskazówka:
W celu bezproblemowej instalacji należy bardzo dokładnie zmierzyć
odstępy między wspornikami 2 (Abb. 1 i Abb. 2).
W razie potrzeby, zależnie od stanu ściany, można wykorzystać załączone
do zestawu elementy wspomagające montaż z tworzywa sztucznego 3 i
nakleić na wsporniki 4 (Abb. 2). Przy tym należy zwrócić uwagę na czystość
klejonych powierzchni.
Zamocować wsporniki ścienne 4 w pozycji A a otwory we wspornikach mają
być skierowane na zewnątrz. Śruby służące do montażu do ściany 6 muszą
zostać zamocowane w samych wspornikach 4 (proponuje się skontrolowanie odstępów między wspornikami przed zamontowaniem grzejnika).
Osadzić wsporniki montażowe 2 we wspornikach ściennych 4 w pozycji A,
a następnie zamocować je przy pomocy śrub metalowych 7 (służą one do
określenia odległości od ściany i wypoziomowania grzejnika).
Przy pomocy podłużnego otworu w ruchomej blaszce 8 umieszczonej we
wsporniku ściennym 4 jest możliwość doboru odpowiedniego odstępu od
ściany.
Idea montażu na ścianie pomyślana jest jako system przeznaczony dla
gotowych ścian.
Podczas używania tych grzejników do ogrzewania pomieszczeń, musi mieć
programowalny regulator temperatury na miejscu zgodnie z wytycznymi
projektowymi ECO 2018.
Grzejniki FULDA/GENEWA są eleganckimi, grzejnikami dekoracyjnymi z
wbudowaną grzałką elektryczną. Zależna od temperatury PTC-grzałka elektryczna reguluje samodzielnie temperaturę cieczy przewodzącej ciepło w grzejniku poprzez zmianę oporu elektrycznego. Niezmienne, wysokie standardy
jakości podlegają ciągłej kontroli służb wewnętrznych, jak i zewnętrznych.
Nie zezwala się na prace naprawcze przy grzejnikach (np. spawanie) wykonywane na własną rękę, a także inne działania mogące powodować deformację grzejnika, lub zniszczenie powłoki lakierniczej.
wymiary grzejnika
szerokoś x wysokoś
[mm]
PTC-grzałka elektryczna
[W] przy 60° C
500 x 1220 400
600 x 1220 600
600 x 1766 900
Page 5

DESCRIEREA RADIATORULUI
RO
INSTALARE ŞI MONTAJ FULDA/GENF RADIATOARE ELECTRICE
RO
Montajul şi punerea în funcţiune a radiatorului design FULDA/GENF
trebuie făcute de către o societate autorizată. De asemenea, trebuie
respectate standardele ţi normele naţionale din domeniul cum ar fi ÖVE
ţi VDE.
Înainte de a începe montajul, ţineţi cont de distanţa până la sol şi la perete,
indicate în „INFORMAŢII IMPORTANTE”.
La montarea radiatoarelor este obligatoriu să se ţină cont de faptul că fixarea lor trebuie să fie astfel executată încât să corespundă întrebuinţării radiatoarelor conform destinaţiei lor ţi chiar situaţiei previzibile în care acestea
sunt utilizate în mod eronat. În acest sens, trebuie verificate după efectuarea montajului, în mod special, racordul cu peretele construcţiei, precum ţi
structura acestuia, rezistenţa accesoriului de montaj ţi posibilele solicitări
asupra structurii construcţiei.
FIXAREA PE PERETE (Abb. 1 şi 2): Fixaţi piuliţele 1 în ştuţurile de montaj
2. (Abb. 2)
Marcaţi şi faceţi găurile pentru poziţia A – gaura ø10 – şi poziţionaţi diblurile în funcţie de mărimea masei suspendate. (Abb. 1)
Recomandare:
Verificaţi în primul rând distanţa între ştuţuri 2 (Abb. 1 şi 2),
pentru a putea determina modelul radiatorului.
Dacă e nevoie, în funcţie de starea peretelui, adăugaţi elementul de fixare
3, din plastic transparent, pe perete 4 (Abb. 2). Asiguraţi-vă că suprafaţa
de adeziune este curată.
Fixaţi şi aliniaţi orizontal baza superioară pe perete 4; gaura de scurgere 5
de la baza peretelui trebuie îndreptată înspre exterior. Şuruburile de fixare 6 trebuie plasate în centrul găurilor longitudinale ale suportului mural.
(Vă recomandăm să verificaţi spaţiul dintre suporturile murale, înainte de a
monta radiatorul pe perete).
Montajul radiatorului pe perete: introduceţi partea superioară a suportului de montaj 2 în baza dinspre perete 4 şi racordaţi-o cu ajutorul unui
şurub din oţel 7. Distanţa până la perete se poate regla în funcţie de găurile din suportul de montaj.
Înălţimea şi lungimea pot fi reglate cu ajutorul găurii alungite de pe plăcuţa
situată pe suport 8.
Sistemul de instalare murală a fost conceput pentru pereţi finisaţi.
Când utilizați aceste radiatoare pentru încălzirea spațiului, trebuie să dispună de un controler de temperatură programabil la fața locului în conformitate cu Orientarea ECO-Design 2018.
Radiatoarele electrice din seria FULDA/GENF sunt radiatoare design
elegante cu tije electrice integrate. Elementul PTC, ce funcţionează dependent de temperatură, reglează independent temperatura apei în radiatoare, modificând rezistenţa electrică.
Standardul înalt de calitate este supus unor controale continue, interne şi
externe.
Dimensiuni radiator
[mm]
PTC-Încălzire electrică pentru
fluid – transfer termic la 60°C
500 x 1220 400
600 x 1220 600
600 x 1766 900
Page 6

Das Gerät darf nur von einem konzessionierten
Fachmann montiert werden.
Die Montage des Gerätes darf nicht unmittelbar
unterhalb einer Wandsteckdose erfolgen.
Zwischen Heizkörperoberkante und Fensterbrett
(falls vorhanden), muss ein Mindestabstand von
100 mm eingehalten werden.
*Entsprechend der europäischen Norm EN603352-43: Warnhinweis: Zur Vermeidung einer Gefährdung für sehr junge Kinder wird empfohlen, dieses Gerät so zu installieren, dass sich die unterste
beheizte Stange mindestens 600 mm über dem
Fussboden befindet.
Bei Geräten ohne eingebauten AUS-EIN Schalter, ist eine allpolige Trennung vom Netz mit
Kontaktöffnungsweite von mind. 3 mm oder eine
Trennung vom Netz mittels Stecker erforderlich.
Bei der Wahl des Anbringungsortes, sowie bei
einer Schukosteckdosen-lnstallation, sind die
örtlichen bzw. die nationalen elektrotechnischen
Sicherheitsvorschriften wie ÖVE und VDE zu beachten.
In Bade- oder Duschräumen sind die Geräte so zu
installieren, dass Schalter und andere Regel – und
Steuereinrichtungen nicht von einer Person, die
sich in der Badewanne oder in der Dusche befindet, berührt werden können.
Dieses Gerät kann von Kindern ab 8 Jahren und
darüber sowie von Personen mit verringerten physischen, sensorischen oder mentalen Fähigkeiten
oder Mangel an Erfahrung und Wissen benutzt
werden, wenn sie beaufsichtigt oder bezüglich
des sicheren Gebrauches des Gerätes unterwiesen wurden und die daraus resultierenden Gefahren verstehen. Kinder dürfen nicht mit dem Gerät
spielen. Reinigung und Benutzerwartung dürfen
nicht von Kindern ohne Beaufsichtigung durchgeführt werden.
Kinder jünger als 3 Jahre sind fernzuhalten, es sei
denn, sie werden ständig überwacht. Kinder ab
3 Jahre und jünger als 8 Jahre dürfen nicht den
Stecker in die Steckdose stecken, das Gerät nicht
reinigen und/ oder nicht die Wartung durch den
Benutzer durchführen.
WICHTIGE HINWEISE
D
Warnung: Dieses Gerät ist nicht mit einer Einrichtung zur Regelung der Raumtemperatur ausgerüstet. Das Heizgerät darf nicht in kleinen Räumen
benutzt werden, die von Personen bewohnt werden, die nicht selbstständig den Raum verlassen
können, es sei denn, eine ständige Überwachung
ist gewährleistet.
Für die Gerätereinigung keine scheuernden Putzmittel bzw. Farbverdünnungen verwenden!
Der Designheizkörper ist mit einer genau festgelegten Menge Wärmeträgerflüssigkeit gefüllt.
Reparaturen, die eine Öffnung des Heizkörpers
erfordern, dürfen nur vom Hersteller, oder dessen
Kundendienst ausgeführt werden. Dies gilt auch
für den Fall, dass Wärmeträgerflüssigkeit aus dem
Gerät ausgetreten ist.
Nacharbeiten am Heizkörper (z.B. Schweißarbeiten) durch den Kunden sind nicht erlaubt.
Bei Beschädigung der Anschlussleitung des Gerätes darf diese nur vom Hersteller ersetzt werden.
Die Designheizkörper FULDA/GENF Elektroausführung sind hochwertige Produkte, die nicht
nur der Raumheizung dienen, sondern auch zur
Trocknung von Handtüchern geeignet sind. Daher ist zu beachten, dass sie heiße Oberflächen
besitzen, die Verbrennungen hervorrufen können.
Besondere Vorsicht ist geboten, wenn Kinder und
schutzbedürftige Personen anwesend sind.
Achtung! Dieses Gerät ist nur zum Trocknen von
Textilien bestimmt, die mit Wasser gewaschen
wurden.
Selbstverständlich ist es unzulässig, diesen Heizkörper als Kletter- oder Sportgerät zu benutzen.
Der Elektroheizkörper darf aus sicherheitstechnischen Gründen nicht komplett abgedeckt werden.
Nach der Montage des Gerätes muss der Stecker
zugänglich sein.
Page 7

IMPORTANT INFORMATION
GB
The unit may only be installed by a licensed specialist.
The unit may not be mounted directly underneath
a wall socket.
There must be a distance of at least 100 mm between the top of the radiator and the windowsill (if
there is one).
*In accordance with the European Standards
EN60335-2-43: WARNING: in order to avoid any
danger to very young children, it is recommended
to install the appliance in such a way as to ensure
that the lowest heating bar is positioned at least
600 mm above the ground.
For units that do not have an integrated ON/OFF
switch, an all-polo disconnection from the mains
with a contact opening width of at least 3 mm, or
a plug for disconnection from the mains is required.
When selecting the installation location or in the
case of earthed socket installations, the applicable standards and national electrotechnical safety
regulations such as the ÖVE and VDE regulations
must be observed.
In bathrooms and shower rooms, the devices must
be installed in such a way that switches and other
control systems cannot be touched by anybody in
the bathtub or in the shower.
This device may be used by children from the age
of 8 years as also by people with diminished physical, sensorial or intellectual capabilities as also by
persons with a lack of experience and knowledge,
when they are either under supervision, or have
been instructed in the safe use of the device and
have understood the risks resulting from its use.
Children must not play with the device. Cleaning
and user maintenance must not be carried out by
children except under adult supervision.
Children under 3 years of age are to be kept away,
unless they are under constant observation. Children between 3 and 8 are not allowed to connect
the plug to the socket, to clean the device, nor
carry out user maintenance.
Warning: this device is not provided with a facility
for regulating the room temperature. The heating
device must not be used in small rooms, which
are occupied as a living area by persons who are
not able to leave the rooms without the help of
others, except in circumstances where these people are under continuous supervision.
Do not use abrasive cleaning agents or paint thinner to clean the units.
The designer radiator is filled with a precisely determined quantity of heat transfer liquid. Repairs
which require the radiator to be opened may only
be carried out by the manufacturer or their customer service agents. This also applies in the event
that there is a heat transfer liquid leak.
The customer is not permitted to carry out work
(e.g. welding) on the radiator. If the unit’s connecting pipe is damaged, it may only be replaced by
the manufacturer.
The FULDA/GENF designer electrical radiators
are high quality products that are suitable for
drying wet towels as well as heating room. Please note that it has hot surfaces which can cause
burns. Special care is required whenever children
or persons in need of special care and protection
are present.
Note! This device may only be used to dry textiles
that have been washed in water.
The radiators may not be used as climbing frames
or sports equipment.
For safety reasons, the electrical radiators may not
be completely covered.
After the unit has been installed the plug must be
accessible.
Page 8

REMARQUES IMPORTANTES
F
Cet appareil ne peut être monté que par un spécialiste autorisé.
Il ne faut pas monter l’appareil directement sous
une prise murale.
Il faut respecter une distance minimale de 100 mm
entre le bord supérieur du radiateur et le rebord
de fenêtre (si cela s’applique).
*En conformité avec le standard européen
EN60335-2-43: AVERTISSEMENT: Pour éviter de
faire courir des risques aux enfants, on recommande de monter ce dispositif de façon à ce que
la barre inférieure chauffée soit situé au minimum
à 600 mm au-dessus du sol.
Pour les appareils sans interrupteur Marche/arrêt
intégré, il faut prévoir une séparation sur tous les
pôles d’au moins 3 mm entre le secteur et la largeur d’inter-valle de coupure ou la séparation du
réseau par le biais d’une fiche.
Pour le choix de l’emplacement de montage, ainsi que pour l’installation d’une prise à
contact de protection, il faut veiller aux consignes de sécurité locales et nationales en matière d’électrotechnique comme ÖVE et VDE.
Installer les appareils dans les salles de bains ou
les douches de sorte que tout contact d’une personne se trouvant dans la baignoire ou dans la
douche avec les interrupteurs ou autres dispositifs de réglage et de commande soit évité.
Cet appareil peut être utilisé par des enfants de
8 ans et plus ainsi que par des personnes présentant des déficiences physiques, sensorielles ou
mentales ou sujettes à un manque d’expériences
ou de savoir, à condition qu’ils soient surveillés
ou qu’ils aient été instruits sur l’utilisation sure de
l’appareil, et qu’ils comprennent les dangers en
résultant. Eviter que des enfants jouent avec l’appareil. Eviter le nettoyage et la maintenance par
des enfants non surveillés.
Tenir à l’écart les enfants inférieurs à 3 ans à moins
de les surveiller en permanence. Il est interdit aux
enfants de 3 ans à 8 ans de mettre la fiche dans la
prise, de nettoyer l’appareil et/ou d’intervenir lors
d’une opération de maintenance.
Avertissement: cet appareil n’est pas équipé d’un
dispositif de réglage de la température ambiante.
Ne pas utiliser l’appareil de chauffage dans de petits locaux habités par des personnes incapables
de sortir seules, à moins qu’elles soient surveillées
de manière continue.
Ne pas utiliser d’agents abrasifs ou de diluants
pour nettoyer l’appareil.
Le radiateur design contient une quantité de liquide caloporteur, calculée avec précision. Les réparations qui nécessitent l’ouverture du radiateur
ne doivent être réalisées que le fabricant ou son
service après-vente. Cela vaut également pour le
cas où il y aurait une fuite de liquide caloporteur.
Le client n’est pas autorisé à effectuer des travaux
sur le radiateur (par ex. travaux de soudage).
En cas d’endommagement de la conduite de raccordement de l’appareil, seul le fabricant est autorisé à la remplacer.
Les radiateurs électriques FULDA/GENF sont des
appareils de haute qualité qui servent non seulement à chauffer la pièce, mais également à sécher
les serviettes. Attention ! Les surfaces sont chaudes et peuvent causer des brûlures. Faire preuve
d’attention particulière en présence d’enfants ou
de personnes vulnérables.
Attention! Cet appareil n’est destiné qu’au séchage de textiles qui ont été lavés à l’eau.
Il ne faut bien sûr pas les utiliser pour grimper ou
comme équipement de sport. Pour des raisons
de sécurité, le radiateur électrique ne doit pas
être entièrement recouvert.
La prise doit être accessible une fois l’appareil
monté.
Page 9

WAŻNE WSKAZÓWKI
PL
Urządzenie nie wolno montować bezpośrednio
nad gniazdkiem wtykowym.
Zalecane jest utrzymanie minimalnej 100mm odległości boku grzejnika od najbliższej ściany.
*Odnośnie europejskiej normy EN60335-2-43:
UWAGA: w celu zapobieżenia niebezpieczeństwu
grożącemu małym dzieciom, urządzenie to należy
zainstalować tak, aby dolna krawędź grzejnika
znajdowała się przynajmniej 600 mm powyżej podłogi.
Przy urządzeniach bez wbudowanego włącznika/
wyłącznika w celu wyłączenia urządzenia wymagane jest wyciągnięcie wtyczki z gniazdka.
Przy wyborze miejsca instalacji grzejnika, jak i instalacji gniazda wtykowego należy przestrzegać
obowiązujących obecnie norm i przepisów bezpieczeństwa.
W łazienkach i pomieszczeniach prysznicowych
urządzenia należy zainstalować w taki sposób, aby
przełącznik oraz inne urządzenia regulacyjne i sterujące nie mogły być dotykane przez osobę znajdującą się w wannie lub pod prysznicem.
Urządzenie nie jest przeznaczone do obsługi przez
osoby z dysfunkcjami fizycznymi i/lub psychicznymi (a także niepełnoletnie osoby) lub osobami nie
dysponującymi odpowiednim zakresem wiedzy na
jego temat, chyba że podlegają opiece i nadzorowane są przez inną osobę lub otrzymają od niej
wskazówki na temat prawidłowej obsługi urządzenia.
Dzieci w wieku poniżej 3 lat nie powinny mieć
dostępu, chyba że znajdują się pod nieustannym
nadzorem. Dzieci w wieku od 3 roku życia i młodsze niż 8-letnie nie mogą wkładać wtyczki do gniazdka, czyścić urządzenia oraz/ani przeprowadzać
konserwacji przeznaczonej do przeprowadzania
przez użytkownika.
Grzejnik dekoracyjny wypełniony jest dokładnie
określoną ilością cieczy trzymającą ciepło. Naprawy wymagające otwarcia grzejnika mogą być przeprowadzane jedynie przez producenta lub jego
serwis. Dotyczy to także przypadku, gdy ciecz
wypłynie z grzejnika. Nie zezwala się na samodzielne czynności naprawcze przeprowadzane przez nabywcę (np. samodzielne spawanie).
W przypadku uszkodzenia przewodów zasilających mogą one zostać wymienione jedynie przez producenta urządzenia, lub jego serwis.
Grzejniki dekoracyjne FULDA-E/GENEWA-E są
produktami wysokiej jakości, służącymi nie tylko
do ogrzewania pomieszczeń, ale i do np. suszenia
ręczników. Z tego też względu nie należy zapominać, że posiadają one gorące powierzchnie.
Nie zezwala się natomiast na używanie grzejników
do innych celów, jak np. drabinki sportowe. Dlatego też należy zwrócić uwagę na to, iż mają one
gorące powierzchnie mogące spowodować oparzenia. Należy zachować szczególną ostrożność w
obecności dzieci i osób wymagających opieki.
Do czyszczenia powierzchni grzejników należy
stosować środki o łagodnym działaniu, nie uszkadzających powierzchni.
Ze względów technicznych oraz bezpieczeństwa
grzejnik nie może być całkowicie zakryty. Po zakończonym montażu podłączenie grzejnika do
gniazdka wtykowego musi być bezproblemowe.
Rettig zastrzega sobie prawo do zmiany parametrów technicznych swoich wyrobów.
Dzieci w wieku 8 lat i starsze oraz osoby o ograniczonej sprawności fizycznej, sensorycznej czy
umysłowej lub nieposiadające odpowiedniego
doświadczenia i wiedzy, mogą korzystać z urządzenia wyłącznie pod nadzorem lub jeśli zostały
one poinstruowane o bezpiecznym korzystaniu z
urządzenia i rozumieją wynikające z tego zagrożenia. Nie pozwalaj dzieciom bawić się urządzeniem. Czyszczenie i konserwacja nie mogą być
dokonywane przez dzieci bez nadzoru.
Uwaga: Urządzenie nie jest wyposażone w przyrząd do regulacji temperatury w pomieszczeniach.
Grzejnik nie może być stosowany w małych pomieszczeniach zamieszkanych przez osoby, które
same nie mogą opuścić pomieszczenie, chyba, że
zapewniony jest stały nadzór.
Page 10

INFORMAŢII IMPORTANTE
RO
Aparatul poate fi montat doar de către un specialist autorizat.
Aparatul nu poate fi montat direct sub o priză
murală. Trebuie să existe o distanţă de cel puţin
100 mm între partea superioară a radiatorului şi
pervazul ferestrei (dacă acesta există).
*Conform normei europene EN60335-2-43:
ATENTIE: Pentru a se evita expunerea la pericol
a copiilor mici se recomandă instalarea acestui radiator în aţa fel încât bara încălzită aflată în poziţia
cea mai de jos să se găsească la min. 600 mm deasupra podelei.
Pentru aparatele fără întrerupător pornit/oprit integrat, trebuie prevăzută o separare a polilor de la
reţea cu o deschidere de minim 3 mm, sau o priză
pentru separarea de la reţea.
Pentru alegerea locului unde se va face instalaţia,
cât şi în cazul instalaţiilor cu pământare trebuie respectate standardele de siguranţă locale şi naţionale din domeniul electrotehnic – ÖVE şi VDE.
În spaţiile de baie sau de duș aparatele trebuie
montate astfel încât comutatorul și alte dispozitive de reglare sau de control să nu poată fi atinse
de o persoană aflată în cadă sau sub duș.
Acest aparat poate fi utilizat de copii de la vârsta
de 8 ani şi peste această vârstă precum şi de persoane cu capacităţi fizice, senzorice sau mentale
diminuate sau cu lipsă de experienţă şi cunoştinţe,
dacă ei sunt supravegheaţi sau au fost instruiţi cu
privire la utilizarea sigură a aparatului şi dacă au
înţeles pericolele ce pot rezulta din aceasta. Copiii nu au voie să se joace cu aparatul. Nu este
voie să se efectueze curăţirea sau întreţinerea de
utillizator a aparatului de către copii fără supraveghere.
A se ţine la distanţă de copiii cu vârste sub trei ani,
cu excepţia cazului în care sunt supravegheaţi în
permanenţă. Nu le este permis copiilor între trei
ani și 8 ani să introducă ștecherul în priză, să cureţe aparatul și/sau să efectueze operaţiunile de
întreţinere destinate utilizatorilor.
Atenţie: Acest aparat nu este echipat cu un dispozitiv pentru a controla temperatura camerei. Sistemul de încălzire nu are voie să fie utilizat în spaţii
mici, locuit de oameni care nu pot părăsi singuri
încăperea, în afară de cazul în care este asigurată
o supraveghere continuă. Suprafeţele radiatoarelor trebuie curăţate cu soluţii anticorozive.
Radiatorul design este umplut cu o cantitate exact determinată de fluid pentru transferul termic.
Reparaţiile care necesită deschiderea radiatorului
vor fi efectuate numai de către producător sau de
unitatea care asigură serviciile post - vânzare. Toate acestea se aplică şi atunci când există scurgeri
ale fluidului din radiator.
Beneficiarilor le sunt interzise intervenţiile ulterioare asupra radiatoarelor. (ex: sudura). Dacă
se constată o defecţiune la nivelul racordurilor,
aceasta va fi remediată numai de către producător.
Radiatoarele design FULDA-E/GENF-E sunt produse de înaltă calitate care nu doar încălzesc încăperi, ci pot fi utilizate şi pentru a usca prosoape.
Prin urmare, trebuie avut în vedere, că acesta are
suprafeţele fierbinţi, care pot provoca arsuri. O
atenţie specială trebuie acordată atunci când sunt
prenzenţi copii sau persoane vulnerabile.
Atenţie! Pot fi puse la uscat numai textile spălate
în apă. Radiatoarele nu pot fi utilizate ca şi echipamente de sport.
Din motive de siguranţă, radiatorul nu trebuie
acoperit în întregime, în cazul în care funcţionează
electric.
După montajul aparatului, priza trebuie să rămână
accesibilă.
Page 11

D
NOTIZEN / NOTES
GB
Page 12

D
NOTIZEN / NOTES
GB
 Loading...