

Vodavi Triad-S 1-2-3, STARPLUS Triad-S 1, STARPLUS Triad-S 2, STARPLUS Triad-S 3 User Manual
Page 1

Feature Package 3
TRIAD- S, 1/2/3
Station User Guide
Includes Attendant Features
a new dimension in business communications
Page 2

STARP LUS
TM
Triad Digital Systems Quick Reference Card
FIXED FEATURE BUTTONS
• CA MP - O N Butto n - - Enables you to alert a busy
party that an outside lin e is on hold and waiting
for th em.
• CONF (CONFERENCE) Button -- Used to
establish and build conference c alls .
• FLASH Button -- Used to terminate an outside
call and restore dial tone without having to
hang up the hands et. It is also used to transfer
calls behind a PBX or Centrex within those
sys tems.
• FORWARD (FWD) Button -- Allows you to
for ward y our c alls to another statio n.
• HO LD Button - - Enables yo u to place an outside
caller on hold.
• H- T- P Switch -- Allo ws th e user to select the ICM
signaling mode: Handsfree, Tone, or Privacy.
CALL FORWA RDING
1. Pres s th e FW D bu t to n or dia l [6 40].
2. Dial the de s i red C all Forwa rd co de:
[6] = All Calls
[7] = N o Answer
[8] = B usy
[9] = B usy/ No Ans wer
3. Dial station number where calls are to be
forwarded. Hear confirmation tone.
4. Replac e h a nd set o r pr ess ON/ OFF bu tt on .
ESTABLISHIN G A CONFER ENCE
Only stations that have Conferen ce enabled will be
able t o initia te a Conference.
1. Lif t the handset.
2. Selec t interc om stat ion or dial desired o ut side
party. When called party answers, press the
CO NF bu tton .
3. Ad d nex t c onf erence par t y by s electing
another outside line or intercom station.
4. Press the CONF button again and repeat
previo us step in a cycle, until all parties are
co nt ac t ed.
5. When last party answers , press the CONF
button twice. All parties are connected.
TERM IN ATI NG A CO NFE RE NC E
To term in ate a C on feren ce, the c onference initiato r
must be actively in the conference.
R eplac e h a nd set or pr ess ON/OFF butt on.
• MSG (MESSAGE WAIT) Bu tt on -- Allows you to
initiate a message waiting indicatio n at stations
that are busy, unattend ed, o r in Do No t Disturb.
Message Waiting Callback request left at your
station is indicat ed b y a f lashing MSG WAIT LED.
• MUTE Button -- Allows you to switch the built-
in mic rophone on or of f when us ing th e
speakerphone, or the handset microphone
when u sing the han ds et.
• ON/OFF Button -- Enables you to make a
te lephone call without lifting the handset. It
turns the teleph one on an d of f when using the
speakerphone.
• SPEED Button -- Provides you with access to
speed dialing, save number r edial and last
numbe r redial. This button is also used to
access flexible button programming.
• TRANS (TRA NSF ER) Button -- Used to transfer
an outside call from one station to another.
• VOLUME BAR -- Allows th e user to adjust
speakerphone and handset volume.
U NSCR EENED T RA NS FER
1. Press TRANS butt on an d dial station numb er.
2. When the called extension begins to signal,
hang up to transfer the call.
3. Rep lace hand set o r p res s O N/ OFF bu tton.
SCR EEN ED T RA NS FER
While connected to an outside line:
1. Press station button where call is to be
transferred (if programmed on your
te le p ho ne ),
-o rPress the TRANS button and dial the desired
station number.
(The called extension signals according to the
intercom signal switch position.)
2. When that extension answers , announce the
tr a ns f er .
3. Hang up to complete transfer.
LEA VIN G A MSG WAITING I NDICAT ION
If you dial a station that is busy, unattended, or in
Do Not Disturb, you can leave a message waiting
indication.
1. Press the ON/OFF button.
2. Dial the desired int ercom station. A busy tone
or DND ton e is heard.
3. Press the MSG button. The called par ty’s M SG
button LED will flash slowly.
4. Press the ON/Off button to end the call.
Page 3

Quick Reference Card STARPLUS
TM
Triad Digital Systems
PLACING AN OUTSIDE LINE ON HOLD
• If yo ur system is p rogrammed for Exclu sive
Hold Pref erence, press the HOLD button once
for Exclusive Hold o r twice for System Hold.
• If yo ur s ystem is p rogra mmed f or System H ol d
Pref erence, press the HOLD button once for
System Hold or twice for Exclusive Hold.
STORING SPEED N UMBERS
1. Pres s th e SPEED button twice.
2. Dial the speed bin location.
• 000 to 01 9 = Stat ion S peed number s
• 020 to 9 99 = System Speed numbers
3. Dial desired telephone number.
4. Pres s th e SPEED button.
5. Pres s the ON/OFF button to end speed d ial
pr og rammi n g.
To cle ar an exi sting spe ed bin:
1. Pres s th e SPEED button twice.
2. Dial the speed bin location.
3. Pres s the SPEED bu tton again. A confirmation
tone will be heard.
DIALING A SPEED NUMBER
1. Pres s th e SPEED button.
2. Dial the speed bin location,
-orP res s p rogr ammed s peed bin bu tto n.
• 000 to 019 = Station Sp eed numbers
• 020 to 999 = System Speed numb ers
3. When called party answers, pick up handset o r
use speakerphone.
DI RE CT ORY DIA LIN G
Users with display telephones may view a list of
individuals on the telephone sys tem and have the
system automatic ally dial that person. Directory
Dialing may also be u sed to tran sfer a c all f ro m one
station to another.
1. Dial the Dir ectory List dial code [680],
-orP res s the DIR ECTORY DIAL flexible bu tton.
2. Pres s a button on the key pad, on ce, twice or
three times, to represent the letter of the
alphabet, to begin viewing the list of names.
3. Scroll through the Directory List to select a
na me as fo llo w s:
• Press [✳] to scroll up to next entry,
-or-
• Press [#] to scroll do wn to previous entry.
4. Pres s the SPEED button at the desired name to
automatically dial the destination station or
outside phone number (via Speed D ial).
To transfer a call usi ng Dire ctory Dia ling
1. Press th e TRA NS bu tton .
2. Dial Directory Dial Code [680] ,
-o rPress the DIRECTORY DIAL flexible button.
3. Press the digit associated with the person ’s
name. Whe n t he nam e d i sp lay s, press t h e
SPEED button to automatically dial the station.
4. Press the ON/OFF button to complete transfer.
Ca lls may o nly be transf erred to i nte r nal st ation s.
PROGRAMMING FLEXIBLE BUTTONS
1. Press the SP EED button twice.
2. Press the flexible button to be programmed.
3. Dial the desired code from the followin g chart.
A confirmation tone will be heard.
4. Press the ON/OFF button.
All Call Page ( Internal & Ext ernal) 70 0
Bac kgroun d M usic 63 2
Call Back 622
Call Park Location (System) 43+[C]
Call Park Location (Station) 439+[XXX]
Call (Park) Pickup #6+[XXX]
Dial Speed D irectory 680
Do Not D istur b 63 1
Extension Numbers - Tr i a d - S 10 0-131
Extension Numbers -Triad 1/2 10 0-171
Extension Numbers -Triad 3 10 0-351
External All Call Page - Triad 1/2/3 76 +[ 0]
(All External Zones)
External Page -Triad-S 76 +[ 1]
Last Number R edial [ SPEED]+[#]
Line Queue 621
Personal Park 43 8
Speed Dial Access [SPEED]+[YYY]
Save Num ber Redial [ SPEED]+[✳]
VM Group Pilot Numbers 44 [V]
________________________________________
C = Call Park Location ( 0-7)
V = Voice Ma il Group Num be r (0-7)
XXX = Sta tio n Ext en s io n Nu mbe rs
YYY = S peed Dial B in Numbe rs
(000-019 Station ) ( 020-999 S yst em )
To eras e a fle xible butto n:
1. Press the SP EED button twice.
2. Press the flexible button to be erased.
3. Press the FLASH button . A confirmation tone
will be heard.
4. Press the ON/OFF button.
Page 4

TRIAD
TM
-S, 1/2/3
Digital Telephone Systems
(Feature Package 3)
Station User Guide
with Attendant Features
Issue 3.2 - March 2001 P/N: 8052-10
Page 5
I
Issue
Release
Date
Changes
1 12-98 Includes Feature Package 1 enhancements.
28-99
35-00
Includes Feature Package 2 {FP2} enhancements.
User Gui de content contains extensive revisions.
Includes Feature Package 3 {FP3} enhancements.
User Guide has been reformatted.
3.1 7-00 User G ui de content co nt ai ns updated in for mation.
3.2 3-01
User Guide conta ins updated information.
LIFE SUPPORT APPLICATIONS POLICY
VODAVI Technology, Inc. products are not authorized for and should not
be used within Life Support applications. Life Support systems are
equipment intended to support or sust ain life and whose failure to
perfo rm w hen properly used in accordance with instruct ions provided can
be reasonably ex pected to result in signifi cant personal injury or death.
VODAVI Technology, Inc. warranty is li mited to replacement of defective
components and does not cover injury to persons or property or other
consequential damages.
Copyright © 2001 VODAVI Technology, Inc.
All Rights Reserved
This mater ial is copyrighted by VODAVI Technology, Inc. Any unauthor ized
reproductions, use or disclosure of this material, or any part thereof, i s strictly prohibited
and is a violation of the Copyright Laws of the United States (17 U.S.C. Section 101 et.
seq.).
VODAVI reserves the ri ght to make changes in specifications at any time and without
notice. The informat ion furnish ed by VODAVI in thi s material is beli eved t o be accurate
and reli able, but is not war ranted to be true in all cases.
STAR PLUSTM an d TRIAD
TM
are registered trademarks of VODAVI Technology, Inc.
seh/2001
Page 6

Contents
Account Codes ................................................................... .... .... ..1
Using Account Codes..... .. .. .. .. .. .. .. .......................................1
Verif ied Ac count Codes......................................................2
Answering Machine Emulation ..............................................2
Notification Methods ..........................................................2
Ring Mode . .. .. .. .. .. ............................................................ 3
Speaker Mode ................................................................ 3
Attendant Features..................................................................... 4
911 Feature (Attendant Alert).......................................... 4
Attendant Override . ..... .... .... .... .... .... .... ..... .... .... .... .... .... .... .. 5
Attendant Unavailable (Alternate P osition) ...............5
Disable O utgoing CO Access ........................................... 6
CO Lines Off-Net Fwd - Incoming (via Speed Dial)...7
Canceling Of f-Net Forwarding .. ... .. .. .. .. .. .. .. .............. 7
Day/Night/Special Mode .. .... .... .... .... ..... .... .... .... .... .... .... .... 8
Setting System Time and Date........................................ 8
Directory By List Programming ....................................... 8
Directory List................................ .. .. ... .. .. .. .. .................... 8
Local Number/Name Translation Table................10
System Speed Dial Bin................................................. 11
Software Version Display....................... .. .. .. .. .. .. ................ 12
Spee d Dial - System Storing .. ........................................... 12
Background Music (Optional) .... .. .. .. .. ..................................... 13
Call Back ... ... .. .. .. .............................................................................. 14
Call Coverage .............. .. .. .. ... .. .. .. ................................................... 14
Call Forwarding ........ .. .. .. .. ... .. ....................................................... 15
All Calls .............................. .... .... .... .... .... .... ..... .... .... .... .... .... .... ..15
Busy........................................................................................... 16
Busy/No Answer ................................................................... 16
Follow-Me ...............................................................................17
Forward Override ................................................................. 18
No Answer ...............................................................................18
Station Off-Net Call Forwarding (via Speed Dial) .....19
Page 7

ii March 2001
Call Park............................. .. ... .. .. .. .. .. ............................................... 20
System...................................................................................... 20
Personal ...................................................................................20
Station ........ .... .. .. .. .................................................................... 21
Retrieving a Station Park Call.................................... 21
Call Pickup ...................................................................................... 21
Directed Pickup..................................................................... 21
Group Pic kup ............. ... .. .. .. .. .. ...............................................22
Call Transfer ............... .. .. .. .. ... .. .. .....................................................22
Answering a Screened Transfer ...................................... 22
Executive/Secretary Transfer ................... .. .. .. .. .. .. .. .......... 23
Incoming CO Transfer ......................................................... 23
PBX/CENTREX Transfer ..................................................... .. 23
Screened Transfer ............................. .. .. ... .. .. .. .. .................... 23
Transfer Search.. .. .. .. .............................................................. 24
Unscreened Transfer........................................................... 24
Caller ID Name/Number ............................................................ 24
Calling Station Tone Mode....................................................... 25
Camp-On . ... .................................................................................... 25
Answering a Camp-On .... .. .. .. .. .. .. ....................................... 25
CO Line Queuing . .. .. .. .. .. .. ... .........................................................26
To Answer a Queue Call Back........................................... 26
CO Ring Tones ..................... .. .. .. .. .. .. ............................................. 27
Conference......................................................................... .... .. .. .. ..28
Conference Combinations................................................28
Establishing a Conference......................................... .. .. .. .. 28
Exiting a Conference (Controller Only).........................29
Re-entering a Conference ................................................. 29
Terminating a Conference .......................... .. .. .. .. .. .. .. ........29
Dial-By-Name .......................................................................... .... .. 30
Directory Dialing .......................................................................... 31
Stations .................................................................................... 31
Transferring a Call using Directory Dialing .................32
Do Not Disturb......................................... .. .. .. ... .. .. ........................ 33
Page 8

March 2001 iii
Activating Do Not Disturb................................................. 33
One-Time Do Not Disturb .... .. .. .. .. ..................................... 33
Executive O verride...................................................................... 34
Flash ....................... .... .. .. .. ................................................................ 34
Flash Key on Intercom ... .. .. .. .. .............................................34
Flexible Button Programming ................................................35
Group Listening ...........................................................................35
Headset Mode .............................................................................. 36
Intercom Buttons . .. .. .. .. ................................................................36
Intercom Calls ...............................................................................37
Answering an Intercom Call ............................................. 37
Intercom Transfer . .. .. ... ......................................................... 37
Placing an Intercom Call ......... .. .. .. .. .. .. ... ............................38
Keyset Mode ........................................................ .... .... .... .... .... .... .. 38
LCR O peration....... .... .... .... ..... .... .... .... .... .... .... ..... .... .... .... .... .... .... ..40
LCR Q ueue Call Back .. .... .... .... .... .... .... ..... .... .... .. .................. 40
LCR Q ueuing (Automatic) ................................................. 41
Mailbox Buttons ............. ..... .... .... .... .... .... .... ..... .... .... .... .... .... .... .... 41
Meet Me Page ....................................................................... .. .. .. .. 41
Answering a Meet Me Page ..............................................42
Message Waiting . .. .. .. ..................................................................42
Answering a Message Waiting........................................ 42
Leaving a Message Waiting Indication.........................42
Mute ................................................................ ..... .. .. ........................ 43
Name In Display ......................................................... .. .. .. .. .. .. .. ....43
Off-Hook Preference................................................................... 44
Off-Hook Preference Programming .............................. 44
Off-Hook Voice Over ( OHVO) ..................................................45
Placing an Off-Hook Voice Over (OHVO) Call.............45
Responding to an Off-Hook Voice Over (OHVO).......46
One-Touch R ecording.. ..... .... .... .... .... .... .... ..... .... .... .... .... .... .... .... 46
Outside Calls.................................................................................. 47
Answering a Recall...................... .. .. .. .. .. ... .. .......................... 47
Answering an Outside Call ................................................48
Page 9

iv March 2001
Placing an Outside Call....................................................... 48
Placing an Outside Line on Hold .................................... 48
Paging.......... .... .. .. ............................................................................ 48
Personalized Messages.. ... .. .. ..................................................... 49
Custom Messages ................................................................ 50
Selecting a Custom Message .................................... 50
Date and Time Entry Messages ....................................... 51
Personalized Msg Codes on a Flex Ke y.........................52
Using 2-Digit Code ........ .. .. .. .. .. .. .. ................................. 52
Using Scroll Function................................................... 52
Scrollable Canned Messages ............................................53
PBX/Centrex Codes on a Flex Button ................................... 54
Repeat Redial ................................................................................ 54
Speakerphone ............................................................ .... .. .. .. ........ 55
Spee d Dial ........ .. .. .. .. .. .. .. ................................................................ 55
Dialing a Speed Number ................................................... 55
Last Number Redial ......................................................... .... 56
Save Number Redial .................................. .. .. .. .. .. .. .............. 56
Storing Speed Numbers ....................................................56
To Dial a Saved Number ....................................................57
Text Messaging (Silent Respo nse) .. .... ......... .... ...... .... ...... .... .. 57
Uniform Call Distribution (UCD)................. .. .. .. .. .. .. .. .............. 58
Available/Unavailable Mode ............................................58
Display Calls in Queue for UCD Groups........................ 59
Overflow Station Forward ................................................. 59
Universal Day/Night Answer ............................................... .. .. 60
Voice Mail ...................................... .. .. .. .. .. .. .. ................................... 60
Call Forwarding to Voic e Mail Gro ups .......................... 60
Retrieving Voice Messages ............................................... 61
Voice Mail Transfer with ID ............................................... 61
Volume Control Bar (DKT Only)....................................... 62
Worksheets .................................................................................... 63
Flexible Button Programming Worksheet .................. 63
Spee d Dial Bin P rogramming Worksheet .. .. .. .............. 63
Page 10
March 2001 v
DEFAULT NUMBERING PLAN .. .. .. .. .. ......................................... 64
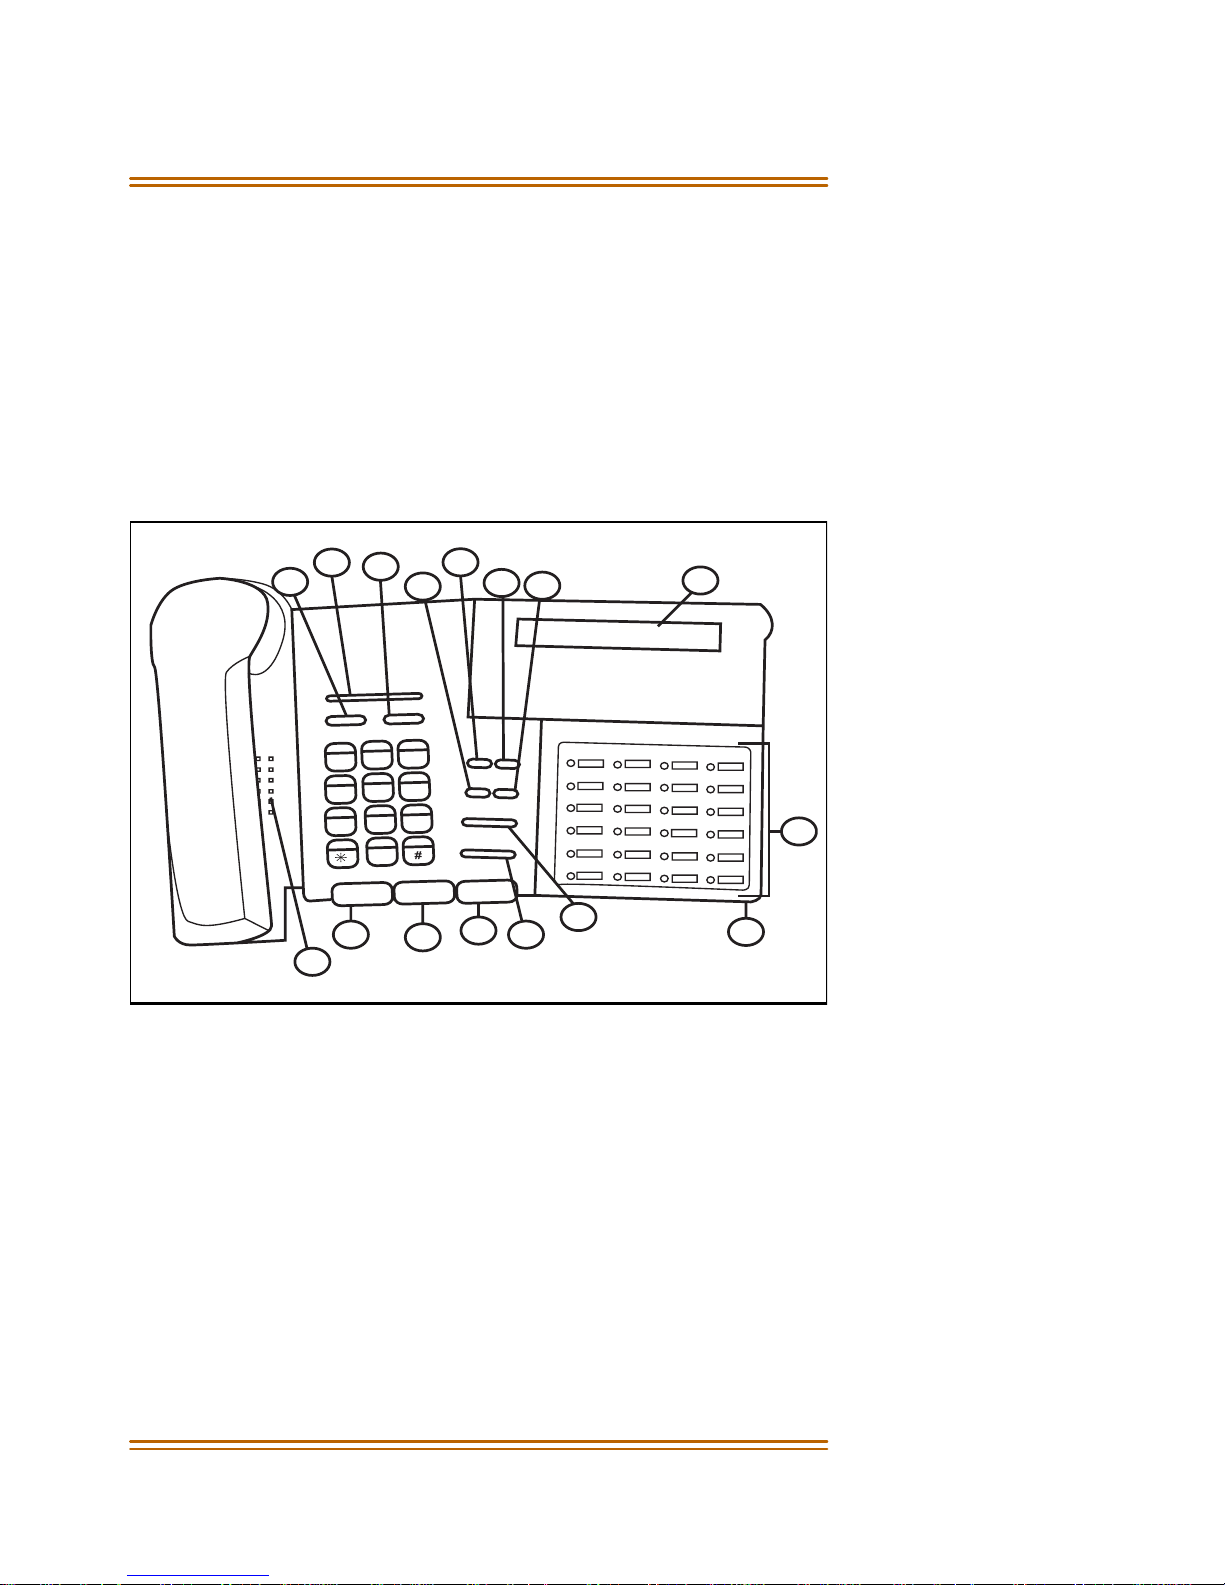
Digital Telephone Features
e
d
3
n
m
6
w
3
f
o
y
x
9
#
E
T
U
M
8
9
4
CAMP ON CONF
MSG FORWARD
FLASH
TRANS
D
L
O
H
13
5
S
T
A
1
5
J
U
L
2
1
9
3
9
1
1
2
:3
1
p
m
16
11
7
14
12
2
6
VOLUME
SPEED
HTP
c
b
a
2
1
l
k
j
i
h
g
5
4
v
u
t
s
r
p
8
7
r
e
p
o
S
0
F
F
O
/
N
O
10
15
Page 11
vi March 2001
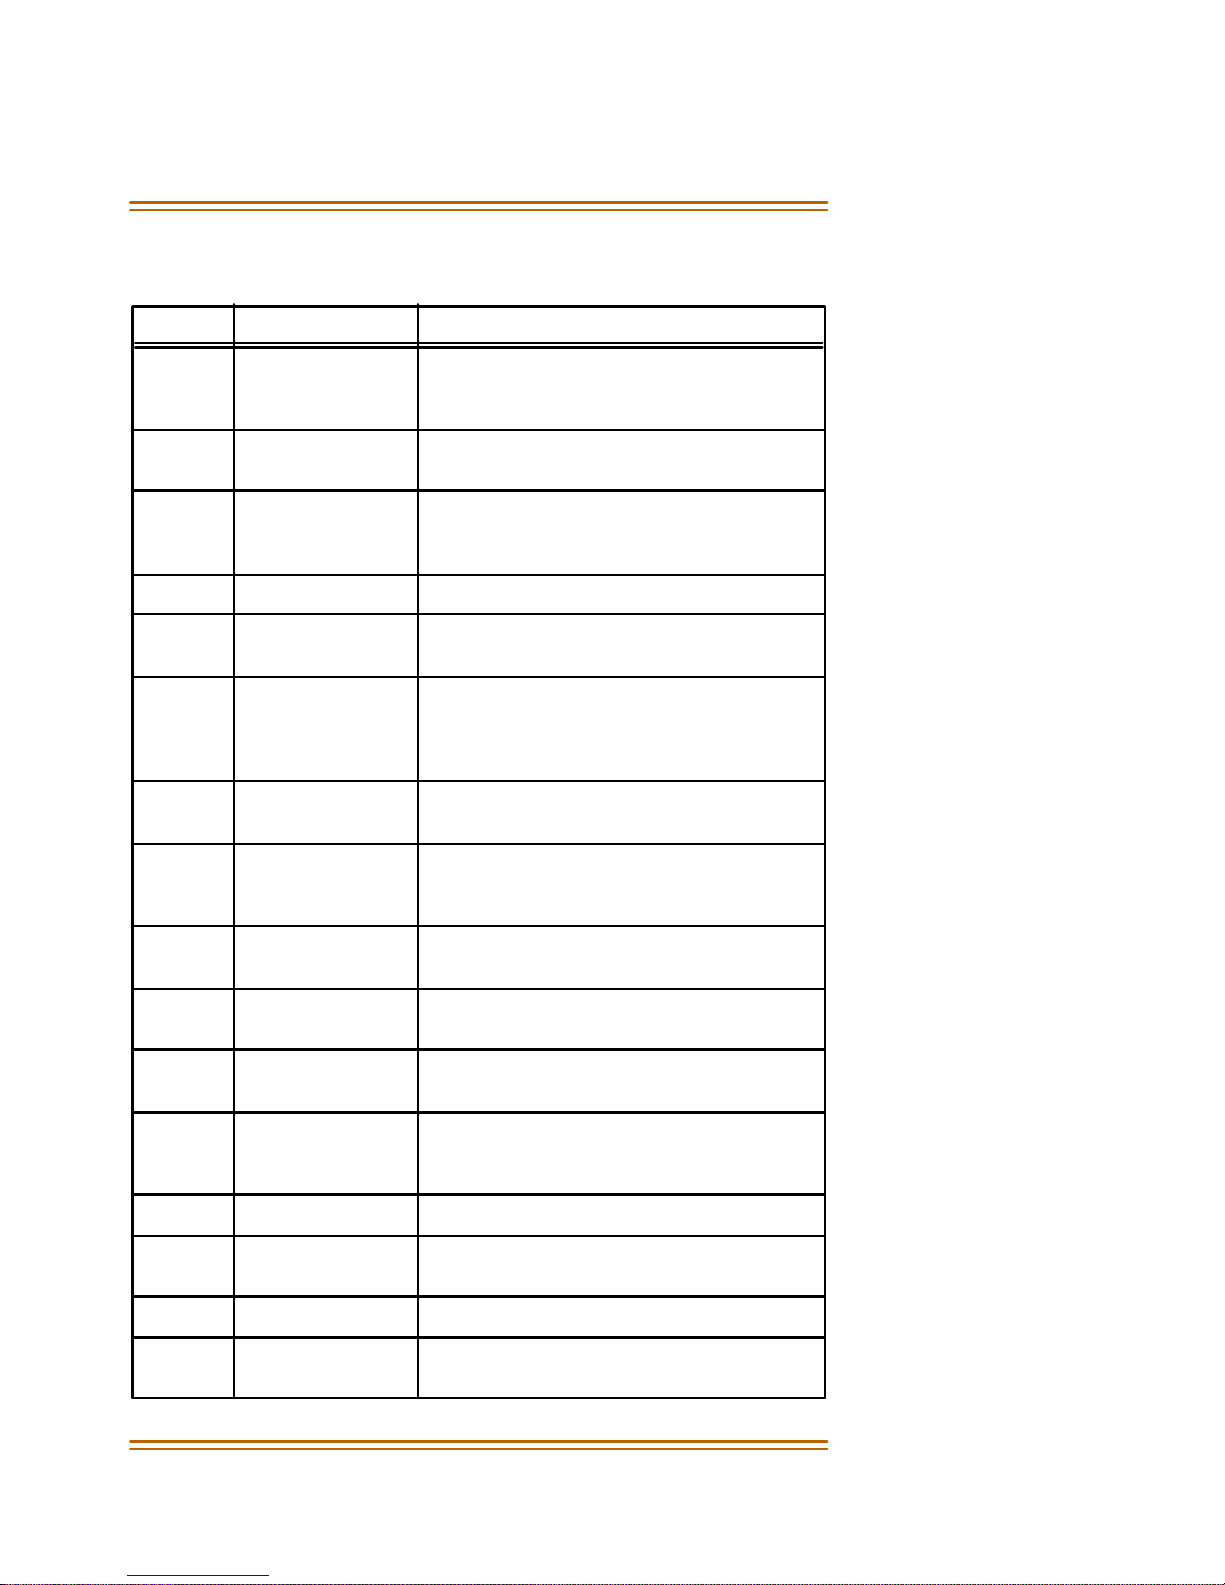
Digital Key Telephone Buttons
Number Feature Description
1Display (Executive
Mode ls onl y)
Displays information about telephone
status, dialing directories, and text
me ss age i n fo rm atio n.
2 h t p Used to select mode of operation:
Ha ndsfree, Tone, or Privacy.
3 ms g Key Used for Auto-CallBack to a phone that has
left a tex t message or to access voice
me ssage s.
4 conf Key Used to establish conference calls.
5 forward Key Used to forward your calls to another
stati on or voice ma il.
6 speed K ey Used to acce ss speed dia ling, s ave numbe r
redia l, and la st number redial . Buton i s also
used to access flexible button
programming.
7 trans Key Used to transfer an outside call from one
stati on to another.
8 mute Key Used to activate/deactivate MUTE
function. When activated, the p arty on the
other end cannot hear you.
9 camp-on Key Used to alert a busy station that an outside
line is on hold and wa iting for them.
10 on/off Key Used to make a call without lifting the
handset.
11 flash Key Used to end an outside call and to restore
dial tone without hanging up receiver.
12 volume Key Used to adjust level of tones, b ackground
music, ringing, receiver volume, and
displ ay contrast.
13 hold Key Used to hold calls, to retrieve held calls.
14 Mi crop hone Used to talk with other party w ithout using
the handset.
15 Speaker Outputs tones and voice at your extension.
16 Flexible Button
Keys
Used to access outside lines or access callhandling fea tures.
Page 12

Account Codes 1
ABOUT THIS USER GUIDE
FLEXIBLE BUTTONS -- Most of the features described in this
user guide may be set up on a flexible button for one-button
access. (Refer to
For certain fea tures to operate properly, a flexible
button MUST be pre-programmed. A “F lex Btn”
symbol has been used to indicate thos e features.
FLEXIBLE NUMBERING -- This feature a llows the system
numbering plan to be modified, as well as the length of the
feature access codes (2-4 digits). This user guide describes the
following features using the system default codes (3-digits).
Consult with your system administrator if you have questions
regarding the n umbering plan for your system.
“Flexible Button Programming” on page 34.
…
)
Flex
Btn
❑
Account Codes
Flex
Using Account Codes
When connected to an outside line call:
1. Press the pre-programmed ACCOUNT CODE flexible
button.
2. Dial the account code up to 12 digits (the other party will
not hear the digits being dialed).
If account code is less than 12 digits, an asterisk [6]
must be entered to return to the call.
If account codes are forced, the account code must
be entered prio r to dial i ng the outside nu mber.
Btn
❑
Page 13

2 Answering Machine Emulation
Flex
Verified Account Codes
To enter an account code prior to a CO call:
1. Press the pre-programmed ACCOUNT CODE flexible
button before accessing a CO line.
Dial the account code, up to 12 digits. If the account
code matches a verified account code, an intercom
dial tone will be returned. Otherwise, an error tone
will be received.
If account code is less than 12 digits, an asterisk [6]
must be entered bef ore the C O l ine ca n be a ccessed.
2. Access the outside CO line or dial the LCR code and dial
the desired number.
Btn
❑
Flex
Answering Machine Emulation
When a call is sent to your voice mailbox, you ca n press a preprogrammed flexible button to listen to the caller leaving the
voice m ail mess age. If y ou decide to s peak with th e caller, y ou
can press th e pre-programmed butt on to be connected to the
cal ler.
Btn
❑
Notification Methods
There are two methods of notification, a Ring Mode or a
Speaker Mode. These methods are controlled by the type of
flexible button assigned on the telephone.
The pre-programmed button type (654+0=Ring Mode,
654+1=Spkr Mode) defines the operation mode. An incoming
CO call rin gs at a station and forwards (except busy type) to the
station’s VM mailbox.
Page 14

Answering Machine Emulation 3
Ring Mode
The pre-programmed flexible button fl ashe s at 4 80 i pm red
while the caller is in your mailbox. You can press the flashing
button and the audio is broadcast over the speaker of the
keyset. The MUTE key is also enabled and th e LED lights solid
red. When the ca ll is ringin g the station in the ring mode , the
display shows:
VM S CREENING RING
MMM DD YY HH:MM a m
Speak er Mode
The VM message is broadcast over the speaker. The MUTE key
is enabled and the LED lights solid red. When the station is
monitoring the caller i n VM, the displa y shows.
VM S CREENING
MMM DD YY HH:MM a m
To leave caller in VM and turn off speaker:
1. Press the ON/OFF button.
2. Then perform one of the following options:
Continue to listen to the message being left without
ta king ac tion at the keyset. Afte r leavi ng the VM
mes sage, t he pre-programmed button returns to solid
red and the keyset returns to idle.
-or-
Press the MUTE key to talk to the party leaving the
message. The station is still in the CONF mode at this
point and the caller can hear the VM and you.
-or-
Press the flexible button to pick up the call. When the
call is picked up, the voice mail system disconnects
from the call.
Page 15

4 Attendan t Features
Attendant Features
If your station is designated as the attendant station, the
following features are available to assist y ou in efficiently
operating your telephone.
Flex
911 Feature (Attendant Alert)
When enabled, and a flexible button has been programmed
(programming code = 608), the 911 Alert feature affects a
flashing flexib le button and audible tone to notify the
Attendant of a 911 call in progress.
Btn
❑
When a 911 call is being made from a user station, the 911
ALERT flexible button rapidly flashes on the Attendant station,
and an audible tone emits from the Attendant’s speak er. The
display shows:
E911 CALL STA XXXX
MMM DD YY HH:MM am
To turn off the alert:
Press the 911 ALERT flexible button.
The display and alert continues until this occurs, then the
display returns to normal, and the audible alarm ceases.
The LED continues to flash until all 911 calls are viewed. If
there is more than one 911 call logged, press the 911
ALERT button to advance to view each call in the log.
Once all calls have been reviewed, the 911 ALERT flexible
button will light solid red. All 911 calls are logged on the
Attenda nt station until th ey are dele t ed.
Page 16

Attendant Features 5
To delete logged 911 alert messages:
1. Press the 911 ALE RT fl ex ible button to displ ay the 911 call
you want to delete.
2. Press the FLASH button to delete that message.
Dialing 911 from any station overrides previously
enabled features such as:
Do Not Disturb.
Flex
Attendant Override
Btn
❑
When Attendant Override is allowed, Attendant(s) stations may
overrid e or call stations that are either busy or in Do Not
Disturb.
If the Attendan t ca lls a station that is bu sy on a CO call
and wishes to alert them of a waiting call:
Press the AT TN OVERRID E b utton [601]. Th re e short tone
bursts are presented to the called party.
(After five (5) seconds, the station CO line automatically is
placed on hold and the Attendant is cut-thru.)
If the Attendan t ca lls a station that is in Do Not Disturb
mode and wishes to alert them of a call:
Press the pre-programmed AT TN OVERRIDE fle xible
button. The station will be signaled with a Camp-On tone.
Attendant Unavailable (Alternate Position)
When the Attendant station is in the unavailable mode, the
next Attendan t station receives recalls and dial “0” calls.
The following process is based on the three programmed
Attendant stations.
Page 17

6 Attendan t Features
Afte r the first programmed Attendant presses the
UNAVAILABLE flexible button, or dials the Attendant
Unavailable code [607]:
-The LED on the pre-programmed flexible button lights
solid.
- Recalls and dial “0” calls that were ringing at the first
Attendant station now ring at the se con d Attenda nt.
-If the se con d Attendan t places their p hone in
unavailable mode, t he third Atte ndant receive s recall
and dial “0” calls.
When the fir st Attenda nt presses the UN AVAILABLE
flexible button again or dials the Attendant Unava ilable
code [607] again:
-The LED on the pre-programmed flexib le button
extinguishes .
-The first Attendant resumes normal operation.
-The second Attendant will not receive recalls or dial
“0” calls.
Disable Outgoing CO Access
The atte ndan t stati on can disab le CO l ines , to prevent outgoing
CO calls.
1. Lift the handset or press the ON/OFF button.
2. Di al [602]. A confirmation tone sounds.
3. Depress the line button(s) of the CO Line(s) to be
disabled. A confirmation tone sounds; th e CO LINE
button( s) LED flashes.
4. Repe at t he steps for disabling to re -activate the CO
Line(s).
Page 18

Attendant Features 7
CO Lines Off-Net Fwd - Incoming (via Speed Dial)
CO Lines Off-Net Forward feature lets the first Attendant
station forward incoming CO calls to an off-net location.
In a speed dial bin, store the number of the off-net location
where calls are to forward. (Follow instructions for storing
station or system speed dial numbers.)
1. Di al [6 03 ],
-orPress the pre-programmed CO OFF-NET FORWARD
button.
2. Press the CO LIN E button for an individual CO Line for OffNet Forward,
-orDial CO line group access code of group being forwarded.
CO Line G roup Access Codes:
[801, 802, 803 . . . 823] = CO Line Group 1- 23
[824] = All CO Line Groups
3. Dial the speed bin number that contains the number
where calls are to f orward. A confirmation tone soun ds.
Canceling Off-Net Forwarding
1. Di al [6 03 ],
-orPr es s pre-programmed CO OFF-NET FORWARD button.
2. Dial the CO group access code,
-orPress the CO LINE button.
3. Dial [#]. A confirmation tone sounds.
When CO lines are off-net forwarded, these lines display
unique flash rates at the Attendant station.
Page 19

8 Attendan t Features
Flex
Day/Night/Special Mode
Btn
❑
Any designated attenda nt may place the system into night
service. The NIGH T SERVICE (DND by default) button cycles
through the choices as follows : d ay, nig ht, and th en s pecial
mode.
Press the pre-programmed NIGHT SERVICE (DND by
default) button once to activate Night mode (LED solid).
Press the button again to activate the Special mode (LED
flashes at 240 ipm).
Setting System Time and Date
The fi r st atte ndan t station may set s yst em time and date .
1. Di al [6 92 ].
2. Enter time and date in the following format:
YYMMDDHHMM
YY =year (00-99) HH =hour (00-23)
MM =month (01-12) MM =minute (00-59)
DD =day (01-31)
When the correct number of digits are entered, a
confirmation tone sounds.
Directory By List Programming
Directory List
To access the Directory List for station or speed dial numbers,
dial the Directory List program code [693]. The HOLD button
illu minates.
Page 20

Attendant Features 9
The first entry (000) in the Directory List is shown on the
display.
DIR LST AAA BIN/ICM: XXX
nnnnnnnnnnnnnnnnnnnnnnn
AAA = Directory List entry number (000-199)
XX X = number s for Station Interc om , Sys tem S pee d d ial b in,
or Entry in Local Number/Name Translation Table
nnn = Programmed Name (blank if none)
To select a different entry in the Directory List:
1. Enter the three-digit entry number (000-199), or dial [
to scroll up (next entry) through the list, or dial [#] to scroll
down (previous entry) through the list.
2. Press the TRANS button to select the entry.
To enter the intercom number to associate to the name:
1. Press the TRANS button.
2. Enter the three-digit station intercom number.
3. Press the S PE ED b utton to save entry. A confir mati on tone
sounds, display updates.
4. Press HOLD, use [
6
] or [#] to scroll to next entry.
To clear an entry:
1. Dial the Directory List program code [693].
2. Select the desired entry using the preceding procedure.
3. Press the FLAS H bu tton.
4. Press the SPEED button. A confirmation tone sounds and
the entry is erased.
6
]
To enter or change the current name shown on the display:
1. Press the MUTE button.
2. Enter the name (up to 24 characters may be entered) by
using the keys. The display updates as the name is
entered (refer to
Table 2: Addit ional Dial-By-Name Char ac ters
Figure 1: Dial-By-Name Key Pad Map
).
, and
Page 21

10 Attendan t Features
3. Press the SPEED button when finished. A confirma tion
tone sounds and the display shows the new or changed
name.
4. Press HOLD, use [
6
] or [#] to scroll to next entry.
Local Number/Name Translation Table
This method is used to enter names that will be associated to
the Local Number/Name Translation Table only.
To enter, edit, or erase names that ap pear in Directory List:
Dial the Directory List program code [693]. The HOLD
button illum inates. The firs t e ntry (000 ) in the Direct ory
List is sh ow n on the display phone (refer to “Directory By
List Programming”).
To select a different entry in the Directory List:
1. Enter the three-digit entry number (000-199), or dial [
6
to scroll up (next entry) through the list, or dial [#] to scroll
down (previous entry) through the list.
2. Press the TRANS button to select the entry.
To enter a name with a Local Number/Name Translation
Table nu mber entry:
]
1. Press the TRANS button.
2. Di al th e three-digit Local Number/Na me Tra nslati on
Ta ble numbe r ( 600- 799) that repres ents the desired
tele phone num ber.
3. Press the SPEED button. A confirmation tone sounds and
the entry is stored.
4. Press HOLD, use [
To enter or change the current name shown on the display:
1. Press the MUTE button.
2. Use the keys on the dial pad to enter the name (up to 24characters may be entered). The display updates as the
name is entered (refer to Figure 1: Dial-By-Name Key Pad
Map, and Table 2: Additional Dial-By-Name Characters).
6
] or [#] to scroll to next entry.
Page 22

Attendant Features 11
3. Press the SPEED button when finished. A confirma tion
tone sounds and the display shows the new or changed
name.
4. Press HOLD, use [
6
] or [#] to scroll to next entry.
System Speed Dial Bin
This method may be used to enter names that will be
associated to a system speed dial bin only.
Dial the Directory List program code [693]. The HOLD
button illum inates. The firs t e ntry (000 ) in the Direct ory
List is sh ow n on the display phone (refer to “Directory By
List Programming”).
To select a different entry in the Directory List:
1. Enter the three-digit entry number (000-199),
-orScroll through the list as follows:
Dial [6] to scroll up to the next entry.
Di al [#] to scroll down to the previous e ntry.
2. Press the TRANS button to select the entry.
To enter a name along with a system speed dial number:
1. Select the desired entry using the preceding procedure.
2. Dial the s ystem speed dial bin location (020–999).
3. Press the SPEED button. A confirmation tone sounds and
the entry is saved.
4. Press HOLD, use [
To enter or change the current name shown on the display:
1. Press the MUTE button.
2. Use the keys on the dial pad to enter the name (up to 24characters may be entered). The display will update as
the name is entered (ref er to Figure 1: Dial-By-Name Key
Pad Map, a nd Table 2: Additional Dial-By-Name
Char act ers).
6
] or [#] to scroll to next entry.
Page 23

12 Attendan t Features
3. Press the SPEED button when finished. A confirma tion
tone sounds and the display updates.
4. Press HOLD, use [
6
] or [#] to scroll to next entry.
5. Hang up to end programm ing.
Software Version Display
The current system software can be viewed by the first
programmed Attendant. This display show s the version
number and the level of software in English.
At the first Attendant station:
Dial the S/W Display code [605].
The top line of the LCD continues to show the same
data.
The bottom line of the LCD chang es to show the
following in place of the time/date information:
STARPLUS™ BASIC
STARPLUS™ ACD
(Station must have LCD type to view the information.)
Speed Dial - System Storing
System Speed numbers must be entered by the first
programmed Attendant. If an Attendant is not specified, enter
at Station 100.
1. Press the SPEED button once, then press the desired
outside line key,
-orPress the SPEED button a second time to select an
outs ide li ne a utomatically.
2. Dial the System Speed bin location (020-999).
3. Dial the telephone number.
4. Press the SPEED button.
5. Hang up.
Page 24
Background Music (Optional) 13
To use the following speed dial options, enter as shown:
Initiate a Pulse-To-Tone Switchover -- Press the TRANS
button during number entry.
Insert a Pause -- Press the HOLD button during
number entry.
Ins er t a Flash into the Speed Number -- Press th e
FLASH key.
Insert a No-Display Character -- Press the TRANS
button as the first en tr y in the sp ee d bin. Thi s causes
the numbers stored in the bin not to display on the
Digital Telephones when the bin is accessed.
Speed Bin numbers 060-099 ARE NOT monitored
by Toll Restri ction.
Background Music (Optional)
To activate Background Music:
1. Di al [6 32 ] or pre ss the pre-programmed BGM flexible
button. The LCD displays:
0: OFF 1:CH-1 2:CH-2
MMM DD YY HH:MM a m
2. Enter the desired channel on the key pad. A confirmation
tone sounds. Music is now audible through the speaker.
3. Press the Volum e Bar to change the v olume. The LC D
displays:
SPEAKER BGM [######## #]
MMM DD YY HH:MM a m
Page 25

14 Call Back
To deactivate Background Music:
1. Di al [6 32 ] a gai n or pres s the BGM fl exible button.
2. Enter a [0]. A confirmation tone sounds and the music
discontinues.
Flex
Call Back
If you dial a telephone number that is busy and you want to
leave a Ca ll Back ind icat i on:
1. Press the pre-programmed CALL BACK flex ible button.
2. Replace handset or press ON/OFF button. Wh en busy
station hangs up, you are signaled.
Btn
❑
3. Answer the call; the station you called will then be
signaled. (If your s tation is busy when signaled, an
automatic MSG will be placed at your phone.) Only one
Call Back request can be left at a station; the second
request will leave a message wait callback request.
W hen th e Autom at ic Cal l Back Time r is e nab led , a c a ll
back r equest is autom atically i nvoked anytime you
listen t o a busy intercom tone for a preset perio d of
time.
Flex
Call Coverage
To program a Call Coverage flexible button on a station:
1. Press the SPEED button twice.
2. Press the desired flex ible button to be programmed.
Btn
❑
3. Dial [646] for Ringing or [647] for Non-Ringing, followed
by the extension number to be covered. A confirmation
tone s ounds. If an error was made during entry, an error
tone s ounds.
Page 26

Ca ll Forwa rding 15
When a call rings in (and a flexible button has been assigned):
The coverage station hears ringing for the coverage
station after a five-second delay.
A message is displayed on the Coverage Station LCD as
shown.
CALL FOR STA XXX
MMM DD YY HH:MM a m
The coverage station then presses their flashing
Coverage flexible button, or presses the ON/OFF button,
or lifts the handset if PLA is enabled. The flash rate is the
same as the incoming line ringing rate.
When the call is answered, it ceases to ring at any other
station that has the same coverage appearance. The LCD
of the coverage station displays as shown.
CALL FOR STA XXX
FROM STA XXX HH:MM a m
Call Forwarding
All Calls
If you have been given the ability to forward your calls:
1. Lift the handset or press the ON/OFF button.
2. Dial the FWD code [640] or press the FWD bu tton, then
dial [6].
3. Press the pre-programmed DSS button, or dial the
intercom nu mber where calls are to be forwa rded.
Page 27

16 Call Forwardin g
The call types affected are:
Call Forwarding Allowed -- ACD, UCD, Voice Mail,
Hunt group pilot numbers, and speed dial bins for
off-net forwarding.
Calls Cancelled (when forwarding is activated) -- Line
Que ue, Call Back requests, Mes sage Wa it request s,
and pre-selected messages.
4. Replace the handset or press the ON/OFF button.
Busy
If you have been given the ability to forward your calls:
1. Lift the handset or press the ON/OFF button.
2. Dial th e FWD code [640] or press the FWD bu tton.
3. Dial the Call Forward Busy code [8].
4. Press the pre-programmed DSS button, or dial the
intercom nu mber where calls are to be forwa rded. A
confirmation tone sounds.
5. Replace the handset or press the ON/OFF button.
Busy/No Answer
If you have been given the ability to forward your calls:
1. Lift the handset or press the ON/OFF button.
2. Dial th e FWD code [640] or press the FWD bu tton.
3. Dial the Call Forward Busy/No Ans wer code [9].
4. Press the pre-programmed DSS button, or dial the
intercom nu mber where calls are to be forwa rded. A
confirmation tone sounds.
5. Replace the handset or press the ON/OFF button.
Page 28

Ca ll Forwa rding 17
Follow-Me
If you have been given the ability to forward your calls:
1. Lift the handset or press the ON/OFF button.
2. Dial the Follow-Me Forward code [642] on the key pad.
3. Dial the station number of the station from which
forwarding is desired.
4. Dial th e appropriate forwarding condition code:
[6] = All
[7] = No Answer
[8] = Busy
[9] = Busy/No Answer
5. Dial the three-digit destination number where calls are to
be forwarded. (Station, Voice Mail, ACD/UCD or Hunt
group. A confirmation tone sounds.
6. Replace the handset or press the ON/OFF button.
To remove Follow-Me Call Forwarding:
1. Lift the handset or press the ON/OFF button.
2. Dial the Follow-Me Call Forward code [642].
3. Dial the station number of the station that forwarding is
be cancelled.
4. Dial [6] (regardless of the forwarding condition).
5. Redial the same three-digit station number. A
confirmation tone sounds and the FWD button LED
extinguishes .
To enable Follow-Me Call Forwarding from an off-site
location:
1. Dial into the system on a DISA trunk. Enter the DISA
access code, if applicable.
2. Dial th e Follow-Me Forward code [642].
3. Dial the station number of the station from which
forwarding is desired.
Page 29

18 Call Forwardin g
4. Dial th e appropriate forwarding condition code:
[6] = All
[7] = No Answer
[8] = Busy
[9] = Busy/No Answer
5. Dial the three-digit destination number where calls are to
be forward. (Station, Voice Mail, AC D/UCD grou ps, or
Hunt group. A conf irmation tone sounds. Five seconds
later a dial tone is received.
To remove Follow-Me Call Forwarding from an off-site
location:
1. Dial into the system on a DISA trunk. Enter the DISA
access code, if applicable.
2. Dial th e Follow-Me Forward code [642].
3. Dial the station number of the station that forwarding is
to be cancelled.
4. Dial [6] (regardless of the forwarding condition).
5. Dial the station number again. A confirmation tone
sounds. Five seconds later a dial tone is received.
Forward Override
This feature allows you to reach a busy station that is busy
forwarded to a d estination. Th is allows you to Camp-On,
Executive Override, or Leave Messages at the busy station
ra ther th an forwarding to the busy dest ina ti on.
Dial [5#], followed by th e desired extension number.
No Answer
If you have been given the ability to forward your calls:
1. Lift the handset or press the ON/OFF button.
2. Dial th e FWD code [640] or press the FWD bu tton.
3. Dial th e Call Forward No Answer code [7].
Page 30

Ca ll Forwa rding 19
4. Press the pre-programmed DSS button, or dial the
intercom nu mber where calls are to be forwa rded. A
confirmation tone sounds.
5. Replace the handset or press the ON/OFF button.
Station Off-Net Call Forwarding (via Speed Dial)
Allows sta tions to for war d intercom and tr ans ferred calls to an
off-net location.
In a speed dial bin, store the number of the off-net location
where calls a re to be forwa rded. (Follow i nstructi ons for stor ing
station or system speed dial numbers.)
1. Lift the handset or press the ON/OFF button.
2. Dial th e FWD code [640] or press the FWD bu tton.
3. Dial an asterisk [
6
]. Then d ial the sp eed bin nu mber that
contains the number where calls are to be forwarded. A
confirmation tone sounds and the FWD button LED
flashes.
To cancel Off-Net Forwarding:
1. Lift the handset or press the ON/OFF button.
2. Press the FWD button. A confirmation tone sounds and
the FWD button LED ex tinguishes.
To remove Call Forwarding (except Follow-Me and Off-Net)
1. Press the ON/OFF button.
2. Dial th e FWD code [640] or press the FWD bu tton.
3. Replace the handset or press the ON/OFF button.
DIDs an d COs mu st r ing at station to fo llow Off-Net
Call Forward.
Page 31

20 Call Park
Call Park
The Call Park feature allows you to place a n outside call in park
and consult with, page, or call an interna l party.
System
While connected to an outside line:
1. Press the pre-programmed TRANS f lexib le button . The
caller is put on Exclusive Hold.
2. Dial the parking location (430 to 437) or press the pre-
programmed CALL PARK flexible button. A confirmation
tone s ounds.
If you receiv e a busy t one:
Press the TRANS button twice and dial another parking
loca tion,
-orPress the CALL PARK flexible button for a different
parking location.
Retrievin g a Parked Call
1. Lift the handset or press the ON/OFF button.
2. Press the pound [#] key.
3. Dial the parking location (430 to 437) where the call was
parked, or press the pre-programmed CALL PARK flexible
button.
Pers on al
While connected to an outside line:
1. Press the TRANS button. The caller is put on Exclusive
Hold.
2. Dial Personal Park code [438] or press pre-programmed
PERSONAL PARK flexible button. A dial tone will be heard.
Page 32

Ca ll Pi c k up 21
To retrieve a parked call from the station that parked the call:
Dial the Person al Park Code [438],
-orPress the pre-programmed PERSONAL PARK flexible
button. A talk path is established between b oth parties.
When dialing the perso nal pa rk location and that
loca tion i s a lre ady oc cupi ed, t he i niti atin g st a tion
rec eive s the pr ev iously pa rke d call an d th e se con d c all
is parked .
St ation
While Connected to an outside line:
1. Press TRANS but ton.
2. Dial [439] + XXX (station number).
Retrieving a Station Park Call
Dial [#6] + XXX (user’s station number, while at the user’s
telephone or from any telephone in the system)
-orDial [438] from the user’s station.
Call Pickup
You can answer a call ringing at an other telephone using
Directed or Group Pickup.
Directed Pickup
When i ncoming, transfe rre d, or recallin g outsi de line ringing,
intercom ringing, or Camp-On ringing is heard at an
unattended telephone:
1. Dial the station num ber of the ringing telephone. Rece ive
ringback or Call Announce Tone.
Page 33
22 Call Transfer
2. Press the PICK-UP flexible button to answer the call.
You MU ST have access to the specific outside line or a
LOOP button to do a d irected call p ickup.
Group Pickup
When intercom tone ringing, transferred outside line ringing,
recall ringing, or initially ringing call is heard at an unattended
tele phone:
1. Lift the handset or press the ON/OFF button.
2. Dial [#0], or press t he PICK-UP fl exible button to be
connected to the calling party.
You must be in the same Pickup group as the ringing
telep hone to pickup the call.
You MUST have access t o the specific outside line or
LOOP button to use Group Call Pickup.
Call Transfer
Outside lines can be transferred from one phone to another
within the system. The transfer can be either screened
(announ ced) or unscreened to either an idl e or busy station, or
an ACD/UCD Group or Hunt Group.
Answering a Screened Transfer
Your intercom will be signal ing accor ding to the intercom
signal switch position.
1. Answer the intercom and receive the transfer notice.
2. Press OUTSIDE LINE or flashing LOOP button on h old.
If the Direct T ransfer feature is en abl ed, the scre en ed
transfe r will go di rectly t o the han dset. Y ou do not ha ve
to press a LINE or LOOP button to answer.
Page 34

Ca ll Transf er 23
Executive/Secretary Transfer
If you are designated the Executive station and your
phone is busy or in DND, all calls will be routed to the
Secretary station .
If you are the designated Secretary station, you can signal
the Execut ive that is busy or in DND by u sin g the Camp On feature.
Incoming CO Transfer
While idle or on an internal/external call and an incoming or
transferred CO call is ringing at your station:
1. Place the current ca ll on h old.
2. Dial th e INC CO XSFR code [639] or press the pre-
programmed INC CO XSFR flex ible button.
3. Press a DSS, Group button, or dial the three-digit station
number or group number. The call is automatically
transferred to that destination.
4. You can then return to the call placed on hold.
PBX/CENTREX Transfer
While connected to an outside line (PBX/Centrex):
1. Press the FLASH button. Transfer dial tone is heard.
2. Dial PBX/Centrex station n umber.
3. Hang up to complete the transfer.
Screened Transfer
While connected to an outside line:
1. Press the station button where call is to be transferred (if
programmed on your telephone), or press the TRANS
button and dial station number.
The called extension signals according to the intercom
signal switch position .
Page 35

24 Caller ID Name/Number
2. When that ex te nsion answers, announce the transfer.
3. Hang up to complete transfer.
Transfer Search
When attempting to locate a party:
1. Press a station DSS button to sign al the station or press
the TRANS button and dial desired station.
2. If the station is unavailable, press another station DSS
button to enter a new station number or press the TRANS
button twice and dial the station number.
3. When called station is answered, hang up; transfer is
complete.
Unscreened Transfer
When the called extension begins to signal, hang up to transfer
the call (recall timer begins counting).
Caller ID Name/Number
This fea ture allows you to prog ram a flexible button to vi e w
both th e number and name on the LCD when receiving a Caller
ID CO call. When the fea ture is ena bled, the flex ible button LED
is lit solid and the name and number is displayed.
During the ca ll:
Press the flexible button to view normal call information.
The top line of the LCD displays the number of the caller
and the bottom l ine of t he LCD disp lays the name.
Page 36

Calling Station Tone Mode 25
Calling Station Tone Mode
The calling station tone mode optio n allows a callin g station to
override a called station’s “H” or “P” inte rcom but t on settings.
When placing a call to a station and Tone ringin g is desired:
1. Di al [6 #].
2. Dial the three-digit station extension or press the DSS
button of desired station. Call tone rings station.
Flex
Camp-On
Btn
❑
If a station is in DND, only the attendant can Camp-On using
the Attendan t Ove rride fea ture.
If t he sta ti on is busy and you wish to alert them to y our call:
Press the CAMP ON button. Called station receives one
burst of ringi ng. Wai t for t heir response.
When the called party answers:
Consult with caller or hang up to transfer the call.
Answering a Camp-On
If you are on a connected call, hear one burst of muted ringing,
and your CAMP-ON button is flashing, you have a call waiting
for you.
To answe r:
1. Press the CAMP-ON button. Any outside line you are
connected to is placed on hold. You may consult with the
stat ion placing the call.
2. Press flashing OUTSIDE LINE button if call is being
transferred.
Page 37

26 CO Line Queuin g
If you do not have a CAMP-ON button, either:
Go on-hook with present call and Camp-On will ring
through.
-orPlace outside CO call on hold, then go on-hook. Camp-On
will ring through.
Flex
CO Line Queuing
If you see that a particular outside line is busy and you wish to
be placed on a list waiting for that line to become available:
1. Press the desired busy OUTSIDE LINE button or POOL
button. Receive busy tone.
Btn
❑
2. Press the pre-programmed LINE QUEUE flexible button.
3. Replace the handset or press the ON/OFF button.
A station can queue only one line at a time.
If your st ation is programmed for Preferred Line
Answer, you will have the line automatically upon
lifting the handset. Then dial the desired number.
To Answer a Queue Call Back
If you hear Queu e Call Back ring ing, and an outside line f or the
LINE GROUP or a LOOP button y ou queued is rapidly flashing:
1. Lift the handset or press the ON/OFF button.
2. Press the flashing OUTSIDE LINE button or LOOP button
to answe r.
Page 38
CO Ring Tones 27
CO Ring Tones
The ring tone signal used to notify stations of an inco ming call
can be changed by each station user to provide distinctive
ringing among a group of stations.
To select a distinctive ring tone for a station:
1. Di al progra m code [695]. The display shows:
ENTER RING TONES 00-36
XX PRESS SPEED TO SAVE
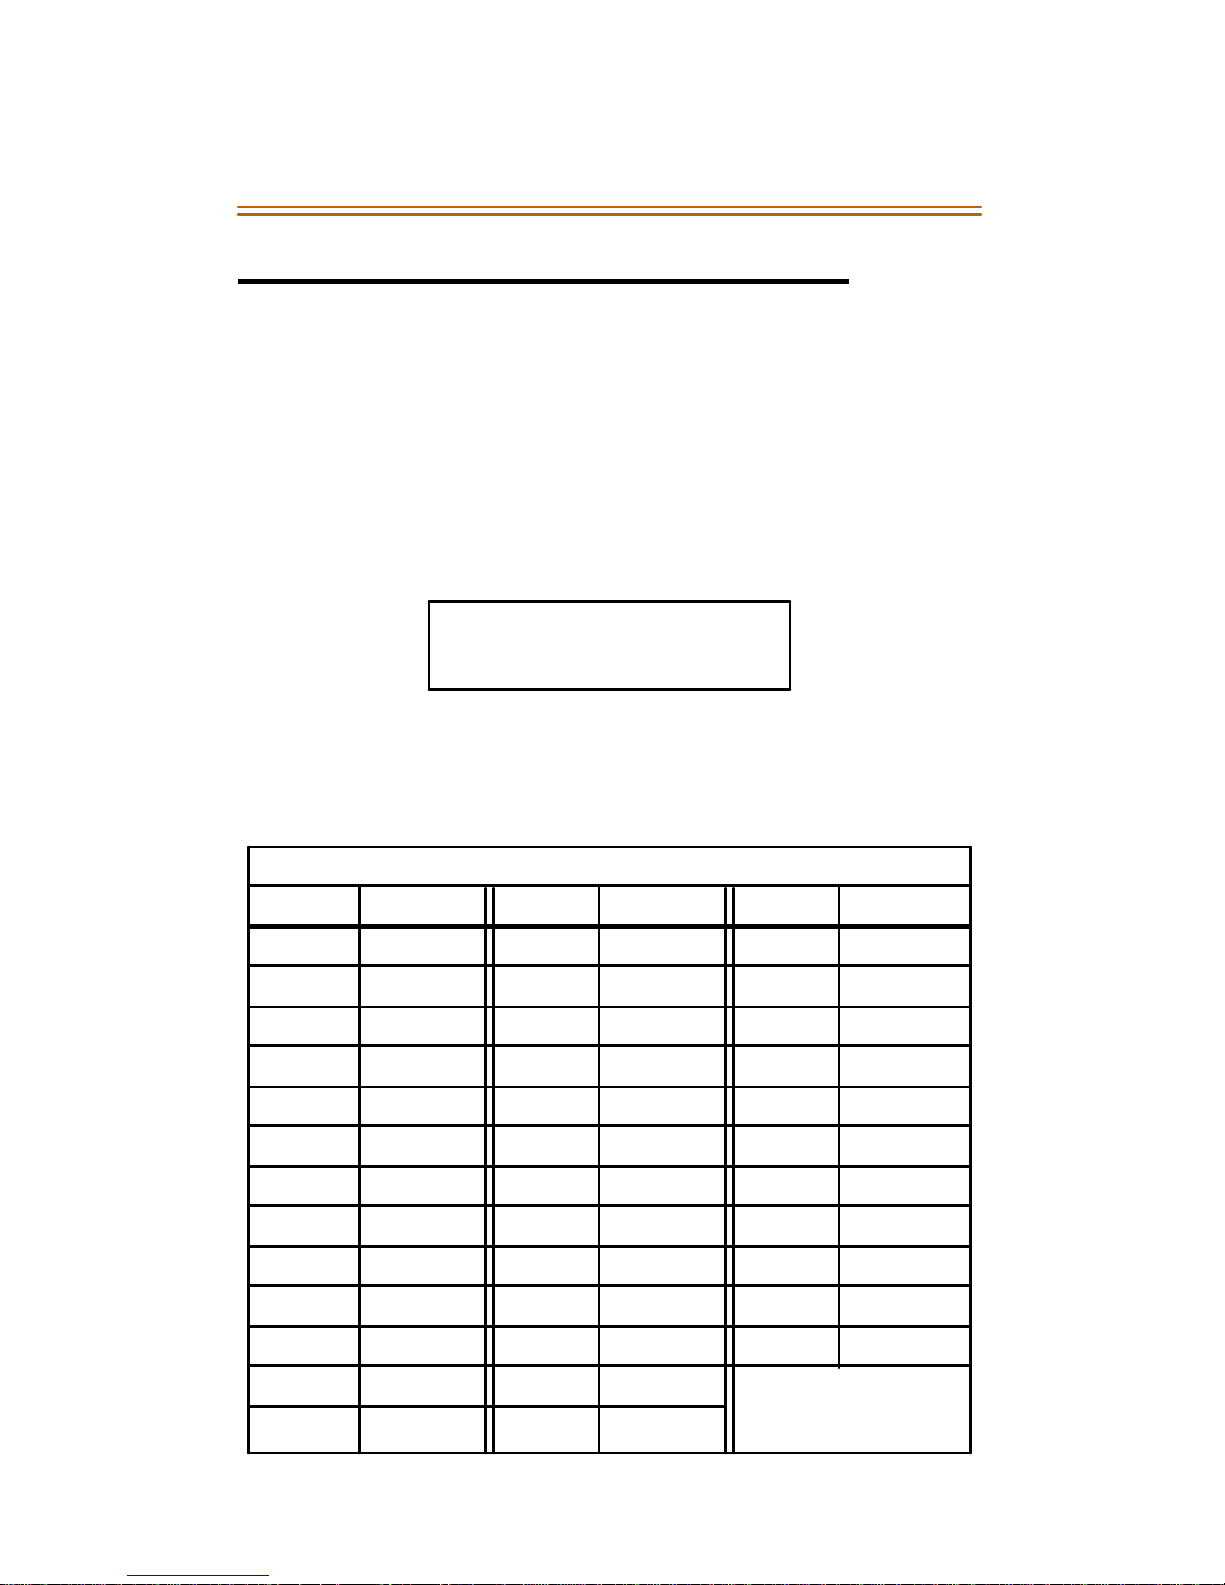
2. Enter two-digit tone number from 00 to 36 (as shown in
“CO Ring Tone Table”). The speaker sounds a steady tone
that corr elates to the two-d igi t entry.
CO RING TO NE*/FREQUENCY
Tone (#) Freq Tone (#) Freq Tone (#) Freq
00 697/770 13 770/1633 26 1209/1336
01 697/852 14 770/0 27 1209/1477
02 697/941 15 852/941 28 1209/1633
03 697/1209 16 852/1209 29 1209/0
04 697/1336 17 852/1336 30 1336/1477
05 697/1477 18 852/1477 31 1336/1633
06 697/1633 19 852/1633 32 1336/0
07 697/0 20 852/0 33 1477/1633
08 770/852 21 941/1209 34 1477/0
09 770/941 22 941/1336 35 1633/0
10 770/1209 23 941/1477 36 OFF
11 770/1336 24 941/1633
12 770/1477 25 941/0
Tone Duration* =
50 ms/ 50 ms
Page 39

28 Conf erence
3. When the desired tone is selected, press the SPEED
button to save this as the tone to be presented when the
station is tone rung. The two-digit tone number will
di splay in the lower left corner of LCD d ispla y.
Conference
Conference Combinations
A maximum of five 8-party conferences can be established in
the s yst em. Howe ver, an individual conference cannot have
more than five external (outside) parties.
Examples:
Eight internal parties can engage in a conference
Seven internal parties with one external party
Three internal and five external parties
Flex
Establishing a Conference
Btn
❑
1. Lift the handset.
2. Select intercom station or dial desired outside party.
When called party answers, press the pre-programmed
CONF flexible button.
3. Select another outside line or intercom station to add
nex t con fer ence pa rty.
4. Press the CONF button again and repeat s teps 3 and 4 in
a cycle, until all parties are contacted.
5. When last party answers, press CONF button twice. All
parties are connected.
Only s ta tion s t hat have C onf er enc e e nab led are abl e to
initiate a Con ference .
Page 40

Co nf e re nce 29
Exiting a Conference (Controller Only)
The re a re three (3) methods of exiting a conference:
Press the ON/OFF button to ON. Press the MUTE button,
and replace the han dset (to monitor a co nference).
-or-
Press HOLD button to place outside parties on hold. Hold
timer sta rt s. If one of the two par t ie s is i ntern al, that p arty
is dropped.
-or-
Press the CO NF button, then h ang up or pres s the ON/
OFF button to leave the other conference parties still
connected in an unsupervised conference. The CONF
button LED flashes and timer starts. There is a warning
tone before the other parties are dropped.
Re-entering a Conference
When the controller re-en ters the co nferen ce, the disconne ct
timer is rese t.
To re-enter a monitored conference, lift handset.
To re-ente r a conf er ence placed on hold, repeat steps for
establishing a conference.
To re-enter an unsupervised conference, lift handset and
press flashing CON F b utton. The CONF button lights
steady and a confirmation tone sounds.
Terminating a Conference
To terminate a Conference, the conference initiator must be
actively in the conferen ce:
Repl ace hand set or pre ss th e ON/OF F button to OFF.
For confer ences inv olving anot her stat ion, it may be
necessary to press the fla shing CONF button after
going on-hook.
Page 41
30 Dial-By-Nam e
Dial-By-Name
The system will allow you to dial extension n umbers by
entering a name of a person that has been programmed for
that station. The system database allow s entry of a name
(alphanumeric) up to 24 characters in length for each station.
This prog rammed name can be used for dialing-by-name
station users and in some cases LCD displays.
To dial a station user by name:
1. Di al th e D ial-By-Na me co de [66], or press the
pre-programmed DIAL-BY-NAME flexible button.
2. Dial the desired person’s name using the key pad.
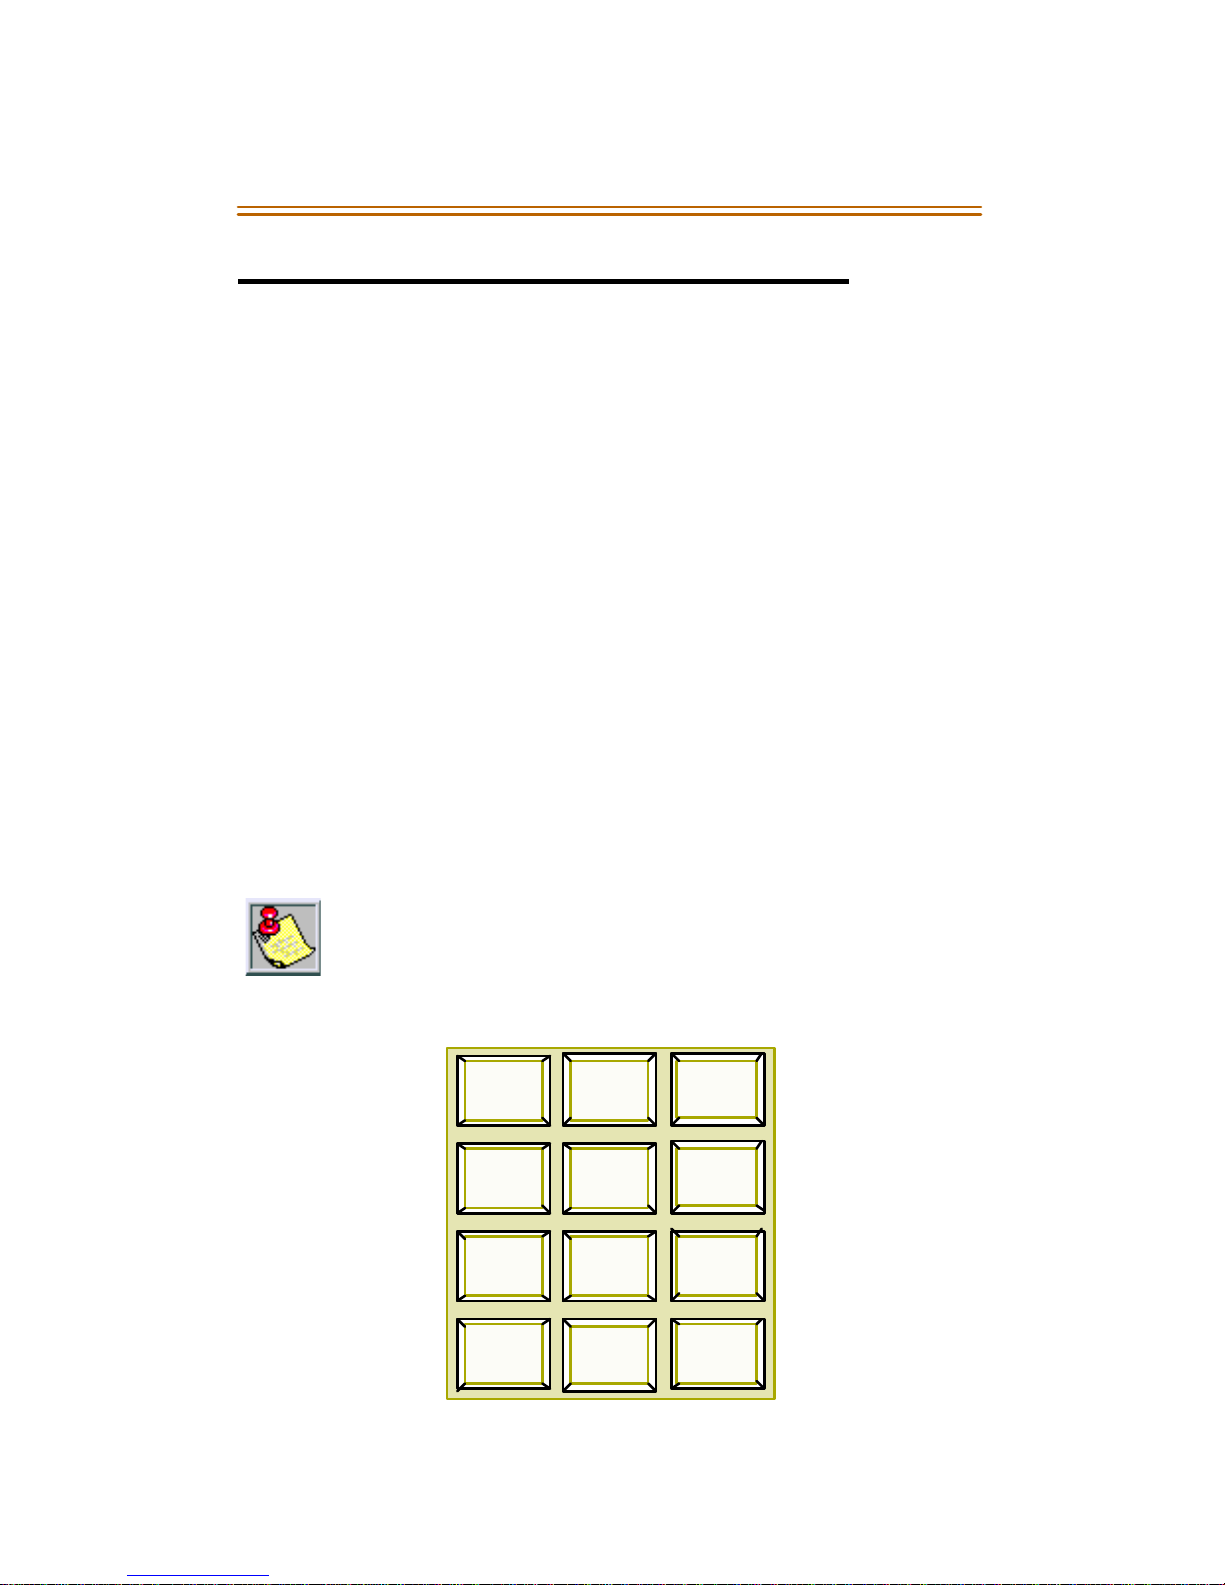
Example -- If you wanted to call Linda Murphy (and last
name s were entered into the Director y Dialing Lis t), you
would press the following numeric keys: 6 (M), 8 (U), 7 (R),
7 (P), 4 (H), 9 (Y).
When the system finds a unique numeric match to the name being
dialed, the call is pl aced to the station matching the name. The
intercom ca ll signals the station according to the H-T-P button
setting. If few er than 8 digits are dialed, the numeric match is dialed
after a 10 sec. i nterdigit time-out occurs, or if a [#] pound is pressed.
G- 4
H-4
I-4
P- 7
R-7
S- 7
Q- 7
A- 2
1
B- 2
C-2
J-5
K- 5
L- 5
T-8
U-8
V- 8
D-3
E- 3
F-3
M-6
N-6
O- 6
W-9
X- 9
Y- 9
Z-9
Figure 1: Dial- By-Name Ke y Pad Map
OPER
*
0
#
Page 42

Direc t ory Dia li ng 31
Directory Dialing
St ations
Display telephones may view a list, of up to 200 na mes from the
System Directory on the station’s LCD display. You can dial the
station or speed dial bin by pressing a single button.
Names placed in the Directory List may be associated to
intercom numbers, System Speed dial bins, or entries in the
Local Number/Name Translation Table. You may view the
Directory List beginning with any letter of the alphabet, then
scroll through the list either forward or backwards.
Directory Dialing ma y also be used to transf er a call from one
station to another.
To view the Directory List:
1. Dial the D irectory List d ia l cod e [680] or press the
DIRECTORY DIAL flexible button (if pre-programmed).
2. To view the list of names, pr es s a button (once, twice or
three times) on the key pad that represents the desired
letter of the alphabet (refer to Figure 1: Dial-By-Name Key
Pad Map).
Example -- Press th e num ber [2]:
Once for names starting with “A”.
Twice for names starting with “B”
Three times for names starting w ith “C”
Names starting with the letter chosen display on LCD.
I f th e Dir ec to ry L ist d oes n ot ha ve a n am e b egi nni ng
with the desired letter, a name with the n ext higher
letter is shown on the LCD display.
Page 43

32 Do Not Disturb
3. Di a l a n [6] to s croll up (nex t entry) thr ough the l ist, or di al
a [#] to scroll down (previous entry) through the list, or
pr ess anot her button to view the li st for a diffe rent lette r
of the alphabet.
4. Press the SPE ED button when the desired name is shown
on t he LC D dis play. (Sys tem a utoma tical ly di als t he
destination station or outside phone number.)
Transferring a Call using Directory Dialing
While on a call:
1. Press the TRANS button.
2. Dial the Directory Dial Code [680] or press the
pre-programmed DIRECTORY DIAL flexib le button.
3. Press the digi t asso ciated wi th the pers on’s name, an d
when it displays press the SPEED button to automatically
dial the destination station.
4. Hang up to complete the transfer.
Calls may b e transferred to internal stations only. An
att empt to transfer a call off-net (via a sp eed dial bin)
resu lts in the call recalling upon going on -hoo k.
Do Not Disturb
Activating Do Not Disturb
If you are given the ability to place your phone in D o Not
Disturb (DND):
Press the pre-programmed D ND f lexib le butto n (DN D
button LED lights steady), or dial [631] on the 8-button
keyset. A confirmation tone sounds.
The DND button can be pressed while pho ne is ringing,
to stop the ringing (re fer to One-Time Do Not Disturb).
Page 44

Executive Override 33
To cancel DND:
Press the DND flexible button again (DND button LED
extinguishes), or dial [631] on the 8-button keyset. A
confirmation tone sounds.
One-Time Do Not Disturb
Allows you to prevent calls from ringing at your station while
you are on a call. The One-Time DND condition automatically
cancels when you end your call.
To use One-Time Do Not Disturb:
Press the DND flexible button (if pre-programmed) while
you are off-hook and connected to a CO line or intercom
call. The DND bu tton LE D lights and off-hook tones at
your stat ion ar e canceled.
To cancel One-Time Do Not Disturb:
Go on-hook or press ON/OFF button. The DND button
LED extinguishes and DND is canceled.
Flex
Executive Override
Use of this feature when the executive over ride war ning tone
i s dis abl ed may be a viol atio n of Fe de ral, Sta te or L ocal La ws,
and an invasion of privacy. Check applicable laws in y our
a rea b efore us ing t his f eatu re.
Executive override allows stations designated as “Executive”
the ability to override and “barge in” on other keysets engaged
in CO Line co nversations. A change in volume m ay occur o n the
CO Line or intercom call after the barge-in occurs.
Btn
❑
Page 45

34 Flash
If you ca ll a busy station:
1. Press the pre-programmed EXECUTIVE OVERRIDE flexible
button. The Executive station will be bridged onto th e CO
conversation in progress at the called station. An optional
warning tone is hear d and pre sente d to a ll parties prior t o
cut- thr u.
2. Replace hand set at Executive station to terminate the
override.
Flash
When connected to an outside line:
Press the FLAS H bu tton to di sconne ct th e ou ts ide line
and reseize an outside line dial tone.
8-button telephones can assign a FLASH button by using
the code [660].
Flash Key on Intercom
When connected to a page zone or another internal party:
Press the FLASH button to disconnect page or intercom
call. An intercom dial tone will be heard.
Flexible Button Programming
To program a flexible button:
1. Press the SPEED button twice.
2. Press button to be programmed (must be programmed
in databa se as a flexible button).
3. Dial the desired code (refer to the Defau lt Nu mberi ng P lan
at the end of thi s user guide ).
Page 46

Group Listening 35
To erase a flexible button:
1. Press the SPEED button twice.
2. Press the flexible button to be erase d.
3. Press the FLASH button. A confirmation tone sounds.
4. Replace the handset or press the ON/OFF button.
Group Listening
All digital key stations have bu ilt in speakerphones. You can
use the speaker to monitor a call while using the handset to
consult with the outside party. This enables other people in the
room to listen to both parties in the conversation.
To activate Group Listening:
While conversing on the handset, press the ON/OFF
button. Both parties of the conversation can then be
hea rd on the dig ital station's s peake r. Th e speakerph one
microphone is muted while the handset is off-hook.
To deactivate Group Listening:
While off-hook, the ON/OFF button must be depressed.
Gro up Listening is NOT a vailabl e when the station is
in the Headset Mode.
Headset Mode
If you wish to use a headset and have been given the ability to
do so in programming, follow these steps.
To activate Headset Mode:
Dial [634] or press the pre-programmed HEADSET MODE
fl exible b utton. The LED will lig ht steady.
Page 47

36 Intercom Buttons
While Headset mode is active, the ON/OFF button will
activate the headset and disable speakerphone and
intercom ca ll announce operation at your station.
To deactivate Headset Mode:
Dial [634] or press the pre-programmed HEADSET MODE
flexible b utton; LED ex tinguishes.
Flex
Intercom Buttons
Btn
❑
To program a flexible button as an intercom button:
1. Press the SPEED button twice.
2. Press the desired flex ible button to be programmed.
3. Di al [645]. A confirmation tone sounds.
If an error is made during entry, an error tone is
received.
If an intercom call is placed to a busy station that has
an intercom button:
- The calling station receives ringback tone instead
of busy tone. The called station hears muted or
reminder rin g and their intercom button LE D
starts flashing at the incoming line rate. This
ind icates an in coming int ercom call.
- The called station can place the current CO call
on hold by pressing the HOLD button, or place
the current intercom call on hold by pressing the
HOLD button. The intercom call would be placed
on hold on the available intercom button.
Page 48

Int ercom Ca lls 37
4. The called station then presses the flashing intercom
button to answer the incoming intercom call. Once t he
call is answered, the following message displays on the
called station LCD as shown.
CALL FROM STA XXX
MMM DD YY HH:MM a m
Intercom Calls
Answering an Intercom Call
When your intercom button signal switch is in the:
H Mod e (No LED) -- Handsfree Mode. You will hear three
bursts of tone and an announcement. Reply handsfree or
lift han dset for privacy.
P Mode (LED Flashing) -- Privacy Mode. You will h ear
three bursts of tone and a one-way announcement. The
calling party cannot hear conversations in progress.
T Mode (LED On) -- Tone Mod e. You will hear repeated
burst s of inte rcom tone ringing and the HO LD b utton will
slow flash. Lift handset or press ON/OFF button to
answer.
Intercom Transfer
Intercom transfer without DSS buttons:
1. Receive or make an intercom call.
2. Press the TRANS button. An intercom dial tone sounds.
3. Dial the s ta tion where call is to b e transferred.
When 2nd s tation an swers, you are in a Supervised
Transfer mode. (1st station is staged for transfer.)
4. Replace the handset. (Station 1 and 2 are connected)
Page 49

38 Keyset Mode
Intercom transfer using DSS buttons:
1. Receive or make an intercom call using a DSS button.
2. Press the TRANS button. Intercom dial tone is heard.
3. Press the DSS button where call is to be transferred.
4. Replace the handset. (Station 1 and 2 are connected)
Pla cing an Intercom Call
1. Press the pre-programmed DSS button of the party to be
called or dial their th ree-d igit station number.
You will hear ringing if the called station’s button is in the
“T” position; or three bursts of tone if in the “H” or “P”
position.
2. Lift the handset or use the speakerphone after the tone
bursts stop.
3. Hang up to end the call.
Dialing a number in t he numbering plan a ctivates
the te lepho ne a utomat ical ly.
Keyset Mode
This feature allows you to determine the mode and baud rate
of the optional CTI Module connected to your phone. This
setting is stored in back-up memory in the case of a power
outage or system reset.
Page 50
Keyset Mode 39
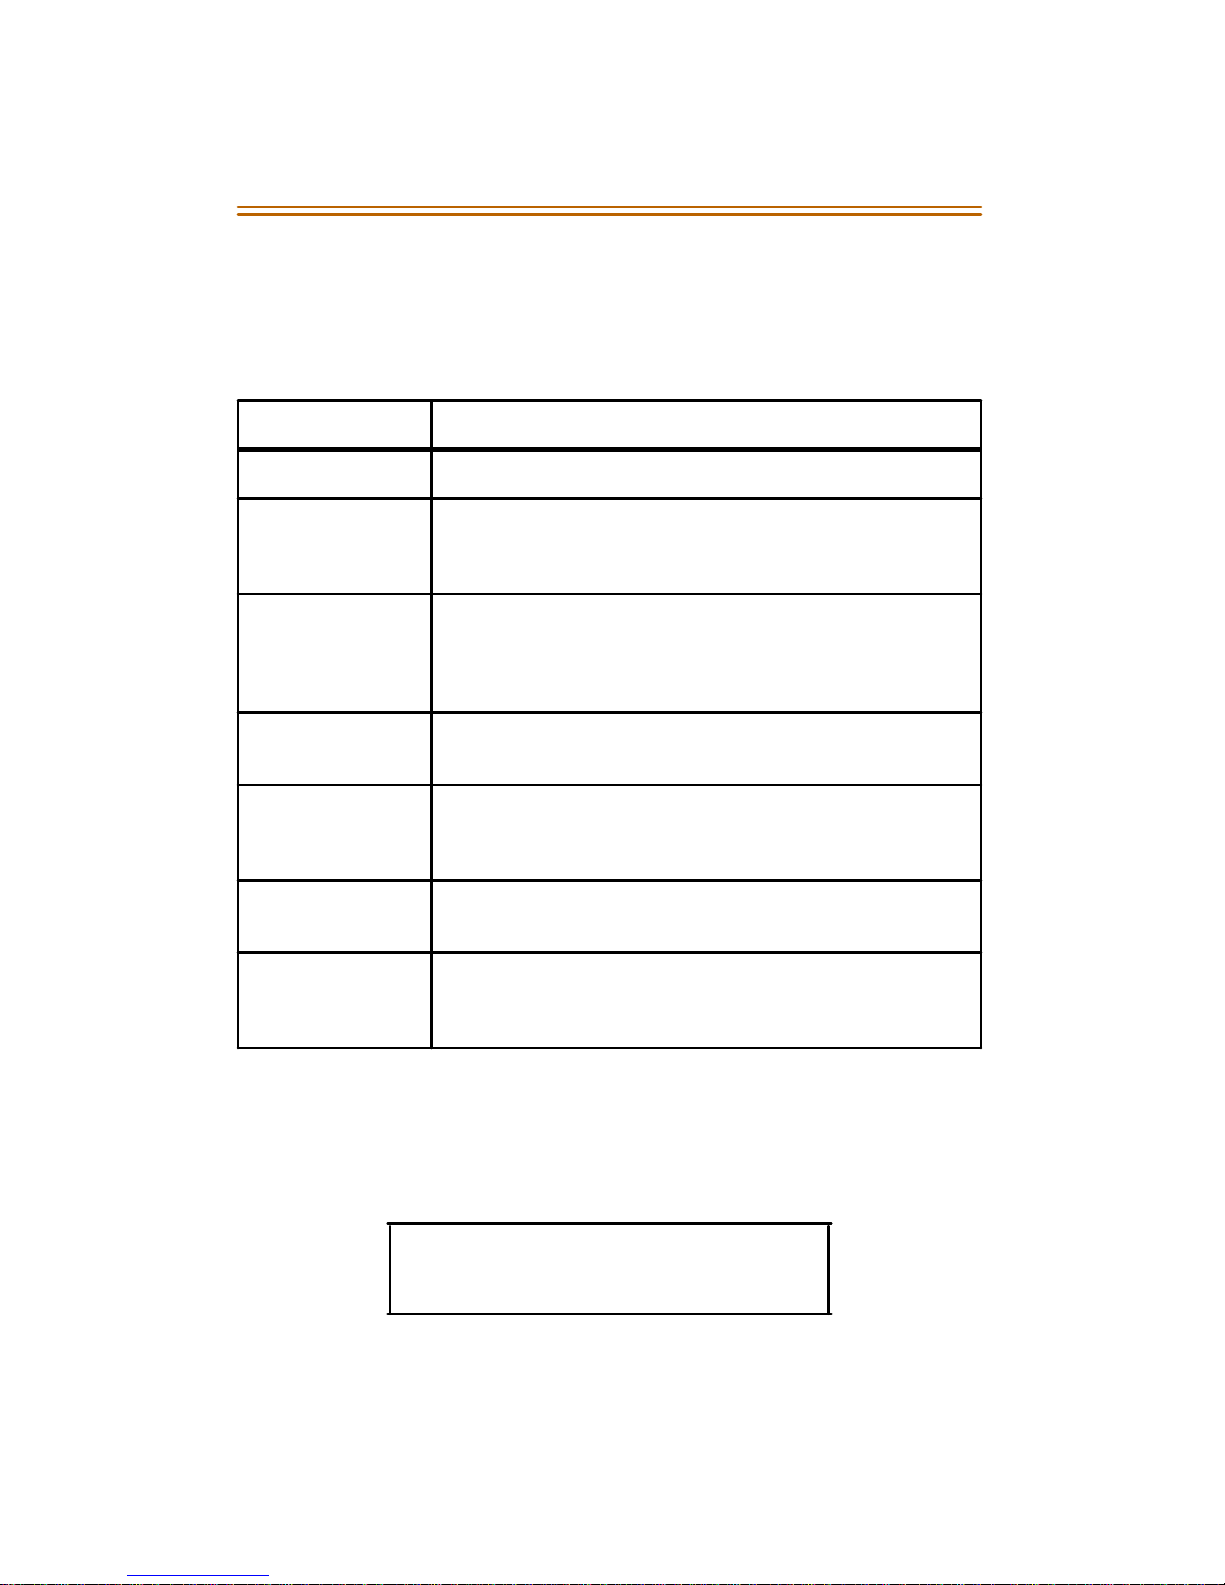
When telep hone is set to AT comma nd mode, these AT
command s are sup ported.
Table 1: AT Command Modes
Mo de De s cr ipt io n
Inactive No CTI i nformation is sent/received by the telephone.
ATD Modem Dialing Command -- The telephone will
recognize the ATD and accept digits after the
command.
ATH or ATHX
(X= 0 or 1)
CKTU Command used with Wanderer (a cordless k ey
PC Phone CTI information used with Dis c ov ery Deskt o p and
If the handset is
off-hook (lifted)…
AT o r AT Z
(X= 0 or 1)
Modem On-Hook/Off-Hook Command -- ATH or ATH0
will force the telephone to go to the on-hook state
from its current state. ATH1 will force the tel ephone to
go to the off-hook state from it’s current state.
telephone unit).
Discove ry PCPhon e software must be set to 4800 baud
rate.
Commands are discarded and no action is taken by the
telephone.
Modem Reset/Initialize Command -- Whenever these
commands are sent to the keyset, the keyset will return
OK in ASCII format.
At an idle station:
1. Dial the Keyset Mode code [648] or press the pre-
programmed KEYSET MODE button. The display shows:
2. Press the [
available modes are: Inactive, PC Phone, ATD, ATH, and
CKTU Comm and modes.
IN A CTIVE 2400
MODE=
6
6
SAVE=HOLD BAUD=#
] key to scroll thr ough the keyset mode s. T he
Page 51
40 LCR Operation
3. Press the [#] key to scroll through the baud rates.
Available Baud rates are: 1200, 2400, and 4800.
4. Press the HOLD button to save the desired entries.
S elec t the CK TU Mode fo r Wan de rer Cor dle ss Ha ndset
operation. The baud ra te is not used i n this mode; no
changes are necessary.
LCR Operation
To place an outside call when LCR is enabled in the system:
1. Dial [9].
2. Dial the d esired 7- digit teleph one numbe r (e.g., 1 + area
code + number).
3. Wait for answer. Lift t he ha ndset or use the sp eakerphone
to converse with the pa r ty.
If the 911 Feature is active, [8] + [0] is the LCR access
code, not [9].
LCR Queue Call Back
If an LCR Queue Call Back is activated:
1. When tel ephone is si gnal ed, answer the ca ll. Desired
tele phone number wi ll automatical ly be redialed.
2. Wait for answer, then lift the handset or use the
speakerphone to converse with the party.
Onl y one LC R Queue Ca ll Bac k re quest m ay be
initiated by a station. When a second request is made,
the first request will be canceled.
To Cancel an active LCR Queue:
1. Dial th e LCR Que ue Cancel code [626].
2. Replace the handset or press the ON/OFF button.
Page 52
Mailbox Butt ons 41
LCR Queuing (Automatic)
1. Dial [9].
2. Dial the d esired 7- digit teleph one numbe r (e.g., 1 + area
code + number).
3. Wait for answer.
If all lines available to you are busy, remain off-h ook
for four (4) seconds to automatically be queued onto
LCR for an avail able line.
Flex
Mailbox Buttons
To program a station’s ma ilbox on a flexible button:
Btn
❑
1. Press the desired flex ible button to be programmed.
2. Dial [644] followed by the three-digit VM Index number
(001–255). A confirma tion to ne sound s. If an error is made
during entry, an error tone sounds.
The VMID number must be pre-programmed in the
database (FLASH 68).
To use a m ailbox button:
The called station presses the MAILBOX flexible button
and goes on-hook. The internal or external call is then
transferred to t he VM port by the te lephone s ystem.
Meet Me Page
To request another party mee t you on a p age:
1. Di al th e desired two or three -digit pagi ng cod e or p ress
the pre-programmed ME ET ME fle xib le button.
2. Request that party meet you on the page.
3. Do not hang up; wait for the requested party to answer.
Page 53

42 Message Waiting
Answering a Meet Me Page
Go to the nearest phone:
Dial [770] or press the pre-programmed MEET ME flexible
button. You will be connected to party that paged you.
Flex
Message Waiting
Btn
❑
Answering a Message Waiting
If your MSG button LED is flashing at a slow rate, you have a
message waiting for you.
1. Press the flashing MSG button. The station that left the
message will be signaled with tone ringing.
2. If cal le d station do es not ans wer, pre ss the MSG button
once to leave message.
The first message l eft will be the first one called.
Leaving a Message Waiting Indication
If you dial a station that is busy, unattended, or in DND, you can
leave a messa ge waiting indication.
1. Lift the handset or press the ON/OFF button.
2. Dial th e desired intercom station. A b usy tone or DND
tone is heard.
3. Press the MSG button, the called party’s MSG button will
flash slow ly.
4. Repl ace hand set or pre ss th e ON/Off b utton t o end ca ll.
Up to five (5) messages can be left at any Key Station.
8-button tel ephones u se [623] to assign a MESSAGE
WAITING b utton.
Page 54
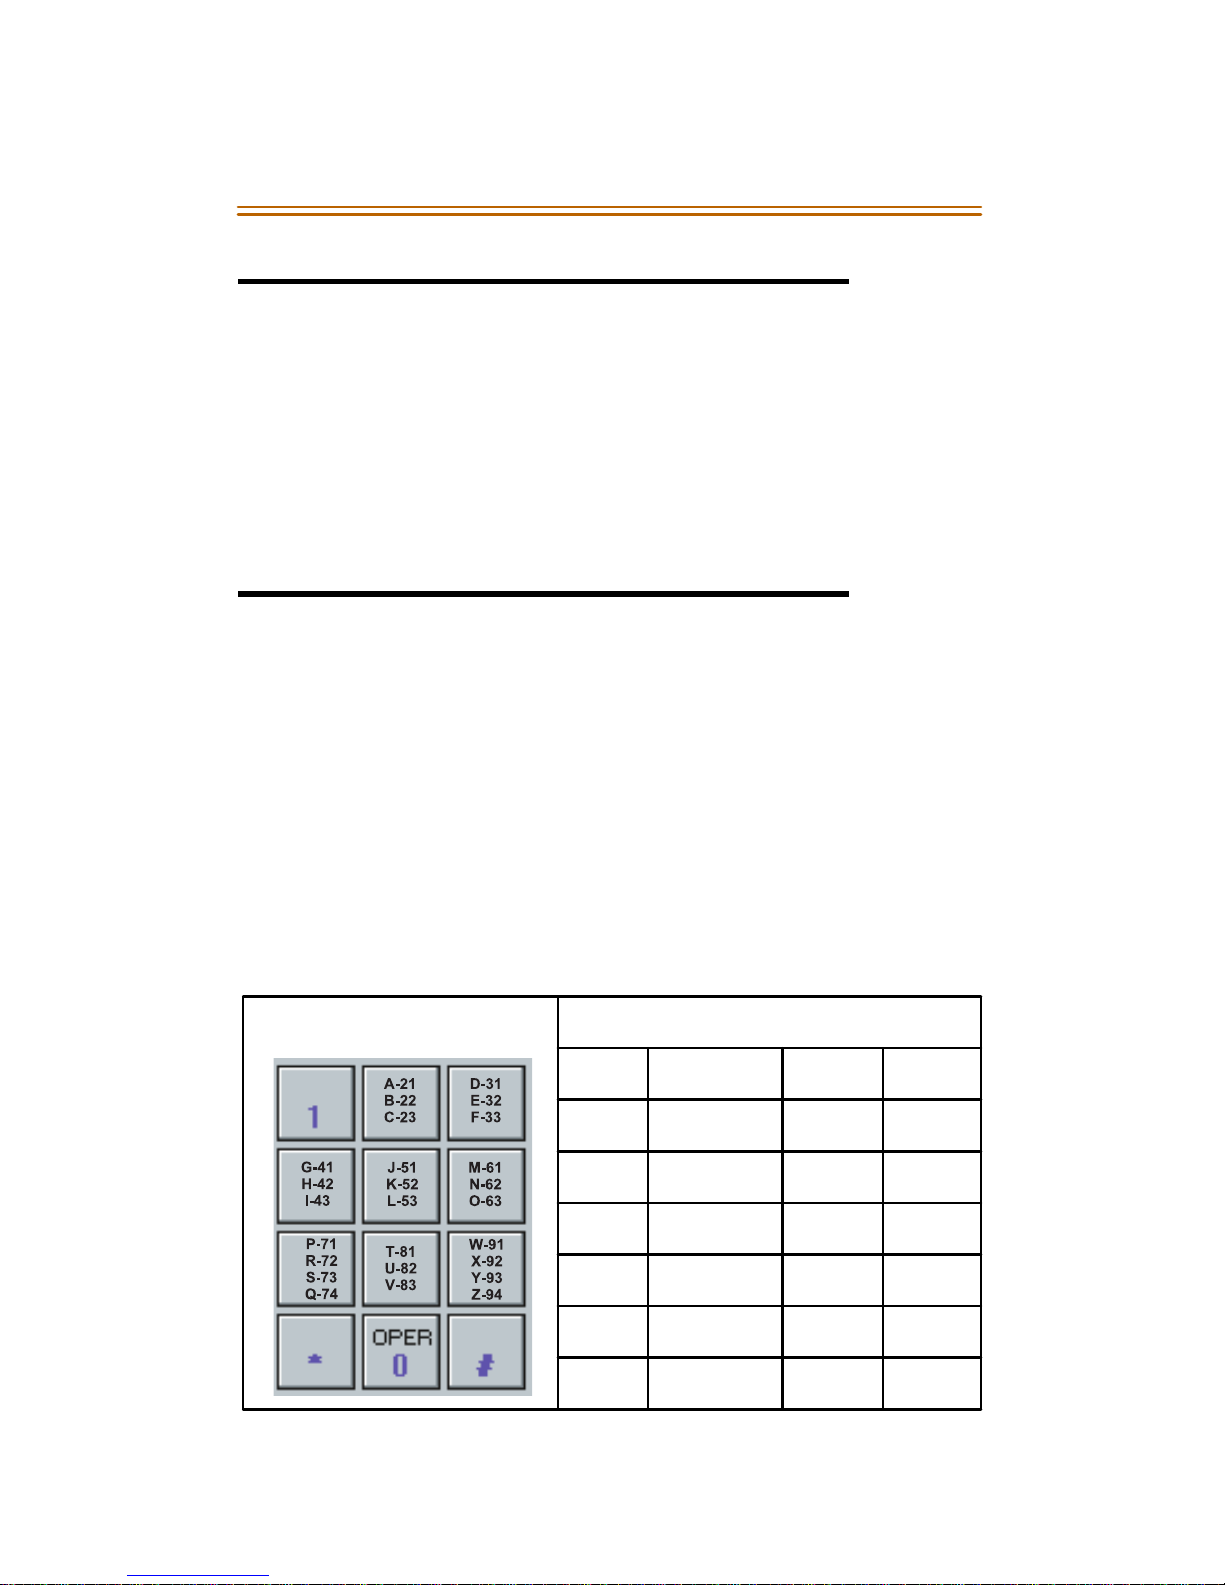
Mute 43
Mute
The MUTE button provides privacy during speakerphone or
handset operation by disabling the microphone.
1. Press the MUTE button while of f-hook on speakerphone
or handset to activate. (MUTE button LED lights steady.)
2. Press the MUTE button again to deactivate.
Name In Display
Every extension (Key or SLT) has the capability to program your
name so th at people using di splay telephones w ill see you r
name instead of your station number.
1. Di al [6 90 ].
2. Enter your name (up to seven characters) using the key
pad map shown.
Table 2: Additional Dial-By-Name Characters
Ot her Co des
1 = 1# 8 = 8# “ = 01 * = *#
2 = 2# 9 = 9# , = 02 ( = #1
3 = 3# 0 = 0# ? = 03 ) = #2
4 = 4# Space = 11 / = 04 + = #3
5 = 5# : = 1 2 ! = *1 = = #4
6 = 6# - = 13 $ = *2 # = ##
7 = 7# ‘ = 14 & = *4 . = 24
3. Press SPEED to complete the programming process.
Page 55
44 Off-Hook Preference
To er ase your na me:
1. Di al [6 90 ].
2. Press the SPEED button to complete the erasing process.
A confirmation tone sounds and your name is erased.
Flex
Off-Hook Preference
Btn
❑
If your phone has been programmed for Off-Hook Preference,
you will access an outside line or a feature by going off-hook or
press ing t he ON/OFF button.
To access an internal intercom dial tone, while Off-Hook
Preference is enabled:
1. Press your pre-programmed ICM flexible button (LED
lights steady), or dial your own three-digit intercom
number. (Do not lift handset or press ON/OFF button
be fore dialing in tercom numbe r).
2. Dial an internal station or feature access code.
Off-Hook Preference Programming
If your phone is programmed for Off-Hook Preference, and you
have the ability to enable or change the prime flexible button:
1. Di al [6 91 ].
2. Dial the two-digit button number (refer to diagram).
1 2 3 4
5 6 7 8
9 10 11 12
13 14 15 16
17 18 19 20
21 22 23 24
Page 56

Of f-Hook Voice Ove r (OHVO) 45
To disable Off-Hook Preference:
1. Di al [6 91 ].
2. Then dial [00].
Off-Hook Voice Over (OHVO)
While off-hook on a call (CO or Intercom), this feature allows
you to receive a voice announcement through the handset
receiver without interrupting the existing call. You may then
respond to the calling party using CAMP-ON procedures to talk
to the ca lling party or use Silent Text Messaging to respond to
the ca ll ing par ty vi a LCD Displ ays .
The calling station is placed in a one- time DND mode upon
ini tiating the voice- over . One -Time DND cannot be toggled
during the OHVO call. The station receiving the OHVO call must
be off-hook and in the “H” mode.
Fl ex
Placing an Off-Hook Voice Over (OHVO) Call
When an OHVO station calls a busy OHVO station, and a busy
tone is received:
1. The calling OHVO station can dial the OHVO code [628],
or press the OHVO flexible button (if pre-programmed) to
initiate an OHVO announcement. The HOLD button LED
flashes at the called OHVO station.
2. The OHVO receiving station receives a one beep warning
tone, the called OHVO station must be in the “H” mode,
and then the calling OHVO party may begin the voice
announcement to the called OHVO party.
Bt n
❑
Page 57

46 One-Touch Recordin g
Responding to an Off-Hook Voice Over
Flex
(OHVO)
To reply to an OHVO announcement, the OHVO receiving
station may respond to calling station in one of three (3) ways:
1) Usi ng the MUTE Button -- The OHVO receiv ing station can
then speak to the station that initiated the OHVO. The called
station can still hear their existing call. This applies to CO calls
only. OHVO calls to station on intercom calls maintain the
present operation.
-or-
2) Usi ng Silent Text Messaging -- This feature is only available
to d igital key terminals, and the ca ll ing station mu st be a dig ital
display terminal. The OHVO receiving station may press a pr e -
programmed MESSAGE button to respond to the voice over
announcement without being released from the current call,
Btn
❑
(i.e., by pressing a flexible button pre-programmed for the
message “IN MEETING”), the calling station will receive this
mes sag e on the calling st ation ’s L CD display.
-or-
3) Usi ng the Camp-On feature -- The OHVO receiving station
presses the flashing HOLD button to converse with the calling
stat ion. Th e e xisting call (CO line) goes on Exclusive Hol d
automatically. This method, then follows Camp-On procedures
and operation.
Flex
One-Touch Record ing
This feature allows you, to press a button and have the system
record the conversation in your mailbox, while on an internal/
external call. This is done by creating a conference bridge
between the caller, station, and VM port.
Btn
❑
Page 58
Outside Calls 47
While on an external call:
1. Press the pre-programmed VM RECORD flexible button.
The LED flutters red at 240 ipm during the setup and the
LCD displays as shown:
RECORDING SETUP
MMM DD YY HH:MM am
2. Once the system has connected to the station, your
mailbox, t he fl exible button LED li ghts s olid green and
the LCD displays as shown:
RECORDING
MMM DD YY 00:00 am
When the caller is finish ed recording, press the
pre-programmed VM RECORD flexible button. The LED
extinguishes and the display returns to the normal LCD call
inf orma tion.
Use of this feature when the One-Touch Warning Tone is
disabled may be interpreted as a violation of federal, state
or loca l laws, and an invasion of privacy . Check applicable
laws in your area before recording c alls using this feature.
Flex
Outside Calls
Btn
❑
Answering a Recall
When an outside line has remained on hold for an extended
pe ri od of time, you are remin ded with a r ecalling ring. (If
Preferred Line Answ er is enabled , s kip next step.)
1. Press button for an OUTSIDE LINE, LOOP, or POOL button
(flashes at a very fast rate).
2. Lift the handset or press ON/OFF to converse with party.
Page 59

48 Paging
Answering an Outside Call
1. Lift the handset or press the ON/OFF button.
2. Press slow flashing OUTSIDE LINE button or LOOP button.
(If your telephone is progra mmed with Preferred Line
Answer, you may answer an outside line by lifting the
handset or pressing the ON/OFF button.)
Placing an Outside Call
To acces s an outsi de li ne for dialing out:
1. Press idle CO line button, POOL button,
-orDial CO line group a ccess code or LCR access co de (9, 801-
823, 88+LLL).
LLL = CO Line Number
2. Di al th e d esi r ed number for outs id e ca ll.
3. Lift handset or use speakerphone to converse with party.
Placing an Outside Line on Hold
If your system is programmed for Exclusive Hold
Preference, pr es s the HO LD button on ce for Exclus ive
Hold or twice for System Hold.
-or-
If your sy stem is programmed for System H old
Preference, pr es s the HO LD button on ce for Syst em Hold
or twice for Exclusive Hold.
Paging
If you are given the ability to make page ann ouncements.:
1. Lift the handset or press the ON/OFF button.
2. Dial a two or three-digit paging code, or press the
programmed
pre-
PAGING flexible button.
Page 60
Personalized Messages 49
Code Zone Code Zone
700 Int/Ext All Call 707 Internal Zone 7
701 Internal Zone 1 708 Internal Zone 8
702 Internal Zone 2 709 Internal All Call
703 Internal Zone 3 76[O] External All Call (Triad 1/2 /3)
704 Internal Zone 4 76[P] External Page Zones 1-2 ( Tr i a d 1 / 2 / 3 )
705 Internal Zone 5 761 External Page ( Triad-S)
706 Internal Zone 6
3. Spe ak in a normal tone of voice to deliver m essage.
4. Stations receiving a page Annou ncement can press the
Volume Bar to change Paging Volume. The display shows:
SPEAKER PAGE [######### ]
MMM DD YY HH:MM am
5. Replace the handset to terminate the page
announcemen t.
Stations off-hook or in DND will not hear the page
announcement.
Personalized Messages
Each station can select a pre-assigned message to be displayed
on the LCD of any Key Telephone calling that station.
To select on e of the ten available messages:
1. Dial th e Message Access code [633] or press the MSG
ACCES S f lexible button (if pre-programmed).
Page 61
50 Personalized Messages
2. Dial the two-digit code for the message to display. A
confirmation tone sounds ; the DND button LED f lashes.
Code Message Code Message
00 Cl ear M essa ge 06 O n Tri p
01 O n Va cation 07 In Me etin g
02 Return AM 08 At Home
03 Return PM 09 On Break
04 Return Tomorrow 10 A t Lunch
05 Re turn Next W ee k
3. Replace the handset. (Activating DND or Call Forward ing
cancels selected message.)
Custom Messages
Selecting a Custom Message
1. Dial th e Message Access code [633], or p ress the MSG
ACCES S f lexible button (if pre-programmed).
2. Dial the two-digit code for the desired message (21-30) to
display on your phone when called. A confirmation
sounds and the DND button LED flashes.
The system admini st rator p rograms the te n custom
messages at the first attendant station (Station 100).
These me ssag es can b e used i n the sa me manne r as
Personalized Messages
in
3. Replace the handset or press the ON/OFF button.
To program a Custom Message:
1. Di al [6 33 ].
2. Dial a valid cod e (18-20) for desired custom message.
.
3. Enter a custom message up to eight characters.
4. Press H OLD to sav e.
Page 62

Personalized Messages 51
To use a unique custom message:
1. Di al [6 33 ] on th e d ial p ad.
2. Dial a valid cod e (18-20) for desired custom message.
To cancel the message:
1. Dial the Message Access code [633]+[00].
2. Replace handset or press ON/OFF button.
Date and Time Entry Messages
You can activa te certain messag es used to en ter a specific time
or a date of return. These messages will show on the calling
station’s display to alert them of your return.
To activate a message with a custom return time or date:
1. Dial the Mess age Access code [633].
2. Di al th e cod e for the message.
Code Date/Time Message
11 Vacation Until: MM/DD
12 Return: HH:MM xm or MM/DD
13 On Tri p Until: MM/DD
14 Meeting Until: HH:MM xm
15 At Home Until: HH:MM xm
16 On Break Until: HH:MM x m
17 At Lunch Until: HH:MM xm
3. Enter the date/time by using the buttons on the key pad
according to Figure 1: Dial-By-Name Key Pad Map and
Table 2: Addit ional Dial-By-Name Char ac ters.
4. Press the HOLD button to enter the message. A
confirmation tone sounds and the DND button LED
flashes.
Page 63

52 Personalized Messages
To cancel the message:
1. Dial the Message Access code [633]+[00]. The DND
button LED extinguishes.
2. Replace the handset or press the ON/OFF button.
Pers on alized Msg Codes on a Flex Key
You can program code [633] on a flexible key to speed a ccess of
pre-s elected messages.
Using 2-D igit Co de
1. Press the SPEED button twice.
2. Press the desired flex ible button. LED flashes.
3. Dial [633]+ [#]. A confirmation tone sounds.
4. You can now press that flexible button and dial the twodigit message number:
00 – 10 = Personalized Messages
18 – 30 = Custom message number
Refer to
Messages
two-digit codes.
Personalized Messages
in this secti on, for further informat ion on
and
Custom
5. A confirmation tone sounds.
Using Scroll Function
1. Press the SPEED button twice.
2. Press the desired flex ible button. LED flashes.
3. Di al [6 33 ]+[ #]. A confirmation tone sound s.
4. Press the programmed flexible button, then press the [#]
to scro ll forward through the messages or press the [
to scroll backward t hrough the list.
6
]
Page 64
Personalized Messages 53
The scroll is a “rolodex” typ e of scr oll; it forwards th rough the
mes sages in the foll owing order:
Text Messages
1. Clea r Mes sa ges 5 . On Brea k 9. Return P M
2. At Home 6. On Trip 10. Return Next Week
3. At Lunch 7. On Vacation 11. Return Tomorrow
4. In Meeting 8. Return AM
5. When the desired mes sag e i s shown on the LC D d isp lay,
press the HOLD button to activate that message on your
station. A confirmation tone sounds and the DND button
LED flashes.
If yo u omit t he [# ] f rom eith er me tho d, and imme diat ely
press the Fl exible button, then dial the two-digit
personalized message number, that sp ecific message
will be programmed to the Flexib le button.
Scrollable Canned Messages
1. Dial [633] + [#] or press th e pre-programmed MSG ACCESS
flexible button. The display shows:
XXXXXXXXXXXXXXXXXXXXX
NEXT-# PREV-6 SAVE-HOLD
2. Press the [#] to scroll forward through the messages, or
press the [
The scroll is a “rolodex” type of scroll; it will forward
through the me ssages i n order a s s hown in “Text
Messages” Tab le .
6
] to scroll backward through the list.
Page 65

54 PBX/Centrex Codes on a Flex Button
3. When the desired mes sag e i s shown on the LC D d isp lay,
press HOLD to activate that message o n your station . A
confirmation tone sounds ; the DND button LED f lashes.
Flex
PBX/Centrex Codes on a Flex Button
For easy one-button access to Centrex or PBX features, perform
the f oll owing steps:
1. Program the Centrex or PBX code into a Station or System
Speed Dial bin, including hook-flash (FLASH key), [
and [#] commands (refer to “Storing Speed Numbers” on
page -56).
Btn
❑
6
],
2. Program that speed bin onto a flexible butto n (refer to
“Flexible Button Programming” on page 34. )
Repeat Redial
A keyset station user places a CO ca ll and receives a busy or no
answ er:
1. Press the pre-programmed REDIAL flexible button. The
LCD prompts you for a timer value as shown:
ENTER RPT REDIAL TIMER;
XXX 006-999
2. Enter a three-digit timer value (006-999 seconds) for the
redial timer. D efault va lue is 0 60 (one minute ). A
confirmation tone sounds and you go on-hook. The
flexible button LED lights steady. When the timer expires,
the station is signaled via a CO line queue indication on
the REDIAL flexible b utton. Once the line queue i s
answered, the LCD indicates an outgoing CO line display.
Page 66

Speakerphone 55
To activate a redial:
Press the REDIAL button, pr ess the ON/OFF button, or lift
the handset. Th e l i ne is seized and the number is dialed.
To cancel the o peration :
Press the REDIAL flexible button (if pre-programmed). A
confirmation tone sounds and the Redial func tion is
canceled.
Speakerp hone
1. Press ON/ O FF button to ON. (Inte rcom dial tone s ounds.)
2. Press the statio n key of the desired party, or press an
available OUTSIDE LINE button and dial number.
Speakerphone is activated.
3. Press the ON/OFF button to end call.
Speed Dial
Dialing a Speed Number
If an outside l ine has not been specified in programming, one
will be chosen automatically or you can choose one now.
1. Press the SPEED button.
2. Dial the speed bin loca tion or press prog rammed speed
bin button.
000 to 019 = Station Speed numbers
020 to 999 = System Speed numbers
3. When called party answers, pick up handset or use
speakerphone.
A worksheet is included in the back of this User Guide
to assist you in keeping track of custom programmed
sp eed bin locat ions.
Page 67

56 Speed Dial
Last Number Redial
1. Press the SPEED button.
2. Press the pound [#] key. The last number dialed over an
outside line will be automatically redi aled.
Save Number Redial
If you wish to save the last n umber you dialed:
1. After placing an outside call, keep handset of f-hook.
2. Press the SPEED button twice.
Storing Speed Numbers
Station Spe ed numbe rs can be en tered by key set us ers. Syst em
Spe ed numbers must be entered b y the first programm ed
attendan t. If an attendant has not been specified, enter at
Station 100.
1. Press the SPEED button once.
2. Press a desired outsi de line key, or press the SPEED
button a second time, to select an outside line.
3. Di al th e s peed bin loca tion.
000 to 019 = Station Speed numbers
020 to 999 = System Speed numbers
4. Dial telephone number, including special codes buttons as
listed in th e following :
TRANS - Pulse-to-Tone Switchover
HOLD - Pause
FLASH - Flash
For Display Security, press the TRANS button, then
enter the telephone number and any other special
c odes buttons as need ed.
5. Press the SPEED button.
6. Replace the handset or press the ON/OFF button to end
speed dial programming.
Page 68

Text Messa ging ( Silent Resp onse) 57
To clear an existing speed bin:
1. Press the SPEED button twice.
2. Di al th e s peed bin loca tion.
3. Press the SPEED button again. A confirmation tone
sounds.
To Dial a Saved Number
1. Press the SPEED button.
2. Press the asterisk [
6
] key. Saved number is automatically
dialed.
Text Messaging (Silent Response)
This feature allows you to use text messages to respond to a
caller that has either Camped-On or has used the Off-Hook
Voice O ver feature to alert a busy station us er of a waitin g call
or message. The “camped-on” sta tion may respond to the ca ll er
via the canned, custom, and silent response text (LCD)
messages. The text messages appear on the calling party LCD
Display.
While receiving a Camp-On, or OHVO call:
1. Press a flexible button pre-programmed for message
access [633+XX].
2. Dial the desired two-digit message code as shown in the
“Text Message” Ta ble.
Example: [633] + [38] means that a telephone calling the
station will receive the message “WH O IS IT ?”
Page 69
58 Uniform Call Distribution (UCD)
Code Text Message Code Text Message
31 I Will Take Call 42 Is It Important?
32 Take Message 43 Is It Urgent?
33 Transfer To Secretary 44 Send Call To Voice M ail
34 Put Call On Hold 45 Pa rk Call
35 Call Back 46 Out Of Service
36 One Moment Please 47 Put Call Through
37 I Will Call Ba ck 48 I Am Busy
38 Who Is It? 49 O.K.
39 Is It Long Distance? 50 No
40 Is It Personal? 51 Yes
41 Is It An Emergency?
These addition al messages along with their codes, ca n also be
sent as a text response. The calling station must be a display
telephone and the call station must be a keyset.
Uniform Call Distribution (UCD)
Available/Unavailable Mode
If you are a UCD Agent: you can place your station in the
Avai lable mod e to receiv e UCD ty pe calls, or in the U navailable
mode to block UCD calls from ringing to your station.
To go Unavailable:
Dial [566] or press the pre-programmed AVAILAVBLE /
UNAVAILABLE flexible button. The LCD displays as shown.
You are now blocked from receiving UCD calls.
UNAVAILA B LE U CD * 1 25*
MMM DD YY HH:MM am
Page 70
Uniform Call Distribution (UCD) 59
To go Available:
Dial [566] or press pre-programmed AVAIL ABLE/
UNAVAILABL E flexible butto n. You may now receive calls.
Display Calls in Queue for UCD Groups
From an idle display key telephone:
1. Di al [5 67 ], followed by the three-digit UCD Group
number (55X), or press the pre-programmed QUEUE
flexible button. The ON/OFF button LED lights steady.
Your display s hows how many calls are in queue for that
group as shown:
UCD 55X 00 CALLS IN QU EU E
MMM DD YY HH:MM am
Dynamic update of display occurs as queue condition
changes.
2. Repl ace hand set or pre ss th e ON/OF F button to
term ina te mode.
Thi s featu re cannot b e u sed with a ca ll i n p rogre ss and
the station will be conside re d busy for incomi ng calls.
Overflow Station Forward
An en hancem ent allows UCD calls reaching the Ov erflow
Station to call forward to another station:
1. Lift the handset or press the ON/OFF button.
2. Press the FWD button or dial [640].
3. Dial the desired code:
[6] = All
[7] = No Answer
[8] = Busy
[9] = Busy/No Answer
Page 71

60 Universal Day/Night Answer
4. Dial the three-digit destination number where calls are to
be forwarded (Station, Voice Mail, ACD/UCD groups, Hunt
group). A con firmation tone sounds.
5. Replace the handset or press the ON/OFF button.
Universal Day/Night Answer
When the system is in Day or Night mode and you hear an
outside line ringing at another station, and you wish to ans wer
the ca ll:
Dial [#5], then the connected outside line can be
transferred or disco nnected.
Ea ch t elepho ne util izi ng U niv ersa l Ni ght An swe r mu st
hav e a LOO P but t on a ppe aran ce if t he r i ngin g ou tsi de
line does not appear at their phone.
Vo i ce Ma il
Call Forwarding to Voice Mail Groups
Int e rcom and Transf erre d C O callers may be route d direct ly to
your mail box by forwarding your phone to a voice mail group.
1. Lift the handset or press the ON/OFF button.
2. Press the FWD button or dial [640].
3. Dial the desired code:
[6] = All
[7] = No Answer
[8] = Busy
[9] = Busy/No Answer
Page 72

Voice Mail 61
4. Di al th e three-digi t Voice Mail group pil ot numbe r (440–
447) for the group (1–8) where calls are to be fo rwarded.
A confirmation tone sounds.
5. Replace handset or press ON/OFF button.
Flex
Retrieving Voice Messages
To enter the Voice Mail system to check for mail:
Dial th e Voi ce Mail group nu mber, or press the
pre-programmed VM GROUP flexible button or flashing
MESSAGE WAIT button. You will immediately be
prompted to enter the password for your ma il box.
Voice Mail Transfer with ID
Btn
❑
Flex
Btn
❑
While on a call and th e d istant end wishes to leav e a Voice
Message for a VM user:
1. At the in itiating sta ti on, press the T RANS button.
2. Dial the Voice Ma il Group nu mber or press the
pre-programmed VM GROUP flexible button.
3. Dial the VMID (Mail Box location) of the desired party and
go on-hook.
The system then makes the connection to an available
Voice Mail p ort and send s the Leave Mail Prefix (if any) +
the digits dialed as the VMID number + the Leave Mail
Suffix digits (if any). The system then cuts through the
transferred caller.
Page 73
62 Voice Mail
Volume Control Bar (DKT Only)
A volume control bar is located below the keypad to control
the ringing, handset, and speakerphone volumes.
While on an Intercom Call:
(Speakerphone) -- Press Volume Bar to change volume.
LCD displays as shown.
SPEAKER CALL [ ## ### ### #]
MMM DD YY HH:MM am
(Handset) -- Press Volume Bar to change volume. LCD
displays as shown.
HANDS ET ICM [#########]
MMM DD YY HH:MM am
While on a CO Call:
(Speakerphone) -- Press Volume Bar to change volume.
LCD displays as shown.
SPEAKER CALL [ ## ### ### #]
MMM DD YY HH:MM am
(Handset) -- Press Volume Bar to change volume. LCD
displays as shown.
HANDS ET CO [#### #####]
MMM DD YY HH:MM am
While Receiving an Incoming Tone Ring (intercom or CO call):
Press the Volume Bar to cha nge th e volume. T he LCD
displays as shown.
SPEAKER RING [# ### ## ### ]
MMM DD YY HH:MM am
Page 74
Worksheets 63
Worksheets
Flexible Button Programming Worksheet
1 2 3 4
5 6 7 8
9 10 11 12
13 14 15 16
17 18 19 20
21 22 23 24
Speed Dial Bin Programming Worksheet
BIN 000 BIN 010
BIN 001 BIN 011
BIN 002 BIN 012
BIN 003 BIN 013
BIN 004 BIN 014
BIN 005 BIN 015
BIN 006 BIN 016
BIN 007 BIN 017
BIN 008 BIN 018
BIN 009 BIN 019
Page 75

64 DEFAULT NUMBERING PLAN
DEFAULT NUMBERING PLAN
Function
911 List 608 Call Coverage 647
Account Code 627 Call Cov erage Ring 646
ACD Calls in Queue 579 Call F or ward 640
ACD Call Factor 580 Call Forward (Follow-Me) 642
ACD Group 1-16 550-565 Call Forward - Off-Net 603
ACD Group Status 567 Call Park Group 1-8 430-437
ACD Help 574 Camp On 620
ACD Member Di splay 573 Cancel LCR Que 626
ACD Primary Login 572 Clear Fwd, DND, Msg 662
ACD Primary Logout 5 71 Cle ar VM Al arm 656
ACD Secondary Login 582 CO Line 88
ACD Secondary Logout 581 CO Line Queue 621
ACD Supervisor Display 577 Conference 624
Code Function Code
ACD Supervisor Login 576 Custom Message 694
ACD Supervisor Logout 575 Dial By Na me 6*
ACD/UCD AVA/UNA 566 Directory Dial 680
All Call Page 700 Do Not Di sturb 631
Ans Machine Ring 654 DTMF Receiver Test 657
Ans Machine Spkr 655 Executive Override 625
ATT Clear Alarm 6 06 Ex t Page Zone All ,1,2 760-7 62
ATT Disable CO Line 602 Flash 660
ATT Unavailable 607 Group Call Pickup #0
Attendant Override 601 Headset Mode 634
Back ground M usic 632 HPT 667
Call Back 622 Hunt Group 1-8 450-457
Page 76
DEFAULT NUMBERING PLAN 65
Function
Code Function Code
ICLID Answered Call 659 Program Name 690
ICLID Name/Number 653 Release 641
ICLID Unanswered Call 635 Repeat Redial 643
Ignore CFW 5# Ring Tone 695
Int Page Zone 1-8, All 701-709 Set Clock 692
Intercom Button 645 SLT Call Pickup #1
Keyset Mode 648 SLT Cal lback 663
LCR 800 SLT Conf Park 66 4
Loop 89 SLT Sp ee d Dial 668
M ailbox Button 6 44 SLT Speed Prog 661
Meet Me Page 770 Speed Dir 693
Message Preselect 633 Station Call Park 439
Message Wait 623 Station Park Pickup #6
Mo d em 4 99 St a ti o n 1 0 0- 3 51 10 0- 3 51
MPB Version 605 Stati on Relocate 636
Mute 629 Stop Trace 658
Night S ervice 604 Telecenter Adm 652
OH VO 6 28 Tele c ent e r E xt 65 0
One Touch Record 649 Tone Ring 6#
Overflow AVA/UNA 578 Transfer Unans CO Ca ll 639
Pause/Resume Rec 655 UNA/UDA #5
Personal Park 438 VM Group 1-8 440-447
Picku p Park Grp 1-8 #430-# 43 7 VM Mess ag e Cance l 421
Pool 1-23 801-823 VM Message Set 420
Pool All 824 VM Msg Set w/Cnt 422
Prime K ey 691 Vol um e 63 8
Page 77

66 DEFAULT NUMBERING PLAN
Page 78
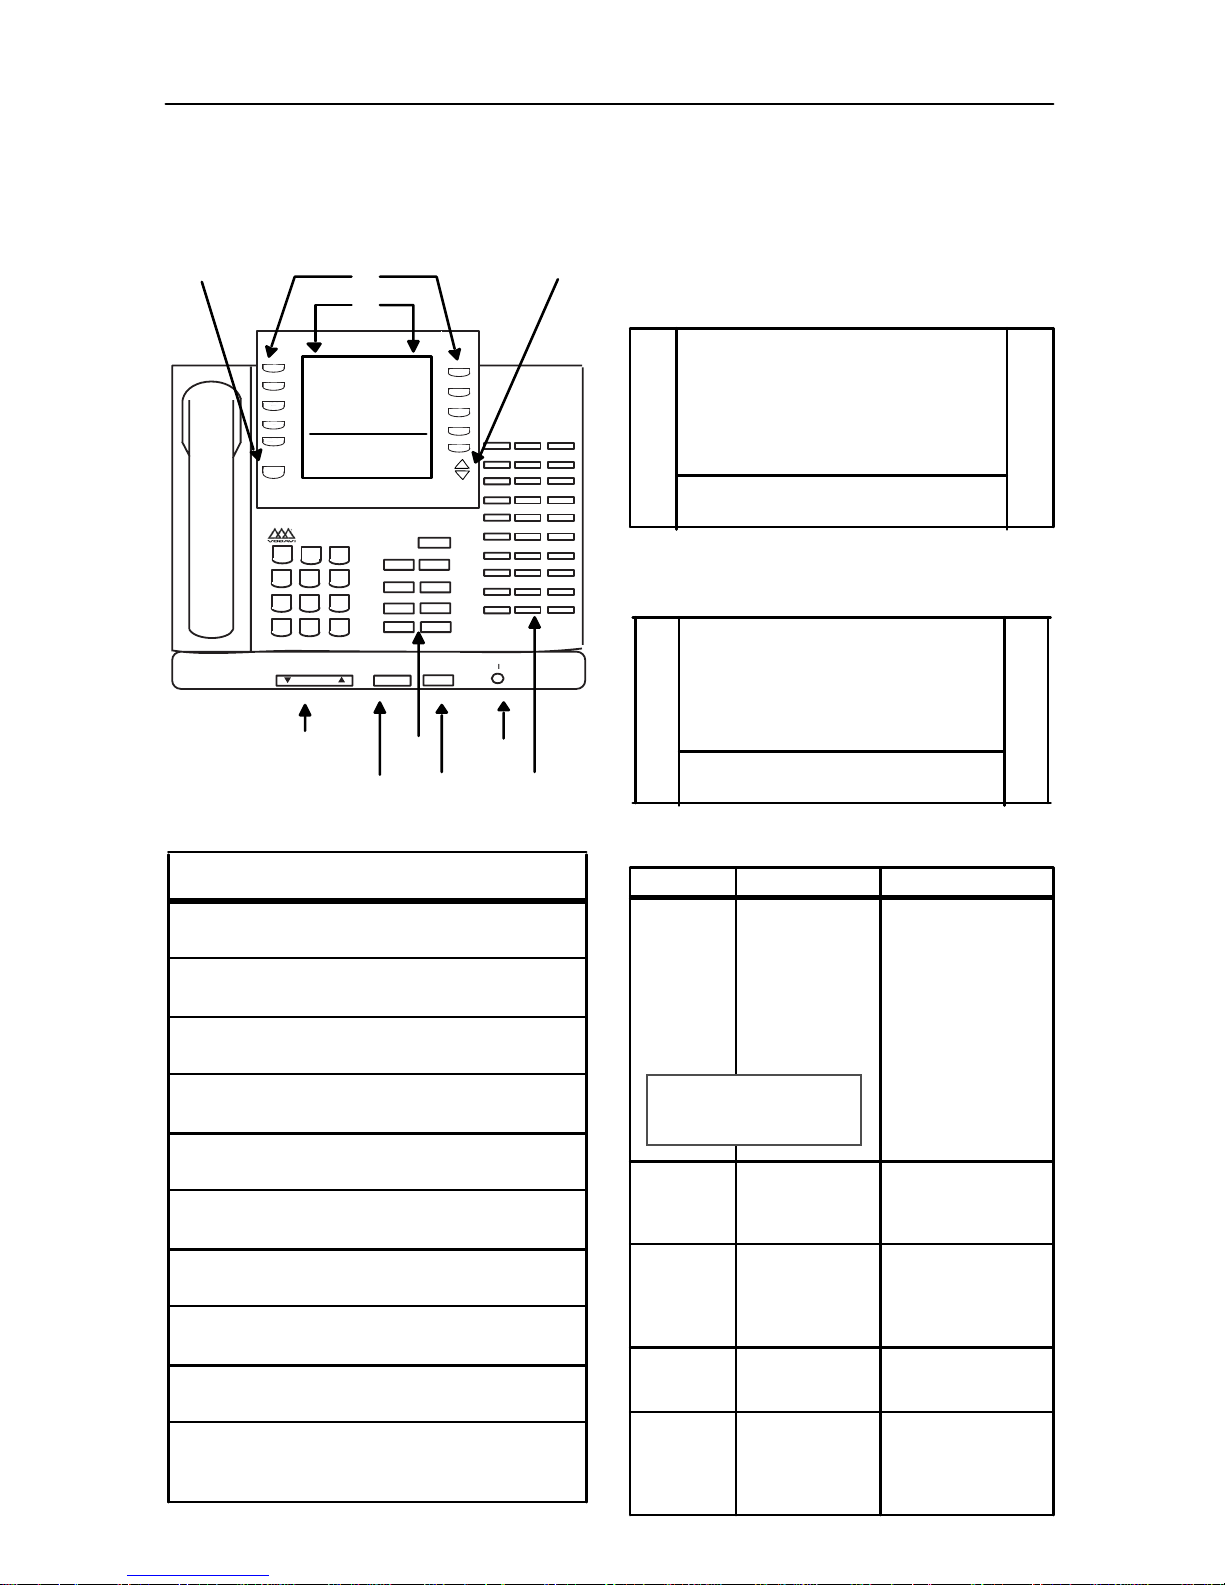
EliteTM Large Screen Telephone Qui ck Reference Car d
Large Screen Disp lay Features
The Elite digital 30-button model provides a 7line by 16-ch aracter display with 10 SOFT keys, a
MENU key, and UP/DOWN scroll keys.
Us i ng the So ft Keys
From the main menu, use th e s oft keys to acces s
the option s l isted.
Ca lend ar Mo de
-- When in idle mode, the
default monthly calendar will display. The
DIGITAL
DIRECTORY DND
SPEED DIAL LNR
PA R K P IC KU P
MUSIC
FEATURES
STA XXX
MMM D D YY HH:MMx
MENU
DEF
ABC
1
3
2
JKL
GHI
MNO
5
4
6
PRS
WXY
TUV
7
9
8
0
#
*
s
ON/OFF HOLD t VOLUME
CAMP ON
FWD
MUTE
PAGE
HTP
CONFTRANS
MSG
FLASH
SPEED
MIC
calen dar may also be accessed by pressing the
MEN U so ft k ey .
Q
Q
SUN MON TUES WED THU RS FRI SAT
Q
6 7 8 9 10 11 12
Q
1 3 1 4 15 16 17 18 19
Q
2 0 2 1 22 23 24 25 2 6
27 28 29 30 31
STA XXX
_
MMM DD YY HH: MMx
Ma in Men u
-- To access the main menu at any
MM M YY YY
1 2 3 4 5
tim e, pres s t he M ENU soft key.
Q
DIRECTORY DND
Q
SPEED DIAL LNR
Q
PARK PI C KUP
MU SIC
Q
FEATURES
Q
STA XXX
_
MM M D D Y Y HH:MM x
Q
Q
Q
Q
Q
V
W
Q
Q
Q
Q
Q
V
W
Feature/Button Descriptions
1. DSS Console -- Provides access to 30 flexible
feature/functions.
2. Fixed Feature Keys -- Used to access specific fixed
feature/ func tions.
3. HOLD Key --Used to place calls on hold and to
retrieve held calls.
4. LARGE Screen -- Designed to provide a 7-line by
16 - char a cte r v iew in g ar ea.
5. MENU Key -- Toggles between main menu screen
and monthly calendar.
6. MICrophone -- Used to talk w ith other party
wi tho ut u si ng th e han dset .
7. ON/O FF Key -- Used to make a cal l without lifting
the handset.
8. PAG E Up/Down Keys -- Used to adva nce to t he
NEXT and PREVIOUS option screens available.
9. Soft Keys -- Used to access specific features and
functions.
10 . VOL UM E Cont ro l Bar - - Used to adju s t le ve l o f
tones, backgr ound music, ringing, r eceiv er volume,
and display contrast.
To select a main menu option:
Press… D isp lay show s… T hen…
DIRECTORY
N OTE -- Wa it fo r the d esir ed
number to displ ay before
pres s in g th e SPEE D bu tton.
SPEED
DIAL
PARK
PICKUP
MUSIC
FEATURES
ABC
DE F
GH I
JK L
MN O
En te r Bi n
Nu m ber
PAR K 1
PAR K 2
PAR K 3
PAR K 4
PAR K 5
BG M 1
BG M 2
BG M O F F
CALL F WD
PAG E I N TE R N AL
PAG E E X TE RN AL
VOICE MAIL
MO R E
press the soft key
assoc ia ted with the
desired number.
Use the PAG E UP /D N
keys to displ ay the
prev ious or n ex t 5
names in Directory.
To s crol l thro ugh the
list, press the [
to v ie w t h e pr ev iou s
entry, or [#] to vie w
the next entry.
dial the bin number
assoc ia ted with
desired ex ter nal
phone number.
se lect desired Park
loca ti on where cal l is
holding (1-5). Press
W
PG D N
PA RK lo c a t i ons 6-8.
se lect desired
backgr ound music
option.
se lect one of the
options listed.
6
] key
to sele ct
Page 79
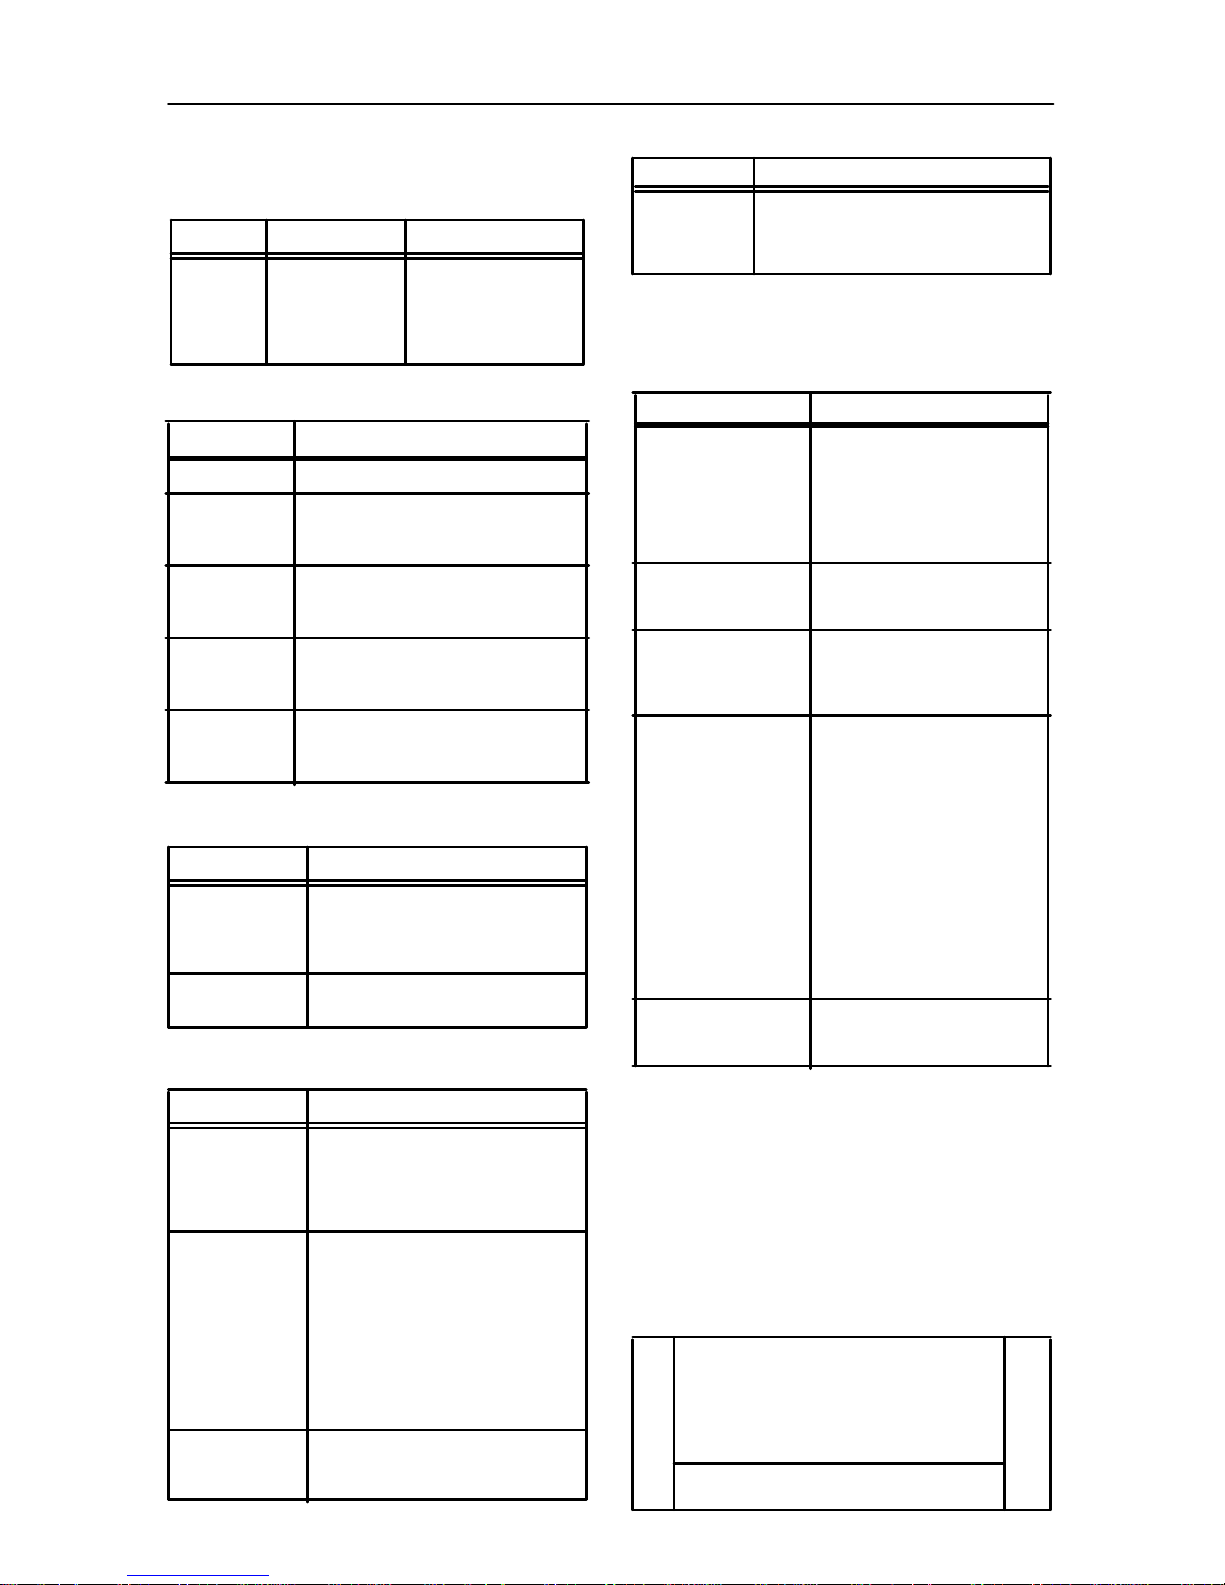
Qui ck Reference Card EliteTM Large Screen Telephone
After selecting FEATURES on the ma i n m e n u, the
following options will display:
Call Fo rward
Press… Then select … Display will show…
CALL FWD A ll
Busy
No Answer
Busy/ No Answer
Off Net*
* If O ff-Net is sel ected, en te r desired bi n nu mbe r.
If you s elect… Then…
Sta dial the desired stationnumber.
Voice Mail se lect the desired VM group (1-5).
To access groups 6-8, press the PG
DO W N
Operator the display shows a “Forward ed to
XX X” message and the main menu
ret ur ns.
ACD/UCD select desired ACD/UCD group (1-5).
To access group 6- 16, press the PG
DO W N W key.
H u nt se le c t t he d e si r e d H u nt g r o u p ( 1 - 5 ) .
To access groups 6-8, press the PG
DO W N W key.
W
St a
Voice Mail
Oper ator
ACD /UCD
Hunt
key.
Page -- I nte rn al / E xt ernal
Press… Then select…
PAGE INT ER NAL t he desir ed Page Zo ne (ALL Ca ll or
PAGE EXTER NAL t he desir ed Page Zone (ALL Ca ll or
Zones 1-4).
To acce s s Pa ge Zon e s 5- 8, pre s s
the PG DOWN
1-2)
W
key.
Mo re
Vo ice Mail
Press… Th en s el e c t …
VOICE MAIL the desi re d VM group (1-5).
To access group 6-8, pr ess t he PG
W
DOWN
NOTE -- To access the following voice mail options,
a DIGITAL voice mail system must be in u se.
En ter pa ssw ord
Press… Then select…
RETRIEVE MSGS Delete
Forwa rd Fo rwa rd M sg A s Is
Fo rwa rd A dd
Pr e am b l e
SEND MSG Re-Record
CHANGE GREETING
CHANGE PASSWORD
CHANGE NAME
to acces s th ese VM options:
ke y.
Reply
Sk ip
Call Back
Sa ve
Fo r w a r d
Replay
Forwar d A dd Prea mble
Cancel
Continue
He ar
Cancel
Re-Record
Append
OK
He ar
Cancel
Dial [6 ] to select one of the
foll owing opti on s :
Private
Cancel
Futur e
Ur g en t
Confirm
Se nd
a new greeting, passw or d, or
name by entering the
change .
Press… Then select…
MO R E
Messages Clear
More Ans Machine Ring
Messages
Headset Enable
Headset Disable
UNA/UDA
More
On
Vacation
Return AM
Return PM
Return
Tom orrow
Ans Machine S pkr
Ans Machine Off
Pr e ss P G D N
access mor e
messages:
Retur n Next Week
On Tr ip
In Meeting
At H om e
On Break
At Lun ch
W
key to
Page/Queue Displays (for LCR)
When you receive an internal/external page,
the screen will display the “MEET ME” option.
When you queue for a line, the s creen will
display the “QUE CNL” option.
If you are already in queue and you receive a
page, the screen will display bo th “MEET ME
QUE CNL” options.
and
Q
DIRECTORY DND
Q
SPEED DIAL LN R
Q
PARK PI C KUP
MUSIC
Q
FEATURES
Q
STA XXX
_
M MM D D Y Y HH:M Mx
ME ET ME
QU E CN L
Q
Q
Q
Q
Q
V
W
Page 80

www.vodavi.com
VODAVI is a registered trademark ofVodavi Technology,Inc.
8052-10
we’re talking
technology
 Loading...