

Page 1

Vodavi Telephone Systems Quick Reference Card
FIXED FEATURE BUTTONS
• CAMP-ON Button -- Enables you to alert a busy
part y that a n outs ide line i s on ho ld and w aiting
for them.
• CONF (CONFERENCE) Button -- Used to
establish and build conference calls.
• FLASH Button -- Used to terminate an outside
call and restore dial tone without having to
hang up the handset. It is also used to transfer
calls behind a PBX or Centrex within those
systems.
• FORWARD (FWD) Button -- Allows you to
forward your calls to another station.
• HOLD Button -- Enables you to place an outside
caller on hold.
• H-P-T Switch -- Allows the user to select the ICM
signaling mode: Handsfree, Tone, or Privacy.
CALL FORWARDING
1. Press the FWD button or dial [640].
2. Dial the desired Call Forward code:
[6] = All Calls
[7] = No Answer
[8] = Busy
[9] = Busy/No Answer
3. Dial station number where calls are to be
forwarded. Confirmation tone sounds.
4. Replace handset or press ON/OFF button.
ESTABLISHING A CONFERENCE
Only stations that have Conference enabled will be
able to initiate a Conference.
1. Lift the handset.
2. Select intercom station or dial desired outside
party. When called party answers, press the
CONF button.
3. Add next conference party by selecting
another outside line or intercom station.
4. Press the CONF button again and repeat
previous step in a cycle, until all parties are
contacted.
5. When last party answers, press the CONF
button twice. All parties are connected.
TERMINATING A CONFERENCE
To terminate a Supervised Conference, the conference initiator, replaces handset or presses ON/OFF
button.
To terminate an Unsupervised Conference, press
the flashing CONF button while on-hook.
• MSG (MESSAGE WAIT) Button -- Allows you to
initiate a message waiting indication at stations
that are busy, unattended, or in Do Not Distu rb.
Message Waiting Callback request left at your
station is indicated by a flashing MSG WAIT LED.
• MUTE Button -- Allows you to switch the builtin microphone on or off when using the
speakerphone, or the handset microphone
when using the handset.
• ON/OFF Button -- Enables you to make a
telephone call without lifting the handset. It
turns the telephone on and off when using the
speakerphone.
• SPEED Button -- Provides you with access to
speed dialing, save number redial and last
number redial. This button is also used to
access flexible button programming.
• TRANS (TRANSFER) Button -- Used to transfer
an outside call from one station to another.
• VOLUME BAR -- Allows the user to adjust
speakerphone and handset volume.
UNSCREENED TRANSFER
1. Press TRANS button and dial station number.
2. When the called extension begins to signal,
hang up to transfer the call.
3. Replace handset or press ON/OFF button.
SCREENED TRANSFER
While connected to an outside line:
1. Press station button where call is to be
transferred (if programmed on your
telephone),
-orPress the TRANS button and dial the desired
station number.
(The called extension signals according to the
intercom signal switch position.)
2. When that extension answers, announce the
transfer.
3. Hang up to complete transfer.
LEAVING A MSG WAITING INDICATION
If you dial a station that is busy, unattended, or in
Do Not Disturb, you can leave a message waiting
indication.
1. Press the ON/OFF button.
2. Dial the desired intercom station. A busy tone
or DND tone is heard.
3. Press the MSG button. The called party’s MSG
button LED will flash slowly.
4. Press the ON/Off button to end the call.
Page 2

Quick Reference Card Vodavi Telephone Systems
PLACING AN OUTSIDE LINE ON HOLD
• If your system is programmed for Exclusive
Hold Preference, press the HOLD button once
for Exclusive Hold or twice for System Hold.
• If your system is programmed for System Hold
Preference, press the HOLD button once for
System Hold or twice for Exclusive Hold.
STORING SPEED NUMBERS
1. Press the SPEED button twice.
2. Dial the speed bin location.
• 9000 to 9019 = Station Speed numbers
• 9020 to 9999 = System Speed numbers
3. Dial desired telephone number.
4. Press the SPEED button.
5. Press the ON/OFF button to end speed dial
programming.
To clear an existing speed bin:
1. Press the SPEED button twice.
2. Dial the speed bin location.
3. Press the SPEED button again. Confirmation
tone sounds.
DIALING A SPEED NUMBER
1. Press the SPEED button and dial the speed bin
location,
-orPress preprogrammed speed bin button.
• 9000 to 9019 = Station Speed numbers
• 9020 to 9999 = System Speed numbers
2. When called party answers, pick up handset or
use speakerphone.
DIRECTORY DIALING
Users with display telephones may view a list of
individuals on the telephone system and have the
system automatically dial that person. Directory
Dialing may also be used to transfer a call from on e
station to another.
1. Dial the Directory List dial code [680],
-orPress the DIRECTORY DIAL flexible button.
2. Press a button on the keypad once, twice, or
three times, to represent the letter of the
alphabet, to begin viewing the list of names.
3. Scroll through the Directory List to select a
name as follows:
• Press [
.
] to scroll up to next entry,
-or-
• Press [#] to scroll down to previous entry.
4. Press the SPEED button at the desired name to
automatically dial the destination station or
outside phone number (via Speed Dial).
To transfer a call using Directory Dialing
1. Press the TRANS button.
2. Dial Directory Dial Code [680],
-orPress the DIRECTORY DIAL flexible button.
3. Press the digit associated with the person’s
name. When the name displays, press the
SPEED button to automatically dial the station.
4. Press the ON/OFF button to complete transfer.
Calls may only be transferred to internal stations.
PROGRAMMING FLEXIBLE BUTTONS
1. Press the SPEED button twice.
2. Press the flexible button to be programmed.
3. Dial the desired code from the following chart.
Confirmation tone sounds.
4. Press the ON/OFF button.
All Call Page (Internal & External)700
Background Music 632
Call Back 622
Call Park Location (System) 43+[C]
Call Park Location (Station) 439+[XXX]
Call (Park) Pickup #6+[XXX]
Caller ID Review (Answered) 659
Caller ID Review (Unanswered) 635
Directory Dial 680
Do Not Disturb 631
Extension Numbers 100-351
External All Call Page 760
(All External Zones)
External Page - Zones 1 or 2 76+[1 or 2]
Last Number Redial [SPEED]+[#]
Line Queue 621
Personal Park 438
Speed Dial Access [SPEED]+[YYYY ]
Save Number Redial [SPEED]+[
.
]
VM Group Pilot Numbers 44 [ V ]
________________________________________
C = Call Park Location (0-7)
V = Voice Mail Group Number (0-7)
XXX = Station Ext ension Num bers
YYYY = Speed Dial Bin Numbers
(9000-9019 Stat ion) (9020-9999 System)
To erase a flexible button:
1. Press the SPEED button twice.
2. Press the flexible button to be erased.
3. Press the FLASH button. Confirmation tone
sounds.
4. Press the ON/OFF button.
Page 3
Vodavi Large Screen Telephone Quick Reference Card
Large Screen Display Features
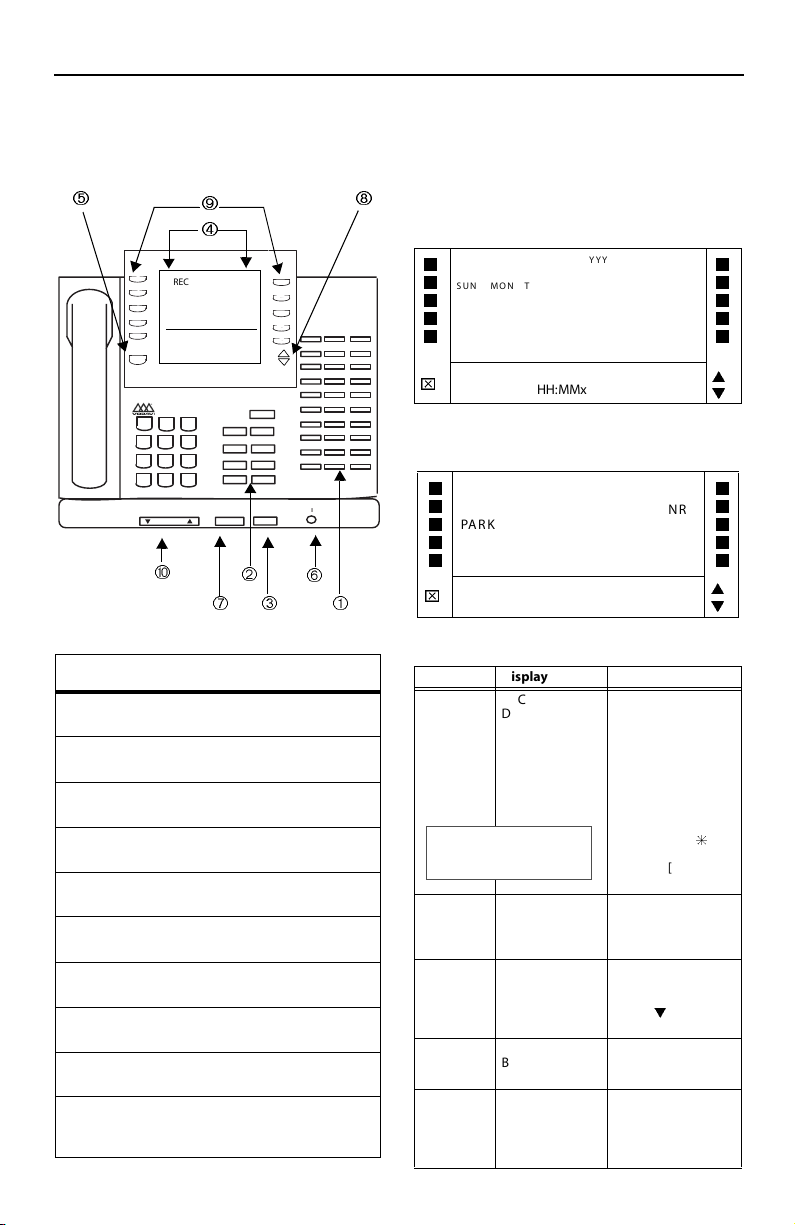
The Elite digital 30-button model provides a
7-line by 16-character display with 10 SOFT keys,
a MENU key, and UP/DOWN scroll keys.
DIGITAL
DIRECTORY DND
SPEED DIAL LNR
PAR K P ICK UP
MUSIC
FEATURES
STA XXX
MMM DD YY HH:MMx
MENU
DEF
ABC
1
3
2
JKL
GHI
MNO
5
4
6
PRS
WXY
TUV
7
9
8
0
#
*
s
HTP
CONFTRANS
MSG
CAMP ON
FWD
FLASH
MUTE
SPEED
ON/OFF HOLD t VOLUME
PAGE
MIC
Using the Soft Keys
From the main menu, use the soft keys to access
the options listed.
Calendar Mode -- When in idle mode, the
default monthly calendar will display. The
calendar may also be accessed by pressing the
MENU soft key.
I
I
SUN MON TUES WED THURS FRI SAT
I
6 7 8 9101112
I
13 14 15 16 17 18 19
I
20 21 22 23 24 25 26
27 28 29 30 3 1
STA XXX
⌧
MMM DD Y Y HH:MMx
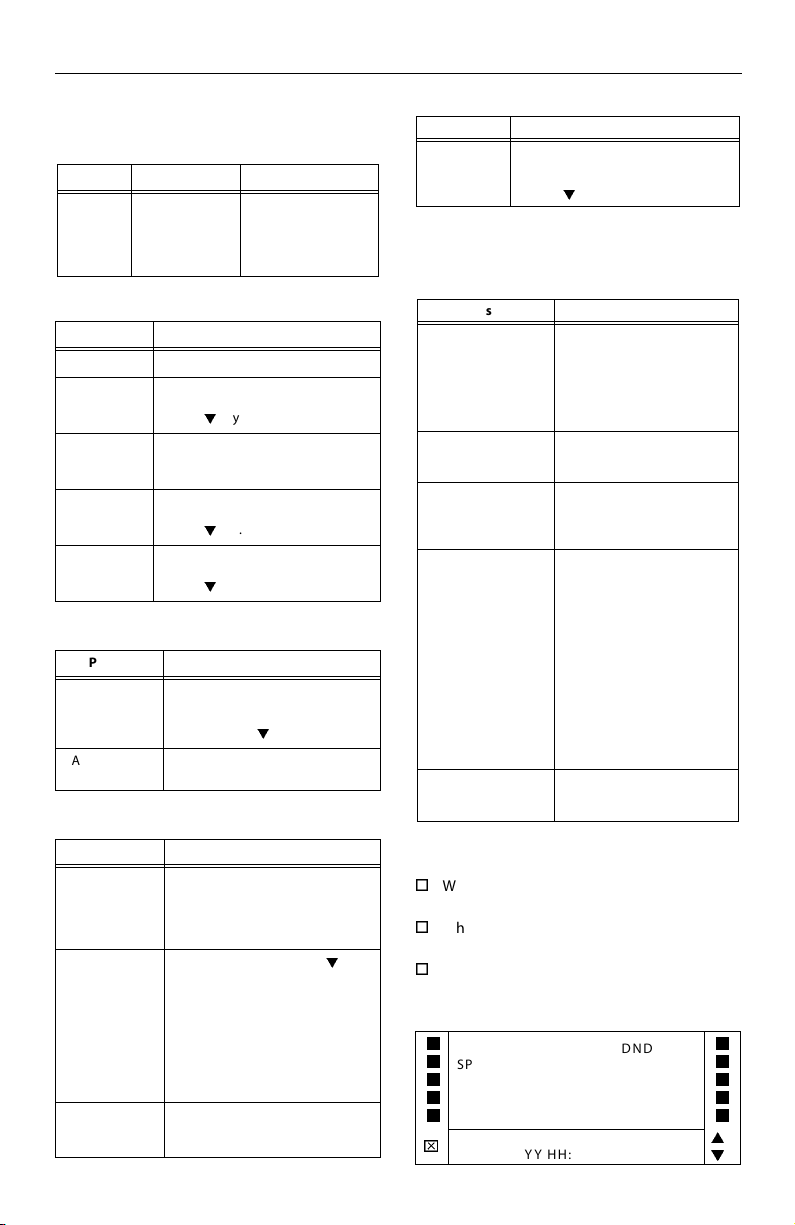
Main Menu -- To access the main menu at any
time, press the MENU soft key.
I
DIRECTORY DND
I
SPEED DIAL LNR
I
PA R K P I C K U P
MUSIC
I
FEATURES
I
STA XXX
⌧
MMM DD YY HH:MMx
MMM YYYY
1 2 3 4 5
To select a main menu option:
Feature/Button Descriptio ns
1. DSS Console -- Provides access to 30 flexible
feature/functions.
2. Fixed Feature Keys -- Used to access spe cific fixed
feature/ functions.
3. HOLD Key --Used to place calls on hold and to
retr ieve hel d calls.
4. LARGE Screen -- Designed to provide a 7-line by
16- character viewing area.
5. MENU Key -- Toggles between main menu screen
and monthly calendar.
6. MICrophone -- Used to talk with other party
without using the handset.
7. ON /OFF Key -- Used to make a call without lifting
the handset.
8. PAGE Up/Down Keys -- Used to advance to the
NEXT and PREVIOUS option screens available.
9. Soft Keys -- Used to access specific features and
functions.
10. VOLUME Control Bar -- Used to adjust level of
tone s, backgroun d music, ring ing, receiver vo lume,
and display contrast.
Press… Display shows… Then…
DIRECTORY ABC
NOTE -- Wait for t he desired
number to display before
pressing the SP EED button.
SPEED
DIAL
PARK
PICKUP
MUSIC BGM1
FEATURES CALL FWD
DEF
GHI
JKL
MNO
Enter Bin
Number
PAR K 1
PAR K 2
PAR K 3
PAR K 4
PAR K 5
BGM2
BGM OFF
PAG E IN TER NAL
PAG E EX TER NAL
VOICE MAIL
MORE
I
I
I
I
I
L
M
I
I
I
I
I
L
M
press the soft key
associated with the
desired n umber.
Use the PAGE UP/DN
keys to dis play the
previous or next 5
names in Dire ctory.
To scroll t hrough the
list, press the [
to view the previous
entry, or [#] to view
the next entry.
dial the bin number
associated with
desired e xternal
phone number.
select desired Park
location where call is
holding (1-5). Press
PG DN
PARK locations 6-8.
select de sired
background music
option.
select one of the
options listed.
M
to select
.
] key
Page 4
Quick Reference Card Vodavi Large Screen Telephone
After selecting FEATUR ES on the main menu, the
following options will display:
Call Forward
Press… Then select … Display will show…
CALL FWD All
* If Off-Ne t is selected, enter desired bin number.
If you select… Then…
Busy
No Answer
Busy/No Answer
Off Net*
Sta dial the desired stationnumber.
Voice Mail select the desired VM group (1-5).
Operator the display sh ows a “Forwarded to
ACD/UCD select desired ACD/UCD group (1-5).
Hunt select the desired Hunt g roup (1-5).
To access groups 6-8, press the PG
DOWN
XXX” message and the main menu
return s.
To access group 6-16, press the PG
DOWN
To access groups 6-8, press the PG
DOWN
Sta
Voice Mail
Operator
ACD/UCD
Hunt
M
key.
M
key.
M
key.
Page -- Internal/External
Press… Then select…
PAGE INTERNAL the desired Page Zone (ALL Call or
PAGE EXTERNAL the desired Page Zone (ALL Call or
Zones 1-4).
To access Page Zones 5-8, press
the PG DOWN
1-2)
M
key.
More
Press… Then select…
MORE Messages
Messages Clear
More Ans Machine Ring
Headset Enable
Headset Disable
UNA/UDA
More
On
Vaca tio n
Return AM
Return PM
Return
Tomo rro w
Ans Machine Spkr
Ans Machine Off
Press PG DN
access more
messages:
Return Next Week
On Trip
In Meeting
At Home
On Break
At Lunch
M
key to
Voice Mail
Press… Then select…
VOICE MAIL the desired VM group (1-5).
To access group 6-8, press the PG
DOWN
M
key.
NOTE -- To access the following voice mail options,
a DIGITAL voice mail system must be in use.
Enter password to access these VM options:
Press… Then select…
RETRIEVE MSGS Delete
Forward For ward Msg A s Is
Forward Ad d
Preamble
SEND MSG Re-R ecord
CHANGE GREETING
CHANGE PASSWORD
CHANGE NAME
Reply
Skip
Call Back
Save
Forward
Replay
Forward Add Pre amble
Cancel
Continue
Hear
Cancel
Re-Record
Append
OK
Hear
Cancel
Dial [6] to select one of the
following options:
Private
Cancel
Future
Urgent
Confirm
Send
a new greeting, password, or
name by entering the
change.
Page/Queue Displays (for LCR)
When you receive an internal/external page,
the screen will display the “MEET ME” option.
When you queue for a line, the screen will
display the “QUE CNL” option.
If you are already in queue and you receive a
page, the screen will display both “MEET ME
and QUE CNL” options.
I
DIRECTORY DND
I
SPEED DIAL LNR
I
PA R K P I C K U P
MUSIC MEET ME
I
FEATURES QUE CNL
I
STA XXX
⌧
MMM DD YY HH:MMx
I
I
I
I
I
L
M
 Loading...