

Page 1
Page 2

Page 3

STSe Quick Start Guide September, 2005
VODAVI
Contents
Installing & Programming STSe Telephone System.............................................. 1
Voicemail Programming......................................................................................... 7
Common Programming Items............................................................................... 17
Programming & Installing Accessory Devices..................................................... 29
Upgrading Software.............................................................................................. 37
WINDBA .............................................................................................................. 41
Quick Reference ................................................................................................... 49
Page 4

Page 5

STSe Quick Start Guide September 2005
I
VOD AV
INSTALLING & PROGRAMMING
STSe TELEPHONE SYSTEM
- 1 -
Page 6

STSe Quick Start Guide September 2005
I
VOD AV
- 2 -
Page 7

STSe Quick Start Guide September 2005
I
VOD AV
INSTALLING & PROGRAMMING STSe TELEPHONE SYSTEM
- References to Installation can be found in the STSe Installation Manual.
- References to Programming can be found in the STSe Programming Manual, Section F.
INSTALLATION
1. Remove system and all equipment from boxes.
2. Inspect equipment for damage or broken parts.
3. Inventory equipment.
4. Use the template to mount BKSU/EKSU and mount to plywood backboard.
5. Install all Cards into proper card slots on the BKSU/EKSU.
6. Check all pre-installed cards to ensure they are seated correctly.
7. Connect ground wire from grounding lug on left side of KSU to approved ground point as indicated in
8. Connect male and female amp connector to connectors on right side of BKSU/EKSU and punch down
9. Cross connect (Jumpers) as required to station cabling and CO Interface. Bridge clip as necessary.
10. Looking into the BKSU in the upper left area above the battery is the Blue / Red battery switch (SW4).
11. To the left on the battery switch is an Orange switch (SW5) with 8 dip switches.
(Refer to list of Flash Codes and Flexible Buttons, or Feature Codes for page number reference.)
the STSe installation manual.
other end of cable to a 66-type block.
CO Pin out: (BKSU Only)
Cable Pair 1 = CO 1
Cable Pair 2 = CO 2 through Cable pair 12
Cable Pair 12 = CO 12
Cable Pair 20 = Alarm
Cable Pair 22 = External Page
Cable Pair 23 = External Music
Cable Pair 25 = Dry Contact Relay
CO Pin out: (EKSU Only)
Cable Pair 1 = CO 13
Cable Pair 2 = CO 14 through Cable Pair 12 = CO 24
Station Pin out: (BKSU)
Cable Pair 1 = Station 100
Cable Pair 2 = Station 101 through Cable Pair 24 = Station 123
Cable Pair 24 is blank
Station Pin out: (EKSU)
Cable Pair 1 = Station 124
Cable Pair 2 = Station 125 through Cable Pair 24 = Station 147
Built-in Analog Station Ports are two RJ11 jacks located on the right side of BKSU only.
These RJ11 jacks are for Stations 148 and 149.
Turn switch ON (down).
Make sure all 8 switches are ON (down).
- 3 -
Page 8

STSe Quick Start Guide September 2005
I
VOD AV
NOTE: To the left of the battery is the PMU card. At the bottom of the PMU card is a switch marked:
1 (UP), 2 (Down). When new software (s/w) is uploaded, the new s/w is located opposite of the
position of the switch. Thus, after uploading new s/w, placing the switch in the opposite position the
system will utilize the new s/w. Placing the switch back would change the system back to old s/w. See
“Software Upgrade” for procedures to upload software.
12. Turn power ON. Let the phones power up and display is normal. Turn power OFF and wait a few
seconds. (It is important that this procedure is not rushed). Turn power back ON and then place Dip
Switch 8 OFF on the Orange Switch (SW5). System is now defaulted and ready to program. With Dip
Switch 8 Off on SW5, system will now retain program memory).
PROGRAMMING
13. At Station 100, enter programming: * * 3226
14. Flex Buttons are as follows: Top row left button is “Flex Button 1” and to the right are
“Flexible Buttons 2, 3, and 4”. The second row is Flexible Buttons 5 through 8 and etc.,
through “Flexible Button 24”.
15. Press FLASH button and dial 24 (Card Slot Programming).
16. Flexible Button 1 is Card Slot “0”; Flex Button 2 is Slot 1 and so forth. Card Slots 0, 1, 2 are built-in
(4x8x2). Flex Button 4 is Card Slot 3. Program Card Slots 3 through 13 as required.
Enter the valid number for the type of card plugged into the current card slot, then Press “HOLD”.
[00]= None [13] = SL04 (SLIB w/4 ports]
[02]= DTIB [15] = LCI4 (LCOBC)
[04]= SL02 (SLIB w/2ports) [17] = VMD1 (flash-based VMIB)
[09]= T1IB (see below) [17] = VMD2 (hard drive-based VMIB)
If the T1IB option is selected, enter a valid number (1-5) to specify the desired cluster (partial) quantity.
[1]= Cluster 4 [4] = Cluster 16
[2]= Cluster 8 [5] = Cluster 20
[3]= Cluster 12 [No Entry] = All CO lines (24)
Press HOLD to save entry. A confirmation tone sounds and the display updates. When finished, the
system must be reset for these changes to take effect. Only FLASH 24 requires system to be reset.
: T1IB is not applicable with the STSe Residential KSU System.
NOTE
17. A normal programming setup is as follows:
Several stations ring on incoming CO and if not answered, the Auto Attendant will answer. When a call
is transferred to a person’s phone, if they do not answer, the call goes to that person’s voicemail box to
leave a message. Below are the steps to accomplish this function. (See Programming Manual section
“F”, Flash Codes and Flex Button Codes, or Feature Codes for page reference.)
a. * * 3226
b. FLASH 40
c. Enter COs to be programmed and press HOLD, or press HOLD to program all CO lines.
d. Display shows “CO Programming” and the range of lines that are being programmed plus
“Page A”.
e. Press Flexible Button 13. This displays the stations that are assigned to ring on those CO
lines. The default display shows S100A
(Station 100 rings All the time).
- 4 -
Page 9

STSe Quick Start Guide September 2005
I
VOD AV
PROGRAMMING (cont’d)
f. To program CO Line Ringing, press Flexible Button 10 (Page A).
Display shows DDDR:
DDD = number (example: Station 100; Voicemail 440)
R = Ringing mode
1=Day 2=Night 3=Day Night 4=Special 5=Day Special
6=Night Special 7=All times 0=Remove ringing
NOTE: Phone must ring on incoming CO calls to receive Caller ID information.
Normal setup is S100D = Station 100 rings Day (100 1 HOLD)
V440N = Voicemail ring Night (440 2 HOLD)
g. Always check ringing Flexible Button 13. Change ringing, programming Flexible Button 10,
then check ringing display Flexible Button 13 again to ensure data is correct.
h. To program CO lines to go to the Auto Attendant if not answered by Operator (Station 100),
press Flexible Button 20. Display now shows Page “B”.
i. Press Flexible Button 5 (Pre-set Fwd Day Dest). Enter 440 and press HOLD. Calls that are
not answered will now go to the auto-attendant. Set the number of rings before the calls go the
auto-attendant.
j. Press Flexible Button 21. Display now shows Page “C”.
k. Press Flexible Button 8. (Preset FWD Day Timer). Enter how many times the CO lines should
ring before they transfer. (Remember that 4 seconds equals approx. one ring cycle. Standard
could be 16 (four ring cycles) Dial 16 and press HOLD.
NOTE: Night and Special Modes can also be set to forward after a given set of Rings.
Page B, Flexible Button 16 Preset FWD Night Dest.
Page C, Flexible Button 11 Preset FWD Night Timer
Page B, Flexible Button 17 Preset FWD Special Dest.
Page C, Flexible Button 12 Preset FWD Special Timer
l. If a CO port is available (not used), that port should be placed in CO Line Group 00. (Not Used)
i. Press FLASH and dial 40.
ii. Enter COs that are not being used. (Example: Line 4, enter 004004 HOLD)
iii. Press Flexible Button 8 (CO Line Group) by default this is Group 01.
iv. Dial 00 and press HOLD. CO Line Group is now 00.
m. To allow programming from any station:
i. Press FLASH and dial 50. Display will show “Station Programming. Enter station
numbers. Press HOLD for all stations or dial the first and last station to program.
(example: 100106 for Stations 100 through 106)
ii. Display will show “Page A; Enter Button Number”
iii. Press Flexible Button 18. Display shows ADMIN Access “Disable”.
iv. Dial one (1) and press HOLD. Display changes to enable.
(Programming can now be done from any station.)
- 5 -
Page 10

STSe Quick Start Guide September 2005
I
VOD AV
PROGRAMMING (cont’d)
n. While in programming press FLASH and dial 50.
o. As with COs, enter the range to be programmed (example: HOLD for all stations or 100110
HOLD for Stations 100 through 110).
p. Display will show page “A”. Press Flexible Button 20, display shows “Page B”.
q. Press Flexible Button 11. (Flexible Button Programming)
r. To program a Flexible Button, dial the button number, function
, function code and press
HOLD (see examples),
Examples: Button 1 is Station 100 (Enter 01 4
Button 12 is CO Line 4 (Enter 12 1
100 HOLD)
004 HOLD)
Button 18 is a Loop Button (Enter 18 2 HOLD)
Button 19 is Pool Button for CO Line Group 1 (Enter 19 3 01 HOLD)
Button 24 is Voicemail Button (Enter 24 4
440 HOLD)
Button 16 is a “multi use button” programmed by user (Enter 16 0 HOLD)
s. Program Flexible Button 24 as a Voicemail Button (440).
t. Press Flexible Button 14 to display Flexible Buttons.
(Pressing Flexible Button several times will display all 24 Buttons.)
u. Press Flexible Button 21, display now shows, “Page C”
The Phone can be programmed so calls transferred to a phone that is either not answered or busy, can be
programmed to forward to a pre-determined location after a set number of rings.
(Normal would be Voicemail 440).
- Press Flexible Button 1 (Internal No Answer FWD), and dial 440, HOLD.
- Press Flexible Button 2 (Internal Busy FWD), and dial 440, HOLD.
- Press Flexible Button 3 (Day Ext No Answer FWD), and dial 440, HOLD.
- Flex Btn 4 (Day Ext Busy FWD), is only programmed if station does not ring on incoming CO line ringing.
- Flex Btn 5 (Day Preset No Answer Timer). Multiply number of rings by 4 (for three rings enter 12, HOLD).
Night EXT No Answer and Busy; Special EXT No Answer and Busy can also be programmed as required.
- Page “C” Flexible Button 14, (Night Ext No Answer FWD) (440, HOLD)
- Page “C” Flexible Button 15, (Night Ext Busy)
- Page “D” Flexible Button 5, (Night No Answer Time, as required)
- Page “C” Flexible Button 16, (Special No Answer)
- Page “C” Flexible Button 17, (Special External Busy)
- Page “D” Flexible Button 6, (Special No Answer Timer)
NOTE: Stations that DO NOT Ring on Incoming CO Lines can also be programmed at the station.
Follow the information in the STSe User Guide to Call FWD station to voicemail.
- 6 -
Page 11

STSe Quick Start Guide September 2005
I
VOD AV
VOICEMAIL
PROGRAMMING
- 7 -
Page 12

STSe Quick Start Guide September 2005
I
VOD AV
- 8 -
Page 13

STSe Quick Start Guide September 2005
I
VOD AV
FLASH VOICEMAIL PROGRAMMING
TWO PROGRAMMING METHODS (TOUCH TONE TELEPHONE AND/OR LAPTOP)
Laptop requirements: straight through DB9 “Serial Cable” with “Female Gender Bender”.
Hyper-Terminal is a communications program.
Some Laptop operating software may require the download of “Hyper-Terminal ver. 6.3
Private Edition” from Hilgreave.com (especially XP Professional)
.
.
Normal Voicemail Setup for a Day Greeting:
Thank you for calling ________ you have reached our voicemail system. If you know your party’s
extension you may dial it now. If you know your parties name and not their extension press “4” for
dial by name. If you do not know who to speak with press “0” and you will be connected with the
operator. Thank you for calling ______________ .
Normal Voicemail Setup for a Night Greeting:
Thank you for calling ________ you have reached our voicemail system. Our office is closed. Our
normal office hours are Monday through Friday 8 AM to 5 PM Central Time. If you know your party’s
extension you may dial it now. If you know you’re party’s name and not their extension press “4” for
dial by name. If you do not know who to speak with press “0” (Example only; Mailbox 120) and you will
be connected with our general mailbox. Thank you for calling _______________.
Set-up Hyper-Terminal following the instructions in the STSe Programming Manual, Section “C”, Lap Top
Programming or as listed below.
To set up Hyper-Terminal, select the following from Laptop:
1. Start; Programs; Accessories; Communications; Hyper-Terminal. Setup New Connection.
2. Name Connection and click OK.
3. Connect using “COM 1” and click OK.
4. Select Com Port Settings (9600, None, 8, 1, XON/XOFF) and click OK.
5. Click on File (top left) of Hyper-Terminal screen and select Properties.
6. Select Settings Tab, then choose Auto Detect as the Emulation.
7. Click on “ASCII Setup” button (lower right area on screen).
8. Uncheck Wrap Lines option and click OK (twice).
9. Exit Hyper-Terminal, then save entry.
10. Connect laptop to Voicemail through Hyper-Terminal using a straight through DB9 “SSEERRIIAALL Cable”,
with a “Female Gender Bender”.
11. At Hyper-Terminal window, press ESC. Enter password “0000”.
12. To move around programming the In-Skin voicemail the following keys are used:
ESC - TO exit a program.
ENTER In-Skin Voicemail Programming
To move around this program:
ENTER key - To save data
F1 key - To move to next page
F2 key - To moves back to previous page
F4 key - Deletes data
Arrow keys - to move up; down; left; and right
Type “Exit” to close Hyper-Terminal
- 9 -
Page 14

STSe Quick Start Guide September 2005
I
VOD AV
FLASH VOICEMAIL PROGRAMMING (cont’d)
13. Select Open & Close Schedule (item # 1).
a. If Open Close time is correct, press ESC.
b. If time needs to be changed, arrow to “Time” and press F4. Enter new time in military format. First
Open, then Close. When finished press ESC.
14. Select Number Plan (item # 2)
NOTE: The CCR menu number at the top of the CCR Menu (1). Max of five (5) Menus F1 and F2 keys
to move from one menu to another. “Y” next to first digit permission key is enabled. “N” key is
disabled.
CCR Menu 1
a. Digit 1 should be “Y”
b. Digit 2, 3, 5, 6,7, 8, and 9 should be “N”
c. Digit 4 should be “Y”
d. Digit 0 should be “Y” and extension ( 0)
e. Digit * and # should be “Y”
f. Press F1 for CCR Menu 2
CCR Menu 2
g. Digit 1 should be “Y”
h. Digit 2, 3, 5, 6,7, 8, and 9 should be “N”
i. Digit 4 should be “Y”
j. Digit 0 should be “Y” and Extension 120
k. Digit * and # should be “Y”
l. When finished press ESC.
15. Select Mailbox Assignments (item # 9)
a. Arrow to Name & Name Mode.
b. Enter the First then Last name of each user. Capitalize only the first letter of each name.
c. To change Mode from Last name to First name, Arrow up to where cursor is under the “L” in Last.
Press “F”, then press ENTER. Last will change to “First.
d. Arrow down to Mailbox 120.
e. Arrow right to “Direct Xfer” column.
f. The cursor is under the “O” in OFF.
g. Press “1”, then press ENTER. OFF changes to “ON”.
NOTE: “ON” sends calls to mailbox, “OFF” sends calls to stations.
h. Press ESC.
16. Type “Exit” from the Main Menu and press ENTER.
--- The voicemail system is now programmed. ---
- 10 -
Page 15

STSe Quick Start Guide September 2005
I
VOD AV
FLASH VOICEMAIL PROGRAMMING (cont’d)
Recording Auto Attendant Greeting
You are now ready to record your system (Auto Attendant) Greeting. You will need to record a greeting for the day
mode (Greeting 1) and the night mode (Greeting 2)
1. To program via Telephone, access system administrator mailbox by dialing into the voicemail system
(Station 150).
2. When voicemail answers, dial [*] + [#].
3. At the Prompt ”Enter Your Mailbox Number”.
4. Enter Administrator number [#] + [00].
5. System announces Mailbox 15-00, “Enter Your Password”.
6. Enter System Admin password [9] + [#] + [56].
7. Press 1 for system greetings and follow instructions to record both the day and the night greeting.
See example Greetings on previous pages, Day Greeting Number is – 1, Night Greeting Number is – 2
NOTE: The default greeting that follows your recorded greeting can be re-recorded by recording 5
seconds of silence. Recording 091= If you have a mailbox on this system press #. Recording 106 =
Enter extension number of the party you are calling. For the directory press 4.
8. From Main Menu, press Item 8 to listen to Prompts. Press 7 to re-record Prompts.
9. When finished, hang-up.
--- The voicemail greetings are now recorded. ---
Programming Auto Attendant without using a Laptop
Refer to the previous greetings above. Omit the statement about pressing 4 for Dial by Name.
1. Enter programming the voicemail via telephone as listed above.
2. Record the Auto-Attendant greeting for both day and night.
3. Using the telephone the Main menu Item 8 allows you to listen to a system prompt and Item 7 allows
you to re-record a system prompt.
4. To list a directory of users, verify (Item 8, listen to a prompt). Prompt 106 (enter extension number of
the party you are calling. For the directory, press 4). Go to Item 7 (record a system prompt).
Re-record Prompt 106 (For Mary Jane dial 101, for Bill Martin dial 105, for Tim Brown dial 103, etc.).
This allows the customer to re-record names as required without having to re-record the main greetings.
NOTE: The default greeting that follows your recorded greeting can be re-recorded by recording 5 seconds
of silence. Recording 091= If you have a mailbox on this system press #.
- 11 -
Page 16

STSe Quick Start Guide September 2005
I
VOD AV
FLASH VOICEMAIL PROGRAMMING (cont’d)
Program Telephones to Operate with the Voicemail
- References to Programming: See Programming Manual, Section F. (Refer to list of Flash Codes and
Flexible Buttons, or Feature Codes for page reference.)
To program the voicemail (auto attendant) to answer incoming CO type calls, you must program CO Line Ringing
and/or CO Line Preset Fwd.
1. Dial * * 3226.
2. Press FLASH and dial 40.
3. Enter the CO Lines to be programmed or press HOLD for all COs.
4. Display shows CO Line Programming Page “A”.
5. Press Flexible Button 13 to display programmed ringing assignments.
6. Press Flexible Button 10 to program CO Line Ringing.
Display shows DDDR
DDD = number, Example Station 100; Voicemail 440
R = Ringing mode
1=Day, 2=Night, 3=Day Night, 4=Special, 5=Day Special, 6=Night Special, 7=All times, 0=Remove ringing
Normal setup is S100D = Station 100 rings Day (100 1 HOLD)
V440N = Voicemail ring Night (440 2 HOLD)
NOTE: If you haven’t done so, program Station Call Forward Busy/No Answer to voicemail box.
Either can be accomplished at the phone (see STSe User Guide), or program FLASH 50,
Page “C”. If phones ring on incoming CO calls, program Call Fwd Busy and No Answer at
FLASH 50, Page “C”.
NOTE: Program Flexible Button 24 as a voicemail button.
To program button from each telephone:
a. Press the SPEED button twice.
b. Press the flexible button to be programmed (Flexible Button 24).
c. Dial 440.
d. Confirmation tone heard. Button 24 is now programmed as personal voicemail button.
--- Programming is complete. ---
- 12 -
Page 17

STSe Quick Start Guide September 2005
I
VOD AV
HARD DRIVE VOICEMAIL PROGRAMMING
The two required programming methods, touch-tone phone and laptop with CD-ROM), are used to program the
Hard Drive voicemail.
- Laptop Requirements: straight through DB9 "Serial Cable"
Installing Software Onto Your PC
1. Place the In-Skins Admin software CD in the CD-ROM drive on your computer.
2. The Wizard should load CD software. When the CD finishes loading, "click", "Install" option.
3. Click OK at Welcome to IN-Skins Admin installation program.
4. Follow wizard to complete installation.
5. When finished select "Exit", remove CD and restart computer.
Starting the In-Skins Admin Program
1. Always make sure the voicemail is working by dialing a voicemail port (150-157) before connecting
computer to the system.
2. The file to open “Admin”, program can be found at: Start > Programs > In-Skins Admin or Icon on
desktop.
3. Each time you open this program, the "Connection Wizard" will display these connection options:
• Direct via RS232
• Remote System via Modem Call
• Offline - Local Direct
4. The Hard Drive voicemail system can be administered locally, or remotely, or you can work offline to
add multiple names.
Local STSe Site
1. When connecting onsite use a straight through serial cable. A female to female gender changer is
required also.
2. Make sure the voicemail system is operating by dialing into the voicemail before connecting.
3. Start the Admin program.
4. At the "Welcome" window, select "Direct via RS232 Cable" and click “NEXT”.
5. Type in a new name, or select a name from the dropdown list, and click “NEXT”.
6. Select the COM Port for your system (normally COM port 1).
7. Make sure baud rate: is 115200 baud.
8. Enter mailbox number: 100.
9. Enter password: 0000
10. Click next and wait for program to load. This can take several minutes.
- 13 -
Page 18

STSe Quick Start Guide September 2005
I
VOD AV
HARD DRIVE VOICEMAIL PROGRAMMING (cont’d)
The following programming steps are based on the Day Greeting and Night Greeting shown below.
Normal Voicemail Setup for a Day Greeting:
Thank you for calling ________ you have reached our voicemail system. If you know your party’s extension
you may dial it now. If you know your party’s name & not their extension, press “4” for the company directory.
If you do not know who to speak with, press “0” and you will be connected with the operator. Thank you for
calling ______________ .
Normal Voicemail Setup for a Night Greeting:
Thank you for calling ________ you have reached our voicemail system. Our office is closed. Our normal
office hours are Monday through Friday from 8 AM to 5 PM Central Time. If you know your party’s extension
you may dial it now to leave a message. If you know you’re party’s name and not their extension press “4” for
the company directory. If you do not know who to speak with press “0” (Example only: Mailbox 120) and you
will be connected with our general mailbox. Thank you for calling _______________ company.
Programming Using your PC.
1. Connect to the Hard Drive voicemail.
2. Start the wizard program.
3. Select, “System Lines”.
4. Select, “How to Answer”, for all lines.
5. Select, “Option to run”.
6. Select, “Time Control”.
7. Select, time “8TO5-8TO5”.
8. Event Group should be 5.
9. Blockage group should be 1.
10. Repeat for all 8 ports.
11. Press “Save” when completed.
12. Select, “Time Control”.
13. Select, “Time Control List”.
14. Select time control “8TO5” 8am to 5pm.
15. Start at Rule 1.
16. Enter start time that day mode is to operate 0800.
17. Enter end time for day mode 1700.
18. Select Day of the Week.
19. Check days the Day Mode operates M, T, W, TH, F.
20. Select menu to operate, enter Menu 100.
21. Ensure Start Day and End Day are left blank.
22. Select Rule 2.
23. Select What to Do.
24. Select Menu 120.
25. Ensure Items 2.1, 2.2, 2.3, 2.4, 2.5 are left blank.
26. Ensure Rule 3, 4 and 5 are all blank.
27. Click “Save”.
28. Close Time Controls.
29. Select Menu Controls.
30. Select Menu List.
31. Select Menu 100. (Day Menu).
32. Select 1. General.
- 14 -
Page 19

STSe Quick Start Guide September 2005
I
VOD AV
HARD DRIVE VOICEMAIL PROGRAMMING (cont’d)
33. Name Menu 100.
34. Password 2275 by default.
35. Do not select Time Control. (Leave blank)
36. Time Out default 5.
37. Retries default 3.
38. Select Menu 100.
39. Select 2. Prompts.
40. Select 2.1 Introduction.
41. Enter Prompt Name 100 Day.
42. Select 2.2 Body.
43. Enter Body Name 100 Body.
44. Select 2.3 Instructions.
45. Enter Instructions Name 100.vox.
46. Select 3. Menu Actions.
47. Leave 3.1 Time Out Action (Operator).
48. Leave 3.2 Retry Action (Operator).
49. Leave 3.3 Key * (Play Instructions).
50. Leave 3.4 Key # (Voicemail).
51. Leave 3.5 Key 0 (Operator).
52. Select 3. Menu Actions.
53. Leave 3.6 Key 1 (auto-Attendant Start).
54. Select 3.7 Key 2 (auto-Attendant Start).
55. Change to Invalid option.
56. Select 3.8 Key 3 (auto-Attendant Start).
57. Change to Invalid Option.
58. Select 3.9 Key 4 (Company Directory MBX).
59. Change to Company directory EXT.
60. Select 3.10 Key 5 (Company Directory EXT).
61. Change to Invalid Option.
62. Leave 3.11 Key 6 (Invalid Option).
63. Leave 3.12 Key 7 (Voice Mail).
64. Leave 3.13 Key 8 (Record Prompts).
65. Leave 3.14 Key 9 (Hang Up).
66. Select Menu 120. (Night Menu)
67. Select 1. General
68. Name Menu 120.
69. Password 2275.
70. Do Not use Time Control. (Leave blank)
71. 1.5 and 1.6 same as Day Menu.
72. Select 2. Prompts.
73. Items 2.1 through 2.3 same as Day Menu.
74. Select 3. Menu Actions.
75. Select 3.1 Time Out Action (Operator).
76. Change to Voice Mail 120.
77. Select 3.2 Retry Action (Operator).
78. Change to Voice Mail 120.
79. Leave 3.3 Key * (Play Instructions).
80. Leave 3.4 Key # (Voicemail).
81. Select 3.5 Key 0 (Operator).
82. Change to Voice Mail 120.
83. Select 3.6 Key 1 (Auto-Attendant Start).
84. Change to Voice Mail Start.
85. Select 3.7 Key 2 (Auto-Attendant Start).
86. Change to Invalid Option.
- 15 -
Page 20

STSe Quick Start Guide September 2005
I
VOD AV
HARD DRIVE VOICEMAIL PROGRAMMING (cont’d)
87. Select 3.8 Key 3 (Auto-Attendant Start).
88. Change to Invalid Option.
89. Leave 3.9 Key 4 (Company Directory MBX).
90. Select 3.10 Key 5 (Company Directory EXT).
91. Change to Invalid Option.
92. Leave 3.11 Key 6 (Invalid Option).
93. Leave 3.12 Key 7 (Voice Mail).
94. Leave 3.13 Key 8 (Record Prompts).
95. Leave 3.14 Key 9 (Hang Up).
96. When finished click “Save”.
97. Close Menus.
98. Select Subscribers.
99. Select Subscribers List.
100. Select each mailbox and enter subscribers first and last names. No other entries or changes required.
101. Select mailbox 120 and enter in First name block Nighttime mailbox for you reference.
102. When finished click “Save”.
103. Close Subscribers.
104. Exit Wizard program.
Programming Via Telephone
Administrator Login
1. Dial any extension connected to voicemail (150-157).
2. At Main Greeting Press 7 and enter mailbox number (100).
3. At Mailbox Greeting press * and enter mailbox password (0000)
OR
1. Dial 440 or press your pre-programmed voicemail button or use right soft key’s to go to your mailbox.
2. At Mailbox prompt enter your password (0000).
3. After entering password press 7 to gain access to Admin.
Prompt should say enter password (2275). Password must be entered within 3 seconds.
NOTES:
- Prompt could also say, “you have no messages.” If this happens, then press 7 again and enter
password at prompt.
- Prompt should say “To record prompts press 1”. At this prompt you are logged into the supervisor
mailbox and are connected to Admin programming.
- When logged into Admin programming via telephone. prompt will say, “To record Prompts press 1,
Administer Mailboxes press 2, Administer Distribution List press 4, Administer Broadcast Messages
press 5, System Administration press 8.”
To record prompts:
1. Press 1 to record prompts.
2. Follow instructions to record Day Greeting and Night Greeting.
3. When completed Hang-up.
4. Dial 150 and press 7.
5. Dial 120.
6. Press * and enter password 0000.
7. Record mailbox 120 greeting for general night mailbox.
Example: “You have reached the nighttime mailbox. Please leave a message at the tone and
someone will contact you the next business day.”
- 16 -
Page 21

STSe Quick Start Guide September 2005
I
VOD AV
COMMON
PROGRAMMING
ITEMS
- 17 -
Page 22

STSe Quick Start Guide September 2005
I
VOD AV
- 18 -
Page 23

STSe Quick Start Guide September 2005
I
VOD AV
COMMON PROGRAMMING ITEMS
(References to Programming: See Programming Manual, Section F. Refer to list of Flash Codes and Flexible
Buttons, or Feature Codes for page number reference.)
1. Admin Access
(To accomplish Flash programming from any telephone. By default Station 100).
At Station 100:
Dial * * 3226
FLASH 50
Enter station range to be programmed (display shows Page “A”)
Press Flexible Button 18, “Admin Access”.
Press 1, HOLD.
2. Attendant Display Timer
Time Display screen holds an item before it changes to the next screen. Example: Line 1 ringing; call
answered, it changes to say Line 1. Changing this to a longer timer allows the operator to recognize the
CO line she is on before the display changes to another screen.
* * 3226
FLASH 02, Button 2
(Default is 1 sec. Suggested time is 5 sec.)
3. Group Listening
Press ON/OFF while off hook. This turns on the speaker and turns off the microphone, so other people in
the area can monitor the conversation. They can only listen, thus the term, “Group Listening".
* * 3226
FLASH 05, Button 9
(Default is disabled. Enter 1 to enable)
4. Attendant Station Assignment
Default is station 100 for group 0. (See Tenant Sharing, Attendant programming below.)
5. Tenant Sharing
Tenant Sharing allows for up to 10 tenants, groups, companies, and etc. (0-9). Each group can have its
own operator, up to 6 in each group. By default, Group 0 has operator assigned to (Station 100).
• Stations are assigned to groups (0-9). All stations are assigned to Group 0 by default.
• CO Lines can be assigned to groups. By default, all CO Lines are assigned to Group 0.
When CO lines are assigned to different groups, dialing 9 will access the last CO Line in your group.
A station can press 0 and go to the operator in their group.
- 19 -
Page 24

STSe Quick Start Guide September 2005
I
VOD AV
COMMON PROGRAMMING ITEMS (cont’d)
Tenant Sharing Example: Setting up two companies, each company having 4 Stations and 2 CO Lines.
Stations 100 - 103 and CO Lines 1 - 2 assign group 0. (Station 100 is operator)
Stations 104 -107 and CO Lines 3 - 4 assign to group 1. (Station 104 is operator)
Station 100 is operator for Group 0 and station 104 for Group 1.
a. * * 3226
b. Flash 05, Flexible button 17 (Multiple Tenants).
c. Press 1, HOLD to enable.
d. Flash 10; press the desired group flexible button and enter station number plus 1 to enter.
(Flexible Button 1 is Group 0, Flexible Button 2 is Group 1, Flexible Button 3 is Group 2, etc.)
(Example: Flexible Button 2, Group 1: enter 104 1 HOLD (default = Flex Btn 1, Grp 0, Sta 100).
e. Flash 50 and enter range to program, or Flash 51 and enter station to program.
(Example: Flash 50, 100 103 HOLD)
f. Press Flexible Button 22, Page D.
g. Press Flexible Button 1. Tenant Group 0. Group 0 by default.
h. Flash 50 and enter range, or Flash 51 and enter station number.
(Example: Flash 50 104 107 HOLD)
i. Flexible Button 22, Page D. Flexible Button 1. Enter Group number. (Example: 1, HOLD)
j. Flash 40 and enter range to program. (Example: Flash 40, 001 003 HOLD)
k. Page A, Flexible Button 17.
l. Enter Tenant Group 0. Default is 0
m. Flash 40 and enter range to program. (Example: 003 004, HOLD)
n. Page A, Flexible Button 17. Tenant Group.
o. Dial 1 HOLD. Stations are in Tenant Group 1.
6. Day Light Savings
FLASH 05 Flexible Button 16.
1 to enable or 0 to disable.
If enabled: time will jump ahead from 2AM to 3AM on the first Sunday in April, and time will jump back from
2AM to 1AM on the last Sunday in October.
7. Setting Time and Date
From station 100 or first attendant, dial 692.
Enter two-digit format as listed below. Note the time is military time.
Enter YY MM DD HH MM (Year, Month, Hour, Minute)
- 20 -
Page 25

STSe Quick Start Guide September 2005
I
VOD AV
COMMON PROGRAMMING ITEMS (cont’d)
8. Set-up Modem Dialing to Voicemail (498)
* * 3226
FLASH 67
Press Flex Button 6, then press 1 and HOLD.
Lower RS232 serial port is now enabled.
Use the null modem cable that comes with the Modem Card (Null Modem Cable) to connect from Serial
Port 2 (lower RS232) on KSU to the serial port on the Flash voicemail.
Set up Hyper-Terminal to dial number into phone system.
Call must be answered and transferred to 498.
When 498 answers, press ESC. At password screen, enter password (0000) and program as required.
9. Card Slot Programming
To add a new card to a system, the card slot must be programmed for the type of card.
(For programming to take effect, the system must be reset after card slot programming is completed.)
NOTE: Power must be turned OFF prior to installing cards.
* * 3226
FLASH 24
Press Flex Button starting with Flex Button 4 (card slot 3).
[00]= None [08]= PRIB [15] = LCI4 (CO Line Card)
[02]= DTIB (Digital Card) [09]= T1IB [16] = SL04C (with caller ID)
[04]= SL02 (built-in 2 port card) [13] = SL04 (Analog Card] [17] = VMIB (Flash or HDD VM Card)
If the T1IB option is selected, enter a valid number (1-5) to specify the desired cluster (partial) quantity.
[1]= cluster 4 [4] = cluster 16
[2]= cluster 8 [5] = cluster 20
[3]= cluster 12 [No Entry] = All CO lines
10. Fax Detect
Allows for CO Lines to be used for incoming Fax calls. For example, when Fax Detect is enabled on all CO
lines, then the System answers the call and looks for the Fax signal. If the Fax Signal is present the fax
call is routed to the analog station connected to the Fax machine. If the Fax signal is not present, then the
call is routed as identified in Flash 40 “Ringing Assignments”.
To enable Fax Detect:
a. * 3226
b. FLASH 40, and enter CO Line range to program
c. Flexible Button 20, Page B
d. Flexible Button 18, Fax Detect
e. Dial 1 to Enable
f. FLASH 09
g. Flexible Button 13, Fax Route
h. Enter the Analog port assigned to the Fax machine.
i. FLASH 01
j. Flexible Button 5, Fax Timeout
k. Enter number of seconds for a CO Call to look for a fax signal, before it is considered a non-fax call.
l. FLASH 5
m. Flexible Button 19, Fax Detect Long Time.
n. Enter 1 to Enable (Enabled = 7 seconds; Disable = 3.5 seconds)
- 21 -
Page 26

STSe Quick Start Guide September 2005
I
VOD AV
COMMON PROGRAMMING ITEMS (cont’d)
11. CO Line Programming
* * 3226
FLASH 40
Enter range to program (example: 001003 = Lines 1 through 3, press HOLD).
Just pressing HOLD is for all CO lines (001-028).
12. CO Line Ringing
* * 3226
FLASH 40
Enter CO Line range to program.
To program CO Line Ringing, see page “A”, Button 10.
To view CO Line Ringing Display, see page “A”, Button 13.
DDDR:
(DDD = number, example: Station 100; Voicemail 440)
(R = Ring mode): 1=Day; 2=Night; 3=Day Night; 4=Special; 5=Day Special; 6=Night Special; 7=All times; 0=No ringing
13. Preset Call Forward
Incoming CO Line rings on a phone or group of phones and if not answered the call would then be
transferred to the Auto-Attendant based on the number on rings prior to transfer.
* * 3226
FLASH 40
Enter range to be programmed, or press HOLD for All COs.
Flexible Button 20. Display now shows Page “B”.
Press Flexible Button 5 (Pre-set Fwd Day Dest). Enter 440 and press HOLD.
Calls that are not answered in the Day Mode will now go to the auto-attendant. Set the number of rings
before the calls go the auto-attendant.
Press Flexible Button 21. Display now shows Page “C”.
Press Flexible Button 8. (Preset FWD Day Timer).
Enter how many times the CO lines should ring before they transfer. (Remember that 4 seconds equals
approx. one ring. Standard could be 16 (Four rings) Dial 16 and press HOLD.
NOTE: Night and Special Modes can also be set to forward after a given set of rings.
Page B, Flexible Button 16 Preset FWD Night Dest.
Page C, Flexible Button 11 Preset FWD Night Timer.
Page B, Flexible Button 17 Preset FWD Special Dest.
Page C, Flexible Button 12 Preset FWD Special Timer
14. CO Line Group
To remove CO Line ports in the system that do not have dial tone and is not used.
* * 3226
FLASH 40
Enter CO Line range to be programmed.
Display shows Page “A”.
Press Flexible Button 8, CO Line Group.
If CO port is not used, enter “00” and press HOLD.
- 22 -
Page 27

STSe Quick Start Guide September 2005
I
VOD AV
COMMON PROGRAMMING ITEMS (cont’d)
15. Ring Delay Timer
Ring Delay is programmed to “06” on All CO Lines that use Caller ID. This allows the Caller ID data to
appear on the telephone and the telephone to ring at the same time.
* * 3226
FLASH 40
Enter CO Line range to program.
Press Flexible Button 21 Page “C”.
Press Flexible Button 2, Ring Delay Timer.
Change to “06” and press HOLD.
16. Next Caller ID Name/Number Display
A Flexible Button must be programmed for Name/Number to appear on incoming calls. The feature code is
653. If the Button is pressed and the LED is ON, the display will show both Name and Number. Otherwise
the button must be pressed to show the Name.
At telephone, press SPEED twice. Press the Flexible Button to be used. Dial 653. Confirmation tone
should be heard.
17. Station Programming
* * 3226
FLASH 50
Enter a range to be programmed (example:100102 for Stations 100 through 102, press HOLD or press
HOLD to program all stations).
18. Flexible Button Programming
* * 3226
Flash 50 Enter range to be programmed (100108) or HOLD for all Stations.
Flash 51 Enter station number, HOLD for just one station. (101 HOLD)
Press Flexible Button 20 for Page B.
Flexible Button 11, for Flexible Button Programming.
Flexible Button 14 to review programmed buttons.
Examples:
Dial 24 4 440 (This makes Button 24 Voicemail 440)
Dial 06 1 001 (This makes Button 6 CO Line 1)
Dial 20 2 (This makes Button 20 Loop Button)
Dial 19 3 01 (This makes Button 19 Pool Line group 1)
Dial 15 0 (This makes Button 15 Flex button user changeable, “Open”)
To program Last Number Redial (onto Button 21):
Dial 21 4 650 HOLD (Button 21 is now Last Number Redial).
- 23 -
Page 28

STSe Quick Start Guide September 2005
I
VOD AV
COMMON PROGRAMMING ITEMS (cont’d)
19. Headset Mode
Change Speakerphone from Full Speakerphone to Disable. This does not disable the speakerphone it only
allows it to be disabled when in the headset mode.
a. Speakerphone Mode
* * 3226
FLASH 50
Enter the Station range to be programmed.
Press Flexible Button 20 Display shows Page “B”.
Press Flexible Button 4, “Speakerphone”.
Default is 0 (Full Speakerphone). Change code to "2" (Disable).
b. Headset Mode
(Still on Page “B”)
Press Flexible Button 18, “Headset Mode”, (default is ”0”).
1 = 2.5mm jack located on top left side of phone.
0= Normal handset jack on side of phone.
c. Light Control
The LED light above the display may be programmed for 5 separate functions.
(Still on Page “B”)
Press Flexible Button 15, “Light Control”.
(Default is None. Change as required below and press HOLD.)
0= None
1= Button Incoming Ringing
2= Voicemail
3= Message Wait
4= Headset in use
d. Headset On/Off Button located on the phone
Headset Feature Code is 634. This can be accomplished in Flash 50 Flexible Button Programming or
at each phone press the Speed button twice and then press a Flexible Button to be to be used as the
Headset Button (On/Off Mode) and dial 634).
To place the phone in headset mode press the Headset Button (LED On) and use the phone ON/OFF
Button to answer calls or disconnect from calls. While in the Headset Mode you can still use the
Handset. Only the Speaker has been turned “OFF”.
To remove Headset Mode press the headset button again (LED off).
20. Name in Display
Dial Feature code 690
Enter a name up to seven digits. Letters are two digit input.
(Example: “A” = Dial 2 and 1; “B” = Dial 2 and 2; “C” = Dial 2 and 3. Space = 11)
21. Off Hook Preference
* * 3226
FLASH 50
Enter stations to be programmed.
Press Flexible Button 20, Page “B”.
Press Button 10.
Dial Button number (example: the Pool Button, Button 20 by default is a Pool Button).
Press 1 to enable, then press HOLD (example: 201).
- 24 -
Page 29

STSe Quick Start Guide September 2005
I
VOD AV
COMMON PROGRAMMING ITEMS (cont’d)
22. Flexible Button Programming Station User Level
Press SPEED (twice).
Press desired Flexible Button to be programmed. Dial feature code (See Programming Manual).
(Example: SPEED, SPEED; press Flexible Button 24; dial 440) Flexible Button 24 = Voicemail Button.
23. Call Coverage
NOTE: DSS buttons for stations are dual function buttons in this application..
Press SPEED twice; Press Flexible Button for station to cover; Dial: 646 = Ringing
(Example from station 101: Speed, Speed, press DSS button 100 and dial 646100)
Next to set the timer for ringing :
* 3226
Flash 51 and enter 101 HOLD
Press Flexible Button 21, Page C
Press Flexible Button 18, Call Coverage Ring Timer.
Enter time as required and press HOLD
647 = Non-Ringing
Example: This was accomplished on Station 101. Then Station 101 would ring if Station 100 did not answer
a ringing call and the call coverage timer expired. This only covers the ringing of a station 100 and does not
affect the other timers like no answer or etc.
24. Speed Dial Numbers
Each phone has 20 Bin Numbers for their personal numbers. (Bins 9000 through 9019). The system has 80
numbers (9020 through 9099) for everyone to use. The last twenty Bin numbers are not Toll Restricted.
To program at the phone:
a. Press the Speed button twice (Speed Speed). This will automatically select a CO Line. If you wish to
program a CO line only press the Speed button once and then press a CO Line Button.
b. Dial the Bin Number 9000 – 9019 at a station or 9020 – 9099 from the Attendant position.
c. Dial the telephone as you normally would.
d. Press the Speed button when finished.
To place the speed dial number on a flexible button:
a. Press the Speed button twice.
b. Press the flexible button to use
c. Dial the Bin number of the speed dial number
25. Multi Voicemail Buttons
Different mailbox buttons can be assigned to phones, like General Mailbox’s and etc. When a message is
in these mailbox’s it light the LED also.
SPEED, SPEED, press desired Flexible Button and dial 460 + VMID (example: 460 150 for Mailbox 150)
- 25 -
Page 30

STSe Quick Start Guide September 2005
I
VOD AV
COMMON PROGRAMMING ITEMS (cont’d)
26. Call Forward Busy / No Answer to Voicemail (Internal & External)
CO Calls that are answered and transferred to a station and that station is busy or doesn’t answer the call.
These calls can be transferred as required. Normally they would be transferred to that station’s voicemail
box to leave a message.
> If incoming CO Lines ring on a phone (or set of phones) and voicemail is used, then EXT Busy Forward is
not programmed to go to voicemail, only no answer is programmed.
The following options are available in Flash code 50 or 51.
Page C Flexible Button 1 = Internal No Answer Forward
Page C Flexible Button 2 = Internal Busy Forward
Page C Flexible Button 3 = Day External No Answer Forward
Page C Flexible Button 5 = Day No Answer Timer
Page C Flexible Button 4 = Day External Busy Forward
Page C Flexible Button 14 = Night External No Answer Forward
Page D Flexible Button 5 = Night No Answer Timer
Page C Flexible Button 15 = Night External Busy Forward
Page C Flexible Button 16 = Special External No Answer Forward
Page D Flexible Button 6 = Special No Answer Timer
Page C Flexible Button 17 = Special External Busy Forward
Normal setup would be for Internal and Busy No Answer forward to 440 (voicemail). External No answer
forward to 440. External Busy if phone rings on incoming CO calls do not program.
> If Phone does not ring on incoming CO calls, then program for 440.
You can also forward a phone when in DND (Do Not Disturb).
Page D Flexible Button 3 = Internal DND Forward
Page D Flexible Button 4 = External DND Forward
27. Virtual Stations
The use of a digital station without a telephone set being attached.
Example: A company has outside sales people that are not always in the office. One common phone
could be used with the flexible buttons programmed as Call coverage buttons to the virtual stations. The
virtual stations can be programmed for call forward just like other stations. Now calls can be transfer to
station (virtual) and if not answered would go to voicemail. This way a sales person could receive calls
while they were available in the office. This saves a company the expense of purchasing telephone sets
that are not used or stations ports that are not needed.
To make a virtual station:
* * 3226
Flash 50 or Flash 51
Flexible Button 20, Page B.
Flexible Button 1.
Enter 9, HOLD for a virtual station.
- 26 -
Page 31

STSe Quick Start Guide September 2005
I
VOD AV
COMMON PROGRAMMING ITEMS (cont’d)
28. Door Box
The Digital Door Box (part number 3560-08) connects to an unused available digital port. The door box has
a volume control for the speaker on the bottom left side of box. Inside the door box is four (4) connecting
screws. The two (2) screws on left side allow for the connection of an external door button. The two (2)
screws on the right connect to the digital port. See STSe Installation manual.
To Program Door Box:
* * 3226
Flash 50 (for a range of stations) Flash 51 (for one station only).
Flexible Button 20, Page B
Flexible Button 1
Dial 020
Flexible Button 21, Page C
Flexible Button 13, Ring Tone
Program ring tone (00-35) for Door Box
Program a Call Coverage Button on all phones you want to ring for Door Box.
> If a Door Open relay is used to open door, see door box drawings to program and connect built-in relay.
29. Backlight Phone
* * 3226
Flash 50 or 51and enter station number.
Flexible Button 22, Page D
Flexible Button 7, Backlight
Dial code as required:
0 = OFF
1 = ON
2 = In Use
- 27 -
Page 32

STSe Quick Start Guide September 2005
I
VOD AV
- 28 -
Page 33

STSe Quick Start Guide September 2005
I
VOD AV
PROGRAMMING & INSTALLING
ACCESSORY DEVICES
- 29 -
Page 34

STSe Quick Start Guide September 2005
I
VOD AV
- 30 -
Page 35
STSe Quick Start Guide September 2005
I
VOD AV
PROGRAMMING & INSTALLING ACCESSORY DEVICES
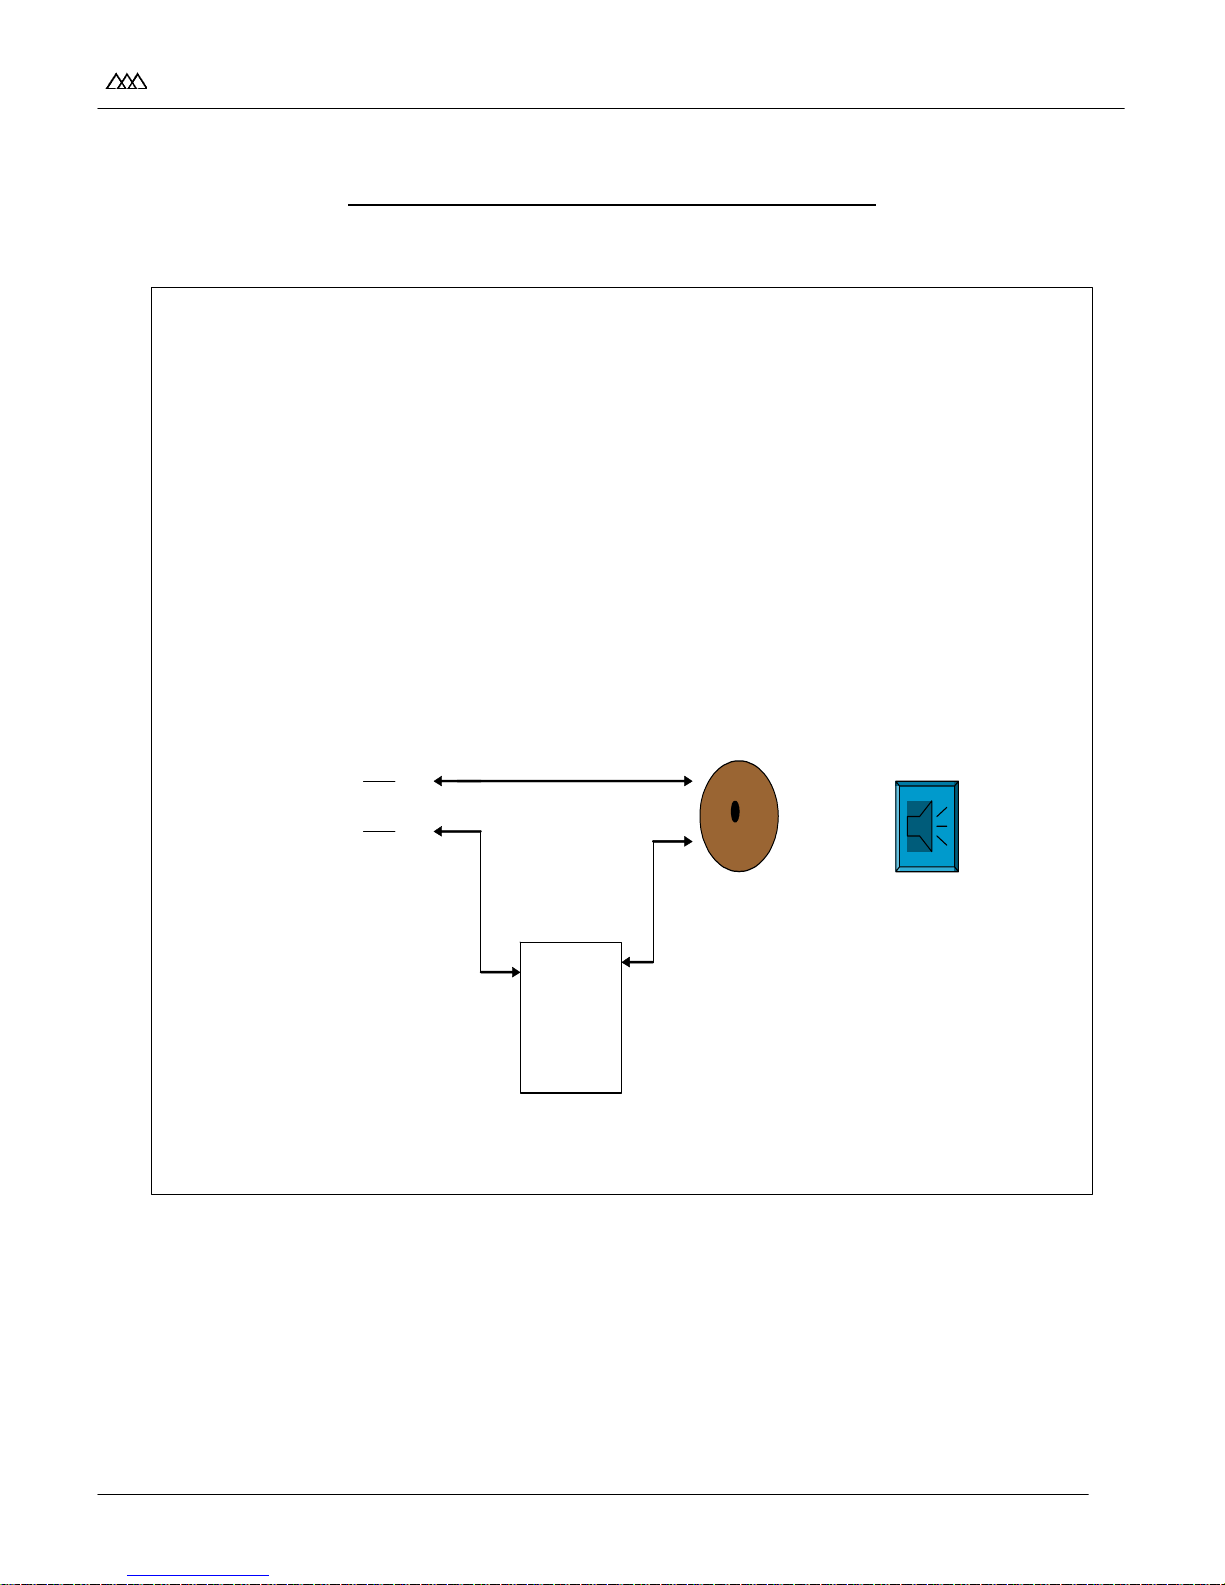
External CO Line Ringing
CO Lines can be programmed to ring through the relay contact located on the BKSU CO Champ
connector pins VL/SL, SL/VL. Programming the relay is found in FLASH 14 and programming the CO
Lines is found in FLASH 40.(See UDA or UNA). External Paging Programming is also in FLASH 14
and connects as below.
Installation of external ringing:
Rel a y
VL/SL
SL/VL
Load
T
R
Bell
OR
Load
Horn
24V DC
Power
Supply
- 31 -
Page 36
STSe Quick Start Guide September 2005
I
VOD AV
PROGRAMMING & INSTALLING ACCESSORY DEVICES (cont’d)
External Paging
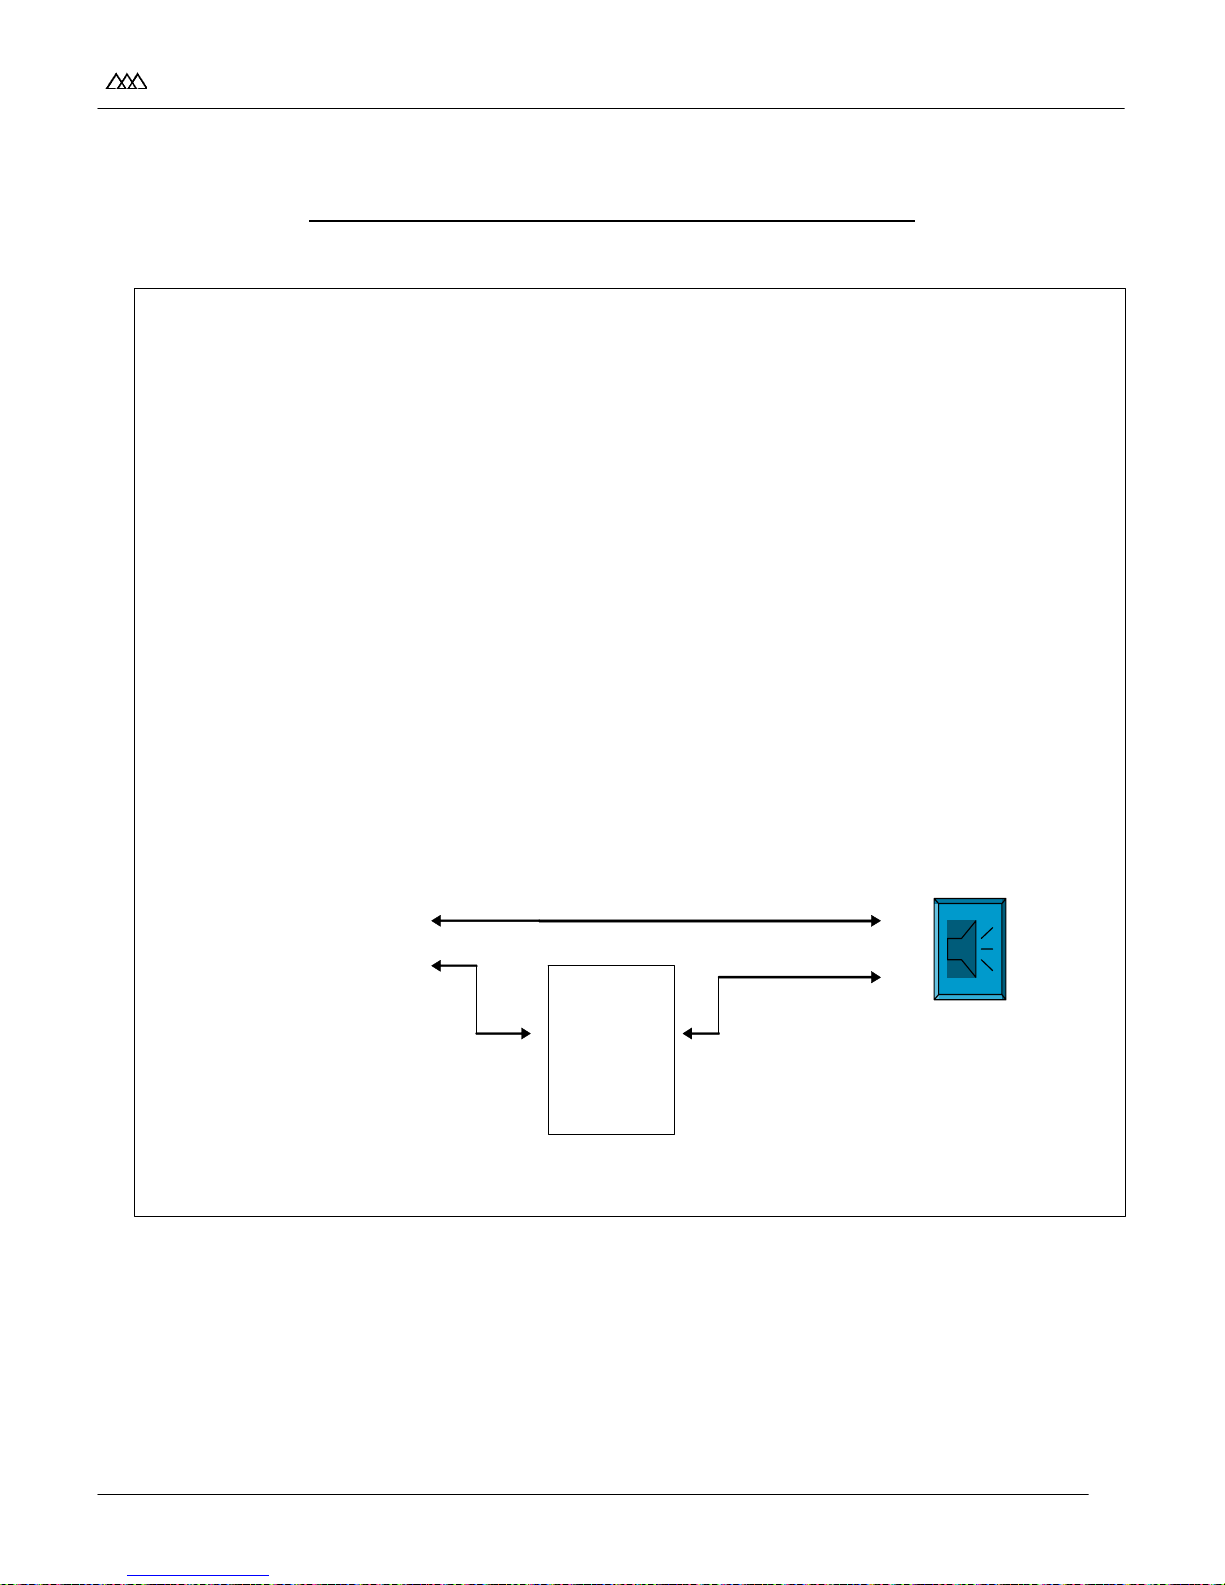
The relay contact can be used for external paging. The dial code for external
paging is 761. Programming the relay is found in FLASH 14. Installation of
external page is the same as previous slide.
External page can also be programmed through a CO port. This is normal when a
page control unit is used for several different page zones. When this procedure
is used program the CO port (used for paging) to a CO line group other than the
CO line group used for active CO lines (example CO line group 2). Programming
of CO Line group found in FLASH 40. Identify the CO port on a flexible button
as external page.
NOTE … Stations allowed to external page must be allowed access to the Line
group identified for external page, FLASH 50. (See Multi-Zone Page Control
slide also.)
Installation of External Page:
Speaker
T
Relay or
CO Port
VL/OR
OR/VL
R
24V DC
Power
Supply
- 32 -
Page 37
STSe Quick Start Guide September 2005
I
VOD AV
PROGRAMMING & INSTALLING ACCESSORY DEVICES (cont’d)
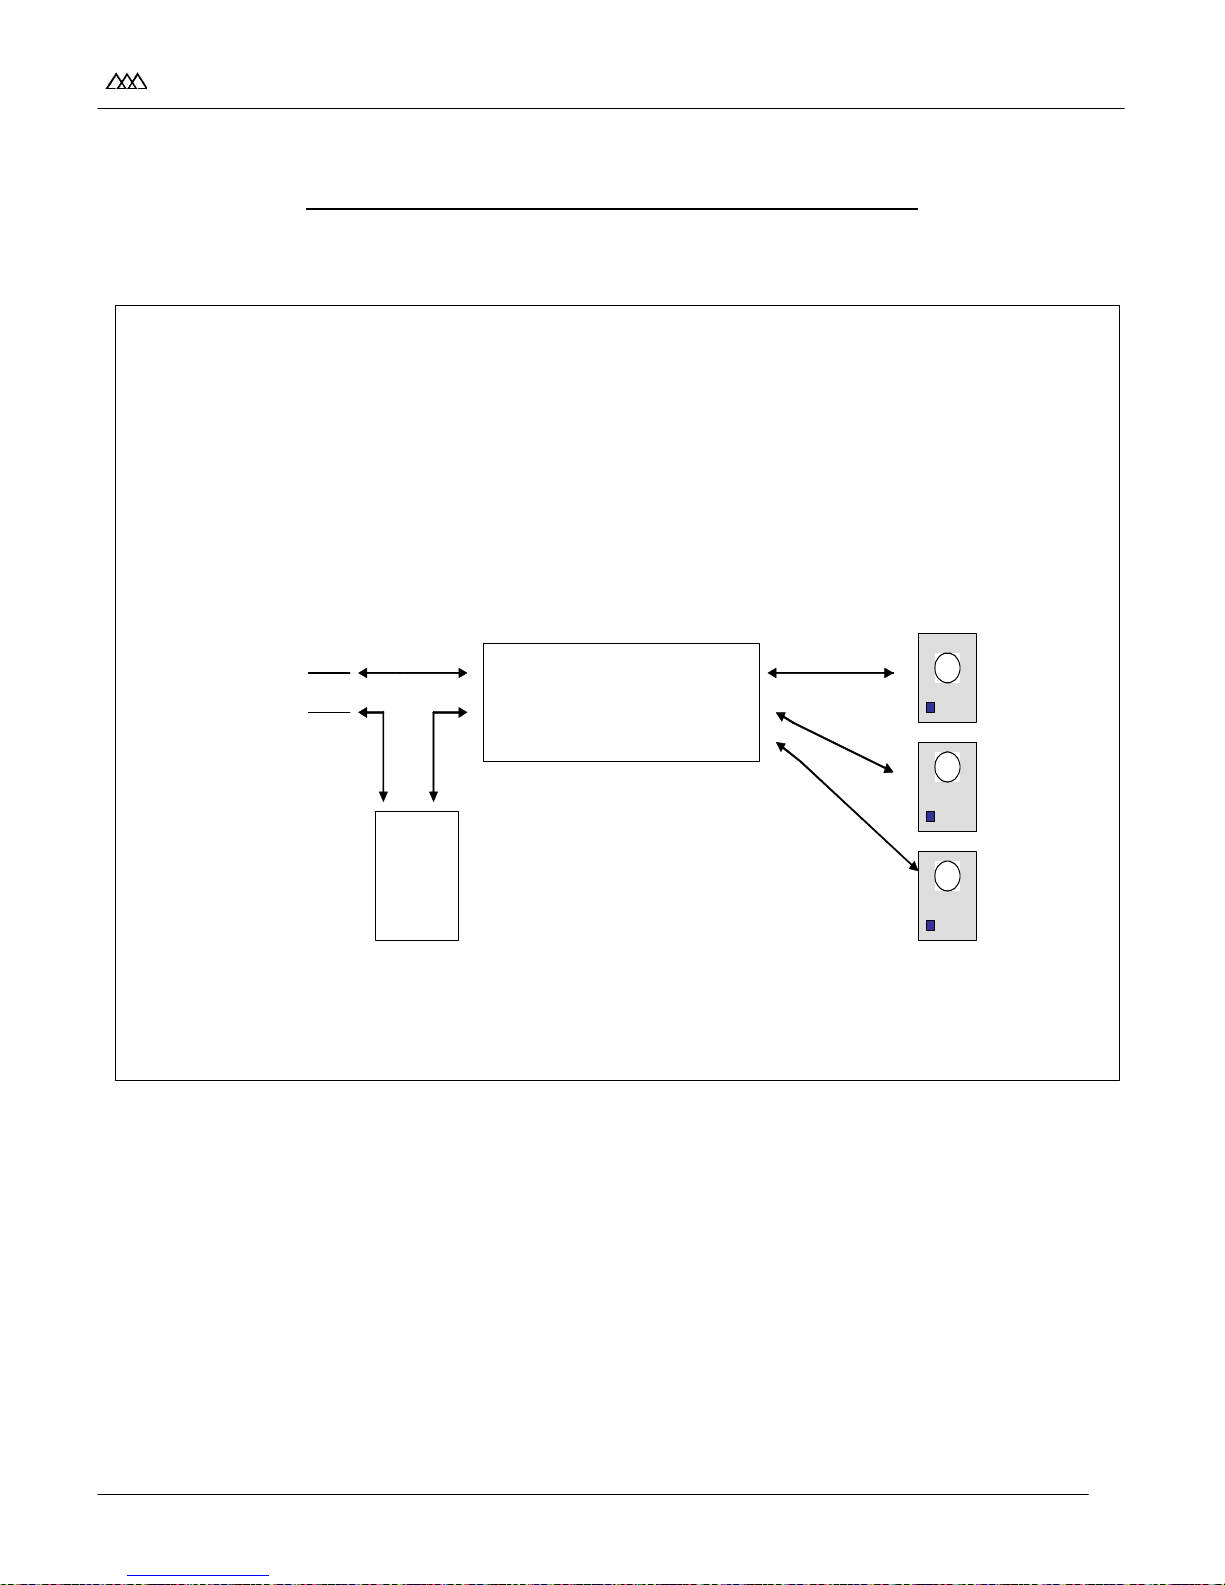
Multi-Door Boxes
CO Lines can also be used for Multi-Zone Boxes. See
Viking, Valcom, or etc for multi door boxes and door
relay control systems
CO Port
T
R
24V DC
Power
Supply
Door/Relay
Control Unit
Door Box
1
Door Box
2
Door Box
3
- 33 -
Page 38
STSe Quick Start Guide September 2005
I
VOD AV
PROGRAMMING & INSTALLING ACCESSORY DEVICES (cont’d)
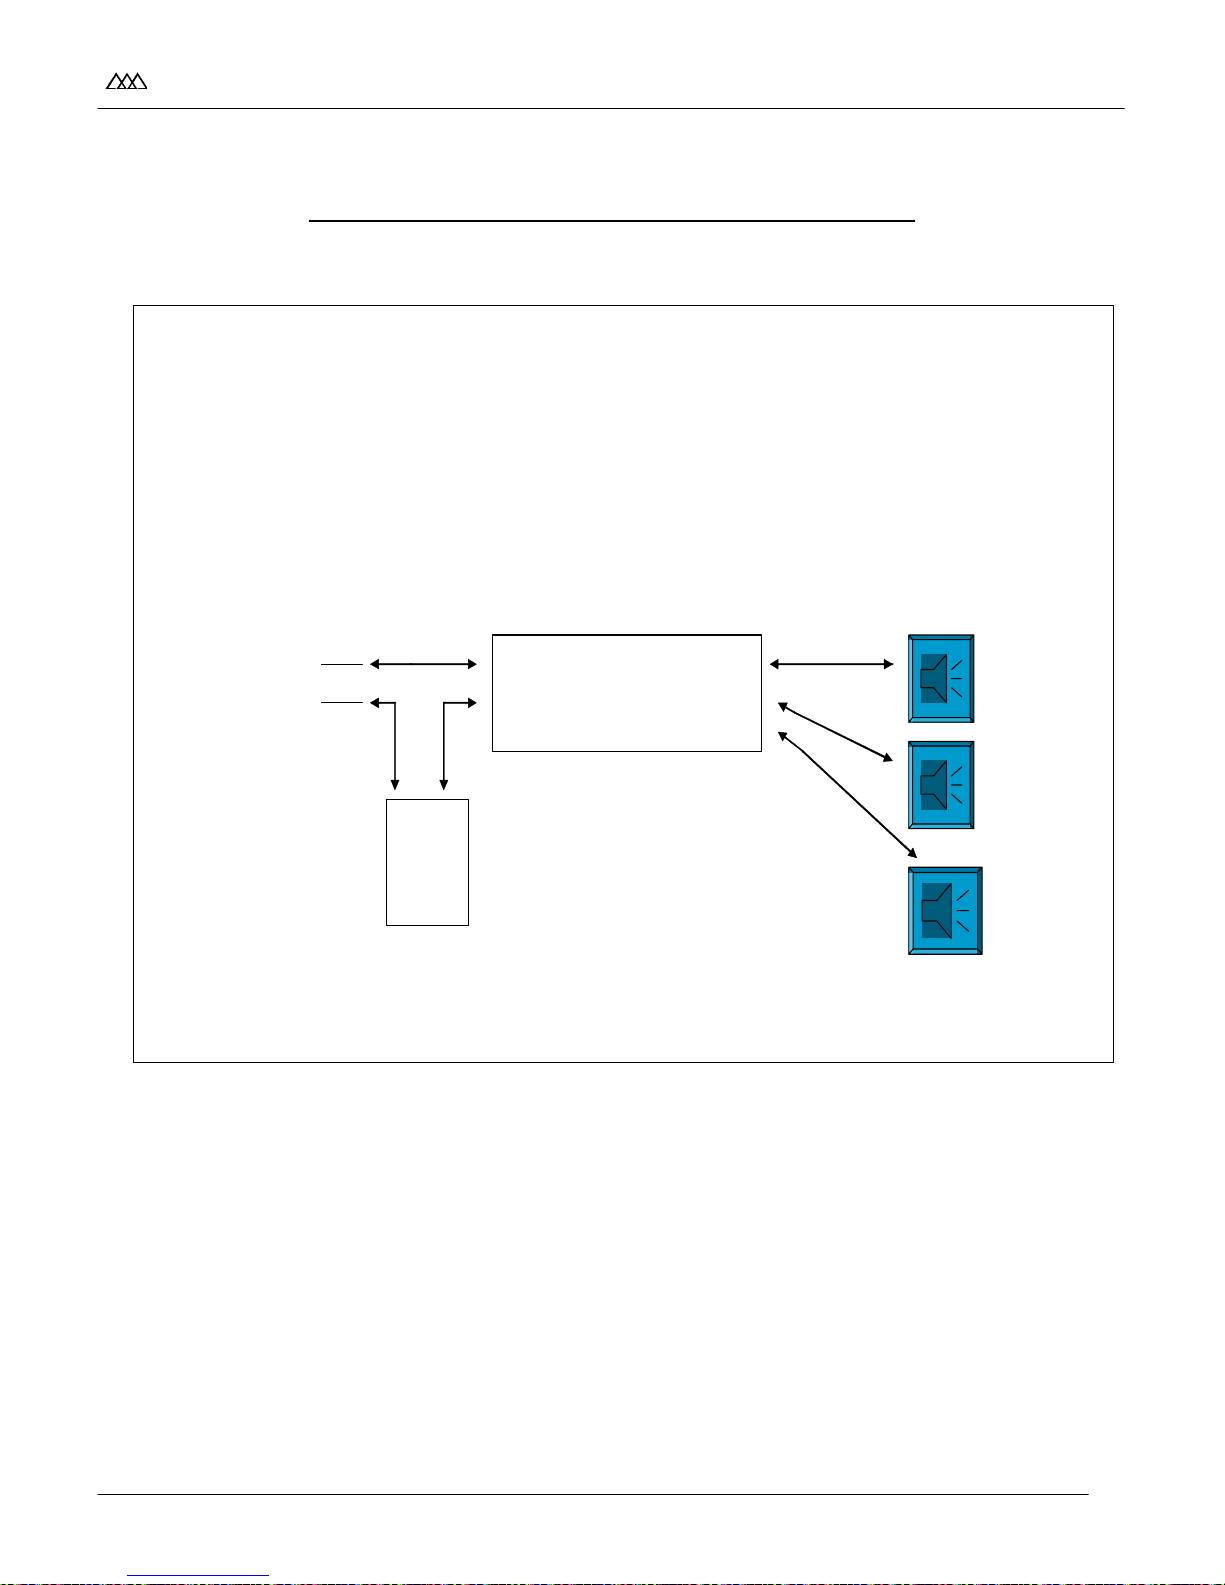
Multi-Zone Page Control
Viking, Valcom, and etc. offer Multi-Door and Relay control units.
CO Lines can also be used for Multi-Zone Paging.
Speaker
CO Port
T
R
24V DC
Power
Supply
Page Control Unit
Zone
1
Zone
2
Zone
3
- 34 -
Page 39
STSe Quick Start Guide September 2005
I
VOD AV
PROGRAMMING & INSTALLING ACCESSORY DEVICES (cont’d)
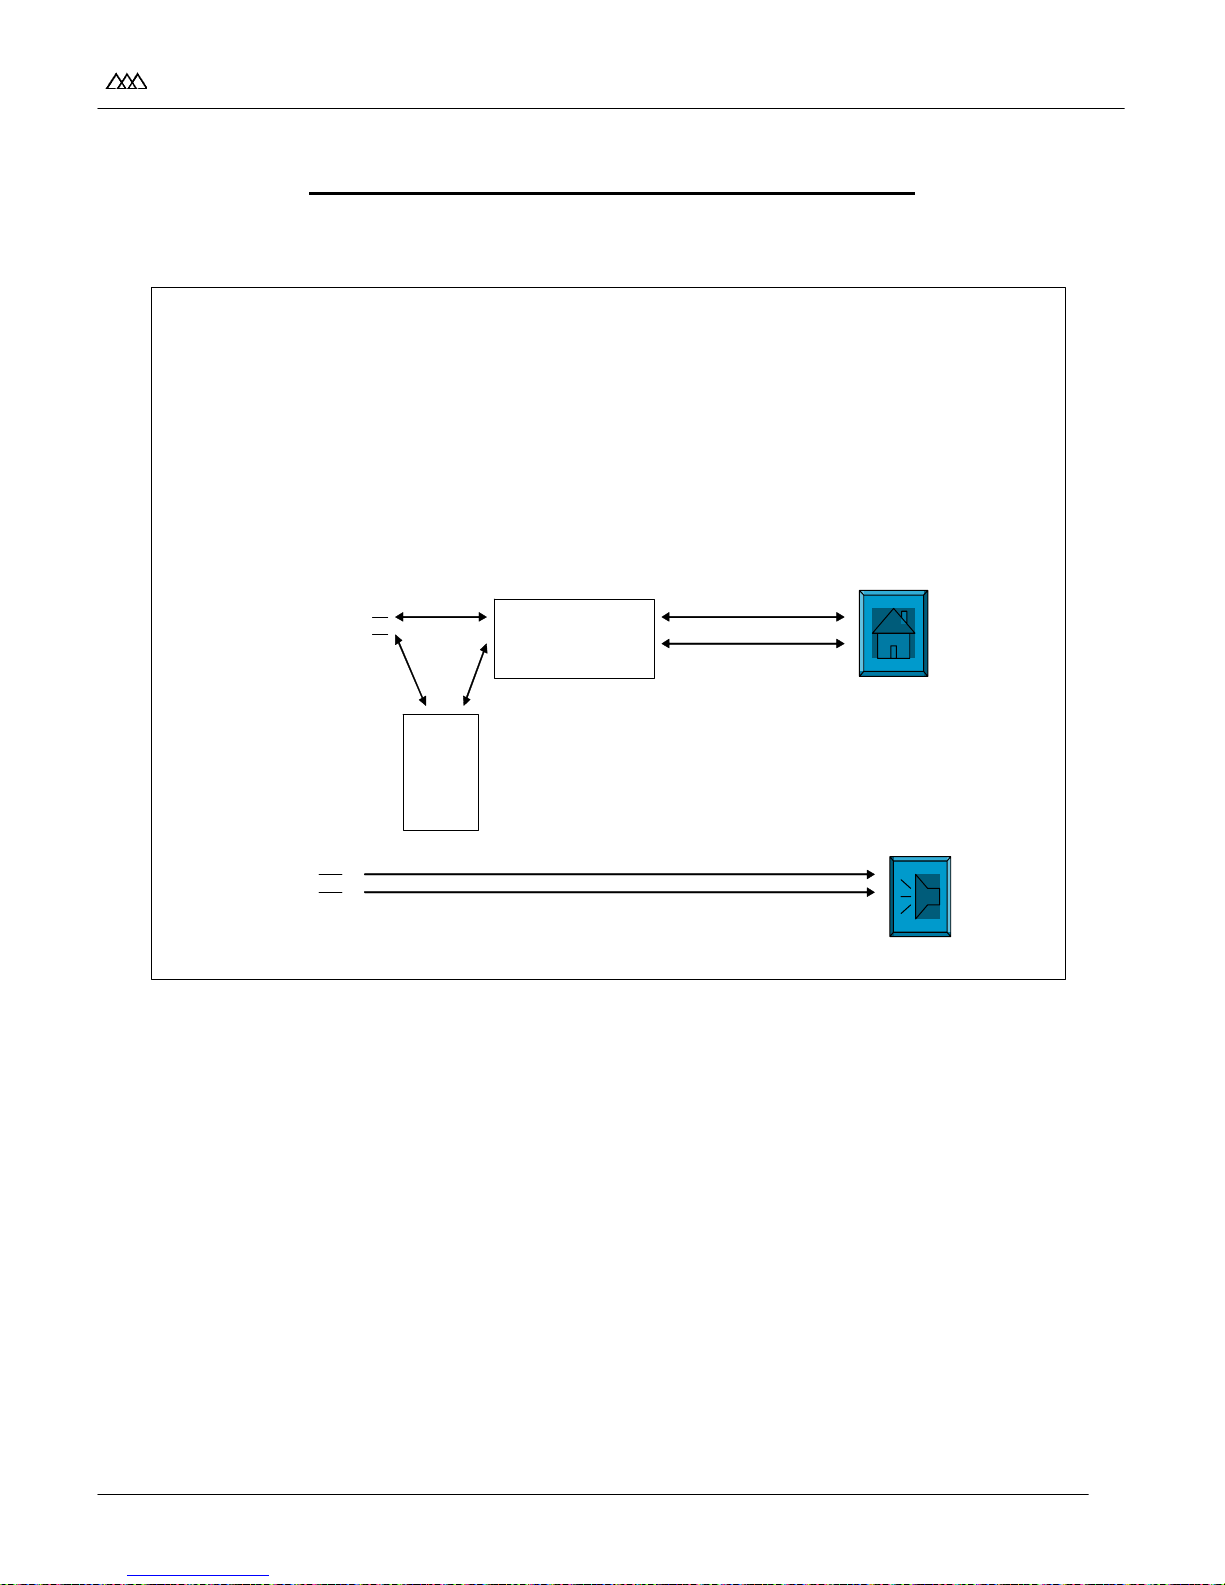
Door Box and Door Striker Plate Control
Digital Door Box with Non-Vodavi Relay control Box. Flash 50/51 to program Door
Box. Flash 14 to program relay. A Flexible Button can be programmed for the relay
control. Feature code 665.
BKSU CO Camp
Connector Cable
pair 25 (VS/SV)
T
R
Striker Plate
Control
Striker Plate
24V DC
Power
Supply
Door Box
Station Camp
Connector
T
R
- 35 -
Page 40
STSe Quick Start Guide September 2005
I
VOD AV
PROGRAMMING & INSTALLING ACCESSORY DEVICES (cont’d)
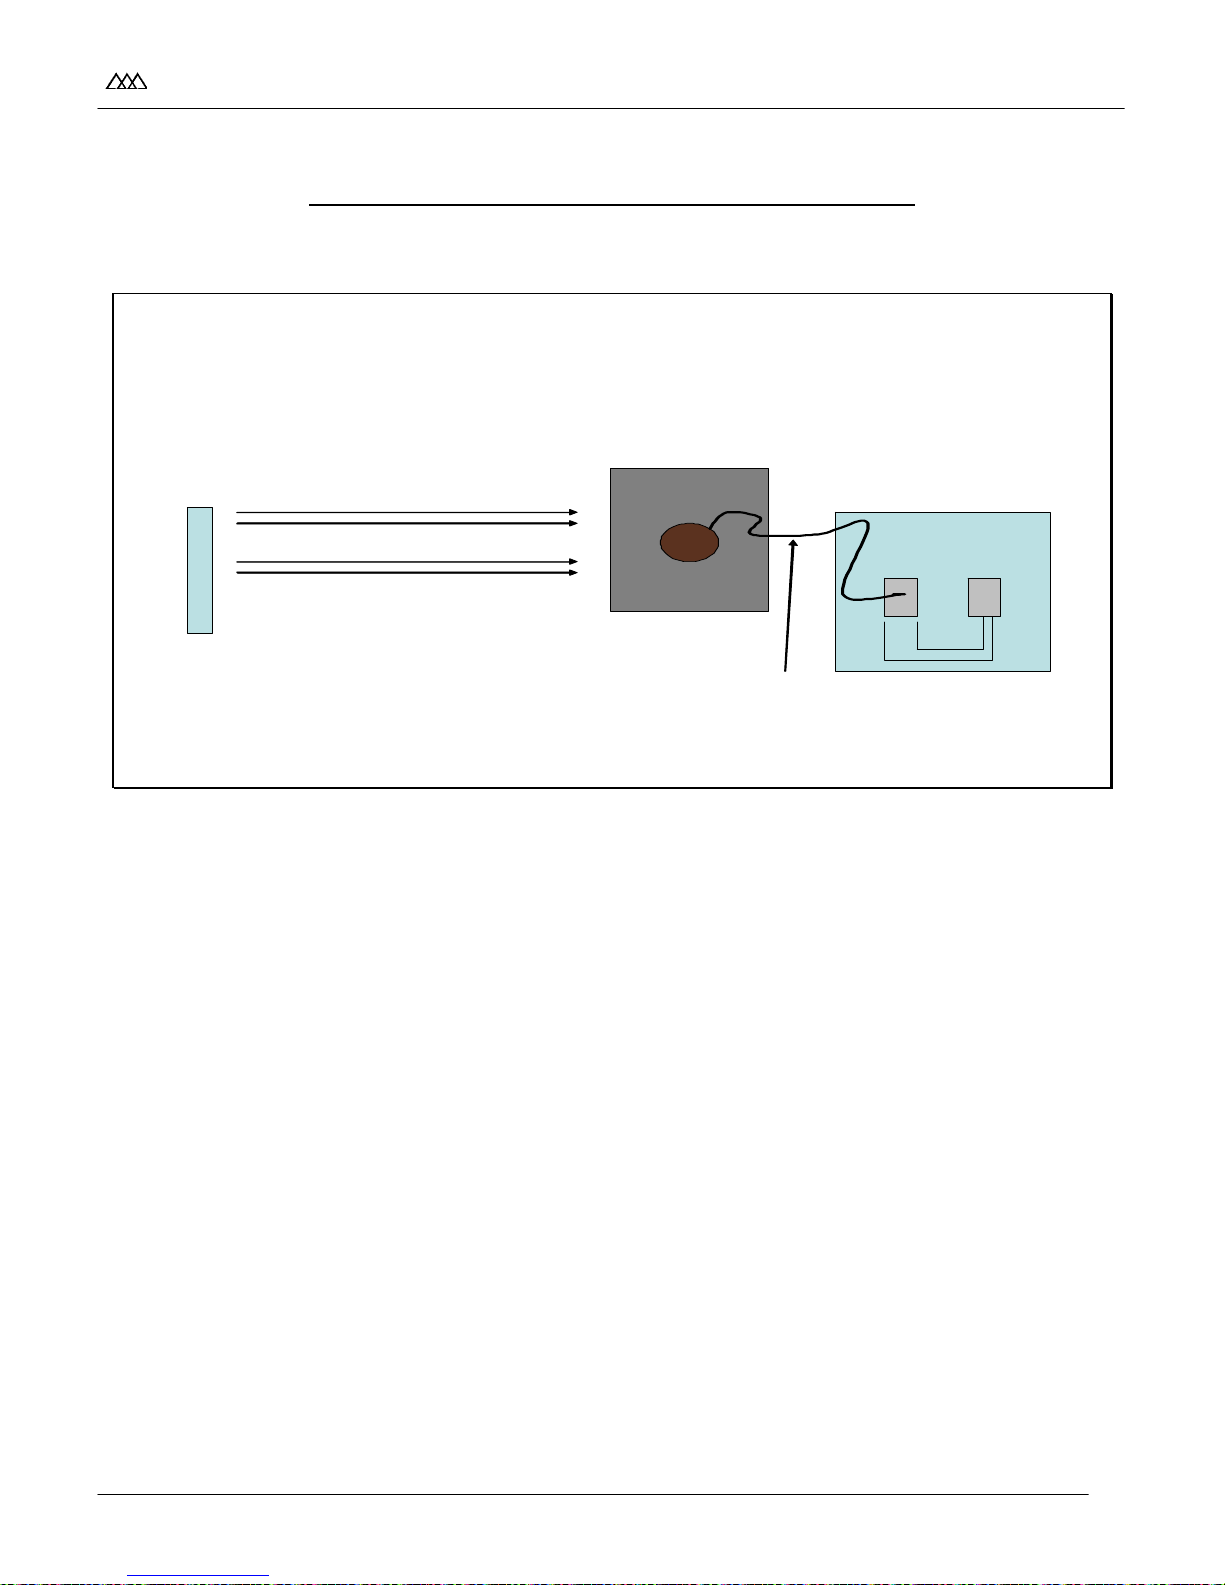
STS Telephone ADP
(Additional Device Port
The ADP jack on the STS is a pass through of pins 1 & 4 from the Line input
jack.
White/Blue Pair to STS Telephone
White/Orange Pair to ADP jack
W all Jack
Equ ipm ent
Block
Line Cord
(4 w ire)
)
Pins
1-4
STS Phone
Pins
2-3
A
D
P
- 36 -
Page 41

STSe Quick Start Guide September 2005
I
VOD AV
UPGRADING
SOFTWARE
- 37 -
Page 42

STSe Quick Start Guide September 2005
I
VOD AV
- 38 -
Page 43

STSe Quick Start Guide September 2005
I
VOD AV
UPGRADING SOFTWARE
STSe Upload/Download Flash ROM
1. Ensure new software is loaded on your computer. (.brn file is available)
Software can be found on the web page at www.vodavi.com
Download software comes with a notice on how to unzip file, etc. (software might be on a CD)
The instructions below are for after the software is ready to load.
2. Connect computer to KSU serial port.
3. Access Hyper-terminal.
4. Press enter.
5. At prompt for Password, type: config.
6. Press enter.
7. Type “U”.
8. Press enter.
9. Enter password: 3226vodavi
10. At the maint prompt enter “U”.
11. Display shows:
Software upload initiated
Flash bank will now be erased
Please wait
When completed display shows:
Flash bank erased completed
To start XMODEM upload, enter Yes (Y) or No (N)
12. Type “Y” for yes.
13. Immediately select “Transfer” from dropdown menu at top of screen.
14. Select: Send File.
15. Select the file by selecting “Browse” to find the program (.brn)
16. Then click “OPEN”.
17. Ensure that the protocol is “XMODEM”.
18. Click “SEND”.
Upload will begin and take 15 to 20 minutes. The progress bar will indicate that the file is being uploaded.
19. When completed the display will show:
XMODEM transfer complete
20. To run new software place the PMU switch in the opposite position. (Bank 1 UP or Bank 2 Down). And
reset system.
NOTE: To revert to the old software place the switch back in the old position and reset system.
21. At phone dial 605 to verify software version is correct
under Technical Support Downloads.
- 39 -
Page 44

STSe Quick Start Guide September 2005
I
VOD AV
UPGRADING SOFTWARE (cont’d)
In-Skin Flash Voicemail
1. Download software file from www.vodavi.com
If you do not have a copy of ECOM, also download it now. ECOM can be found under “Software
Downloads”, “Voicemail Analog/Digital”. Download file: “Analog and Digital Voicemail Administration
Programming Software 346/486 Ver 3.12 Software”. ECOM is one of the two applications that are on
this download. Unzipping the download using the Wizard will open both programs: ADMIN and ECOM.
2. Unzip the “In Skin” upgrade file to your desktop.
3. Copy file to “A” drive or the CD drive.
4. Connect your PC to the In Skin Voicemail card using a straight through DB9 “Serial Cable” with
a “Female Gender Bender”. (This will give you two female DB9 connectors.)
5. Using your PC, access ECOM.
6. Set up ECOM connections by pressing “Alt P”.
a. Baud rate - 9600
b. Parity - None
c. Data Bits - 8
d. Stop Bits - 1
e. Flow Control – No Flow Control (This means that all boxes are unchecked)
7. Press ENTER.
8. At password prompt, enter “0000”.
9. At the menu prompt, “Dial 18 and press ENTER”.
10. At the Programming Flash prompt, type “Y” and press ENTER.
11. Select upload icon. The upload icon can be identified by positioning the cursor over the symbol.
12. Select protocol – set to ASCII and click OK.
13. Select file to upload from floppy disk inserted in drive “A”.
14. Once file is selected (highlighted), click OK or press ENTER.
15. The process will begin and sometimes a progress bar will appear at the bottom of the screen to also
indicate in process has started. When the process is completed, the screen will change to reflect the
Programming Flash prompt.
16. Type “Y” and press ENTER.
17. Wait for the “Main Menu” to return.
NOTE: This process could take several minutes … in some cases, over 30 minutes.
When the Main Menu returns, type “Exit”. Power down the BKSU and then power the BKSU back-up.
Connect to the In-Skin using Hyper-Terminal and check the Version item to confirm the software has been
updated. The software on the In-Skin Voicemail has been successfully upgraded.
In-Skin Hard Drive Voicemail
Follow the instructions on CD sent from Vodavi Communications and follow the prompts using the Hard
Drive ADMIN wizard to upload software. Or download software from www.vodavi.com
instructions as above.
, Technical Support Downloads.
and follow
- 40 -
Page 45

STSe Quick Start Guide September 2005
I
VOD AV
WIN DBA
- 41 -
Page 46

STSe Quick Start Guide September 2005
I
VOD AV
- 42 -
Page 47

STSe Quick Start Guide September 2005
I
VOD AV
WIN DBA
Download WIN DBA Software from Vodavi Website
1. Go to the Vodavi web page, www.vodavi.com
2. On the left, click on “Dealer Sign-In”.
3. Enter Login Name and Password, then press the Login button. “If you are not a registered member, sign up
by clicking on click here
in the “Need to Register” area. (Within approximately 24 hours you will be emailed
with your Login Name and Password).
4. Click on Starplus product line. And then click “Next”.
5. Click on Software Downloads.
6. Go to the WIN DBA block.
7. At WIN DBA, click on WIN DBA for the STSe system. (NOTE: software version: 0.08 is a “Field Trail”
version. Report any problems to Vodavi Tech Support.
8. At “File Download” screen click, Save.
9. At “Save As” screen, save file to Save in_________ and File Name ____________ and click on “Save”.
(example: Save in: Desktop; File Name: STSe DBA 008)
10. When Download is complete. Click the “Open” button.
11. Look for ICON that resembles a 3.5” floppy disk and reads “SETUP”. Double-click the setup ICON.
12. Follow the Wizard and click Next; Next; Next; Next. When the Wizard is finished, a folder called
WINDBA_STSe is established with an ICON (WinDbaV72 Shortcut).
To Start a New File Using WIN DBA Software:
1. Click on the WinDba72 Icon.
2. Click on “File”.
3. Click on “New.”
4. Select a default configuration.
5. Enter Password, “SECRET”.
6. At Select Directory window, in the Directory N
enter “\”, followed by file name you want to establish (example: \Mike), then click OK.
7. When system is finished building program, click “Edit”. (Notice that Program codes are listed from top to
bottom, and Icons are from left to right).
8. Note the following folders:
a. File (Open, New, Close, Delete, Copy, Report, and Exit)
b. Edit (14 programming sections up and down and their Icons appear left to right)
c. Tools (Connect, Disconnect, Upload to KSU, Download from KSU, Download from File
Modem/RS-232, Monitor).
d. Help (Contents, How To Use Help, About)
9. Review the Help folder for using this program. Also, make note of software version number.
10. To “Exit”. Click on File, Close, then Exit. Always save program.
To Open an Existing File Using WIN DBA Software:
1. Double click, WinDbaV70 shortcut Icon.
2. Click “File”, then “Open”.
3. Double click “Directories: (file). (example: Mike)
4. Click OK.
5. Enter Password, “secret”. Click OK.
6. Click “No” at the “Do you wish to backup this database” prompt.
7. Click “Edit”. Note Icons and program section names.
8. To exit, click “File” and “Exit”, then “X” to close.
.
ame block: place cursor at the end of existing Path name and
- 43 -
Page 48

STSe Quick Start Guide September 2005
I
VOD AV
WIN DBA (cont’d)
Review Programming Sections in the WIN DBA Software:
1. Select “Account Codes”. (See Programming Manual, Section F, Flash 05 Flex Button 8; Flash 06 Flex
Button 3; Flash 31 for programming information.)
a. Enter Account code, Day and Night COS.
b. Click either Verified or Forced and the will take you to System feature codes. Click (check) either
Verified, Forced or Both. Click Save and the “X” block to exit.
c. Complete Account codes if needed. (Not a normal item to use on the average STSe system.)
d. Select “Cards”. (See Programming Manual, Section F, Flash 24 for programming information.)
: Slot 0 and 1 are fixed. Slot 2 should be also, since this is the 2 port analog card. To add a card
NOTE
to a slot; first click on slot (NOTE: The Block “Card Type” will indicate what that card slot is
programmed for). Use the Arrow down icon to find the card name to select and click on name. Card
name is now in the Card Type block. Click on that card slot again. Now the card is identified for that
card slot. Continue until all card slots are programmed as required.
: Remember when program is up loaded that the system must be reset for Card Slot
NOTE
programming to take effect.
e. Click the “X” block to save and exit this section.
2. Select “CO Lines”. (See Programming Manual, Section F, Flash 40 for programming information)
a. Note you are on CO # 1. By clicking on the > < buttons you can move from one CO to another.
b. Note the folders (CO, Timers, Features, Ring Assign, Grid, Copy, and Report).
c. Program each CO as required.
d. Note the copy folder you can copy blocks of CO Lines in three groups and also ringing assignments
either “Yes or No”.
e. When complete, click Save then “X “to exit.
3. Select “DID”. (See Programming Manual, Section F, Flash 43 & Flash 44 for programming information)
a. Program as required
b. When complete Click Save and “X” to exit.
4. Select “Hunt Groups”. (See Programming Manual, Section F, Flash 30 for programming information.)
a. Note: Three types of hunt in, Group Type.
b. Enter members (station numbers) up to 8 maximum.
c. When complete, save and click on “X” to exit.
5. Select “LCR Programming”. (See Programming Manual, Section F, Flash 75, Flash 50 Flex Button 9, Flash
05 Flex Button 7 for programming information.)
a. Program as required.
b. When completed, save and click on “X” to exit.
6. Select “Passwords”. This is the password for WINDBA. Note there is no back door password if you
change it, so DO NOT
loose password.
- 44 -
Page 49

STSe Quick Start Guide September 2005
I
VOD AV
WIN DBA (cont’d)
7. Select “Ports”. (See Programming Manual, Section F, Flash 42 & 52 for programming information.)
a. Program as required. Note under most cases,
do not make any changes in this section. Keeping it
simple is the best. If you change a port around and then went to work on CO Line 1 and now it was on
Port 24 it would be confusing. Correct?
b. Click Save and “X” to exit.
8. Select “Stations”. (See Programming Manual, Section F, Flash 50 for programming information.)
a. Note folders (Stations, Features, Buttons, Speed, Volume, Preset Fwd, Grid, Copy, and report)
b. Use the > < keys to move from station to station.
c. Note Copy allows you to copy from one station to three block of a group of station numbers to include
copying buttons “Yes or No”.
d. The Button Folder is like the Card slot programming. First select either Button number or Type. Then
select feature under Type block. Then click button to make change.
e. When completed, save and click on “X” to exit.
9. Select “System Features”. (See Programming Manual, Section F, Flash 01, 02, 05, 06, 07, 09, 10, 11, 12,
13, 14, 15, 20, 21, 22, 23, 39, and 52 for programming information.)
a. Note the “Flexible Numbering Plan”. Remember, if changes are made here make sure it does not
conflict with some other code, the user guide and you must be able to maintain these changes.
b. When completed, save and click on “X” to exit.
10. Select “Toll Restriction Programming”. (See Programming Manual, Section F, Flash 70, and Flash 50 Page
B Flex buttons 2 and 3 for programming information.)
a. Note three folders (Allow/Deny Table A, Allow/Deny Table B, and Special Tables)
b. If a Station is in Class of Service (COS) 2, 3 or 4, the system would go check Toll restrictions Table A
Allow. If found call would be allowed. If no found in the Allow it would go to the Denied Table. If found
in the Deny Table call is Denied. If not found in either table call is allowed.
c. Program as required.
d. When finished, save and click on “X” to exit.
11. Select “T1”. (See Programming Manual, Section F, Flash 47 for programming information.)
a. Program as required
b. When finished save and click “X” to exit.
12. Select “UCD”. (See Programming Manual, Section F, Flash 60, 61 and 62 for programming information.)
a. Program as required
b. When finished save and click “X” to exit.
13. Select “Voice Mail Programming”. (See Programming Manual, Section F, Flash 65, 66, and 76 for
programming information.)
a. No programming is required if you are using the STSe In-Skin Voicemail system.
b. If you are using the Dispatch Voicemail system only the station members need to be changed to
stations connected to the Dispatch.
c. When completed save and click “X” to exit.
- 45 -
Page 50

STSe Quick Start Guide September 2005
I
VOD AV
WIN DBA (cont’d)
Connecting to STSe to Upload or Download Data Using WIN DBA Software
Download from KSU to Laptop (PC)
1. Connect a Straight Serial Cable as pervious explained to the top Serial port on the Left side of the KSU to
the Serial port on the Laptop (PC).
2. Select drop down selection “Tool”.
3. Click on “Connect “.
4. Select Direct RS-232 Connect
5. Click on “Connect “.
6. Process takes approximately 30 seconds to connect at 9600 bd.
7. Click OK.
8. Select Tools folder again.
9. Select “Download From KSU”.
10. At “do you wish to download database from KSU? Click “YES”
11. At “Overwrite existing file c:\winbda~1\xxxx.dnl (example xxxx = Mike). Click “YES”.
12. Wait till program is downloaded. This can take several minutes and you may never see activity in the
progress block. Patience is needed here.
13. When download is completed click OK.
14. Select the Tools folder and click “Disconnect”.
15. Be sure to save file.
Upload from Laptop (PC) to KSU
1. Connect a Straight Serial Cable as pervious explained to the top Serial port on the Left side of the KSU to
the Serial port on the Laptop (PC).
2. Select drop down selection “Tool”.
3. Click on “Connect”.
4. Select Direct RS-232 Connect.
5. Click the “CONNECT” button.
6. Process takes approximately 30 seconds to connect at 9600 baud.
7. Click OK.
8. Select Tools folder again.
9. Select “Upload to KSU”.
10. At “Do you wish to upload database to KSU?”, click “YES”.
11. At “The target system will be initialized to a default. Continue?”, click “YES”.
12. At “Overwrite existing file: c:\windba~1\xxxx.dnl” (example xxxx = Mike), click “YES”.
13. Wait this will take several minutes based on amount of data. The progress bar will start to show data flow.
14. When finished the window will ask to reset system, click “YES”.
15. Be sure you have saved file before WINDBA is closed.
- 46 -
Page 51

STSe Quick Start Guide September 2005
I
VOD AV
WIN DBA (cont’d)
Programming STSe System Using WIN DBA Software
(Refer to “Programming STSe Telephone System” for programming steps.)
To start a New File using WIN DBA Software:
1. Click the Edit folder.
2. Click on “Cards or the Cards Icon. Configure card slots as required.
3. Click CO Line Programming or CO Line Icon. Program Ringing Assignments for each CO as required.
(Note the copy feature).
4. Click the CO folder and select “Preset Forward”: Change “None” to “Voice_Mail”. In block to right, enter
the number “1” and press ENTER.
5. Click the Timers folder and enter timer for “Preset Forward”. Preset Forward is now set, so the Auto-
attendant would answer call if no one answers a CO line.
6. Save data and click on the “X” to exit.
7. Click on Station Programming or the Icon.
8. Select the Buttons folder and program the buttons for each phone. (Note the copy feature also).
9. Select the Preset Fwd folder. Enter “Voicemail” for Internal No Answer; External No Answer; and Internal
Busy. Do not use External Busy if phone rings on Incoming CO calls. In block to right of each item, enter
“1”. At top is timer for No Answer, enter time as required.
10. Save and click on “X” to exit.
11. If CO Port is available but not used, select CO Line Programming. Select CO Line that is not used and
change CO Group to “0”.
12. Save and click on “X” to exit.
13. Refer to “Connecting to KSU” and upload data from Laptop (PC) to KSU and follow procedures to upload
data.
- 47 -
Page 52

STSe Quick Start Guide September 2005
I
VOD AV
- 48 -
Page 53

STSe Quick Start Guide September 2005
I
VOD AV
QUICK
REFERENCE
- 49 -
Page 54

STSe Quick Start Guide September 2005
I
VOD AV
- 50 -
Page 55
STSe Quick Start Guide September, 2005
VODAVI
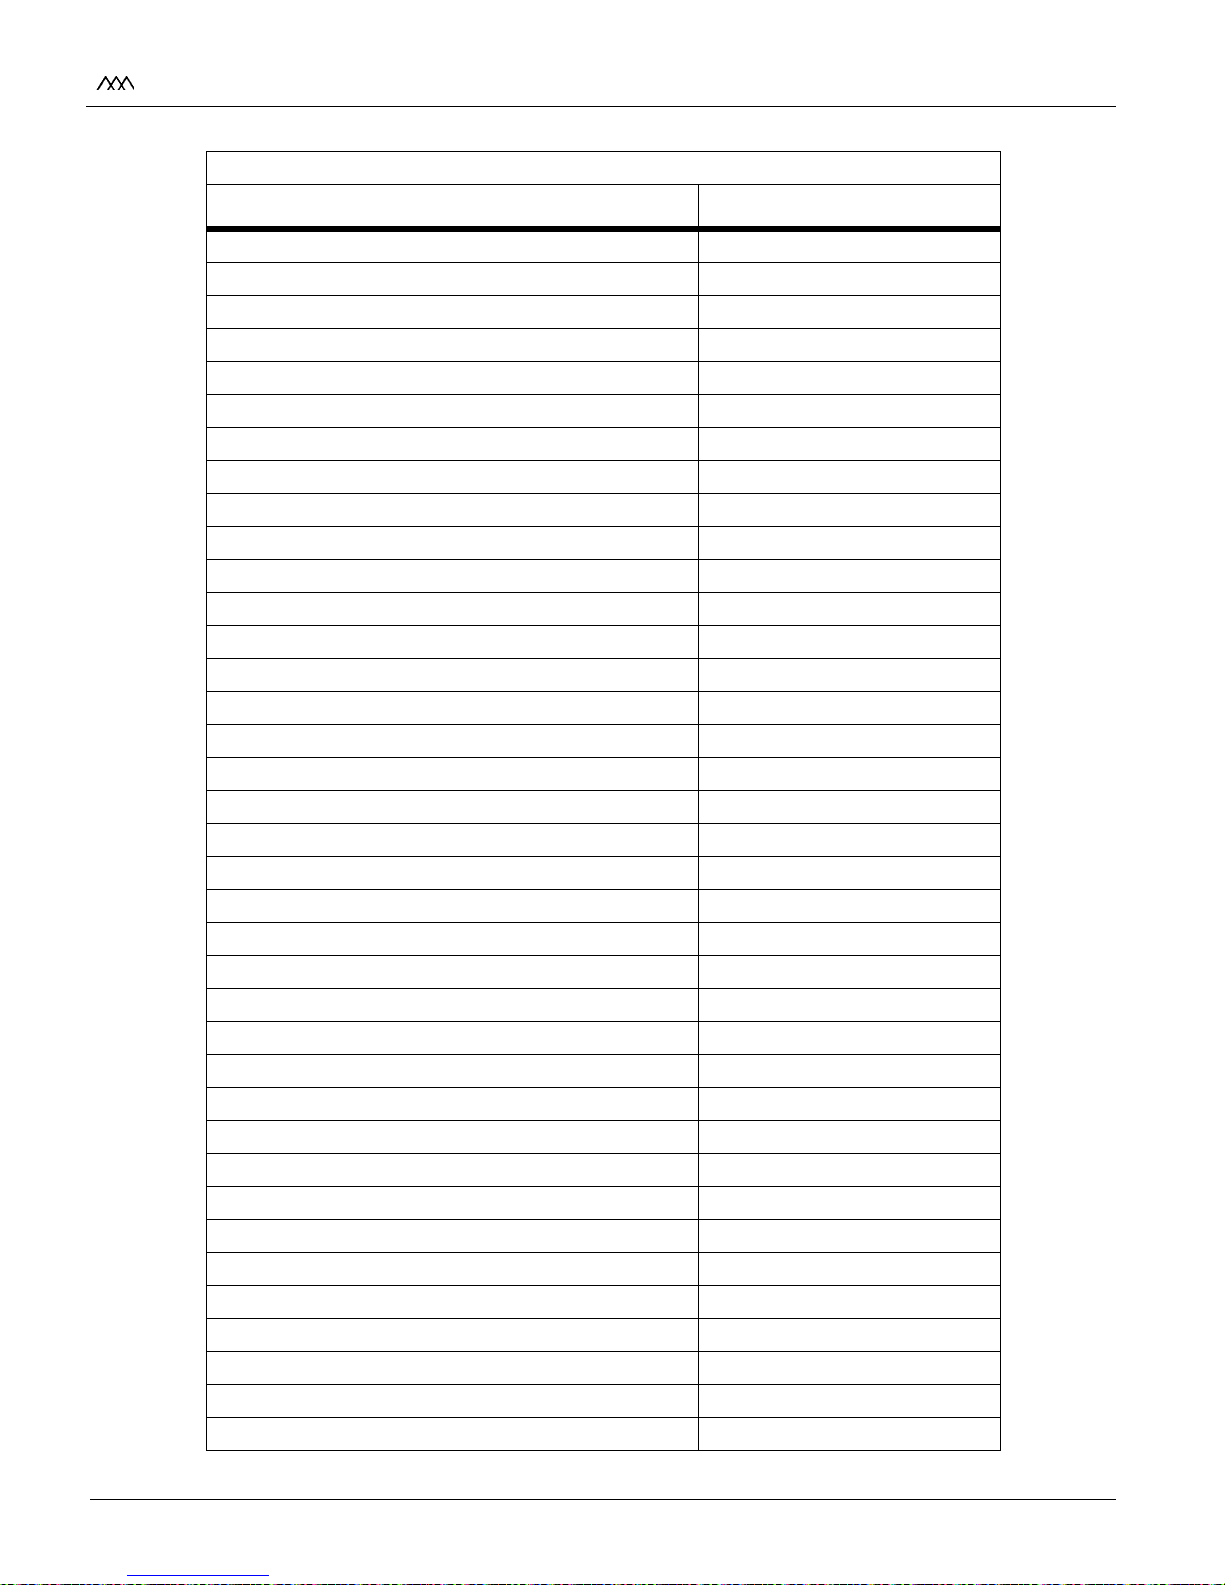
Default Numbering Plan
Feature / Function Feature Code
911 Alert View/Delete (requires button) 608/608+FLASH
Account Code (requires button) 627
Answering Machine Ring 654+[0]
Answering Machine Speaker 654+[1]
Attendant 0
Attendant Clear Alarm 606
Attendant CO Line External (Off-Net) Forward 603+[NNN]+[YYYY]
Attendant Custom Message 694+[XX]+message
Attendant Day/Night/Special (requires button) 631 (DND key)
Attendant Directory List Programming 693
Attendant Disable Outgoing CO Line 602+press CO line button
Attendant Override (requires button) 601
Attendant Setting Time and Date 692+date and time entry
Attendant Unavailable 607
Attendant Voice Mail Alarm Clear 656
Background Music 632+[0 (off ), 1, or 2]
Back Light Display 637
Call Back 622
Call Coverage - Non-Ringing (requires button) 647+[XXX]
Call Coverage - Ringing (requires button) 646+[XXX]
Call Forward 640+[C]
Call Forward - External (Off-Net) [640]+[
]+[YYYY]
Call Forward - Follow Me 642+[XXX]+[C]+destination
Call Park (location 1-8 & 9-14) 430-437 & 424-429
Call Park - Personal 438
Call Park - Station 439+[XXX]
Call Park Pickup - Station #6+[XXX]
Call Park Pickup - System (location 1-8 & 9-14) #430-#437 & #424-#429
Call Pickup (requires button) #0
Caller ID Display (Answered Calls) 659
Caller ID Display (Unanswered Calls) 635
Caller ID Name/Number (requires button) 653
Calling Forward Override 5#+[XXX]+press[B]
Calling Station Handsfree Mode Override 7#+[XXX]
Calling Station Tone Mode Override 6#+[XXX]
Clear Call Forward, DND, Personal Message 662
CO Line (Idle) Direct Access 88+[LLL]
- 51 -
Page 56
STSe Quick Start Guide September, 2005
VODAVI
Default Numbering Plan
Feature / Function Feature Code
CO Line Group Access Code (group 1-23) 801-823
CO Line Group Access Code (all groups) 824
CO Line Queue 621
CO Line Queue Cancel 626
Dial-By-Name 6
Directory Dial 680
Do Not Disturb 631
Door Opener 665
DTMF Receiver Test 657
Executive Override 625
Flash (Centrex) 660
Headset Mode 634
Hunt Group (group 1-8) 450-457
In and Out Button (requires button) 644
Intercom Button (requires button) 645
Last Number Redial 650
LCR (E911 active on CO Line) 800
LCR (if active) or CO Line Group 1 9
Loop Key (requires button) 89
Message Wait Answer 663
Modem 499
Modem - Voice Mail Access 498
Name in Display 690
Night Service (requires button) 604
Off Hook Voice Over (requires button) 628
Page - All Call 700
Page - External Zone 760 or 761
Page - Internal Zones 1-20, All 701-720, 721
Page - Meet Me (Answer) 770
Personal Messages 633+[ZZ]
Release Button (requires button) 641
Repeat Redial 643
Ring Down / Hot Line / Off-Hook Preference 691+[BB]
Ring Tone 695+[RR]
Save Number Redial [SPEED]+[
]
School Zone 630
SLT Conference Park 664
- 52 -
Page 57
STSe Quick Start Guide September, 2005
VODAVI
Default Numbering Plan
Feature / Function Feature Code
SLT Directed Call Pickup #1
SLT Message Wait 623
SLT Speed Programming 661+[YYYY]
SLT Volume 638+[V ]
Software Version 605
Speed Dial [SPEED]+[YYYY]
Speed Dial for SLT; digital only for Admin Prog 668+[YYYY]
Station Numbers (Fixed) 100-149
Station/Port Fixed Number 611
Station Relocate 636+[XXX]
Stop Trace 658
UCD Available/Unavailable 566
UCD Calls In Queue Status Display (any group) 567+[UUU]
UCD Group (group 1-16) 550-565
UCD Wrap-up End Button 584
Unanswered CO Call Transfer 639
Universal Day/Night Answer #5
Voice Mail Group (group 1-8) 440-447
Voice Mail Message Cancel (VM Port only) 421+[MMMM]
Voice Mail Message Set (VM Port only) 420+[MMMM]
Voice Mail Message Set w/count (VM Port only) 422+[MMMM]
Voice Mail One Touch Recording (requires button) 649+[VVV]
Voice Mailbox Button (requires button) 460-467+[VMID]
B = Button w/ feature code:
622 = Call Back, 620 = Camp On, 625 = Executive Override, 623 = Message Wait, 628 = OHVO
BB = Button Number
C = Call Forward Condition Code:
(6-9 = All Calls, No Answer, Busy, Busy/No Answer; = Off-Net)
LLL = CO Line Number (001-028)
MMMM = 2- to 4-digit Mailbox Number
NNN = CO Line Group Access Code of group to be forwarded:
(801-823 = CO Group; 1-23, 824 = All CO Groups)
RR = Ring Tone Number (00-36)
V = Volume Control Level (0-9)
VVV = Voice Mail Group Number (440-447)
XX = Custom Message Number (21-30)
XXX = Intercom Station Numbers
YYYY = Speed Dial Bin Numbers (9000-9099)
ZZ = Personalized Messages
TAB LE LEG ENDS:
- 53 -
Page 58
STSe Quick Start Guide September, 2005
VODAVI
FLASH CODE PROGRAMMING
At Station 100 … dial **3226 > press FLASH button > dial Flash Code
System Feature
Program
Code
Flexible
Button
SYSTEM TIMERS FLASH 01 --
System Hold Recall Timer 1
Exclusive Hold Recall Timer 2
Attendant Recall Timer 3
Transfer Recall Timer 4
Fax Timeout 5
Pause Timer 7
Call Park Recall Timer 8
Conference/DISA Timer 9
Paging Time-Out Timer 10
CO Ring Detect Timer 11
SLT DTMF Receiver Timer 12
Message Wait Reminder Tone Timer 13
SLT Hook Switch Timer 14
SLT Hook Switch Bounce Timer 15
SMDR Call Qualification Timer 16
Automatic Call Back Timer 17
Reminder Ring Timer 18
Inter-Digit Time-Out 20
ADDITIONAL SYSTEM TIMERS FLASH 02 --
Repeat Redial Timer 1
Attendant Display Timer 2
Modem Answer Timer 4
Pulse Dial Inter-Digit Timer 5
DTMF On/Off Time Operation 6
SYSTEM FEATURES 1 PROGRAMMING FLASH 05 --
Attendant Override 1
Hold Preference 2
External Night Ring 3
Executive Override Warning Tone 4
Page Warning Tone 5
Background Music 6
Least Cost Routing (LCR) 7
Account Codes – Forced 8
Group Listening 9
Idle Speaker Mode 10
Call Cost Display 11
Music-On-Hold 12
- 54 -
Page 59
STSe Quick Start Guide September, 2005
VODAVI
System Feature
Program
Code
Flexible
Button
CO Line Loop Superv - Forced Disconnect FLASH 05 14
Daylight Saving Time 16
Multiple Tenant Group Enable/Disable 17
Long Fax Detect 19
SYSTEM FEATURES 2 PROGRAMMING FLASH 06 --
Barge In Warn Tone 1
CO Ring Tones 2
Verified Account Codes 3
Call Forward Display 4
External Day Ring 5
Overflow Station Forward 6
Direct Transfer Mode 7
Station ID Lock 8
LCR Call Progress 9
One-Touch Recording Warn Tone 10
Ringback on Transfer 11
911 Feature 13
Enhanced 911 14
VMID Same As Station Numbers 15
FLASH RATES (Programmable) FLASH 07 --
Incoming CO Line Ringing 1
Incoming Intercom Ringing 2
Call Forward Button 3
Message Wait/VM Button 4
Do Not Disturb – DSS/BLF 6
Auto Call Back – BLF 7
UCD Available/Unavailable – DSS/BLF 8
Transfer CO Ringing 9
Recall CO Ringing 10
Queued CO Ringing 11
Exclusive Hold 12
System Hold 13
In-Use Hold (I-Hold) 14
Camp On Button 15
Call Back Button 16
Line Queue Button 17
Do Not Disturb Button 18
UCD Wrap-up End Button 20
Page Block (DND Button) 21
In and Out Button 22
- 55 -
Page 60
STSe Quick Start Guide September, 2005
VODAVI
System Feature
Program
Code
Flexible
Button
SYSTEM PARAMETERS PROGRAMMING FLASH 09 --
MOH Assignments (Channels 3-8) 1-6
E911 Power Failure Station 7
Leading Digit 9
School Mode 10
School Forward Destination 11
Muted Ring 12
Fax Route 13
ATTENDANT STATION ASSIGNMENT FLASH 10 --
Attd Sta Assignments for Tenant Groups 1-10
SYSTEM TIME AND DATE FLASH 11 1
PBX DIALING CODES FLASH 12 --
EXECUTIVE/SECRETARY PAIRS FLASH 13 1-4
RELAY PROGRAMMING FLASH 14 1
BAUD RATE ASSIGNMENTS FLASH 15 --
Port #1 (RS-232C on the BKSU) 1
Port #2 (RS-232C on the BKSU) 2
Port #3 (optional modem - baud auto-negotiated) 3
ACCESS CODES FLASH 20 --
DISA Access Code 1
Database Admin Password 2
STATION MESSAGE DETAIL RECORDING FLASH 21 --
SMDR Enable/Disable 1
Long Distance/All Calls 2
Character Print Assignment 3
SMDR Port Assignments 5
WEEKLY NIGHT MODE SCHEDULE FLASH 22 --
Automatic/Manual Operation 1
Day of Week Programming 2-8
DIRECTORY DIALING FLASH 23 --
Bin/ICM Numbering 1
Name Changes 2
Clearing An Entry 3
Backspace To Correct Error 4
Scroll to next Entry 18
Scroll to previous Entry 19
Select a Specific Directory List Entry 20
CARD SLOT PROGRAMMING FLASH 24 --
Card Slots (0-13) 1-14
- 56 -
Page 61
STSe Quick Start Guide September, 2005
VODAVI
System Feature
Program
Code
Flexible
Button
HUNT GROUPS FLASH 30 --
Hunt Group Programming 1-12
Station/Pilot/Pilot Ring All --
13
Hunting Assignments
Overflow Destination - Day 14
Overflow Destination - Night 15
Overflow Destination - Special 16
Overflow Destination - VMID 17
Overflow Timer 18
Queue 19
VERIFIED ACCOUNT CODES FLASH 31 --
Account Code 1
Class of Service 2
Delete Code 3
Erase Digits 4
CO LINE GROUP QUEUING FLASH 39 1-24
CO LINE ATTRIBUTES PAGE A PROGRAMMING FLASH 40 Btn 19
DTMF/Dial Pulse Programming Page A 1
CO/PBX Programming 2
Universal Night Answer (UNA) 3
DISA CO-to-CO 4
Privacy 5
Loop Supervision Programming 6
DISA Programming 7
CO Line Group Programming 8
Class of Service (COS) Programming 9
CO Line Ringing Assignments 10
CO Line Identification Display 11
CO Direction 12
Display Ring Assignments 13
DID/TIE Signal 14
Lines for 911Use 15
Tenant Group CO Line Programming 17
Scroll to next CO Line 22
Scroll to previous CO Line 23
Return to Flash 40 “Select a CO Line Range” Display 24
- 57 -
Page 62
STSe Quick Start Guide September, 2005
VODAVI
System Feature
Program
Code
Flexible
Button
CO LINE ATTRIBUTES PAGE B PROGRAMMING FLASH 40 Btn 20
T-1 Signal Type Page B 1
T-1 Ringback 2
T-1 Dial Tone 3
Transmit Volume 4
Preset Call Forward Day Destination 5
Preset Forward Voice Mail ID 6
Universal Day Answer (UDA) 7
Music-On-Hold (per CO Line) 8
Ring Tone (per CO Line) 9
Preset Call Forward Night Destination 16
Preset Call Forward Special Destination 17
Fax Detect Enable/Disable 18
Scroll to next CO Line 22
Scroll to previous CO Line 23
Return to Flash 40 “Select a CO Line Range” Display 24
CO LINE ATTRIBUTES PAGE C PROGRAMMING FLASH 40 Btn 21
Flash Timer Programming Page C 1
Ring Delay Timer 2
Wink Timer 3
Release Timer 4
Reseize Timer 5
Guard Timer 6
Seize Timer 7
Preset Forward Timer 8
DID Collect Timer 9
T-1 Collect Timer 10
Scroll to next CO Line 22
Scroll to previous CO Line 23
Return to Flash 40 “Select a CO Line Range” Display 24
DID-TIE PARAMETERS FLASH 41 --
Dial Pulse Parameters 1
DID Digits 3
DID Incoming Signal 5
T-1 Incoming Signal 6
T-1 Framing Type 7
LCOB Loop Length 8
Display PRI Name 9
CO Tolerance 11
CO Line Sharing - Tenent Groups 12
- 58 -
Page 63
STSe Quick Start Guide September, 2005
VODAVI
System Feature
Program
Code
Flexible
Button
CO FLEXIBLE PORT ASSIGNMENT FLASH 42 1-7
ICLID PROGRAMMING FLASH 43 --
ICLID Ringing Assignment(s) 1
Preset Forward Day Destination 2
Preset Forward Night Destination 3
Preset Forward Special Destination 4
Preset Forward VMID 5
Preset Forward Day Timer 6
MOH Channel 7
Universal Day Answer 8
Universal Night Answer 9
Tenant Group Incoming Ring Assignments 10
Preset Forward Night Timer 11
Preset Forward Special Timer 12
View ICLID Ringing Assignments 17
Next ICLID Route Number 18
Previous ICLID Route Number 19
Select Route Number 20
DID PROGRAMMING FLASH 44 --
Route Number 1
DID Phone Number 2
Name Assigned to Number 3
Erasing a DID Table Entry 4
Scroll to next Route 18
Scroll to previous Route 19
ISDN PAGE A PROGRAMMING FLASH 45 Btn 19
PRI CO Type Page A 2
Framing 3
Power 5
Directory Number (PRI) 6
Max Out I-Frames 7
Leading 1 8
Leading 011 9
PRI 7-11 Digit Number Plan 10
Calling Number 11
Loopback 12
- 59 -
Page 64
STSe Quick Start Guide September, 2005
VODAVI
System Feature
Program
Code
Flexible
Button
ISDN PAGE B PROGRAMMING FLASH 45 Btn 20
Maximum Number Retransmission Page B 1
Maximum Octets 2
Maximum TEI ID Request 3
Maximum XID Retransmission 4
T-200 5
Minimum TEI ID Check Message 6
Minimum TEI ID Request 7
Message Exchange Timer 8
Minimum XID Retransmission 9
Inter Digit T/O 10
Set-up Timer 11
Disconnect Timer 12
Release Request 13
Link Disconnect 14
Call Proceeding 15
Connect Request 16
Restart Request Timer 17
T-1 ALARM PROGRAMMING FLASH 47 --
Carrier Loss Alarm 1
Blue Alarm 2
Yellow Alarm 3
Red Alarm 4
Bipolar Alarm 5
Frame Slip Alarm 6
Data Errors Alarm 7
Enable/Disable 11
Clear Alarm 12
Minor Alarm 13
Major Alarm 14
Time Period 15
Attendant Display 16
- 60 -
Page 65
STSe Quick Start Guide September, 2005
VODAVI
System Feature
Program
Code
Flexible
Button
STATION ATTRIBUTES PAGE A PROGRAMMING FLASH 50/51 Btn 19
Paging Access Page A 1
Do Not Disturb 2
Conference Enable/Disable (Per Station) 3
Executive Override 4
Privacy (Per Station) 5
System Speed Dial Access 6
Line Queuing 7
Preferred Line Answer 8
Off-Hook Voice Over (OHVO) 9
Call Forward - Enable/Disable 10
Forced Least Cost Routing 11
Executive Override Blocking 13
CO Line Ringing Options 14
Name/Number Display at Idle 15
CO Line, Loop, and Pool Buttons 17
Admin Access 18
Return to Flash 50/51 “Select a Station Range” or
24
“Enter Station Number” Display
STATION ATTRIBUTES PAGE B PROGRAMMING FLASH 50/51 Btn 20
Station Identification Page B 1
Station Day Class of Service (COS) 2
Station Night Class of Service (COS) 3
Speakerphone Programming 4
Pickup Group(s) Programming 5
Paging Zone(s) Programming 6
School Zone 7
Line Group Access - Station 8
LCR Class of Service (COS) 9
Off-Hook Preference Programming 10
Flexible Button Programming 11
Keyset Mode 12
Voice Mail ID Translation 13
Display Flexible Buttons 14
Light Control 15
Cordless Key Telephone Unit (CKTU) Button 17
Headset Mode 18
Return to Flash 50/51 “Select a Station Range” or
24
“Enter Station Number” Display
- 61 -
Page 66
STSe Quick Start Guide September, 2005
VODAVI
System Feature
Program
Code
Flexible
Button
STATION ATTRIBUTES PAGE C PROGRAMMING FLASH 50/51 Btn 21
Internal No Answer Forward Page C 1
Internal Busy/DND Forward 2
Day External No Answer Forward 3
Day External Busy/DND Forward 4
Day No Answer Timer 5
SLT Loop Supervision 7
Outbound DID Number 8
Distinctive Ring Tone - Station 13
Night External No Answer Forward 14
Night External Busy/DND Forward 15
Special External No Answer Forward 16
Special External Busy Forward 17
Call Coverage Ring Timer 18
Return to Flash 50/51 “Select a Station Range” or
24
“Enter Station Number” Display
STATION ATTRIBUTES PAGE D PROGRAMMING FLASH 50/51 Btn 22
Tenant Group Assignments Page D 1
Internal DND Forward 3
External DND Forward 4
Night No Answer Timer 5
Special No Answer Timer 6
Back Light Display 7
FLEXIBLE NUMBERING ASSIGNMENT FLASH 52 --
Changing a Flexible Code 1
Erasing a Flexible Code 2
Selecting a Flexible Code 21
Next Code Entry 22
Previous Code Entry 23
Selecting a Fixed Code 24
NAME/NUMBER TRANSLATION TABLE FLASH 55 --
Route Number 1
Phone Number 2
Name 3
Clear Entry 4
Scroll to next Table 18
Scroll to previous Table 19
Locate a specific Table 20
- 62 -
Page 67
STSe Quick Start Guide September, 2005
VODAVI
System Feature
Program
Code
Flexible
Button
ICLID FEATURES FLASH 56 --
Enable/Disable 1
Name in Display 2
Baud Rate Display 3
Port Assignment 4
UCD GROUP PROGRAMMING FLASH 60 --
Alternate UCD Group Assignment 2
UCD Overflow Station Assignment 3
UCD Primary Agent Assignments 7
UCD Primary RAN 10
UCD Secondary RAN 11
Scroll to next Group 22
Scroll to previous Group 23
Return to Flash 60 “Select a Group” Display 24
UCD TIMERS FLASH 61 --
UCD Ring Timer 1
UCD Message Interval Timer 2
UCD Overflow Timer 3
UCD Wrap-up Timer 4
UCD No-Answer Recall Timer 5
UCD No-Answer Retry Timer 6
UCD ANNOUNCEMENT TABLES (RAN) FLASH 62 1–8
VOICE MAIL PROGRAMMING FLASH 65 --
Voice Mail Groups (440-447) 1–8
Alternate Voice Mail Group 9
Standard Leave Mail Index Entry 10
Retrieve Mail Index Entry 11
Station Assignment(s) 12
No Answer Leave Mail Index Entry 13
Busy Leave Mail Index Entry 14
VOICE MAIL OUTPULSING TABLE FLASH 66 --
Voice Mail In-Band Signaling
(Table 0) 1
(Table 1) 2
(Tables 2-6) 3-7
(Table 7) 8
Voice Mail Disconnect Table 9
- 63 -
Page 68
STSe Quick Start Guide September, 2005
VODAVI
System Feature
Program
Code
Flexible
Button
VOICE MAIL IN-BAND FEATURES FLASH 67 --
Voice Mail In-Band Digits 1
Voice Mail Transfer/Forward 2
Voice Mail Broker 3
VMID Digit Length 4
VM Port 6
VM Port Number 7
TOLL RESTRICTION PROGRAMMING FLASH 70 --
Allow Table A Programming 1
Deny Table A Programming 2
Allow Table B Programming 3
Deny Table B Programming 4
Special Table 1 Programming 5
Special Table 2 Programming 6
Special Table 3 Programming 7
Special Table 4 Programming 8
Area Code for Special Table 1 9
Area Code for Special Table 2 10
Area Code for Special Table 3 11
Displaying Toll Table Entries 12
LCR TABLES PROGRAMMING FLASH 75 --
3-Digit Area/Office Code Table 1
6-Digit Area/Office Code Table 2
Exception Code Table 3
Route List Table 4
Digit Insert/Delete Table 5
Daily Start Time Table 6
Weekly Schedule Table 7
LCR Routing for Toll Information 8
- 64 -
Page 69
STSe Quick Start Guide September, 2005
VODAVI
System Feature
Program
Code
Flexible
Button
INITIALIZE DATABASE PARAMETERS FLASH 80 --
Initialize System Parameters 1
Initialize CO Line Attributes 2
Initialize Station Attributes 3
Initialize CO Port Assignments / Codes 4
Initialize Exception Tables 5
Initialize System Speed Numbers 6
Initialize LCR Tables 7
Initialize ICLID - DID Tables 8
Initialize Directory Dialing Table Parameters 9
Initialize Hunt Group Parameters 10
Initialize UCD Group Parameters 11
Initialize Voice Mail* Group Parameters 12
Initialize DID-TIE Parameters 13
Initialize Verified Account Code Table 14
Initialize ISDN Parameters 15
System Reset 20
PRINT SYSTEM DATABASE PARAMETERS FLASH 85 --
Print System Parameters 1
Print CO Line Attributes 2
Print Station Attributes 3
Print CO Port Parameters / Codes 4
Print Exception Tables 5
Print System Speed Numbers 6
Print LCR Tables 7
Print Entire System Database 8
Print ICLID - DID Tables 9
Print Directory Dial Table Parameters 10
Print Hunt Group Parameters 11
Print UCD Group Parameters 12
Print Voice Mail* Group Parameters 13
Print DID-TIE Parameters 14
Print Verified Account Codes 15
Print ISDN Parameters 16
LOAD DATABASE ROUTINE FLASH 86 --
Upload Database 1
Download Database 2
- 65 -
Page 70

Page 71

Page 72

Vodavi Communications Systems, Inc.
www.vodavi.com
P/N: MMBB0163401 PRINTED IN KOREA
 Loading...