

Page 1
Wireless Phone
Station
User
Guide
Issue 2.0 - March 2007
P/N: 3807-14
Page 2
I
Issue Release Changes
1.0 6-06 Initial Release
2.0 3-07 The document is revised to show that the
product is now associated with Vertical
Communications, Inc.
Vertical Communications, Inc. reserves the right to revise this
publication and to make changes in content without notice.
© 2007 by Vertical Communications, Inc. All rights reserved.
This publication contains proprietary and confidential
information of Vertical Communications, Inc. The contents of this
document may not be disclosed, copied or translated by third
parties, in any form, or by any means known, or not now known or
conceived, without prior explicit written permission from Vertical
Communications, Inc.
LIMIT OF LIABILITY/DISCLAIMER OF WARRANTY
Vertical Communications, Inc. makes no representation or
warranties with respect to the accuracy or completeness of the
content of this publication and specifically disclaims any implied
warranty of merchantability or fitness for any particular purpose,
and shall not be liable for any loss of profit or any other
commercial damage, including but not limited to, special,
incidental, or consequential.
TRADEMARKS
Vertical Communications and the Vertical Communications logo
and combinations thereof, DiscoveryCT, Infinite, Nomad IP,
PathFinder IP, XTS IP, XTSc, Telenium IP, Triad, and Xcelerator IP
are trademarks and Artisoft, Comdial, InstantOffice, StarPlus,
TeleVantage, Vertical Networks and Vodavi are registered
trademarks of Vertical Communications, Inc. All other brand and
product names that appear in this publication are used for
identification only and are the property of their respective
holders
.
mlj/2007
Page 3

Contents
Product Description ......................................... 1
List of Features ............................................................1
Nomad IP Layout ........................................................ 2
User Interface ................................................... 3
LCD Display .................................................................. 3
LCD Icons....................................................................... 4
Main Menu Icons ........................................................5
Main Menu -- Displays / Options / Navigation.6
Buttons & Functions..................................................11
Ring / Message LED ...................................................13
Entering Text................................................................ 14
i
Entering Your Name in the Display ..................... 16
Telephone Features ......................................... 17
Registration ..................................................................17
Basic Features.............................................................. 18
Key Phone Features...................................................21
Placing a Call............................................................21
Answering a Call.....................................................22
Transferring a Call ................................................. 23
Holding a Call .......................................................... 24
Call Forward.............................................................25
Call Park ....................................................................26
Call Pick-Up ..............................................................27
Call Waiting ..............................................................28
Message Wait / Call Back.....................................29
Do Not Disturb (DND) ..........................................30
System Speed Dial.................................................30
System Speed Redial ............................................30
Flex Functions ......................................................... 31
Push-To-Talk Groups ............................................33
Nomad IP User Guide March 2007
Page 4

Menu Features..................................................34
Phone Book [Main Menu + 1].................................35
Add New ...................................................................35
Search ........................................................................35
Caller Groups ..........................................................36
Speed Dials...............................................................36
Delete All...................................................................37
Call History [Main Menu + 2] ..................................38
Messages [Main Menu + 3] .....................................39
Write Message ........................................................39
Inbox...........................................................................40
Outbox .......................................................................40
Draft ............................................................................41
ii
Tools [Main Menu + 4]..............................................42
Schedule ...................................................................42
Memo .........................................................................48
Alarm Clock ..............................................................50
Calculator ..................................................................51
World Time ...............................................................52
D-Day..........................................................................53
Settings [Main Menu + 5] ........................................55
Sound .........................................................................55
Display........................................................................57
Power Save ...............................................................58
Security ......................................................................58
Lock Phone ...............................................................58
Reset Default............................................................58
Network .....................................................................58
System........................................................................61
Key Lock.....................................................................62
Dialing Rule ..............................................................62
User Dictionary........................................................62
Phone Info [Main Menu + 6]...................................63
Nomad IP User Guide March 2007
Page 5

S/W Version..............................................................63
Network Info............................................................63
System [Main Menu + 7]..........................................63
Forward .....................................................................63
Conference............................................................... 63
DND ............................................................................ 63
Message/Call Back .................................................64
Flash............................................................................64
System Speed..........................................................64
System Redial ..........................................................64
ICM ..............................................................................64
Mute ...........................................................................64
Transfer...................................................................... 64
iii
Hold/Save .................................................................64
Program.....................................................................64
Nomad IP User Guide March 2007
Page 6

Page 7

Product Description 1
Product Description
List of Features
The
Nomad IP
WIT-300H) comes equipped with the following features:
Twenty-seven (27) Fixed Feature/Function buttons:
- Send and End Buttons
- Left and Right Soft Menu Buttons
- OK Button and 4 Navigation Buttons
wireless phone (also referred to as the
- Hold/Save Button
- Trans/PGM Button
- Clear/Prev Button
- Standard Dial Buttons (1-9, 0, *, #)
- Volume Up and Down Buttons
-PTT Button
65K Color Graphic LCD
(128x128 dot matrix), Back Light
Vibration / PTT
64 Poly Sound
Internal Antenna
2.5 mm Headset Jack
Hearing Aid Compatible Receiver
Nomad IP User Guide March 2007
Page 8
2Nomad IP Layout
Nomad IP Layout
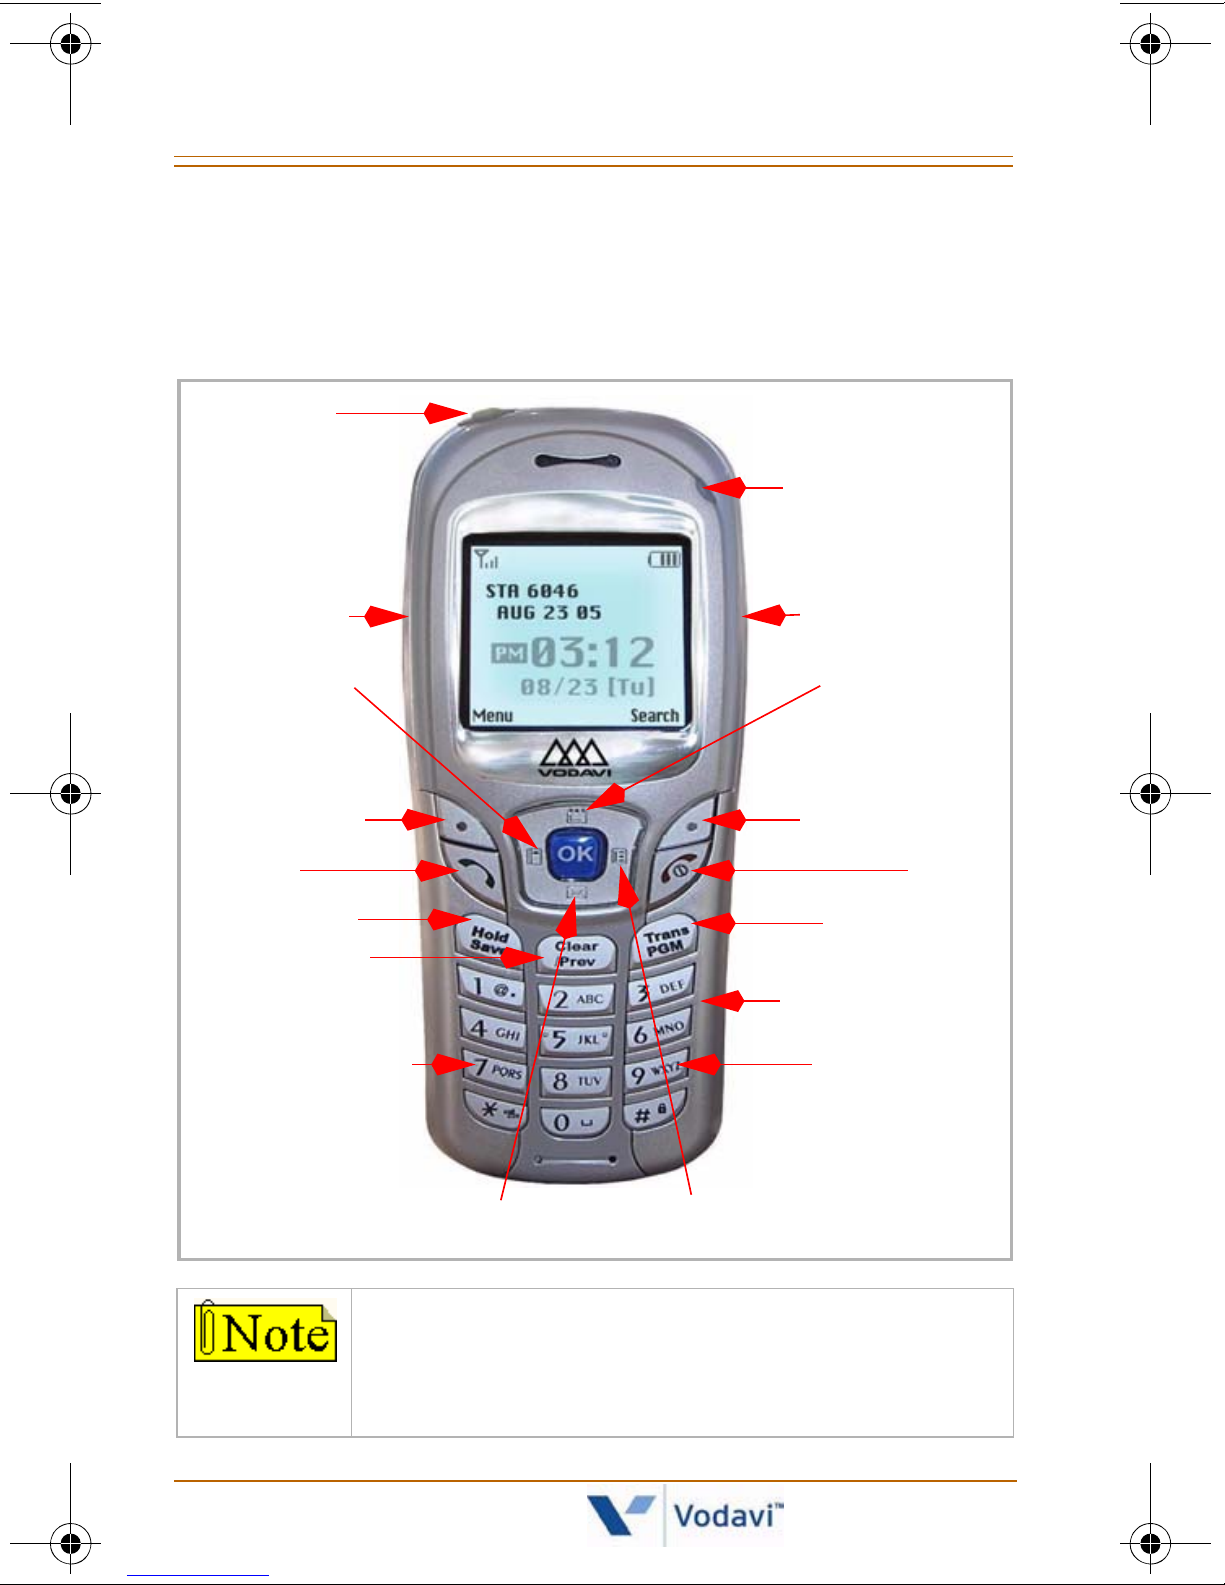
The following diagram will help you become familiar with
your new wireless phone.
Ear-Jack
Ring/Msg LED
Volume
Up/Down
System (Left)
Menu/LSK*
Send
Hold/Save
Clear/Prev
Manner Mode
(Vibrate)
Push-To-Talk
Schedule (Up)
Search/RSK*
End
Trans/PGM
Nbr/Char Keys
Lock Mode
Message (Down)
* Dual-Function Keys
“Menu” button serves as Left Soft Key (LSK).
“Search” button functions as Right Soft Key (RSK).
Nomad IP User Guide March 2007
Flex (Right)
Page 9
User Interface 3
User Interface
This section describes the LCD display, the function
associated with each button, and the multiple ways to
enter text when sending a message.
LCD Display
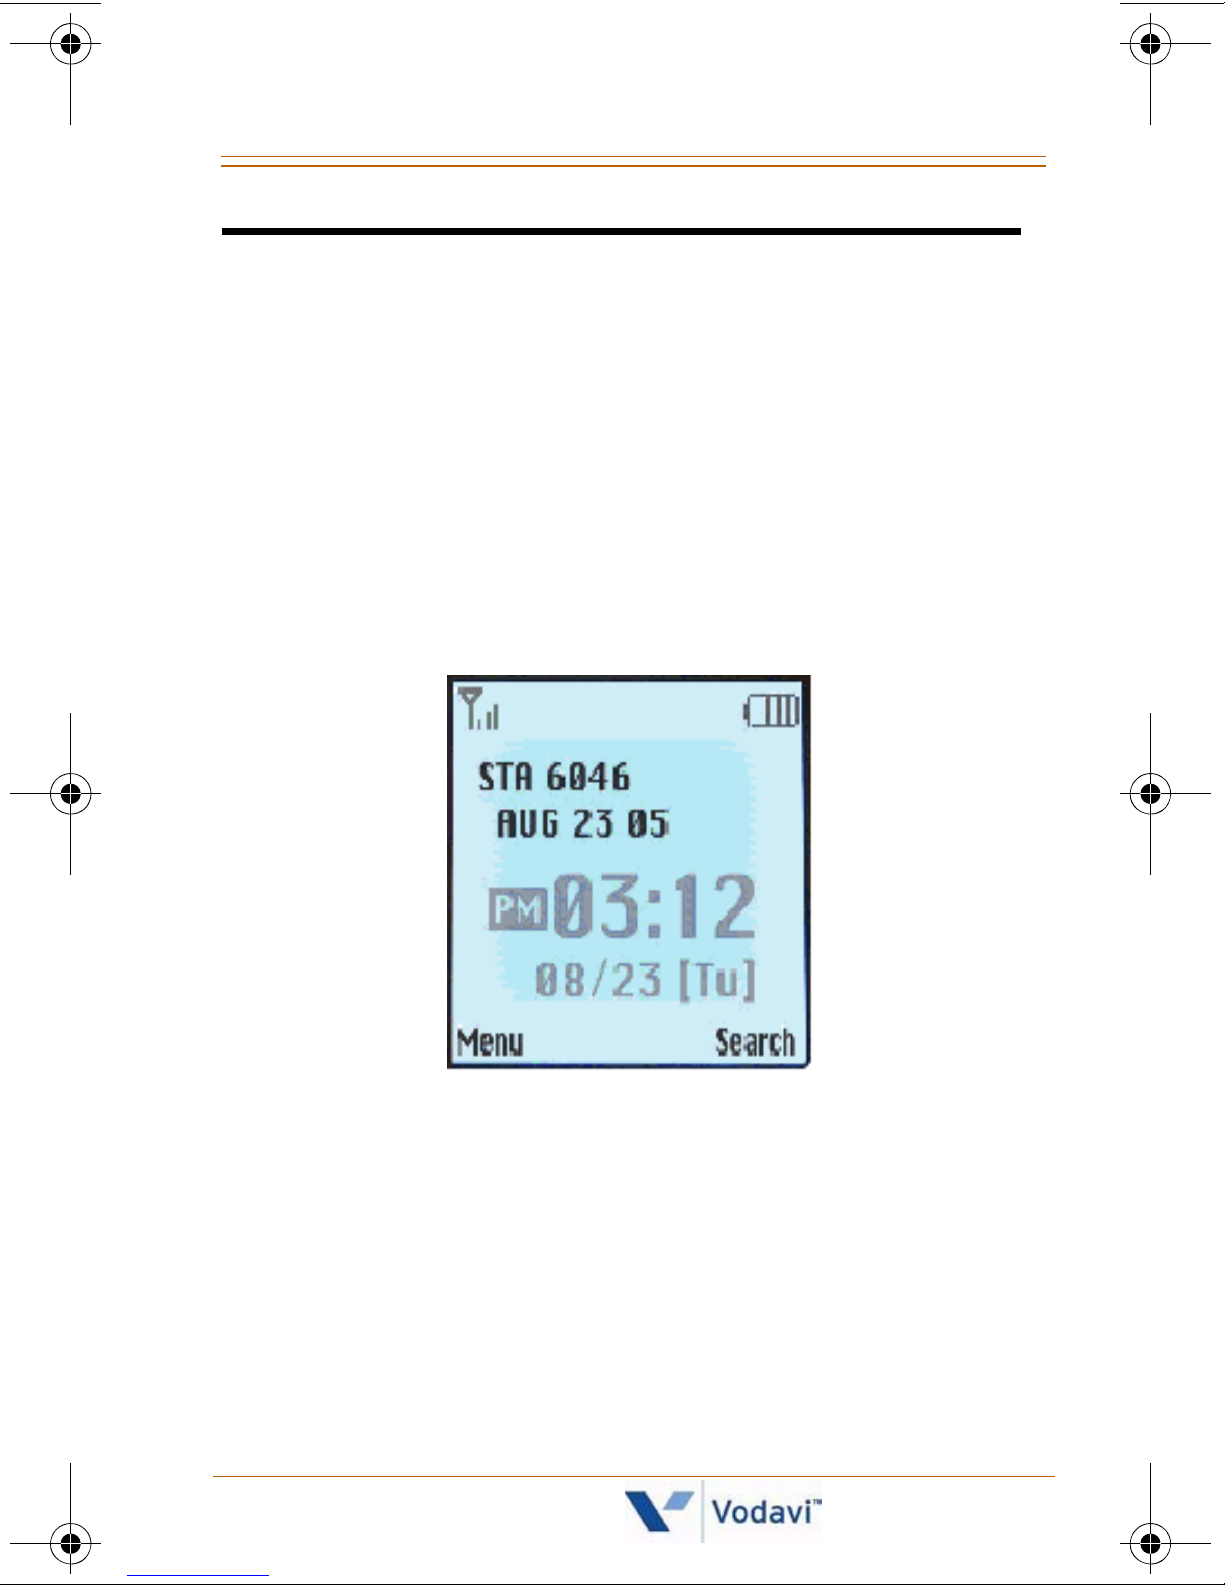
The LCD shows different wireless states, and displays
visual feedback for the actions performed by the user.
Nomad IP User Guide March 2007
Page 10
4LCD Icons
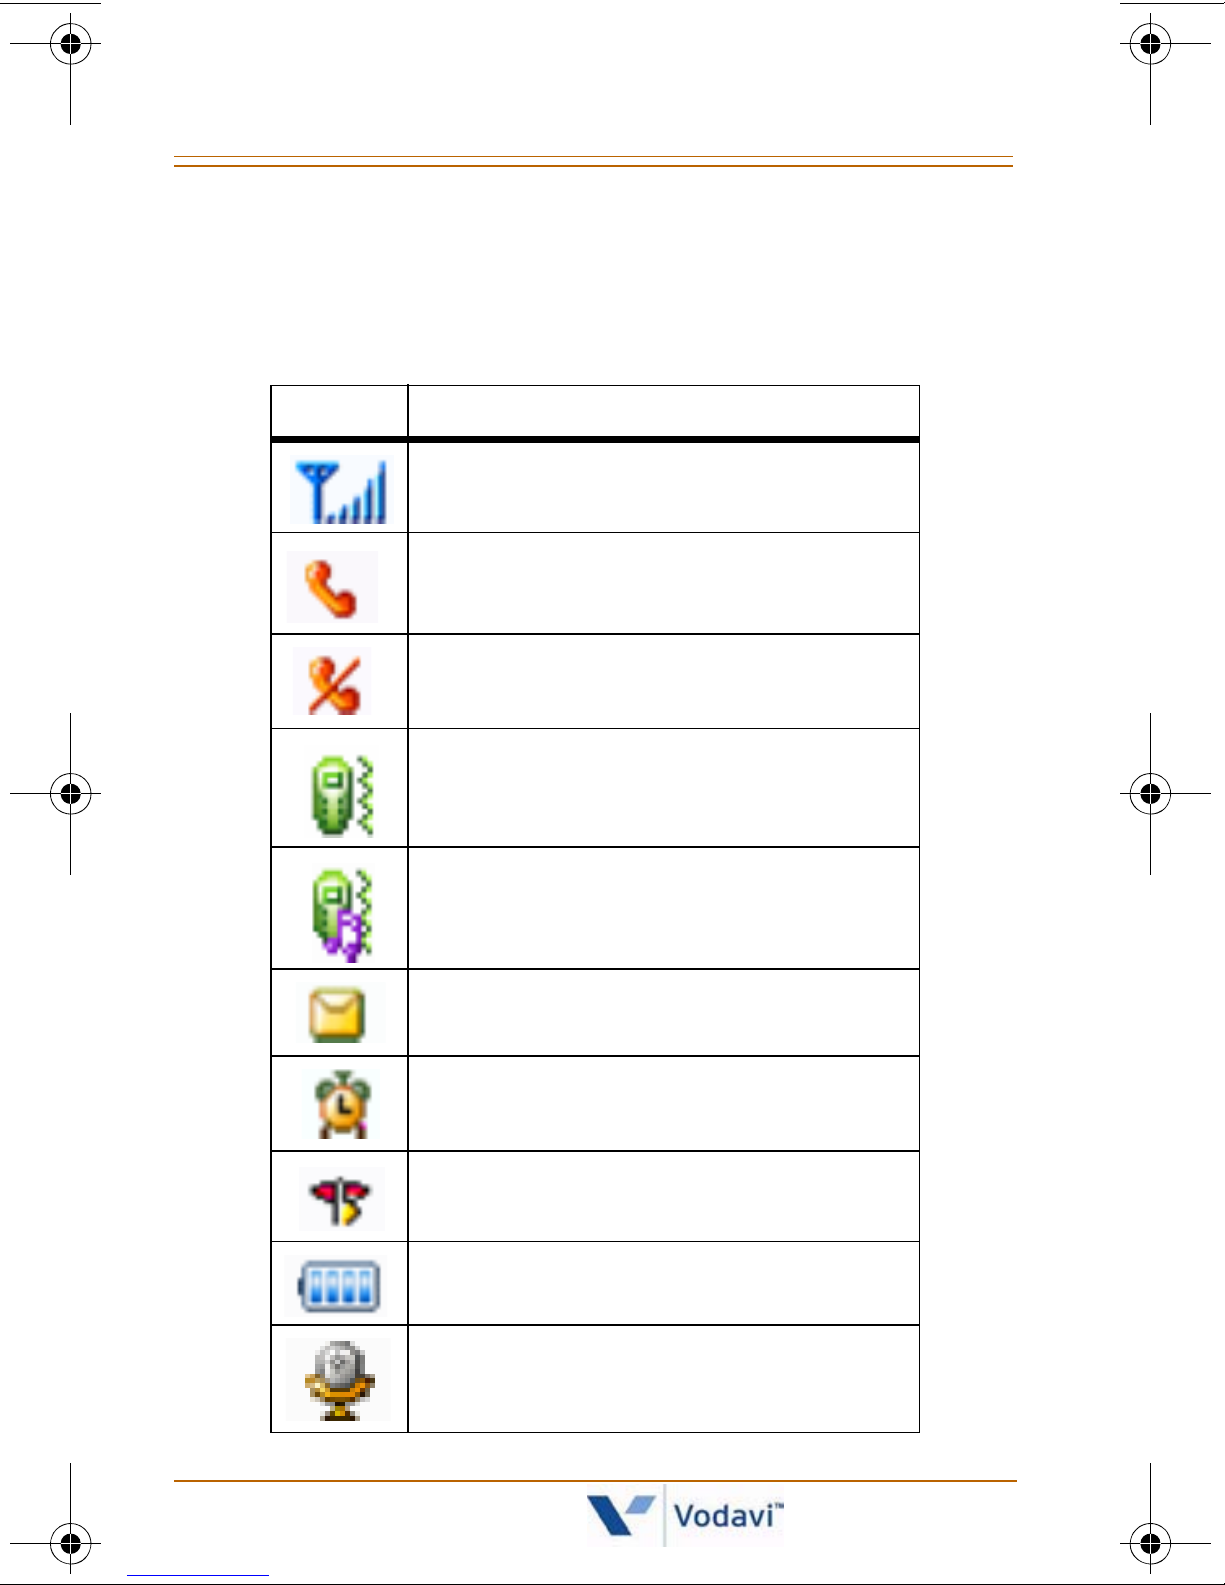
LCD Icons
The following icons display in the top area of the LCD and
indicate the status and/or action of the functions shown.
Icon Description
Signal strength
Call is connected
No service
(phone is not receiving a system signal)
Vibration mode
Vibration and Ring mode
New text message received
Alarm is set and ON
Manner Mode
(quickly set to vibrate mode)
Battery status
Nomad IP User Guide March 2007
New voice message received
Page 11
Main Menu Icons 5
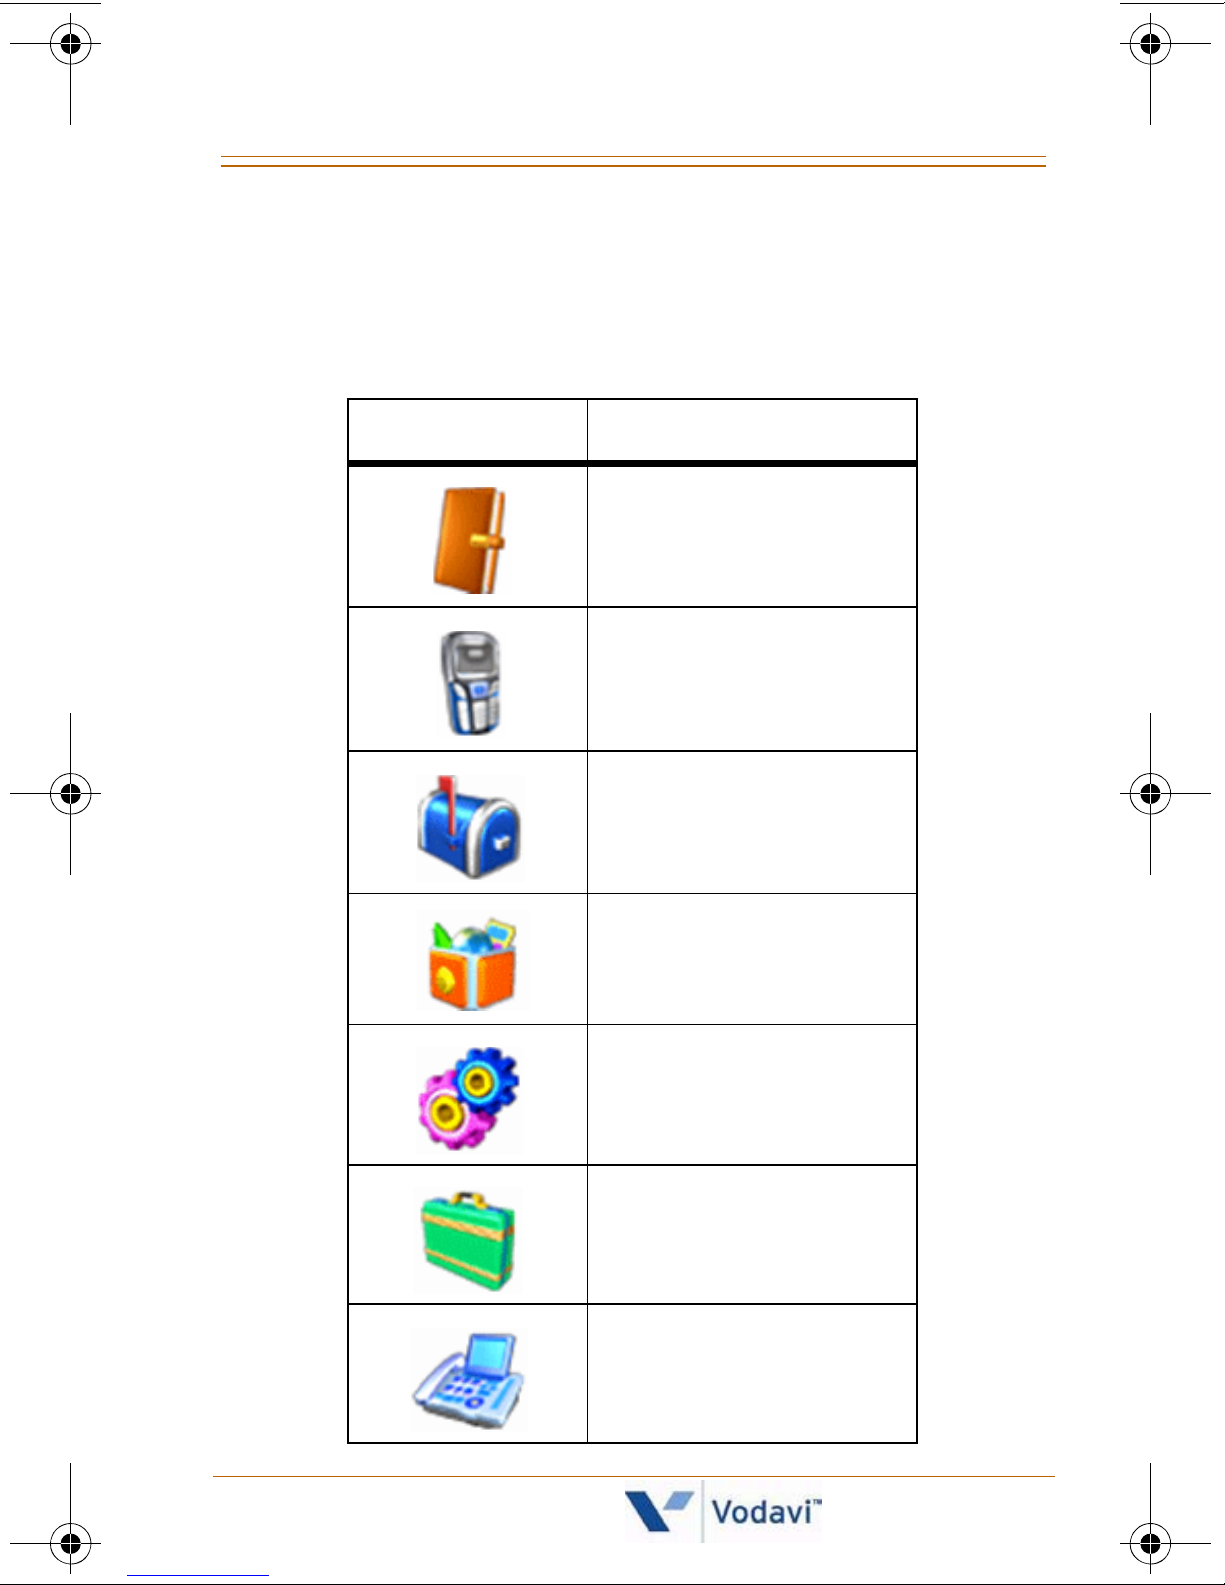
Main Menu Icons
These icons are used to access the following
Main Menu options:
Icon Description
1. Phone Book
2. Call History
3. Messages
Nomad IP
4. Tools
5. Settings
6. Phone Info
7. System
Nomad IP User Guide March 2007
Page 12
6 Main Menu -- Displays / Options / Navigation
Main Menu -- Displays / Options / Navigation
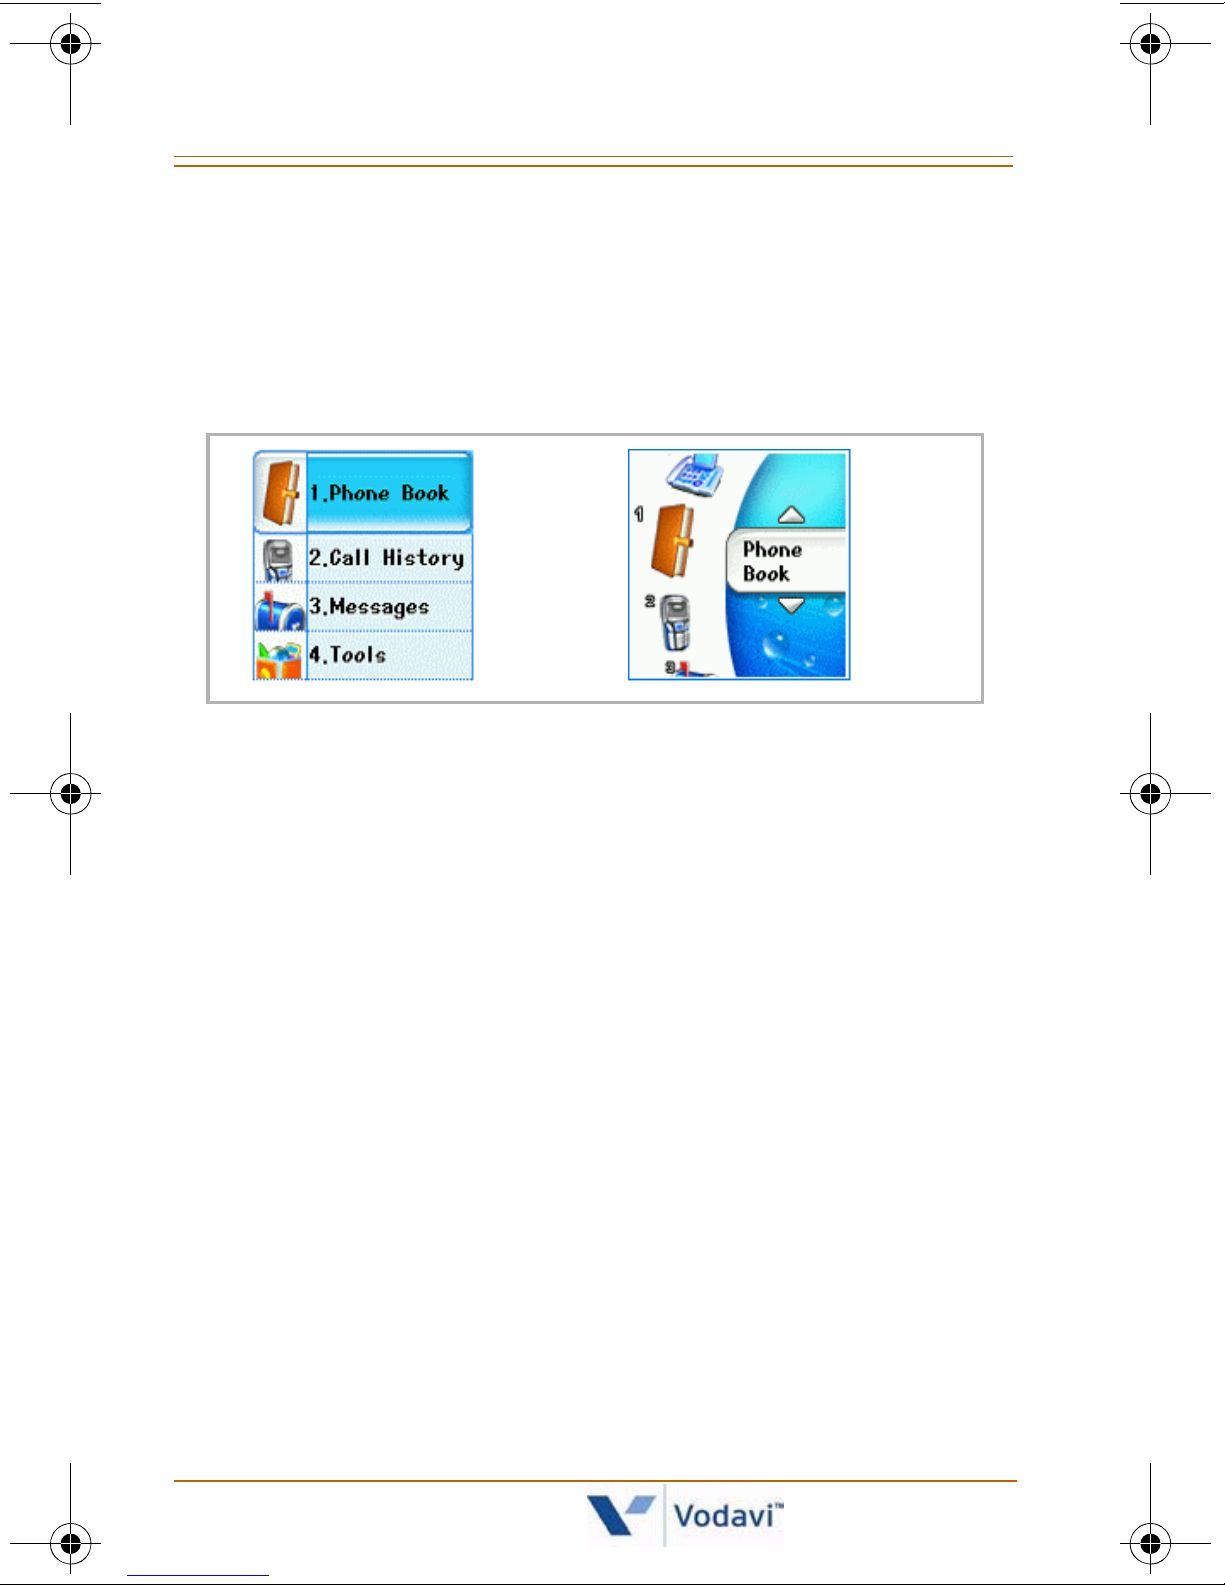
Main Menu Display
The Main Menu can be displayed in either a list style or an
arch style.
ArchList
Style Style
You can access the Main Menu in one of two ways:
1) Press the [LSK].
Using the [Up/Down] navigation keys, scroll to the
desired option and press the [OK] button.
Then scroll to the desired sub-option using the
[Up/Down] navigation keys and press [OK].
-or-
2) Press the [Left] navigation button.
Using the [Left/Right] navigation keys, scroll to the
desired option.
Then scroll to the desired sub-option using the
[Up/Down] navigation keys and press [OK].
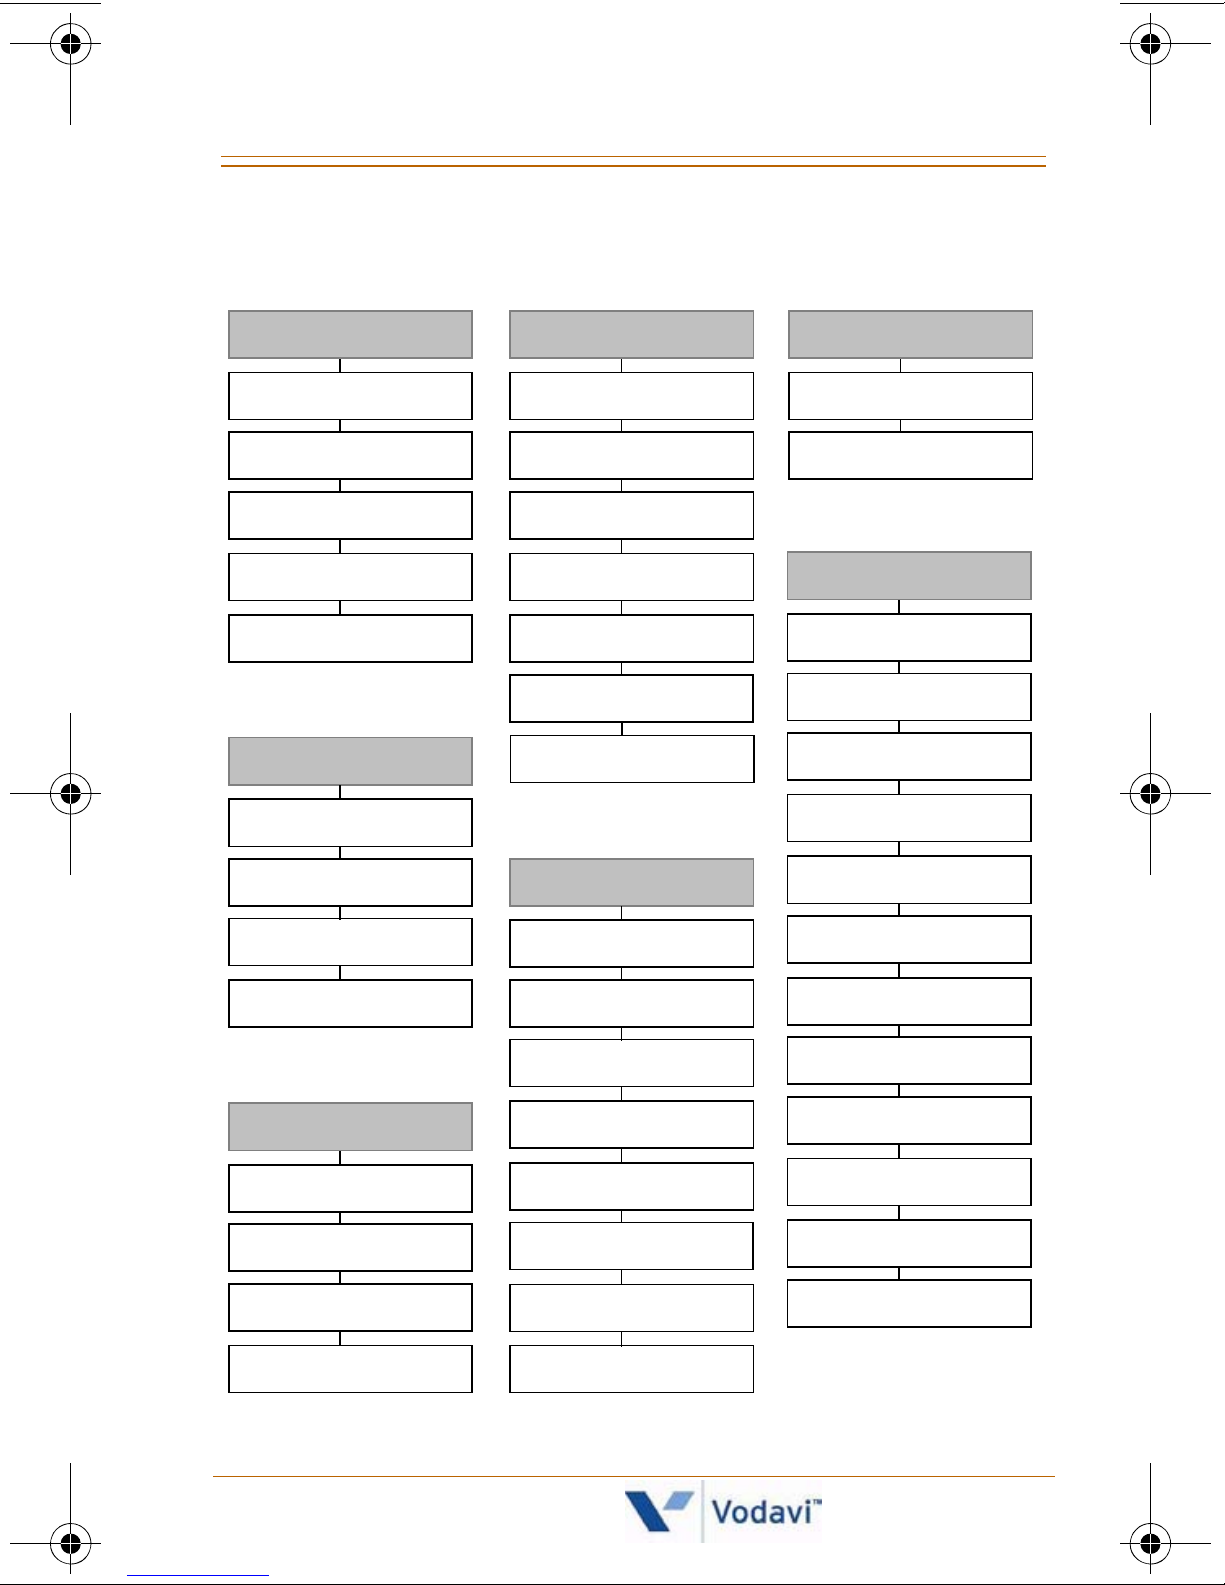
Quick Reference
To view the Main Menu options, their respective sub-
menus, and the navigation keys … refer to the
illustrations on the next two pages.
Nomad IP User Guide March 2007
Page 13
Main Menu -- Displays / Options / Navigation 7
Main Menu Options
1. Phone Book
Add New
Search
Caller Groups
Speed Dials
Delete All
2. Call History
Missed Calls
Dialed Calls
4. Tools
Schedule
Memo
Alarm Clock
Calculator
World Time
D-Day
Site Survey
5. Settings
6. Phone Info
S/W Version
Network Info
7. System
Forward
Conference
DND
MSG/CallBk
Flash
Received Calls
All Calls
3. Messages
Write Message
Inbox
Outbox
Draft
Sound
Display
Security
Network
System
Key Lock
Dialing Rule
User Dictionary
System Speed
System Redial
ICM
Mute
Transfer
Hold/Save
Program
Nomad IP User Guide March 2007
Page 14
8 Main Menu -- Displays / Options / Navigation
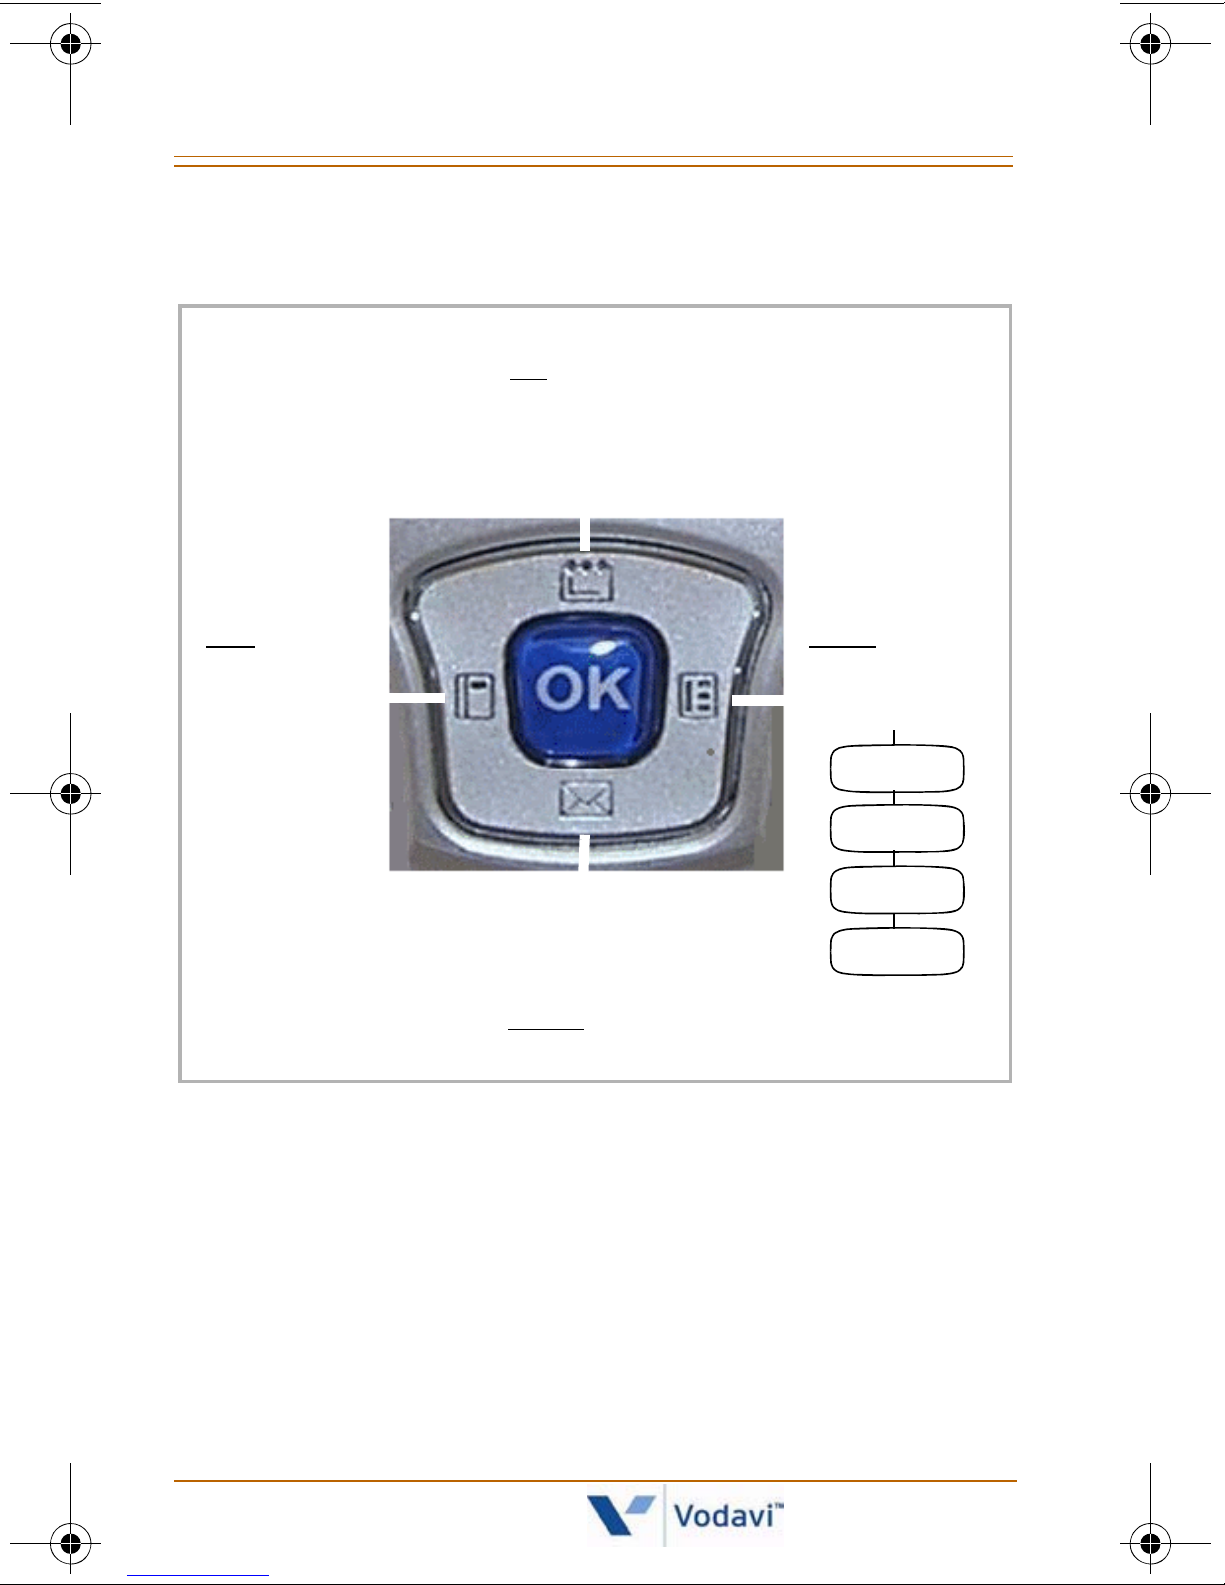
Navigation Keys / Menus
(Up Nav Key)
Same as Schedule in Tools of Main Menu
SCHEDULE
(Left Nav Key)
SYSTEM
Same as System
in Main Menu
MESSAGES
Same as Messages in Main Menu
(Down Nav Key)
(Right Nav Key)
FLEX KEY
Flex 1
Flex 2
....
Flex 12
Nomad IP User Guide March 2007
Page 15
Main Menu -- Displays / Options / Navigation 9
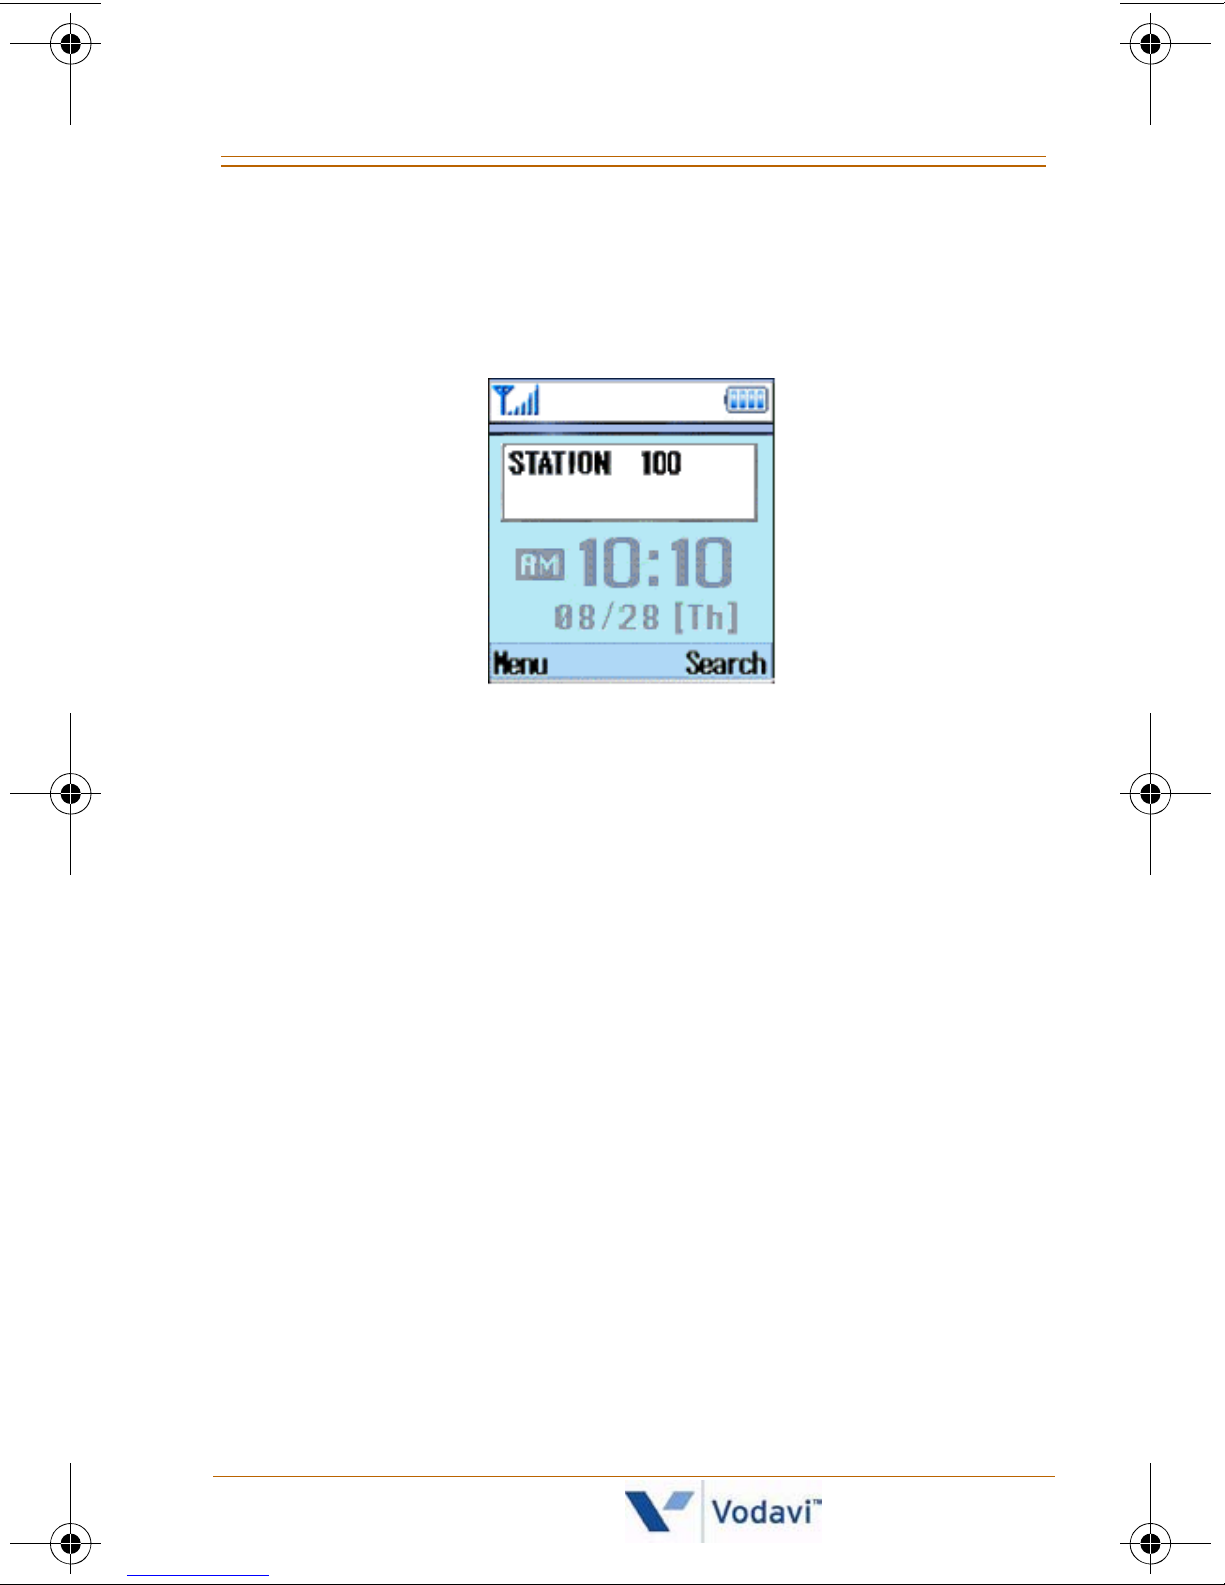
Idle Mode Display
When in idle mode, the display of the
Nomad IP
appear as shown:
The LCD display is divided into two parts:
1 -- The rectangle area displays the status of the
Nomad IP
phone. In an idle mode, only the station
will
number is shown.
2 -- The time/date/day area displays the system time,
the current date, and the day of the week, after
registration with the phone system.
Nomad IP User Guide March 2007
Page 16

10 Main Menu -- Displays / Options / Navigation
Ringing / Call State Display
The following examples show the Ring/Call displays:
Incoming Call
Outgoing Call
Missed Call
- If the caller’s name and number are stored in your
Phone Book, the
Nomad IP
will show both items on the
LCD display.
- If the caller is not
display the phone number.
Nomad IP User Guide March 2007
in your book,
Nomad IP
will only
Page 17
Buttons & Functions 11
Buttons & Functions
The
Nomad IP
Digit Buttons
[0], [1], [2], [3], [4], [5], [6], [7], [8], [9]
Feature Buttons
has 10 digit buttons & 17 feature buttons.
[*], [#],
[
LSK
[
VOL UP
], [
[
SEND
RSK
], [
], [
VOL DOWN
], [
END
], [UP], [
HOLD/SAVE
], [
DOWN
], [
CLEAR/PREV
PTT
]
], [
LEFT
], [
], [
TRANS/PGM
RIGHT
], [OK],
Refer to the following table for button descriptions.
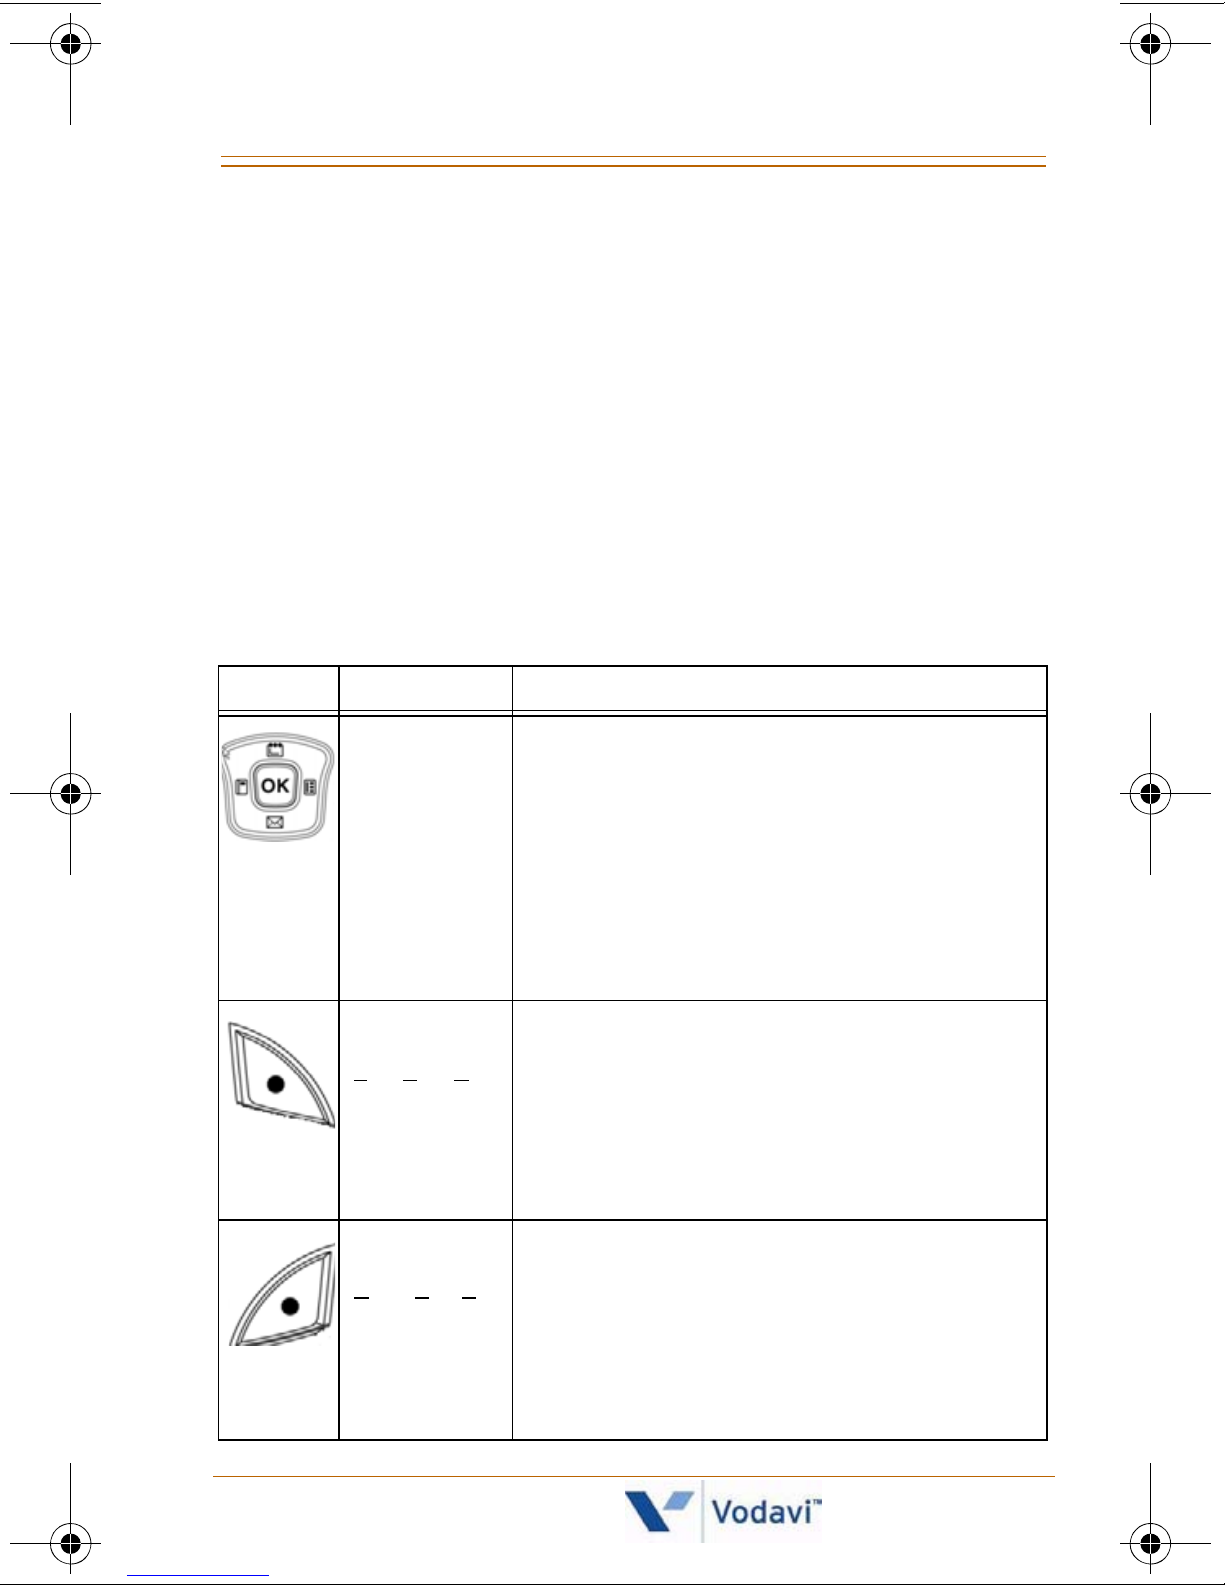
Button Function Description
Navigation
Keys …
[OK]
[LEFT]
[RIGHT ]
[UP]
[DOWN]
[LSK]
eft Soft Key
L
In Menu mode:
- navigation keys move thru menus.
- [OK] selects menu or confirms action.
In Idle mode:
- [LEFT] goes to System menu.
- [RIGHT] goes to Flex Key menu.
- [UP] goes to Schedule menu.
- [DOWN] goes to Messages menu.
In Idle mode:
used as a menu key and goes to Main
Menu mode.
],
[RSK]
ight Soft Key
R
Nomad IP User Guide March 2007
In Menu mode or other modes:
used to access options or special
menu keys.
In Idle mode:
used as a search key in the Search
menu of the Phone Book.
In Menu mode or other modes:
used to delete or to access special
menu keys.
Page 18
12 Buttons & Functions
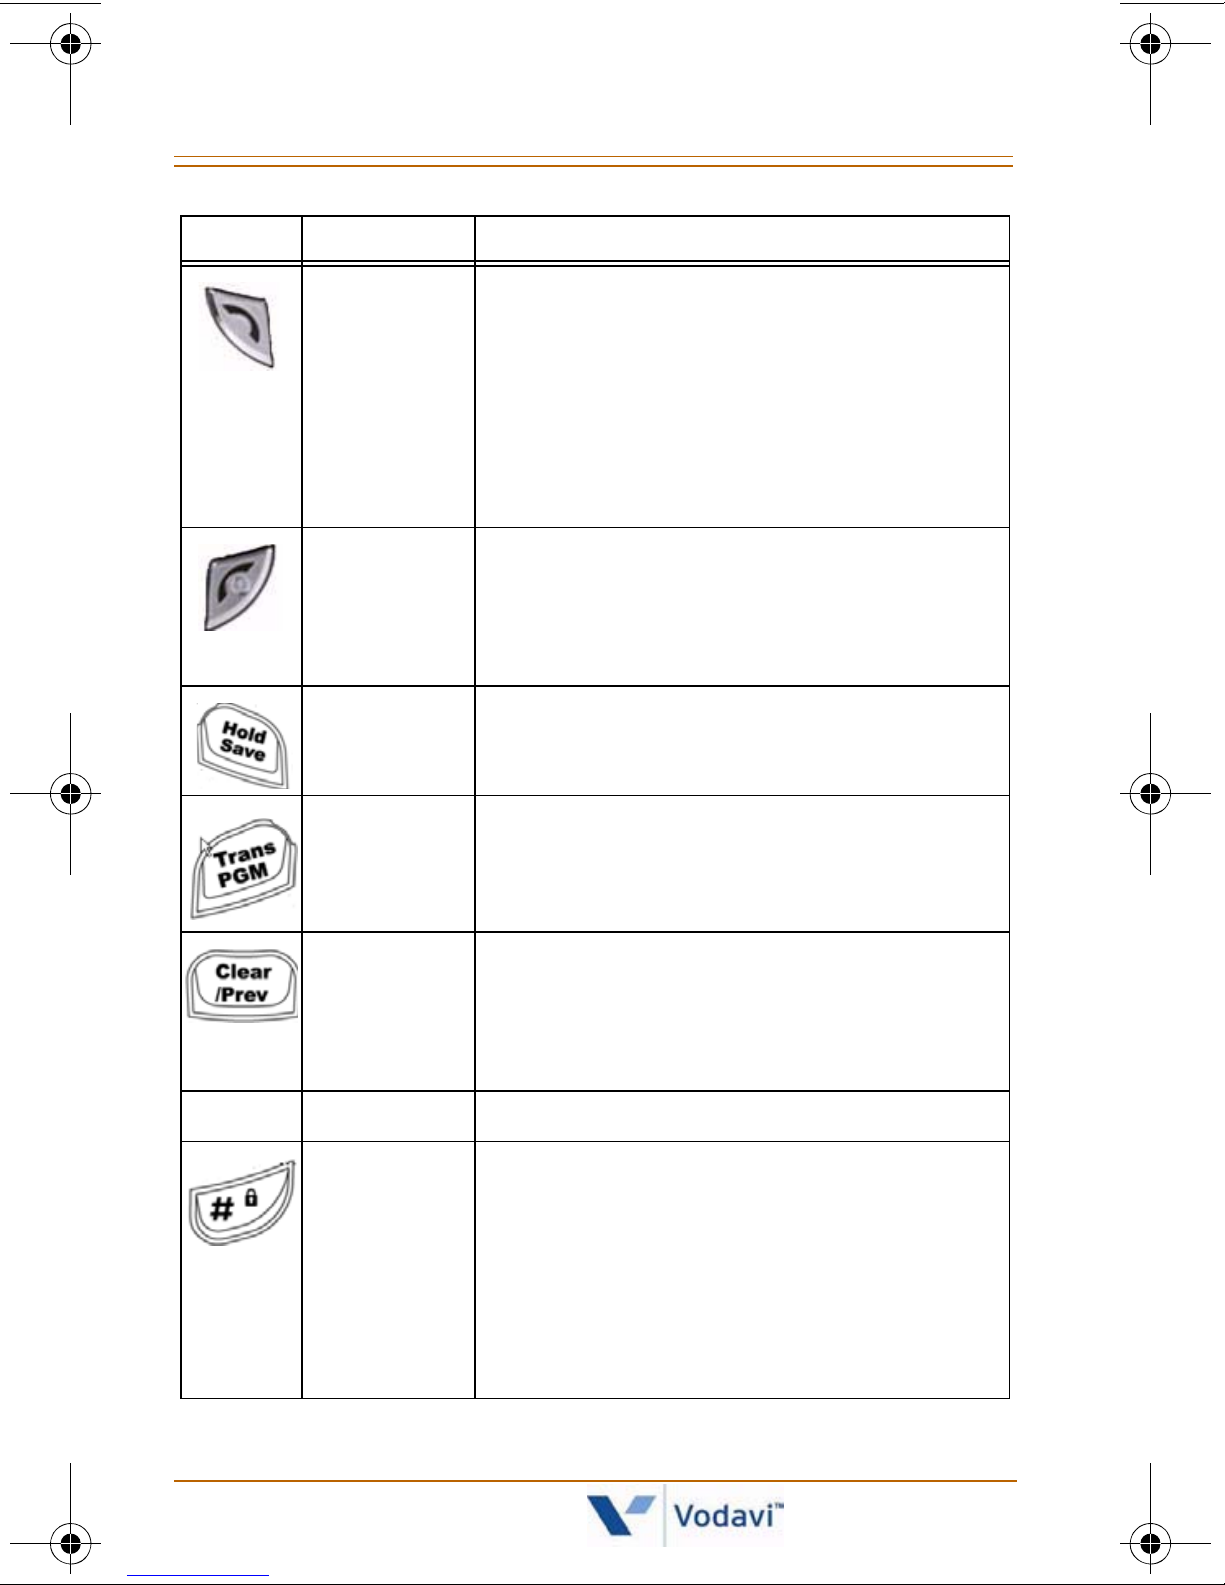
Button Function Description
[SEND]
[END]
[HOLD]/
[SAVE]
[TRANS]/
[PGM]
While ringing:
answers an incoming call.
In Idle mode:
shows recent calls.
When pre-dialing, or after selecting the
call list or Phone Book:
dials selected phone number.
During a call:
releases the call.
In Menu mode:
goes to idle mode.
used as a Hold and a Save key.
- used to transfer a call to another
station or off-net.
0-9
[CLEAR]/
[PREV]
Dial Pad Keys
[#]
- used to program function keys.
In Menu mode:
goes to Previous menu mode.
In Edit mode:
deletes previous input character.
Standard dial buttons.
In Idle mode:
- pressing longer than 1 second goes
to Phone Lock mode.
- pressing less than 1 second displays #
symbol.
In other modes:
displays # symbol.
Nomad IP User Guide March 2007
Page 19
Ring / Message LED 13
Button Function Description
In Idle mode:
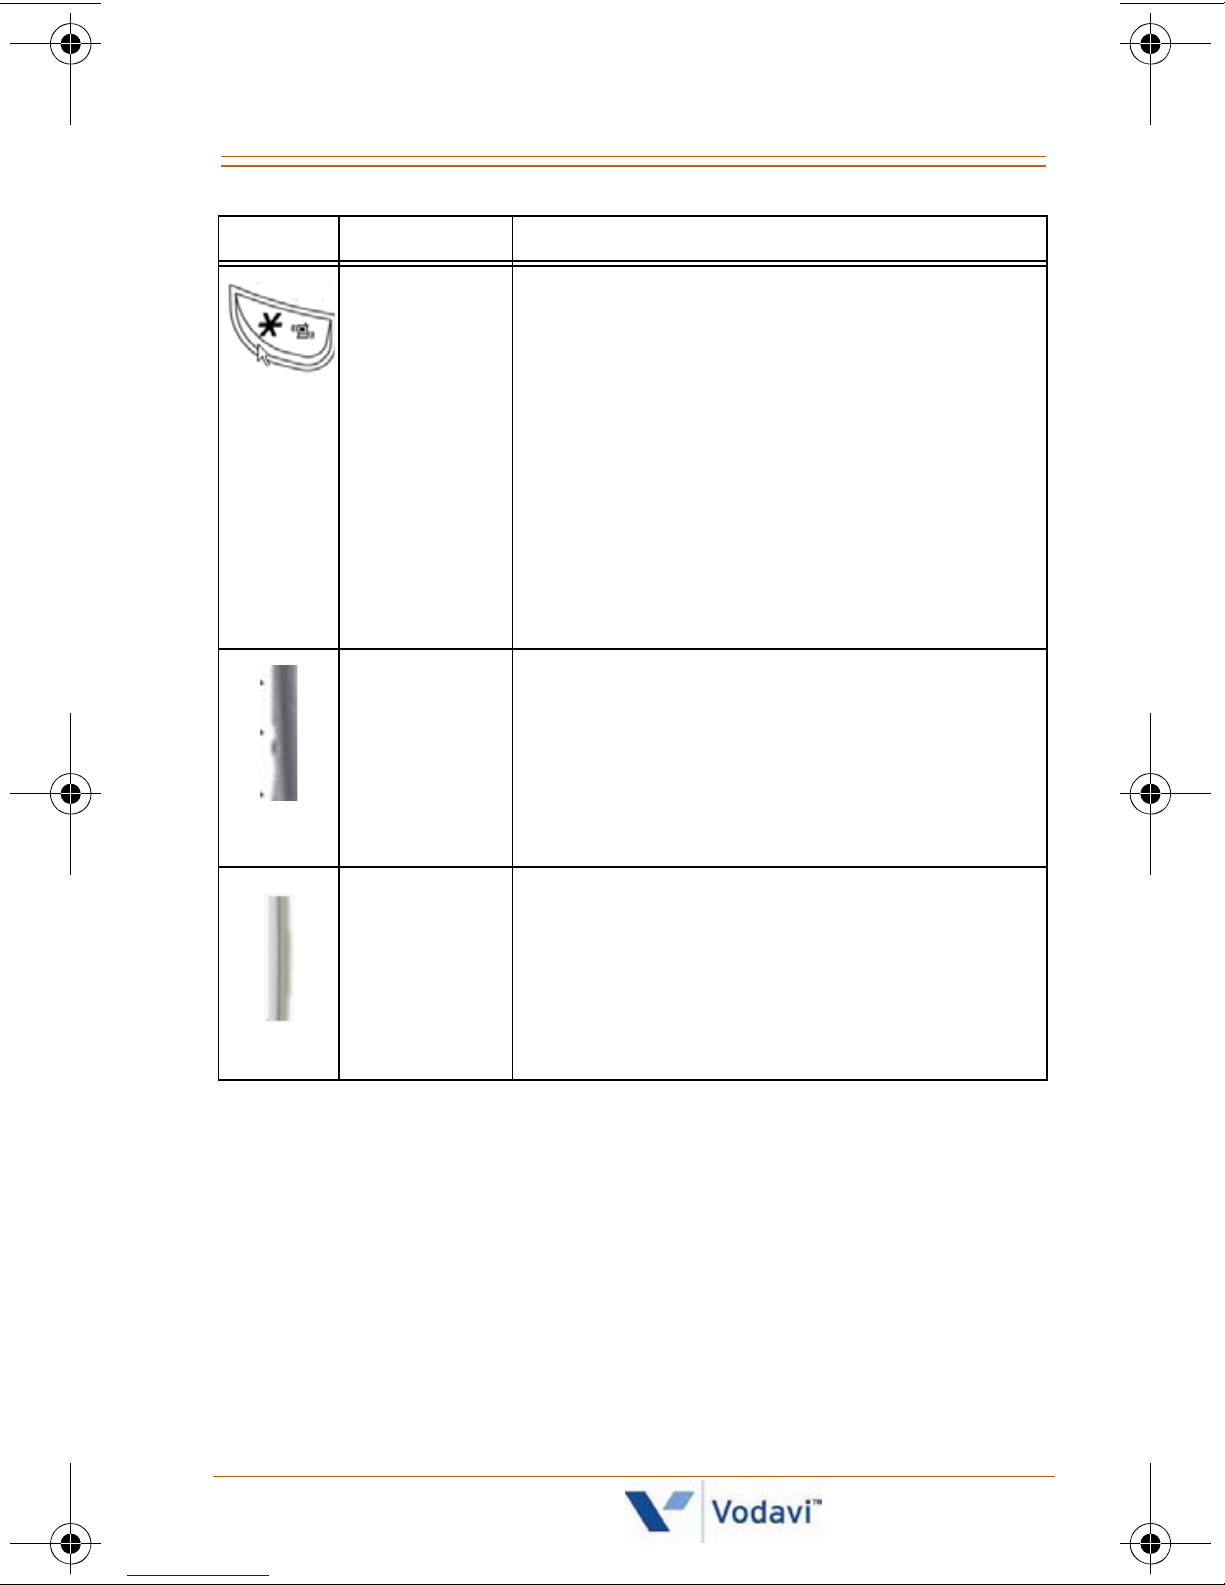
[*]
- pressing longer than 3 secs. goes to
Manner mode which provides only
vibration for ringing, alarms, etc. (no
tone is presented).
- pressing less than 3 secs. displays *.
In Manner mode:
pressing longer than 3 secs. returns
phone to ringing mode.
In other modes:
displays * symbol.
[VOL UP],
[VOL DOWN]
Push-To-Talk
In Idle mode:
controls key tone volume.
In Voice mode:
controls conversation volume.
In Ringing mode:
controls ringing volume.
In Idle mode:
- press & hold the PTT button while
speaking. Other parties in your PTT
grp can listen to your announcement.
- release the PTT button to end your
PTT announcement.
Ring / Message LED
The Ring/Message LED is located at the upper right side.
The LED turns ON when an incoming call or a new
message is received.
- The Ring LED lights solid for incoming calls, and
flashes for a message waiting indication.
- When the Ring OFF function is enabled, ring tone is
not heard, but the Ring LED lights solid.
Nomad IP User Guide March 2007
Page 20

14 Entering Text
Entering Text
You can enter alphanumeric characters using the keypad
of the
Nomad IP
handset. The following text input
methods will allow you to place a name in the Phone
Book, write a message, or set up events in the Schedule.
Changing Text Input Mode
When you are in a field that allows characters to be
entered, you will notice the text input mode indicator in
the upper right corner of the display.
Press the [RSK] button to change the input mode to:
Abc, abc, ABC, T9Abc, T9abc, T9ABC or 123.
Using T9 Mode
The T9 “predictive text input” mode allows you to enter
words easily using a minimum number of keys.
- As you press each key, the handset displays the
characters that it thinks you are typing based on a
built-in dictionary.
- When new letters are added, the word changes to
reflect the most likely entry from the dictionary.
When you are in the T9 mode:
Start entering a word by pressing keys [2] through [9],
one key per letter.
- The word changes as letters are typed, ignore what
you see on the screen until word is typed completely.
- If the word is still incorrect, press the [*] key to cycle
through other entries.
Nomad IP User Guide March 2007
Page 21

Entering Text 15
Example:
Press [4] + [6] + [6] + [3] to type the word “Good”;
press the [*] key to see other choices .
- If the desired word is missing from the word list,
you can add the word by using the ABC mode.
- Missing words can be added to the user
dictionary.
Enter the whole word before editing or deleting any
keystrokes. Complete each word with a space by
pressing [0].
To delete a letter … press the [Clear/Prev] key.
To erase a word … press and
hold the [Clear/Prev] key.
Using ABC Mode
To enter text:
Using keys [2] through [9], press the key labeled with
the desired letter. Once for the first letter, twice for the
second letter, and so on.
To insert a space … press the [0] key once.
To delete a letter … press the [Clear/Prev] key.
To erase a word … press and
hold the [Clear/Prev] key.
Using 123 Mode
The 123 Mode enables you to enter numbers in a text
messages (a telephone number, for example).
Press the keys corresponding to the required digits
before manually switching back to the appropriate
text entry mode.
Nomad IP User Guide March 2007
Page 22
16 Entering Your Name in the Display
Entering Your Name in the Display
You can enter a default display into the
Nomad IP
handset
using the keypad so that your name or other identifier
can be sent to calling parties when you place ICM calls.
To create your name in an
XTS-IP / XTSc-IP
system:
1. Dial access code [690] to
enter the keypad
programming mode. The
handset will display
“Enter Name”.
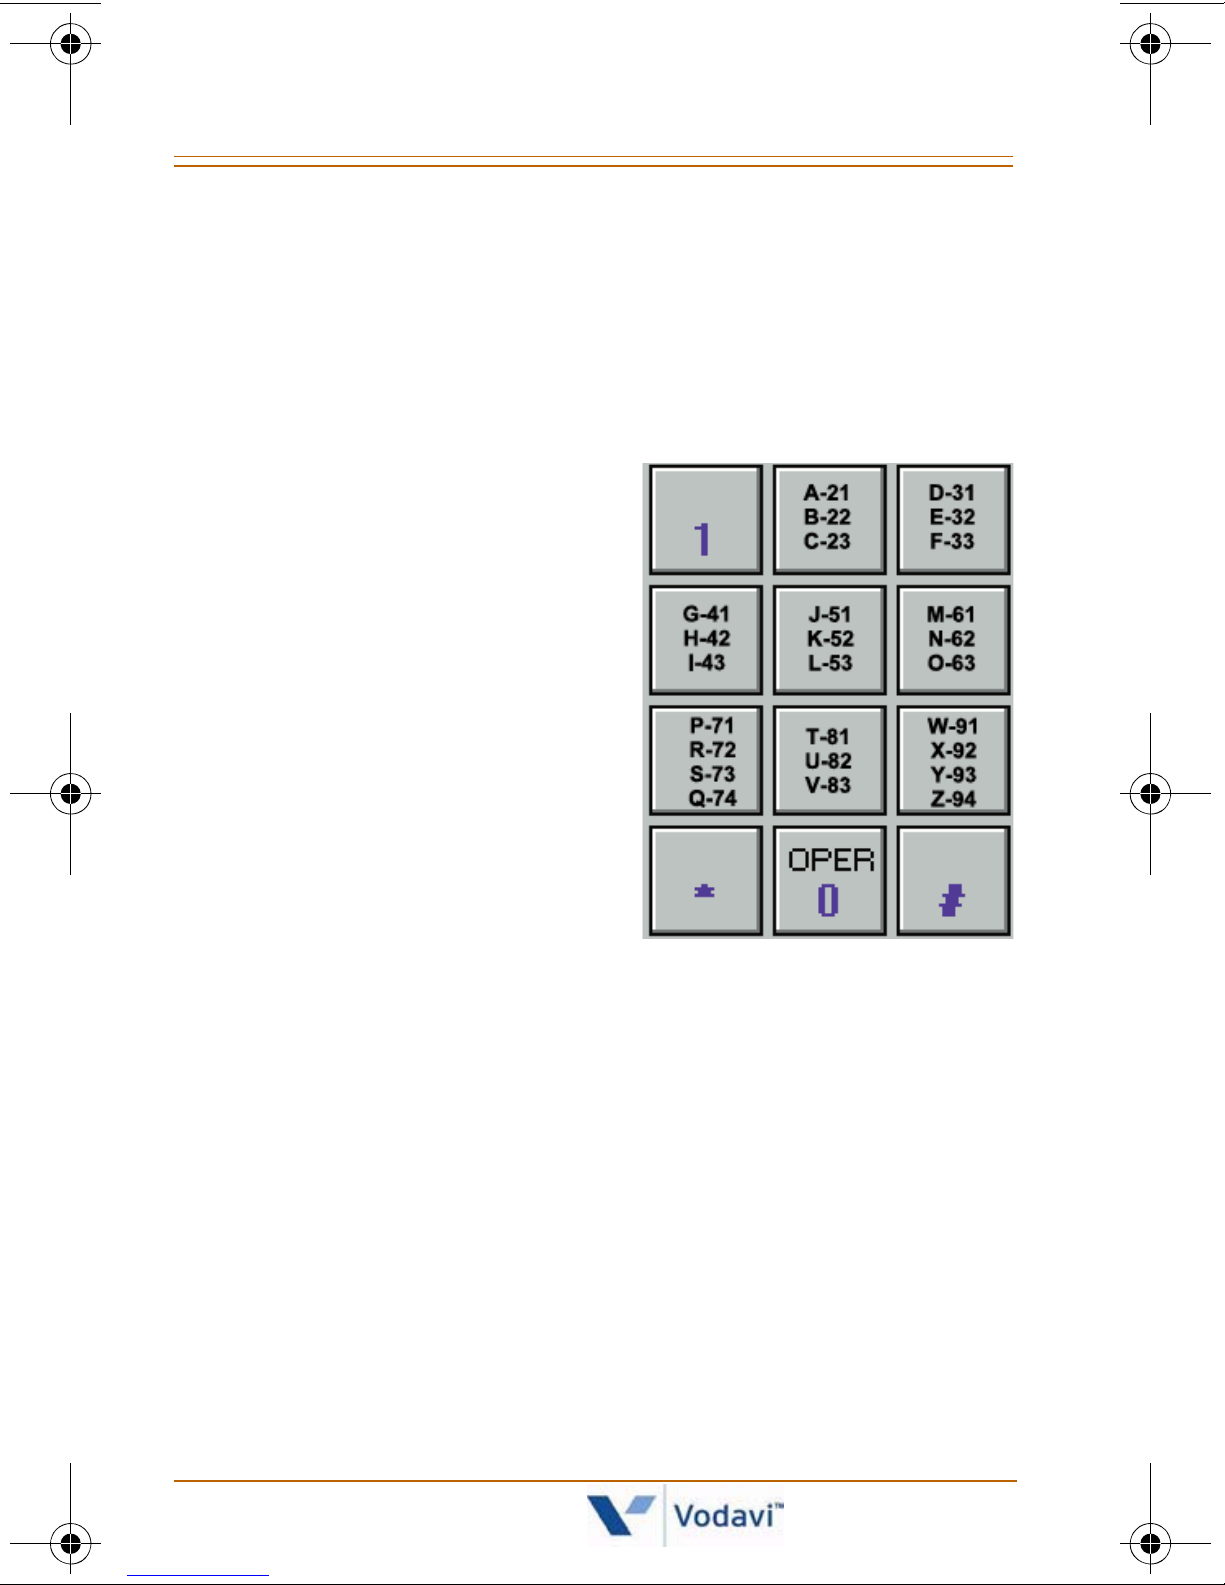
2. Using the key pad, enter
two digits for each alpha
character.
3. Press the [Left] navigation
key. The handset will
display “System” options.
4. Press the [Down]
navigation button and
scroll to “System Speed”.
5. Press [6] and hold the [OK] button. A system tone will
sound to indicate the default display change.
To create your name in a
TeleniumIP
system:
Use the Web Admin interface to enter your name in the
display. Refer to the
TeleniumIP
User Guide.
Nomad IP User Guide March 2007
Page 23

Telephone Features 17
Telephone Features
Registration
The
Nomad IP
is one of the IP phones recognized by the
TeleniumIP
Nomad IP
successful call processing. The registration is
accomplished in two phases: wireless LAN connection
establishment and MFIM/VoIP card registration.
and
must be registered with the system for
XTS IP
/
XTSc-IP
systems. Therefore, the
Wireless LAN Connection
SSID is used as an identifier which means, “you are part
of the 802.11b compliant wireless network”. The
Nomad IP
configured within an Access Point (AP). To setup an SSID,
refer to “Network” on page 58.
should have the same SSID as the one
MFIM/VoIP Card Setup
XTS IP
with the IP address of the VoIP card to initially request
/
XTSc-IP
--- The
Nomad IP
must be programmed
registration. To setup the VoIP card IP address, refer to
“System” on page 61.
TeleniumIP
Remote mode on
Remote settings are configured in the same way as a
wired IP phone. Refer to “System” on page 61.
The
Nomad IP
configured. Refer to page 59 for details to set up network
configuration.
Nomad IP User Guide March 2007
--- The
can be a DHCP client or may be statically
Nomad IP
TeleniumIP
may be used in Local or
systems. Its Local and
Page 24

18 Basic Features
Rebooting the Nomad IP Phone
After the proper setup of both wireless LAN and MFIM/
VoIP card IP addresses, turn off the phone and turn it on
again. The
Nomad IP
will start registration and show its
station number, which is given by the MFIM/VoIP card.
Basic Features
Turning the Power On and Off
When pressing the [End] button, the power is turned on
and the
To turn the Phone On:
1. Install a charged battery pack.
2. Press [END] for a few seconds until the blue light in the
upper right of the phone flashes on and off.
-The
-The
Nomad IP
Nomad IP
Nomad IP
goes to an idle state.
shows power-on animation.
tries to lock the access point while
blinking Antenna Icon and RSSI level.
- If the Antenna icon and RSSI level stop blinking, it
means all procedures for initial setup are completed.
-The
Nomad IP
searches for and sends a registration
message to MFIM/VoIP card.
-If the
Nomad IP
receives REGISTER RESPONSE, it
stores and displays the station number.
To turn the Phone Off:
Press the [End] key until the display turns off.
Nomad IP User Guide March 2007
Page 25
Basic Features 19
Using Manner and Lock Mode Quickly
Manner Mode (quickly set to vibrate mode)
Use the Manner Mode in public places.
- When in the idle mode, activate the Manner Mode
quickly by pressing [*] for 3 seconds.
- When the Manner Mode is set, the key tones are silent,
and the phone is set to vibrate.
The phone remains in Manner Mode even
if you turn it off and back on.
To cancel Manner Mode, press [*] for 3
seconds to switch into Normal Mode.
Lock Mode (Quick)
You can use the Lock Mode to prevent others from using
your phone. When in the idle mode:
To activate the Lock Mode quickly … press [#] for 3
seconds. The Lock Mode setting is displayed.
To cancel the Lock Mode … press [OK], select Unlock,
then enter your 4-digit password (default is 0000).
Mute
The Mute function prevents the other party from hearing
your voice, but allows you to hear the other party.
While on a call, the Mute function automatically
becomes available and appears on the LCD.
To activate Mute … press the [OK] button.
To cancel Mute … press the [OK] button again.
Nomad IP User Guide March 2007
Page 26

20 Basic Features
Redialing Calls
Press [Send] to redial the last number in your Call History.
The latest 100 phone numbers are stored in the Call
History list; you can also select one of these to redial.
Adjusting Volume
Use the side keys to adjust the earpiece, ringer, and key
beep volumes. The upper key is used to increase the
volume, the lower key is used to decrease the volume.
- You may adjust the earpiece volume during a call.
- The ringer volume can be adjusted through the menu.
- The key beep volume is adjusted through the menu.
Signal Strength
Call quality depends on the signal strength in your area.
The signal strength is indicated on the screen as the
number of bars next to the signal strength icon. The more
bars shown, the better the signal strength. If you go out
of access point range, three short beeps are received.
Caller ID
Caller ID lets you know who is calling by displaying the
number of the person calling when your phone rings.
AP Probing
The
Nomad IP
Points (APs). The “Network” menu shows the list of SSIDs
configured in the APs. You can choose one of them under
this preference. For more information on AP probing,
has an ability to detect all reachable Access
refer to “AP PROBING” on page 60.
Nomad IP User Guide March 2007
Page 27
Key Phone Features 21
Key Phone Features
Placing a Call
You can make a call to another user in your system or to
an external party by dialing the number and pressing the
[SEND] button.
To place an outgoing call:
1. Enter a phone number to connect a call.
2. Press the [Send] button.
- The phone Icon ( ) is shown on the LCD while
trying to connect.
- The connection tone is heard when connection is
completed.
The button on the earbud provided, works
as a Send button and can hang up the call.
CONDITIONS
» If you dial an incorrect digit, you can erase the last
digit by pressing [Clear/Prev] button once. If you want
to erase all digits, press [Clear/Prev] button for more
than 1 second.
» Press the Volume [Up/Down] button on the side
during the conversation to control the volume level.
» When conversation is over, press the [End] button. The
phone icon will disappear and the call will terminate.
» Call duration time (HH:MM:SS) is displayed on the
LCD. (HH = 00-23, MM=00-59, SS=00-59).
» Although the earbud provided is attached, key tone is
heard through the speaker, not through the earbud.
Nomad IP User Guide March 2007
Page 28
22 Key Phone Features
Answering a Call
When the phone rings or vibrates, press [Send]. If the
earbud provided is attached to a
Nomad IP
, you can also
receive an incoming call by pressing the button on the
earbud when the ring sounds.
When an incoming CO ring is heard and a message
from
TeleniumIP
/
XTS-IP
/
XTSc-IP
is displayed on the
LCD, press [Send] to connect.
The button on the earbud provided, works
as a Send button and can hang up the call.
CONDITIONS
» When audible signals are heard, call information is
displayed and the Ring LED will flash.
» Caller Groups can be distinguished with a different ring
type.
» Press the Volume [Up/Down] button on the side during
a conversation to control the volume level.
» When the conversation is over, press the [End] button.
The phone icon disappears and the call is terminated.
» Even though the earbud is attached, incoming call ring
tone is heard through the speaker, not through the
earbud.
Nomad IP User Guide March 2007
Page 29

Key Phone Features 23
Transferring a Call
This function lets you send a call to another system user.
To transfer a current call by dialing a number:
1. While talking, either press [Trans/PGM] or press the
[Left] navigation key + [0].
2. Dial the number to transfer.
3. Press [End] to release a call (unscreened transfer).
-orRemain on the line until the party to be transferred
answers. Announce who is being transferred and
press [End] to release the call (screened transfer).
To transfer a current call using a Flex key:
1. While talking, either press [Trans/PGM] or press [Left]
navigation key + [0].
2. Press the [Right] navigation key and select the desired
Flex key. If the Flex key is a CO button, dial the number
to transfer.
3. Press [End] to release a call (unscreened transfer).
-orRemain on the line until the party to be transferred
answers. Announce who is being transferred and
press [End] to release the call (screened transfer).
CONDITIONS
» The primary call must be answered before the transfer
can be initiated.
» If a transferred call is not answered within 30 seconds,
a recall ring will sound at both stations. To reconnect
with the transferred call, press the [Send] button.
Nomad IP User Guide March 2007
Page 30

24 Key Phone Features
Holding a Call
You can put the current call on hold and then make or
receive another call.
To hold a call:
Press the [Hold/Save] button.
-or-
1. Press the [Left] navigation key to access “System”
options.
2. Scroll to [Hold/Save].
3. Press [OK].
To retrieve a held ICM call (
TeleniumIP
only):
1. Press [Left] navigation key to access “System” options.
2. Scroll to [ICM].
3. Press [OK].
To retrieve a held CO call:
1. Press [Right] navigation key to access “Flex Keys”.
2. Select the CO Flex key.
3. Press [OK].
CONDITIONS
» Call must be answered before Hold can be initiated.
» The
Nomad IP
will receive a Hold Recall after the Hold
Recall Timer setting expires . At this time, you can
answer the ring by pressing [Send].
» Only one call at a time may be placed on hold.
»
Nomad IP
cannot hold ICM calls on
systems.
Nomad IP User Guide March 2007
XTS-IP / XTSc-IP
Page 31

Key Phone Features 25
Call Forward
This feature allows you to forward calls under certain
conditions. You may forward a call to a specific station,
station group, MFIM/VoIP card, or to an external party.
The following Call Forward types are supported in
TeleniumIP
0 = Remote Forward 3 = No Answer
1 = Unconditional 4 = Busy/No Answer
2 = Busy 5 = No Answer Off-Net (Attendant only)
systems.
The following Call Forward types are supported in the
XTS-IP / XTSc-IP
6 = Unconditional 8 = Busy
7 = No Answer 9 = Busy/No Answer
To forward a call in
systems.
TeleniumIP
systems:
1. Press the [Left] navigation key to access “System”
options. Forward is already selected.
2. Press [OK].
3. Enter Call Forward type (0-5) and destination number.
4. Press [End].
To cancel call forwarding in
1. Press the [Left] navigation key to access “System”
options. Forward is already selected.
2. Press [OK].
To forward a call in
1. Dial feature code 640.
2. Enter Call Forward type (6-9) and destination number.
3. Press [Send].
Nomad IP User Guide March 2007
TeleniumIP
XTS-IP / XTSc-IP
systems:
systems:
Page 32
26 Key Phone Features
To cancel call forwarding in
XTS-IP / XTSc-IP
systems:
1. Dial 640.
2. Press [Send].
CONDITIONS
» When Call Forward is active, a station can make
outgoing calls (internal or external), but cannot
activate a call back or queue request.
» Activating Call Forward will automatically deactivate
any active custom display message. Active call back or
queue requests are not canceled.
Call Park
You can park a call using a CO line-to-CO line parking
location.
To park a call:
1. While connected to an outside call, press [Trans/PGM].
2. Dial a parking location.
System Parking Location Number
TeleniumIP 601 - 610 for MFIM
601 - 619 for MFIME
XTS-IP / XTSc-IP 424-437
3. Press [Send]. The CO line being used is on hold and the
Nomad IP
goes to an idle state.
To retrieve a parked call:
1. Dial the parking location number.
2. Press [Send].
Nomad IP User Guide March 2007
Page 33

Key Phone Features 27
CONDITIONS
» Call Park can only be applied to users in “talk status”.
» Once a Call Park condition has been established, the
Nomad IP
goes to an idle state.
» A parked call will re-call after the time out is reached.
Call Pick-Up
This feature allows you to pick up a call that is ringing at
another user’s station. Call Pick-Up can be used after the
function has been programmed at the attendant station.
GROUP CALL PICK-UP
A station can answer incoming and transferred Intercom,
CO and IP calls that are ringing at another station when
they are in the same Station Pick-up Group.
- All ringing calls are subject to pick-up by other group
members, except private lines and queue callbacks.
- If programmed, stations in other types of Station
Groups may also use the Group Call Pick-Up function.
To answer a ringing phone in your Call Pick-Up
Group:
1. Dial Group Call Pick-Up access code [566].
2. Press [Send].
CONDITIONS
» A station should be in the same Call Pick-up Group
with the ringing station.
» This feature should be programmed in Admin
programming before using. (Refer to Call Pick-up in
appropriate System Programming Manual.)
Nomad IP User Guide March 2007
Page 34
28 Key Phone Features
DIRECTED CALL PICK-UP
A station may answer (“Pick-Up”) incoming and
transferred Intercom, CO and IP calls ringing at another
station. All ringing calls are subject to Directed Call Pickup, except private lines and queue callbacks.
1. Dial the Directed Call Pick-up access code [7].
2. Dial the ringing station’s intercom number.
3. Press [Send].
Call Waiting
Call Waiting is used to notify a busy station that an
Intercom call is waiting. The busy station is notified of the
call waiting by a camp-on tone.
After receiving a busy signal, calling station can camp-on
called station. The called station can respond as follows:
- Answer waiting call (after placing active call on Hold)
- Send a Silent Message
- Activate a One-Time DND
- Ignore the Camp-On tone
After receiving an intercom busy tone:
You can press [*], or dial the last digit of the called station
number. (Called station will hear camp-on tone.)
- The called party can press [Send] to connect to you.
The 1st calling party is automatically placed on hold.
- When you finish your call, the called station can press
[Send] to continue speaking with the 1st calling party.
Nomad IP User Guide March 2007
Pressing the [End] button releases the
active call (CO call or intercom call).
Page 35

Key Phone Features 29
Message Wait / Call Back
You can activate a Message Wait Indication requesting a
Call Back when calling a station that does not answer or
is in DND. A station may receive a Message Wait from
other stations in the system.
- The station receiving the Message Wait can return the
call using the [MSG/CALLBK] button or selecting the
missed call entry in the Call History’s “Missed Calls” list
and pressing [Send].
- When a busy station is called, the user may request to
be placed in a queue to receive a Call Back. When the
called station returns to idle, the system signals the
initiating station with Callback ring. When the user
answers, the now idle station is called.
To leave
a Message Wait indication:
1. After receiving a ringback tone, press the [Left]
navigation key.
2. Scroll to [MSG/CALLBK].
3. Press [OK]. The
To respond
to a message wait indication:
Nomad IP
goes to an idle condition.
1. Press the [LSK].
2. Press the [Down] navigation button to scroll to “Call
History”.
3. Press [OK].
4. Press [OK] again to access the list of Missed Calls.
5. Press the [Down] navigation button to scroll to the
desired missed call entry.
6. Press the [Send] button.
Nomad IP User Guide March 2007
Page 36

30 Key Phone Features
Do Not Disturb (DND)
Use this feature when you do not want to receive any
phone calls.
To activate
Do Not Disturb (DND):
1. Press the [Left] navigation key.
2. Scroll to [DND].
3. Press [OK].
To deactivate
Do Not Disturb (DND):
1. Press the [Left] navigation key.
2. Scroll to [DND] and press [OK].
System Speed Dial
This is the same function as implemented in
XTS-IP
/
XTSc-IP
with the title of “System Speed Dialing”.
Refer to the appropriate system manual.
System Speed Redial
TeleniumIP
/
This is the same function as implemented in
XTS-IP
/
XTSc-IP
with the title of “System Speed Redial”.
TeleniumIP
/
Refer to the appropriate system manual.
Nomad IP User Guide March 2007
Page 37

Key Phone Features 31
Flex Functions
The
Nomad IP
buttons are enabled by software emulation.
How to display:
Press the [Right] navigation button.
does not have physical Flex buttons. Flex
To program
a Flex Key on a
TeleniumIP
system:
1. Press the [Trans/PGM] button.
-orPress the [Left] navigation button, scroll to “Program”
function, and press [OK}.
2. Press the [Right] navigation button.
3. Scroll to an empty Flex Key and press [OK].
4. Enter the desired feature code, and press [Hold/Save].
5. Press the [Right] navigation button to view your new
Flex Key entry.
To clear
a Flex Key on a
TeleniumIP
system:
1. Press the [Trans/PGM] button.
-orPress the [Left] navigation button, scroll to “Program”
function and press [OK}.
2. Press the [Right] navigation button to scroll to the
desired Flex Key.
3. Press [OK]. The screen will display “Enter New Feature”.
4. Press [Hold/Save].
Nomad IP User Guide March 2007
Page 38

32 Key Phone Features
To program a Flex Key on an
XTS-IP/XTSc-IP
system:
1. Press the [Left] navigation button and press [6] for
System Speed.
2. Press the [Left] navigation button and press [6] for
System Speed a second time.
3. Press the [Right] navigation button to scroll to the
desired Flex Key.
4. Press [OK].
5. Enter the desired feature code.
To clear
a Flex Key on an
XTS-IP
/
XTSc-IP
system:
1. Press the [Left] navigation button and press [6] for
System Speed.
2. Press the [Left] navigation button and press [6] for
System Speed a second time.
3. Press the [Right] navigation button, scroll to the
desired Flex key, and press [OK].
4. Press the [Left] navigation button and press [5] for
Flash.
CONDITIONS
» Flex bin should be empty before programming.
Nomad IP User Guide March 2007
Page 39

Key Phone Features 33
Push-To-Talk Groups
In
TeleniumIP
assigned to receive Push-To-Talk (PTT) announcements
from other members of the PTT group.
- A station can be assigned to one or more groups, or
not assigned to any group.
systems, each
Nomad IP
station can be
- PTT groups are defined in the
TeleniumIP
system’s
administrative programming.
NOTE: PTT will not work if phone is remote to MIFM(E).
Invoking a PTT
1. Press and hold the [PTT] button while making an
announcement.
2. Release the [PTT] button when the announcement is
complete.
Receiving a PTT
The idle screen of the
Nomad IP
changes to display the
PTT group number, and the announcement is emitted
from the speaker.
Nomad IP User Guide March 2007
Page 40
34 Menu Features
Menu Features
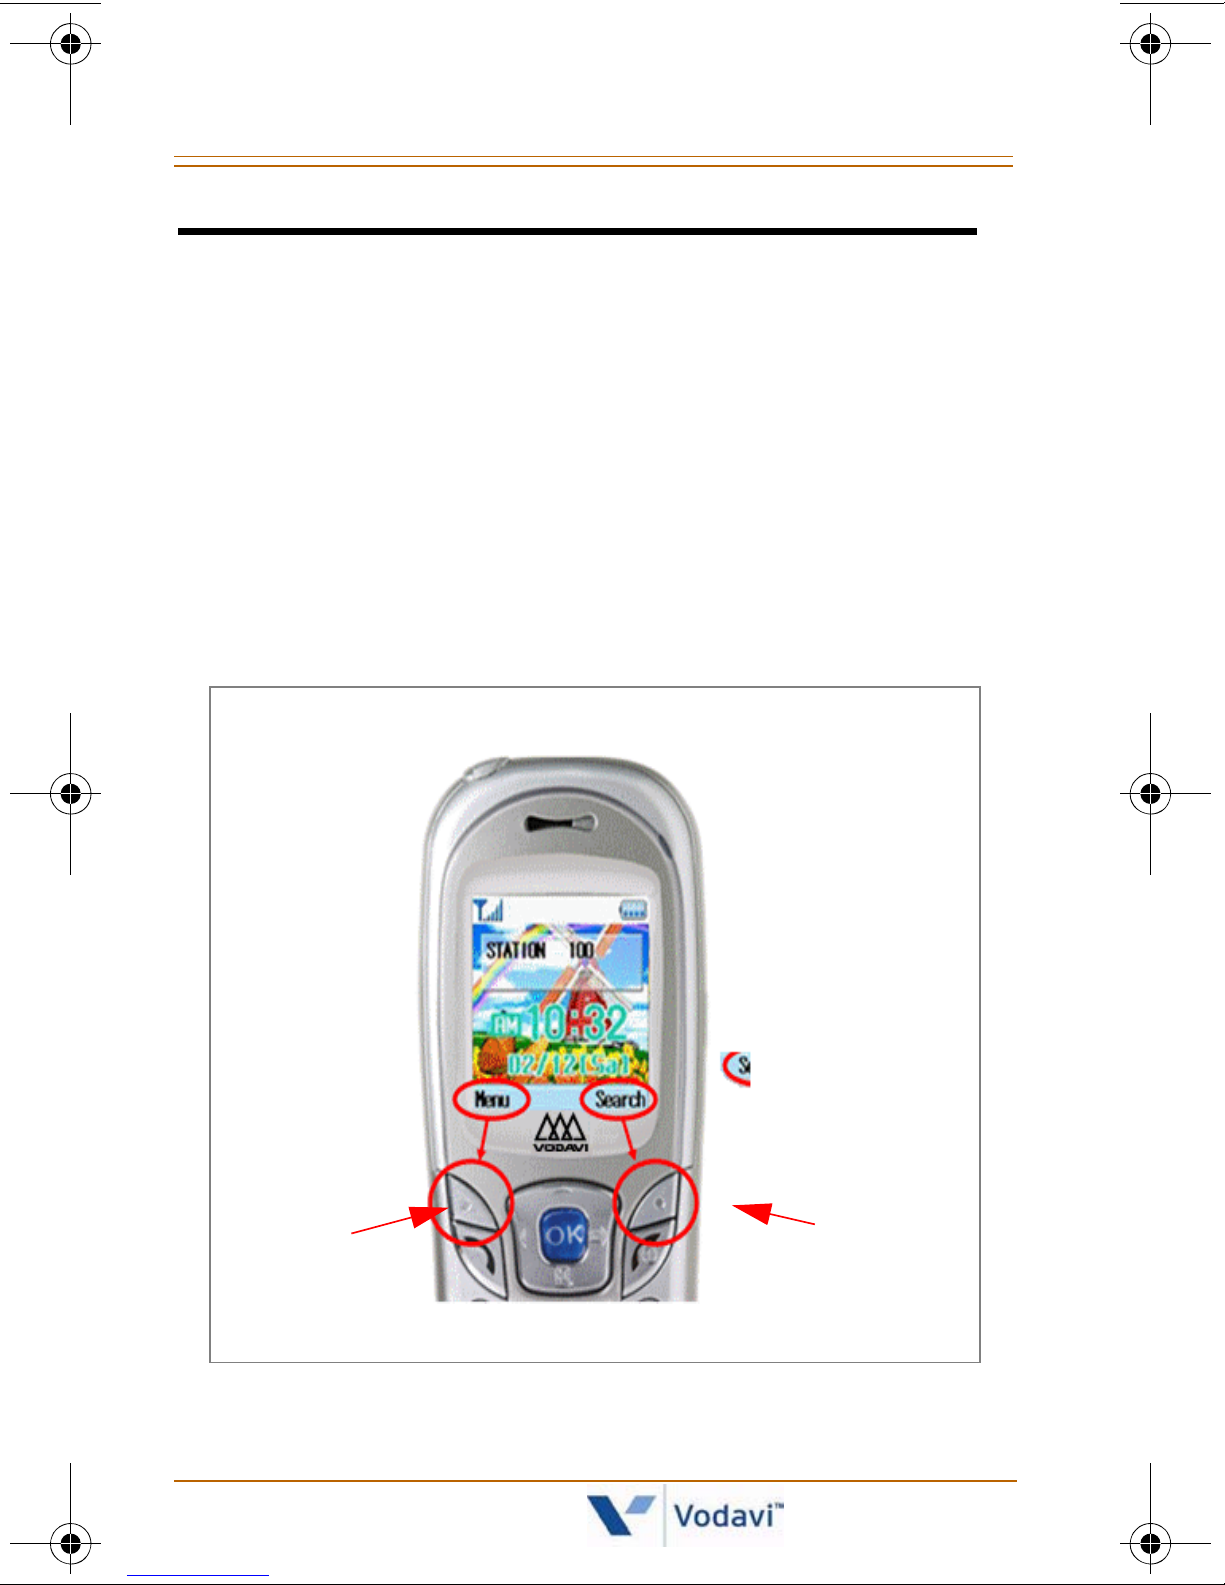
The
Nomad IP
customize your phone. These functions are accessed via
the Left and Right soft keys.
Each menu and sub-menu lets you view and alter the
settings of a specific function. The roles of these soft keys
vary according to the applications and services. The label
on the bottom of the display (just above each key)
indicates its current function.
offers a set of menus that allow you to
Left Soft
Key (LSK)
Nomad IP User Guide March 2007
Right Soft
Key (RSK)
Page 41
Phone Book [Main Menu + 1] 35
Phone Book [Main Menu + 1]
This menu allows you to save and manage contact
address information. The Phone Book option provides
functions to add a new address, or to search saved
contact addresses by name, phone number and group.
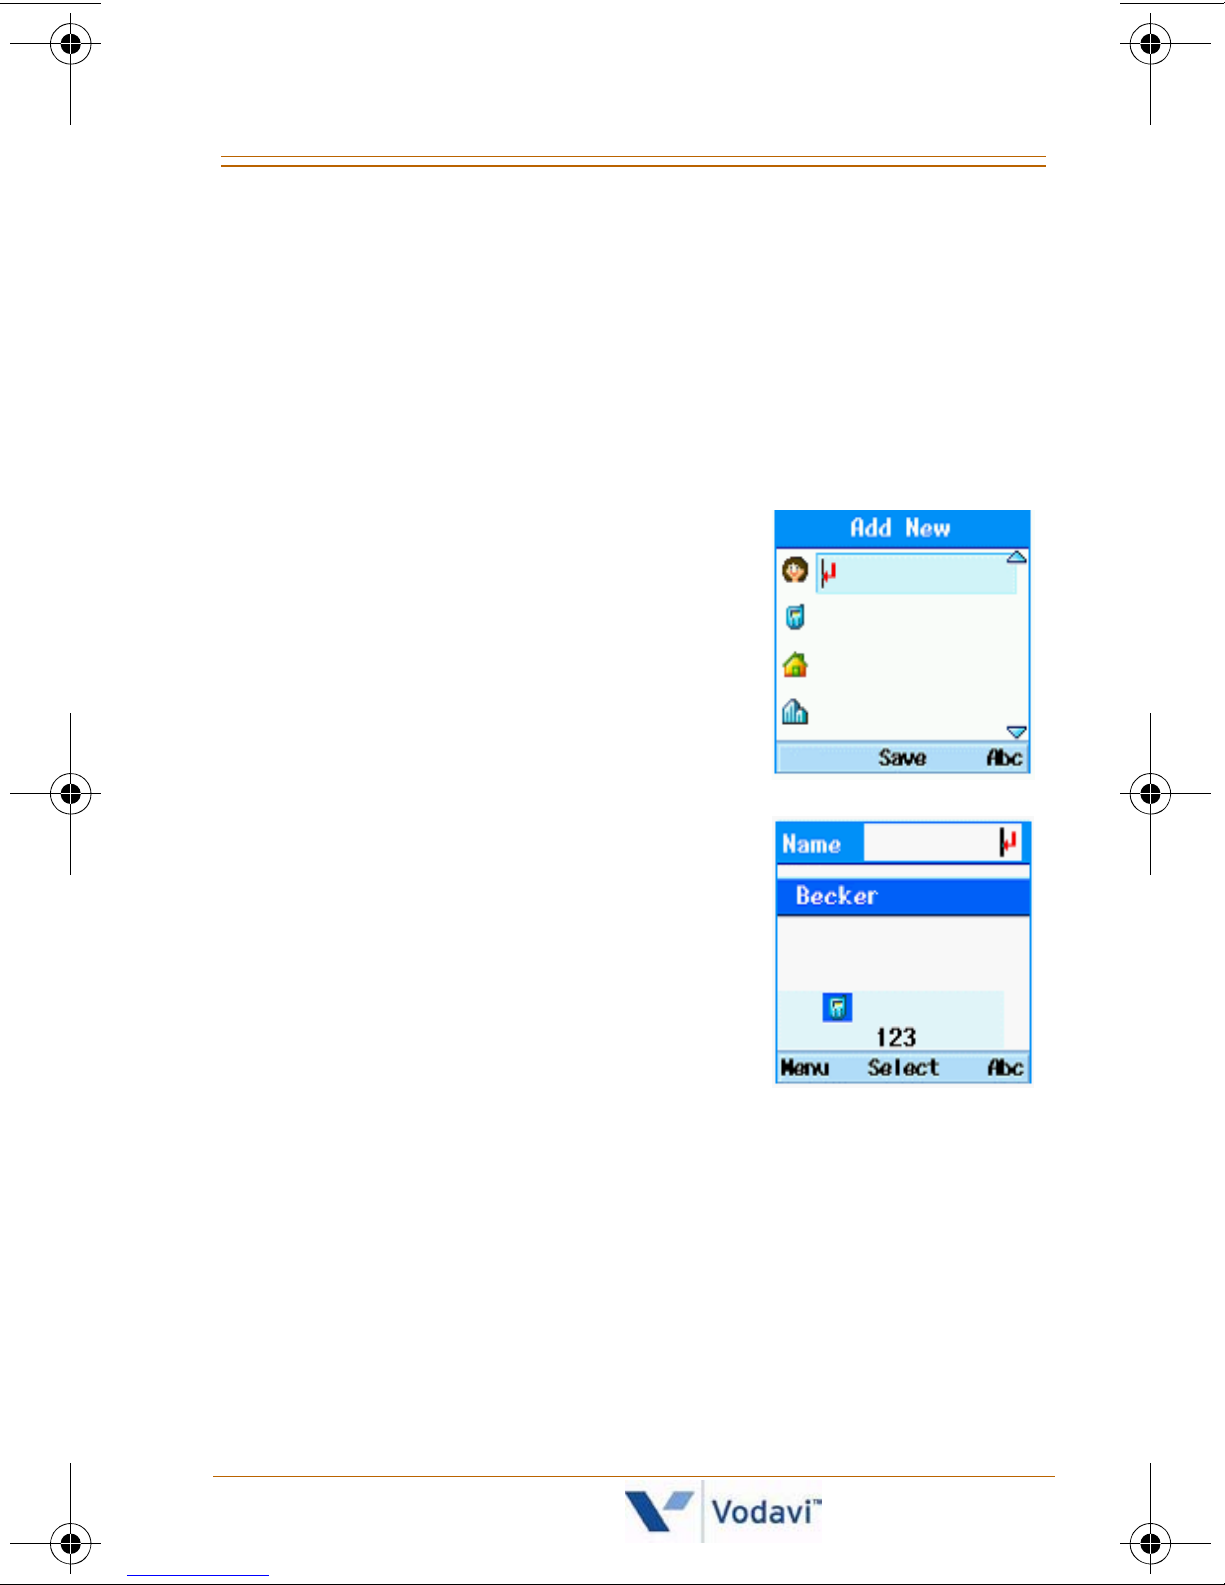
Add New
This menu allows you to add a
new contact address. You can
enter contact address information
that includes … name, phone
number, group information items,
and personal bell.
Search
This menu allows you to search
your contact addresses. Generally,
the search operation is performed
by entering a name.
- When the Search window
appears, it will display the
current search function and the
results for the search condition
that you entered.
- You can change the configuration in the [Menu]
option so you can perform these functions … send a
message, change a search option, or edit/delete the
selected phone number. You can also make a phone
call by selecting a phone number and pressing [Send].
Nomad IP User Guide March 2007
Page 42
36 Phone Book [Main Menu + 1]
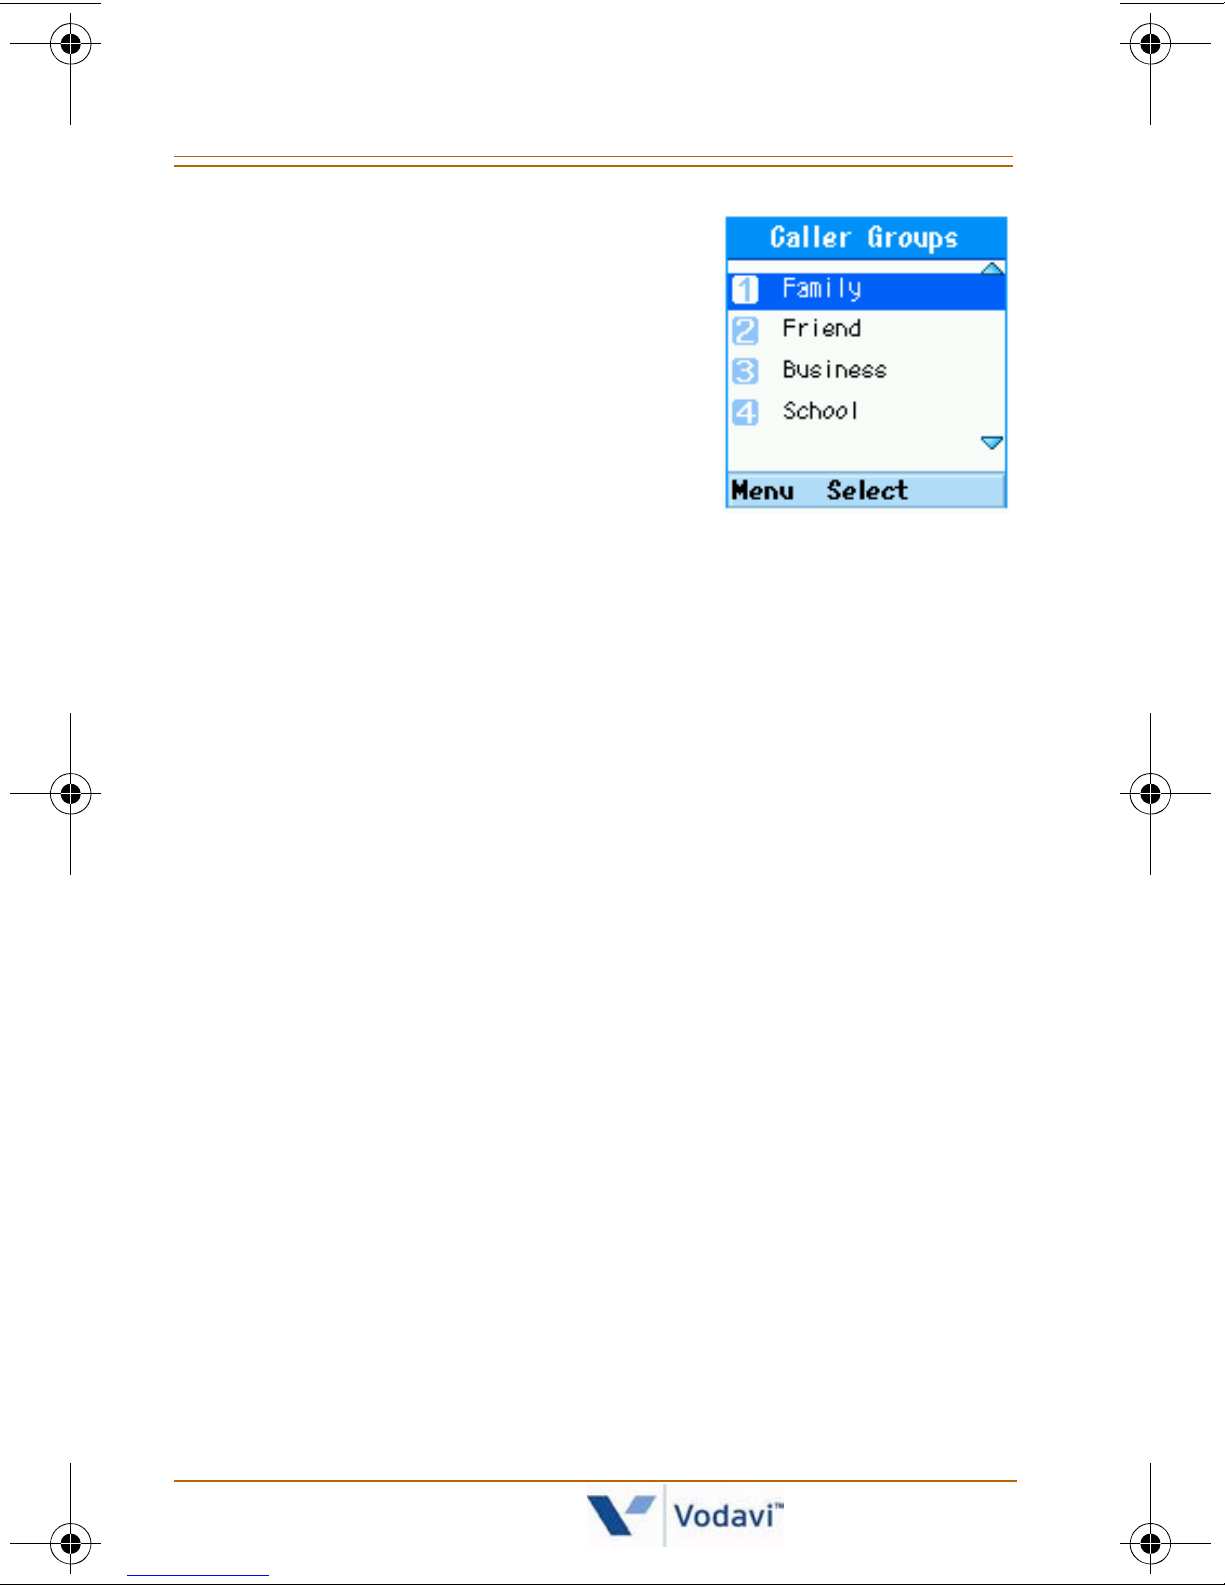
Caller Groups
This menu allows you to manage
group information. By default,
there are 4 groups: family, friends,
business, and school. You can edit
and delete a group except for
default groups.
You can also configure a ring tone
for a group so that the group ring tone sounds when a
call from a specific contact address within that group
arrives and there is no ring tone configured for the
contact address.
Speed Dials
Speed dialing allows you to make an outgoing call at a
specific number by pressing either one or two button(s).
Both the number and the associated button are to be
registered in the “Speed Dials” option under the “Phone
Book” menu. (Up to 99 phone numbers can be linked to
speed buttons.)
To associate a phone number with a Speed Dial button:
1. Press the [LSK]. Phone Book is already selected.
2. Press [OK] to access the “Phone Book”.
3. Press the [Down] navigation key, scroll to Speed Dials,
and press [OK].
4. Press the [Down] navigation key to scroll to the desired
speed dial bin (1-99).
5. Press the [RSK] and select the “Add” option. A listing of
your Phone Book entries will display.
6. Press the [Down] navigation key, scroll to the entry to
associate with the speed button, and press [OK].
Nomad IP User Guide March 2007
Page 43

Phone Book [Main Menu + 1] 37
To move, change, or delete Speed Dial buttons:
1. Press the [LSK]. Phone Book is already selected.
2. Press [OK] to access the “Phone Book”.
3. Press the [Down] navigation key, scroll to Speed Dials,
and press [OK].
4. Press the [Down] navigation key to scroll to the
desired speed dial bin (1-99) that has been
programmed previously.
5. Press the [LSK] to access the “Option” menu.
6. Press the [Down] navigation key to scroll to the
desired option … Move or Change.
7. Press [OK].
8. Press [OK] to verify that you want to perform the
selected action.
Making a call:
1. Press the [LSK]. Phone Book is already selected.
2. Press [OK] to access the “Phone Book”.
3. Press the [Down] navigation key, scroll to Speed Dials,
and press [OK].
4. Press the [Down] navigation key to scroll to the
desired speed dial bin (1-99).
5. Press [Send].
CONDITIONS
» Only numbers in your Phone Book can be registered
as speed dial numbers.
Delete All
This menu deletes all saved Phone Book information.
Nomad IP User Guide March 2007
Page 44
38 Call History [Main Menu + 2]
Call History [Main Menu + 2]
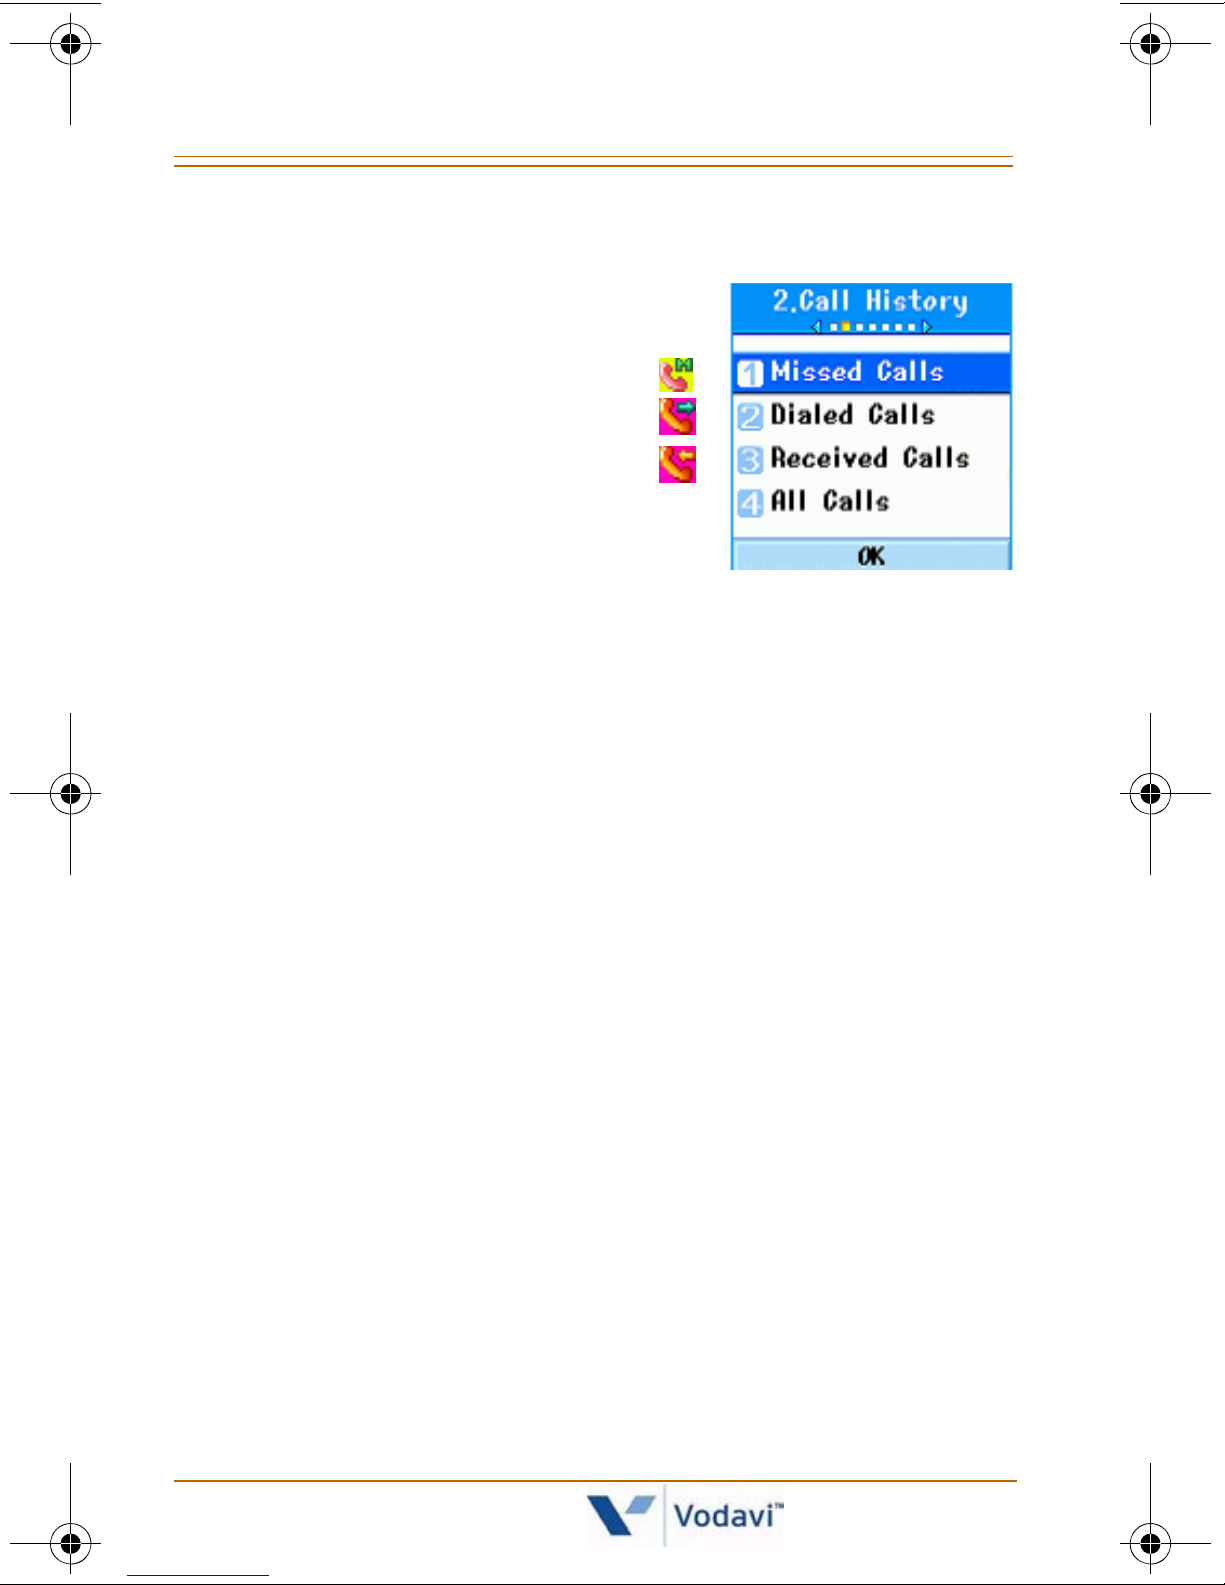
You can access the recent call
register by pressing [Send].
Different icons are used to
show the types of calls
registered in the list.
=
=
=
- Each call type is stored in a
separate area for easy
viewing: Missed Calls, Dialed Calls, or Received Calls.
- Selecting “All Calls” will allow you to view the call
records for ALL types of calls.
- Call History can store up to 100 call records. Once the
maximum number is reached, any new call is placed at
the top of the list (most current) and the oldest call
record is removed.
- Each call record menu allows you to perform the
following functions:
Place a call to a number in the call record.
Save a number in the call record to the Phone Book.
Send a message to the number in the call record.
View detailed information about the call records to
include: date, time, and call duration.
Clear call records.
Nomad IP User Guide March 2007
Page 45

Messages [Main Menu + 3] 39
Messages [Main Menu + 3]
You can send/receive a short text message to/from any
other IP phones in a
TeleniumIP
system. The message
may contain up to 100 characters and you can send the
message to up to 20 different numbers.
Write Message
1. Press the [Down] navigation key, then skip to Step 5.
-or-
2. Press the [LSK] to access the Main Menu.
3. Press [Down] navigation key to scroll to “Messages”.
4. Press [OK]. Write Message is already selected.
5. Press [OK] to enter Short Message Service (SMS) area.
6. Enter message in the “Contents” area, and press [OK].
7. Enter the station numbers in the “To” area, then press
[OK] to send the message.
For details, see “Changing Text Input Mode” on page 14
.
When in the Contents Area … you can press the [LSK] to
access these menu items: select a prepared comment
from a Template, choose an Emoticon for insertion into
your Contents, or search the Phone Book.
CONDITIONS
» When you send a message, you will not be able to tell
if your message has been received.
» If you send a message to an invalid destination, the
LCD will display “Access Denied”.
» If you receive an incoming call while writing a
message, your message will disappear.
Nomad IP User Guide March 2007
Page 46

40 Messages [Main Menu + 3]
Inbox
You can browse the messages stored in your mailbox.
Any message that comes to the
Nomad IP
is stored in this
mailbox.
1. Press the [Down] navigation key, then skip to Step 4.
-or-
2. Press the [LSK] to access the Main Menu.
3. Press the [Down] navigation key and scroll to
“Messages”.
4. Press [OK]. Write Message is already selected.
5. Press the [Down] navigation key to scroll to “Inbox”.
6. Press [OK] to view the contents of your Inbox.
7. Use the [LSK] and [RSK] buttons to: reply, forward,
delete, or delete all messages in your Inbox.
» The Inbox can hold up to 10 messages. If the mailbox is
full, no new messages will be received until one or
more stored messages are deleted.
Outbox
Any message sent from the
mailbox.
1. Press the [Down] navigation key, then skip to Step 4.
-or-
2. Press the [LSK] to access the Main Menu.
3. Press the [Down] navigation key, scroll to “Messages”,
and press [OK]. Write Message is already selected.
4. Press the [Down] navigation key to scroll to “Outbox”.
5. Press [OK] to view the contents of your outbox.
Nomad IP
is stored in this
Nomad IP User Guide March 2007
Page 47

Messages [Main Menu + 3] 41
6. Use the [LSK] and [RSK] buttons to: forward, edit,
delete, or delete all messages in your Outbox.
» A maximum of 30 messages can be stored in the
outbox. Once the outbox reaches 30 messages, any
new message is placed at the top of the queue (most
current) and the oldest message is removed.
Draft
Any messages that have been prepared and saved, but
not yet sent, are stored in this area.
1. Press the [Down] navigation key, then skip to Step 5.
-or-
2. Press the [LSK] to access the Main Menu.
3. Press the [Down] navigation key, scroll to Messages,
and press [OK]. Write Message is already selected.
4. Press the [Down] navigation key, to scroll to “Draft”.
- Press [OK] to view the contents of messages that
you previously prepared and have saved, but not yet
sent.
- Press the [Down] navigation key to scroll to the
desired draft message.
- Press [OK] to view the Contents and the” To”
information of the message. Make any desired
changes, then either send or save for future delivery.
» A maximum of 10 draft messages can be stored.
Nomad IP User Guide March 2007
Page 48
42 Tools [Main Menu + 4]
Tools [Main Menu + 4]
Schedule
The Scheduler keeps your agenda convenient and easy to
access. Simply store your appointments and your phone
alerts you with a reminder of your appointment. You can
also take advantage of the Alarm Clock feature.
MONTHLY SCHEDULE MANAGEMENT
1. Press the [Up] navigation key, then skip to Step 6.
-or-
2. Press the [LSK] to access the Main Menu.
3. Press the [Down] navigation key to scroll to “Tools”.
4. Press [OK]. Schedule is already selected.
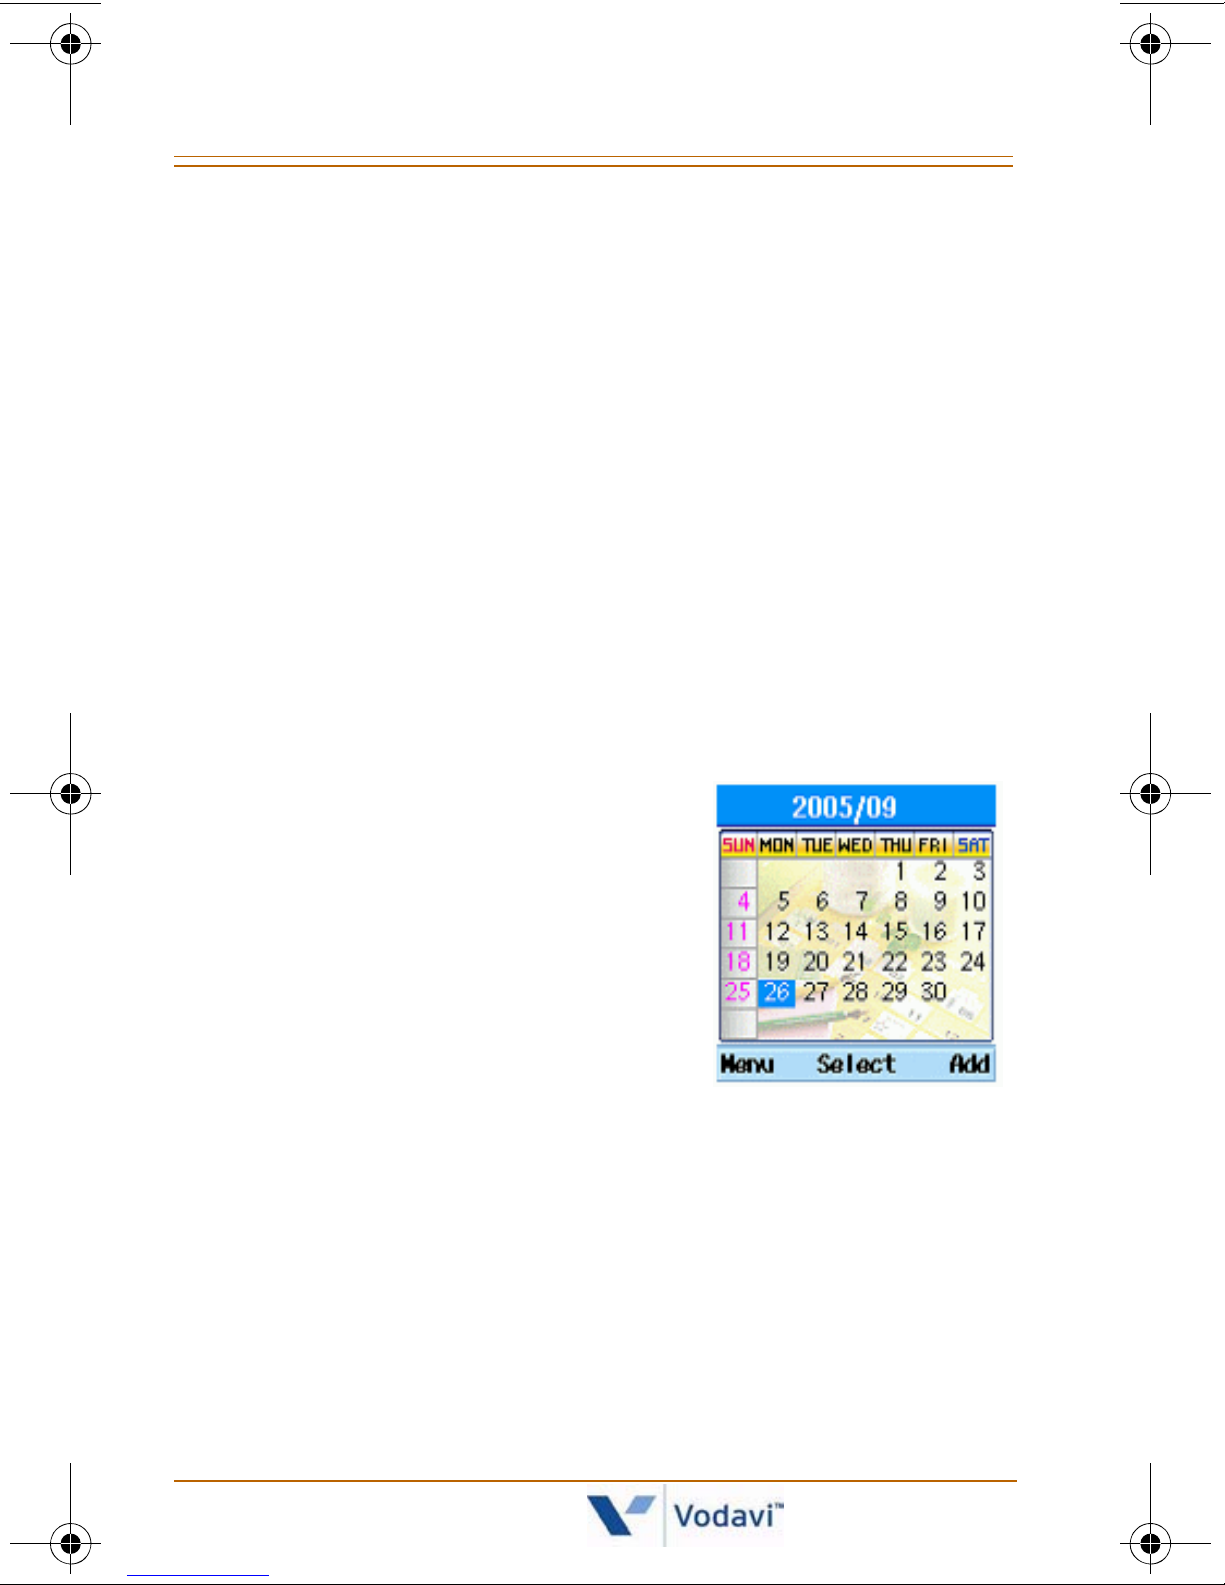
5. Press [OK] to display the
monthly calendar.
6. Initially, the cursor appears on
today’s date according to your
Nomad IP
settings.
You can move the cursor to the
desired date using the
[Up/Down/Left/Right]
navigation keys.
Nomad IP User Guide March 2007
Page 49
Tools [Main Menu + 4] 43
ADDING A NEW SCHEDULE ITEM
1. Press the [Up] navigation key, then skip to Step 6.
-or-
2. Press the [LSK] to access the Main Menu.
3. Press the [Down] navigation key to scroll to “Tools”.
4. Press [OK]. Schedule is already selected.
5. Press [OK] to display the monthly calendar.
6. Initially, the cursor appears on today’s date according
to your
Nomad IP
settings. Move the cursor to the
desired date using the [Up/Down/Left/Right]
navigation keys.
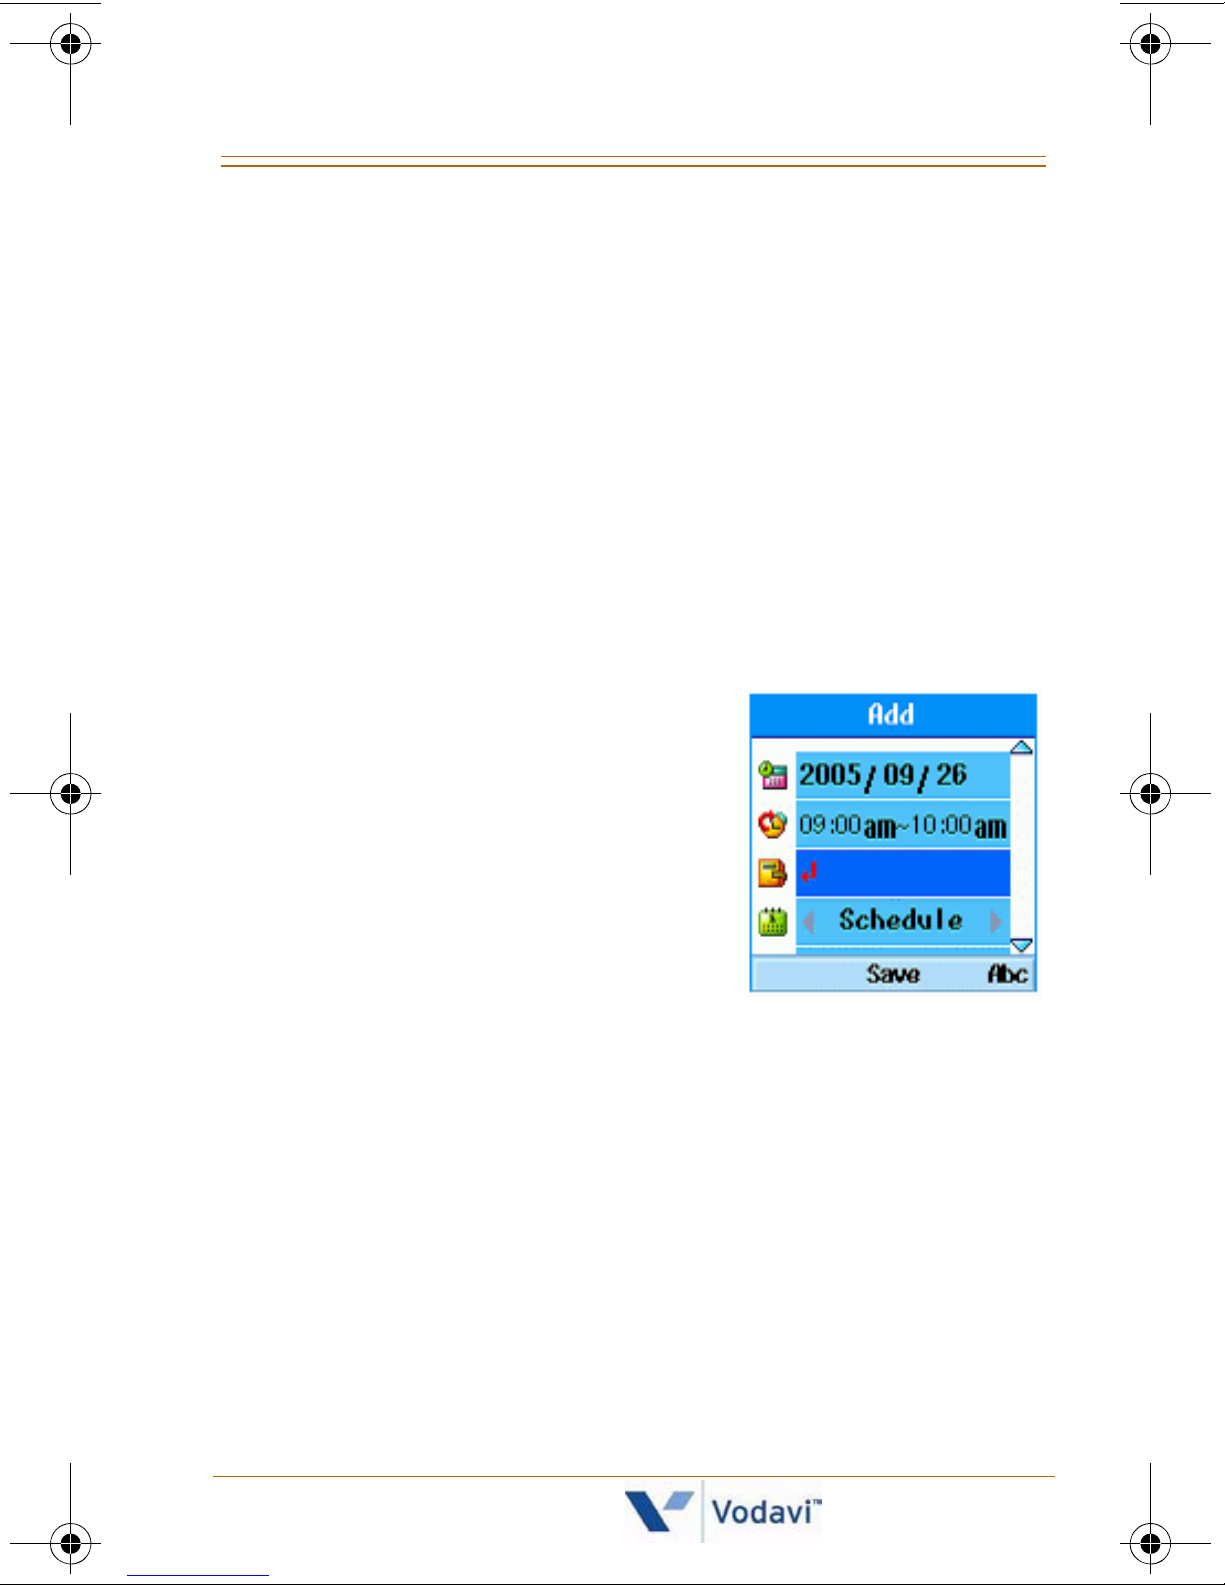
7. Press the [RSK] to add a new
schedule item.
-orPress the [LSK] to scroll to the
“Add” option, and press [OK].
8. Press the [Up/Down/Left/
Right] navigation keys to
access the date, time, and
subject fields.
9. Enter the data and press [OK] to save the item.
Nomad IP User Guide March 2007
Page 50
44 Tools [Main Menu + 4]
DELETING A SCHEDULE ITEM
1. Press the [Up] navigation key, then skip to Step 6.
-or-
2. Press the [LSK] to access the Main Menu.
3. Press the [Down] navigation key to scroll to ”Tools”.
4. Press [OK]. Schedule is already selected.
5. Press [OK] to display the monthly calendar.
6. To delete a schedule item,
press
the [Up/Down/Left/Right]
navigation keys to go to the
date of the item, then press
[OK] to access a list of items for
that day.
7. Press the [Up] or [Down]
navigation key to access the
item you want to delete, then
press [OK].
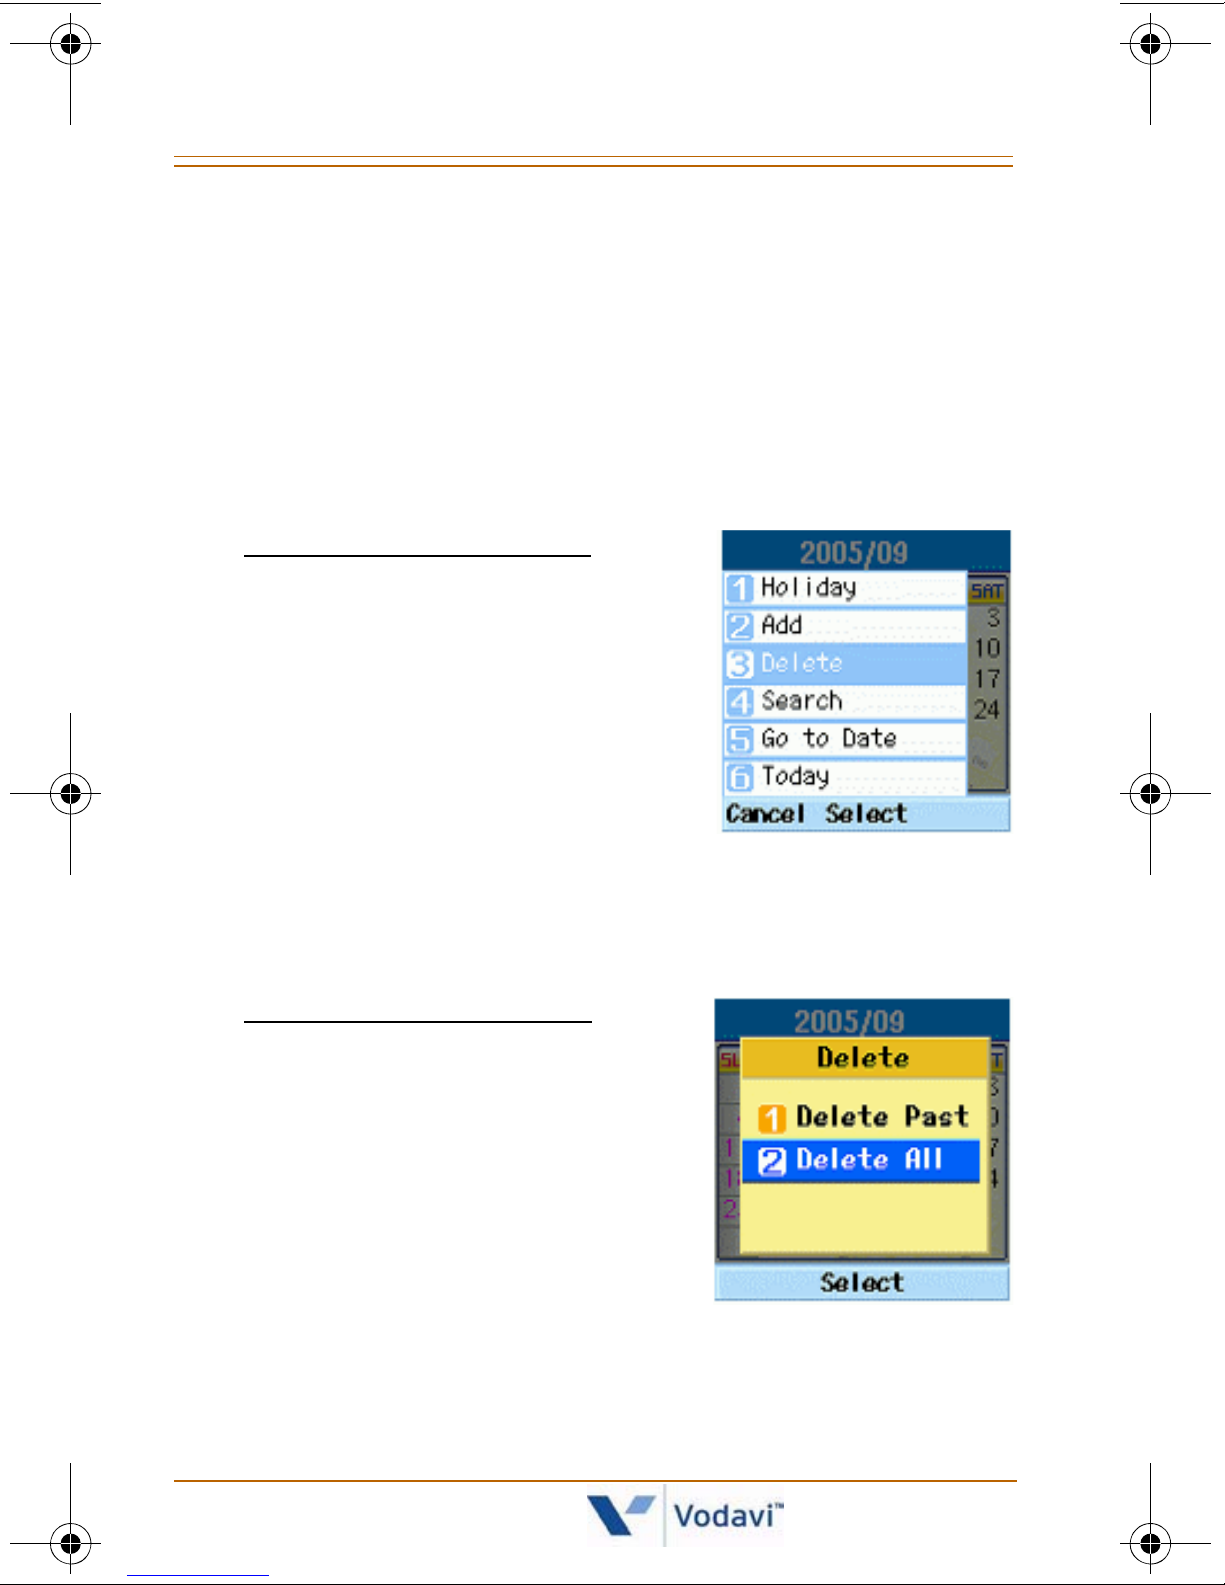
8. Press the [RSK] to select the Delete option, then press
[OK] to confirm the delete action.
9. To delete All or Past items
, press
the [LSK].
10. Press the [Down] navigation
key to select Delete, then press
[OK].
11. Select Delete All and press [OK]
to delete all items.
-or-
12. Select Delete Past and press [OK] to delete all schedule
items prior to today. (This option does not delete items
scheduled on the current date.)
Nomad IP User Guide March 2007
Page 51
Tools [Main Menu + 4] 45
SET HOLIDAY
1. Press the [Up] navigation key, then skip to Step 6.
-or-
2. Press the [LSK] to access the Main Menu.
3. Press the [Down] navigation key to scroll to “Tools.”
4. Press [OK]. Schedule is already selected.
5. Press [OK] to display the monthly calendar.
6. Press the [Up/Down/Left/Right]
navigation keys to go to the
date of the holiday.
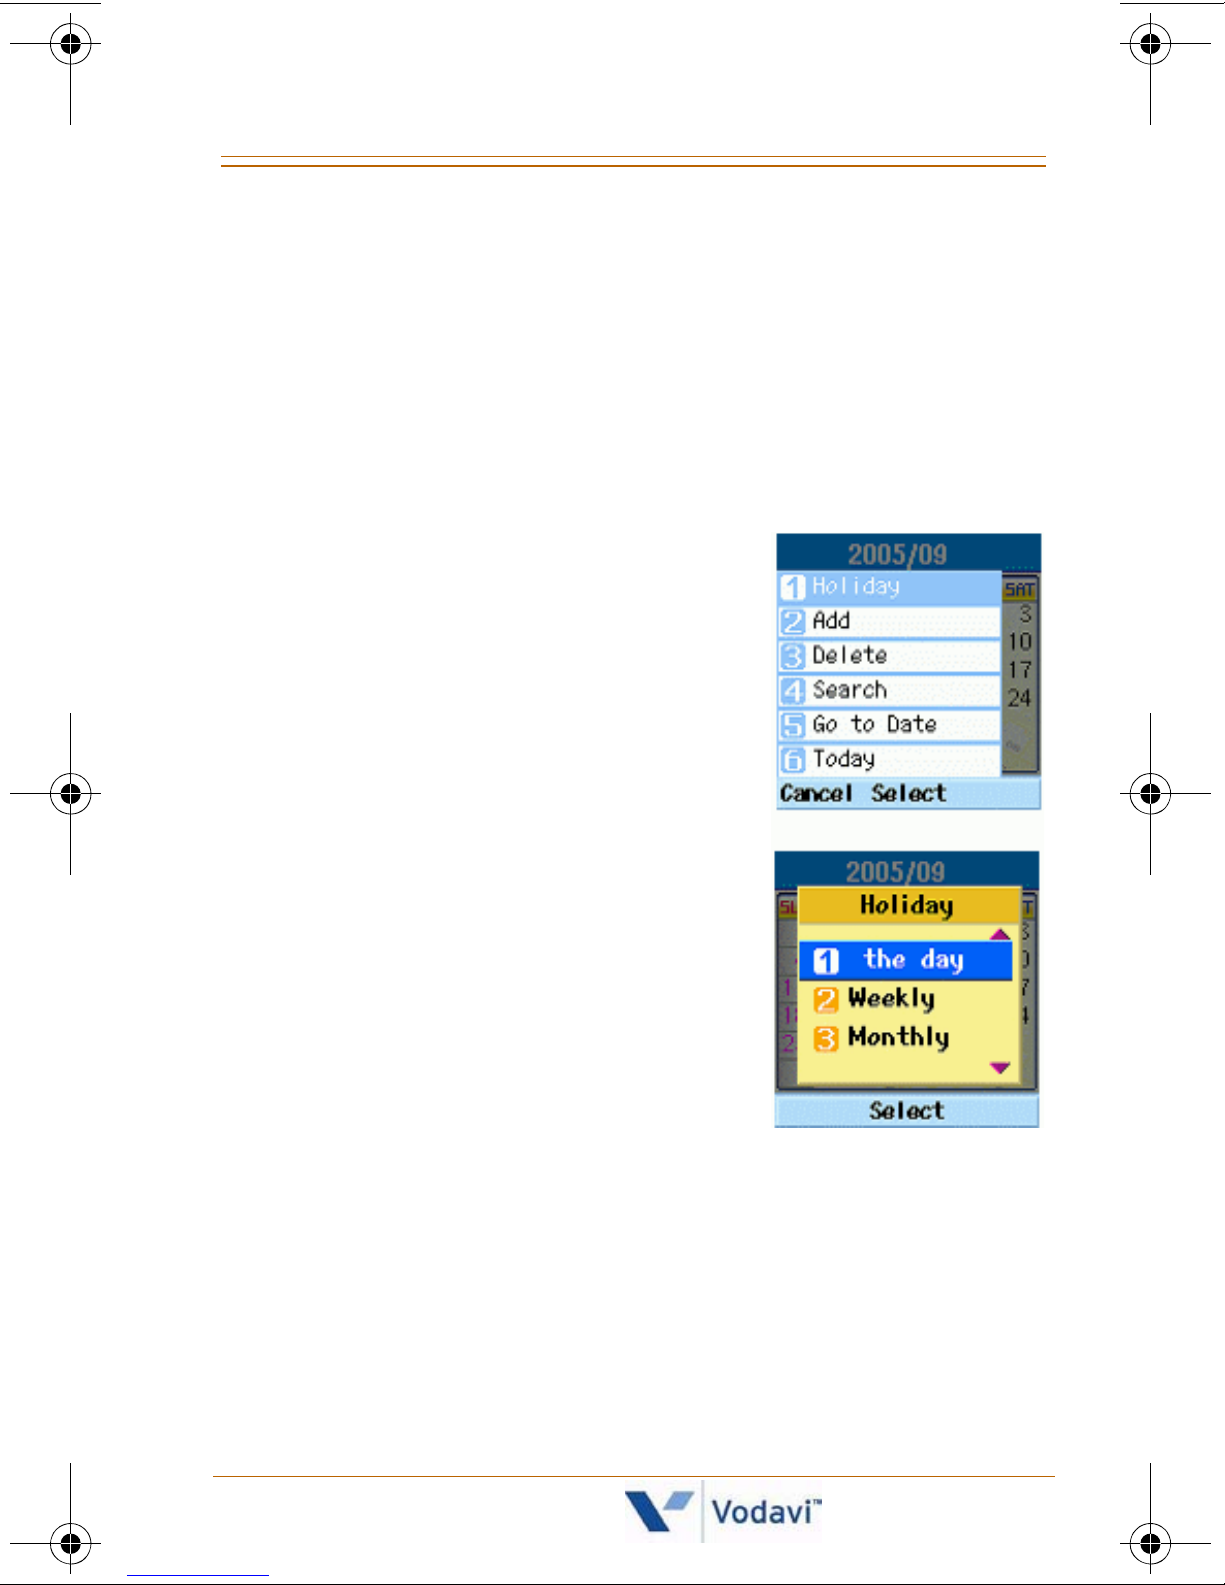
7. Press the [LSK]. Holiday is
already selected.
8. Press [OK].
9. Select the holiday
configuration type and press
[OK].
- Supported holiday types
include: the day, Weekly,
Monthly, and Yearly.
- The date corresponding to
the configured holiday is
represented “in red” in the
Monthly Schedule
management screen.
Nomad IP User Guide March 2007
Page 52
46 Tools [Main Menu + 4]
SEARCHING FOR A SCHEDULE ITEM
1. Press the [Up] navigation key, then skip to Step 6.
-or-
2. Press the [LSK] to access the Main Menu.
3. Press the [Down] navigation key to scroll to “Tools”.
4. Press [OK]. Schedule is already selected.
5. Press [OK] to display the monthly calendar.
6. Press the [LSK] to access the menu.
7. Press the [Down] navigation
key to scroll to “Search”.
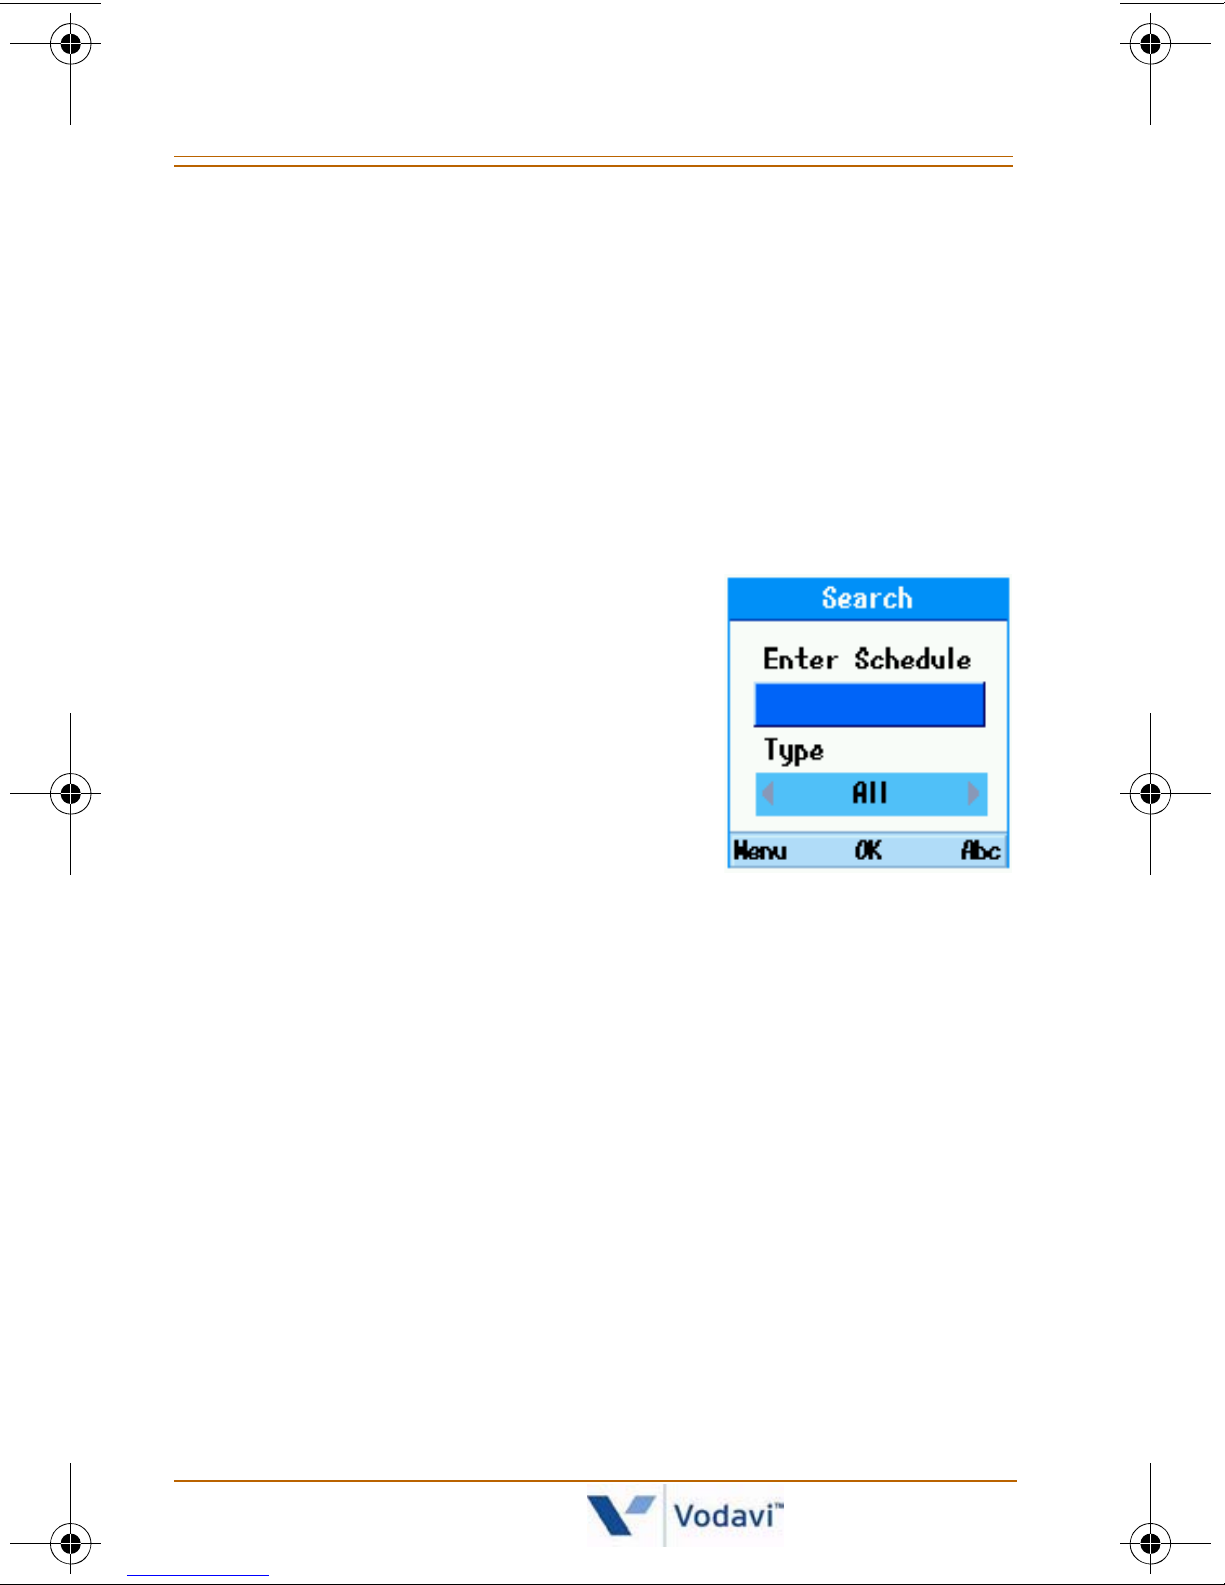
8. Press [OK] to display the Search
Schedule items screen.
9. Enter the subject of the
schedule item you wish to find.
10. Then select the schedule type
and press [OK].
- If there are schedule items that meet the search
criteria, the schedule items are displayed.
- If no matching schedule item is found, the
“No match schedule item” message appears.
Nomad IP User Guide March 2007
Page 53
Tools [Main Menu + 4] 47
MOVING TO A SPECIFIC DATE
1. Press the [Up] navigation key, then skip to Step 6.
-or-
2. Press the [LSK] to access the Main Menu.
3. Press the [Down] navigation key to scroll to “Tools”.
4. Press [OK]. Schedule is already selected.
5. Press [OK] to display the monthly calendar.
6. Press the [LSK] to access the menu.
7. Press the [Down] navigation
key to scroll to “Go to Date”.
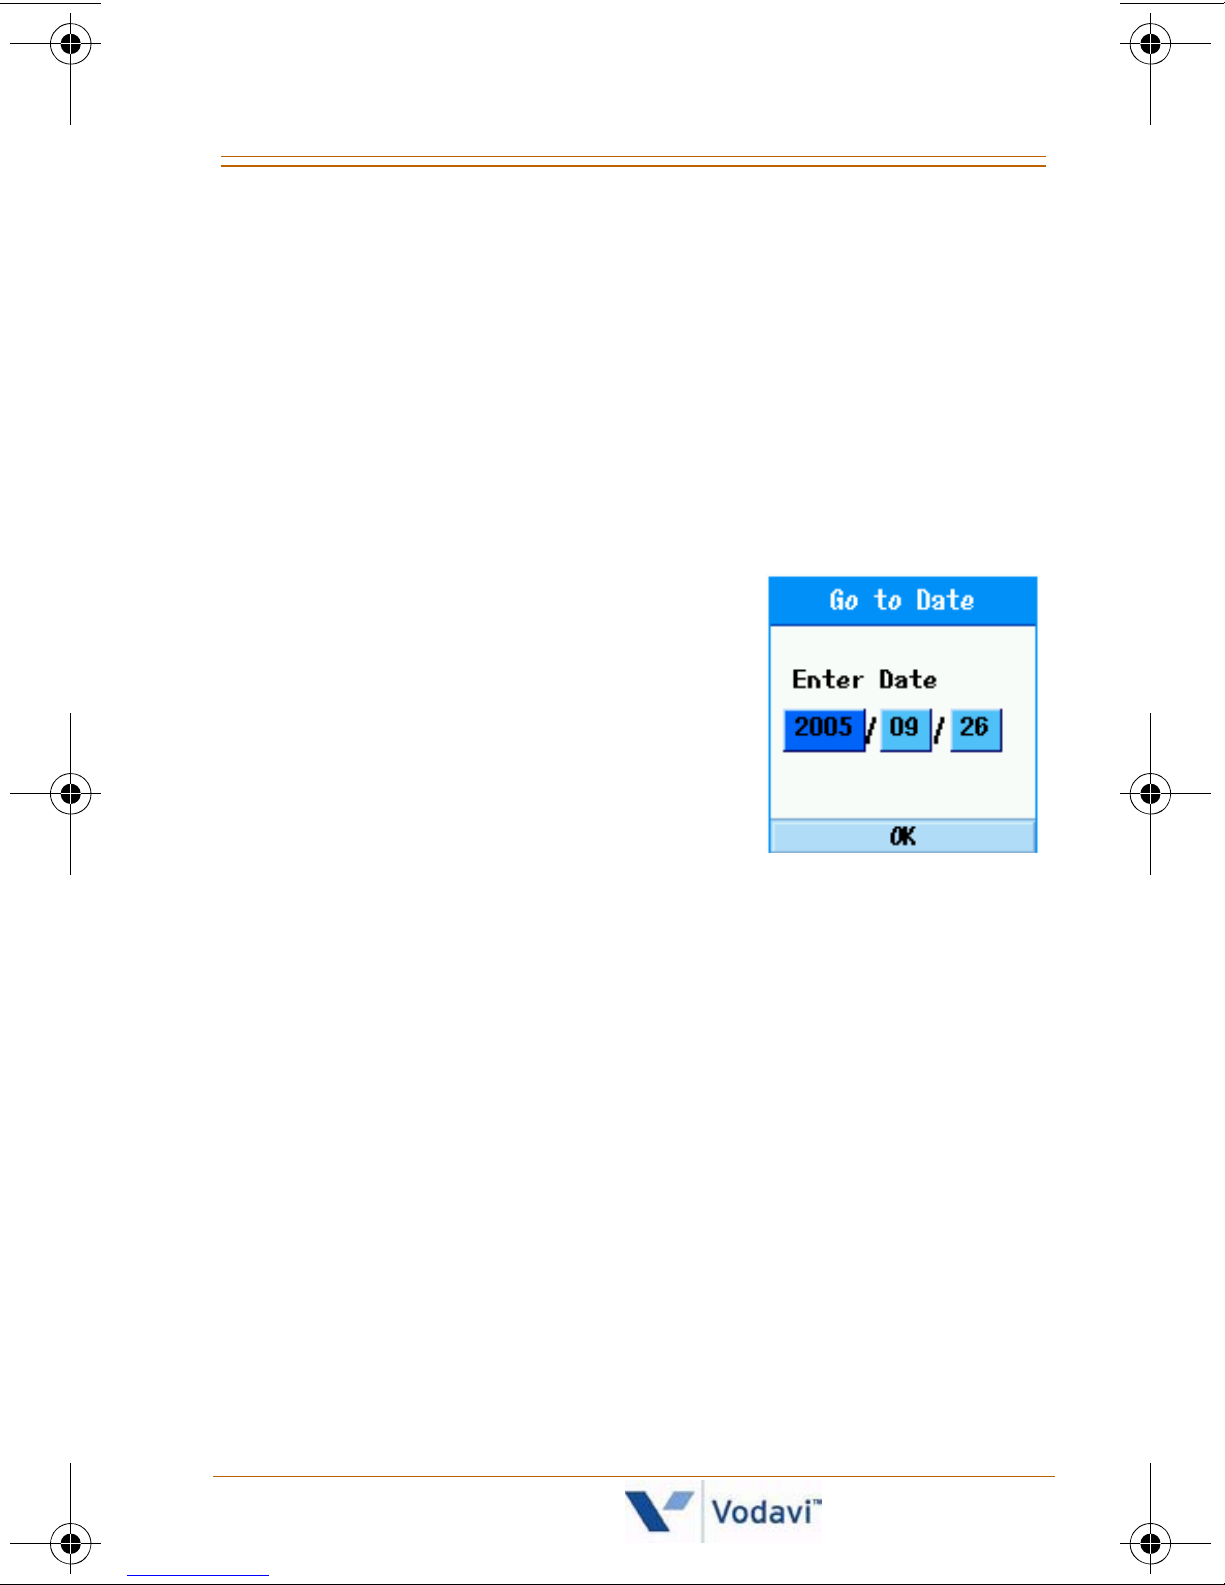
8. Press [OK] to display the Go to
Date screen.
9. Enter the desired date, then
press [OK].
The cursor will then move to
the specified date.
GO TO TODAY
1. Press the [Up] navigation key, then skip to Step 6.
-or-
2. Press the [LSK] to access the Main Menu.
3. Press the [Down] navigation key to scroll to “Tools”.
4. Press [OK]. Schedule is already selected.
5. Press [OK] to display the monthly calendar.
6. Press the [LSK] to access the menu.
7. Press the [Down] navigation key to scroll to “Today”.
8. Press [OK]. The cursor will then move to today’s date.
Nomad IP User Guide March 2007
Page 54
48 Tools [Main Menu + 4]
Memo
This menu allows you to record a note of up to 200
characters. A maximum of 30 memos can be stored.
1. Press the [LSK] to access the Main Menu.
2. Press the [Down] navigation key to scroll to “Tools”.
3. Press [OK]. Schedule is already selected.
4. Press the [Down] navigation key to scroll to “Memo”.
5. Press [OK].
6. Press the [RSK] to add a new memo.
7. Enter the desired memo text, then press [OK] to save
the memo.
When entering text for the memo, you
may want to press the [LSK] to access one
of the following:
- a template with a prepared message,
- emoticons to apply to your text.
SAVED MEMOS
1. Press the [LSK] to access the Main Menu.
2. Press the [Down] navigation key to scroll to “Tools”.
3. Press [OK]. Schedule is already selected.
4. Press the [Down] navigation key to scroll to “Memo”.
5. Press [OK]. The saved memo list is displayed.
Nomad IP User Guide March 2007
Page 55

Tools [Main Menu + 4] 49
MEMO ADD
1. Press the [LSK] to access the Main Menu.
2. Press the [Down] navigation key to scroll to Tools
.
3. Press [OK]. Schedule is already selected.
4. Press the [Down] navigation key to scroll to “Memo”.
5. Press [OK]. The saved memo list is displayed.
6. Press the [RSK] to add a new memo.
-orPress the [LSK]. The Add function is already selected;
press [OK].
7. Enter the contents of the memo to be saved.
8. Press [OK] to save the memo.
MEMO DELETE / DELETE ALL
1. Press the [LSK] to access the Main Menu.
2. Press the [Down] navigation key to scroll to “Tools”.
3. Press [OK]. Schedule is already selected.
4. Press the [Down] navigation key to scroll to “Memo”.
5. Press [OK]. The saved memo list is displayed.
6. Press the [Down] navigation key to scroll to the memo
you wish to delete.
7. Press the [LSK], then press the [Down] navigation key
to select either Delete or Delete All.
8. Press [OK].
Nomad IP User Guide March 2007
Page 56
50 Tools [Main Menu + 4]
Alarm Clock
The alarm function lets you set up to three separate
alarms. You can also set the time, repetition interval and
alarm sound.
1. Press the [LSK] to access the Main Menu.
2. Press the [Down] navigation key to scroll to “Tools”.
3. Press [OK]. Schedule is already selected.
4. Press the [Down] navigation key to scroll to “Alarm
Clock” and press [OK].
5. From the alarm list, select the desired entry. If there are
no alarm entries, press the [RSK] to add a new alarm.
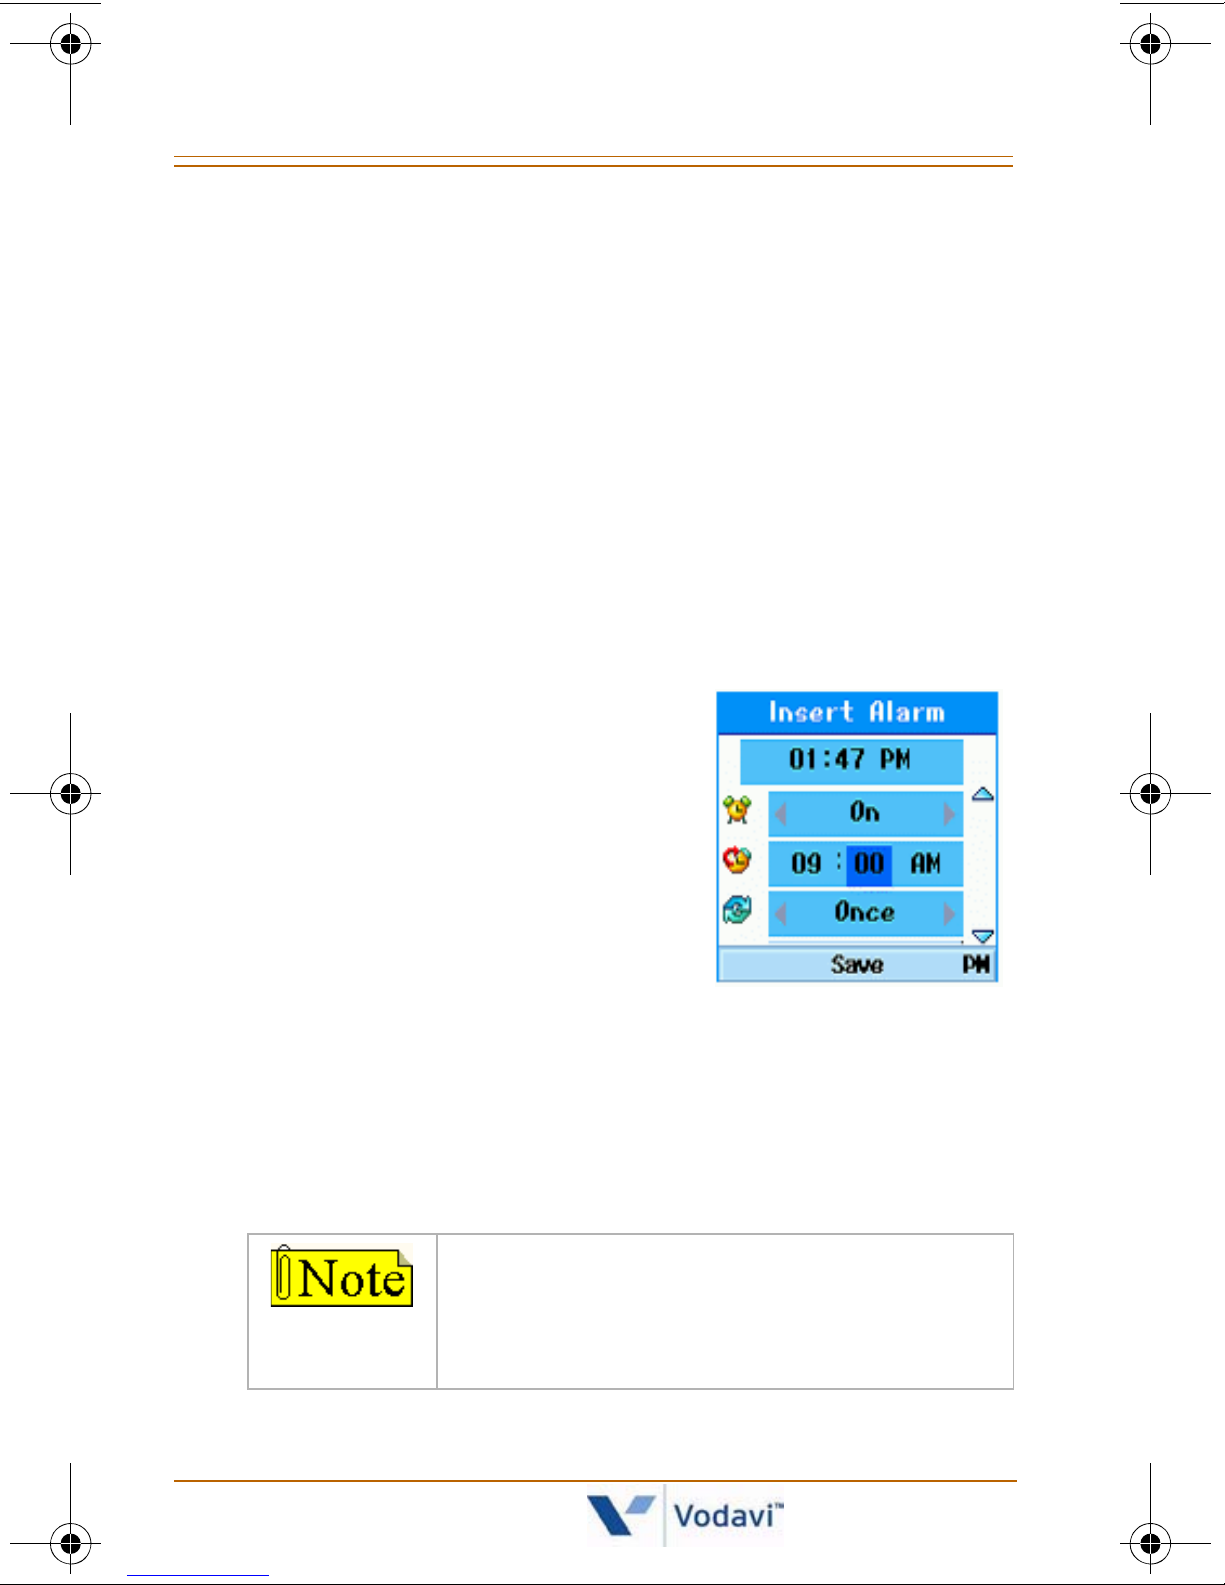
6. Set the alarm to ON or OFF
using the navigation key.
7. Enter the hour and minute for
the desired alarm time. If the
time is based on a12-hour
format, press the [RSK] and
select either “am” or “pm”.
8. Select desired repeat mode
using a navigation key.
9. Enter the alarm name.
10. Select the bell for the alarm using the navigation key.
11. When you have completed the configuration, press
[OK] to save the alarm settings.
- The alarm function does not work if the
handset is turned OFF.
Nomad IP User Guide March 2007
- During a voice call, the alarm works in
Vibration mode.
Page 57
Tools [Main Menu + 4] 51
Calculator
The calculator function allows you to add, subtract,
multiply and divide.
1. Press the [LSK] to access the Main Menu.
2. Press the [Down] navigation key to scroll to “Tools”.
3. Press [OK]. Schedule is already selected.
4. Press the [Down] navigation key to scroll to the
“Calculator” option.
5. Press [OK].
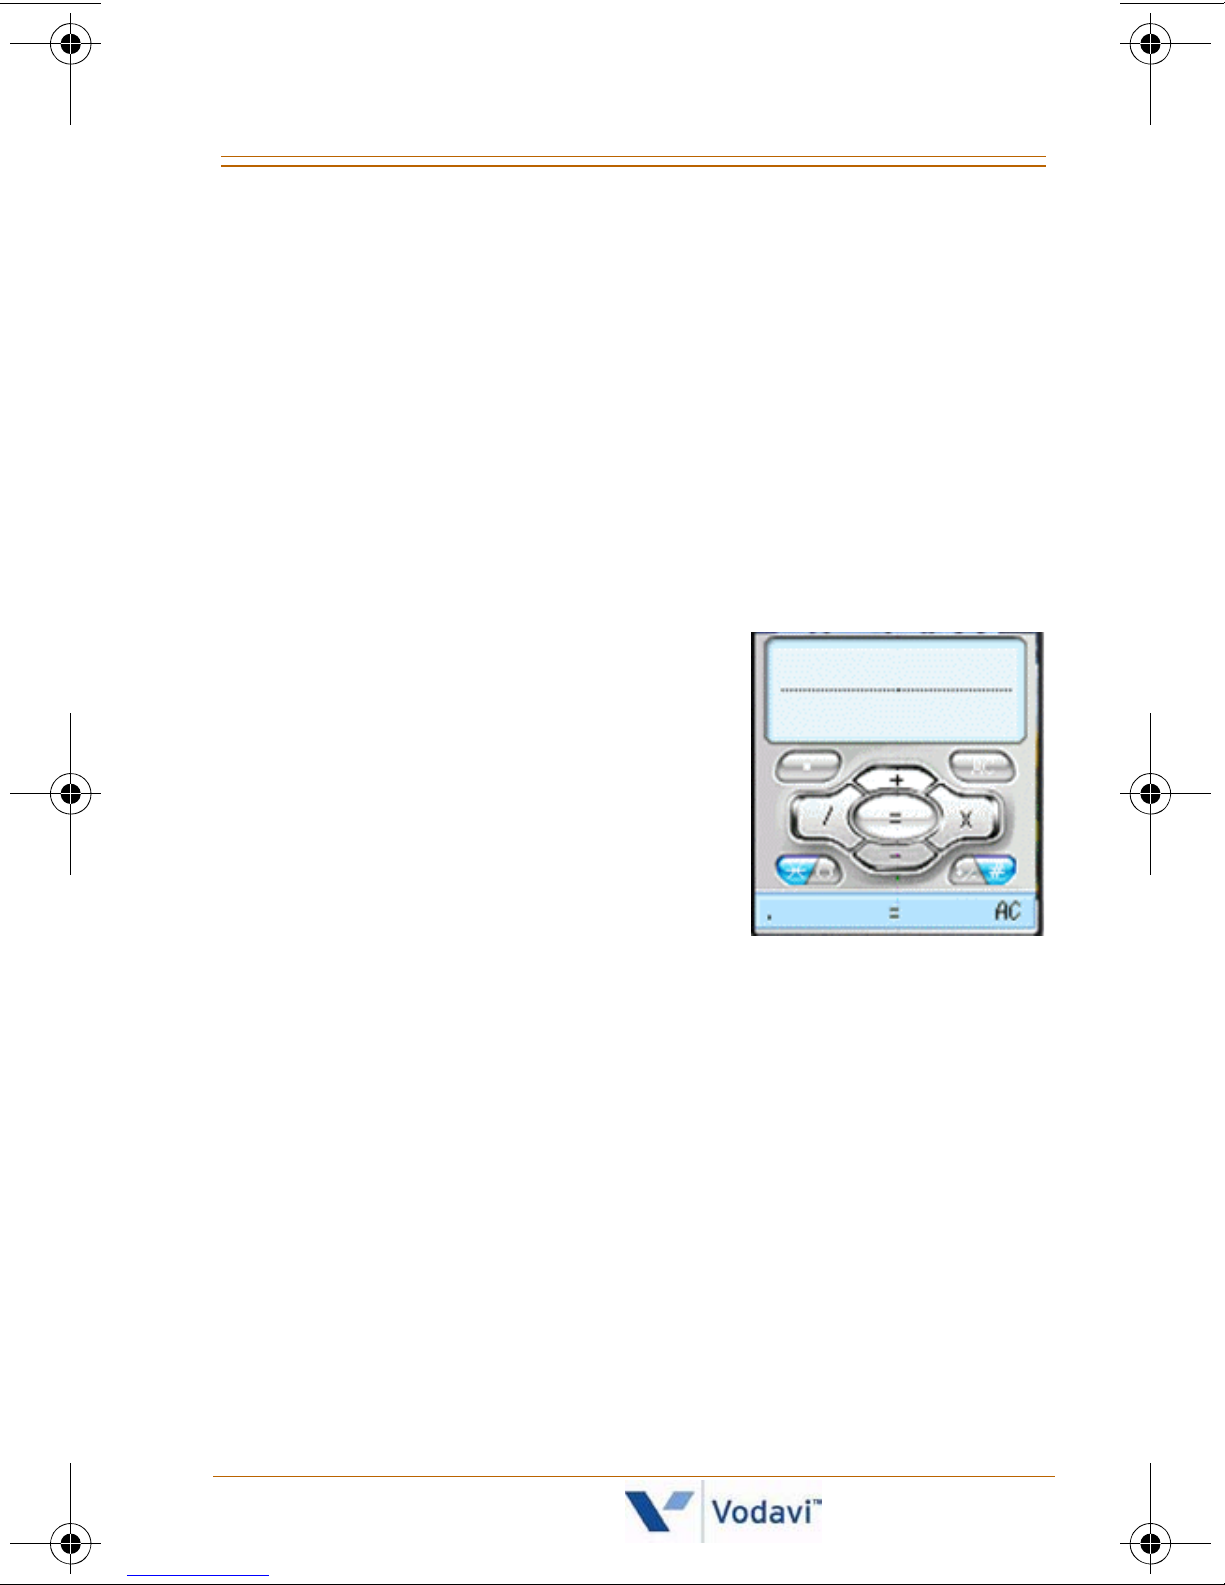
Using the Calculator
- Enter digits using the dial
pad number keys.
- Access the mathematical
functions (+, -, *, /) using the
[Up/Down/Left/Right]
navigation keys.
- Enter a decimal point by
pressing the [LSK].
- Whenever you press the [Clear/Prev] button,
characters are deleted sequentially in the reverse
direction.
- To erase ALL digits, press the [Clear/Prev] button for
more than 1 second.
Nomad IP User Guide March 2007
Page 58
52 Tools [Main Menu + 4]
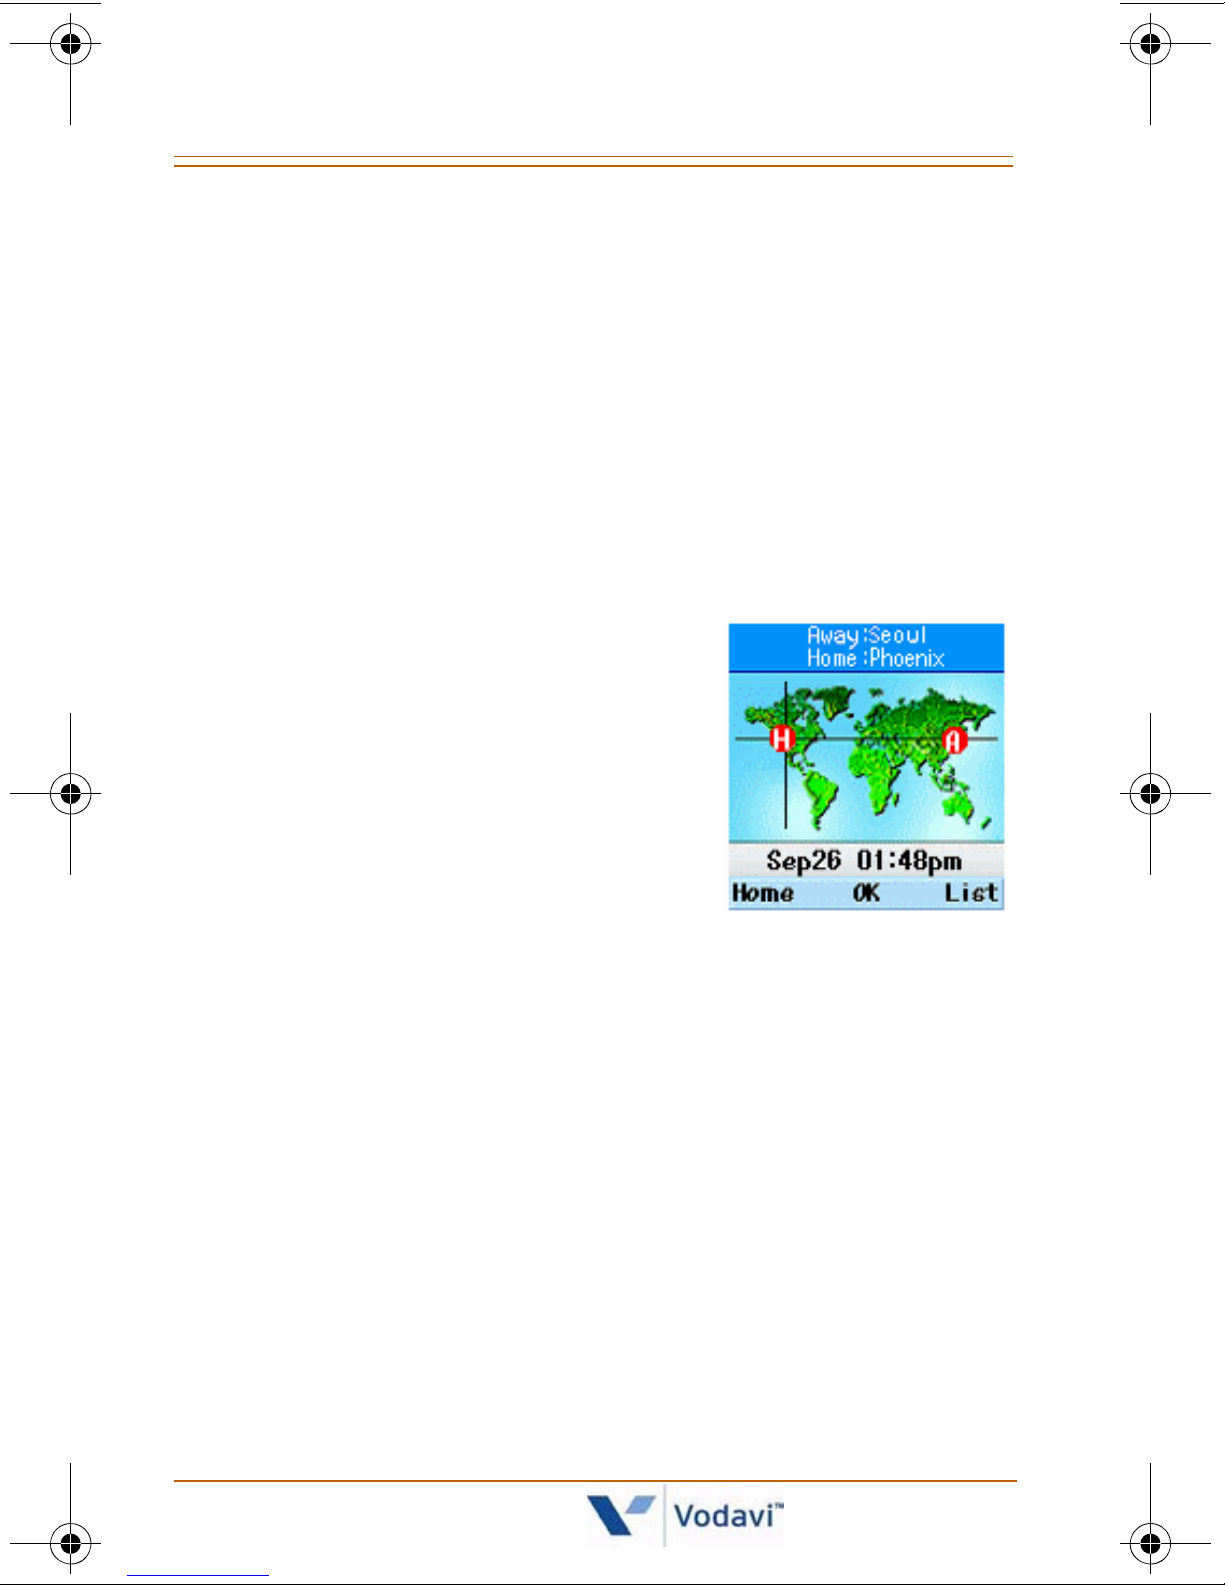
World Time
The World Time function provides time information on
major cities worldwide.
1. Press the [LSK] to access the Main Menu.
2. Press the [Down] navigation key to scroll to “Tools”.
3. Press [OK]. Schedule is already selected.
4. Press the [Down] navigation key to scroll to “World
Time”.
5. Press [OK].
6. Press the [Left] and [Right]
navigation keys to view the
time of desired country or city.
7. Select a desired city as a base
using the [Home] key.
8. Press the [Left] and [Right]
navigation keys to view the
time of desired country or city.
Nomad IP User Guide March 2007
Page 59
Tools [Main Menu + 4] 53
D-Day
D-DAY FINDER
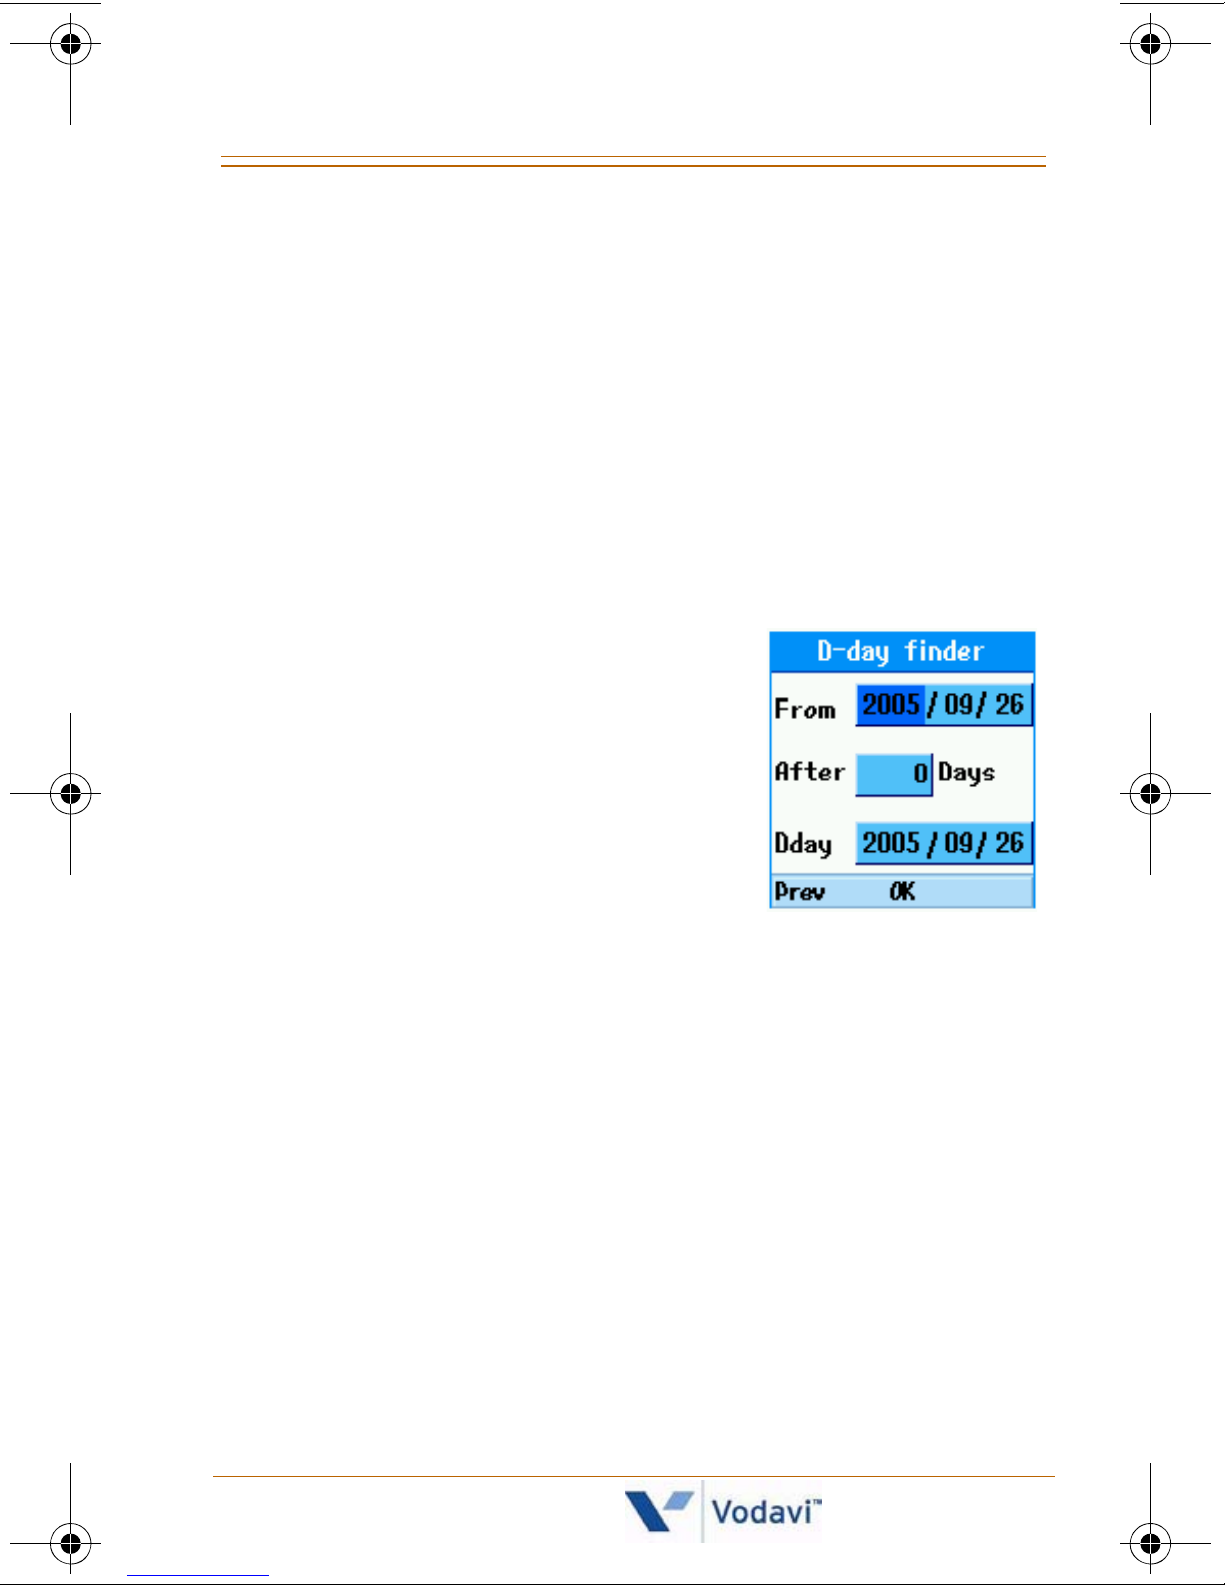
The D-day Finder shows the date after a specified
number of days from a specified start date.
1. Press the [LSK] to access the Main Menu.
2. Press the [Down] navigation key to scroll to “Tools”.
3. Press [OK]. Schedule is already selected.
4. Press the [Down] navigation key to scroll to “D-Day”.
D-day Finder is already selected.
5. Press [OK] to access the “D-day
Finder” screen.
6. Enter the “From” date as YYYY/
MM/DD, then enter the
number of days and press
[OK]. The D-day displays on
the bottom of the screen.
D-DAY COUNTER
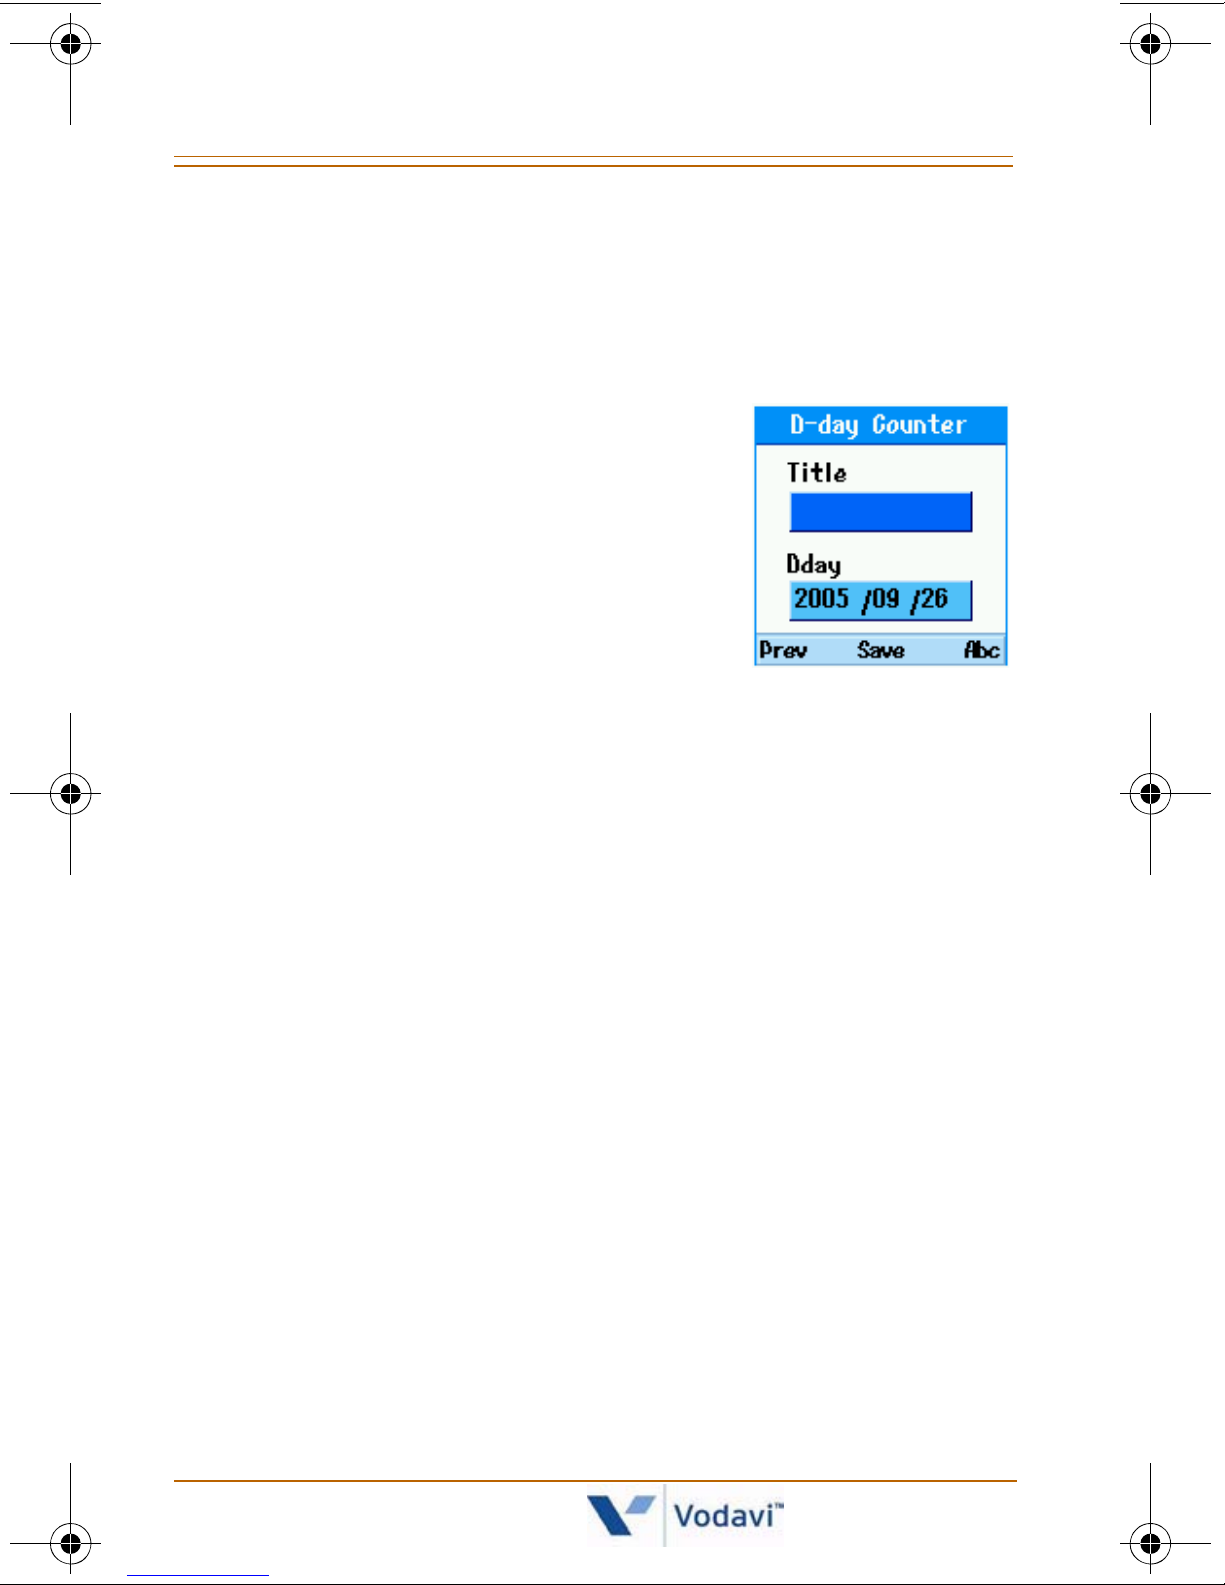
The D-day Counter is a timer that counts down to a
specified future date. You can make up to 20
D-day Counters.
1. Press the [LSK] to access the Main Menu.
2. Press the [Down] navigation key to scroll to “Tools”.
3. Press [OK]. Schedule is already selected.
4. Press the [Down] navigation key to scroll to “Timer”.
5. Press [OK]. D-day Finder is already selected.
6. Press the [Down] navigation key to scroll to “D-day
Counter” and press [OK].
Nomad IP User Guide March 2007
Page 60
54 Tools [Main Menu + 4]
To review a previously entered Counter item:
1. Select the desired item in the list.
2. Then press [OK] to view the counter parameters: Title,
Target Date, and Days Remaining.
To add a new Counter item:
1. Press the [RSK] and enter a Title
for the item.
2. Enter the Date as YYYY/MM/DD.
3. Then press [OK] to add the item
to the list.
SITE SURVEY
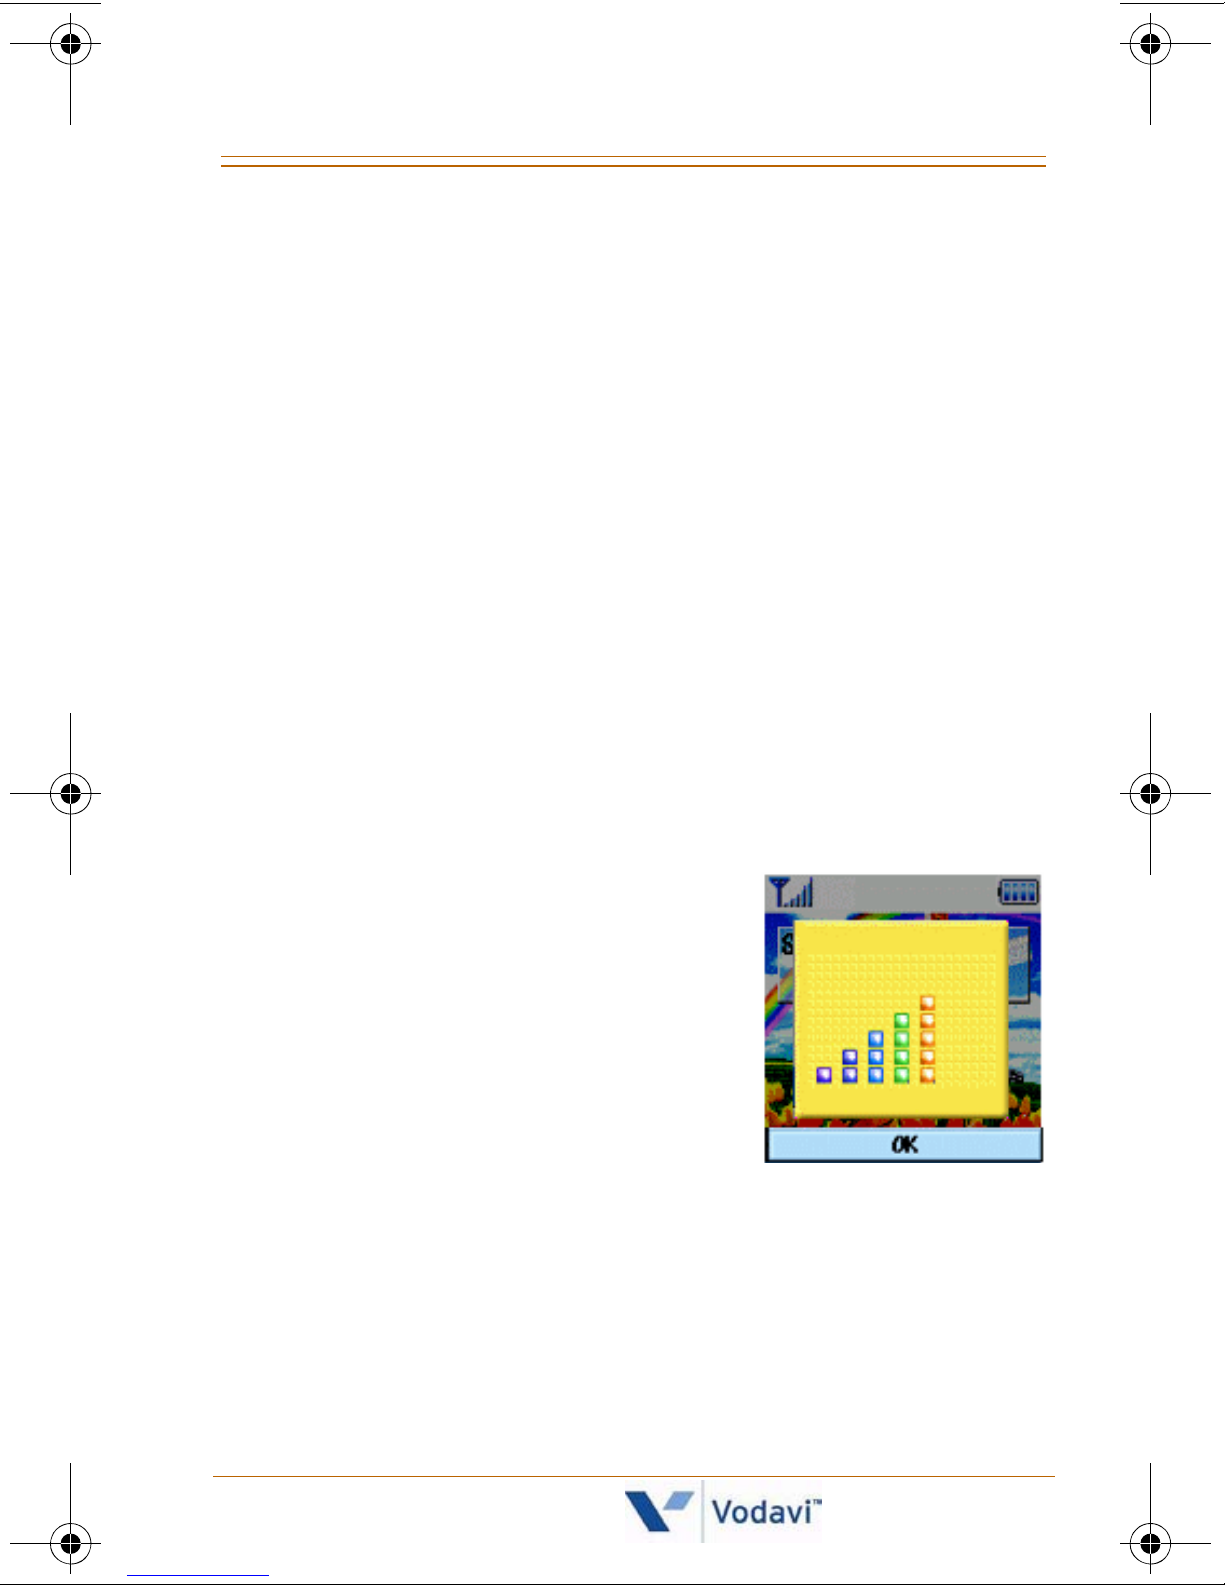
The Site Survey window provides specific information
about the
Nomad IP
such as:
- BSSID (MAC address of the phone)
- SSID
-Channel
-Signal
-Noise
- Quality
1. Press the [LSK] to access the Main Menu.
2. Press the [Down] navigation key to scroll to “Tools”.
3. Press [OK]. Schedule is already selected.
4. Press the [Down] navigation key to scroll to “Site
Survey”.
Nomad IP User Guide March 2007
Page 61
Settings [Main Menu + 5] 55
Settings [Main Menu + 5]
Sound
The Sound menu and its sub-menus are described in the
following sections.
ALERT BY
The Alert By menu determines the incoming call
notification mode. You can select from Crescendo,
Ringer Sound, Vibration, Ring after vibration, Ring and
Vibration, Mute, and Vibrate once.
RING TONE
The Ring Tone menu determines the ring tone for
incoming call notification.
The
Nomad IP
supports 5 different ring tone types, each
with 10 tones under each type.
RING TONE VOLUME
The Ring Tone menu
determines the ring tone
volume for incoming call
notification.
Nomad IP User Guide March 2007
Page 62

56 Settings [Main Menu + 5]
POWER-ON TONE
The Power-On Tone menu determines the “switch on”
effect that sounds when the
POWER-OFF TONE
Nomad IP
is turned on.
The Power-Off Tone menu determines the “switch off”
effect that sounds when the
KEY TONE
Nomad IP
is turned off.
The Key Tone menu determines the key tone that sounds
when a key is pressed.
KEY TONE VOLUME
The Key Tone Volume menu determines the volume of
the key tone.
EFFECT SOUND
The Effect Sound menu determines the confirmation tone
that sounds.
Nomad IP User Guide March 2007
Page 63
Settings [Main Menu + 5] 57
Display
In this menu, you can configure screen display options
including Screen settings and themes.
SCREEN THEME
Screen background in an idle state is defined here.
Currently, four screen themes are provided.
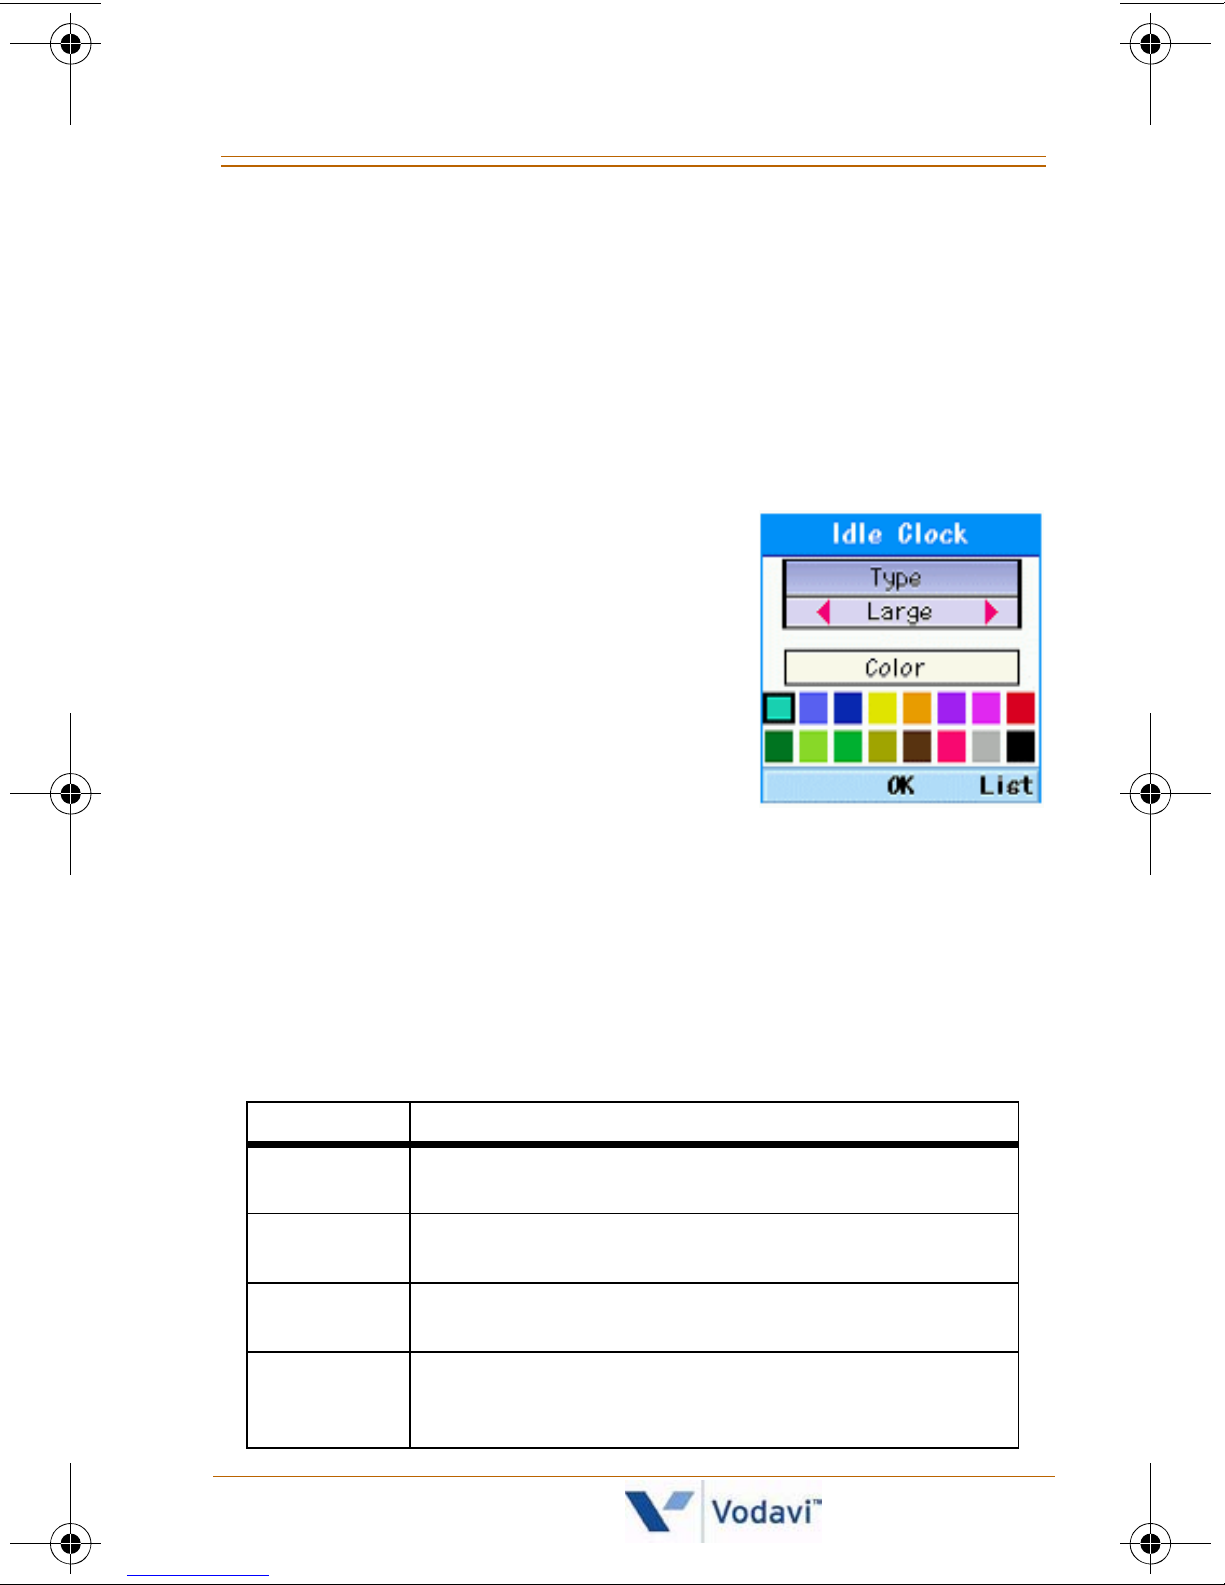
IDLE CLOCK
You can configure the font type
and color of the clock displayed
on the main screen. You can
configure type to: Clock Off,
Small, or Large. If “Small or Large”
is selected, you can set the color
using the color chart.
MENU STYLE
You can configure the menu to: Arch style or List style.
For more details, refer to “Main Menu Display ” on page 6.
BACKLIGHT
Use this function to set the backlight duration and
brightness settings.
Item Default Value
Standard - LCD duration: 5 sec
- LCD brightness: Bright
Saving - LCD duration: 5 sec
- LCD brightness: Normal
Ultra
Saving
User
Settings
Nomad IP User Guide March 2007
- LCD duration: Always Off
- LCD brightness: Normal
- LCD duration: Always Off, 5 sec, 10 sec, 15 sec, 20 sec,
- Always On
- LCD brightness: Normal, Bright, Brightest
Page 64
58 Settings [Main Menu + 5]
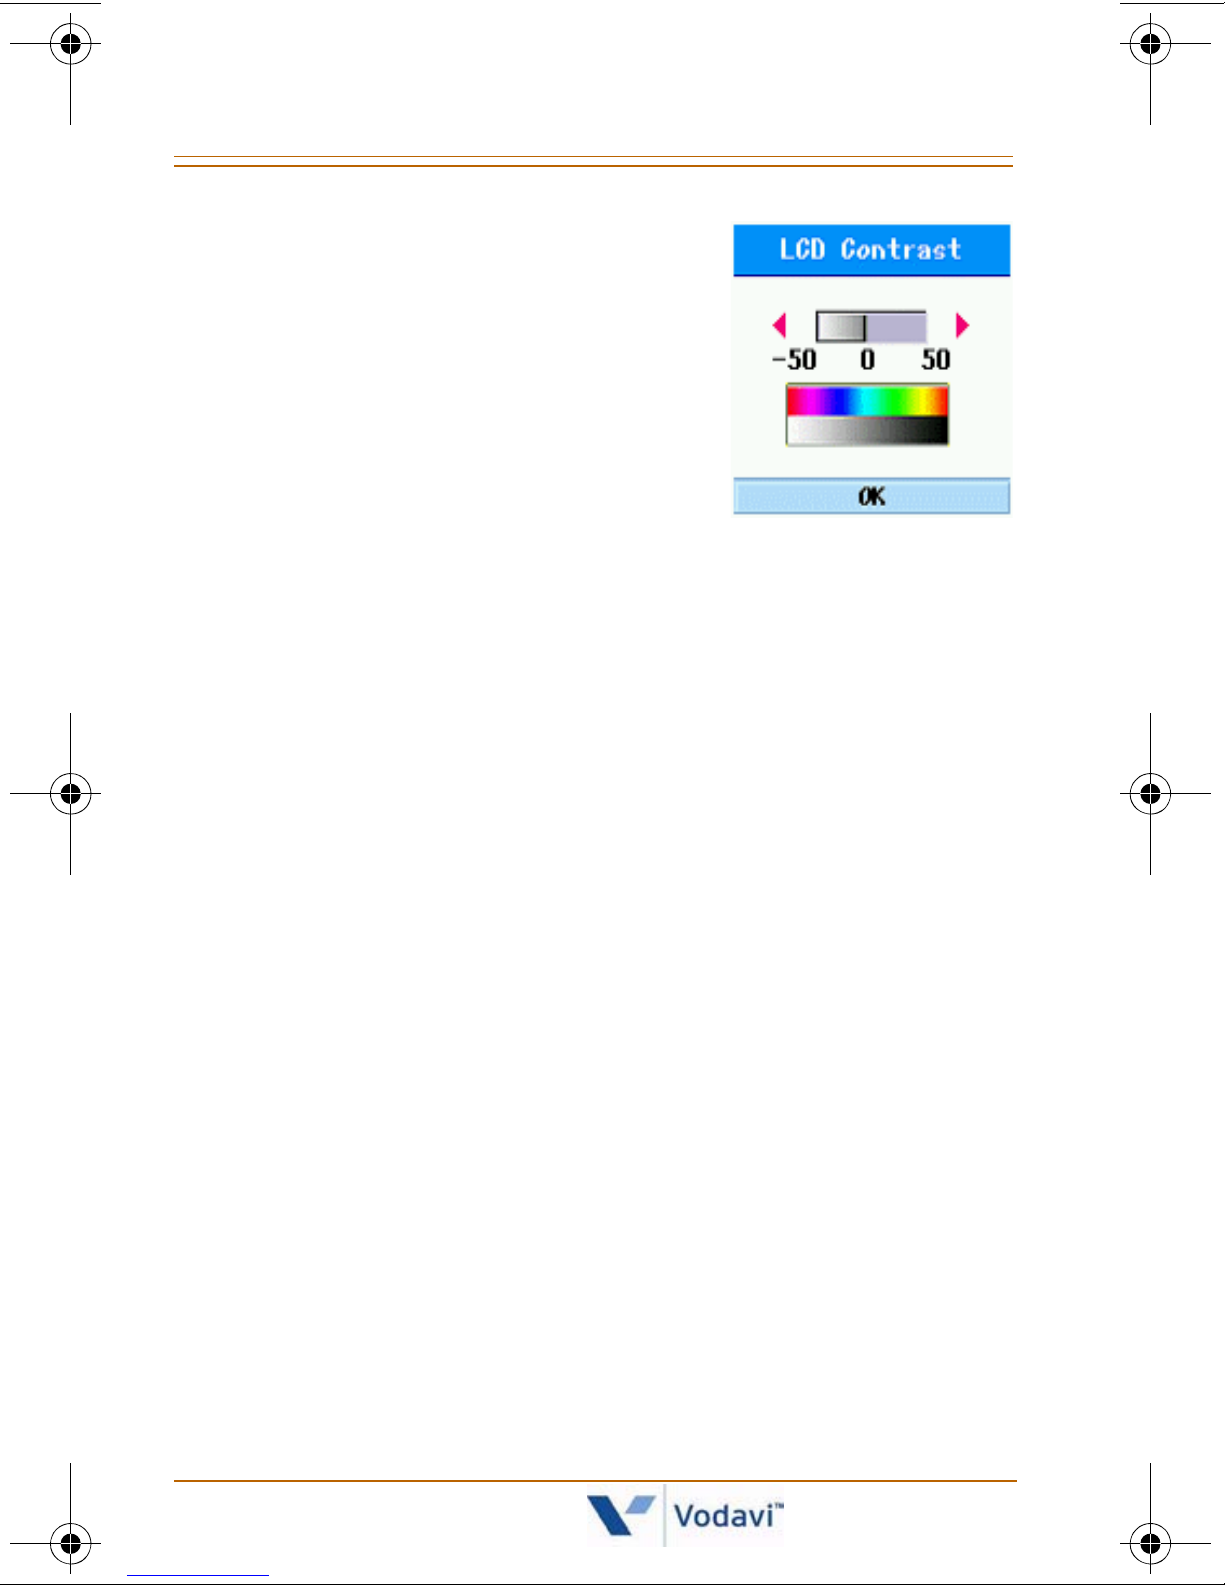
LCD CONTRAST
You can adjust the brightness of
the main screen by using the [Left]
and [Right] navigation keys. Press
the navigation key for more than
1.5 sec to change fully to
-50 or 50.
Power Save
You can set the phone to one of three power options: LCD
On, LCD Off, or No Power Save.
Security
Security options are provided to lock the
Nomad IP
for
privacy.
Lock Phone
After selecting the Lock Phone function, the
prompt you to enter a password. The default password is
0000. You can change the password.
Nomad IP
will
Reset Default
It changes sound setting and display settings.
Network
The Network menu provides information on using the
network configuration. This menu has 5 sub-menus:
-DHCP
- Static IP
- 802.11b Config
- Authentication
-Load Default
Nomad IP User Guide March 2007
Page 65
Settings [Main Menu + 5] 59
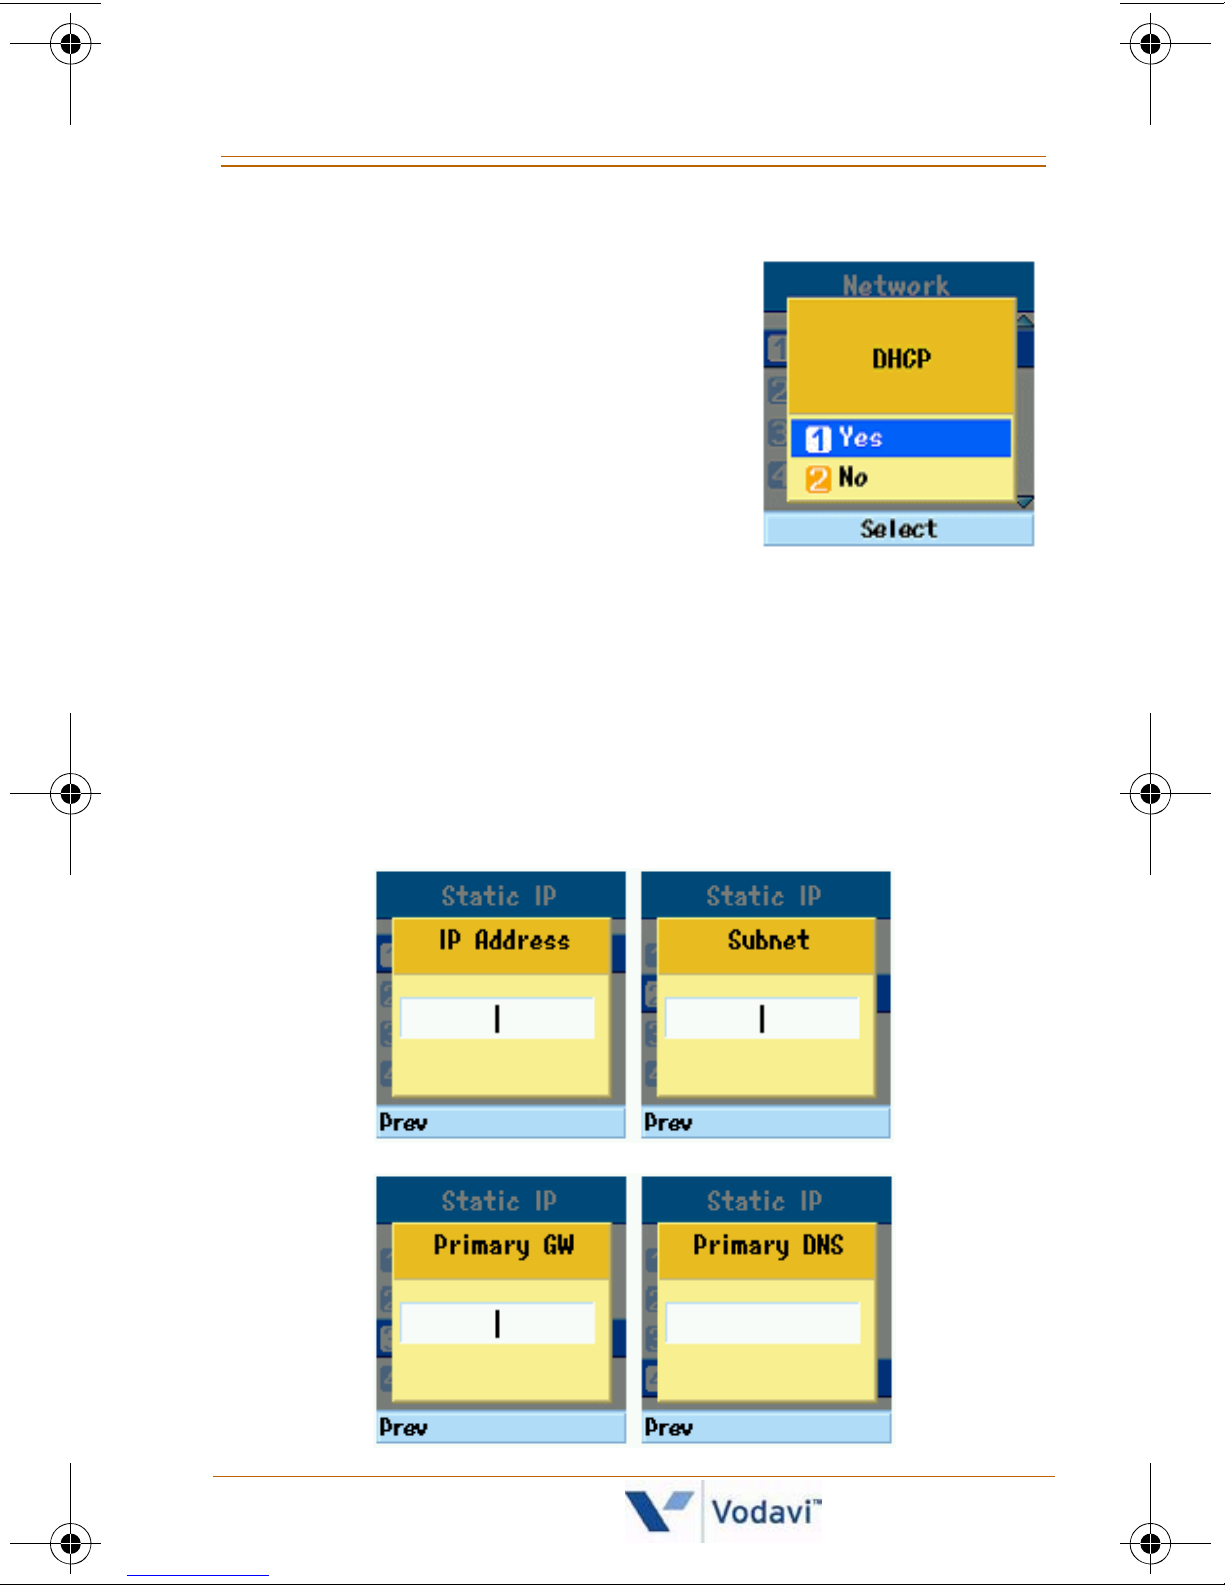
DYNAMIC HOST CONFIGURATION PROTOCOL (DHCP)
The DHCP client provides a
mechanism for allocating IP
addresses dynamically so that
addresses can be reused when
hosts no longer need them.
This menu determines whether or
not to use DHCP.
When DHCP is set to NO, you must
set the static IP address in the following menu.
(When used as Local mode in
TeleniumIP
systems, this
setting is not relevant.)
SETTING STATIC IP ADDRESS
You can configure a static IP Address, Subnet, Primary
Gateway, and Primary DNS.
Nomad IP User Guide March 2007
Page 66
60 Settings [Main Menu + 5]
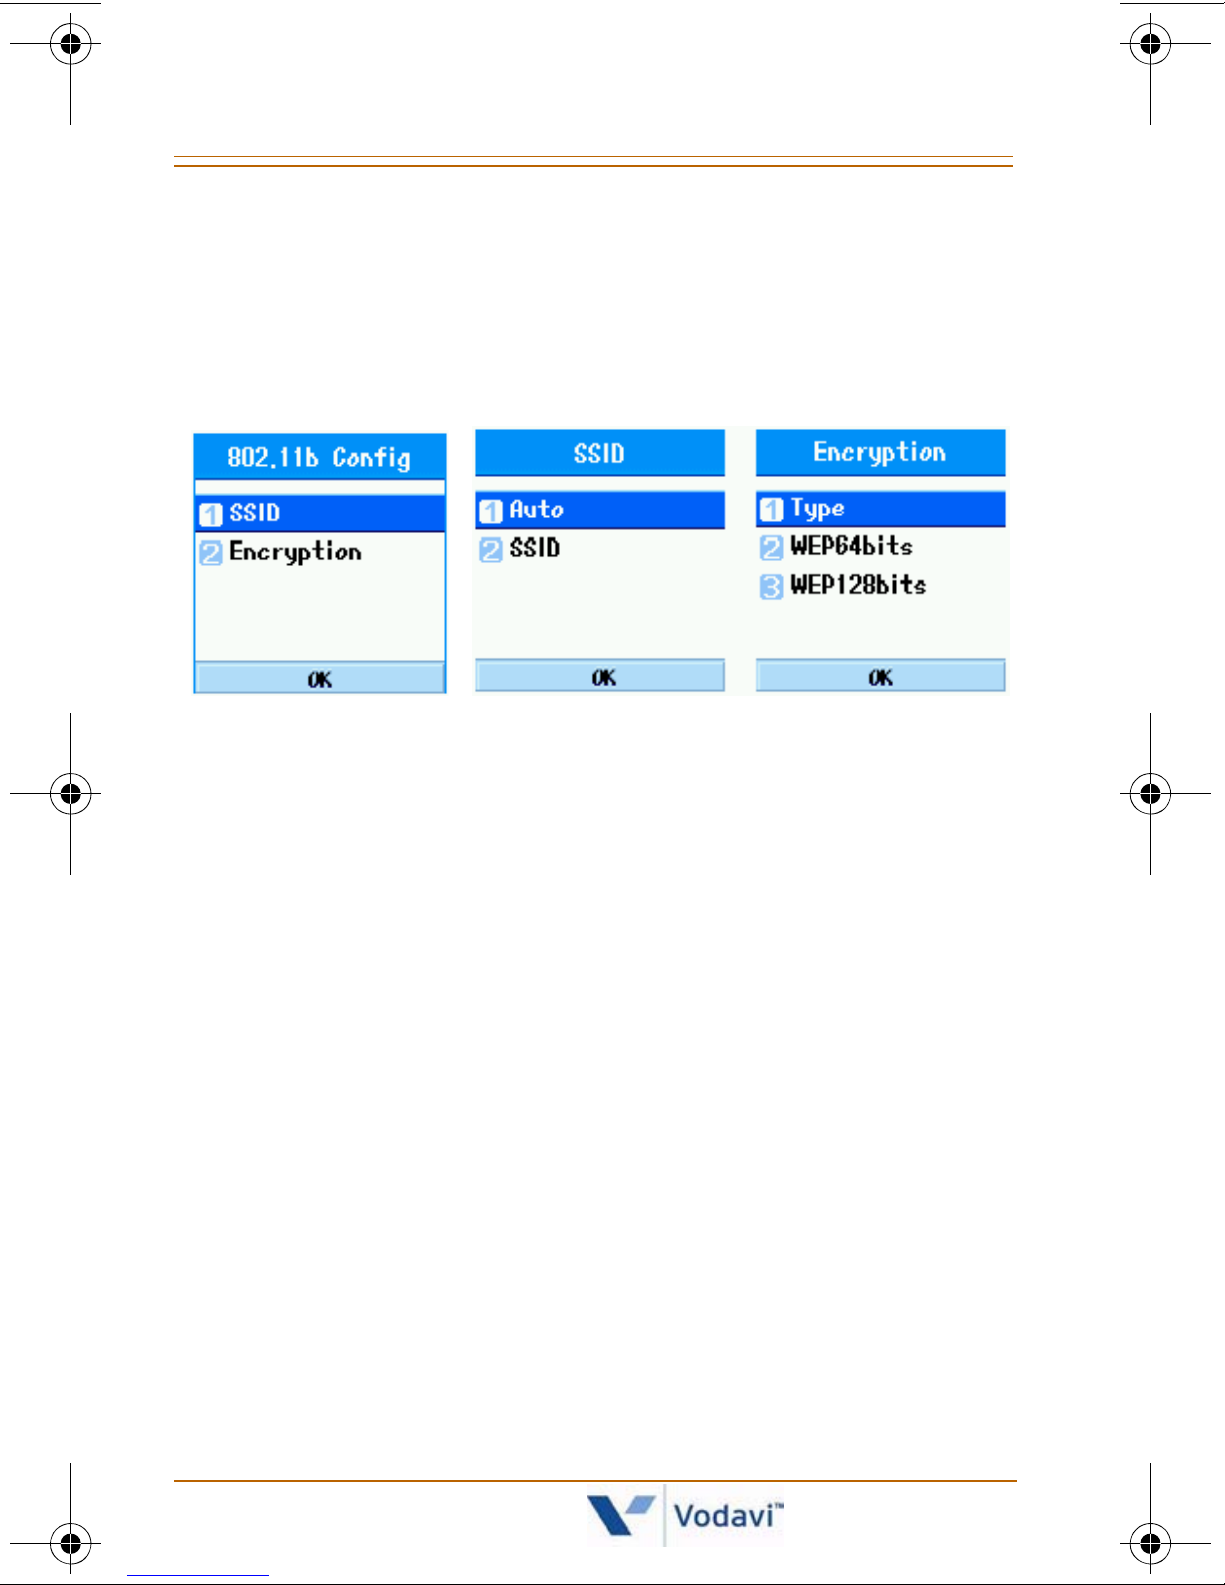
SETTING 802.11B CONFIGURATION
You can configure the following 802.11b parameters:
-SSID
- Encryption (WEP 64/128 bits)
AP PROBING
The
Nomad IP
searches all the reachable APs. To detect
the APs, select “Auto” from the SSID items in the “Setting
802.11b Config” menu.
The
Nomad IP
shows a list of the SSIDs configured in the
APs from which to choose (20 maximum).
- If you cannot find the desired AP, you can try AP
probing by pressing [Clear/Prev] and [OK].
- After you have selected an AP, you will need to reboot
the
Nomad IP
.
Nomad IP User Guide March 2007
Page 67

Settings [Main Menu + 5] 61
System
DIRECT SEND / REMOTE MODE / SAME ROUTER
These menus are all related to the MFIM/VoIP card
configuration. For normal interaction with an MFIM/VoIP
card in
IP
should be configured like one of the IP phones.
TeleniumIP
/
XTS-IP
/
XTSc-IP
systems, the
Nomad
- For detailed descriptions about Direct Send/Remote
Mode/Same Router, refer to the IP phone section in
the
TeleniumIP
DIRECT SEND
The
Nomad IP
/
XTS-IP
/
XTSc-IP
Technical Manuals.
can automatically locate an MFIM/VoIP
card when the Direct Send value is set to NO. This allows
a user to register to the MFIM/VoIP card without
knowing the IP address of the MFIM/VoIP card.
If there is more than one MFIM/VoIP card in the same IP
Subnet, a user can selectively register to a specific MFIM/
VoIP card by setting its value to YES.
SYSTEM IP
This menu shows the IP address of MFIM/VoIP card.
STATION SET
This feature is not applicable to
with
Nomad IP User Guide March 2007
TeleniumIP
/
XTS-IP
/
XTSc-IP
Nomad IP
systems.
phones used
Page 68
62 Settings [Main Menu + 5]
Key Lock
When Key Lock is enabled, the keypad will automatically
lock on an idle screen once the Key Lock time setting is
reached. You can unlock the phone keypad by pressing
the [OK] button twice. However, the keypad will
automatically lock up again unless you change the Key
Lock setting to “Disable”. The Key Lock settings are:
Disable, 10 seconds, 30 seconds, and 1 minute.
Dialing Rule
You can set up a CO Access Code in a Dialing Rule that will
be attached to dialing in recent calls, Phone Book, and
Call History (except when dialing in an idle state). The
number is checked in recent calls, Phone Book, and Call
History. If the length of the dialing number is more than 4
(except those with a CO Access Code), the CO Access
Code will be added to the dialing number.
To distinguish between a 4-digit CO and
4-digit ICM, leave the dial number added CO
Access Code in recent calls.
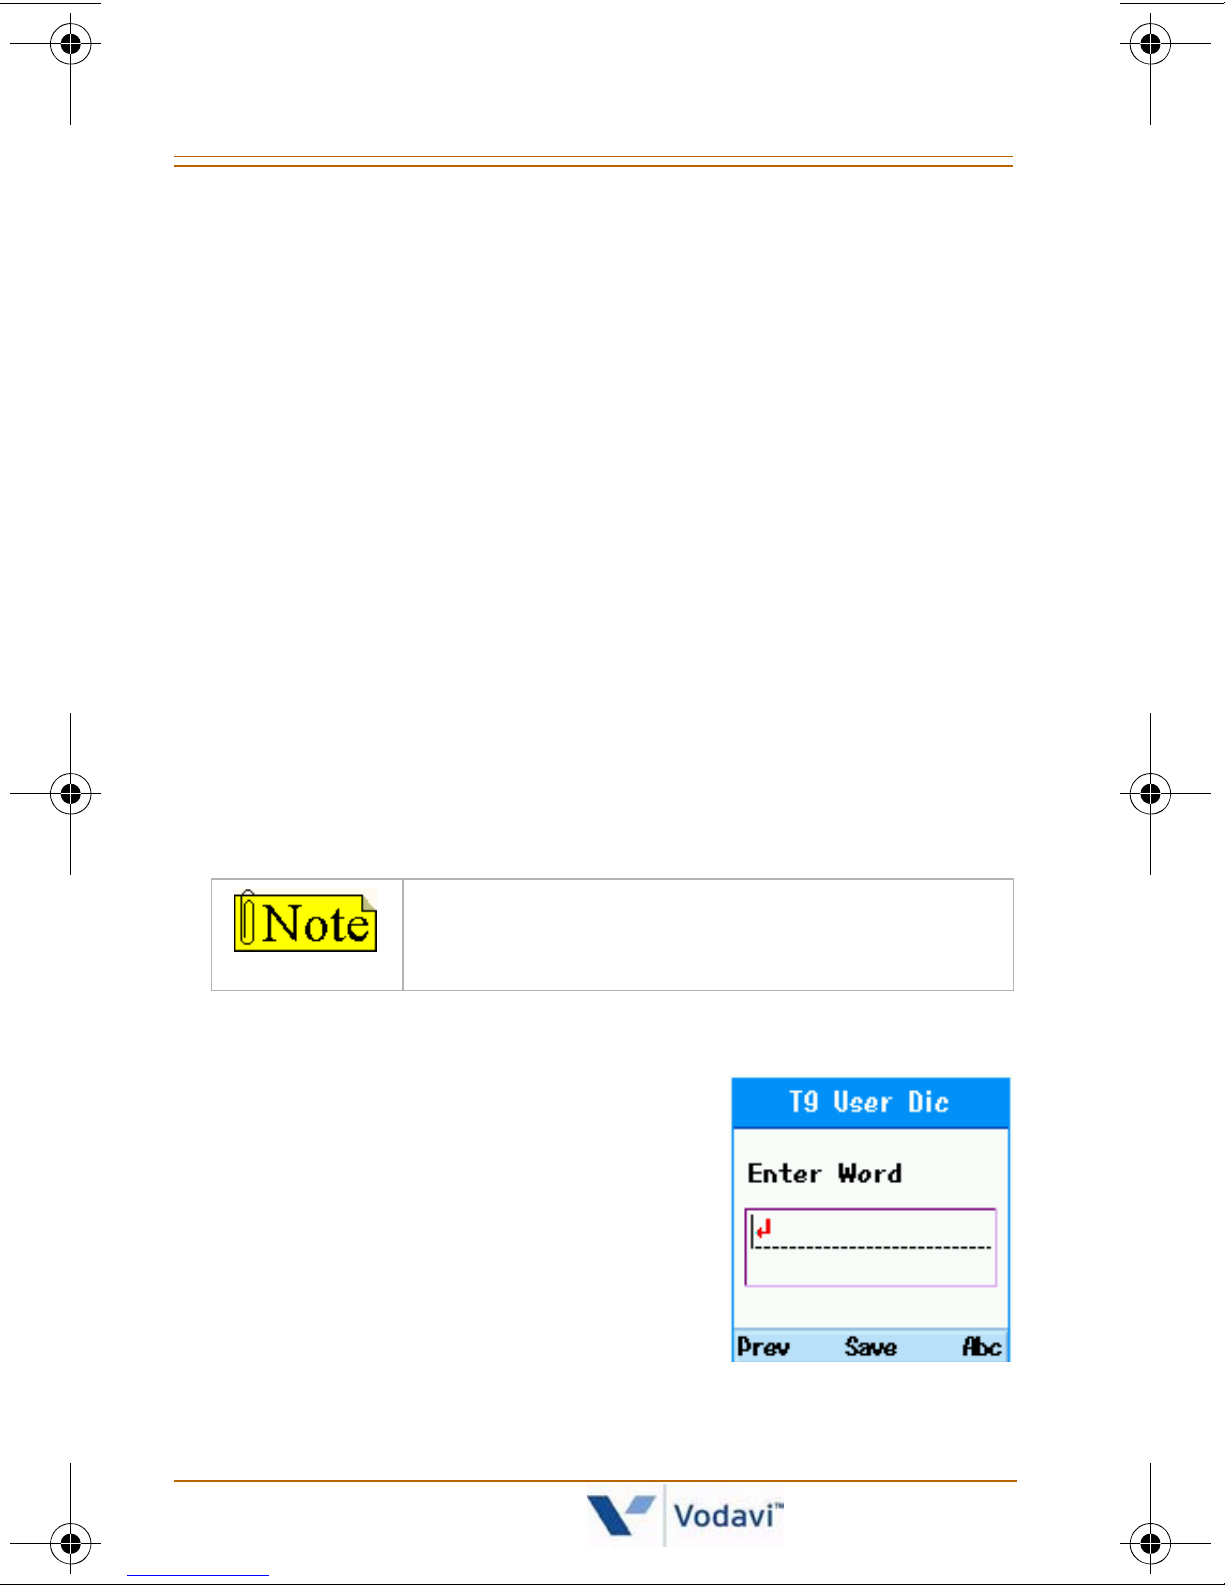
User Dictionary
You can add a word to the T9
Dictionary which is used to reduce
keystrokes in features that require
alphabetic input.
When you access a feature that
requires entering text, and you are
in T9 editing, press the key with
the alpha character once for each
character of the word, then press the [*] key.
Nomad IP User Guide March 2007
Page 69

Phone Info [Main Menu + 6] 63
Phone Info [Main Menu + 6]
S/W Version
This area allows you to view the software version of your
Nomad IP
.
Network Info
This menu allows you to access the data in the following
sub-menus:
-MAC address
- IP Address
System [Main Menu + 7]
Forward
Refer to “Call Forward” on page 25.
Conference
You can use this feature to establish a three-way
conference call.
While on a call:
1. Press the [Left] navigation key.
2. Select “Conference”.
3. Dial the number of the party to add to the conference.
4. Press the [Left] navigation key.
5. Choose “Conference” again.
DND
Refer to “Do Not Disturb (DND)” on page 30.
Nomad IP User Guide March 2007
Page 70

Message/Call Back
Refer to “Message Wait / Call Back” on page 29.
Flash
Use the Flash option to insert a Flash command.
System Speed
Refer to “System Speed Dial” on page 30.
System Redial
Refer to “System Speed Redial” on page 30.
ICM
Use the ICM option to allow two intercom calls to be
managed simultaneously. Refer to “To retrieve a held ICM
call (TeleniumIP only):” on page 24.
Mute
Use the Mute option while on an active call to prevent the
other party from hearing your conversation. You can still
hear the other party, but they cannot hear you.
Transfer
Refer to “Transferring a Call ” on page 23.
Hold/Save
Refer to “Holding a Call” on page 24.
Program
Refer to “Flex Functions” on page 31 (TeleniumIP only).
 Loading...