

Page 1

Make the most of now.
Vodafone 716 Mobile Phone
User Guide
Page 2

Notice
Copyright © 2007 Huawei T echnologies Co.
Ltd.
All Rights Reserved
1 Your Vodafone 716 is made exclusively for
Vodafone by Huawei Technologies.
2 No part of this manual may be reproduced or
transmitted in any form or by any means without
prior written consent of Huawei Technologies
Co. Ltd.
3
Trademarks
4 Vodafone 2007. Vodafone and the Vodafone
logos are trade marks of the Vodafone Group.
5
Notice
6 The information in this manual is subject to
change without notice. Every effort has been
made in the preparation of this manual to ensure
accuracy of the contents, but all statements,
information, and recommendations in this manual do not constitute a warranty of any kind,
expressed or implied.
7 Read the safety precautions carefully to ensure
that you use wireless device in a correct and
safe manner. For details, see the section "Warnings and Precautions".
Huawei Technologies Co. Ltd.
Branch Address:
8 Huawei Technologies Deutschland GmbH,
9 Am Seestem 24, Dusseldorf, Germany
10 Postal Code: 40547
Head Office Address:
11 Administration Building, Huawei Technologies
Co. Ltd., Bantian, Longgang District,
12 Shenzhen, P. R. China
13 Postal Code: 518129
Website: http://www.huawei.com
Page 3
14
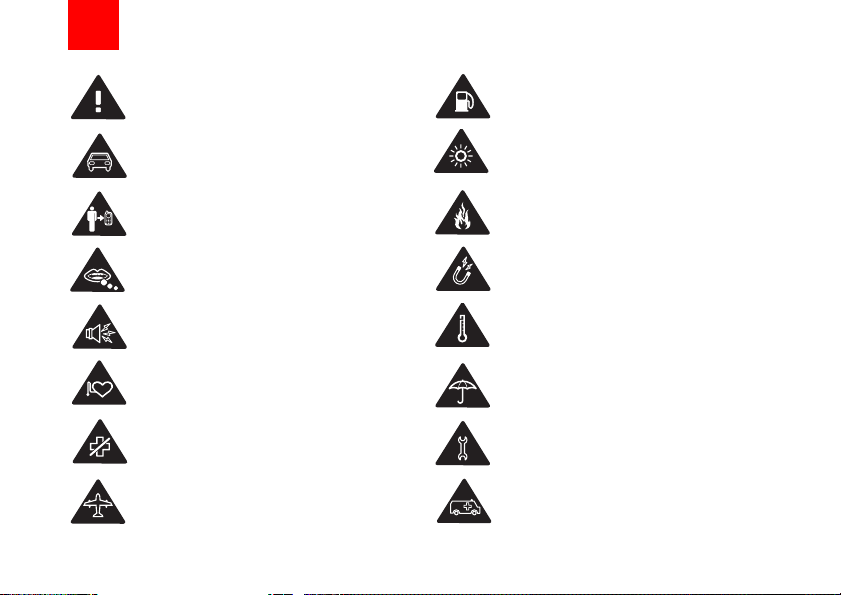
Safety Precautions
Read the Safety Information section of
this user guide on page 66.
Do not use hand-held while driving.
For body-worn operation maintain a
separation of 15 mm.
Small parts may cause a choking
hazard.
This device may produce a loud sound.
Keep away from pacemakers and other
personal medical devices.
Switch off when instructed in hospitals
and medical facilities.
Switch off when instructed in aircrafts
and airports.
Do not use while re-fuelling.
This device may produce a bright or
flashing light.
Do not dispose of in a fire.
Avoid contact with magnetic media.
Avoid Extreme Temperatures
Avoid contact with liquid, keep dry.
Do not try and disassemble.
Do not rely on this device for
emergency communications.
Page 4

Switch off in explosive environments.
Only use approved accessories.
15
Specific Absorption Rate (SAR)
16
17 Your mobile device is a radio transmitter and
receiver. It is designed not to exceed the limits
for exposure to radio waves recommended by
international guidelines. These guidelines were
developed by the independent scientific
organisation ICNIRP and include safety margins
designed to assure the protection of all persons,
regardless of age and health.
18 The guidelines use a unit of measurement
known as the Specific Absorption Rate, or SAR.
.
The SAR limit for mobile devices is 2 W/kg and
the highest SAR value for this device when
tested at the ear was 0.816 W/kg*. As mobile
devices offer a range of functions, they can be
used in other positions, su ch as on the body as
described in this user guide**.
19 As SAR is measured utilising the device's
highest transmitting power, the actual SAR of
this device while operating is typically below that
indicated above. This is due to automatic
changes to the power level of the device to
ensure it only uses the minimum power required
to communicate with the network.
20 * The tests are carried out in accordance with
IEC standard PT62209-1.
21 ** Please see page 66 about body worn
operation.
22 Please read the safety precautions carefully to
ensure the correct and safe use of your wireless
device. For detailed information, refer to the
23 section “Warnings and Precautions”.
24
25
Page 5

1Table of Contents
Table of Contents 1
Getting to Know Your Phone 1
Packing List........... .. ... ... .............................1
Your Phone ................................................2
Getting Started 6
Loading the Battery ....................................6
Unloading the Battery.................................6
Charging the Battery ..................................7
Loading/Removing the SIM Card...............8
Loading/Removing a Memory Card............9
Powering On/Off.........................................9
Call Service 11
Making or Answering Calls.......................11
Operations During a Voice Call...............12
Operations During a Video Call...............13
Text Input 15
T9 Input Method .......................................15
Traditional Input Method ..........................16
"123" Numeric Input Method ....................16
Symbol Input Method ...............................16
Input Different Languages........................17
Contacts 18
Making Calls from the Contacts ...............18
Searching for a Contact............................18
Other Operations..................... ... ..............19
Groups......................................................19
Call Log 21
Making Calls from Call Log ......................21
Other Operations .....................................21
Messaging 22
Text Messages....................................... .. 22
Multimedia Messages ..............................25
Creating Live!Postcards...........................2 9
Email........................................................29
Push Inbox...............................................34
Broadcast Inbox.......................................34
Voice Mail number ................... ... ... ..........35
Common Phrases .................... ... .............35
Music 36
My Music........................ ... .. .....................36
Playlist......................................................37
Organiser & Tools 38
SIM ToolKit ..............................................38
Alarms...................................................... 38
Calendar ..................................................38
Task ......................................................... 39
Memo ......................... ............................. 40
Synchronise ............................................. 40
Calculator................................................. 41
Unit Converter..........................................41
Currency Converter... ............................... 42
Voice Recorder ........................................42
World Time...............................................43
Stopwatch ................................................ 43
Timer........................................................ 43
1
Page 6

Service Dial Number ................................43
My Files 44
Vodafone live! 45
Vodafone live!...........................................45
Enter URL.................................................45
Bookmarks ...............................................46
Internet Settings ................... ... ... ..............46
Entertainment 47
Games......................................................47
Camera.....................................................47
Video Camera ..........................................48
Music........................................................49
FM Radio.............................. ... .................49
Connections 51
Bluetooth ..................................................51
USB..........................................................54
Settings 58
Phone Settings.........................................58
Display Settings........................................59
Message Settings.....................................60
Call Settings .............................................60
Video call .................................................63
Connectivity..............................................63
Network ........................ ...........................63
Security ....................................................64
Warnings and Precautions 66
RF Exposure ............................................66
2
Distraction................................................67
Product Handling .....................................67
Electrical safety........................................ 70
Interference.............................................. 70
Explosive environments ........................... 72
Environmental Protection.... ... ..................72
Acronyms and Abbreviations 73
Appendix 74
Index 1
Page 7
1Getting to Know Your Phone
Your Vodafone 716 phone can operate in virtually all
countries, automatically switching between
WCDMA 2100 and GSM/GPRS 900/1800/1900 networks. This allows you to enjoy communication wherever you use your mobile phone.
The services supported by your phone
Note
should be also supported by the network
from where you use the phone. For details,
please contact your local Vodafone
customer care centre. Note that you can
also access information on Vodafone services at www.vodafone.com.
Packing List
Your phone package box contains the following articles:
1 One Vodafone 716 mobile phone
2 One travel charger
3 One Li-ion battery
4 One user Guide
5 One headset
6 One USB data cable
7 One CD-ROM disk which contains Vodafone 716
Mobile Phone PC Assistant
1
Page 8
Your Phone
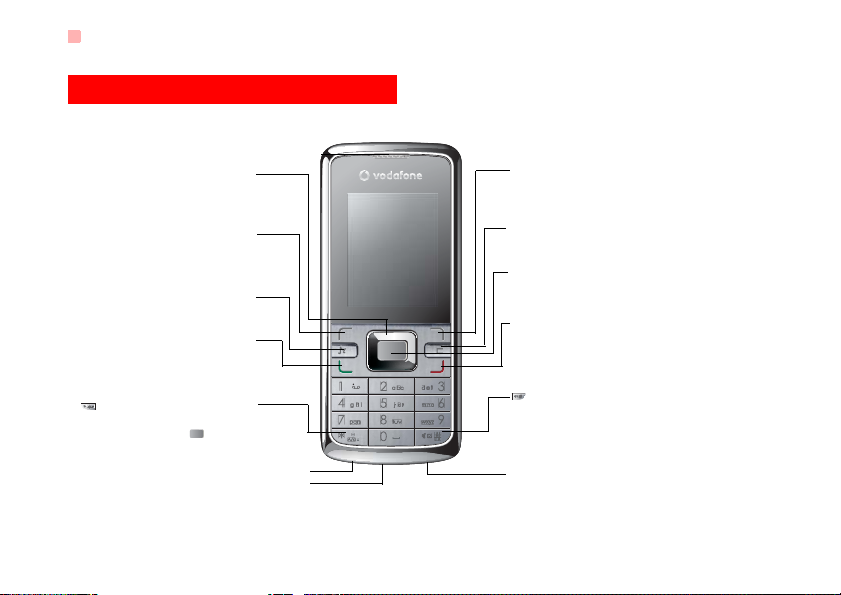
Your Phone
Scroll key
• Press this key to scroll through a menu.
• To quick access Browser, Contacts, text message
editor and My Files.
Left function key
• To activate the function indicated at the left of
the prompt bar on the screen.
• To access the main menu in standby mode.
Music key
• To access the play screen in the standby mode.
• To make a video call.
Send key
• To make or answer a call.
• To access the Call Log screen in the standby
mode.
key
Press and hold it to lock the keypad in the standby
mode. Then press it and to unlock the keypad.
2
Earpiece
Microphone
Headset jack
Right function key
• To activate the function indicated at the right of the
prompt bar on the screen.
• To access Vodafone live! in standby mode.
Clear key
To delete a character before the cursor in the
editing mode.
OK key
• To start the selected function in the menu.
• To access the main menu in standby mode.
Power/End key
• To end an ongoing call or reject an incoming call.
• To return to the Home screen.
• Press and hold it to power on or power off the phone.
key
• Press and hold it to switch to the meeting profile
from the current profile.
• To select the check box of the option item.
Charger connector/Cable connector
Page 9
Your Phone
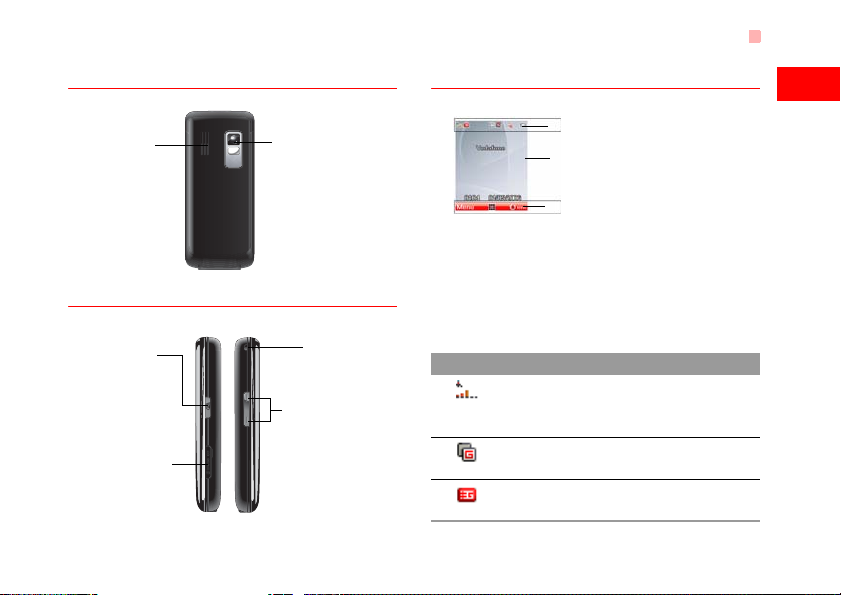
Back View
Speaker
Side View
Camera key
• To activate the camera
in the standby mode.
• To activate the voice
recorder during a call.
Memory card slot
Home Screen
1
Getting to Know Your Phone
Camera
Pixel
Mega
Pixel
Mega
1.3
1.3
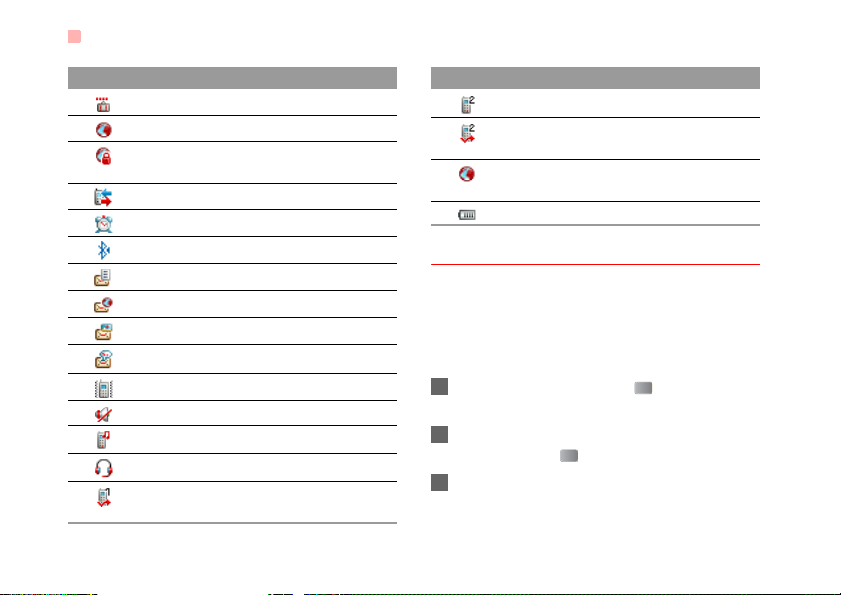
◆ Icon bar
This area displays the phone status. The following
table illustrates all the icons that may appear on this
bar.
Strap hole
Icon Description
Volume keys
Icon bar
Desktop
To display the operations and the function
options.
Prompt bar
To display the operations currently available.
Indicates signal strength. The more horizontal bars that appear, the stronger the
signal.
The phone is currently in a GSM
network.
The phone is currently in a WCDMA
network.
3
Page 10
Your Phone
Icon Description
You are using the roaming service.
Indicates network connection state.
Indicates security connection state of
the network.
The phone is in a call.
Alarm clock is enabled.
Bluetooth is enabled.
You have new text messages.
You have new PUSH messages.
You have new multimedia messages.
You have new voice mail.
The vibration mode is enabled.
The phone is in mute mode.
The normal profile is activated.
The headset is plugged in.
Forwarding all incoming voice calls to
line 1.
4
Icon Description
Call line 2 is enabled currently.
Forwarding all incoming voice calls to
line 2.
Your PC connects to the Internet
through your phone.
Indicates power level of the battery.
Introduction to the Menu
Your ph one provides an extensive range of functions.
You can use these functions by navigating the following menus: Entertainment, Music, Call Log, Vodafone
live!, Messaging, My Files, Organiser & Tools, Contacts and Settings.
1 In the standby mode, press to display the
main menu.
2 Press the scroll key to scroll through the menu,
and then press to select.
3 If the menu contains further submenus, repeat
step 2.
Page 11

4 Use the selected function according to the
prompts on the screen.
5 Select Back to return to the previous menu.
Press to return to the standby mode.
Your Phone
1
Getting to Know Your Phone
5
Page 12
2Getting Started
Loading the Battery
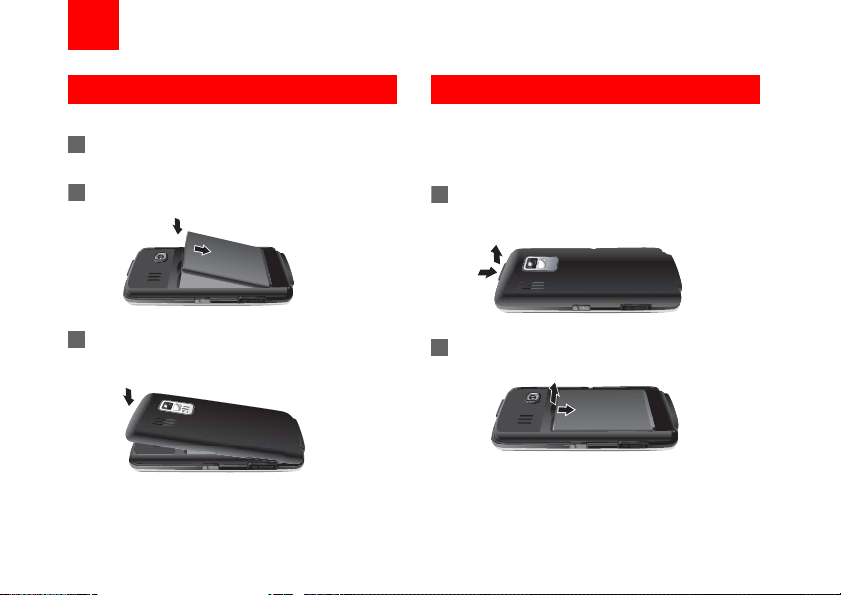
To load the battery, do as follows:
1 Fit the battery into the battery slot on b ack of the
phone.
2 Press the battery down until it clicks into place.
Unloading the Battery
Only unload the battery after powering off your
phone. Otherwise, your phone may be damaged.
To unload the battery, do as follows:
1 Take the back cover out of the phone, as shown
in the following figure.
Pixel
Pixel
Mega
Mega
1.3
1.3
3 Press the back cover down until it clicks into
place.
l
l
e
e
x
x
i
i
P
P
a
a
g
g
e
e
M
M
1.3
1.3
6
2 Take out the battery.
Page 13
Charging the Battery
Before charging the batt ery, please read the following
precautions carefully.
• When charging the mobile phone, you
Note
must use the battery and charger provided
with the mobile phone. Otherwise, you
should be responsible for all the
consequences caused by misusing other
batteries and chargers.
• When you charge the battery for the first
time, please charge it for a minimum of 12
hours.
• Do not strike, toss or cause any kind of
violent shock to the battery , otherwise liquid leakage, body damage, overheating,
explosion or fire may occur.
• The battery can be recharged but eventually wears out. If the battery lasts for a
shorter time period than usual after being
charged normally, replace it with a battery
of the same type.
Charging the Battery
• The charging time depends on the environmental temperature and the age of the
battery.
• The battery discharges even while not
being used. If you haven't used it for a
long time, please recharge it first.
Charging with a Cable Charger
Before charging the battery with a cable charger,
ensure that the battery has been properly loaded int o
your phone.
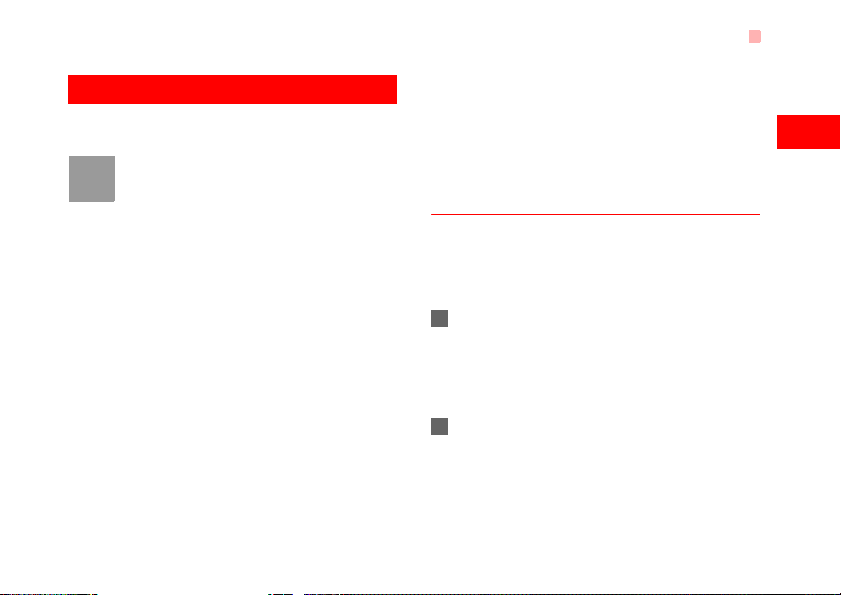
To charge the battery, do as follows:
1 Insert the plug of the charger into the connector
of the phone as shown in the following figure.
Before inserting the plug, ensure that the arrow
on the charger output jack points to the front side
of the phone.
2 Plug in the connector of the charger to a power
socket.
2
Getting Started
7
Page 14
Loading/Removing the SIM Card
• When the battery power level is very low,
Note
the phone makes alert sounds and displays a prompt. When the battery power
level is too low, the phone will power off
automatically.
• When the battery is being charged, the
charging indicator blinks continuously.
When the charging indicator stops blinking, it indicates that the battery is full.
Loading/Removing the SIM Card
Your SIM card contains such information as phone
numbers and contacts. Load your SIM card before
using your phone. To use the SIM card properly,
please read the following instructions carefully.
8
• Keep the SIM card out of the reach of chil-
Note
dren.
• The SIM card and its metal contacts can
be easily damaged by scratching or bending. Ensure care when you carry, load or
remove it.
• Always disconnect the charger from the
phone before loading or removing the SIM
card.
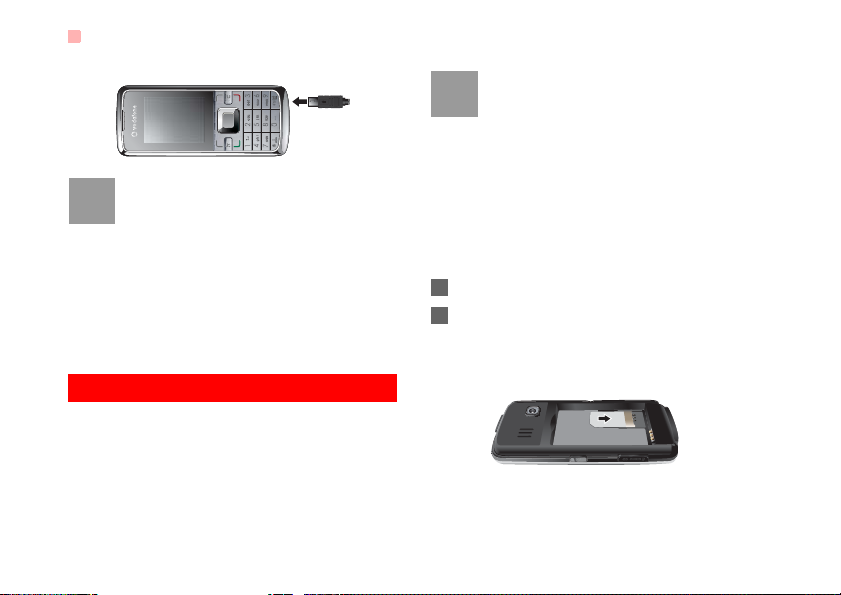
To load or remove the SIM card, do as follows:
1 Power off the phone and remove the battery.
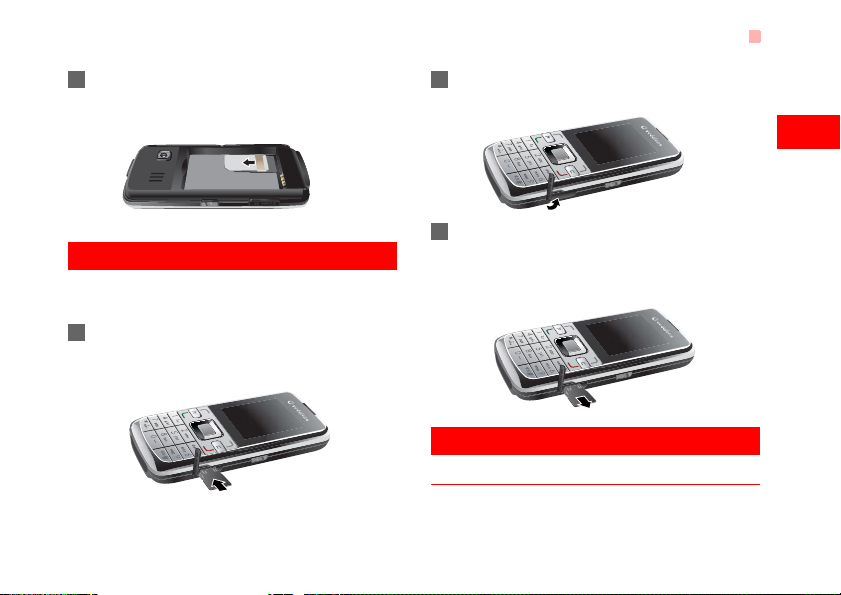
2 Position the card at the card slot entrance, mak-
ing sure it is facing the same way as shown in
the diagram below, with the notched corner at
the bottom right. Then slide in as shown.
Page 15
3 To remove the SIM card, power off your phone
and take out the battery. Then press the SIM
card with one finger and slide it out of the slot.
Loading/Removing a Memory Card
The Vodafone 716 phone supports a memory card
(micro-SD) with a capacity up to 1 GB.
1 Remove the rubber cap from the memory card
slot; then insert the memory card into the slot, as
shown in the following figure.
Loading/Removing a Memory Card
2 After inserting the memory card completely,
replace the rubber cap.
3 To remove a memory card, open the rubber cap
and press the memory card gently. Now the
memory card will pop up automatically. Then
take it out as shown in the following figure.
Powering On/Off
Powering On
Ensure that the SIM card is in your phone and that
the battery has been charged.
2
Getting Started
9
Page 16

Powering On/Off
Press and hold to power on your phone.
Powering Off
Press and hold to power off your phone.
Access Codes
If you have set the phone password and the PIN is
ON, you have to enter the corresponding access
codes when you power on your phone. For setting
and changing the access codes, please refer to "Settings/Security Setup" on page 64.
◆ Phone Password
The phone password is used to protect your phone
from unauthorized use. The phone password is
preset as 0000 for your Vodafone 716 phone.
◆ PIN
The personal identification number (PIN) code is
used to protect your SIM card from unauthorized use.
The PIN code is usually provided when you get the
SIM card from Vodafone. If you have not received a
PIN code or if you have forgotten it, contact your
local Vodafone custome r car e centre.
10
◆ PIN2
Some SIM cards provide a PIN2 code. Some special
functions such as the "Fixed Dialer Number" are not
available until you enter the PIN2 code. At the same
time, your SIM card should support these functions.
◆ PUK
To unlock a locked SIM card, you need to enter the
PIN Unblocking Key (PUK) code. The PUK code is
usually provided when you get the SIM card from
Vodafone. If you have not received a PUK code or if
you have forgotten it, contact your local Vodafone
customer care centre.
◆ PUK2
Some SIM cards provide a PUK2 code that is used to
unlock a locked PIN2 code. The PUK2 code is usually provided when you get the SIM card from
Vodafone. If you have not received a Puk2 code or if
you have forgotten it, contact your local Vodafone
customer care centre.
Page 17
3Call Service
Making or Answering Calls
Making a Video Call
You can make a video call to other person whose
phone also supports video calls.
1 Enter or edit a phone number in one of the fol-
lowing ways:
• Enter a phone number through the keypad.
• Select a number from the Call Log screen.
• Access the Contacts screen to select a phone
number from Phone or SIM.
2 Press to dial.
3 Press to end the video call.
T o delete a wrong number , pr ess once t o
Note
delete the digit to the left of the cursor.
Making a Voice Call
1 Enter or edit a phone number in one of the fol-
lowing ways:
• Enter a phone number through the keypad.
• Select a number from the Call Log screen.
• Access the Contacts screen to select a phone
number from Phone or SIM.
2 Press to dial.
3 Press to end the call.
Making Voice Calls Using SDN
You ca n make a voice call throug h speed dialing. For
instructions on assigning speed dialing numbers,
refer to "Contacts/Speed Dialing Numbers" on page
19.
T o make a call by speed diali ng number (SDN), press
and hold the number key until the phone dials the
corresponding phone number.
Answering or Rejecting Calls
You can set the answer mode to Any key or Send
key. For details, refer to "Settings/Call Settings/
Answer Mode".
The following describes how to answer or reject a call
in different answer modes:
11
Page 18
Operations During a Voice Call
Operation Description
Answer
a call
Reject
a call
End a call • If the headset is not in use, you can
Reply by
message
You can also set the auto answer mode to Immedi-
ate answer, Message or Recorded message.
For details, refer to “Settings/Call settings/Auto
Answer”.
• If the answer mode is Any key, open
the phone and press any key.
except and .
• If the answer mode is Send key,
press .
• If the headset is in use, press the control key on the headset.
Press or select Options > Reject.
close the phone or press .
• If the headset is in use, press the control key of the headset.
Select Options > Reply to send a predefined message to the caller.
12
Operations During a Voice Call
Icon Description
: A call is ongoing.
: The call is on hold.
: There is a new incoming call during a call.
Operations
During a voice call, you can select Options to perform the following operations.
• Hold/Resume: To hold or resume the call during a
call.
• End: To end all calls, the active call, the current
call or the on hold call.
• New Call: To make a 3-party call during a call.
• Handsfree/Earpiece: To switch between the Handsfree and the Earpiece modes during a call.
• Start recording/Stop recording: to record or stop
recording the conversation.
Page 19
• Other Applications: To access the SMS screen, the
Contacts screen or the Call Log screen.
• Answer/Reject: Your phone allows you to handle
two calls simultaneously. During a call, if there is a
new incoming call, select Options > Answer to
answer it or select Options > Reject to reject it.
• Swap: To swap between calls during a 3-party call.
• Conference call/Private call: To switch to the conference call during a 3-party call or to talk with a
party privately during a conference call.
• Mute/Unmute:To mute or unmute your voice during
a call.
Operations During a Video Call
Icon Description
Icon Description
Press the up or down scroll key to adjust
the brightness.
Press the left or right scroll key to zoom
in or zoom out.
Operations During a Video Call
Icon Description
Press the volume keys to adjust the volume.
Press to switch between the loud-
/
speaker mode and the earpiece mode.
Operations
During a video call, you can press to hold the call
and send a preset file to the other party. You can
press again to resume the call. Before you use
the function, you can preset a file in settings/video
call/Send specific file.
During a video call, you can select Options to perform the following operations.
• Switch picture: To switch display.
• Camera off/Open video: To forbid or allow the video
from your side.
• Audio off/Open audio:To forbid or allow the audio
from your side.
• Play file: To play a media file.
13
3
Call Service
Page 20

Operations During a Video Call
• Handsfree/Earpiece: Switch between the loudspeaker mode and the earpiece mode.
• Record: To record a video clip. A recorded video
clip is saved to the My Files/Videos directory.
• Other Applications:To access the SMS screen, the
Contacts screen or the Call Log screen.
• Picture in Picture: To set the P-in-P mode to off, top
left, top right, bottom right or bottom lef t.
• Image quality: To set the image quality to best quality or more smooth.
14
Page 21
4Text Input
You can use the keypad to enter alphanumeric characters and symbols. For example, you can add
entries to the contacts, write messages or schedule
events on the calendar.
While entering text:
Note
• Press to switch between input methods, including "abc", "Abc", "ABC", and
numbers.
• Press to enable or disable T9 input
method.
• Press to display the commonly-used
symbols list. Y ou can use the scroll keys
to select.
• Press to delete the letter before the cursor.
T9 Input Method
With the T9 input method, you can easily and quickly
enter words with predictive text scheme.
• Press each key carrying the desired letter once,
and then the predictive text scheme will present the
candidate words composed by the letters you have
entered in the drop-down menu.
• After entering all letters, if there is not the expected
one in the drop-down menu, you can select [Spell]
to enter the desired letter using the traditional input
method and then select Insert. The words you
inserted will be saved in the predictive text dictionary. If the dictiona ry is full, the new word replaces
the oldest one.
For example, to enter the word "good" with the T9
input method, follow these steps.
1 Press successively the keys , , , and
which "g", "o", "o", and "d" belong to, and the
candidate words composed by these letters will
be shown in the drop-down menu.
2 Use the up/down scroll key to select "good".
Then press to enter a space for entering the
next word.
Press repeatedly and you will see "T9
Note
english", "T9 English" and "T9 ENGLISH"
on the upper left corner of the screen successively. It indicates the words to be
15
Page 22

Traditional Input Method
entered will be in lower case, first letter capitalized or in upper case.
Traditional Input Method
When T9 input method is off, you can use the traditional input method for entering alphabetic characters. Repeatedly press the key that carries the letter
to be entered when it appears on the screen.
For example, to enter the word "Hello" with the traditional input method, follow these steps.
1 Press that carries "h" repeatedly and all let-
ters carried by this key will be displayed successively on the screen. Stop when you see an "h"
on the screen.
2 After entering the first letter, you can directly
press another key (except ) to enter the next
letter. If the next desired letter is on the same
key as the current one, wait until the cursor
appears to the right of the current lette r and t hen
you can enter the next one.
3 Enter "e", "l", "l" and "o" in the same way.
16
• Press repeatedly and you will see
Note
"abc", "Abc" or "ABC" on the upper left
corner of the screen successively. It indicates the words to be entered will be in
lower case, first letter capitalized or in
upper case.
• Press and hold number keys to enter
numbers.
"123" Numeric Input Method
With the "123" numeric input method, you can enter
corresponding numeric characters by pressing the
character/number keys. For example, to enter "1"
with the "123" numeric input method, you can
press . Then "1" appears on the screen.
Symbol Input Method
Your Vodafone 716 provides an independent symbol
input method. For example, to enter ":" with the symbol input method, you can just press the scroll keys to
select ":" in the symbol list and then press .
Page 23

Input Different Languages
In a text editing screen, select Options > Input
language to set the language for the text. The
selected language will be displayed on the upper
middle part of the editing screen.
Input Different Languages
4
17
Text Input
Page 24
5Contacts
Contacts enables you to save and manage such
information as phone numbers and addresses of your
contacts. You can save such information in your
phone or your SIM card. You can also assign frequently-used numbers to speed dialing keys for your
convenience.
Making Calls from the Contacts
You can make a voice/video call with a contact
selected from the contacts list.
1 In the Contacts screen, press the left/right
scroll key to select Phone or SIM .
2 Select a contact and select Options > Call.
Then, you can select Voice Call or Video Call to
make a call. Alternatively, you can select Edit
before call to edit the number before making the
call.
Searching for a Contact
You can find a contact from the contacts list easily
and quickly by using this function on both the Phone
18
screen and the SIM screen.
1 In the Contacts screen, press the left/right
scroll key to select Phone or SIM .
2 Select Options > Search.
3 Select Options > Search, and then enter the
contact name you are searching for. The contact
is displayed.
The search result includes all matched con-
Note
tacts from both the phone and SIM memories, regardless of the screen (Phone or
SIM) from which you start searching.
You can also use quick search in the Phone or SIM
screen:
1 In the Contacts screen, press the left/right
scroll key to select Phone or SIM .
2 Enter a string (one or more letters or numbers)
contained in the contact name yo u are searching
for. Then the contact s whose names cont ain this
string are displayed.
Page 25
You can also find a contact by entering the initials of
the first name and the last name of the contact. For
example, to find a contact named "Alice Green",
enter the initials "ag". This contact is displayed in the
candidate list.
Other Operations
In the Contacts screen, press the left/right scroll
key to select Phone or SIM .Then select
Options for the following options.
• Detail: To view the details of contact.
• Create message: To send a message, MMS or
Email to the selected contact.
• New: To create a new contact.
• Send contact: To send a contact to other devices
supporting SMS or Bluetooth.
• Copy to SIM/Copy to phone: To Copy one or more
contacts from your phone to the SIM card or from
your SIM card to the phone.
• Speed Dial Number: To assign often-used numbers
to speed dialing keys "2" to "9".
Other Operations
• My business card: To save your own information to
a Business Card. You can send the information by
SMS or Bluetooth.
• Backup contacts: To back up your contacts from
your phone to a memory card or from your memory
card to your phone.
• Delete: To delete the selected contact.
• Mark/Unmark: To mark/unmark a record or all
records in your phone and SIM card.
• Memory status: To view the memory status of both
your phone and SIM card.
• Settings: To sort the contacts in the phone and the
SIM card or to set an alert before saving.
Groups
You can rename a group, add group members, or
delete a group.
Adding/Deleting Group Members
You can add a member to a group in your phone or
delete a member from it.
19
5
Contacts
Page 26
Groups
1 In the Contacts screen, press the left/right
scroll key to select Groups.
2 Select a group and press to view the details.
3 Select Options > Add. Select a contact and
press . The member you added is displayed
in the group member list.
T o del ete a group member, select a member from the
group member list, and then select Options >
Delete.
Managing a Group
1 In the Contacts screen, press the left/right
scroll key to select Groups.
2 Select a group and select Options for the follow-
ing options.
• Detail: to view the details of a group.
• Rename: to change the name of a group.
• Create message: to send a text message or
MMS to all members of a group.
20
• Delete: to delete a group and all members of
the group.
You cannot rename or dele te any group pre-
Note
set in your phone.
Page 27
6Call Log
The recently dialed calls, received calls and missed
calls are saved automatically. This makes it easier to
refer to these calls.
Making Calls from Call Log
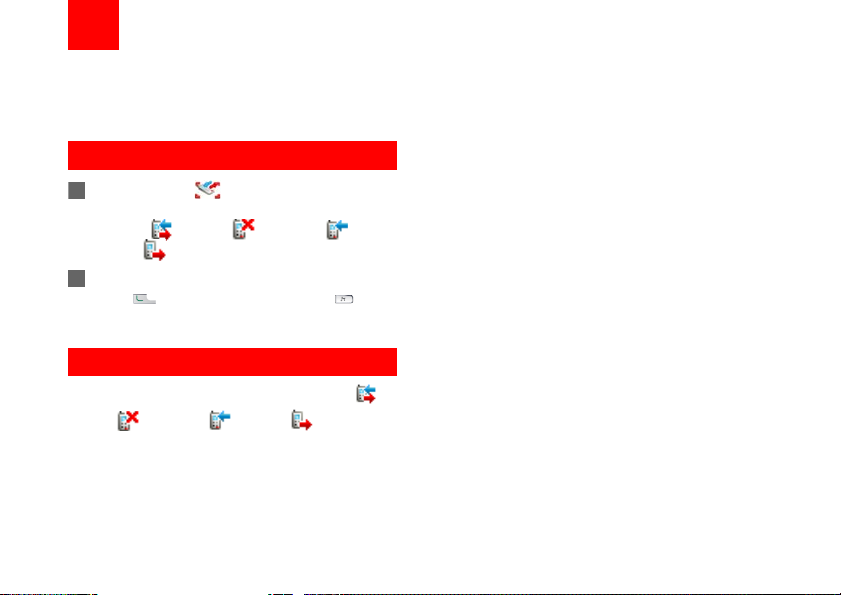
1 Select Call Log in the main menu and then
press the left/right scroll key to switch between
All calls , Missed , Received and
Dialed .
2 Press the up/down scroll key to select a record.
Press to make a voice call or press to
make a video call.
Other Operations
Press the left/right scroll key to select All calls ,
Missed , Received or Dialed . Then select
Options for the following options.
• Create message: To send a message or MMS.
• Save number: To save the numbers of the selected
record to the phone, the SIM card, or an existing
contact.
• Call: To make a voice call or a video call. Alternatively, you can select Edit before call to edit the
number before making a call.
• Display mode: You ca n select Normal to di sp lay al l
records or select Simple to ignore the duplicated
records.
• Delete: To delete the selected record.
• Mark/Unmark: To mark/unmark a record or all
records.
• Calls status: To display the information on voice
calls, video calls and data services. In the voice
call, video call and data page, you can select Reset
to clear all records.
21
Page 28
7Messaging
Text Messages
The maximum content for a single text message is
160 English letters. If the characters you enter
exceed this limit, the text is divided into two or more
continuous messages when it is sent.
Creating a Text Message
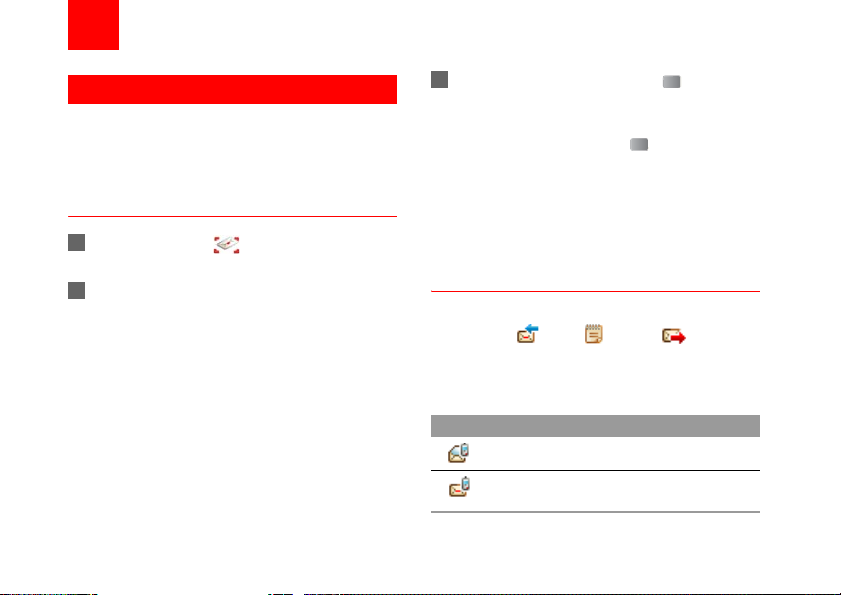
1 Select Messaging > Write SMS in the main
menu.
2 In the message editing screen, select Options:
• Send:To send the message.
• Insert number: Y o u can insert a p hone numbe r
saved on the phone or the SIM card.
• Common phrases: Y ou can use these to speed
up the process of entering text.
• T9 Switch: Y ou can sel ect th is optio n to en able
or disable T9 input method.
• Input mode: You may select one of the input
methods to enter the message contents.
• Input language: You can select a language for
this message.
22
3 After editing the message, press to access
the "Edit numbers" screen.
• Enter the phone number, and then select
Options > Send or press to send the mes-
sage.
• Select Options > Group or Contacts to
choose a number and send the message.
• Select Options > Save to drafts to save the
message.
SMS Mailboxes
The phone provides three mailboxes for SMS,
namely, Inbox , Drafts and Sent .
◆ Inbox
You can save the received messages in Inbox.
Icons in Inbox
Icon Description
a read message in the phone memory
an unread message in the phone mem-
ory
Page 29
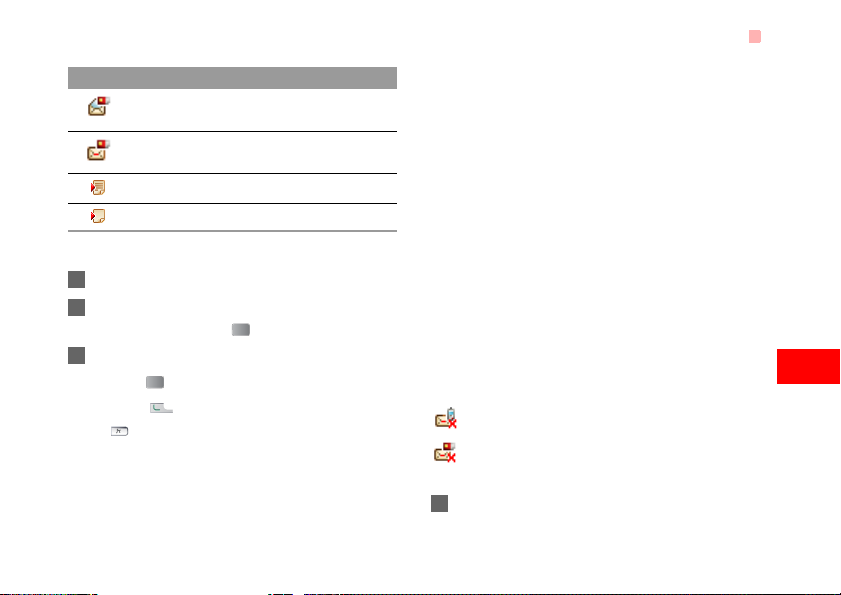
Icon Description
a read message on the SIM card memory
an unread message on the SIM card
memory
a read message report
an unread message report
Viewing Messages in Inbox
1 Select Messaging > SMS > Inbox.
2 Press the up/down scroll key to view the mes-
sages and then press to view the details.
3 Reply or call back.
• Press to reply with a text message.
• Press to call back by a voice call or press
to call back with a video call.
You can select Options for the following operations.
• Reply: To reply the message.
• Forward: To forward the message.
Text Messages
• Save number: To save the numbers retrieved from
an SMS to phone or SIM memory or an existing
entry in the contacts.
• Extract URL: To extract URL address from an SMS
for browsing web pages or stream media.
• Save Email address: To retrieve email address from
an SMS and save it.
• Copy to SIM: To back up the SMS to SIM memory.
• Call: To make a voice call or a video call.
Alternatively, you can select Edit before call to edit
the number making the call.
• Delete: To delete the message.
◆ Drafts
The Draft box is used to save the messages you created and saved and those which failed to send.
Icons in Drafts
: A text message saved to the phone.
: A text message saved to the SIM card.
Viewing and Editing Messages in the Draft
1 Select Messaging > SMS > Drafts.
23
7
Messaging
Page 30

Text Messages
2 Press the up/down scroll key to select a mes-
sage and press to edit it.
◆ Sent
Sent is used to save the messages that have been
sent.
Icons in Sent
: A text message that has been sent and saved to
the phone.
: A text message that has been sent and saved to
the SIM card.
Viewing Messages in the Sent
1 Select Messaging > SMS > Sent.
2 Press the up/down scroll key to select a mes-
sage and press to view the details.
3 Forward or make a call.
• Press to forward a text message.
• Press to make a voice call or press to
make a video call.
You may select Options to do the same operations
as those of SMS Inbox.
24
SMS Settings
You can change the SMS settings by performing the
following steps.
1 Select Messaging > Settings > SMS from the
main menu.
2 Set the parameters related to messages:
• Message center: The Phone can auto read the
number of the message centre from the SIM
card or the phone. If you have deleted the
information by accident, contact your local
Vodafone customer care centre.
• Valid period: The time a message is kept in the
message centre after it is sent.
• Auto save: Y ou can set whether a message will
be saved automatically to Sent when it is sent.
• Save to: To set the position for saving newly
created messages, received messages, and
sent messages.
• Signature: To set whether your signature will
be sent along with the message. You can edit
the signature while creating a new message.
Page 31
• Status report: You can set it to On or Off. If you
set it to On, the network sends you a status
report indicating whether the SMS has reached
the recipient or not.
• Concatenate SMS: Y ou can se t it to On or Off.
If you set it to Off, you cannot edit and send
messages longer than the limit of a single
SMS.
Multimedia Messages
You can send messages attached with images, text
and music under this mode.
Creating a Multimedia Message
1 Select Messaging > Write MMS from the main
menu.
2 Select To, Cc or Bcc.
• Select an entry from the recipients list, and
then press or select Options > Edit to enter
a phone number.
Multimedia Messages
• Select a position from the recipients list, select
Options > Contact or Group, and then select
phone numbers.
3 Select Back to return to the Edit MMS screen,
select Subject to enter text as subject, and then
press .
4 Select Content to edit the pages.
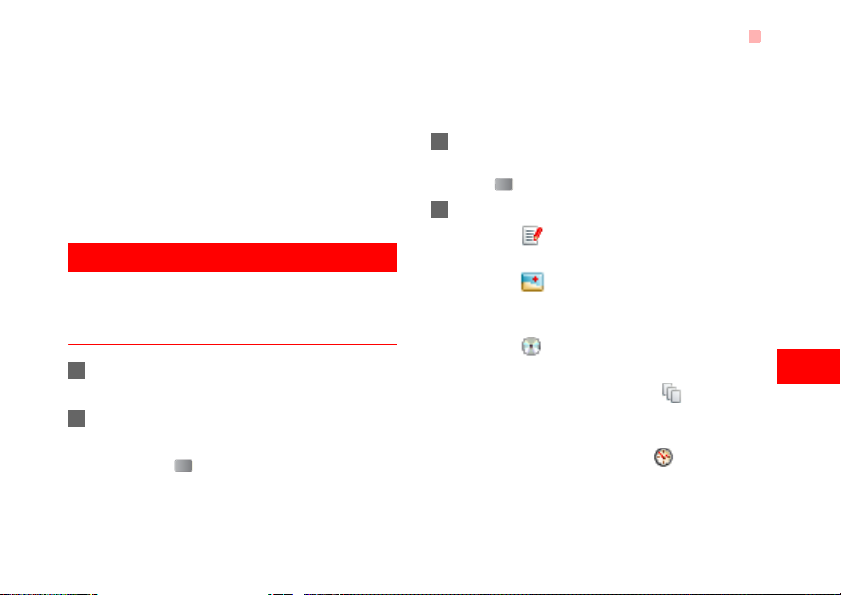
(1) Select to access the text entry field, and
then edit the text.
(2) Select to enter the image-editing field
and then you can select images or video files in
My Files.
(3) Select to enter the music-editing field and
then you can select audio files in My Files.
(4) Access the field indicated by and press
the left/right scroll key to select one page if there
are a number of pages.
(5) Access the field indicated by and press the
left/right scroll key to adjust the playing time of
the current page.
25
7
Messaging
Page 32
Multimedia Messages
5 Return to the Edit MMS screen, and select
Options > send to send the multimedia
message.
If the video file is chosen in the image-edit-
Note
ing field, you cannot edit the music-editing
field any more.
MMS Mailboxes
The Phone provides four mailboxes for MMS,
namely, Inbox ,Drafts , Sent and Templates .
◆ Inbox
Inbox is used to save received multimedia messages.
Icons in Inbox
Icon Description
a read message
an unread message
a read notice or delivery report for an
MMS
26
Icon Description
an unread notice or delivery report for an
MMS
Viewing Messages in Inbox
1 Select a multimedia message to view its con-
tents.
2 During the playing, you can select Stop to stop
playing.
3 Select Options for the following operations.
• Reply MMS: to reply a MMS to the MMS
sender.
• Reply SMS: to reply a SMS to the MMS
sender.
• Forward: to forward a MMS.
• Edit before call: to edit the number.
• Next page: to play the next page.
• Previous page: to play the previous page.
• Rewind: to return to the first page.
• Save: to save the selected object.
Page 33

• Object list: After entering the content list of this
message, you may select an item and select
Save to save the message to a corresponding
directory of the folder.
• Save number: To save the numbers retrieved
from an MMS to phone or SIM memory or an
existing entry in the contacts.
• Extract URL: To extract URL address from an
MMS for browsing web pages or stream
media.
• Save Email address: T o ret rieve email address
from MMS and save.
◆ Drafts
Drafts is used to save the multimedia messages you
created and saved and those which failed to be sent.
Icons in Drafts
: A multimedia message saved after you created
it or a multimedia message failed to be sent.
Viewing and Editing Messages in Drafts
1 Access Drafts and select a multimedia mes-
sage.
Multimedia Messages
2 Press to access the editing screen.
3 You can edit the message. The operations are
the same as those for creating a multimedia
message.
◆ Sent
The Sent is used to save the multimedia messages
that have been sent successfully.
Icons in Sent
: A multimedia message has been sent.
Viewing Messages in Sent
1 Select a multimedia message to view its con-
tents.
2 During playing an MMS, you can select Stop to
stop playing.
3 During playing, you may select Options to do
the same operations as those of MMS Inbox.
Refer to "Messaging/MMS/MMS Mailboxes" on
page 26.
27
7
Messaging
Page 34

Multimedia Messages
◆ Templates
To send messages quickly, you can save commonly
used multimedia messages as templates.
◆ Folder
You can categorize your multimedia messages into
different folders.
Yo u can access Folders from the four tabs of Inbox,
Drafts, Sent or Templates.
Let us take the example of entering the Inbox
screen.
Select MMS > Inbox. Then select Options >
Folders. You can perfor m the following operations.
• Select: to access a folder.
• Rename: to rename a folder.
MMS Settings
Select Messaging > Settings > MMS, and then you
can set parameters related to multimedia messag es .
It contains the following submenus.
◆ Sending
This option is used to set parameters related to sending multimedia messages.
28
• Valid period: The time for a multimedia message
stored in the message centre after it is sent.
• Delivery report: You have two alternatives, On and
Off. With this mode enabled (On), the network will
report on successfully sending a multimedia message.
• Reading report: To set whether to accept a read
report.
• Send limit: To set the size limit of a multimedia message to be sent.
• Save on send: To set whether to save a multimedia
message to the sent folder after it has been sent.
• Sender visibility: To set whether the sender information will be displayed when a multimedia message is sent.
◆ Receiving
This option is used to set parameters rel a ted to
retrieval of multimedia messages.
• Send delivery report: You have two options, On and
Off. When this mode is enabled (On), the network
sends a report to the sender indicating that you
have received the message.
Page 35
• Send read report: To set whether to send a read
report.
• Receiving limit: To set the size limit of a multimedia
message that you can receive.
• Auto receive: To set whether the phone auto
receives multimedia messages or not.
Settings such as "Network Access Point" and "WAP
gateway" are all preset for your convenience.
Creating Live!Postcards
Use this option to get Vodafone to print a photo you
have selected and send it by post to the recipient.
From the Messaging menu, select Live!postcard
and press .
Select the photo you want to send and press .
Then press Confirm. Type out the message you
would like printed on the postcard and press .
Enter the recipient's name, address, post code and
city (and optionally county and Country) using to
move through the options.
Finally, to send the postc ard press Options > Send.
Creating Live!Postcards
This service may not be supported in all
Note
counties yet. Check with your local
Vodafone service provider.
Email
The Phone provides four mailboxes for email,
namely, Inbox , Drafts , Sent and Outbox .
Creating an Email
1 Select Messaging > Write Email from the main
menu.
2 Select Recipients and press .
• Select one record in the recipients list and then
press to enter an email address.
• Select Options > Contact/Group/History to
select an email address.
3 In the email editing screen, select Subject
and press to edit the contents.
29
7
Messaging
Page 36
Email
4 In the email editing screen, select the Content
text box and press to edit the content.
5 In the email editing screen, select Attachment
to attach picture, music, video, or eBook.
6 In the email editing screen, select Options to
save or send the email. The saved emails are in
Messaging/Email/Drafts.
Mailboxes
Your Vodafone 716 provides four mailboxes for
Emails, namely, Inbox , Drafts , Sent and
Outbox .
◆ Inbox
All Emails received are saved in the inbox.
Icons in Inbox
: A read email.
: An unread email.
Viewing and Editing Emails in Inbox
1 Select an email and press to view the con-
tent. If only the title of this email is received, the
30
phone prompts whether to download other information of the email.
2 In the details screen, select Options > Reply to
reply to the sender.
Other Options for Inbox
1 Access Inbox of email.
2 Select Options for the following operations.
• View: to view the selected email.
• Reply: to reply to the selected email.
• Forward: to forward the selected email.
• Move to folder: to move the selected email to a
specified folder.
• My folders: to categorize your emails in different folders.
• Sync inbox: to synchronise emails from server.
• Sort: to sort your emails according to date,
sender or subject.
• Delete: to delete the selected email.
• Mark: to mark an email in the inbox.
• Unmark all: to unmark all emails in the inbox.
• Mark all: to mark all emails in the inbox.
Page 37
◆ Drafts
The saved new emails are saved in the drafts.
Icons in Drafts
: Emails to be sent.
Viewing and Editing Emails in Drafts
1 Select the desired email in the drafts and press
to access the editing screen.
2 Edit the related information. For details, perform
the same operations as in creating an email.
Other operations in Drafts
1 Enter Drafts of email.
2 Select Options for the following operations.
• Edit: to edit the selected email.
• Write Email: to create a new email.
• Move to folder: to move the selected email to a
specified folder.
• My folders: to categorize your emails in different folders.
• Sort: to sort your emails according to date,
sender or subject.
• Delete: to delete the selected email.
Email
• Mark: to mark an email in the inbox.
• Mark all: to mark all emails in the drafts.
• Unmark all: to unmark all emails in the drafts.
◆ Sent
The emails sent to server are saved in the sent.
Icon for Sent
: A read email.
Viewing and Editing Emails in Sent
1 Select an email and press to access the edit-
ing screen.
2 Edit the related information. For details, perform
the same operations as in creating an email.
Other Options in Sent
1 Enter Sent of email.
2 Select Options for the following operations.
• View: to view the selected email.
• Forward: to forward the selected email.
• Move to folder: to move the selected email to a
specified folder.
31
7
Messaging
Page 38

Email
• My folders: to categorize your emails in different folders.
• Sort: to sort your emails according to date,
sender or subject.
• Delete: to delete the selected email.
• Mark: to mark an email in the inbox.
• Unmark all: to unmark all emails in the sent.
• Mark all: to mark all emails in the sent.
◆ Outbox
Those emails which failed to be sent are retained in
the outbox.
Icon for Outbox
: Emails failed to send.
Viewing and Editing Emails in Outbox
1 Select an email and press to access the edit-
ing screen.
2 Edit the related information. For details, perform
the same operations as in creating an email.
Other Operations in Outbox
1 Enter Outbox of email.
32
2 Select Options for the following operations:
• Edit: to edit the selected email.
• Send: to send the selected email.
• Move to folder: to move the selected email to a
specified folder.
• My folders: to categorize your emails in different folders.
• Sort: to sort your Emails according to date,
sender or topic.
• Delete: to delete the selected email.
• Mark: to mark an email in the inbox.
• Unmark all: to unmark all emails in the outbox.
• Mark all: to mark all emails in the outbox.
◆ My Folders
You can categorize your emails in different folders.
You can ent er My Folders fr om the inbo x, drafts, outbox and the sent box.
Let's take the example of the folder of the inbox.
Select Email > Inbox. Then select Options > My
Folders for the following operations.
• Rename: to rename the folder.
Page 39
• Select: to enter one folder.
Email Settings
Select Messaging > Settings > Email to set the following items.
◆ Accounts
1 Select Options > Add account and enter the
account name. Press to access the General
settings screen.
2 The related account information contains:
Account name, From name, From address, Protocol, Incoming server, User name, Password,
and Outgoing server.
3 Select Options > Advanced settings to access
the Advanced Settings screen.
4 Return to the Account screen. Select Options >
Activate to activate this account.
5 To delete an account, select an account and
then select Options > Delete account.
Email
For the account settings, contact your local
Note
Vodafone customer care centre.
◆ Common Options
• Reply with history: to reply with history.
• Save sent Email: to save sent emails to the sent
box.
• Sending limit: to set the size of an email.
• Receiving limit: to set the limit of the received email.
If the size of the email exceeds the limit, only the
title of the email will be received. If Only header is
selected, only the title of the email will be received.
• Network Access Point: This option is used to select
information about the profile to be adopted when
you send emails. For more information, contact
your local Vodafone customer care centre.
After completing all settings, press Back.
◆ Memory Status
The memory in use of Inbox, Drafts, Outbox, Sent,
My folders and Total are displayed.
33
7
Messaging
Page 40

Push Inbox
Push Inbox
The Push Inbox is used to save the Push messages
you have received.
Viewing Push Messages
In the Push Inbox, select a Push message, and then
press to view the details of the Push message.
◆ Icon for Push Inbox
• : A read Push message.
• : An unr e ad Pu sh me ss ag e .
◆ Other Operations for the P ush Inbox
• Load: T o st art the W AP browser and connect a URL
specified by the Push message.
• Delete: To delete the selected messages.
• Unmark all: To unmark all Push messages.
• mark all: To mark all the Push messages.
Push Inbox Settings
Select Messaging > Settings > Push messages to
set the Push inbox.
34
◆ Push message setting
You can set the acceptable push messages.
◆ Enable push SL
You can enable or disable the push SL function by
selecting On or Off.
Broadcast Inbox
The broadcast messages are saved in the broadcast
inbox. You can set the broadcast message.
Select Messaging > Settings > Broadcast to set the
following items.
• Service: to enable or disable this service.
• Subscription: to subscribe to broadcast channels or
cancel the subscription.
• Language: to select the language of the broadcast.
• Silent alert: to specify whether a silent alert occurs
when there is a new broadcast message.
• Auto delete: to set whether to auto delete earlier
messages when the broadcast inbox memory is
full.
Page 41

Voice Mail number
The voice mail number is already preset for you in the
phone. To access your voicemail, press and
hold in standby mode. The phone dials the voice
mail number automatically.
Common Phrases
Your Vodafone 716 has been preset with some commonly used phrases. They are used for editing a new
message, sending a message while answering a call
and auto replying. You can select Messaging > Set-
tings > Common phrases to edit them if you want.
Voice Mail number
35
7
Messaging
Page 42
8Music
Music enables you to manage your music files
easily and conveniently . I t enables you to pu rchase a
wide variety of latest music from V odafone . Vodafone
offers a great variety of Music which is always up to
date.
My Music
You can play various music files, including those supplied with the phone, recorded by using the phone,
downloaded from the Internet, and attached to email.
You can also enjoy the online audio files.
Function Options During Playing
During playing the music file, select Options for the
following operations.
• Nowplaying: To access the current playlist.
• Play Via Bluetooth: To play audio files through the
Bluetooth device.
• Mute/Unmute: To mute or unmute the music.
• Bookmarks:To access the bookmark list.
• Playlist: To access the music playlist.
• Shuffle: On/Off the random play.
36
• Loop: T o select to cycle play current music, play all
music or close.
• Equilibrium: To select the music style.
• Settings:To set the play mode, full screen direction,
and Streaming setting.
• Video camera:To enable the video camera function.
• History:To display the records of the played music.
• Info.:To view the information of the music files.
• Exit: To exit the music play screen.
Screen Operations During Playing
During playing the music file, you can perform the following operations on the music file.
Operation Description
Press the up scroll key to access the
current playlist.
Press the down scroll key to go back
the beginning of the current music file.
Press to replay this music file.
Page 43
Operation Description
Press the right scroll key to access the
next music file. Press and hold the right
scroll key to fast forward the current
music file.
Press the left scroll key to access to the
last music file. Press and hold the left
scroll key to fast backward the current
music file.
Press to pause the playing. Press
/
again to resume the playing.
Press the volume keys to adjust the volume.
Playlist
Selecting this option, you can rename and edit the
playlist as well as play the music in the playlist.
Playlist
37
8
Music
Page 44

9Organiser & Tools
This function provides you with various assistant
tools. You can access the Organiser & Tools screen
by selecting from the main menu.
SIM ToolKit
Your Vodafone 716 supports a number of intelli gent
SIM ToolKit (STK) functions such as location based
services. For more information, contact your local
Vodafone customer care centre.
Alarms
Yo u can set several alarm clocks. You can also set
the prompt messages, alarm tones and the cycle
period for alarm clocks.
Setting Alarm Clocks
Enter alarm function, you can select one alarm from
the list, and then press to set an alarm clock.
In the screen for editing alarm clock, you can set the
following items: alarm time, the prompt message, the
ringtone, the alarm cycle, the snooze function, the
vibration function, the alarm tone.
38
Prompt Interface for an Alarm
When it is time for an alarm clock to ring, the selected
alarm tone is played and a prompt interface is displayed. Y ou can stop the ringing by pr essing any key.
On the prompt interface, you can select to snooze or
stop the alarm prompt.
If your phone is powered off, the alarm clock can still
ring. When the alarm rings, you can choose to po wer
on the phone.
Stopping the Alarm Clock
Select an alarm clock from the list, and press the left
function key to deactivate it.
Calendar
With this function, you can view the calendar and
manage your schedules.
New Schedule
Enter calendar function, you can select Options >
New to create the schedule events for the current
day.
Page 45

In the screen for editing schedule, you can set th e following items: schedule title, schedule location,
schedule type, starting/ending time of the schedule,
whether the alarm is on, when to prompt before the
start time, alarm cycle, schedule content, sound
alarm, Vibration, select tone, and image files.
You can create up to 500 schedules in total
Note
and 15 for each day. While creating a new
schedule, you need to set the alarm on
before setting the alarm time, the alarm
cycle, the alarm tone and the image.
Calendar Functions
Enter calendar function and select Options. You can
perform the following operations.
• New: To create a new schedule.
• Go to: To go to a certain date directly from the
Month view screen.
• Display event: To view all events, specified events,
Calendar files and to back up all schedules to a
memory card.
• View mode: To view the calendar in three different
modes: month view, week view, and day view.
Task
• Management: To manage all schedules, including
Backup all and Restore data.
• Delete event: To delete all past events, specific
period events or all events.
• Settings: To set save location, main view, week
begin day.
• Memory status: To view the memory status, including the used space and the total space.
Prompt Interface for a Schedule
When it is time to remind you of a schedule, the
selected ringtone is played and a prompt interface is
displayed. Y ou can stop the ringing by pressing any
key. On the prompt interface, you can snooze the
alarm or stop the prompt.
Task
You can define and manage tasks to be conducted
before a certain time. Your phone can remind you of
these tasks and track them automatically.
Organiser & Tools
9
39
Page 46
Memo
Select Task from Organiser & Tools .The tasks
are classified into three kinds: pending, done, and all.
You can define up to 1000 tasks on your phone.
New Tasks
To define a new task, press or select Options >
New on the Tasks screen.
In the screen for editing task, you can set the following items: the title of the task, the deadline, the priority level, the task state, the task alert, sound alarm,
vibration, the alert time, the task type.
Tasks Functions
On the T asks screen, you can also perform the following operations: edit, new, sned, copy, day view,
set as done, delete, delete all and memory status.
Prompt Interface for a Task
When it is time for the phone to remind you of a task,
it rings automatically and a prompt interface is displayed. Y ou can stop t he ringing by pressing any key.
On the prompt interface, you can select to snooze or
stop the task prompt.
40
Memo
You can store important events on your phone. You
can save up to 100 such memos.
Select Memo from Organiser & Tools . If there is
no memo, you need to create one when you access
the Memo screen.
On the Memo Pad screen, you can perform the following operations: edit, new, send by Message or
Bluetooth, delete, delete all and view the memory
status.
Synchronise
You can synchronise contacts with your personal
phone book stored on a network server. This service
is network dependent. Contact your service provider
for further details.
Select Synchronise from Organiser & Tools to
create or edit a profile. Select Options > View log to
view the latest synchronisation log. Before you use
the synchronise function, you may need to set a profile.
Page 47
1 To create a profile, select Options > New to cre-
ate a profile.
2 Press the left/right scroll key to switch between
Synchronise item, Server Setting, and Network
profile.
3 In the Synchronise item screen, select the item
to be synchronized and press to confirm it.
Then, enter the database name, User name,
Password of the synchronization items.
4 In the Server Setting screen, enter the server
address, username, and password.
5 In the Network profile screen, enter the proxy
server address and the port. Then, enter the network access point and select a desired profile.
6 Return to the previous menu and select Options
> Synchronise to start synchronising.
This service is not available in all networks.
Note
Please contact your local Vodafone customer care centre.
Calculator
Calculator
You can perform addition, subtraction, multiplication,
division and extraction operations on your phone.
• Press the number keys to enter the figures.
• Press the scroll key to enter the operators.
• Press the left function key to clear.
• Press the right function key to exit Calculator.
• Press to enter a radix point.
• Press to delete the character to the left of the
cursor.
• Press to enter an equal mark.
Unit Converter
You can convert units of length and weight between
different systems on your phone.
1 Press the up/down scroll key to select the unit
type bar, input unit bar or output unit bar.
2 On the unit type selection bar, press the left/right
scroll key to select weight or length.
Organiser & Tools
9
41
Page 48
Currency Converter
3 On the From bar, press the left /right scroll key to
select the unit to be converted from.
4 On the To bar, press the left/right scroll key to
select the unit to be converted to.
5 Press the number keys to enter a numeric value
to be converted in the Input bar.
Press or select CE to clear the numeric values
you entered.
Currency Converter
Yo u can convert a value fro m one currency to another
using your phone.
To using this function, access the Currency con-
verter screen, and then press the up/down scroll key
to switch between the setup items.
1 On the Input bar, press the number keys to enter
a numeric value to be converted.
2 On the From bar, press the left /right scroll key to
select the currency to be converted from.
42
3 On the To bar, press the left/right scroll key to
select the currency to be converted to.
4 On the Rate bar, enter the currency rate.
Then you can view the conversion result.
Press to clear the numeric values you entered.
Select Setting in the currency converter screen, and
you can select frequently used currency units. This
makes it easy to switch between selected units in the
From or To bar.
Voice Recorder
You can record voices or sounds on your phone.
On the standby screen of the voice recorder, you can
select Options to set the recording duration.
• Record/Pause: Press to start the recording. During recording, press to pause, and press
again to resume.
• Stop and save: During recording, press the left
function key to stop recording.The audio file is
saved in My Files\Music automatically.
Page 49

• Play an audio file instantly: After recording is complete, select Option > Play to play the audio file
instantly.
Alternatively, you can select for the following operations: Send As MMS, Send As Email, Via Bluetooth,
set as ringtone and delete.
World Time
You can view the time of important cities around the
world. To switch among the time zones, press the left/
right scroll key.
If the daylight saving time (DST) is used in your city,
you need to set the phone to DST. Then, you can get
the right local time. T o set the phone to DST, switch to
the desired time zone and then select Options > Set
to DST.
Stopwatch
You can use the stopwatch function and save up to
five records on your phone.
On the Stopwatch screen, you can perform the following operations: start, save, pause, continu e, reset.
World Time
Timer
You can set a timer for up to 99 hours and 59 minutes. After you have set it, the timer is displayed on
the home screen.
Service Dial Number
You can contact your local Vodafone customer care
centre by dialing this number.
Organiser & Tools
9
43
Page 50

10My Files
My Files enables you to manage the Pictures, Music,
Ringtones, Videos, Games, Applications and other
files conveniently. You can access My Files by
selecting from the main menu.
Select Pictures, Music, Ringtones or Videos
folder. You can perform the following operations on
files.
• View: To view the picture file.
• Play: To play a selected file.
• Send: To send the selected file by MMS, postcard,
Email or Bluetooth.
• Set as: To set a picture as thumbnail of a contact or
the wallpaper .
• Set as ringtone: T o set a ringtone as voice call ton e,
video call tone or specific contact tone.
• Picture edit: To edit a picture file.
• Rename: To rename the selected file.
• Cut: To cut the selected file.
• Copy: To copy the selected file.
• Sort by name/date: To sort the selected file by
name or by date.
• Delete: To delete the selected files.
44
• Mark/Unmark: To select one or more files or cancel
the selection.
• Info.: To view the properties of one or more files.
Some sound files are protected by Digital
Note
Rights Management (DRM), and may not be
able to be used as a ringtone.
Select Games, applications, other folder.
• Games: T o play games an d download more games.
The downloaded files are saved in this folder. For
more details, Please refer to "Entertainment/
games" on page 47.
• Applications: Any applications that you download
are saved in this folder.
• Others: you can save any kind of file. You can also
create new folders in this folder to categorise your
files.
When the phone detects and recognises the memory
card, Memory card is displayed as a tab on the top
of the My Files screen. You ca n perform the same
operations on the contents in the memory card as
those in the phone. Your Vodafone 716 also provides
a function to format the memory card.
Page 51
11Vodafone live!
The built-in browser makes it easy to browse the
Vodafone live! port al. You can access the Browser
screen by selecting Vodafone live! from the main
menu.
Vodafone live!
Browsing Pre-set Web Pages
On the homepage, select a link from the page. Then
select to browse the page. When browsing, you
can press the scroll keys to select a link you want to
access. The selected link is highlighted. Press to
access the link.
Other Operations for the Homepage
After selecting Options from the homepage, yo u can
perform the following operations:
• Homepage: To access the homepage.
• Forward: To go forward when you browse web
pages.
• Bookmarks: To access the bookmark directory and
view the saved bookmarks.
• Enter URL: To enter a website address and access
it.
• Recent pages: To access pages you have browsed
recently. The recently browsed pages can be
saved.
• Save page: To save the pages in your phone. Web
pages are saved to the Saved pages.
• Save item: To save contents on the page to the
folders in your phone.
• Refresh: To refresh the current web page.
• Saved pages: To browse the saved pages offline.
• Settings: To change the relevant settings for the
web page.
• Exit: To exit the current web page.
Enter URL
Access the Enter URL screen, and then you can
enter the address of the page to be accessed. You
can select Goto, Edit, Delete or Delete all from the
Options to perform corresponding operations upon
the entered website address.
45
Page 52

Bookmarks
Bookmarks
With this option, you can save and edit the information of the websites that you often access.
Some bookmarks have been preset by Vodafone for
you on the phone. Select any one of them, and then
select Options, you can perform the following operations.
• Goto: T o conn ect to the server to get the latest web
page.
• Add: To add a Title and Address for a bookmark.
• Edit: To edit the selected bookmark. The preset
bookmarks cannot be edited.
• Delete: to delete the selected bookmark.
Internet Settings
These are preset for you to use the Vodafone service. If you need to modify them, open the Browser
and select Internet Settings.
46
Page 53
12Entertainment
You can use the phone to play games, take photos,
listen to online music, and listen to FM radio.
Games
You can play games and download more games.
Downloaded games are saved to the My Files/
Games directory.
Downloading Games
Vodafone offers a great choice of games for your
mobile phone. To download one of these to the
phone or memory card, select Download Games.
Available Options of Games
You can scroll the cursor to a Java game and press
or select Options > Select to launch the game.
In the Games screen, you can select Options to perform the following operations:
• Select: To launch the game.
• Update: To upgrade the game.
• Move: To move games saved in the phone to the
memory card and vice versa.
• Security: To set the security requirements of the
game.
• Send: To send the game to a recipient by email or
Bluetooth.
• Settings: To set the volume, vibration and internet
settings.
• Delete: To delete the game.
• Info.: To view the property of the game.
Camera
Press the Camera key or select Entertainment >
Camera to launch the camera.
Operations in the Viewfinder Screen
In the viewfinder screen, you can:
Icon Operation
Press the left/right scroll key to adjust
the brightness.
Press the up/down scroll key to zoom in
or zoom out.
47
Page 54
Video Camera
Icon Operation
Press the up/down volume key to adjust
the contrast
If you use the assistant lens and set the res-
Note
olution to 1280 × 1024 or 1280 × 960, you
cannot zoom in or zoom out.
In the viewfinder screen, you can select Options to
choose from the following operations:
• Video camera: To record a video clip.
• Frame: To choose a frame for pictures.
• Normal size/Screen size: To set the viewfinder size.
• Go to gallery: To access the My Files/Pictures
directory to view pictures.
• White balance: The phone provides you with
several modes, including auto, fluorescent,
incandescent, outdoor, indoor, night mode.
• Capture Mode: To set the shooting mode.
• Self timer: To set the countdown time for the phone
to take a picture automatically.
• Settings: To change the relevant settings for
camera function.
48
Operations After Takin g a Pictur e
In the viewfinder screen, you can press to take a
picture. Pictures taken are auto saved to the
My Files/Pictures directory.
After taking a picture, you can select Options for the
following operations.
• Send: To send the picture through MMS, postcard,
Bluetooth or email.
• Set as: To set the picture as the wallpaper or the
image of a contact.
• Edit: To edit the picture.
• Delete: To detelet the picture.
Video Camera
You can use your phone to record a video.
In the main menu, select Entertainment > Camera.
In the camera viewfinder screen, select Options >
Video camera to launch the video camera.
Operations in the Viewfinder Screen
In the viewfinder screen, you can:
Page 55
Icon Operation
Press the left/right scroll key to adjust
the brightness.
Press the up/down scroll key to zoom in
or zoom out.
In the viewfinder screen, you can select Options to
choose from the following operations.
• Camera: To launch the camera.
• Record: To start recording the video.
• Zoom display: To zoom in or zoom out.
• Go to gallery: To access the My Files/Videos directory to view videos.
• Settings: To change the relevant settings for video
camera function.
• Available memory: To view the total duration of all
videos, and the free space.
Operations During Recording
In the viewfinder screen, you can press to start
recording the video.
During the recording, you can perform the following
operations.
Music
• Pause/Record: To pause and then to start recording
again.
• Stop: To stop recording.
Music
Music enables you to manage your music files easily
and conveniently. It can play all kinds of music file s. it
also enables you to purchase music, manage the
channels and play streaming media. For more
details, Please refer to "Music" on page 36.
FM Radio
FM Radio helps you conveniently listen to the FM
radio programs. Select Entertainment > FM Radio,
and then press the up/down scroll key to switch the
channel.
You can select Options for the following operations.
• Loudspeaker/Headset: To switch between the
Handsfree and the Earpiece modes.
• Tuning: The phone provides you with several
modes, including Automatic Tuning, Manual
Tuning, Inching Tuning, and Set Frequency .
12
Entertainment
49
Page 56

FM Radio
• Add to Channel List: Add the current FM radio
channel to the channel list
• Channel List: To access Channel List screen.
• Exit: To exit the FM Radio funtion.
50
Page 57
13Connections
Your Vodafone 716 provides you with many data
communication functions. You can access the Con-
nectivity screen by selecting Settings from the
main menu. You can synchronise data between your
phone and a PC through USB cable or Bluetooth.
You can transfer files from your phone to other Bluetooth devices and conversely. You can also use the
built-in modem of your phone to set up a dialup connection for your PC to access the Internet .
Bluetooth
You may use the built-in Bluetooth function of your
phone to synchronise data between a PC and your
phone, or use the built-in modem of your phone to
access the Internet with a PC, or exchange data with
other Bluetooth devices. You can also talk by using
the Bluetooth headset or Bluetooth loudspeaker.
The Bluetooth function supported by your
Note
Vodafone 716 meets the r equirements of
Bluetooth Specification 1.2. It can wo rk successfully only if you use it with compatible
Bluetooth devices. For more information,
refer to the user manuals of related devices,
or consult the manufacturer of related
devices.
Bluetooth-Based Synchronisation
Your Vodafone 716 can respond to data synchronisation requests from a computer.
To operate the Bluetooth synchronisation with your
Vodafone 716 phone, your PC needs to support Bl uetooth function. If not, see page 54 on how to use a
USB connection.
1 Install the Vodafone Mobile Phone PC Assistant
supplied with your phone. After inserting the CD,
follow the prompts to complete the installation.
2 Select Settings > Connectivity > Bluetooth >
Switch On/Off > On to enable the Bluetooth
function.
3 Run the driver software for Blueto oth on the PC,
and pair the Vod afone 716 phone. After the PC
detects and recognises the Vodafone 716 serial
port service, activate the Bluetooth serial port
service on the phone.
51
Page 58

Bluetooth
4 Run the Vodafone Mobile Phone PC Assistant
on the PC.
5 You can now operate the synchronisation. For
details of the operation, refer to the Help of the
Vodafone Mobile Phone PC Assistant.
The Bluetooth Headset
You can answer a call by a Bluetooth headset or
Bluetooth loudspeaker. For details, refer to the corresponding user manual of a Bluetooth headset or
loudspeaker.
Select Settings > Connectivity > Bluetooth to
access the Bluetooth Settings screen.
To use a Bluetooth headset, do as follows.
1 Set the Bluetooth headset to the status for
detecting.
2 Select Switch On/Off > On from the Bluetooth
settings list to enable the device. A Bluetooth
device icon appears on the icon bar.
52
3 Select Devices and then select Search. When
the Bluetooth headset is found, its profile is displayed in the device list.
4 If a Bluetooth headset is detected and recogn-
ised for the first time, it should be authenticated
by a PIN code.
Now you can use the Bluetooth headset as the connection has been established between your phone
and the Bluetooth headset.
The Bluetooth headset should be set to the st atu s for
detecting only when authentication is needed. Once
the headset has been authenticated, you just need to
turn on your Bluetooth headset. For more information, refer to the user manual of your Bluetooth headset.
The procedure for using a Bluetooth loud-
Note
speaker is similar to that for a Bluetooth
headset. For details, refer to the user manual supplied with your Bluetooth loudspeaker.
Page 59
Bluetooth
Bluetooth-Based Data Transfer
You can exchange data between your Bluetooth
phone and other Bluetooth devices. If you want to
exchange data between your phone and another
device, that device must support Bluetooth and the
Bluetooth function must be enabled.
1 Select Switch On/Off > On from the Bluetooth
settings list to enable the Bluetooth device. A
Bluetooth device icon appears on the icon bar.
2 Select Devices list.
3 Select Options > Search to search a Bluetooth
device. When a Bluetooth device is found for the
first time, authentication is required.
Now you can exchange data between your phone
and the other Bluetooth device.
In transferring data by Bluetooth, the received contacts, Memo Pad records, schedule events an d To Do
tasks will be saved to Contacts, Memo Pad and To
Do, and other media and data files will be saved to
the corresponding folders in My Files.
Bluetooth-Based Internet Access
Connecting your phone to a PC through Bluetooth
function enables the PC to use the phone as a
modem. This helps to set up a dial-up connection to
the Internet. (This is particularly useful for laptop.)
You can create Bluetooth-based Internet access
through the Vodafone Mobile Phone PC Assistant
supplied with your Vodafone 716, or the built-in Internet wizard of the Windows operating system, or the
Internet wizard supplied with the Bluetooth drive suite
of the PC.
Windows 2000 and Windows XP are sup-
Note
ported.
◆ Accessing the Internet using the Vodafone
Mobile Phone PC Assistant
To access the Internet by Bluetooth using the
Vodafone Mobile Phone PC Assistant, make sure
that your PC supports the Bluetooth function and
your SIM card supports the Internet access service.
1 Select Settings > Connectivity > Modem and
set the port to Modem via Bluetooth.
53
13
Connections
Page 60

USB
2 Select Settings > Connectivity > Bluetooth >
Switch On/Off > On.
3 Make sure that Bluetooth modem is in Device
Manager/Modem of your PC. Run the driver
program for Bluetooth on your PC, and then pa ir
the Vodafone 716 phone. After the PC has
detected the Vodafone 716 dial-up network service, you can activate this service.
4 Install the Vodaf one Mobile Phone PC A ssistant.
After inserting the CD, follow the prompts to
complete the installation.
5 Run the Vodafone 716 Dialup I nternet to access
the Internet.
◆ Other Bluetooth Operations
You can perform the basic settings for the Bluetooth
functions.
Select Settings > Connectivity > Bluetooth for the
following operations.
• Switch On/Off: To set the Bluetooth device to On or
Off.
54
• Search new devices: To search for new Bluetooth
devices.
• Devices: To view all detected Bluetooth devices.
• Visibility: To set whether your phone can be found
by other devices when the Bluetooth function is
enabled.
• Rename: To rename your phone.
• My device information: To view the detailed information of your phone, such as the device name and
device address.
• Uninterrupted Access On/Off: When this option is
set to On, only the Bluetooth connection
requirement from the trusted device is accepted.
When it is set to Off, the Bluetooth connection
requirements from all devices are accepted.
USB
You can synchronise data between your phone and
PC, surf the Internet with your phone and read the
memory card by USB cable.
Page 61
• T o use USB cable, ple ase strictly obey the
!
!
Warning
following rules. Otherwise, your phone or
警告
PC may be damaged. To connect your
phone with a PC through USB cable, first
connect the USB connector to your
phone, and then connect the other end of
the cable to the PC.To disconnect your
phone from the PC, first disable the
Vodafone Mobile Phone PC Assistant,
then disconnect the USB connector from
the PC, and finally disconnect the USB
cable from your phone.
• If the PC cannot recognise your phone
when connecting through the USB cable,
power off and restart the PC and then
retry.
• Do not plug the USB cable in and out of
your Vodafone 716 frequently.
USB-Based Synchronisation
Your Vodafone 716 supports th e synchronisation
requests from a PC to your phone.
USB
With a USB cable and Vodafone Mobile Phone PC
Assistant, your phone can communicate with a PC.
You can back up the contact entries and messages
saved on your phone and the SIM card to a PC. You
can also synchronise contacts, schedule events and
To Do tasks between your phone and Outlook.
To operate the USB-based synchronisation with your
phone, do as follows.
1 Install the V odafone Mobile Pho ne PC Assista nt.
After inserting the CD, follow the prompts to
complete the installation.
2 Select Settings > Connectivity > Modem from
the main menu of your phone and set the port to
Modem via USB.
3 Connect your phone to the PC by using the USB
cable.
4 Run the Vodafone Mobile Phone PC Assistant
on the PC.
5 Now you can operate the USB-based synchroni-
sation. For details of the operation, refer to the
55
13
Connections
Page 62
USB
Help of the Vodafone Mobile Phone PC Assistant.
Accessing the Internet by USB
Connecting your phone to the PC with the USB cable
enables the PC to use the phone as a modem. This
helps to set up a dial-up connection to the Internet.
There are two methods to access the internet by
using the USB cable: use the Vodafone Mobile
Phone PC Assistant supplied with your Vodafone 716
or to use the Windows operating system to set the
service.
1 Select Settings > Connectivity > Modem and
set the port to Modem via USB.
2 Install Vodafone Mobile Phone PC Assistant.
After inserting the CD, follow the prompts to
complete the installation.
3 Connect your phone to the PC by using the USB
cable.
4 Ensure the USB device is shown in Device Man-
ager/Port of your PC.
56
5 Select one of the following methods to set u p the
dial-up connection.
• Run the Vodafone 716 Dial-up Internet on the
PC to create the dial-up connection.
• Create Internet access through the built-in
Internet wizard of the Windows operating system.
Only Windows 2000 and Windows XP are
Note
supported.
micro-SD Card Reader
You can read the files saved in the micro-SD card by
using a USB cable.
To use the micro-SD card reader, do as follows.
1 Insert the micro-SD card to your phone.
2 Connect your phone to the PC by using the USB
cable.
3 Found New Hardware is displayed on your PC,
and an icon for the mobile memory drive
appears.
Page 63

The function of micro-SD card reader and
Note
the other functions using the USB cable are
incompatible. If you enable the micro-SD
card reader, other functions using th e USB
cable are unavailable. If you need to
recover other USB functions, disable the
card reader function.
USB
57
13
Connections
Page 64
14Settings
You can access the Settings screen by selecting from the main menu.
Phone Settings
You can change the settings of the phone, including
Profiles, Phone language, Input language, Date and
time, Date format, Shortcuts, as well as Auto ON and
OFF, Auto keypad lock, Keypad lock period.
Profiles
You can select different profiles for the phone to suit
different environmental situations.
The Vodafone 716 provides various profiles, including Normal, Meeting, Silent, Activity, Car, Head-
set, Offline and My profile.
You can select a profile and then press or select
Options > On to activate this profile. You can also
select Options > Edit to edit the settings for this profile.
In the standby mode, you can press and
Note
hold to switch the current profile to the
58
meeting profile. If the current profile is
offline, you cannot use this function.
Phone language
Your Vodafone 716 supports several languages.
Select Settings > Phone settings > Phone lan-
guage to select a language. In addition to these languages, you can also select Auto. This option is
used to set the phone language to be the same as
that used in your SIM card.
Input language
The option is used to set the language used to enter
text.
Date and time
This option is used to change the system time for the
phone.
Date format
This option is used to change the display format of
the date of the phone. Three formats are available:
yy.mm.dd, mm.dd.yy, and dd.mm.yy.
Page 65
Display Settings
Shortcuts
This option is used to assign the frequently used
functions to the scroll keys as shortcut keys.
Auto ON and OFF
This option is used to set your phone to power on or
off automatically.
4 In the Auto ON and Auto OFF screen, enable
this function and set the cycle for Auto On and
Auto Off respectively. Then select Option >
Settings.
5 Set the time for Auto On and Auto Off, and then
select Option > Save to save your settings.
Auto keypad lock
The auto keypad lock function can prevent the phone
from reacting to the accidentally key-pressing. You
can enable or disable the function.
Keypad lock period
After enabling the auto keypad lock function, you can
set the keypad lock period. If there is no operat ion on
the phone within a preset period of time, the keypad
is locked automatically . You can press and to
unlock the keypad.
Display Settings
You can change the settings for the phone display,
including Wallpaper, Brightness, Keypad backlight,
Backlight time, LCD sleep delay, Greet ing message.
• Wallpaper: To set the wallpaper layout for the home
screen.
• Brightness: To set the brightness of the screen.
• Keypad backlight: To turn the keypad backlight on
or off.
• Backlight time: To set the backlight delay time for
the screen.
• LCD sleep delay: To set the duration between backlight off and LCD off.
59
14
Settings
Page 66
Message Settings
• Greeting message: To enter a greeting message
that appears on the screen when you power on
your phone.
Message Settings
You can change the message settings including
SMS, MMS, Email, Push messages, Broadcast,
Voice Mail Number and Common phrases.
Call Settings
You can change the settings for making calls.
Call forwarding
This option is used to forward incoming calls.
1 In the main screen, select Settings > Call set-
tings > Call forwarding.
2 Select the forwarding condition from All calls, If
out of reach, If busy, and If not answer.
3 Then select the forwarding type from Voice call,
Fax call, Data call and All services.
60
4 Select Activate or Deactivate to enable or dis-
able the service. You can also select Check status to check the status of call forwarding service.
Alternatively, you can select Disable all and then
select one from the four items: Voice call, Fax call,
Data call and All services. Then press to disable
all call forwarding services of this type.
Call barring
This option is used to set the call barring mode for the
phone.
Select Call settings > Call barring for the following
options:
◆ Barring outgoing calls:
1 Select the barring condition from All outgoing
calls, International calls, and International
calls except home.
2 Then select the barring type from Voice call,
Fax call, Data call.
Page 67

3 Select Activate or Deactivate to enable or dis-
able the service. You can also select Check status to check the status of call barring service.
◆ Barring incoming calls:
1 Select the barring condition from All incoming
calls and Incoming calls when abroad.
2 Then, select the barring type from Voice call,
Fax call, Data call, and All services. You have
the following options.
3 Select Activate or Deactivate to enable or dis-
able the service. You can also select Check status to check the status of call barring service.
◆ Disable All
Select one type from Voice cal l, Fax call, Data call
and All services, and then enter the call barring
password. Press to cancel all call barring services
of each type.
Call Settings
Call waiting
This option is used to enable or disable the call waiting function. You can also view whether the call waiting function is enabled by checking the status.
The call waiting function is network-dependent. For
more information, contact your local Vodafone customer care centre.
Auto redial
This function is used to auto redial the dialed number
if the dialing failed.
Answer mode
It is used to set the mode for answering an incoming
call. Two options are available: Any key and Send
key.
Auto answer
This option is used to select auto answering for
incoming calls. Select Call settings > Auto answer
for the following options.
61
14
Settings
Page 68

Call Settings
• Immediate answer: To answer an incoming call
immediately.
• Message: To auto send a text message that is preset and chosen from the Common phrases to the
current caller.
• Recorded message: To answer an incoming call by
auto playing a recorded message.
• Disable: To disable the auto answer function.
Calling ID
This options allows you to select whether to display
your phone number on the phone of the party who
called you.
Select Call settings > Calling ID for the following
options.
• Auto: Whether your phone number will be shown
on the called phone depends on the network.
• Send: Your phone number will be shown (if the network supports this service).
• Hide: Your phone number will not be shown (if the
network supports this service).
62
Select line
This option is used to set the call line for your phone.
Two options are available: Line 1 and Line 2.
My number
This function can be used to save your own phone
numbers on the SIM card. Y ou can select Options to
edit or delete the records.
Call barring password
This function is used to change the password for call
barring.
Select Call barring passw ord from the Call settings
screen. Then you can change the call barring password.
The old call barring password is provided by
Note
your network operator if it is the first time for
you to change the password.
Page 69

Prompt to save
This function is used to prompt whether to save the
number when there is an incoming call. You can
enable or disable this function.
Video call
You can change the settings for the Video Call function, including Picture in Picture, Switch picture,
Image quality, Camera off, Audio off, Auto voice call,
Send specific file and Auto answer.
• Picture in picture: To display your image on your
phone and arrange the positions of your image.
• Switch picture: To switch between image windows
during a video call.
• Image quality: To set the image quality for video.
• Camera off: To open or close the video channel
during a video call.
• Audio off: To open or close the audio channel during a video call.
• Auto voice call: To enable the auto voice call
function. The phone auto makes a voice call, when
Video call
the other party's phone does not support the video
call service.
• Send specific file: To select a file and send it to the
other party when you hold a video call.
• Auto answer: To auto answer an incoming video
call. You can enable or disable this function.
Connectivity
The data connection function provides seve ral data
communication functions. You can synchronise data
between your phone and a PC through a USB cable
or Bluetooth. Your PC can use the built-in modem of
your phone to access the Internet. For detailed infor-
mation, refer to "Connections" on page 51.
Network
You can change the settings for the network.
Select Settings > Network for the following options:
Mode, Select network, Cell information, and My public land mobile network (PLMN) list.
63
14
Settings
Page 70
Security
Security
You can change the settings related to the phone
security.
Select Security from Settings, and then enter the
correct phone password if you have set the phone
lock to On (the initial password is 0000). Then press
to display the following security setting items.
Reset
This option is used to reset your phone to the factory
settings.
Password lock
This option is used to enable or disable the "Phone
lock" and "PIN lock".
Operation Description
Phone
lock
64
1 Select Phone lock.
2 Press the up/down scroll key to
select On or Off.
3 Enter the phone password.
Operation Description
PIN lock
1 Select PIN lock.
2 Press the up/down scroll key to
select On or Off.
3 If the desired status is the same as
the current status, just press .
Conversely, you need to select the
desired status and then enter the
PIN code.
Change password
You can modify the phone password and PIN code.
1 Select Security > Change password.
2 Select one item from phone password, PIN
code, and PIN2 code.
3 Enter the old password (The initial phone pass-
word of the Vodafone 716 is 0000).
4 Enter a new password.
5 Enter the new password again to confirm.
Page 71

• To modify the PIN code, you must set the
Note
"PIN lock" to "On" first.
• If you enter the wrong PIN or PIN2 three
times, the SIM card is locked. You need
the PUK or PUK2 code to unlock the SIM
card. If you enter the wrong PUK or PUK2
code 10 times in total, the SIM card is
locked permanently.
• PUK or PUK2 code are delivered with the
SIM card. If you have not received one or
have forgotten it, contact your local
Vodafone customer care centre.
Fixed dialer number
If your SIM card supports the Fixed Dialer Number
(FDN) function, you can set the limit for phone numbers.
Select Security > Fixed dialer number for the following options.
• On: You can dial the numbers only in the FDN list.
To enable this function, you need to enter the correct PIN2 code.
• Off: You can dial any number.
Security
• FDN list: It is used to view the fixed dialer numbers.
To create, edit or delete it, you need to enter the
correct PIN2 code.
DRM Setting
Digital Rights Management (DRM) can protect the
digital content from piracy and protect the provider’s
interests. The digital content includes Java applications and multimedia content such as images, audio
and video. If the protected content cannot be
accessed, it indicates that the corresponding copyright is overdue or used up.
Select Settings > Security > DRM setting. Enter the
correct phone password and press to confirm, and
you can delete all the rights.
65
14
Settings
Page 72
15Warnings and Precautions
RF Exposure
General St atement on RF energy
Your phone contains a transmitter and a receiver.
When it is ON, it receives and transmits RF energy.
When you communicate with your phone, the system
handling your call controls the power level at which
your phone transmits.
Body worn operation
Important safety information regarding ra dio
frequency radiation (RF) exposure.
To ensure compliance with RF exposure guidelines
the phone must be used with a minimum of 1.5 cm
(0.6 inch) separation from the body.
Failure to observe these instructions could result in
your RF exposure exceeding the relevant guideline
limits.
66
Limiting exposure to radio frequency
(RF) fields
For individuals concerned about limiting their
exposure to RF fields, the World Health Organisa tio n
(WHO) provides the following advice:
Precautionary measures: Present scientific information does not indicate the need for any special precautions for the use of mobile phones. If individuals
are concerned, they might choose to limit their own or
their children's RF exposure by limiting the length of
calls, or using 'hands-free' devices to keep mobile
phones away from the head and body.
Further information on this subject can be obtained
from the WHO home page http://www.who.int/pehemf WHO Fact sheet 193: June 2000.
Regulatory information
The following approvals and notices apply in specific
regions as noted.
EU Declaration of Conformity
Page 73

according to the Radio Equipment and Telecommunications Terminal Equipment Directive 1999/5/EC
For the following equipment
Product: WCDMA/GPRS/GSM Mobile Phone With
Bluetooth
Type Designation/Trademark: V716/Vodafone 716
Manufacturer's Name: Huawei Technologies Co.,Ltd.
Manufacturer's Address: Bantian, Longgang District,
Shenzhen, 518129, Guangdong, P. R. China.
is herewith confirmed to comply with the require-
ments set out in the Council Directive1999/5/EC for
radio equipment and telecommunications terminal
equipment. For the evaluation of the compliance with
this Directive, the following standards were applied:
Safety: EN 60950-1:2001 First Edition;
Health: EN 50360:2001; EN 50361:2001;
EMC: EN 301 489-1 V1.4.1; EN 301 489-24 V1.2.1;
EN 301489-7 1.2.1; EN 301489-17 1.2.1;
Radio: EN 301 51 1 V9. 0.2; EN 30 1 908-1 V2. 2.1; EN
301 908-2 V2.2.1; EN 300 328 V1.4.1;
Distraction
Responsible for making this declaration is the: Manufacturer.
Distraction
Driving
Full attention must be given to driving at all times in
order to reduce the risk of an accident. Using a phon e
while driving (even with a hands free kit) causes
distraction and can lead to an accident. You must
comply with local laws and regulations restricting the
use of wireless devices while driving.
Operating machinery
Full attention must be given to operating the
machinery in order to reduce the risk of an accident.
Product Handling
General Statement on handling and
use
You alone are responsible for how you use your
Warnings and Precautions
15
67
Page 74

Product Handling
phone and any consequences of its use.
Yo u must always swit ch of f your phone whenever the
use of a phone is prohibited. Use of your phone is
subject to safety measures designed to protect users
and their environment.
• Always treat your phone and its accessories with
care and keep it in an clean and dust-free place.
• Do not expose your phone or its accessories to
open flames or lit tobacco products.
• Do not expose your phone or its accessories to
liquid, moisture or high humidity.
• Do not drop, throw or try to bend your phone or its
accessories.
• Do not use harsh chemicals, cleaning solvents, or
aerosols to clean the device or its accessories.
• Do not paint your phone or its accessories.
• Do not attempt to disassemble your phone or its
accessories, only authorised personnel must do so.
• Do not expose your phone or its accessories to
extreme temperatures, minimum - 40 and
maximum + 70 degrees Celsius.
68
• Please check local regulations for disposal of
electronic products.
Do not carry your phone in your back pocket as it
could break when you sit down.
Small children
Do not leave your phone or its accessories within the
reach of small children or allow them to play with it.
They could hurt themselves or others, or could
accidentally damage the phone.
Your phone contains small parts with sharp edges
that may cause an injury or which could become
detached and create a choking hazard.
Demagnetisation
To avoid the risk of demagnetisation, do not allow
electronic devices or magnetic media close to your
phone for a long time.
Electrostatic discharge (ESD)
Do not touch the SIM card's metal connectors.
Page 75
Product Handling
Antenna
Do not touch the antenna unnecessarily.
Normal use position
When placing or receiving a phone call, hold your
phone to your ear, with the bottom towards your
mouth or as you would a fixed line phone.
Air bags
Do not place a phone in the area over an air bag or i n
the air bag deployment area. Store the phone safely
before driving your vehicle.
Seizures/Blackouts
The phone is capable of producing bright flashing
lights.
Repetitive Motion Injuries
To minimise the risk of RSI, when Texting or playing
games with your phone:
• Do not grip the phone too tightly.
• Press the buttons lightly.
• Make use of the special features in the handset
which minimise the number of buttons which have
to be pressed, such as message templates and
predictive text.
• Take lots of breaks to stretch and relax.
Emergency calls
The phone, like any wireless phone, operates using
radio signals, which cannot guarantee connection in
all conditions. Therefore, you must never rely solely
on any wireless phone for emergency
communications.
Loud noise
This phone is capable of producing loud noises which
may damage your hearing.
Warnings and Precautions
15
69
Page 76

Electrical safety
Bright light
This phone is capable of producing flash of light or
use as torch, do not use it too close to the eyes.
Phone heating
Your phone may become warm during charging and
during normal use.
Electrical safety
Accessories
Use only approved accessories.
Do not connect with incompatible products or
accessories.
T ake care not to touch or allow met al objects, such as
coins or key rings, to contact or short-circuit the
battery terminals.
Connection to a Car
Seek professional advice when connecting a phone
interface to the vehicle electrical system.
70
Faulty and Damaged Products
Do not attempt to disassemble the phone or its
accessories.
Only qualified personnel must service or repair the
phone or its accessories.
If your phone or its accessory has been submerged in
water, punctured, or subjected t o a severe fa ll, do not
use it until you have taken it to be checked at an
authorised service centre.
Interference
General statement on interference
Care must be taken when using the phone in close
proximity to personal medical devices, such as
pacemakers and hearing aids.
Pacemakers
Pacemaker manufactures recommend that a
minimum separation of 15 cm be maintained betwe en
a mobile phone and a pacemaker to avoid potential
Page 77

interference with the pacemaker. To achieve this use
the phone on the opposite ear to your pacemaker
and do not carry it in a breast pocket.
Hearing Aids
People with hearing aids or other cochlear implants
may experience interfering noises when using
wireless devices or when one is nearby.
The level of interference will depend on the type of
hearing device and the distance from the interference
source, increasing the separation between them may
reduce the interference. You may also consult your
hearing aid manufacturer to discuss alternatives.
Medical devices
Please consult your doctor and the device
manufacturer to determine if operation of your phone
may interfere with the operation of your medical
device.
Interference
Hospitals
Switch off your wireless device when requested to do
so in hospitals, clinics or health care facilities. These
requests are designed to prevent possible
interference with sensitive medical equipment.
Aircraft
Switch off your wireless device whenever you are
instructed to do so by airport or airline staff.
Consult the airline staff about the use of wireless
devices on board the aircraft, if your device offers a
'flight mode' this must be enabled prior to boarding an
aircraft.
Interference in cars
Please not that because of possible interference to
electronic equipment, some vehicle manufacturers
forbid the use of mobile phones in their vehicles
unless a handsfree kit with an external antenna is
included in the installation.
Warnings and Precautions
15
71
Page 78
Explosive environments
Explosive environments
Petrol stations and explosive
atmospheres
In locations with potentially explosive atmospheres,
obey all posted signs to turn off wireless devices
such as your phone or other radio equipment.
Areas with potentially explosive atmospheres include
fuelling areas, below decks on boats, fuel or ch emical
transfer or storage facilities, areas where the air
contains chemicals or particles, such as grain, dust,
or metal powders.
Blasting Caps and Areas
Turn off your mobile phone or wireless device when
in a blasting area or in areas posted turn off 'two-way
radios' or 'electronic devices' to avoid interfering with
blasting operations.
72
Environmental Protection
Please observe the local regulations regarding the
disposal of your packaging materials, exhausted battery and old phone and please promote their recycling. Do not dispose of an exhausted battery or old
phone in municipal waste.
: This symbol indicates that the equipment carry-
ing this mark must NOT be thrown into general waste
but should be collected separately and properly recycled under local regulations.
Page 79

16Acronyms and Abbreviations
DCF DRM Content Format
DRM Digital Rights Management
FDN Fixed Dial Number
GPRS General Packet Radio Service
GSM Global System for Mobile communica-
tion
OTA Over-The-Air
PIN Personal Identification Number
PLMN Public Land Mobile Network
PUK PIN Unblocking Key
SD Secure Digital Card
SAR Specific Absorption Rate
STK SIM Tool Kit
URL Universal Resource Locator
USB Universal Serial Bus
WAP Wireless Application Protocol
WCDMA Wideband Code Division Multiple
Access
73
Page 80

17Appendix
The Vodafone 716 supports image files, video files
and audio files of many formats. For details, see the
following table.
File type Formats
Image JPG, PNG, BMP, GIF, BCI, WBMP, SVG ,
and SVGZ.
Audio MP3, AAC/AAC+, AMR, MID, WAV
Note
74
(ADPCM), MMF, QCP, and XMF/DLS.
Video 3GP, MP4, 3G2, and PMD.
In some cases, the preceding media formats may not be supported.
Page 81

Index
"123" Numeric Input Method.................................. 16
Access Codes........................................................ 10
Accessing the Internet by USB .............................. 56
Accessories............................................................ 70
Adding/Deleting Group Members........................... 19
Air bags ................................................................. 69
Aircraft.................................................................... 71
Alarms.................................................................... 38
Answer mode......................................................... 61
Answering or Rejecting Calls................................. 11
Antenna.................................................................. 69
Available Options of Games .................................. 47
Auto answer.... .. ... ............................... ... ... ............. 61
Auto keypad lock....... ................................ .. ... ........ 59
Auto ON and OFF........ ... ....................................... 59
Auto redial....................... ............................... ... .. ... 61
Back View ................................................................ 3
Blasting Caps and Areas ...................................... 72
Bluetooth................................................................ 51
Bluetooth-Based Data Transfer ............................. 53
Bluetooth-Based Internet Access........................... 53
Bluetooth-Based Synchronisation.......................... 51
Body worn operation ....................................... .. .... 66
Bookmarks............................................................. 46
Bright light.............................................................. 70
Broadcast Inbox..................................................... 34
Browsing Pre-set Web Pages ................................ 45
Calculator............................................................... 41
Calendar Functions................................................ 39
Calendar................................................................ 38
Call barring password............................................ 62
Call barring ............................................................ 60
Call forwarding....................................................... 60
Call Settings .......................................................... 60
Call waiting ............................................................ 61
Calling ID............................................................... 62
Camera.................................................................. 47
Change password.................................................. 64
Charging the Battery................................................ 7
Charging with a Cable Charger............................... 7
Common Phrases.................................................. 35
Connection to a Car............................................... 70
Connectivity........................................................... 63
Creating a Multimedia Message ............................ 25
Creating a Text Message ...................................... 22
Creating an Email.................................................. 29
Creating Live!Postcards ........................................ 29
Currency Converter ............................................... 42
Date and time ........................................................ 58
Date format...................... ... ............................... ... . 58
Demagnetisation.................................................... 68
Display Settings.................................................... . 59
Distraction.............................................................. 67
Downloading Games ............................................. 47
Driving ................................................................... 67
DRM Setting .......................................................... 65
Electrical safety ..................................................... 70
Electrostatic discharge (ESD)................................ 68
1
Page 82

Email Settings........................................................ 33
Email...................................................................... 29
Emergency calls ................................................... 69
Enter URL .............................................................. 45
Environmental Protection............. .......................... 72
Explosive environments .............................. ... ........ 72
Faulty and Damaged Products .............................. 70
Fixed dialer number ............................................... 65
FM Radio ............................................................... 49
Function Options During Playing ........................... 36
Games ................................................................... 47
General Statement on handling and use .............. 67
General statement on interference........................ 70
General Statement on RF energy.......................... 66
Groups ................................................................... 19
Hearing Aids ........... .. ... .......................................... 71
Home Screen.... ... .................................................... 3
Hospitals ................................................................ 71
Icon Description ..................................................... 12
Icon Description ..................................................... 13
Input Different Languages...................................... 17
Input language .................................................... .. 58
Interference in cars .............. .. ... ............................. 71
Interference............................................................ 70
Internet Settings..................................................... 46
Introduction to the Menu ................ ... .. ..................... 4
Keypad lock period ................................................ 59
Limiting exposure to radio frequency (RF) fields ... 66
Loading the Battery.................................................. 6
2
Loading/Removing a Memory Card......................... 9
Loading/Removing the SIM Card ............................ 8
Loud noise ............................................................ 69
Mailboxes .............................................................. 30
Making a Video Call............................................... 11
Making a Voice Call............................................... 11
Making Calls from Call Log.................................... 21
Making Calls from the Contacts............................. 18
Making or Answering Calls .................................... 11
Making Voice Calls Using SDN ............................. 11
Managing a Group................................................. 20
Medical devices..................................................... 71
Memo ...................... ........... ....... ........... .......... ....... 40
Message Settings .................................................. 60
micro-SD Card Reader .......................................... 56
MMS Mailboxes.................................... ................. 26
MMS Settings ........................................................ 28
Multimedia Messages............................................ 25
Music..................................................................... 49
My Music ............................................................... 36
My number............................................................. 62
Network ................................................................ 63
New Schedule ....................................................... 38
New Tasks............................ ... .............................. 40
Normal use position .............................................. 69
Operating machinery ............................................. 67
Operations After Taking a Picture ......................... 48
Operations During a Video Call............................ 13
Operations During a Voice Call ............................ 12
Page 83

Operations During Recording ................................ 49
Operations in the Viewfinder Screen ..................... 47
Operations in the Viewfinder Screen ..................... 48
Operations ............................................................. 12
Operations ............................................................. 13
Other Operations for the Homepage...................... 45
Other Operations ................................................... 19
Other Operations ................................................... 21
Pacemakers........................................................... 70
Packing List.............................................................. 1
Password lock........................................................ 64
Petrol stations and explosive atmospheres........... 72
Phone heating........................................................ 70
Phone language .................................................... 58
Phone Settings....................................................... 58
Playlist.................................................................... 37
Powering Off .......................... ... ............................. 10
Powering On .......................... ... ... .. .......................... 9
Powering On/Off ..... .. ... ... ............................... ... .. ... .. 9
Product Handling ................................................... 67
Profiles................................................................... 58
Prompt Interface for a Schedule............................ 39
Prompt Interface for a Task ................................... 40
Prompt Interface for an Alarm................................ 38
Prompt to save....................................................... 63
Push Inbox Settings.. ... ... ....................................... 34
Push Inbox...... .. ... .................................................. 34
Regulatory information.......................................... 66
Repetitive Motion Injuries....................................... 69
Reset ..................................................................... 64
RF Exposure......... ... .............................................. 66
Screen Operations During Playing........................ 36
Searching for a Contact......................................... 18
Security.................................................................. 64
Seizures/Blackouts .... ........................................... 69
Select line........... .................................. ................. 62
Service Dial Number.............................................. 43
Setting Alarm Clocks ............................................. 38
Shortcuts ............................................................... 59
Side View ................................................................ 3
SIM ToolKit............................................................ 38
Small children........................................................ 68
SMS Mailboxes...................................................... 22
SMS Settings......................................................... 24
Stopping the Alarm Clock.................................. ... . 38
Stopwatch.............................................................. 43
Symbol Input Method............................................. 16
Synchronise........................................................... 40
T9 Input Method .................................................... 15
Task....................................................................... 39
Tasks Functions .................................................. 40
Text Messages ...................................................... 22
The Bluetooth Headset.......................................... 52
Timer ..................................................................... 43
Traditional Input Method ....................................... 16
Video call .............................................................. 63
Video Camera.......... .................................. ............ 48
Viewing Push Messages ....................................... 34
3
Page 84

Unit Converter........................................................ 41
Unloading the Battery .............................................. 6
Vodafone live!........................................................ 45
Voice Mail number ................................................. 35
Voice Recorder ...................................................... 42
World Time............................................................. 43
USB........................................................................ 54
USB-Based Synchronisati on....................... ... ........ 55
Your Phone.............................................................. 2
4
Page 85

Warranty Terms and Conditions
1. Vodafone warrants that, for the periods set out
below, the enclosed products will be free from defects in materials and workmanship and agrees that
it will, at its sole discretion, either repair or replace
any defective products subject to the terms and conditions set out herein.
2. The warranty periods commence at the time of
the first end-user's original purchase of the products
and are as follows:
(a) two (2) years for the mobile phone;
(b) six (6) months for the mobile phone battery and
charger;
(c) any and all other accessories have a limited warranty period of three (3) months.
3. This warranty does not cover damage resulting
from:
(a) normal wear and tear of the products;
(b) defects and damages due to the products bei ng
used other than in their normal and customary manner or in a way that is contrary to the instructions
provided by Vodafone;
(c) any unauthorised disassembly, repair, alteration
or modifications being carried out;
(d) defects or damage, negligence or accident
howsoever caused;
(e) defects or damage arising from improper testing,
operation, maintenance, installation, or any
alteration or modification;
(f) defects or damage due to spillage of food or
liquids, corrosion, rust or the use of wrong voltage;
(g) scratches or damage to plastic surfaces and all
other externally exposed parts that are due to
normal customer use;
(h) defects caused by the fact that the product was
used with or connected to a product or an accessory
not manufactured or supplied by Vodafone;
(i) defects caused by the fact that the battery was
short-circuited or seals of the battery enclosure or
cells were broken or show evidence of tampering or
the battery was used in equipment other than for
which it has been specified;
(j) the propensity of a battery to show a gradual
diminution in battery recharging capacity due to
natural degradation in battery power; or
(k) viruses from end-user's or from a third party°Øs
unauthorised access to services, other accounts,
computer systems or networks.
4. Any product requiring service/repair under this
warranty must be delivered at the end-user's cost.
5. This warranty will be null and void should any of
the following events occur:
(a) the defacing or removal of the serial number or
warranty seal on the products;
(b) the alteration or modification in any way of any
term contained in this warranty without the prior written consent of Vodafone;
6. All repaired or replaced products will be warranted for the balance of the original warranty period
Page 86

from the date of repair or replacement.
7. This limited warranty is valid and enforceable only
in the United Kingdom and only in respect of
products purchased in the United Kingdom from
Vodafone or its authorised vendors.
8. If the product is returned to Vodafone after the
expiration of the warranty period then Vodafone
normal service policies shall apply and the end-user
will be charged accordingly.
9. Vodafone does not assume any other obligation
or liability beyond that which is expressly provided
for in this limited warranty.
10. All warranty information, product features and
specifications are subject to change without notice.
11. This limited warranty is end-user's sole and
exclusive remedy against Vodafone and Vodafone's
sole and exclusive liability in respect of defects in the
products. To the extent permitted by law, this
warranty is in lieu of any and all warranties express
or implied including any implied warranty of
merchantability or fitness for a particular purpose.
Vodafone assumes no liability for the breach of the
warranty beyond correcting the breach in the
manner described above. In no event shall
Vodafone be liable for loss of profits, revenue, data,
use, commercial loss or consequential loss or
damages.
12. In the event that the end-user wishes to make a
claim under this warranty, the end-user is requested
to retain their original proof of purchase of the
product for presentation to the vendor from whom
the product was purchased.
's
 Loading...