

Vocera Badge, B3000, B2000 User Manual

Vocera Badge User Guide
Version 4.x

ii ··· Vocera Badge User Guide
Copyright © 2002-2014 Vocera Communications, Inc. All rights reserved.
Protected by US Patent Numbers D486,806; D486,807; 6,892,083; 6,901,255;
7,190,802; 7,206,594; 7,248,881; 7,257,415; 7,310,541; 7,457,751; AU
Patent Number AU 2002332828 B2; CA Patent Number 2,459,955; EEC Patent
Number ED 7513; and Japan Patent Number JP 4,372,547.
Vocera® is a registered trademark of Vocera Communications, Inc.
This software is licensed, not sold, by Vocera Communications, Inc. (“Vocera”).
The reference text of the license governing this software can be found at
www.vocera.com/legal. The version legally binding on you (which includes
limitations of warranty, limitations of remedy and liability, and other provisions)
is as agreed between Vocera and the reseller from whom your system was
acquired and is available from that reseller.
Certain portions of Vocera’s product are derived from software licensed by the
third parties as described at http://www.vocera.com/legal/.
Microsoft®, Windows®, Windows Server®, Internet Explorer®, Excel®, and
Active Directory® are registered trademarks of Microsoft Corporation in the
United States and other countries.
Java® is a registered trademark of Oracle Corporation and/or its affiliates.
All other trademarks, service marks, registered trademarks, or registered service
marks are the property of their respective owner/s. All other brands and/or
product names are the trademarks (or registered trademarks) and property of
their respective owner/s.
Vocera Communications, Inc.
www.vocera.com
tel :: +1 408 882 5100
fax :: +1 408 882 5101
Part No :: 930-01863 Rev D
2014-01-17 12:04:43

Contents ··· iii
Contents
Welcome to Vocera..................................................................... 9
Getting Started with a Badge...................................................... 10
About this Guide........................................................................ 13
Badge Features.......................................................................... 15
B3000 Features........................................................................... 15
Enhanced Durability.............................................................. 16
Enhanced Display.................................................................. 16
Increased Speaker Volume..................................................... 17
Integrated Noise Cancellation................................................. 17
Smart Battery and Power Efficiency......................................... 19
Handset Mode...................................................................... 19
Improved Attachments.......................................................... 20
Indicator Lights..................................................................... 20
B2000 Features........................................................................... 20
Display Screen...................................................................... 20
Microphone and Speaker....................................................... 21
Indicator Lights..................................................................... 21
Common Badge Features............................................................ 22
Call Button........................................................................... 22
Hold/DND Button.................................................................. 22
The Badge Menus................................................................. 23
Custom Settings................................................................... 29
Background Updater............................................................. 34
Anti-Microbial Protection....................................................... 35
Headset Jack........................................................................ 36
Alert Tones and Notifications................................................. 36
Commands.................................................................................. 39
Basic Calling............................................................................... 41
Logging In and Out.................................................................... 41
Recording Names and Greetings................................................... 42

iv ··· Vocera Badge User Guide
Using the Welcome Tutorial on the Badge..................................... 42
Placing and Receiving Calls.......................................................... 43
Calling Other Users............................................................... 43
Using Speak or Spell............................................................. 44
Calling with Department Names............................................. 45
Calling a Group Member....................................................... 45
Training the Genie................................................................ 46
Answering a Call.................................................................. 49
Ending a Call....................................................................... 49
Using Buttons to Answer "Yes" or "No"................................. 50
Call Waiting......................................................................... 50
Putting a Caller on Hold and Releasing the Hold...................... 50
Using Do Not Disturb............................................................ 51
Sending Voice and Email Messages............................................... 51
Sending a Voice Message...................................................... 52
Sending an Email Message.................................................... 52
Listening to Messages................................................................. 53
Commands You Can Use During Message Play........................ 55
Reading Text Messages................................................................ 56
Using Voice Commands to Set Device Properties............................ 57
Using the Auto Answer Commands........................................ 58
Using the Announce through Speaker Commands.................... 58
Getting Help.............................................................................. 59
Advanced Commands................................................................ 61
Calling Telephone Numbers......................................................... 61
Calling an Address Book Entry or Buddy....................................... 62
Sending and Receiving Numeric Pages.......................................... 63
Redialing Phone Numbers............................................................ 65
Using Instant Conferences........................................................... 66
Joining and Leaving a Conference.......................................... 66
Using the Vocera Badge or Phone in a Conference................... 67
Summary of Conference Commands....................................... 67
Broadcasting to a Group............................................................. 68
Summoning Help in an Emergency......................................... 69
Forwarding Your Calls................................................................. 70
Placing a Three-Way Conference Call............................................ 71
Unsupervised Conferencing.................................................... 71
Supervised Conferencing....................................................... 72
Issuing Urgent Commands........................................................... 73
Dialing a Phone Number to Urgently Broadcast to a Group........ 74
Joining or Leaving a Group.......................................................... 74
Locating a Vocera User or Group Member..................................... 76
Using Care Transition Commands................................................. 76
Recording Your Voiceprint........................................................... 77

Contents ··· v
Blocking and Accepting Calls....................................................... 78
Recording a Dictation Session...................................................... 79
Getting Other Information........................................................... 79
Navigating IVR Phone Trees with a Badge...................................... 80
Possible Touch-Tone Responses............................................... 81
Special Features......................................................................... 83
Communicating with Multiple Sites........................................ 85
About Sites................................................................................ 85
Types of Sites............................................................................. 85
Using Sites in Voice Commands................................................... 86
Logging In at a Site you are Visiting....................................... 87
Placing a Three-Way Conference Call Between Different
Sites.................................................................................... 87
Commands for Group Managers.............................................. 89
Group Manager Capabilities........................................................ 89
Adding and Removing Group Members........................................ 90
Recording Names and Greetings for a Group................................. 90
Sending Text Messages to Vocera Devices.............................. 93
Sending a Text Message from an Email Program............................. 93
Sending a Text Message from the User Console............................. 94
Using Vocera Access Anywhere............................................... 97
Types of Access to the Genie....................................................... 97
Software and Configuration Requirements.................................... 98
Starting a Genie Session from a Phone......................................... 98
Starting a Genie Session at Another Site..................................... 100
Vocera Access Anywhere Special Keys......................................... 101
Announcements for Calls from a Phone...................................... 101
Commands Not Supported from a Phone.................................... 102
Other Functionality Not Supported on a Phone...................... 102
Training the Genie from a Phone................................................ 103
The User Console..................................................................... 105
User Console Features............................................................... 105
Maintaining Your Badge......................................................... 107
When to Charge the Battery...................................................... 107

vi ··· Vocera Badge User Guide
Preparing the Charger............................................................... 107
Preparing the B3000 Charger............................................... 108
Preparing the B2000 Charger............................................... 109
Charging the Battery................................................................. 110
Charging the B3000 Battery................................................ 110
Charging the B2000 Battery................................................ 111
Cleaning the Badge and Accessories........................................... 113
Reference.................................................................................. 115
Frequently Asked Questions.................................................. 117
Why does the Genie have trouble understanding me?.................. 117
Why is my device chirping or beeping?....................................... 118
Why does my device beep when I'm talking to someone?............. 119
Why does my device display say "Searching for Server"?............... 119
Why does the Genie ask me to wait when I press Call?................. 119
Why can't I receive calls or messages?........................................ 120
Why do some text messages begin with strange characters?.......... 120
Why does my badge beep and then restart?................................ 120
What can I do if badge buttons are not working?........................ 120
How can I stop getting logged out when I charge my badge?........ 120
Agreements, Specifications, and Notices............................... 121
Third-Party Software Agreements................................................ 121
System Specifications................................................................. 121
System Specifications for B2000........................................... 121
System Specifications for B3000........................................... 124
Regulatory Notices.................................................................... 126
B2000 Regulatory Notices.................................................... 127
B3000 Regulatory Notices.................................................... 130
Important Safety Instructions................................................ 141
Warning Definition.................................................................... 142
Badge and Battery Charger Safety.............................................. 143
Important Information About Use in Certain Areas....................... 147
Additional Instructions for B3000 Battery Safety........................... 147
Product Disposal Warning.................................................... 148
National Safety Statement of Compliance – CE Marking.......... 149
Command Reference............................................................... 151
Summon and Dismiss the Genie................................................. 151
Log In and Log Out.................................................................. 151

Contents ··· vii
Record Your Name, Greeting, and Voiceprint............................... 152
Call a User or Group Member.................................................... 152
Dial a Telephone Number.......................................................... 153
Broadcast to a Group................................................................ 153
Forward a Call.......................................................................... 154
Transfer a Call.......................................................................... 154
Use Instant Conferences............................................................ 154
Send and Receive Numeric Pages............................................... 155
Block and Accept Calls.............................................................. 156
Send Messages......................................................................... 156
Play Messages.......................................................................... 156
Locate Users and Groups........................................................... 157
Work With Your Groups............................................................ 158
Manage Groups........................................................................ 158
Place a Three-Way Conference Call............................................. 159
Work with Sites........................................................................ 160
Care Transition.......................................................................... 160
Dictation.................................................................................. 161
Getting Help............................................................................. 161
Miscellaneous........................................................................... 162
Index......................................................................................... 163

viii ··· Vocera Badge User Guide

Welcome to Vocera ··· 9
Welcome to Vocera
Your Vocera device provides fast, simple, person-to-person communication
over your company's wireless network. Using voice commands, Vocera instantly
connects you to the people you need to reach, reducing phone tag, overhead
paging, and physically searching for a person. It also gives you the freedom to
be mobile, even when you are expecting an important call.
The Vocera badge has a built-in speaker, microphone, and radio, plus a display
that shows caller ID and messages. Attachment options for the badge allow
hands-free operation.
Vocera devices communicate through your in-house wireless local area network
(WLAN). This design permits people to reach you even in areas where cellular
phones experience what people call dead spots. Also, since Vocera devices
transmit and receive calls in a different frequency range than cellular phones,
you can use a Vocera devices in areas where cellular phones are prohibited
because of concerns about interference with other equipment.
A central computer, the Vocera Server, controls all Vocera device
communications. If you have a Vocera Smartphone, it communicates with the
Vocera Server through a separate Vocera Client Gateway. As you use your
Vocera badge or phone, you are prompted by the Genie, which is the voice
interface to the server. The Genie recognizes simple commands in verb-noun
format. For example:
"Call Charles Jones."
"Record a message for Tech Support."
"Block all calls."
Because Vocera devices uses voice commands, the system is easy to learn, and
you can start using your badge or phone immediately.
Getting Started with a Badge
10 ··· Vocera Badge User Guide
Getting Started with a Badge
If this is the first time you are using a Vocera badge, you can get started right
away by following these simple steps:
When your badge is ready to use, you can press the Call button at any time,
wait for the Genie to answer, and then give the Genie a voice command, such
as:
"Call Jim Olsen."
"Record my greeting."
"Play my messages."
For more information about Vocera commands, see Basic
Calling on page 41 and Advanced Commands on page 61.
To get started with a B3000 badge:
1. Charge the battery, if necessary.
New batteries must be charged before use. If the badge has already been
used by someone else, check the battery level indicator on the badge
display to make sure the battery has sufficient power.
See Maintaining Your Badge on page 107 for other ways to determine
whether the battery needs charging and for instructions on how to charge
the battery.
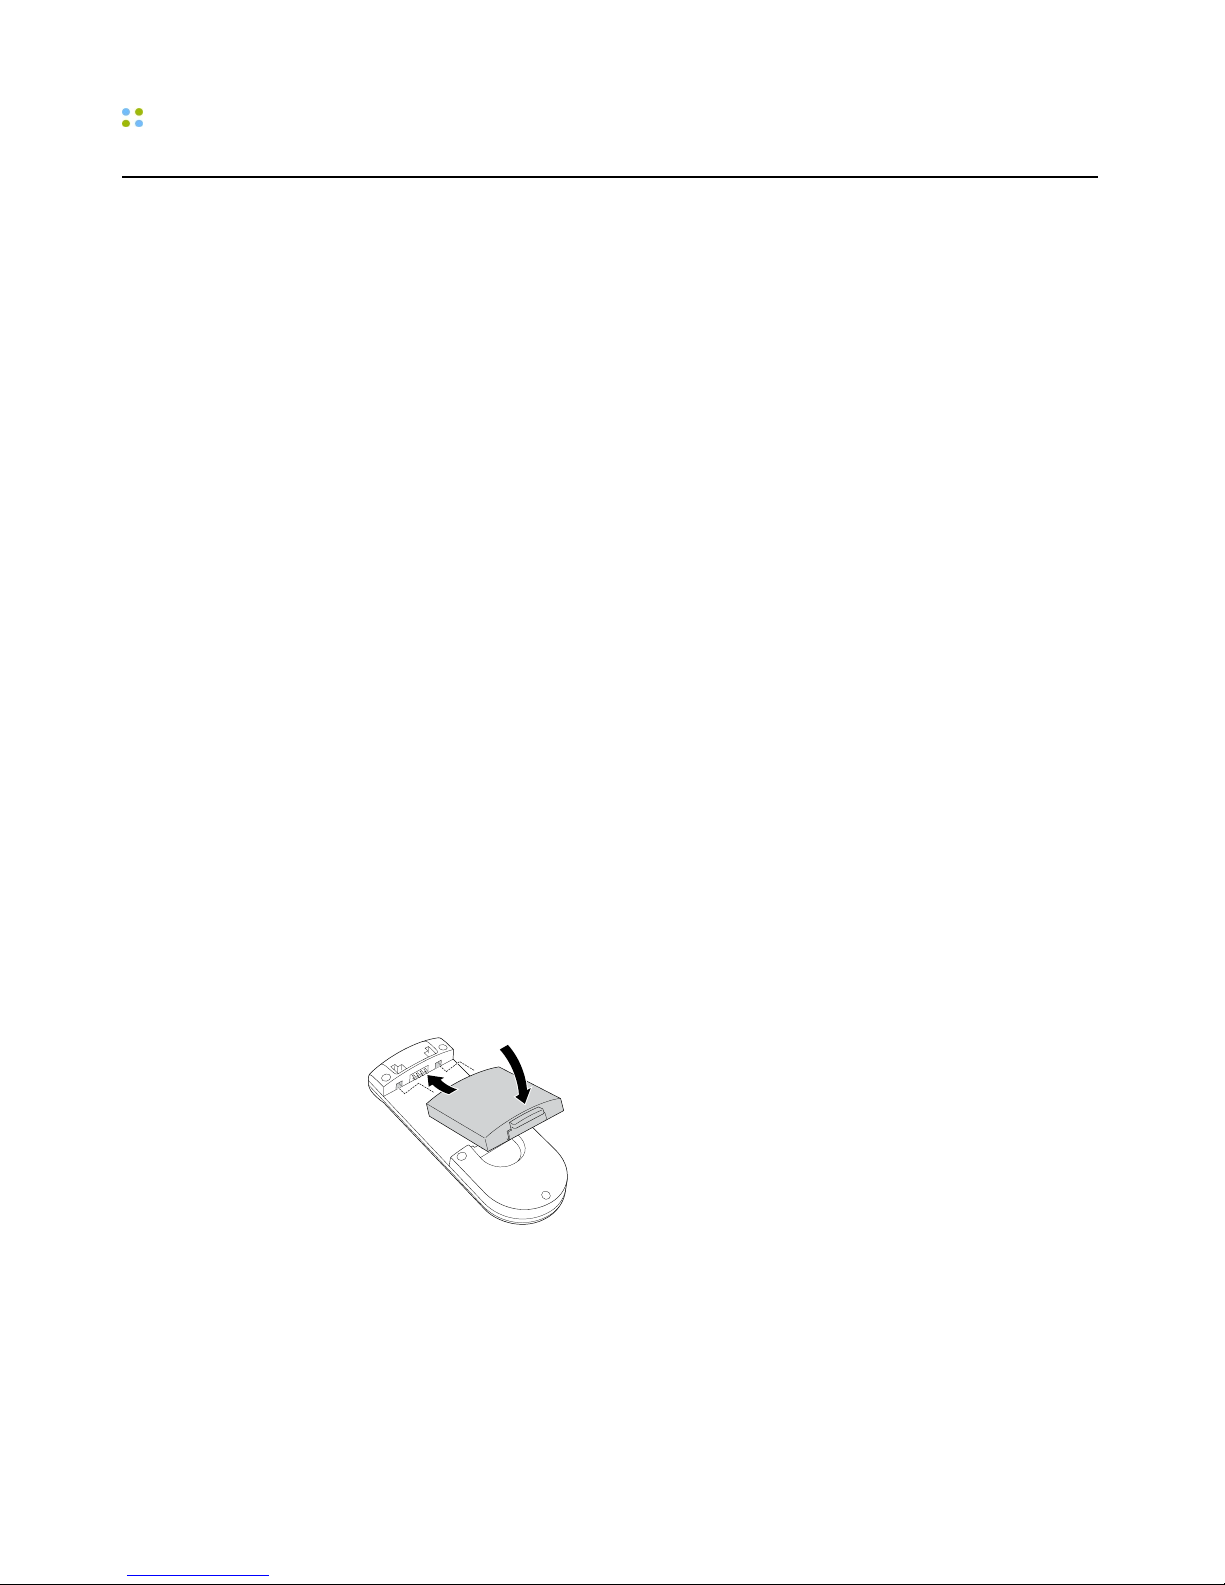
2. Install the battery. To do this, slide the pegs at the top of the battery into
the two holes in the badge's battery compartment, and then press down
gently to seat the battery.
The badge will begin a startup sequence. Wait until the badge display reads
Logged Out or shows someone's name.
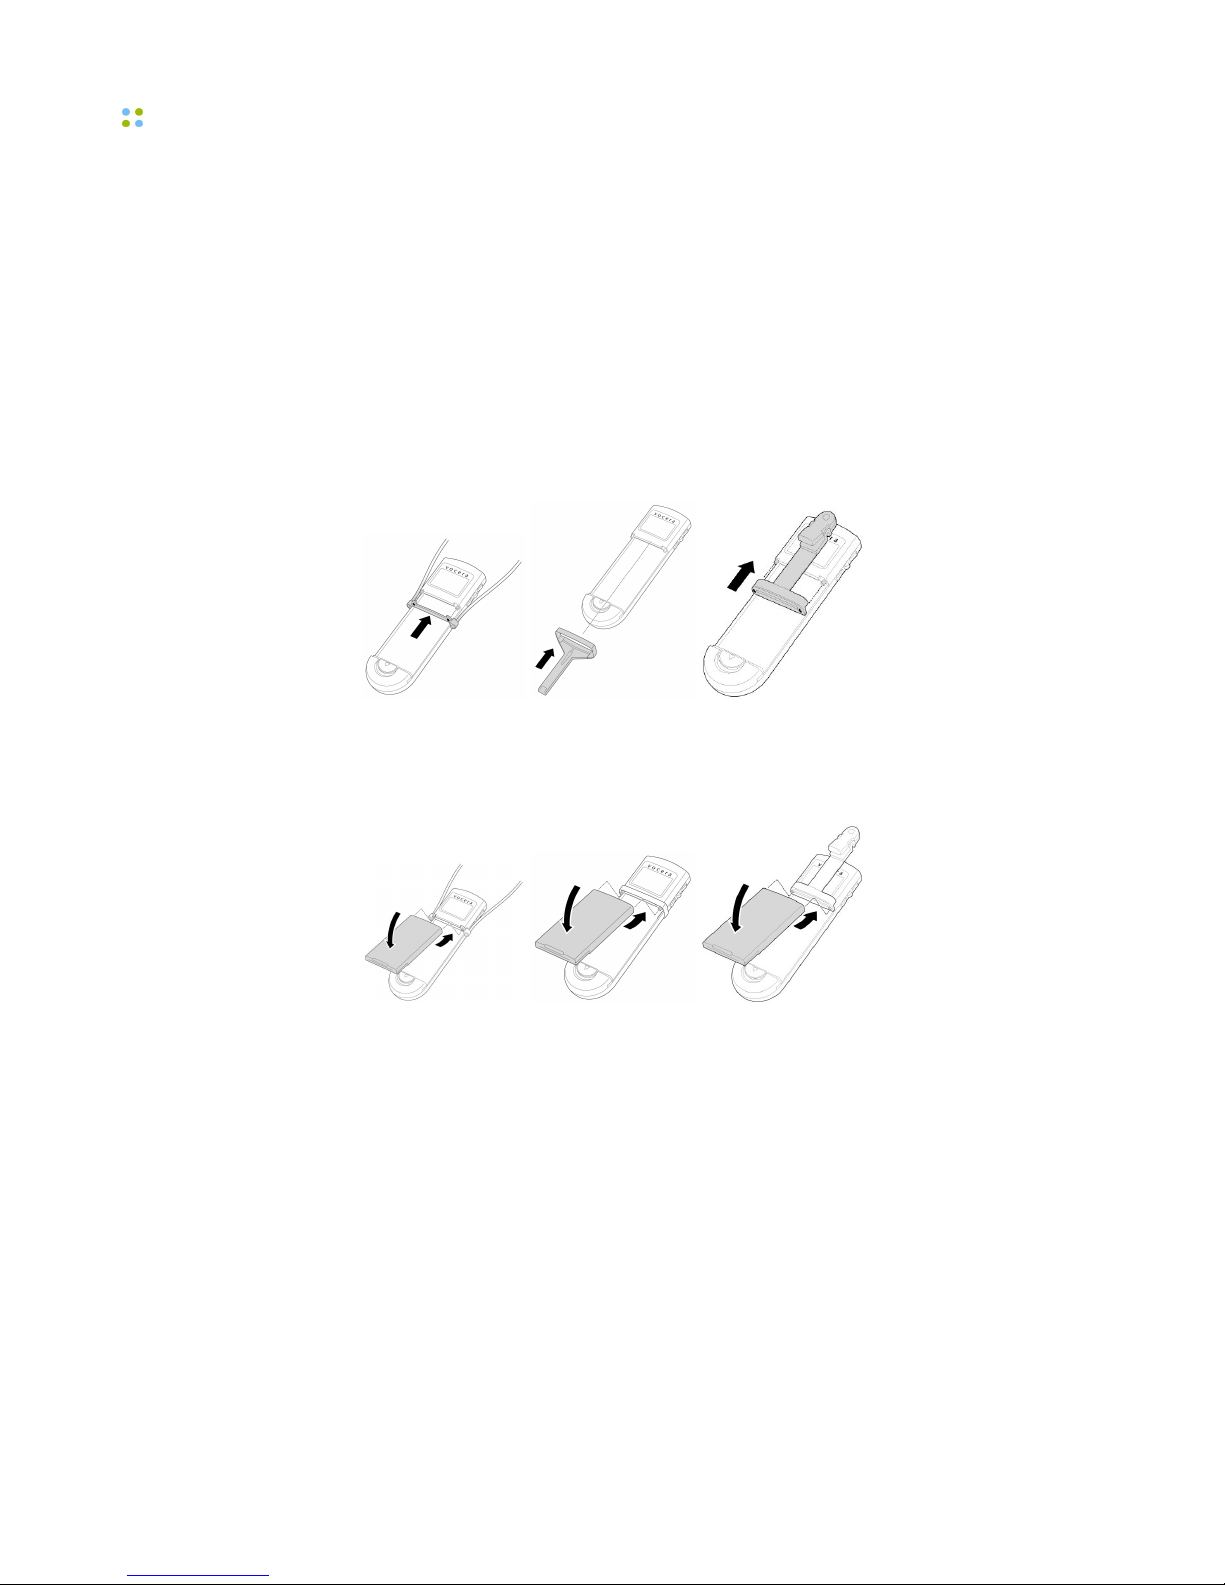
3. Choose the lanyard or universal clip attachment, and connect it to the
badge.

Getting Started with a Badge
Welcome to Vocera ··· 11
You also can connect the lanyard or clip to the badge before installing the
battery.
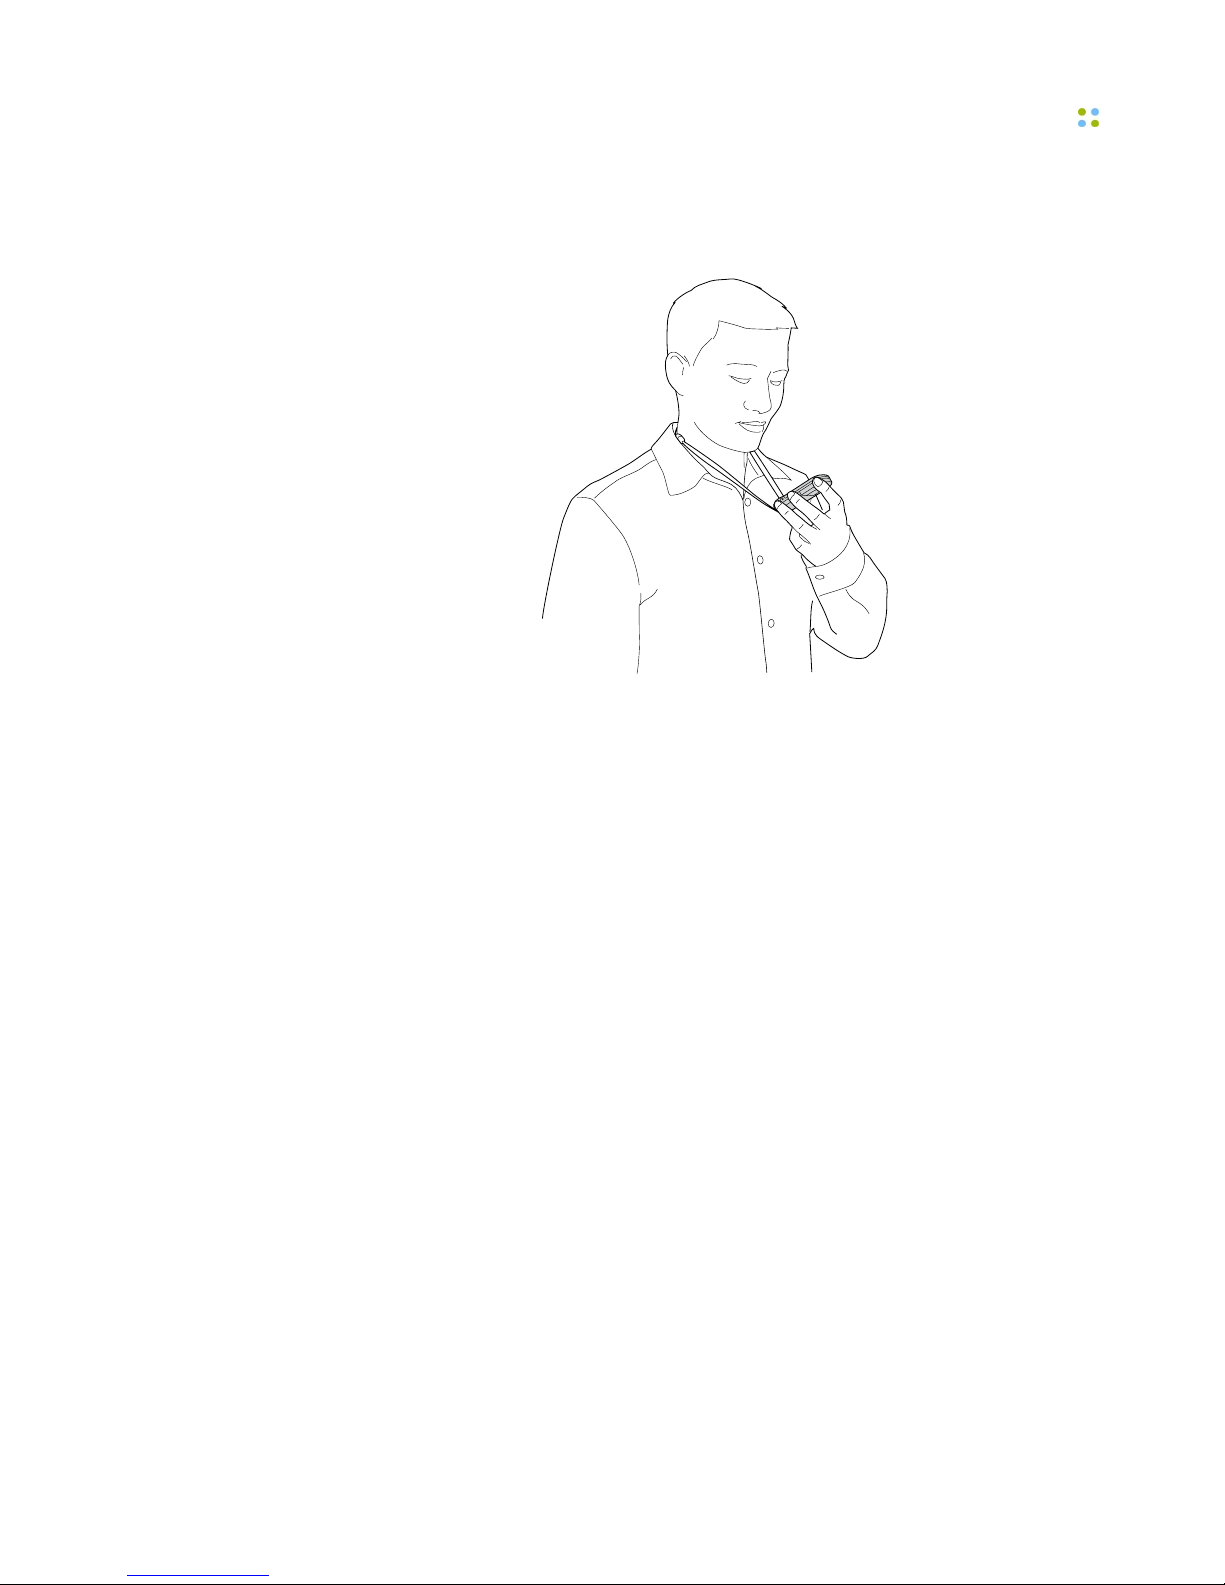
4. Put the badge on, and make sure it is in the proper position.
For optimal speech recognition, the top of the badge should be
approximately 6 inches (15 centimeters) from your chin. Any sound coming
from another direction or beyond that distance is reduced or eliminated by
the noise canceling microphones.
5. Log in: Press the Call button and wait for the Genie to answer.
• If the Genie asks for your name, say your first and last names.
• If the Genie answers by saying "Vocera" or by playing a tone,
another user may already be logged in. If so, say "Log me out," wait for
the chime, and then press the Call button again to log in.
6. Record your name: Press the Call button, wait for the Genie to answer, and
then say "Record my name."
The Genie will prompt you to record your name. If you do not record your
name, the Vocera system uses speech synthesis to say your name.
7. Adjust the volume on the badge, if necessary. See Adjusting the
Volume on page 30.
To get started with a B2000 badge:
1. Charge the battery, if necessary.
Getting Started with a Badge
12 ··· Vocera Badge User Guide
New batteries must be charged before use. If the badge has already been
used by someone else, check the battery level indicator on the badge
display to make sure the battery has sufficient power.
See Maintaining Your Badge on page 107 for other ways to determine
whether the battery needs charging and for instructions on how to charge
the battery.
2. Choose the lanyard, pocket clip, or universal clip attachment, and connect it
to the badge.
Connect attachments before you install the battery.
3. Install the battery. To do this, slide the holes in the top of the battery over
the small pegs at the top of the badge's battery compartment, and then
press down gently to seat the battery.
The badge will begin a startup sequence. Wait until the badge display reads
Logged Out or shows someone's name.
4. Put the badge on, and make sure it is in the proper position.
To get the best possible speech recognition, the microphone on the top of
the badge should point toward your mouth and should be approximately 6
inches (15 centimeters) from your chin.

About this Guide
Welcome to Vocera ··· 13
5. Log in: Press the Call button and wait for the Genie to answer.
• If the Genie asks for your name, say your first and last names.
• If the Genie answers by saying "Vocera" or by playing a tone,
another user may already be logged in. If so, say "Log me out," wait for
the chime, and then press the Call button again to log in.
6. Record your name: Press the Call button, wait for the Genie to answer, and
then say "Record my name."
The Genie will prompt you to record your name. If you do not record your
name, the Vocera system uses speech synthesis to say your name.
7. Adjust the volume on the badge, if necessary. See Adjusting the
Volume on page 30.
About this Guide
This guide describes how to use Vocera badges to communicate. It starts with
the basics, such as the different features of the device and how to place and
receive calls. It also provides information about sending messages, broadcasting,
setting properties to customize behavior, cleaning and maintenance, and using
the full set of voice commands.
Important: All voice commands and features mentioned in this guide are
supported in Vocera 4.0 or later unless otherwise indicated.

About this Guide
14 ··· Vocera Badge User Guide

Badge Features ··· 15
Badge Features
The design of the Vocera badge is simple, so you can communicate quickly
and easily and keep your hands free to do other tasks. The information in this
chapter will help you become familiar with the badge features.
B3000 Features
Version: Vocera 4.1 SP7 or later
Enhanced Durability
16 ··· Vocera Badge User Guide
Enhanced Durability
The B3000 is more durable and rugged than its B2000 predecessor. All buttons
on the badge now use dome switches instead of mechanical switches. Menu
selection buttons have been moved from the side to the front of the badge, and
the battery latch is now part of the battery. A metallic spine reinforces the shell
and serves as the attachment point for accessories at the top of the badge. The
B3000 has been tested to withstand dust, shock, and vibration. Like the B2000
badge, the B3000 is NOT water-resistant.
Enhanced Display
The B3000 badge display, which is 11% larger than the B2000 display but with
nearly twice as many pixels, has been moved to the front of the badge and
positioned in portrait orientation. To conserve power, the display is activated
only when you press buttons, use menus, or are on a call. Otherwise, the
display is powered off. You can choose to invert the screen, thus letting you
conveniently read the text by tilting the bottom of the badge up.
The following figure show the B3000 screen in different orientations (right side
up and upside down):
Increased Speaker Volume
Badge Features ··· 17
The following figure shows a user tilting his badge up to read the inverted
screen:
Note: When you tilt the badge to read the screen, make sure your fingers do
not block any of the four microphones.
Increased Speaker Volume
The B3000 has a speaker with 85 dBSPL peak loudness, more than 10 dB louder
than the B2000 speaker, making it easier to use without a headset in noisy
areas or areas with persistent background noise.
Integrated Noise Cancellation
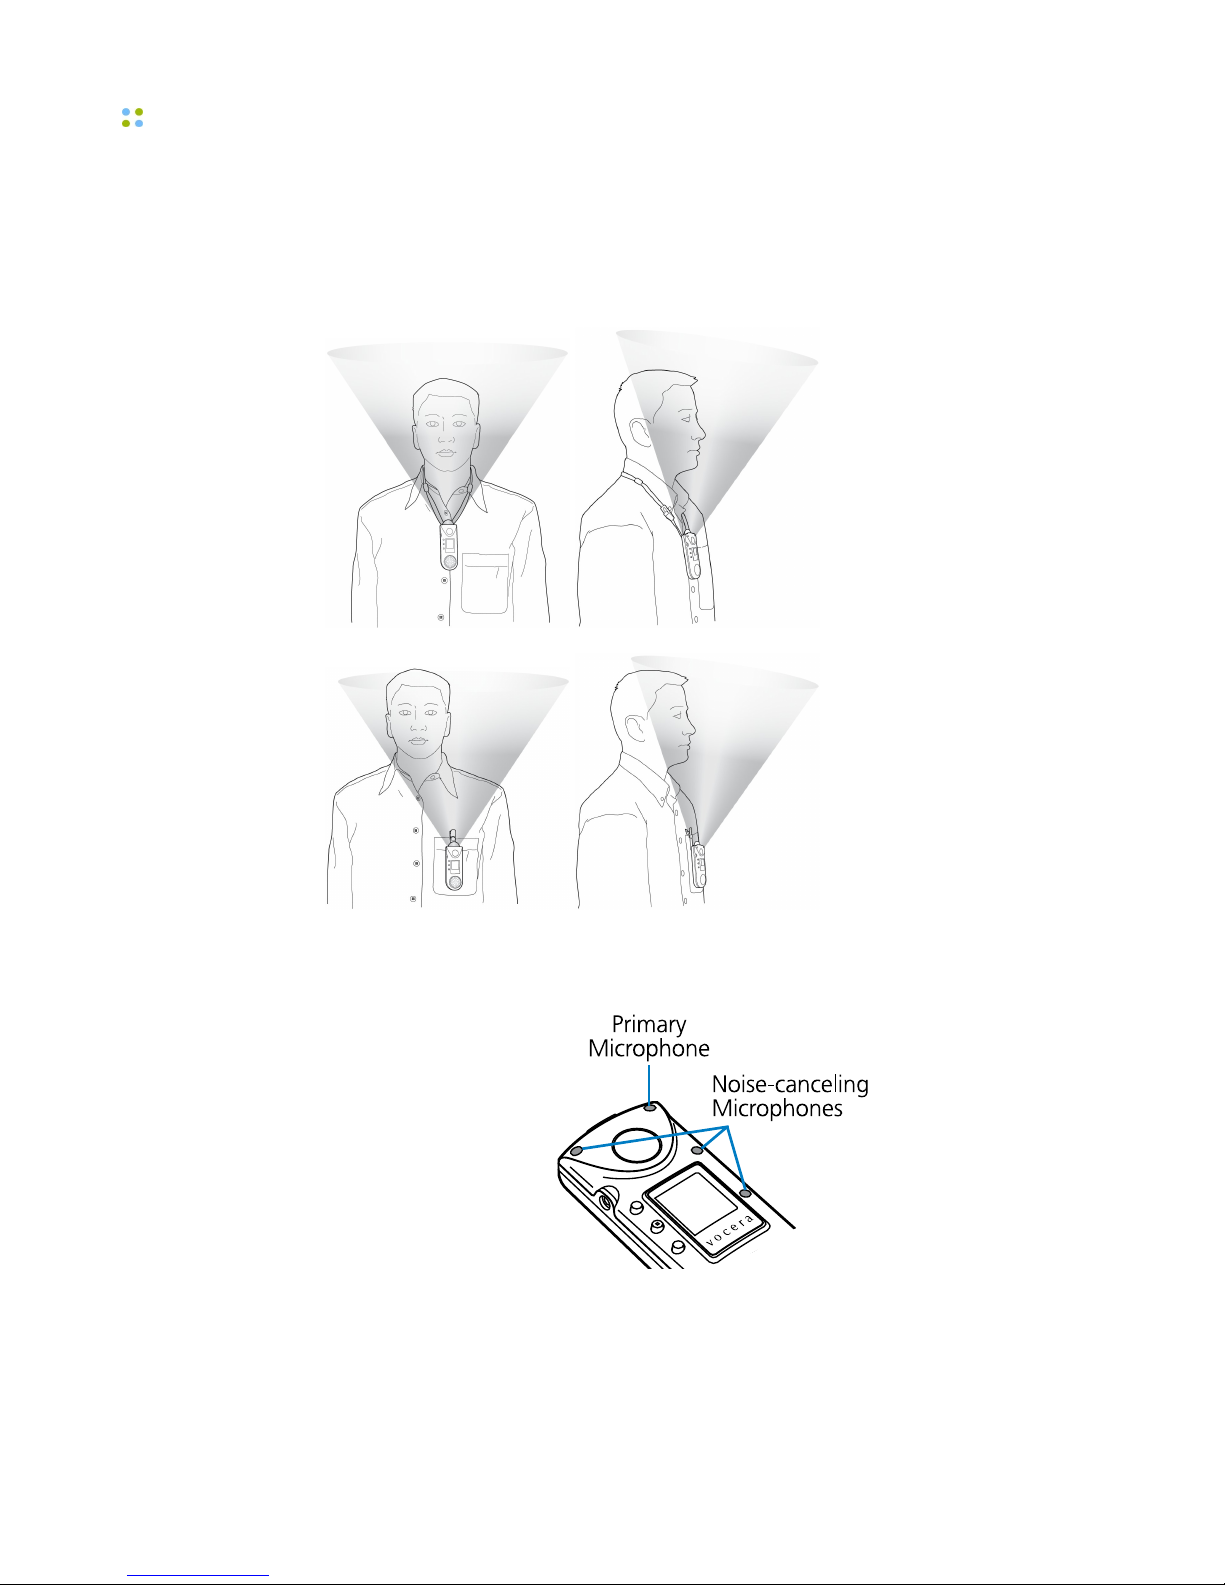
The B3000 has enhanced noise cancellation as well as better acoustic echo
cancellation. The badge has an array of four directional microphones (two at
the top and two along the right front side), each with their own echo cancellor,
reducing background noise while you speak.
Integrated Noise Cancellation
18 ··· Vocera Badge User Guide
The following figures illustrate B3000 microphone sensitivity. They show front
and side views of someone wearing the badge using a lanyard or a universal
clip. The shaded area above the badge is the speech zone, the region in which
audio can be detected.
The following figure shows the primary B3000 microphone and the three noisecanceling microphones.
The noise cancellation features of the B3000 badge have been designed to
provide significant improvement in speech recognition accuracy in environments
with background noise compared to the older B2000 model.
Smart Battery and Power Efficiency
Badge Features ··· 19
Smart Battery and Power Efficiency
The lithium-ion polymer smart battery continuously monitors battery life and
is able to accurately report remaining capacity. Due to improvements in power
efficiency in the B3000 badge, a fully charged B3000 standard battery should
provide 3 hours of talk time (U-APSD enabled) and up to 45 hours of standby
time. A fully charged B3000 extended battery should provide 5 hours of talk
time and 60 hours of standby time. Unlike the B2000 battery, you must remove
the B3000 battery from the badge to charge it.
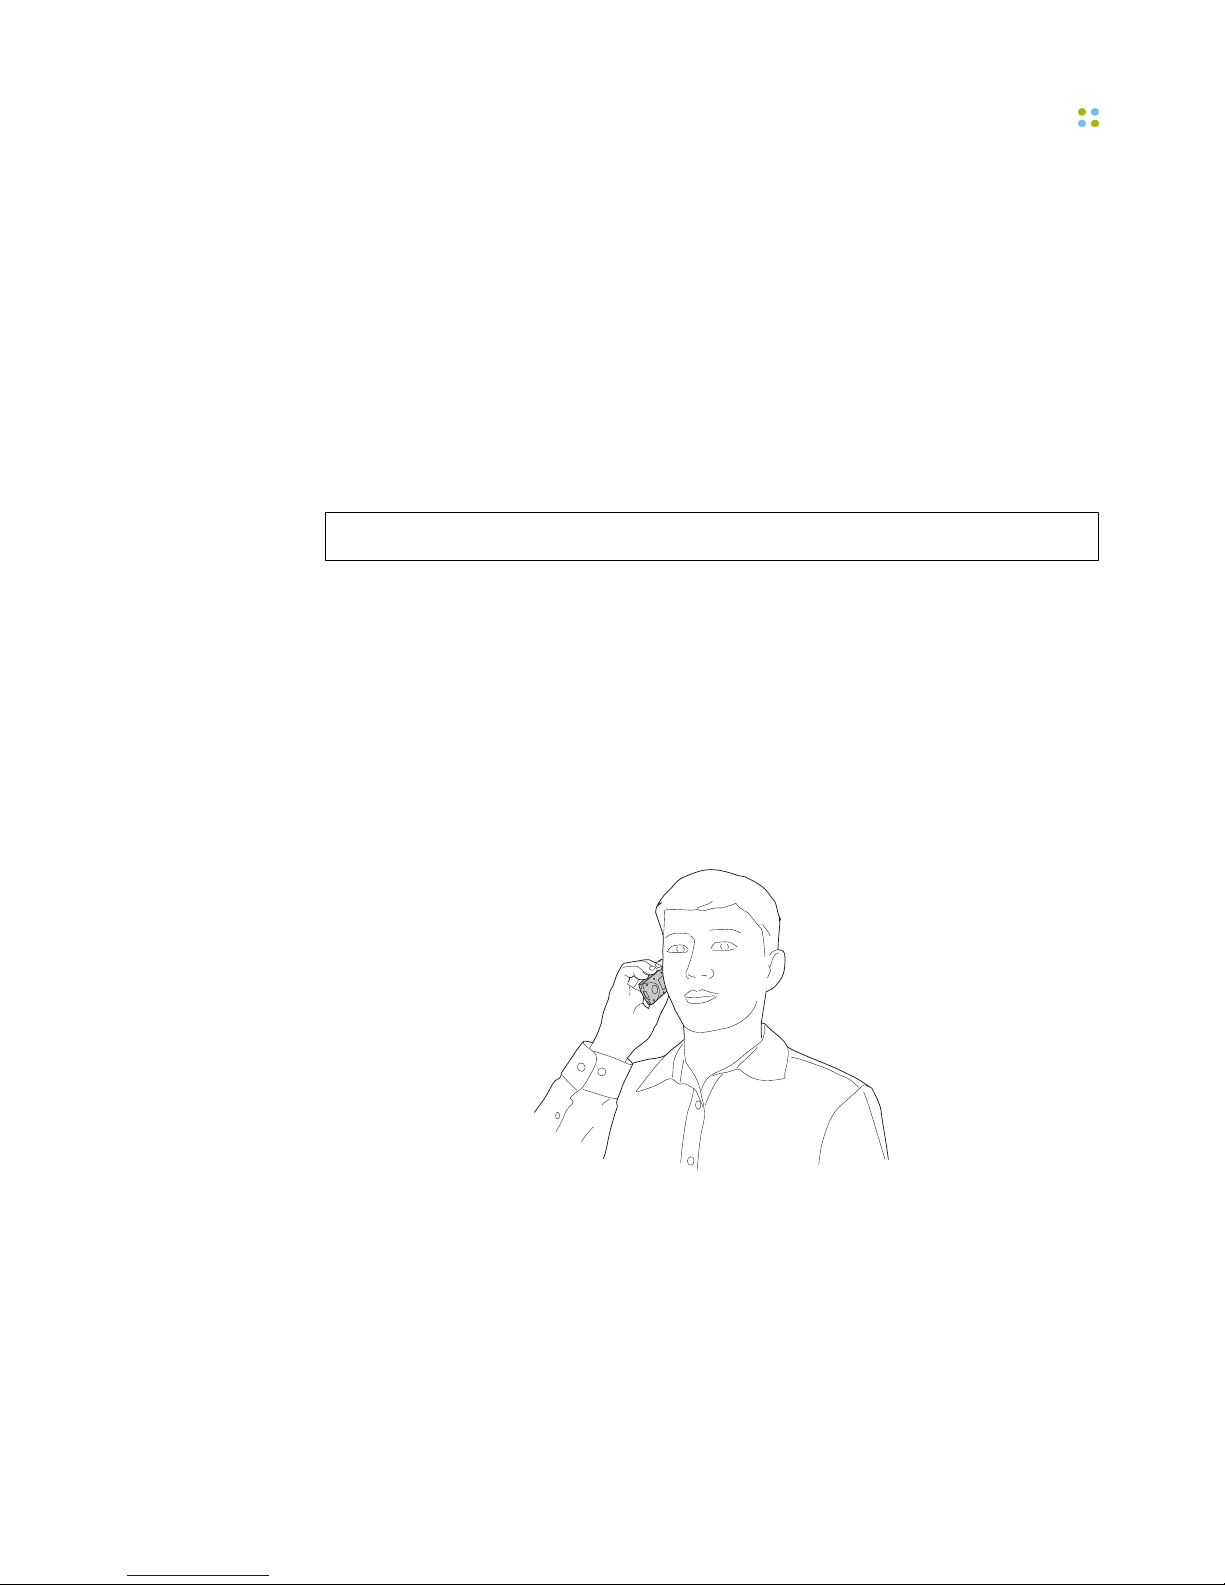
Handset Mode
Version: Vocera 4.3 SP2 or later
The B3000 lets users switch to handset mode to ensure privacy or use the
badge in a high noise environment without a headset. When the badge is in
handset mode, you can use it like a telephone handset. Press the Call button to
make a call or answer a call, and then put the badge speaker to your ear and
speak into the primary microphone located on the front of the badge at the
top right corner. Only the primary microphone is enabled in handset mode; the
three noise-canceling microphones are automatically disabled. For information
on how to switch the badge to handset mode, see Turning Handset Mode
On or Off on page 32.
Note: When you hold the badge speaker up to your ear, do not cover the
primary microphone with your fingers. Otherwise, the Genie will not hear
anything you say.
Improved Attachments
20 ··· Vocera Badge User Guide
Improved Attachments
B3000 lanyards and clips attach easily and securely to the metal spine at the top
of the badge, letting you remove the attachment without removing the battery,
and vice versa.
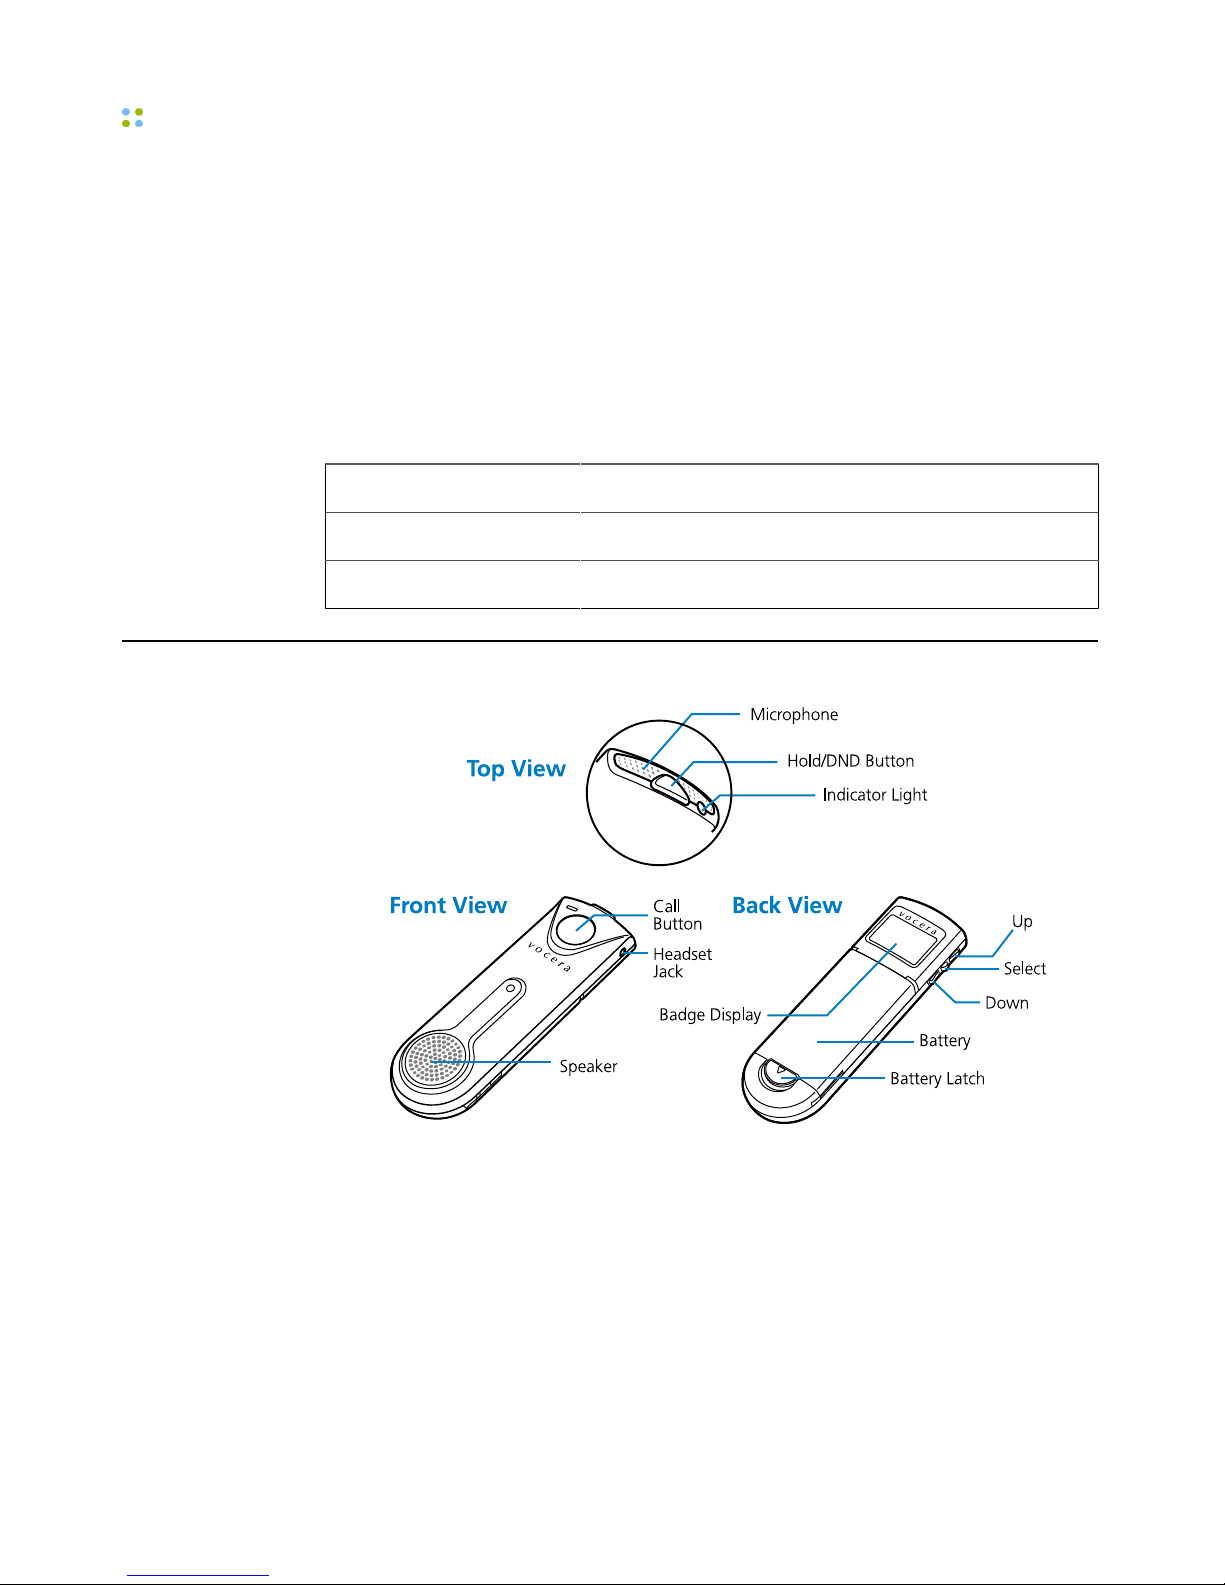
Indicator Lights
The indicator light on the top of the badge indicates whether the badge's
power and DND mode are on:
Color Meaning
Green blink Power is on, DND mode is off
Amber blink Power and DND mode are on
B2000 Features
Display Screen
The display screen on the back of the badge provides status information and a
menu that lets you view badge information and customize settings. The display
screen also lets you view text messages sent by email, the Vocera User Console,
or an application that integrates with the Vocera system, such as a nurse call
system. See The Badge Menus on page 23 for information about each of
the screens in the badge menu.
Microphone and Speaker
Badge Features ··· 21
The B2000 badge features a high-contrast, high-resolution display with an
extensive grey-scale to provide greater readability. This display allows for fonts
that use both upper- and lower-case characters.
The B2000 badge automatically launches a screen saver when its display is
inactive. The screen saver shows your first name and the first initial of your
last name, along with an icon indicating the remaining battery life. The badge
dismisses this screen saver immediately if the display needs to become active—
for example, if you receive a call or a message.
You can manually interrupt the screen saver and return the badge to its
previous display by using any of the badge buttons:
• Pressing a side button dismisses the screen saver without taking any
additional action.
• Pressing the Call button dismisses the screen saver and also initiates a call.
• Pressing the Hold/DND button dismisses the screen saver and places the
badge in DND mode.
Microphone and Speaker
The unidirectional design of the microphone enables it to gather and transmit
speech, yet minimizes the amount of background noise that is picked up.
You can adjust the speaker volume by using the buttons on the left side of the
badge. See Adjusting the Volume on page 30.
Indicator Lights
The indicator light on the top of the badge provides message alerts, out-ofnetwork alerts, and low battery warnings. The color and blink rate of the
indicator light give you the following information:
Common Badge Features
22 ··· Vocera Badge User Guide
Color Blink Rate Meaning
Slow Normal operation. No new voice or text messagesGreen
Fast Normal operation and you have unplayed voice
messages or unread text messages
Slow Your badge is out of range or is not
communicating with the Vocera server. If the
badge is out of range, you will see the message
“Searching for Access Points” on the badge
display. If the badge is within range but is not
connecting to the server, you will see the message
“Searching for Server.”
Red
Fast The battery needs to be recharged.
Note: The Hold/DND button has a yellow indicator light that blinks to remind
you that a call is on hold or that you have put the badge in Do Not Disturb
mode.
Common Badge Features
This section describes features that are common to all types of Vocera badges.
Call Button
Press the Call button to begin and end all voice communications, such as
making calls, sending and listening to messages, and recording your name and
greeting. The Call button also has these other uses:
• If the badge power is off, you can press the Call button to turn it on.
• If the Genie asks you a question that requires a yes or no response, you can
press the Call button to answer "yes."
• If you are on a call and you hear a Call Waiting tone, press the Call button to
put the current call on hold and connect to the new call. To disconnect from
the second call and return to the call on hold, press the Call button again.
Hold/DND Button
The Hold/DND button places calls on hold, puts the badge in Do Not Disturb
(DND) mode, and turns the badge power off:
• To hold a call, press the Hold/DND button while the call is in progress. To
release the hold, press the button again.

The Badge Menus
Badge Features ··· 23
While a call is on hold, you can press the Call button to summon the Genie.
When the Genie answers, you can call another user, check for new messages,
or issue any other command. Once the command has been carried out and
the operation is finished, the Genie automatically reconnects you with the
person on hold.
• To put the badge in Do Not Disturb mode, press the Hold/DND button when
no call is in progress. Callers are told that you are unavailable, and they
are invited to leave a message, or else their call is forwarded to another
destination if forwarding is active for your badge.
• The Hold/DND button can turn the badge off. Press and hold the Hold/DND
button for at least seven seconds to turn off the badge power.
A small yellow indicator light on the Hold/DND button blinks when the badge is
in Hold or Do Not Disturb mode.
The Hold/DND button also has these other uses:
• Press the Hold/DND button to cancel a command. For example, if you are
calling someone, leaving a message, or recording your name and you change
your mind, press Hold/DND to cancel the action.
• If the Genie asks you a question that requires a yes or no response, press the
Hold/DND button to answer "no." (To answer "yes," use the Call button.)
The Badge Menus
The badge display shows a series of menu screens that comprise the top level of
the menu system. You navigate the badge menus differently depending on the
type of badge.
To navigate through B3000 menus:
• Press the Select button to display the menu, and then use the Up or Down
buttons to navigate.
Note: The menu screens wrap in either direction if you keep pressing Up or
Down.
To navigate through B2000 menus:
• Press the Up, Select, or Down button to display the menu, and then use the
Up or Down buttons to navigate.
On B3000 badges, the Up, Select, and Down buttons are on the front of the
badge. Up and Down depend on the orientation of the screen.

The Badge Menus
24 ··· Vocera Badge User Guide
On B2000 badges, the Up, Select, and Down buttons are on the side of the
badge. The screen orientation cannot be changed.
Use the Select button to choose a displayed item. To return to the main screen
at any time, press and hold the Select button until the badge beeps. Pressing
the Select button from the main screen takes you to the Messages screen.
The top-level menu differs for each Vocera badge type, as shown in the
following table:
Badge Type Top-Level Menu
B3000 Messages
Settings
Return Home
Info
Power Off

The Badge Menus
Badge Features ··· 25
Badge Type Top-Level Menu
B2000 Info
Power Off
Volume
Font
Messages
The following sections describe your badge's display menu choices.
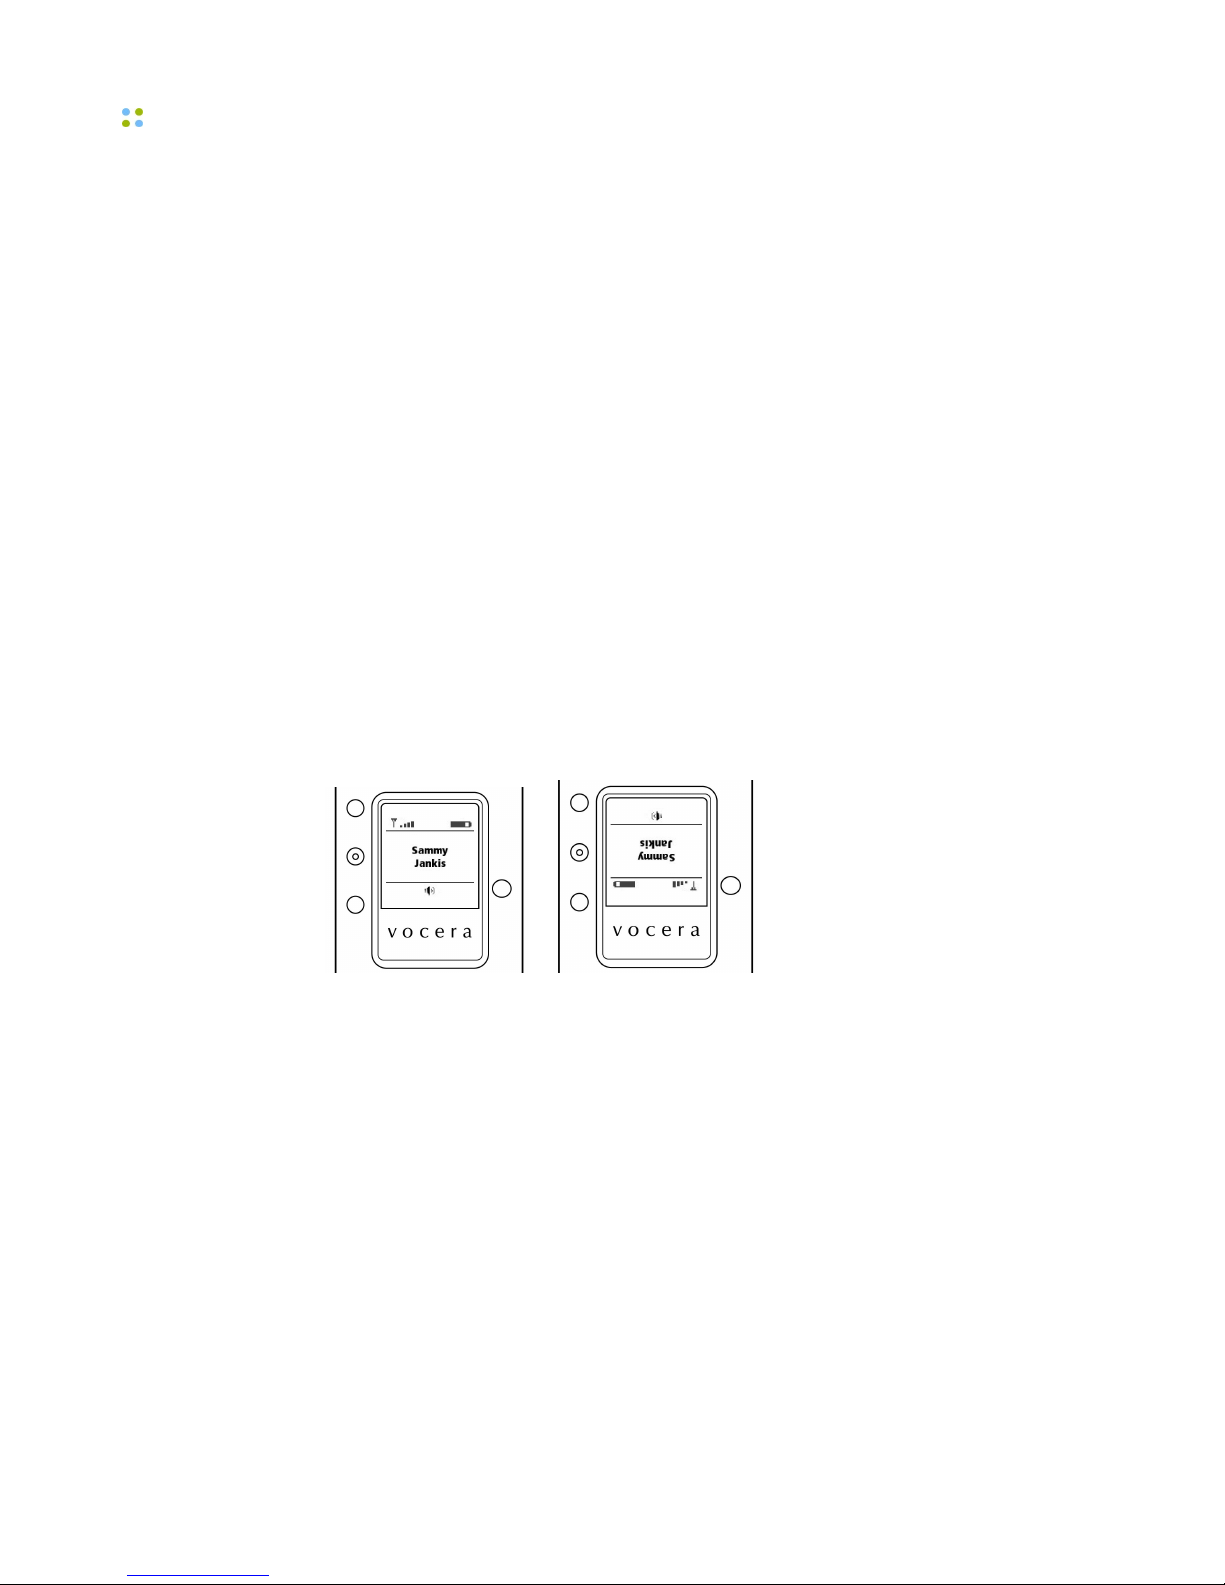
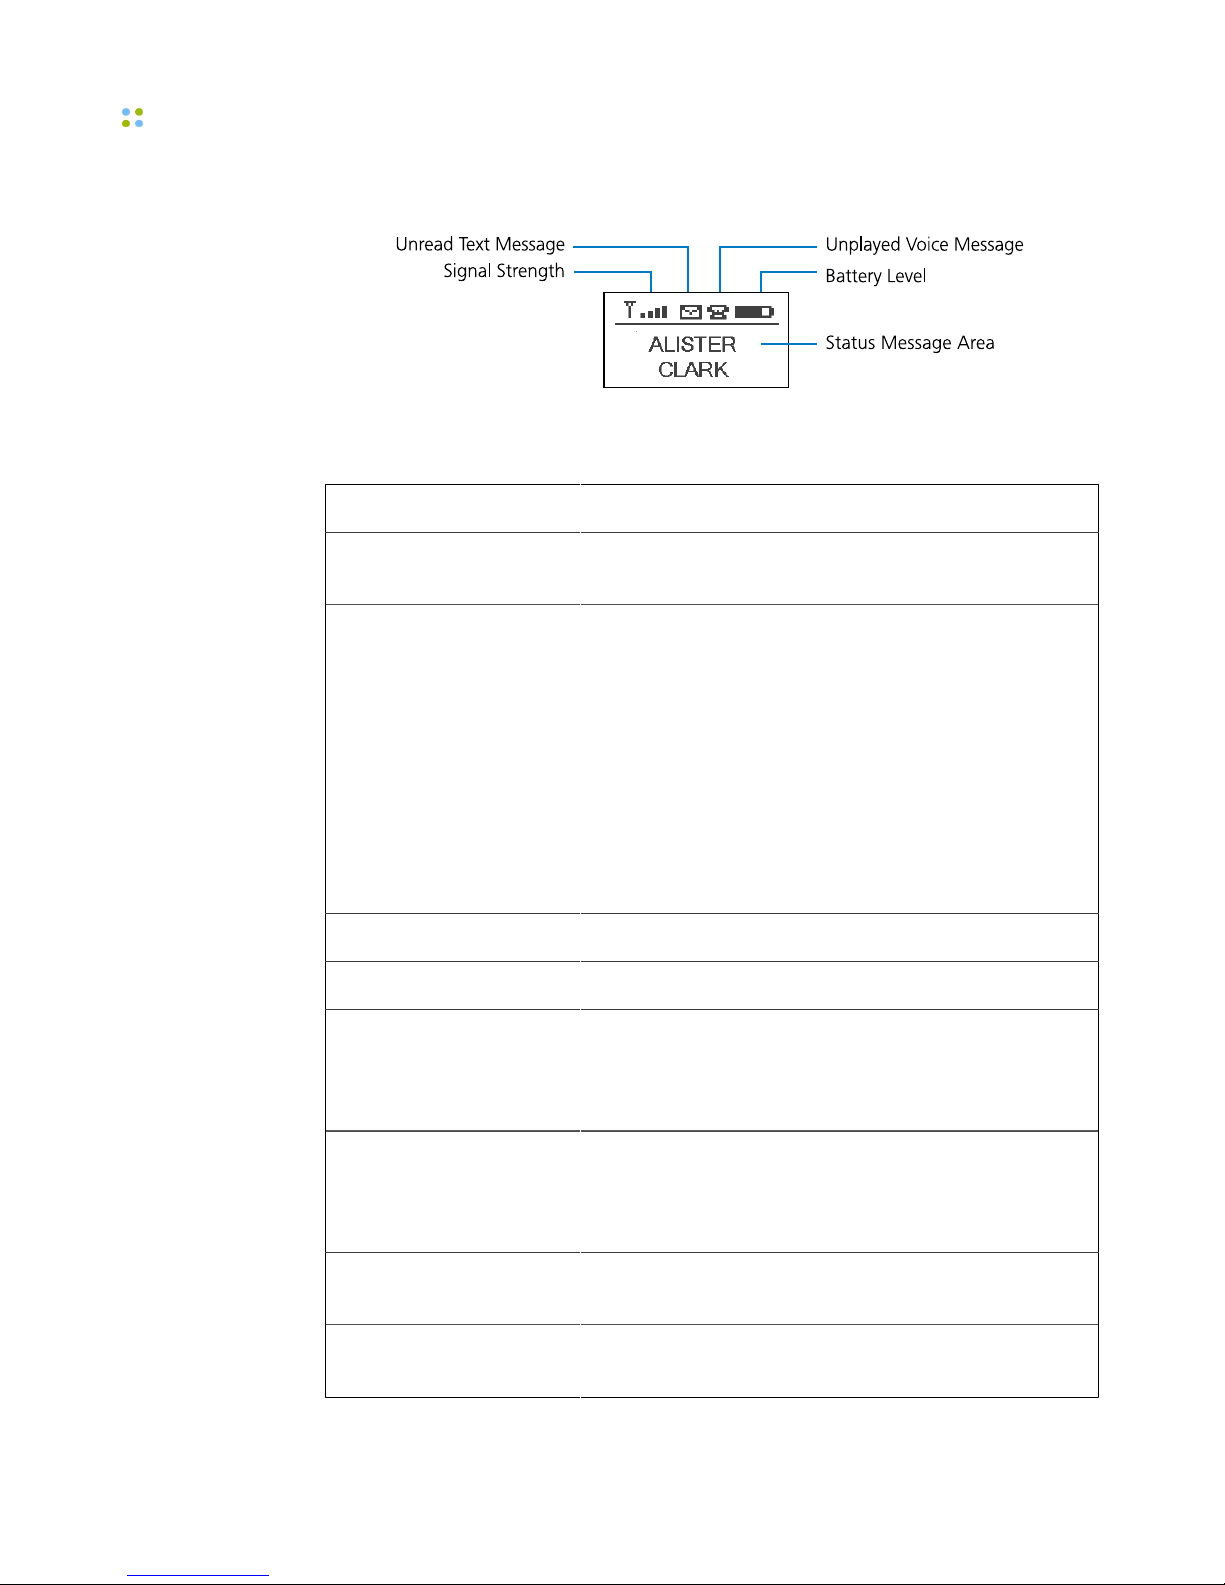
Main Screen
The main screen appears when you turn on the badge. This screen has a status
message area with symbols that show you the wireless network signal strength,
the battery charge level, whether you are in speakerphone or headset mode,
and whether you have unread text messages or unplayed voice messages.
The following figure shows the B3000 main screen:
The Badge Menus
26 ··· Vocera Badge User Guide
The following figure shows the B2000 main screen:
The status message area may show one of the following alerts:
Status Message Meaning
Name—not blinking The name of the person who is logged in to the Vocera
system using this badge.
Name—blinking If someone is trying to call you, this shows you the
name of the person who is calling. If you are already on
a call, this shows the name of the person with whom
you are currently speaking. If you are already on a call
and you hear the Call Waiting tone, this displays the
name of the person who is trying to call you.
If you are in a conference, this shows its name. If you
are receiving a broadcast, this shows the name of the
person making the broadcast.
If you received a message, this shows the name of the
person who sent the message for 15 seconds.
Vocera Your badge is communicating with the Genie.
Logged out No one is logged in with this badge.
Searching for Access
Points or Off Network
The badge is out of network range or is not able to
connect with the network. If you are sure you are
within range of your network, contact your system
administrator.
Searching for Server The badge is within network range, but it is not
communicating with the Vocera Server. See Why
does my device display say "Searching for
Server"? on page 119.
Authenticating The badge's credentials are being authenticated for
network security.
Requesting IP Address The badge is requesting an IP address from the DHCP
server.

The Badge Menus
Badge Features ··· 27
Info Menu
The Info menu gives you information about the badge you are using and how it
is connected to the network.
Most of this information is intended to be used by your system administrator for
diagnostic purposes.
The Info menu provides the following information:
• Battery. The battery strength is given in volts (V). The badge operates correctly
when the battery level is 3.5 V or greater.
• Badge MAC. The MAC address is a unique identifier for your badge that
the Vocera server uses as the Badge ID. On a B3000 badge, this screen also
displays the Vocera serial number.
• Location. The name of the location or the physical network address of the
access point with which your badge is currently communicating.
• Label. A label that uniquely identifies the device in the Vocera system for
device management purposes.
• Badge IP. The Internet Protocol (IP) network address of the badge. The Badge
IP command also shows the subnet mask—or netmask— and the gateway IP
address.
• Version. The version of the firmware that your badge is using.
• FIPS Mode. Whether FIPS 140-2 mode is enabled. For more information
about FIPS, see the Vocera Badge Configuration Guide.
Note: FIPS mode is certified for B2000 badges only.
• Server IP. The IP network address of the Vocera Server or the active node of
the Vocera Server cluster.
• Cluster. The IP network addresses of the nodes in the Vocera Server cluster, if
one exists. If all the Vocera Server cluster IP addresses don't fit on one screen,
you can scroll to the next screen by pressing Down.
• AP MAC. The physical ID of the access point to which the badge is currently
connected.
• User. The name of the person who is currently logged in to your network
with this badge.
• Radio. If the badge is connected to the network, displays the message
"Connected" and the channel that the radio is using; otherwise, displays the
message "Powering off."

The Badge Menus
28 ··· Vocera Badge User Guide
This screen also displays the signal-to-noise ratio (SNR) of the connection and
plays a beep for the built-in survey tool.
• SSID. The SSID of the access point the badge is connected to.
Power Off Menu
Power Off turns off all power to the badge and the badge display to preserve
the battery charge when you are away from the network.
Press the Call button to turn the power on again.
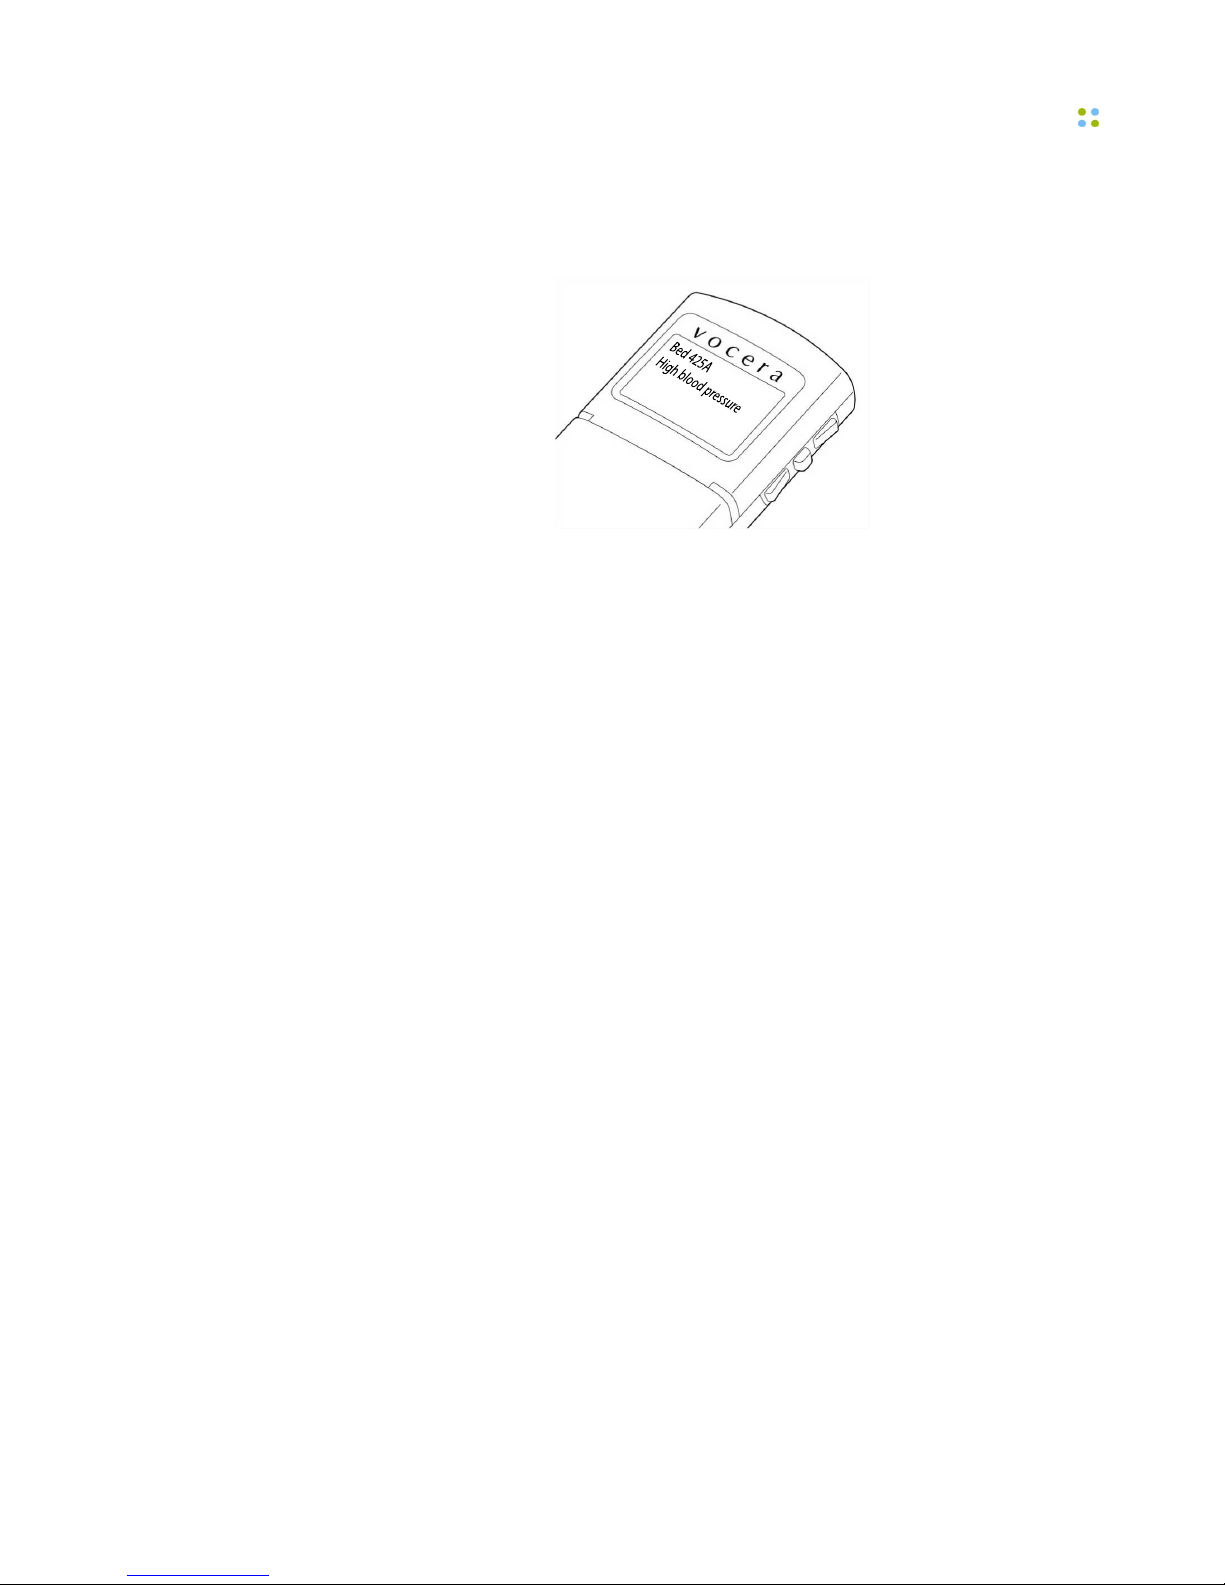
Messages Menu
Your badge can display text messages that were sent from email accounts, the
Vocera User Console, or an application that integrates with the Vocera system,
such as a nurse call system.
When you select Messages, the display shows one subject line for each text
message. On a B3000 badge, the subject line for only one message is shown at
a time. A closed envelope symbol next to a subject means you have not yet read
that message; an open envelope means you have already read that message.
An [S] means you have already read and saved that message. See Reading Text
Messages on page 56 for more information.
Settings Menu
The Settings menu (available only on B3000 badges) displays the following
submenus for personal settings: Volume, Font, Handset, Group Mode, Flip
Screen, and Return Home. The Vocera Server preserves these settings whenever
you log into a different B3000 badge.
Return Home Command
The Return Home command (available only on B3000 badges) returns to the
main screen.
Volume Menu
The Volume menu independently adjusts the sound level for speakerphone and
headset modes. On B3000 badges, you can also set the volume for handset
mode. See Adjusting the Volume on page 30 for instructions.

Custom Settings
Badge Features ··· 29
Font Menu
The Font menu lets you display all uppercase letters or mixed case letters in text
messages. See Adjusting the Message Font on page 30 for instructions.
Handset Menu
Version: Vocera 4.3 SP2 or later
The Handset menu (available only on B3000 badges) lets you turn handset
mode on or off. In handset mode, you can press the Call button to make a call
or answer a call, and then put the badge speaker to your ear and speak into the
primary microphone located on the front of the badge at the top right corner.
This ensures privacy and lets you use the badge in a high noise environment
without a headset. See Turning Handset Mode On or Off on page 32 for
instructions.
Group Mode Menu
Version: Vocera 4.3 GA or later
The Group Mode menu (available only on B3000 badges) lets you turn off
noise-canceling microphones while you are on a call, thus widening the speech
zone and letting other people speak into the badge's primary microphone.
If you are in a noisy environment, you can disable Group Mode to eliminate
background noise while you are on a call.
Flip Screen Menu
Version: Vocera 4.1 SP7 or later
The Flip Screen menu (available only on B3000 badges) lets you invert
the screen, turning it upside down. When the screen is inverted, you can
conveniently read the text by tilting the bottom of the badge up.
Custom Settings
This section describes how to customize badge settings.
Important: The Vocera Server maintains B3000 settings for Volume, Font,
Handset, Group Mode, and Flip Screen for each user. When you log into a
different B3000 badge, your personal settings are preserved.

Custom Settings
30 ··· Vocera Badge User Guide
Adjusting the Message Font
You can adjust the way that the badge displays text messages. If you receive
a lot of text messages—for example, if your site integrates with a messaging
system such as a Nurse Call System—you may want to choose the display that is
most readable for you.
To adjust the font used by badge messages on a B3000:
1. Hold the badge, and orient it so that you can read the screen.
2. Press the Select button to see the menu, then press the Up button until you
see the Settings icon.
3. Press the Select button to choose the Settings menu.
4. Press the Up button until you see the Font icon.
5. Press the Select button to choose the Font menu.
The display prompts you to select either all uppercase letters (UPPERCASE
MSG ON) or sentence-style mixed case letters (UPPERCASE MSG OFF).
6. If necessary, press the Up or Down buttons to move the highlight, then
press the Select button to set the text message display and return to the
main screen.
To adjust the font used by badge messages on a B2000:
1. Turn the badge over so you can see the display.
2. Press the Up button until you see the Font icon.
3. Press the Select button to choose the Font menu.
The display prompts you to select either all uppercase letters (UPPERCASE
MSG ON) or sentence-style mixed case letters (UPPERCASE MSG OFF).
4. If necessary, press the Up or Down buttons to move the highlight, then
press the Select button to set the text message display and return to the
main screen.
Adjusting the Volume
You can adjust the sound level for speakerphone or headset mode
independently. On B3000 badges, you can also set the volume for handset
mode. There are two procedures for adjusting the volume: one for when the
badge is idle, and one for when you are on a call.
 Loading...