

VNS Therapy SENTIVA M3000 Programmer, SENTIVA M2000 Wand, SENTIVA VNS Therapy System Technical Manual
Technical Guide
1

Table of Contents
PRODUCT OVERVIEW
VNS Therapy System Components and Support Materials
4
SENTIVA SYSTEM MANAGEMENT
Getting Started
In Oce Programming
Manual Programming
Tachycardia Detection/ Prone Position/Low Heart Rate Detection
Guided Programming
Scheduled Programming
Day/Night Programming
Therapy Protocols
Viewing Device Data
Session Reports
Export Full Programmer Copy
Trend Data
Timestamp Data
Functions of the Magnet
End of Service
Device Diagnostics
In the Operating Room
Preoperative System Checks
Programming & Diagnostics
GENERAL DOSING GUIDELINES
SenTiva Dosing Guidelines
MRI
SenTiva MRI Guidelines
9
22
23
24
30
33
35
37
39
39
40
41
42
45
45
46
50
50
51
57
60
TROUBLESHOOTING
Screen Freeze
Wand Connection or Communication Issues
Patient Cannot Feel Stimulation
Patient Cannot Feel Magnet Stimulation
Patient Does Not Perceive AutoStim Activation
High/Low Lead Impedance and Low Output Current Issues
Generator Battery Issues
Heartbeat Detection Issues
Tachycardia Detection Issues
66
67
71
72
73
74
77
79
80
2

INDICATIONS FOR USE
The VNS Therapy Programming System supports the delivery of personalized
Vagus Nerve Stimulation (VNS) Therapy for drug-resistant epilepsy (DRE).
This guide contains information on the use of the VNS Therapy® Programming
System with the Model 3000 Programmer and Model 2000 Programming
Wand. Please refer to the VNS Therapy® Programming System Physician’s
Manual for additional important prescribing and safety information.
Indication for Use
The VNS Therapy System is indicated for use as an adjunctive therapy in
reducing the frequency of seizures in patients 4 years of age and older with
partial onset seizures that are refractory to antiepileptic medications.
This overview is not intended to be a substitute for the VNS Therapy
Physician’s Manual.
Please note that not all products shown in this Technical Guide are cleared for
sale in all markets. Please check with your local representative to see what is
available in your area.
CONTACT INFORMATION
Contact Us
General inqiuries (for questions about LivaNova, LivaNova products, warranties,
etc. or to request a call from company representative) http://www.livanova.
com/contact-us/
24-hour Technical Support (for technical questions with programmer,
generator, or wand)
• 1 (866) 882-8804 (US and Canada)
• 1 (281) 228-7330 (Worldwide)
• 32 2 790 27 73 (Europe/EMMEA)
Mailing Address
LivaNova USA, Inc (formerly Cyberonics, Inc.)
100 Cyberonics Boulevard
Houston, TX 77058 USA
LivaNova Belgium NV
Ikaroslaan 83 B-1931
Zavantem, BELGIUM
©2019 LivaNova USA, Inc, a wholly-owned subsidiary of LivaNova PLC.
All rights reserved. LivaNova®, SenTiva®, AspireSR®, and VNS Therapy®
are registered trademarks of LivaNova USA, Inc.
3
Product Overview
INTRODUCTION TO VNS THERAPY
The VNS Therapy® System supports the delivery of personalized Vagus Nerve
Stimulation (VNS) Therapy for drug-resistant epilepsy (DRE).
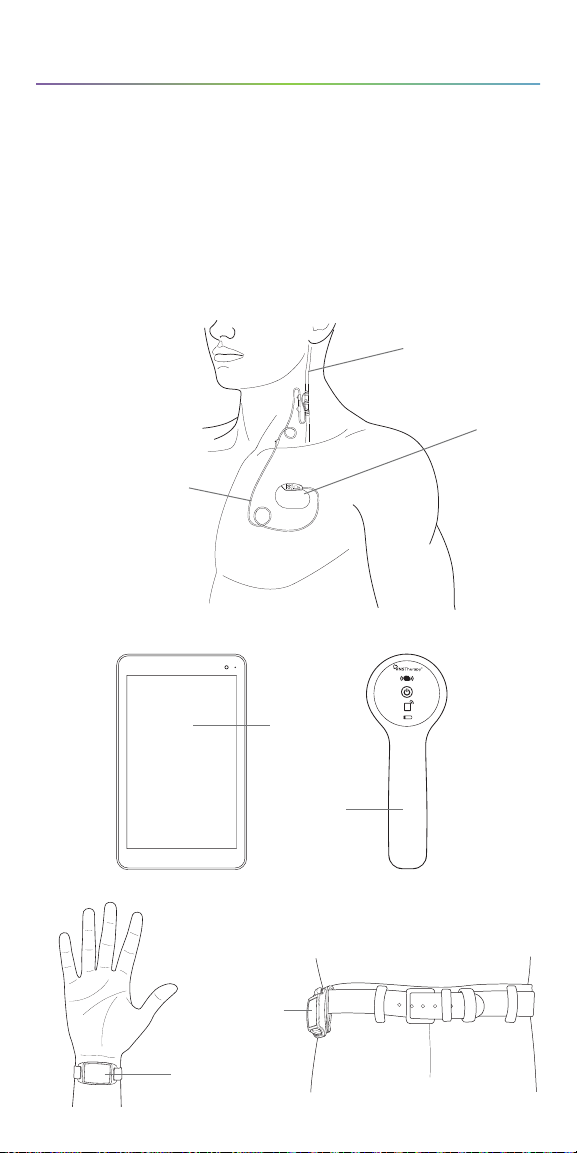
The VNS Therapy® System includes four parts:
• Generator and lead
• Programmer (tablet and software)
• Wand
• Magnet
Vagus Nerve
VNS Therapy
Generator
VNS Therapy
Lead
Pager Style
Magnet
Watch Style
Magnet
Programmer
Programming
Wand
4
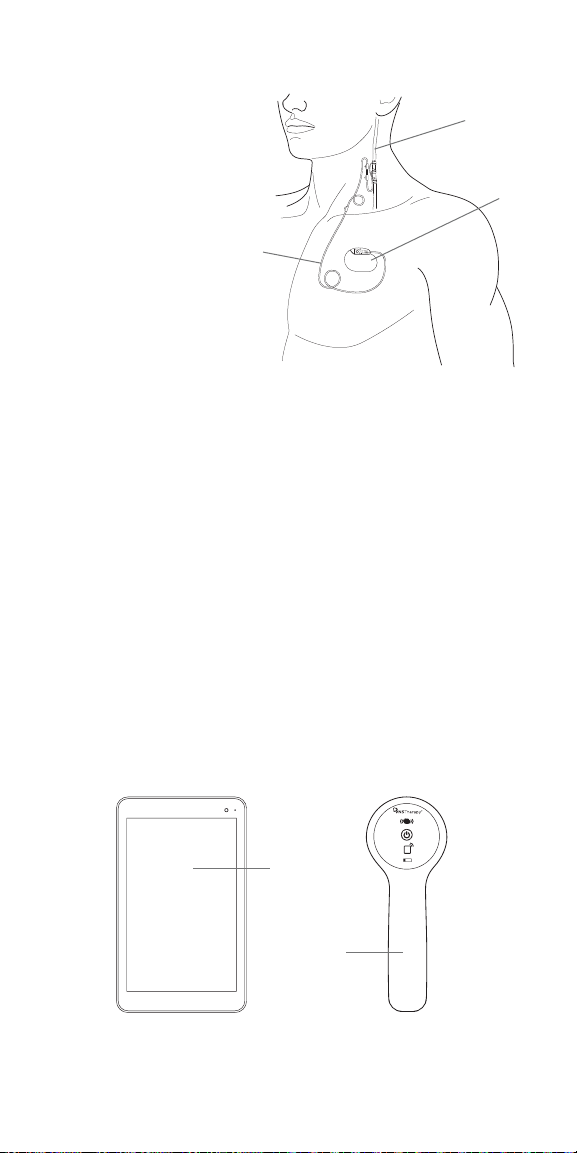
Generator and Lead
The implanted portion of
the VNS Therapy® System
consists of the generator and
a lead. The generator delivers
electrical signals, or pulses, to
the vagus nerve via the lead.
VNS Therapy
Lead
Vagus Nerve
VNS Therapy
Generator
Programmer (M3000)
The external portion of the VNS Therapy® System consists of a programmer
(a computer tablet with VNS Therapy® programmer software pre-installed)
and a wand (M2000). The programmer and the wand connect wirelessly.
This training module is developed for the M3000 programmer and M2000
wand. The programmer and wand are required for use.
The programmer and wand work together to:
• Interrogate (communicate with the generator) in order to adjust therapy
parameters for the generator
• Assess whether the generator and lead are functioning as expected
• View device histories
• Export session reports
Programmer
Programming
Wand
5
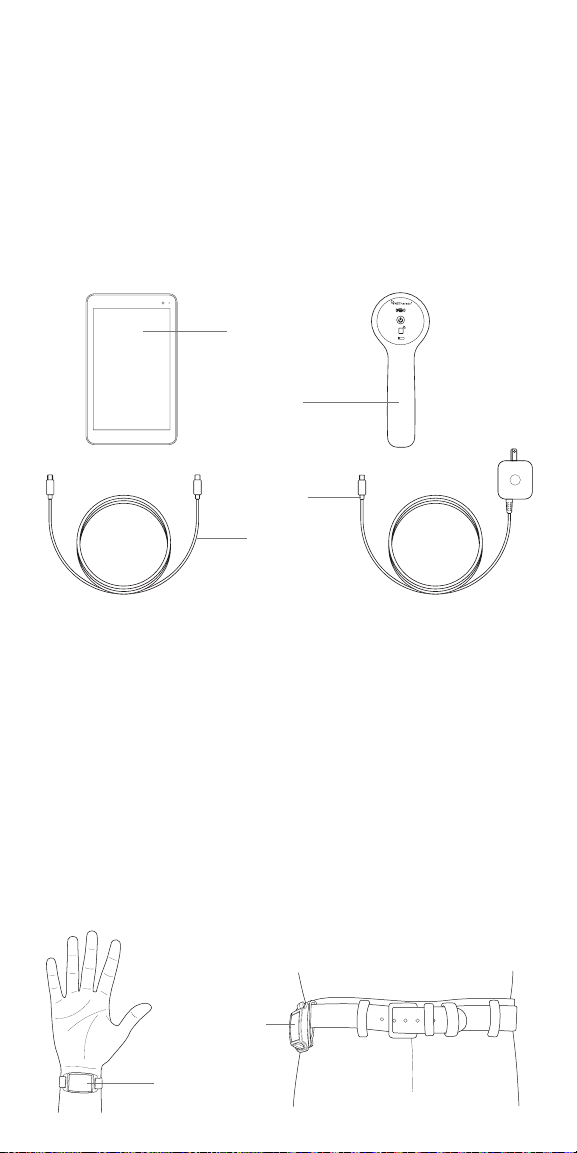
Wand (M2000)
The wand is designed to communicate wirelessly with the programmer
(M3000) at distances up to 3 meters (10 feet) under most conditions.
If communication is unstable, use the supplied USB cable to connect the
wand and the programmer instead.
Hold the wand no more than 1 inch away from the generator in order to
maintain good communication.
The wand operates on two AA lithium or alkaline batteries.
Programmer
Programming
Wand
Programmer
Charger
Wand
USB Cable
Magnet
The VNS Therapy® System has a patient controlled feature that can be activated
with a specially designed magnet.
The magnet can be used to:
• Attempt to reduce the intensity of or abort an oncoming seizure or
seizure in progress
• Temporarily inhibit stimulation
• Verify the generator is providing stimulation
• Reset the generator (in combination with the programmer and wand)
The magnet is available in two styles.
Pager Style
Magnet
Watch Style
Magnet
6

Product Compatibility
There are di erent VNS Therapy® generator models, including the new
SenTiva® generator.
The VNS Therapy® Programmer, Model 3000, and Wand, Model 2000, allow
you to interrogate and program the following VNS Therapy® generators:
• Model 102 Pulse™
• Model 102R Pulse Duo™
• Model 103 Demipulse®
• Model 104 Demipulse Duo®
• Model 105 ApsireHC®
• Model 106 AspireSR®
• Model 1000 SenTiva®
Please see the following chart to determine the generator’s compatibility
with other VNS Therapy® components.
The table below details the compatibility for all components
of the VNS Therapy®system
Programming
Lead
Tunneler
Wand
(Programmer)
Accessory
Pack
Patient
Essentials Kit
300* 302† 303† 304† 402 502 220201
TM
102† Pulse
102R† Pulse
Duo
103† Demipulse
104† Demipulse
Duo
105† AspireHC
106† AspireSR
1000† SenTiva
* No longer distributed
† Not for sale in all markets
TM
®
®
®
®
®
2000
(M250)
(M3000)
7

VNS Therapy® Modes
The VNS Therapy® System can function in three dierent modes:
NORMAL MODE
In Normal Mode, the generator initiates intervals of stimulation at preset ON
and OFF times throughout the day. Specific stimulation parameters are set by
the healthcare provider.
MAGNET MODE
Magnet Mode is an on-demand stimulation that attempts to abort or
de-intensify an oncoming seizure or a seizure in progress. The patient or
caregiver initiates Magnet Mode by passing a VNS magnet over the
implanted generator.
AUTOSTIM MODE
Automatic stimulation, or AutoStim, is an optional feature in some generator
models. AutoStim delivers stimulation when the generator detects a rapid
relative heart rate increase (≥20%) that may be associated with a seizure.
This feature works in conjunction with Normal Mode and can be inhibited
using the VNS magnet.
8
SenTiva System Management
GETTING STARTED
To get started, collect all the components of the VNS Therapy® System:
a) Touch-screen programmer preloaded with VNS Therapy®
programmer software
b) Wireless wand (Model 2000) with two AA lithium or alkaline batteries
c) Programmer charger
d) Type A-C USB cable (used to connect to charger to charge the programmer)
e) Type C USB cable (option to connect programmer to wand)
f) Type A-C USB drive (used to import/export protocols and export
session reports)
Before Using the Programming System
in a Patient Session
1. Charge the programmer
2. Turn the programmer ON
3. Check the programmer battery: Check the battery status on the
BATTERY INDICATOR at the top right corner of the programmer screen
4. Check the wand batteries: Confirm that the wand batteries are not low
5. Change the date and time if necessary. Accurate patient and device history
stored in the programmer depend on correct date and time settings
6. Connect the wand to the programmer
7. Interrogate the generator (check communication between the programmer
and the generator)
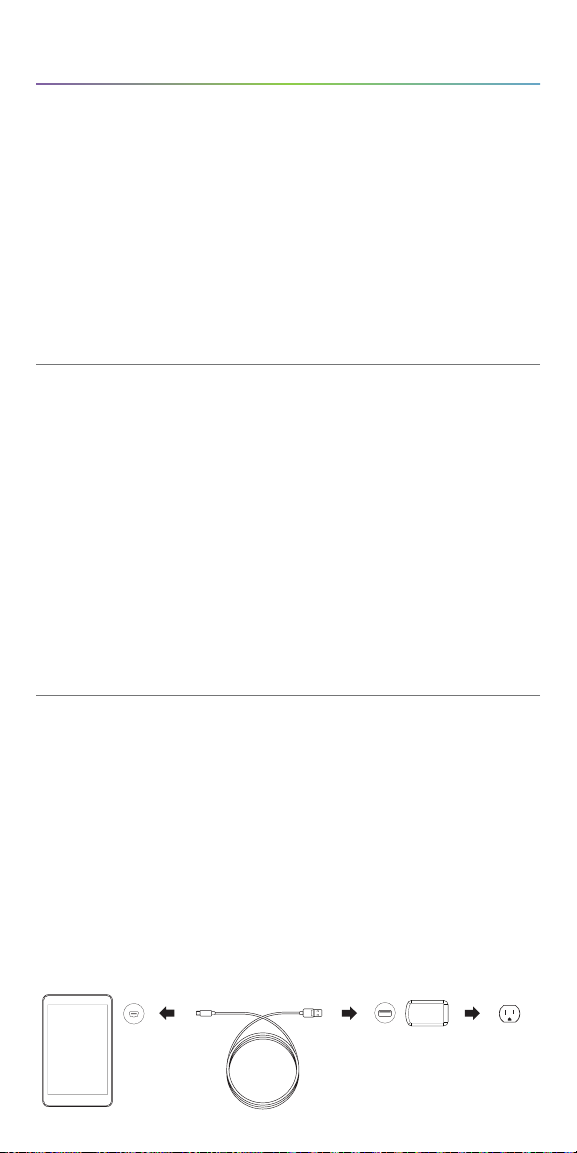
Charge the Programmer
Charge the programmer before use so that there is adequate battery power
during a patient session.
To charge the programmer:
1. Connect the adapter cord to the programmer and to the AC adapter
2. Plug the AC adapter into an outlet
A fully discharged battery may take four to five hours to charge.
Programmer Adapter Cord AC Adapter Outlet
9
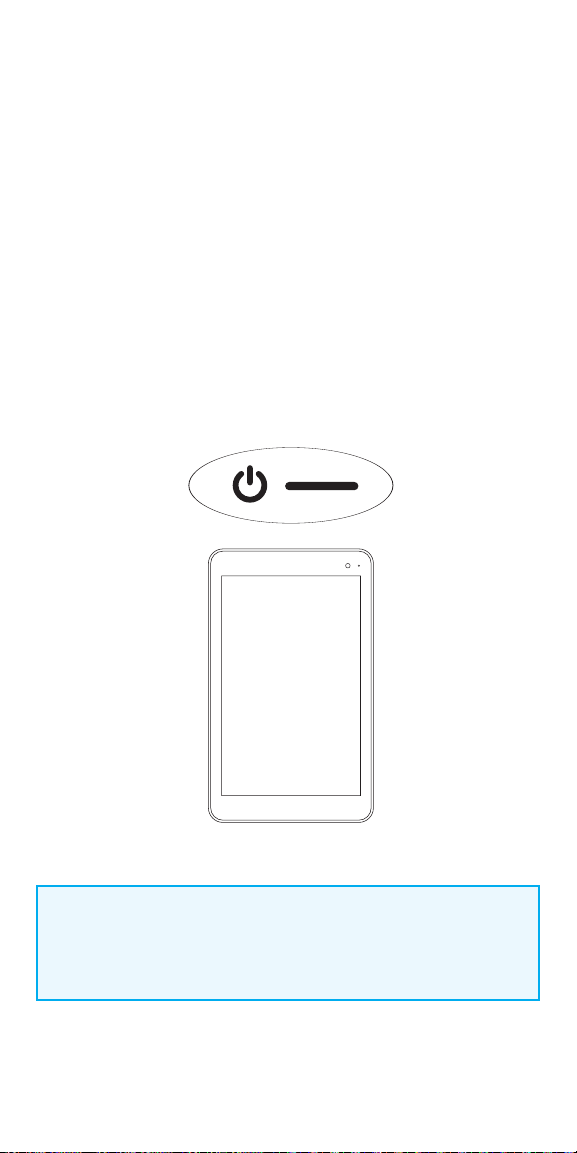
Turn the Programmer ON/OFF
Charge the programmer before use so that there is adequate battery power
during a patient session.
To turn programmer ON:
Press and hold the POWER button for 3 seconds and then release. You will then
see an on-screen logo, and the VNS software will start.
To turn programmer OFF:
Press and hold the POWER button for 3 seconds and then release. Follow the
on-screen instructions to shut down the programmer.
- After 10 minutes of inactivity, the screen will automatically turn o
- To manually turn the screen o: Quickly press and release the
POWER button. Use this method when you want to preserve battery,
but not shut down the Programmer
NOTE:
The POWER button may not respond if the programmer is still shutting
down. Wait for 30 seconds after a shutdown to restart the programmer.
10

Navigation
There are two main screens on the programmer.
Each of these screens acts as a launching point for other functions.
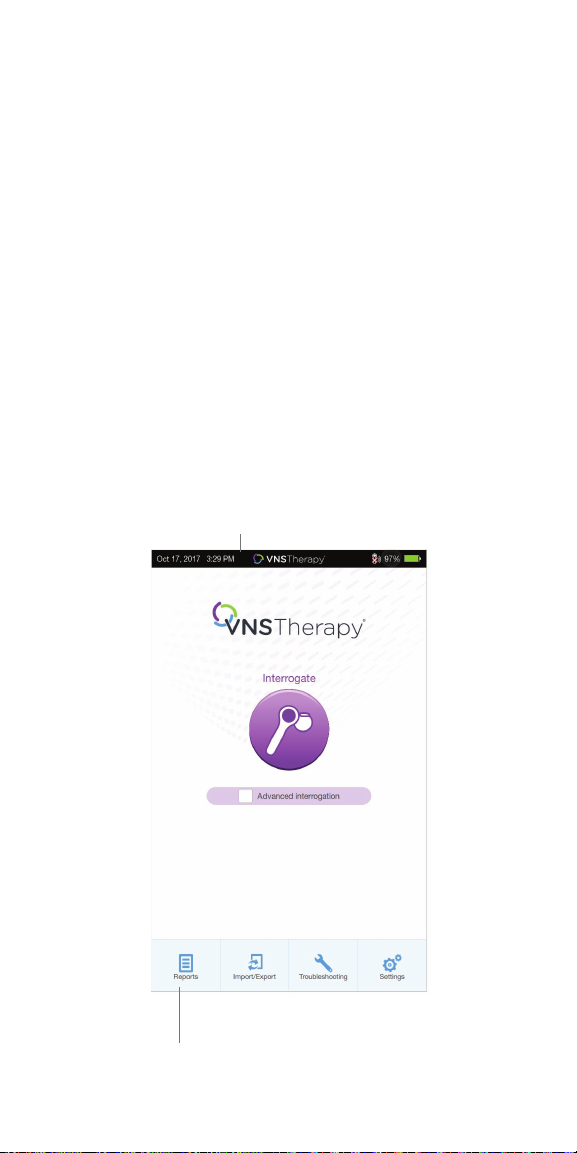
Main Screen – the first screen you see after turning on the programmer,
when the programmer is still OUT OF SESSION (programmer is not yet
communicating with a generator)
Summary Screen – the first screen you see once you are IN SESSION
(programmer is communicating with a generator)
OUT OF SESSION VS. IN SESSION
Available functions change based on whether the programmer is out of
session or in session.
• OUT OF SESSION (programmer is not communicating with a
generator)
• IN SESSION (programmer is communicating with a generator)
Quick Access Bar – From any software screen, tap the VNS Therapy® logo on
the title bar (black bar at the top of the screen) to access programmer settings
and system information.
This drop-down menu shows the following:
• Programmer date and time (OUT OF SESSION only)
• Wand connection status
• Programmer battery level
• Sliders to adjust the system volume and display brightness
• Programmer software version
• Wand software version and generator firmware (IN SESSION only)
Navigation Bar – From any software screen, tap the icons at the bottom of the
screen to access additional features
Patient ID Bar – If the blue patient ID Bar is showing on the screen,
the programmer is IN SESSION. To end the session, tap on the
END SESSION button at the left of the Patient ID Bar
11
Quick Access Bar
Patient ID Bar
Main Screen (Out of Session) Summary Screen (In Session)
Navigation Bar
12
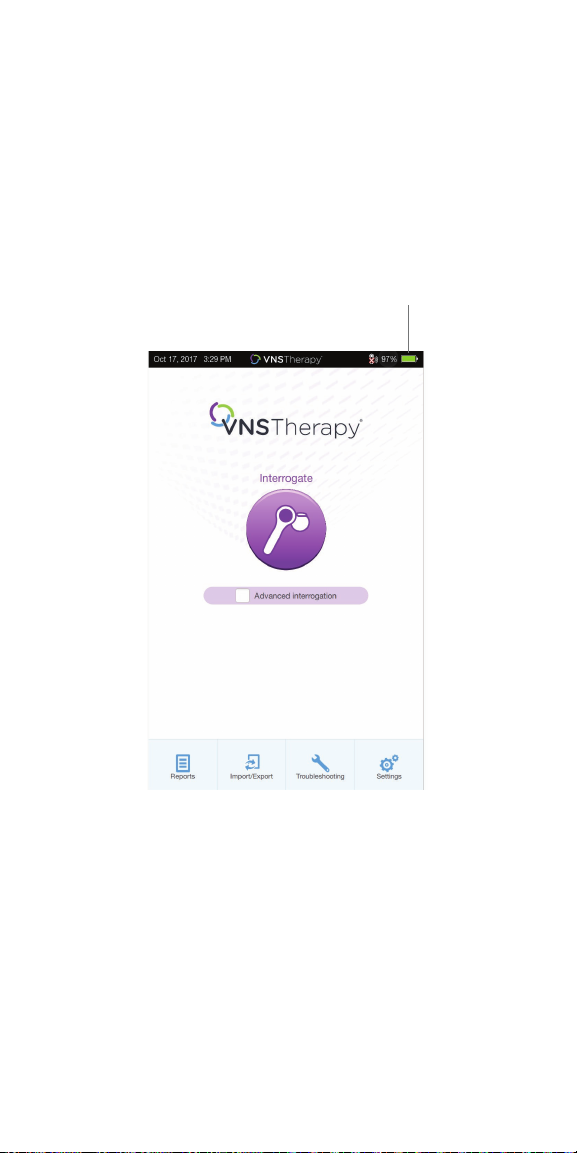
Check the Programmer Battery
Before using the programmer with a patient, confi rm that the battery is
fully charged.
To check the battery:
Look at the BATTERY INDICATOR in the top right corner of every screen
Battery Indicator
13
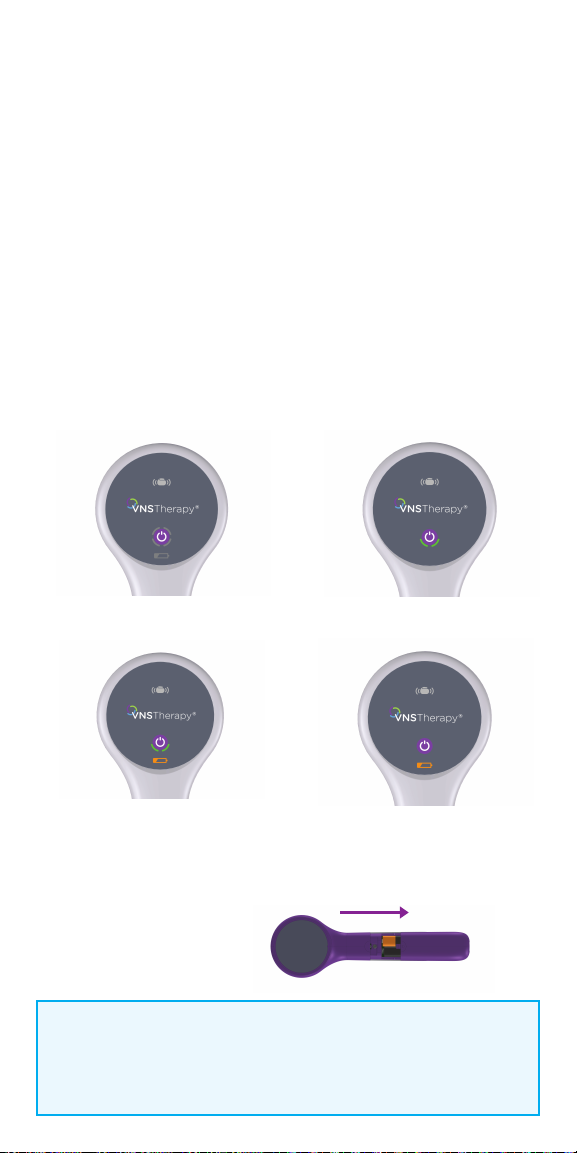
Check the Wand Batteries
1. To turn wand ON: Press and release the POWER button
• If the battery is OK, green arcs around the power button will light up to
indicate that the wand has power
- Two green arcs indicate that the wand is available for connection
with the programmer
- Four green arcs indicate that the wand is connected to the
programmer
• If the battery is low, the Low Battery Indicator will light up.
If this happens, replace the batteries before using the device
• If only the Low Battery Indicator lights up (no green arcs),
no communication will be possible until you replace the batteries
2. To replace batteries: If batteries are low, remove the battery compartment
cover on the back of the wand and replace the batteries with two new AA
lithium ion or alkaline batteries
Turn Wand Power On
Low Battery Indicator
Battery OK Indicator
Low Battery Power/
No Communication
Push and slide to open battery compartment
Wand Battery
Replacement
NOTE:
When illuminated, the flashing white icon at the top of the screen
indicates that there is communication with the generator.
14
Change Date and Time
Accurate patient and device history stored in the programmer depends on
correct date and time settings. Before using the programmer with a patient,
verify that the time and date on the programmer are correct. This will ensure
that the session is properly time-stamped.
1. Navigate to the Date & Time screen:
• OPTION 1: From the Main Screen, tap the VNS Therapy® logo on the title
bar (black bar at the top of the screen)
• OPTION 2: From the Main Screen, select SETTINGS from the bottom
navigation bar
• On the Settings Screen, tap the EDIT button at the top of the page
near the time
2. To change time: Tap the current display time and scroll up or down
3. To change date: Use LEFT or RIGHT ARROW to adjust the calendar,
and then tap the desired date
Title Bar
Navigation Bar
Main Screen
15
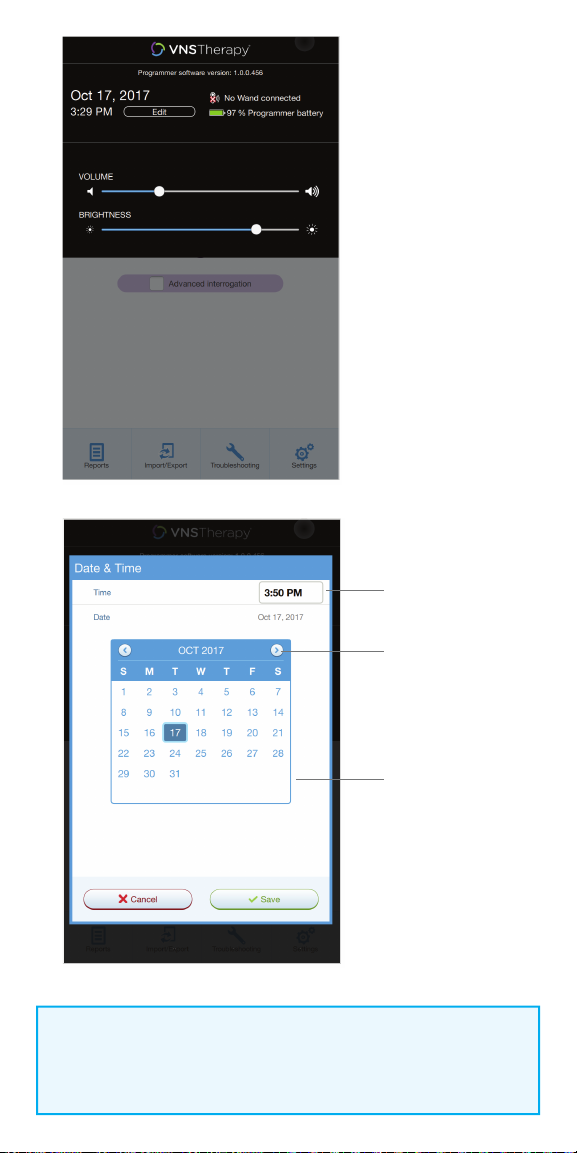
Tap and scroll to
change time
Use left and right
arrows to change
month
Tap the desired
date
NOTE:
You must adjust the programmer manually for time zones or Daylight
Savings Time.
16
Connect the Wand to the Programmer
The programmer and the wand can be connected wirelessly or with a backup
USB cable.
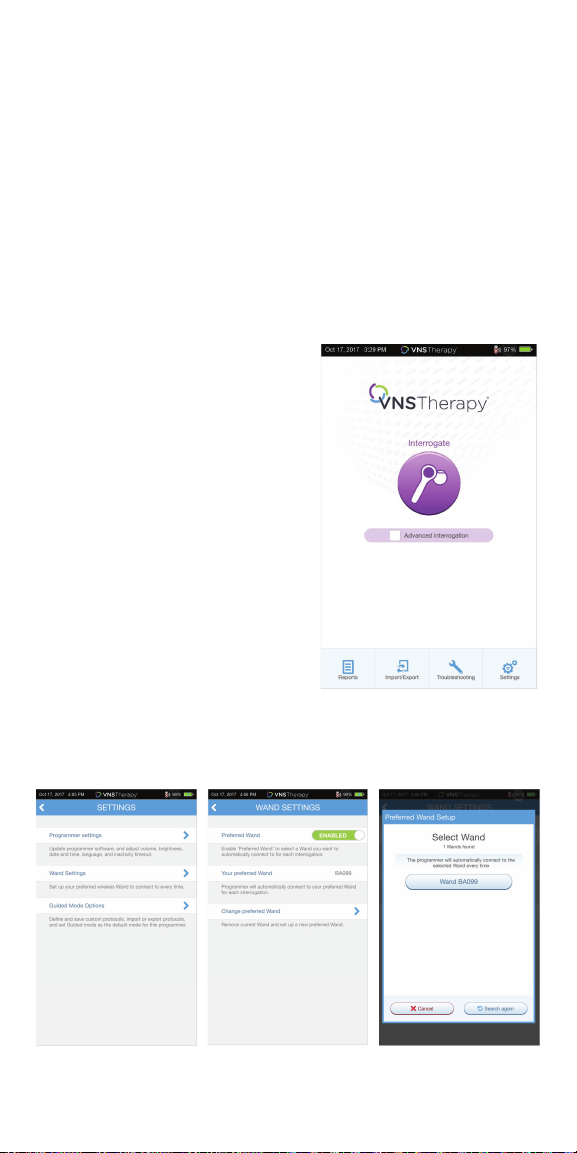
WIRELESS CONNECTION
To set up wireless connection:
1. Turn on the programmer
2. Turn on the wand. Look for two green lights on the wand, indicating that
power is on and the wand is ready to connect
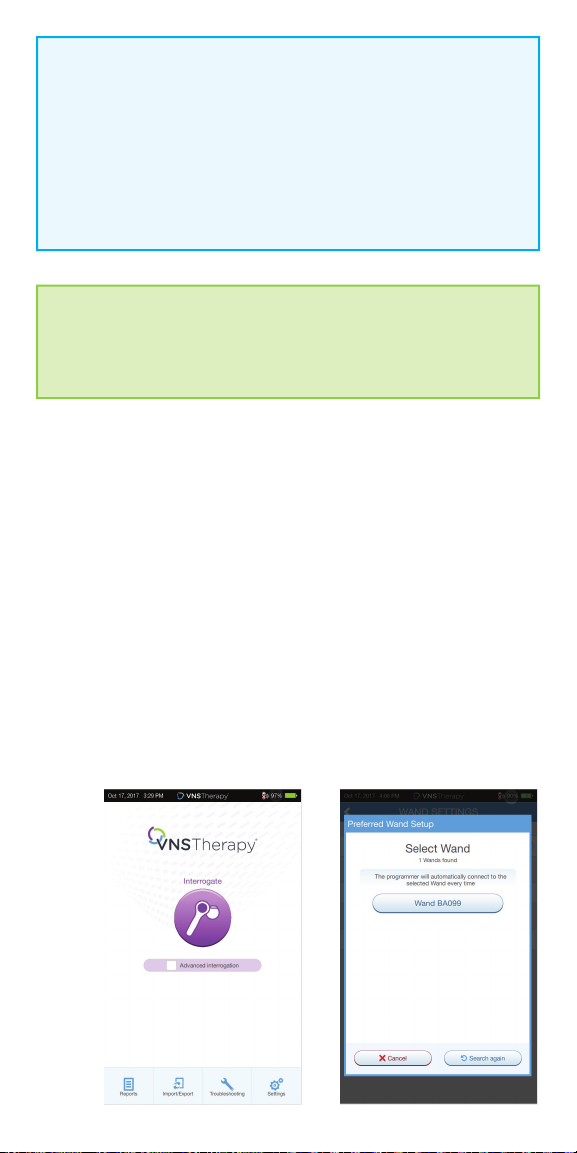
3. From the Main Screen on the programmer, tap on SETTINGS in the
Navigation Bar at the bottom of the screen
4. From the Settings Screen on the programmer, tap on WAND SETTINGS >
PREFERRED WAND
5. Tap on the preferred wand serial
number (found on the back of the
wand) to enable the preferred wand or
to change wands
6. Tap on BACK (upper left) to return to
the Main Screen
7. Look for two green arcs on the wand to
indicate the wand is available for
connection with the programmer. Once
availablity is established, four green arcs
on the wand to indicate that the
programmer and the wand are
connected. The green lights will stay on
for 10 minutes when the programmer
and wand are connected. When they are
not connected, the green lights will go
o after 2 minutes
Main Screen
17
NOTE: Wireless
“Preferred” connection - recommended for wands and programmers
that are always used together. Provides a quicker connection
when interrogating a patient’s generator because the programmer
automatically looks for the preferred wand. “Choose a wand” connection
recommended if there are several interchangeable programming systems
in your area. When interrogating a patient’s generator, the programmer
searches for all available wands in range.
SHORTCUT
You can set up a wireless connection automatically by starting the
interrogation. The programmer will prompt you to save the preferred
wand information as part of the workfl ow.
WIRED CONNECTION
Use the supplied USB cable to connect the wand to the programmer.
To set up wired connection:
1. Connect the programmer to the wand using the USB cable
2. Tap INTERROGATE on the programmer. The programmer will automatically
connect to the preferred wand and display the wand’s information on the
screen, indicating that the programmer and the wand are connected
3. Look for four green lights on the wand to indicate that the programmer and
the wand are connected. The green lights will stay on for 10 minutes when
the programmer and wand are connected. When they are not connected,
the green lights will go o after 2 minutes
18
Interrogate the Generator
You must interrogate the generator before performing other functions,
such as changing parameters or performing diagnostic tests.
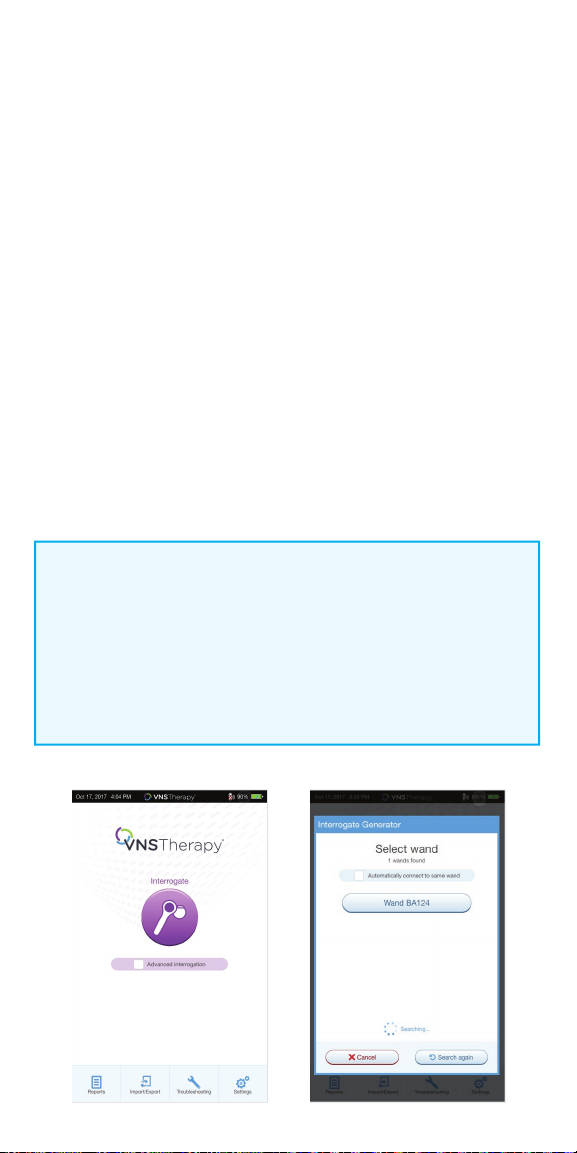
To interrogate the generator:
1. Turn on the programmer
2. Turn on the wand. Look for two green lights on the wand, indicating that
power is on and the wand is ready to connect
3. On the Main Screen, tap INTERROGATE
4. Preferred wand: If you have set up a preferred wand, the programmer
will automatically connect to the preferred wand and display the wand’s
information on the screen, indicating that the programmer and the wand
are connected
5. No preferred wand: If you have not set up a preferred wand, the
programmer will show all powered-on wands in range. Select the serial
number for the wand you intend to use. The programmer will connect to
that wand and display the wand’s information on the screen, indicating that
the programmer and wand are connected
6. Place the wand over the generator
7. If the interrogation is working, a generator icon will fl ash on the
wand screen
NOTE:
When the ADVANCED INTERROGATION box on the Main Screen is checked,
the programmer will download detailed data from the generator for the
previous 180 days during interrogation. These data will be displayed in the
Events and Trends tab which is accessible from the Navigation Bar.
For rapid interrogation, uncheck the ADVANCED INTERROGATION box.
19
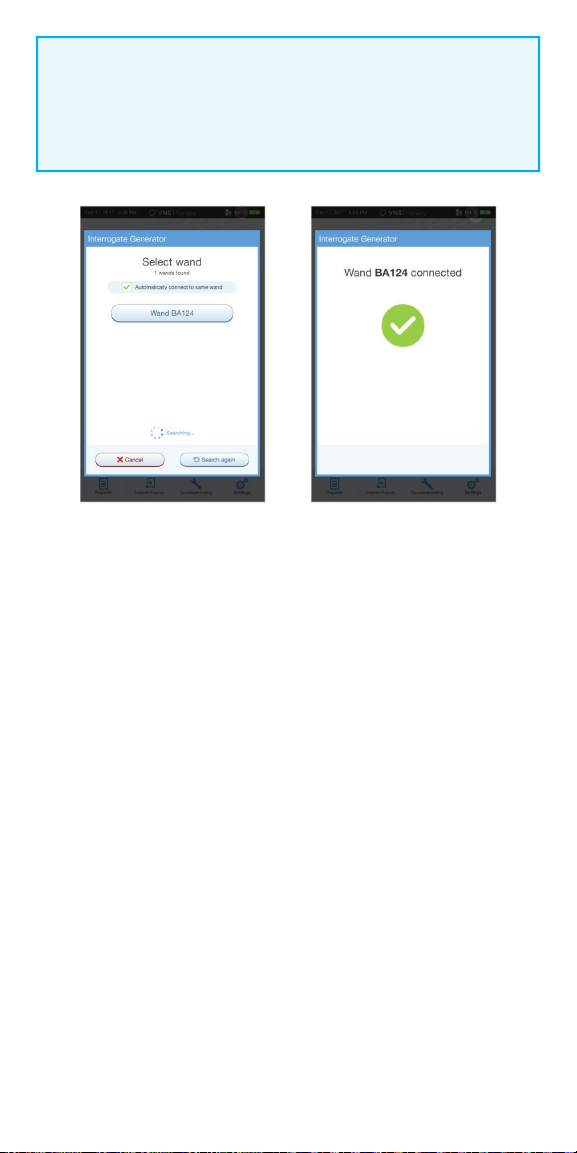
NOTE:
Check box only appears if the programmer does not have a preferred
wand. If a preferred wand is selected, the programmer will search and
automatically connect to the preferred wand.
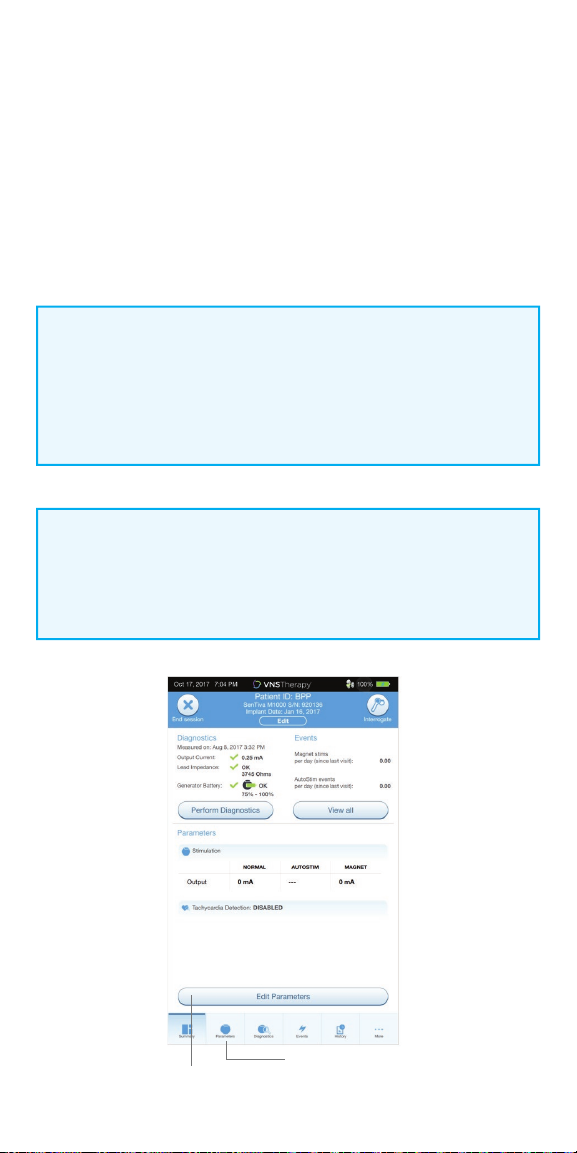
After a successful interrogation, the Summary Screen will display.
From this screen, you can perform the following functions:
•
View generator ID information, including model number and serial number
•
View and edit patient data, such as patient ID and implant date
•
View last known diagnostics data, such as lead impedance and battery status
•
Change settings to generator parameters, such as Normal, Magnet, AutoStim,
or Detection settings
•
Perform Diagnostics
•
View events and trends such as magnet activations and daily average
AutoStims
•
Access device history, including parameter settings associated with prior
o ce visits
•
Interrogate the generator again to verify parameters or refresh data
•
End programming session
•
Access other software options
20
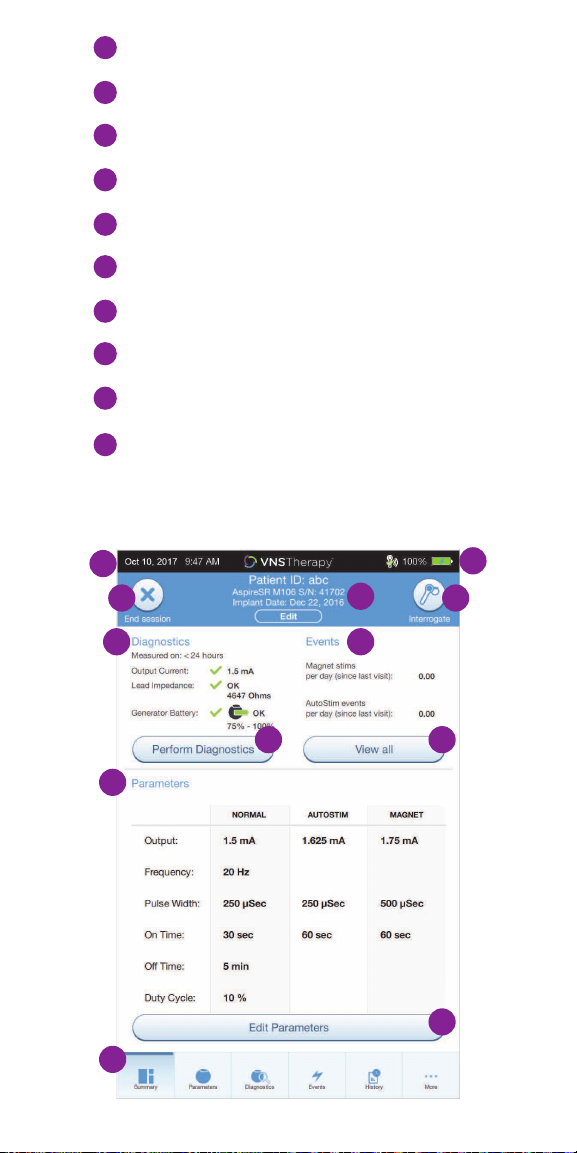
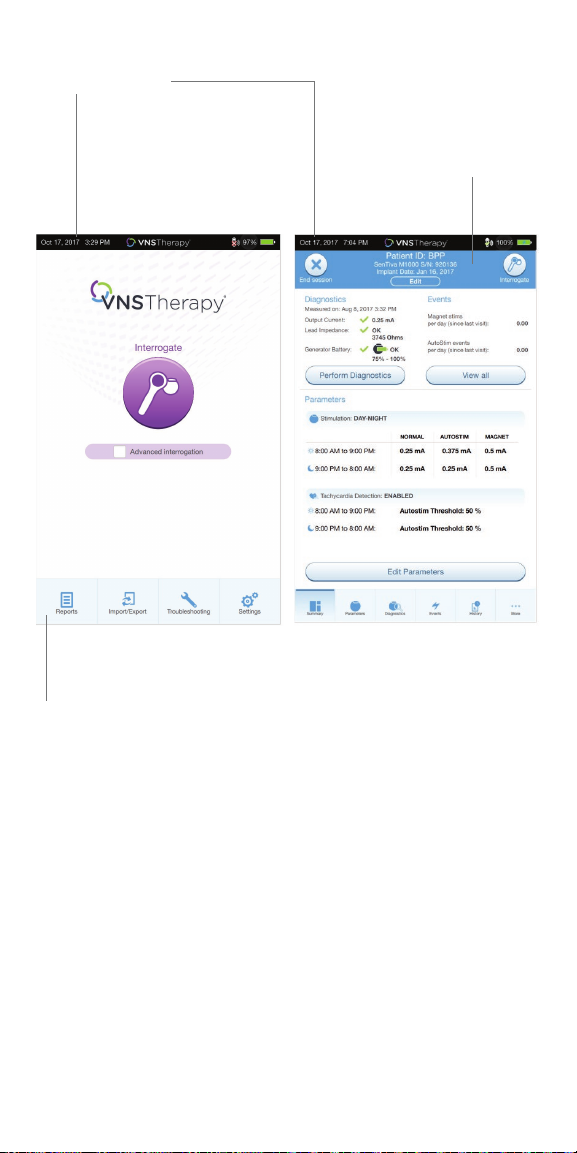
1
Current Programmer date and time
Wand connection and Programmer battery status
2
3
Ends current session
4
Generator and patient information
Interrogate generator
5
6
Last known diagnostics measurements
7
View stimulation events
8
Current parameters
9
Navigation bar to additional software features
Shortcut buttons
10
1
3
6 7
10 10
8
9
2
4
5
10
21

IN OFFICE PROGRAMMING
The SenTiva® (M1000) VNS Therapy System oers a number of new features
that help simplify and customize patient care.
The generator’s output current for the programmed stimulation in all modes
must be 0 mA for the first 14 days after implantation.
Manual Programming
Manually adjust parameters
Prone Position/Low Heart Rate Detection
Monitor the patient for episodes of low heart rate and prone body position
after an AutoStim or magnet activation
Guided Programming
Simplifies programming with option of Standard or Custom
Therapy Protocols
Scheduled Programming
Automatically change parameter steps according to a preset schedule
Day/Night Programming
Delivers two independent sets of therapy parameter schedules at dierent
times during a 24-hour period
NOTE:
The programmer must be IN SESSION to access these features.
NOTE:
At the end of each oce visit, the generator must be interrogated by
tapping the INTERROGATE button followed by tapping the END SESSION
button to ensure creation and accuracy of the session reports.
22
Manual Programming
Use Manual Programming to adjust stimulation and/or detection parameters
individually.
To manually program parameters:
1. From the Summary Screen, tap on the EDIT PARAMETERS button,
or tap on PARAMETERS in the Navigation Bar at the bottom of the screen
2. On the Parameters screen, select the Stimulation or Detection Tab.
Follow the on-screen prompts to make change to parameters
3. Tap APPLY CHANGES to program your changes
NOTE:
• After Implant: Set output current to 0 mA, slowly increase by 0.25 mA
increments until patient feels stimulation at a comfortable level
• Replacement Generators: Set output current at 0 mA, slowly increase
by 0.25 mA to previous therapy level to allow patient time to re-adjust
NOTE:
At the end of each o ce visit, the generator must be interrogated by
tapping the INTERROGATE button followed by tapping the END SESSION
button to ensure creation and accuracy of the session reports.
Edit
Parameters
Parameters
23
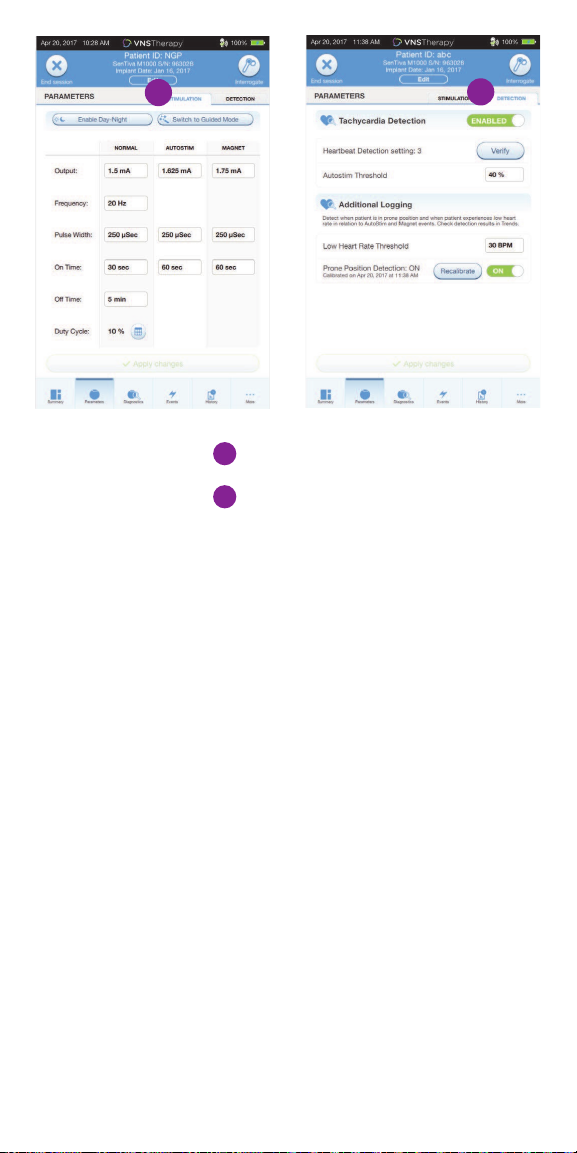
1
1
Stimulation Tab
2
Detection Tab
2
Tachycardia Detection
You may enable or disable Detection. If Detection is Disabled, then the model
1000 generators use only Normal and Magnet stimulation. If Detection is
Enabled, then parameters for AutoStim will become available, in addition to
Normal and Magnet parameters.
When you enable Detection for the first time, the software will prompt you to
set the Heartbeat Detection setting and AutoStim Threshold. These settings
work together to ensure the generator is accurately detecting the patient’s
heartbeats, and set the criterion for AutoStim delivery based on changes in
heart rate, respectively. Once Detection is enabled, you can adjust the settings
from the Detection tab as needed.
24
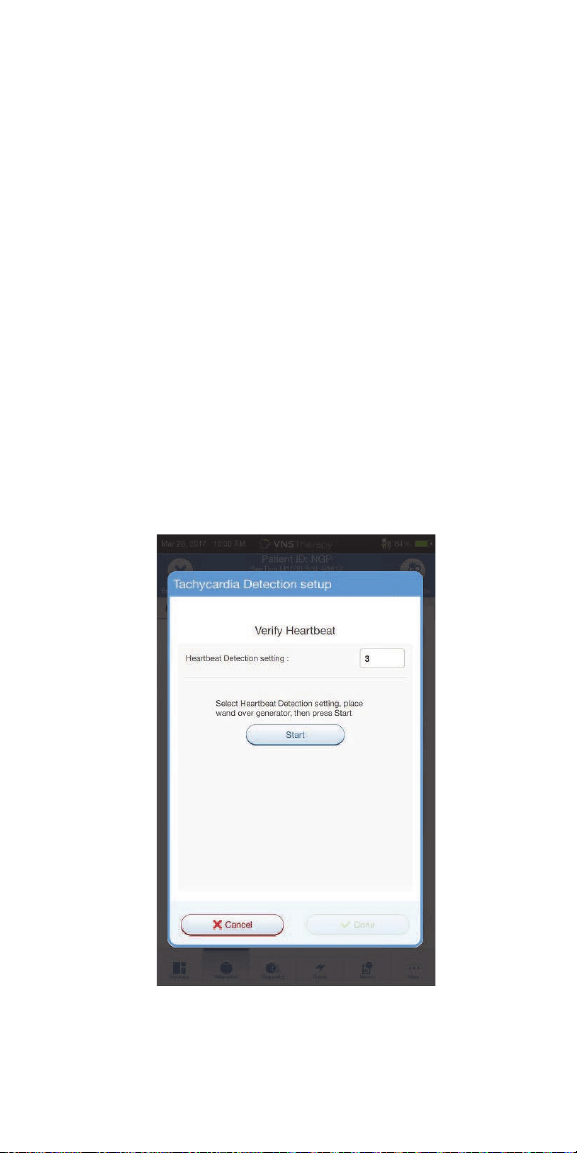
In order for the generator to accurately detect heartbeats, the heartbeat
detection must be set for the individual patient. Manually select from a range
of heartbeat detection sensitivity values: 1 (least sensitive; for use with largest
amplitude ECG signals) to 5 (most sensitive; for use with smallest amplitude
ECG signals). The setting will not change unless manually programmed to a
dierent value.
When Detection is enabled, the software will walk you through heartbeat
detection setting verification and AutoStim Threshold selection.
To Verify Heartbeat Detection:
1. Select VERIFY on the Detection Tab to confirm the accuracy of the heart
rate detected by the generator or to change the Heartbeat Detection setting
2. Place the Wand over the generator and press START to begin the test.
Keep the Wand over the generator during the entire Verify Heartbeat
Detection process. The generator will transmit a signal and the Programmer
will display the detected heart rate in beats per minute (BPM) for up to
two minutes
25
 Loading...