


G-202 User Manual V 1.03 Document: G-202102
------------------------------------------------------------------------------------------------------------------------------------------------
1
G-202 Operation Manual
(Single channel warping box with edge blending)
Technical support:
E-mail: support@vnstw.com
Tel: +886-2-8751-2785 ext. 301
Cell: +886-935-678-033
Version: 1.03

G-202 User Manual V 1.03 Document: G-202102
------------------------------------------------------------------------------------------------------------------------------------------------
2
Table of Contents
1 Introduction………………………………………………………………………………………….… 4
2 Outlook and Function………………………………………………………………………………… 5
3 Helpful Tips…………………………………………………………………………………………….. 5
4 Internal Grid Pattern for Geometry Adjustment……………………………………………….….. 6
5 [Picture] Color Adjustment……………………………………………………………….……….….. 6
6 [Image Setup] for PC graphics from VGA input…………………………………………………… 6
7 [Image Properties]……………………………………………………………………………………….. 6
8 Passive 3D Display…………………………………………………………………….………………. 7
8.1 System Configuration…………………………………………………………………….……. 7
8.2 GeoBox Setup for Stereoscopic 3D Display………………………………………..……… 7
8.3 Procedures for 3D Display Setting in GeoBox…………………………………..….…….. 8
9 [Anyplace]: Warp and Geometry Correction for the image……………………………...…….. 8
9.1 [Keystone] Correction…………………………………………………………….……………. 9
9.2 Image [Rotation]………………………………………………………………………….……… 9
9.3 [4 Corner] Adjustment………………………………………………………………….………. 9
9.4 Image [Edge Blending]……………………………………………………………………..…… 10
9.5 Image Curved Display ………………………………………………………………..………. 11
9.5.1 [Corner] Curve Adjustment……………………………………………………..………. 11
9.5.2 [Edge] Curve Adjustment………………………………………………………….……. 12
9.5.3 [Center] Curve Adjustment………………………………………………..……………. 12
9.5.4 [Shift] Adjustment (Corner Position Adjustment)…………………………..……… 13
9.5.5 [Order]…………………………………………………………………………………….... 13
9.6 [Edge Mask]………………………………………………………………………………..……… 14
10 OSD Miscellaneous Functions—[Options]………………………………………………..……….. 14
10.1 System Information: [Information]…………………………………………………..……….. 14
10.2 OSD Language: [Language]……………………………………………………………………. 15
10.3 [Reset]……………………………………………………………………………………..……….. 15
10.4 [Accessibility]………………………………………………………………………………..……. 15
10.4.1 [Button Repeat Rate]………………………………………………….…………... 15
10.4.2 [Menu Time Out]……………………………………………………………….……. 16
10.4.3 [Logo Time Out]………………………………………………………………..……. 16
10.5 [Setting]………………………….………………….…………………………………..…………. 16
10.5.1 Audio [Mute]………….……….……………………………………………….…….. 16
10.5.2 [Box ID]……………………………………………………………………………..….. 17
10.5.3 [Profile Setting]………….….………………………………………………………… 17
10.5.4 [Network]……………….…………………………………………………….……….. 17
11
Two projector image stacking procedures…………………………………………………………… 17
12 Specifications…………………………………………………………………………………………… 19
13 Revision history………………………………………………………………………………………… 21

G-202 User Manual V 1.03 Document: G-202102
------------------------------------------------------------------------------------------------------------------------------------------------
3
Limited Warranty
This device is designed and tested to the highest standards and backed by a one year parts
and labor warranty. Warranties are effective upon the first delivery date to the end
customer and are non-transferable. Warranty related repairs include parts and labor, but
do not include repair of faults resulting from user negligence, special modifications, abuse
(mechanical damage), shipping damage, and/or other unusual damages. The customer
shall pay shipping charges when the unit is returned for repair. Manufacturer will pay
shipping charges for return shipments to customers.
Manufacturer does not assume responsibility for consequential damages, expenses or loss
of revenue, inconvenience or interruption in operation experienced by the customer.
Warranty service shall not automatically extend the warranty period.
FCC/CE statement
This equipment has been tested and found to comply with the limits for a Class A digital
device, pursuant to part 15 of the FCC Rules. These limits are designed to provide
reasonable protection against harmful interference when the equipment is operated in a
residential / commercial environment. This equipment generates, uses, and can radiate
radio frequency energy and, if not installed and used in accordance with the instruction
manual, may cause harmful interference to radio communications. Operation of this
equipment in a residential area is likely to cause harmful interference in which case the
user will be required to correct the interference at his own expense.
G-202 User Manual V 1.03 Document: G-202102
------------------------------------------------------------------------------------------------------------------------------------------------
4
1. Introduction
Features
1. Full HD input and output.
2. DVI loop back from digital input signals
for passive 3D & projector stacking
without additional video splitter
3. Patented warp technology for precise
geometry alignment & edge blending.
4. Work with Matrox video card to provide
up to 16x full HD output images from
one PC source.
5. De-multiplexing HDMI 1.4a standard 3D
formats from Blue Ray, game, PC…
6. DVI-I input port to support VGA, DVI &
HDMI (with audio) input signals.
7. DVI-D output port to support DVI and
HDMI (with audio) output.
8. Decode 3D signal into RH or LH for
passive 3D display (required 2 units of
G-202).
9.
User friendly OSD and IR remote control.
No PC software is required.
10. IR extender & RS-232 control.
11. Optional eWarp PC tool for irregular
curved display application.
G-202 User Manual
(Single channel Warp & High Resolution Edge blending)
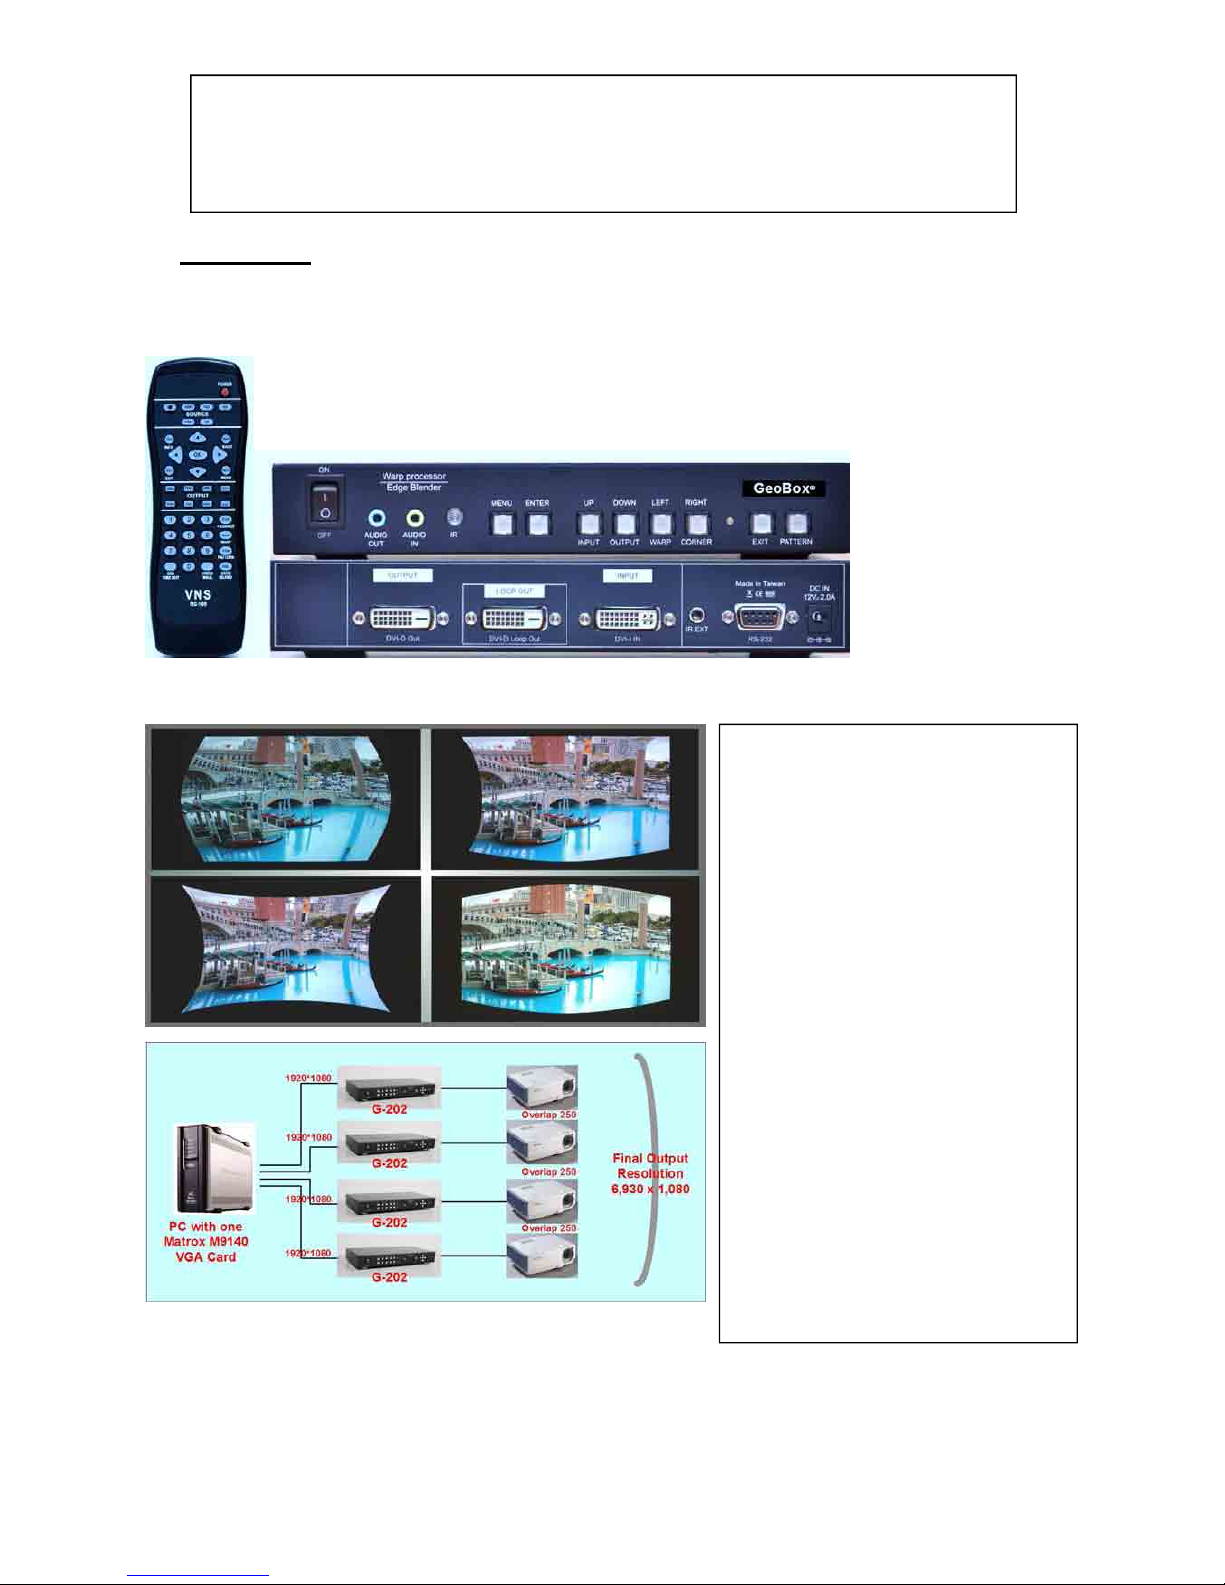
G-202 is an advanced single channel video processor with patented warp technology,
passive 3D decoding and edge blending function. It is designed to work with PC display card
(with overlap setting) for high resolution edge blending and capable of image warp, stacking
& 3D demultiplexer. No additional tool or PC software is required for the setup.
G-202 User Manual V 1.03 Document: G-202102
------------------------------------------------------------------------------------------------------------------------------------------------
5
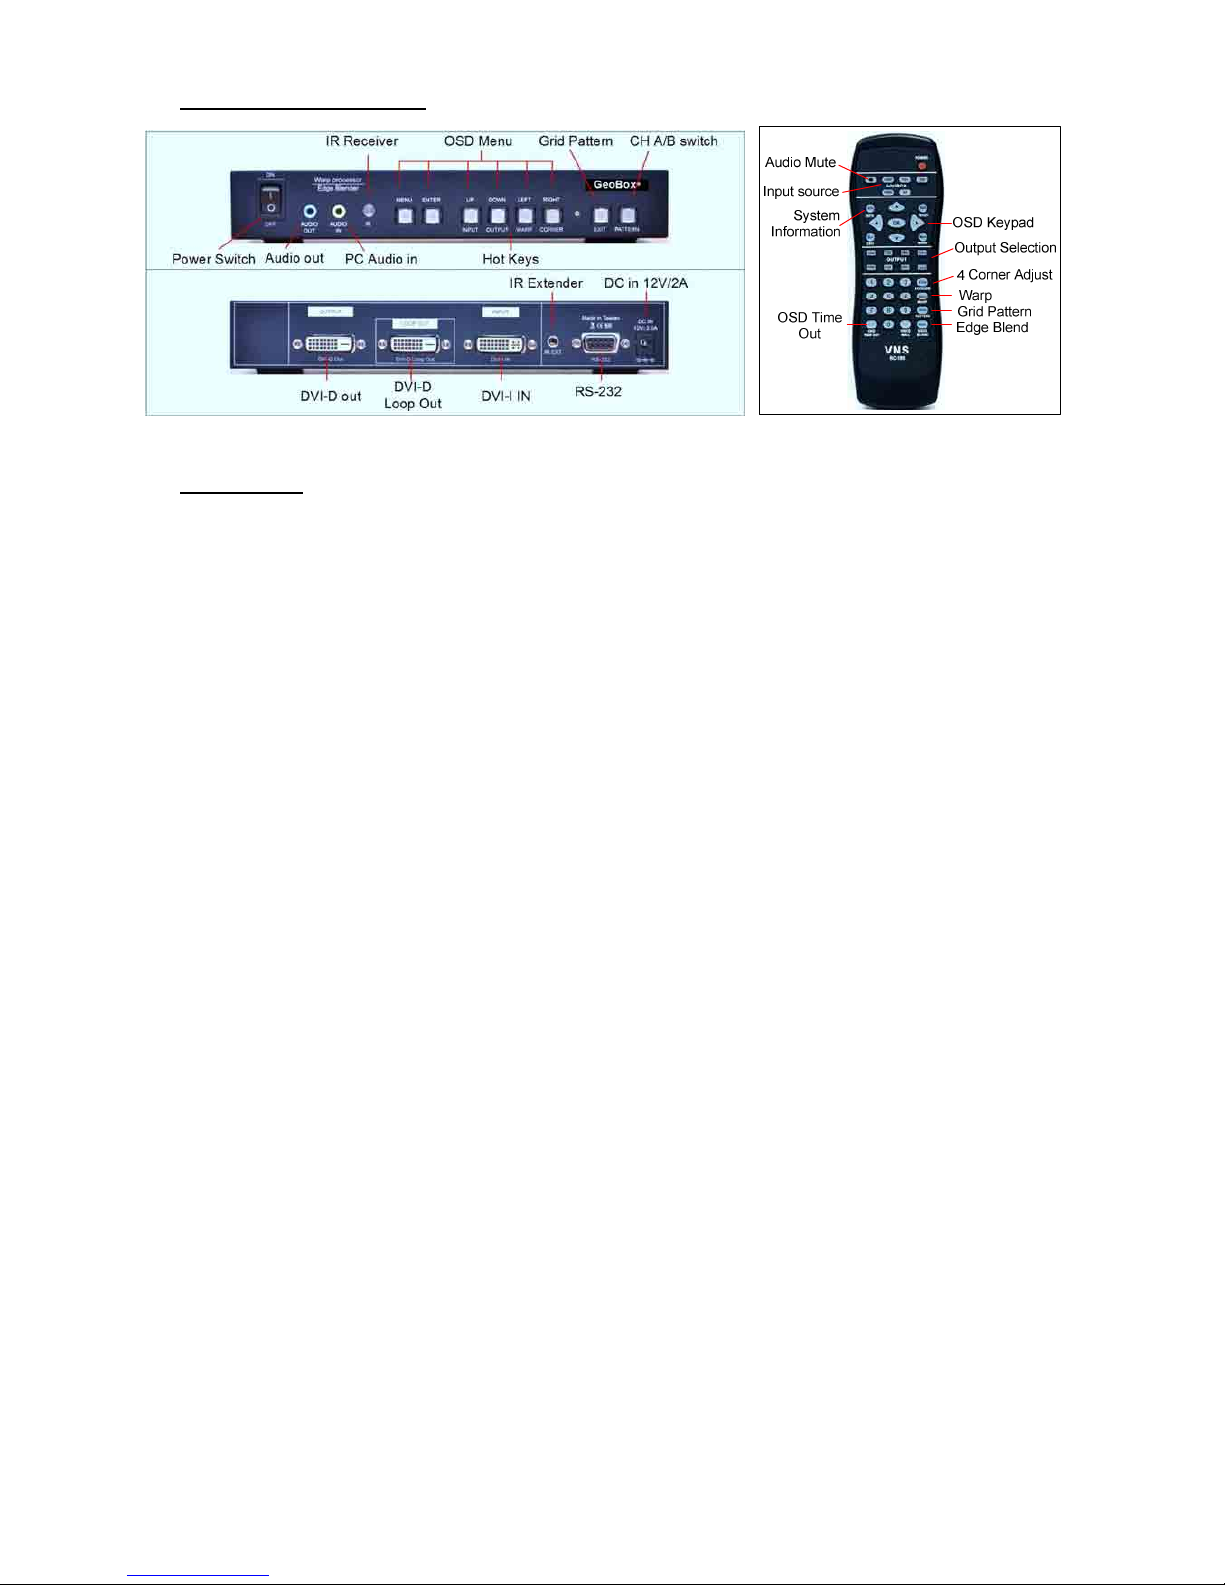
2. Outlook and Functions
3. Helpful tips
3.1 Please Reset GeoBox when start a new application to avoid unexpected setting inside the system.
Procedures to do system Reset: OSD Menu [Options][Reset][Reset All]
3.2 OSD Lock / Unlock: Continuously press [MENU] key on Front Panel or IR Remote Controller for 12
seconds, the OSD function will be locked to prevent from the setting changes by other people. To press
MENU key for 12 seconds again, it will unlock OSD and user can manipulate the OSD again.
3.3 [Picture] menu in the OSD can only be activated while the input signal is not in [Preset Mode]. To select
[Image Properties] [Custom] [Save], then user can activate [Picture] menu again.
3.4 [Image Setup] menu will not be activated if the input source is not from VGA.
3.5 To set [Menu Time Out] to “0”, the OSD will appear till the OSD Menu has been turned off manually.
3.6 To set [Logo Time Out] to “0”, the splash screen Logo will not appear while GeoBox is powered on.
3.7 Shortcut Keys on the front panel are only functional while the OSD menu is not activated. Once the
OSD menu is activated, these keys will be served as OSD functional keys.
3.8 In order to avoid interference among multiple GeoBox during the installation, user can use OSD lock
function or set ID number for each GeoBox through [Options] Menu. Press number keys in Remote
Controller for the control of multiple GeoBox:
850: simultaneous control for all GeoBox
851: control GeoBox ID No. 1
853: control GeoBox ID No. 3
3.9 Please select digital signals output to projector (HDMI or DVI) to avoid image position shift. If VGA
output should be applied through DVI to VGA converter, please set projector without implementing
Auto-Adjustment in VGA input.
3.10 Loop out signal is only available while the input is HDMI or DVI-D signal.
3.11 Please use external grid pattern for two projector image stacking.
3.12 Each Grid in internal grid pattern represents 50x50 pixels no matter which input resolution is selected.
3.13 Please use qualified HDMI cable and carefully plug in and out. Unqualified cable may damage HDMI
connector or cause abnormal display.
3.14 Pay attention to the HDMI compatibility due to different cables, equipment and distance. If the distance
is too long, HDMI extender should be used. It may extend the distance up to 100m.
G-202 User Manual V 1.03 Document: G-202102
------------------------------------------------------------------------------------------------------------------------------------------------
6
4. Internal Grid Pattern for Geometry Adjustment
To press [PATTERN] key in Remote Controller or front panel, it will show Cross Hatch grid pattern. To press
[PATTERN] key again, different colors of Grid pattern will appear cyclically from White Red Green
Blue Blank. User needs to select [Blank] or not active [Pattern] function if user wants to use external test
pattern during geometry adjustment. Please use Exit key in Remote Controller or Menu key on Front Panel to
exit from grid pattern. Each Grid pattern is 50x50 pixels. User can calculate the overlap pixel via the number of
Grid pattern and figure out the pixel number in the images or overlap region.
5. [Picture] Color Adjustment
[Picture] menu can only be activated when [Preset Mode] function under [Image Properties] Menu is not
activated. It can adjust brightness, contrast, color hue, saturation and sharpness of the image
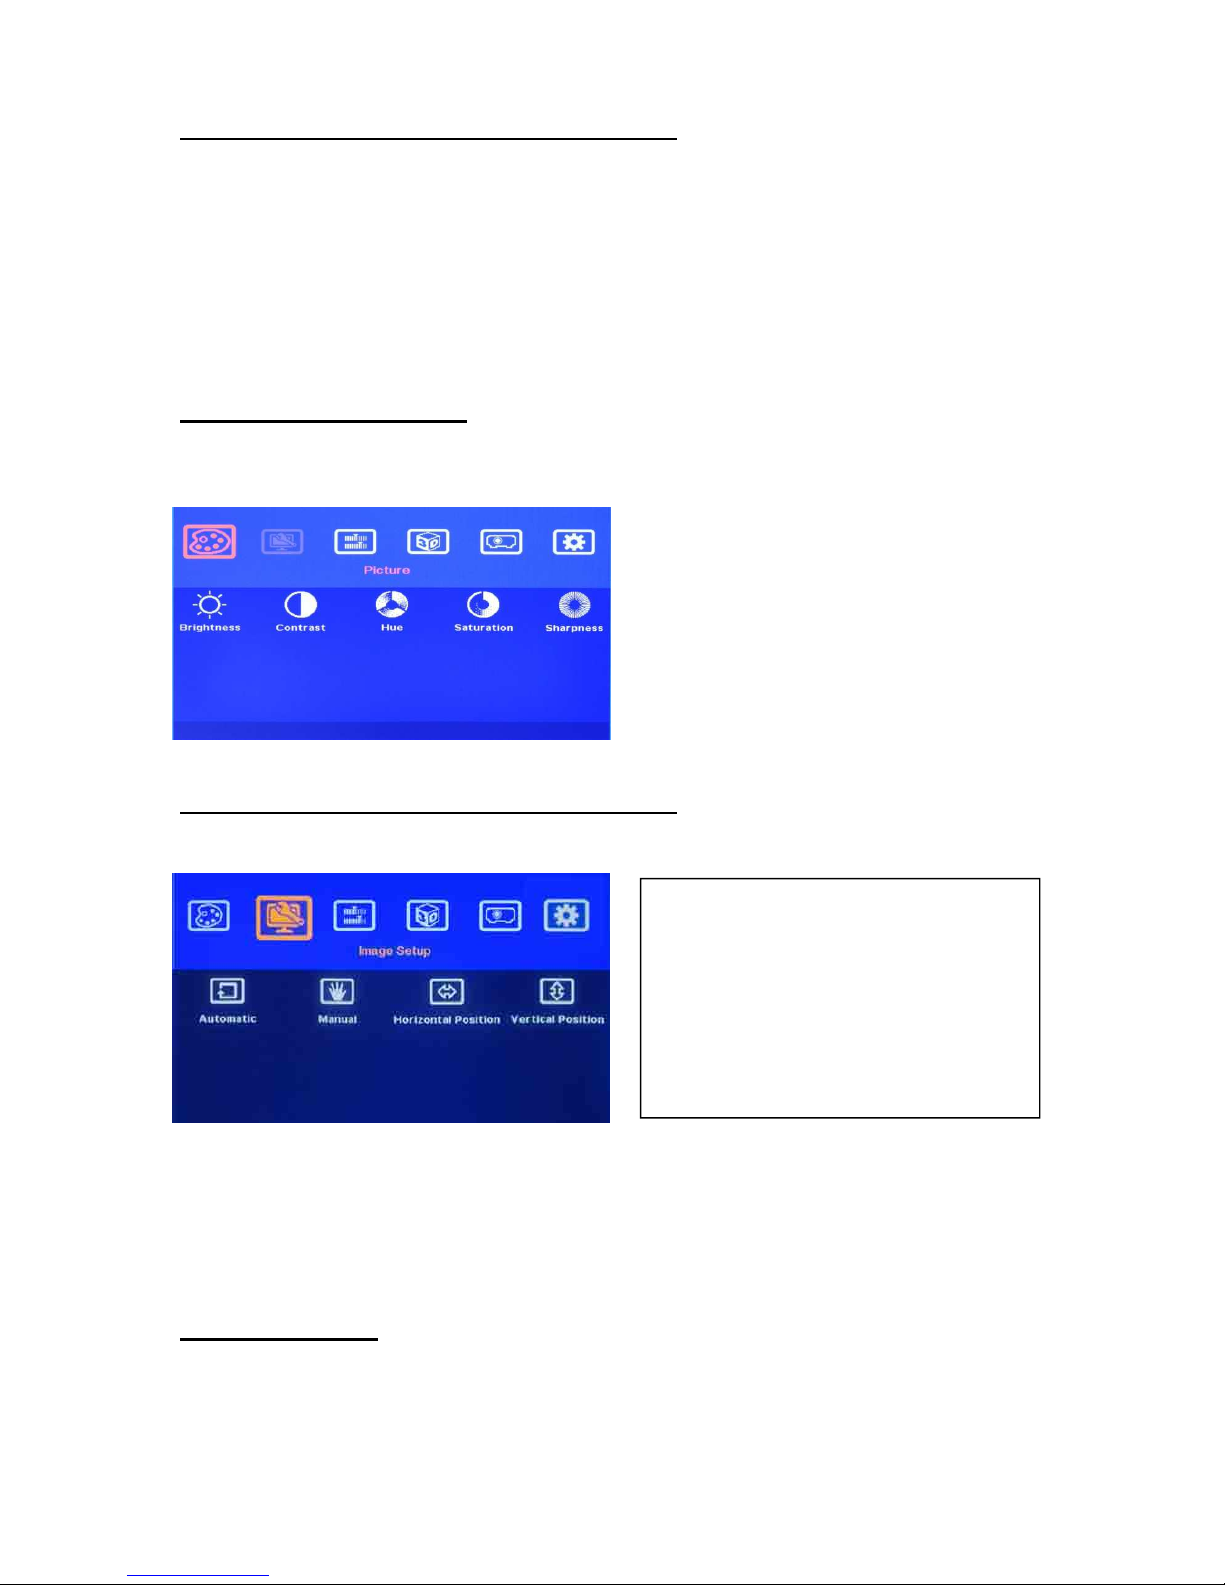
6. [Image Setup] for PC graphics from VGA input
[Image Setup] menu can only be activated when video signal input is from VGA input port.
6.1 Automatics: It will do automatic image alignment inside the system
6.2 Manual: manual setting for signal Phase and Clock to eliminate image noise in VGA input
6.3 Horizontal Position: to adjust manually the image horizontal position.
6.4 Vertical Position: to adjust manually the image vertical position.
7. [Image Properties]
[Image properties] is designed for the selection of image color, input port, aspect ratio and output modes.
Inside [Color] menu, there are four Preset color (Neutral, sRGB, Reddish and Bluish) and also customized
R.G.B. color independent adjustment. The [Scaling] function is to set aspect ratio of the image. [Output Mode]
Activate [Image Setup] Menu by Front Panel
keypad or Remote Controller.
G-202 User Manual V 1.03 Document: G-202102
------------------------------------------------------------------------------------------------------------------------------------------------
7
is for the selection of output resolutions. User can select output resolution directly from shortcut keys on the
front panel or remote controller.
.
.
8. Passive 3D Display
8.1 System Configuration:
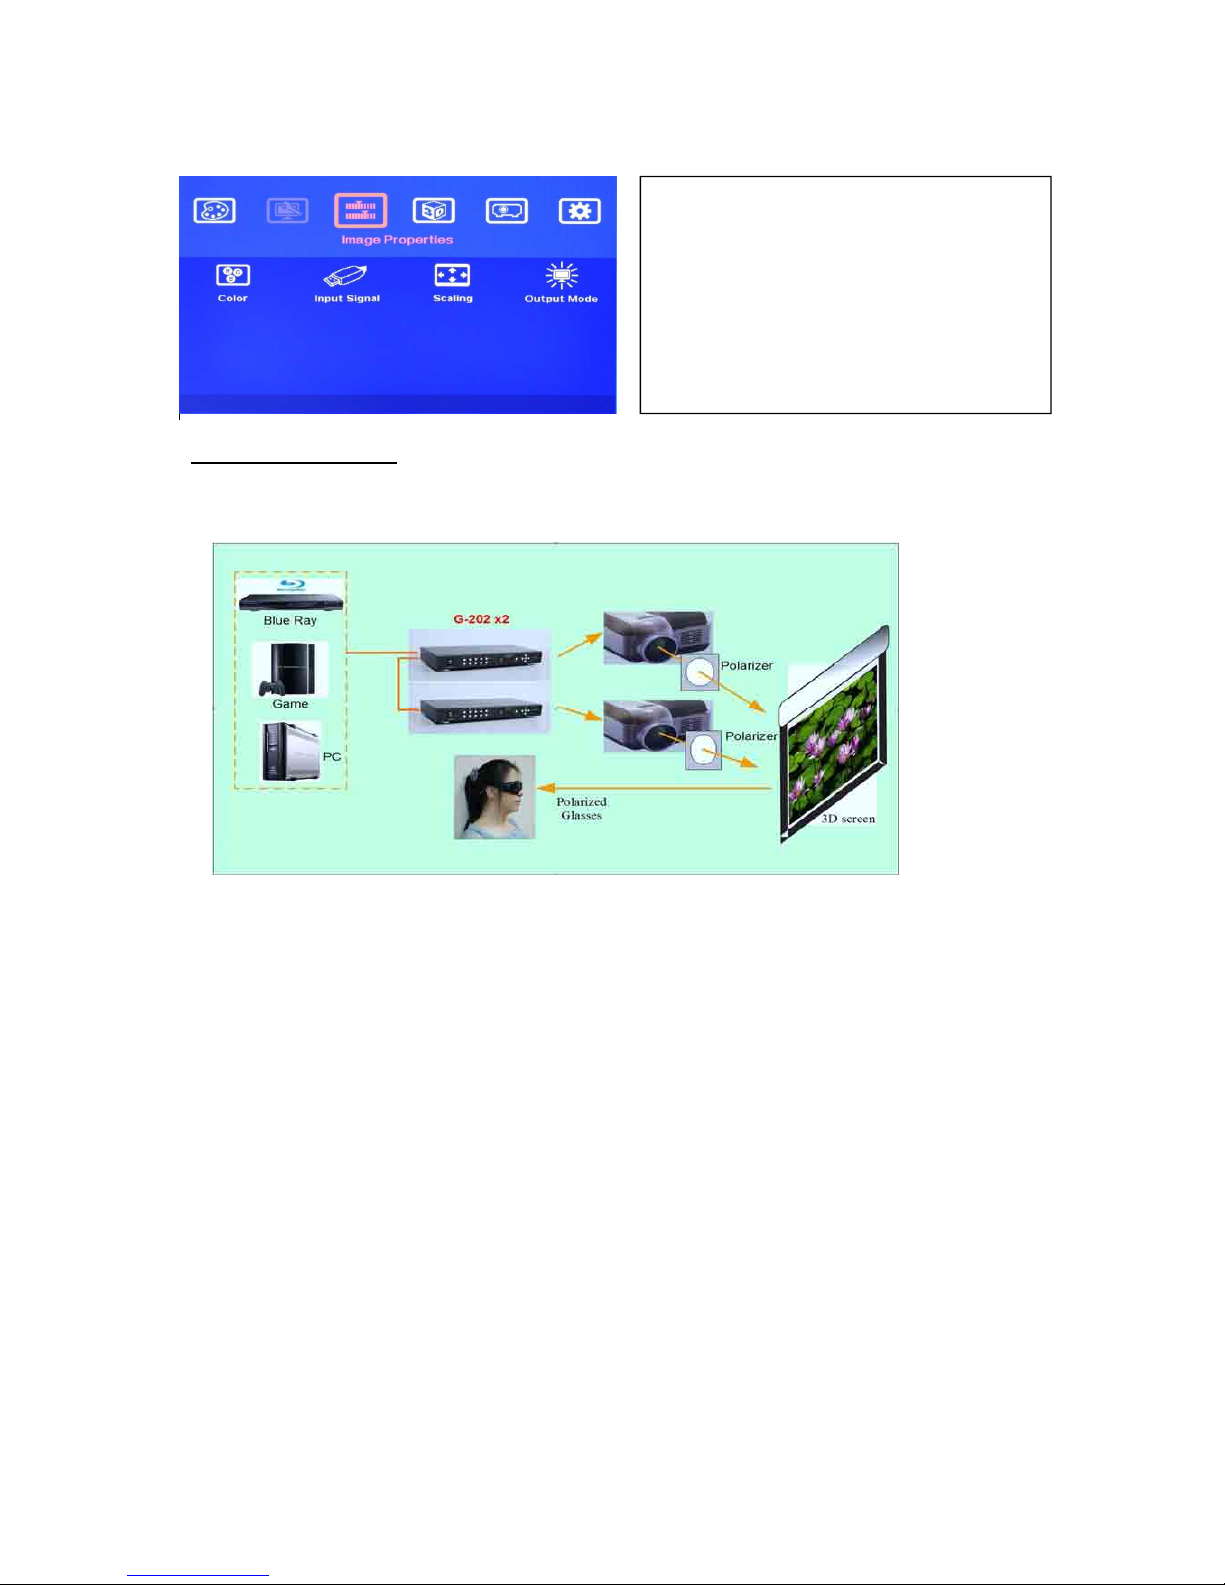
G-202 can decode 3D format from different 3D video sources, including Blue Ray DVD, STB, Media
player, Game and PC… 3D signal will be decoded by G-202 into signal for Right or Left eyes. One G-202
can only provide signal for one projector. RH/LH 3D signals need be displayed through two projectors.
Each projector will display signal only for one eye. User needs to set a polarized filter in front of the
projector and also wears polarized glasses. The glasses need to match the polarized filter in front of the
projectors so that the right eye can only see the scene for right eye and the left eye can only see the
scene for left eye. A 3D screen is also required to preserve the polarization of the image for 3D display. It
is possible to use optic spectrum method similar to Dolby 3D display using normal 2D screen.
8.2 GeoBox Setup for Stereoscopic 3D Display
8.2.1 GeoBox should not be installed at the side of the projector where the ventilation hot air comes out.
8.2.2 Two projectors can be installed at side by side or Top/Bottom position. Closer lens position will
reduce [4 Corner] adjustment range and reduce the loss of the image resolution and brightness.
8.2.3 Setup the polarized film and glasses so that RH/LH eye can only see the scene for one eye.
8.2.4
Use [4 Corner] or [Warp] adjustment Menu to align the images from two projectors completely
together. Place the polarized film in front of the projector before geometry adjustment.
Activate [Image Properties] Menu by Front
Panel keypad or Remote Controller.
5 items in the menu.

G-202 User Manual V 1.03 Document: G-202102
------------------------------------------------------------------------------------------------------------------------------------------------
8
8.3 Procedures for 3D Display Setting in GeoBox
If still can’t verify “R” & “L” characters in both eyes, please check below again:
1. Is the screen for 3D display?
2. Are the Glasses and polarizer filters the same types and paired for the RH & LH eyes?
3. G-202 for RH eye should connect to RH eye projector and LH G-202 should connect to LH eye projector.
Please check from [Output Format] menu and make sure to have correct settings. If the connection is
incorrect, please use [Output Frame] setting to change the connection for RH/LH eyes. Don’t change the
connection cables. Otherwise geometry settings should be re-aligned again.
4. Is the Blue Ray player set to [Auto 3D] or [1080p @24Hz] mode to deliver 3D signal out?
5. If Side by Side or Top-Bottom 3D formats are used, please check the aspect ratio in video source output
to make sure G-202 will receive full screen image.
6. Is there any DVI/HDMI or signal source compatibility issue and only one projector shows image?
7. Are the DVI/HDMI cables qualified and the length not too long?
8. If video distributor is used, please make sure it can support HDMI 1.4 3D signals.
9. [Anyplace]: Warp and Geometry Correction of the Image
Each function in OSD menu may not be functional simultaneously. [4 Corner] adjustment can replace
[Keystone] function. When [Warp] Menu is activated, [4 Corner] function will be disabled. In curved display
application, please use [Shift] menu under [Warp] to adjust 4 corner positions.
1. After image alignment, to activate [3D Properties]
menu and select [Input Format].
2. Select [Automatic] if the 3D signal is standard 3D
formats from Blue Ray player or sources with 3D
index inside the signal.
3. Select [Side By Side] or [Top-Bottom] based on
user’s 3D input source.
4. Line Interleave 3D will be auto detected.
1. Activate [Identify] menu to show “R &
L” characters on the screen
simultaneously to verify the final 3D
settings in the system.
2. RH eye should see only “R” and LH
eye should see only “L”.
1. To activate [Output Format] and set RH eye
AF5D-20 with [Right Eye Frame] and LH eye
AF5D-20 with [Left Eye Frame] output format.
2. If the input is 1080p 24Hz and the projectors can
support this signal, please select [Enable] in
[1080p 24Hz Output] menu in both RH/LH
AF5D-20 to get the best 3D performance

G-202 User Manual V 1.03 Document: G-202102
------------------------------------------------------------------------------------------------------------------------------------------------
9
9.1 [Keystone] Correction
If the projection direction from projector is not perpendicular to the screen, the image on the screen will have
keystone as below. Keystone Correction is required to compensate this kind of distortion. [4 Corner] menu can
also correct this distortion.
9.2 Image [Rotation]
Image Rotation is to compensate the misalignment between projector and screen. User can activate [Rotation]
under [Anyplace].
9.3 [4 Corner] Adjustment
[4 Corner] can adjust each corner position independently and is necessary for the alignment in multiple
projector applications, such as Edge Blending, stacking & 3D display.
Activate [Anyplace] Menu for Warp and Geometry
correction of the image.
[Warp] & [4 Corner] short cuts are available in
remote controller.
When Rotation menu is activated,
Pin-Barrel will remain functional and other
functions in [Anyplace] will be disabled.
The rotation angle can be clockwise or
anti-clockwise ±127 degrees under 1400 x
1050 output resolution and ±7 in full HD.

G-202 User Manual V 1.03 Document: G-202102
------------------------------------------------------------------------------------------------------------------------------------------------
10
9.3.1 Use OSD MENU to activate [4 Corner] adjustment or Press [4 CORN] hot key in Remote Controller as
showed above.
9.3.2 Maximum adjustment range for each corner is ±256 pixels horizontally (max. 300 pixels in Left + Right)
and ±200 pixels vertically (max. 200 pixels Top + Bottom) under 1400x1050 output resolution. If the
output resolution is over 1400x1050, the adjustment range for each corner is ±150 pixels horizontally
(max. 300 pixels in Left + Right) and ±100 pixels vertically (max. 200 pixels Top + Bottom).
9.3.3 Example for [4 Corner] adjustment:
Activate [4 Corner] menu then select the corner for the adjustment Press [OK] activate
[PATTERN] key to show Grid pattern and start [4 Corner] geometry adjustment. After finishing the first
corner adjustment, press [OK] select next corner press [OK] then Grid pattern will appear again
automatically and then start further adjustment.
Before [4 Corner] adjustment After [4 Corner] adjustment
9.4 Image [Edge Blend]
9.4.1 Projector with higher contrast ratio is recommended. It will reduce the light leakage in overlap region.
This light leakage will be more obvious in dark environment. It can’t be fixed by external signal control.
9.4.2 Use the same projector model and settings.
9.4.3 To align the grid patterns between two images. All edge blending images shall have the same display
dimensions.
9.4.4 To split, assign and crop the images through PC display card, G-201 or other video wall controller.
[Edge Blend] is to seamlessly expand the image
size with multiple projectors. Enough pixels in
overlap region (about 10%~20%) are required to
get good result. Before [Edge Blend] setting, the
image should be aligned, split and cropped the
right region. Geometry adjustment is required.
[4 Corner]
shortcut

G-202 User Manual V 1.03 Document: G-202102
------------------------------------------------------------------------------------------------------------------------------------------------
11
9.4.5 Set [Edge Blend] value based on the overlap pixels (each overlap grid represents 50 pixels) to the
correct edge(s) in each edge blending image.
9.4.6 After above procedures, user can see the result of the edge blending. If the performance is not
satisfied, then below procedures can be tried.
--Select different [Gamma] values and check video performance.
--Set right [Offset] value to compensate black level difference between Transition area and
Non-transition area.
--Eliminate the banding effect via [Shift] blending position.
--Fine-tune color from projectors or AG-202 if necessary.
9.4.7 Application case study:
9.5 Image Curved Display—[Warp]
9.5.1 [Corner] Curve adjustment
Under [Warp] menu, it consists of 5 menu for
image warping: [Corner], [Edge] and [Center]
and [Shift].
Dual projector Edge Blending:
G-201: video wall settings
G-202: Geometry adjustment
and edge blending
Using Matrox M9148 display
card for super high resolution
Edge blending application:
Geometry adjustment and
edge blending via G-202
Image split and overlap by
M9148 VGA card

G-202 User Manual V 1.03 Document: G-202102
------------------------------------------------------------------------------------------------------------------------------------------------
12
9.5.2 [Edge] Curve adjustment
9.5.3 [Center] Curve adjustment
OSD Menu under [Edge] Curve adjustment
includes [Left Edge], [Right Edge], [Top Edge],
[Bottom Edge] and [Reset]
Example:
Curve adjustment in all Corners
Example:
After applying 4 Edges curve adjustment
User can adjust the curve in each edge of the
image independently.
Under [Corner] curve menu, user can adjust the
curve in each corner. While adjusting one corner,
the other corresponding corner will be adjusted
simultaneously.

G-202 User Manual V 1.03 Document: G-202102
------------------------------------------------------------------------------------------------------------------------------------------------
13
9.5.4 [Shift] adjustment (4 Corner adjustment)
9.5.5 Order
Under [Center] Menu user can adjust the
positions of the axis center of the image to get
non-symmetrical curved image.
The axis center can be adjusted horizontally and
vertically with the range of ±256 pixels in
horizontal position and ±200 pixels in vertical
position if the output resolution is under
1400x1050. In full HD output resolution, the
adjusting range is H±200 & V±150 pixels.
[Shift] function is to adjust the corners of the
image before or after Curved adjustment. It can
co-exist with other functions under [Warp] Menu.
The menu under [Shift] is the same as [4
Corner] adjustment to allow the adjustment of
the position in each edge in curve image.
The response time in corner position
adjustment under [Shift] will be slower than [4
Corner] for flat screen display.

G-202 User Manual V 1.03 Document: G-202102
------------------------------------------------------------------------------------------------------------------------------------------------
14
9.6 [Edge Mask]
Edge mask is a function to adjustment the display range of the image. It can mask each image edge up to 250
pixels with black background. The major purpose is to fit the image into the screen especially in the edge
blending application. In edge blending, if user applies geometry adjustment function, it will change the Grid
pattern size and aspect ratio in the whole image and affect the edge blending result. Edge mask is one
function to adjust the positions of the edges but still maintains the aspect ratio and location of the Grid pattern
without change. It will simplify the system installation.
Edge Mask will affect 3D display in Side by Side or Top-Bottom 3D input Format. Please don’t apply Edge
Mask in 3D display.
10 OSD Miscellaneous Functions—[Options]
10.1 System Information: [Information]
[Order] function is to decide the order for both
[Shift] and [Curve] adjustments.
For the correction of image distortion from
source side, user can select [Curved First].
For normal curved screen projection, [Shift
First] is defaulted and user can start with 4
corner adjustment.
[Front Edge Mask] is to mask the image edge
before Warp.
[Rear Edge Mask] is to mask the image after
Warp.
In most of edge blending application, [Rear
Edge Mask] will be applied.
Each edge of the image can be masked with black
background up to 250 pixels. This pixel number
includes the geometry adjustment pixels. Users
will not see the Edge Mask result till the
adjustment range is over geometry adjustment
range.

G-202 User Manual V 1.03 Document: G-202102
------------------------------------------------------------------------------------------------------------------------------------------------
15
10.2 OSD Language: [Language]
10.3 [Reset]
[Exit] menu will exit from [Reset] menu and the system settings will not be changed.
[Reset All] menu will reset GeoBox to its factory default settings.
[Anyplace] menu will reset the settings in [Anyplace] function to its factory default settings
10.4 [Accessibility]
10.4.1 [Button Repeat Rate]
[Off]: OSD only responds once when every time OSD key is pressed.
[Default]: OSD will respond slowly at the beginning but will increase the speed of the response when
OSD key is pressed continuously.
In [Information] menu, it will show the
information in GeoBox, such as input mode,
output mode, Network, Model name and
Microcode (firmware) version.
In [Reset] menu, two types of Reset can be
done: Reset All and reset [Anyplace] function.
In [Language] menu, three languages can be
selected as OSD Language:
English, Simplified Chinese and Traditional
Chinese
In [Accessibility] menu, three items can be
set:
OSD [Button Repeat Rate], OSD [Menu Time
out] and [Logo Time Out]

G-202 User Manual V 1.03 Document: G-202102
------------------------------------------------------------------------------------------------------------------------------------------------
16
[Slow]: OSD behavior is similar to [Default] but the response speed will be slower than Default.
10.4.2 [Menu Time Out]
When [Off] is selected, the OSD menu will remain in the screen until user activates other OSD
Menu.
Internal Grid Pattern will be also controlled by the time setting in [Menu Time Out] menu.
10.4.3 [Logo Time Out]
10.5 [Setting]
10.5.1 Audio [Mute]
OSD [Button Repeat Rate]:
It controls the speed of the response of the
OSD button while user presses OSD button
continuously.
OSD [Menu Time Out]
OSD menu will disappear from the screen
based on time setting.
The default time is 30 seconds.
4 items under [Settings] menu:
[Mute] Audio mute or enable
[Box ID]: Set control ID
[Profile]: Save/Load profile settings
[Network]: set RS232
control
To set the time to show Splash screen
when power on GeoBox.
If “Off” is selected, then the splash screen
will not appear during system booting up
period.

G-202 User Manual V 1.03 Document: G-202102
------------------------------------------------------------------------------------------------------------------------------------------------
17
10.5.2 [Box ID]
10.5.3 [Profile Setting]
10.5.4 [Network]
11 Two projector image stacking procedures
11.1 Image stacking is a cost effective solution to increase the brightness of the projection system. User
can use two low cost projector with 4,000 lumen to stack up to 8,000 lumens easily at fraction of cost.
11.2 In image stacking application, user needs to use digital input signal (HDMI or DVI-D) as input source
and the projectors shall be able to support DVI-D or HDMI input signal. If connecting with analog
Audio Mute:
[Mute Off] will enable audio output.
[Mute On] will disable audio output.
[Mute] hot key in remote controller is
available
[Box ID] is the identification No of each
GeoBox
GeoBox ID No is from 1-99
After set Box ID, user can control GeoBox
via IR Remote controller or RS232
Please see details in [Helpful Tips]
Remote controller can only control GeoBox
ID# from 1-9.
[Profile] is to save and load GeoBox settings
including input port, output resolution and all
the settings in GeoBox.
Five indexes can be chosen to save GeoBox
settings in each GeoBox and can be recalled
by IR remote controller or RS232
RS232 interface is designed with DB-9
connector for the communication
between GeoBox and Host computer.
Detailed RS-232 protocol can be
provided as needed.

G-202 User Manual V 1.03 Document: G-202102
------------------------------------------------------------------------------------------------------------------------------------------------
18
signal source, it may have image shift issue after turn OFF/ON the system. If VGA signal must be
used, user needs to add video distributor at front of G-202 and connect one projector directly to video
distributor and another video distributor output shall be connected with G-202 input port with DVI-I to
VGA adapter. “Auto Adjustment” function in the projectors shall be shut off to avoid image shift after
the system is turned OFF/ON.
11.3 Please use external grid pattern for geometry alignment. One projector should be connected through
[DVI Loop Back] port with native raw signal without processing by G-202 and the other projector
should be connected to G-202 output port.
11.4 To do geometry adjustment in the first projector to let the image match the screen borders through
keystone correction or lens shift function inside the projector, then to use [4 Corner] adjustment in
G-202 to align the images from the 2nd projector onto the first one. External Grid pattern shall be
applied from video source.
11.5 For curved screen stacking, each projector shall be connected with one Geobox and user needs to
align the images through [Warp] function in GeoBox unless the first projector can support curved
screen display.
11.6 If the screen is not flat enough, the image sharpness will be reduced in misaligned regions.

G-202 User Manual V 1.03 Document: G-202102
------------------------------------------------------------------------------------------------------------------------------------------------
19
12.
Specifications
Main items Features G-202
Brief comparison
Video processor
10 bits
processing channel Single
Image Stacking to amplify brightness Yes
Passive 3D
Yes
Active 3D Yes
Warp/geometry alignment
Yes
Edge Blending (with Matrox card)
Yes
Input & Output
Video Input Ports 1x DVI-I
Video Loop Out 1x DVI-D
Video Output 1x DVI-D
Audio Input PC Jack
Audio Output (analog RH/LH) Yes
Input up to full HD Yes
Output resolution up to 1080P Yes
High speed HDMI Rx & Tx Yes
Geometry & Warp
4 corner quick adjustment Yes
H & V Keystone Correction Yes
Patented Warp for curve display Yes
Internal grid pattern Yes
Image Rotation
Image rotation to +_128 degrees under 1400x1050 output
resolution
Yes
Edge Mask Image edges masked with black background up to 250 pixels Yes
Edge Blending +Matrox VGA card for super high resolution edge blending Yes
Passive 3D Display
Automatically 3D formats detection Yes
Support Side by Side 3D format Yes
Support Top-Bottom 3D format Yes
Support Line Interleave 3D format Yes
Support Blue Ray 1080P@24 Hz 3D format Yes
Swappable outputs for RH/LH projectors Yes
Perfect Sync algorithm for zero latency in passive 3D RH/LH
channel
Yes
16:9 video display on 2.35:1 screen without pixel lose. Yes
Image stack Multiple projector image stacking for brightness magnification
Yes
Video processing
Advanced full 10 bits 3D de-interlace, smooth edge algorithm
and 3:2/2:2 film mode detecting and recovery
Yes

G-202 User Manual V 1.03 Document: G-202102
------------------------------------------------------------------------------------------------------------------------------------------------
20
High quality video and graphics scaling up and scaling down
Yes
Color adjustment (RGB color adjustment, Hue, saturation,
sharpness, contrast, brightness, preset color modes)
Yes
System control
Full function Front Panel Keypads & IR Remote controller Yes
Cabled IR Receiver Extender (up to 20 meters) Option
Box ID for easy independent control through IR, RS-232 or
Ethernet.
Yes
Embedded RS-232 with DB-9 connector Yes
ASCII control protocol over RS-232 Yes
Easy Use
Firmware update via RS-232 connector Yes
5 selectable Profile settings for difference display modes Yes
NO PC required Yes
Ear mount bracket in 1U rack Option
Dimension & weight
Only Box body, not including remote controller, power supply
and packing
225x155x36mm, 0.7kg

G-202 User Manual V 1.03 Document: G-202102
------------------------------------------------------------------------------------------------------------------------------------------------
21
13. Revision History
Revision
Date Originator Comments
V 1.01 2012-12-20 Steve Wang First revision
V 1.02 2013-03-08 Steve Wang Add case study
V1.03 2013-05-10 Steve Wang Support rotation up to 128 degrees
 Loading...