

Page 1

vCenter Chargeback Manager
Installation and Upgrade Guide
vCenter Chargeback Manager 2.0.0
This document supports the version of each product listed and
supports all subsequent versions until the document is replaced
by a new edition. To check for more recent editions of this
document, see http://www.vmware.com/support/pubs.
EN-000763-00
Page 2

vCenter Chargeback Manager Installation and Upgrade Guide
You can find the most up-to-date technical documentation on the VMware Web site at:
http://www.vmware.com/support/
The VMware Web site also provides the latest product updates.
If you have comments about this documentation, submit your feedback to:
docfeedback@vmware.com
Copyright © 2011 VMware, Inc. All rights reserved. This product is protected by U.S. and international copyright and intellectual
property laws. VMware products are covered by one or more patents listed at http://www.vmware.com/go/patents.
VMware is a registered trademark or trademark of VMware, Inc. in the United States and/or other jurisdictions. All other marks
and names mentioned herein may be trademarks of their respective companies.
VMware, Inc.
3401 Hillview Ave.
Palo Alto, CA 94304
www.vmware.com
2 VMware, Inc.
Page 3

Contents
About the Guide 5
Introduction to vCenter Chargeback Manager 7
1
What Is Chargeback 7
Chargeback Solution for Virtual Environments 7
Overview of vCenter Chargeback Manager 8
System Requirements 11
2
Hardware Requirements 11
Software Requirements 11
Install and Upgrade Prerequisites 13
3
Network Management Prerequisites 13
Database Management Prerequisites 14
Other System Prerequisites 15
Pre-installation Checklist 16
Download and Extract the vCenter Chargeback Manager Installer 17
Installing vCenter Chargeback Manager 19
4
Install vCenter Chargeback Manager 19
Create a vCenter Chargeback Manager Cluster 24
Install vCenter Chargeback Manager with an Existing Database Schema 28
Services Related to the vCenter Chargeback Manager 32
Accessing the vCenter Chargeback Manager 34
Upgrading vCenter Chargeback Manager 35
5
Pre-Upgrade Tasks for vCenter Chargeback Manager 35
Upgrade vCenter Chargeback Manager 36
Upgrading vCenter Chargeback Manager and Configuring in DMZ 38
Upgrading a vCenter Chargeback 1.0.x Setup 38
Installing and Upgrading Data Collectors 43
6
Install vCenter Chargeback Manager Data Collector 44
Install VMware Cloud Director Data Collector 46
Install vShield Manager Data Collector 48
Upgrade Data Collectors 50
Uninstall vCenter Chargeback Manager 51
7
Index 53
VMware, Inc. 3
Page 4

vCenter Chargeback Manager Installation and Upgrade Guide
4 VMware, Inc.
Page 5

About the Guide
The vCenter Chargeback Manager Installation and Upgrade Guide provides information about installing and
upgrading VMware® vCenter Chargeback Manager. This book also describes how to install and upgrade the
different data collectors.
Intended Audience
This book is intended for anyone who wants to install or upgrade vCenter Chargeback Manager. The
information in this book is written for experienced system administrators who are familiar with Windows,
VMware vSphere®, VMware vCloud Director, and basic database administration.
VMware, Inc. 5
Page 6

vCenter Chargeback Manager Installation and Upgrade Guide
6 VMware, Inc.
Page 7

Introduction to vCenter Chargeback
Manager 1
vCenter Chargeback Manager is an end-to-end cost reporting solution for virtual environments using vSphere.
vCenter Chargeback Manager can also be used with VMware vCloud Director. Before you install and start
using vCenter Chargeback Manager, an understanding of what is chargeback and about chargeback solutions
for a virtual environment would be helpful.
This chapter includes the following topics:
n
“What Is Chargeback,” on page 7
n
“Chargeback Solution for Virtual Environments,” on page 7
n
“Overview of vCenter Chargeback Manager,” on page 8
What Is Chargeback
Chargeback is a mechanism to account for the operational costs involved in providing and maintaining an
IT infrastructure, including the costs for IT services and applications. Measuring resource utilization and
calculating the corresponding IT operational cost enables you to account for the IT resources utilized and bill
for the services provided.
In a non-virtual environment, a physical server and the associated resources like the applications running on
it can be easily mapped to the department using them, making the billing for such resource utilizations
relatively easy. Also, costs incurred due to maintenance and licensing can be directly associated to a
department, thereby enabling you to calculate the complete IT operational costs.
In a virtual environment, however, the task of calculating the IT operational cost for each department becomes
very difficult. Multiple virtual machines run on a physical server, which might be shared across different
departments or cost centers in an organization. As a result, resource utilization for this server and, therefore,
the cost incurred cannot be directly associated to any single department or cost center. The difficulty in
accounting gets further compounded when applications and services get shifted over time to different servers,
based on the load and available infrastructure resources.
Chargeback Solution for Virtual Environments
In a virtual environment, a chargeback solution requires a flexible metering system that can account for the
utilization of resources shared across the organization.
These measurements can be based on allocation or actual usage of individual servers and resources. In the case
of VMotion, DRS, or HA being enabled, the measurements could be based on the allocation or actual usage of
resource pools.
To support chargeback, the virtual environment and the chargeback solution must provide ways to measure
resource usage and associate the usage with a specific costing model. The chargeback solution must also
support the use of different costing models so as to charge the various departments or cost centers differently.
VMware, Inc.
7
Page 8
JDBC
vCenter Chargeback
Manager
Load Balancer
vCenter Server
Data Collector
vCenter
Chargeback
Manager
database
vCenter Chargeback
Manager UI
vCenter
Server
database
ESXi
host03
ESXi
host02
ESXi
host01
VIM API
vCenter Chargeback Manager Installation and Upgrade Guide
A chargeback solution for a virtual environment defines a hierarchy with different types of entities such as
departments, divisions, business units, cost centers, physical servers, virtual machines, and so on. For each
entity type, a cost model is defined that determines the rate for each unit of a resource utilized. The chargeback
solution determines the resource usage by using either utilization-based metering or allocation-based metering
of virtual machines. The metered parameters are then associated with the designated entities, and the cost
model defined for that entity along with specific chargeback formulas are used as part of the overall chargeback
solution.
Overview of vCenter Chargeback Manager
Determining the resource utilization and calculating the corresponding cost for a virtual environment that uses
VMware vSphere typically involves VMware professional services’ work or use of partner solutions. These
solutions are built using custom methods for VMware vSphere resource data collection and chargeback cost
calculation for organizations.
vCenter Chargeback Manager is an end-to-end cost reporting solution for virtual environments that use
VMware vSphere. This Web-based application interacts with the vCenter Server Database to retrieve usage
information, calculates the cost by using the defined chargeback formulas, and generates cost and usage
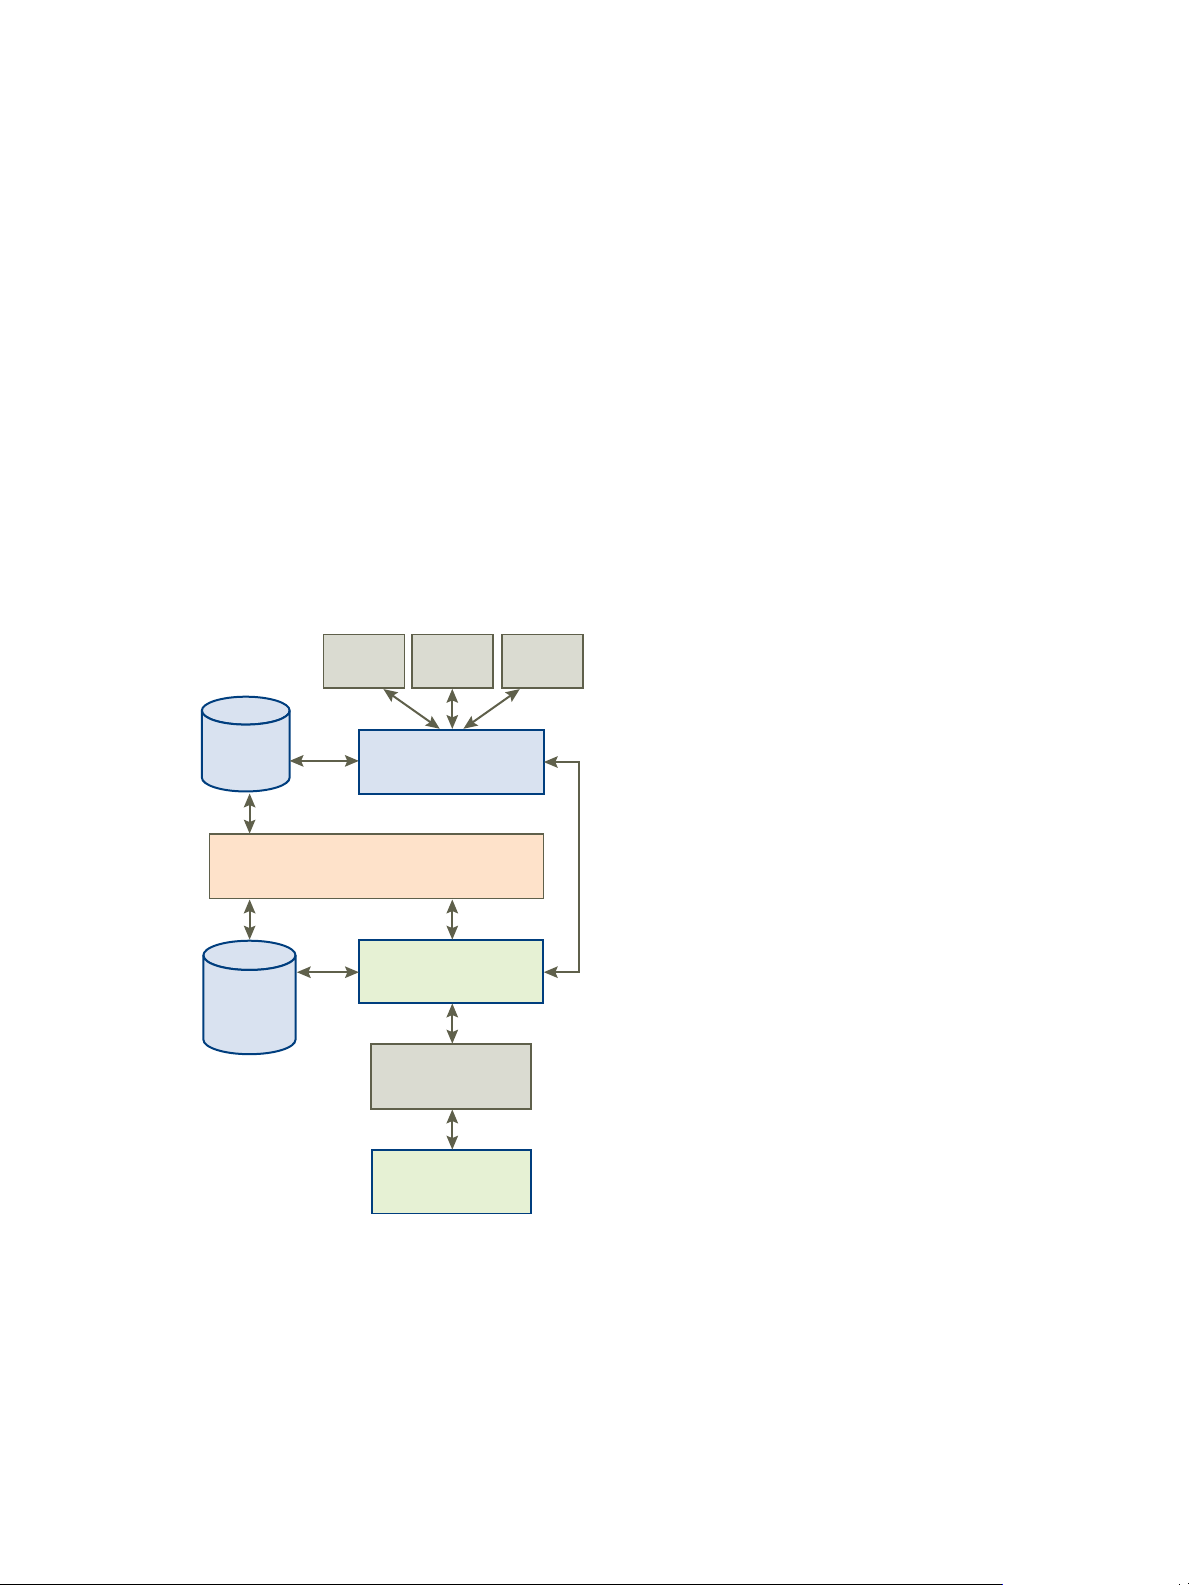
reports. Figure 1-1 shows how vCenter Chargeback Manager interacts with various components of a virtual
environment using VMware vSphere.
Figure 1-1. vCenter Chargeback Manager in a Virtual Environment
vCenter Chargeback Manager runs on an Apache Tomcat server instance. Users interact with vCenter
Chargeback Manager through a load balancer (Apache HTTP Server). vCenter Chargeback Manager connects
to the vCenter Chargeback Manager database that stores application-specific information, such as the defined
chargeback hierarchies, cost models, users, roles, and so on. The application interacts with the vCenter Server
using VIM APIs and with the vCenter Server database through a data collector. The data collector
communicates with the vCenter Server Database using JDBC.
8 VMware, Inc.
Page 9

Chapter 1 Introduction to vCenter Chargeback Manager
When you install vCenter Chargeback Manager, a load balancer and a data collector is also installed and run
on the same machine. Although the vCenter Chargeback Manager database can also be installed on the same
machine, in a real-world scenario you would install the application and the database on separate machines.
vCenter Chargeback Manager retrieves the virtual infrastructure inventory and the resource usage information
for each virtual machine from the vCenter Server database through the data collector. The data collector
replicates this information in the vCenter Chargeback Manager database. vCenter Chargeback Manager uses
this information from the vCenter Chargeback Manager database along with the cost model and chargeback
cost calculation formulas to generate the cost reports. A single data collector instance can communicate with
multiple vCenter Server instances and vCenter Server databases and replicate the relevant information in a
vCenter Chargeback Manager database.
vCenter Chargeback Manager also lets you create a cluster of vCenter Chargeback Manager instances that
share a single load balancer. Each user request is routed through the load balancer. The load balancer forwards
the request to a vCenter Chargeback Manager instance in the cluster, while ensuring session affinity for an
instance, based on the number of requests currently being serviced by each instance in the cluster. All the
vCenter Chargeback Manager instances in a cluster are connected to the same vCenter Chargeback Manager
database.
If you have a VMWare vCloud Director setup, you can install the vCloud Director Data Collector and configure
it appropriately so that the vCloud Director setup can be integrated with vCenter Chargeback Manager. You
can then generate various reports of the organizations classified under the different categories, such as PayAs-You-Go, Reservation, and Allocation Pool.
VMware, Inc. 9
Page 10

vCenter Chargeback Manager Installation and Upgrade Guide
10 VMware, Inc.
Page 11

System Requirements 2
Before you install vCenter Chargeback Manager, you must ensure that the minimum hardware and software
requirements are met.
This chapter includes the following topics:
n
“Hardware Requirements,” on page 11
n
“Software Requirements,” on page 11
Hardware Requirements
The system on which vCenter Chargeback Manager is installed must meet the minimum hardware
requirements for installing and running the application.
vCenter Chargeback Manager can be run on a computer or a virtual machine that matches or exceeds the
following hardware specifications:
n
2.0GHz or faster Intel or AMD x86 processor
n
4GB or more of RAM
n
A minimum of 2GB disk storage (3GB recommended)
n
10/100 Ethernet adapter (Gigabit recommended)
If you want to install the vCenter Chargeback Manager database on the computer on which vCenter
Chargeback Manager along with the load balancer and data collector is already installed, then additional
storage, memory, and processor capacity are required.
Software Requirements
Other than an operating system, you must have a database management system and a Web browser installed
to run and access vCenter Chargeback Manager.
Operating Systems
vCenter Chargeback Manager can be installed and run on the following operating systems (32-bit and 64-bit):
n
Microsoft Windows Server 2003 with Service Pack 2
n
Microsoft Windows Server 2003 R2
n
Microsoft Windows Server 2008
n
Microsoft Windows Server 2008 R2 (64-bit only)
64-bit operating systesm give the App Server more addressable memory and are therfore preferred over 32bit operating systems.
VMware, Inc.
11
Page 12

vCenter Chargeback Manager Installation and Upgrade Guide
Database Management Systems
vCenter Chargeback Manager supports the Standard and Enterprise edition of the following database
management systems:
n
Microsoft SQL Server 2008 (x64) (with Service Pack 2)
n
Microsoft SQL Server 2008 (Intel x86) (with Service Pack 2)
n
Microsoft SQL Server 2005 (x64) (with Service Pack 2)
n
Microsoft SQL Server 2005 (Intel x86) (with Service Pack 2)
vCenter Chargeback Manager supports the Enterprise edition of the following database management systems:
n
Oracle Database 11g Release 2
n
Oracle Database 10g Release 2
Web Browsers and Flash Player Plug-In
vCenter Chargeback Manager is a browser-based application that is tested and supported on the following:
n
Microsoft Internet Explorer 7.x and 8.x
n
Mozilla Firefox 4.x and 5.x
n
Adobe Flash Player for Windows Plug-in version 10.1 or later
n
Adobe Flash Player for Linux Plug-in version 10.1 or later
VMware vCenter Server
vCenter Chargeback Manager supports the folowing vCenter Server releases:
n
vCenter Server 5.0
n
vCenter Server 4.1 and later releases
n
vCenter Server 4.0 and later releases
n
VirtualCenter Server 2.5 Update 3 and later releases
12 VMware, Inc.
Page 13

Install and Upgrade Prerequisites 3
Before installing or upgrading vCenter Chargeback Manager, you must peform few pre-installation tasks.
This chapter includes the following topics:
n
“Network Management Prerequisites,” on page 13
n
“Database Management Prerequisites,” on page 14
n
“Other System Prerequisites,” on page 15
n
“Pre-installation Checklist,” on page 16
n
“Download and Extract the vCenter Chargeback Manager Installer,” on page 17
Network Management Prerequisites
To ensure successful installation and upgrade of vCenter Chargeback Manager, the networking-related preinstallation tasks must be completed.
You must perform the following pre-installation tasks:
n
Check whether the required ports are free.
Ensure that the ports that you specify during the installation are free. While installing, you must provide
the port details for the following applications and protocols:
VMware, Inc.
HTTP port
Load-balancer port
HTTPS port
If any of the specified port is also configured for another service and the service is not running, then the
installer will use the specified port. However, this might result in a port conflict and either of the configured
services might fail.
If you are upgrading an existing vCenter Chargeback Manager setup, then note down the ports currently
used by the application and enter the same port details during upgrade.
This port is used by vCenter Chargeback Manager for communication using
the HTTP protocol. The default port number is 8080.
This port is used by vCenter Chargeback Manager to communicate with the
load balancer. The default port is 8009.
This port is used by the load balancer to listen for user requests. The default
port is 443.
13
Page 14

vCenter Chargeback Manager Installation and Upgrade Guide
n
Set a static IP address on the machine.
Before you install the vCenter Chargeback Manager, you must obtain a static IP address from your network
administrator. Set this IP address on the machine on which you are going to install vCenter Chargeback
Manager. Preferably, obtain and set static IP addresses on all the servers and databases that the vCenter
Chargeback Manager communicates with.
Alternately, you can use the fully-qualified domain name (FQDN) for all the servers and databases that
vCenter Chargeback Manager communicates with.
Database Management Prerequisites
Performing the database management-related pre-installation tasks ensures that you have a database and a
database user account with the required privileges that the application can use.
Before you begin the vCenter Chargeback installation you must create a vCenter Chargeback Manager database
and a corresponding database user. vCenter Chargeback Manager stores the application-specific data, such as
cost models, chargeback hierarchies, and users and roles, in the vCenter Chargeback Manager database. You
must, therefore, first create a database for storing this data. The database management systems supported by
vCenter Chargeback Manager are listed in “Software Requirements,” on page 11. You can either create the
database yourself by referring to the corresponding product documentation or ask your database administrator
to create one for you. Ensure that the database is not configured to be case-sensitive.
If you are using an Oracle database as the vCenter Chargeback Manager database, you must configure the
database to use the Unicode (AL32UTF8) character set to support the following scenarios:
n
You want to deploy the vCenter Chargeback Manager database in a non-English environment.
n
You want to synchronize the vCenter Chargeback Manager database with a vCenter Server database that
has non-English data.
You must provide the details of the database and database user when installing vCenter Chargeback Manager.
The installer uses these details to create the database schema and objects. Also, vCenter Chargeback Manager
and the data collector authenticates in to the database by using this database user account to perform the
necessary database operations.
NOTE Instead of using the default database users, such as sa, SYS, and SYSTEM, create a database user with just
the required privileges and access the database with this users credentials. This is a good security practice.
vCenter Chargeback Manager Database User Privileges in Oracle Database
After you create a database instance and a database user in Oracle Database that vCenter Chargeback Manager
can use, you must assign the following system roles and privileges to this user.
n
CONNECT
n
RESOURCE
n
CREATE TRIGGER
n
CREATE TABLE
n
CREATE VIEW
n
CREATE PROCEDURE
n
CREATE SEQUENCE
14 VMware, Inc.
Page 15

Chapter 3 Install and Upgrade Prerequisites
vCenter Chargeback Manager Database User Privileges in SQL Server
After you create a database instance and a database user in SQL Server that vCenter Chargeback Manager can
use, you must assign privileges to this user by running the following commands in SQL Server:
CREATE ROLE CB_ADMIN_ROLE;
GRANT ALTER ON SCHEMA :: DBO TO CB_ADMIN_ROLE;
GRANT REFERENCES ON SCHEMA :: DBO TO CB_ADMIN_ROLE;
GRANT INSERT ON SCHEMA :: DBO TO CB_ADMIN_ROLE;
GRANT SELECT ON SCHEMA :: DBO TO CB_ADMIN_ROLE;
GRANT DELETE ON SCHEMA :: DBO TO CB_ADMIN_ROLE;
GRANT UPDATE ON SCHEMA :: DBO TO CB_ADMIN_ROLE;
GRANT EXECUTE ON SCHEMA :: DBO TO CB_ADMIN_ROLE;
GRANT CREATE TABLE to CB_ADMIN_ROLE;
GRANT CREATE VIEW to CB_ADMIN_ROLE;
GRANT CREATE PROCEDURE to CB_ADMIN_ROLE;
GRANT CREATE FUNCTION TO CB_ADMIN_ROLE;
GO
sp_addrolemember CB_ADMIN_ROLE, <db_username>
Other System Prerequisites
Apart from the networking and database management related prerequisites, you must perform few other preinstallation tasks to ensure that vCenter Chargeback Manager is successfully installed and upgraded.
You must perform the following pre-install tasks:
n
Ensure that system time of all the servers and databases are in sync.
You must ensure that the system time of the machines on which you install vCenter Chargeback Manager
and vCenter Chargeback Manager database are in sync. If you plan to install one or more data collectors
on different machines, then the system time of these machines must be in sync with that of the machines
on which vCenter Chargeback Manager and vCenter Chargeback Manager database are installed.
Also, the system time of the vCenter Servers and the vCenter Server databases that you configure in
vCenter Chargeback Manager must be in sync with the that of the machine on which vCenter Chargeback
Manager is installed. In short, the system time of the machines on which vCenter Chargeback Manager
and the applications and databases that it communicates with are installed must be in sync.
n
Ensure that MSI Installation is enabled.
Before you start the installation, you must ensure that MSI installation is enabled on the machine. If not,
you must manually install Microsoft Visual C++ 2005 Redistributable Package (x86) before running the
vCenter Chargeback Manager installer.
n
Ensure that port exceptions are configured on the Windows firewall.
If the Windows Firewall is enabled, you must set the port exceptions for the HTTP, load balancer, and
HTTPS ports on the Windows Firewall. If these exceptions are not set, the application will be not be usable.
n
Ensure that the Windows user has the Log on as a service permission.
If you want to use the Windows authentication option for the vCenter Chargeback Manager database, you
must ensure that the Windows user has the Log on as a service permission. If this permission is not set
on the user, the installation will fail. Also, the installer must be run in the context of this Windows user.
VMware, Inc. 15
Page 16

vCenter Chargeback Manager Installation and Upgrade Guide
Pre-installation Checklist
The pre-installation checklist helps you ensure that you have all the required information and have performed
the necessary pre-install tasks.
Table 3-1 lists the pre-install requirements.
Table 3-1. vCenter Chargeback Manager Pre-Install Checklist
Item Requirement Checked
Hardware Configuration
CPU 2.0GHz or faster Intel or AMD x86 processor
RAM 4.0 GB or more
Disk space Minimum 2.0 GB; Recommended 3.0 GB or more
Card 10/100 Ethernet adapter (Gigabit recommended)
Network Configuration
FQDN or static IP Address Write down the FQDN or IP address of the machine on which you plan
to install vCenter Chargeback Manager. If you are using an IP address,
ensure that the machine has a static IP address.
Port Numbers HTTP Port (default: 8080)
Load-balancer Port (default: 8009)
HTTPS Port (default: 443)
Ensure that the default ports are free. If not, use any other free ports.
Note down the port numbers that you want to use.
Database Configuration
Type Microsoft SQL Server 2005 or later
Oracle Database 10g or later
Database name Create a database for vCenter Chargeback Manager and note down the
database name.
URL IP address of the vCenter Chargeback Manager database. Ensure that
the machine on which the database is installed has a static IP address.
TNS listener port for Oracle database
Database instance name for SQL Server database
Database user name and
password
Software Configuration
System Time Ensure that system time of all the servers and databases are in sync
Microsoft SQL Server Ensure that the SQL Server Browser service is running if you are using
User name of the database user who has privileges to create and delete
schema, as well as to read from and write to the database.
Password for this user
If you are using Windows Authentication for a Microsoft SQL Server
database, then you must have the Windows user account name. This
user must have the Log on as a service permission.
Password for this Windows user account
If you are using Windows authentication, ensure that you run the
installer in the context of this Windows user.
a database instance name and dynamic database instance port to
connect to the vCenter Chargeback Manager database.
16 VMware, Inc.
Page 17

Chapter 3 Install and Upgrade Prerequisites
Table 3-1. vCenter Chargeback Manager Pre-Install Checklist (Continued)
Item Requirement Checked
MSI Installation Is MSI installation enabled?
If not, install Microsoft Visual C++ 2005 Redistributable Package (x86).
Port Exceptions on
Windows Firewall
If you have enabled Windows Firewall, you must set the port exceptions
for the HTTP port, load balancer port, and HTTPS port.
Download and Extract the vCenter Chargeback Manager Installer
You must first download the installer files and extract its contents on to the machine on which you want to
install vCenter Chargeback Manager. You must run the installer on the local machine and not from a remote
machine.
Procedure
1 Download the installation-related files, vCenter-CB-
http://www.vmware.com/products/vcenter-chargeback/overview.html.
2 Extract the content of this ZIP file to the machine on which you want to install the application.
The vCenter-CB.exe file is the installer file.
What to do next
Run the installer to install vCenter Chargeback Manager.
version_number-build_number
.zip, from
VMware, Inc. 17
Page 18

vCenter Chargeback Manager Installation and Upgrade Guide
18 VMware, Inc.
Page 19

Installing vCenter Chargeback
Manager 4
After you have ensured that the minimum hardware and software requirements are met and the relevant preinstallation tasks are completed, you can install vCenter Chargeback Manager.
You can install vCenter Chargeback Manager to be used as a stand-alone instance or you can create a cluster
of vCenter Chargeback Manager instances. When you install vCenter Chargeback Manager a corresponding
load balancer is installed and the vCenter Chargeback Manager database schema is created in the database.
You can choose to install the load balancer and the vCenter Chargeback Manager instance on different
machines. This helps you to install the load balancer on a DMZ network and the vCenter Chargeback Manager
on a secured internal network.
You can choose to install a data collector along with vCenter Chargeback Manager on the same machine. You
can also install one or more data collectors on different machines. You must, however, install at least one data
collector instance. This data collector fetches the relevant data from the vCenter Server database and replicates
the same in the vCenter Chargeback Manager database.
You can also install a vCenter Chargeback Manager instance and point it to a database that contains a valid
vCenter Chargeback Manager database schema. This is useful when you want to move the vCenter Chargeback
Manager and the vCenter Chargeback Manager database to a different machine from the one that they are
currently installed on.
This chapter includes the following topics:
n
“Install vCenter Chargeback Manager,” on page 19
n
“Create a vCenter Chargeback Manager Cluster,” on page 24
n
“Install vCenter Chargeback Manager with an Existing Database Schema,” on page 28
n
“Services Related to the vCenter Chargeback Manager,” on page 32
n
“Accessing the vCenter Chargeback Manager,” on page 34
Install vCenter Chargeback Manager
vCenter Chargeback Manager can be installed on any system or virtual machine that meets the system
requirements.
When you install the application for the first time, the installer performs the following tasks:
n
Connects to the database and creates a schema for the application data.
n
Installs the load balancer, which receives and routes all user requests to the application.
n
Installs the application.
VMware, Inc.
19
Page 20

vCenter Chargeback Manager Installation and Upgrade Guide
n
Installs the data collector, which synchronizes the vCenter Chargeback Manager database with the
vCenter Server databases.
NOTE If the installation fails due to some reason, the uninstaller is automatically invoked and all the
components installed till the failure occurred is removed.
When you install vCenter Chargeback Manager, you can choose to install the load balancer, vCenter
Chargeback Manager server, and data collectors on the same or different machines. If you choose to install the
load balancer and the vCenter Chargeback Manager server on different machines, then you must first install
the load balancer and then the vCenter Chargeback Manager server.
When you install the load balancer, the relevant data is stored in the vCenter Server database. When you run
the installer on a different machine and provide the same database details, the installer provides you with an
option to install a new load balancer or connect to an existing load balancer.
Prerequisites
Ensure that you run the installer on the machine on which vCenter Chargeback Manager has to be installed.
Do not run it on a remote machine.
Procedure
1 Run the vCenter-CB.exe file.
The installation wizard is displayed.
2 Click Next on the Introduction screen.
3 Accept the end-user license agreement, and click Next.
4 Provide the path for the installation directory, and click Next.
If the specified installation directory exists, ensure that it is empty. If the specified installation directory
does not exist, the installer creates the directory. The install path must contain at least one folder. You
cannot provide only the drive name. Also, the directory path must contain only ASCII characters.
5 Enter the vCenter Chargeback Manager database-related information, and click Next.
Option Description
Database Type
Database URL
Database Port
The type of database used to create the vCenter Chargeback Manager
database. This can be either SQL SERVER or ORACLE.
The IP address or host name of the system on which the vCenter Chargeback
Manager database is installed. For an SQL Server database, you can also
provide the vCenter Chargeback Manager database instance name. The
database instance name must contain only ASCII characters.
For Oracle Database, the database URL can be in any of the following formats:
IP Address
Host Name
For SQL Server, the database URL can be in any of the following formats:
IP Address
Host Name
IP Address\Database Instance Name
Host Name\Database Instance Name
You can also specify a well formed JDBC URL that starts with 'jdbc' and
contains the database name.
(Optional) The port on which the database service is listening for requests.
If the port number is not specified, the installer uses the default port. For an
Oracle database, you must specify the TNS listener port if you are not using
the default port 1521. For an SQL Server database, specify the database
instance port if you are using a static port.
20 VMware, Inc.
Page 21

Chapter 4 Installing vCenter Chargeback Manager
Option Description
Database Name
SQL Authentication Mode
Database Username
Database Password
Name of the database in which vCenter Chargeback Manager stores the
application-specific data. For Oracle Database, ensure that you provide the
service name and not the SID.
This option is applicable only for SQL Server databases. For an SQL Server
database, the authentication type can be either SQL Server Authentication
or Windows Authentication.
The name of the database user. The database user must have privileges to
create and delete schema, as well as read from and write to the database. If
you select Windows Authentication for SQL Authentication Mode, you
must provide the Windows user account name. The user name must be of
the form DomainName\UserName. Also, the user must have the Log on as
a service permission.
Password for the user name that you have provided. If you select Windows
Authentication as the authentication type, you must provide the password
for the Windows user account. Ensure that the Windows user account
password does not contain any special characters. The installer might fail if
the password contains special characters.
If the installer successfully connects to the database and the database user has CREATE, INSERT, and DROP
privileges, the next screen is displayed.
6 Enter the load balancer-related information, and click Next.
Option Description
IP Address
Admin Email Address
HTTPS Port
Static IP address or the FQDN of the machine on which you are installing
load balancer. Do not use localhost instead of the IP address or FQDN.
Email address of the server administrator. Ensure that the email address
contains only ASCII characters.
An unused port through which the Apache Server can communicate. The
load balancer listens on this port for user requests.
If the specified port is free, the next screen is displayed.
7 Select Install vCenter Chargeback Server, enter the IP address and port details for the vCenter Chargeback
Manager, and click Next.
Option Description
IP Address
HTTP Port
Load-Balancer Port
Server Instance Name
Static IP address or the FQDN of the machine on which you are installing
vCenter Chargeback Manager. Do not use localhost instead of the IP
address or the FQDN.
An unused HTTP port through which vCenter Chargeback Manager can
communicate.
An unused port through which vCenter Chargeback Manager can
communicate with the load balancer (Apache Server).
A unique user-defined name for the vCenter Chargeback Manager instance.
This name is used by the load balancer to identify the instance. Ensure that
the instance name contains only ASCII characters.
If the specified ports are free, the next screen is displayed.
If you are installing only the load balancer, then ensure that the Install vCenter Chargeback Server option
is not selected and click Next.
VMware, Inc. 21
Page 22

vCenter Chargeback Manager Installation and Upgrade Guide
8 Enter a user name and password for the vCenter Chargeback Manager administrative account, and click
Next.
The password must contains at least 8 characters and should not exceed 24 characters in length. The
password cannot be same as the user name. Also, the password must include a combination of upper-case
and lower-case characters.
NOTE If you are using Oracle Database for your vCenter Chargeback Manager database, ensure that the
user name for the administrative account contains only ASCII and non-ASCII characters. Extended ASCII
characters in the user name is not supported. This restriction is not applicable if you are using Microsoft
SQL Server for you vCenter Chargeback Manager database.
If you are installing only the load balancer, then this screen is not displayed.
9 Select the data collectors that you want to install and click Next.
The Install vCenter Chargeback Data Collector option is selected by default. You must have at least one
instance of this data collector running and registered with the application for the database synchronization
jobs to run.
You can optionally choose to install the VMware Cloud Director Data Collector and vShield Manager Data
Collector. All the data collectors can be installed even after a vCenter Chargeback Manager instance is
installed. If you are installing the vShield Manager Data Collector, choose to install the VMware Cloud
Director Data Collector too or ensure that at least one instance of VMware Cloud Director Data Collector
is running.
If you installing only the load balancer, then you cannot select any data collectors for installation.
10 If you chose to install the VMware Cloud Director Data Collector, enter the VMware Cloud Director
database-related information, and click Next.
Option Description
Database Type
Database URL
Database Port
Database Name
Database Username
Database Password
The type of database used to create the VMware Cloud Director database.
The permissible values are ORACLE and SQL Server.
The IP address of the system on which the VMware Cloud Director database
is installed.
The database URL can be in any of the following formats:
IP Address
Host Name
You can also specify a well formed JDBC URL that starts with 'jdbc' and
contains the database name.
(Optional) The port on which the database service is listening for requests.
If the port number is not specified, the installer uses the default port. You
must specify the TNS listener port if you are not using the default port 1521.
Name of the database in which VMware Cloud Director stores the
application-specific data. This must be the service name and not the SID.
The name of the database user. The database user must have privileges to
read the VMware Cloud Director database objects.
Password for the user name that you have provided.
If the installer successfully connects to the database, the next screen is displayed.
11 If you chose to install the VMware Cloud Director Data Collector or the vShield Manager Data Collector,
enter the password for the vCenter Chargeback Manager administrative account and click Next.
You must provide the correct password to ensure that the data collectors can call the vCenter Chargeback
Manager APIs.
22 VMware, Inc.
Page 23

Chapter 4 Installing vCenter Chargeback Manager
12 Review the information displayed on the Pre-Installation Summary screen, and click Install.
The installer starts installing the various components and creating the database schema. If the installation
is successful, the URL for accessing the vCenter Chargeback Manager is displayed.
13 Note this URL, and click Done.
The installer displays a dialog stating whether you want to generate your own SSL certificate.
14 Click Generate my own SSL Certificate.
A command window is displayed.
a Provide a pass phrase for the default key and press Enter.
You are prompted to enter the pass phrase three more times. Provide the same pass phrase and press
Enter each time.
b Provide the required certificate information and press Enter.
You are prompted to enter the following information:
n
Country Code: A two letter code for the country.
n
State or Province Name: Name of the state or province.
n
Locality Name: Name of the city or town.
n
Organization Name: Name of the organization.
n
Organization Unit Name: Name of the department or organization unit.
n
Common Name: Your name.
n
Email Address: An email address.
c Provide the requested extra attributes for the certificate and press Enter.
You are prompted to enter the following information:
n
A challenge password: A user-defined password.
n
An optional company name: Company name. This is optional and can be left blank.
d Provide the pass phrase and press Enter.
You are prompted to enter the pass phrase again. Provide the same pass phrase and press Enter.
e Press any key to complete the process and close the window.
An SSL certificate is successfully installed.
What to do next
If you have installed only the load balancer, then you can install the vCenter Chargeback Manager server on
a different machine. Ensure that you provide the same database details and the IP address on the load balancer
when installing the vCenter Chargeback Manager server.
If you chose not to generate an SSL certificate after the installation is completed by clicking Skip now, I'll
generate it later, then you must generate an SSL certificate by following the instructions in “Generate an SSL
Certificate for vCenter Chargeback Manager,” on page 23. The Apache Tomcat server installed with vCenter
Chargeback Manager uses SSL v3 and strong authentication.
Generate an SSL Certificate for vCenter Chargeback Manager
After you have installed vCenter Chargeback Manager, you can generate an SSL certificate for the vCenter
Chargeback Manager instance.
You can generate an SSL certificate for vCenter Chargeback Manager either when installing the application or
after you install the application.
VMware, Inc. 23
Page 24

vCenter Chargeback Manager Installation and Upgrade Guide
Procedure
1 Select Generate SSL Certificate from the Start > Programs > VMware > VMware vCenter Chargeback >
vCenter Chargeback Manager Tools menu.
The Generate SSL Certificate window is displayed.
2 Provide a pass phrase for the default key and press Enter.
You are prompted to enter the pass phrase three more times. Provide the same pass phrase and press Enter
each time.
3 Provide the required certificate information and press Enter.
You are prompted to enter the some information to be included in the generated SSL certificate.
Option Description
Country Code
State or Province Name
Locality Name
Organization Name
Organization Unit Name
Common Name
Email Address
4 Provide the requested extra attributes for the certificate and press Enter.
A two letter code for the country.
Name of the state or province.
Name of the city or town.
Name of the organization.
Name of the department or organization unit.
Your name.
An email address.
Option Description
A challenge password
An optional company name
A user-defined password
Company name. This is optional and can be left blank
5 Provide the pass phrase and press Enter.
You are prompted to enter the pass phrase again. Provide the same pass phrase and press Enter.
The SSL certificate is generated with the information provided.
6 Press any key to complete the process and close the window.
The generated SSL certificate can be seen when you access the application.
Create a vCenter Chargeback Manager Cluster
Apart from installing standalone vCenter Chargeback Manager instances, you can also create a cluster of
vCenter Chargeback Manager instances. A cluster has more than one vCenter Chargeback Manager instance
accessing the same vCenter Chargeback Manager database and having a common load balancer.
Cluster Installation
When you install vCenter Chargeback Manager for the first time on a machine, a load balancer is installed.
The load balancer enables you to run more than one instance of the vCenter Chargeback Manager, with each
instance accessing the same vCenter Chargeback Manager database.
These vCenter Chargeback Manager instances form a cluster. All user requests are routed through the load
balancer. Also, all the instances in the cluster share the same administrative account information.
NOTE Ensure that each instance of vCenter Chargeback Manager in the cluster is of the same version.
24 VMware, Inc.
Page 25

Chapter 4 Installing vCenter Chargeback Manager
The load balancer ensures that the vCenter Chargeback Manager instances are serving equal number of
concurrent sessions. New sessions are distributed to the instances in a round-robin fashion. Also, if one of the
instances fails, any request currently being serviced by that instance is automatically redirected to another
instance in the cluster. For the failover to happen successfully, you must ensure the following:
n
All the vCenter Chargeback Manager instances in the cluster, the vCenter Chargeback Manager database,
and the data collectors have the same system time. That is, the system times are in sync.
n
All the vCenter Chargeback Manager instances in the cluster are in the same network domain.
n
Multicasting must be enabled on the machine on which the vCenter Chargeback Manager instance is
installed.
Installing a vCenter Chargeback Manager Cluster Instance
You can create a cluster of vCenter Chargeback Manager instances that use the same database and load
balancer.
You have installed a vCenter Chargeback Manager instance and the corresponding load balancer and vCenter
Chargeback Manager database. To install another instance of vCenter Chargeback Manager and create a
cluster, perform the following tasks.
NOTE If the installation fails due to some reason, the uninstaller is automatically invoked and all the
components installed till the failure occurred is removed.
Procedure
1 Run the vCenter-CB.exe file.
The installation wizard is displayed.
2 Click Next on the Introduction screen.
3 Accept the end-user license agreement, and click Next.
4 Provide the path for the installation directory, and click Next.
If the specified installation directory exists, ensure that it is empty. If the specified installation directory
does not exist, the installer creates the directory. The install path must contain at least one folder. You
cannot provide only the drive name. Also, the directory path must contain only ASCII characters.
5 Enter the vCenter Chargeback Manager database-related information, and click Next.
Option Description
Database Type
Database URL
The type of database used to create the vCenter Chargeback Manager
database. This can be either SQL SERVER or ORACLE.
The IP address or host name of the system on which the vCenter Chargeback
Manager database is installed. For an SQL Server database, you can also
provide the vCenter Chargeback Manager database instance name. The
database instance name must contain only ASCII characters.
For Oracle Database, the database URL can be in any of the following formats:
IP Address
Host Name
For SQL Server, the database URL can be in any of the following formats:
IP Address
Host Name
IP Address\Database Instance Name
Host Name\Database Instance Name
You can also specify a well formed JDBC URL that starts with 'jdbc' and
contains the database name.
VMware, Inc. 25
Page 26

vCenter Chargeback Manager Installation and Upgrade Guide
Option Description
Database Port
Database Name
SQL Authentication Mode
Database Username
Database Password
If the installer connects to the database and detects a vCenter Chargeback Manager schema, a dialog is
displayed.
(Optional) The port on which the database service is listening for requests.
If the port number is not specified, the installer uses the default port. For an
Oracle database, you must specify the TNS listener port if you are not using
the default port 1521. For an SQL Server database, specify the database
instance port if you are using a static port.
Name of the database in which vCenter Chargeback Manager stores the
application-specific data. For Oracle Database, ensure that you provide the
service name and not the SID.
This option is applicable only for SQL Server databases. For an SQL Server
database, the authentication type can be either SQL Server Authentication
or Windows Authentication.
The name of the database user. The database user must have privileges to
create and delete schema, as well as read from and write to the database. If
you select Windows Authentication for SQL Authentication Mode, you
must provide the Windows user account name. The user name must be of
the form DomainName\UserName. Also, the user must have the Log on as
a service permission.
Password for the user name that you have provided. If you select Windows
Authentication as the authentication type, you must provide the password
for the Windows user account. Ensure that the Windows user account
password does not contain any special characters. The installer might fail if
the password contains special characters.
6 Click Use it.
The vCenter Chargeback Manager instance will use this existing vCenter Chargeback Manager database.
7 Ensure that the Install Load Balancer Server option is not selected, and click Next.
8 Select Install vCenter Chargeback Server, enter the IP address and port details for the vCenter Chargeback
Manager, and click Next.
Option Description
IP Address
HTTP Port
Load-Balancer Port
Server Instance Name
Static IP address or the FQDN of the machine on which you are installing
vCenter Chargeback Manager. Do not use localhost instead of the IP
address or the FQDN.
An unused HTTP port through which vCenter Chargeback Manager can
communicate.
An unused port through which vCenter Chargeback Manager can
communicate with the load balancer (Apache Server).
A unique user-defined name for the vCenter Chargeback Manager instance.
This name is used by the load balancer to identify the instance. Ensure that
the instance name contains only ASCII characters.
If the specified ports are free, the next screen is displayed.
If you are installing only the load balancer, then ensure that the Install vCenter Chargeback Server option
is not selected and click Next.
9 Select the data collectors that you want to install and click Next.
The Install vCenter Chargeback Data Collector option is selected by default. You must have at least one
instance of this data collector running and registered with the application for the database synchronization
jobs to run.
26 VMware, Inc.
Page 27

Chapter 4 Installing vCenter Chargeback Manager
You can optionally choose to install the VMware Cloud Director Data Collector and vShield Manager Data
Collector. All the data collectors can be installed even after a vCenter Chargeback Manager instance is
installed. If you are installing the vShield Manager Data Collector, choose to install the VMware Cloud
Director Data Collector too or ensure that at least one instance of VMware Cloud Director Data Collector
is running.
If you installing only the load balancer, then you cannot select any data collectors for installation.
10 If you chose to install the VMware Cloud Director Data Collector, enter the VMware Cloud Director
database-related information, and click Next.
Option Description
Database Type
Database URL
Database Port
Database Name
Database Username
Database Password
The type of database used to create the VMware Cloud Director database.
The permissible values are ORACLE and SQL Server.
The IP address of the system on which the VMware Cloud Director database
is installed.
The database URL can be in any of the following formats:
IP Address
Host Name
You can also specify a well formed JDBC URL that starts with 'jdbc' and
contains the database name.
(Optional) The port on which the database service is listening for requests.
If the port number is not specified, the installer uses the default port. You
must specify the TNS listener port if you are not using the default port 1521.
Name of the database in which VMware Cloud Director stores the
application-specific data. This must be the service name and not the SID.
The name of the database user. The database user must have privileges to
read the VMware Cloud Director database objects.
Password for the user name that you have provided.
If the installer successfully connects to the database, the next screen is displayed.
11 If you chose to install the VMware Cloud Director Data Collector or the vShield Manager Data Collector,
enter the password for the vCenter Chargeback Manager administrative account and click Next.
You must provide the correct password for the data collectors to call the vCenter Chargeback Manager
APIs.
12 Review the information displayed on the Pre-Installation Summary screen, and click Install.
The installer starts installing the various components. If the installation is successful, the URL for accessing
the vCenter Chargeback Manager application and the information required to add this installed instance
to the cluster is displayed.
13 Note this information, and click Done.
The administrative account for accessing this instance will be same as the one used by the existing vCenter
Chargeback Manager instance.
Adding a vCenter Chargeback Manager Instance to a Cluster
Installing a vCenter Chargeback Manager cluster instance does not automatically add it to the cluster. You
must manually add a vCenter Chargeback Manager instance to a cluster.
You can add a vCenter Chargeback Manager instance to a cluster by running the ModifyLBWorkers.bat file on
the machine on which the load balancer is installed.
Procedure
1 On the machine on which the load balancer is installed, open a command-line window.
VMware, Inc. 27
Page 28

vCenter Chargeback Manager Installation and Upgrade Guide
2 Navigate to the \vCenter-CB-Tools\load-balancer\bin directory.
cd
Installation_Folder
\vCenter-CB-Tools\load-balancer\bin\
where, Installation_Folder is the complete folder path provided during the vCenter Chargeback Manager
installation. The default installation folder is C:\Program Files\VMware\VMware vCenter Chargeback.
3 Run the ModifyLBWorkers.bat file to register the vCenter Chargeback Manager instance with the load
balancer.
ModifyLBWorkers add
Host_IP_Address Load-Balancer_Port Server_Instance_Name
Here, Host_IP_Address is the IP address of the machine on which the new vCenter Chargeback Manager
instance is installed, Load-Balancer_Port is the port through which the vCenter Chargeback Manager
instance communicates with the load balancer, and Server_Instance_Name is the name of the new vCenter
Chargeback Manager instance that you want to add to the cluster. Load-Balancer_Port is same as the port
configured during the new vCenter Chargeback Manager installation. Server_Instance_Name is the name
that you have provided during the installation.
4 Restart the Load Balancer service from the Start > Programs > VMware > VMware vCenter Chargeback
> vCenter Chargeback Manager Services menu.
Install vCenter Chargeback Manager with an Existing Database Schema
You can create a stand-alone vCenter Chargeback Manager instance that uses an existing vCenter Chargeback
Manager schema.
When you install vCenter Chargeback Manager, you provide database details to install the vCenter Chargeback
Manager schema. If the database already contains the vCenter Chargeback Manager database schema, the
installer lets you use it as is or create a new schema.
This install procedure is particularly useful when you want to move a vCenter Chargeback Manager instance,
the load balancer, and the vCenter Chargeback Manager database to a different machine from the one that
they currently exist on.
You can uninstall a vCenter Chargeback Manager instance but retain the database. You can then move the
database to a new location and re-install vCenter Chargeback Manager and the load balancer on different
machines. When re-installing vCenter Chargeback Manager, you must provide the database details of the
relocated vCenter Chargeback Manager database.
NOTE If the installation fails due to some reason, the uninstaller is automatically invoked and all the
components installed till the failure occurred is removed.
The administrative account for accessing this re-installed vCenter Chargeback Manager instance will be same
as the one used during the installation of the earlier vCenter Chargeback Manager instance.
Procedure
1 Run the vCenter-CB.exe file.
The installation wizard is displayed.
2 Click Next on the Introduction screen.
3 Accept the end-user license agreement, and click Next.
4 Provide the path for the installation directory, and click Next.
If the specified installation directory exists, ensure that it is empty. If the specified installation directory
does not exist, the installer creates the directory. The install path must contain at least one folder. You
cannot provide only the drive name. Also, the directory path must contain only ASCII characters.
28 VMware, Inc.
Page 29

Chapter 4 Installing vCenter Chargeback Manager
5 Enter the vCenter Chargeback Manager database-related information, and click Next.
Option Description
Database Type
Database URL
The type of database used to create the vCenter Chargeback Manager
database. This can be either SQL SERVER or ORACLE.
The IP address or host name of the system on which the vCenter Chargeback
Manager database is installed. For an SQL Server database, you can also
provide the vCenter Chargeback Manager database instance name. The
database instance name must contain only ASCII characters.
For Oracle Database, the database URL can be in any of the following formats:
IP Address
Host Name
For SQL Server, the database URL can be in any of the following formats:
IP Address
Host Name
IP Address\Database Instance Name
Host Name\Database Instance Name
You can also specify a well formed JDBC URL that starts with 'jdbc' and
contains the database name.
Database Port
Database Name
SQL Authentication Mode
Database Username
Database Password
(Optional) The port on which the database service is listening for requests.
If the port number is not specified, the installer uses the default port. For an
Oracle database, you must specify the TNS listener port if you are not using
the default port 1521. For an SQL Server database, specify the database
instance port if you are using a static port.
Name of the database in which vCenter Chargeback Manager stores the
application-specific data. For Oracle Database, ensure that you provide the
service name and not the SID.
This option is applicable only for SQL Server databases. For an SQL Server
database, the authentication type can be either SQL Server Authentication
or Windows Authentication.
The name of the database user. The database user must have privileges to
create and delete schema, as well as read from and write to the database. If
you select Windows Authentication for SQL Authentication Mode, you
must provide the Windows user account name. The user name must be of
the form DomainName\UserName. Also, the user must have the Log on as
a service permission.
Password for the user name that you have provided. If you select Windows
Authentication as the authentication type, you must provide the password
for the Windows user account. Ensure that the Windows user account
password does not contain any special characters. The installer might fail if
the password contains special characters.
If the installer connects to the database and detects a vCenter Chargeback Manager schema, a dialog is
displayed.
6 Click Use it.
The vCenter Chargeback Manager instance will use this existing vCenter Chargeback Manager database.
Do not click Create new schema, because the installer will overwrite the existing schema with a new
schema. All the data in the existing schema will be lost.
VMware, Inc. 29
Page 30

vCenter Chargeback Manager Installation and Upgrade Guide
7 Enter the load balancer-related information, and click Next.
Option Description
IP Address
Admin Email Address
HTTPS Port
If the specified port is free, the next screen is displayed.
8 Select Install vCenter Chargeback Server, enter the IP address and port details for the vCenter Chargeback
Manager, and click Next.
Option Description
IP Address
HTTP Port
Load-Balancer Port
Server Instance Name
If the specified ports are free, the next screen is displayed.
Static IP address or the FQDN of the machine on which you are installing
load balancer. Do not use localhost instead of the IP address or FQDN.
Email address of the server administrator. Ensure that the email address
contains only ASCII characters.
An unused port through which the Apache Server can communicate. The
load balancer listens on this port for user requests.
Static IP address or the FQDN of the machine on which you are installing
vCenter Chargeback Manager. Do not use localhost instead of the IP
address or the FQDN.
An unused HTTP port through which vCenter Chargeback Manager can
communicate.
An unused port through which vCenter Chargeback Manager can
communicate with the load balancer (Apache Server).
A unique user-defined name for the vCenter Chargeback Manager instance.
This name is used by the load balancer to identify the instance. Ensure that
the instance name contains only ASCII characters.
If you are installing only the load balancer, then ensure that the Install vCenter Chargeback Server option
is not selected and click Next.
9 Select the data collectors that you want to install and click Next.
The Install vCenter Chargeback Data Collector option is selected by default. You must have at least one
instance of this data collector running and registered with the application for the database synchronization
jobs to run.
You can optionally choose to install the VMware Cloud Director Data Collector and vShield Manager Data
Collector. All the data collectors can be installed even after a vCenter Chargeback Manager instance is
installed. If you are installing the vShield Manager Data Collector, choose to install the VMware Cloud
Director Data Collector too or ensure that at least one instance of VMware Cloud Director Data Collector
is running.
If you installing only the load balancer, then you cannot select any data collectors for installation.
10 If you chose to install the VMware Cloud Director Data Collector, enter the VMware Cloud Director
database-related information, and click Next.
Option Description
Database Type
Database URL
The type of database used to create the VMware Cloud Director database.
The permissible values are ORACLE and SQL Server.
The IP address of the system on which the VMware Cloud Director database
is installed.
The database URL can be in any of the following formats:
IP Address
Host Name
You can also specify a well formed JDBC URL that starts with 'jdbc' and
contains the database name.
30 VMware, Inc.
Page 31

Chapter 4 Installing vCenter Chargeback Manager
Option Description
Database Port
Database Name
Database Username
Database Password
(Optional) The port on which the database service is listening for requests.
If the port number is not specified, the installer uses the default port. You
must specify the TNS listener port if you are not using the default port 1521.
Name of the database in which VMware Cloud Director stores the
application-specific data. This must be the service name and not the SID.
The name of the database user. The database user must have privileges to
read the VMware Cloud Director database objects.
Password for the user name that you have provided.
If the installer successfully connects to the database, the next screen is displayed.
11 If you chose to install the VMware Cloud Director Data Collector or the vShield Manager Data Collector,
enter the password for the vCenter Chargeback Manager administrative account and click Next.
You must provide the correct password for the data collectors to call the vCenter Chargeback Manager
APIs.
12 Review the information displayed on the Pre-Installation Summary screen, and click Install.
The installer starts installing the various components. If the installation is successful, the URL for accessing
the vCenter Chargeback Manager is displayed.
13 Note this URL, and click Done.
The installer displays a dialog stating whether you want to generate your own SSL certificate.
14 Click Generate my own SSL Certificate.
A command window is displayed.
a Provide a pass phrase for the default key and press Enter.
You are prompted to enter the pass phrase three more times. Provide the same pass phrase and press
Enter each time.
b Provide the required certificate information and press Enter.
You are prompted to enter the following information:
n
Country Code: A two letter code for the country.
n
State or Province Name: Name of the state or province.
n
Locality Name: Name of the city or town.
n
Organization Name: Name of the organization.
n
Organization Unit Name: Name of the department or organization unit.
n
Common Name: Your name.
n
Email Address: An email address.
c Provide the requested extra attributes for the certificate and press Enter.
You are prompted to enter the following information:
n
A challenge password: A user-defined password.
n
An optional company name: Company name. This is optional and can be left blank.
VMware, Inc. 31
Page 32

vCenter Chargeback Manager Installation and Upgrade Guide
d Provide the pass phrase and press Enter.
You are prompted to enter the pass phrase again. Provide the same pass phrase and press Enter.
e Press any key to complete the process and close the window.
An SSL certificate is successfully installed.
What to do next
If you chose not to generate an SSL certificate after the installation is completed by clicking Skip now, I'll
generate it later, then you must generate an SSL certificate by following the instructions in “Generate an SSL
Certificate for vCenter Chargeback Manager,” on page 23. The Apache Tomcat server installed with vCenter
Chargeback Manager uses SSL v3 and strong authentication.
Services Related to the vCenter Chargeback Manager
When vCenter Chargeback Manager is installed, by default, a load balancer is installed. You can install one or
more data collector instances too. The services related to the vCenter Chargeback Manager and its
corresponding components must be started for the application to function properly.
The services related to the application and the corresponding components are:
VMware vCenter
Chargeback Service
VMware vCenter
Chargeback Load
Balancer Service
VMware vCenter
Chargeback
DataCollectorEmbedded
VMware vCenter
Chargeback
DataCollector
VMware vCenter
Chargeback - VMware
Cloud Director
DataCollectorEmbedded
VMware vCenter
Chargeback - VMware
Cloud Director
DataCollector
Starting this service starts the application.
Starting this service starts the load balancer. This service must be running so
that the load balancer can receive user requests and route them to the
application for them to be serviced.
Starting this service starts the Data Collector instance that was installed along
with the vCenter Chargeback Manager.
Starting this service starts the Data Collector instance that was installed
individually (in this case, the name of the instance is DataCollector) and not
with the application.
Starting this service starts the VMware Cloud Director Data Collector instance
that was installed along with the vCenter Chargeback Manager.
Starting this service starts the VMware Cloud Director Data Collector instance
that was installed individually (in this case, the name of the instance is VMware
Cloud Director DataCollector) and not with the application.
32 VMware, Inc.
Page 33

Chapter 4 Installing vCenter Chargeback Manager
VMware vCenter
Chargeback - vShield
Starting this service starts the vShield Manager Data Collector instance that
was installed along with the vCenter Chargeback Manager.
Manager DataCollectorEmbedded
VMware vCenter
Chargeback - vShield
Manager DataCollector
Starting this service starts the vShield Manager Data Collector instance that
was installed individually (in this case, the name of the instance is vShield
Manager DataCollector) and not with the application.
NOTE Before starting any data collector service, ensure that the corresponding database services are started
and are running correctly.
Managing Application-Related Services
All the services required for successfully running and accessing vCenter Chargeback Manager are configured
to start automatically when the machine is powered on and the operating system is started. You can also
manually control these services.
If the database service corresponding to the vCenter Chargeback Manager database stops, then the data
collector services stop automatically after a period of time. If the data collector services stop, then you must
manually start the data collector services after restarting the vCenter Chargeback Manager database service.
If you start the vCenter Chargeback Manager service, before starting the corresponding database service, then
you must manually restart the vCenter Chargeback Manager service after restarting the database service.
If vCenter Chargeback Manager, the corresponding database, and the data collectors are installed on different
machines, then you must individually start each of the services. You must start the services in the following
order:
1 vCenter Chargeback Manager database service
2 vCenter Chargeback Manager service
3 Services for each data collector installed
Prerequisites
Before starting any of the application-related services, ensure that the database service corresponding to the
vCenter Chargeback Manager database is started and is running without any issues.
Procedure
1 Select the relevant service menu from the Start > Programs > VMware > VMware vCenter Chargeback >
vCenter Chargeback Manager Services menu.
The menu provides shortcuts for the following services:
n
VMware vCenter Chargeback
n
VMware vCenter Chargeback DataCollector
n
VMware vCenter Chargeback Load Balancer
n
VMware vCenter Chargeback - VMware Cloud Director DataCollector
n
VMware vCenter Chargeback - vShield Manager DataCollector
2 Select the relevant shortcut to start or stop a service from the selected service menu.
VMware, Inc. 33
Page 34

vCenter Chargeback Manager Installation and Upgrade Guide
Accessing the vCenter Chargeback Manager
If all the required services are running, you can access the vCenter Chargeback Manager through a supported
Web browser.
Procedure
1 Click Launch vCenter Chargeback Manager Homepage from the Start > Programs > VMware >
VMware vCenter Chargeback menu.
If you want to access the application from a remote machine, the open a Web browser and provide the
application URL that was displayed after installing the vCenter Chargeback Manager.
2 Enter the login credentials, and click Login.
34 VMware, Inc.
Page 35

Upgrading vCenter Chargeback
Manager 5
You can upgrade an existing vCenter Chargeback Manager setup to the latest version of vCenter Chargeback
Manager.
If you are using vCenter Chargeback 1.5 or later version, then you can directly upgrade your existing setup to
vCenter Chargeback Manager 2.0. However, if you have a vCenter Chargeback 1.0.x setup, then you must first
upgrade to vCenter Chargeback 1.5 before upgrading to vCenter Chargeback Manager 2.0.
This chapter includes the following topics:
n
“Pre-Upgrade Tasks for vCenter Chargeback Manager,” on page 35
n
“Upgrade vCenter Chargeback Manager,” on page 36
n
“Upgrading vCenter Chargeback Manager and Configuring in DMZ,” on page 38
n
“Upgrading a vCenter Chargeback 1.0.x Setup,” on page 38
Pre-Upgrade Tasks for vCenter Chargeback Manager
The pre-upgrade tasks ensure that you have a backup of the database and the necessary configuration files.
Also, the completion of the pre-upgrade tasks ensures that vCenter Chargeback Manager can function
smoothly after the upgrade is completed.
VMware, Inc.
Prerequisites
In your current vCenter Chargeback Manager installation, check and ensure that the following criteria are met.
n
No roles have names containing the prefix CBM_150_DEFAULT_ROLE_NAME_.
n
None of the LDAP users are assigned the Super User role.
n
None of the user names contain the prefix CBM_150_USER_.
Procedure
1 Check whether the data collector has synchronized all the vCenter Server hierarchies.
You can check the status and last run time for the data collector synchronization jobs from the Data
Collectors page on the Settings tab.
2 Stop all the vCenter Chargeback Manager related services.
3 Take a backup of the existing vCenter Chargeback Manager database.
If the upgrade fails due to any unforeseen reason and you are not able to use the existing setup either, you
can use the database backup to recover the data.
35
Page 36

vCenter Chargeback Manager Installation and Upgrade Guide
What to do next
After you have taken a backup of the database, you must purge the vCenter Chargeback Manager database.
See KB 1026068 (http://kb.vmware.com/kb/1026068) for further instructions.
If you are using a vCenter Chargeback Manager release prior to 1.6, and are using Oracle Database as a vCenter
Chargeback Manager database and Microsoft SQL Server database as the vCenter Server database, then follow
the instructions provided in KB 1032952 (http://kb.vmware.com/kb/1032952.)
You can also back up the relevant configuration files from the current vCenter Chargeback Manager
installation, so that you can restore the existing installation if the upgrade fails. See KB 1026796
(http://kb.vmware.com/kb/1026796) for further details.
Upgrade vCenter Chargeback Manager
You can upgrade an existing vCenter Chargeback Manager instance to a more recent version.
Prerequisites
Before you upgrade a standalone vCenter Chargeback Manager instance, stop the corresponding vCenter
Chargeback Manager service and the data collector services. If any vCenter Chargeback Manager related
service is running, the upgrade process fails.
For a cluster installation, you must upgrade each vCenter Chargeback Manager instance in the cluster. You
must first upgrade the instance that has the load balancer. Before upgrading the first instance of a cluster, you
must stop all the related services. When the first instance is upgraded, the corresponding vCenter Chargeback
Manager database is also upgraded. After the upgrade, the vCenter Chargeback Manager service and the
corresponding database, data collector, and load balancer services are automatically restarted.
NOTE You must upgrade all the instances in a cluster to ensure that the application functions correctly. A
cluster with multi-version vCenter Chargeback Manager instances might not function correctly.
Ensure that you are running the installer on the machine on which vCenter Chargeback Manager is installed.
If you run the installer from a shared location on the network, the installer might fail.
If the existing instance vCenter Chargeback Manager has a VMware Cloud Director Data Collector installed,
ensure that you provide the same VMware Cloud Director database details for the vCenter Chargeback
Manager instance during upgrade.
Procedure
1 Run the vCenter-CB.exe file.
The installation wizard is displayed.
2 Click Next on the Introduction screen.
3 Accept the end-user license agreement, and click Next.
When the installer detects an older version of vCenter Chargeback Manager, an Alert dialog box is
displayed.
4 Click Upgrade to 2.0.0.0 in the Alert dialog box.
5 If the vCenter Chargeback Manager database is an SQL Server database, the installer displays the Database
Configuration screen.
You can change the SQL Authentication Mode option on this screen.
a (Optional) Select Windows Authentication as the authentication type.
b Provide the Windows user account name in the form DomainName\UserName.
The user must have the Log on as a service permission.
36 VMware, Inc.
Page 37

Chapter 5 Upgrading vCenter Chargeback Manager
The installer checks whether the vCenter Chargeback Manager and data collector services are stopped. If
any of the services are running, the installer stops the services.
6 Select the data collectors that you want to install and click Next.
The Install vCenter Chargeback Data Collector option is selected by default. You must have at least one
instance of this data collector running and registered with the application for the database synchronization
jobs to run.
You can optionally choose to install the VMware Cloud Director Data Collector and vShield Manager Data
Collector. All the data collectors can be installed even after a vCenter Chargeback Manager instance is
installed. If you are installing the vShield Manager Data Collector, choose to install the VMware Cloud
Director Data Collector too or ensure that at least one instance of VMware Cloud Director Data Collector
is running.
If you installing only the load balancer, then you cannot select any data collectors for installation.
7 If you chose to install the VMware Cloud Director Data Collector, enter the VMware Cloud Director
database-related information, and click Next.
Option Description
Database Type
Database URL
Database Port
Database Name
Database Username
Database Password
The type of database used to create the VMware Cloud Director database.
The permissible values are ORACLE and SQL Server.
The IP address of the system on which the VMware Cloud Director database
is installed.
The database URL can be in any of the following formats:
IP Address
Host Name
You can also specify a well formed JDBC URL that starts with 'jdbc' and
contains the database name.
(Optional) The port on which the database service is listening for requests.
If the port number is not specified, the installer uses the default port. You
must specify the TNS listener port if you are not using the default port 1521.
Name of the database in which VMware Cloud Director stores the
application-specific data. This must be the service name and not the SID.
The name of the database user. The database user must have privileges to
read the VMware Cloud Director database objects.
Password for the user name that you have provided.
If the installer successfully connects to the database, the next screen is displayed.
8 Provide the password for the administrative account of the existing installation and click Next.
9 Review the information displayed on the Pre-Installation Summary screen, and click Install.
The installer starts upgrading the various components. If the upgrade process is successful, the URL for
accessing the vCenter Chargeback Manager is displayed.
10 Note the URL, and click Done.
The vCenter Chargeback Manager instance is upgraded.
What to do next
You can now connect to the upgraded vCenter Chargeback Manager setup. Ensure that you clear your Web
browser cache before accessing the vCenter Chargeback Manager.
VMware, Inc. 37
Page 38

vCenter Chargeback Manager Installation and Upgrade Guide
Upgrading vCenter Chargeback Manager and Configuring in DMZ
You can upgrade an existing vCenter Chargeback Manager setup to version 2.0 such that the load balancer
runs in the DMZ and the vCenter Chargeback Manager instance is in a secured internal network.
If you have a vCenter Chargeback 1.5 or later setup and want the load balancer and the vCenter Chargeback
Manager to run on different machines post-upgrade, then you must perform the following tasks.
Procedure
1 Perform the pre-upgrade tasks listed in “Pre-Upgrade Tasks for vCenter Chargeback Manager,” on
page 35.
2 Stop all the vCenter Chargeback Manager related services.
You must stop the load balancer, database, and all the data collector services along with the vCenter
Chargeback Manager service.
3 Uninstall the existing vCenter Chargeback Manager setup but retain the database.
Ensure that you do not select the option to empty the database during uninstallation.
4 Run the vCenter Chargeback Manager installer on the machine on which you want to install the load
balancer.
During the install provide the details of the retained vCenter Chargeback Manager database. Do not select
the Install vCenter Chargeback Server option during the installation.
5 Run the vCenter Chargeback Manager installer on the machine on which you want to install the vCenter
Chargeback Manager instance.
During the install provide the details of the retained vCenter Chargeback Manager database and the newly
installed load balancer details. Ensure that you select the Install vCenter Chargeback Server option during
the installation.
Upgrading a vCenter Chargeback 1.0.x Setup
You cannot directly upgrade a vCenter Chargeback 1.0.x setup to the latest vCenter Chargeback Manager
release.
After performing the pre-upgrade tasks, you must perform the following tasks to upgrade a vCenter
Chargeback 1.0.x setup to the latest vCenter Chargeback Manager release.
1 Upgrade your setup to vCenter Chargeback 1.5.
When you upgrade to vCenter Chargeback 1.5, the database schema is updated.
2 Take a backup of the upgraded database.
3 Upgrade the vCenter Chargeback 1.5 setup to the latest version of vCenter Chargeback Manager.
Upgrade to vCenter Chargeback 1.5
You can upgrade a vCenter Chargeback 1.0.x setup to vCenter Chargeback 1.5.
Prerequisites
Before you upgrade a standalone vCenter Chargeback Manager instance, stop the corresponding vCenter
Chargeback Manager service and the data collector services. If any vCenter Chargeback Manager related
service is running, the upgrade process fails.
38 VMware, Inc.
Page 39

Chapter 5 Upgrading vCenter Chargeback Manager
For a cluster installation, you must upgrade each vCenter Chargeback Manager instance in the cluster. You
must first upgrade the instance that has the load balancer. Before upgrading the first instance of a cluster, you
must stop all the related services. When the first instance is upgraded, the corresponding vCenter Chargeback
Manager database is also upgraded. After the upgrade, the vCenter Chargeback Manager service and the
corresponding database, data collector, and load balancer services are automatically restarted.
NOTE You must upgrade all the instances in a cluster to ensure that the application functions correctly. A
cluster with multi-version vCenter Chargeback Manager instances might not function correctly.
Ensure that you are running the installer on the machine on which vCenter Chargeback Manager is installed.
If you run the installer from a shared location on the network, the installer might fail.
If the existing instance vCenter Chargeback Manager has a VMware Cloud Director Data Collector installed,
ensure that you provide the same VMware Cloud Director database details for the vCenter Chargeback
Manager instance during upgrade.
Procedure
1 Run the vCenter-CB.exe file.
The installation wizard is displayed.
2 Click Next on the Introduction screen.
3 Accept the end-user license agreement, and click Next.
When the installer detects an older version of vCenter Chargeback Manager, an Alert dialog box is
displayed.
4 Click Upgrade to 1.5.0.0 in the Alert dialog box.
5 If the vCenter Chargeback Manager database is an SQL Server database, the installer displays the Database
Configuration screen.
You can change the SQL Authentication Mode option on this screen.
a (Optional) Select Windows Authentication as the authentication type.
b Provide the Windows user account name in the form DomainName\UserName.
The user must have the Log on as a service permission.
The installer checks whether the vCenter Chargeback Manager and data collector services are stopped. If
any of the services are running, the installer stops the services.
6 Select the data collectors that you want to install and click Next.
The Install vCenter Chargeback Data Collector option is selected by default. You must have at least one
instance of this data collector running and registered with the application for the database synchronization
jobs to run.
You can optionally choose to install the VMware Cloud Director Data Collector and vShield Manager Data
Collector. All the data collectors can be installed even after a vCenter Chargeback Manager instance is
installed. If you are installing the vShield Manager Data Collector, choose to install the VMware Cloud
Director Data Collector too or ensure that at least one instance of VMware Cloud Director Data Collector
is running.
If you installing only the load balancer, then you cannot select any data collectors for installation.
VMware, Inc. 39
Page 40

vCenter Chargeback Manager Installation and Upgrade Guide
7 If you chose to install the VMware Cloud Director Data Collector, enter the VMware Cloud Director
database-related information, and click Next.
Option Description
Database Type
Database URL
Database Port
Database Name
Database Username
Database Password
If the installer successfully connects to the database, the next screen is displayed.
The type of database used to create the VMware Cloud Director database.
The permissible values are ORACLE and SQL Server.
The IP address of the system on which the VMware Cloud Director database
is installed.
The database URL can be in any of the following formats:
IP Address
Host Name
You can also specify a well formed JDBC URL that starts with 'jdbc' and
contains the database name.
(Optional) The port on which the database service is listening for requests.
If the port number is not specified, the installer uses the default port. You
must specify the TNS listener port if you are not using the default port 1521.
Name of the database in which VMware Cloud Director stores the
application-specific data. This must be the service name and not the SID.
The name of the database user. The database user must have privileges to
read the VMware Cloud Director database objects.
Password for the user name that you have provided.
8 Provide the password for the administrative account of the existing installation and click Next.
9 Review the information displayed on the Pre-Installation Summary screen, and click Install.
The installer starts upgrading the various components. If the upgrade process is successful, the URL for
accessing the vCenter Chargeback Manager is displayed.
10 Note the URL, and click Done.
The vCenter Chargeback Manager instance is upgraded.
Post-Upgrade Changes in vCenter Chargeback 1.5
When you upgrade an existing vCenter Chargeback 1.0 or 1.0.1 installation to vCenter Chargeback 1.5, the
installer makes changes to the user-defined resources created in the existing installation.
In vCenter Chargeback 1.5, user names are case-insensitive. Therefore, the installer renames users in the
existing setup that have the same name but with different casing. The installer uses the prefix CBM_150_USER_
for the duplicate names. You can rename users with such prefix appropriately.
Unlike earlier release, in vCenter Chargeback 1.5 a user cannot be assigned individual privileges on the entities.
Therefore, privileges assigned to the user on entities are grouped together into roles after upgrade. These roles
have names with the prefix CBM_150_DEFAULT_ROLE_NAME_. You can rename such roles.
If a vCenter Server is added to vCenter Chargeback with the Register as Plugin option selected, then the user
whose authentication details are used when adding the vCenter Server is automatically added to vCenter
Chargeback. Also, vCenter Server users who have generated reports on this vCenter Server are automatically
added to vCenter Chargeback. You can delete the users that are not required and also assign appropriate roles
on the ones that are required.
In earlier releases, any user can view any of the vCenter Servers or cost models. However, starting from vCenter
Chargeback 1.5, users must be assigned role with privileges to access the cost models and vCenter Servers.
Only the super user can view all the resources in the application. The vCenter Server users who are added to
the application can view the vCenter Server to which they belong. These users can also view the default
hierarchy of the corresponding vCenter Server.
40 VMware, Inc.
Page 41

Chapter 5 Upgrading vCenter Chargeback Manager
In earlier releases of vCenter Chargeback, users with the view privilege on a hierarchy have privileges to view
all the reports generated on the hierarchy. After the upgrade, a user can view only the reports that he has
generated. If the user who has generated the report is deleted, then the report is assigned to the super user.
Scheduled report generation might fail after the upgrade is compete. The users who scheduled the reports
must be assigned roles with access privileges on the cost models, chargeback hierarchies, and chargeback
hierarchical entities used for scheduling the reports. vCenter Chargeback does not display any error message
stating the scheduled report generation failed due to lack of privileges.
The Report Viewer role in the earlier versions of vCenter Chargeback is upgraded to the Report Generator role
in vCenter Chargeback 1.5. After upgrade, users with the Report View role are assigned the Report Generator
role, which has more privileges. Assess the privilege requirements for such users and reassign new roles
appropriately.
Any local fixed cost added to a cost template in the existing setup is renamed after the upgrade. If you upgraded
from vCenter Chargeback 1.0, then the fixed cost name is prefixed with CT_
id_of_cost_template_fixed_cost
If you upgraded from vCenter Chargeback 1.0.1, then the fixed cost name is prefixed with
G_
id_of_cost_template_fixed_cost
.
.
VMware, Inc. 41
Page 42

vCenter Chargeback Manager Installation and Upgrade Guide
42 VMware, Inc.
Page 43

Installing and Upgrading Data
Collectors 6
vCenter Chargeback Manager interacts with the vCenter Server and vCenter Server database through a data
collector. The data collector synchronizes the information in the vCenter Chargeback Manager database with
that in the vCenter Server database.
Other than the data collector that interacts with the vCenter Server database, vCenter Chargeback Manager
provides two more data collectors. These are the VMware Cloud Director Data Collector and the vShield
Manager Data Collector. These data collectors enable you to integrate VMware Cloud Director with vCenter
Chargeback Manager.
vCenter Chargeback Manager 2.0 supports VMware Cloud Director 1.5. It also supports the versions of vShield
Manager supported by VMware Cloud Director 1.5.
The VMware Cloud Director Data Collector polls the VMware Cloud Director database for chargeback events.
These events details are used to call specific vCenter Chargeback Manager APIs. A chargeback hierarchy for
each organization in the VMware Cloud Director setup is created in vCenter Chargeback Manager and also
the corresponding allocation details are set on the entities.
By integrating VMware Cloud Director with vCenter Chargeback Manager, you can perform the following
tasks:
n
Meter and charge for allocation and usage of VMware Cloud Director resources, including virtual
datacenters, vApps, templates and media file storage.
n
Meter and charge for external network bandwidth, network count, and network services, such as DHCP,
NAT, and firewall.
n
Deliver multi-tenant chargeback reports.
However, this release does not include support for the following features:
n
Charging for storage utilized by partially created or imported virtual machines, vApps, and templates
and media files.
n
Charging for resources utilized by virtual machines that are created by vShield Edge.
NOTE Only the vCenter Chargeback Manager related events are processed by the Cloud Director Data
Collector. To update the vCloud Director Org hierarchies in vCenter Chargeback Manager, the corresponding
vCenter Server must be added to vCenter Chargeback Manager and the vCenter Chargeback Manager data
collector must be running to synchronize the vCenter Chargeback Manager database with the vCenter Server
database. If the vCenter Chargeback Manager data collector is not installed or is not running, then the changes
will not be processed and the changes in the vCenter Server and the vCloud Director Org hierarchy is not
accounted for in vCenter Chargeback Manager.
The vShield Manager Data Collector fetches the network statistics from the vShield Manager for the networks
included in the VMware Cloud Director setup.
VMware, Inc.
43
Page 44

vCenter Chargeback Manager Installation and Upgrade Guide
The vShield Manager Data Collector fetches the external traffic information from vShield Manager for the
following types of VMware Cloud Director networks:
n
Private routed org networks
n
Routed vApp networks
n
Fenced vApp networks
In the case that a routed or fenced vApp network is connected to a private routed org network, then the external
traffic information of the corresponding virtual machine is recorded at both, the vApp network level as well
as the org network level.
This chapter includes the following topics:
n
“Install vCenter Chargeback Manager Data Collector,” on page 44
n
“Install VMware Cloud Director Data Collector,” on page 46
n
“Install vShield Manager Data Collector,” on page 48
n
“Upgrade Data Collectors,” on page 50
Install vCenter Chargeback Manager Data Collector
You can install and run more than one data collector. You can install an individual data collector instance using
the data collector installer.
If you are integrating vCenter Chargeback Manager with VMware Cloud Director by installing the VMware
Cloud Director Data Collector and vShield Manager Data Collector, then you must install and run more than
one instance of the vCenter Chargeback Manager data collector. This ensures that the inventory and statistics
information for the vCenter Server instances added to VMware Cloud Director and vCenter Chargeback
Manager is synchronised and available in the vCenter Chargeback Manager database even if a data collector
instance fails.
Prerequisites
Before you start the installation, ensure that the system time of the machine on which the data collector is being
installed is the same as the vCenter Chargeback Manager and vCenter Chargeback Manager database system
time. That is, the system time of all these machines are in sync.
Procedure
1 Run the vCenter-CB-DC.exe file.
2 Click Next on the Introduction screen.
3 Accept the end-user license agreement, and click Next.
4 (Optional) If a data collector instance exists on the machine, you can either create a new instance or upgrade
the existing instance.
a Select the required option.
b (Optional) Provide a unique name for the instance.
The default name is DataCollector. Ensure that the data collector instance name contains only ASCII
characters. The installer does not prompt for a name if you are upgrading an existing data collector
instance.
c Click Next.
44 VMware, Inc.
Page 45

Chapter 6 Installing and Upgrading Data Collectors
5 Provide the path for the installation directory, and click Next.
If the specified installation directory exists, ensure that it is empty. If the specified installation directory
does not exist, the installer creates the directory. The install path must contain at least one folder. You
cannot provide only the drive name. Also, the directory path must contain only ASCII characters.
6 Provide the details of the vCenter Chargeback Manager database that the data collector must synchronize
with the vCenter Server databases, and click Next.
Option Description
Database Type
Database URL
The type of database used to create the vCenter Chargeback Manager
database. This can be either SQL SERVER or ORACLE.
The IP address or host name of the system on which the vCenter Chargeback
Manager database is installed. For an SQL Server database, you can also
provide the vCenter Chargeback Manager database instance name. The
database instance name must contain only ASCII characters.
For Oracle Database, the database URL can be in any of the following formats:
IP Address
Host Name
For SQL Server, the database URL can be in any of the following formats:
IP Address
Host Name
IP Address\Database Instance Name
Host Name\Database Instance Name
You can also specify a well formed JDBC URL that starts with 'jdbc' and
contains the database name.
Database Port
Database Name
SQL Authentication Mode
Database Username
Database Password
(Optional) The port on which the database service is listening for requests.
If the port number is not specified, the installer uses the default port. For an
Oracle database, you must specify the TNS listener port if you are not using
the default port 1521. For an SQL Server database, specify the database
instance port if you are using a static port.
Name of the database in which vCenter Chargeback Manager stores the
application-specific data. For Oracle Database, ensure that you provide the
service name and not the SID.
This option is applicable only for SQL Server databases. For an SQL Server
database, the authentication type can be either SQL Server Authentication
or Windows Authentication.
The name of the database user. The database user must have privileges to
create and delete schema, as well as read from and write to the database. If
you select Windows Authentication for SQL Authentication Mode, you
must provide the Windows user account name. The user name must be of
the form DomainName\UserName. Also, the user must have the Log on as
a service permission.
Password for the user name that you have provided. If you select Windows
Authentication as the authentication type, you must provide the password
for the Windows user account. Ensure that the Windows user account
password does not contain any special characters. The installer might fail if
the password contains special characters.
The installer connects to the database and checks whether a vCenter Chargeback Manager schema is
present.
7 Review the information displayed on the Pre-Installation Summary screen, and click Install.
The installer starts installing the data collector. If the installation is successful, the URL for accessing
vCenter Chargeback Manager is displayed.
8 Note this URL, and click Done.
NOTE If the installation fails, the uninstaller starts automatically and removes all the components installed.
VMware, Inc. 45
Page 46

vCenter Chargeback Manager Installation and Upgrade Guide
What to do next
After you install a separate data collector, the Data Collector service starts and runs automatically. You can
manually start and stop the service from the Start > Programs > VMware > VMware vCenter Chargeback
menu.
Install VMware Cloud Director Data Collector
If you want to integrate a vCenter Chargeback Manager instance with a VMware Cloud Director instance, you
must have a VMware Cloud Director Data Collector instance installed and running.
You can install a VMware Cloud Director Data Collector instance along with vCenter Chargeback Manager or
separately by using the VMware Cloud Director Data Collector installer. Although you can install more than
one VMware Cloud Director Data Collector instance, only one instance will be interacting with the VMware
Cloud Director database at any given point of time. Another data collector instance will be used only in the
case of a failover.
Prerequisites
Before you start the installation, ensure that the system time of the machine on which the data collector is being
installed is the same as that on the VMware Cloud Director database, vCenter Chargeback Manager, and
vCenter Chargeback Manager database. That is, the system time of all these machines are in sync.
Procedure
1 Run the vCenter-VCLOUD-DC.exe file.
2 Click Next on the Introduction screen.
3 Accept the end-user license agreement, and click Next.
4 Provide the path for the installation directory, and click Next.
If the specified installation directory exists, ensure that it is empty. If the specified installation directory
does not exist, the installer creates the directory. The install path must contain at least one folder. You
cannot provide only the drive name. Also, the directory path must contain only ASCII characters.
5 Provide the details of the vCenter Chargeback Manager database that the data collector must synchronize
with the VMware Cloud Director database, and click Next.
Option Description
Database Type
Database URL
The type of database used to create the vCenter Chargeback Manager
database. This can be either SQL SERVER or ORACLE.
The IP address or host name of the system on which the vCenter Chargeback
Manager database is installed. For an SQL Server database, you can also
provide the vCenter Chargeback Manager database instance name. The
database instance name must contain only ASCII characters.
For Oracle Database, the database URL can be in any of the following formats:
IP Address
Host Name
For SQL Server, the database URL can be in any of the following formats:
IP Address
Host Name
IP Address\Database Instance Name
Host Name\Database Instance Name
You can also specify a well formed JDBC URL that starts with 'jdbc' and
contains the database name.
46 VMware, Inc.
Page 47

Chapter 6 Installing and Upgrading Data Collectors
Option Description
Database Port
Database Name
SQL Authentication Mode
Database Username
Database Password
(Optional) The port on which the database service is listening for requests.
If the port number is not specified, the installer uses the default port. For an
Oracle database, you must specify the TNS listener port if you are not using
the default port 1521. For an SQL Server database, specify the database
instance port if you are using a static port.
Name of the database in which vCenter Chargeback Manager stores the
application-specific data. For Oracle Database, ensure that you provide the
service name and not the SID.
This option is applicable only for SQL Server databases. For an SQL Server
database, the authentication type can be either SQL Server Authentication
or Windows Authentication.
The name of the database user. The database user must have privileges to
create and delete schema, as well as read from and write to the database. If
you select Windows Authentication for SQL Authentication Mode, you
must provide the Windows user account name. The user name must be of
the form DomainName\UserName. Also, the user must have the Log on as
a service permission.
Password for the user name that you have provided. If you select Windows
Authentication as the authentication type, you must provide the password
for the Windows user account. Ensure that the Windows user account
password does not contain any special characters. The installer might fail if
the password contains special characters.
If the installer connects to the database and detects a vCenter Chargeback Manager schema, a dialog
window is displayed.
6 Enter the VMware Cloud Director database-related information, and click Next.
NOTE If you have an existing VMware Cloud Director data collector instance, ensure that you provide
the same database details as provided when installing the existing VMware Cloud Director data collector
instance.
Option Description
Database Type
Database URL
The type of database used to create the VMware Cloud Director database.
The permissible values are ORACLE and SQL Server.
The IP address of the system on which the VMware Cloud Director database
is installed.
The database URL can be in any of the following formats:
IP Address
Host Name
You can also specify a well formed JDBC URL that starts with 'jdbc' and
contains the database name.
Database Port
Database Name
Database Username
Database Password
(Optional) The port on which the database service is listening for requests.
If the port number is not specified, the installer uses the default port. You
must specify the TNS listener port if you are not using the default port 1521.
Name of the database in which VMware Cloud Director stores the
application-specific data. This must be the service name and not the SID.
The name of the database user. The database user must have privileges to
read the VMware Cloud Director database objects.
Password for the user name that you have provided.
If the installer successfully connects to the database, the next screen is displayed.
7 Enter the password for the vCenter Chargeback Manager administrative account and click Next.
You must provide the correct password for the data collector to call the vCenter Chargeback Manager
APIs.
VMware, Inc. 47
Page 48

vCenter Chargeback Manager Installation and Upgrade Guide
8 Review the information displayed on the Pre-Installation Summary screen, and click Install.
The installer starts installing the data collector. If the installation is successful, the URL for accessing
vCenter Chargeback Manager is displayed.
9 Note this URL, and click Done.
NOTE If the installation fails, the uninstaller starts automatically and removes all the components installed.
What to do next
After you install a VMware Cloud Director Data Collector instance, the VMware Cloud Director Data Collector
service starts and runs automatically. You can manually start and stop the service from the Start > Programs
> VMware > VMware vCenter Chargeback menu.
Install vShield Manager Data Collector
If you integrate a vCenter Chargeback Manager instance with a VMware Cloud Director instance, you must
have a vShield Manager Data Collector instance installed and running to fetch the network statistics from
vShield Manager.
You can install a vShield Manager Data Collector instance along with vCenter Chargeback Manager or
separately using the vShield Manager Data Collector installer.
Prerequisites
Before you start the installation, ensure that the system time of the machine on which the data collector is being
installed is the same as the vCenter Chargeback Manager and vCenter Chargeback Manager database system
time. That is, the system time of all these machines are in sync.
The vShield Manager Data Collector can run jobs successfully only if an instance of the VMware Cloud Director
Data Collector is installed and running. You must, therefore, ensure that at least one instance of the VMware
Cloud Director Data Collector is running.
Procedure
1 Run the vCenter-VSM-DC.exe file.
2 Click Next on the Introduction screen.
3 Accept the end-user license agreement, and click Next.
4 Provide the path for the installation directory, and click Next.
If the specified installation directory exists, ensure that it is empty. If the specified installation directory
does not exist, the installer creates the directory. The install path must contain at least one folder. You
cannot provide only the drive name. Also, the directory path must contain only ASCII characters.
48 VMware, Inc.
Page 49

Chapter 6 Installing and Upgrading Data Collectors
5 Provide the details of the vCenter Chargeback Manager database that the data collector must synchronize
with the VMware Cloud Director database, and click Next.
Option Description
Database Type
Database URL
The type of database used to create the vCenter Chargeback Manager
database. This can be either SQL SERVER or ORACLE.
The IP address or host name of the system on which the vCenter Chargeback
Manager database is installed. For an SQL Server database, you can also
provide the vCenter Chargeback Manager database instance name. The
database instance name must contain only ASCII characters.
For Oracle Database, the database URL can be in any of the following formats:
IP Address
Host Name
For SQL Server, the database URL can be in any of the following formats:
IP Address
Host Name
IP Address\Database Instance Name
Host Name\Database Instance Name
You can also specify a well formed JDBC URL that starts with 'jdbc' and
contains the database name.
Database Port
Database Name
SQL Authentication Mode
Database Username
Database Password
(Optional) The port on which the database service is listening for requests.
If the port number is not specified, the installer uses the default port. For an
Oracle database, you must specify the TNS listener port if you are not using
the default port 1521. For an SQL Server database, specify the database
instance port if you are using a static port.
Name of the database in which vCenter Chargeback Manager stores the
application-specific data. For Oracle Database, ensure that you provide the
service name and not the SID.
This option is applicable only for SQL Server databases. For an SQL Server
database, the authentication type can be either SQL Server Authentication
or Windows Authentication.
The name of the database user. The database user must have privileges to
create and delete schema, as well as read from and write to the database. If
you select Windows Authentication for SQL Authentication Mode, you
must provide the Windows user account name. The user name must be of
the form DomainName\UserName. Also, the user must have the Log on as
a service permission.
Password for the user name that you have provided. If you select Windows
Authentication as the authentication type, you must provide the password
for the Windows user account. Ensure that the Windows user account
password does not contain any special characters. The installer might fail if
the password contains special characters.
If the installer connects to the database and detects a vCenter Chargeback Manager schema, a dialog
window is displayed.
6 Enter the password for the vCenter Chargeback Manager administrative account and click Next.
You must provide the correct password for the data collector to call the vCenter Chargeback Manager
APIs.
7 Review the information displayed on the Pre-Installation Summary screen, and click Install.
The installer starts installing the data collector. If the installation is successful, the URL for accessing
vCenter Chargeback Manager is displayed.
8 Note this URL, and click Done.
NOTE If the installation fails, the uninstaller starts automatically and removes all the components installed.
VMware, Inc. 49
Page 50

vCenter Chargeback Manager Installation and Upgrade Guide
What to do next
After you install a VSM Data Collector instance, the VSM Data Collector service starts and runs automatically.
You can manually start and stop the service from the Start > Programs > VMware >
VMware vCenter Chargeback menu.
Upgrade Data Collectors
Upgrading a vCenter Chargeback Manager instance does not automatically upgrade the standalone data
collector instances associated with it. You must manually upgrade each such data collector instance.
Prerequisites
Before you upgrade a data collector instance, ensure that you upgrade the corresponding vCenter Chargeback
Manager instance.
Procedure
1 Run the vCenter-CB-DC.exe file.
2 Click Next on the Introduction screen.
3 Accept the end-user license agreement, and click Next.
4 Select Upgrade Previously Installed Data Collector and click Next.
5 Click Upgrade in the Alert dialog box.
6 Click OK.
7 Review the information displayed on the Pre-Installation Summary screen, and click Install.
The installer starts installing the data collector. If the installation is successful, the URL for accessing
vCenter Chargeback Manager is displayed.
8 Note the URL, and click Done.
NOTE If the installation fails, the uninstaller starts automatically and removes all the components installed.
What to do next
If you have installed the VMware Cloud Director Data Collector and vShield Manager Data Collector on a
machine different from the one on which the vCenter Chargeback Manager is installed, then these data
collectors are not upgraded when you upgrade vCenter Chargeback Manager. To upgrade these data collectors,
download the installer for these data collectors from the upgraded vCenter Chargeback Manager and run them
on the machine on which these data collectors are running. Ensure that you stop the data collector service
before running the installer.
50 VMware, Inc.
Page 51

Uninstall vCenter Chargeback
Manager 7
If you do not require a vCenter Chargeback Manager instance, you can uninstall the instance.
When you uninstall a vCenter Chargeback Manager instance, the corresponding load balancer, if installed with
the instance, and all the embedded data collector instances are also uninstalled. You can optionally delete the
corresponding database schema and the vCenter Server plug-ins.
Prerequisites
If you want to uninstall the vCenter Chargeback Manager instance that was initially installed and is part of a
cluster, you must first uninstall all the other vCenter Chargeback Manager instances in the cluster before this
instance is uninstalled. That is, the vCenter Chargeback Manager instance that includes the load balancer must
not be uninstalled before other instances from the cluster are uninstalled.
Procedure
1 Start the uninstaller from the Start > Programs > VMware > VMware vCenter Chargeback >
Uninstall VMware vCenter Chargeback menu.
Do not remove the application using Add/Remove Programs. The application is not removed cleanly and
you might have to manually delete some files that were not deleted during the uninstall process.
2 Select the required options and click Uninstall.
You can choose to reatin the vCenter Chargeback Manager database or empty the database. Also, if you
have registered the application as a vSphere Client plug-in with any of the vCenter Servers added to the
application, you can choose to uninstall the plug-ins.
3 Click Continue to confirm the uninstallation.
4 Click Done.
What to do next
If you uninstall an instance that is part of a cluster, ensure that you manually remove the entries corresponding
to the instance from the worker.properties file located at
For example, if the instance name is chargeTest, you must remove the following section from the
worker.properties file:
# Set properties for chargeTest (ajp99)
worker.chargeTest.type=ajp99
worker.chargeTest.host=90.0.1.1
worker.chargeTest.port=8009
worker.chargeTest.lbfactor=1
The entry (ajp99), in this case, is the AJP port of the load balancer.
Installation_Directory
\Apache2.2\conf\.
VMware, Inc.
51
Page 52

vCenter Chargeback Manager Installation and Upgrade Guide
You must also remove the instance name from the list of instances included in the
worker.balancer.balance_workers parameter under the Define the LB worker section. For the example
suggested in the previous step, the entry might be as follows:
# Define the LB worker
worker.balancer.type=lb
worker.balancer.sticky_session = 1
worker.balancer.method=R
worker.balancer.balance_workers=worker1,worker2,
Delete the chargeTest entry from the list of instances.
chargeTest
,sample0
52 VMware, Inc.
Page 53

Index
A
application, accessing 34
C
chargeback
definition 7
non-virtual environment 7
virtual environment 7
D
data collector
about 43
install vCenter Chargeback Manager Data
Collector 44
install VMware Cloud Director Data
Collector 46
install vShield Manager Data Collector 48
upgrade 50
definition, chargeback 7
I
install
adding instance to cluster 27
cluster installation 25
database prerequisites 14
fresh installation 19
hardware requirements 11
installer files 17
networking prerequisites 13
other system prerequisites 15
preinstallation checklist 16
preinstallation tasks 13
prerequisites 13
software requirements 11
stand-alone instance 19
upgrading existing instance 36
using existing database schema 28
software 11
vCenter Server 11
web browsers 11
U
uninstall application 51
upgrade
application 36
database prerequisites 14
from vCenter Chargeback 1.0.x 38
installer files 17
networking prerequisites 13
other system prerequisites 15
post-upgrade changes 40
pre-upgrade tasks 35
preinstallation checklist 16
preinstallation tasks 13
prerequisites 13
to vCenter Chargeback 1.5 38
V
vCenter Chargeback Manager
architectural overview 8
cluster 24
cluster installation 24
generate SSL certificate for 23
hardware requirements 11
installing 19
related services 32
software requirements 11
system requirements 11
uninstall 51
upgrade and configure in DMZ 38
upgrading 35
S
services
application services 32
manage 33
system requirements
database management systems 11
hardware 11
operating systems 11
VMware, Inc. 53
Page 54

vCenter Chargeback Manager Installation and Upgrade Guide
54 VMware, Inc.
 Loading...