

Page 1

vCenter CapacityIQ Installation Guide
vCenter CapacityIQ 1.5.1
This document supports the version of each product listed and
supports all subsequent versions until the document is replaced
by a new edition. To check for more recent editions of this
document, see http://www.vmware.com/support/pubs.
EN-000417-01
Page 2

vCenter CapacityIQ Installation Guide
You can find the most up-to-date technical documentation on the VMware Web site at:
http://www.vmware.com/support/
The VMware Web site also provides the latest product updates.
If you have comments about this documentation, submit your feedback to:
docfeedback@vmware.com
Copyright © 2011 VMware, Inc. All rights reserved. This product is protected by U.S. and international copyright and intellectual
property laws. VMware products are covered by one or more patents listed at http://www.vmware.com/go/patents.
VMware is a registered trademark or trademark of VMware, Inc. in the United States and/or other jurisdictions. All other marks
and names mentioned herein may be trademarks of their respective companies.
VMware, Inc.
3401 Hillview Ave.
Palo Alto, CA 94304
www.vmware.com
2 VMware, Inc.
Page 3

Contents
About This Book 5
About vCenter CapacityIQ 7
1
CapacityIQ Main Tasks 7
CapacityIQ Architecture 7
Administrator Process Overview for CapacityIQ 9
Licensing CapacityIQ 9
Installing the CapacityIQ Virtual Appliance 11
2
CapacityIQ Installation Requirements 12
Deploy the Virtual Appliance 13
Configure the Virtual Appliance 14
Configure Network and Time Zone Settings 15
Configure SMTP Settings 16
CapacityIQ Configuration 16
Grant Access to CapacityIQ 20
Verify the CapacityIQ Installation 20
Updating or Replacing a CapacityIQ Instance 21
3
Update CapacityIQ 21
Replace a Registered Instance of CapacityIQ 22
Post-Installation Tasks for CapacityIQ 23
4
Convert a CPU Evaluation License to a CPU Full License 23
Optimizing the CapacityIQ Setup 23
Troubleshooting the CapacityIQ Installation 25
5
DHCP Address Avoidance at Startup 25
Restarting the vSphere Client is Required After Registration 26
Registration Fails Because of Existing Registration 26
Data Unavailable During Initial Startup 26
Wrong Time Zone Setting 27
System Time Synchronization 27
Virtual Appliance Password Forgotten 28
No Volume Groups Found 28
DHCP Not Available Causes Network Connection Failure 29
Cannot Remove SSH Keys 29
CapacityIQ Update Fails 29
Index 31
VMware, Inc. 3
Page 4

vCenter CapacityIQ Installation Guide
4 VMware, Inc.
Page 5

About This Book
The vCenter CapacityIQ Installation Guide describes how to install the VMware vCenter™ CapacityIQ virtual
appliance.
Intended Audience
CapacityIQ is a capacity planning and management tool for VMware vSphere environments. This book is
intended for administrators of vSphere who are familiar with virtual machine technology and datacenter
operations, and who are responsible for administering CapacityIQ. This book offers instructions for installing
CapacityIQ and information that helps resolve installation issues.
VMware Technical Publications Glossary
VMware Technical Publications provides a glossary of terms that might be unfamiliar to you. For definitions
of terms as they are used in VMware technical documentation, go to http://www.vmware.com/support/pubs.
Document Feedback
VMware welcomes your suggestions for improving our documentation. If you have comments, send your
feedback to docfeedback@vmware.com.
VMware CapacityIQ Documentation
The documentation set for VMware CapacityIQ consists of the following documents.
n
vCenter CapacityIQ Installation Guide. Explains installation of CapacityIQ.
n
vCenter CapacityIQ Release Notes. Late-breaking news and descriptions of known issues and workarounds.
n
vCenter CapacityIQ online help. Conceptual and procedural information to help you complete a task.
n
vCenter CapacityIQ Administration Portal online help. Conceptual and procedural information to help
you complete an administrative task.
The vCenter CapacityIQ landing page provides release notes that contain current information about the release.
You can find the landing page, as well as documentation for vSphere, at
http://www.vmware.com/support/pubs.
VMware, Inc.
5
Page 6

vCenter CapacityIQ Installation Guide
Technical Support and Education Resources
The following technical support resources are available to you. To access the current version of this book and
other books, go to http://www.vmware.com/support/pubs.
Online and Telephone
Support
Support Offerings
VMware Professional
Services
To use online support to view your product and contract information, register
your products and submit technical support requests, go to
http://www.vmware.com/support.
Customers with appropriate support contracts should use telephone support
for the fastest response on issues. Go to
http://www.vmware.com/support/phone_support.html.
To find out how VMware support offerings can help meet your business needs,
go to http://www.vmware.com/support/services.
VMware Education Services courses offer extensive hands-on labs, case study
examples and course materials designed to be used as on-the-job reference
tools. Courses are available onsite, in the classroom and live online. For onsite
pilot programs and implementation best practices, VMware Consulting
Services provides offerings to help you assess, plan, build and manage your
virtual environment. To access information about education classes,
certification programs and consulting services, go to
http://www.vmware.com/services.
6 VMware, Inc.
Page 7

About vCenter CapacityIQ 1
VMware vCenter™ CapacityIQ helps vSphere system administrators monitor and manage the capacity of
virtualized environments.
Install CapacityIQ as a vCenter Server plug-in. CapacityIQ ensures that virtualized infrastructure capacity is
efficient and predictable.
The what-if scenario feature allows administrators to model changes to the virtualized environment and assess
the effect of a change without implementation costs or time-consuming trial and error.
This chapter includes the following topics:
n
“CapacityIQ Main Tasks,” on page 7
n
“CapacityIQ Architecture,” on page 7
n
“Administrator Process Overview for CapacityIQ,” on page 9
n
“Licensing CapacityIQ,” on page 9
CapacityIQ Main Tasks
CapacityIQ collects performance information about managed objects, such as hosts and virtual machines in
the virtual infrastructure. CapacityIQ stores the information in the CapacityIQ database.
You query the database to understand available capacity in the virtual infrastructure. CapacityIQ performs
these tasks.
n
Collects performance statistics about managed objects in the virtual infrastructure.
n
Stores the statistics in the CapacityIQ database and builds a performance history for each object.
n
Collects and stores inventory history for each object, such as moving a virtual machine from one host to
another.
n
Retrieves and presents the statistics on demand through the CapacityIQ user interface.
n
Filters the information presented according to objects, time periods, or types of activity.
n
Provides scenarios to model potential changes to the virtual infrastructure.
CapacityIQ Architecture
CapacityIQ is a virtual appliance that you install on vCenter Server. A virtual appliance is a virtual machine
image that contains software designed to run in a virtual machine.
CapacityIQ does not affect the performance of vSphere. The CapacityIQ virtual appliance processes the vCenter
Server data.
VMware, Inc.
7
Page 8
vCenter
database
vCenter
Server system
CapacityIQ
administrative
server
SSH
Admin Portal HTTP
Admin Portal HTTPS
CapacityIQ HTTP
CapacityIQ HTTPS
SQL SQL
CapacityIQ
server
data
collector
database
server
CapacityIQ
plug-in
vCenter
License
Server
vCenter
Server
vSphere Client
data
disk
system
disk
vSphere
Client
vSphere
Client
vCenter CapacityIQ Installation Guide
You must have one vCenter Server instance for each CapacityIQ instance. If you have vCenter Server Linked
Mode groups in your environment, install a separate instance of CapacityIQ for each vCenter Server system.
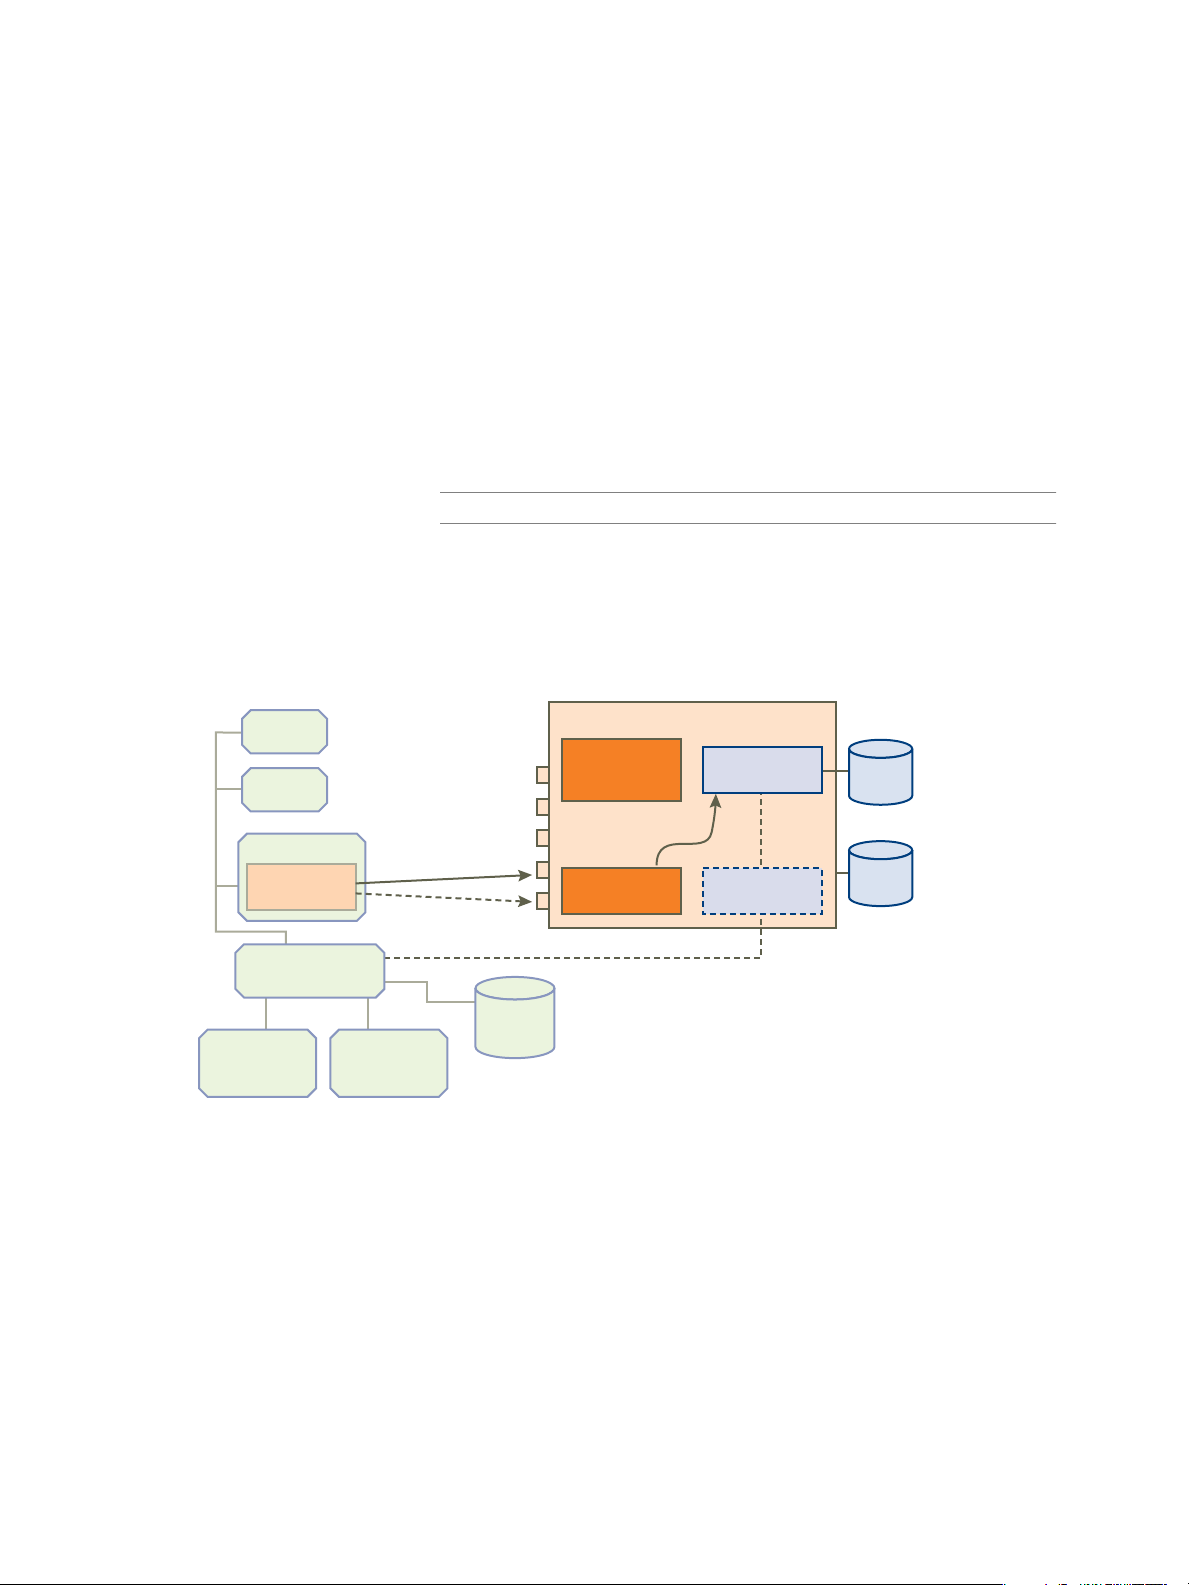
The virtual appliance includes the following components as illustrated in Figure 1-1.
CapacityIQ
Administrative Server
The CapacityIQ administrative server provides the Administration Portal user
interface for the CapacityIQ system administrator to configure and maintain
the virtual appliance.
CapacityIQ Server
The CapacityIQ server hosts an operating system and the CapacityIQ
application. A monitoring feature called watchdog tracks whether CapacityIQ
processes are operating properly. The watchdog logs exceptions such as
services stopping and starting. Events are posted in the ciq_watchdog.log file.
Database Server
The CapacityIQ virtual appliance includes its own PostgreSQL database. The
database server stores data collected from objects managed in vCenter Server.
NOTE CapacityIQ does not support storing data in an external database.
Data Collector
The data collector collects inventory and performance data. Configure the data
collector to access vCenter Server through port 443 on vCenter Server.
Each instance of the vSphere Client installed on vCenter Server can use CapacityIQ. CapacityIQ does not
require changes to your vCenter Server setup, such as modifying the logging levels.
Figure 1-1. CapacityIQ Architecture Components
CapacityIQ begins collecting performance data shortly after installation. Updates to performance statistics in
the CapacityIQ database occur using standard vSphere APIs. Data collection remains continuous unless you
stop CapacityIQ.
CapacityIQ begins to populate the dashboard within an hour or so after you install the virtual appliance. To
generate meaningful information in views and reports, wait until you have collected at least three days of
performance data.
8 VMware, Inc.
Page 9

Administrator Process Overview for CapacityIQ
The person administering CapacityIQ is responsible for installation, maintenance, and troubleshooting.
Setup
The initial setup includes the following tasks.
1 In the vSphere Client, import the CapacityIQ appliance.
2 Deploy the CapacityIQ appliance, which means that CapacityIQ completes an initialization sequence. This
process includes entering account credentials for the virtual appliance services and CapacityIQ
Administration Portal access.
3 Configure the network and time zone settings.
4 Open a browser and log in to the CapacityIQ Administration Portal.
5 Configure the settings to register CapacityIQ with vCenter Server.
6 Apply the CapacityIQ license.
7 Verify that CapacityIQ populates the dashboard with data.
The process of populating the dashboard might take a few hours.
Chapter 1 About vCenter CapacityIQ
If you already have an instance of CapacityIQ installed, you can update the virtual appliance to the latest
release.
Maintenance
After initial setup is complete, perform ongoing administrator tasks.
n
Stop or restart CapacityIQ, for example, during a vCenter Server maintenance cycle.
n
Check the status of CapacityIQ on the Status tab in the Administration Portal.
n
Apply patches and updates to the CapacityIQ application.
n
Manage license changes and renewals.
n
Troubleshoot any problems and send diagnostic data to VMware technical support.
Licensing CapacityIQ
CapacityIQ supports license management through vCenter Server or through the CapacityIQ Administration
Portal depending on the license type and version of vCenter Server that CapacityIQ is registered to.
CPU Licenses for CapacityIQ
The Administration Portal supports the management of only CPU-based licenses for CapacityIQ. If you have
an existing CPU-based license, it will continue to function with vCenter Server 4.1.
Virtual Machine Licenses for CapacityIQ
If you obtain a virtual machine-based license for CapacityIQ, install and manage the license from
vCenter Server. Virtual machine-based licenses for CapacityIQ require vCenter Server 4.1 or later versions. For
information about assigning license keys to assets in vCenter Server, see the VMware vSphere documentation.
VMware, Inc. 9
Page 10

vCenter CapacityIQ Installation Guide
Evaluation and Full Licenses
You can download a free evaluation version of CapacityIQ that offers a trial period. For more information
about licensing, see the VMware licensing portal.
10 VMware, Inc.
Page 11

Installing the CapacityIQ Virtual
Appliance 2
Only the CapacityIQ administrator performs installation and setup tasks. Installation includes using the
vSphere Client interface for importing the appliance, deploying the appliance by running a Linux-based
installation script, and configuring the virtual appliance.
Procedure
1 CapacityIQ Installation Requirements on page 12
Before you install CapacityIQ, your vSphere environment must meet virtual appliance, port access, and
listening port requirements.
2 Deploy the Virtual Appliance on page 13
You use the vSphere Client user interface to deploy the CapacityIQ appliance. VMware distributes the
appliance as a .zip file that includes an Open Virtualization Format (OVF) file.
3 Configure the Virtual Appliance on page 14
After you import the CapacityIQ OVF file, configure the virtual appliance to set up access to the
CapacityIQ Administration Portal.
4 Configure Network and Time Zone Settings on page 15
When you configure the virtual appliance, you can configure optional network and time zone settings.
Time zone settings affect the scheduling of reports, the time stamp generated in reports for CapacityIQ,
and the daily and weekly dates that appear in the dashboard and views.
VMware, Inc.
5 Configure SMTP Settings on page 16
Configure an optional SMTP server to activate email service for CapacityIQ reports.
6 CapacityIQ Configuration on page 16
Configuring CapacityIQ includes registering CapacityIQ, installing the license, and optionally installing
a custom SSL certificate.
7 Grant Access to CapacityIQ on page 20
The vSphere administrator grants users access to CapacityIQ by assigning the CapacityIQ privilege to
a role.
8 Verify the CapacityIQ Installation on page 20
Verify that CapacityIQ is properly installed so that you can start working with CapacityIQ.
11
Page 12

vCenter CapacityIQ Installation Guide
CapacityIQ Installation Requirements
Before you install CapacityIQ, your vSphere environment must meet virtual appliance, port access, and
listening port requirements.
vCenter Server/ESX Requirements
CapacityIQ supports vCenter Server 4.0 or later versions. For more information about the scalability limits and
the vCenter Server and ESX Server versions that CapacityIQ supports, see the CapacityIQ release notes.
You must have one vCenter Server instance for each CapacityIQ instance. If you have vCenter Server Linked
Mode groups in your environment, install a separate instance of CapacityIQ for each vCenter Server system.
vCenter Server includes a service called VMware VirtualCenter Management Webservices. CapacityIQ
requires vCenter Server to run this service.
CapacityIQ Virtual Appliance Requirements
Table 2-1 lists the requirements for the CapacityIQ virtual appliance.
Table 2-1. Requirements for the CapacityIQ Virtual Appliance
Component Minimum Requirement
CPU 2vCPU
Memory 3600MB
Disk space 258GB for vSphere 4.0 with thick disk provisioning
258GB for vSphere 4.1 with thick disk provisioning
Approximately 12GB for vSphere 4.1 with thin disk
provisioning
ESX host ESX 3.0.2
The CapacityIQ virtual appliance uses the Community ENTerprise Operating System (CentOS) 5.2 operating
system.
CapacityIQ Port Requirements
Table 2-2 describes CapacityIQ port access requirements for TCP connection. Configure your external firewalls
so that these ports are open.
NOTE You cannot customize the server ports for CapacityIQ.
Table 2-2. CapacityIQ Port Access Requirements
Port Number Description
22 Must be open to enable SSH access to the CapacityIQ virtual
appliance
80 Administration Portal HTTP server port (forwards to port
8080)
443 Administration Portal HTTPS server port (forwards to port
9443)
5480 HTTPS server port for the VMware Studio version of the
Administration Portal
8080 CapacityIQ HTTP port
8443 CapacityIQ HTTPS port
12 VMware, Inc.
Page 13

Chapter 2 Installing the CapacityIQ Virtual Appliance
CapacityIQ Listening Ports
Table 2-3 describes the local listening ports that CapacityIQ requires. These ports do not require an opening
in your firewall.
Table 2-3. CapacityIQ Listening Ports
Port Number Description
5432 PostgreSQL server port. Listens to connections from
localhost only.
5488, 5489 Ports that the VMware Studio version of the Administration
Portal use
8005, 9005 Apache Tomcat management ports for the Administration
Portal
8080, 8443 These CapacityIQ ports are listening ports and ports that are
required for TCP connection
9080 Administration Portal HTTP server port
9443 Administration Portal HTTPS server port
Administration Portal Supported Browsers
Access the CapacityIQ Administration Portal using these browsers.
n
Internet Explorer 6.0.x, 7.0.x, and 8.0.x
n
Mozilla Firefox 2.0.x and 3.x
Deploy the Virtual Appliance
You use the vSphere Client user interface to deploy the CapacityIQ appliance. VMware distributes the
appliance as a .zip file that includes an Open Virtualization Format (OVF) file.
Prerequisites
n
To deploy CapacityIQ with thin disks, use vCenter Server 4.1 with ESX hosts version 3.5 or later or see
“Deploy the Virtual Appliance with Thin Disks in vSphere 4.0,” on page 14.
n
You are in the vSphere Client and your assigned role and permissions allow you to import a virtual
appliance.
Procedure
1 Download and extract the CapacityIQ .zip file.
2 In the vSphere Client that is connected to a vCenter Server system or an ESX host, select File > Deploy
OVF Template.
3 Locate the extracted .ovf file.
For information about how to complete the wizard, see the vSphere documentation. The network switch
that you select must have access to vCenter Server and the datastore must have enough capacity to deploy
the virtual appliance.
The virtual appliance appears in the vSphere Client inventory panel as a virtual machine.
What to do next
Configure the virtual appliance.
VMware, Inc. 13
Page 14

vCenter CapacityIQ Installation Guide
Deploy the Virtual Appliance with Thin Disks in vSphere 4.0
To deploy CapacityIQ with thin disks instead of thick disks in a vSphere 4.0 environment, use the VMware OVF
tool to deploy the CapacityIQ appliance.
vSphere 4.0 prevents you from deploying CapacityIQ with thin disk provisioning despite the default thin disk
setting for the CapacityIQ OVF disks. You might prefer thin disks in a small environment with limited storage
space.
Prerequisites
n
Download the VMware OVF utility version 2.0.1.
n
Use an ESX host 3.5 with VMFS 3 or later version of the datastore.
Procedure
1 Download and install the VMware OVF tool version 2.0.1.
2 Download CapacityIQ to the same computer and extract the zip file.
3 Open a command prompt and navigate to the directory that the OVF tool is installed in.
4 Deploy CapacityIQ with thin disks.
ovftool --name=
powerOn
vi://
ip=
unzipped_OVF_file_path
vCenter_Server_user_name:vCenter_Server_password@vCenter_Server_IP_address
ESX_host_IP_address
CapacityIQ_virtual_machine_name
5 Accept the license agreement and refer to the OVF tool help to complete the deployment process.
6 In the vSphere Client, open the CapacityIQ virtual machine console and follow the instructions in the
console.
CapacityIQ uses thin disks in a vSphere 4.0 environment.
What to do next
Configure the virtual appliance.
Configure the Virtual Appliance
After you import the CapacityIQ OVF file, configure the virtual appliance to set up access to the CapacityIQ
Administration Portal.
Prerequisites
You imported the OVF file. The appliance appears as a virtual machine in the vSphere Client inventory panel.
Procedure
1 Select the virtual appliance icon in the vSphere Client inventory panel.
--datastore=
datastore_name
--diskMode=thin --
/?
2 Power on the virtual machine.
14 VMware, Inc.
Page 15

3 Click the Console tab.
The deployment process begins.
4 Specify the passwords for the configuration process.
n
A password for the root user.
n
A password for the ciqadmin user.
When the process completes, the appliance console interface displays the URL to the Administration
Portal.
The virtual appliance is configured.
What to do next
On the Console tab, configure the network and time zone settings.
Configure Network and Time Zone Settings
When you configure the virtual appliance, you can configure optional network and time zone settings. Time
zone settings affect the scheduling of reports, the time stamp generated in reports for CapacityIQ, and the daily
and weekly dates that appear in the dashboard and views.
Prerequisites
Chapter 2 Installing the CapacityIQ Virtual Appliance
You deployed and configured the CapacityIQ virtual appliance, and you are on the Console tab in the console
interface.
NOTE The CapacityIQ virtual appliance uses DHCP (Dynamic Host Configuration Protocol) by default, and
the CapacityIQ clock synchronizes with the ESX host on which it is running. Clock synchronization uses
VMware Tools.
Procedure
1 Navigate to Configure Network.
2 Select an IP address for the CapacityIQ virtual appliance.
n
Use a DHCP server to select an IP address by domain name, such as ciq.vmware.com.
NOTE CapacityIQ does not provide an interface to set the host name. If you use a DHCP IP address
and it changes when you restart the virtual appliance, you might lose the connection to CapacityIQ
from the vSphere Client.
n
Use a static IP address for the CapacityIQ address. Static IP is the recommended choice.
Either choice works. This choice is left to administrator preference or policies in your organization.
3 Navigate to Set Timezone, select the time zone from the list of zones, and click OK.
If any time zones are missing from your view of the list, press Shift+PgUp or Shift+PgDn to scroll through
the zones.
4 Open a browser window and navigate to the URL that appears in the console interface to start the
Administration Portal.
5 For changes to network and time zone settings that occur after registering CapacityIQ, click Restart in the
Status tab of the Administration Portal to restart CapacityIQ.
The first time you configure network and time zone settings, the Restart button is dimmed until you
register CapacityIQ.
VMware, Inc. 15
Page 16

vCenter CapacityIQ Installation Guide
You configured the network and time zone settings. You are finished working in the vSphere Client for now.
NOTE These time zone settings do not affect the monthly, quarterly, and yearly dates in the dashboard and
views that depend on UTC time. Time zones set in the virtual appliance affect the daily and weekly dates in
the dashboard and views and all of the recurring time intervals for scheduled reports.
What to do next
Configure optional SMTP server settings for CapacityIQ email service.
Configure SMTP Settings
Configure an optional SMTP server to activate email service for CapacityIQ reports.
Prerequisites
Log in to the Administration Portal with the user name ciqadmin and the password you selected during
installation. The Administration Portal is accessible using the IP address shown in the virtual appliance console
interface.
Procedure
1 On the SMTP tab, select the Enable report email service check box.
2 Type the SMTP server address and port number.
3 Type the name and email address of the sender for the reports.
4 If the SMTP server requires SSL or TLS protocols, select the Server requires an encrypted connection
check box and select the protocol.
5 If the SMTP server requires credentials, select the Outgoing SMTP server requires authentication check
box and type the user name and password.
6 Click Update.
The SMTP server setup activates CapacityIQ options to email reports.
What to do next
Configure CapacityIQ.
CapacityIQ Configuration
Configuring CapacityIQ includes registering CapacityIQ, installing the license, and optionally installing a
custom SSL certificate.
Register CapacityIQ
Register the CapacityIQ appliance to establish communications and credentials for the vCenter Server system
to which CapacityIQ connects.
Prerequisites
n
Log in to the Administration Portal.
n
Because the registration process involves assigning permissions at the root vCenter Server folder level
and propagating them to child objects in the inventory tree, verify that the user who registers CapacityIQ
does not have conflicting permissions that are set outside of the registration process and might block access
to any objects. For more information about creating roles and assigning users to roles, see the vSphere
documentation.
16 VMware, Inc.
Page 17

Chapter 2 Installing the CapacityIQ Virtual Appliance
Procedure
1 In the vSphere Client, create a role, such as CIQ_ADMIN, and assign the Manage custom attributes, Set
custom attribute, and Licenses global privileges, the Register extension, Unregister extension, and
Update extension extension privileges, and the View Storage views privilege.
2 Right-click the root vCenter Server folder in the inventory tree and select Add Permission.
3 In the Assign Permissions dialog box, assign the CIQ_ADMIN role to the user who is registering
CapacityIQ and propagate the privileges to child objects.
4 In the Administration Portal, click Register on the Setup tab to configure the registration settings.
5 In the vCenter CapacityIQ - Register dialog box, specify whether to use the CapacityIQ IP address or fully
qualified domain name.
If you register CapacityIQ with a fully qualified domain name, and you use DHCP, make sure
vCenter Server and every instance of the vSphere Client that requires access to CapacityIQ can resolve
the name to the IP address.
6 Specify the client connection type.
n
Select HTTPS to improve security. You must use HTTPS to establish a connection in a vCenter Server
4.1 environment.
NOTE HTTPS uses a self-signed SSL certificate unless you install a customized certificate.
n
Select HTTP if speed is more important than security in a vCenter Server environment that is earlier
than version 4.1.
7 Type the server address, user name, and password for vCenter Server for which you want to analyze
capacity.
NOTE The user name and password must give you privileges associated with the CIQ_ADMIN role in
the vSphere Client. vCenter Server checks the credentials each time CapacityIQ starts up. If a change
occurs, such as an expired password, you must update the credentials on the Setup tab of the
Administration Portal.
8 Click Apply to complete the setup.
The vCenter CapacityIQ - Register dialog box closes.
9 Restart the vSphere Client.
If you do not restart the vSphere Client after registration, the CapacityIQ button does not appear in the
vSphere Client toolbar.
Managing CapacityIQ Licenses
From the Administration Portal, you can install a CPU-based license or convert a CPU-based license to a virtual
machine-based license.
If you obtain a virtual machine-based license for CapacityIQ, install and manage the license from vCenter
Server. Virtual machine-based licenses require vCenter Server 4.1 or later versions. For information about
assigning license keys to assets in vCenter Server, see the VMware vSphere documentation.
Install a CPU-Based License for CapacityIQ
Install a CPU-based license that you can manage from the License tab of the Administration Portal.
Prerequisites
Log in to the Administration Portal.
VMware, Inc. 17
Page 18

vCenter CapacityIQ Installation Guide
Procedure
1 On the License tab, type your CapacityIQ license key in the space provided and click Apply.
CapacityIQ populates the License information area.
2 Verify that the License information is correct.
Option Description
License Type
License Capacity
License Used
License Remaining
License Expires on
License Expires in
You installed and verified the CPU-based license. CapacityIQ updates the license information on the Setup
tab.
What to do next
License type is Demo if you installed an evaluation version, or Valid for a
full license.
This value is based on the number of physical CPUs you are using. For
example, if you have 689 ESX physical hosts that are visible to vCenter Server,
you might have a license capacity of 1000 to allow for growth.
Number of licenses that are deployed.
License Capacity minus License Used.
Date and time of license expiration.
Remaining number of days before expiration.
Install the SSL certificate if you plan to use one. Otherwise, grant access to CapacityIQ.
Convert a CPU License to a Virtual Machine License
You can convert an existing CPU-based license for CapacityIQ to a virtual machine-based license that you
manage through vCenter Server instead of through the Administration Portal.
Prerequisites
n
Use a permanent virtual machine-based license.
n
Log in to the Administration Portal.
n
If your vCenter Server system is earlier than 4.1, unregister CapacityIQ and register it with a vCenter Server
system that is 4.1 or later.
n
In the vSphere documentation, review the process of adding license keys and assigning the keys to assets.
If CapacityIQ does not appear as a license asset in vCenter Server, unregister and reregister CapacityIQ
to the vCenter Server system.
Procedure
1 In vCenter Server, add the virtual machine-based license and assign it to the CapacityIQ asset.
2 On the Status tab of the Administration Portal, click Restart to restart CapacityIQ.
CapacityIQ prevents you from managing the original CPU-based license through the Administration Portal.
What to do next
Install the SSL certificate if you plan to use one. Otherwise, grant access to CapacityIQ.
18 VMware, Inc.
Page 19

Chapter 2 Installing the CapacityIQ Virtual Appliance
Request and Install a Custom SSL Certificate
CapacityIQ installs a self-signed SSL certificate on the virtual appliance. The self-signed certificate generates
security warnings. If you do not want to use the self-signed security certificate, you can install a custom SSL
certificate for CapacityIQ at the command line. This task is optional and does not affect CapacityIQ capabilities.
If you are familiar with SSL certificate handling, you can use other methods.
Procedure
1 Log in as the ciqadmin user to the CapacityIQ appliance by using an SSH client such as PuTTY.
2 Open a command-line prompt.
3 Enter the ciq-admin command to create the certificate request.
Use the following syntax.
ciq-admin ssl genkey
--org-unit
--city
[--use IP] [--validity
The certificate signing request (CSR) appears on your screen.
organizationUnit
city name
--state
--org-name
state/province name
certificate validity in days
organizationName
--country
two-letter country code
]
NOTE Type your entries with care. You cannot regenerate the CSR without restarting the process.
4 (Optional) If you must start over, include the --force flag to regenerate the CSR.
ciq-admin ssl genkey --force
--org unit ...
certificate validity in days
]
5 Copy the CSR and send it to a certifying authority to obtain your SSL certificate.
The certificate must be in X509 or .PK7 format.
6 When you have the authorized certificate, use a file-copying tool to upload the certificate file to the virtual
appliance.
This step must be completed correctly. If it is not, you might not be able to install the certificate.
7 Use the install --cert option of the ciq-admin command to install the certificate.
ciq-admin ssl install --cert
filename
8 Confirm the certificate details.
The certificate details appear in the SSL certificate information area of the HTTPS tab in the Administration
Portal.
The custom certificate replaces the default self-signed certificate that CapacityIQ installed. Installing the
custom certificate restarts CapacityIQ and the ciqadmin processes.
On the Setup tab in the Administration Portal, CapacityIQ updates the HTTPS certificate information with the
new certificate name and certificate expiration date.
What to do next
Grant access to CapacityIQ.
VMware, Inc. 19
Page 20

vCenter CapacityIQ Installation Guide
Grant Access to CapacityIQ
The vSphere administrator grants users access to CapacityIQ by assigning the CapacityIQ privilege to a role.
When you configure CapacityIQ, the virtual appliance generates a CapacityIQ global privilege in the vSphere
Client.
Prerequisites
Restart the vSphere Client before you assign privileges.
Procedure
1 Restart the vSphere Client.
2 Add the CapacityIQ global privilege to a new or existing role.
3 Right-click the root vCenter Server folder in the inventory tree and select Add Permission.
4 In the Assign Permissions dialog box, assign the new or existing role to the user who accesses CapacityIQ.
After a user gains privileges, the user can log in to the vSphere Client and access CapacityIQ. The CapacityIQ
icon appears in the vSphere Client.
Verify the CapacityIQ Installation
Verify that CapacityIQ is properly installed so that you can start working with CapacityIQ.
Prerequisites
You installed the virtual appliance and configured settings on the Administration Portal.
Procedure
1 Log in to vCenter Server and locate the CapacityIQ icon on the vSphere Client toolbar.
2 Click the icon to open CapacityIQ.
3 Look at the inventory panel and verify that the objects you expect to see in the inventory panel appear.
CapacityIQ starts collecting data. As it becomes available, data populates the Dashboard. This process might
take a few minutes.
NOTE If you were already logged in to the vSphere Client when you registered CapacityIQ, reconnect the
vSphere Client to see the CapacityIQ icon.
20 VMware, Inc.
Page 21

Updating or Replacing a CapacityIQ
Instance 3
Update or replace a CapacityIQ instance if the original instance is deleted or you need to register a new instance
with the vCenter Server.
This chapter includes the following topics:
n
“Update CapacityIQ,” on page 21
n
“Replace a Registered Instance of CapacityIQ,” on page 22
Update CapacityIQ
VMware vCenter Update Manager does not manage updates to CapacityIQ. Periodically monitor the VMware
CapacityIQ Web site to check for updates.
Prerequisites
n
Check the CapacityIQ Release Notes for the latest information about upgrading CapacityIQ and supported
versions for the upgrade process. You must adhere to the strict sequence of steps depending on your
versions.
n
To ensure that CapacityIQ can complete the upgrade process and avoid the need to start over, complete
the prerequisite tasks that appear in the release notes text box on the Update tab after you browse for and
upload the package. These prerequisites include such tasks as backing up the virtual appliance, verifying
the percentage of free space on Hard disk 2 and increasing the space to support the upgrade, and closing
any instances of the vSphere Client that access CapacityIQ. You cannot roll back a CapacityIQ update.
n
Decide when to apply the update. CapacityIQ services are unavailable until the update completes. The
update process can take up to two days depending on the amount of data.
Procedure
1 On the Update tab of the Administration Portal, verify the current version of CapacityIQ and the last
update applied.
2 Consult the VMware CapacityIQ Web site to find available updates that you have not yet applied.
The update package is distributed as a .pak file.
3 Download the update package to your computer.
4 On the Update tab, click Browse to find the update package.
5 To upload the .pak file, click Update.
6 Review the prerequisite tasks for the upgrade process that CapacityIQ displays in the text box.
VMware, Inc.
21
Page 22

vCenter CapacityIQ Installation Guide
7 Accept the license agreement and confirm to proceed with the update.
CapacityIQ logs you out of the Administration Portal and restarts services.
8 After the update completes, log in to the Administration Portal to view the status of the data migration
on the Update tab.
If the login page appears blank, press F5 to refresh the page.
The Update tab displays the status of the update.
Replace a Registered Instance of CapacityIQ
Replacing a registered instance of CapacityIQ involves unregistering the original instance and switching to
the new CapacityIQ Administration Portal to register the new instance.
NOTE Do not register more than one instance of CapacityIQ to the same vCenter Server system. VMware does
not support multiple instances of CapacityIQ that increase the load on the vCenter Server system.
Prerequisites
Understand the registration process described in “Register CapacityIQ,” on page 16.
Procedure
1 Log in to the Administration Portal with the user name ciqadmin and the password you selected during
the installation.
The Administration Portal is accessible using the IP address that appears in the virtual appliance console
interface.
2 On the Status tab, click Unregister to unregister the original CapacityIQ instance from the vCenter Server
system.
3 Access the Administration Portal for the new CapacityIQ instance and register it with the vCenter Server
system.
The new portal might require different credentials.
4 (Optional) Discard the original instance of CapacityIQ.
The registration status changes to Registered and the vCenter connection status changes to Connected.
22 VMware, Inc.
Page 23

Post-Installation Tasks for CapacityIQ 4
Post-installation tasks include converting evaluation licenses and adjusting resources to optimize the
CapacityIQ setup.
For information about maintenance tasks, such as stopping and restarting CapacityIQ services or downloading
log files for VMware technical support, see the online help in the Administration Portal.
This chapter includes the following topics:
n
“Convert a CPU Evaluation License to a CPU Full License,” on page 23
n
“Optimizing the CapacityIQ Setup,” on page 23
Convert a CPU Evaluation License to a CPU Full License
You can convert an CPU-based evaluation license to a full license without losing data in the CapacityIQ
database.
If you obtain a virtual machine-based license for CapacityIQ, install and manage the license from vCenter
Server. Virtual machine-based licenses for CapacityIQ support vCenter Server 4.1 or later versions. For
information about assigning license keys to assets in vCenter Server, see the VMware vSphere documentation.
Prerequisites
Purchase a full CPU license for CapacityIQ.
Procedure
u
On the License tab of the Administration Portal, type the new CPU-based license key in the License key
text box and click Apply.
When the conversion process is complete, the new license information appears. The new number of days until
expiration appears in the CapacityIQ License field on the Setup tab.
For information about updating an existing valid license, see the Administration Portal online help.
Optimizing the CapacityIQ Setup
You might adjust CPU, memory, or disk resources to improve resource utilization.
An upgraded environment that is based on older installation requirements might require you to adjust the
resources.
Allocating CPU for CapacityIQ
Table 4-1 describes the effect of different numbers of CPU.
VMware, Inc.
23
Page 24

vCenter CapacityIQ Installation Guide
Table 4-1. Changing the CPU Count in CapacityIQ
Number of CPUs Result
1vCPU In an environment with an inventory of a few hundred
2vCPU VMware ships with and recommends this number of CPUs.
4vCPU The CapacityIQ environment can handle additional
objects, the CapacityIQ views might render slowly because
of data collection, computation, and scheduled report
activities.
concurrent users.
Allocating Memory for CapacityIQ
A new installation of the CapacityIQ appliance is configured with 3.6GB of RAM. To increase the number of
objects and the time range that CapacityIQ can analyze, add more RAM.
If the CapacityIQ appliance uses virtual machine version 7, the optimal amount of configured memory is 3GB
and any larger amount causes the guest operating system to utilize less memory. For information about virtual
machine versions, see the VMware vSphere documentation.
Allocating Disk Space for CapacityIQ
A new installation of the CapacityIQ appliance includes 8GB for the first hard disk and 250GB for the second
hard disk that stores CapacityIQ data. Table 4-2 describes the data retention level that different amounts of
disk space support.
Table 4-2. Changing the Disk Space Allocation in CapacityIQ
Disk Space on Hard disk 2 Result
100GB Capacity IQ can support the maximum data retention level
for about 1500 objects.
The maximum data retention level is 52 weeks, 24 months,
16 quarters, and 10 years.
200GB CapacityIQ can support the maximum data retention level
for about 3100 objects.
The maximum data retention level is 52 weeks, 24 months,
16 quarters, and 10 years.
220GB CapacityIQ can support the maximum data retention level
for about 3500 objects.
The maximum data retention level is 52 weeks, 24 months,
16 quarters, and 10 years.
250GB CapacityIQ can support either the maximum data retention
level for about 4000 objects or the default data retention level
for about 4600 objects.
The maximum data retention level is 52 weeks, 24 months,
16 quarters, and 10 years.
The default data retention level is 52 weeks, 24 months, 8
quarters, and 4 years.
500GB CapacityIQ can support the maximum data retention level
for about 8000 objects.
The maximum data retention level is 52 weeks, 24 months,
16 quarters, and 10 years.
24 VMware, Inc.
Page 25

Troubleshooting the CapacityIQ
Installation 5
Troubleshooting information can help you with problems you might encounter when you install or upgrade
CapacityIQ.
This chapter includes the following topics:
n
“DHCP Address Avoidance at Startup,” on page 25
n
“Restarting the vSphere Client is Required After Registration,” on page 26
n
“Registration Fails Because of Existing Registration,” on page 26
n
“Data Unavailable During Initial Startup,” on page 26
n
“Wrong Time Zone Setting,” on page 27
n
“System Time Synchronization,” on page 27
n
“Virtual Appliance Password Forgotten,” on page 28
n
“No Volume Groups Found,” on page 28
n
“DHCP Not Available Causes Network Connection Failure,” on page 29
n
“Cannot Remove SSH Keys,” on page 29
n
“CapacityIQ Update Fails,” on page 29
DHCP Address Avoidance at Startup
When CapacityIQ starts for the first time, it attempts to obtain a DHCP address for vCenter Server that is
hosting the appliance.
Problem
After startup, you can configure a static IP address, but the first attempt to use a DHCP address might generate
errors. The workaround is to disable the virtual appliance network interface card (NIC) before you start the
virtual appliance. To configure a static IP address, see “Configure Network and Time Zone Settings,” on
page 15. For information about how to deploy a virtual appliance, see“Configure the Virtual Appliance,” on
page 14.
Solution
1 Deploy the virtual appliance.
2 Select the CapacityIQ virtual machine in the inventory panel but do not start the machine yet.
3 Right-click the virtual machine and select Edit Settings.
4 On the Hardware tab of the Virtual Machine Properties dialog box, select Network adapter 1.
VMware, Inc.
25
Page 26

vCenter CapacityIQ Installation Guide
5 In the Device Status area of the Virtual Machine Properties dialog box, deselect Connect at power on and
click OK.
6 Power on the virtual machine.
7 Click the Console tab.
The Linux-based installation script runs.
8 When the script completes, configure a static IP address.
9 Reverse the change to the NIC settings for Network adapter 1 by selecting Connect at power on.
10 Restart the virtual machine.
Restarting the vSphere Client is Required After Registration
After you register CapacityIQ with the vSphere Client or you update a registered instance, you must restart
the vSphere Client.
Problem
If you do not restart the vSphere Client after registration, the CapacityIQ button does not appear in the vSphere
Client toolbar.
Cause
You must restart the vSphere Client to discover the new plug-in.
Solution
1 Install and register CapacityIQ at a time when it is convenient to restart the vSphere Client.
2 Restart the vSphere Client.
Registration Fails Because of Existing Registration
The CapacityIQ registration process fails because it detects another registered instance of CapacityIQ.
Problem
When you register CapacityIQ, the operation fails and prompts you to force the registration because another
instance of CapacityIQ is registered to the vCenter Server system.
Cause
An administrator might delete a registered instance of CapacityIQ without unregistering it or recording the
IP address.
Solution
u
When the Registration Failed dialog box appears, click OK to overwrite the original registration and force
the registration of the new CapacityIQ instance.
Data Unavailable During Initial Startup
When you first open CapacityIQ, it might take up to an hour for the Dashboard to populate with data.
Problem
The Dashboard might appear blank when you first open CapacityIQ.
26 VMware, Inc.
Page 27

Cause
CapacityIQ needs time to collect the initial inventory and performance data before it can display the data on
the Dashboard.
Solution
u
Check the vCenter Connection Status on the Setup tab of the Administration Portal to verify that
CapacityIQ is running. Wait for the information to appear on the Dashboard.
Wrong Time Zone Setting
Setting the time zone incorrectly during installation of the CapacityIQ appliance results in time stamping errors
for views and reports.
Problem
If the time zone for Capacity IQ does not match the time zone on the vCenter Server system, the collected data
does not reflect the time zone in which you are located.
Cause
Capacity IQ might collect data across numerous time zones that use standard or Daylight Savings Time. To
view data as if it comes from one time zone, CapacityIQ uses the Set Timezone setting to adjust the date and
time associated with the collected inventory and performance data. Daily and weekly data are time stamped
with the date and time of the vCenter Server location where CapacityIQ is installed. Data for monthly and
greater intervals uses UTC time.
Chapter 5 Troubleshooting the CapacityIQ Installation
Solution
1 In the vSphere Client, select the VMware CapacityIQ appliance in the inventory panel.
2 Click the Console tab.
3 Navigate to Set Timezone, select the time zone from the list of zones, and click OK.
Select the time zone that matches the local time for vCenter Server where the CapacityIQ virtual appliance
is installed. If any time zones are missing from your view of the list, press Shift+PgUp or Shift+PgDn to
scroll through the zones.
4 Open a browser window and navigate to the URL that appears in the console interface to start the
Administration Portal.
5 On the Status tab of the Administration Portal, click Restart to restart CapacityIQ.
System Time Synchronization
As a best practice, synchronize the time of CapacityIQ with the time of the ESX host that is hosting CapacityIQ.
Problem
If CapacityIQ is not synchronized with the ESX host, the system time is not synchronized with the time on
other systems in your datacenter.
Cause
You disable the time synchronization feature.
Solution
1 In the vSphere Client, right-click the CapacityIQ virtual machine and select Edit Settings.
2 In the Virtual Machine Properties dialog box, click the Options tab.
VMware, Inc. 27
Page 28

vCenter CapacityIQ Installation Guide
3 Select the VMware Tools setting.
4 Under Advanced options, select Synchronize guest time with host.
5 Click OK.
Virtual Appliance Password Forgotten
If you forget your password for logging in to the Administration Portal, reset and make a record of the new
password.
Problem
You manage the CapacityIQ administrator password on the Account tab in the Administration Portal. If you
forget your password, you cannot log in to the Administration Portal to update to a new password.
Solution
1 Boot the virtual appliance and navigate to the console for the virtual machine in the vSphere Client.
2 Press any key to display the GRUB menu in the console.
3 On the GRUB menu, select CentOS (<version_number>).
4 Type e to edit the line.
A list of items in the CentOS configuration file appears.
5 Select the line that starts with kernel and type e to edit the line.
6 At the end of the line, press the spacebar and type single to indicate single-user mode.
7 Press Enter to exit edit mode.
8 On the GRUB screen, type b to boot into single-user mode.
The virtual appliance boots in single-user mode.
9 To change the ciqadmin user password, type passwd ciqadmin.
10 To restart the virtual appliance, type shutdown -r now.
When the virtual appliance starts, you can log in using the new password.
No Volume Groups Found
During the CapacityIQ installation, you might see a No volume groups found error message that the Linux
Logical Volume Manager displays on the console.
Problem
This message might imply that a problem exists with the installation.
Cause
CapacityIQ uses CentOS, which by default uses logical volumes. Because CapacityIQ configurations do not
include logical volumes, the No volume groups found error message appears.
Solution
Ignore this message.
28 VMware, Inc.
Page 29

Chapter 5 Troubleshooting the CapacityIQ Installation
DHCP Not Available Causes Network Connection Failure
During the CapacityIQ installation, you might see an error message on the console that your connection fails
because DHCP is unavailable.
Problem
The CapacityIQ virtual appliance uses DHCP by default.
Cause
If DHCP is not available, an error appears after ten attempts to connect with DHCP.
Solution
u
Ignore the message, continue the installation, and reconfigure the network connection for static IP at
another time.
Cannot Remove SSH Keys
During the CapacityIQ installation, you might see the rm: cannot remove [...]/ssh_host_*',: No such file
or directory error message on the console.
Problem
CapacityIQ generates SSH keys for the self-signed certificate when you first open the virtual appliance.
Cause
SSH keys must be unique. The installation process assumes that you have existing SSH keys installed for the
virtual appliance and tries to remove them. Because no SSH keys are installed, an error message appears.
Solution
Ignore this message.
CapacityIQ Update Fails
When you apply a new version of CapacityIQ, the update fails.
Problem
You cannot complete the update for CapacityIQ.
Cause
The update file might be corrupt or the existing environment might not meet the new operating requirements.
Solution
u
You can try to resolve the update failure by using one of the following methods.
n
Verify that the checksum of the update file matches the checksum on the download site.
n
Make sure that the connection between the browser and the CapacityIQ appliance does not corrupt
the update file.
n
Log in to the Administration Portal and check the Update tab for error messages.
n
If you cannot upload the .pak file before the Update release notes text box appears, clear
the /usr/lib/tomcat-ciq/temp folder to ensure that the root partition has enough free space for the
upgrade process. For more information about root partition requirements and clearing the disk space,
see the VMware knowledge base article at http://kb.vmware.com/kb/1034269.
VMware, Inc. 29
Page 30

vCenter CapacityIQ Installation Guide
What to do next
If this solution does not work, restore CapacityIQ from a backup.
30 VMware, Inc.
Page 31

Index
A
Administration Portal
activating email for reports 16
configuring SMTP servers 16
licensing 9, 17, 18, 23
passwords 14, 28
registering CapacityIQ 16, 26
updating CapacityIQ 21
viewing SSL certificates 19
administrative server 7
Apache Tomcat management ports 12
APIs, data collection 7
architecture of CapacityIQ 7
audience 5
B
browsers, Administration Portal 12
C
CentOS configuration file 28
certificate signing request (CSR) 19
configuring
CapacityIQ virtual appliance 14
network 15
tasks 16
time zones 15, 27
configuring SMTP servers 16
converting
CPU license to virtual machine license 18
evaluation license to full license 23
CPU
optimizing 23
requirement 12
customizing SSL certificates 19
disk space
optimizing 23
requirement 12
document feedback 5
G
granting access to CapacityIQ 20
I
installation
overview of tasks 9
requirements 12
troubleshooting 25
verifying completion 20
L
licensing
capacity 17
converting from CPU to virtual machine 18
converting from evaluation to full 23
CPU 9, 17
evaluation 9
full 9
managing from vCenter Server or
Administration Portal 9, 17
virtual machine 9, 17
M
maintenance process overview 9
memory
optimizing 23
requirement 12
N
network, configuring 15
D
Dashboard data 26
data collector 7
data unavailable during initial startup 26
database server 7
deploying, CapacityIQ virtual appliance 13, 14
DHCP
address for hosting appliance 25
impact on network connection 29
VMware, Inc.
O
Open Virtualization Format (OVF) 13
P
password for Administration Portal 28
performance impact on vSphere 7
ports, requirements 7, 12
post-installation tasks 23
31
Page 32

vCenter CapacityIQ Installation Guide
privileges
accessing CapacityIQ 20
registering CapacityIQ 16
R
registration
overriding existing instance 26
process 16
replacing registered instance 22
restarting the vSphere Client 26
replacing CapacityIQ 21
reports
activating email service 16
time stamp errors 27
resources, optimizing 23
roles
accessing CapacityIQ 20
registering CapacityIQ 16
S
security
forgotten password 28
SSL certificates 19
server hosting CapacityIQ 7
setup
optimizing resources 23
overview of tasks 9
SMTP, configuring for email reports 16
SSH keys 29
SSL certificates, customizing 19
system administrator tasks 9
system time synchronization 27
V
vCenter Server
plug-in 7
supported versions 12
virtual appliance
configuring 14
defining 7
deploying 13
deploying with vSphere 4.0 14
installing 11
VMware licensing portal 9
volume groups 28
W
watchdog 7
T
tasks in CapacityIQ 7
technical support 5
thin disks
deploying CapacityIQ 14
requirements 12
time, synchronizing CapacityIQ with ESX
hosts 27
time zones, configuring 15, 27
trial period for CapacityIQ 9
troubleshooting
overriding registration 26
updates 29
U
updating CapacityIQ 21, 29
32 VMware, Inc.
 Loading...