

Page 1
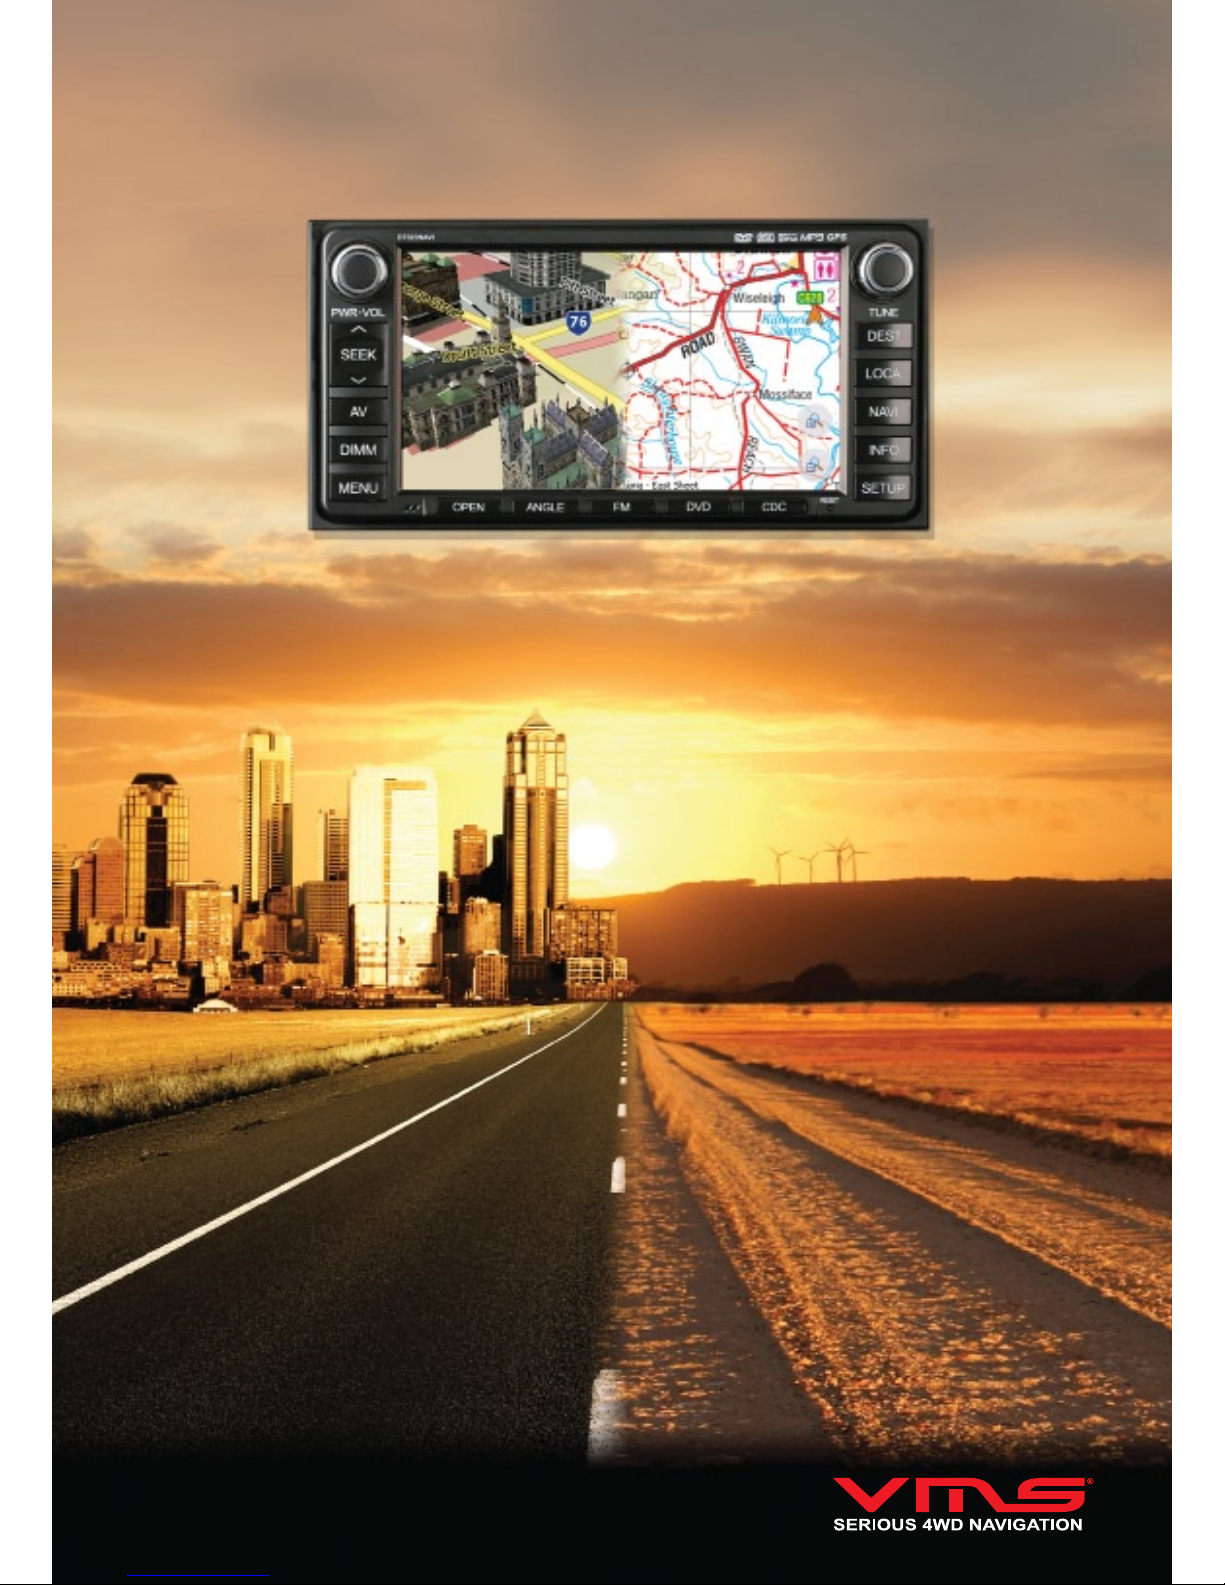
TOURING 7000 SERIES QUICK USER GUIDE
Page 2

Quick User Guide
page 2
Page 3

Quick User Guide
page 3
CONTENTS
SAFETY PRECAUTIONS ............................................................................................................................................................................ 4
BACK UP SD MEMORY CARD DATA ........................................................................................................................................................ 5
FRONT PANEL CONTROLS ........................................................................................................................................................................ 6
POWER ON / OFF ........................................................................................................................................................................................... 7
SYSTEM MENU .............................................................................................................................................................................................. 7
INSERT / EJECT DISK ................................................................................................................................................................................. 7
INSERT / EJECT MEMORY CARD ............................................................................................................................................................. 7
DVD / CD OPERATION .................................................................................................................................................................................... 7
FM / AM RADIO OPERATION ...................................................................................................................................................................... 8
REAR SEAT ENTERTAINMENT OPERATION ......................................................................................................................................... 8
BLUETOOTH OPERATION ........................................................................................................................................................................... 8
iPOD OPERATION .......................................................................................................................................................................................... 9
SYSTEM SETTINGS ...................................................................................................................................................................................... 9
TPMS AND INFO ............................................................................................................................................................................................. 10
REVERSE CAMERA OPERATION ............................................................................................................................................................... 10
GPS CONSOLE ................................................................................................................................................................................................ 10
CHOOSING OFF ROAD SOFTWARE .......................................................................................................................................................... 10
COMPARING OFF ROAD SOFTWARE ........................................................................................................................................................ 11
STREET NAVIGATION ................................................................................................................................................................................... 12
NAVIGATION TO ADDRESS ......................................................................................................................................................... 12
ON SCREEN KEYBOARD .............................................................................................................................................................. 12
MAP CONTROLS ............................................................................................................................................................................. 13
SETTINGS ......................................................................................................................................................................................... 14
MEMORY MAP ................................................................................................................................................................................................. 15
MENU TOOLBAR ............................................................................................................................................................................. 15
WAYPOINTS ..................................................................................................................................................................................... 15
PLACING A WAYPOINT ................................................................................................................................................ 15
GO TO A WAYPOINT ...................................................................................................................................................... 15
BROWSING THE MAP .................................................................................................................................................................... 15
PLANNING A ROUTE .................................................................................................................................................................. 15
CREATING A ROUTE ..................................................................................................................................................... 15
NAVIGATING ALONG A ROUTE .................................................................................................................................. 15
MANAGING OVERLAYS ................................................................................................................................................................. 16
FIND A PLACE BY NAME .............................................................................................................................................................. 16
FIND A PLACE BY CO-ORDINATE ................................................................................................................................................. 16
USING TOURING 7000 WITH MEMORY MAP ON THE PC .................................................................................................. 17
LOADING ADDITIONAL MAPS ..................................................................................................................................................... 17
HELP & SUPPORT ........................................................................................................................................................................... 17
OZI EXPLORER .................................................................................................................................................................................................. 17
OPEN A MAP ..................................................................................................................................................................................... 17
FIND MAP OPTIONS ....................................................................................................................................................................... 17
MAP ZOOM ........................................................................................................................................................................................ 17
FIND A PLACE BY NAME .............................................................................................................................................................. 18
PLANNING AND NAVIGATION MODES ..................................................................................................................................... 18
WAYPOINTS ...................................................................................................................................................................................... 19
PLACING A WAYPOINT ................................................................................................................................................. 19
GO TO A WAYPOINT ....................................................................................................................................................... 19
CANCEL NAVIGATION ................................................................................................................................................... 19
WAYPOINT TOOLBAR .................................................................................................................................................... 19
ROUTES .............................................................................................................................................................................................. 19
CREATING A ROUTE ...................................................................................................................................................... 19
NAVIGATING ALONG A ROUTE ................................................................................................................................... 20
ROUTE TOOLBAR ............................................................................................................................................................ 20
TRACK LOG ....................................................................................................................................................................................... 20
TRACK LOG OPTIONS .................................................................................................................................................... 20
HELP & SUPPORT ............................................................................................................................................................................ 20
NOTES .................................................................................................................................................................................................................. 22
Page 4
Quick User Guide
page 4
SAFETY PRECAUTIONS
This symbol means important
instructions. Failure to heed them
can result in serious injury or death.
WARNING
INSTALL THE PRODUCT CORRECTLY SO THAT THE DRIVER CANNOT WATCH TV / VIDEO UNLESS THE VEHICLE HAS STOPPED
AND THE PARKING BRAKE IS APPLIED.
It is dangerous for the driver to watch the TV/Video while driving the vehicle. The
driver may be distracted from looking ahead and an accident could occur. If the
product is not installed correctly, the driver will be able to watch the TV/Video
whilst driving the vehicle and may be distracted from looking ahead causing an
accident. The driver or other people could be severely injured.
DO NOT OPERATE ANY FUNCTIONS THAT CAN CAUSE
DISTRACTIONS WHILE DRIVING.
Any function that requires your prolonged attention should only be performed
after coming to a complete stop. Always stop the vehicle in a safe location before
performing these functions. Failure to do so may result in an accident.
KEEP SMALL OBJECTS OUT OF THE REACH OF CHILDREN.
Swallowing Small objects may result in serious injury. If swallowed, consult a
physician immediately.
DO NOT DISASSEMBLE OR ALTER THE PRODUCT.
Doing so may result in an accident, re or electric shock.
DO NOT USE THIS PRODUCT FOR MOBILE 12V APPLICATIONS.
Use of this product other than its designed application, may result in re, electric
shock or other injury.
USE ONLY IN CARS WITH A 12 VOLT NEGATIVE GROUND. (Check
with your dealer if you are not sure.) Failure to do so may result in re, etc.
DO NOT BLOCK VENTS OR RADIATOR PANELS. Doing so may cause
heat to build up inside and may result in re.
MINIMISE DISPLAY VIEWING WHILE DRIVING. Viewing the display
may distract the driver from looking ahead of the vehicle and cause an accident.
DO NOT WATCH VIDEO / TV WHILE DRIVING. Watching the video may
distract the driver from looking ahead of the vehicle and cause an accident.
KEEP THE VOLUME AT A LEVEL WHERE YOU CAN STILL HEAR
OUTSIDE NOISE WHILE DRIVING.
Failure to do so may result in an accident.
HALT USE IMMEDIATELY IF A PROBLEM OCCURS.
Failure to do so may cause personal injury or damage to the product. Return it to
your authorised VMS dealer or the nearest VMS Service Centre for repairing.
DO NOT PLACE HANDS, FINGERS OR FOREIGN OBJECTS IN
INSERTION SLOTS OR GAPS.
Doing so may result in personal injury or damage to the product.
DO NOT MIX NEW BATTERIES WITH OLD BATTERIES. INSERT
WITH THE CORRECT BATTERY POLARITY.
When inserting the batteries, be sure to observe proper polarity (+ and –) as
instructed. Rupture or chemical leakage from the battery may cause re or
personal injury.
Product Cleaning
Use a soft dry cloth for periodic cleaning of the product. For more severe stains,
please dampen the cloth with water only. Anything else has the chance of dissolving the paint or damaging the plastic.
Temperature
Be sure that the temperature inside the vehicle is between 0°C (+32°F) and
+45°C (+113°F) before turning your unit on.
Moisture Condensation
You may notice the disc playback sound wavering due to condensation. If this
happens, remove the disc from the player and wait about an hour for the moisture to evaporate.
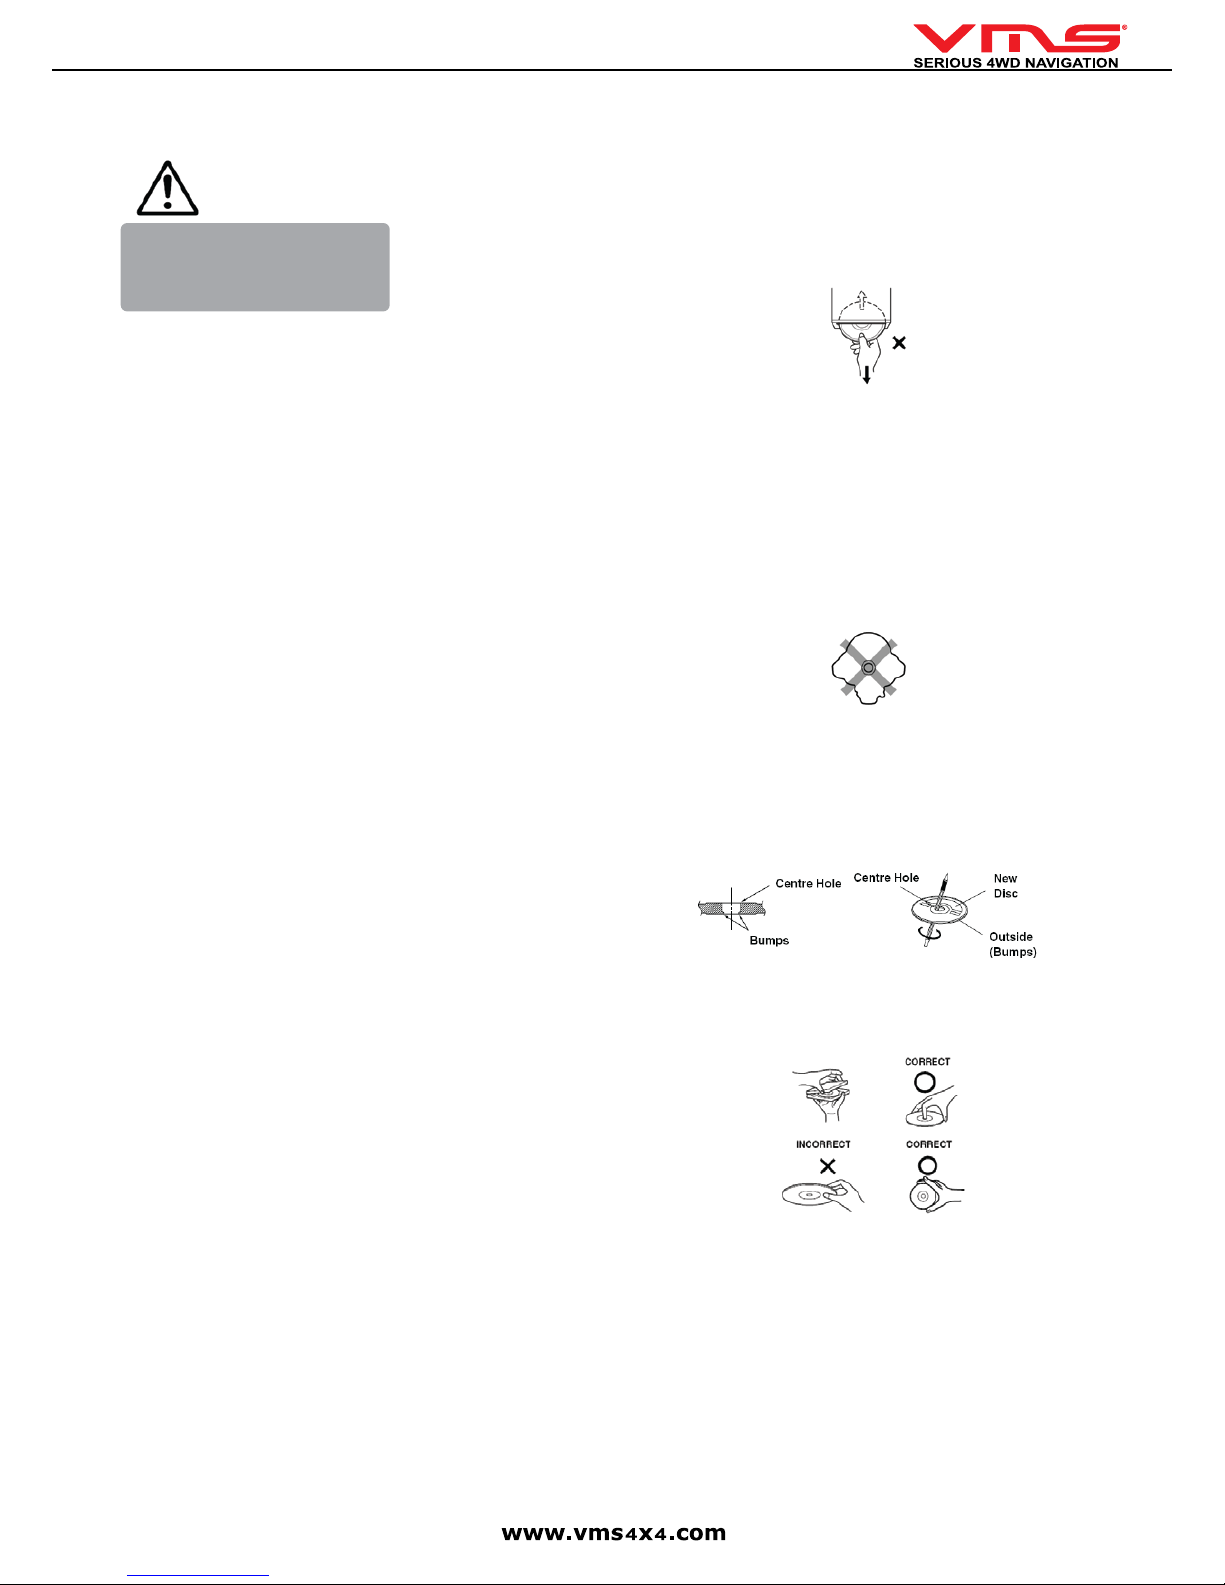
Damaged Disc
Do not attempt to play cracked, warped, or damaged discs. Playing a bad disc
could severely damage the playback mechanism.
Maintenance
If you are experiencing problems, do not attempt to repair the unit yourself.
Return it to your VMS dealer.
Never Attempt the Following:
Do not grip or pull out the disc while it is being pulled back into the player by the
automatic reloading mechanism.
Do not attempt to insert a disc into the unit when the unit power is off. Doing so
may cause damage to the DVD / CD mechism.
Inserting Discs
Your player accepts only one disc at a time for playback. Do not attempt to load
more than one disc.
Make sure the label side is facing up when you insert the disc.
Your player will automatically eject any disc that is inserted incorrectly. If the
player continues to eject a correctly inserted disc, push the Power button.
Playing a disc while driving on a very bumpy road may result in skips, but this
will not scratch the disc or damage the player.
Irregular Shaped Discs
Be sure to use round shaped discs only for this unit and never use any special
shaped discs. Use of special shaped discs may cause damage to the mechanism.
New Discs
As a protective measure to prevent the Disc from jamming, the DVD player will
automatically eject discs with irregular surfaces or which have been inserted
incorrectly. When a new disc is inserted into the player and ejected after initial
loading, using your nger, feel around the inside of the centre hole and outside
edge of the disc. If you feel any small bumps or irregularities, this could inhibit
proper loading of the disc. To remove the bumps, rub the inside edge of the hole
and outside edge of the disc with a ball-point pen or other such instrument, then
insert the disc again.
Correct Handling
Do not drop the disc while handling. Hold the disc so you will not leave ngerprints on the surface. Do not afx tape, paper, or gummed labels to the disc. Do
not write on the disc.
Disc Cleaning
Fingerprints, dust, or soil on the surface of the disc could cause the DVD player
to skip. For routine cleaning, wipe the playing surface with a clean, soft cloth
from the centre of the disc to the outer edge. If the surface is heavily soiled,
dampen a clean, soft cloth in a solution of mild neutral detergent before cleaning
the disc.
Using compact discs (CD/CD-R/CD-RW)
If you use unspecied compact discs, correct performance cannot be guaranteed.
You can play CD-Rs (CD-Recordable)/CD-RWs (CD Re Writable) which have
been recorded only on audio devices.
You can also play CD-Rs/CD-RWs containing MP3/WMA formatted audio les.
• Some of the following discs may not play on this unit:
Flawed discs, discs with ngerprints, discs exposed to extreme temperatures or
sunlight (e.g., left in the car or in unit), discs recorded under unstable conditions, discs on which a recording failed or a re-recording was attempted, copy
Page 5

Quick User Guide
page 5
protected CDs which do not conform to the audio CD industry standard.
• Use discs with MP3/WMA les written in a format compliant with this unit.
To customers using CD-R / CD-RW
• If a CD-R/CD-RW cannot be played, make sure the last recording session was
closed (nalised).
• Finalise the CD-R / CD-RW if necessary, and attempt playback again.
Installation Location
Make sure the unit will not be installed in a location subjected to:
• Direct sun and heat
• High humidity and water
• Excessive dust
• Excessive vibrations
BACK UP SD MEMORY CARD DATA
DATA REDUNDANCY
Memory Cards utilized in this product is of an automotive grade. However, data
corruption may still occur. To ensure data redundancy, we recommend backing up
the data onto a computer.
• Back up the original data.
• Back up your own data.
BACK UP DATA FROM MEMORY CARD TO A COMPUTER
1. Insert Micro SD card into a SD card reader on the computer.
2. In My Computer, the SD card will appear as a removable drive. For easy
identication, all VMS Touring SD cards are programed to appear with a VMS
icon.
3. Select all the data on the SD card & select COPY.
4. Paste the data on to the computer.
5. If the data on the SD card becomes corrupt, the sd card can be formatted and
the backup data on the computer can be copied onto the card.
PLEASE NOTE: The data on the SD card is encrypted. Copying the data onto
a different SD card is not possible. The system will only work with the genuine
memory card.
Loss or corruption of data on the memory card is not covered
under warranty. Ensure the data is backed up onto another form
of media as soon as the possible.
If you are not sure on how to back up data contained on the
memory card, contact your VMS dealer before any attempts are
made. Backing up data is not VMS or the dealer’s responsibility.
You may also request VMS to back up the DATA onto a DVD-R
disk. A service charge of $55 (excluding postage) apply. To
access this service, please call VMS on 03 9017 5568.
Business Hours: 9am to 5pm Monday to Friday, AEST.
VMS will not accept responsibility for items sent to the ofce
that do not contain an RA number which, is given to you over the
phone.
Page 6
Quick User Guide
page 6
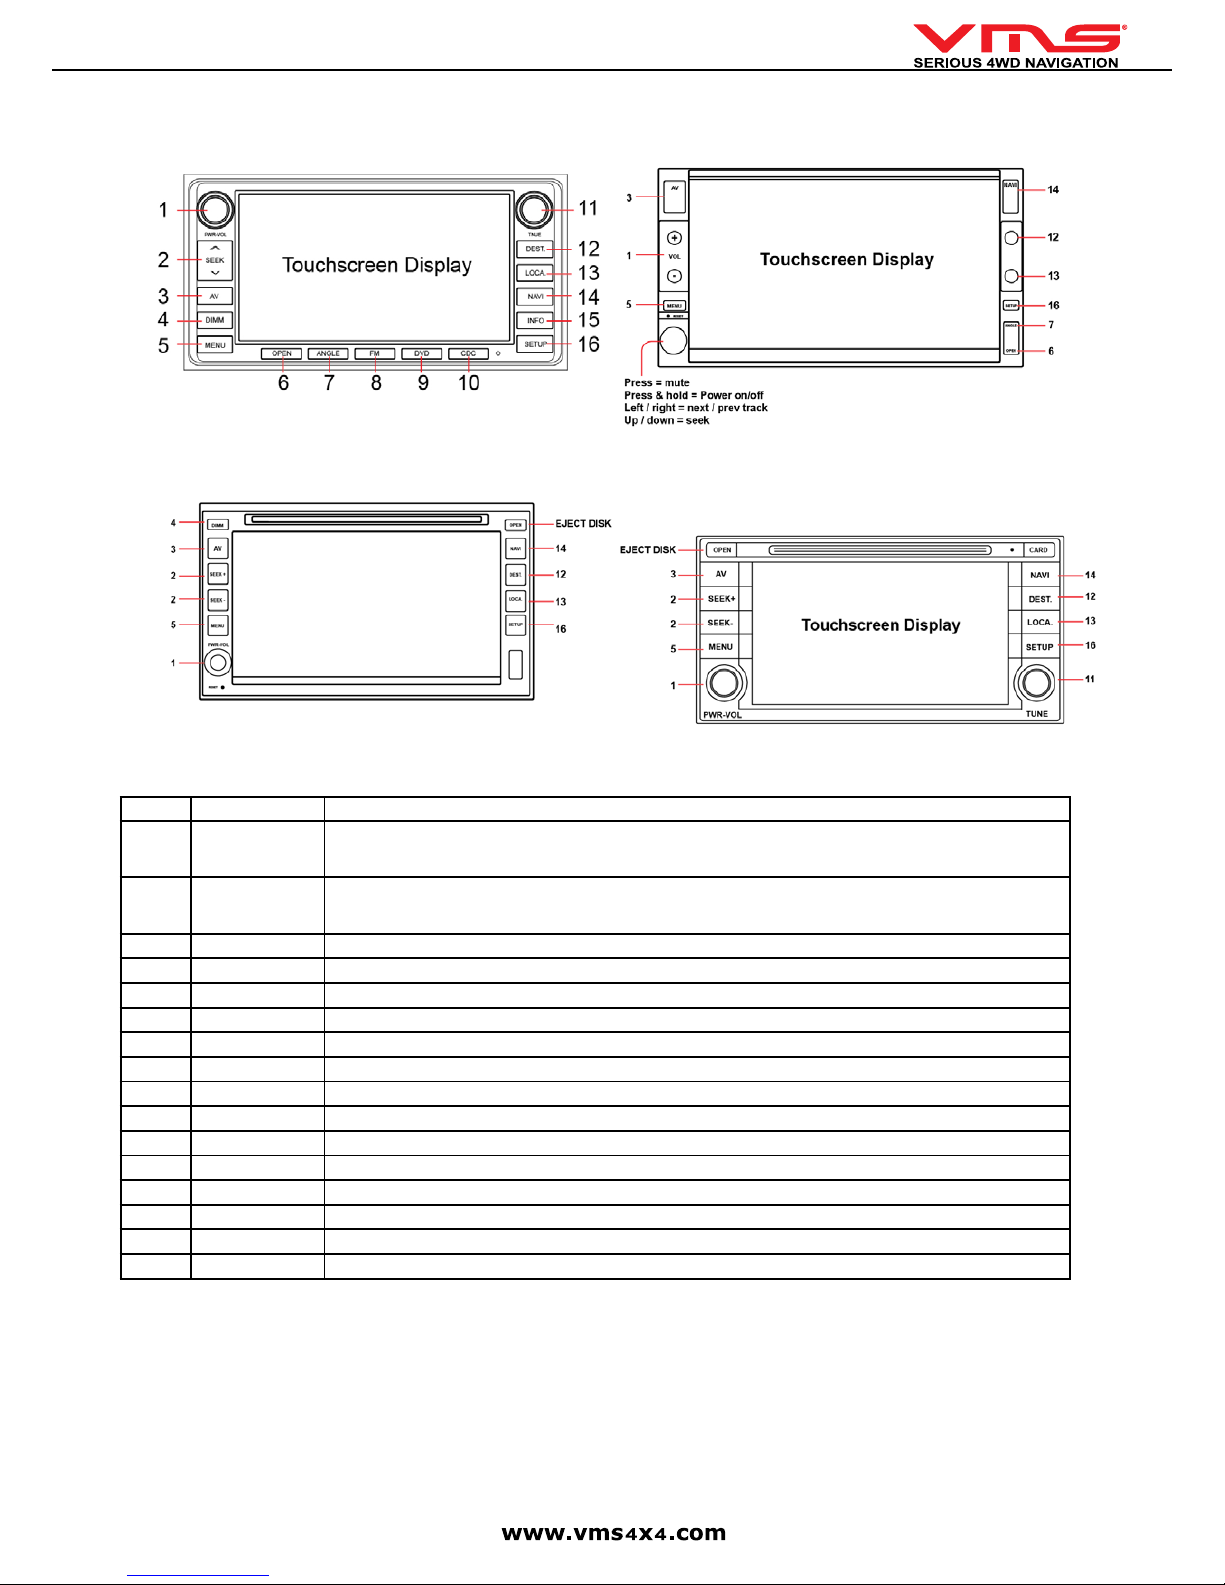
FRONT PANEL CONTROLS
Touring 7023 Toyota Front Panel Touring 7000 Double Din Front Panel
Touring 7006 Nissan Front Panel Touring 7032 Subaru Forester Front Panel
No. Function Description
1 PWR-VOL Tune knob to increase / decrease volume.
Press to MUTE.
Press and hold to power on / off.
2 SEEK Radio: Change station up or down.
CD/DVD: Change track up or down.
iPOD: Change track up or down.
3 AV Cycles through all AV functions.
4 DIMM Press to increase / decrease screen brightness.
5 MENU Go to System Menu.
6 OPEN Open / Close the front panel.
7 ANGLE Press to activate front panel angle adjustment. Use TUNE to adjust the angle.
8 FM Go to FM radio menu.
9 DVD Go to DVD / CD menu.
10 CDC Go to CD changer menu.
11 TUNE Manually tune radio stations. Turn the knob to turn up or down in frequency.
12 DEST. NO FUNCTION (FOR FUTURE EXPENDABILITY).
13 LOCA. NO FUNCTION (FOR FUTURE EXPENDABILITY).
14 NAVI Display GPS console.
15 INFO Go to info menu.
16 SETUP Go to setup menu.
Touchscreen Display
Page 7
Quick User Guide
page 7
POWERING ON/OFF
At key ignition, the system will automatically switch on. When the ignition is
switched off, the system will power down. To manually power the system on or off,
press and hold the [PWR/VOL] knob.
SYSTEM MENU
TO SELECT A FUNCTION, TOUCH THE SCREEN
RETURN TO SYSTEM MENU: To return to the main menu at any time, press
the [MENU] button on the front fascia.
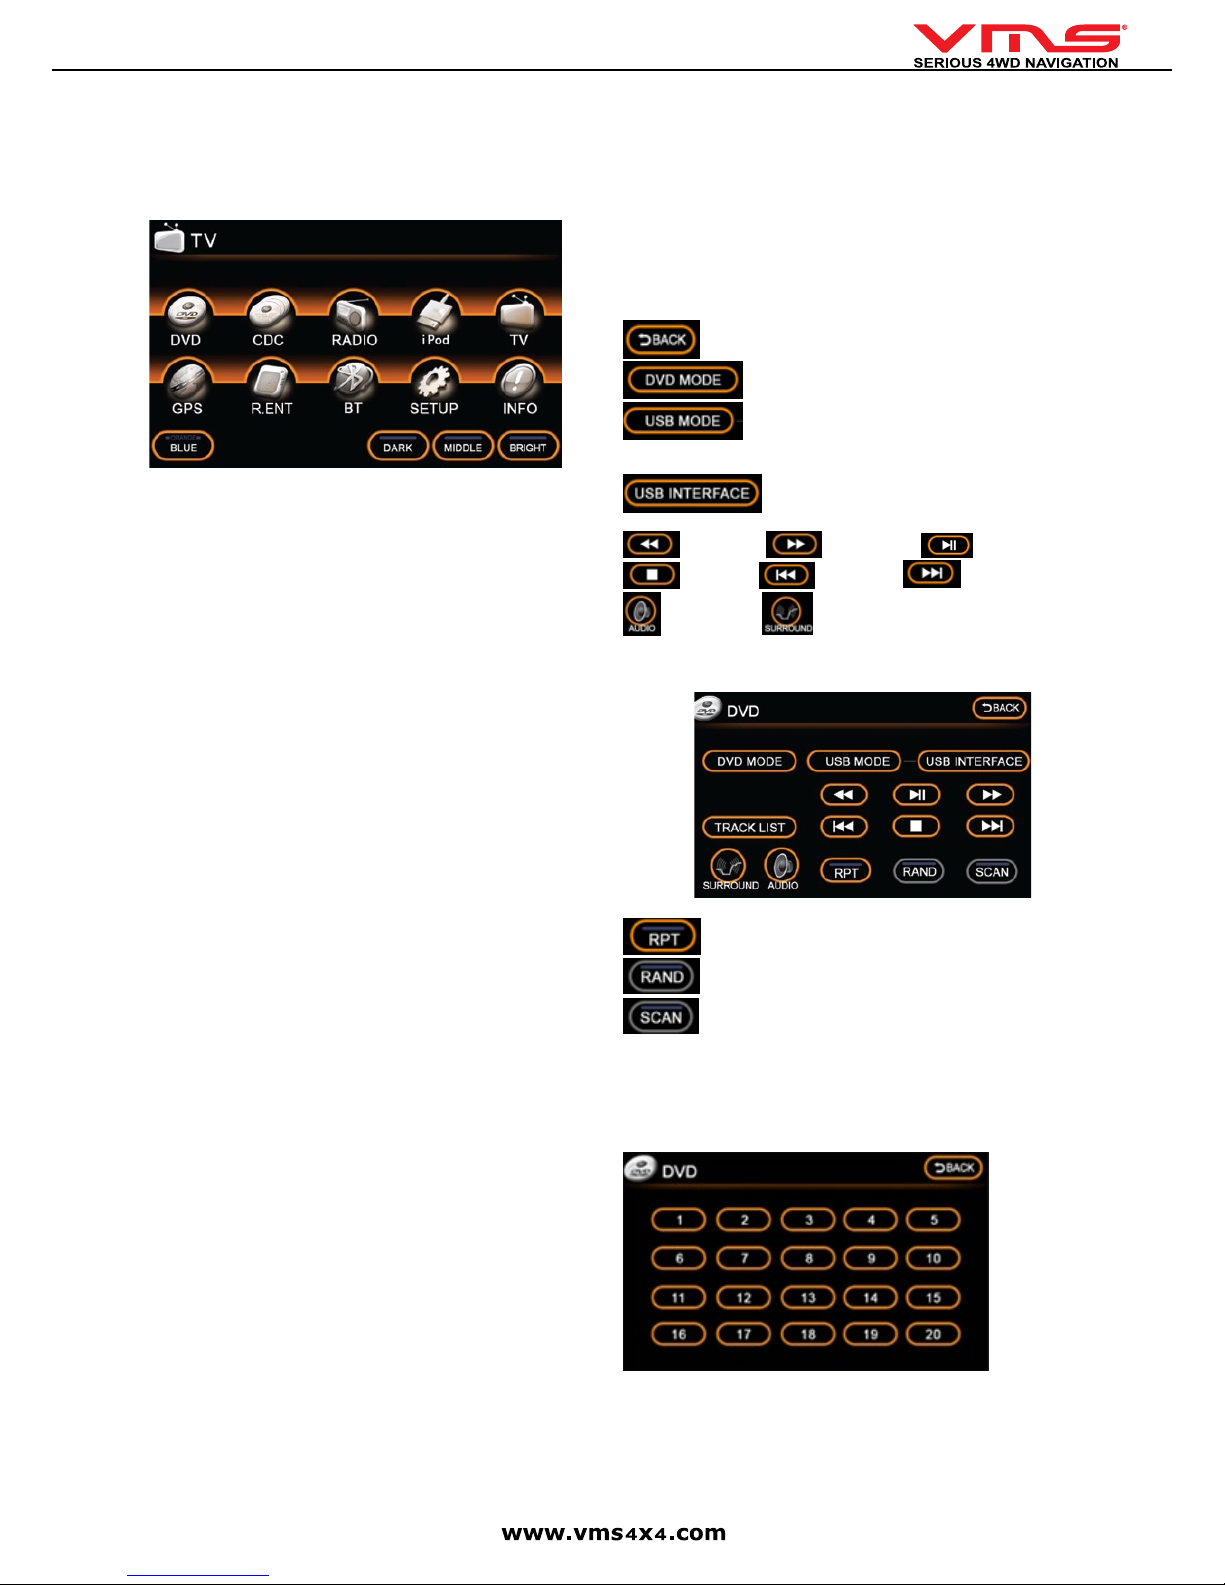
SYSTEM MENU FUNCTIONS
[DVD] - Play DVD/CD or connected USB ash memory. (Supported formats on
USB: mp3 & WMA).
[CDC] - CD changer can be accessed via this icon (only when CDC is connected).
[Radio] - Operate FM or AM radio.
[iPOD] or [AUX] - operate connected iPOD or AUX input. This icon can be
changed in “SETUP” to perform either of these functions.
[TV] - Receive TV broadcast (optional, only when ECM with TV function is con-
nected).
[GPS] - enters the GPS console.
[R.ENT] - controls for rear seat entertainment.
[BT] controls for Bluetooth phone connectivity.
[SETUP] - congure system settings.
[INFO] - displays TPMS & volt metre information.
[DARK / MIDDLE / BRIGHT] - adjust LCD screen brightness.
[BLUE / ORANGE] - toggles interface from Blue to Orange themes. Unit must
be restarted by turning the acc on & off.
CALIBRATE TOUCHSCREEN
The touchscreen requires recalibration from time to time.
1. Press the centre of the touchscreen and turn on the ignition.
2. Press and hold until the calibration screen appears.
3. Touch the + . The more precise the touch, the more accurate the touchscreen
will respond.
INSERTING A DISC
1. Press the [OPEN] button.
2. Place the disc in the loader slot and the system will automatically insert the disc
into the loader.
3. Close the front panel by pressing the [OPEN] button.
EJECTING A DISC
1. Press the [OPEN] button
2. Press the [EJECT] button and the disc will automatically be ejected from the
loader. Remove the disc.
3. Close the front panel by pressing the [OPEN] button.
ADJUSTING FRONT PANEL ANGLE
Due to ambient light, the screen may experience reduced visibility. The front panel
angle can be adjusted to optimise visibility.
1. Press [ANGLE] button.
2. Turn the [TUNE] knob to adjust the angle up or down.
PLEASE NOTE: The angle of the front panel is automatically memorised. The
front panel will retract to a completely closed position when the system is off.
When it is powered on again, the panel will automatically tilt to the last position in
its memory.
MEMORY CARD
COMPATIBLE MEMORY CARDS
1GB, 2GB 4GB, 8GB class 4 micro sd cards are compatible.
All navigation software(s) and map(s) are stored on the memory card. Navigation
will not operate without the memory card.
INSERT SD CARD
PLEASE NOTE: The memory card slot is directional. Ensure the card is in the cor-
rect orientation. Incorrect orientation can cause physical damage to the card slot.
Insert the card into the slot and press gently until the card locks into position.
REMOVE SD CARD
Press the Memory Card gently until card unlocks.
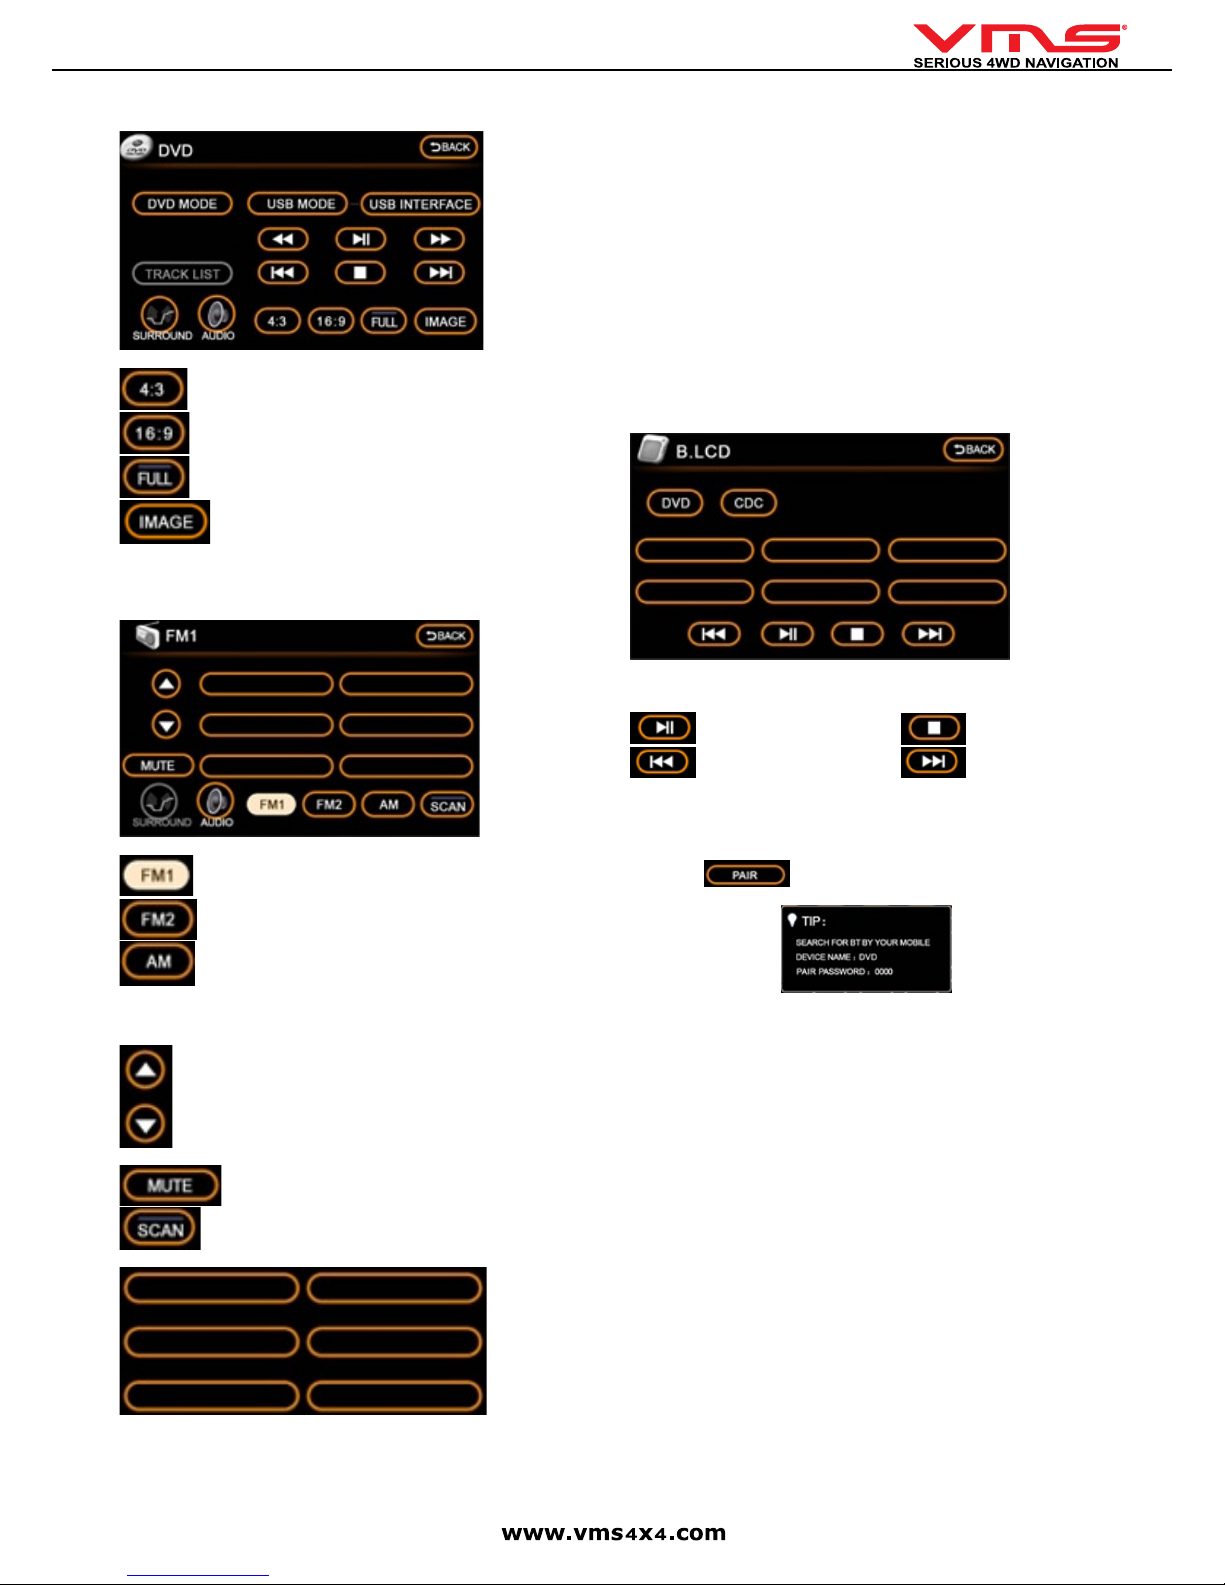
DVD/CD playback
1. Insert disc & select DVD/CD from the main menu.
The controls below are common to both CD, DVD & USB ash memory playback.
- Return to previous menu.
- Select to play DVD or CD.
- Select to play mp3 music from USB ash memory utilising
standard DVD controls.
- Browse USB ash memory content.
- seek back - seek forward - play / pause
- stop - next track - prev track
- Audio settings - EQ settings
CD MENU
When an audio CD is inserted, the CD menu will appear.
- enable album repeat.
- enable random track selection.
- enable track scan, plays rst 10 sec of every track on the cd.
TRACK LIST MENU
[TRACK LIST] - brings up a list of all available tracks on an audio CD (not mp3
CD).
Page 8
Quick User Guide
page 8
DVD MENU
When a DVD is inserted, the DVD menu will appear.
- Display picture in 4:3 ratio (letterbox).
- Display picture in 16:9 radio (widescreen).
- Display picture full screen.
- Display DVD picture. PLEASE NOTE: This icon can only be
activated while the vehicle is not in motion & the park brake is applied.
FM / AM RADIO
To access FM or AM radio, press the [RADIO] button in the Main Menu.
- 6 FM presets
- 6 FM presets
- 6 AM presets
To switch between FM1 / FM2 / AM, press the corresponding icons.
- Step up or down (manually change the radio frequency by 1 step).
Turns the radio off.
- Automatically scan for radio stations.
[Preset locations] 1 station can be stored in each location.
SCAN AND STORE RADIO STATIONS
1. Press [SCAN] until the desired station appears. Press and hold the desired
preset location and the station will be saved in this position.
2. Repeat the above for other stations.
MANUALLY TUNING A RADIO STATION
If the automatic scan did not nd a station, you can manually adjust the station
by pressing the step up or down buttons.
REAR SEAT ENTERTAINMENT
The 7000 series is Rear Seat Entertainment ready. It has the ability to:
Send DVD video & audio to a display located at the rear of the vehicle. Rear
Seat Passengers can watch a movie with wireless headphones. At the same
time, navigation is displayed up front with either radio or iPOD playback through
the vehicle sound system. All controls for rear seat dvd are accessible via the
touchscreen.
To access Rear Entertainment controls, press [R.ENT] in the main menu.
PLEASE NOTE: Rear Entertainment option needs to be [ON] in the settings. If
its not on, the mp3 menu will be displayed instead.
R.ENT MENU
[DVD] play DVD/CD inserted in the 7000 series.
[CDC] play disks from a CD/DVD changer.
Play / Pause Stop
Previous track Next track
BLUETOOTH PHONE CONNECTIVITY
To access the Bluetooth Phone menu, press [BT] in the main menu.
PAIR YOUR PHONE
1: Press the
button. A tip menu appears
2: On your mobile phone, enter the Bluetooth menu & search for a new device.
Follow the on screen instructions.
3: Enter the password = 0000
4: The phone should now be paired.
If you phone does not pair, it may not be Bluetooth V2.0 compliant. Please contact the manufacturer of the mobile phone to obtain further information.
MAKING A PHONE CALL
A call can be made from either the handset or from the touchscreen.
Dialing from the handset: Dial from the handset as usual & the call will be connected to the handsfree automatically.
Dialing from the touchscreen: Enter the Phone number on the keypad using the
touchscreen and press the dial button.
Dialing from recent history: Select the Phone number to call from the
[RECENTS] menu, press the dial button on the touchscreen.
Answering a phone call: Press the [DIAL] button.
Rejecting a phone call: Press the [REJECT] button
Page 9

Quick User Guide
page 9
PHONE MENU
Keypad
- Connected phone name.
- Pair phone.
- Handsfree mode is activated.
- Switch call back to handset.
- Turn Bluetooth On/Off.
- End / Reject call. - Dial / Accept call.
- Access RECENT CALL HISTORY.
- Delete / Backspace. - BT Connection status.
[RECENT] MENU
Received calls history Dialled calls history
- Delete call history
To call from these menus, select the phone number to call, then press the
[CALL] button.
IPOD OPERATION
Ensure iPOD is connected to the iPOD cable. To access the iPOD menu, press
[iPOD] in the main menu.
IPOD MENU
- Current track name. - Current artist name.
- Current album name.
- Play / pause. - Previous Track.
- Next Track. - Next / Previous.
SHUFFLE AND REPEAT
1. Disconnect the iPOD from the cable.
2. Enable Shufe and / or repeat on the iPOD.
3. Connect the iPOD with the cable.
4. When next track is selected, the iPOD will now shufe or repeat your selection.
PLAYLIST
1. Disconnect the iPOD from the cable.
2. Select the playlist desired and press play on the iPOD.
3. Connect the iPOD with the cable
4. The selected playlist will be available.
CONTROLLING THE IPOD DIRECTLY FROM THE IPOD
The iPOD can be controlled directly from its own controls while connected to the
system.
1. Go to Settings.
2. Turn iPOD control OFF.
3. Return to the system menu.
4. Press [AUX]
5. This enables the iPOD to play through the system while maintaining complete
control through the iPOD interface.
PLEASE NOTE: The 7000 series will not charge the iPOD in this mode of
operation.
SETUP MENU
To access the setup menu, press [SETUP] in the main menu.
SETUP MENU PAGE 1
AUTO DISPLAY GPS SCREEN - Toggles auto display GPS screen (10 secs)
on/off. DEFAULT = OFF.
Page 10

Quick User Guide
page 10
GPS AUDIO - Toggles GPS sound on/off. DEFAULT = ON.
iPOD - Toggles iPOD integration on/off. If this option is OFF, the iPOD icon in the
main menu turns into a AUX icon. DEFAULT = ON.
AUTO DIMMING - Toggles dimming of the screen when headlights are
switched on, on/off. DEFAULT = ON.
REAR ENTERTAINMENT - Toggles rear entertainment menu on/off.
DEFAULT = ON.
CDC MULTIDISC - Turns DVD / CD changer control on/off. DEFAULT = OFF.
[NEXT] - press to access next page of setup
Setup Menu page 2
BRAKE INSPECTION - Toggle handbrake sensor on/off. DEFAULT = ON.
REVERSE CAMERA - Toggle reverse camera function on/off/mute. While in
mute, there is no audio while in reverse camera mode. DEFAULT = ON.
STEERING WHEEL BUTTON - Toggles steering wheel controls on/off.
DEFAULT = ON.
GPS COLD START - If on, the GPS will perform a reboot & require satellites. Please note, signal acquisition time is much longer when GPS is on COLD
START. DEFAULT = OFF.
TIP: When navigation software (s) experience a crash, it is recommended to
conduct a GPS cold start.
1. Turn GPS COLD START to ON. The GPS console will reboot.
2. Once gps software has restarted and is running turn GPS COLD START to
OFF.
BUTTON ILLUMINATION (0-20) - Front fascia backlighting. 0 = MIN / 20 =
MAX.
STEERING WHEEL - Steering wheel code. Must be matched to vehicle to
ensure proper operation.
[PREV] - press to go back to setup menu page 1.
INFO MENU
PLEASE NOTE: TPMS MODULE (optional) IS REQUIRED FOR TPMS FUNCTIONS.
To access the info menu, press [INFO] in the main menu.
The information menu displays Tyre Pressure Monitoring System (TPMS) & battery condition information.
- TPMS setup menu. - Pair TPMS sensors.
- Copyright & system info menu.
TPMS - Tyre Pressure Monitoring System
TPMS SETUP MENU
TEMP SETTING - Set min temperature.
TEMP UNIT - Set Celsius or Fahrenheit.
MAX.TYRE PRESSURE - Set maximum tyre pressure.
MIN.TYRE PRESSURE - Set minimum tyre pressure.
PRESSURE UNIT - Set pressure unit format.
REVERSE CAMERA OPERATION
When a receiver camera is connected to the 7000 series, select reverse gear &
the camera image will automatically be displayed.
When the video signal for reverse camera is not connected, the following warning
will be displayed. Check the video signal input from the camera to the system.
GPS OPERATION
The GPS console can launch both street & off road navigation software.
To access the GPS console, press [GPS] in the main menu.
GPS CONSOLE MENU
STREET NAVIGATION - launches street nav.
OFF ROAD GPS - Off road software menu.
OFF ROAD GPS MENU
The Off road GPS menu contains both Memory Map and Ozi Explorer (DEMO
VERSION ONLY) softwares. Press the corresponding icon to start either software.
Once a software has been selected, it will automatically launch the next time GPS
console starts.
To return to the GPS console when in either Street Nav or Off Road GPS, select
the exit option in either software.
DIFFERENCES BETWEEN MEMORY MAP AND OZI EXPLORER
Memory map and Ozi Explorer are GPS software applications. Although they differ in methods of operation, most features are offered by both application.
Memory Map can use Memory Map formatted maps while Ozi Explorer can accept Ozi Explorer formatted maps. This has often caused much confusion among
users. Maps such as GeoSicence 1:250,000 topo and HEMA raster maps are
available in either format. The end user just needs to choose weather they prefer
to use Memory Map or Oziexplorer.
Page 11

Quick User Guide
page 11
Memory Map Pros:
Easier to use.
Easier to learn.
Technical support via phone and online.
Memory Map Cons:
Can only use Memory Map format maps. Not all maps are published in this
format.
Ozi Explorer Pros:
Can accept a wider format of maps.
Many users may already have maps in Oziexplorer format.
Offers advanced users more exibility.
Ozi Explorer Cons:
Harder to use compared with Memory Map.
Online technical support only.
For customers who have not used either Memory Map or Ozi
Explorer previously, VMS recommends Memory Map as it may be
easier to operate.
STREET NAVIGATION
Page 12

Quick User Guide
page 12
To Start Street navigation, select [Street Navigation] in the GPS console.
This quick start guide will only cover basic operation. For a complete Street Navigation user manual, please visit: http://www.vms4x4.com/vms_support
GETTING STARTED WITH STREET NAVIGATION
Street Navigation is optimised for in-car use. You can use it easily by tapping the screen buttons and the map with your ngertips. You do not need to tap the screen
twice for any function. With buttons and controls, a single tap is sufcient. Street Navigation can plan routes throughout the entire installed map set.
The typical way of using Street Navigation is to enter a destination to start navigation. You can enter your destination a number of ways:
• Enter a full address or a part of an address, for example a street name without a house number
• The names of two intersecting streets.
• Other methods are available. Please refer to the complete user manual online: http://www.vms4x4.com/vms_support
NAVIGATING TO AN ADDRESS
1: Touch [Find] in navigation menu
2. Tap [Find Address]
Country
Suburb
Prev entered
suburbs
Go to city centre
(if street not required)
Find Address Menu:
Street Name
Street No
State
Back to
Prev menu
Go to Street Midpoint if no
house number is required
Go to an intersection by
entering another street name
By default, Street Navigation displays the country, state and suburb of where you are. If needed, tap the button with the name of the country, and select a different
one from the list. If you select a new country, you also need to select the state, or tap to search for a suburb regardless of the state it is in. If you have not changed the
country, you can still change the state. Tap the button with the name of the state and select from the list.
3. To change the suburb tap on the [Suburb] eld.
4. Start entering the suburb name using the on screen keyboard. After entering a couple of characters, a list of possible results will appear.
5. Select the desired suburb from the list. To navigate to this suburb without entering a street entered, press [City Centre]
6. To enter a street name, tap on the [Street Name] eld.
7. Start entering the street name using the on screen keyboard. After entering a couple of characters, a list of possible results will appear.
8. Select the desired street from the list. To navigate to this street without entering a House number, press [Street Midpoint]
9. To enter a house number, tap on the [House Number] eld.
10. Start entering the house number using the keyboard and press [DONE].
11. The overview screen will appear and display the found location on the map. If this location is correct, press the [Set as Destination] button.
Page 13

Quick User Guide
page 13
USING THE ON SCREEN KEYBOARD
You can enter letters or numbers in Street Navigation with your ngertips on the full-screen keyboards and you can switch between various keyboard layouts, for exam
Tap , and select from the list of available
keyboard types.
Switching to another keyboard
layout, for example from a Latin
QWERTY keyboard to a Greek
keyboard
Correcting your entry on the
keyboard
Entering a space, for example
between a rst name and a family
name or in multi-word street names
Entering small or capital letters
Entering symbols
Finalising the keyboard entry
Street Navigation remembers your last keyboard
choice and offers it the next time you need to enter
data.
Remove the unwanted character(s): tap .
Tap and hold the button to delete the entire input
string.
Tap .
Tap to cycle through entering lower case letters,
capital initials or all capitals.
Tap to switch to a keyboard of symbol characters.
Tap
MAP VIEW
6.4 Map View
Toggle 3D / 2D
map view
Detour menu
Go to Cursor
Navigation Menu
Next turn
indicator
GPS signal
strength
Current road name
Next turn road name
Turn after next
turn indicator
500 m
Stats /
Dashboard
Battery
Status
Your position
Map
Action Button (s) Description
Activate map controls
Tap this button to show or hide the following map control buttons:
• Zoom in/out
• Rotate left / right (3D view only)
• Tilt up/down (3D view only)
• Zoom preset buttons (2D view only)
• Tilt and zoom preset buttons (3D view only)
• Return to GPS position button
• Smart Zoom Button
Zoom in and out
Changes how much of the map is displayed on the screen. Street Nav uses high-quality vector
maps that let you see the map at various zoom levels, always with optimised content. It always
displays street names and other text with the same font size, never upsidedown, and you only
see the streets and objects that you need. Map scaling has different limits in 2D and in 3D map
view modes.
Tilt up and down
Changes the vertical view angle of the map in 3D mode.
Page 14

Quick User Guide
page 14
Action Button (s) Description
Changes the horizontal view angle of the map in 3D mode. When GPS position is available,
Street Nav always rotates the map so its top faces your direction of travel (Track-up orientation).
You can turn away from track up with these buttons if GPS position is available and you have
rotated the map, the button appears. Tap this button to re-enable the automatic map rotation.
Viewing modes
Gives you the following map perspectives in Street Nav:
• Classic top-down view (2D)
• Perspective view (3D)
The value always shows the mode the button switches to. If you are in 2D mode, you can see the
button and you need to tap it to switch to 3D mode.
Smart Zoom
Street Navigation can automatically rotate, scale and tilt the map and give you the optimal view:
• When you are approaching a turn, street navigation zooms in and raises the view angle to let
you easily recognise your manoeuvre at the next junction.
• If the next turn is at a distance, Street Nav zooms out and lowers the view angle to show you
the road in front of you. Tap this button once to enable Smart Zoom.
Returning to normal
navigation (back to the
GPS position with
automatic map
rotation)
Tap this button to move the map back to the current GPS position. If the map has been rotated in
3D mode, automatic map rotation is also re-enabled.
Tilt and zoom preset
buttons (available in
Advanced mode only)
Tap one of the preset buttons to set the tilt and zoom levels to x, predened values. Smart Zoom
is disabled. These buttons are available in 3D mode. Tap & hold any of the buttons to set its value
to the current tilt and zoom levels, or to reset it to its original value.
SETTINGS OVERVIEW
To change any of the following settings, press [settings] in the main menu.
Settings Category Settings sub category
Map Screen: • 3D settings
• Colour Proles
• Elevation on 2D map
• Street names during navigation
• Land information
Sound • Master Volume (Street Nav)
• Voice Guidance Volume
• Key Sounds
• Dynamic Volume
Route Settings • Vehicle Type
• Road types used for route planning
• Route calculation method
Regional Settings • Program language
• Voice prole
• Units (km/mile etc)
• Set Date & Time Format
• Time and Time zone settings
Navigation Settings • Keep position on road
• Off route Recalculation
• Restore lock to position
• Automatic Overview
Warnings • Warn when speeding
• Speed Camera warning
Menu Settings • Animation
• Background
Device Settings • Power Management
About Street Navigation • Maps
• Credits
• Safety
• Legal
A detailed Street Navigation User Manual is available online:
www.vms4x4.com/vms_support
OFF ROAD GPS (Memory Map) BASIC OPERATION GUIDE
To start Memory Map, press [Memory Map] in the Off Road GPS console.
Page 15

Quick User Guide
page 15
The Toolbar provides access to most of the functions in Memory Map. Another less
obvious control is the TAP-AND-HOLD technique. Tap-and-Hold is equivalent to
a right mouse click on a PC. Simply Tap on an object like a map, mark or position
symbol, hold for a moment without moving, then release. A menu will appear that is
related to the where you tapped.
TOOLBAR BUTTONS
Icon Description
Menu Options
Toggle Full Screen on/off. Whilst in Full Screen mode, large transparent touch buttons remain on the right hand side of the screen
for Zooming in and out.
Zoom in or out with automatic map scaling. When you have
reached the maximum or minimum zoom level for a particular
map the next tap will take you to the next available map scale.
Tap-and-hold on the map to manually choose from the list of maps
available at that location.
Toggles between two views (Zoom / Scale levels of choice) of the
same map
When you have a GPS x the “Padlock” button will appear. Tap
the Lock button to automatically display your current position. Your
position is shown as a ashing red cursor with an arrow indicating
your direction and speed of travel. The map will automatically
scroll as you move. To scroll around the map, you will need to
toggle off the lock button. Toggling it back on brings the map view
back to your position.
Icon Description
Select the data box and tap on the map to see grid coordinates
and route/track information. Use the Menu > Overlay > Settings...
command to set your preferred units of measurement, magnetic
variation and the size of the velocity vector.
INFORMATION - The blue Information button will appear whilst
your GPS position is being calculated. Tapping the Blue information button will simply bring up a dialogue box that states you have
No GPS Signal. Once a signal is acquired the Blue information
button will become grey and unavailable. For detailed status tap
Menu > GPS > Satellites.
WAYPOINTS / MARKS
Icon Description
To plot a waypoint. Tap this button & tap anywhere on the map. A
ag will appear to show that a waypoint has been placed. To plot
another waypoint, repeat the above procedure
To create a waypoint at the current position, select “MENU” >
“GPS” > “MARK POSITION”. A waypoint marker will be placed at
the current location.
BROWSING THE MAP
When the GPS lock is off (
), pan the map by dragging across the touchscreen.
PLANNING A ROUTE
Scroll and zoom the map to show the entire region your route will cover.
Tap on Menu > Overlay > Create Route.
Tap on the screen to place each waypoint. Waypoints do not need to be precisely
positioned, this can be edited later. Double Tap on the last waypoint to nish the
route.
TIP: For long route, zoom out to a smaller scale map. First create a rough outline
of your route and then zoom in to a more detailed map to re-position or add/
remove waypoints as required.
Page 16

Quick User Guide
page 16
Once the route is complete, Tap-and-Hold on the route and select Lock to prevent
any waypoints from being accidentally re-positioned.
Tap-and- Hold on the route and select [Follow Route] to Navigate along this route.
Tap-and-Hold on a route or mark and select [Follow Route] or [Goto Mark]. The
Navigation window appears to show the distance and bearing from your current
position together with ETA, VMG and XTE.
The Guidance Arrow indicates the direction to travel. If the arrow points left, bear
left, if it points right, bear right. When it points straight up you are heading directly
for the waypoint in the route or to the mark you selected
MANAGING OVERLAYS
Use the Show All / Hide All menu commands to choose which overlays to show
on your maps.
FIND A PLACE BY NAME
Tap Menu > Find Place and tap the [Kbd] keyboard button on the right of the
window.
Ensure that the cursor is in the Find box and start typing. It’s best to type part of
the word to maximise search results. In this instance Alice was typed with the
intention of nding Alice Springs. Press the --> button to display results.
A list of matching results will display. To reduce the number of entries, select a
specic category from the drop down list. When the correct result appears, simply
Tap on it and the corresponding map will appear on screen.
In the Find Place window there is a check box labelled Create Mark. By checking
this, a Waypoint will be placed in the position of the searched item and listed in
the Overlays List.
FIND A PLACE BY CO-ORDINATES
Tap Menu > Find Place and tap the [Kbd] button on the right of the window. In the
Coordinates eld, select and delete any displayed coordinates and enter the one
you want to nd.
Check the create Mark check box and tap the --> button. A variety of position
formats is available in Menu > Settings > Units.
Page 17

Quick User Guide
page 17
USING TOURING 7000 SERIES WITH MEMORY MAP ON THE PC
Memory Map Mobile is compatible with Memory Map on the PC. Maps, Routes,
Waypoints, Tracks & licenses etc can be shared between VMS Touring products &
Memory Map. To share information, the PC must have a SDHC compatible SD card
reader. If you do not have one, these can be purchased at any good electronics
retailer.
1. Ensure Memory Map is installed on the PC.
2. Eject the SD card from the device.
3. Insert the SD Card into the SD card reader.
4. Open Memory map on you PC
LOADING ADDITIONAL MAPS
In Memory Map, select “Mobile Device” > “Send Map”, select the SD card directory
& then the topo folder. Click OK and the map will be exported to the SD card.
For additional information on using Memory Map with, click on Help in Memory map
PC application toolbar.
Additional Help & Support
For video tutorials, please visit our website.
http://www.vms4x4.com/vms_support
OFF ROAD GPS (Ozi Explorer) BASIC OPERATION GUIDE
To start Ozi Explorer, press [Ozi Explorer] in the Off Road GPS console.
Before the device can nd your location, it requires satellite lock.
1. Make sure the vehicle is outdoors and the GPS antenna has a clear view of the
sky.
2. Start off road gps. It may take up to a few minutes to acquire GPS lock.
GPS SIGNAL VIEW IN OZIEXPLORER
OPEN A MAP
If the GPS has acquired satellites lock, your current position will be displayed on
a map. There is no need to manually open a map le. However, you can open a
map le manually for trip preparation.
ON SCREEN FUNCTION
FINDING MORE OR LESS DETAILED MAPS
THE CONCEPT
Ozi Explorer operates by joining lots of map images together like a puzzle to form
a complete topographical map of Australia. Maps may vary in scale also. Base
maps (such as an over view map of Australia) display a large area with less detail.
More detailed maps such as the 1:250,000 topographic maps reveal much more
detail.
To get an overview of an area, base maps are very handy, however to obtain
more information in one particular area, drilling down to a detailed topographical
map is necessary.
To switch between the difference scale maps, press the [more detail] or [less
detail] buttons.
UNDERSTANDING SEARCH FOR MORE / LESS DETAILED
Finding more or less detailed maps is not to be confused with the zoom function;
using the zoom will only magnify the map on the screen. The difference with
switching to a more detailed map is that a different, more detailed map is loaded.
IMPORTANT: Zooming the map will not automatically change the map scale.
UNDERSTANDING THE ZOOM FUNCTION
Zooming in and out of a map is the same as looking through magnifying glass at
a paper map. if you want to get a closer look you would zoom in, if you wanted to
see more of the map on screen at once you would zoom out.
A map at 10% zoom level. Notice that a large portion of the map
is visible. For more legibility, zoom in on a particular area.
Page 18

Quick User Guide
page 18
SEARCHING FOR MAPS AROUND CURRENT POSITION
1. Another method of nding more maps around your location is to simply go to the
map menu,
select [map] > [nd maps at cursor]
2. A list of found maps appear. Select the desired map and press [OK]
FIND A PLACE BY NAME
1. To nd a specic location, select [View] > [Name Search]
PLEASE NOTE: The HEMA raster map collection contains a comprehensive
database of Australian place names. However, there will be place names not
present.
2. Enter in part or all of the keyword [KB], than press the [F] button. In the example
above, GRAMP was enough to display 3 matching results.
3. Select the place name. To view this place on a map, press [map]. To place a
waypoint at this place and navigate to it select [Gt].
WAYPOINT
WHAT IS A WAYPOINT?
Waypoints are used to mark points of interest such as locations or landmarks for
later reference. The Waypoint can be stored in memory and loaded for later use.
Examples of using waypoints could be marking a camp site, vehicles location, a
hazard or even your favourite shing spot. Waypoints can be marked prior to or
during your trip either by manually entering coordinates or simply by marking them
on the navigators map.
WAYPOINT INFORMATION DISPLAY
UNDERSTANDING PLANNING MODE AND NAVIGATION MODE
It is important to understand that OziExplorer has 2 modes of use, Planning mode
and Navigation Mode.
PLANNING MODE
Planning mode is used to browse maps, place waypoints, routes or view any track
logs / Track log trails. There is no live GPS position display planning mode
When in planning mode, acrosshair appears at the centre of the map screen and
the GPS icon on the task bar is NOT highlighted.
SWITCHING TO NAVIGATION MODE
To switch to navigation mode, simply press the GPS icon on the task bar.
NAVIGATION MODE
While in navigation mode, your current location is displayed live on the map.
Moving map is also active so when the GPS location changes, the map will move
along in sync with your location.
WHEN IN NAVIGATION MODE
1. The crosshair is replaced by the RED position arrow.
2. The GPS icon on the task bar is highlighted.
3. Speed indicator will appear.
ADDING A WAYPOINT
Page 19

Quick User Guide
page 19
Planning mode is required for this tutorial.
1. Load any map.
2. Open the Waypoint Toolbar. [View] > [Toolbars] > [Waypoint Toolbar]
3. Add a waypoint
4. Waypoint list
5. Edit waypoint properties
NAVIGATING TO A WAYPOINT
To navigate (GO TO) a particular waypoint, open the waypoint list, select the
desired waypoint and press [Go To]. While navigating to a waypoint, statistic
on distance, bearing, heading will be display in relation to your position and the
waypoint.
CANCEL NAVIGATION
To cancel navigation, select [Map] > [Navigation] > [Cancel Nav]
ANALYSING THE WAYPOINT TOOLBAR
Button (s) Description
Add a Waypoint - If selected, a waypoint is added at the position
on the map where you touch.
Delete Waypoints - All waypoints are deleted from the map.
Display Waypoint List - A list of waypoints on the map is displayed. The list shows information about each waypoint.
Button (s) Description
Load a Waypoint File - Select a waypoint le (.wpt) to load onto
the map.
Save Waypoints to File - All waypoints currently on the map are
saved to a waypoint le (.wpt).
Show / Hide Waypoint Name - Waypoint names are displayed on
map / or not.
Auto Show Waypoint Properties - If selected, the waypoint
properties dialog is shown automatically when a new waypoint
is added. Changes to the name and description of the waypoint
can be made.
Close - Turns off waypoint toolbar.
ROUTES
WHAT IS A ROUTE?
A route is a series of waypoints linked together to provide more accurate
navigation information along a route. Each waypoint on the route is a checkpoint,
When each check point is reached, the next waypoint in the route is automatically
called.
This is a route, each yellow waypoint represents a checkpoint / change of
direction.
CREATING A ROUTE
1. Load a map
2. Open the Route Create Toolbar. [View] > [Toolbars] > [Route Create
Toolbar]
3. Add a series of waypoints
4. Insert waypoints into a route (optional)
Page 20

Quick User Guide
page 20
5. Route properties
NAVIGATING ALONG A ROUTE
To navigate along this route in normal order, select [map] > [navigation] >
[Forward Route]
REVERSE THE ROUTE
To navigate along this route in reverse order, select [map] > [ Navigation] >
[Forward Route]
ANALYSE THE ROUTE TOOLBAR
Button
(s)
Description
Add a Route Waypoint - If selected, a Route waypoint is added
at the position on the map where you touch.
Insert a Route Waypoint - If selected, a route waypoint is inserted between two waypoints or at the start or end of the route
depending on a best choice.
Delete Route - The current route displayed is deleted from the
map.
Display the Route Properties Dialog - The properties dialog
displays a list of the route waypoints.
Load a Route - the selected route is loaded to the map.
Save Route to File - The currently loaded route is saved as a
(.rt2) le.
Show / Hide Route Waypoint Name - If selected, route waypoint
names are displayed.
Close - Turns off Route Create toolbar.
TRACK LOG
WHAT IS A TRACK LOG?
A tracklog, also known as a bread crumb trail is simply a record of your previous
GPS positions displayed as a “trail” on the map.
TRACK LOG OPTIONS
PLEASE NOTE: The information provided in this quick user guide
on Ozi Explorer is current with Version 2.3. For additional help and
support contact Oziexplorer directly.
Ozi Explorer provides online support for the Ozi Explorer Product. For further information or support on the Ozi Explorer Product Contact Ozi Explorer Directly.
http://www.oziexplorer.com
Page 21

Quick User Guide
page 21
IMPORTANT INFORMATION
MAP DATA INFORMATION: One of the goals of the product is to provide customers with the most complete and accurate cartography that is
available to us at a reasonable cost. Along with VMS’ extensive eld work, we use a combination of governmental and private data sources, which
we identify in product literature and copyright messages displayed to the consumer. Virtually all data sources contain some inaccurate or incomplete
data. In some countries, complete and accurate map information is either not available of is prohibitively expensive.
DECLARATION OF CONFORMITY
Hereby, VMS declares that this product is in compliance with the essential requirements and other relevant provisions of Directive 1999/5/EC. FCC
Compliance This product has been tested and found to comply with Part 15 of the FCC interference limits for Class B digital devices FOR HOME
OR OFFICE USE. These limits are designed to provide reasonable protection against harmful interference in a residential installation, and are more
stringent than ‘outdoor’ requirements.
Operation of this device is subjected to the following conditions: (1) this device may not cause harmful interference, and (2) this device must accept
any interference received, including interference that may cause undesired operation. This product does not contain any user-serviceable parts.
Repairs should only be made by an authorised VMS service centre. Unauthorised repairs or modications could result in permanent damage to the
equipment, and void your warranty and your authority to operate this device under Part 15 regulations.
WARRANTY TERMS AND CONDITIONS
Limited Warranty
1. This VMS product is warranted to be free from defects in materials or workmanship for 12 month from the date of purchase. Within this period,
VMS will, at its sole option, repair or replace any components that fail in normal use. Such repairs or replacement will be made at no charge to the
customer for parts or labour, provided that the customer shall be responsible for any transportation costs. This warranty does not cover failures due
to abuse, misuse, accident, or unauthorised alterations or repairs. Batteries included are not coverd by any warranty.
2. This warranty is valid only for Products purchased new and unused in Australia or New Zealand from VMS AUSTRALIA, or an authorised dealer.
The customer must provide the original proof of purchase from one of those organisations to receive any services under this warranty.
3. This warranty only applies where a HARDWARE defect has arisen, wholly or substantially, as a result of faulty manufacture, parts or labour. The
warranty does not apply where damage is caused by other factors, including without limitation:
(a) Normal wear and tear.
(b) Abuse, mishandling, accident or failure to follow operating instructions.
(c) Incorrect installation.
(d) Exposure to liquid or inltration of foreign particles.
(e) Servicing or modication of the product by any one other than by VMS AUSTRALIA .
(f) Use of product with other accessories, attachments, product supplies, parts or devices (including batteries, memory cards) that do not conform to
VMS specications; or
(g) Shipment or other transit.
(h) Faulty units may only be replaced with a new unit provided the unit is returned to your authorised dealer within 7 days. After this 7 day period,
units will be repaired.
4. This warranty does not cover:
(a) 3rd party software(s) such as navigation application(s) and map data packaged with the product. For software & data warranty term and condi-
tions, refer to the EULA contained in the software package.
(b) The replacement of any consumable such as batteries.
(c) The cost of transit of the Product to or from VMS AUSTRALIA.
(d) Repair or replacement of any Product damaged during transit to or from VMS; or
(e) Any loss or consequential damage incurred while the Product is being repaired; or
(f) installation and uninstallation labour cost
(g) Loss of data stored on the SD card or internal memory. It is the users responsibility to backup any data contained on the card and this include
navigation software applications and user’s own data.
THE WARRANTIES AND REMEDIES CONTAINED HEREIN ARE EXCLUSIVE AND IN LIEU OF ALL OTHER WARRANTIES EXPRESSED,
IMPLIED, OR STATUTORY, INCLUDING ANY LIABILITY ARISING UNDER ANY WARRANTY OF MERCHANTABILITY OR FITNESS FOR A
PARTICULAR PURPOSE, STATUTORY OR OTHERWISE. THIS WARRANTY GIVES YOU SPECIFIC LEGAL RIGHTS, WHICH MAY VARY FROM
STATE TO STATE. IN NO EVENT SHALL VMS BE LIABLE FOR ANY INCIDENTAL, SPECIAL, INDIRECT, OR CONSEQUENTIAL DAMAGES,
WHETHER RESULTING FROM THE USE, MISUSE, OR INABILITY TO USE THIS PRODUCT OR FROM DEFECTS IN THE PRODUCT.
Some states do not allow the exclusion of incidental or consequential damages, so the above limitations may not apply to you. VMS retains the
exclusive right to repair or replace the unit or software or offer a full refund of the purchase price at its sole discretion. SUCH REMEDY SHALL BE
YOUR SOLE AND EXCLUSIVE REMEDY FOR ANY BREACH OF WARRANTY. To obtain warranty service, contact your local VMS dealer or call
VMS product support to obtain a WARRANTY CLAIM report. Complete the report in full & Fax ( +61 3 9587 8040) the form to VMS for approval.
Once approved, VMS will issue a RA number & shipping instructions. Securely pack the unit and a copy of the original sales receipt, which is
required as the proof of purchase for warranty repairs. Write the RA number clearly on the outside of the package. Send the unit, freight charges
prepaid to any VMS service centre.
Online Auction Purchases: Products sold through online auctions are not eligible for rebates or other special offers from VMS. Online auction conrmations are not accepted for warranty verication. To obtain warranty service, an original or copy of the sales receipt from the original retailer is
required. VMS will not replace missing components from any package purchased through an online auction.
Page 22

Quick User Guide
page 22
Page 23

Quick User Guide
page 23
Page 24

September 2009 / Rev 1.0
Printed in Australia
VMS © is a trademark of XIA GROUP PTY LTD, registered in Australia and other countries
and may not be used without the express permission of XIA GROUP Pty Ltd.
copyright © 2009
 Loading...