

Page 1
TM
QUICK START GUIDE
Touring 430
Page 2

TM
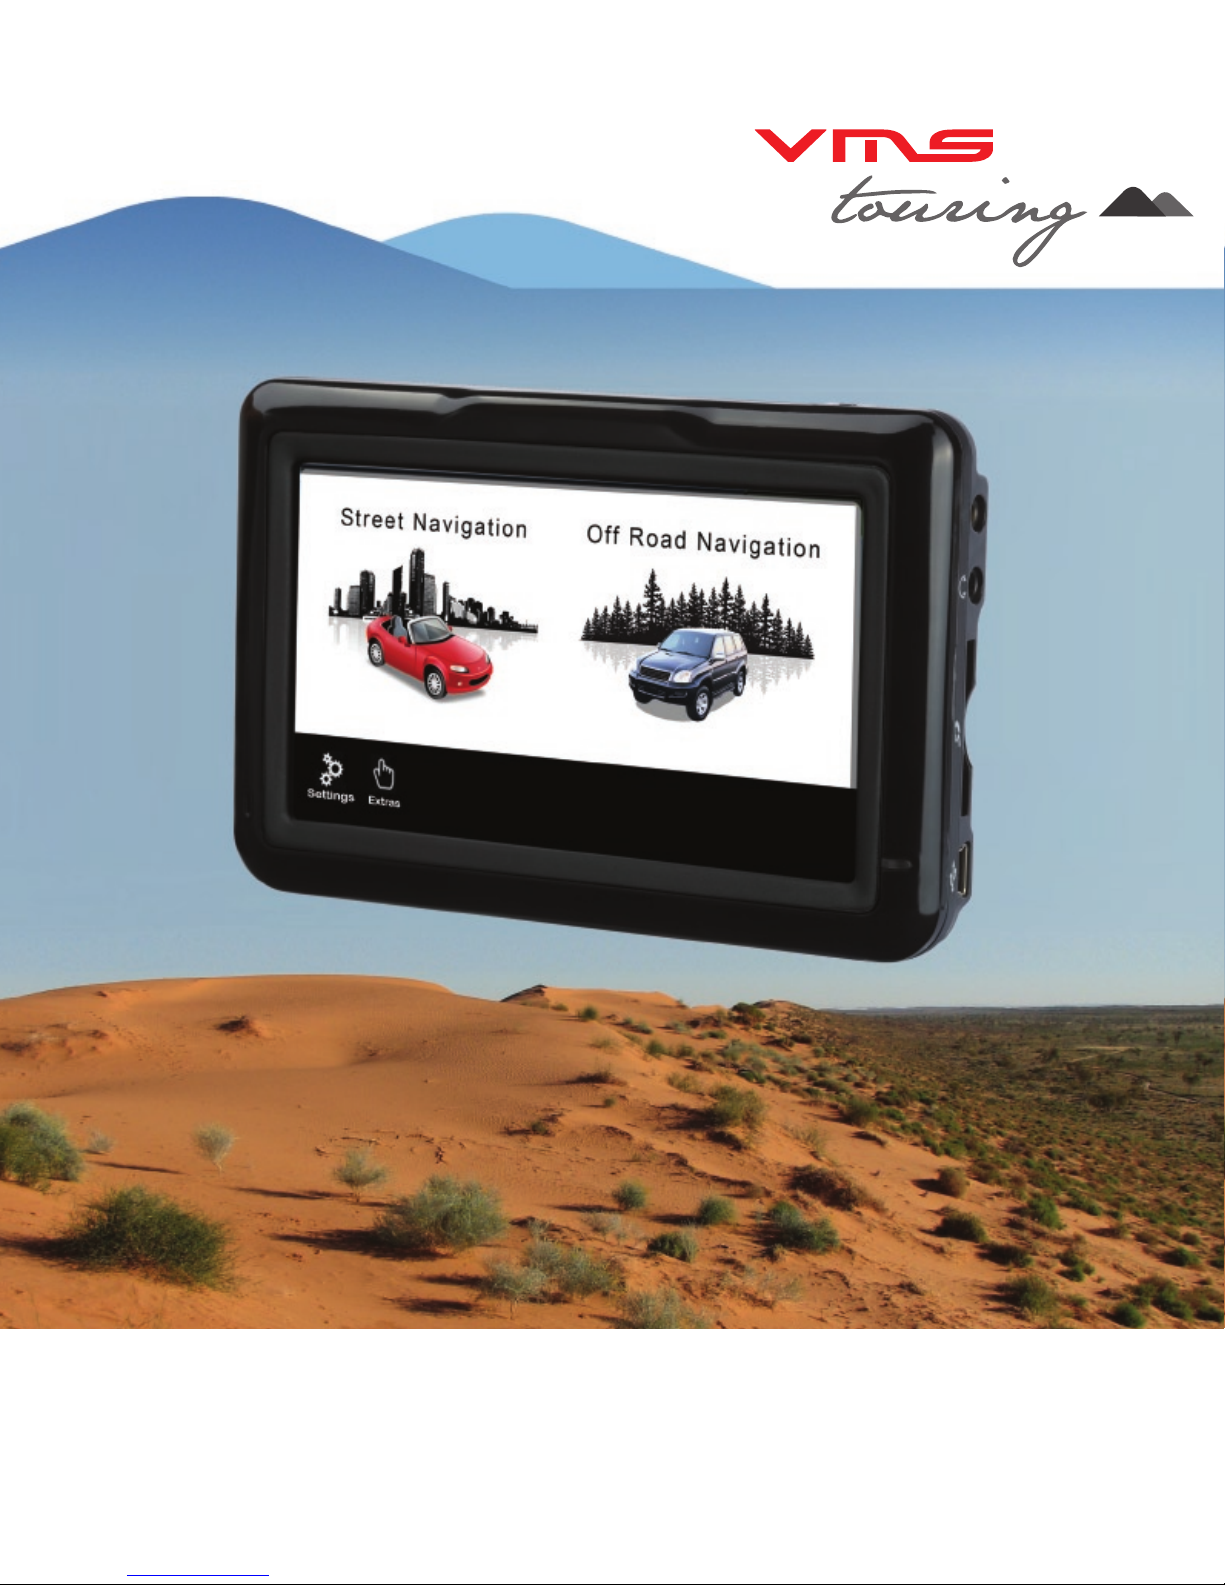
Product Introduction
The VMS Touring 430 navigates just as well in the outback as it does around town!
Ideal for touring the outback, the Touring Series features the iTOPO* topographic mapping system
and is complete with 4WD tracks, camp sites, caravan parks & other vital info so you can explore
the most remote regions in complete confidence.
Street navigation uses the latest Where IS mapping for Australia. Featuring spoken street names
and easy to follow voice guidance the VMS Touring will get you safely and quickly to your
destination.
With the VMS reverse camera package, the Touring 430 can also display up to 2 camera images
automatically.
Designed in Australia, we believe that the Touring Series is the best GPS for touring & 4WDs!
*iTOPO maps are optional
Page 3

TM
Quick Start Guide
1. Whats in the Box..........................................
2. Touring 430 Illustration................................
3. Getting Started
3.1 Inserting SD memory Card.......................
3.2 Installing the Touring 430..........................
3.3 Power ON/OFF & Sleep modes................
4. System Menus
4.1 System main menu...................................
4.2 System settings menu...............................
4.3 System volume settings............................
4.4 System battery settings.............................
4.5 System backlight settings..........................
4.6 System date & time settings......................
4.6.1 System time settings...........................
4.6.2 System date settings...........................
4.6.3 System time zone settings..................
4.7 System language settings.........................
4.8 System information....................................
5. System Extras Menus
5.1 Multimedia extras menu............................
5.1.1 Photo browser menu...........................
5.1.2 Photo viewer........................................
5.2 Video browser menu.................................
5.2.1 Video viewer........................................
5.3.1 Music browser.....................................
5.3.2 Music player........................................
6. Street Navigation
6.1 Getting started with street navigation........
6.2 Navigating to an Address..........................
6.3 Using the on screen keyboard...................
6.4 Map View...................................................
6.7 Street nav settings...........................
7. Topographic GPS (Off road navigation)
7.1 Toolbar.............................................
7.2 Toolbar buttons................................
7.3 Browsing around the map................
7.3.1 Selecting a map.........................
7.4 Planning a Route..........................
7.5.1 Navigation along a route............
7.5.2 Navigation window.....................
7.6 managing overlays...........................
7.7 Find place........................................
7.8 Finding a place by coordinates........
7.9 System coordinate format................
7.10 Installing PC software....................
8. Reverse Camera
8.1 Installation........................................
8.2 Operation.........................................
9. Safety and product information........
10. Product warranty..............................
11. Caring for your Touring 430.............
12. Technical Support.............................
13. Specifications...................................
CONTENTS
.4
.4
.5
.5
.5
.6
.6
.7
.7
.7
.8
.8
.8
.8
.9
.9
.10
.10
.10
.11
.11
.11
.12
.12
.13
.15
.16
.18
.19
.20
.21
.21
.22
.23
.23
.24
.24
.25
.25
.26
.27
.27
.27
.28
.29
.30
.31
.31
Page 4
TM
1. What’s in the box
- 1 x VMS Touring Series 4.3” GPS - 1 x 12-24V DC cigar charger
- 1 x Windscreen suction cup mount - 1 x USB Cable
- 1 x Mounting bracket - 1 x DVD disk
- 1 x Stylus - 1 x Quick Start Guide
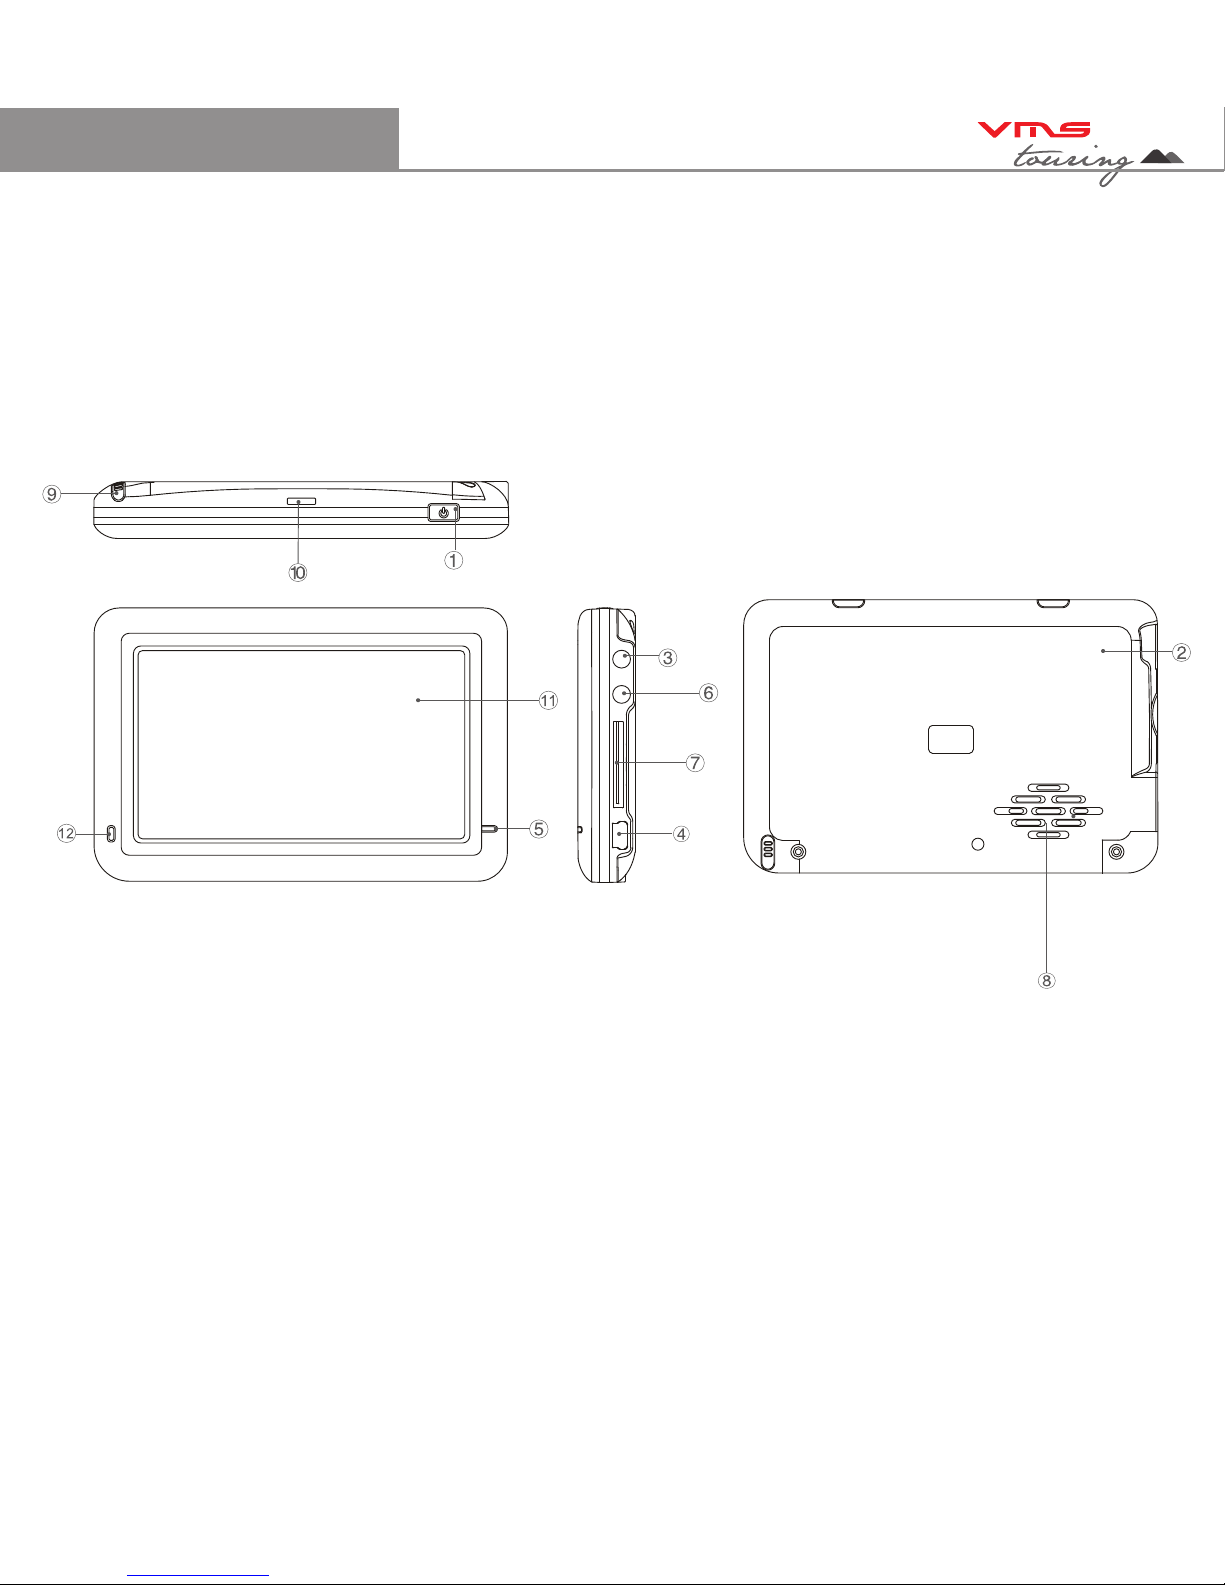
2. Touting 430 Illustration
Quick Start Guide
1. Power button....................... Press for 1 sec to enter sleep mode. Press for 5 secs for power off.
Press for 1 sec to turn on.
2. System Reset...................... Resets the entire system when system is non-responsive.
3. Camera input.......................Input for Reverse Camera cable.
4. USB charger........................ Car charger input, USB type.
5. LED indicator....................... Red when charging / green when fully charged.
6. Earphone jack (3.5mm)...... Audio output 3.5 mm earphone.
7. SD card slot........................ Suitable for 1 SD or SDHC memory card (up to 8GBs Class2).
8. Speaker............................... Audio output.
9. Stylus Pen...........................Stylus pen for improved touchscreen accuracy.
10. Mounting Bracket Holder... Location pins for mounting bracket.
11. LCD display....................... 4.3 inch Display with touchscreen.
4
Page 5
3.2 Installing the Touring 430
Step 1: Select a suitable location to mount the GPS on your windscreen.
Step 2: Clean & dry the suction cup and select the area of your windscreen.
Step 3: Plug the Car Charger into the side of the GPS.
Step 4: Attached the cradle to the suction cup mount.
Step 5: Adjust the angle with the rotary clamp if necessary.
Step 6: Place the suction cup on the windscreen and secure with rotary latch.
Step 7: Place the bottom of the GPS on to the cradle and gently snap the top of the GPS into the
cradle.
Step 8: Plug the car charger into a power outlet in your vehicle. Your unit should turn on
automatically if it is plugged in and your vehicle key is turned to ON/ACC.
3.3 Power on/off & sleep mode
Power on: press the power button for 2 secs.
Power off: press the power button until the unit displays “POWER OFF MODE”. This mode
powers down the system completely allowing long periods of storage without
discharging the battery.
Sleep mode: press the power button for 2 secs & the unit display “ENTERING SLEEP MODE”.
This modes puts the system into sleep and allows for fast start up. During sleep
mode the system is not completely off and the battery will be discharged in a few
days.
TM
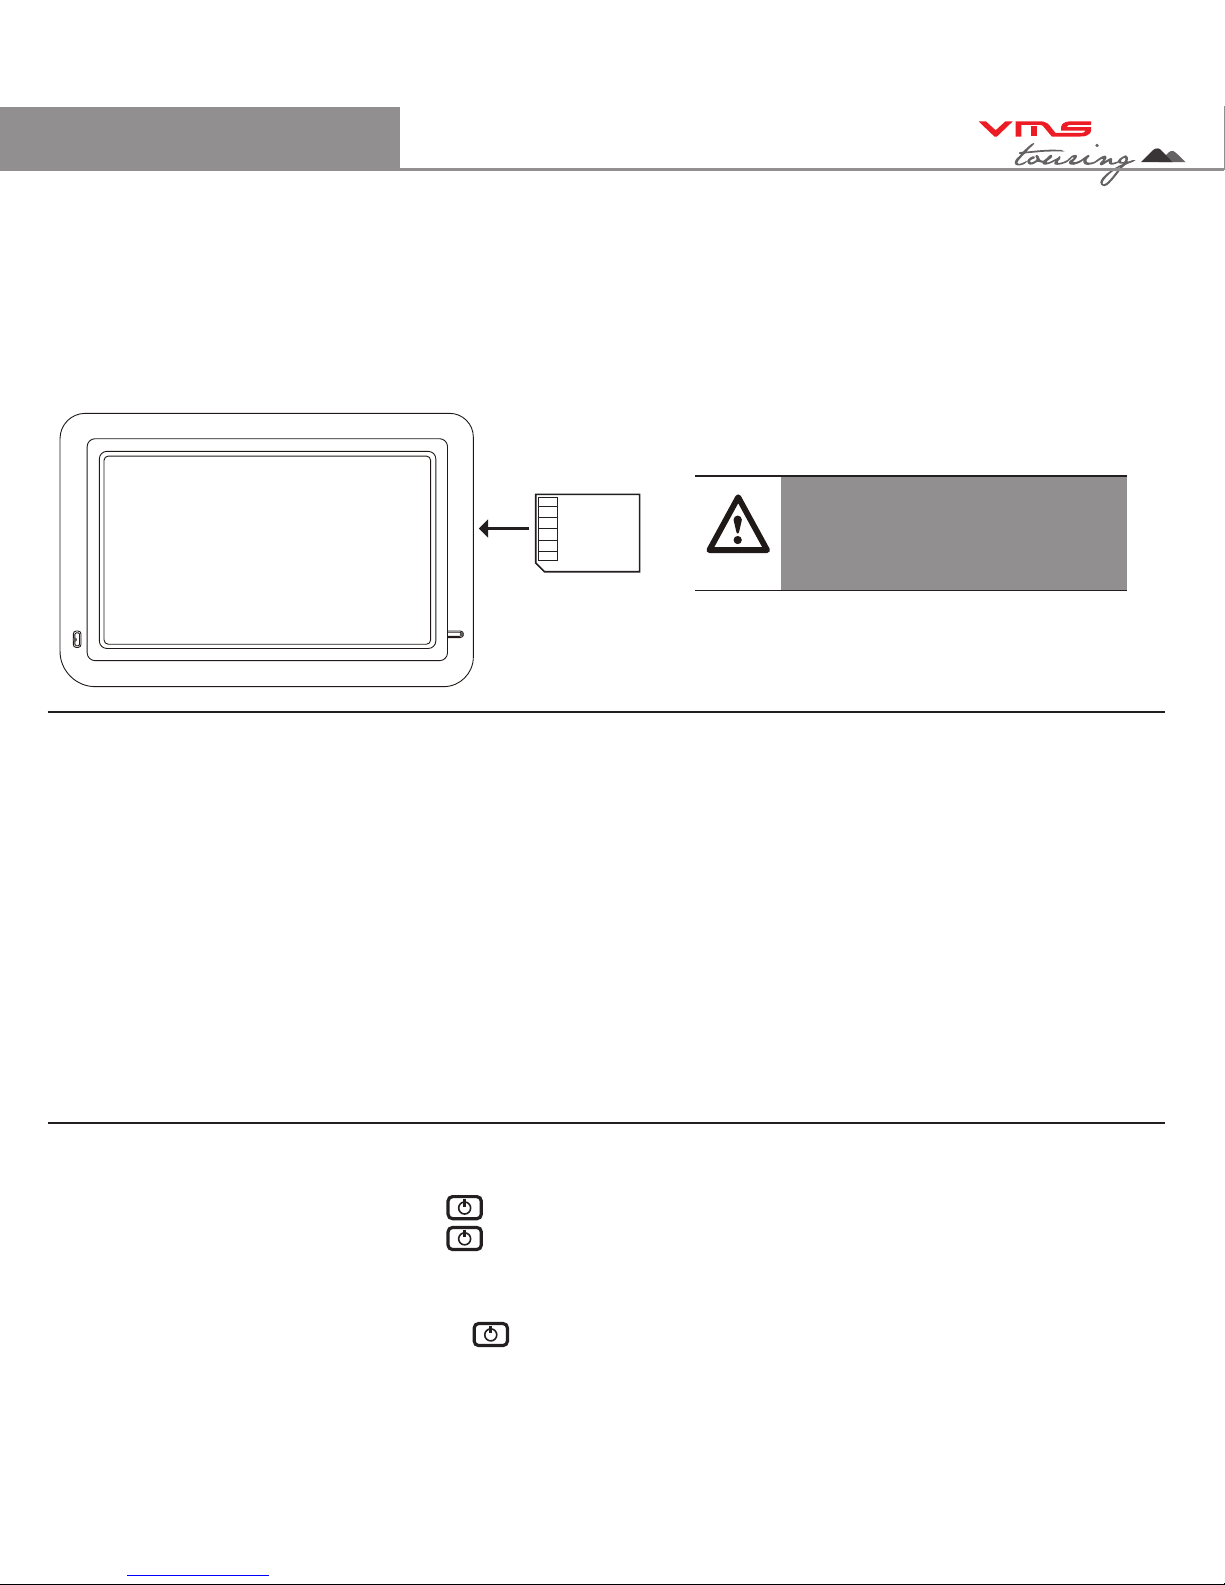
3.1 Inserting SD Memory Card
Step 1: Remove sd card from its plastic holder.
Step 2: Locate the SD card slot on the right side of the Touring 430.
Step 3: Ensure orientation of the SD card is correct.
Step 4: Insert the SD card by sliding it gently into the slot completely. The card will click
indicating correct installation.
Quick Start Guide
LCD Display
Caution
Please note the orientation of
the sd card before inserting
5
Page 6
TM
Quick Start Guide
Tip
When not using the Touring GPS for an extended period (few days or longer)
power off the unit completely.
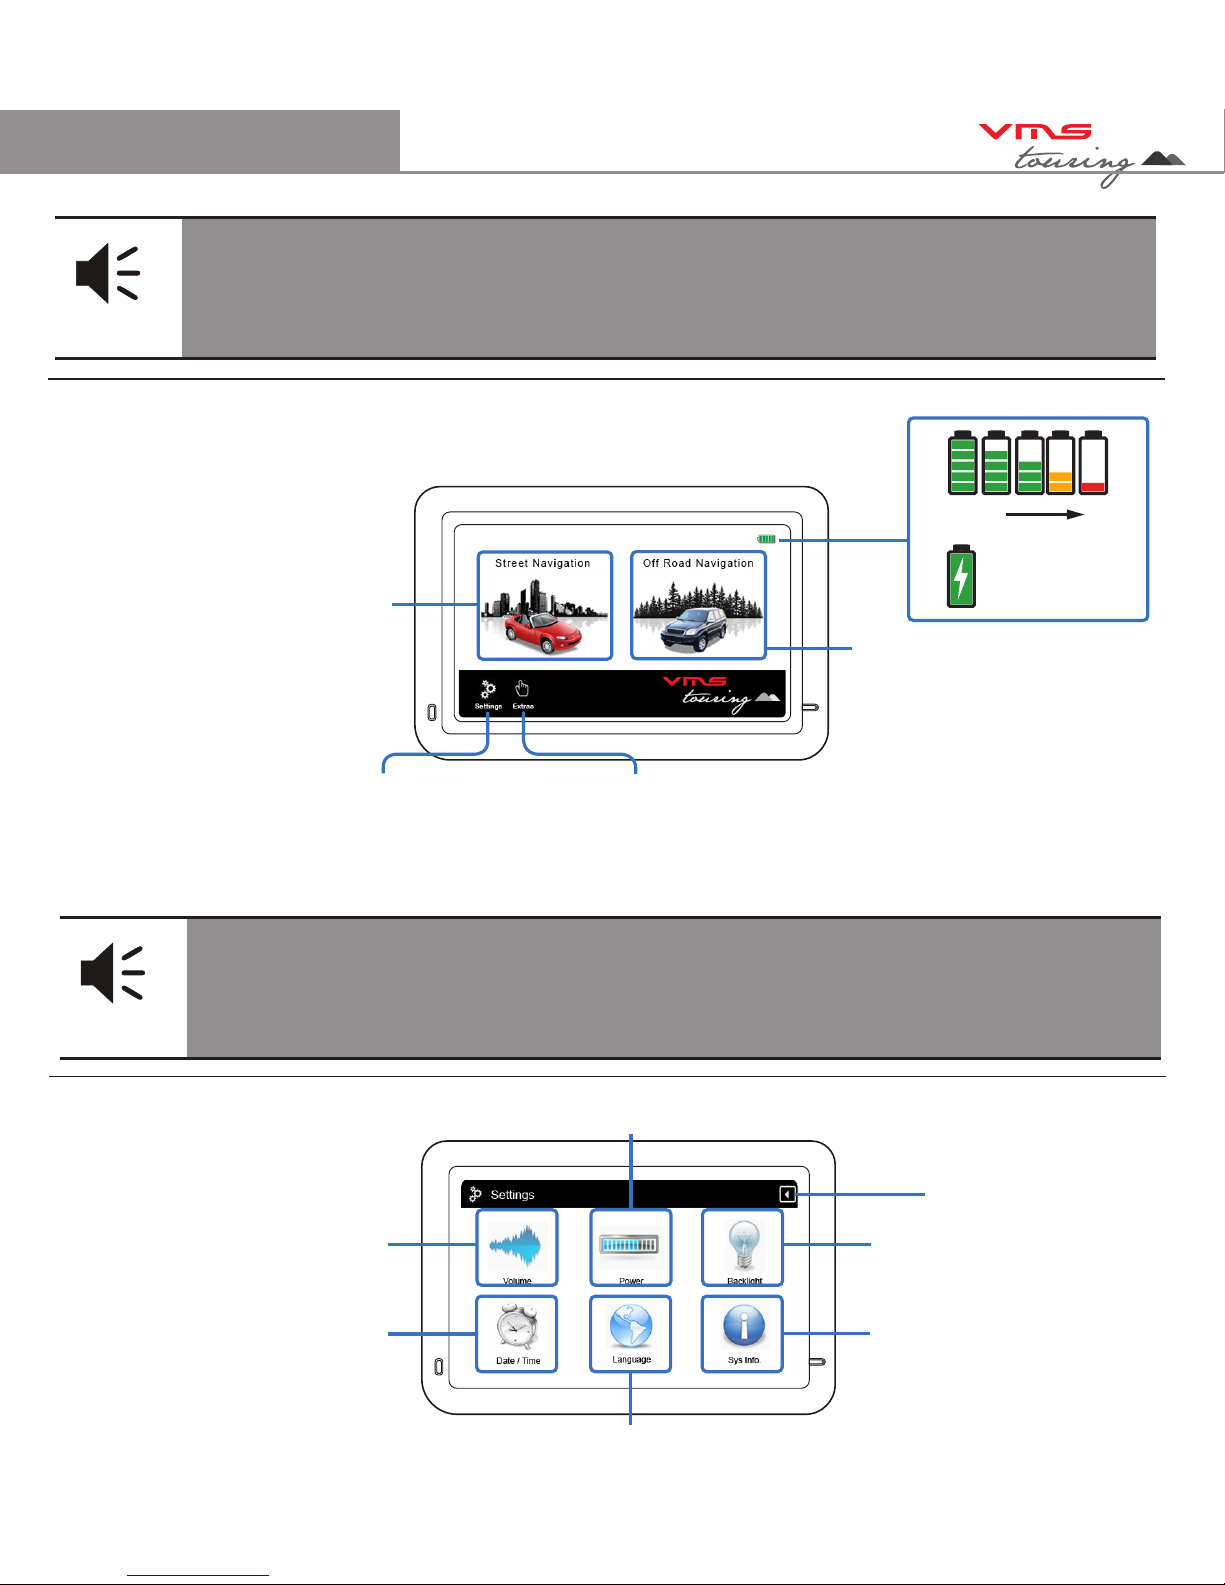
4.1 Using the System Main Menu
Street Navigation
Topographical GPS
System Settings Multi Media Extras
Battery Status
Select your mode of travel. For paved road travel, select street navigation. For Off road travel,
select topographical navigation.
Tip
Topographical Navigation is used where street navigation lacks accurate
information. Best used when on unpaved tracks & outback touring.
4.2 Using the System Settings Menu
100% 0%
Charging
Volume Settings
Date & Time settings
Main Menu Language Settings
Back to Main Menu
System Information /
Touchscreen Calibration
Display Backlight
Settings
Battery Management Settings
6
Page 7
TM
Quick Start Guide
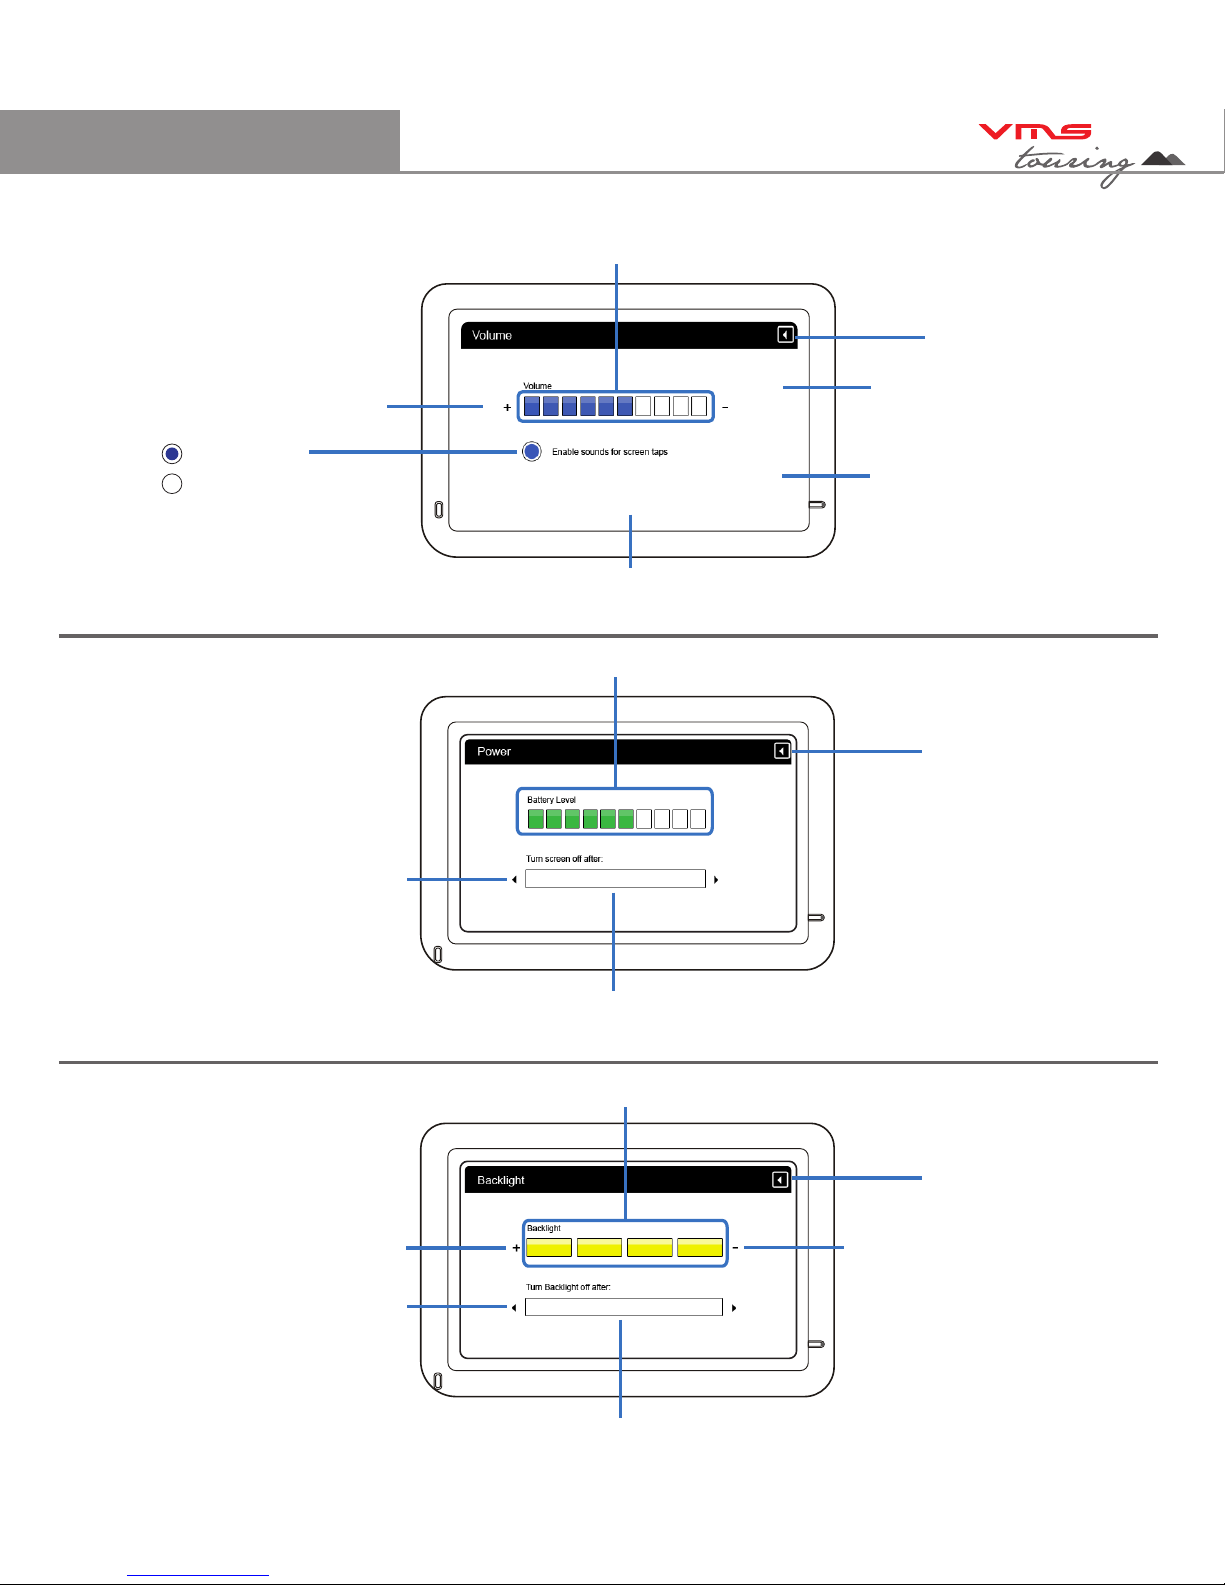
4.3 System Volume Settings
Tap to increase vol
Main Menu Language Settings
Back to Settings Menu
System Information /
Touchscreen Calibration
Display Backlight
Settings
System Volume Indication Bar
Enabled
Disabled
4.4 Battery Management Settings
Toggle auto sleep mode
Automatically Enter Sleep Mode
Always On / 1, 2, 3, 10, 30 mins
Battery level indicator
Back to Settings Menu
4.5 Display Backlight Settings
Toggle auto backlight
Automatically Adjust Backlight in
Always On / 1, 2, 3, 5 mins
Backlight Level Indicator
Back to Settings Menu
Increase backlight
Decrease backlight
7
Page 8
TM
Quick Start Guide
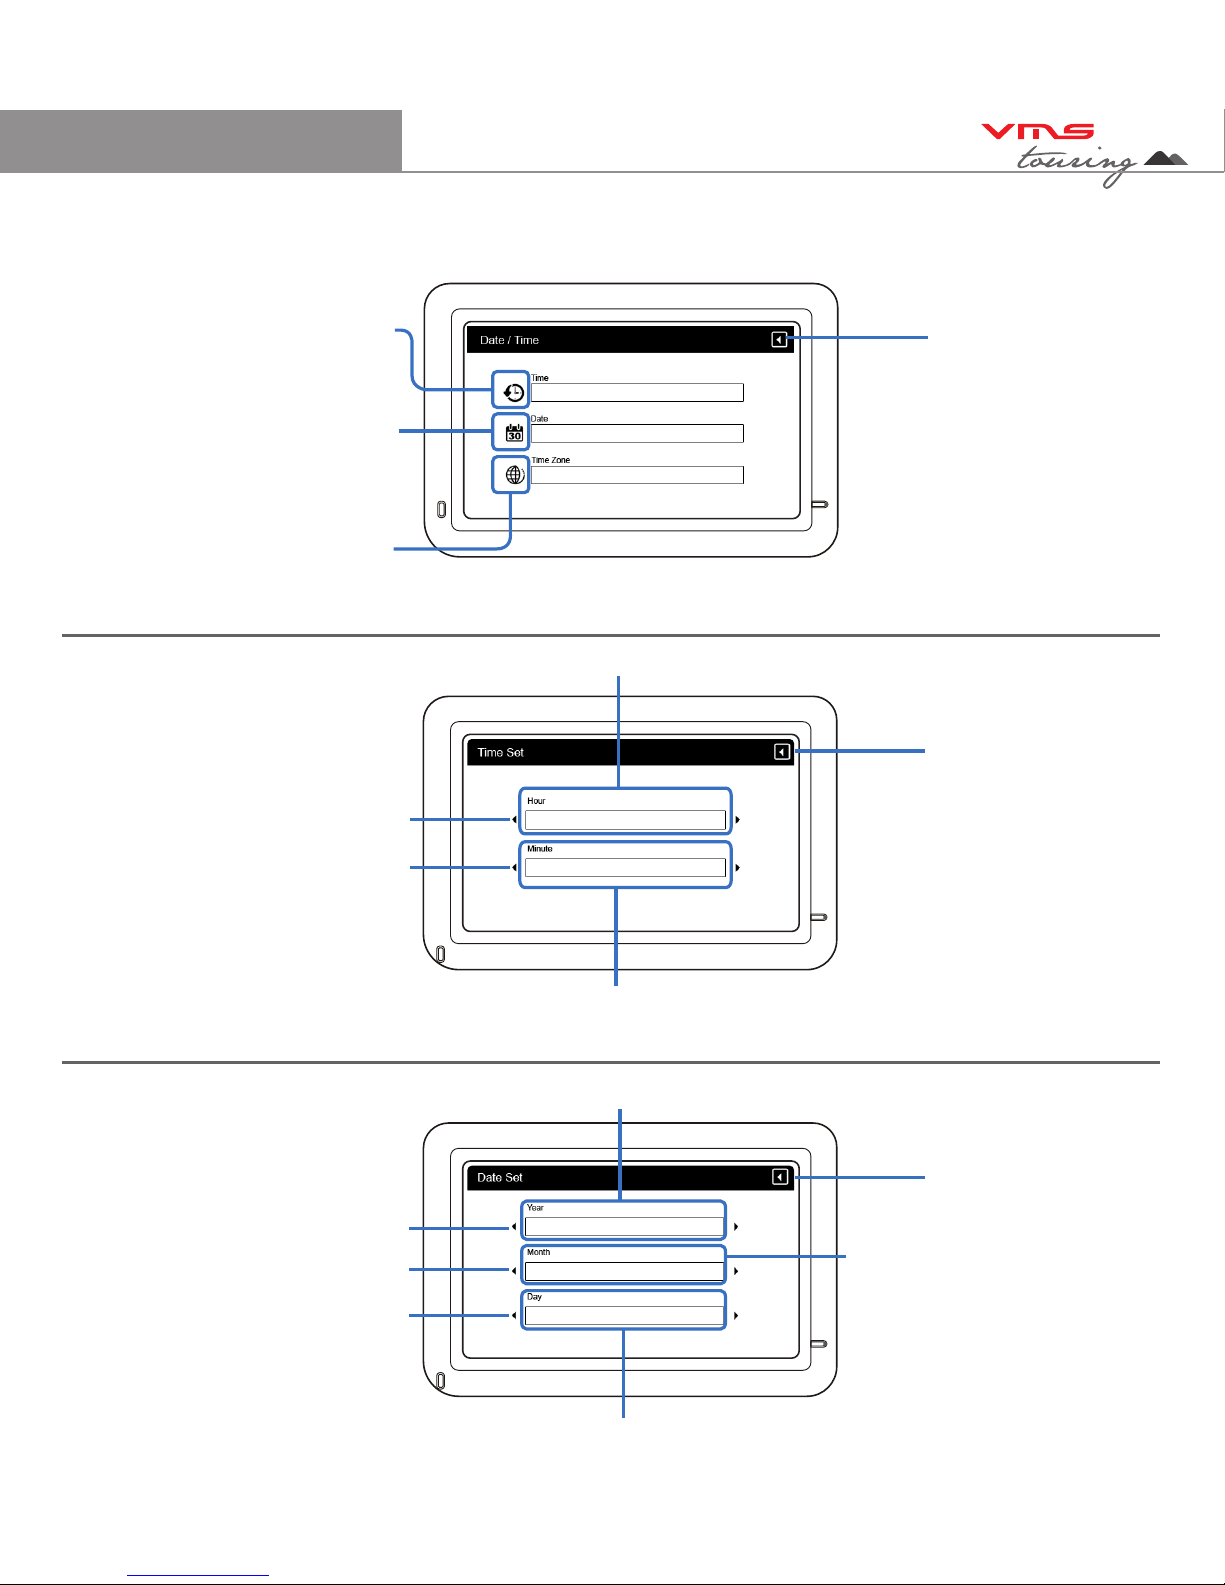
4.6 System Date & Time Settings Main Menu
Back to Settings Menu
System Time zone /
Touch to enter time zone
settings
System Time / Touch to
enter time settings
4.6.1 System Time Settings
+ or - hour toggle
Min Display
Hour Display
Back to Date & Time
Main Menu
4.6.2 System Date Settings
+ or - month toggle
Day indicator
Year Indicator
+ or - year toggle
System Date / Touch to
enter date settings
+ or - min toggle
+ or - day toggle
Month Indicator
Back to Date & Time
Main Menu
8
Page 9

TM
Quick Start Guide
4.6.3 System Time Zone Settings
Back to Date & Time
Settings menu
4.7 System Language Settings
Language indicator
Back to Settings Menu
4.8 System Information Settings
Reset GPS receiver
To calibrate the
touchscreen,
tap this button &
follow the on screen
instructions.
System Information Display
Back to Settings menu
+ or - time zone toggle
Time zone Indicator
System Language options is ENGLISH only.
Reset to factory settings
9
Page 10
TM
Quick Start Guide
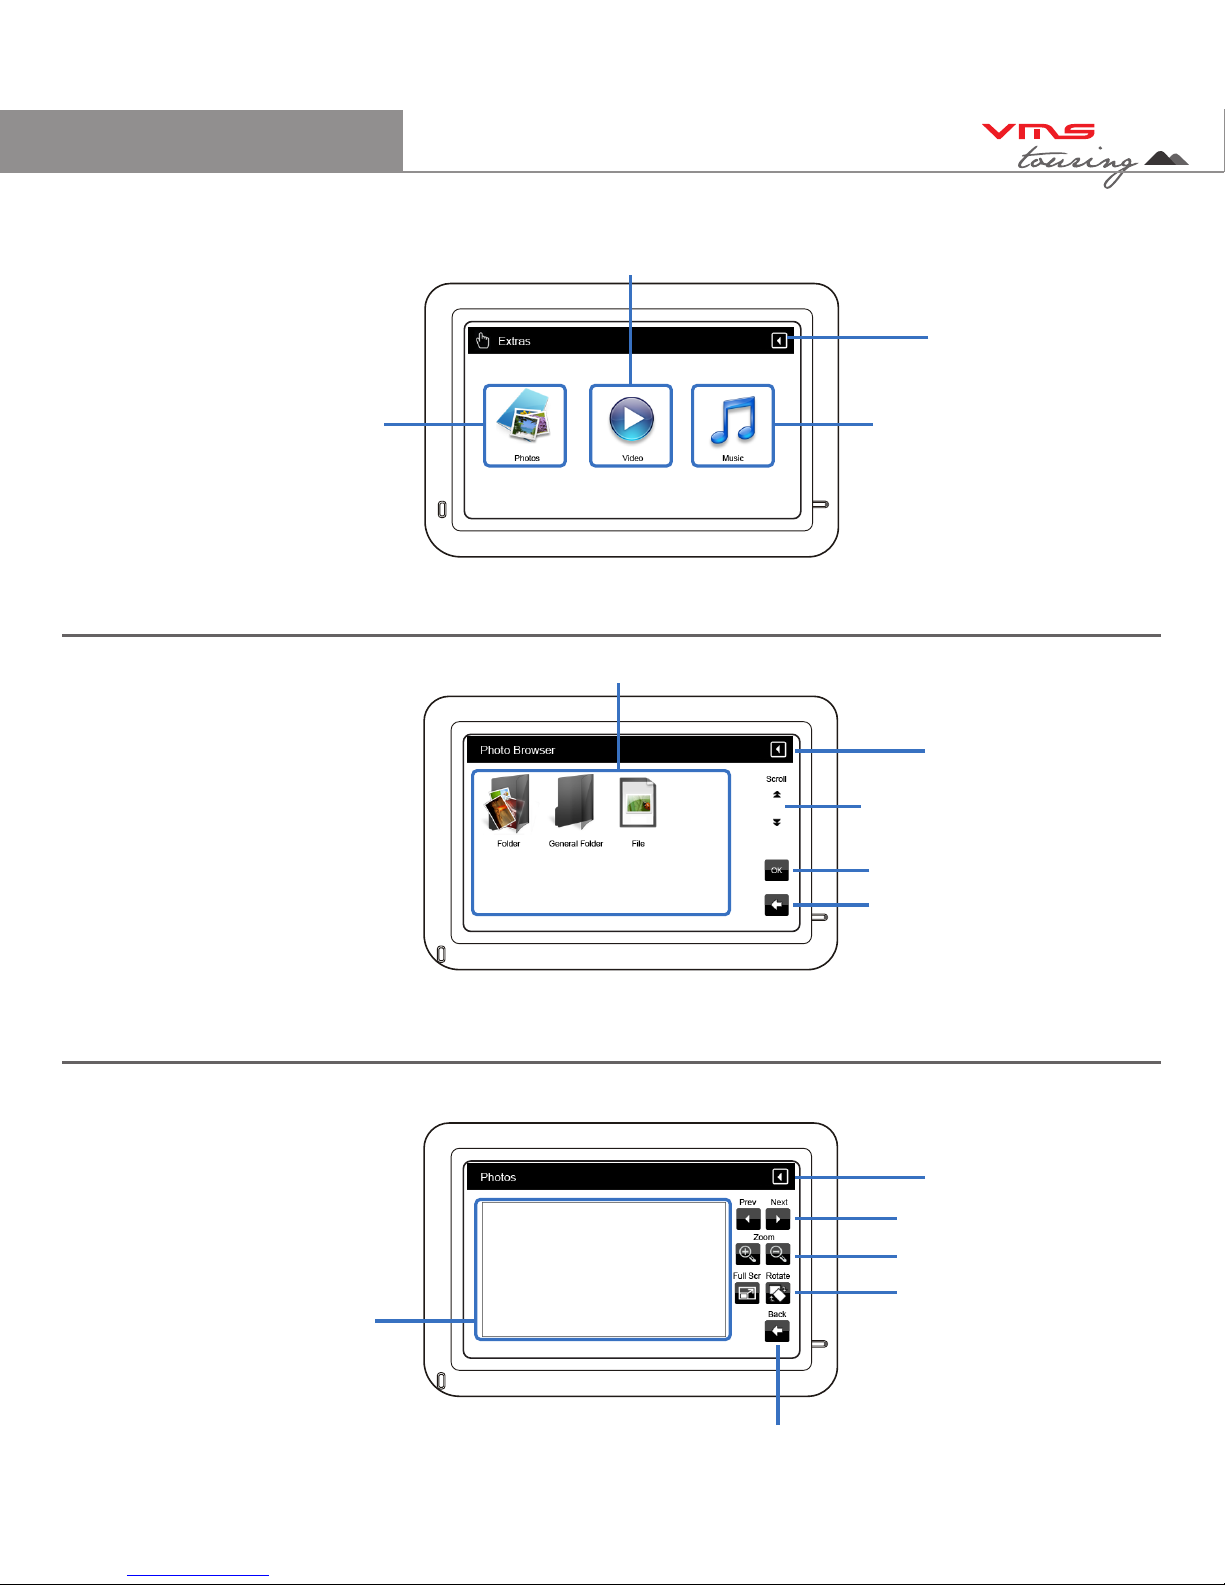
5.1 Multimedia Extras Menu
Back to Main Menu
5.1.1 Photo browser menu
Files
Back to Settings Menu
5.1.2 Photo Viewer
Photo Display Area
Zoom in or out of photo
Back to Settings menu
Photo browser
Video browser
Back to Photo Browser Menu
Music browser
Scroll up or down
Browse
up one folder
Next or Prev photo
Full screen mode /
rotate photo
10
Page 11

TM
Quick Start Guide
5.2 Video browser menu
5.2.1 Video Viewer
Back to Settings Menu
5.3.1 Music Browser
SD card content
Back to Settings menu
Back to Main Menu
Video Display
Vol indicator
Scroll up or down
Back to Settings Menu
Scroll up or down
Browse
up one folder
SD card content
Stop / Play / FF
Back to Video browser menu
Status indicator
Double tap le
to play
11
Page 12

TM
Quick Start Guide
5.3.2 Music player
Back to Media Menu
Controls
Vol indicator
Track information
Repeat / Shue
Back to
Music Browser
6. Street Navigation
To Start Street navigation, select “Street Navigation” in the main menu.
This quick start guide will only cover basic functions. For a complete user manual, please visit
http://www.vms4x4.com/support.html
6.1 Getting started with Street Navigation
VMS Street Navigation is optimised for in-car use. You can use it easily by tapping the screen
buttons and the map with your fingertips. You do not need to tap the screen twice for any
function. With buttons and controls, a single tap is sufficient. VMS Navigation can plan routes
throughout the entire installed map set.
When Street Navigation is started the first time, you need to do the following:
1. Select the written language of the application.
2. Select the language and voice used for voice guidance messages. Please note, for Spoken
Street Names, Select a voice with text to speech (TTS).
3. The Navigation menu appears and you can start using Street Navigation.
The typical way of using Street Navigation is to enter a destination, and start navigating. You can
enter your destination a number of ways
• Enter a full address or a part of an address, for example a street name without a house number
or the names of two intersecting streets. Other methods are available. Please refer to the
complete user manual online:
http://www.vms4x4.com/support.html
12
Page 13

TM
Quick Start Guide
6.2 Navigating to an Address
STEP 1:
Navigation Menu (simple mode)
Touch
Find Address
Country
Suburb
Prev entered
suburbs
Go to city centre
(if street not required)
Find Address Menu:
Street Name
Street No
State
Back to
Prev menu
Step 2: Enter Destination
Go to Street Midpoint if no
house number is required
Go to an intersection by
entering another street name
13
Page 14

TM
Quick Start Guide
1. Tap the following buttons: (Simple mode).
2. By default, Street Navigation displays the country, state and suburb of where you are. If
needed, tap the button with the name of the country, and select a different one from the list. If
you select a new country, you also need to select the state, or tap to search for a suburb
regardless of the state it is in. If you have not changed the country, you can still change the
state. Tap the button with the name of the state and select from the list.
3. If needed, change the Suburb:
• To select a recently used suburb, tap the button.
• Or to enter a new suburb:
4. Start entering the suburb name using the on screen keyboard.
• After entering a couple of characters, a list of possible results will appear.
• Or, tap to open the list of results before it appears automatically.
5. Select the desired suburb from the list. To navigate to this suburb without a street entered,
press “City Centre”
6. To enter a street, tap
7. Start entering the street name using the on screen keyboard.
• After entering a couple of characters, a list of possible results will appear.
• OR, tap to open the list of results before it appears automatically.
8. Select the desired street from the list. To navigate to this street without a House number,
press “Street Midpoint”.
9. Enter the house number:
10. To enter a house number, tap
14. Enter the house number using the on screen keyboard.
15. Tap to finish.
16. The map appears with the selected point in the middle. Tap to start navigating to
this location. (Simple mode)
14
Page 15

TM
Quick Start Guide
6.3 Using the On screen Keyboard
Type Description
Switching to another keyboard
layout, for example from a Latin
QWERTY keyboard to a Greek
keyboard
Tap , and select from the list of
available keyboard types.
VMS Navigation remembers your last keyboard
choice and offers it the next time you need to enter
data.
Correcting your entry on the keyboard
Remove the unneeded character(s): tap .
Tap and hold the button to delete the entire input
string.
Entering a space, for example
between a first name and a family
name or in multi-word street names
Tap .
Entering small or capital letters
Tap to cycle through entering lower case
letters, capital initials or all capitals.
Entering symbols
Tap to switch to a keyboard of symbol
characters.
Finalising the keyboard entry
Tap
You can enter letters or numbers in Street Navigation with your fingertips on the full-screen
keyboards and you can switch between various keyboard layouts, for example ABC, QWERTY, or
numerical.
15
Page 16

TM
Quick Start Guide
6.4 Map View
Toggle 3D / 2D
map view
Detour menu
Go to Cursor
Navigation Menu
Next turn
indicator
GPS signal
strength
Current road name
Next turn road name
Turn after next
turn indicator
500 m
Stats /
Dashboard
Battery
Status
Your position
Action Button (s) Description
Zooming in
and out
Activate
map controls
Tap this button to show or hide the following map
control buttons:
- Zoom in/out
- Rotate left / right (3D view only)
- Tilt up/down (3D view only)
- Zoom preset buttons (2D view only)
- Tilt and zoom preset buttons (3D view only)
- Return to GPS position button
- Smart Zoom Button
Changes how much of the map is displayed on the
screen. Street Nav uses high-quality vector maps that
let you see the map at various zoom levels, always
with optimised content. It always displays street names
and other text with the same font size, never upsidedown, and you only see the streets and objects that
you need. Map scaling has different limits in 2D and in
3D map view modes.
Map
16
Page 17

TM
Quick Start Guide
Tilting up
and down
Rotating left
and right
Viewing
modes
Smart Zoom
Returning to
normal
navigation
(back to the
GPS
position with
automatic
map
rotation)
Changes the vertical view angle of the map in 3D mode.
Changes the horizontal view angle of the map in 3D
mode. When GPS position is available, Street Nav always
rotates the map so its top faces your direction of travel
(Track-up orientation). You can turn away from track up
with these buttons if GPS position is available and you
have rotated the map, the button appears. Tap this
button to re-enable the automatic map rotation.
Gives you the following map perspectives in Street Nav:
• Classic top-down view (2D)
• Perspective view (3D)
The value always shows the mode the button
switches to If you are in 2D mode, you can see the
button and you need to tap it to switch to
3D mode.
Street Navigation can automatically rotate, scale and
tilt the map and give you the optimal view:
• When you are approaching a turn, street navigation
zooms in and raises the view angle to let you easily
recognise your manoeuvre at the next junction.
• If the next turn is at a distance, Street Nav zooms
out and lowers the view angle to show you the road
in front of you. Tap this button once to enable Smart
Zoom.
Tap this button to move the map back to the current
GPS position. If the map has been rotated in 3D
mode, automatic map rotation is also re-enabled.
17
Page 18

TM
Quick Start Guide
Tilt and
zoom preset
buttons
(available in
Advanced
mode only)
Tap one of the preset buttons to set the tilt and zoom
levels to fix, predefined values. Smart Zoom is
disabled. These buttons are available in 3D mode.
Tap & hold any of the buttons to set its value to the
current tilt and zoom levels, or to reset it to its original
value.
6.7 Settings
Map Screen:
3D settings
Colour Profiles
Elevation on 2D map
Street names during navigation
Land information
Sound:
Master Volume (Street Nav)
Voice Guidance Volume
Key Sounds
Dynamic Volume
Route Settings:
Vehicle Type
Road types used for route planning
Route calculation method
Regional Settings:
Program language
Voice profile
Units (km/mile etc)
Set Date & Time Format
Time and Time zone settings
Navigation Settings:
Keep position on road
Off route Recalculation
Restore lock to position
Automatic Overview
Warnings:
Warn when speeding
Warn if too fast for a pedestrian
Safety mode
Speed Camera warning
Settings page 2:
GPS Settings:
GPS Enabled
Port & Baud rate
TMC Settings: (Not applicable in Touring
Series)
Menu Settings:
Animation
Background
Device Settings:
Power Management
Tracklogs Settings (Not applicable in Street
Nav)
About Street Navigation
Maps
Credits
Safety
Legal
A DETAILED STREET NAVIGATION USER
MANUAL VISIT:
www.vms4x4.com/support.html
CLICK ON PRODUCT MANUALS
18
Page 19

TM
Quick Start Guide
7. Topographic GPS (optional)
7.2 Tap-and-hold menu 7.3 Menu system
7.1 Toolbar
The Toolbar provides access to most of the functions in VMS topo. Another less obvious control is
the TAP-AND-HOLD technique. Tap-and-Hold is equivalent to a right mouse click on a PC. Simply
Tap on an object like a map, mark or position symbol, hold for a moment without moving, then
release. A menu will appear that is related to the where you tapped.
Advanced features and settings.
Full Screen toggle on/off
Zoom / Scale map in & out
Alt view toggle between two views
Mark Place (Waypoint)
GPS Status
Data Box on/off
Lock onto GPS
19
Page 20

TM
Quick Start Guide
7.2 Toolbar buttons
Menu - Access to more advanced features and settings
* - Toggle Full Screen on/off. Whilst in Full Screen mode, large transparent touch buttons
remain on the right hand side of the screen for Zooming in and out.
ZOOM - Zoom in or out with automatic map scaling. When you have reached the
maximum or minimum zoom level for a particular map the next tap will take you to the next
available map scale. Tap-and-hold on the map to manually choose from the list of maps
available at that location.
ALTERNATE VIEW - Toggles between two views (Zoom / Scale levels of choice) of the
same map.
GPS LOCK - When you have a GPS fix the "Padlock" button will appear. Tap the Lock
button to automatically display your current position. Your position is shown as a flashing
red cursor with an arrow indicating your direction and speed of travel. The map will
automatically scroll as you move. To scroll around the map, you will need to toggle off the
lock button. Toggling it back on brings the map view back to your position.
DATA BOX - Select the data box and tap on the map to see grid coordinates and
route/track information. Use the Menu > Overlay > Settings... command to set your
preferred units of measurement, magnetic variation and the size of the velocity vector.
INFORMATION - The blue Information button will appear whilst your GPS position is being
calculated. Tapping the Blue information button will simply bring up a dialogue box that
states you have No GPS Signal. Once a signal is acquired the Blue information button will
become greyed out and unavailable. For detailed status tap Menu > GPS > Satellites.
Mark / Waypoint - To plot a waypoint. Tap this button & tap anywhere on the map. A flag will
appear to show that a waypoint has been placed. To plot another waypoint, repeat the
above procedure
To create a waypoint at the current position, select “MENU” > “GPS” > “MARK POSITION”.
A waypoint marker will be placed at the current location.
20
Page 21

TM
Quick Start Guide
7.3 Browsing around the map
When the GPS is OFF, drag the map using the touchscreen.
Tap and slide to move around the
map. Use the zoom in / out
buttons to change the zoom level.
As you zoom out the map will
automatically change to one of
larger scale. Large scale maps
provide a better overview of
a large area, however with less
detail. To obtain more detail, just
zoom in and the map will
automatically change to a more
detailed map.
7.3.1 Selecting a map from the map list
Tap to enter
Select map menu
Select Map Menu:
List of maps
Scroll list
up or down
Map Type
Map Name
Refresh Map List
OK & Keyboard
Map Search Box
21
Page 22

TM
Quick Start Guide
Refresh map list:
This function is used to update the map list. When maps are added or deleted from the SD card,
refresh the map list.
Selecting map by name:
To select a map from the map list. Tap on the name & press “OK”
Map type:
This column displays information about each particular map. The maps can be either 4x4, Topo,
Street or Marine.
Search for a map:
If you know the exact name of the map, you can search for it by using the keyboard (tap “Kbd”
button). Type the map name into the search box. The search engine can also narrow down search
results. For example, typing in H will eliminate all the maps that do not begin with the letter H. The
more characters that are entered, the shorter the list of possible maps.
7.4 Planning a Route:
Scroll and zoom the map to
show the entire region your
route will cover.
Step 1: Tap on Menu >
Overlay > Create Route.
Step 2: Now tap on the
screen to place each
waypoint in the route. Double
tap on the last waypoint to
finish the route. Each
waypoint’s position can be
modified by dragging its
position.
Tip
When creating a long route, zoom out to a overview map. First create a rough
outline of your route and then zoom in to a more detailed map to re-position or
add/remove waypoints as required.
A Route is a series of waypoints. Each WP is a position along the route.
22
Page 23

TM
Quick Start Guide
Tip
When the route is finished, Tap & Hold on the route and select Lock to prevent
any waypoints from being accidentally re-positioned.
7.5.1 Navigating along a route:
Tap and Hold on the route and
select “FOLLOW ROUTE” to
navigate along this route. The
Navigation Window appears to show
Distance & Bearing from your
current position together with ETA,
VMG and XTE. Topo GPS will
automatically provide info to the
nearest WP along the route relative
to your position. When the WP is
reached, info on the next WP along
the route. E.G. if the nearest WP is
WP3, once reached, info on WP4
will appear automatically. To reverse
navigate a route, select Reverse.
E.G. if the nearest WP is WP3, once
reached, info on WP2 will appear
automatically.
The Guidance arrow indicates the
direction to travel. If the arrow points
left, bear left, if it points right, bear
right. When it points straight up, you
are heading directly for the
waypoint.
7.5.2 Navigation Window
Tip
Planning your trip using Routes & waypoints is extremely useful. The navigation
window makes it easy to know exactly where to go. Without planning a trip, Topo
GPS can only display your position on a map and your heading.
Guidance Arrow
Navigation Window
TAP &
HOLD
Route Options Menu
23
Page 24

TM
Quick Start Guide
7.6 Managing Overlays
Menu > Overlay > List... to show all Mark/WP, Routes, Tracks & Positions
Choose the category to display in the property
windows
Property Window
Tip
Use the Show All /
Hide All functions to
choose which
overlays to display
on the map.
7.7 Find Place
Find Place can be used to find a place by name or find a track by name. Find place menu can
be found under MENU > FIND PLACE
Find Box
OK & Keyboard
Scroll list
up or down
Keyboard display
List of results
Create a Mark
at selected
result
Find by Coordinates
Close Find Place
Window
Search
Category
Start
Search
24
Page 25

TM
Quick Start Guide
Type into the FIND BOX. The search engine can also narrow down search results. For example,
typing in H will eliminate all the results that do not begin with the letter H. The more characters
entered, the shorter the list of possible results.
Tip
Selecting the category before searching produces better results. E.G. if you are
searching for a Track, select Track from in the category box. Results displayed will
only involve tracks. This can eliminate unrelated results.
Once you have found what you are looking for, it can be displayed on the map by highlighting (tap
on the name) the result & “OK”. Topo GPS will automatically display the most detailed map with
contains this result.
7.8 Finding a place by Coordinates
To find by coordinates, simply type in the coordinates into the CO-ORDINATES BOX. Click OK and
the relevant map will be displayed.
Tip
To enter symbols select on the keyboard
Coordinates must be entered in the correct format.
Example:
DEG MIN SEC: 36 29’57.4”S, 146 18,16.5”E
UTM NAD27: 55 498526E -4039215N
UTM WGS84: 55S 463613E 5969432N
7.9 System Coordinate Format
To change the coordinate format, go to MENU > SETTINGS > UNITS. Available formats are:
Units: Metric, Statue, Nautical.
Position: Deg Min Sec, UTM NAD27, UTM WGS84, British Nad Grid, Deg +/-, Can Township.
25
Page 26

TM
Quick Start Guide
7.10 Installing PC software
Installing Topo GPS PC software on a PC (Microsoft Windows XP)
VMS topo GPS PC software allows map browsing & trip planning on a PC or laptop. Maps,
Routes, Waypoints, Tracks & additional licenses can be shared between the PC and a VMS
Touring GPS. To share information, the PC must have a SDHC compatible SD card reader. If
you do not have one, these can be purchased at any good electronics retailer.
Install PC software:
1. Insert the PC software DVD into a DVD drive on a PC.
2. Follow the on screen instructions.
For additional help with PC software, click on HELP in toolbar.
For further training visit
www.vms4x4.com/support.html
CLICK ON VIDEO TUTORIALS
VMS also runs group classes for Topo GPS. For information, pricing or to book, email
support@vms4x4.com
26
Page 27

TM
Quick Start Guide
8. Reverse Camera Setup
The Touring 430 is capable of accepting either 1 or 2 cameras on its input using the VMS
reverse camera systems.
8.1 Setting up reverse camera
Camera input lead
Video out from Camera System
8.2 Reverse camera operation.
Single Camera: Select reverse gear. The image will automatically appear on the screen.
Dual Camera kit: When the second camera on the trailer is plugged in, select reverse and the
image from the second camera will appear. When the second camera is not plugged in, select
reverse and the first camera image will appear.
VMS Camera part numbers:
Single Camera: CAM010
Dual Camera kit: CAMKIT2
Installation of cameras:
For camera installation procedures, please refer to the instructions included with the camera
kits.
NOTE: the Touring Series has been tested to operate with VMS reverse camera kits. We
cannot ensure compatibility with 3rd party camera kits.
27
Page 28

TM
Quick Start Guide
Failure to avoid the following potentially
hazardous situations could result in an accident
or collision resulting in death or serious injury.
- When installing the unit in a vehicle, place the
unit securely so it does not obstruct the driver’s
view of the road or interfere with vehicle
operating controls, such as the steering wheel,
foot pedals, or transmission levers. Do not place
in front of or above any airbag.
- When navigating, carefully compare information
displayed on the unit to all available navigation
sources, including information from street signs,
visual sighting, and maps. For safety, always
resolve any discrepancies or questions before
continuing navigation and defer to posted road
signs.
- Always operate the vehicle in a safe manner.
Do not become distracted by the unit while
driving, and always be fully aware of all driving
conditions. Minimize the amount of time spent
viewing the unit’s screen while driving and use
voice prompts when possible. Do not input
destinations, change settings, or access any
functions requiring prolonged use of the unit’s
controls while driving. Pull over in a safe and
legal manner before attempting such
operations.
- The unit is designed to provide route
suggestions. It is not designed to replace the
need for driver attentiveness regarding road
closures or road conditions, traffic
congestions, weather conditions, or other
factors that may affect safety while driving.
9. IMPORTANT SAFETY AND PRODUCT INFORMATION
Battery Warnings:
If these guidelines are not followed, the internal,
non-user-replaceable, rechargeable lithium-ion
battery may experience a shortened life span or
may present a risk of damage to the GPS unit,
fire, chemical burn, electrolyte leak, and/or
injury.
- Do not incinerate.
- Contact your local waste disposal department
to properly dispose of the unit/battery
- Do not leave the unit exposed to a heat source
or in a high temperature location, such as in the
sun in an unattended vehicle on a hot day. To
prevent damage, remove the unit from the
vehicle or store it out of direct sunlight.
- When storing the unit for a limited length of
time, store within the following temperature
range:
-10˚ to 55˚C. When storing the unit for an
extended time, store within the following
temperature range:
0˚ to 25˚C.
- Do not operate the unit outside the following
temperature range: -20˚ to 55˚C.
- Do not remove or attempt to remove the
battery.
Important Information
MAP DATA INFORMATION: One of the goals of the
VMS Touring GPS is to provide customers with the
most complete and accurate cartography that is
available to us at a reasonable cost. Along with
VMS’ extensive field work, we use a
combination of governmental and private data
sources, which we identify in product literature
28
Page 29

TM
Quick Start Guide
and copyright messages displayed to the
consumer. Virtually all data sources contain
some inaccurate or incomplete data. In some
counties, complete and accurate map
information is either not available of is
prohibitively expensive.
Declaration of Conformity
Hereby, VMS declares that this product is in
compliance with the essential requirements and
other relevant provisions of Directive
1999/5/EC.
FCC Compliance
This product has been tested and found to
comply with Part 15 of
the FCC interference limits for Class B digital
devices FOR HOME OR OFFICE USE. These
limits are designed to provide reasonable
protection against harmful interference in a
residential installation, and are more stringent
than ‘outdoor’ requirements.
Operation of this device is subjected to the
following conditions: (1) this device may not
cause harmful interference, and (2) this device
must accept any interference received,
including interference that may cause
undesired operation.
This product does not contain any
user-serviceable parts. Repairs should only be
made by an authorized VMS service centre.
Unauthorized repairs or modifications could
result in permanent damage to the equipment,
and void your warranty and your authority to
operate this device under Part 15 regulations.
10. Limited Warranty
This VMS product is warranted to be free from
defects in materials or workmanship for one year
from the date of purchase. Within this period,
VMS will, at its sole option, repair or replace any
components that fail in normal use. Such repairs
or replacement will be made at no charge to the
customer for parts or labour, provided that the
customer shall be responsible for any
transportation costs. This warranty does not
cover failures due to abuse, misuse, accident, or
unauthorised alterations or repairs. Batteries
included is warranted for a period of 6 months
from the date of purchase.
THE WARRANTIES AND REMEDIES
CONTAINED HEREIN ARE EXCLUSIVE AND IN
LIEU OF ALL OTHER WARRANTIES
EXPRESSED, IMPLIED, OR STATUTORY,
INCLUDING ANY LIABILITY ARISING UNDER
ANY WARRANTY OF MERCHANTABILITY OR
FITNESS FOR A PARTICULAR PURPOSE,
STATUTORY OR OTHERWISE. THIS
WARRANTY GIVES YOU SPECIFIC LEGAL
RIGHTS, WHICH MAY VARY FROM STATE TO
STATE.
IN NO EVENT SHALL VMS BE LIABLE FOR
ANY INCIDENTAL, SPECIAL, INDIRECT, OR
CONSEQUENTIAL DAMAGES, WHETHER
RESULTING FROM THE USE, MISUSE,
OR INABILITY TO USE THIS PRODUCT OR
FROM DEFECTS IN THE PRODUCT. Some
states do not allow the exclusion of incidental or
consequential damages, so the above limitations
may not apply
to you.
VMS retains the exclusive right to repair or
replace the unit or software or offer a full refund
of the purchase price at its sole discretion. SUCH
REMEDY SHALL BE YOUR SOLE AND
29
Page 30

TM
Quick Start Guide
EXCLUSIVE REMEDY FOR ANY BREACH OF
WARRANTY. To obtain warranty service,
contact your local VMS dealer or call VMS
product support to obtain a WARRANTY CLAIM
report. Complete the report in full & Fax ( +61 3
9587 8040) the form to VMS for approval. Once
approved, VMS will issue a RA number &
shipping instructions. Securely pack the unit and
a copy of the original sales receipt, which is
required as the proof of purchase for warranty
repairs. Write the RA number clearly on the
outside of the package. Send the unit, freight
charges prepaid to any VMS service centre.
Online Auction Purchases: Products sold
through online auctions are not eligible for
rebates or other special offers from VMS. Online
auction confirmations are not accepted for
warranty verification. To obtain warranty service,
an original or copy of the sales receipt from the
original retailer is required. VMS will not replace
missing components from any package
purchased through an online auction.
INTERNATIONAL PURCHASES: A separate
warranty is provided by international distributors
for units purchased outside of Australia & New
Zealand. This warranty is provided by the local
in-country distributor and this distributor provides
local service for your unit. Distributor warranties
are only valid in the area of intended distribution.
Units purchased in Australia or New Zealand
must be returned to the VMS service centre in
Australia.
11. Caring for your VMS Touring.
Your VMS Touring GPS contains sensitive
electronic components that can be permanently
damaged if exposed to excessive shock or
vibration. To minimize the risk of damage to
your unit, avoid dropping your unit and
operating it in high-shock and high-vibration
environments.
- Do not store the unit where prolonged
exposure to extreme temperatures can occur,
because it can cause permanent damage.
- Do not expose the unit to water. Contact with
water can cause this unit to malfunction.
- Never use a hard or sharp object to operate
the touchscreen or damage may result.
CLEANING THE UNIT
The Touring GPS is constructed of high-quality
materials and does not require user
maintenance other than cleaning. Clean the
unit’s outer casing (not the touchscreen) using a
cloth dampened with a mild detergent solution,
and then wipe dry. Avoid chemical cleaners and
solvents that can damage plastic components.
CLEANING THE TOUCH SCREEN
Clean the touch screen with a soft, clean,
lint-free cloth. Use water, isopropyl alcohol, or
eyeglass cleaner, if needed. Apply the liquid to
the cloth, and then gently wipe the touch
screen.
AVOIDING THEFT
- To avoid theft, remove the unit and mount from
sight when not in use. Remove the residue on
the windscreen left by the suction cup.
Software License Agreement
BY USING THE VMS Touring, YOU AGREE TO
BE BOUND BY THE TERMS & CONDITIONS
OF THE FOLLOWING SOFTWARE LICENSE
AGREEMENT. PLEASE READ THIS AGREEMENT CAREFULLY.
30
Page 31

TM
Quick Start Guide
Size: 123.5 x 81.5 x 17 mm (W x H x D)
Weight: 182g
Display: 4.3 diagonal (10.9 cm), 480 x 272
pixels; WQVGA TFT landscape
display with white backlight and
touch screen
Data storage: Removable SD card
Computer interface: NON
Power input: DC vehicle power using
included 12-24V DC vehicle power cable.
Usage: 8W max.
Charge time: Approx 5 hours
Battery life: up to 4 hours
13. SPECIFICATIONS
CAUTION: the VMS TOURING
is not water proof.
VMS grants you a limited license to use the
software embedded in this device (the
“software”) in binary executable form in the
normal operation of the product. Title, ownership rights, and intellectual property rights in
and to the software remains in VMS.
You acknowledge that the Software is the
property of VMS and is protected under
Australia copyright laws and international
copyright treaties. You further acknowledge that
the structure, organization, and code of the
software are valuable trade secrets of VMS and
that the software in source code form remains a
valuable trade secret of VMS. You agree not to
de compile, de scramble, modify, reverse
assemble, reverse engineer, or reduce to
human readable form the software or any part
thereof or create any derivative works based on
the software.
12. Technical Support
website: www.vms4x4.com/support.html
e-mail: support@vms4x4.com
Video Tutorials:
www.vms4x4.com/support/tute.html
31
Page 32

March 2009 / Rev 1.0
Part Number: TOUR430GPS
Printed in China
VMS © is a trademark of XIA GROUP PTY LTD, registered in Australia and other countries and may not be
used without the express permission of XIA GROUP Pty Ltd.
copyright © 2009
www.vms4x4.com
TM
 Loading...