

Page 1
VIDEO MOUNT PRODUCTS
Instruction Sheet For:
LCD-CM2
For more information, please contact us at:
325 Log Canoe Circle, Stevensville, Maryland 21666
(T) 410.643.6390 / (F) 410.643.6615
www.videomount.com
Page 2

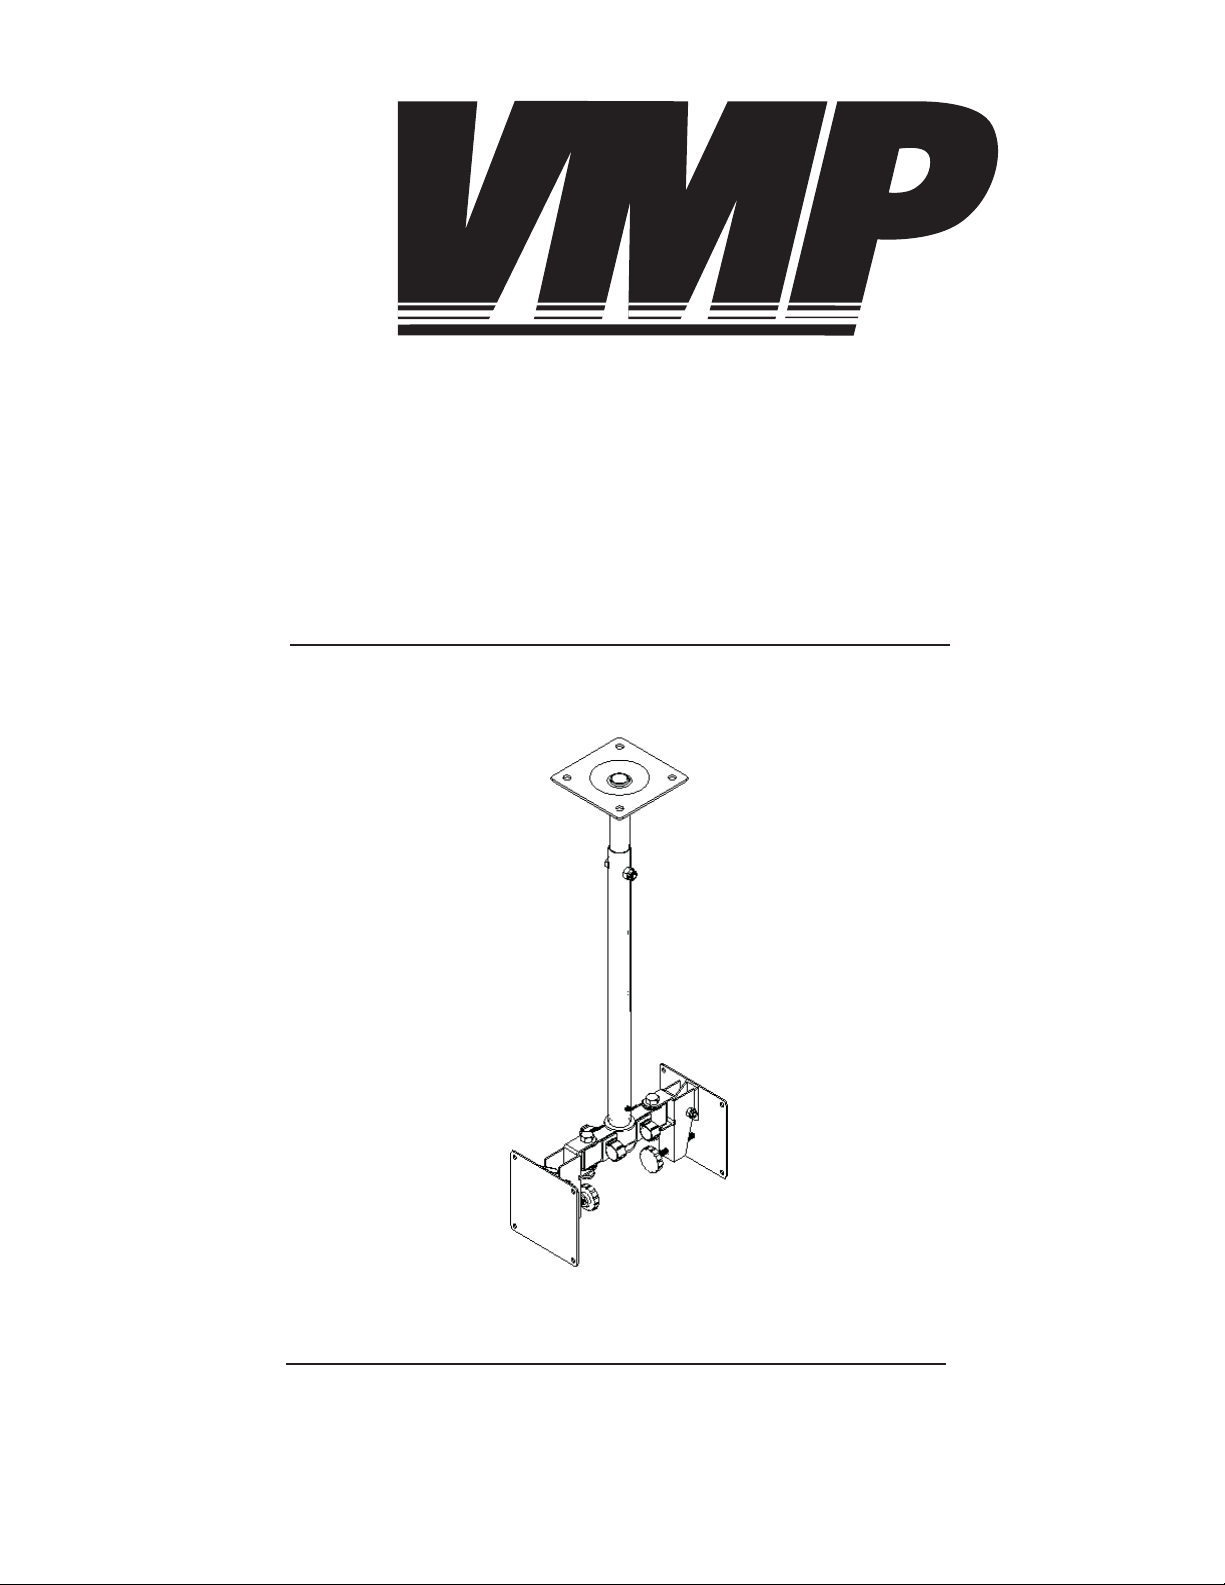
Step 2: Mounting the ceiling plate
Step1
Before starting, lay out all parts to your mount and match them to the
parts list provided. Verify that you have all your parts before attempting
to assemble the mount. Note: The LCD-CM2 and LCD-1C combo was
designed to mount two of the same TV or TVs of similar size and weight.
It is not designed to have two signifi cantly different TVs mounted. Also
note that LCD-1C part numbers have circles around their numbers and
LCD-CM2 has hexagons around their part numbers.
Step 2
For the follow steps it is assumed that you are assembling a new
LCD-1C and LCD-CM2. If you are retro fi tting a LCD-1C then pro-
ceed to step 8. Mark the ceiling or desired mounting surface in
preparation of installation of the ceiling plate LCD-1C. Predrill if necessary and mount the ceiling plate LCD-1C to the
desired surface.
Warning: Please verify that your mounting surface
will support the combined weight of your mount, mounting hardware, and monitor. Also verify that the mounting surface is safe to
drill through. If in doubt, please contact a profession installer.
1
1
Step 3: Attaching the mount plate
to the pivot bracket
Step 3
Determine which VESA standard plate you will be using. If your TV
follows the VESA 75 standard then you should use the small mounting plate LCD-1C / LCD-CM2. If your TV follows the VESA 100
standard then you should use the big mounting plate LCD-1C /
LCD-CM2. Once you determined the correct VESA plate attach
3
it to the pivot bracket LCD-1C / LCD-CM2 using the M6 screw
9
LCD-1C / LCD-CM2 and nylon nut LCD-1C / LCD-CM2.
6
7
4
5
4
2
7
5
Step 4
Attach the pivot brackets assemblies from step 3 to the support tube
LCD-CM2 using the 3/8” screw LCD-1C / LCD-CM2,
1
washers LCD-1C and LCD-CM2, and nylon nut LCD-1C /
6
LCD-CM2. Insert the adjusting screw LCD-1C / LCD-CM2
15
10
into the back of the pivot bracket LCD-1C / LCD-CM2.
16
12
4
11
8
8
2
Step 4: Attaching the pivot
bracket to the support tube
Key:
LCD-1C
LCD-CM2
VIDEO MOUNT PRODUCTS
Page 3

Step 5: Attaching the support
tube to the extension tube
Step 5
Attach the extend tube LCD-1C to the support tube LCDCM2 using the M12 bolt LCD-1C and washers LCD-1C.
Secure the M12 bolt LCD-1C in the extend tube LCD-1C by
screwing in the ¼” brake screw LCD-1C.
2
10
10
17
1
11
2
Step 6
Attach your TV to the VESA standard plate you choose earlier using either the M4 LCD-1C / LCD-CM2 or M5 LCD-1C
12
/ LCD-CM2 screws as appropriate.
22
13
21
Step 7
Attach the extend tube LCD-1C to the ceiling plate LCD-1C
using the 5/16” screw LCD-1C and nylon nut LCD-1C. Pro-
2
18
ceed to step 10.
1
19
Step 8
Remove the extend tube LCD-1C from the ceiling plate
1
LCD-1C by removing the 5/16” screw LCD-1C and nylon nut
19
LCD-1C.
2
18
Step 6: Attaching the TVs to the
mount plate
Step 9
Remove the support tube LCD-1C from the extend tube
LCD-1C by removing the ¼” brake screw LCD-1C and
then removing the M12 bolt LCD-1C and washers LCD-1C.
Remove the adjusting screw LCD-1C from the pivot bracket
4
LCD-1C. Remove the pivot bracket LCD-1C from the support
3 16
tube LCD-1C by removing the 3/8” screw LCD-1C, washers
15
LCD-1C and nylon nut LCD-1C. Remove the end plugs
LCD-1C from the support tube LCD-1C. Proceed to step 3.
14
3
172
10 11
12
4
8
3
Step 7 : Attaching the extend
tube to the ceiling plate
Step 8 : Removing the extend
tube from the ceiling plate
Step 9 : Removing the
support tube
Page 4

Step 10: Inserting end plugs
and cable clips
Step10
Insert the end plugs LCD-1C into the support tube LCD-CM2.
For cable management, insert the cable clips LCD-1C / LCD-
CM2 into the support tube LCD-CM2. Please verify that all nuts
and screws are tight.
14
13
1
1
9
Key:
LCD-1C
LCD-CM2
VIDEO MOUNT PRODUCTS
Enjoy Your Mount!
WARNING: The installer of these products must verify that the mounting surface, ceiling or wall, will safely support the combined weight
of all attached equipment and hardware. Video Mount roducts will
not be held liable for the improper use or installation of its products.
 Loading...