

Page 1
Vmed Technology
Vet-Dop2 TM
Doppler Blood Pressure System
Model BF2
User Manual
1
Page 2

Table of Contents
ACCESSORIES AND COMPONENTS ............................................................................................ 3
PRECAUTIONS ............................................................................................................................... 3
Chapter 1 Description .................................................................................................................. 4
Vet-Dop2 Doppler ...................................................................................................................... 4
Doppler Technique ..................................................................................................................... 5
Description of Controls and Indicators ........................................................................................ 5
Control Panel ............................................................................................................................. 6
Connector Panel ........................................................................................................................ 7
Chapter 2 Preparation and Use ..................................................................................................... 8
Doppler Preparation ................................................................................................................... 8
Cuff Selection ............................................................................................................................. 9
Doppler Procedure ................................................................................................................... 10
Tips for using the Doppler: ....................................................................................................... 12
Clinical References .................................................................................................................. 13
Hypertension in an unstressed, awake animal.......................................................................... 13
Using the Doppler as a Surgical Monitor .................................................................................. 13
Chapter 3 Service, Maintenance and Specifications ............................................................... 14
Service and Support ................................................................................................................. 14
Cleaning and Maintenance ....................................................................................................... 14
Specifications ........................................................................................................................... 15
Troubleshooting ....................................................................................................................... 16
Appendix A Limited Warranty ................................................................................................... 17
WARRANTY RETURN POLICY ............................................................................................... 18
Appendix B Accessories and Replacement Parts ................................................................... 19
2
Page 3

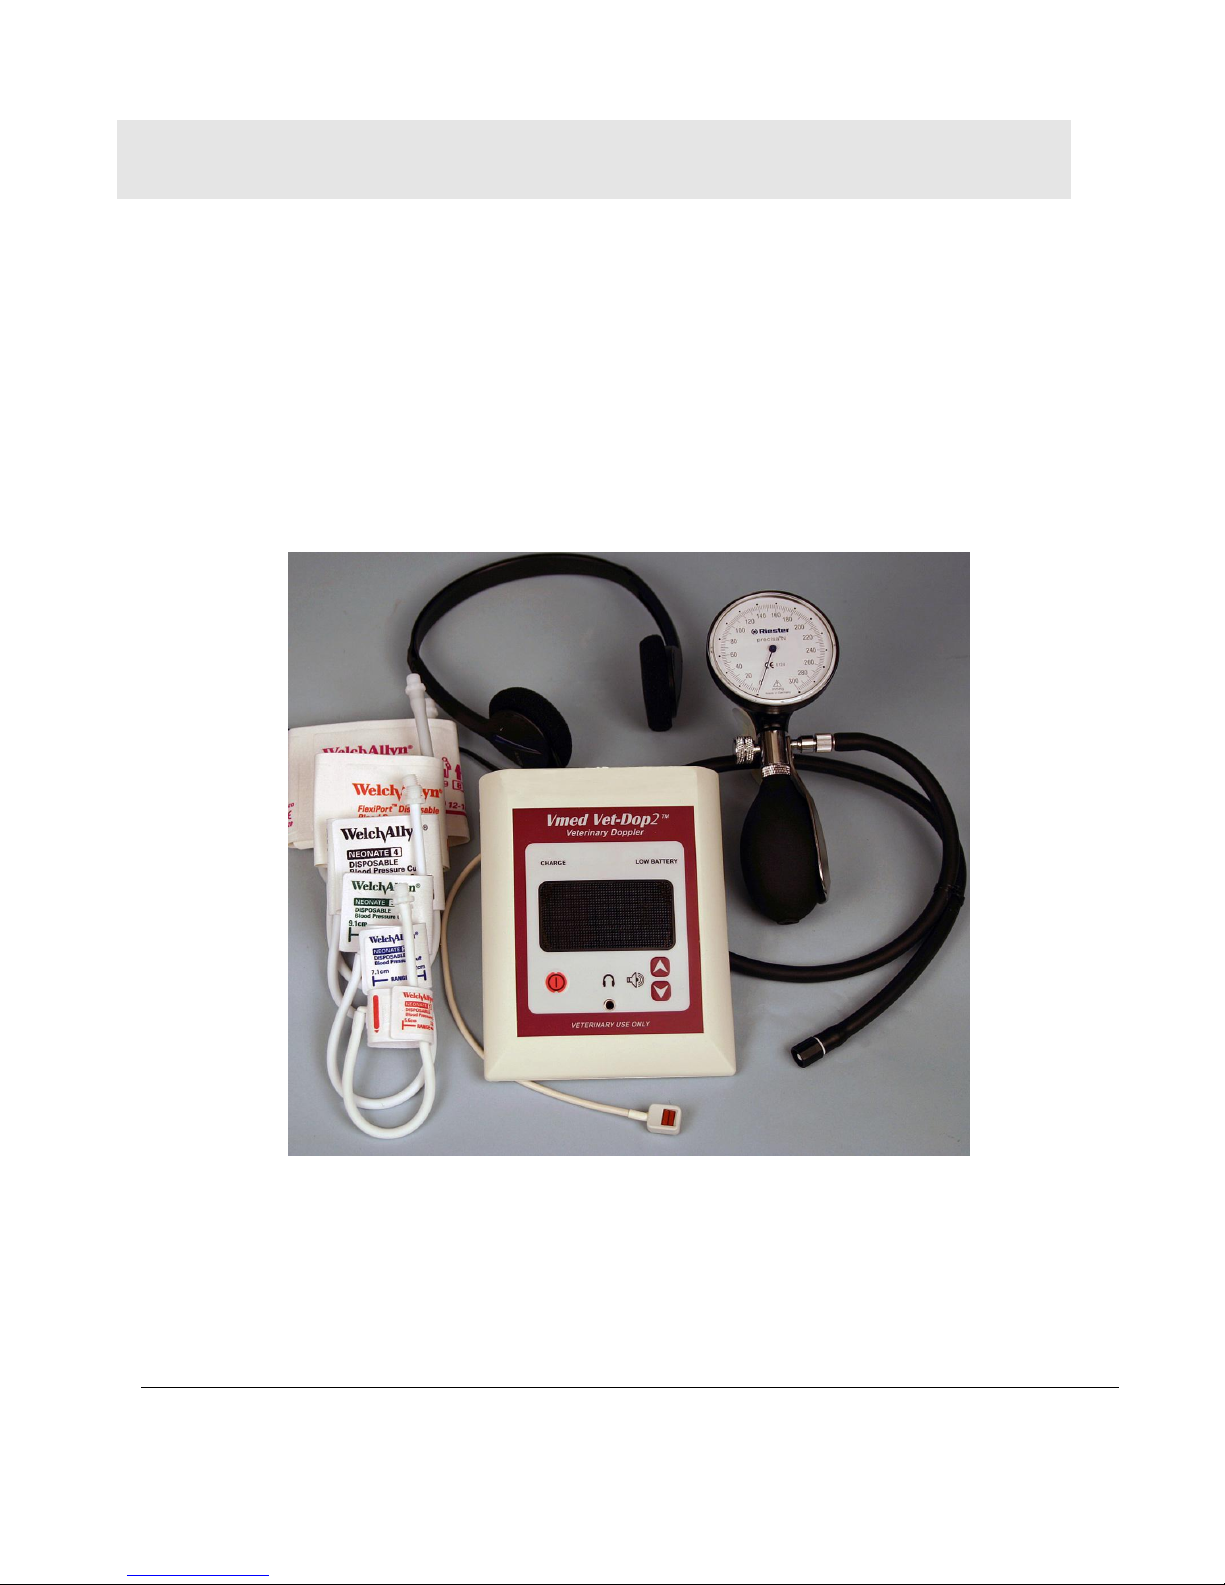
ACCESSORIES AND COMPONENTS
Check Vet-Dop2 storage pouch and ensure the following items are included
Vet-Dop2 Doppler
Sphygmomanometer
Headset
Battery charger
Coupling gel
Six cuffs (#1, #2, #3, #4, #5(or #7), #8
Six probe attachment straps
Application DVD (NOTE: DVD shows photos of an earlier Vet-Dop model)
Optional protective pouch
PRECAUTIONS
CAUTION: Use only the battery charger provided by Vmed. Laptop charging plugs
may appear identical but their use may damage electronics and void the
warranty. (NOTE: For safety, the Vet-Dop2 will not operate under AC/charger
power. Unplug the charger before use.)
Protect sensor face from sharp objects and clean often
Grasp the sensor plug to insert and remove the sensor. Do not pull on cable.
For veterinary use only. Vet-Dop2 does not have FDA registration for human use.
Do not use in the presence of flammable anesthetics.
Protect the Vet-Dop2 and cable connectors from moisture (See cleaning
instructions in Chapter 3).
Do not autoclave the Vet-Dop2 or accessories.
Do not disassemble the Vet-Dop2 enclosure. It contains no operator serviceable
components and opening the enclosure voids the warranty.
3
Page 4

Chapter
1
Chapter 1 Description
Vet-Dop2 Doppler
Vmed designed the Vet-Dop2 for veterinarians to measure systolic blood pressure on
awake animals; to check blood pressure in surgery; to monitor blood flow at the
extremities during surgery and to check for intact blood vessels after trauma and
before amputation. The non-invasive Doppler technique is the method of choice for
measuring blood pressure in animals weighing less than 10 pounds, especially cats.
Other methods, including monitors that use the oscillometric technique even with
small animal validated software, may not calculate pressures as quickly especially on
awake, smaller patients. The-Dop2 also works well on larger breeds and can detect
blood flow at the base of the tail in horses.
Monitor blood flow sounds with the integral speaker or with the headset, which
when plugged in, disables the speaker since speaker sounds may startle the animal.
The Vet-Dop2 uses a sensitive 9.4 MHZ, focused piezo-electric sensor held in place
with the finger and thumb of one hand while stabilizing the limb with the remaining
fingers. Use one of the Velcro straps to attach the sensor to the limb for long term
monitoring. A pressure pump and gauge (Sphygmomanometer), stereo audio
headphones, six cuffs, instructions and a procedural video are included with each
Vet-Dop2. The cuff set covers most animals from kittens to large dogs with limb
circumferences from 3.3 cm to 16.8 cm.
4
Page 5

Doppler Technique
Doppler detects blood flow in arteries and veins. Doppler blood pressure is a manual
technique using a Doppler flow detector to listen to electronically produced blood
flow sounds with the sensor placed proximal to a cuff of suitable size. Use the
sphygmomanometer to inflate the cuff until the artery is occluded and the blood
flow stops. Increase the pressure 20 to 30 mmHG above the occlusion pressure and
then decrease the pressure by slowly deflating the cuff using the thumb valve on the
pump. When blood flow audio resumes, read the systolic pressure on the gauge as
the needle passes this point. For accuracy record five measurements, eliminate the
highest and lowest measurements and take the mean of the remaining. The mean is
the indirect systolic blood pressure.
The Doppler technique depends on successful acquisition of the Doppler blood flow
signal. Body temperature, vasoconstrictive drugs, a bent limb, too much hair and
inadequate lubrication of the area contribute to difficulties in acquiring an adequate
signal.
Description of Controls and Indicators (Refer to Figures 1 and 2)
Indicator Lights (NOTE: LED locations are only visible when illuminated.)
LOW BATTERY (Status) Light: The LOW BATTERY LED illuminates YELLOW when the
unit requires a charge (NOTE: You may use the Vet-Dop2 at normal
performance for about an hour after light first illuminates).
CHARGE Light: The charge light will turn YELLOW or AMBER during charging. The light
will turn GREEN when the battery is fully charged. (NOTE: Battery requires up to
4.5 hours to become fully charged.
POWER Light: A red LED over the power button will illuminate when the unit is on.
(NOTE: Press and immediately release the power button to turn on; press and
hold button down to turn off)
5
Page 6
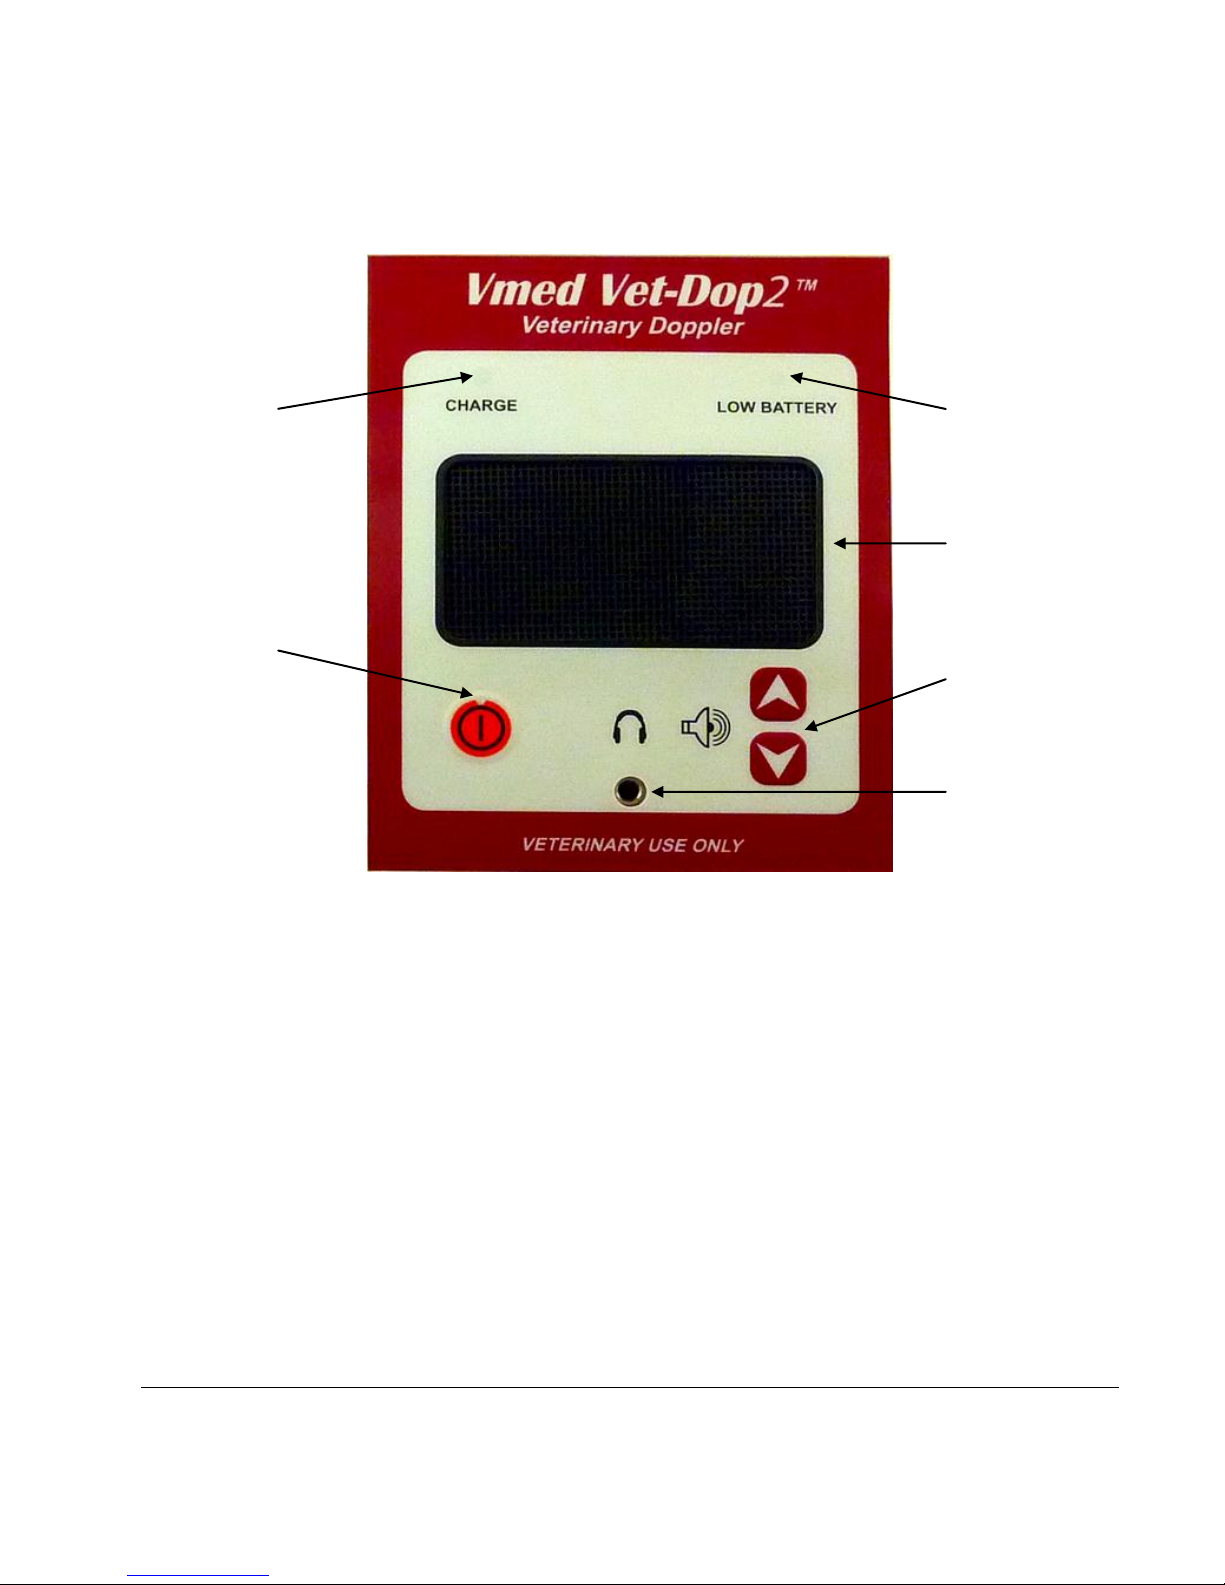
YELLOW LED here
YELLOW or GREEN
LED here
RED LED here
Speaker Grill
Volume Controls
Headset Jack
Control Panel
Figure 1 – Top panel with controls and indicator lights
6
Page 7
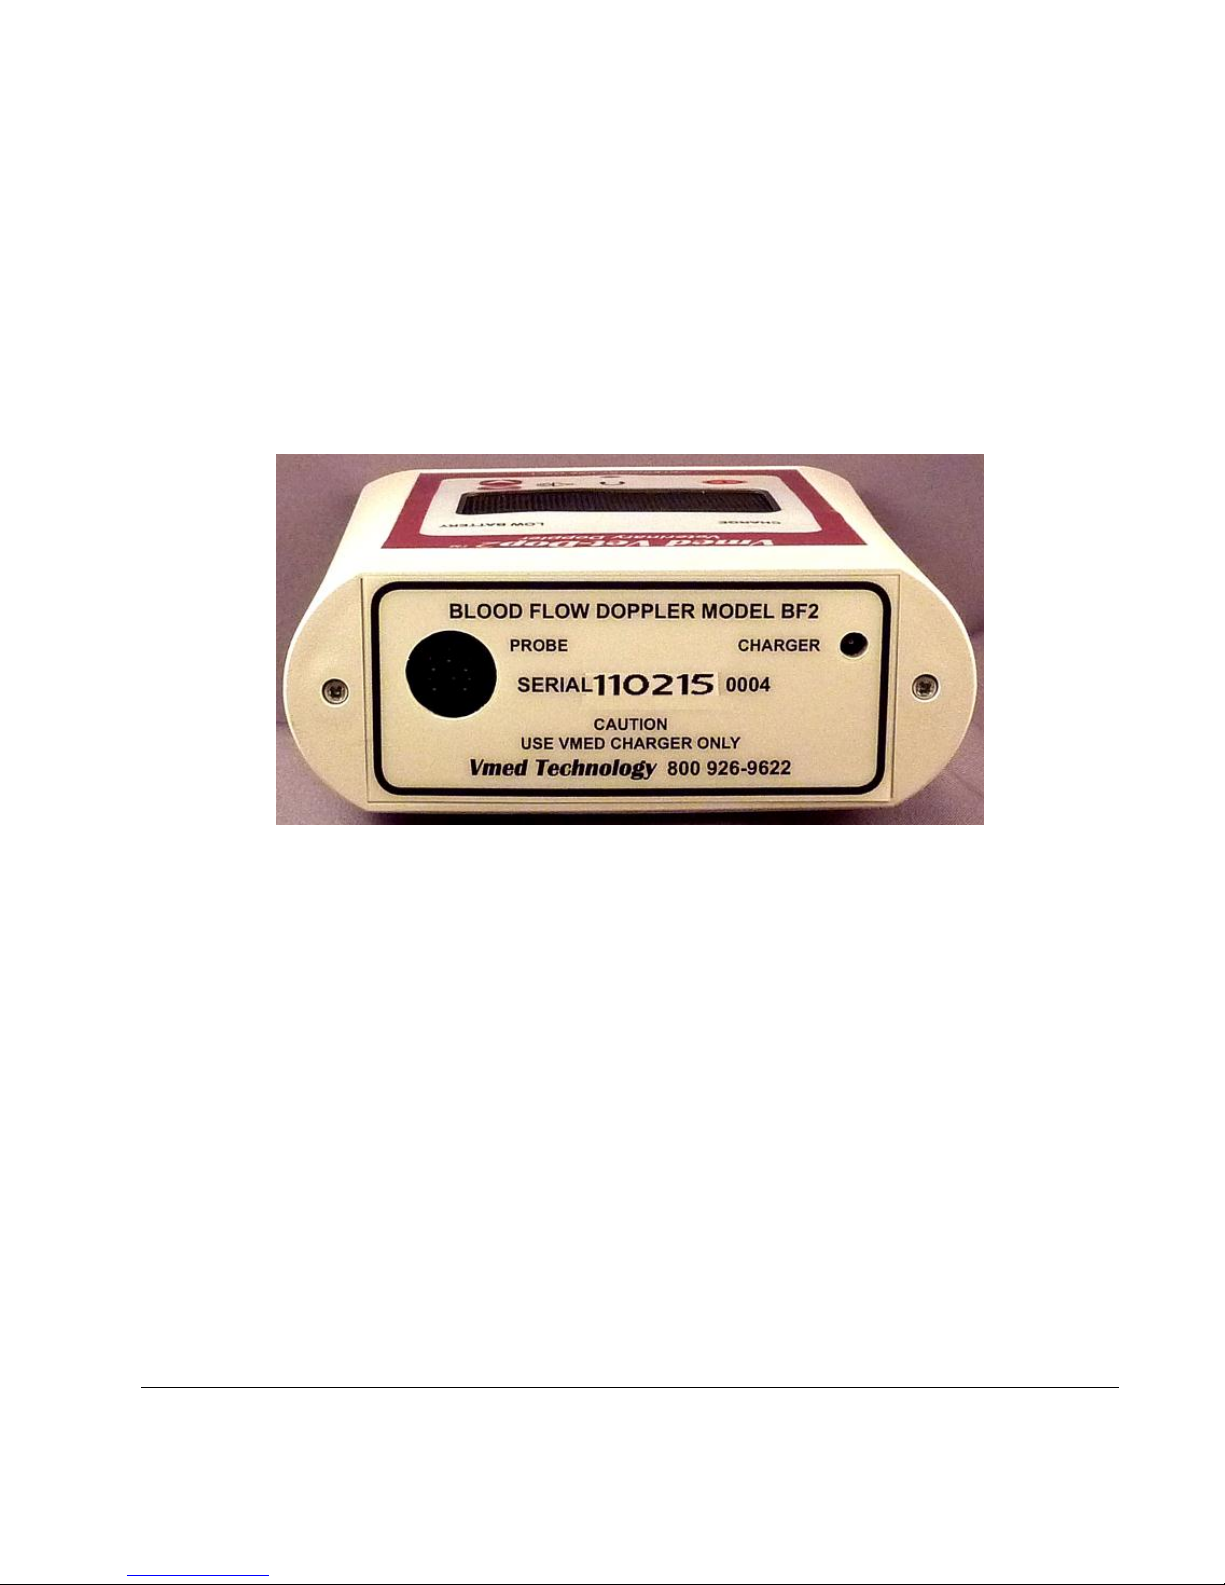
Connector Panel
The connector panel includes the battery charge port and the Doppler sensor
receptacle as shown below.
Figure 2 Connector panel
CHARGING RECEPTACLE: Plug the battery charger cable into the CHARGER port to
charge the battery. (NOTE: For safety reasons, the device will not operate
when the battery charger is plugged in.) (CAUTION: Use the power supply
adapter provided with the Vet-Dop2 ONLY. Use of any other power supply
adapter could damage the unit and void the warranty.)
PROBE RECEPTACLE: Insert the Doppler sensor into the PROBE receptacle. (NOTE:
The sensor plug is keyed and can only be inserted one way-see Fig. 3).
SERIAL NUMBER: Each device has a unique serial number as shown above.
7
Page 8

Chapter
2
Chapter 2 Preparation and Use
Doppler Preparation
Ensure that the Vet-Dop2 is fully charged and assemble the unit, sensor, headset,
appropriate cuff, ultrasound gel and alcohol. Turn on the Vet-Dop2 by pressing and
immediately releasing the red power button on the keypad. Do not hold the button
down unless you wish to turn the device off.
Connect the sensor probe to the Vet-Dop2 by plugging into the keyed receptacle (NOTE:
Cable will face in the direction shown in Figure 3.)
Figure 3 – Connecting Doppler probe and charger
8
Page 9

Figure 4 – Reference mark
should fall within range
Figure 5 – Reference mark is
also artery mark
Cuff Selection
Choose the appropriate cuff as shown in Figures 4 and 5.
9
Page 10

Doppler Procedure
Doppler detects blood flow in arteries and veins. The radial, cranial, tibial, and
median coccygeal arteries are the most practical to monitor. Our preference is the
cranial tibial artery because the hair clipping that is required is least noticeable.
However, the other two arteries are acceptable and preferred by some. When using
the median tibial artery for cats, place a 2-4 cm wide cuff above the hock. Stress
must be minimized is to get meaningful blood pressure readings. Allow your patient
a few minutes to rest in a quiet place away from other animals before proceeding.
The presence of the owner is very helpful in relieving your patient’s stress. Take
advantage of this if possible. (NOTE: Ensure that all comparable measurements for
each animal is taken at the same location because pressure will vary with location.)
1. Assemble the Doppler unit before addressing the patient. If you believe
Doppler audio will agitate the patient, plug in the headphones and place the
headset over your ears.
2. Position the cuff proximal to the hock, proximal to the elbow, or at the base of
the tail, depending on the artery used. (NOTE: Cuff size in width should be
40% of the circumference of the limb at the site of placement. Making use of
the size gauge printed on the cuff will ensure that a cuff of the correct width
is used.)
3. Turn the unit on and verify that the volume is set in the high range and then
turn the unit back off again. (NOTE: Arterial blood flow may be difficult to
detect if the volume is set too low.)
4. Clip hair as short as possible at the palmar aspect of the foot just proximal to
the metacarpal pad. Wet the hair with alcohol and rub a small amount of
ultrasound gel into the skin in the midline area where the palmar arterial arch,
located slightly medial to the midline. You can palpate the pulse on large dogs.
(NOTE: Clipping the hair may NOT be necessary if hair is short and very fine
and is first wetted with alcohol.)
10
Page 11

5. Select an animal cuff with a width approximately equal to the width of the
limb and up to two times the width of the forearm measured at the mid-radial
region. Vmed blood pressure cuffs have a handy reference gauge to assist with
proper cuff selection. Place the artery reference arrow printed on the cuff over
the in-tended artery. Wrap the cuff around the limb. The reference arrow
should fall within the circumference range marked on the cuff. The cuff should
be place with the line and arrow over the intended artery.
6. Apply ball of gel to the cup of the sensor. (NOTE: Do this with the power off
since loud noise is generated when gel is applied.)
7. Place the sensor over the artery and either hold it in place with thumb and
forefinger or strap to the limb using a Velcro strap or surgical tape for surgical
monitoring.
8. Turn on the unit once more and move the sensor slightly to acquire the blood
flow signal. Apply enough pressure to hold the signal but not so much as to
occlude the artery.
9. Squeeze the bulb on the sphygmomanometer until the reading is
approximately 20-30 mm Hg over the pressure where blood flow stops. Slowly
deflate the cuff by turning the thumb wheel on the valve and mark the systolic
pressure on the gauge when blood flow sounds resume. The first signal will be
a shorter and choppier sound than the swishing sound heard before inflation.
10. Detection of diastolic pressure is possible on some animals by carefully
listening to the signal quality as the cuff continues to deflate toward zero
pressure. You will hear a weak "swishing" sound at this point that corresponds
to a very small back flow of blood corresponding to the diastolic pressure. You
may also detect a slight oscillation of the needle at this point confirming the
audio signal. (NOTE: Reproducible readings are not always possible.)
11. Take five measurements, discard the high and low readings and average the
remaining three.
11
Page 12

Tips for using the Doppler:
Review the original Vet-Dop procedure video. (NOTE: This video shows the older VetDop, but the procedure is the same.)
Do not strap the transducer to the limb if the animal is awake. The slightest movement
of the foot or limb may move the sensor off the artery and the signal will be lost. By
holding the sensor in place, a slight movement of the thumb can relocate the signal.
Use the highest audio volume that is comfortable. Although headphones are somewhat
cumbersome, they minimize the stress of the procedure. Speaker noise will frighten
some animals, especially cats, elevating their blood pressure. The headphones bypass
the external speaker.
Sensor failures occur mostly from damage to the sensor cable. Take care not to sharply
bend the cable particularly at the junction of the sensor face and the plug. Protect the
sensor face from contact with hard or sharp objects.
Ultrasound gel is preferred, however KY jelly or any water based gel is a suitable
alternative. Do not use ECG paste, baby oil or any other oil based fluid with the sensor
head. These products may cause deterioration of the resin surface of the sensor.
Remove gel from the sensor face after each use with a wet, fine bristle toothbrush.
Comfortably extend the animal’s limb when taking the reading. A flexed limb may
abnormally restrict the blood flow through the artery giving no readings or falsely low
readings.
Signal acquisition depends on limb temperature, limb flexation, vasoconstrictive drug
use, amount of hair or fur and proper lubrication of the site. (NOTE: Pre-wetting the
limb with alcohol or water may increase detection.)
12
Page 13

Clinical References
Hypertension
Cats: Systolic pressure greater than 170-180 mmHg
Dogs: Systolic pressure greater than 180 mmHg
Hypertension in an unstressed, awake animal
Larry Tilley, DVM, DACVIM (Internal Medicine), VetMed Associates, Santa Fe, NM
Doppler in Surgery
“Doppler flow technology presents several desirable characteristics over
other monitoring devices as a surgical monitoring device. The ability of the
Doppler to measure blood flow in a peripheral artery and generate an
audible sound with each pulse provides the surgeon with an 'eyes free' way
to evaluate their patient's cardiovascular performance while continuing to
focus on their surgery. If the peripheral Doppler sound is good, the systolic
blood pressure is within an acceptable range, and with a
sphygmomanometer above the Doppler transducer, the systolic pressure
can be easily and economically measured and entered into the anesthetic
record. Although diastolic pressure cannot be measured this way, the
reliability of Doppler blood pressure monitoring allows the anesthetist to
spend less time fiddling with the monitor and more time monitoring the
patient. Heart rate can also be monitored audibly and recorded. A
particularly strong value of the Doppler is the ability of the anesthetist or
surgeon to hear ventricular premature contractions (the most common
arrhythmia under anesthesia) as a 'dropped sound' in and otherwise stable,
rhythmic 'whoosh, whoosh, whoosh'; often in plenty of time to look up at
the ECG tracing and watch the VPC go by on the screen! Supplemental
ventilation of these patients will often resolve this common arrhythmia.
Because the Doppler is portable, it can be moved with the patient easily
when moving to radiology or the recovery area. Their low cost relative to
other monitoring devices, reliability and toughness make them the best
'bang for the buck' surgical monitoring device in many people's opinion.”
Using the Doppler as a Surgical Monitor
R. Randy Bassinger, DVM, ACVS, South Carolina Veterinary Referral Center, Columbia, SC
13
Page 14

Chapter
3
Chapter 3 Service, Maintenance and Specifications
Service and Support
Phone: 800-926-9622
FAX: 425-585-0231
Email: info@vmedtech.com
WEB: vmedtech.com/customers (For manual download)
vmedtech.com (For clinical references, parts and accessories)
Cleaning and Maintenance
Cleaning
MONITOR: Wipe with a damp cloth or sponge using any of the below fluids.
(CAUTION: Do not let moisture enter any receptacle, plug opening or the speaker
grill.)
Soap and water
Isopropyl or ethyl alcohol
Peroxide solution
SENSOR: Clean dried gel from probe face with a soft bristle toothbrush under
running water. Wipe cable with water or alcohol. (CAUTION: Do not let moisture
enter inside of plug.)
CUFFS: Use a scrub brush and mild detergent to clean cuffs. (CAUTION: Do not let
fluids enter cuff tubing.)
14
Page 15

Maintenance
There are no field serviceable components inside the Vet-Dop2. Opening the housing
voids the warranty. Store this device in the storage pouch when not in use.
Charging the Battery
The Vet-Dop2 uses a rechargeable lithium-ion battery that has a useful life of
approximately two to four years. When the battery no longer holds a charge, battery
replacement may be required. (NOTE: Call for support concerning battery replacement.)
A full battery charge can take up to 4.5 hours depending upon how depleted the battery
charge is to begin with. The Vet-Dop2 can not be operated when the charger is plugged
in so only charge the battery when the device is not in use.
Specifications
TYPE: CW ultrasonic Doppler blood flow detector
CONSTRUCTION: High impact ABS-PC
DIMENSIONS (OVERALL): 6"x 4.625"x 1.75"
WEIGHT: 15 oz.
DOPPLER FREQUENCY: 9.6 MHz
AUDIO OUTPUT: Speaker and headset jack with speaker cutoff
CHARGER: Input: 110/220 VAC 50 or 60 Hz
Output: 5 VDC (Will not operate unit while charger is connected)
BATTERY: Rechargeable Lithium-ion
BATTERY USE BETWEEN CHARGES: 35-40 hours continuous
TRANSDUCER: Focused piezoelectric elements with 5 Ft. Cable
TRANSDUCER DIMENSIONS: 0.6" X 0.5" X 0.24"
CONNECTOR: 5 Pin circular DIN
SPHYGMOMANOMETER: 0-300 mmHg certified manometer with bulb type
deflation valve
pump and
HEADPHONES: Stereo audio with 3.5 mm phone plug
CUFFS: 6 ea. for limb circumferences 3.3-16.8 cm
15
Page 16

SITUATION
POSSIBLE CAUSES
CORRECTIVE ACTION
Cannot detect signal
Patient not optimum
Doppler not optimum
Warm limb
Extend limb
Delay vasoconstrictive
drug administration
Clip hair
Wet area with alcohol
Reposition sensor
Increase or decrease
thumb pressure on sensor
Fully charge battery
Check volume controls
Check sensor/cable
damage (See below)
Defective electronics
Excess static/noise
Defective sensor
Defective electronics
Check for change in sound
when cable flexed at plug
and sensor face1
Call technical support
Call technical support
1
Troubleshooting
A faulty sensor or defective electronic components or both can cause excess noise, static,
and difficulty acquiring a signal. Improper application or technique can also be an issue.
Refer to the guide below to help identify various problems and recommended
corrective action.
Change in noise indicates bad wire in cable.
16
Page 17

Appendix A Limited Warranty
All Vmed Technology products carry the limited warranties described below. All warranty claims
must be received by Vmed Technology in written form within the warranty periods specified below
or they will lapse.
Limited Warranty. Vmed Technology warrants: Its wireless monitors and IRMA gas sensors to be
free of defects in materials and workmanship for two years from date of purchase by the original
end user customer; (ii) Vet-Dop Blood Pressure Monitor to be free of defects in materials and
workmanship for one year from date of purchase by the original end user customer; (iii) Cables,
lead wires and connectors, Doppler transducers, ECG sensors and clips, esophageal probes,
temperature probes, blood pressure cuffs and blood pressure tubing sold with all Vmed monitors,
or purchased as an optional accessory for such monitors, will be free of defects in materials and
workmanship for six months from date of purchase by the original end user customer; and (iv) all
other supplies or disposable or single use instruments or products, are warranted to be free of
defects in materials and workmanship for the period that ends upon the earlier of initial use for
their intended purpose or their expiration date.
Customers who feel an instrument is defective must return it to Vmed Technology for evaluation.
Such return must be made in accordance with both the Vmed Technology RMA procedures
described below and prior to expiration of the warranty period. Products found by Vmed
Technology to be defective will either be repaired or replaced with the same or a comparable
product, at the discretion of Vmed Technology. As described below, repair or replacement, at no
charge for parts or labor, is the Customer’s sole and exclusive remedy. The warranty on any Vmed
Technology product is voided if the product is repaired by anyone other than Vmed Technology.
Shipping charges are not covered by this warranty. Warranties do not cover general maintenance
or cleaning needs that result from normal use. Warranty does not cover the costs of loaner units
that customer may request during warranty evaluation or warranty repair. Damage to an
instrument or product caused by accident, abuse, alteration, misuse, improper care, cleaning,
chemicals, or loss or theft are not covered by this warranty. OPENING ANY MONITOR’S HOUSING
(ENCLOSURE) OR THE HOUSING (ENCLOSURE) OF ANY OTHER VMED TECHNOLOGY PRODUCT OR
ACCESSORY WILL VOID THE WARRANTY.
Disclaimer of all other Warranties. VMED TECHNOLOGY HEREBY DISCLAIMS ANY AND ALL OTHER
WARRANTIES WHATSOEVER, INCLUDING WITHOUT LIMITATION THE IMPLIED WARRANTIES OF
MERCHANTABILITY, FITNESS FOR PARTICULAR PURPOSE, TITLE OR NON-INFRINGEMENT OF THIRD
PARTY RIGHTS. The agents and representatives of Vmed Technology are not authorized to make
modifications to these warranties, or to make additional warranties. Any additional statements,
whether oral or written, do not constitute warranties and should not be relied upon by the
Customer.
17
Page 18

Exclusive Remedies of Customer; Limitation of Liability. Vmed Technology’s liability and
Customer’s remedy for damages incurred as a result of any breach of warranty or related to the
goods and products provided to Customer or use of those products by Customer or others, is
expressly limited to return of the non-conforming or defective goods to Vmed Technology and, at
Vmed Technology’s option, either the repair of non-conforming or defective goods or the
replacement of non-conforming or defective goods with conforming or comparable goods.
THE REMEDIES OF THE CUSTOMER SET FORTH IN THESE CONDITIONS OF SALE ARE EXCLUSIVE. VMED
TECHNOLOGY SHALL NOT BE LIABLE FOR SPECIAL, INCIDENTAL, PUNITIVE OR CONSEQUENTIAL DAMAGES
ARISING FROM BREACH OF WARRANTY, BREACH OF CONTRACT, TORT, PERSONAL INJURY, PRODUCT
LIABILITY, NEGLIGENCE, STRICT LIABILITY, INDEMNITY, OR ANY OTHER LEGAL THEORY, EVEN IF VMED
TECHNOLOGY HAS BEEN ADVISED OF THE POSSIBILITY OF SUCH DAMAGES OR THE REMEDY PROVIDED
HEREUNDER FAILS OF ITS ESSENTIAL PURPOSE. SUCH EXCLUDED DAMAGES INCLUDE, BUT ARE NOT LIMITED
TO, LOSS OF PROFITS OR REVENUES, LOST INCOME, CANCELLED PATIENT FEES OR PROCEDURES STEMMING
FROM ANY PRODUCT ON BACKORDER, LOSS OF USE OF THE GOODS OR INSTRUMENTS, COSTS OF CAPITAL,
COST OF SUBSTITUTE GOODS, FACILITIES OR SERVICES, OR CLAIMS OF CUSTOMERS OR PATIENTS/CLIENTS
OF THE CUSTOMER FOR SUCH DAMAGES.
Some states may not allow exclusion or limitation of liability for consequential or incidental
damages and therefore the above limitations may not apply to you if such state's laws are found to
be applicable to you.
WARRANTY RETURN POLICY
Return of Product for Breach of Warranty. In order to make a claim for breach of warranty or to
return a product for warranty or non-warranty repair, Customer must obtain a Return Material
Authorization (RMA) number from Vmed Technology customer service at (800)-926-9622. An
itemized list of returned products must accompany all returns. The RMA number and explanation
of why the product is being returned must be included. Returned goods MUST be packaged in a
shipping container equivalent to that in which it was received. Returned goods MUST be shipped
pre-paid at Customer’s expense by FedEx, UPS, or other service that provides package tracking, and
must be insured for the purchase price of the contents. Returned goods received by Vmed
Technology in any form less than that described above will be refused by Vmed Technology and
returned to the Customer. Vmed Technology will pay the return freight on products repaired or
replaced under warranty.
18
Page 19

Appendix B Accessories and Replacement Parts
Doppler sensor, 9.4 MHZ Part BF-94A (cats, dogs and exotics) BF-94R rats
Certified Sphygmomanometer, Part P801
Cuff Set of 6 Mixed, Part C200
Cuff Set of 6 Cat, Part C201
Charger, Part BPC-1
Lithium-ion rechargeable battery, Part BP1-1003
DVD training video, Part V1
Storage pouch
Protective pouch with handle
Please phone 800-926-9622 or Email us at info@vmedtech.com for price and
availability
19
Page 20

Vet-Dop2
Doppler Blood Pressure System Model BF2
Vmed Technology, 2011
914 164th Street SE
Mill Creek, WA 98012
Phone 800-926-9622
Fax 425-585-0231
Email info@vmedtech.com
www.vmedtech.com
User Manual
20
 Loading...