

SRAT10-BK
SHAKER SERIES
ACTIVE FLOORSTANDING
LOUDSPEAKERS
2
Thank you for your interest in VM Audio products. Our
goal is to enhance your listening experience. The Shaker
Series was designed as the economical solution for a
performance craving, casual consumer. The experts and
engineers at VM Audio have meticulously tested and
designed this product with a reasonable price tag to t any
budget. Let the Shaker Series maximize the value of your
investment.
Welcome!
About This Manual
This user guide describes the controls on the speaker
system. You can use the controls on the remote if they
have the same or similar names as those on the control
panel.
Speci cations
Loudspeaker Type
Cabinet Color
High Frequency
Midrange Driver
Bass Driver
Audio Input
Frequency Range
Power (RMS/Peak)
Dimensions (H x W x D)
Operating Voltage
Bluetooth Wireless Range
Microphone Input Jack
Full Range System
Phantom Black
1 1/2” Composite Soft Dome
4” Treated Composite Fiber
8” Dual Pulp Cone
Analog RCA, Bluetooth, USB, SD
40 Hz - 20 kHz
300W / 1000W
32.68” x 6.38” x 12.20”
120V
30 ft.
1/4” / 6.3mm
43
Limited Warranty Agreement (contd)
Include a copy of the original receipt or invoice with the purchase
date, dealer’s name, customer’s name and invoice number clearly
visible. Manufacturing date may be used if no proof of purchase is
provided. The customer will pay to ship the defective product; COD
will not be accepted.
Please follow the above instructions carefully to prevent voiding
your warranty.
Your Warranty Service Does Not Cover the Following:
- Products not purchased from an Authorized VM Audio Dealer
- Damages from poor installation by not following the included
instruction manual.
- Damages due to excessive moisture, heat and other elements
from improper care.
- Evidence of tampering or repair by non-authorized personnel.
- Products not issued an RMA number.
- Damage during freight from poor packaging or handling.
- Return shipping on non-defective items.
Warranty Turnaround Time
It is VM Audio’s goal to turnaround the merchandise in a timely
fashion of 1 week. Unexpected delays may occur due to repair
parts or replacement shortage.
International Warranty
Please check with your Authorized International VM Audio Dealer
or distributor for speci c warranty policies and process for your
country.
42
Limited Warranty Agreement
Your product is covered by a limited warranty by VM Audio as
established below:
Electronics Limited Warranty
Products purchased from an Authorized VM Audio Dealer are
warranted to be free of defects in material and workmanship
for one (1) year from the date of original purchase under normal
usage. Products that are identi ed as “refurbished” have a limited
warranty of ninety (90) days from the date of original purchase.
Dated proof of purchase (original receipt or invoice) will be required
for all warranty claims. In the unlikely event that you experienced
a manufacturing defect or malfunction during the warranty period,
VM Audio will repair the defective product or replace with the
same or equivalent product if the same item is not available or
discontinued. Replacement product may have super cial blemishes
or scratches that do not affect the performance of the product.
This warranty is only intended and valid for the original purchaser
and cannot be extended to subsequent owners. Any applicable
implied warranties are limited to the period of the expressed
warranty starting from the original purchase date. No warranties,
expressed or implied, will be accepted after the previously listed
periods. Exclusions may apply; please check your local state laws.
Instructions for Claiming Warranty Service
If you should require warranty service, please return the product
to the Authorized VM Audio Dealer you originally purchased the
item for an experienced and speedy claim of your warranty service.
Contact VM Audio directly to nd the Authorized Dealers nearest
you.
In the case the defective merchandise needs to be returned to VM
Audio, please contact us and a Return Merchandise Authorization
(RMA) number will be assigned. It is important to pack all defective
items in the original packaging to prevent damages from shipping,
and be sure to write the RMA number clearly on the outside of the
box for faster processing. Do not include non-defective items as it
is not necessary and will increase your shipping costs.
3
Table of Contents
2
2
3
4
5
6
7
8
18
22
37
40
41
42
Welcome
Speci cations
Table of Contents
Warning
Precautions
System Features
Included
Overview
Connections
Settings & Adjustments
Operation
Speaker Placement
Troubleshooting
Warranty
4
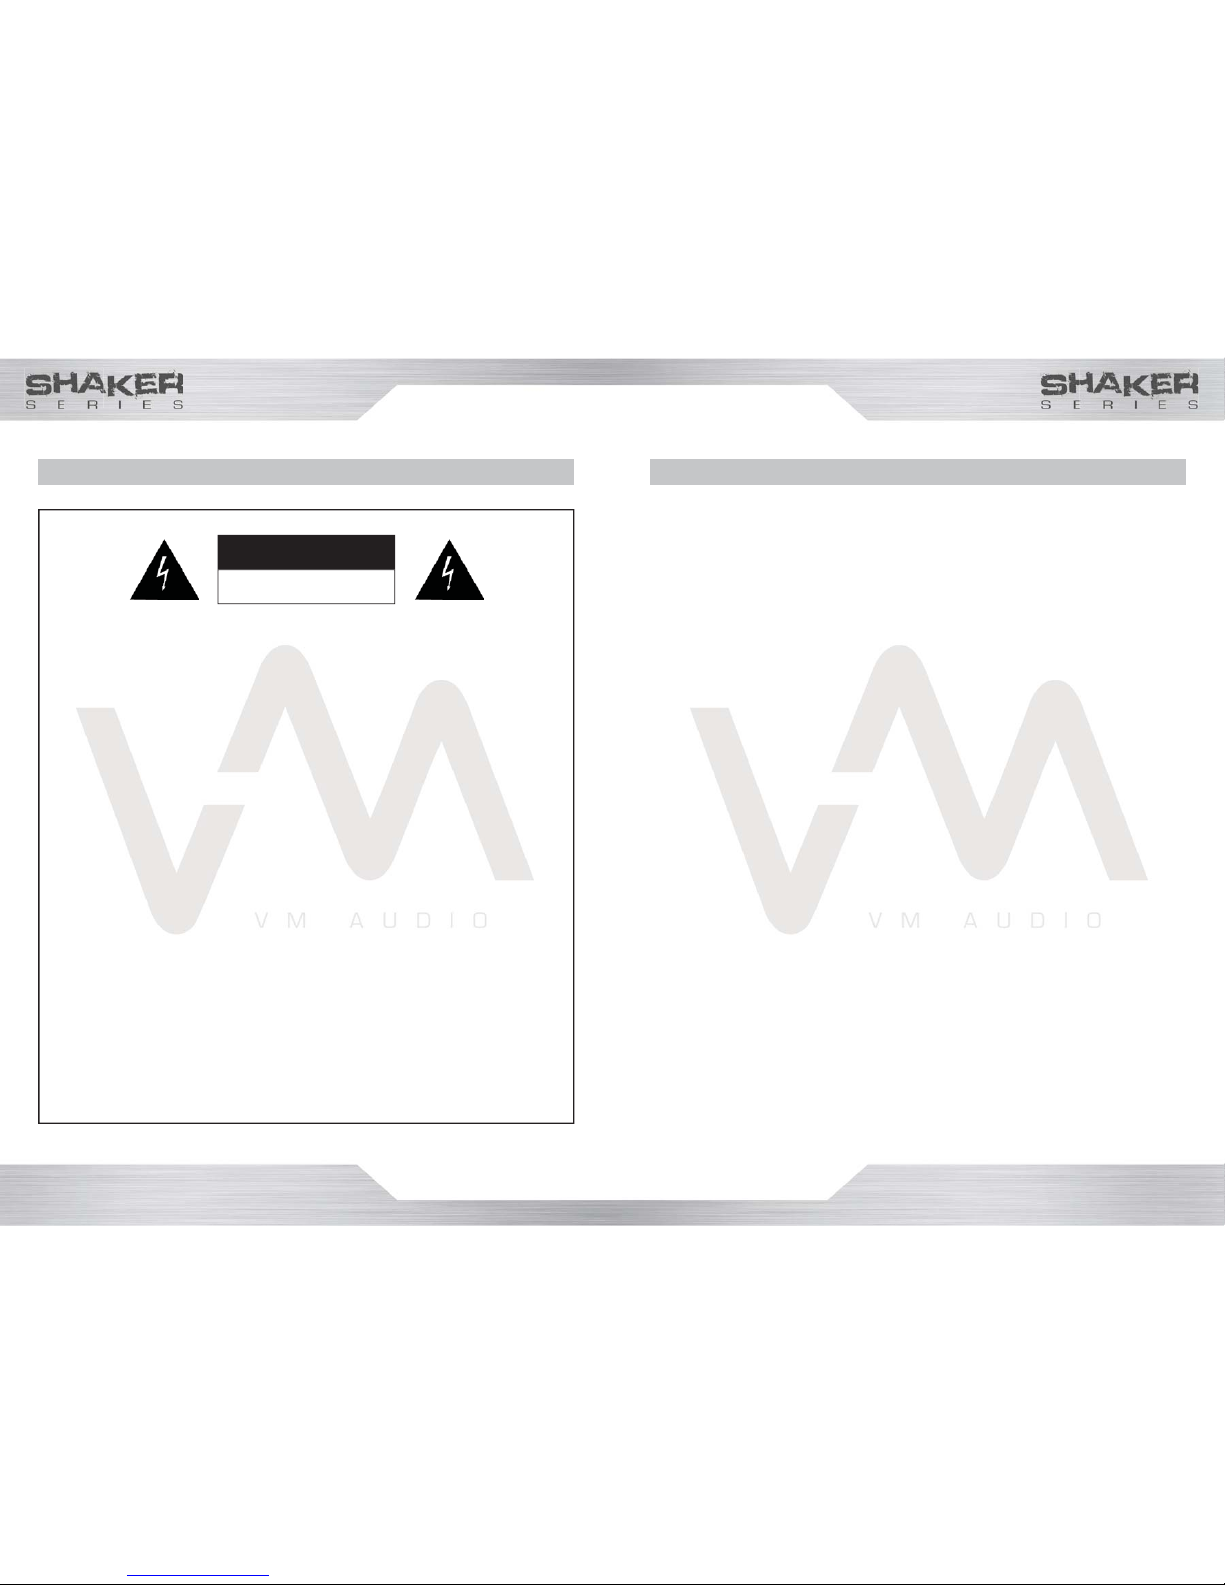
Warning!
To prevent re or electric shock:
• Do not expose the unit to rain or moisture.
• Do not open the cabinet.
• Do not use these speakers near water.
• Do not expose these speakers to dripping or
splashing liquids
• Do not set objects containing liquids on units.
• Do not spill liquids into any part of the speaker
system.
• Do not overload wall outlets and extension
cords.
• Do not run power cables and speaker wires
through sharp edges.
• Do not pinch power cables and speaker wires.
• Do not expose the bare wires from the power
cable and speaker wires.
• Do not remove the back ampli er plate. No
user-serviceable parts inside.
• Refer servicing to quali ed personnel only.
WARNING
RISK OF ELECTRIC
SHOCK
CAUTION:
Any change or modi cations not expressly
approved in this manual could void your warranty
for this equipment.
41
Troubleshooting
No Power
• Press the Power/Standby button to turn power on.
• Make sure unit is connected to AC power.
No Sound
• Raise volume to check output.
• Volume ON from the audio source might be muted or low.
• Make sure correct input is selected.
• Ensure speaker wires are connected.
• Check RCA cable connectivity.
No sound from the microphone
• Make sure it is rmly connected to the MIC input jack.
• Make sure it is turned on (see microphone user manual).
• Make sure the MIC volume controls are not on the lowest
setting.
• Main VOLUME is set to minimum; raise volume.
File(s) on USB/SD not playing
• The le may be corrupted; replace le.
• The le is not in a compatible format.
• The connected USB device is not supported by the system.
The Bluetooth device cannot connect or be paired.
• You have not activated the Bluetooth function on your device;
refer to the Bluetooth device user manual.
• The unit is not in pairing mode; (see page 37 to pair).
• The unit is already connected with another Bluetooth device;
refer to the Bluetooth device user manual to prepare your
device pairing and see page 37 for pairing).

40
The speaker system allows for an extensive amount of
settings that are user-friendly. While the quality of the
speaker system is superb it may fall prey to some of the
quality reducing issues all speakers encounter. It’s important
to know that the dimensions and construction of your home
as well as your home furnishings will all play a role in the
quality of the speaker system. The extra steps taken to
correct the positioning of the speaker system will ultimately
result in a better sound and clarity coming from the speaker
system.
Anywhere from mid to high frequencies are affected by
amount’s of plush materials in a room. Some of the most
common types of material’s include carpets, sofas, beds,
and soft curtains. Too much of these materials can result
in a sound that is low and dull to the user. Just as there
can be too much of this material, there can also be too little
of the material which can result in an uncomfortably bright
sound quality for the user. So with both in mind, a stable
amount of soft furnishings must be achieved to receive the
best quality sound coming from the speaker system.
Equalities between a room’s height, width, and length can
also prove to be an issue in the quality of the speaker
system for it will produce low frequency standing wave
problems, which means the clarity of the system will not be
up to par. If no other rooms provide a better solution to
this problem then experiment with different placement of
the speakers to reduce these negative effects.
Placement
Speaker Placement
The speakers should be placed within a 1.5 meter and 3
meters apart. You should position your speakers so that
each one is at least 0.5 meter away from any bare wall.
Improving Sound Quality
5
Precautions
On Safety
• Contact between bare speaker wires may result in a
short-circuit.
• Should any liquid or solid object fall into the speaker
system, unplug the system’s power cord and have the
system checked before operating it any further.
On Power Sources
• Before operating this speaker system, check that the
operating voltage of the speaker system is identical to the
wall outlet voltage where the speaker is being connected.
• If you are not going to use the speaker system for a long
period of time, be sure to disconnect the speaker system
from the wall outlet. To disconnect the AC power cord
(mains lead), grasp the plug itself and never pull the cord.
• AC power cord must be changed by quali ed electrical
personnel.
On Placement
• Use good lifting practice when moving speakers to avoid
injury.
• Do not install the speakers in an inclined position.
On Operation
• Before making any connections, turn off your receiver
or audio source and unplug if from the AC (mains) power
outlet. Not doing this may result in damage to your system.
• The volume level should not be turned up to the point of
distortion.
On Adjusting Volume
• Do not turn up the volume while listening to a portion
with very low level inputs or no audio signals. If you do,
the speakers may be damaged when a peak level portion is
played.
On Cleaning
• Clean the cabinet, panel and controls with a soft cloth
slightly moistened with a mild detergent solution. Do not
use any type of abrasive pad, scouring powder or solvent
such as alcohol or benzine.
6
System Features
• High Performance With Smooth & Detailed Reproduction
• Phantom Black Wood Veneer Body
• Easy 1-2-3 Direct Play Setup
• All-In-One Home Audio Solution
• Wide Range 3-Way Soundstage Performance
• Fully Powered, Bi-ampli ed System
• Advanced Wireless Bluetooth Connectivity
• Internal, Magnetic Motor Shielding Protection
• Optimum Bass Re ex Wood Enclosure Design
• CAD Energized Bass Port Design
• Soft Dome 1.5” High Frequency Driver
• High Performance 4” Midrange Driver
• Deep Note 8” Solid Bass Subwoofer
• Karaoke Function with Dual Mic Input & Echo Control
• USB Drive / SD Card Music Playback
• WMA / MP3 Music File Compatibility
• Bass, Treble, Mic, Echo & Volume Adjustments
• Built-In Digital Control POD
• High Clarity Class A/B Ampli er Technology
• Low Distortion CMOS Signal Processing Technology
• Infrared Full Function Wireless Remote Control
39
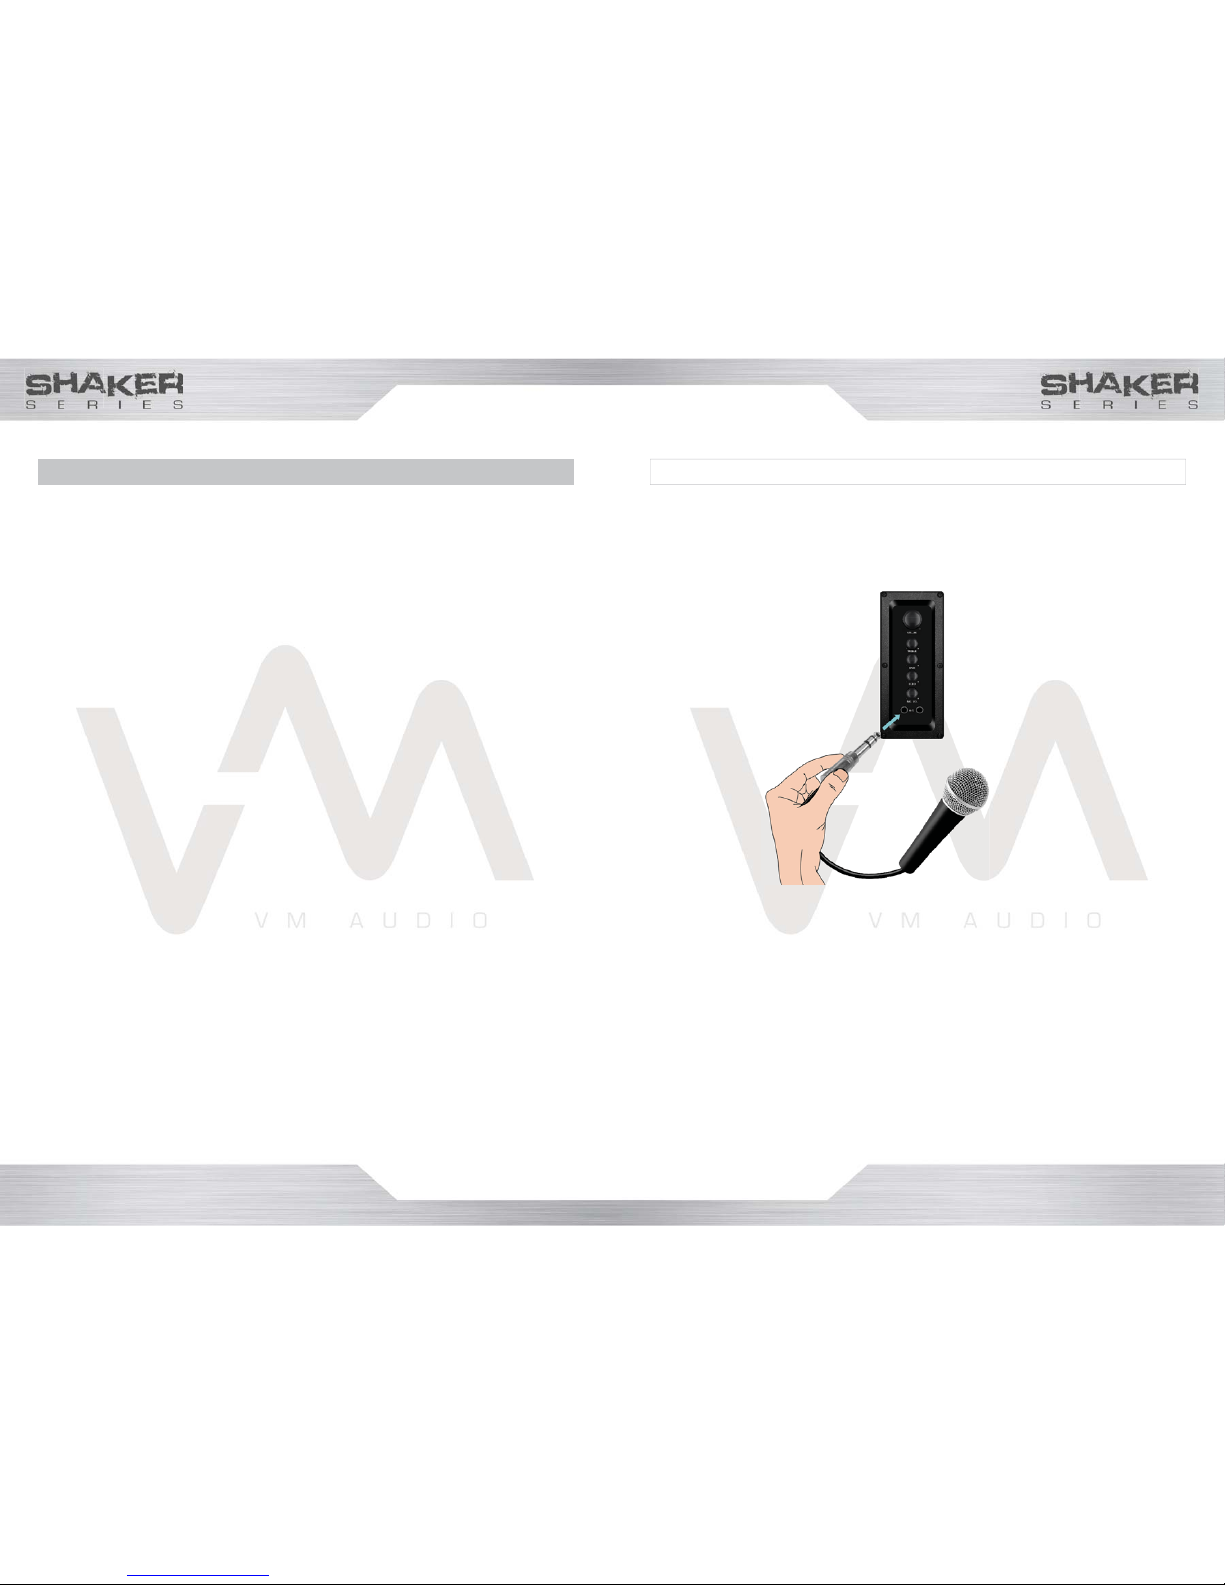
Operation
Step 1: Connect the microphone to the input plug on the
Level Control Panel.
Using Microphone
Step 2: Adjust the microphone level (see page 28).
Step 3: Adjust the ECHO level (see page 29).
Caution
• Do not drop or tap microphone as damage to the mic or
speakers may occur.
• Avoid feedback by placing the microphone behind the
speakers.
• Do not point microphone directly to the front of the
speakers.
38
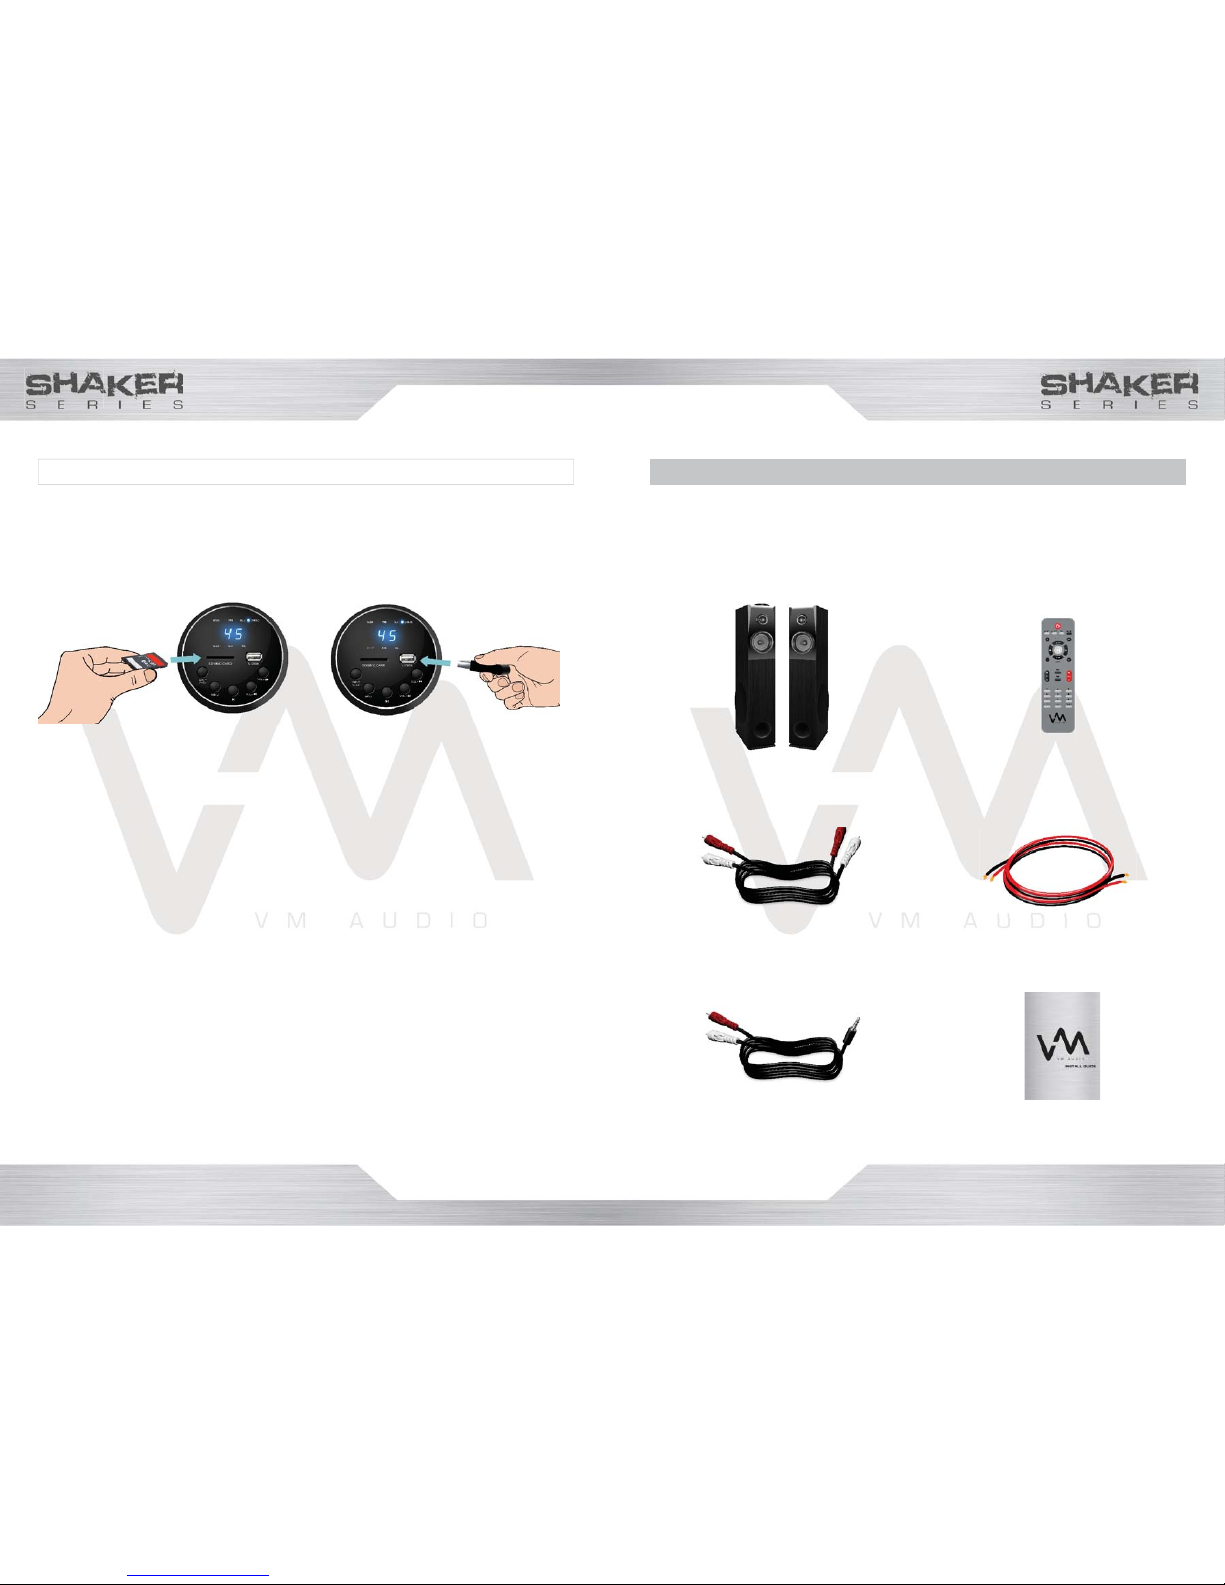
Using USB/SD Audio Source
Step 1: Insert the USB drive or SD card to it’s
corresponding USB or SD port on the Digital Control POD.
Operation
Step 2: Music playback will begin automatically.
Step 3: Search select VMAUDIO-SRAT10-BK
Step 4: Adjust VOLUME level (see page 24).
Step 5: Adjust TONE to the desired levels (see page 26).
Note
• INPUT will recognize drive and will automatically select USB
input.
• When inserting an SD card, “SD” will brie y display on the
LED screen, followed by the number of tracks on the card,
the track number it will currently play and end with the track
time running.
• When inserting a USB drive, USB will brie y display on the
LED screen, followed by the number of tracks on the drive
and end with the track time running.
7
Review the contents of the package and make sure the
following items are included:
Included
RemoteSpeaker Cabinets
RCA-to-RCA Cables 20ft Speaker Wire
RCA-to-3.5mm Cable User Guide
SRAT10-BK
SHAKER SERIES
ACTIVE FLOORSTANDING
LOUDSPEAKERS

8
Right SpeakerLeft Speaker
Front View
Overview
37
Step 1: Select AUX as the audio INPUT source if it is not
already selected (see page 23).
Step 2: Start audio source and play track (refer to the
audio source’s user guide for instructions).
Step 3: Adjust the VOLUME level (see pages 24-25).
Step 4: Adjust TONE levels as desired (see pages 26-27).
Using AUX Audio Source
Operation
Bluetooth Pairing
Step 1: Select BLU as the audio INPUT source if it is not
already selected BLU LED will blink rapidly to indicate pairing
mode is ready.
Step 2: Set your device to Bluetooth pairing mode (refer to
the audio source’s user guide for instructions).
Step 3: Search select VMAUDIO-SRAT10-BK
Step 4: When pairing is a success and complete the BLU
LED will stop blinking and will remain on.
Step 5: Start music playback.
Step 6: Adjust VOLUME level (see page 24).
Step 7: Adjust TONE levels as desired (see pages 26).
Note
Average Bluetooth wireless range is 30 ft.
Using Bluetooth Audio Source

36
Sleep Function
Use SLEEP feature to put speaker system in Stand-by
mode at a predetermined time.
You can set time in 10 minute intervals.
Settings & Adjustments
Reset Mode
Press RESET button on
the REMOTE once.
Reset function, adjusts all levels and settings to their
original factory con gurations.
Once all levels and settings are reset, 45 will appear in the
Digital Control POD display.
If RESET is set during USB / SD playback, 45 will appear for
a brief moment.
Maximum time that is reached is120 minutes.
1. Press SLEEP repeatedly until the desired time is reached
and it appears in the Digital Control POD display.
2. To cancel timer, press SLEEP repeatedly until 0 appears
in the Digital Control POD display.
9
Overview
Rear View
Ampli er
Back Plate
Speaker
Connector
Right SpeakerLeft Speaker

10
Side View
Overview
Left Speaker
Side Panel
Control
Digital Control
Pod
35
EQ Presets
Four equalizer presets are available to customize the sound
(Pop, Jazz, Rock, Classic).
Note
Function only available when USB/SD input is selected.
Settings & Adjustments
Remote
1. Repeatedly press
the EQ button to cycle
through the EQ options
(EQ1, EQ2, EQ3, EQ4)
2. To cancel EQ, press
EQ repeatedly until EQOF
appears on display.
Display Dimmer
This function adjusts the intensity brightness of the LED
display.
Brightness can only be adjusted via the REMOTE.
1. Repeatedly press
the DISP + button to
increase the display
brightness.
2. Press DISP button to decrease
brightness.

34
Pausing Music Playback
Function only available when BLU (Bluetooth) or USB/SD
input is selected.
Settings & Adjustments
1. Press the >ll button
once to pause.
2. Press, >ll button
once again to resume
playback.
Using Remote
Using Control POD
Note
LED display will blink when pausing.
11
Top View
Overview
Left Speaker
Digital Control
POD

12
Level Control Panel
Overview
VOLUME
TREBLE
BASS
MIC. VOL
ECHO
MIC
33
Repeat Play
This function allows you to “shuf e” tracks and play in
random order.
Settings & Adjustments
While the track you want is playing, press
REPEAT until “ANd” appears on the display
in the Digital Control POD. All the tracks
in USB drive or SD card will play in random
order continuously.
To Cancel Random Order Play
Random Order Play
Press REPEAT
repeatedly until “ALL”
appears in the Digital
Control POD display.

32
Repeat Play
This function allows you to repeat one track, shuf e tracks
(play in random), and continuous play all the tracks in a loop
when in USB/SD or Bluetooth is use.
Settings & Adjustments
Repeating The Current Track
While the track you want is being played,
press REPEAT until “ONE” appears on the
display in the Digital Control POD. The
current track will repeat continously.
To Cancel REPEAT
Press REPEAT
repeatedly until “ALL”
appears in the Digital
Control POD display.
Note
Repeat “ALL” is the default setting when a USB drive or SD
card is in use.
Repeat “ALL” plays all the tracks in the USB drive or SD card
in a continuous loop.
Repeat “ALL” cannot be cancelled unless a different repeat
feature is selected.
13
Ampli er Back Plate
Overview
Speaker
Output
Audio Input
Jacks
Power Cord
Power Switch

14
Overview
Digital Control POD
14
7
6
5
4
3
2
1
8
9
10
11
12
13
15
31
Direct Access Play
This function allows quick access to tracks by entering their
track number.
Track number can be entered at any time during playback.
Function only available when BLU (Bluetooth) or USB/SD
input is selected.
Settings & Adjustments
• Enter the track number into the numeric key pad.
• To select a two-digit track, press two numbers
within 4 seconds and press play.
Note
If two numbers are pressed and the play button is not
pressed right after, the two-digit track will play after a few
seconds.
Using Remote

30
Choosing Music File To Play
Function only available when BLU (Bluetooth) or USB/SD
input is selected.
Settings & Adjustments
1. Press the >>l +
button to go to the
next track or forward
skip tracks until the
track number you want
appears on the display
of the Digital Control
POD.
2. Press the - l<< button
to go to the previous
track or reverse skip
tracks until the track
number you want
appears on the display
of the Digital Control
POD.
Using Control POD
Using Remote
15
Digital Control POD Functions
Overview
1-
2 -
3 -
4 -
5 -
6 -
7 -
8 -
9 -
10 -
11 -
12 -
13 -
14 -
15 -
Input selector / On-OFF wake button.
Tone control selector button.
Play / Pause control button.
Reverse skip function / Volume down button.
Forward skip function / Volume up button.
LED indicator for bass adjustment.
LED indicator for treble adjustment.
LED indicator for Bluetooth operation.
LED indicator for USB/SD operation.
LED indicator for sleep timer function.
LED indicator for equalizer preset function.
LED indicator for Auxiliary operation.
LED display.
USB drive input port.
SD card input port.

16
Remote
Overview
19 11
12
2
1
9
5
3
4
17
18
16
15
8
10
6
20
7
13 14
29
Settings & Adjustments
Adjusting Echo Level
Using Level Control Panel
Using Remote
Turn TREBLE knob
clockwise to increase,
turn counterclockwise
to decrease level.
Press TRE + to
increase, TRE - to
decrease level.

28
Adjusting Microphone Level
Settings & Adjustments
Using Level Control Panel
Using Remote
Turn TREBLE knob
clockwise to increase,
counterclockwise to
decrease level.
Press TRE + to
increase, TRE - to
decrease level.
17
Overview
Remote Function Buttons
1 -
2 -
3 -
4 -
5 -
6 -
7 -
8 -
9 -
10 -
11 -
12 -
13 -
14 -
15 -
16 -
17 -
18 -
19 -
20 -
System On-OFF wake.
Input selector switch.
Play / Pause control function.
Reverse skip function.
Forward skip function.
Direct numeric input keypad.
Repeat function.
Volume level adjustment.
Bass level adjustment.
Treble level adjustment.
Equalizer preset function.
Mute function.
Microphone level decrease.
Microphone level increase.
Echo level decrease.
Echo level increase.
Dimmer display increase.
Dimmer display decrease.
Sleep timer function.
System reset function.

18
Speaker Wire Connection
Connections
Right Speaker
1. Push the negative (Black)
spring loaded tab to open
and insert the negative wire
into the terminal.
2. Push the positive (Red)
spring loaded tab to open
and insert the positive wire
into the terminal.
Pushthe
n
eg
at
ive (Black
)
spring loaded tab to open
and insert the negative wire
tothetermina
l.
27
Adjusting Tone Quality
Settings & Adjustments
Press Menu to select
BASS or TREBLE
This function is only available when AUX input is selected.
Using Digital Control POD
Press VOL + to
increase level, VOL -
to decrease level.
r
ess
increase
to dec
r

26
Adjusting Tone Quality
Using Level Control Panel
Settings & Adjustments
Adjusting BassAdjusting Treble
Using Remote
Turn TREBLE knob
clockwise to increase
level, counterclockwise
to decrease level.
Turn TREBLE knob
clockwise to increase
level, counterclockwise
to decrease level.
Press BASS + to
increase, BASS - to
decrease level.
Press TRE + to increase,
TRE - to decrease level.
19
Connections
Speaker Wire Connection
Left Speaker
Be sure to only connect positive
speaker wires to positive
terminals (Red), and negative
speaker wires to negative
terminals (Black).

20
Connections
Connection Audio Source
Be sure to turn off the power of each component before
making the connections.
When connecting the RCA cable, be sure to match
the color-coded cord to the appropriate jacks on the
components. Red (right) to Red and White (left) to White. Be
sure to make rm connections to avoid humming and noise.
Analog RCA Inputs
25
Adjusting Volume
Settings & Adjustments
This function is only available when AUX input is selected.
Using Digital Control POD
Press VOL + to
increase, VOL - to
decrease volume.
Press MUTE to
silence sound,
press again to
enable sound.
Mute Sound
Using Remote

24
Adjusting Volume
Settings & Adjustments
Using Level Control Panel
Using remote
Turn VOLUME
knob clockwise to
increase volume, turn
counterclockwise to
decrease volume.
Press VOL + to
increase, VOL - to
decrease volume.
21
Power Cord Connection
Connections
Connect this power cord
after all other cables and
cords are connected.
Co
nnect tt
thispower cord
after
a
ll
ot
o
her
cables and
crds
arre
connec
te
d.

22
Turning Speaker System On
Settings & Adjustments
Press POWER switch to
ON position to provide
power to system.
Press POWER button to
turn ON speaker system.
• Volume level will automatically self adjust to 45 and it will
display on the LED screen.
• Input source from the last session will be selected.
Using Remote
23
Source Input Selection
Settings & Adjustments
Select the following:
AUX - To play directly from a portable audio device.
BLU - To transmit audio wirelessly through Bluetooth.
USB - To play MP3 or WMA audio les using USB ash
drive or SD card.
Use this function to select the desired input audio source.
Press INPUT repeatedly
to select the desired
audio source.
Using remote
Using Digital Control POD
Press INPUT button
repeatedly to select the
desired audio source.
 Loading...