


SRA1500.1 / SRA2200.1
MONO AMPLIFIERS

CONTENTS INTRODUCTION
Thank you for your interest in VM Audio products.
INTRODUCTION
FEATURES
FUNCTIONS
GETTING STARTED
INSTALLATION
2
2
3
5
7
Our goal is to enhance your listening experience.
The Shaker Series was designed as the economical
solution for a performance craving, casual
consumer. The experts and engineers at VM Audio
have meticulously tested and designed this product
with a reasonable price tag to t any budget. Let
the Shaker Series maximize the value of your
investment.
POWER CONNECTIONS
AUDIO INPUT
LINE OUTPUT
REMOTE CONNECTION
SPEAKER WIRING
CONTROLS
CALIBRATION
TROUBLESHOOTING
SPECIFICATIONS
WARRANTY
8
11
12
13
14
17
18
20
22
23
FEATURES
Class A/B Ampliers
Low Noise and Distortion
Bridgeable Outputs
DC-to-DC PWM Conversion
Unbalanced Inputs
Soft Turn-On
Discrete Signal Processing
Preamp Stereo Outputs
Amplier Protection Circuits
Variable Gain Control
Lowpass Active Crossover
Frequency Variable Crossover
Bass Boost Gain
Remote Bass Adjustment
2
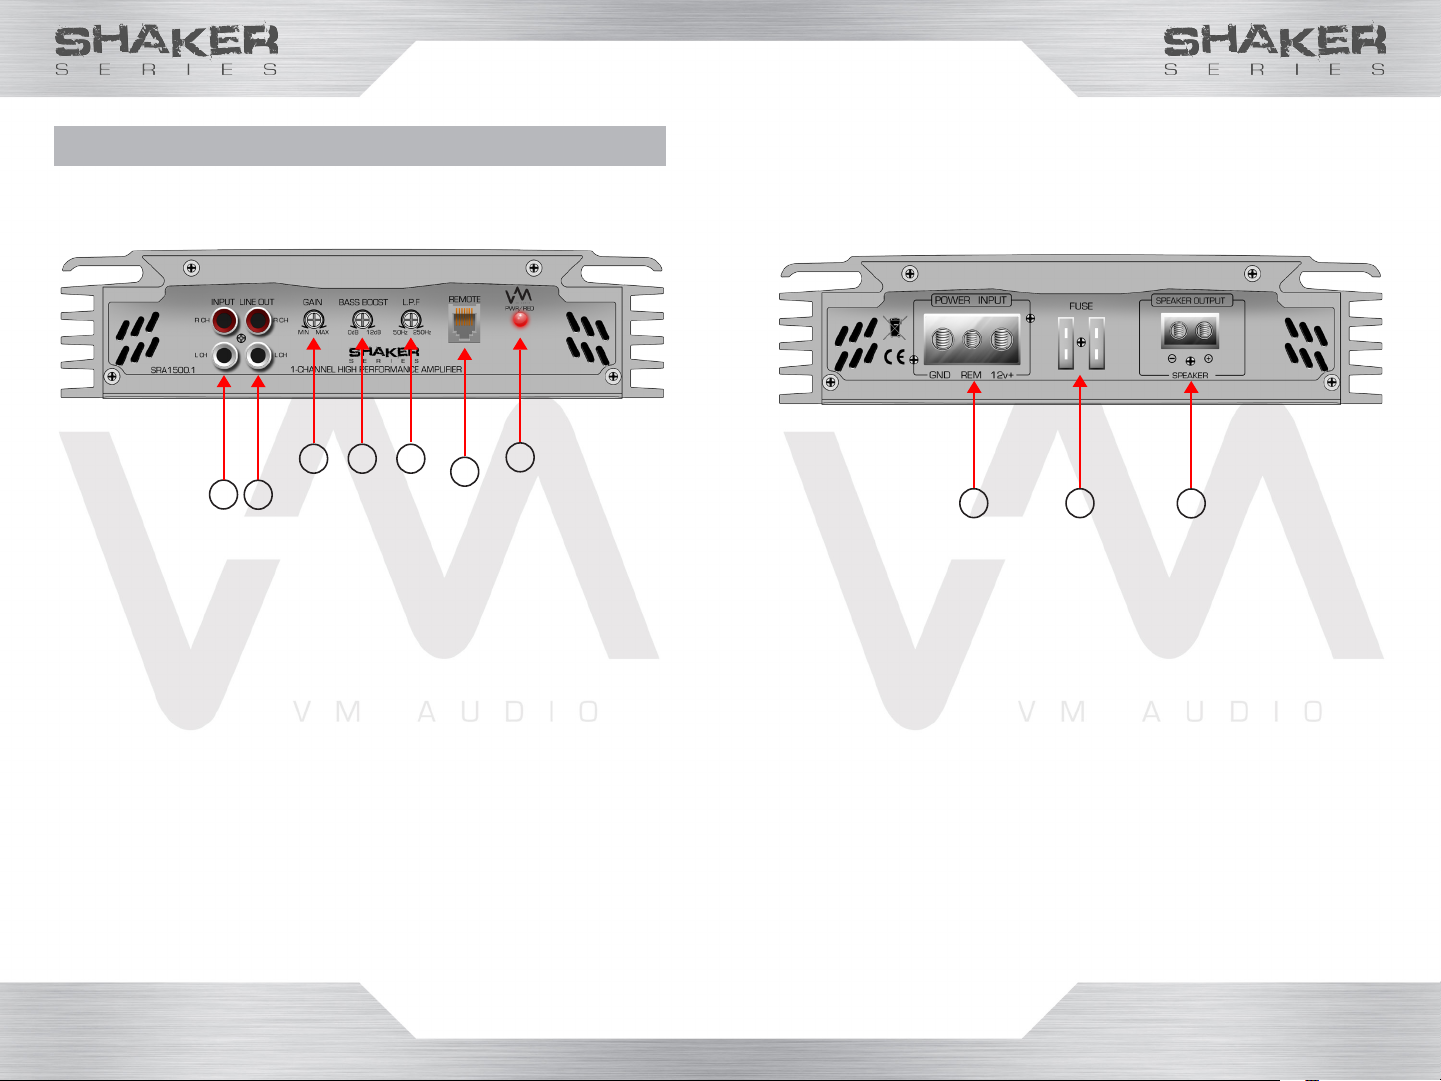
FUNCTIONS
Front Panel
SRA1500.1
Shown
1
3 4 5
2
1. INPUT: Audio Cable Jack Connections
2. OUTPUT: Audio Cable Jack Connections
3. GAIN: Input Signal Adjustment Knob
4. BASS BOOST: Bass Adjustment Knob
5. LPF: Low Frequency Filter Adjustment Knob
6. REMOTE: Remote Bass Knob Cable Plug
7. LED: Power Status LED
7
6
Rear Panel
SRA1500.1
Shown
8
9
8. POWER INPUT: Power Cable Terminal
9. FUSE: In-Line Protection Fuse(s)
10. SPEAKER OUTPUT: Speaker Wire Terminal
10
3 4

GETTING STARTED
Mounting
• Mount the amplier on a at, secure surface.
• Investigate the layout of your automobile
thoroughly before drilling.
• Place the amplier in a location that allows air to
circulate around it to keep it cool.
• If possible, mount the amplier vertically for
proper heat dissipation.
• Avoid mounting the amplier upside-down as
this will not provide adequate ventilation for the
amplier.
• In order to prevent overheating, avoid covering
the amplier with carpet or enclosing it behind
the interior panels.
• If the amplier is installed in a tight area, it must
have at least a 1-inch air gap all around for
proper cooling.
Warning!
• Be aware of gas tanks, gas lines, hydraulic lines
and electrical wiring when drilling mounting holes
to prevent serious or life threatening injuries.
• Do not leave the amplier unmounted in order to
prevent the unit from ejecting like a projectile in
the unexpected event of an accident.
• Do not mount the amplier on top of wires or
metal surfaces in order to prevent electrical
short circuit or a re.
• Never mount the amplier in the engine
compartment.
Wiring
• Before you begin routing and connecting the
power wires, disconnect the negative ground
cable from the vehicle’s battery.
• Install and connect the highest possible wire
gauge the amplier’s terminal will accept (1/0
GAUGE) for both power cables (+12V and GND).
• Install an in-line fuse into the positive (+) wire 18
inches away from the car battery. It should be
the same rating as the amplier’s internal fuse(s)
• Route all power and speaker wires inside the
vehicle toward the amplier prior to mounting it.
• Avoid routing electrical wires where they are at
risk of getting pinched.
• Use rubber or plastic grommets to protect any
wires when routed through metal.
• Route the power cables through one side of
the vehicle while routing the RCA audio cables
through the other side.
• The ground connections should be as short as
possible and always be connected to chassis
metal. Chassis ground connection should be
clean, rust free, unpainted and as close to the
amplier as possible.
Warning!
• Disconnect the negative (-) battery terminal
before routing cables and wires to prevent
electrical shorts.
• Never route wires underneath the vehicle.
• Do not run wires through sharp edges.
• Always turn off amplier(s) before making any
type of connection.
5 6

INSTALLATION POWER CONNECTIONS
Make sure to mount the amplier in a location
where there is enough room to have access to the
knobs and terminals.
1
Mark the mounting
screw holes to be
drilled with a marker.
2
Drill the holes on the
marked spots with an
electric drill.
3
Secure the amplier
with screws using a
phillips screwdriver.
WARNING! Be aware of gas tanks, gas lines, hydraulic
lines and electrical wiring when drilling mounting holes
to prevent serious or life-threatening injuries.
Make sure to disconnect the negative (-) battery
terminal before routing cables and wires to
prevent electrical shorts.
Power
Capacitor
Battery
Terminal
VM Audio SRPK8R power kit
recommended
1. Strip 1/2 inch of insulation off each end of the
power cables.
2. Connect one end of the power cable to the
positive + battery post.
3. Install an in-line fuse holder 18 inches away from
the car battery.
4. Route the power cable from the battery to the
in-line fuse holder and connect.
5. Route the power cable from the in-line fuse
to the amplier’s power terminal (or a power
capacitor such as VM Audio SRCAP2.0).
6. Connect the power cable to the in-line fuse
and the other end to the amplier’s positive +12V
power terminal (or capacitor’s positive + terminal).
In-Line
Fuse
Power
Terminal
7 8

POWER CONNECTIONS Continued...
The remote wire, when connected to the amplier, is
designed to turn on the amplier automatically when
your stereo is turned on.
REMOTE
1. Locate the remote wire on the stereo head unit.
2. Route the remote wire with a wire length that
expands from the stereo head unit all the way to
the amplier’s negative power terminal.
3. Strip both ends of the remote wire by 1/2” to
expose the wire.
4. Connect the remote wire to the stereo’s
remote wire by twisting both wires together, and
insulate the connection well with electrical tape.
5. Connect the other end of the remote wire to
the amplier’s remote REM terminal.
Consult with the manufacturer’s user guide for your
stereo head unit to locate the remote or turn-on wire,
as some manufacturers might label their amplier
turn-on feature differently.
For a good electrical connection and maximum power
transfer, use the same gauge size ground cable as
the power cable. The length of the cable should be
as short as possible and as close to the amplier as
possible.
GROUND
1. Locate a good, non-rusted chassis metal point
in the vehicle.
2. Mark and drill a screw hole with an electric drill
where chassis ground connection is to be made.
3. Use sandpaper to remove paint or rust to
expose the area to bare metal.
4. Strip 1/2” of insulation on both ends of the
ground cable to expose the wires.
5. Connect one end of the ground cable to an
O-ring connector, and tightly fasten the connector
using a sheet metal screw to the chassis metal.
6. Connect the other end of the gound cable to
the amplier’s ground GND terminal.
WARNING! Be aware of gas tanks, gas lines, hydraulic
lines and electrical wiring when drilling mounting holes
to prevent serious or life-threatening injuries.
9 10

AUDIO INPUT LINE OUTPUT
The audio inputs on the side panel of the amplier
receive low level signals from the RCA outputs
of the stereo head unit. If your stereo head unit
does not have RCA outputs, a High-to-Low level
converter (not included) must be used. Both line
inputs need to be connected to the stereo head
unit in order to use all of the speaker outputs.
Stereo RCA Cables
Right
Channel
Left
Channel
Speaker Wires
Right
Channel
The pre-amp line outputs allow linking additional
ampliers without the need to split the audio signals
from the stereo, using Y-RCA cable adaptors.
Amplier Line Outputs
Main
Amplier
Linking
Amplier
Left
Channel
High-to-Low Level
Converter
(not included)
11 12

REMOTE CONNECTION
SPEAKER WIRING
The remote control knob will allow you to control the
bass output from your dashboard.
Remote Cable Plugin
Remote Plug
on Amplier
Remote
Bass Knob
1. Carefully route the cable (included) from
the amplier to your stereo head unit.
2. Once the cable is in place, connect one
end of the cable to the remote bass knob.
3. Connect the other end of the cable to
the amplier remote plug input.
Single Subwoofer Wiring
2Ω - 4Ω
SPEAKER
IMPEDANCE
Connect the subwoofer’s positive + terminal to the
positive + terminal on the amplier, then connect the
negative (-) terminal of the subwoofer to the negative
(-) terminal on the amplier.
Amplier Filter Setting
80 Hz
13 14

SPEAKER WIRING Continued...
Parallel Subwoofer Wiring
1 2
2Ω - 4Ω
TOTAL
IMPEDANCE
Connect the positive + terminals from subwoofers 1
and 2 to the positive + terminal on the amplier, then
connect the negative (-) terminals from subwoofers 1
and 2 to the negative (-) terminal on the amplier.
Amplier Filter Setting
Series Subwoofer Wiring
1
2Ω - 4Ω
2
Connect subwoofer 1’s positive + terminal to the negative
(-) terminal on subwoofer 2, then connect the negative
(-) terminal of subwoofer 1 to the negative (-) terminal on
the amplier. Connect subwoofer’s 2 positive + terminal
to the positive + terminal on the amplier.
Amplier Filter Settings
TOTAL
IMPEDANCE
80 Hz
80 Hz
15 16

CONTROLS
CALIBRATION
Description
Gain: This feature controls the audio input
signal strength going into the amplier.
Bass Boost: Increases the bass level from
+1dB up to +18dB.
LPF Frequency: Low pass crossover
frequency lter adjustment.
REMOTE: Gain knob cable input plug to
conveniently adjust the bass boost strength.
Power LED: Power and protection amplier
status indicator.
Input: Line level audio inputs.
Output: Line level audio outputs.
Setting Gain
1. Turn the gain and bass control all the way
down (counterclockwise).
2. Turn the vehicle on, and make sure the source
unit is turned on.
3. Insert a CD/DVD with undistorted music.
4. Start to increase the volume at the source unit
until you hear distortion (aproximately at 90%).
5. Turn the volume down at the source unit until
the distortion goes away.
6. At the amplier, slowly turn the Gain control
up (clockwise) until you hear a slight audio
distortion.
7. Turn the Gain control back down until the audio
distortion goes away.
8. When the Gain control is properly set, you
should be able to achieve the maximum
undistorted output with the volume turned all
the way up.
Warning!
Do not set the amplier’s gain very high as noise,
distortion and amplier heat will increase signicantly
and amplier failure could occur.
If Bass Boost is used, keep the Gain setting down.
17 18

CALIBRATION Continued...
TROUBLESHOOTING
Setting Bass Boost
1. Turn the gain and bass control all the way
down (counterclockwise).
2. Turn the vehicle on, and make sure the source
unit is turned on.
3. Insert a CD/DVD with undistorted music.
4. Start to increase the volume at the source unit
until you hear distortion (aproximately at 90%).
5. Turn the volume down at the source unit until
the distortion goes away.
6. At the amplier, slowly turn the Bass Boost
control up (clockwise) until you hear a slight
distortion from the speakers.
7. Turn the Bass Boost control back down until
the distortion goes away.
8. When the Bass Boost control is properly set,
you should be able to achieve the maximum
undistorted output with the volume turned all
the way up.
Warning!
Do not set or increase the amplier’s gain when setting
the Bass Boost control. Increasing the gain even slightly
will cause the amplier to heat up and amplier failure
could occur.
If the amplier does not appear to be working, check
for blown fuses, poor or incorrect wiring connections
and incorrect settings.
NO SOUND? 1) Source unit volume is turned down
or muted: Turn volume up slowly or turn mute off.
2) Low or no remote turn-on voltage: Check remote
connections at the amplier and source unit. check
with your DMM to make sure there is 12V to the
REM wire. 3) Blown Fuse on the Amplier: Replace
with new fast-blow fuse (same rating). 4) Power
wires not connected: Check battery connections,
Check grounding wire at amplier, Use your DMM
and check your voltage at the amplier. 5) Speaker
leads shorted: Check speaker continuity using your
DMM to ground (it should show no common ground).
6) Speakers not connected or blown: Check speaker
connections at amplier and at speakers, Disconnect
speakers at amplier and measure coil impedance
with DMM.
DISTORTED AUDIO? 1) Gain may not be properly
set: Review section (Calibration) for setting the Gain
properly. 2) Speaker may be damaged: Inspect each
speaker cone for signs of damage (frozen cone,
burned smell, separated or ripped surround or
spider).
REDUCED BASS? 1) Speakers may be wired in
reverse polarity: Reverse a speaker connection from
positive to negative on the stereo or speaker.
19 20

TROUBLESHOOTING Continued...
AMPLIFIER FUSE KEEPS BLOWING? 1) Incorrect
wiring or short circuit: Using your DMM, make sure
that all voltage polarities are correct, Review section
(Installation) for proper wire connection. 2) Amplier
being driven too hard: Turn down the volume. Gain or
Bass Boost not properly set, Review section (Tuning)
for setting the Gain and Bass Boost properly. 3)
Under-sized or faulty fuse installed: Replace the fuse
with a fuse of the same rating in accordance with the
manufacturer’s suggestion.
WHINING NOISE WHEN ENGINE IS ON? 1) RCA
cables too close to power wire: Separate RCA and
power cables, Run an extra set of RCAs on the
outside of the vehicle, and if noise is eliminated you
might need a better shielded RCA cable. 2) Ground
loop problem: Re-Ground the amplier to a more
electrically conductive location, Re-Ground the stereo
head unit to a more electrically conductive location,
Re-ground the amplier to a point of the vehicle that
is secure and not thin metal, Make sure that bare
metal is in contact with the connector. 3) Induced
noise: Relocate components away from electrical
noise sources such as engine control computers and
ABS brake control modules.
AMPLIFIER SHUTS DOWN AFTER PLAYING FOR
A PERIOD OF TIME? 1) Thermal protection circuits
are shutting the amplier off: Check the location for
adequate ventilation (Relocate amplier if necessary),
Impedance may be too low and over heating the
amplier.
SPECIFICATIONS
MODELS
OUTPUT CHANNELS
POWER per channel
4Ω
2Ω
THD-N @ 4Ω
FREQ. RESPONSE
LOWPASS
SUBSONIC
BASS BOOST
INPUT SENSITIVITY
INPUT IMPEDANCE
S/N RATIO
FUSE
DIMENSIONS
WIDTH (inches)
HEIGHT (inches)
DEPTH (inches)
SRA1500.1
15Hz - 350Hz
1
750W
1500W
<0.05%
50 - 350Hz
N/A
0dB - 12dB
200mV - 8V
22k Ω
>90dB
40A
11.35”
9.94”
2.40”
SRA2200.2
1
1100W
2200W
<0.05%
15Hz - 350Hz
50 - 350Hz
N/A
0dB - 12dB
200mV - 8V
22k Ω
>90dB
60A
12.93”
9.94”
2.40”
21 22

CONSUMER LIMITED WARRANTY AGREEMENT
Your product is covered by a limited warranty by VM Audio
as established below:
Mobile Electronics Limited Warranty
Products purchased from an Authorized VM Audio Dealer
are warranted to be free of defects in material and
workmanship for one (1) year from the date of original
purchase under normal usage. Products that are identied
as “refurbished” have a limited warranty of ninety (90)
days from the date of original purchase. Dated proof of
purchase (original receipt or invoice) will be required for all
warranty claims. In the unlikely event that you experienced
a manufacturing defect or malfunction during the warranty
period, VM Audio will repair the defective product or replace
with the same or equivalent product if the same item is not
available or discontinued. Replacement product may have
supercial blemishes or scratches that do not affect the
performance of the product. This warranty is only intended
and valid for the original purchaser and cannot be extended
to subsequent owners. Any applicable implied warranties
are limited to the period of the expressed warranty starting
from the original purchase date. No warranties, expressed
or implied, will be accepted after the previously listed periods.
Exclusions may apply; please check your local state laws.
Instructions for Claiming Warranty Service
If you should require warranty service, please return the
product to the Authorized VM Audio Dealer you originally
purchased the item for an experienced and speedy claim of
your warranty service. Contact VM Audio directly to nd the
Authorized Dealers nearest you.
In the case the defective merchandise needs to be returned
to VM Audio, please contact us and a Return Merchandise
Authorization (RMA) number will be assigned. It is important
to pack all defective items in the original packaging to
prevent damages from shipping, and be sure to write the
RMA number clearly on the outside of the box for faster
processing. Do not include non-defective items as it is not
necessary and will increase your shipping costs.
Include a copy of the original receipt or invoice with the
purchase date, dealer’s name, customer’s name and invoice
number clearly visible. Manufacturing date may be used if no
proof of purchase is provided. The customer will pay to ship
the defective product; COD will not be accepted.
Please follow the above instructions carefully to prevent
voiding your warranty.
Your Warranty Service Does Not Cover the Following:
-Products not purchased from an Authorized VM Audio
Dealer
-Damages from poor installation by not following the included
instruction manual.
-Damages due to excessive moisture, heat and other
elements from improper care.
-Evidence of tampering or repair by non-authorized personnel.
-Products not issued an RMA number.
-Damage during freight from poor packaging or handling.
-Return shipping on non-defective items.
Warranty Turnaround Time
It is VM Audio’s goal to turnaround the merchandise in a
timely fashion of 1 week. Unexpected delays may occur due
to repair parts or replacement shortage.
International Warranty
Please check with your Authorized International VM Audio
Dealer or distributor for specic warranty policies and
process for your country.
23 24
 Loading...