

VM Audio EXM511 Quick Installation Manual
5. OperationSetup (option 2)
6. Troubleshooting
Caution & Warning
5.1 Speaker System
5.1 Speaker System
DVD AUDIO OUTPUT
FL
FR SW
SL
SR
CEN
AUDIO INPUT
R
L
AUXDVD
FL FR
CEN
POWER SOURCE
MODEL:
AC120V 60HZ 350mA
CAUTION
RISK OF ELECTRIC SHOCK
DO NOT OPEN
ON
OFF
POWER SWITCH
SW
SRSL
CEN
FL
FR
AC IN
˜
SL
SR
AUDIO OUTPUT
DVD / Surround
Processor
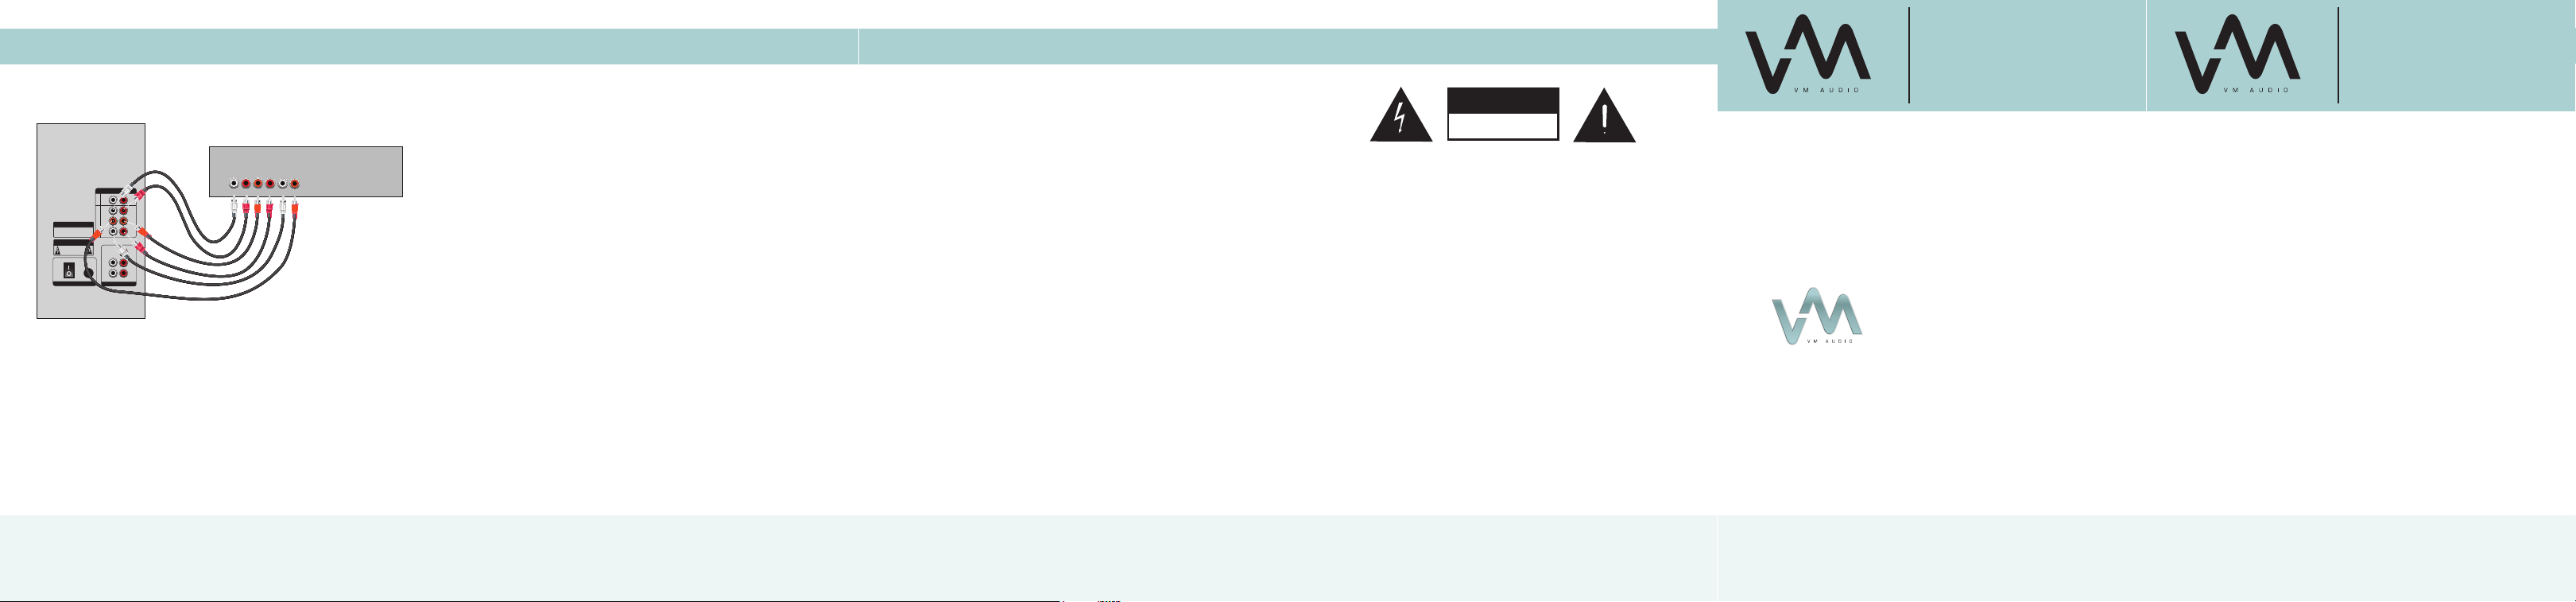
1. Use the Stereo RCA Cables (included) to plug into
your DVD or Surround Processor Outputs.
2. Plug the other end of the cable into the Input Section
of the Subwoofer.
Use the supplied cables to connect to audio source (refer to
Setup Section).
• Turn on the Speaker System.
• Set the Volume for each Speaker to the zero position to start.
• Turn on Audio Source and launch media.
• Select USB / SD / AUX /DVD Iput Source from Remote
Control or Subwoofer Front Panel.
• Adjust each Speaker Volume as needed.
EXCLUSIVE FEATURES
USB and SD Card
The Multimedia System will accept USB or SD data drives that
contain MP3 music files. Music playback order can be adjusted
from the Remote Control.
Pro-Logic Surround
The Multimedia System is equipped with a Pro-Logic surround
mode that provides 5.1 channels of sound with conventional Left
and Right Stereo Sources.
• Select PRO mode for Movie Surround Soundtrack
• Disble PRO mode for Music or Game 2-Channel Sound.
System is not powering on?
• Switch Power Button on and verify if the LED Indicator is
Illuminated.
• Confirm that the AC plug is plugged in and that there is power
to that outlet.
Speaker(s) does not produce sound?
• Verify the system is getting power and check above steps.
• Make sure the volume is turned up to an audible listening level
and/or your PC is not in a mute status.
• Verify that all cables are plugged into the correct jacks.
• Try connecting your system to another audio source or device.
If the system works correctly with the other device, then your
first device is most likely the cause of the problem.
Sound is distorted or is not clear?
• Low quality compressed music files will increase the distortion
and noise that are easily noticed with amplified speakers.
Recheck sound quality with a non-compressed music file.
• Check the audio source level and decrease if necessary. You
should never have your source volume above 90% volume level
to minimize distortion.
CAUTION
RISK OF ELECTIC SHOCK
DO NOT OPEN
CAUTION:
TO REDUCE THE RISK OF ELECTRIC SHOCK, DO NOT REMOVE
COVER (OR BACK). NO USER-SERVICEABLE PARTS INSIDE.
REFER SERVICING TO QUALIFIED SERVICE PERSONNEL.
• Avoid high temperatures. Allow for sufficient heat dispersion
when installed in a rack.
• Keep the bass module free from moisture, water, and dust.
• Do not let foreign objects into the port opening of the subwoofer.
• Handle the power cord carefully. Hold the plug when unplugging
the cord.
• Unplug the power cord when not using the unit for long period
of time.
• Do not let flammable sprays come in contact with the unit.
• Never disassemble or modify the unit in any way.
WARNING:
TO REDUCE THE RISK OF FIRE OR ELECTRIC SHOCK, DO NOT
EXPOSE THIS UNIT TO RAIN OR MOISTURE
EXMS511
VM Audio Tech Support
US / Canada
phone: (855) audio-99 / (855) 283-4699
email: help@vmaudio.com
EXMS511
Quick Installation
Guide
| 7
| 8 | 9
| 10
© VM Audio All rights reserved. All trade names are registered trademarks of
respective manufacturers listed.
Rev. 1

Five Satellite Speakers and One Subwoofer
5.1 Speaker System
Quick Installation
Guide
EXMS511
Rev. 1
RCA-to-RCA Cables
(3 pcs)
RCA to 3.5mm Cable
(1 pc)
Quick Guide
1
PRO
SLEEP USB
NOR
AUX DVD
INPUT
ST. BY
VOL+
VOL-
PRO-LOGIC
SD/MMC CARD U DISK
3. ConnectConnections/ControlsConnections/Controls2. Connections/Controls1. Inside The Box
4. Setup (option 1)
----- System Power (On/Off)
DVD / Surround Processor
MP3
Notebook
TV
Game Console
Smartphone
Tablet
----- Temporarily Turns Sound (On/Off)
MUTE
----- Multi-Channel Sound (On/Off)
MUTE
IR
2
3
1. Indicator Display
2. Function Buttons
(Input / St. By / Pro-Logic / Vol)
3. SD/MMC/USB Card Input
POWER SOURCE
MODEL:
AC120V 60HZ 350mA
ON
4
OFF
CAUTION
RISK OF ELECTRIC SHOCK
DO NOT OPEN
POWER SWITCH
AC IN
˜
AUDIO INPUT
L
AUXDVD
FL FR
CEN
FL
SL
AUDIO OUTPUT
6
R
4. Power Switch
5. AC Power Cord
SW
SRSL
CEN
FR
SR
6. RCA Aux Audio Inputs
7
7. RCA Surround Audio Inputs
8. RCA Speaker Outputs
8
USB SD AUX
FL FLFRFR
SW
SL SL SR SR
1 2
4
7 8 9
REPEAT
EQEQDISP
PRO
DVD
SLEEP
SLEEP
CEN
VOL
CEN
3
5
6
RESET
0
DISP
5
0-9 BUTTONS
PRO
USB
SD
AUX
DVD
SLEEP (-/+)
FL (-/+)
FR (-/+)
SW (-/+)
CEN (-/+)
VOL (-/+)
SL (-/+)
SR (-/+)
REPEAT
RESET
EQ (-/+)
DISP (-/+)
----- USB Source Selector
----- SD Source Selector
----- Alternate Source Selector
----- DVD Source Selector
----- Play or Pause
----- Previous Song (USB/SD only)
----- Next Song (USB/SD only)
----- Timer to Turn-off System
----- Front Left Volume Controller
----- Front Right Volume Controller
----- Subwoofer Volume Controller
----- Center Volume Controller
----- Master Volume Controller
----- Surround Left Volume Controller
----- Surround Right Volume Controller
----- Song/Track Selector
----- Song Repeat
----- Volume Reset
----- Equalizer On/Off (USB/SD only)
----- Display Illumination Adjustment
AUDIO INPUT
R
L
AUXDVD
FL FR
CEN
POWER SOURCE
MODEL:
AC120V 60HZ 350mA
CAUTION
RISK OF ELECTRIC SHOCK
DO NOT OPEN
ON
OFF
POWER SWITCH
SW
SRSL
CEN
FL
FR
AC IN
˜
SL
SR
AUDIO OUTPUT
1. Plug the Speaker Wires from each Satellite Speaker
into the RCA Output jacks on the Subwoofer.
2. Plug the Subwoofer Power Cord into an electrical
outlet.
AUDIO INPUT
R
L
AUXDVD
FL FR
CEN
POWER SOURCE
MODEL:
AC120V 60HZ 350mA
CAUTION
RISK OF ELECTRIC SHOCK
DO NOT OPEN
ON
OFF
POWER SWITCH
SW
SRSL
CEN
FL
FR
AC IN
˜
SL
SR
AUDIO OUTPUT
1. Using the appropriate audio cable (RCA-to-RCA or
RCA-to-3.5m Cable, both included) plug one end of the
cable into the audio output of your choice for source.
2. Plug the other end of the cable into the Input Section
of the Subwoofer.
| 1 | 2 | 3 | 4 | 5 | 6
 Loading...