

Page 1

Version 28.07.2015
v.LiNK Video-inserter
VL2-MIB-2
for VAG Fahrzeuge with
MIB High/Standard infotainment systems
with 7”/8” or 5.8” monitors
Video-inserter with 2 video + RGB + rear-view camera input and CAN control
Product features
Video-inserter for factory-infotainment monitors
2 video-inputs for after-market devices (e.g. DVD-Player, DVB-T tuner, …)
Built-in audio-switch (no audio-insertion)
Rear-view camera video-input
Automatic switching to rear-view camera input on engagement of reverse gear
Activitable parking guide lines for rear-view camera
RGB-input for after-market navigation
Video-in-motion (ONLY for connected video-sources)
Compatible with factory rear-view camera
AV-inputs PAL/NTSC compatible
Page 2

Version 28.07.2015 VL2-MIB-2
Pag
e2
Contents
1. Prior to installation
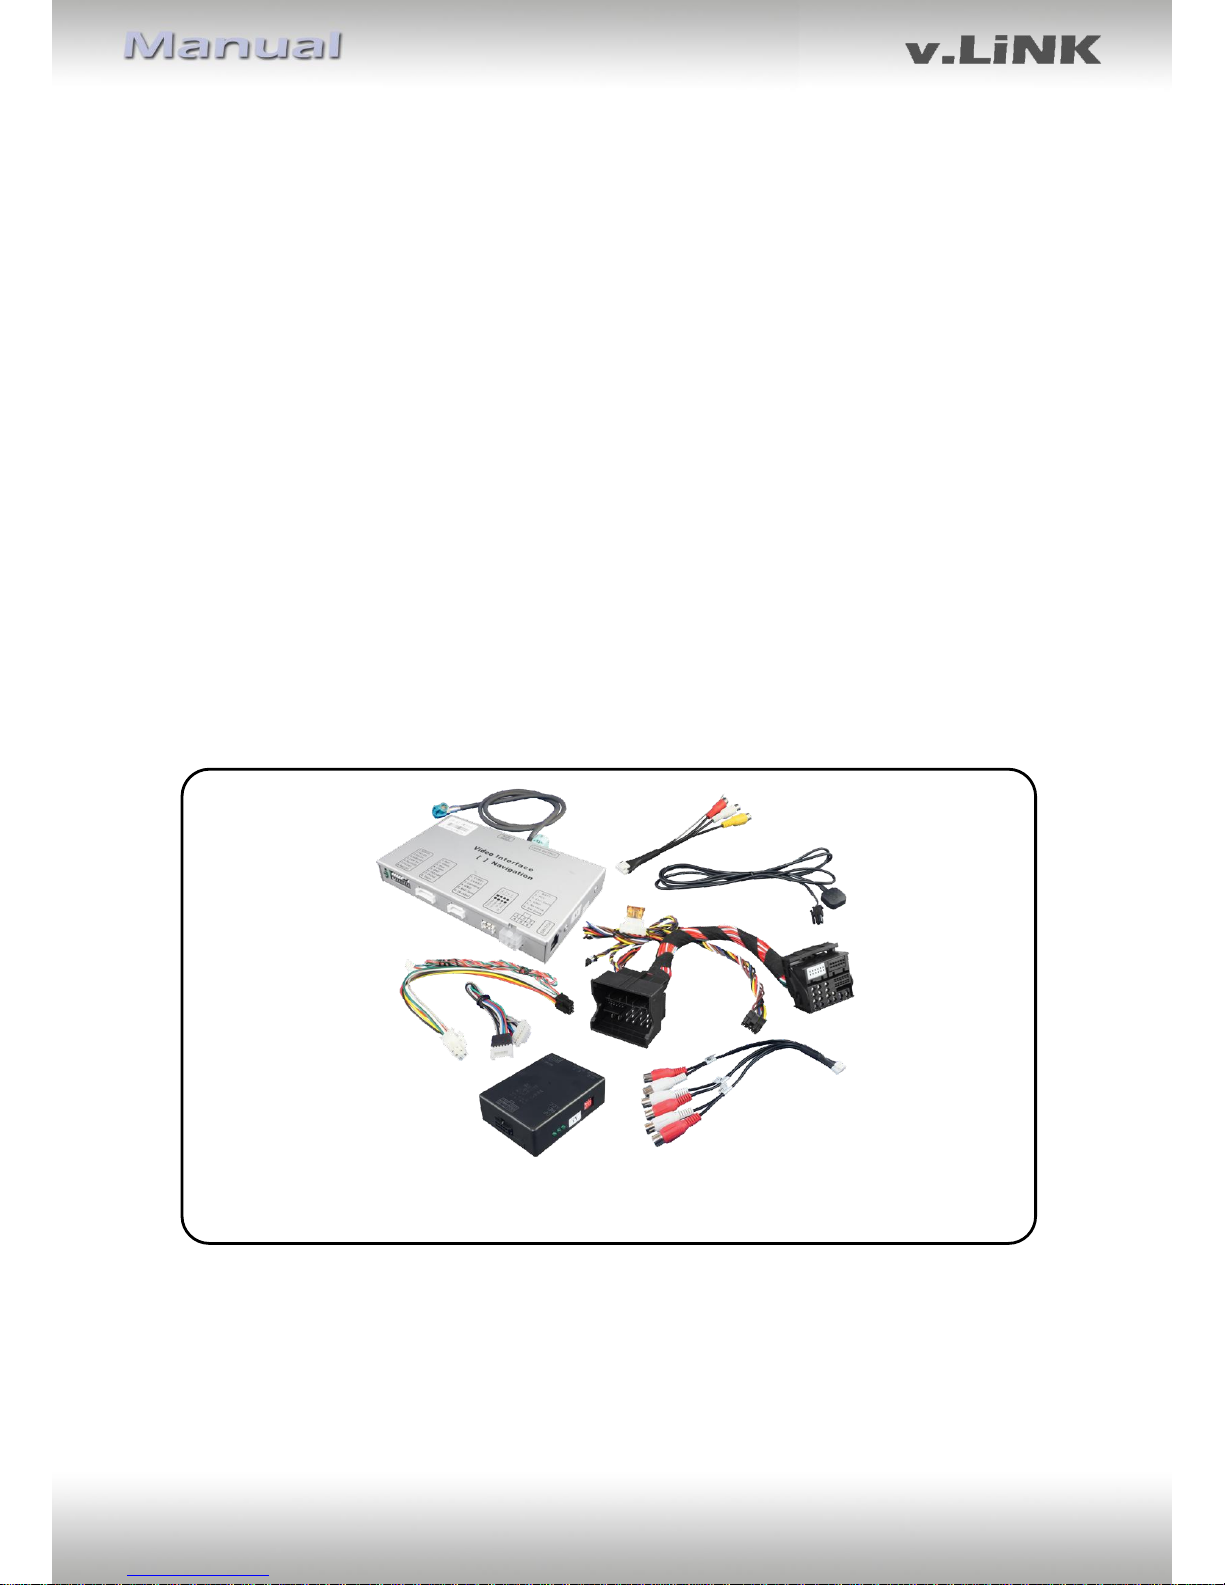
1.1. Delivery contents
1.2. Checking the compatibility of vehicle and accessories
1.3. Dip-switch settings
1.3.1. Vehicle selection (dip 7-8)
1.3.2. Video signal selection after-market navigation (Dip 4)
1.3.3. Enabling the interface’s video inputs (dip 1-3)
1.3.4. Rear-view camera settings (dip 5)
1.4. Dip-switch settings of the CAN-box
2. Installation
2.1. Place of installation
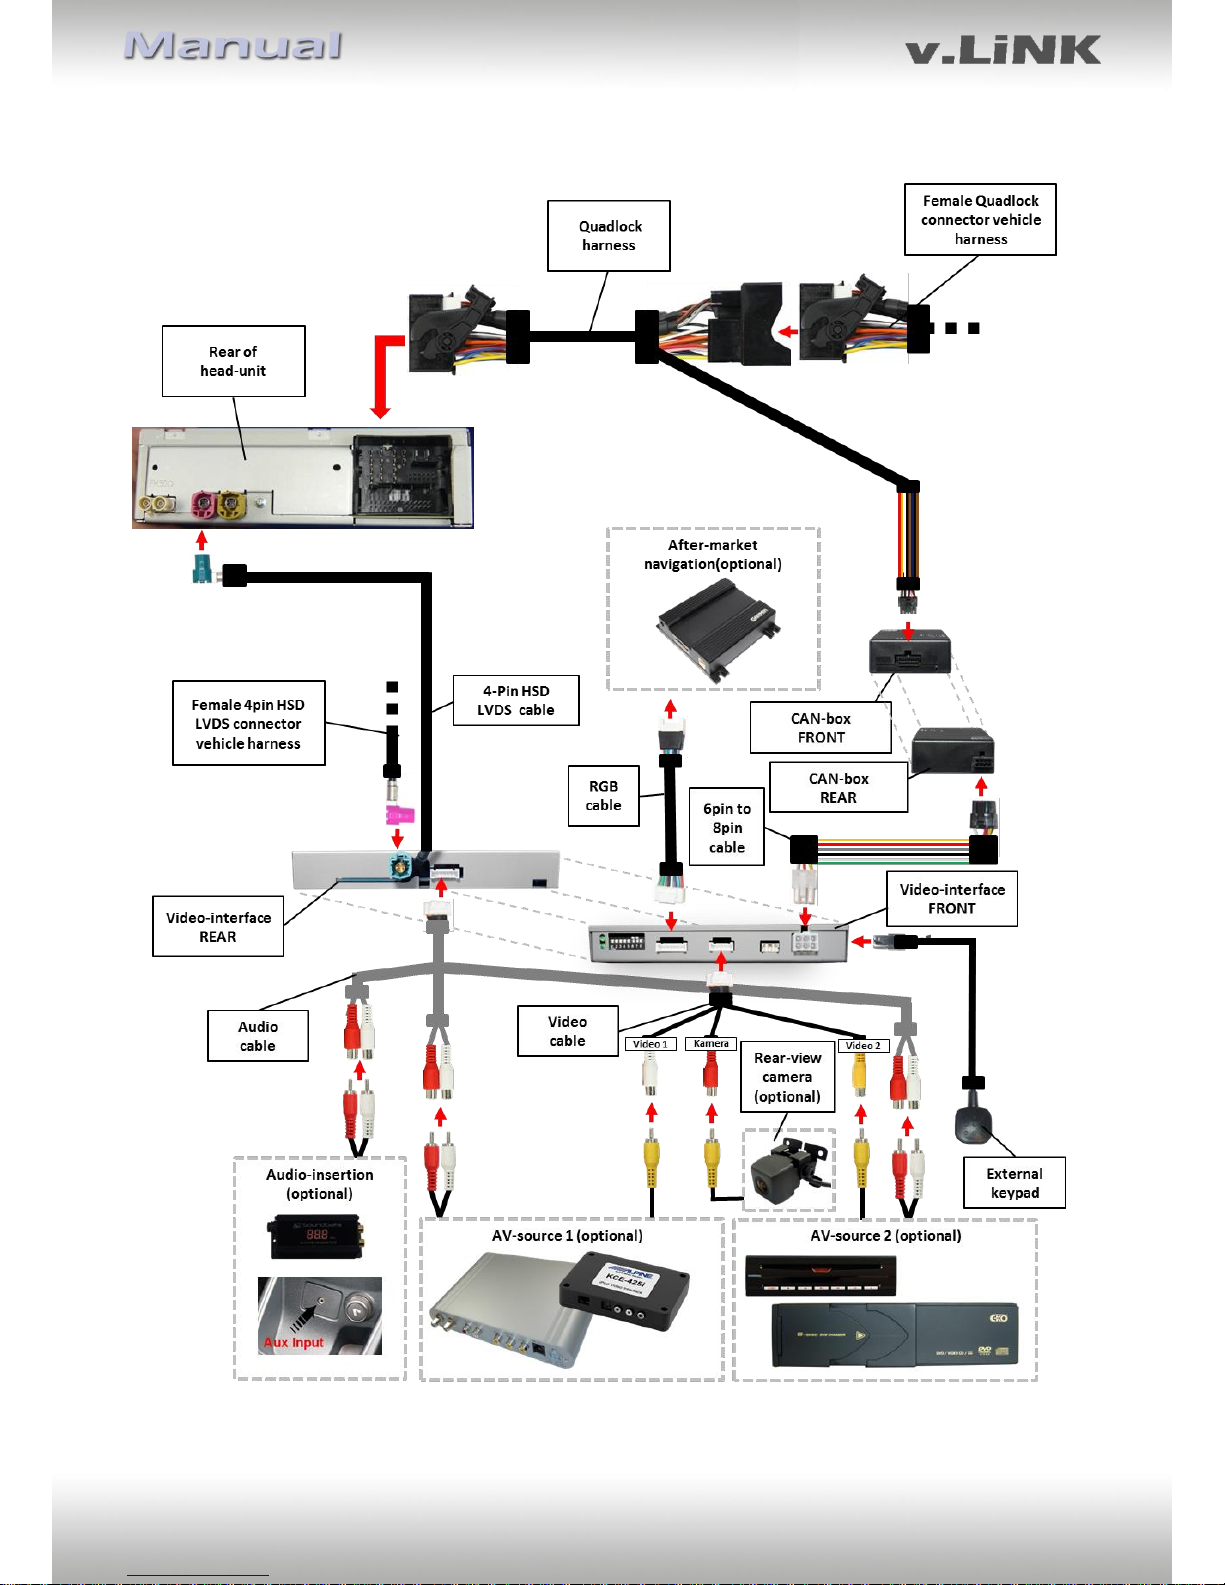
2.2. Connection schema
2.3. Connecting video-interface and CAN-box
2.4. Connection to the head-unit
2.5. Connecting peripheral devices
2.5.1. Video-sources to IN1 and IN2
2.5.2. Audio-switch and audio-insertion
2.5.3. After-market rear-view camera
2.5.4. After-market navigation
2.6. Connecting video-interface and keypad
2.7. Picture settings
2.8. Activation of parking guide lines for rear-view camera
3. Interface operation
4. Specifications
5. Connections (video-interface)
6. Technical support
Page 3
Version 28.07.2015 VL2-MIB-2
Pag
e3
Legal Information
By law, watching moving pictures while driving is prohibited, the driver must not be
distracted. We do not accept any liability for material damage or personal injury resulting,
directly or indirectly, from installation or operation of this product. This product should only
be used while standing or to display fixed menus or rear-view-camera video when the
vehicle is moving, for example the MP3 menu for DVD upgrades.
Changes/updates of the vehicle’s software can cause malfunctions of the interface. We
offer free software-updates for our interfaces for one year after purchase. To receive a free
update, the interface must be sent in at own cost. Labor cost for and other expenses
involved with the software-updates will not be refunded.
1. Prior to installation
Read the manual prior to installation.
Technical knowledge is necessary for installation. The place of installation must be free of
moisture and away from heat sources.
1.1. Delivery contents
Take down the serial number of the interface and store this manual for support
purposes: ____________________
Page 4
Version 28.07.2015 VL2-MIB-2
Pag
e4
Requirements
Vehicle Audi A3 (8V), Seat Leon, Skoda Octavia 3, VW Golf 7, VW Polo 5
(6C) and other vehicles with
Head-unit/monitor MIB High/Standard with 7” (Audi) respectively 8”
(Seat/Skoda/VW) and 5.8” Monitor
Limitations
Video only The interface inserts ONLY video signals into the infotainment.
For sound use the possibly existing factory-audio-AUX-input or a
FM-modulator.
1.2. Checking the compatibility of vehicle and accessories
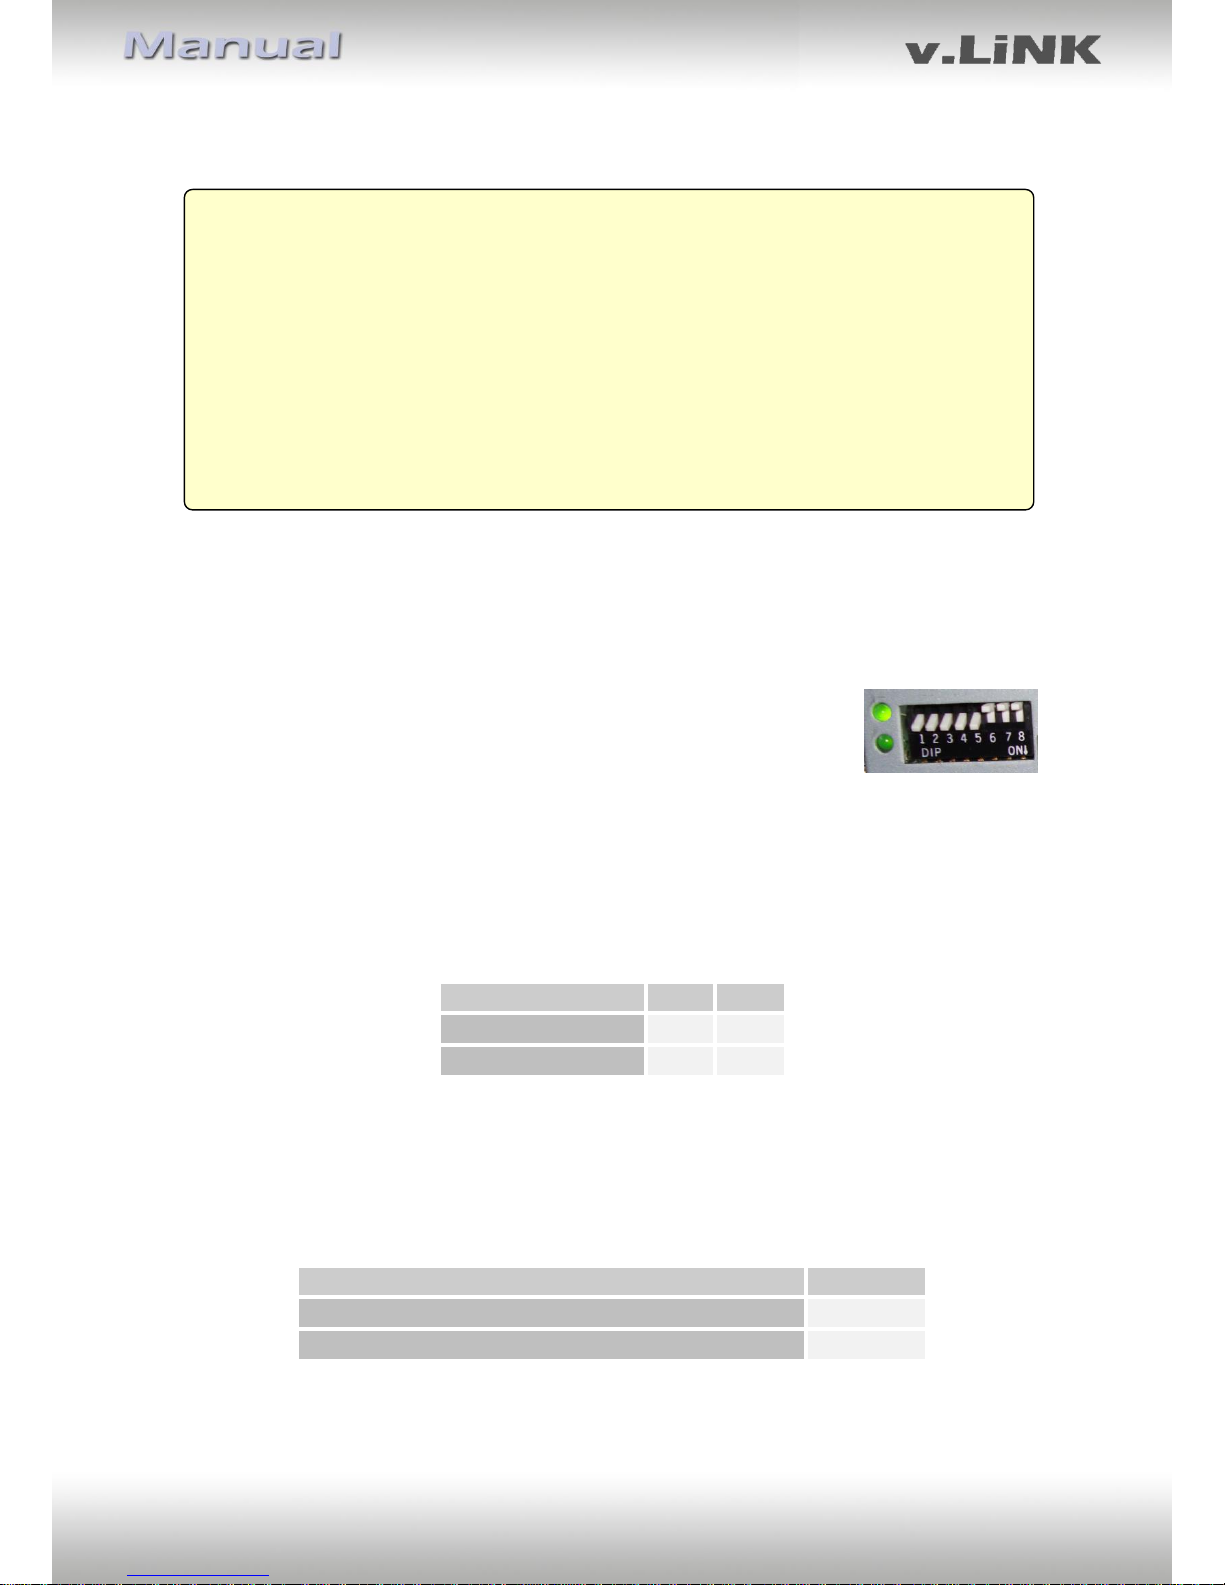
1.3. Dip-switch settings
With the video interface boxes dip-switches it is possible to select vehicle/navigation the
interface is to be installed in (dip 7 and 8), to select the video signal of an optional connected
after-market navigation (Dip 4), to dis- or enable the interfaces inputs
(dip 1 to 3) and to preselect the type of camera which is (to be) installed
(dip 5).
Dip position down is ON and position up is OFF.
1.3.1. Vehicle selection (dip 7-8)
Choose the vehicle/navigation/monitor the interface is to be installed to and set dip 7
through 8 according to the below table.
Vehicle/ Navigation
Dip 7
Dip 8
7”/8“-monitor
OFF
OFF
5.8”- monitor
OFF
ON
1.3.2. Video signal selection after-market navigation(Dip 4)
To the video interface’s RGB-input it is possible to connect a RGB- or a VGA-video source. Set
dip 4 according to table.
After-Market Navigation
Dip 4
VGA 800x480 (RGB-Input Pin 4 H-Sync, Pin 8 V-Sync)
ON
RGB NTSC 400(or480)x240
OFF
Page 5
Version 28.07.2015 VL2-MIB-2
Pag
e5
1.3.3. Enabling the interface’s video inputs (dip 1-3)
Only the enabled video inputs can be accessed when switching through the video sources. It
is recommended to enable only the required inputs for the disabled will be skipped when
switching through the video interfaces inputs.
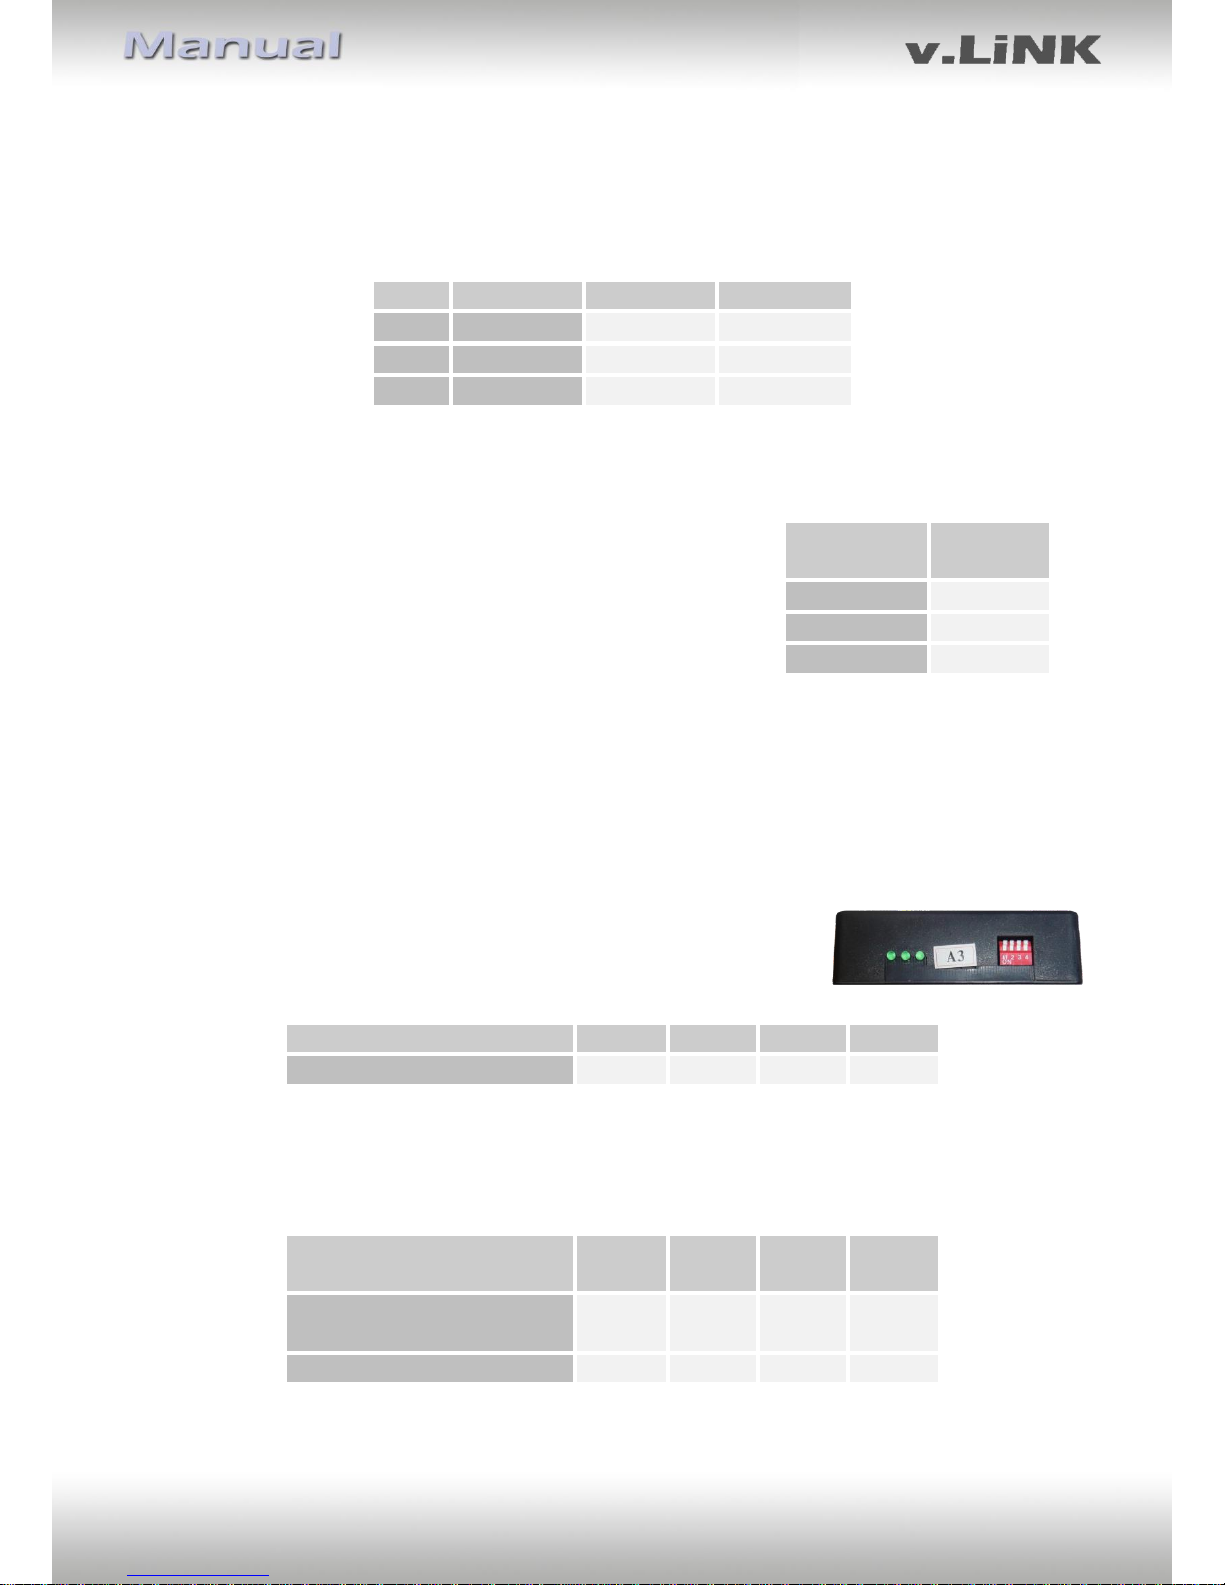
1.3.4. Rear-view camera settings (dip 5)
Depending on whether no camera, after-market camera or
factory camera shall be used, dip 5 must use different settings.
If set to OFF, the interface switches to factory LVDS picture
when the reverse gear is engaged to display factory rear-view
camera or factory PDC picture.
If a rear-view camera will be or is connected (factory or after-market rear-view camera), cut
the green cable of the 6pin to 8pin cable at the black 8pin connector and connect it to the
reverse gear light (+12V). For this use a relay because the reverse gear light of the vehicle is
clocked (relay AC-RW1230 and AC-RS5 optional available).
1.4. Dip-switch settings of the CAN-box
All 4 dip-switches of the CAN-box have no function for normal use
and must be be set to OFF.
Dip position down is ON and position up is OFF.
Vehicle/Navigation
Dip 1
Dip 2
Dip 3
Dip 4
All vehicles
OFF
OFF
OFF
OFF
Exception: Bei Anschluss der After-Market Navigation NAV-FN900D über den RGB-Eingang
im Audi A3 dient Dip 1 zur Einstellung der Steuerung der Navigation über den WerksController.
NAV-FN900D in Audi A3 by
RGB
Dip 1
Dip 2
Dip 3
Dip 4
Control via cross on the
display
ON
OFF
OFF
OFF
Direct control
OFF
OFF
OFF
OFF
Dip
Video-input
ON (down)
OFF (up)
Dip 1
RGB
enabled
disabled
Dip 2
Video IN1
enabled
disabled
Dip 3
Video IN2
enabled
disabled
Rear-view
camera type
Dip 5
None
OFF
Factory
OFF
After-market
ON
Page 6

Version 28.07.2015 VL2-MIB-2
Pag
e6
2. Installation
Switch off ignition and disconnect the vehicle’s battery! The interface needs a permanent
12V source. If according to factory rules disconnecting the battery is to be avoided, it is
usually sufficient to put the vehicle is sleep-mode. In case the sleep-mode does not show
success, disconnect the battery with a resistor lead.
If power source is not taken directly from the battery, the connection has to be checked
for being start-up proven and permanent.
2.1. Place of installation
The interface is installed on the backside of the head-unit.
Page 7
Version 28.07.2015 VL2-MIB-2
Pag
e7
2.2. Connection schema
Page 8
Version 28.07.2015 VL2-MIB-2
Pag
e8
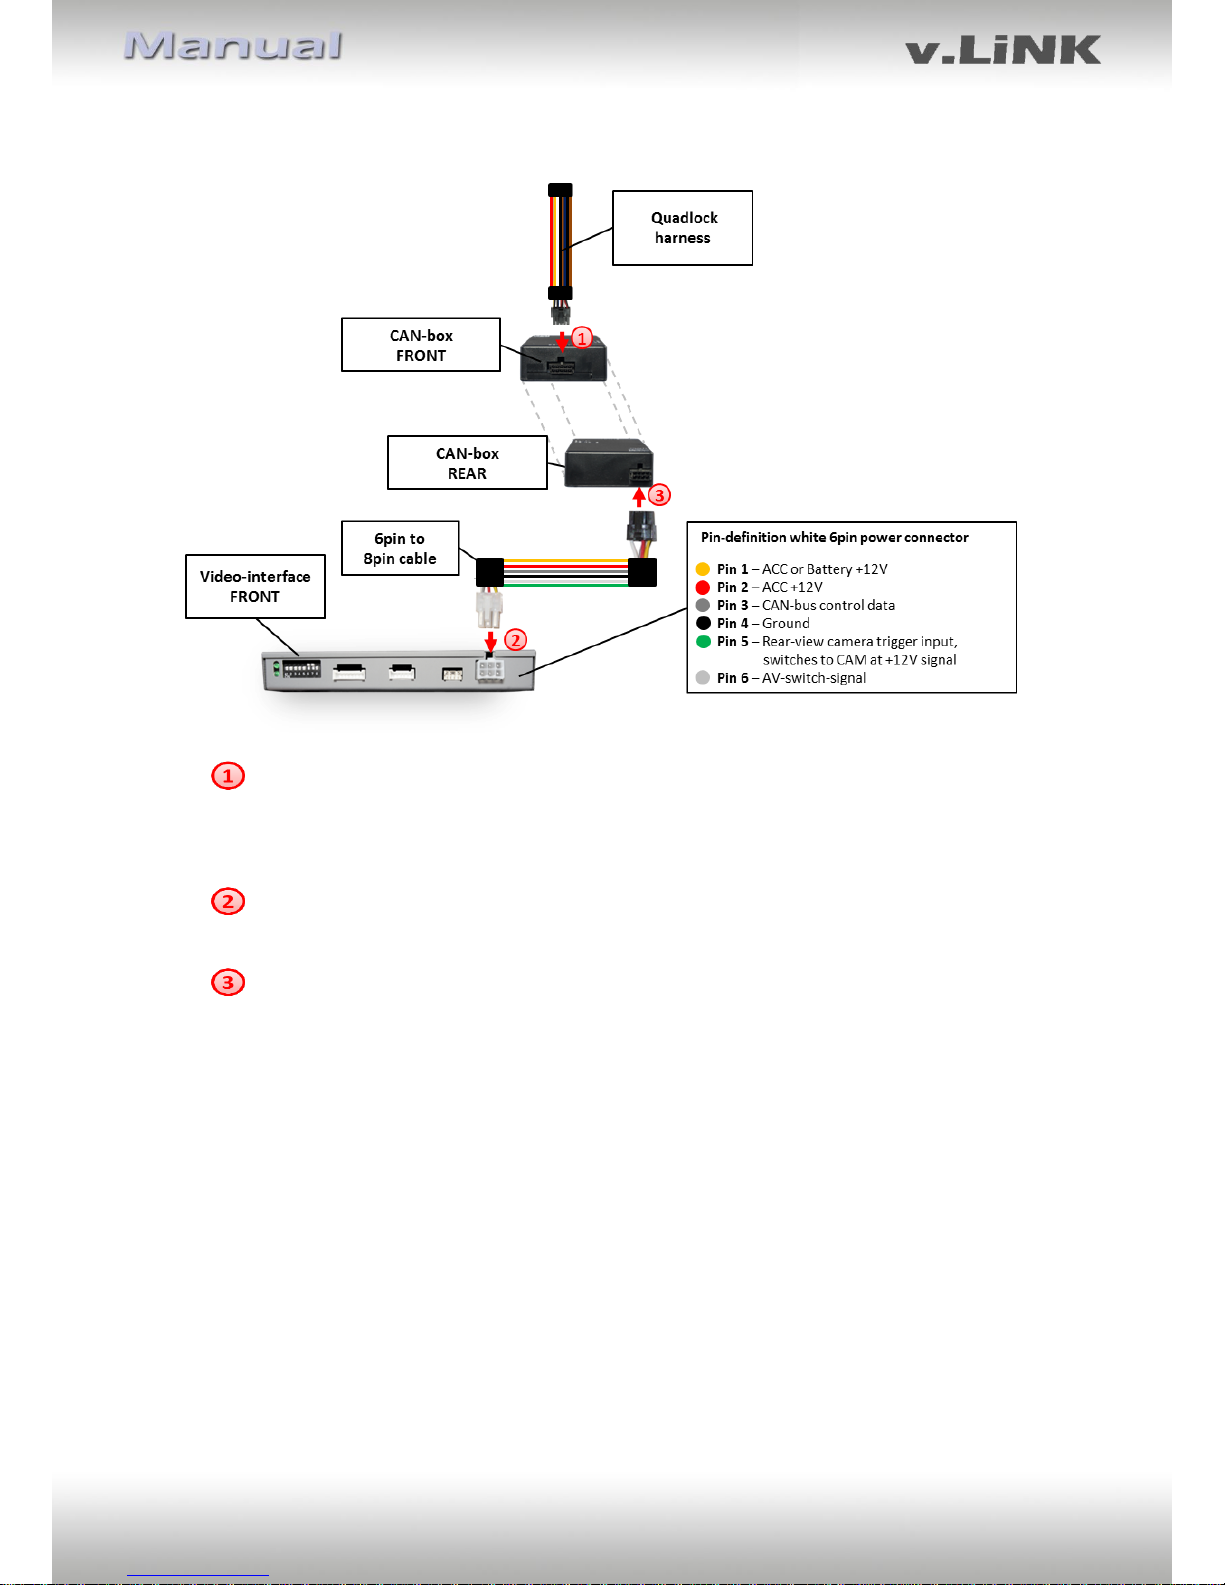
2.3. Connecting video-interface and CAN-box
Connect black female 6pin Micro-Fit connector of the VAG system-connector harness
to the male 6pin Micro-Fit connector of the CAN-box.
Note: Check LEDs on CAN-box after reconnecting the battery, two must be on.
Connect white female 6pin Molex connector of the 6pin to 8pin cable to the male
6pin Molex connector of the video-interface.
Connect black female 8pin Micro-Fit connector of the 6pin to 8pin cable to male 8pin
Micro-Fit connector of the CAN-box.
Note: Check LEDs on video-interface after reconnecting the battery, one must be on.
Note: No liability for vehicle wire colours and pin definition!
Possible changes by the vehicle manufacturer. The given information must be verified by
the installer.
Page 9
Version 28.07.2015 VL2-MIB-2
Pag
e9
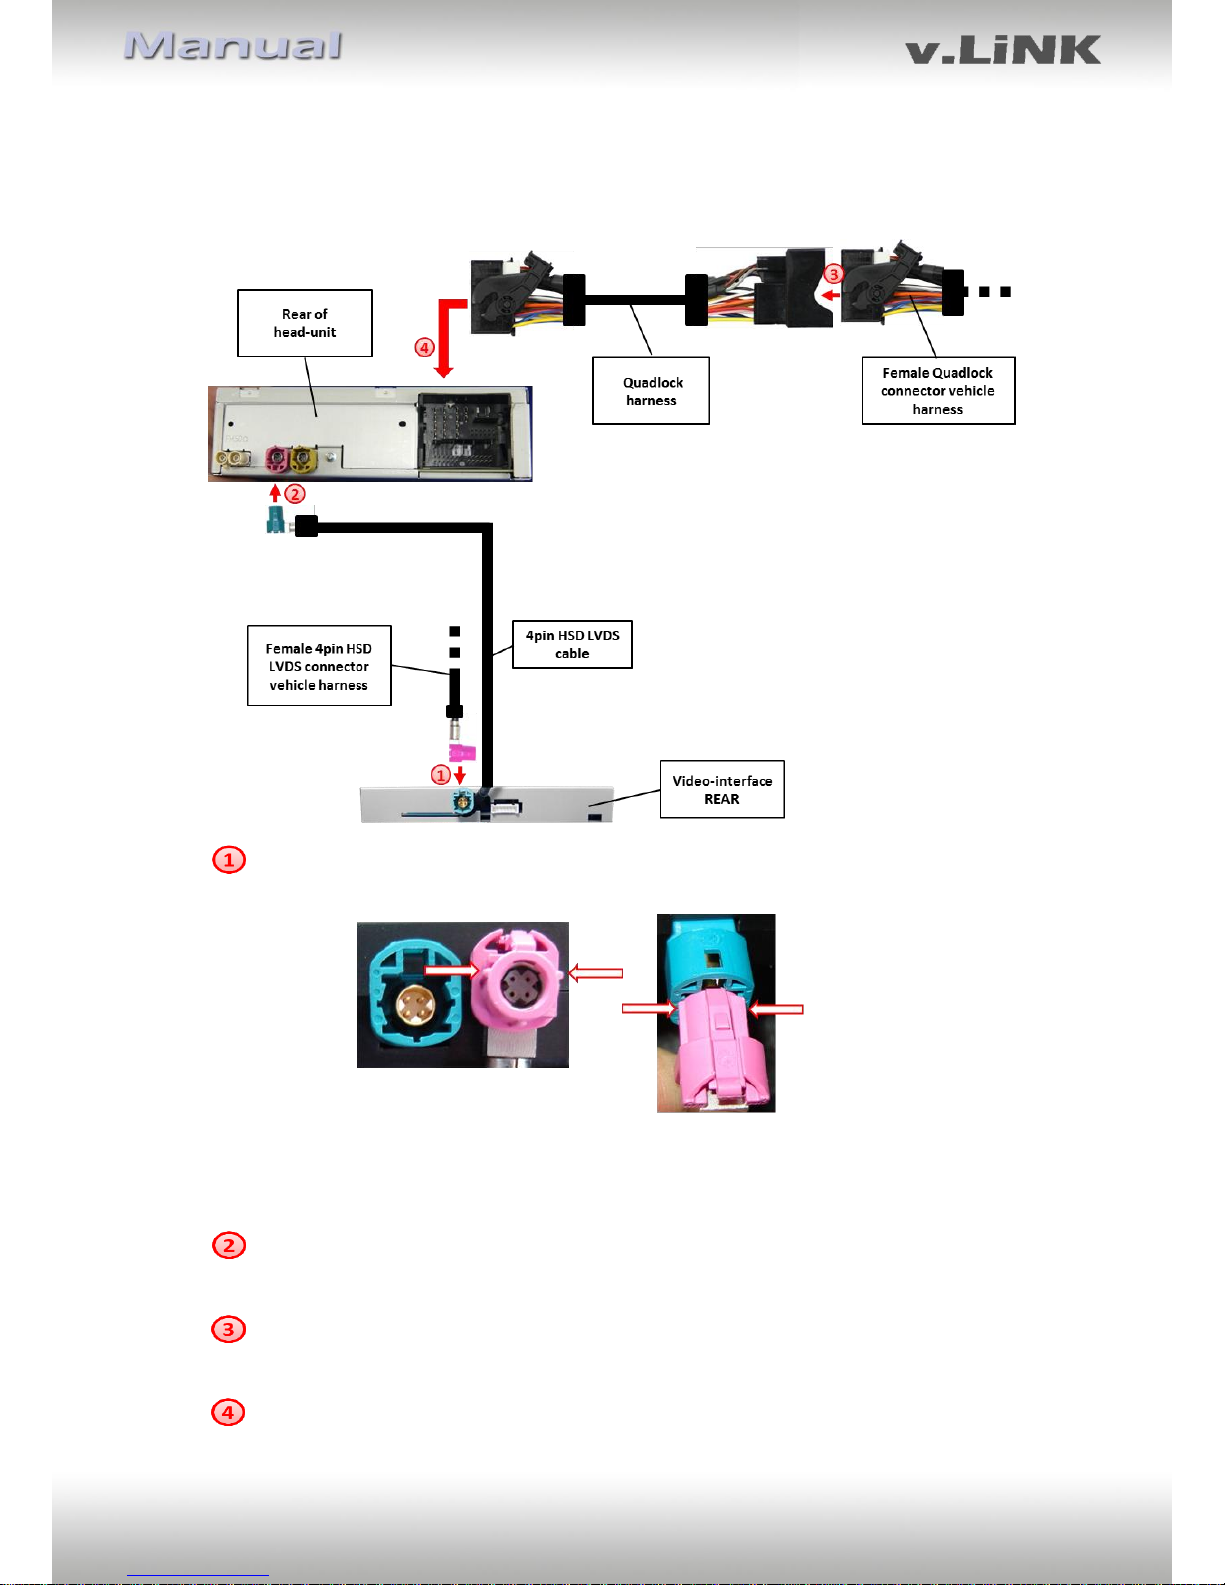
2.4. Connections to the head-unit
Remove head-unit.
Remove female 4pin HSD LVDS connector from the rear of the head-unit and connect
it to the male 4pin HSD LVDS connector of the video-interface.
Note: The marked lug of the female 4pin HSD LVDS connector of the vehicle harness
has to be cut off in some vehicles! The colour of the female 4pin HSD LVDS connector
in vehicles with 8” monitor is grey.
Connect female 4pin connector of the HSD LVDS interface cable to the male 4pin HSD
LVDS connector of the head-unit (pink or grey on VW).
Remove the female Quadlock connector of the vehicle harness from the rear of the
head-unit and connect it to the male Quadlock connector of Quadlock harness.
Connect female Quadlock connector of Quadlock harness to the male Quadlock
connector of the head-unit.
Page 10
Version 28.07.2015 VL2-MIB-2
Pag
e10
2.5. Connecting peripheral devices
It is possible to connect 2 after-market AV-sources, an after-market rear-view camera and an
after-market navigation to the video-interface.
Before final installation of the peripheral devices, we recommend a test-run to detect
incompatibility of vehicle and interface. Due to changes in the production of the vehicle
manufacturer is always the possibility of incompatibility.
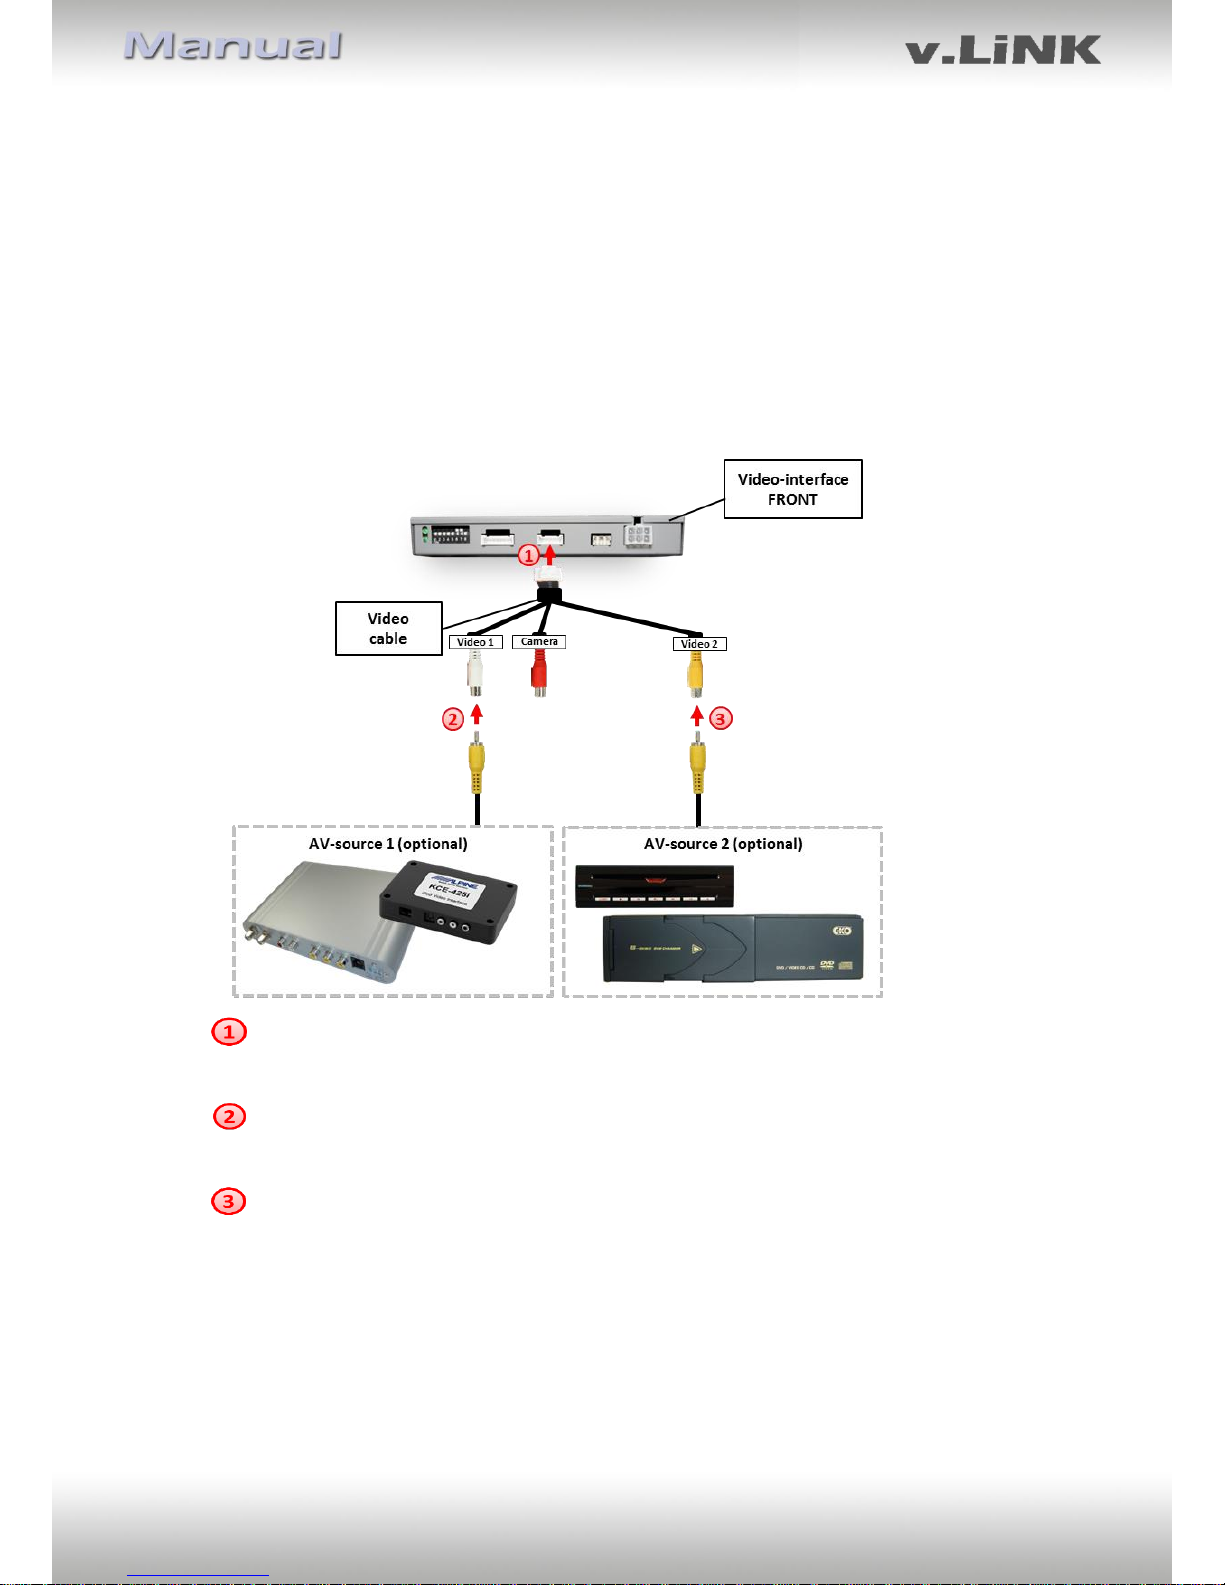
2.5.1. Video-sources to IN1 and IN2
Connect female 6pin connector of the audio cable to male 6pin connector of the
video-interface.
Connect video RCA of the AV-source 1 to the female RCA connector Video 1 of the
video cable.
Connect video RCA of the AV-source 2 to the female RCA connector Video 2 of the
video cable.
Page 11

Version 28.07.2015 VL2-MIB-2
Pag
e11
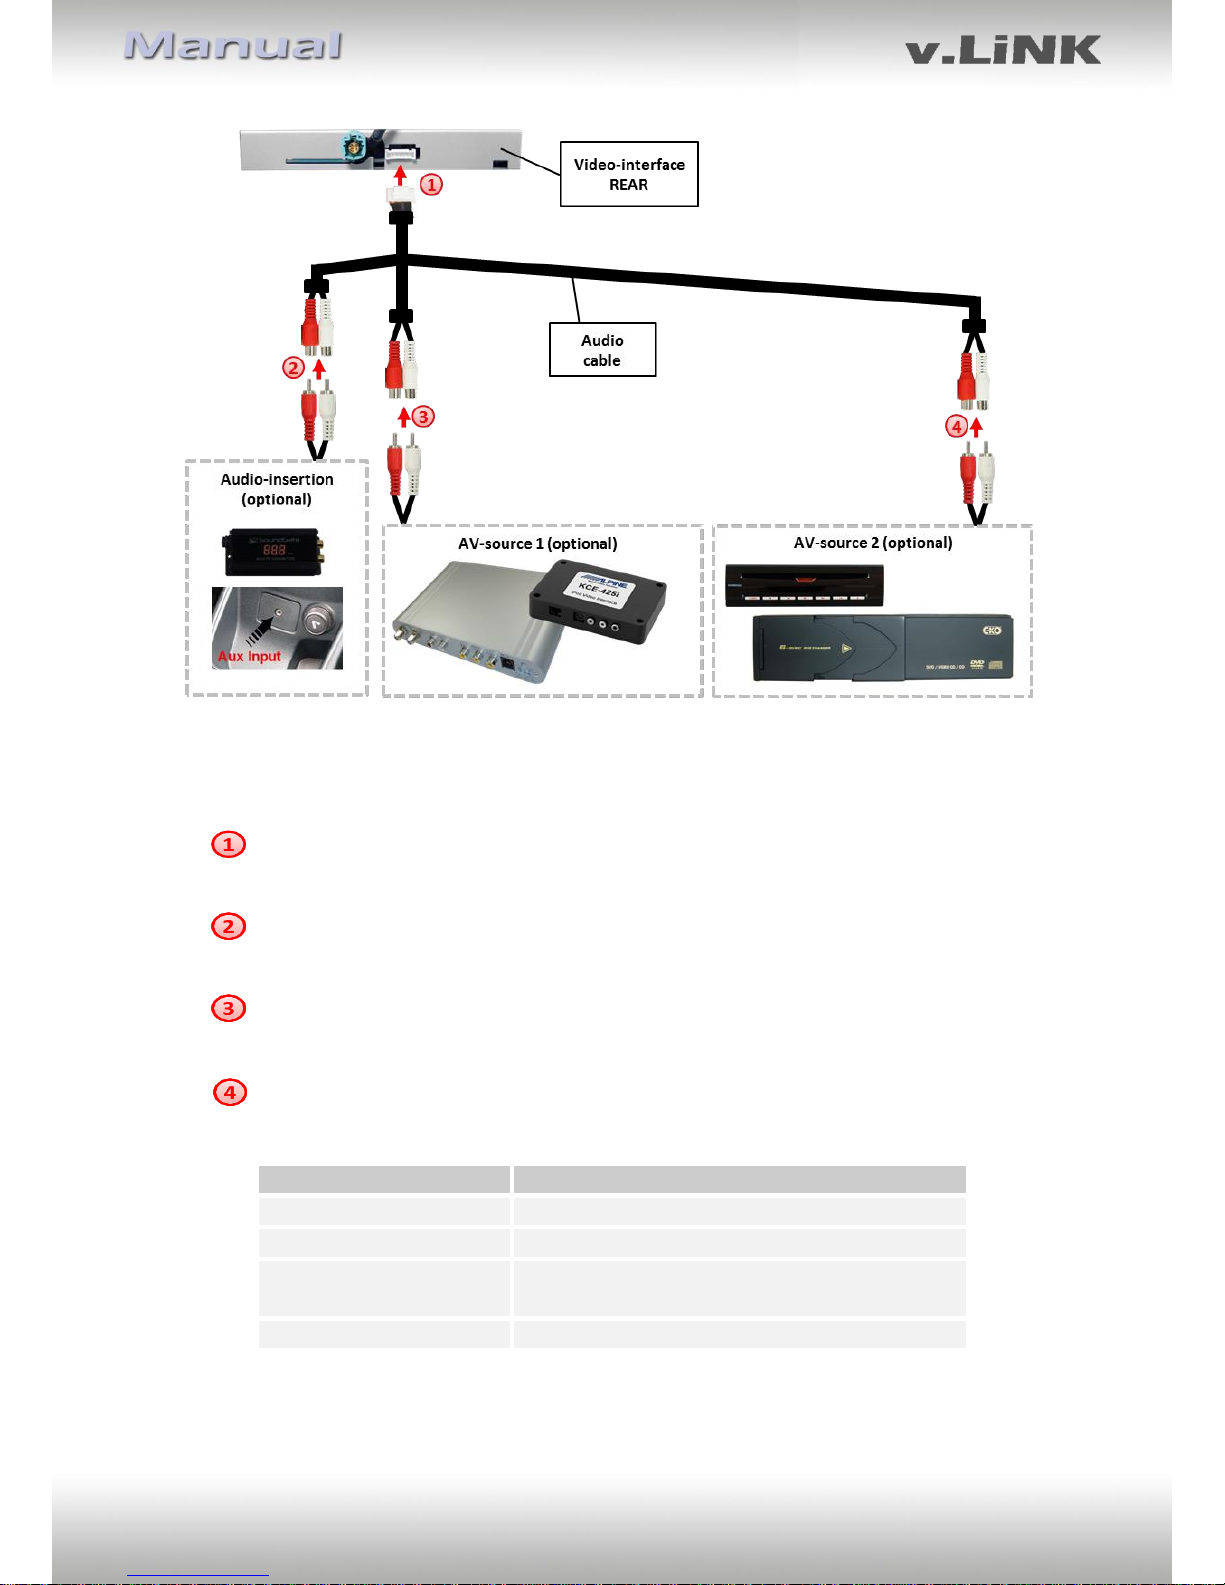
2.5.2. Audio-switch and audio insertion
This interface can only insert video signals into the factory infotainment. Audio insertion is
possible by possibly existing factory audio AUX input or FM-modulator. The inserted videosignal can be activated parallel to each audio-mode of the factory infotainment.
It is possible to switch the audio signals from the to IN1 and IN2 connected AV-sources
parallel to the video-signal of the respective AV-source by video-interface’s built-in audioswitch.
Page 12
Version 28.07.2015 VL2-MIB-2
Pag
e12
Note: If only one AV-source shall be connected, it is possible to connect the video output of
the AV-source to video IN1 of the video-interface and the audio output of the AV-source
direct to the audio-insertion.
Connect female 7pin connector of the audio cable to male 7pin connector of the
video-interface.
Connect the audio-RCA of the possibly existing factory AUX-input or the FMmodulator to the female RCA port AV-Out of the audio cable.
Connect the audio-RCA of the AV-source 1 to the female RCA port AV1 of the audio
cable.
Connect the audio-RCA of the AV-source 2 to the female RCA port AV2 of the audio
cable.
Audio pins
Definition
1/2
Audio input signal R/L of source IN2
3/4
Audio input signal R/L of source IN1
5/6
Audio output signal R/L of factory audio AUX
or FM-modulator
7
Ground
Note: When switching the video interface from video-IN1 to video-IN2, the audio will also
automatically be switched.
Page 13
Version 28.07.2015 VL2-MIB-2
Pag
e13
2.5.3. After-market rear-view camera
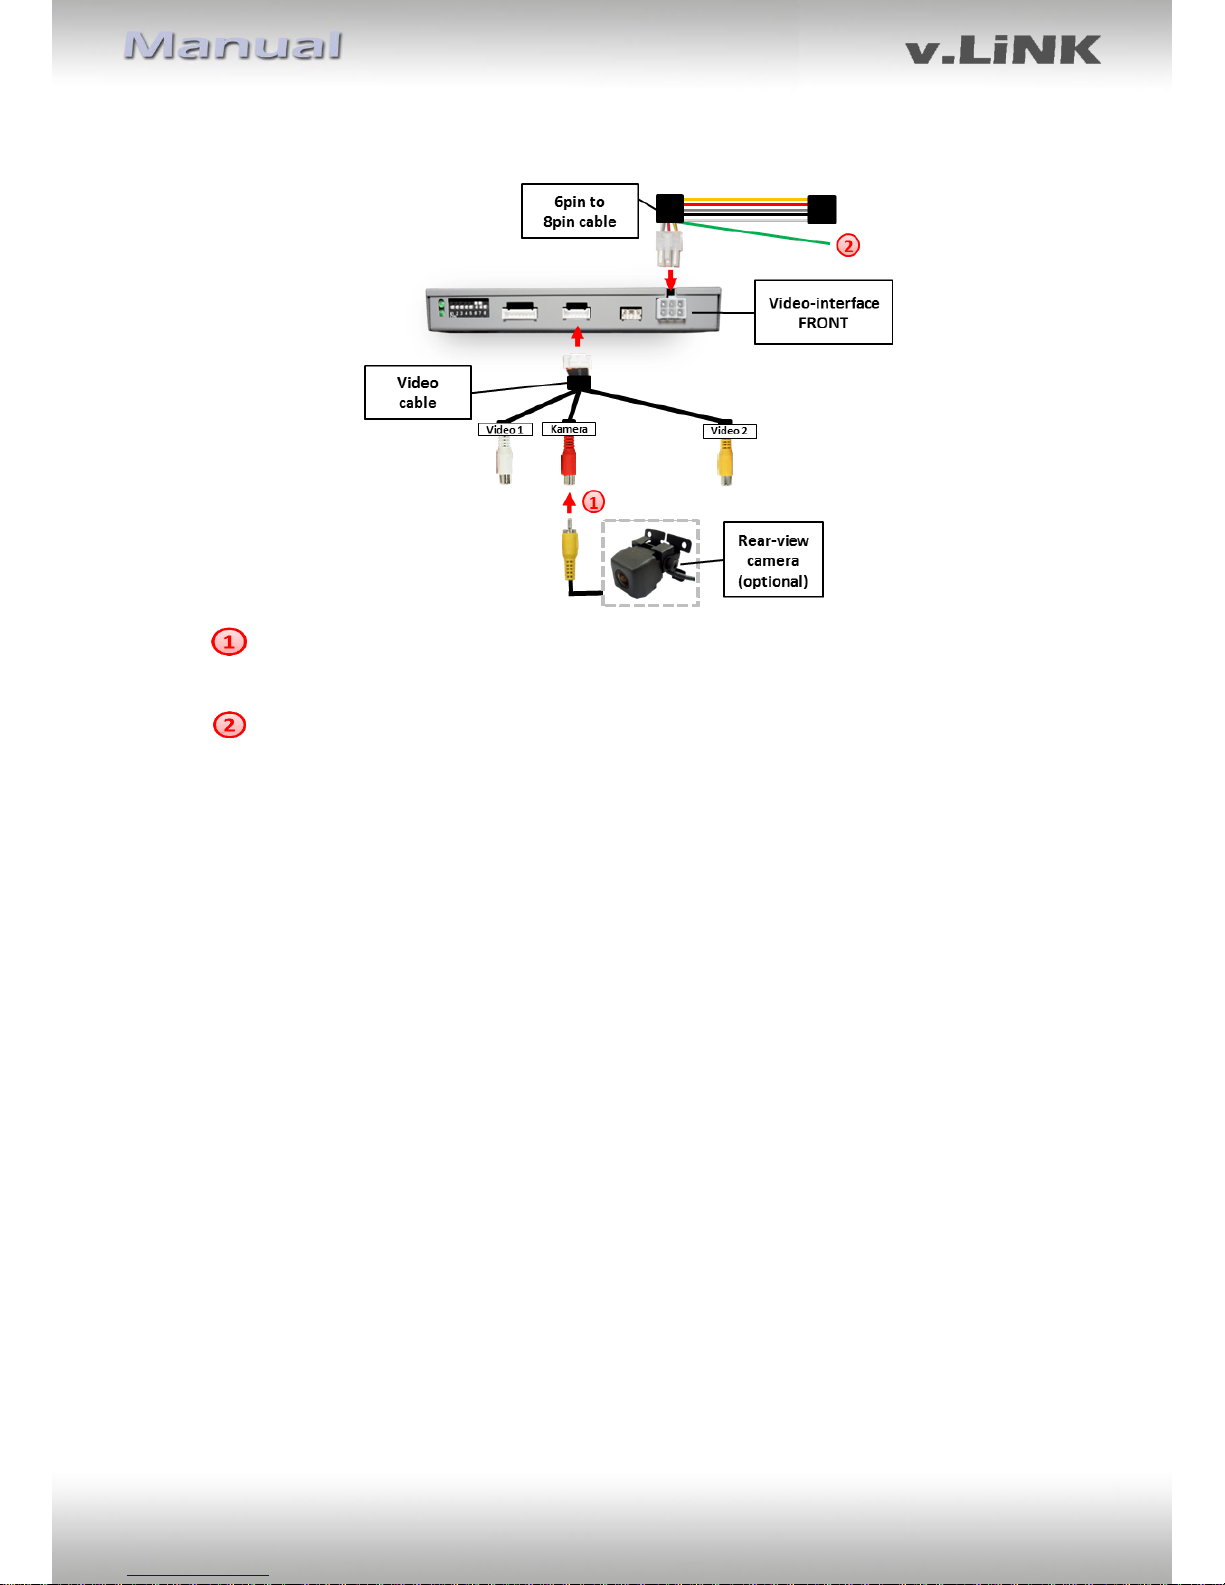
Connect the video-RCA of the after-market rear-view camera to the female RCA port
of the video-interface.
- If the Can-bus does not work while connecting an after-market rear-view camera, cut
the green cable of the 6pin to 8pin cable at the black 8pin connector and connect it
to the reverse gear light (+12V). For this use a relay because the reverse gear light of
the vehicle is clocked (relay AC-RW1230 and AC-RS5 optional available).
-
Note: Set Dip 5 to ON.
Page 14
Version 28.07.2015 VL2-MIB-2
Pag
e14
2.5.4. After-Market navigation
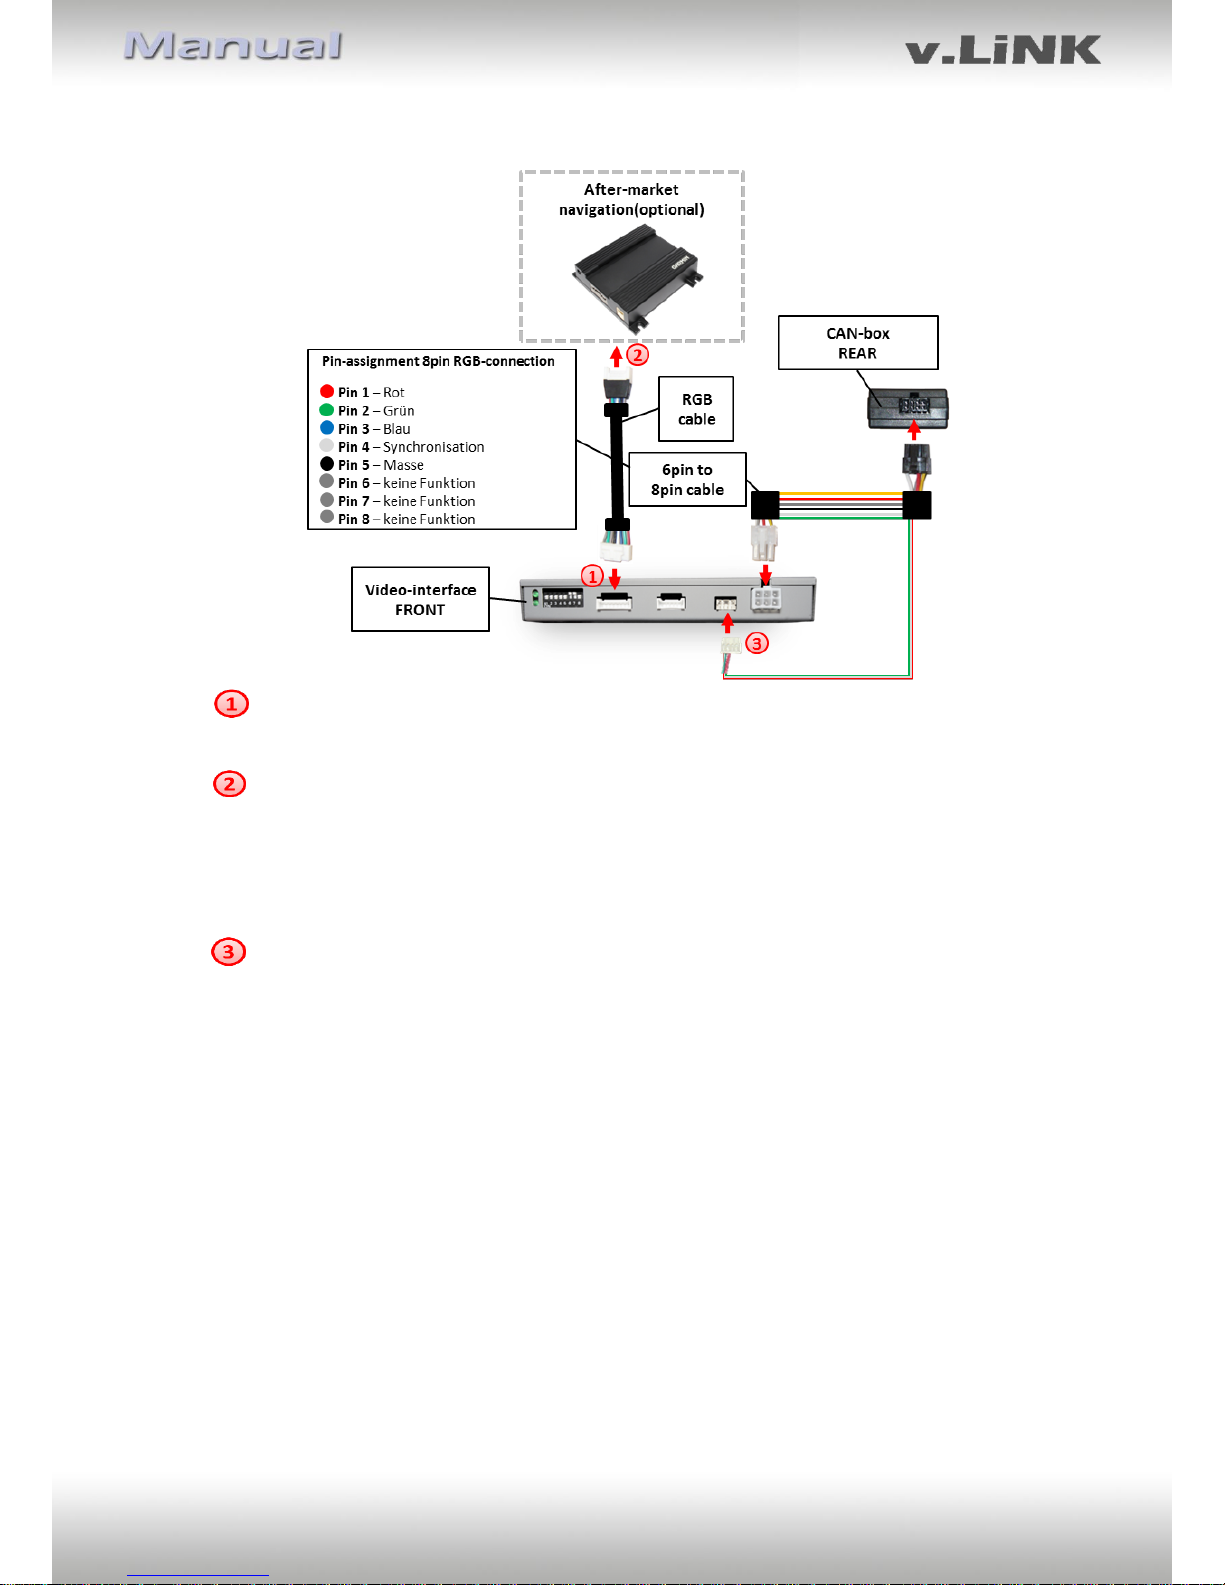
Connect female 8pin connector of the RGB cable to the male 8pin connector of the
video-interface. The loose grey wires have no function and have to be isolated.
Connect male 6pin connector of the RGB cable to the after-Market navigation.
If connecting the after market navigation NAV-FN900D the factory touch-screen can
be used (not Audi A3!). Please do the following step, too:
Connect female 8pin connector of 6pin to 8pin cable to 8pin connector (Ctrl) of the
video-interface.
Page 15
Version 28.07.2015 VL2-MIB-2
Pag
e15
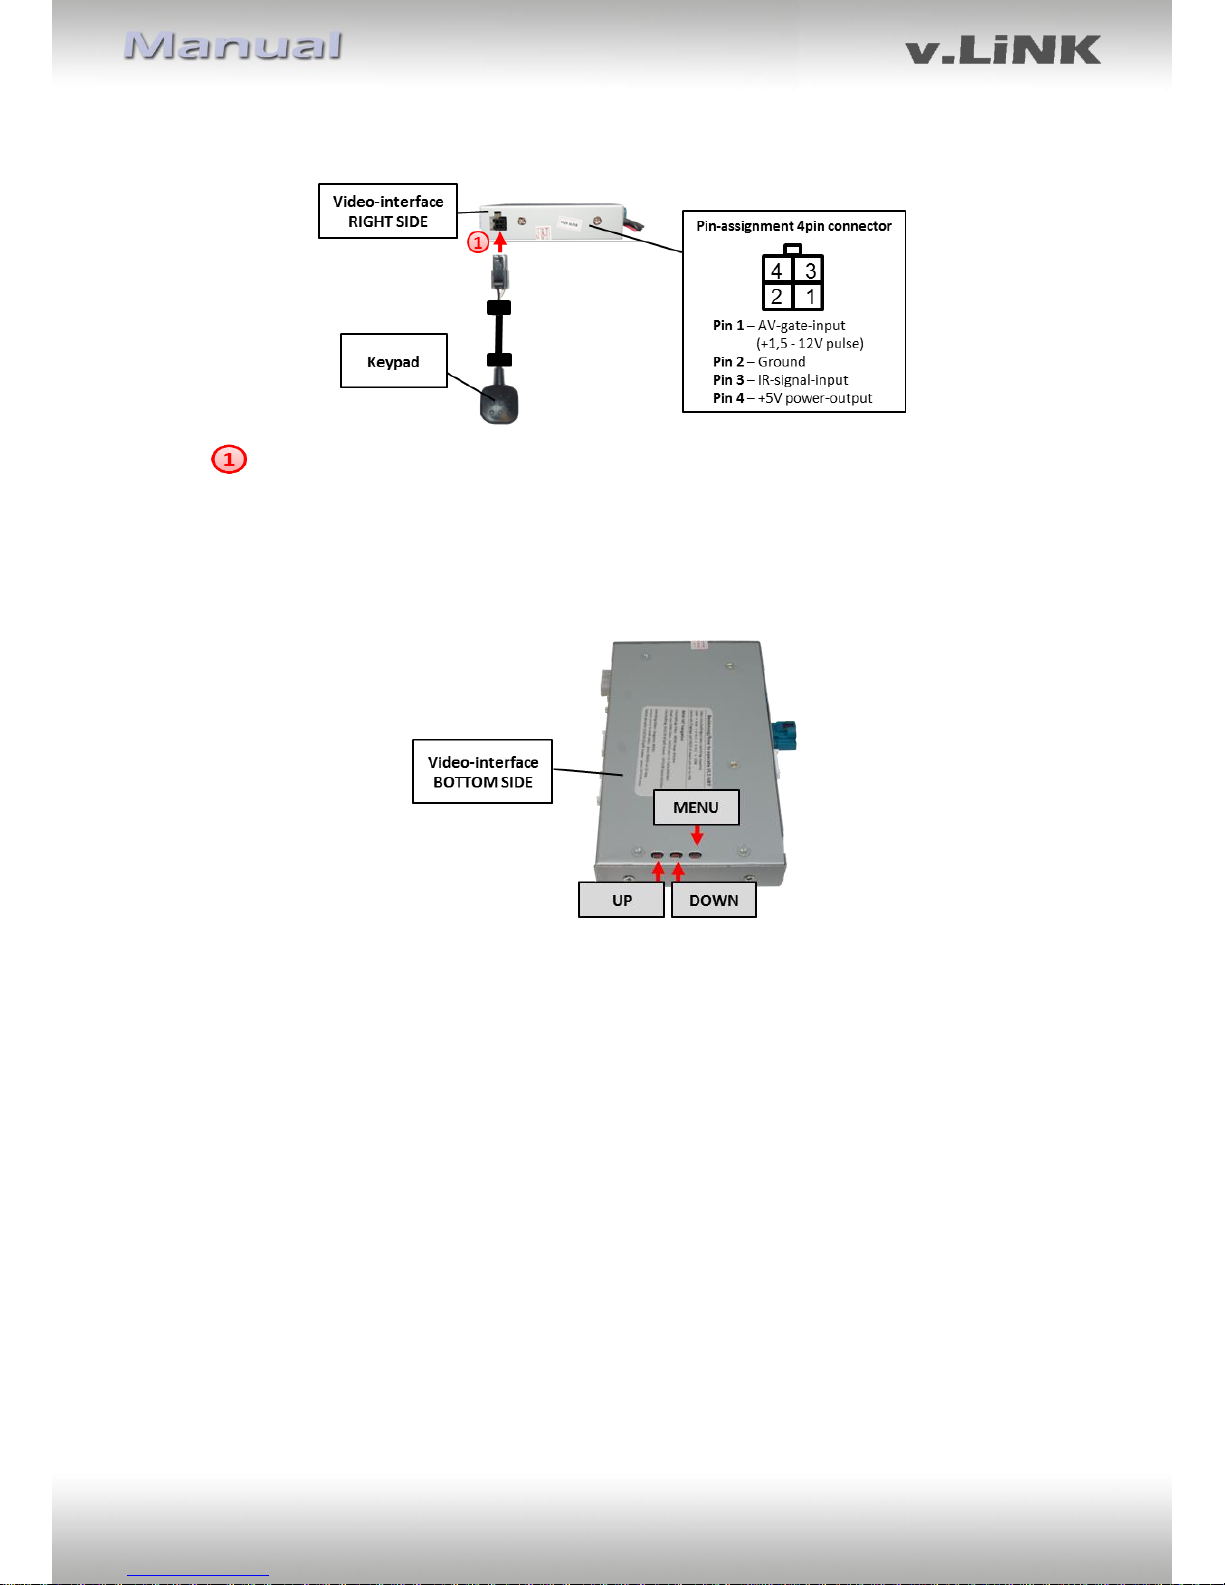
2.6. Connecting video-interface and keypad
Connect the female 4pin connector of the keypad to the male 4pin connector of the
video-interface.
2.7. Picture settings
After installing the sources the picture settings can be changed using a pen on the buttons of
the video interface. Press the MENU button to open settings menu on the OSD and to switch
to the next setting. UP and DOWN change the corresponding values. The buttons are
embedded in the housing to avoid accidental changes during or after installation.
The following settings are available:
Brightness
Contrast
Saturation
Position H (horizontal)
Position V (vertical)
Page 16
Version 28.07.2015 VL2-MIB-2
Pag
e16
2.8. Activation of parking guide lines for rear-view camera
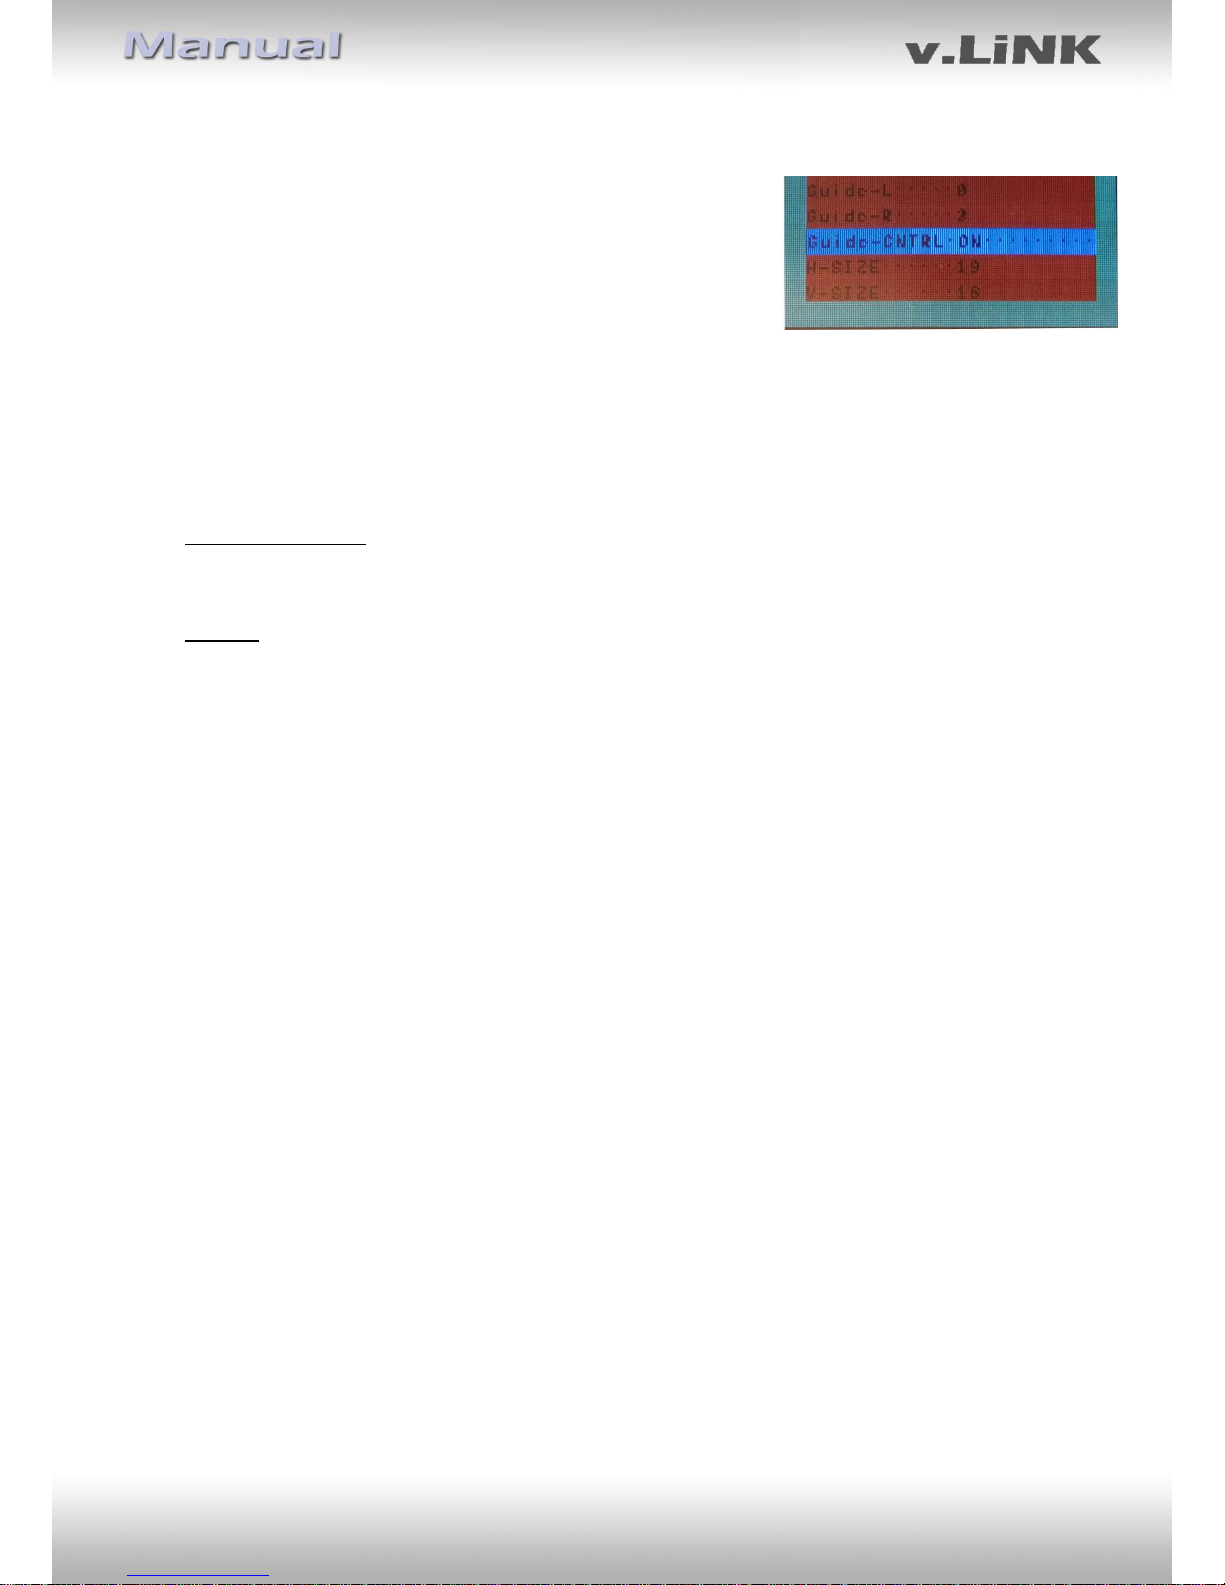
The parking guide lines for rear-view camera can be activated
of deactivated via the OSD. Press the MENU button to open
settings menu on the OSD and to switch to the next setting.
Choose menu item “Guide Line” and activate (ON) or
deactivate (OFF) parking guide lines by UP and DOWN buttons.
3. Interface operation
One of the factory infotainment buttons and the external keypad can be used to execute
interface functions.
Skoda/Volkswagen
Press MENU button or shortpress keypad to switch the video-source
Audi A3
Press NAVI button of the steering-wheel or shortpress keypad to switch the video-source.
Each press will switch to the next enabled input. If all inputs are enabled the order is:
Factory video RGB-in video IN1 video IN2 factory video …
Inputs which are not enabled are skipped. If the sources are connected to the audio cable,
when switching from video IN1 to video IN2, also the sound will be switched.
Page 17
Version 28.07.2015 VL2-MIB-2
Pag
e17
4. Specifications
BATT/ACC range 7V ~ 25V
Stand-by power drain <10mA
Power 0.7A @12V
Power consumption 28.4W
Video input 0.7V~1V
Video input formats PAL/NTSC
RGB-video amplitude 0.7V with 75 Ohm impedance
Temperature range -40°C to +85°C
Weight 368g
Dimensions (box only) W x H x D 154 x 22 x 92 mm
Page 18
Version 28.07.2015 VL2-MIB-2
Pag
e18
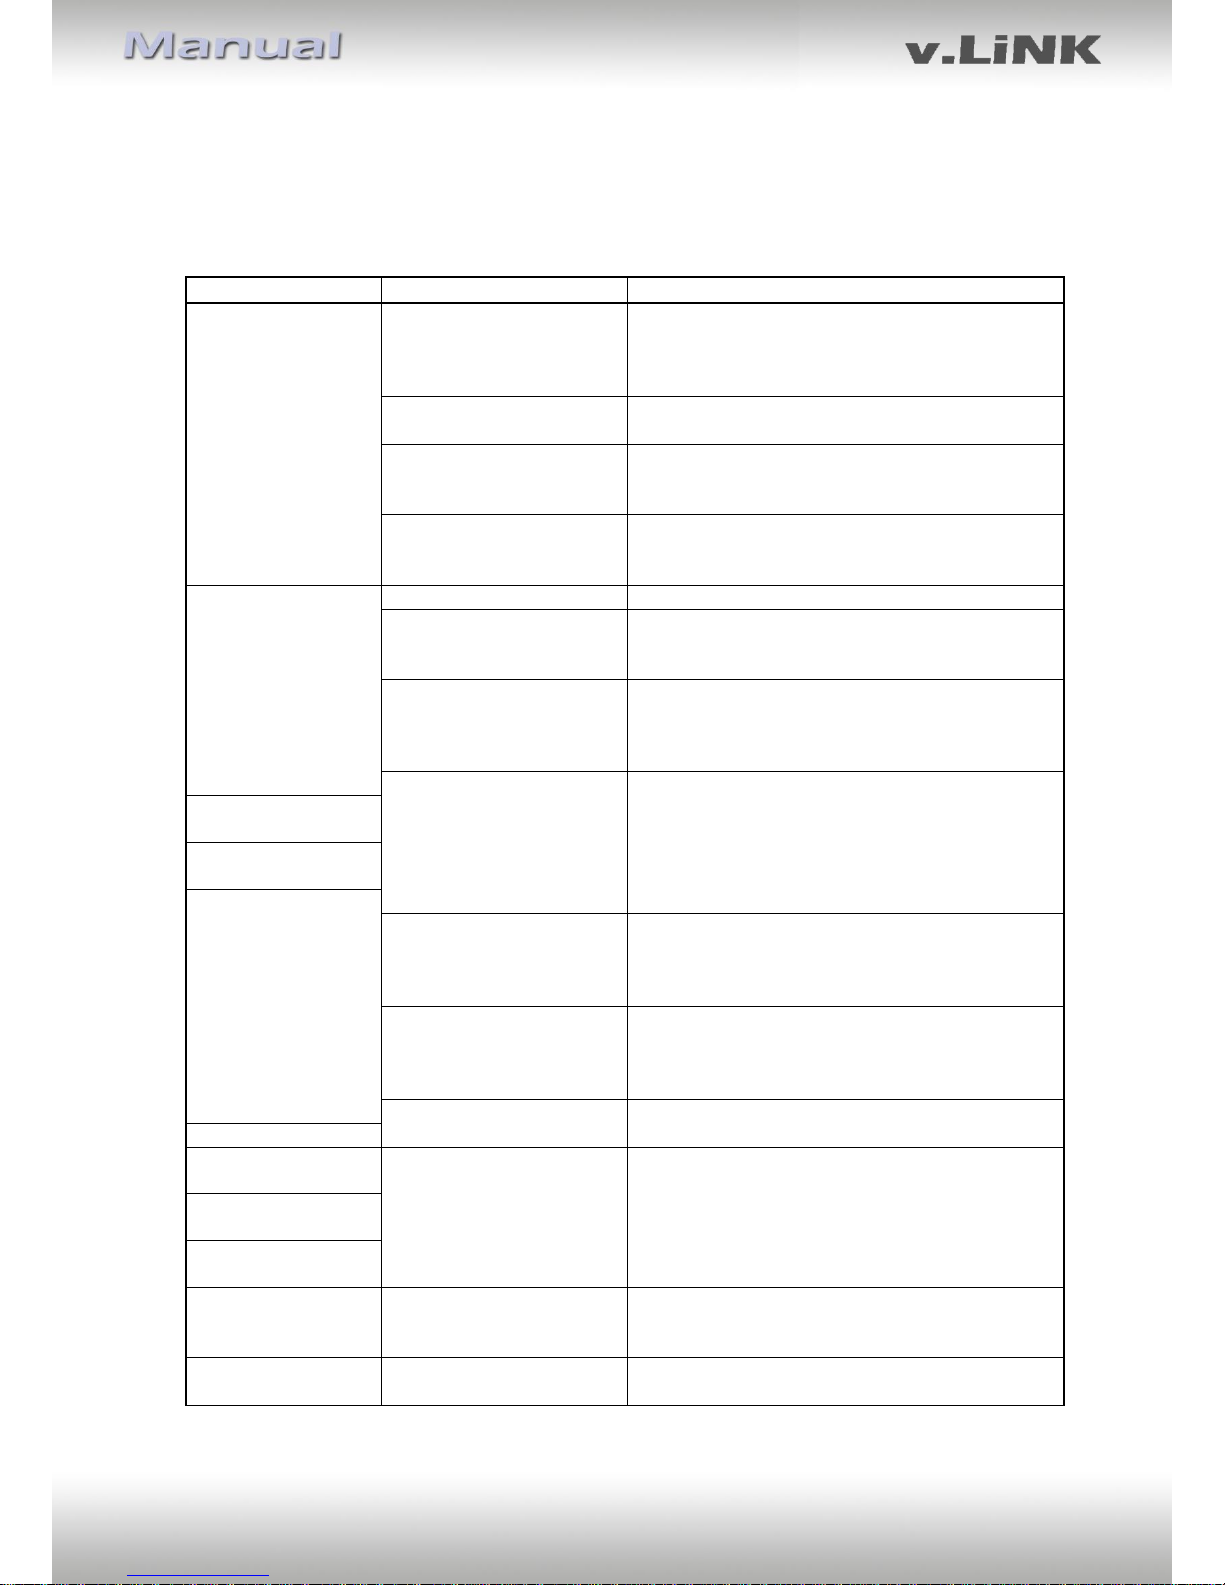
5. Frequently asked questions
For any troubles which may occur, check the following table for a solution before requesting
support from your vendor.
Symptom
Reason
Possible solution
No picture/black
picture (factory
picture).
Not all connectors have been
reconnected to factory headunit or monitor after
installation.
Connect missing connectors.
No power on CAN-bus box (all
LED CAN-bus box are off).
Check power supply of CAN-bus box. Check CAN-bus
connection of CAN-bus box.
CAN-bus box connected to
CAN-bus in wrong place.
Refer to the manual where to connected to the CANbus. If not mentioned, try another place to connect to
the CAN-bus.
No power on video-interface
(all LED video-interface are
off).
Check whether CAN-bus box delivers +12V ACC on red
wire output of 8pin to 6pin cable. If not cut wire and
supply ACC +12V directly to video-interface.
No picture/black
picture/white picture
(inserted picture) but
factory picture is OK.
No picture from video source.
Check on other monitor whether video source is OK.
No video-source connected to
the selected interface input.
Check settings dips 1 to 3 of video interface which
inputs are activated and switch to corresponding
input(s).
LVDS cables plugged in wrong
place.
Double-check whether order of LVDS cables is exactly
connected according to manual. Plugging into headunit does not work when the manual says to plug into
monitor and vice versa.
Wrong monitor settings of
video-interface.
Try different combinations of dips 7 and 8 of videointerface. Unplug 6pin power after each change.
Inserted picture totally
wrong size or position.
Inserted picture double
or 4 times on monitor.
Inserted picture
distorted, flickering or
running vertically.
Video sources output set to
AUTO or MULTI which causes
a conflict with the interfaces
auto detection.
Set video source output fixed to PAL or NTSC. It is best
to set all video sources to the same standard.
If error occurs only after
source switching: Connected
sources are not set to the
same TV standard.
Set all video sources to the same standard.
Some interfaces can only
handle NTSC input.
Check manual whether there is a limitation to NTSC
mentioned. If yes, set source fixed to NTSC output.
Inserted picture b/w.
Inserted picture qual.
bad.
Picture settings have not been
adjusted.
Use the 3 buttons and the interface's OSD to adjust the
picture settings for the corresponding video input.
Inserted picture size
slightly wrong.
Inserted picture
position wrong.
Camera input picture
flickers.
Camera is being tested under
fluorescent light which shines
directly into the camera.
Test camera under natural light outside the garage.
Camera input picture is
bluish.
Protection sticker not
removed from camera lens.
Remove protection sticker.
Page 19
Version 28.07.2015 VL2-MIB-2
Pag
e19
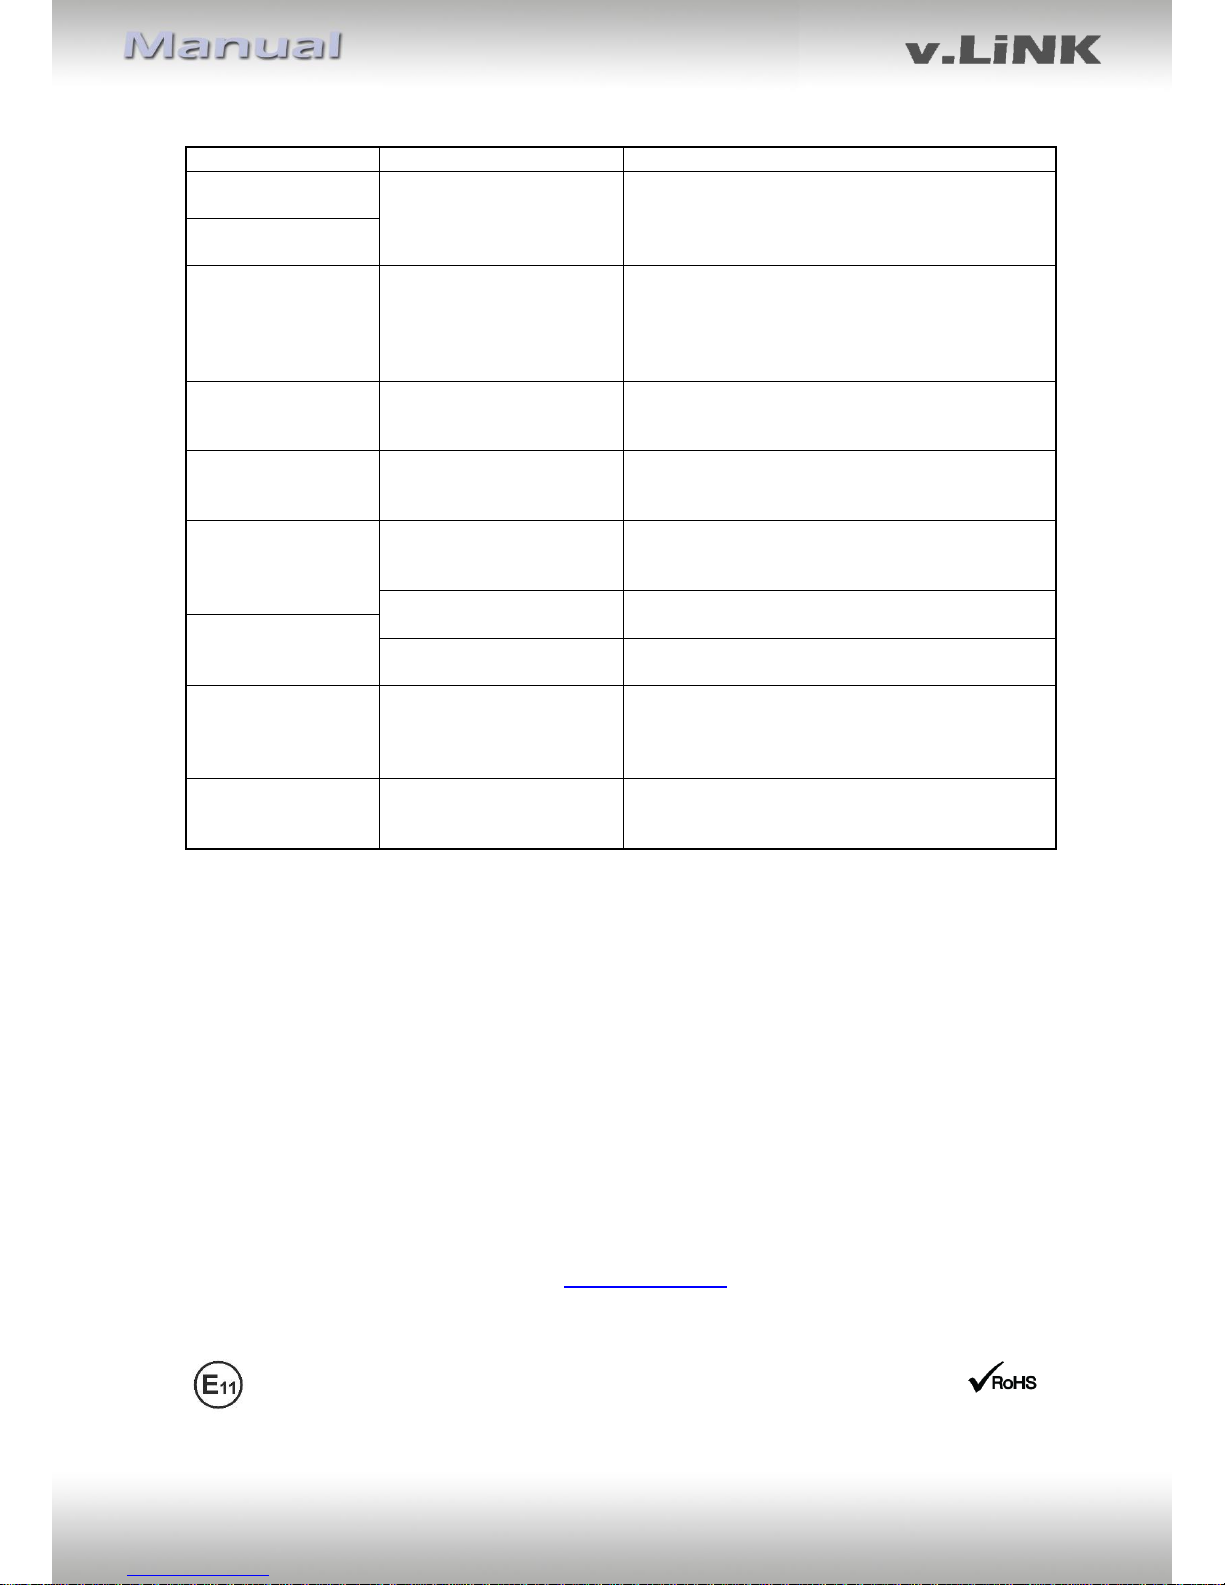
Symptom
Reason
Possible solution
Camera input picture
black.
Camera power taken directly
from reverse gear lamp.
Use relay or electronics to "clean" reverse gear lamp
power. Alternatively, if CAN-bus box is compatible
with the vehicle, camera power can be taken from
green wire of 6pin to 8pin cable.
Camera input picture
has distortion.
Camera input picture
settings cannot be
adjusted.
Camera input picture settings
can only be adjusted in AV2
mode.
Set dip 3 of video-interface to ON (if not input AV2 is
not already activated) and connect the camera to AV2.
Switch to AV2 and adjust settings. Reconnect camera
to camera input and deactivate AV2 if not used for
other source.
Graphics of a car in
camera input picture.
Function PDC is ON in the
interface OSD.
In compatible vehicles, the graphics will display the
factory PDC distance. If not working or not wanted, set
interface OSD menu item UI-CNTRL to ALLOFF.
Chinese signs in
camera input picture
Function RET or ALL is ON
(function for Asian market) in
the interface OSD.
Set interface OSD menu item UI-CNTRL to ALLOFF or
PDCON.
Not possible to switch
video sources by OEM
button.
CAN-bus interface does not
support this function for
vehicle.
Use external keypad or cut white wire of 6pin to 8pin
cable and apply +12V impulses for AV-switching.
Pressed too short.
For video source switching a longer press of about 2.5
seconds is required.
Not possible to switch
video sources by
external keypad.
SW-version of interface does
not support external keypad.
Use OEM-button or cut white wire of 6pin to 8pin
cable and apply +12V impulses for AV-switching.
Interface does not
switch to camera input
when reverse gear is
engaged.
CAN-bus interface does not
support this function for the
vehicles.
Cut the green wire of the 6pin to 8pin cable and apply
+12V constant from reverse gear-lamp signal. Use
relay to "clean" gear lamp power.
Interface switches
video-sources by itself.
CAN-bus interface
compatibility to vehicle is
limited.
Cut the grey wire of 6pin to 8pin and isolate both
ends. If problem still occurs, additionally cut the white
wire of 6pin to 8pin cable and isolate both ends.
6. Technical Support
Please note that direct technical support is only available for products purchased directly
from NavLinkz GmbH. For products bought from other sources, contact your vendor for
technical support.
NavLinkz GmbH
distribution/tech dealer-support
Eurotec-Ring 45
D-47445 Moers
Tel +49 2841 949970
Email [email protected]
10R-03 5384 Made in China
 Loading...