

Page 1
Family E nte rtain ment Syste m /Elit e
by
E L I T E
OWNER’S MANUAL
Page 2

Cont ent s
Operating I ns tr uc ti on s
Wel co me
... ..... ..... ..... ..... ....... .. ... ..... ..... ..... ..... 2
Saf ety Ins truct ions
CAU TI ON
WAR NI NG
PRE CAUTI ON S
... ..... ..... ..... ..... ....... .. ... ..... . 2
... ..... ..... ..... ..... ....... .. ... ..... ..... ..... .... 2
... ..... ..... ..... ..... ....... .. ... ..... ..... ..... ... 2
... ..... ..... ..... ..... ....... .. ... ..... ..... . 3
Getting Sta rted
Mon itor Fu nctio n Ov erv iew
Whe n Using t he Remo te Cont rol
Rem ote Con trol Ba ttery R eplac ement
Rem ote Con trol Fu nctio n Ov erv iew
... ..... ..... ..... ..... ...... 4
... ..... ..... ..... .... 5
Basic Opera ti on s
Turni ng Po we r ON/ OFF
Loa ding Di scs / Unl oadin g Discs
Swi tchin g the Sou rce
Turni ng FM/I R/ Spe aker ON /OFF
... ..... ..... ..... ..... ....... .. ... 7
... ..... ..... ..... .. 7
... ..... ..... ..... ..... ....... .. ... ... 7
... ..... ..... ..... .... 7
Monitor Set up
Adj ustin g OSD
Adj ust Bri ghtne ss
Adj ust Con trast
Adj ust Hue
Adj ust Sat urati on
Res ettin g Pictu re Adju stmen t
... ..... ..... ..... ..... ....... .. ... ..... ..... .. 8
... ..... ..... ..... ..... ....... .. ... .... 8
... ..... ..... ..... ..... ....... .. ... ..... .. 8
... ..... ..... ..... ..... ....... .. ... ..... ..... .... 8
... ..... ..... ..... ..... ....... .. ... .... 8
... ..... ..... ..... .... 8
MMD (Multim ed ia D ri ve r) O perations
Pla ying DV D/ V CD/ CD
Dis c Auto Pl ay
Sto pping P layba ck (PRE -S TOP )
Sto pping P layba ck
Pla ying St ill Fra me s (PAUSE)
Fas t-f or wardi ng / Fa st-re ve rsi ng
Fin ding th e Begin ning of C hapte rs
Slo w Motio n Playb ack
Set ting Zo om In / Out
Rep eatin g Displ ay Peri od (A-B )
Set ting Ra ndom (O n/Off )
Swi tchin g Angle ( DVD Onl y)
Usi ng Numb er Key Pad
Dis playi ng Disc S tatus
Swi tchin g Subti tles (D VD O nly)
Swi tchin g Audio Track s
Cha pter/ Track / Title R ep eat P layba ck
... ..... ..... ..... ..... ....... .. ... . 9
... ..... ..... ..... ..... ....... .. ... ..... ..... ... 9
... ..... ..... ..... .... 9
... ..... ..... ..... ..... ....... .. ... ..... . 9
... ..... ..... ..... ..... ... 9
... ..... ..... ..... ... 9
... ..... ..... ..... ..... ....... .. .. 10
... ..... ..... ..... ..... ....... .. ... 1 0
... ..... ..... ..... ... 10
... ..... ..... ..... ..... ....... 1 0
... ..... ..... ..... ..... ... 10
... ..... ..... ..... ..... ....... .. . 10
... ..... ..... ..... ..... ....... .. . 11
... ..... ..... ..... ... 11
... ..... ..... ..... ..... ....... .. 1 1
... ..... ..... . 5
... ..... ..... ..... 5
... ..... ..... ... 10
... ..... ... 11
USB / Memory Card Operation s
Swi tchin g DVD / USB / M em ory Car d Mo de
Set ting Ra ndom
Rep eatin g Playb ack
... ..... ..... ..... ..... ....... .. ... ..... 1 2
... ..... ..... ..... ..... ....... .. . 12
MMD Setup
DVD S et up Oper at ion
Gen eral Se tup Pag e
Set ting th e TV Disp lay
Set ting An gle Mar k
Set ting OS D Langu age
Set ting Ca ption s
Set ting Sc reen Sa ver
Set ting La st Memo ry
Aud io Setu p Page
Dol by Digi tal Set up
Set ting Du al Mono
Set ting Dy namic
Equ alize r Page
Set ting EQ Typ e
Set ting Ba ss Boos t
Set ting Su per Bas s
Set ting Treble B oo st
3D Pr ocess ing Pag e
Set ting Re verb Mo de
Pre feren ce Page
Set ting TV Typ e
Set ting PB C
Set ting Au dio Lan guage
Set ting Su btitl e Langu age
Set ting Di sc Menu L angua ge
Set ting Pa renta l
Set ting De fault
Pas sword S et up
Set ting Pa sswor d
... ..... ..... ..... ..... ....... .. ... 1 3
... ..... ..... ..... ..... ....... .. ... ..13
... ..... ..... ..... ..... ....... 1 3
... ..... ..... ..... ..... ....... .. .. 14
... ..... ..... ..... ..... ...... 14
... ..... ..... ..... ..... ....... .. ... ... 14
... ..... ..... ..... ..... ....... .. 1 4
... ..... ..... ..... ..... ....... .. 1 4
... ..... ..... ..... ..... ....... .. ... .... 15
... ..... ..... ..... ..... ....... .. .. 15
... ..... ..... ..... ..... ....... .. 1 5
... ..... ..... ..... ..... ....... .. ... 1 5
... ..... ..... ..... ..... ....... .. ... ..... 1 5
... ..... ..... ..... ..... ....... .. ... . 15
... ..... ..... ..... ..... ....... . 15
... ..... ..... ..... ..... ....... . 15
... ..... ..... ..... ..... ...... 15
... ..... ..... ..... ..... ....... .. . 15
... ..... ..... ..... ..... ...... 15
... ..... ..... ..... ..... ....... .. ... ..... .. 16
... ..... ..... ..... ..... ....... .. ... ..... 1 6
... ..... ..... ..... ..... ....... .. ... ..... ..... 1 6
... ..... ..... ..... ..... ....... .. ... .... 17
... ..... ..... ..... ..... ....... .. ... ..... . 17
... ..... ..... ..... ..... ....... .. ... ..... .. 17
... ..... ..... ..... ..... ....... .. ... .. 17
Installat io n an d Co nn ec tions
CAU TI ON
WAR NI NG
PRE CAUTI ON S
Par ts Indi ca tio n
Lim itati on
Ins talla tion St ep
Con necti ons
Sys tem Con necti ons
... ..... ..... ..... ..... ....... .. ... ..... ..... ..... 1 8
... ..... ..... ..... ..... ....... .. ... ..... ..... .... 18
... ..... ..... ..... ..... ....... .. ... ..... .. 18
... ..... ..... ..... ..... ....... .. ... ..... .. 19
... ..... ..... ..... ..... ....... .. ... ..... ..... ..... 1 9
... ..... ..... ..... ..... ....... .. ... ..... . 20
... ..... ..... ..... ..... ....... .. ... ..... ..... . 23
... ..... ..... ..... ..... ....... .. .. 24
Informati on
Acc essor ies
Gen eral Sp ecifi catio ns
Trouble S ho oting
War ra nty
War ra nty C ar d
... ..... ..... ..... ..... ....... .. ... ..... ..... . 25
... ..... ..... ..... ..... ....... . 26
... ..... ..... ..... ..... ....... .. ... .... 27
... ..... ..... ..... ..... ....... .. ... ..... ..... ..... . 28
... ..... ..... ..... ..... ....... .. ... ..... .. 29
.. 12
... ..... ..... ..... ..... .... 16
... ..... ..... ..... ..... . 16
... ..... ..... ..... .. 17
1
Page 3
Operating Instructions
Welcome
‧Thank s fo r purch as in g Seat Ba ck M onito r
Unive rs al Stan ch io n Mount . Th is manu al w il l help yo u
use the e xa ctly fe at ur es of you r ne w monit or.
‧Pleas e re ad all sa fe ty a nd oper at ing ins tr uc tions
in this m an ual car ef ul ly, an d ke ep this m an ual for
futur e re feren ce .
with
Safety Instructions
Be sure t o ob serve t he f ol lowin g in struc ti on s and
preca ut ions to e ns ur e safe us in g of this m on it or. If y ou
or othe r th ird par ti es u se this p ro duct in a n on -c orrec tl y
way and c au se the pr od uc t break do wn or dam ag e, a s
to law, th er e is no r es po nsibi li ty f or comp en satio n.
DVS w il l no t be resp on sible f or i t, p lease u nd ersta nd in g.
CAUTION:
This sy mb ol means "Ple as e be sure to obse rve."
Fai lure to heed th em c an result in in ju ry or mate ri al
prope r ty d am ag e.
Do not repair, alter or disassemble by yourself.
Doing s o ma y resul t in a n ac ciden t, f ire or el ec tr ic
shock . Co nsult a r et ai ler or se rv ice tec hn ic ian for
inspe ct ions an d re pa irs, if m ai ntena nc e is n eeded .
Halt use immediately if an unusual states appears.
Fai lu re to do so m ay c ause pe rs on al inju ry o r da mag e
to the pr od uct. Re tu rn i t to your a ut horiz ed d ea ler or
neare st s ervic e ce nt er for re pa iring .
Kee p fi ng er s aw ay w hi le t he m ot orized front
panel or moving monitor is in motion.
Fai lu re to do so m ay r esult i n pe rs onal in ju ry o r
damag e to t he prod uc t.
Do not strike or make this monitor drops strongly.
Doing s o ma y resul t in p er sonal i nj ury or sl as h.
Do not leave the disc in the car or the unit for a
long time.
Never e xp ose the d is c to d irect s un light . He at a nd
humid it y may dam ag e th e disc an d yo u may not b e
able to p la y it agai n.
WARNING:
This sy mb ol means "Forbids this b eh avior."
Fai lure to heed th em c an result in se ri ous injury
or deat h.
Do not operate any function that takes your
attention away from safety driving your
vehicles.
Any fun ct ion tha t re qu ires dr iv er's pr ol on ged att en tion
shoul d on ly be per fo rm ed afte r co ming to a c om pl ete
stop. A lw ays sto p th e ve hicle i n a sa fe loca ti on b efore
perfo rm ing the se f un ction s. Fail ur e to do so ma y re su lt
in an acc id ent.
Do not touch the screen when meet a strike
strongly.
If liqu id c rysta l to uc hes han ds , feet or c lo th es
incau ti ous, pl ea se w ash wit h th e neutr al d et ergen t or
consu lt a p hysic ia n if n ecess ar y.
Do not expose this monitor to high humidity
levels.
Fai lu re to do so m ay r esult i n fi re o r elect ri c shock .
Do not expose this monitor to dripping or
splashing.
Doing s o ma y resul t in e le ctric s ho ck.
Do not operate this monitor with wet hands.
Fai lu re to do so m ay r esult i n el ec tric sh oc k.
Do not use this monitor again when the power
cord is damaged.
Doing s o ma y resul t in f ir e or elec tr ic shoc k.
Use only in cars with A 12 Volt negative ground.
(Chec k wi th your d ea le r if you ar e no t sure. )
Use for o th er than i ts d es igned a pp licat io n ma y resul t
in fire , el ectri c sh oc k or othe r in jury.
Kee p sm al l ob je ct s su ch a s ba tteries out of the
reach of children.
Swall ow ing the m ma y re sult in s er ious in ju ry.
If swal lo wed, co ns ul t a physi ci an imme di at ely.
Do not block vents or radiator panels.
Doing s o ma y cause h ea t to b uild up i ns ide and m ay
resul t in f ire.
Do not place hands, fingers or foreign objects in
insertio n sl ot s or g ap s.
Fai lu re to do so m ay r esult i n pe rs onal in ju ry or dam ag e
to the pr od uct.
2
Page 4
Operating Instructions
PRECAUTI ONS
Please read all safety and operating instr uctions
in this manual carefully, and keep this manual
for future refer ence.
Personal Safety
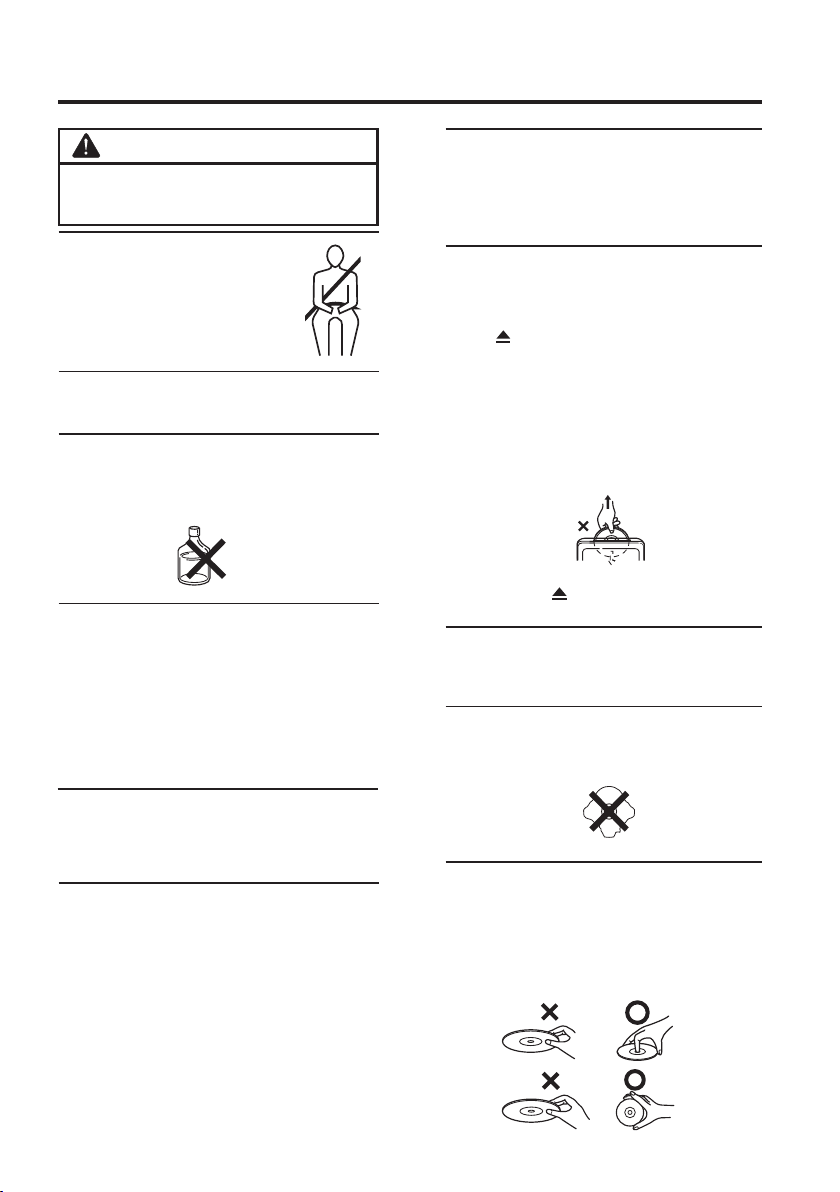
‧The ba ck sea t pass enger must fasten the
seat belt while operatin g this monit or.
‧Do not in ser t the USB or Memo ny Car d
whil e driv ing. Failu re to do so may result
in pers ona l inju ry.
Temperature
Do not op era te you r unit in ambient temper ature
above +50°C (+ 12 2°F) or bel ow 0°C (32°F ).
Product Cleaning
Use a sof t dry cl oth fo r peri odic cleaning of the
product . For mor e seve re sta ins, please dampen the
clot h with water only. Any thin g else h as the chanc e of
diss olv ing th e pain t or damagin g the plasti c.
ALC OHOL
Installation
‧Plea se inquir e to your retailin g shop to contact the
spec ialized engin eer or techn ical staff for ins tal lati on.
‧Be sur e to comply with this manual while
conn ecting the cables. Fai lure to do so may resul t in
dama ge to the product.
‧Be sur e the stabil ity of the signal cable while instal ling.
Failu re to do so m ay cau se fir e or electri c shoc k due to
the wea r of the signa l cabl e.
‧Be sur e to collect the cables well after install ation.
Failu re to do so m ay cau se fir e or electri c shoc k.
Maintenance
If you ha ve proble ms, do not attempt to repair the un it by
your sel f. Doing so may resul t in persona l inju ry or
dama ge to th e prod uct. Return it to your retaili ng sho p for
repa iri ng.
Characteristics of LCD Panel
‧After turning the system off, a slight ghost of the image
will re mai n temp orarily. Thi s is an effect pecul iar to LCD
tech nology and is norm al.
‧Unde r cold temperat ure co ndition s, the scree n may
lose co ntr ast te mporari ly. Afte r a short warm-up period ,
it will r eturn to nor mal.
‧The LC D pane l is manufac tured using an ext remely
high pr eci sion manufact uring technol ogy. Its effec tive
pixe l rati o is over 99.99%. This means that 0.01% of the
pixe ls cou ld be either alway s ON or OFF.
Using the remote control
‧Point the rem ote co ntrol at the r emot e sens ors withi n 2
mete rs.
‧It may no t be pos sible to ope rate the rem ote co ntrol if
the rem ote contr ol sen sor is expos ed to direct sunli ght
or inte rfe re wit h obje cts.
Inserting & Ej ec ti ng D is cs
‧Be sure t o sw itch to D VD s ource b ef or e loadi ng a nd
Unloa di ng Disc s.
‧Make su re t he labe l si de i s facin g yo u when yo u
inser t th e disc.
‧Press t o ej ect any d is c th at is ins er te d inc or re ctly.
‧Do not at te mpt to in se rt a d isc int o th e unit wh en t he
unit po we r is off.
‧Your p layer a cc epts on ly o ne d isc at a ti me f or p lay back. D o no t attem pt t o lo ad more t ha n on e dis c.
‧Playi ng a d isc whi le d ri ving on a v er y bumpy r oa d
may res ul t in skip s, b ut t his wil l no t sc rat ch t he d isc
or dama ge t he play er.
‧Do not gr ip o r pull ou t th e di sc whil e it i s being p ul le d
back in to t he play er b y th e autom at ic relo ad in g
mecha ni sm.
‧As a prot ec tive me as ur e to prev en t the dis c fr om
jammi ng , press t o ej ec t any dis c wi th i rre gu la r
surfa ce o r inser te d in corre ct ly.
Damage Discs
Do not at te mpt to pl ay c ra cked, w ar ped, or d am ag ed
discs . Pl aying a b ad d is c could s ev erely d am ag e the
playb ac k mecha ni sm .
Irregular Shaped Discs
Be sure t o us e round s ha pe d discs o nl y fo r thi s un it
and nev er u se any sp ec ia l shape d di scs. Us e of
speci al s haped d is cs m ay caus e da mage to t he
mecha ni sm.
Correct Handling
‧Do not dr op t he disc w hi le h andli ng .
‧Hold th e di sc so you w il l no t leave f in gerpr in ts o n
the sur fa ce.
‧Do not af fi x tape, p ap er, or g um med lab el s to t he
disc.
‧Do not wr it e on the di sc .
COR RECTINC ORREC T
3
Page 5
Getting St arted
Disc Cleaning
Finge rp rints , du st , or soil o n th e surfa ce o f th e disc
could c au se the pl ay er t o skip. F or rout in e clean in g,
wipe th e pl aying s ur fa ce with a c le an, sof t cl ot h from th e
cente r of t he disc t o th e ou ter edg e. I f the sur fa ce i s
heavi ly s oiled , da mp en a clea n, s oft clo th i n a so lutio n
of mild n eu tral de te rg ent bef or e clean in g th e disc.
On handling compact (CD/CD -R /C D-RW)
‧Do not to uc h the sur fa ce .
‧Do not ex po se the di sc t o di rect su nl ight.
‧Do not af fi x stick er s or l abels .
‧Clean t he d isc whe n it i s du sty.
‧Make su re t hat the d is c is s mooth a nd f lat.
‧Do not us e co mmerc ia ll y avail ab le disc a cc es sorie s.
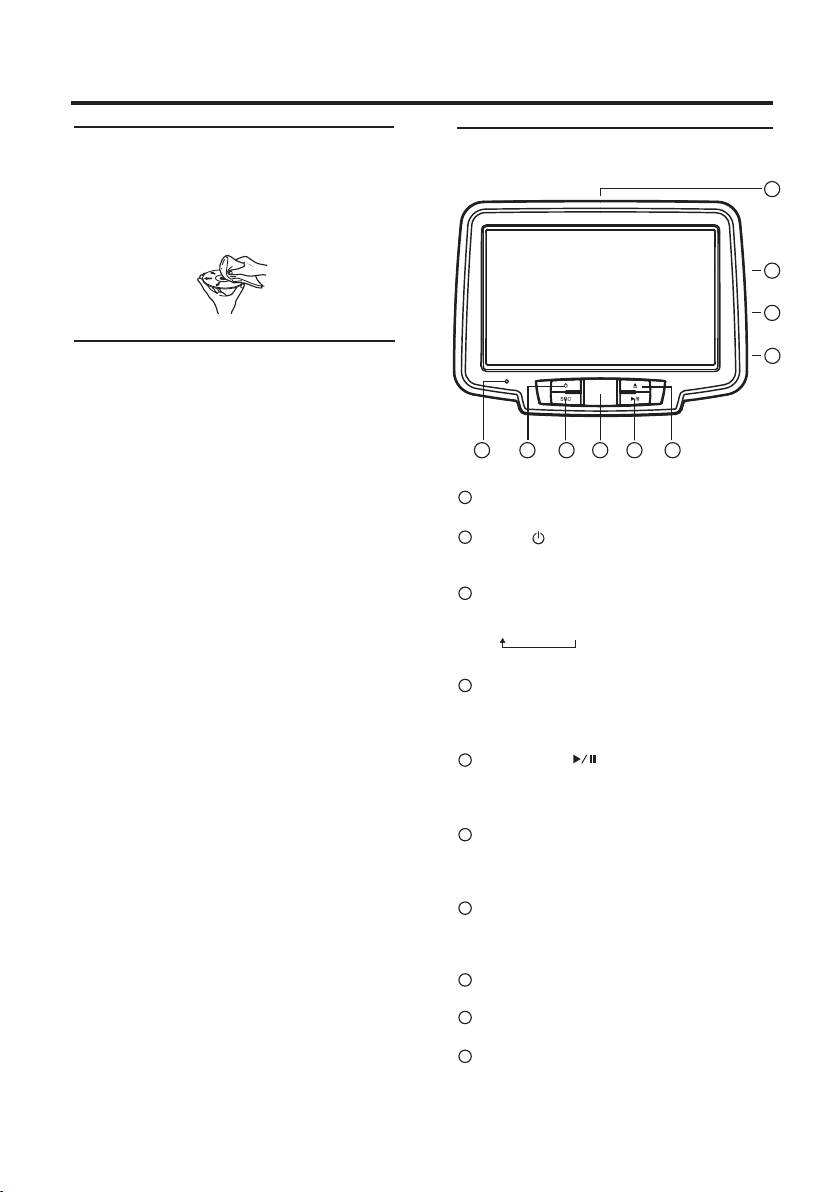
Monitor Function Overview
1 2 3 4 5 6
1
Auto Dimmer Sensor
2
POWER
- Press PWR button to turn on or off the unit.
3
SOURCE
- Press SOURCE button to switch the display source.
DVD / AV 1 / AV 2
4
IR Receiver
The receiving angle is about 20 degrees and the
receiving distance is about 2M.
7
8
9
10
5
PLAY / PAUSE
- Press once to start playing. Press twice to pause
playing.
6
EJECT
- Press EJECT button to stop playing and eject the
disc.
7
Disc - In Slot
(DVD / DVD-R / DVD-RW / DVD+R / DVD+RW /
VCD / CD-ROM / CD-RW)
8
USB Port (MP3 / WMA / AVI / JPEG)
9
Memory Card Reader (SD / MS / MMC)
10
AV Input (AV 3 / Game Port)
4
Page 6
Getting St arted
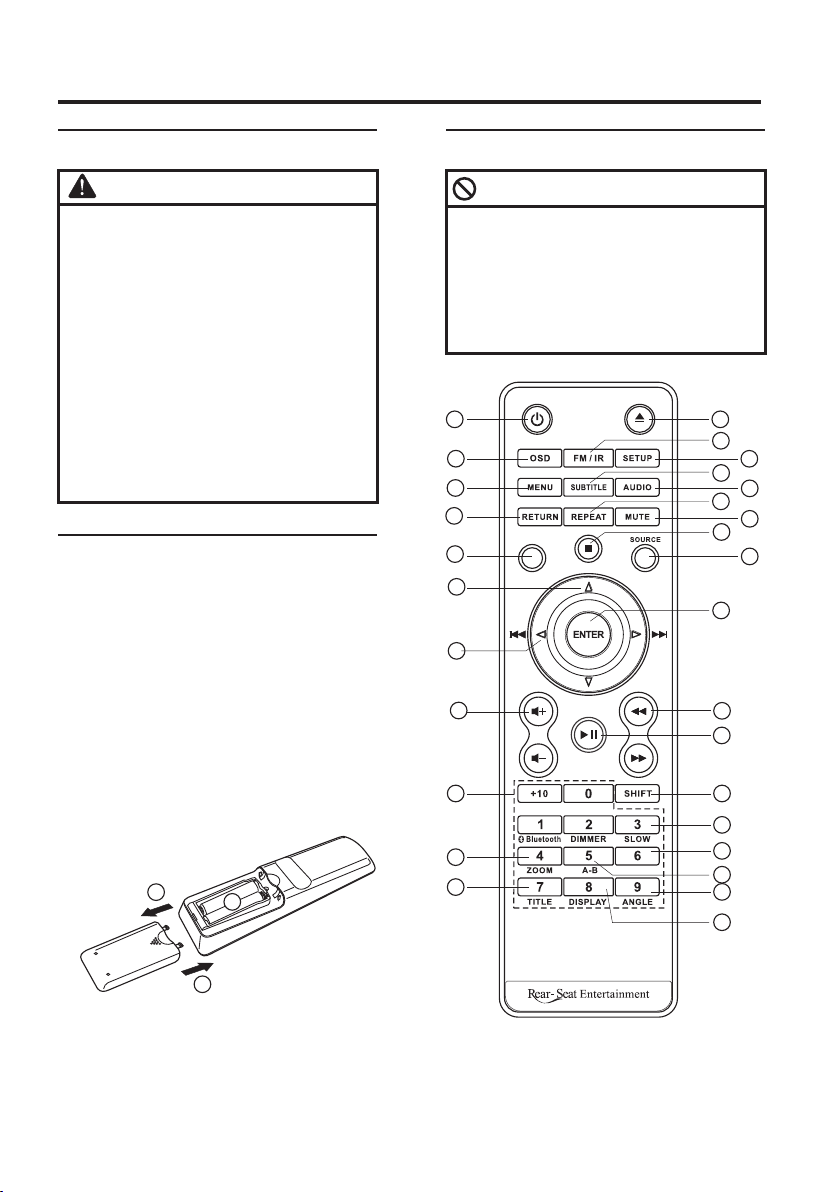
When Using the Remote Control Remote Control Function Overview
CAUTION
‧Poi nt the re mo te c ontro l at t he r emo te s en sors
withi n 2 me ters.
‧It may no t be p ossib le t o op erate t he r emote
contr ol i f the rem ot e co ntrol s en sor is ex po se d
to dire ct s unlig ht o r in terfe re w ith obj ec ts .
‧The rem ot e contr ol i s a sm all, li gh tweig ht
preci si on devi ce . To avoi d da ma ge, s ho rt b atter y
life, o pe ratio na l er rors an d po or resp on se ,
obser ve t he foll ow in g.
-D o no t su bject t he r emote c on tr ol to exc es sive
shock .
-D o no t pu t in a trou se r pocke t.
-K ee p awa y fr om f ood, mo is tu re and di rt .
-D o no t pl ace in di re ct suns hi ne .
‧Remov e th e batte ry i f it ’s not be in g used fo r a
long ti me .
‧Batte ri es cont ai n ch emica l su bstan ce , so t hey
shoul d be d ispos ed o f pr operl y.
Battery Replacement
1. Opening the battery case.
Pull up the bat tery cover.
2. Replacing the battery.
Plac e two AAA batterie s into the battery compa rtment
of the re mote control, makin g sure that the battery
pola rity is corr ect.
‧Batt ery type : AAA batte ry or equiva lent.
‧Plac ing a ba ttery in bac kwards way may cau se a
malf unction .
3. Closing the cover.
Push the battery cover as illu stra ted until a cl ick is
hear d.
1
2
WARNING
Do not operate any function that takes your
attention away from safety driving your
vehicle.
Any fun ct ion tha t re qu ires yo ur p rolon ge d at tenti on
shoul d on ly be per fo rm ed afte r co ming to a
compl et e stop. A lw ay s stop th e ve hicle i n a sa fe
locat io n befor e pe rf ormin g th ese fun ct io ns.
Fai lu re to do so m ay r esult i n an a cc ident .
1
3
6
9
12
15
17
18
21
24
27
USB/ DVD
RAN DOM
2
4
7
10
13
16
19
20
22
23
26
25
29
28
5
8
11
14
5
3
Page 7
Getting St arted
1
2
3
4
5
6
7
8
9
10
11
12
13
14
15
16
17
18
19
20
21
22
23
24
25
26
27
28
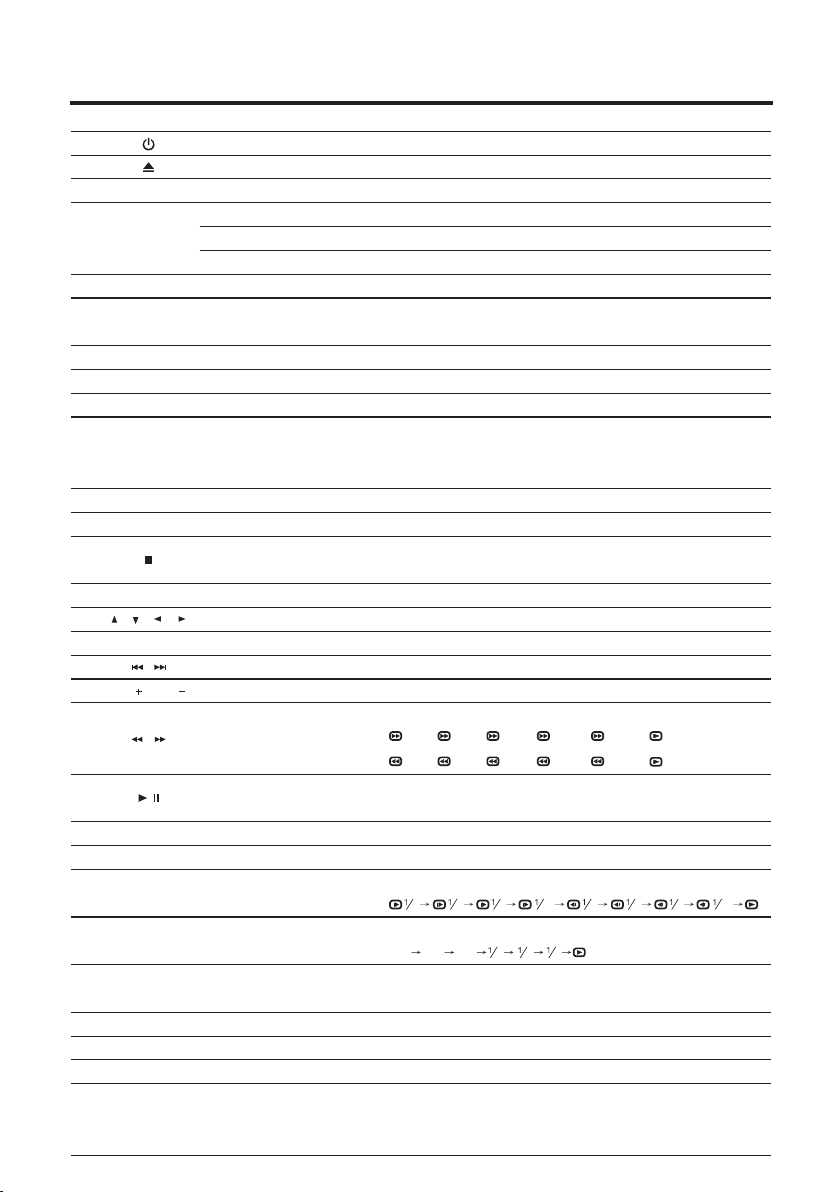
29
OSD
FM / IR
SET UP
MEN U
SUB TITLE
AUD IO
RET URN
REP EAT
MUT E
USB /DVD
SOU RCE
ENT ER
VOL VOL
+10
0
~
SHI FT
SLO W (3)
ZOO M (4)
A-B ( 5)
RAN DOM (6)
TIT LE (7)
DIS PLAY (8)
ANG LE (9)
Power
Eject
OSD Menu
FM Modulator
IR Sensor
Speaker (Opti on)
DVD Setup Menu
Disc Menu
Subtitl e
Audio
Return
Repeat
Mute
USB / DVD
Stop Playback
Display Sourc e
Cursor Button s
Enter
Skip / Backwar d Forw ard
Volume Incr ease / Decrease
Search Backwa rd / Forward
Play/Pau se
Number Key Pad
Shift
Slow (3)
Zoom (4)
A-B (5)
Random (6 )
Title (7)
Display (8)
Angle (9)
Switch monito r powe r ON/OFF
Stop playback and eje ct the disc.
Enter or exi t on-s cre en dis play menu sy ste m.
(1) Pr ess On ce : Switch FM ON /OF F. ( 87.7 MHz to 89.9M Hz)
(2) Pr ess Twice : Switch IR A/ B/ OFF.
(3) Pr ess Th ird : Switch S peaker ON/OFF.
Enter or exi t the disc DVD se tup me nu.
Return to di sc con ten ts men u.
(For VC D with PBC featur e, PB C must be turned off. )
Select desire d subt itl e to display.
Select desire d audi o languag e to display.
Return to th e prev iou s disp lay.
Select desire d repe at mode.
(1) DVD Disc : Chapter → Title → All→Repeat Off
(2) CD / VCD Disc : Track → All → Off
Disable or enable aud io out put.
Switch DVD / US B / Memo ry Car d mode .
(1) Pr ess On ce: PR E-ST OP disc playbac k.
(2) Pr ess Twice : STOP playbac k comp let ely.
Switch displa y sour ce. (DVD→AV 1→AV 2)
Move between the func tion items in the menu.
Determi ne an operat ion or item.
Skip to the previo us or ne xt cha pter / title / tr ack .
Increas e / Decrease v olume.
Select desire d sear ch backwa rd / forward speed.
2X 4X 8X 16X 32X → → → → →
2X → 4X → 8X → 16X → 32X →
(1) Pr ess On ce : Start pla yback.
(2) Pr ess Twice : Pause playback.
Press number key pad to input da ta for disc.
Switch Number / Functi on mod e.
Select differ ent sl ow playba ck mod es for a VCD/DVD.
2 4
Enlarge a pi cture or act ive image on the scr een .
2X 3X 4X
Repeat playba ck of a spe cif ic sec tion with in a chapter of DVD or
a trac k.
Select to pl ayback th e chap ter/ track rand omly.
Go to disc title.
Display curre nt inf orm ation during pl ayback.
Select desire d view ing angle . (If a DVD disc contai ns multi- angle
feature , view ing an gle s may be se lected. )
※JPEG: Change the brow sing effects during playback .
342
2
8 16
4
8 16
66
Page 8
Basic Operations
Turning Power ON/ OFF
1. P re ss to t ur n ON .
2. To turn of f th e po wer, press an d ho ld a gai n.
Loading Discs/ Unloading Discs
Turn on t he p ower be fo re load in g an d unloa di ng disc s.
‧Be sure t o sw itch to D VD s ou re, bef or e loadi ng a nd
unloa di ng disc s.
Loading Discs
Inser t th e disc wi th t he l abel si de f acing y ou .
Once th e di sc is par ti al ly inse rt ed, it is d ra wn i n
autom at icall y. Playb ac k st arts.
‧If the ig ni tion ke y is o n AC C or ON, a di sc c annot b e
inser te d when th e po we r is OFF.
‧
If wron g di sc, ups id e- down di sc o r dirty d is c ha ve
been in se rted. ” NO D IS C” i s di splay ed .
Unloadin g Discs
Press t o ej ect the d is c.
Be sure t o re move th e di sc .
‧If the ig ni tion ke y is s et t o ACC or ON , a di sc cann ot
be remo ve d when th e po we r is OFF.
‧Durin g AC C OFF or wh il e th e disc is b ei ng load ed
(”REA D” i s displ ay ed ) the dis c wi ll not be e je ct ed
even if y ou p ress” E JE CT ”.
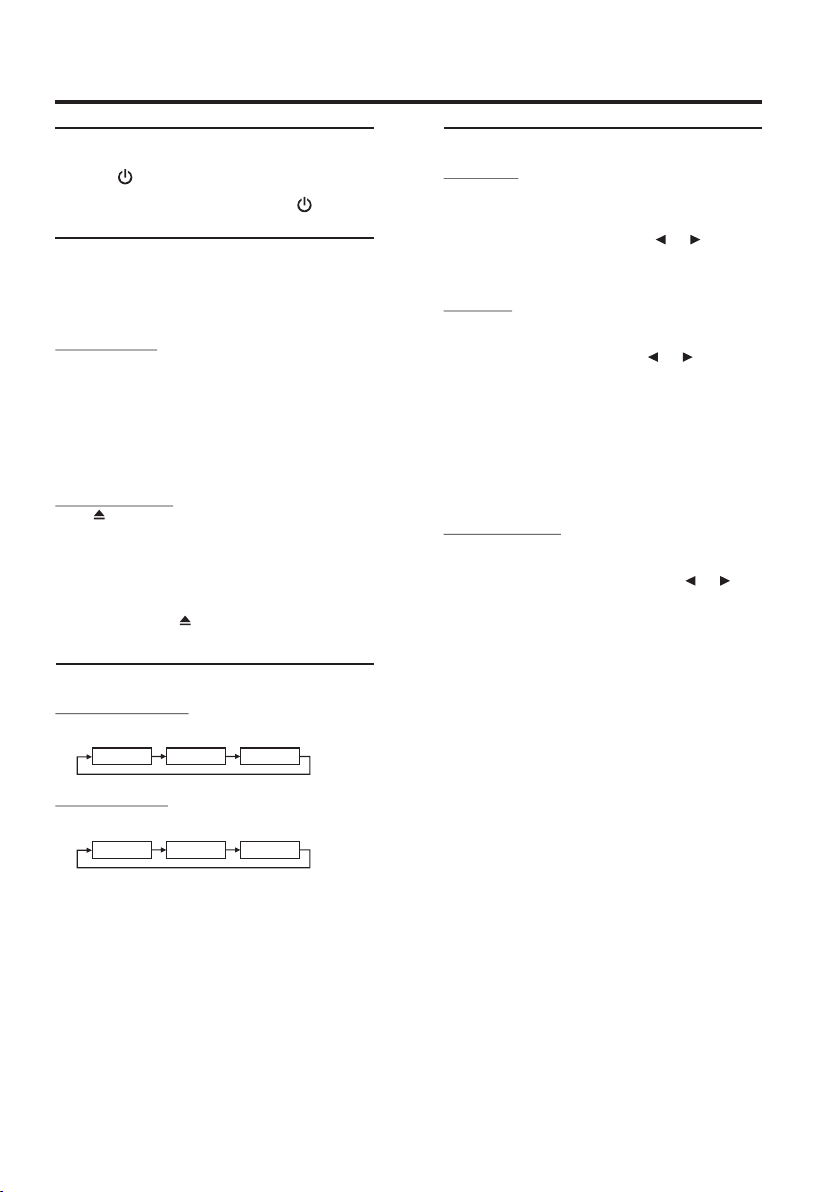
Switching the Source
Front Control Keys
1. P re ss “SRC ” to c ycle th ro ug h the d if fe rent so ur ce s.
DVD AV 1 AV 2
FM/IR (On/Off)
FM ON/OFF (defa ul t: OFF)
1. P re ss FM/I R on ce: To turn O N/OFF t he F M
trans mi tter.
2. W he n you tur n on t he F M, pres s or t o selec t
desir ed F M frequ en cy 8 7.7 MHz ~ 89. 9MHz or O FF.
IR ON/OFF (defa ul t: IR A)
1. P re ss FM/I R tw ice: To tur n CH A / CH B or Of f th e IR.
2. W he n you tur n on t he I R, pres s or t o selec t
CH A , CH B or Off .
‧The wir el ess hea dp ho ne uses t he i nf rar ed r ay ( IR) to
trans mi t, if the re a re o bstac le s am ong t he t ra nsmit te r
and hea dp hone, i t ma y ha ve some n oi se .
‧When op en t he 2 sets o f sc re en, ple as e se t the I R fo r
the ind iv idual C H A or C H B, t o preve nt m ut ual
inter fe rence .
SPEAKER ON/OFF (Option)
(defa ul t: OFF)
1. P re ss FM/I R th ird: To tur n ON/OF F th e Speak er.
2. W he n you tur n on t he s peake r, pre ss o r to
selec t ON o r OFF.
Remo te Control
1. P re ss “Sou rce” to c yc le t hroug h th e diffe re nt s ource s.
DVD AV 1 AV 2
‧OSD (On S cr een Dis pl ay ) will be t ur ned off
autom at icall y, when no t op er ating m or e than 10
secon ds .
‧When yo u pr oceed t he a bo ve step w it h front c on tr ol
keys or r em ote con tr ol , the dev ic e sourc e na me o n
OSD can b e au tomat ic al ly shif te d.
7
Page 9
Moni tor Set up
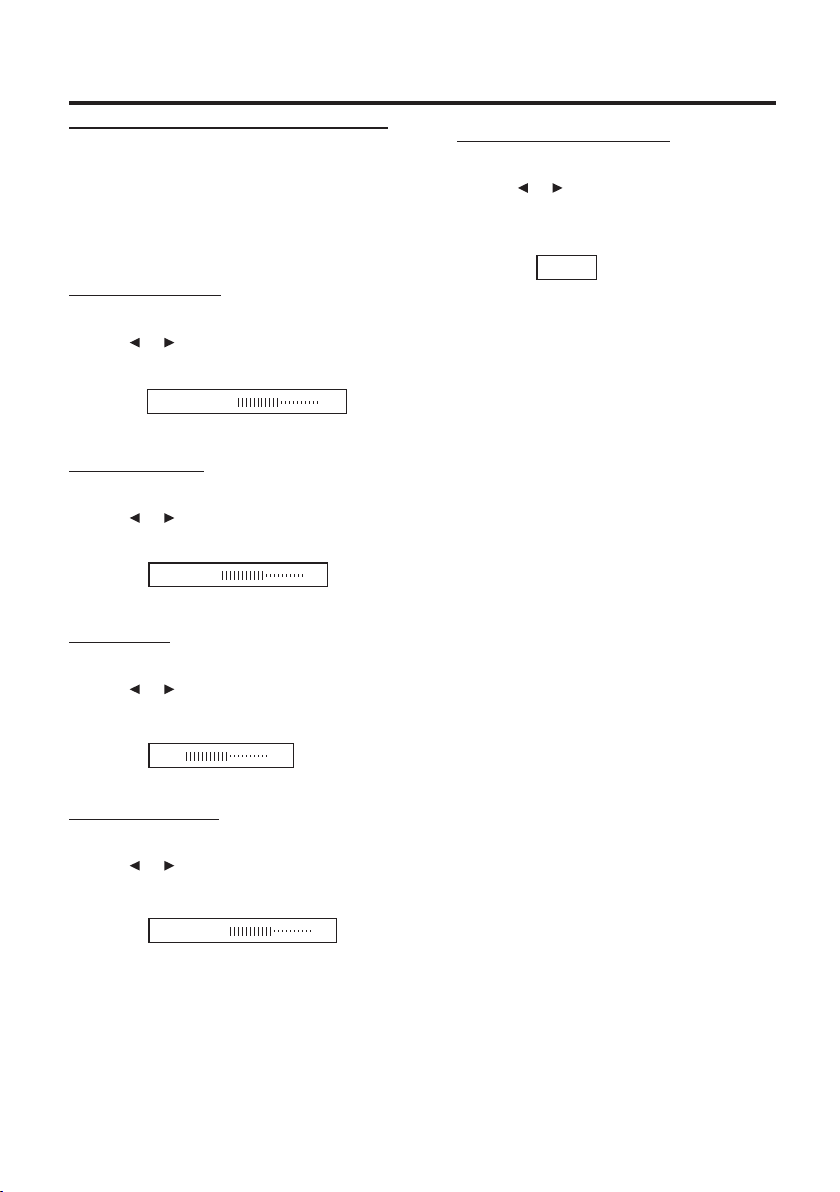
Adjusting OSD
Visua l br ightn es s, are
adjus ta ble.
Each so ur ce is ind ep en dentl y ad ju sta bl e.
‧
‧Make ad ju stmen ts w it hin 10 se co nds, ot he rw ise the
OSD (On S cr een Dis pl ay ) will tu rn o ff a uto ma ti cally.
Adjustin g Brightnes s
contr as t, hue an d sa tu ratio n
1.Pres s OS D to s elect B ri ghtne ss .
2.Pres s or t o ad ju st the br ig ht ness.
Brigh tn es s can be adju st ed f rom -20 (MI N) t o +2 0
(MAX) .
Brightness
00
Adjustin g Contrast
1.Pres s OS D to s elect C on trast .
2.Pres s or t o ad ju st the co nt ra st .
Contr as t ca n be adjust ed f ro m -20 (LO W) to +20
(HIGH ).
Contrast
00
Adjustin g Hue
1.Pres s OS D to s elect H ue .
2.Pres s or t o ad ju st the hu e.
Hue ton e ca n be a djusted f ro m -2 0 (G MIN) to
+20 (G MA X) .
Rese tting Pictu re Adjustment
1.Pres s OS D to s elect R eset.
2.Pres s or t o re se tting a dj us tment.
Reset w il l be s et up in 00(m ed ia n).
To save a dj ustme nt o r wa it 1 0 secon ds u nt il O SD
disap pe ar, th e ad ju stmen t wi ll b e sa ve auto ma ti cally.
Reset
Hue
00
Adjustin g Saturatio n
1.Pres s OS D to s elect S at urati on .
2.Pres s or t o ad ju st the sa tu ra tion.
Chang e de pt h can be adju st ed f rom -20 (MI N) t o
+20 (R MA X) .
Saturation
00
8
Page 10

MMD Operations
CAUTION
Not all function wi ll o pe ra te f or e ve ry D VD.
‧
See the individua l MM D’ s in st ru ct io ns f or
details on the feat ur es s up po rt ed .
‧Fingerprints on a d is c ma y ad ve rs el y af fe ct
playback. If a prob le m oc cu rs , re mo ve t he
disc and check for fi ng er pr in ts o n th e pl ay back side. Clean th e di sc i f ne ce ss ar y.
‧When using the remo te c on tr ol , be c ar ef ul t o
press a button at tim e. P re ss in g mu lt ip le
buttons at the same t im e ma y ca us e
erroneous opera ti on .
‧If you switch the pow er o r ig ni ti on k ey O FF
during playback , pl ay ba ck w il l co nt in ue
where you left off wh en y ou r es um e pl ay back.
‧If you try to perform a n in va li d op er at io n
(based on the type of d is c be in g pl ay ed ),
the message “ ” will be d is pl ay ed o n th e
monitor screen.
‧A disc type must matc h th e se tt in g of t he
system. If a wrong ty pe d is c is i ns er te d, t he
message “NO DISC ” wi ll b e di sp layed, and
playback is not ava il ab le .
Playing DVD/VCD/CD
Place a disc with the label side facing you.
To load d iscs, s ee “ Pl acing D is c” o n page 7. P la yback
start s.
The rev er se side o f a di sc w ill not b e pl ay ed
‧
autom at icall y. Remov e th e di sc, tur n it o ver and
repla ce i t.
‧It may ta ke s ome tim e be fo re play ba ck star ts a ft er
placi ng a d isc.
Disc Auto Play
The dis c wi ll play a ut om atica ll y witho ut p re ssing
when di sc i s place d.
MMD Menu
1. P re ss MENU t o di splay M MD M en u.
2. P re ss to sel ec t th e desir ed i te m,
then pr es s ENTER o r to c onfir m a se le ction .
‧Fo r som e di sc s it is pos si bl e to sele ct i tems di re ct ly
from th e me nu scre en u si ng the nu mb er k eys ( “0 ” to “ 9”).
Video Menu
1. P re ss MENU t o di splay V id eo M enu .
2. P re ss to sel ec t th e desir ed i tem, an d th en
press E NT ER or a ga in t o confi rm a s el ectio n.
Stopping Playback (PRE-STOP)
1. P re ss duri ng p la yback .“ P re ss Play K ey
To Cont in ue ” is disp la ye d, and pl ay back pa us es .
That po si tion is s to re d in memo ry.
2. P re ss in the P RE -ST OP m od e to retu rn t o
norma l pl aybac k.
Playb ac k start s fr om t he posi ti on at whi ch i t wa s
stopp ed .
Fo r som e di sc , the pos it io n at whic h pl aybac k wa s
‧
stopp ed m ay not be a cc ur ate.
Stopping Playback
1. P re ss twic e du ri ng play ba ck.
“ ” is disp la yed, an d pl ay back st op s.
2. P re ss in the S TO P mo de to ret ur n to norm al
playb ac k.
Playb ac k start s fr om t he begi nn ing.
Playing Still Frames (Pause)
1. D ur ing pla yb ac k, pres s to p ause.
“ ” is disp la yed.
2. P re ss agai n to r es ume pla yb ack.
‧No soun d ap pears d ur in g the sti ll m ode.
‧The ima ge o r sound m ay s to p tempo ra rily wh en
playb ac k start s fr om t he paus e mo de . Thi s is n ot a
malfu nc tion.
Fast-for warding / Fast-reversing
1. D ur ing pla yb ac k, pr es s an d hold or t o se t
searc h sp eed (×2 / ×4 / ×8 / x16/ x3 2 ) fo rward ed
or reve rs ed.
2. R el ease or t o pa us e, then p re ss retu rn t o
norma l pl aybac k.
‧No soun d ap pears d ur in g fast- forwa rd / f as t-
rever se .
‧Fa st- fo rward in g / fa st- re versi ng o f a vi deo C D is o nl y
funct io n if the di sc i nc orpor at es play ba ck c ontro l.
‧Fo r DVD a nd v id eo CDs wi th p la yback c on trol,
the men u sc reen ma y re ap pear du ri ng f ast forwa rd ing / fas t- rever si ng.
9
Page 11

MMD Operations
RAN DOM
22
21
Finding the Beginning of
Chapters
Durin g pl aybac k, p re ss or to fi nd t he
begin ni ng of cha pt er s.
The cha pt er / trac k sw it ches ea ch t ime the b ut to n is
press ed , and pla yb ac k of the se le cted ch ap te r / track
start s.
:
Press t hi s to star t pl ay back fr om t he
begin ni ng of the c ur re nt chap te r or t rack.
:
Press t hi s to star t pl ay back fr om t he
begin ni ng of the f ol lo wing ch ap te r or tr ac k.
‧Some DV Ds d o not hav e ch ap ters.
※ Suppl em en tary e xplanat io n:
“Ch apter s” are divi si ons of mo vi es o r music al
selec ti ons on DV Ds .
“Tra cks” ar e di visio ns o f mo vies or m us ic al
selec ti ons on vi de o an d music C Ds .
Slow Motion Playback
Slow al lo ws you to s el ec t diffe re nt slow p la yb ack
modes f or a V CD / DVD du ri ng play ba ck .
1.Pres s SLO W to s elect s lo w pl ayb ac k sp eed
from no rm al to ½, , , .
2
2
8 16
4
8 16
4
8 16
4
2. To retur n to n or mal pla yb ac k, pr es s SLO W
repea te dly unt il n or mal spe ed p layba ck .
‧No soun d is p layed d ur in g slow mo ti on p lay ba ck /
rever se s low mot io n pl aybac k.
Repeating Display Period (A-B)
Use thi s fu nctio n to s et a d ispla y pe riod re pe at edly.
1.Duri ng p layba ck , pr ess A-B .
Rep eat A-
Rep eat A-B
Rep eat Off
-Sett in g a displ ay p er iod sta rt .
-Sett in g a displ ay p er iod end .
-Canc el ing the s et ti ng of dis pl ay peri od .
Setting RANDOM (On/Off)
Rando m al lows yo u to s el ect to pl ay t he chap te r /
track r an domly d ur in g playb ac k.
1.Pres s RA NDO M to turn the R an do m funct io n
ON or OFF.
Switching Angle (DVD only)
On DV Ds i n wh ich sce ne s have be en f il med fro m
multi pl e angle s, t he a ngles c an b e switc he d du ring
playb ac k.
1. D ur ing pla yb ac k, pres s AN GLE .
The ang le s witch es b et ween th e an gles re co rd ed
on the di sc , each ti me t he b utton i s pr es sed .
‧Somet im es may be r eq ui red for t he a ng le to c ha ng e.
Using Number Key pad
1.Pres s SH IF T to swit ch N umber /Func ti on mode.
2.In Num be r mode, i np ut s the num er ic k eys ( 0~ 9) d ata
for dis c.
Setting Zoom In / Out
Zoomi ng a llows y ou t o en large a p ic ture or a ct iv e
image o n sc reen du ri ng p layba ck .
1.Pres s ZO OM repe at edly to z oo m in o ut on the
playb ac k video i ma ge .
2X 3X 4X
2.To ret ur n to norm al p layba ck , pr ess ZOO M
repea te dly unt il “ ZO OM OFF”
342
4
SHI FT KEY
NUM BER KEY PA D
10
Page 12

MMD Operations
Displaying Disc Status
Use the p ro cedur e de sc ribed b el ow to dis pl ay t he
statu s (t itle nu mb er, ch ap ter num be r, etc .) of the
curre nt ly play in g DVD/V CD /C D on the mo ni tor
scree n.
1.Duri ng p layba ck , pr ess DIS PLAY. Th e pl aybac k
statu s is d ispla ye d.
DVD Disc
Titl e Elaps ed
TT 01/ 14 CH 02/ 20 00:0 5:34
Cur rent ti tle num ber
Tit le Elap sed
Tit le Rema in
Cha pter El apsed
Cha pter Re main
Dis play Of f
VCD / CD Disc
Titl e Elaps ed
Track 0 1 / 30
Sin gle Ela psed
Sin gle Rem ain
Total E lap sed
Total R ema in
Dis play Of f
Cha pter pl aybac k time
Cur rent ch apter n umber
-Elap se d playb ac k ti me of cur re nt
title .
-Rema in ing tim e of c ur rent ti tl e.
-Elap se d playb ac k ti me of cur re nt
chapt er.
-Rema in ing tim e of c ur rent ch ap ter.
-Turns o ff t he d ispla y in fo rma ti on .
05:3 4
Track p layba ck time
Cur rent ti tle num ber
-Elap se d playb ac k ti me of cur re nt
title .
-Rema in ing pla yb ac k time of
curre nt t itle.
-Elap se d playb ac k ti me of cur re nt
disc.
-Rema in ing pla yb ac k time of c ur rent
disc.
-Turns o ff t he d ispla y in fo rma ti on .
Switching Subtitles (DVD only)
Wi th mult ip le subt it le l angua ge D VDs, th e su bt itle
langu ag e can be sw it ch ed duri ng p layba ck , or
subti tl es can be h id de n.
1.Duri ng p layba ck , pr ess SUB TITLE .
The sub ti tle swi tc he d betwe en t he lang ua ge s
recor de d on the di sc a nd O FF each t im e the but to n is
press ed .
‧There m ay b e a delay b ef or e the sel ec te d subti tl e
appea rs .
‧Not all d is c with al lo w ch angin g th e su bti tl es d uring
playb ac k. In the se c as es, sel ec t su bti tl es f rom the
MMD’s m en u.
‧The sel ec ted sub ti tl e langu ag e be com es t he d efaul t
setti ng e very ti me t he p ower is t ur ne d on or t he d is c
is repl ac ed. If th e di sc d oes not i nc lu de th at l an guage ,
the dis c’ s defau lt l an guage i s se le cte d in st ead.
‧Fo r som e di sc s, the su bt it les wil l be d ispla ye d ev en
when th is i s set to of f.
Switching Audio Tracks
DVD s ca n ha ve diff er ent aud io t ra cks. Th es e alter na te
track s ca n be swit ch ed d uring p la yback .
1. D ur ing pla yb ac k, pres s AU DIO .
The sou nd s witch ed b et ween th e al terna te a ud io
track s re corde d on t he d isc eac h ti me t he bu tt on i s
press ed .
‧The sel ec ted alt er na te trac k be co mes t he d ef ault
setti ng e very ti me t he p ower is t ur ne d on or t he d is c is
repla ce d. If the d is c do es not In cl ud e tha t tr ac k, the
disc’ s de fault l an gu age is se le ct ed in st ea d.
‧Not all d is cs will a ll ow c hangi ng t he a lte rn at e audio
track s du ring pl ay ba ck. In th es e ca ses , se le ct audi o
track s fr om the DV D me nu .
‧There m ay b e a delay b ef or e the sel ec te d alter na te
track b eg ins to pl ay.
Video CDs With multiplex audio
Mon o left Mo no Righ t Mix-M ono S tereo
Chapter/Track/ Title Repeat
Playback
Use thi s fu nctio n to p la y the dis c’ s title s, c ha pters o r
track s re peate dl y.
1.Duri ng p layba ck , pr ess REP EAT.
The rep ea t mode sw it ch es each t im e when th e
butto n is p resse d.
DVD Disc
Cha pter Ti tle All O ff
11
CD/VCD Disc
Track A ll Off
Page 13

USB / Memor y Card Operations
CAUTION
‧Not all f un ction w il l op erate f or e very fo rm at s.
See the i nd ividu al U SB ’s inst ru ction s fo r de tails
on the fe at ures su pp or ted.
‧Do not us e US B while d ri vi ng your v eh icle.
Alway s st op the ve hi cl e in a safe l oc ation b ef or e
perfo rm ing the se f un ction s. Fail ur e to d o so ma y
resul t in s eriou s in ju ry or an ac ci dent.
‧If you tr y to p erfor m an i nv alid op er ation ( ba se d
on the ty pe o f disc be in g pl ayed) , th e messa ge
“ ” will be d is playe d on t he
monit or s creen .
‧A disc ty pe m ust mat ch t he s ettin g of t he syst em .
If a wron g ty pe disc i s in se rted, t he m essag e
“ NOT FOU ND U SB” wil l be d is playe d, a nd
playb ac k is not av ai la ble.
Switching DVD/USB/Memory Card
Mode
After c on necti ng U SB o r Memor y Ca rd, the u ni t sh all
searc h th e direc to ri es auto ma tical ly, and sh ow a ll f iles
on the sc re en.
1.Pres s US B/D VD to chang e to U SB m ode or Me mo ry
Card mo de .
2. P re ss to sel ec t de sired f il es or pre ss
to skip t o th e next an d pr ev ious pa ge , an d the n pr es s
ENT ER or to star t or p au se play ba ck.
‧It may ta ke s ome tim e to s ea rch the d ir ec tor ie s wh ile
readi ng t he USB or M em or y Card.
3.Pres s to r et urn t o th e pl aybac k me nu .
Cur rent pl aybac k infor matio n
Cur rent pl aybac k
Cha pter
Adj ustin g the vol ume
Pla yback / S top
Num
Fas t-for wardi ng /
Fas t-rev ersin g
Pre view Ar ea
00: 59 05: 05 128Kb ps 2 X
004 / 0 50
MP3
MUS IC01
MUS IC05_ 1
MP3
MP3
MUS IC07_ 2
MOV IE_03 _01
AVI
PHO TO_001
Fil e Are a
Cur rent pl aybac k mode
USB
Setting RANDOM
Rando m al lows yo u to s el ect to pl ay t he trac k ra nd omly
durin g pl aybac k.
1.Duri ng p lacyb ac k, p ress RA ND OM.
The ran do m mode sw it ch es each t im e when th e
butto n is p resse d.
MP 3
Ran dom Fol der
AVI
Ran dom Re pea t Off
Repeating Playback
Use thi s fu nctio n to p la y the tra ck s in USB or M em or y
Card re pe atedl y.
1.Duri ng p layba ck , pr ess REP EAT.
The rep ea t mode sw it ch es each t im e when th e
butto n is p resse d.
MP 3
Sin gle Rep eat One R epe at Fold er Fo lde r
AVI
Sin gle Repe at On e Rep eat All R epeat O ff
Tips
When pl ay p hotos , yo u ca n see the p ho tos in th e
Photo P re view Ar ea .
1.Pres s EN TER or to s ta rt or pau se p la yback
by full -s creen a ut om atica ll y.
2.Duri ng p layba ck , pr ess or se e pr ev ious
or next p ho to.
3.Pres s or t he p hot o ca n ro tate cl oc kw ise
or coun te rcloc kw is e.
4.Pres s to r et urn t o in de x of the ph ot os .
3
7
11 12
4
8
1 2
5 6
9
10
Sli de Show M enu Pre v Next
- Press t o se le ct de si re d photo s,
and pre ss E NTER or t o st art or pa us e
playb ac k.
- Press M EN U to retu rn t o the pla yb ac k menu.
12
Page 14

MMD Set up
DVD Setup Operation
The fol lo wing st ep s 1 to 2 a re comm on t o ea ch of
the DVD s et tings d es cr ibed he re . Re fer t o ea ch
secti on f or deta il s.
1.Pres s an d ho ld SE TUP on the re mo te cont ro l.
The set up m enu app ea rs o n the mon it or.
2.Pres s or t o se lect de si red set ti ng i tem
(Gene ra l Setup P age / Aud io S et up / Pref er ence Pa ge /
Pas sw ord S et up Pa ge ), t hen pre ss .
Fur th er item s wi ll be dis pl ay ed.
GENERAL SETUP PAGE
TV DISP LAY / A NGLE MA RK / O SD L ANG /
CAPTI ON S / SCREE N SA VER / LAS T ME MORY
AUDIO PAGE
DOLBY DIGI TAL S ET UP / E QUA LI ZER /
3D PROC ES SI NG
PRFERENCE PAGE
TV TYPE / P BC / A UDIO / SU BT IT LE / DISC M EN U /
PARE NTA L / DE FAULT
PASSWORD SETUP PAGE
PASSWO RD
EXIT SETUP PAGE
3.Pres s or t o ch ange th e se tting o f fu rt her
items , th en pres s EN TER.
4.Pres s an d ho ld EN TER. Th e se tt ings ar e st or ed and
the set up m ode is de ac ti vated .
5.Pres s SE TUP o r “E XI T SETUP ” to return t o no rm al
displ ay.
‧When se tt ings ar e ch an ged, ol d se tt ing s ar e
overw ri tten. M ak e a no te of cur re nt s ett in gs b efore
makin g ch anges . If t he v ehicl e’ s ba ttery i s
disco nn ected , th e se tting s wi ll b e cle ar ed a nd will
retur n to F ac tory se tt in gs.
General Setup Page
TV disp la y, Ang le m ark, OS D la ng uage, S cr een sav er
and Las t me mory ar e ad ju stabl e.
1.Pres s SE TUP b ut to n on the re mo te c ontro l. T he
setup m en u appea rs o n th e monit or.
2.Pres s or t o se lec t Ge ne ral Set up Page .
3.Pres s or t o se lec t TV D IS PLAY / ANG LE M ARK
OSD LAN G / SC REEN SA VE R / LAS T ME MO RY,
then pr es s ENTER t o co nfirm a s el ec tio n.
Setting TV D isplay
‧Fo r som e di sc s, the pi ct ur e may not b e se t to the
selec te d scree n si ze .
(defa ul t: Nor mal/PS)
4.Pres s or t o se lec t de si red scr ee n ty pe.
5.Pres s EN TER t o sa ve a djust me nt .
- - Gen eral Se tup Pag e - -
TV Dis play
Angl e Mark
OSD La ng
Capt ions
Scre en Save r
Last M emory
Set TV D ispla y Mode
‧Normal / PS (Pa n- Sc an )
Selec t th is when c on ne cted to a c on venti on al 4 :3
size mo ni tor. The pict ur e wi ll fill t he e ntire T V
scree n. D ue to the m is ma tch in as pe ct rati o, p ar ts
of the mo vi e at the ex tr em e left an d ri ght sid es
will no t be v isibl e wh en p layin g a 16 :9 size
movie .
‧Normal / LB (Le tt er B ox )
Selec t th is when c on ne cted to a c on venti on al 4 :3
size (n or mal TV as pe ct r atio) m on itor. There
may be bl ac k bands v is ib le at the t op a nd bott om
of the sc re en when p la yi ng a 16:9 s iz e movie .
‧Wide (16:9)
Selec t th is when c on ne cted to a w id e scree n TV.
This is s el ected u po n sh ipmen t fr om the fa ct or y.
Wide
On
ENG
Off
On
On
Norm al / PS
Norm al / LB
Wide
13
Page 15

MMD Set up
Setting An gle Mark
(defa ul t: On)
4.Pres s or t o selec t an gl e mark On / O ff .
5.Pres s EN TER to sa ve a djust me nt .
- - Gen eral Se tup Pag e - -
TV Dis play
Angl e Mark
OSD La ng
Capt ions
Scre en Save r
Last M emory
Set Ang le Mark
Setting OS D Lang uage
PS
On
On
Off
ENG
Off
On
On
(defa ul t: English)
4.Pres s or t o selec t de si red lan gu ag e.
‧There a re 7 k inds of l an gu ages ca n be c ho sen.
(Engl is h, Chin es e, F rench , Sp an ish , Ge rm an, Ita li an
and Por tu gu ese)
5.Pres s EN TER to sa ve a djust me nt .
The set ti ngs are s to re d and the s et up m ode i s
deact iv ated.
- - Gen eral Se tup Pag e - -
TV Dis play
Angl e Mark
OSD La ng
Capt ions
Scre en Save r
Last M emory
Set OS D Langu age
PS
On
ENG
Off
On
On
Engl ish
Chin ese
Fren ch
Span ish
Germ an
Ital ian
Port ugues e
(defa ul t: On)
Setting Sc reen Saver
4.Pres s or t o se lec t sc re en save r ON OFF.
or
5.Pres s EN TER t o sa ve a djust me nt .
- - Gen eral Se tup Pag e - -
TV Dis play
Angl e Mark
OSD La ng
Capt ions
Scre en Save r
Last M emory
Set Sc reen Sa ver
Setting Last Mem ory
Video m em ory can c ho os e to manu al ly ON or OF F.
Press o r to s elect l as t me mory ON o r OF F.
4.
Press E NT ER to s av e ad justm en t.
5.
- - Gen eral Se tup Pag e - -
TV Dis play
Angl e Mark
OSD La ng
Capt ions
Scre en Save r
Last M emory
Set La st Memo ry Stat e
PS
On
ENG
Off
On
On
Off
On
(defa ul t: On)
PS
On
ENG
Off
On
On
On
Off
Setting Ca ptions
(defa ul t: Off)
4.Pres s or t o selec t ca pt ions On / O ff .
5.Pres s EN TER to sa ve a djust me nt .
- - Gen eral Se tup Pag e - -
TV Dis play
Angl e Mark
OSD La ng
Capt ions
Scre en Save r
Last M emory
Clos ed Capt ions
PS
On
ENG
Off
On
On
On
Off
14
Page 16

MMD Set up
Audio Setup Page
Dolby D ig ital, E qu al izer an d 3D P roces si ng a re
adjus ta ble.
1.Pres s SE TUP b ut to n on the re mo te c ontro l. T he setu p
menu ap pe ars on th e mo ni tor.
2.Pres s or t o se lec t Au di o Setup P age.
3.Pres s or t o se lec t DO LBY D IG ITA L /
EQUAL IZER / 3D P RO CE SS ING, th en p ress EN TER
to conf ir m a selec ti on .
Dolby Digi tal Setup:
Setting Da ul Mono
(defa ul t: Stereo)
4.Pres s or t o se lec t da ul m ono mod e of
STERE O / L-MO NO / R-MO NO o r MI X-MO NO.
5.Pres s EN TER to sa ve a djust me nt .
- - Dol by Digi tal Set up - -
Dual M ono
Dyna mic
Dual M ono (1 + 1) S etup
Setting Dy namic
(defa ul t: Off)
Ster eo
STR
L-Mo no
R-Mo no
Mix- Mono
4.Pres s or t o se lec t de si red dyn am ic o f
Ful l, 3 / 4 , 1 / 2, 1 / 4 or OFF.
5.Pres s EN TER to sa ve a djust me nt .
Setting Ba ss Boost
(defa ul t: Off)
4.Pres s or t o se lec t ba ss b oost On / O ff .
5.Pres s EN TER to sa ve a djust me nt .
- - Equ alize r Page - -
EQ Type
Bass B oost
Supe r Bass
Trebl e Boost
Bass B oost
Setting Su per Bass
None
On
Off
Off
Off
Off
(defa ul t: Off)
4.Pres s or t o se lec t su pe r bass On / O ff .
5.Pres s EN TER to sa ve a djust me nt .
- - Equ alize r Page - -
EQ Type
Bass B oost
Supe r Bass
Trebl e Boost
Supe r Bass
Setting Treble Bo ost
None
Off
On
Off
Off
Off
(defa ul t: Off)
4.Pres s or t o se lec t tr eb le boos t On / O ff.
5.Pres s EN TER to sa ve a djust me nt .
- - Dol by Digi tal Set up - -
Dual M ono
Dyna mic
Set DR C Off
STR
FULL
3 / 4
1 / 2
1 / 4
OFF
Equalize r Page:
Setting Eq ualizer Typ e
(defa ul t: None)
4.Pres s or t o se lec t de si red equ al iz er of
None, R oc k, Po p, L ive, Da nc e, Tech no , Cl ass ic o r
Soft.
5.Pres s EN TER to sa ve a djust me nt .
- - Equ alize r Page - -
EQ Type
Bass B oost
Supe r Bass
Trebl e Boost
Sele ct Equa lizer Ty pe
None
Off
Off
Off
None
Rock
Pop
Live
Danc e
Techn o
Clas sic
Soft
15
- - Equ alize r Page - -
EQ Type
Bass B oost
Supe r Bass
Trebl e Boost
Treb le Boos t
None
Off
Off
Off
On
Off
3D Process ing Page :
Setting Reverb Mo de
(defa ul t: Off)
4.Pres s or t o se lec t re ve rb mode O n / Of f.
5.Pres s EN TER to sa ve a djust me nt .
- - 3D Pr ocess ing Pag e - -
Reve rb Mode
Reve rb Mode
Off
Off
Conc ert
Livi ng Room
Hall
Bath room
Cave
Aren a
Chur ch
Page 17

MMD Set up
Preference Page
TV type , PB C, A udio, S ub ti tle, Di sc M en u and P arent al
are adj us table .
1.Pres s SE TUP b ut to n on the re mo te c ontro l. T he
setup m en u appea rs o n th e monit or.
2.Pres s or t o se lec t Pr ef erenc e Se tu p.
3.Pres s or t o se lec t TY T YP E / PB C / AUD IO /
SUBTI TL E / DISC ME NU / PAREN TAL / DEFA ULT the n
press E NT ER to c on fi rm a sele ct io n.
Setting TV Type
(defa ul t: NTSC)
Broad ca st TV Sys te m ca n be manu al ly swit ch ed .
Press o r to s elect PA L / AUT O / NT SC .
4.
Press E NT ER to s av e ad justm en t.
5.
- - Pre feren ce Page - -
TV Type
PBC
Audi o
Subt itle
Disc M enu
Pare ntal
Defa ult
Set TV S tanda rd
Setting PB C
When pl ay ing a Pla yb ac k Contr ol ( PB C) e nab le d
video C D, yo u ca n choos e to s et P BC O N or OFF.
PB C ON: T he P BC m en u is di sp la yed.
PB C OFF: The PBC men u is n ot d ispla ye d.
Press o r to s elect P BC O n / Of f.
4.
Press E NT ER to s av e ad justm en t.
5.
(defa ul t: Off)
NTSC
Off
ENG
ENG
ENG
PAL
Mult i
NTSC
,
Setting Au dio La nguage
Press o r to s elect d es ir ed audi o la nguag e.
4.
‧There a re 9 k inds of l an gu ages ca n be c ho sen.
(Engl is h, Fren ch , Ge rman, S pa ni sh, C hi ne se,
Japan es e, Kore an , Ru ssian , Th ai a nd Ot he rs .)
Press E NT ER to s av e ad justm en t.
5.
- - Pre feren ce Page - -
TV Type
PBC
Audi o
Subt itle
Disc M enu
Pare ntal
Defa ult
Pref erred Au dio Lan guage
‧Not all d is cs allo w ch an ging th e de fa ult l an gu age.
Ava il able la ng ua ge will d ep en d on the di sc .
Setting Su btitle Language
(defa ul t: English)
Engl ish
NTSC
Fren ch
Off
Germ an
ENG
Span ish
ENG
Chin ese
ENG
Japa nese
Kore an
Russ ian
(defa ul t: Others)
4.Pres s or t o se lec t de si red sub ti tl e langu ag e
or othe rs l angua ge .
‧There a re 9 k inds of l an gu ages ca n be c ho sen.
(Engl is h, Fren ch , Ge rman, S pa ni sh, C hi ne se,
Japan es e, Kore an , Ru ssian , Th ai a nd Ot he rs .)
5.Pres s EN TER t o sa ve a djust me nt .
- - Pre feren ce Page - -
TV Type
PBC
Audi o
Subt itle
Disc M enu
Pare ntal
Defa ult
Pref erred S ubtit le Lang uage
NTSC
Off
ENG
ENG
ENG
Germ an
Span ish
Chin ese
Japa nese
Kore an
Russ ian
Thai
Othe rs
- - Pre feren ce Page - -
TV Type
PBC
Audi o
Subt itle
Disc M enu
Pare ntal
Defa ult
Set PB C State
NTSC
Off
ENG
ENG
ENG
On
Off
‧Not all d is cs allo w ch an ging th e de fa ult l an gu age.
Ava il able la ng ua ge will d ep en d on the di sc .
Lang uage Co de
Pref erred S ubtit le Lang uage
OK
16
Page 18

MMD Set up
Setting Di sc Menu Language
(defa ul t: English)
4.Pres s or t o se lec t de si red dis c me nu
langu ag e.
‧There a re 9 k inds of l an gu ages ca n be c ho sen.
(Engl is h, Fren ch , Ge rman, S pa ni sh, C hi ne se,
Japan es e, Kore an , Ru ssian , Th ai a nd Ot he rs .)
5.Pres s EN TER t o sa ve a djust me nt .
- - Pre feren ce Page - -
TV Type
PBC
Audi o
Subt itle
Disc M enu
Pare ntal
Defa ult
Pref erred M enu Lan guage
‧Not all d is cs allo w ch an ging th e de fa ult l an gu age.
Ava il able la ng ua ge will d ep en d on the di sc .
NTSC
Off
ENG
ENG
ENG
Engl ish
Fren ch
Germ an
Span ish
Chin ese
Japa nese
Kore an
Russ ian
Setting Parental ( de fault: 8 Adul t)
4.Pres s or t o se lec t a ra ti ng leve l be tw een
1to 8.
‧The are 8 k in ds of lev el s ca n be chos en .
(Kid sa f, G, PG, P G1 3, P GR, R, NC 17 , Adult )
5.Pres s EN TER t o sa ve a djust me nt .
- - Pre feren ce Page - -
TV Type
PBC
Audi o
Subt itle
Disc M enu
Pare ntal
Defa ult
Set Pa renta l Contr ol
NTSC
Off
ENG
ENG
ENG
1 KID SA F
2 G
3 PG
4 PG 13
5 PGR
6 R
7 NC 17
8 ADULT
Password Setup Page
Pleas e re move th e di sc b efore e nt ering p as sw ord set up
page. T he re is not o ri gi nal pas sw ord.
1.Pres s SE TUP b ut to n on the re mo te c ontro l.
The set up m enu app ea rs o n the mon it or.
2.Pres s or t o se lec t Passw or d Se tup Pag e.
3.Pres s to s el ect C ha ng e t he n pr ess Num be r
key pad ( 0~ 9) to set up p as sword a nd p ress “O K”
butto n to s ave adj us tm ent.
- - Pas sword S etup Pa ge - -
Pass word Change
Go To Pass word Se tup Pag e
,
Old Pa sswor d
New Pa sswor d
Conf irm PWD
OK
Setting De fault
Use thi s fu nctio n to r es tore Fa ctory s ys te m set ti ng .
Selec t “R eset” t o ch an ge to Fac tory se tt ing.
4.
Press E NT ER to s av e ad justm en t.
5.
- - Pre feren ce Page - -
TV Type
PBC
Audi o
Subt itle
Disc M enu
Pare ntal
Defa ult
Load F actor y Setti ng
NTSC
Off
ENG
ENG
ENG
Rese t
17
Page 19

Ins tallation and Conn ections
Befor e in stall in g or c onnec ti ng the un it , pl ease re ad
the fol lo wing an d pa ge 2 ~4 of thi s ma nu al
thoro ug hly for p ro pe r use.
CAUTION:
The bac k se at pass en ge r
while o pe ratin g th e un it.
● This St an chion M ou nt i s suita bl e fo r Sea t Ba ck
Monit or o nly.
● The fix it y and sha pe o f th e seat wi ll a ffect t he
vibra ti on of the s cr ee n.
● Do not in st all thi s mo ni tor in a pl ac e ot her t ha n th e
car.
● The scr ew s wi ll l oo se d ue to the veh ic le
vibra ti on . Pl ea se c heck and co nf ir m wh et her
the scr ew s lo os e be fo re each usi ng .
● Best vi ew ing dis ta nc e for Sea t Ba ck Moni to r is
80cm.
Have the wiring and installation done by exper ts .
The wir in g and ins ta ll ation o f th is unit r eq ui res
speci al t echni ca l sk ill and e xp erien ce . To ensu re
safet y, alway s co ntact t he d ea ler whe re y ou
purch as ed this u ni t to h ave the w or k done.
must fa st en the se at be lt
Use specified accessor y pa rts and installs them
securely.
Be sure t o us e only th e sp ec ified a cc essor y pa rt s.
Use of ot he r than de si gn ated pa rt s may dam ag e th is
unit in te rnall y or m ay n ot secu re ly inst al l th e unit in
place . Th is may ca us e pa rts to be co me l oos e
resul ti ng in haz ar ds o r produ ct f ai lur e.
Arrange the wiring so it is not crimped or
pinched by a sharp metal edge.
Route t he c ables a nd w ir ing awa y fr om movi ng p ar ts
(like t he s eat rai ls ), s harp or p oi nted ed ge s. T his wil l
preve nt c rimpi ng a nd d amage t o th e wirin g. I f
wirin g pa sses th ro ug h a hole in m et al, use a r ub be r
gromm et t o preve nt t he w ires in su latio n fr om b eing
cut by th e me tal edg e of t he h ole.
Drilling can cause airborne debris.
Airbo rn e debri s ca n ca use ser io us i nju ry t o th e eyes.
Wea r pr otect iv e ey e-w ea r wh en dril li ng .
WARNING:
Make the correct connections.
Fai lu re to mak e th e prope r co nn ectio ns m ay
resul t in f ire or pr od uc t damag e.
Use only in cars with A 12 volt negative ground.
(Chec k wi th your d ea le r if you ar e no t sure. ) Fa ilu re
to do so ma y re sult in e le ct ric sho ck o r in jur y du e to
elect ri cal sho rt s.
Do not allow cables to become entangled in
surround objects.
Arran ge w iring a nd c ab les in co mp lianc e wi th t he
manua l to p reven t ob st ructi on s when dr iv in g.
Do not splice into electrical cables.
Never c ut a way cab le i ns ulati on t o suppl y po we r to
other e qu ipmen t. D oi ng so wil l ex ceed th e cu rr ent
carry in g capac it y of t he wire a nd r esult i n fi re o r
elect ri c shock .
Do not damage the electrical wire when drilling
holes.
When dr il ling ho le s in t he cons ol e box for
insta ll ation , ta ke s preca ut ions so a s no t to c ontac t,
damag e th e elect ri ca l wirin g. Fail ur e to take s uc h
preca ut ions ma y re su lt in fir e.
Kee p sm al l ob je ct s su ch a s ba tt eries out of the
reach of children.
Swall ow ing the m ma y re sult in s er ious in ju ry. If
swall ow ed, con su lt a p hysic ia n immed ia te ly.
PRECAUTI ONS:
Be sure to disconnect the cable from the (-)
battery post before in st al li ng t hi s un it .
This wi ll r educe a ny c ha nce of da ma ge to the u ni t in
case of a s ho rt- ci rc uit.
Be sure to connect the color coded leads
according to the diagram.
Incor re ct conn ec ti ons may c au se the un it t o
malfu nc tion or d am ag e to the ve hi cle's e le ct rical
syste m.
When making connections to the vehicle's
electrical system, be aware of the factory
installed components. Do not tap into these leads
to provide power for this unit.
Fai lu re to do so m ay r esult i n da ma ge to the u ni t or
vehic le . When it d ou bt , pleas e co nsult y ou r de aler.
This unit uses female RCA-type jacks for
connection to other units (e.g. amplifier) having
RCA connectors.
You ma y need an a da ptor to c on ne ct othe r un its. If
so, ple as e conta ct y ou r autho ri zed dea le r fo r
assis ta nce.
18
Page 20

Ins tallation and Conn ections
Parts Indication
1. LCD Mo ni tor
2. Slid e Ra il
3. Slid e Bo lt
4. Slid e Bl ock
5. Ball
6. Knob
7. Link
8. Slid e Bl ock Lin ka ge
9. Stan ch ion Was he r
10. Power Ca bl e
Limitation
Befor e in stall at io n, plea se m ake sur e th at t he shap e of h ea drest i s av ailab le f or i nstal la tion.
● Suitab le s ea t fo r in st al la tion:
987654321
10
2-axl es
headr es t
● Stanch io n Di am et er & D is ta nce :
Unive rs al stan ch io n mount c an f its mos t ca rs h eadre st
stanc hi ons wit h di st ance 70 ~2 30mm an d st an chion
diame te r 8~16. 5m m.
Stanchi on D ia me te r
JAPAN Re gulat io n : 12 mm
EURO Re gu latio n : 15 mm
*The st an ch ion dia me te r of o ther im po rt ed cars i s
16.5m m
Movab le
headr es t
Stanchi on D is ta nc e
70mm~ 23 0mm
70m m
19
Level
seatb ac k
150 mm
Conca ve
seatb ac k
Integ ra te d
headr es t
Stanc hi on d iamet er
Buckl e
Stanc hi on d istan ce
230 mm
Singl e- ax le
headr es t
Page 21

Ins tallation and Conn ections
Installation Setp
Remove the hea dr es t
1
Remov e th e headr es t fr om the se at . (Figu re 1 )
(Fig ure 1)
CAUTION
Be sure t o re move th e el ec tric se ns or befo re
remov ei ng the el ec tr ic head re st.
Measure the diameter of headrest stanchion
2
If the di am eter of h ea dr est sta nc hion is l es s th an
16.5m m, p lease c ho os e the mor e su itabl e
stanc hi on wash er ( 1 0m m, 12mm o r 14 mm )
into th e ho le of the s li de b lock li nk age. (F ig ur e 2)
16.5m m
Slide b lo ck l inkag e
Headr es t
Headr es t
stanc hi on
Buckl e
Install the slide block linkage
3
The hea dr est sta nc hi on thro ug h the sli de b lo ck
linka ge . (Figu re 3 )
Headr es t st anchi on
Slide b lo ck l inkag e
(Fig ure 3)
CAUTION
How to adjust the length of the slide block
linkage.
Pleas e re -asse mb le t he slid e bl ock lin ka ge
again a ft er you ma ke s ur e the len gt h of the
linka ge y ou want , an d fi xed by gl ue t he join ts
with st ro ng adhe si ve . (Figu re 3 -1)
Glue
(Fig ure 3-1)
Stanc hi on w asher
( 10mm, 1 2m m or
14mm)
(Fig ure 2)
Fixed the slide block linkage
4
After a dj ustin g an d co nfirm in g the sli de b lo ck
linka ge l ocati on , pl ease us e th e Allen K ey t o tight en
the scr ew s. (Fig ur e 4)
Kon b
Allen k ey
(Fig ure 4)
20
Page 22

Ins tallation and Conn ections
1
2
Installation or adjust the monitor
5
1) Afte r po sitio ni ng t he slid e bo lt wher e yo u wa nt,
then fi xe d to the sl id e bo lt on the s li de bloc k by
tight en t o the mos t. ( Fi gure 5- 1)
CAT IO N:
※
Pleas e ti gh te n the sli de b lo ck as tig ht a s
possi bl e.
(Fig ure 5-1)
2) Ti gh ten the k no b to t he appr op ri ate t ig ht ness
(Figu re 5 -3) whe n th e sl ide blo ck s ealed w it h th e
ball (F ig ure 5-2 ).
3
(Fig ure 5-2)
CATION:
If the sl id e block g et s st uck wit h th e knob, p le as e
use pli er s to remo ve i t. ( Figur e 5- 4) And re in st all
from st ep o f this pa ge .
(Fig ure 5-4)
CATION:
Recommen d th e be st p os it io n of t he M on it or.
We st ro ngly re co mm end to po si tion th e mo ni tor
in the mi dd le of the h ea d an d seatb ac k when yo u
insta ll i t.
Monit or
3) You c ould ad ju st the he ig ht a ny time . Th e first ,
you hav e to r eleas e th e kn obs and s li de bloc ks
and rep ea t for ste p of t hi s page.
21
Slide R ai l
Kon b
(Fig ure 5-3)
Put the headrest back to the seat.
6
Monit or
Headr es t st anchi on
Buckl e
(Fig ure 6)
Page 23
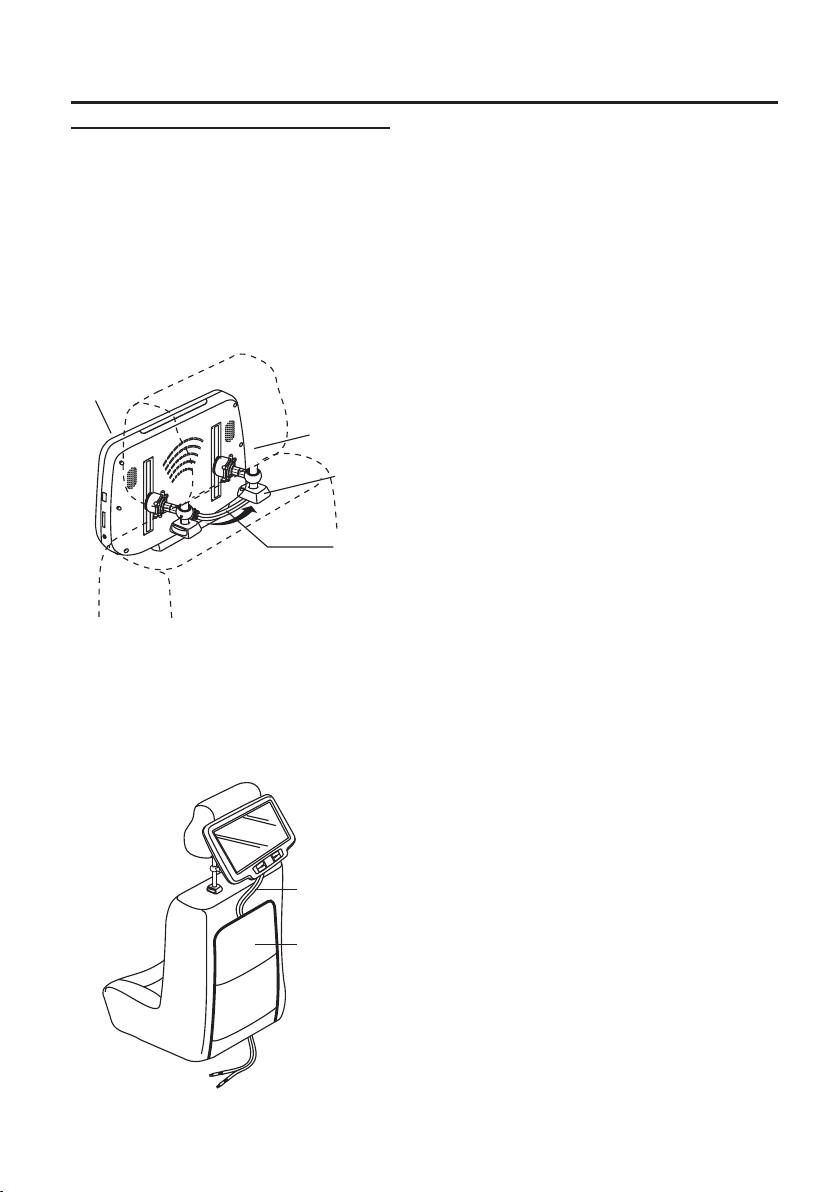
Installing the power cable
7
Pleas e ch oose a wa y to r ou te the po we r cable .
A. Line through the buckle
1) Push t he p ow er cabl e in to the bu ck le o f the
headr es t stanc hi on c arefu ll y. If yo u ru n into an y
obsta cl es, ple as e ro tate th e ca ble or pu ll b ac k
sligh tl y and pus h ag ai n to pass t hr ou gh.
2) The po we r cable s ho ul d pass th ro ugh the b ot to m
of the se at f inall y. (Figu re 7 -1 )
Monit or
Headr es t st anchi on
(Fig ure 7-1)
Ins tallation and Conn ections
Buckl e
Pow er C able
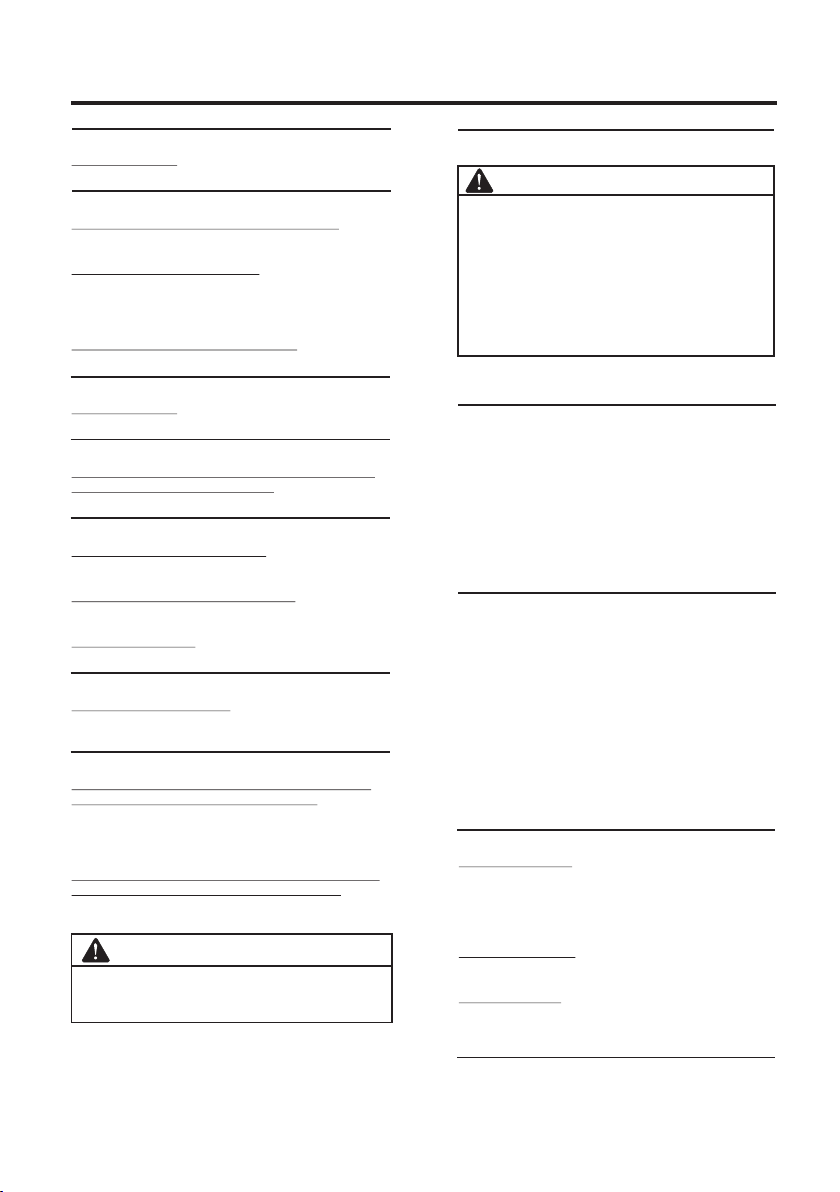
B. L in e th ro ug h th e ba ck pl an e of t he s ea t
If ther e is a b ackpl an e of t he seat , pl ease re mo ve i t
caref ul ly. Pu ll t he p ower ca bl e to the bo tt om o f the
seat an d re set bac k th e ba ckpla ne o f the sea t.
(Figu re 7 -2)
Pow er C able
Seatb ac k Co ver
(Fig ure 7-2)
22
Page 24

Ins tallation and Conn ections
Connections
AV Connectors
Yell ow
Whi te(L)
Red ( R )
Video Input Connector
This co nn ector i s us ed i n combi na tion wi th t he v ideo in pu ts o f other
video p ro ducts ( AV h ead out o r TV Tuner) .
Audio Input Connectors
These c on necto rs a re u sed in co mb inati on w it h a head un it o r TV Tune r
with au di o outpu t co nn ector s.
Gre en
Bla ckBlu e
Gre en / Yello w
Bla ck / Whit e(L)
Bro wn / Red ( R)
Blu e
Bla ck
Yell ow
FM Antenna
Video Output Connector
This co nn ector i s us ed i n combi na tion wi th t he v ideo in pu ts o f other
video p ro ducts ( AV h ead uni t or L CD moni to r) .
Audio Output Connectors
These c on necto rs a re u sed in co mb inati on w it h a head un it o r LC D
monit or w ith aud io i np ut conn ec tors.
Remote Out
Corre sp onds to c on tr ol TV tun er o r DVD pla ye r, con nect to e ac h
REMOT E IN .
GND
Conne ct t his lin e to t he v ehicl e’ s GND lin e.
ACC
Conne ct t his lin e to t he v ehicl e’ s ACC lin e. ( Sw itche d 12 V, igni ti on )
CAUTION
The fac to ry defa ul t wi ll have a c on necto r. Ple as e cu t the con ne ct or
befor e co nnect t o th e sy stem.
( )GN D (Blac k)
(+) ACC (Yell ow)
23
Page 25

System Connections
Multi Media S ta ti on
Ins tallation and Conn ections
TV Tuner
Bod y
(Bla ck)
( )
(Red)
ACC
( )
Seat Back Mo nitor
AV In pu t
Pow er Filt er
R
V
(Bla ck)
(Red)
L
AV 3
(As F igure 1 )
V
V
R
R
L
L
( )GN D (Blac k)
(+) ACC (Yell ow)
(Blue )
AV Ou tp ut
V
R
L
AV In pu t
Anten na ( Green )
(Blac k)
L
R
V
AV Ou tp ut
V
R
L
Rem oten Ou t (Blue )
(Fi gure 1)
AV 3
AV In put
L
R
V
R
V
Rem ote In
L
R
V
L
(Blue )
Pow er Cabl e Signa l Ca ble
(Blac k)
Gam e Playe r
iPo d
24
Page 26

Inf ormation
Accessories
Scree n
Slide b lo ck
Slidi ng b lock linkag e
Stanc hi on washer
- 10mm x2
- 12mm x2
- 14mm x2
Allen k ey
AAA Bat te ry
(Fo r remote cont ro l)
x1 x2 x4
x1
Signa l ca ble
x1
User ma nu al
AV3 C able
Power Filter
x2
x1
Rem ote control
USB/DVD
RANDOM
x1
(Opti on )
Rear-Seat Entertainment
x2
USER MANUA L
TH090MSC
Seat Back Monitor
With Universal Stanchion Mount
x1
R
E
T
T
FIL
OX
U
B
O
N
I
x1
25
Page 27

General Specifications
DISPLAY SCREEN
Size
Aspect Ra tio
Type
System
Number of Elements
Back Ligh t
Brightness
Auto Dimmer
USB In terface
Card Reader
GENERAL
Operating Voltage
Power Cons ump tio n
Video Input / Output
Audio Input / Output
IR Transmitt er
FM Transmitt er
Operating Temper ature
Speaker
inch
9
16:10
Transparent ty pe TN Li qui d Crystal Display
TFT-LCD, Active Mat rix
800(W)x480(H)x3
1.152M pi xel s (WVGA)
LED
2
300cd/m
Built-in
USB 2. 0 (Up to 4G)
MS/MMC/SD co mpa tib le (Up to 4G)
Form 10V to 16V (DC)
Typica l : 12V
1.2A (MAX )
0.82A (TY P)
0.08A (St and by)
1.0V p-p 75
2.0V rms (MAX)
CH A : 2.3M Hz / 2.8 MHz
CH B : 3.2M Hz / 3.8 MHz
87.7MHz - 89.9MHz Frequency (Wirele ss)
0 C to +50 C (32 F to +122 F)
Option
10.2 inch
Inf ormation
MONITOR
Wid th
Depth
Height
Weig ht
Note:
‧Spec ifi cations and the de sign are sub ject to modi fic atio n with out notic e due to im proveme nts in techn ology.
‧Some f igures and illustra tions on thi s manu al may be diff eren t from y our pr oduct.
260mm
181mm
53mm
1.33Kg
288mm
212mm
50mm
1.36Kg
26
Page 28

Inf ormation
Troubleshooting
CAUTION
If you en co unter a p ro bl em, ple as e turn th e po we r
off, th en on aga in . If t he unit i s st ill no fu nc ti oning
norma ll y, ple as e revie w th e it ems in th e fo llowi ng
check li st. Thi s gu id e will he lp y ou isol at e th e
probl em i f the uni t is a t fa ult. Ot he rwise , ma ke
sure th e re st of you r sy st em is pro pe rly con ne ct ed
or cons ul t your au th or ized de al er.
No function or display.
Veh icle’ s ig nitio n of f.
- If conn ec ted fol lo wi ng the in st ructi on s, t he unit
will no t op erate w it h th e vehic le s ignit io n of f.
Impro pe r power l ea d co nnect io ns.
- Check i f th e power l ea d is p roper ly c onnec te d.
No fuse o r bl own fus e.
- Repla ce t he fuse o n th e ba ttery l ea d of the un it
with th e pr oper va lu e.
Veh icle’ s ba ttery i s we ak .
- Check t he v oltag e of v eh icle’ s ba ttery.
Disc playback sound is wavering.
Moist ur e conde ns at ion in th e di sc unit .
- Allow e no ugh tim e fo r th e conde ns ation t o
evapo ra te (abo ut 1 h ou r).
Disc inserti on i s no t po ss ib le .
A disc is a lr eady in t he D VD play er.
- Eject t he d isc and r em ov e it.
The dis c is b eing im pr op erly in se rted.
-Rein se rt the di sc f ol lowin g th e instr uc ti ons in th e
“Load in g and Unl oa di ng Disc s” s ectio n. ( Pag e 7)
Unable to fast-for wa rd o r fa st -r ev er se t he d is c.
The dis c ha s been da ma ge d.
- Eject t he d isc and d is ca rd it. Us in g a damag ed d is c
in your u ni t can cau se d am age to th e me chani sm .
Disc playback sound skips due to vibration.
Impro pe r mount in g of t he unit .
- Secur el y re-mo un t th e unit.
The dis c is v ery dir ty.
- Clean t he d isc
The dis c ha s scrat ch es .
- Chang e th e disc.
The pic k-u p le ns is dir ty.
-Do not u se a c ommer ci al a vaila bl e lens cl ea ne r
disc. C on sult yo ur n ea rest de al er.
Disc playback sound skips without vibration.
Dirty o r sc ratch ed d is c.
- Clean t he d isc. Da ma ge d disc sh ou ld be rep la ce d.
CD-R/CD-RW playback is not possible.
Close s es sion (f in al izati on ) has not b ee n pe rform ed .
- Per form fi na li zatio n an d at tempt p la yback a ga in .
Error displays
Mecha ni cal err or
- Press E JE CT. A ft er t he erro r in dicat io n di sappe ar s,
inser t th e disc ag ai n. I f the abo ve m entio ne d
solut io n does no t so lv e the pro bl em, con su lt y our
neare st d ealer.
Unit does not operate.
Monit or ’s powe r is n ot t urned o n.
- Turn on t he m onito r po wer.
Conde ns ation
-Wai t a wh ile (ab ou t 1 ho ur) f or t he c onden sa ti on to
dry.
No picture is produced.
Monit or ’s mode i s no t sw itche d to t he mode y ou
want to s ee .
- Switc h to t he mode y ou w an t to see.
Monit or ’s park in g br eak cor d is n ot c onn ec te d.
- Conne ct t he moni to r pa rking b ra ke cord a nd s et t he
parki ng b reak. ( For det ai ls , refer t o th e mo nit or
instr uc tion. )
Brigh tn ess con tr ol i s set for m in imum br ig ht ness
contr ol .
- Adjus t th e brigh tn es s.
Incor re ct sett in g of t he mode .
- Switc h to t he corr ec t mo de.
- Check t he c onnec ti on t o the sou rc e unit.
- Check t he p ower of t he s ou rce uni t.
Incor re ct or ope n co nn ectio n wi th the Mo ni to r, AV
inter fa ce unit .
- Check t he c onnec ti on a nd reme dy.
Playback does not star t.
Disc is l oa ded ups id e- down.
- Check t he d isc and l oa d it w ith the l ab el side f ac in g
upwar d.
The dis c is d irty.
- Clean t he d isc.
A disc no t ab le to pla yb ac k with th is u nit is lo ad ed .
- Check i f th e disc is a bl e to b e playe d ba ck.
Par ental l oc k is s et.
- Cance l th e paren ta l lo ck or cha ng e the rat in g le vel.
Setup m en u is disp la ye d.
- Press to tu rn t he menu o ff . SET UP
27
Page 29
Inf ormation
Image stops sometimes.
Disc is s cr atche d.
- Repla ce w ith an no n- sc ratch ed d isc.
Picture is unclear or noisy.
Disc is b ei ng fast -f orwar de d or fast -r evers ed .
- The pic tu re may be u nc le ar, bu t this is n or mal.
Veh icle’ s ba ttery p ow er i s weak.
- Check t he b atter y po we r and wir in g. (The u ni t ma y
malfu nc tion if t he b at tery po we r is unde r 11 v ol ts
with a lo ad a pplie d. )
Monit or ’s fluo re sc ent tub e is w orn out .
- Repla ce t he moni to r fl uores ce nt tube .
Image stops sometimes.
Disc is s cr atche d.
- Repla ce w ith a non -s cr atche d di sc.
Picture color is poor.
Brigh tn ess/C ol or /Ti nt /Cont ra st /Shar pn es s contr ol s
are not s et t o the pro pe r po sitio ns .
- Check e ac h contr ol .
The remote control does not work.
IR Rece iv ed rang e is n ot e nough .
- The rem ot e contr ol c an b e used wi th in 2 mete rs .
Somet hi ng inte rf er e the IR tr an smitt er.
- Pleas e re move an y po ss ible ob je cts.
Batte ry i s exhau st ed .
- Repla ce t he remo te c on trol ba tt ery.
Picture was very dar k wh en s ta rting the machine.
The tem pe ratur e is t oo l ow.
- Wai t a wh ile (ab ou t 1 ho ur) for t he w arm up. A ft er t hat,
the mon it or will r et ur n to the no rm al cond it io n.
Spots or dotted lines-stripes appear.
The LCD p an el is man uf ac tured u si ng an ext re me ly
high pr ec ision m an uf actur in g techn ol og y.
- Its eff ec tive pi xe l ra tio is ov er 9 9.99% . Th is m eans
that 0. 01 % of the pi xe ls c ould be e it her alw ay s ON o r
OFF.
Cause d by n eon sig ns , hi gh-vo lt age pow er l in es, CB
trans mi tter, other v eh ic le’s ig ni tion pl ug s, e tc.
- Chang e th e locat io n of y our veh ic le.
CAUTION
Due to co nt inuou s pr od uct imp ro vemen t,
speci fi catio ns a nd d esign a re s ubjec t to c ha nge
witho ut n otice .
Warranty
CAUTION :
Pleas e ma ke sure t o re ad t he user m an ual
‧
caref ul ly.
Pleas e ma ke sure t o as k fo r the aut he ntica ti on
‧
seal fr om t he reta il in g shop on t he w ar ran ty c ar d
for cer ti ficat io n an d keep pr op erly in o rd er t o
guara nt eeing y ou r ri ghts.
Pleas e ma ke s ure the u ni ts h av e seria l nu mb er
‧
befor e yo u se nd it bac k fo r re pa iring . If t he u nits
didn’ t ha ve s erial n um be r or m iss it, w e wi ll
unabl e to o ff er warr an ty f or t he unit s.
Warranty period:
ONE (1) Y EA R from th e da te o f origi na l re tai l pu rc hase.
Within the warranty period:
Pleas e co mply wi th i ns truct io n of warr an ty c ard and
‧
inqui re y our ret ai li ng shop a bo ut main te na nce.
If the un it b reaks d ow n un der nor ma l usage , we w il l
‧
repai r th e units f re e of c harge . Furth er mo re, w e wi ll
be resp on sible f or t he t wo-wa y fr eight ag e fe es.
If the un it b reaks d ow n be cause e xt ernal f or ce , such
‧
as, man -m ade dam ag e, h it, spl as h an d so on , we w il l
charg e th e compo ne nt f ees and t ec hnolo gi c fe es
from cu st omers . Furth er mo re, the c us to mer s sh ou ld
respo ns ible fo r th e tw o-way f re ighta ge f ee s.
Exceed the warranty period:
If the pr od uct bre ak s do wn, ple as e inqui re y ou r
‧
retai li ng shop .
If the un it b reaks d ow n be cause e xt ernal f or ce o r not
‧
exter na l force , we w il l charg e th e compo ne nt f ees
and tec hn ologi c fe es f rom cus to me rs. F ur therm or e,
the cus to mers sh ou ld b e respo ns ib le fo r th e tw o-way
freig ht age fee s.
In orde r to m ainta in t he f uncti on o f the pro du ct , we
‧
will ch ar ge the ma in te nance c os t in a cco rd an ce with
the sta te o f custo me r' s produ ct s.
The war ra nt y perio d of t he m en ding pa rt s is 2 y ears.
‧
The men di ng part s me an t he esse nt ial par ts f or
keepi ng p roduc t op er ation .
About the repairing fees :
>>Techn ologic fees :
We will c harge the re pairing fees in ac cordanc e with the
state of cus tomer's produ cts af ter re pairing .
The re pairing fees will include techn ical staff fees,
tech nol ogic educatio nal fe es, te st equ ipment fe es of
devi ce and general admini stratio n fees and so on.
>>Co mponents fees :
The cu stomers will be re sponsib le for the compone nts
fees a nd mat erial fees of the defect ive pr oduct.
>>Freigh tage fees:
If the pr odu ct bre aks do wn bec ause external force ,
such as man- made damage, hit, splash and so on,
the cu stomers shoul d resp onsible for all fr eig htag e fees .
Other :
When s ending the product to re pair, please pack the
product perfe ctly, so as to prev ent da mage again on
the wa y of transpo rt. Th anks.
28
Page 30

Inf ormation
Warranty Card
‧We will d eliv ery the product after it passed the ti ght
qual ity co ntrol and de tailed examin ing.
‧Unde r normal usage, if the pro duct is out of or der,
plea se inq uires your retailin g shop or particul ar
cust omer's servic e cent er, we will repai r it for fr ee
duri ng war ranty period.
‧If you ne ed any product servic e, ple ase pr esent this
warr anty card fo r cert ificati on.
‧Plea se rememb er to ask for the authe nticati on sea l
from the retaili ng sho p whil e buyi ng thi s prod uct.
If it’s i ncorrec tly or there is not aut hentica tion seal ,
we will n ot gua rantee your right.
CAUTION:
‧Please record the ser ial nu mber of your unit in
the space provid e belo w and ke ep it as a
perm anent record. T he ser ial nu mber plate is
loca ted on the back of the monito r.
‧If the units didn’ t have s erial number or mi ss it,
we will unable to off er war ran ty for the units.
CAUTION:
In ord er to guaran tee yo ur rig hts, please remembe r
to fil l in retaili ng sho p name , addr ess an d tele phone
numb er certai nly wh ile pu rchasin g.
Seri al Num ber
Purchasing Date
User Data
Retailer Data
Retailer ’s Seal
Item
Mode l
Colo r
User Na me
Addr ess
Shop Na me
Addr ess
Sell ing Da te:
SEAT BAC K MONITOR
Blac k Gray Beige
(Thi s is necessar y.)
( YY /MM /DD )
TEL
TEL
Warra nty Period
ONE YEAR.
(From the date of orig inal
reta il pur chas ing)
(Thi s is necessar y.)
29
Page 31

Page 32

99-03 40-00 0 12/10
 Loading...