

Page 1
USER MANUAL
TH080C
Center Armrest Monitor
With Adjustable Bracket
CAUTION:
Please Test All Functions Before
Installing.
Page 2

Contents
Operating I nstructions
Wel com e
... ..... ..... ..... ..... ........ ..... ..... ........ ..... ..... ... 2
Saf ety Ins truct ions
CAU TIO N
WAR NIN G
PRE CAUTI ONS
... ..... ..... ..... ..... ........ ..... ..... ........ 2
... ..... ..... ..... ..... ........ ..... ..... ........ ..... ..... ... 2
... ..... ..... ..... ..... ........ ..... ..... ........ ..... ..... .. 2
... ..... ..... ..... ..... ........ ..... ..... ........ .... 3
Getting Sta rted
Mon itor Fu nct ion O ver vie w
Whe n Using R emote C ontro l
Rem ote Con trol Ba ttery R eplac ement
Rem ote Con trol Fu nct ion O ver vie w
... ..... ..... ..... ..... ........ ..... . 4
... ..... ..... ..... ..... ........ ... 5
... ..... ..... ..... ... 5
... ..... ..... ..... ..... ...5
Basic Opera tions
Bef ore Usi ng the MM D
Turni ng Pow er ON/O FF
Pla cing Di scs
Swi tchin g Sourc e
FM / IR
... ..... ..... ..... ..... ........ ..... ..... ........ ..... ..... ...... 7
... ..... ..... ..... ..... ........ ..... ..... .. 7
... ..... ..... ..... ..... ........ ..... ..... .. 7
... ..... ..... ..... ..... ........ ..... ..... ........ ..... .. 7
... ..... ..... ..... ..... ........ ..... ..... ........ . 7
Monitor Set up
Adj ustin g OSD
Adj ustin g Brigh t
Adj ustin g Contr ast
Adj ustin g Color
Adj ustin g Hue
Res ettin g Pictu re Adju stmen t
... ..... ..... ..... ..... ........ ..... ..... ........ ..... 7
... ..... ..... ..... ..... ........ ..... ..... ...... 7
... ..... ..... ..... ..... ........ ..... ..... .. 7
... ..... ..... ..... ..... ........ ..... ..... ....... 7
... ..... ..... ..... ..... ........ ..... ..... ........ . 7
... ..... ..... ..... ..... ..... 7
MMD (Open Cov er Multimedia D river)
Operation s
Pla ying DV D/ VC D/ CD
Dis c Auto Pl ay
Sto pping P layba ck (PRE -ST OP)
Sto pping P layba ck
Pla ying St ill Fra mes ( PAUSE )
Fas t-forwarding / Fa st- reversing
Fin ding th e Begin ning of C hapte rs
Set ting Di mmer
Slo w Motio n Playb ack
Set ting Zo om In / Out
Rep eatin g Displ ay Peri od (A -B)
Set ting Ra ndom
Swi tchin g Angle ( DVD Onl y)
Usi ng Numb er Key Pad
Dis playi ng Disc S tatus
Swi tchin g Subti tles (D VD On ly)
Swi tchin g Audio Tr acks
Cha pter/ Track /Titl e Rep eat P lay bac k
... ..... ..... ..... ..... ........ ..... ..... .. 8
... ..... ..... ..... ..... ........ ..... ..... ........ ..... . 8
... ..... ..... ..... ..... ...... 8
... ..... ..... ..... ..... ........ ..... ..... ....... 8
... ..... ..... ..... ..... ........ ... 8
... ..... ..... ..... ..... ..... 8
... ..... ..... ..... ..... .. 9
... ..... ..... ..... ..... ........ ..... ..... ........ .... 9
... ..... ..... ..... ..... ........ ..... ..... .. 9
... ..... ..... ..... ..... ........ ..... ..... .... 9
... ..... ..... ..... ..... ....... 9
... ..... ..... ..... ..... ........ ..... ..... ........ ... 9
... ..... ..... ..... ..... ........ .... 9
... ..... ..... ..... ..... ........ ..... ..... . 9
... ..... ..... ..... ..... ........ ..... ..... 1 0
... ..... ..... ..... ..... ...... 10
... ..... ..... ..... ..... ........ ..... .... 10
... ..... ..... ..... .10
USB Operati ons
Swi tchin g DVD / USB / M emo ry Ca rd Mo de
Set ting Ra ndom
Rep eat Pla yback
... ..... ..... ..... ..... ........ ..... ..... ........ . 11
... ..... ..... ..... ..... ........ ..... ..... ........ 1 1
MMD Setup
DVD S etu p Ope rat ion
Gen eral Se tup Pag e
Set ting TV D ispla y
Set ting OS D Langu age
Set ting Sc reen Sa ver
Set ting La st Memo ry
Pas swo rd Se tup Pa ge
Pre feren ce Setu p
Set ting TV Typ e
Set ting Au dio Lan guage
Set ting Su btitl e Langu age
Set ting Di sc Menu L angua ge
Set ting Pa ren tal
Set ting De fault
Installat ion and Connect ions
CAU TIO N
... ..... ..... ..... ..... ........ ..... ..... ........ ..... ..... 15
WAR NIN G
PRE CAUTI ONS
Par ts In dic ati on
Lim itati on
Ins talla tion St eps
Con necti ons
Sys tem Con necti ons
... ..... ..... ..... ..... ........ ..... ..... ........ ..... .... 15
... ..... ..... ..... ..... ........ ..... ..... ........ ..... ..... 17
... ..... ..... ..... ..... ........ ..... ..... . 12
... ..... ..... ..... ..... ........ ..... ..... ....12
... ..... ..... ..... ..... ........ ..... .. 12
... ..... ..... ..... ..... ........ ..... 1 3
... ..... ..... ..... ..... ........ ..... ... 13
... ..... ..... ..... ..... ........ ..... .... 13
... ..... ..... ..... ..... ........ ..... ..... 13
... ..... ..... ..... ..... ........ ..... ..... ..... 14
... ..... ..... ..... ..... ........ ..... ..... ...... 14
... ..... ..... ..... ..... ........ ... 14
... ..... ..... ..... ..... ........ . 14
... ..... ..... ..... ..... ..... 14
... ..... ..... ..... ..... ........ ..... ..... ...... 14
... ..... ..... ..... ..... ........ ..... ..... ....... 14
... ..... ..... ..... ..... ........ ..... ..... ........ .. 15
... ..... ..... ..... ..... ........ ..... ..... ........ . 16
... ..... ..... ..... ..... ........ ..... ..... ....... 18
... ..... ..... ..... ..... ........ ..... ..... ........ ..... . 20
... ..... ..... ..... ..... ........ ..... ..... .. 21
Informati on
Acc essor ies
Gen eral Sp ecifi catio ns
Trouble Shooting
War ran ty
War ran ty Ca rd
... ..... ..... ..... ..... ........ ..... ..... ........ ..... . 22
... ..... ..... ..... ..... ........ ..... ... 23
... ..... ..... ..... ..... ........ ..... ..... ....... 24
... ..... ..... ..... ..... ........ ..... ..... ........ ..... ..... . 25
... ..... ..... ..... ..... ........ ..... ..... ........ .. 26
... ..... .... 11
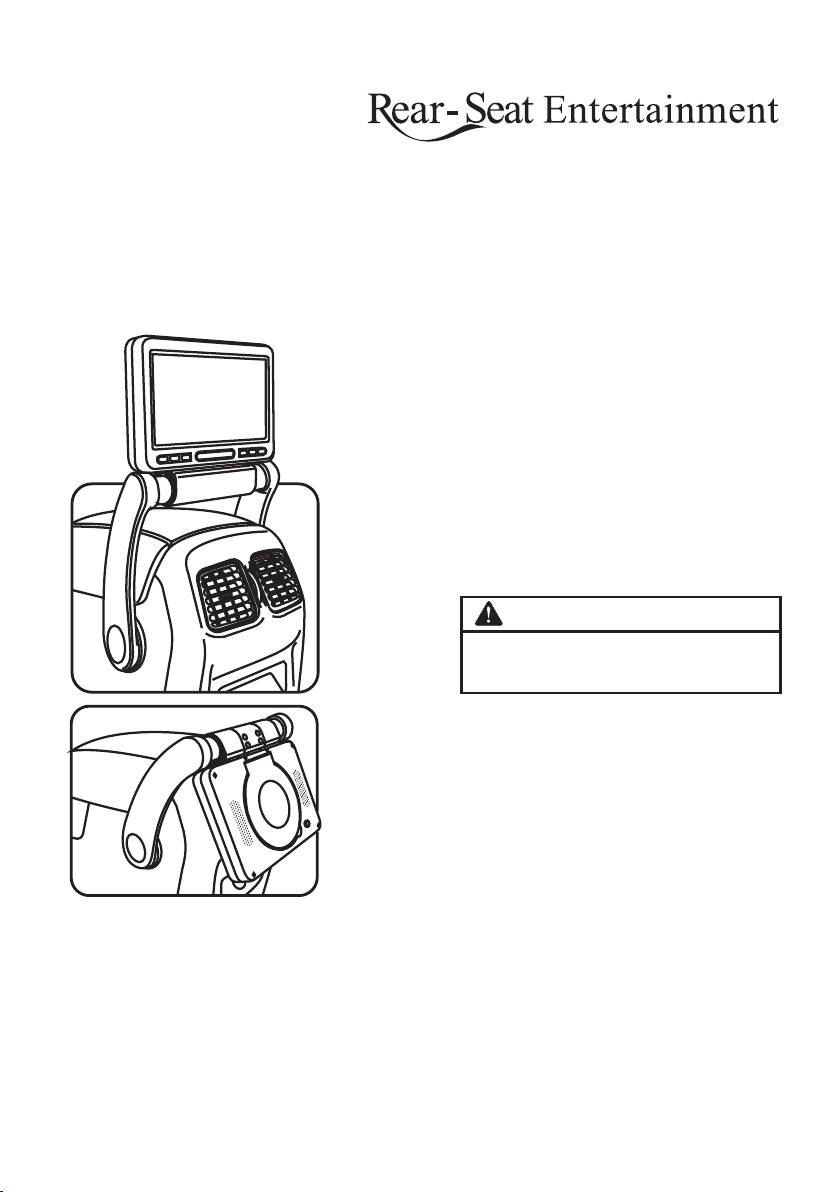
Cente r Arm rest Mo nitor
1
Page 3
Operating Ins truc tions
Welcome
‧Thanks for purc has ing C ent er Ar mre st Mo nit or. This
manual will hel p you u se th e exa ctl y fea tur es of y our
new monitor.
‧Please read all s afe ty an d ope rat ing i nst ruc tio ns
in this manual ca ref ull y, and keep this manu al fo r
future refere nce .
Safety Instructions
Be sure to observ e the f oll owi ng in str uct ion s and
precautions t o ens ure s afe u sin g of th is mo nit or. If you
or other third pa rti es us e thi s pro duc t in a no n-c orr ectly
way and cause the p rod uct b rea kdo wn or d ama ge, a s
to law, the re is n o responsibil ity f or co mpe nsa tio n.
We wi ll no t be re spo nsible for it, pl eas e und ers tan din g.
CAUTION:
This symbol mea ns "P lease be sure to ob ser ve."
Fai lur e to heed them can re sul t in in jury or material
propert y damage.
Do not re pair, alt er or dis assemble by yours elf.
Doing so may resu lt in a n acc ide nt, f ire o r ele ctr ic
shock. Consul t a ret ail er or s erv ice t ech nic ian f or
inspections a nd re pai rs, i f mai nte nan ce is n eed ed.
Halt us e immediately if an u nusua l state s appea rs.
Fai lur e to do s o may c aus e personal inju ry or d ama ge
to the product. R etu rn it t o you r aut hor ize d dea ler o r
nearest servi ce ce nte r for r epa iri ng.
Kee p finge rs away w hile the motorize d front
panel o r moving monitor is i n motio n.
Fai lur e to do s o may r esu lt in personal in jur y or
damage to the pro duc t.
Do not st rike or make this mon itor dr ops str ongly.
Doing so may resu lt in p ers ona l inj ury o r sla sh.
Do not le ave the disc in the car o r unit fo r a long
time.
Never expose th e dis c to di rec t sun lig ht. H eat a nd
humidity may da mag e the d isc a nd yo u may n ot be
able to play it aga in.
Do not to uch pick-up head.
Fai lur e to do s o may r esu lt in damage to the p rod uct .
WARNING:
This symbol mea ns "Forb ids t his b ehavior."
Fai lur e to heed them can re sul t in se rious injury
or death.
Do not op erate any functio n that ta kes you r
atten tion away from safe ty driv ing you r
vehic les.
Any function th at re qui res d riv er' s pro lon ged a tte ntion
should only be pe rfo rme d aft er co min g to a co mpl ete
stop. Always st op th e veh icl e in a sa fe lo cat ion b efo re
performing th ese f unc tio ns. Failure t o do so m ay re sul t
in an accident.
Do not to uch the screen when m eet a str ike
stron gly.
If liquid cryst al to uch es ha nds , fee t or cl oth es
incautious, p lea se wa sh wi th th e neu tra l det erg ent o r
consult a physi cia n if ne ces sar y.
Do not ex pose this monitor t o high hu midit y
level s.
Fai lur e to do s o may r esu lt in fire or elect ric s hoc k.
Do not ex pose this monitor t o dripp ing or
splas hing.
Doing so may resu lt in e lec tri c sho ck.
Do not op erate this monito r with we t hands .
Fai lur e to do s o may r esu lt in electric sh ock .
Do not us e this monitor agai n when th e power
cord is d amaged.
Doing so may resu lt in f ire o r ele ctr ic sh ock .
Use onl y in cars with A 12 Volt negative g round .
(C hec k with your deale r if yo u are n ot su re. )
Use for other tha n its d esi gne d app lic ati on ma y res ult
in fire, electr ic sh ock o r oth er in jur y.
Kee p small o bject s such as batteries o ut of the
reach o f children.
Swallowing them ma y res ult i n ser iou s inj ury.
If swallowed, c ons ult a p hys ici an im med iat ely.
Do not bl ock vents or radiat or pane ls.
Doing so may caus e hea t to bu ild u p ins ide a nd ma y
result in fire.
Do not pl ace hands, finger s or fore ign obj ects in
inser tion slots or ga ps.
Fai lur e to do s o may r esu lt in personal in jur y or da mag e
to the product.
Rear-S eat E ntert ainment
2
Page 4
Operating Ins truc tions
PRECAUTIONS
Please read all safety and operati ng instructions
in this manual carefully, and keep this manual
for future reference.
Personal Safety
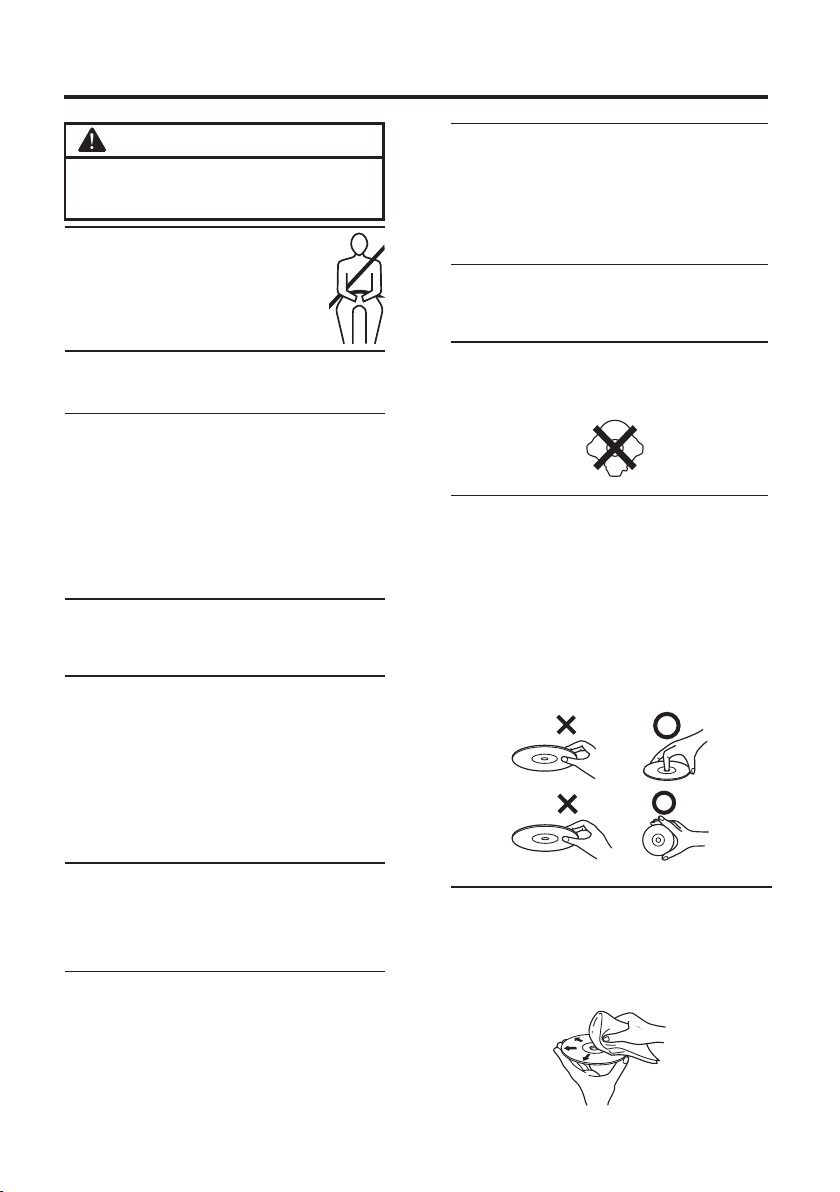
The ba ck seat passenger mu st tie th e
‧
safe ty belt before opera ting this mon itor.
‧Do not insert the USB while dri ving .
Failure to do so ma y result in personal
inju ry.
Temperature
Do not op erat e your unit in ambi ent tem perature
above +50°C (+ 122°F) or be low 0°C (+ 32°F).
Installation
‧Plea se inquire to yo ur reta iling shop to contact t he
spec ialized engineer or technical st aff for in stal lation.
‧Be sur e to comply with th is manu al whil e
conn ecting the cab les. Failure to do so may res ult in
dama ge to the pr oduct.
‧Be sur e the stabilit y of the sig nal cab le whil e insta llin g.
Failu re to do so ma y cause fire or ele ctric shock du e to
the wea r of the signal cable.
‧Be sur e to collect the ca bles we ll afte r insta llat ion.
Failu re to do so ma y cause fire or ele ctric shock.
Maintenance
If you ha ve problems , do not att empt to repair the unit by
your self. Doing so may result in pers onal in jury or d amage
to the pr oduc t. Retu rn it to you r retai ling sh op for re pairing.
Characteristics of LCD Panel
‧After turning the sy stem of f, a sligh t ghost o f the imag e
will re main tempor arily. This is an eff ect pec uliar to LCD
tech nology and is normal.
‧Unde r cold te mperature condit ions , the scre en may
lose co ntra st temp orarily. After a short warm-up period ,
it will r eturn to norma l.
‧The LC D panel is manufactur ed usin g an extremely
high pr ecis ion man ufacturin g techn olog y. Its effec tive
pixe l ratio is over 99. 99%. Th is mean s that 0. 01% of the
pixe ls coul d be either always ON or OFF.
Using the remote control
‧Point the remo te cont rol at th e remot e senso rs with in 2
mete rs.
‧It may no t be poss ible to operat e the remote control if
the rem ote control sensor is exposed to dire ct sunl ight
or inte rfer e with objects .
Product Cleaning
Use a sof t dry clo th for periodi c clean ing of th e
product. Fo r more severe stains, please dampen the
cloth with wa ter onl y. Anythi ng else has the cha nce of
diss olvi ng the paint or dam aging the plas tic.
Placi ng Discs
Make sure the lab el si de is f aci ng yo u whe n you
‧
place the disc.
‧Your p lay er ac cep ts on ly on e dis c at a ti me fo r play back. Do not atte mpt t o pla ce mo re th an on e dis c.
‧Playing a disc wh ile d riv ing o n a ver y bum py ro ad
may result in ski ps, b ut th is wi ll no t scr atc h the d isc
or damage the pla yer.
Damag e Discs
Do not attempt to p lay c rac ked , war ped , or da mag ed
discs. Playin g a bad d isc c oul d sev ere ly da mag e the
playback mech ani sm.
Irreg ular Shaped Discs
Be sure to use roun d sha ped d isc s onl y for t his u nit
and never use any s pec ial s hap ed di scs . Use o f
special shape d dis cs ma y cau se da mag e to th e
mechanism.
Corre ct Handling
‧Do not drop the dis c whi le ha ndl ing .
‧Hold the disc so yo u wil l not l eav e fin ger pri nts o n
the surface.
‧Do not affix tape , pap er, or gu mme d lab els t o the
disc.
‧Do not write on the d isc .
‧Do not touch the su rfa ce.
‧Do not expose the disc t o dir ect s unl igh t.
‧Clean the disc when it i s dus ty.
‧Make sure that th e dis c is sm oot h and f lat .
‧Do not use commer cia lly a vai lab le di sc ac ces sor ies .
COR RECTINC ORREC T
Disc Cl eaning
Fingerprints, du st, o r soi l on th e sur fac e of th e dis c
could cause the p lay er to s kip . For rout ine c lea nin g,
wipe the playing sur fac e wit h a cle an, s oft c lot h
from the center o f the d isc t o the o ute r edg e. If t he
surface is heav ily s oil ed, d amp en a cl ean , sof t clo th
in a solution of mi ld ne utr al de ter gen t bef ore
cleaning the di sc.
Cente r Arm rest Mo nitor
3
Page 5
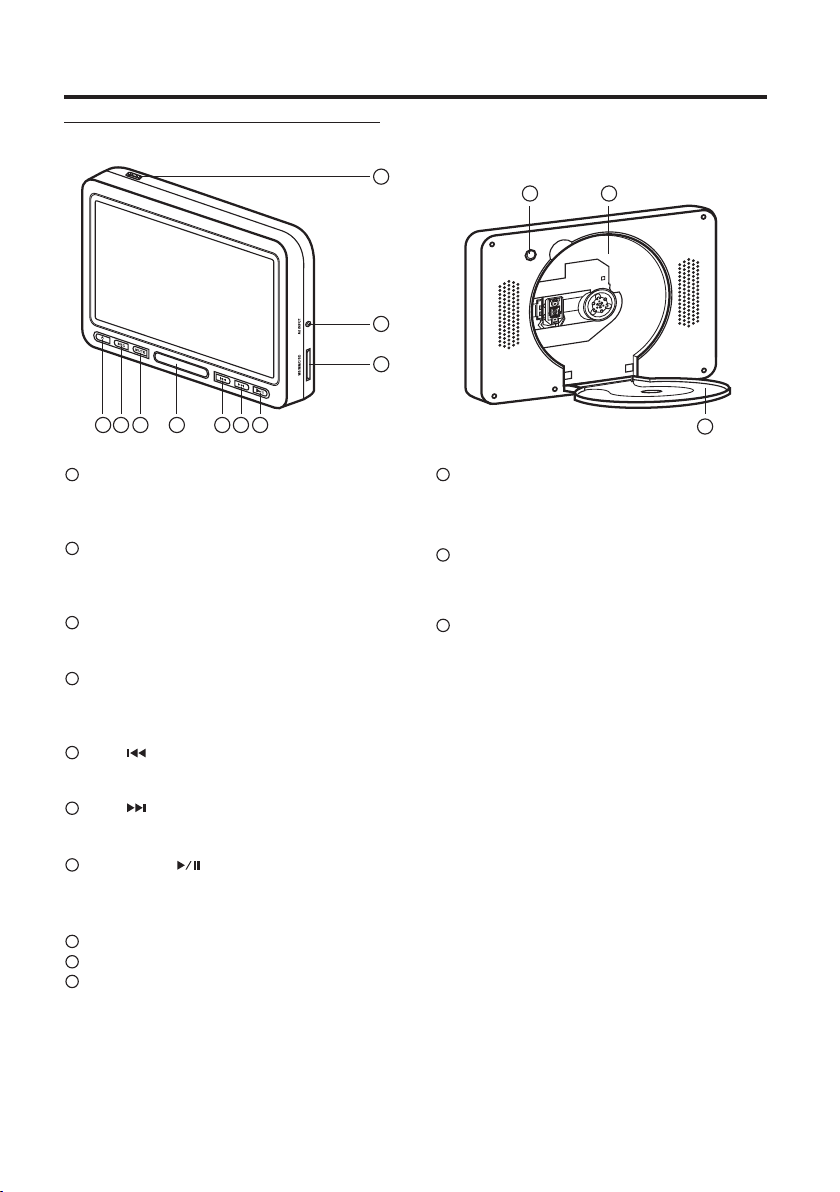
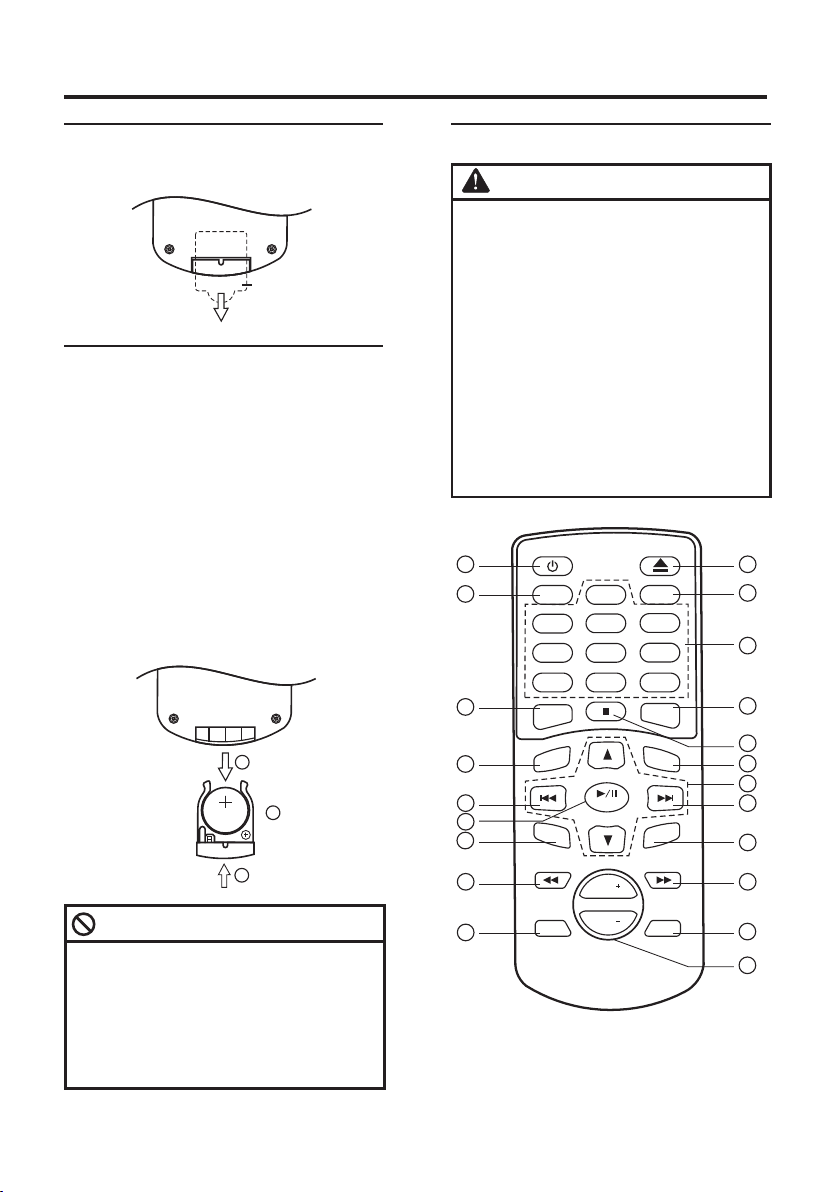
Monitor Function Overview
Getting St arted
8
9
10
11
12
1 2 3 5 6 7
1
POWER
4
- Press PWR button to turn on or off the unit.
2
SRC
- Press SRC button to switch the display source.
DVD / AV IN1 / AV IN2
3
MUTE
- Press MUTE button to disable or enable audio output.
4
IR Transmitter and Receiver
The receiving angle is about 30 degrees and the
receiving distance is about 2M.
5
PREV
- Press PREV button to skip backward. (chapter).
6
NEXT
- Press NEXT button to skip forward. (chapter).
7
PLAY / PAUSE
- Press once to start playing. Press twice to pause
playing.
8
USB Port
9
AV Input (Game Port)
10
MS / MMC / SD Card Slot
11
Switch
- Press this button to open the disc cover.
12
Disc Tray
(DVD / DVD-R / DVD-RW / DVD+R / DVD+RW /
VCD / CD-ROM / CD-RW)
13
Disc Cover
13
Rear-S eat E ntert ainment
4
Page 6
Getting St arted
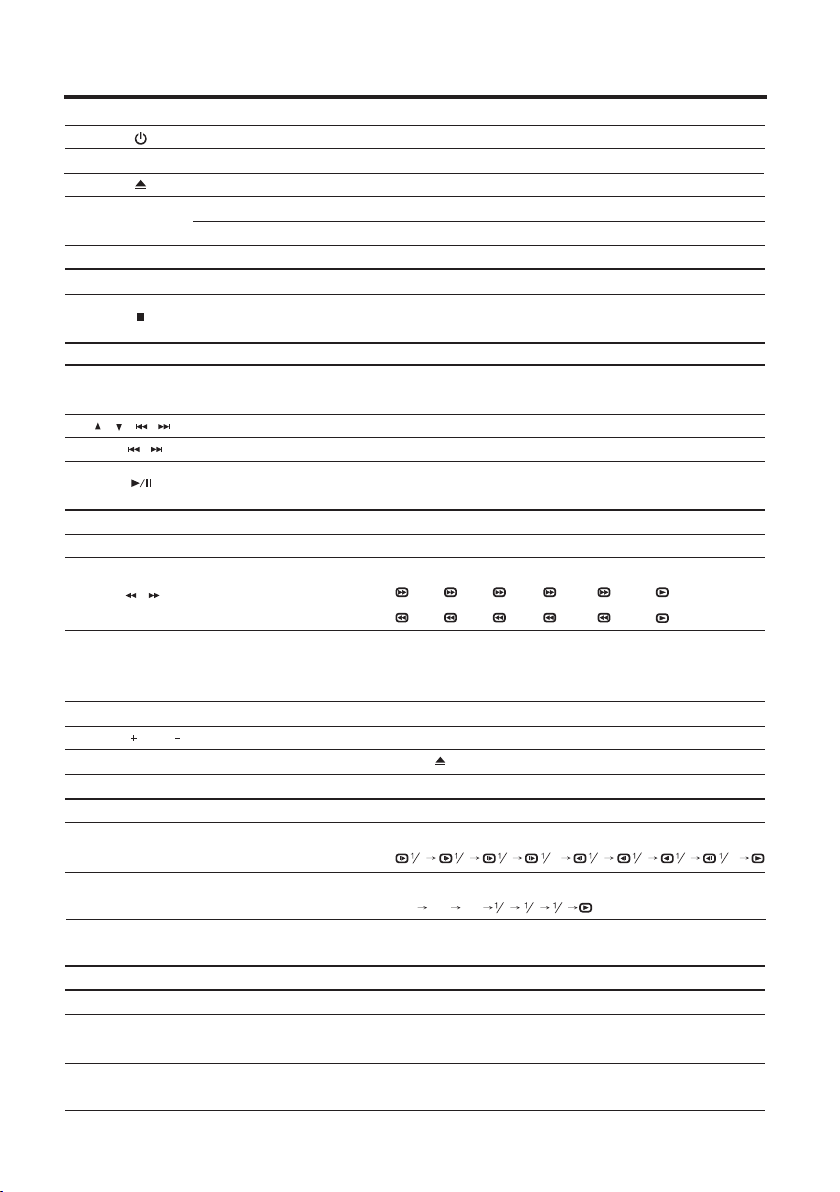
When Using the Remote Control
The first time
remove the plastic tape before using.
when you use the remote control, ple ase
Pla stic Tape
Battery Replacement
1. Opening the battery case.
Pull out the bat tery tr ay.
2. Replacing the battery. (CR-2025)
Put the battery in the ca se with th e (+) ind ication
upwa rd as show in the illustra tion.
‧Battery typ e : Mercur y Battery - CR 2025.
‧Plac ing a battery in ba ckwards way ma y cause a
malf unction.
3. Closing the cover.
Push the battery tra y as illus trat ed unti l a click is
hear d.
1
Cr202 5
CR2 025
2
3V
3
Remote Control Function Overview
CAUTION
‧Poi nt th e rem ote c ont rol a t the I R Reciver
2 meters.
‧It may not be possi ble t o ope rat e the r emo te
control if the re mot e con tro l sen sor i s exp ose d
to direct sunli ght o r int erf ere w ith o bje cts .
‧The remote cont rol i s a sma ll, l igh twe igh t
precision dev ice . To avoid damage, sho rt ba tte ry
life, operati ona l err ors a nd po or re spo nse ,
observe the fol low ing .
-D o not s ubject the remo te co ntr ol to e xce ssi ve
shock.
-D o not p ut in a trouser poc ket .
-K eep a way f rom f ood , moi sture and dirt.
-D o not p lace in direct su nsh ine .
‧Remove the battery i f it’ s not b ein g use d for a
long time.
‧Batteries con tai n che mic al su bst anc e, so t hey
should be dispo sed o f pro per ly.
0/1 0
A-B
ENTE R
VOL
FUNC TION
F/R
3
2
RAND OM
6
5
SOUR CE
MENU
AUDI O
1
2
5
8
OSD
RETU RN DIMM ER S LOW
1
ZOOM
4
TITL E DISP LAY ANGL E
7 8 9
USB/ DVD
SETU P
11
12
13
SUB.
15
within
3
4
19
6
7
9
10
11
14
15
WARNING
Do not op erate any functio n that ta kes you r
atten tion away from safe ty driv ing you r
vehic le.
Any function th at re qui res y our p rol ong ed at ten tion
should only be pe rfo rme d aft er co min g to a
complete stop . Alw ays s top t he ve hic le in a s afe
location befo re pe rfo rmi ng th ese f unc tio ns.
Fai lur e to do s o may r esu lt in an accident .
Cente r Arm rest Mo nitor
5
VOL
16
RPT.
MUTE
17
18
Page 7
Getting St arted
1
2
3
4
5
6
7
8
9
10
11
12
13
14
15
16
17
18
19
OSD
F/R
USB /DVD
SOU RCE
SET UP
MEN U
ENTE R
SUB .
AUD IO
RPT.
MUT E
VOL VOL
0
~
RET URN (1)
DIM MER (2)
SLO W (3)
ZOO M (4)
A-B ( 5)
RAN DOM (6)
TIT LE (7)
DIS PLAY (8)
ANG LE (9)
Power
OSD Menu
Function
FM Modulator (Option)
IR Sensor
USB DVD /
Display Source
Stop Playback
DVD Setup Men u
Disc Menu
Cursor Buttons
Skip / Backward Forward
Play/Pause/En ter
Subtitle
Audio
Search Backward / Forward
Repeat
Mute
Volume Incre ase / Decrease
9
Number Key Pad
Return (1)
Dimmer (2)
Slow (3)
Zoom (4)
A-B (5)
Random (6)
Title (7)
Display (8)
Angle (9)
Switch monitor po wer ON/ OFF
Enter or exit on-scr een display menu sys tem.
Switch Number / Function mo de.
(1) Pr ess Onc e : Switch FM ON/OFF. ( 87.7 MHz to 88 .9MHz)
(2) Pr ess Twice : Switch IR ON/ OFF.
Switch DVD / USB / Me mory Card mode.
Switch display so urce. (DVD→AV IN1 AV IN2)
(1) Pr ess Onc e: PRE- STOP di sc play back .
(2) Pr ess Twice : STOP playback com pletely.
Enter or exit the disc DV D setup menu.
Return to dis c conte nts menu.
(For VC D with PB C feature, PB C must be turned off.)
Move between the fun ctio n items in the menu .
Skip to the previous or next chapter / ti tle / tra ck.
(1) Pr ess Onc e : Start pl ayba ck.
(2) Pr ess Twice : Pause playb ack.
Select desired subtitle to disp lay.
Select desired audio lan guage to display.
Select desired search ba ckward / forward speed.
2X → 4X → 8X → 16X → 32X →
2X → 4X → 8X → 16X → 32X →
Select desired repeat mo de.
(1) DVD Disc : Cha pter → Titl e → All→Repe at Off
(2) CD / VCD Disc : Repeat 1 → Repeat All → Rep eat Off
Disable or en able au dio output.
Increase / De crease volu me.
Press to swit ch numb er key pa d to input data for disc.
Returns to th e previ ous display.
Select differen t LCD pan el back- ligh t brigh tness.
Select differen t slow pl ayback mode s for a VCD/ DVD.
8 1 6
4
2 4
Enlarge a pic ture or a ctive image on the scre en.
2X 3X 4X
Repeat playback o f a specific section wi thin a chapter of DVD or
a trac k.
Select to pla ybac k the chapter / tra ck randomly.
Go to disc title.
Display current i nformatio n during playback.
※JPEG: Change the bro wsin g effec ts during playback .
Select desired viewing angle. (If a DVD dis c conta ins multi-a ngle
feature, viewin g angles may be selected.)
342
→
2
8 1 6
Rear-S eat E ntert ainment
6
Page 8
Basic Operations
Monitor Set up
Before Using the MMD
Before using the MMD, please remove the card from th e
Multi Media Driver (MMD).
Car d
Turning Power ON/ OF
1. P res s to t urn O N.
2. To turn of f the p owe r, pres s and h old a gain.
Placing Discs
1. Tur n on th e pow er be for e pla cin g dis cs.
2. P lac e the d isc w ith t he label side fac ing y ou.
Once the disc is pa rti all y pla ced , it is d raw n in
automatical ly. Pla yba ck starts.
‧Be sure to put DVD in t o the m ort ise , to en sur e the
normal operat ion o f the D VD.
‧
If wrong disc, up sid e-d own d isc o r dir ty di sc ha ve
been inserted . ”NO D ISC ” is displayed .
Switching Source
1. P res s “SR C” to cyc le through the di ffe ren t sou rce s.
DVD AV IN1 AV IN2
‧OSD (On Screen Di spl ay) w ill b e tur ned o ff
automatical ly, whe n not o perating m ore t han 1 0
seconds.
FM/IR (On/Off)
FM ON/O FF (Option)
1. P res s onc e: To tur n ON/ OFF t he FM t ran smi tte r.
F/R
2. W hen y ou tu rn on t he FM, press or to
select desire d FM fr equ enc y 87. 7MH z ~ 88.9MHz or
OFF.
IR ON/O FF
1. P res s twi ce: To tu rn ON /OF F the I R.
F/R
2. W hen y ou tu rn on t he IR, press or to
select ON or OFF.
Adjusting OSD
Visual bright nes s, color are adjus tab le.
Each source is in dep end ent ly ad jus tab le.
‧
‧Make adjustme nts w ith in 6 se con ds, o the rwi se th e
OSD (On Screen Di spl ay) w ill t urn o ff au tom ati cal ly.
Adjusting Brightness
1.Pr ess t o sel ect Brightness.
contrast and
OSD
2.Pr ess o r to ad just the bri ght nes s.
Brightne ss ca n be ad jus ted fro m -20 ( MIN ) to +2 0
(MAX).
Brigh tness
00
Adjusting Contrast
1.Pr ess t o sel ect Contrast.
OSD
2.Pr ess o r to ad just the con tra st.
Contrast c an be a dju ste d from -2 0 (LOW ) to +20
(HIGH).
Contr ast
00
Adjusting Color Density
1.Pr ess t o sel ect Color.
OSD
2.Pr ess o r to ad just the col or de nsi ty.
Change dep th ca n be ad jus ted fro m -20 ( MIN ) to
+20 (R MAX).
Color
00
Adjusting Hue
1.Pr ess t o sel ect Hue.
OSD
2.Pr ess o r to ad just the hue .
Hue tone can b e adj ust ed fr om -20 (G M IN) t o
+20 (G MAX).
Hue
00
Resetting Picture Adjustment
1.Pr ess t o sel ect Res et.
OSD
2.Pr ess o r to re setting ad jus tme nt.
Reset will b e set u p in 00 (me dian) .
To save a dju stm ent or wa it 10 s eco nds u ntil OSD
disappea r, the ad justment w ill b e sav e aut omati cal ly.
Reset
Cente r Arm rest Mo nitor
7
Page 9

MMD Operations
CAUTION
Not all f unc tion wi ll oper ate f or ever y DVD.
‧
See the i ndi vidua l MMD’s i nst ructi ons f or
detai ls on t he feat ures su ppo rted.
‧Finge rpr ints on a d isc may a dve rsely a ffe ct
playb ack . If a prob lem occ urs , remov e the
disc an d che ck for fi ngerp rin ts on the p lay back si de. C lean th e disc if n ece ssary.
‧When us ing t he remo te cont rol , be care ful t o
press a b utt on at tim e. Pres sin g multi ple
butto ns at t he same t ime may c aus e
erron eou s opera tion.
‧If you sw itc h the pow er or ign iti on key OF F
durin g pla yback , playb ack w ill con tin ue
where y ou le ft off wh en you re sum e play back.
‧If you tr y to pe rform a n inval id op erati on
(base d on th e type of d isc bei ng pl ayed) ,
the mes sag e “ ” will be d ispla yed o n the
monit or sc reen.
‧A disc ty pe mu st matc h the set tin g of the
syste m. If a w rong ty pe disc i s ins erted , the
messa ge “N O DISC” wil l be disp lay ed, and
playb ack i s not ava ilabl e.
Playing DVD/VCD/CD
Place a d isc with the label si de faci ng you.
To load d isc s, se e “Pl aci ng Di sc” on page 7. Play bac k
starts.
The reverse sid e of a di sc wi ll no t be pl aye d
‧
automatical ly. Rem ove t he disc, turn it ov er an d
replace it.
‧It may take some ti me be for e pla yba ck st art s aft er
placing a disc.
Disc Auto Play
The disc will pla y aut oma tic all y wit hou t pre ssi ng
when disc is plac ed.
MMD Men u
1. P res s to di spl ay MMD Menu.
MENU
ENTER
Stopping Playback (PRE-STOP)
1. P res s dur ing p layback.“ PRE SS PL AY
KEY TO CONTINUE ” is di spl aye d, an d pla yba ck
pauses.
That position i s sto red i n mem ory.
2. P res s in th e PRE -ST OP mo de to r etu rn to
normal playba ck.
Playback star ts fr om th e pos iti on at w hic h it wa s
stopped.
‧
stopped may not b e acc ura te.
ENTER
Fo r som e dis c, th e pos iti on at w hic h pla yback was
Stopping Playback
1. P res s twi ce du ring playback .
“ ” is displayed, a nd pl ayb ack s top s.
2. P res s in th e STO P mode to return to n orm al
playback.
Playback star ts fr om th e beg inn ing .
ENTER
Playing Still Frames (Pause)
1. D uri ng pl ayb ack, press to pau se.
“ ” is displayed.
2. P res s aga in to r esume playbac k.
‧No sound appear s dur ing t he st ill m ode .
‧The image or soun d may s top t emp ora ril y whe n
playback star ts fr om th e pau se mo de. T his i s not a
malfunction .
ENTER
ENTER
Fast-forwarding / Fast-reversing
1. D uri ng pl ayb ack , press and ho ld or
to set search spe ed (× 2/ ×4 / ×8/ x 16/ x 32 )
forwarded or re ver sed .
2X 4X 8 X 16X 32X
2X 4X 8 X 16X 32X
2. P res s to select the des ire d
item, then pres s to co nfi rm a se lec tio n.
‧Fo r som e dis cs it i s pos sib le to s ele ct it ems directly
from the menu scr een u sin g the n umb er ke ys (“ 0” to “ 9”) .
MMD Men u
Press to displa y Vid eo Me nu.
1.
Press to select t he de sir ed it em, a nd
2.
then press agai n to co nfi rm a se lec tio n.
ENTER
MENU
ENTER
2. R ele ase o r to pa use, then press
return to norma l pla yba ck.
‧No sound appear s dur ing f ast-fo rwa rd / fa st-
reverse.
‧Fa st-forwardin g / fas t-reversi ng of a v ide o CD is o nly
function if the d isc i nco rpo rat es pl ayb ack c ont rol.
‧Fo r DVD a nd vi deo C Ds wi th pl ayb ack c ont rol ,
the menu screen m ay re app ear d uri ng fa st forwarding / fa st-reversing .
Rear-S eat E ntert ainment
ENTER
8
Page 10

MMD Operations
Finding the Beginning of
Chapters
During playba ck, p res s or to f ind t he
beginning of ch apt ers .
The chapter / tra ck sw itc hes e ach t ime t he bu tto n is
pressed, and pl ayb ack o f the s ele cte d cha pte r / tra ck
starts.
Press this to sta rt pl ayb ack f rom t he
beginning of th e cur ren t cha pte r or tr ack .
Press this to sta rt pl ayb ack f rom t he
beginning of th e fol low ing c hap ter o r tra ck.
‧Some DVDs do not ha ve ch apt ers .
※ Supplementa ry explana tio n:
“Ch apter s” are divisions of m ovi es or m usi cal
selections on DVDs.
“Tra cks ” are d ivi sio ns of m ovi es or m usi cal
selections on v ide o and m usi c CDs .
Setting DIMMER
Dimmer allows you to s ele ct di ffe ren t LCD b ack lig ht
brightness du rin g pla yba ck.
1. P res s DIM MER t o tur n the D imm er fu nction
ON / OFF.
2
Slow Motion Playback
Slow allows you t o sel ect d iff ere nt sl ow pl ayb ack m odes
for a VCD / DV D during playba ck.
1.Pr ess S LOW to s ele ct sl ow playback spe ed
from normal to ½, , , .
2. To retur n to no rma l pla yba ck, p res s SLOW
repeatedly un til n orm al sp eed p lay bac k.
‧No sound is playe d dur ing s low m oti on pl ayb ack /
reverse slow mo tio n pla yba ck.
3
2
2
8 16
4
8 16
4
8 16
4
3
Setting Zoom In / Out
Zooming allow s you t o enl arg e a pic tur e or ac tiv e
image on screen d uri ng pl ayb ack .
1.Pr ess Z OOM r epe ate dly t o zoo m in ou t on
the playback vi deo i mag e.
4
2X 3X 4X
342
Repeating Display Period (A-B)
Use this functi on to s et a di spl ay pe rio d rep eat edl y.
1.Du rin g pla yba ck, p res s A-B .
Rep eat A-
Rep eat A-B
Rep eat Off
-Setting a disp lay p eri od st art .
-Setting a disp lay p eri od en d.
-Canceling th e set tin g of di spl ay pe rio d.
5
Setting RANDOM (On/Off)
Random allows y ou to s ele ct to p lay t he ch apt er /
track randoml y dur ing p lay bac k.
1.Pr ess R AND OM to t urn t he Ra ndo m fun cti on
ON or OFF.
6
Switching Angle (DVD only)
On DV Ds in w hich scenes hav e bee n fil med f rom
multiple angl es, t he an gle s can b e swi tch ed du rin g
playback.
1. D uri ng pl ayb ack, press ANGLE.
The angle switc hes b etw een t he an gle s rec ord ed on
the disc, each ti me th e but ton i s pre sse d.
‧Sometimes may b e req uir ed fo r the a ngl e to
change.
9
Using Number Key pad
1.Pr ess f unc tio n key t o swi tch N umber/Fun cti on
mode.
2.In N umb er mo de, i npu ts th e num eric keys (0~9) d ata
for disc.
FUNC TION
OSD
0/1 0
RETU RN DIMM ER S LOW
1
ZOOM
4
TITL E DISP LAY ANGL E
7
2
A-B
5
8 9
F/R
RAND OM
3
6
FUN CTION K EY
3
NUM BER KEY PA D
19
2.To retu rn to normal play bac k, pr ess Z OOM
repeatedly un til “ ZOO M OFF ”
Cente r Arm rest Mo nitor
9
4
Page 11

MMD Operations
Displaying Disc Status
Use the procedu re de scr ibe d bel ow to d isp lay t he
status (title n umb er, cha pte r num ber, etc. ) of th e
currently pla yin g DVD /VC D/C D on th e mon ito r
screen.
1.Du rin g pla yba ck, p res s DIS PLAY.
The playback st atu s is di spl aye d.
DVD Dis c
Titl e Elaps ed
TT 01/ 14 CH 02/ 20 00:0 5:34
Cur rent ti tle num ber
Tit le Elap sed
Tit le Rema in
Cha pter El apsed
Cha pter Re main
Dis play Of f
VCD / CD Di sc
Titl e Elaps ed
Track 0 1 / 30
Sin gle Ela psed
Sin gle Rem ain
Total E lap sed
Total R emai n
Dis play Of f
8
Cha pter pl aybac k time
Cur rent ch apter n umber
-Elapsed play bac k tim e of cu rre nt
title.
-Remaining ti me of c urr ent t itl e.
-Elapsed play bac k tim e of cu rre nt
chapter.
-Remaining ti me of c urr ent c hap ter.
-Turns o ff the display in for mat ion .
05:3 4
Track p layba ck time
Cur rent ti tle num ber
-Elapsed play bac k tim e of cu rre nt
title.
-Remaining pl ayb ack t ime o f
current title .
-Elapsed play bac k tim e of cu rre nt
disc.
-Remaining pl ayb ack t ime o f cur ren t
disc.
-Turns o ff the display in for mat ion .
Switching Subtitles (DVD only)
Wi th mu lti ple s ubt itl e lan gua ge DV Ds, t he subtitle
language can be s wit che d dur ing p lay bac k, or
subtitles can b e hid den .
1.Du rin g pla yba ck, p res s .
The subtitle sw itc hed b etw een t he la ngu age s
recorded on the d isc a nd OF F eac h tim e the b utt on is
pressed.
‧There may be a dela y bef ore t he se lec ted s ubt itl e
appears.
‧Not all disc with a llo w cha ngi ng th e sub tit les d uri ng
playback. In th ese c ase s, se lec t sub tit les f rom t he
MMD’s menu.
‧The selected su bti tle l ang uag e bec ome s the d efa ult
setting every t ime t he po wer i s tur ned o n or th e dis c
is replaced. If t he di sc do es no t inc lud e tha t lan gua ge,
the disc’s defa ult l ang uag e is se lec ted i nst ead .
‧Fo r som e dis cs, t he su bti tle s wil l be di splayed even
when this is set to o ff.
SUB.
Switching Audio Tracks
DVD s can h ave different a udi o tra cks . The se al ter nat e
tracks can be swi tch ed du rin g pla yba ck.
1. D uri ng pl ayb ack, press .
The sound switc hed b etw een t he al ter nat e aud io
tracks record ed on t he di sc ea ch ti me th e but ton i s
pressed.
‧The selected al ter nat e tra ck be com es th e def aul t
setting every t ime t he po wer i s tur ned o n or th e dis c is
replaced. If th e dis c doe s not I ncl ude t hat t rac k, th e
disc’s defaul t lan gua ge is s ele cte d ins tea d.
‧Not all discs wil l all ow ch ang ing t he al ter nat e aud io
tracks during p lay bac k. In t hes e cas es, s ele ct au dio
tracks from the D VD me nu.
‧There may be a dela y bef ore t he se lec ted a lte rna te
track begins to p lay.
AUDI O
Video C Ds With multiplex audio
Mon o left Mo no Righ t Mix-M ono St ereo
Chapter/Track/ Title Repeat
Playback
Use this functi on to p lay t he di sc’ s tit les , cha pte rs or
tracks repeat edl y.
1.Du rin g pla yba ck, p res s .
The repeat mode s wit che s eac h tim e whe n the
button is press ed.
DVD Dis c
Cha pter Ti tle All O ff
RPT.
CD/VC D Disc
Track A ll Off
Rear-S eat E ntert ainment
10
Page 12

USB Operations
CAUTION
‧Not all functio n wil l ope rat e for e ver y for mat s.
See the individ ual U SB’ s ins tru cti ons f or de tai ls
on the features s upp ort ed.
‧Do not use USB whil e dri vin g you r veh icl e.
Always stop the v ehi cle i n a saf e loc ati on be for e
performing th ese f unc tio ns. Fail ure t o do so m ay
result in serio us in jur y or an a cci den t.
‧If you try to perfo rm an i nva lid o per ati on (b ase d
on the type of disc b ein g pla yed ), th e mes sag e
“ ” will be display ed on t he
monitor scree n.
‧A disc type must ma tch t he se tti ng of t he sy ste m.
If a wrong type dis c is in ser ted , the m ess age
“ NOT FOUND USB” wi ll be d isp lay ed, a nd
playback is not a vai lab le.
Switching DVD/USB/Memory Card
Mode
After connect ing U SB or M emo ry Ca rd, t he un it sh all
search the dire cto rie s aut oma tic all y, and s how a ll fi les
on the screen.
1.Pr ess t o cha nge t o USB m ode o r Memory
Card mode.
USB/ DVD
2. P res s to se lect desired fi les o r pre ss
to skip to the n ext a nd pr evi ous p age ,
and then press to s tar t or pa use p lay bac k.
‧It may take some ti me to s ear ch th e dir ect ori es wh ile
reading the USB o r Mem ory C ard .
ENTER
3.Pr ess t o ret urn t o the p lay bac k menu.
Cur rent pl aybac k infor matio n
Cur rent pl aybac k
Cha pter
Adj ustin g the vol ume
Pla yback / S top
00: 59 0 5:05 128 Kbps 2X
004 / 0 50
MP3
MUS IC01
MUS IC05_ 1
MP3
MP3
MUS IC07_ 2
MOV IE_03 _01
AVI
PHO TO_001
Fil e Ar ea
Cur rent pl aybac k mode
USB
Fas t-for wardi ng /
Fas t-rev ersin g
Pre view Ar ea
Setting RANDOM
Random allows y ou to s ele ct to p lay t he tr ack r and oml y
during playba ck.
1.Du rin g pla cyb ack , pre ss RA NDOM.
The random mode s wit che s eac h tim e whe n the
button is press ed.
6
MP 3
Ran dom Fol der
AVI
Sin gle Re peat O ne R epeat A ll Repe at Off
Repeating Playback
Use this functi on to p lay t he tr ack s in US B or Me mor y
Card repeated ly.
1.Du rin g pla yba ck, p res s .
The repeat mode s wit che s eac h tim e whe n the
button is press ed.
RPT.
MP 3
SIN GLE REP EAT ONE R EPEAT FOLD ER FOLD ER
AVI
SIN GLE REP EAT ONE R EPEAT ALL R EPEAT OFF
Tips
When play photo s, yo u can s ee th e pho tos i n the
Photo Preview A rea .
1.Pr ess t o sta rt or p aus e pla yba ck by full-
screen automa tic all y.
ENTER
2.Du rin g pla yba ck, p res s or se e previous
or next photo.
3.Pr ess o r , the p hot o can r ota te
clockwise or co unt erc loc kwi se.
4.Pr ess t o ret urn t o ind ex of t he ph otos.
3
7
11 12
4
8
1 2
5 6
9
10
Sli de Show M enu Pre v Next
- Press to sel ect d esi red p hot os,
and press to star t or pa use p lay bac k.
- Press MENU to return to the p lay bac k men u.
ENTER
Cente r Arm rest Mo nitor
11
Page 13

MMD Set up
DVD Setup Operation
The following s tep s 1 to 2 ar e com mon t o eac h of
the DVD setting s des cri bed h ere . Ref er to e ach
section for det ail s.
1.Pr ess a nd ho ld on t he re mot e con trol.
SETU P
The setup menu ap pea rs on t he mo nit or.
2.Pr ess o r to se lec t des ire d setting item
(General Setu p Page / P ass wor d Set up Page /
Preference Pag e), t hen p ress .
Fur the r ite ms wi ll be d isplayed.
GENER AL SETU P PAGE
TV DISPLAY / OSD LANGUAG E / SCREEN SAVE R /
LAST MEMORY
PASSWO RD SETU P PAGE
PASSWORD MODE / PAS SWO RD
PRFER ENCE PAG E
TV TYPE / AU DIO / S UBT ITLE / DISC MENU /
PARE NTAL / DEFAULT
EXIT SE TUP PAGE
3.Pr ess o r to ch ang e the s ett ing o f further
items, then pre ss .
4.
Press and hold .T he se tti ngs a re st ore d and
the setup mode is d eac tiv ate d.
5.
display.
‧When settings a re ch ang ed, o ld se tti ngs a re
overwritten . Mak e a not e of cu rre nt se tti ngs b efo re
making change s. If t he ve hic le’ s bat ter y is
disconnecte d, th e set tin gs wi ll be c lea red a nd will
return to Fa cto ry se tti ngs .
SETU P
Press or “EXIT SE TUP ” to re tur n to normal
ENTER
ENTER
General Setup Page
TV display, OS D lan gua ge, S creen savre and L astmemory are adju sta ble .
1.Pr ess b utt on on t he re mot e con trol. The
setup menu appe ars o n the m oni tor.
SETU P
2.Pr ess o r to se lec t TV DI SPL AY /
OSD LANGUAG E / SCR EEN S AVE R / LAS T MEM ORY,
then press to con fir m a sel ect ion .
Setting TV Display
‧Fo r som e dis cs, t he pi ctu re ma y not b e set t o the
selected scre en si ze.
ENTER
(default: Wid e)
3.Pr ess o r to se lec t des ire d screen type.
4.Pr ess t o sav e adj ust men t.
ENTER
- - Gen eral Se tup Pag e - -
TV Dis play
OSD La ng
Scre en Save r
Last M emory
Set TV D ispla y Mode
‧Norma l / PS (Pan-Scan)
Select this when con nec ted t o a con ven tio nal 4 :3
size monitor. The p ict ure w ill f ill t he en tire TV
screen. Due to th e mis mat ch in a spe ct ra tio , par ts
of the movie at the e xtr eme l eft a nd ri ght s ide s
will not be visib le wh en pl ayi ng a 16 :9 si ze
movie.
‧Norma l / LB (Letter B ox)
Select this when con nec ted t o a con ven tio nal 4 :3
size (normal TV a spe ct ra tio ) mon ito r. There
may be black band s vis ibl e at th e top a nd bo tto m
of the screen whe n pla yin g a 16: 9 siz e mov ie.
‧Wide (1 6:9)
Select this when con nec ted t o a wid e scr een T V.
This is selecte d upo n shi pme nt fr om th e fac tor y.
Wide
ENG
On
On
Norm al / PS
Norm al / LB
Wide
Rear-S eat E ntert ainment
12
Page 14

MMD Set up
Setting OSD Language
(default: Eng lis h)
3.Pr ess o r to se lec t des ire d lan guage.
‧There are 9 kinds o f lan gua ges c an be c hos en.
(English, Fre nch , Spa nis h, Ge rma n, It ali an,
Portu gue se an d 中文)
4.Pr ess t o sav e adj ust men t.
The settings ar e sto red a nd th e set up mo de is
deactivated .
Setting Screen Saver
3.
OFF.
4.
ENTER
- - Gen eral Se tup Pag e - -
TV Dis play
OSD La ng
Scre en Save r
Last M emory
Set OS D Langu age
Wide
ENG
Engl ish
Fren ch
On
Span ish
On
Germ an
Ital ian
Port ugues e
中文
(default: On)
Press or to selec t scr een s ave r ON
ENTER
Press to save adj ust men t.
- - Gen eral Se tup Pag e - -
TV Dis play
OSD La ng
Scre en Save r
Last M emory
Set Sc reen Sa ver
Wide
ENG
On
On
On
Off
Password Setup Page
There is not orig ina l pas swo rd.
1.Pr ess b utt on on t he re mot e con trol. The
setup menu appe ars o n the m oni tor.
2.Pr ess o r to se lec t Pas swo rd Se tup Page.
3.Pr ess t o sel ect C han ge then press
Fun cti on ke y + Num ber k ey pa d (0~9) to set up
password and pr ess “ OK” b utt on to s ave a dju stm ent .
or
SETU P
- - Pas sword S etup Pa ge - -
Pass word Mo de
Pass word
Pass word Mo de
- - Pas sword S etup Pa ge - -
Pass word Mo de
Pass word
Pass word Mo de
On
On
Off
Chan ge
,
PASSW ORD
Old Pa sswor d
New Pa sswor d
Conf irm PWD
OK
OK
Setting Last Memory
(default: On)
Video memory can cho ose t o man ual ly ON o r OFF .
Press or to selec t las t mem ory O N or OF F.
3.
Press to save adj ust men t.
4.
13
ENTER
- - Gen eral Se tup Pag e - -
TV Dis play
OSD La ng
Scre en Save r
Last M emory
Set La st Memo ry Stat e
Wide
ENG
On
On
Cente r Arm rest Mo nitor
On
Off
Page 15

MMD Set up
Preference Setup
TV type, Audio, S ubt itl e, Di sc Me nu an d Parent al ar e
adjustable.
1.Pr ess b utt on on t he re mot e con trol. The
SETU P
setup menu appe ars o n the m oni tor.
2.Pr ess o r to se lec t Pre fer enc e Setup.
3.Pr ess o r to se lec t TY TY PE / AU DIO /
SUBTITLE / DISC M ENU / PAR ENTAL / DE FAULT t hen
press to confir m a sel ect ion .
ENTER
Setting TV Type
(default: NTS C)
Broad cas t TV Syst em can be m anu ally sw itc hed.
Press or to selec t PAL / AUT O / NTS C.
4.
ENTER
Press to save adj ust men t.
5.
- - Pre feren ce Page - -
TV Type
Audi o
Subt itle
Disc M enu
Pare ntal
Defa ult
Set TV S tanda rd
Setting Audio Language
Press or to selec t des ire d aud io la ngu age .
4.
ENTER
Press to save adj ust men t.
5.
- - Pre feren ce Page - -
TV Type
Audi o
Subt itle
Disc M enu
Pare ntal
Defa ult
Pref erred Au dio Lan guage
Setting Subtitle Language
Press or to selec t des ire d sub tit le
4.
language or OFF.
Press to save adj ust men t.
5.
ENTER
PAL
NTSC
Auto
ENG
NTSC
Off
ENG
(default: Eng lis h)
NTSC
Engl ish
ENG
Fren ch
Off
Span ish
ENG
Chin ese
Japa nese
(default: Off )
,
Setting Disc Menu Language
Press or to selec t des ire d dis c men u
4.
language.
Press to save adj ust men t.
5.
ENTER
- - Pre feren ce Page - -
TV Type
Audi o
Subt itle
Disc M enu
Pare ntal
Defa ult
Pref erred M enu Lan guage
NTSC
ENG
Off
ENG
(default: Eng lis h)
Engl ish
Fren ch
Span ish
Chin ese
Japa nese
Setting Pare ntal (default: 8 Ad ult )
Press or to selec t a rat ing l eve l bet wee n
4.
1to 8.
‧The are 8 kinds of le vel s can b e cho sen .
(Kid saf, G, PG , PG1 3, PGR, R, NC17, Ad ult )
ENTER
Press to save adj ust men t.
5.
- - Pre feren ce Page - -
TV Type
Audi o
Subt itle
Disc M enu
Pare ntal
Defa ult
Set Pa renta l Contr ol
AUTO
ENG
OFF
ENG
1 KID SA F
2 G
3 PG
4 PG 13
5 PGR
6 R
7 NC 17
8 ADULT
Setting Default
Use this functi on to r est ore Factory s yst em se tti ng.
Select RESET to c han ge to Fa ctory setting .
4.
Press to save adj ust men t.
5.
ENTER
- - Pre feren ce Page - -
TV Type
Audi o
Subt itle
Disc M enu
Pare ntal
Defa ult
Load F actor y Setti ng
NTSC
ENG
Off
ENG
Rese t
- - Pre feren ce Page - -
TV Type
Audi o
Subt itle
Disc M enu
Pare ntal
Defa ult
Pref erred S ubtit le Lang uage
NTSC
ENG
Off
ENG
Engl ish
Fren ch
Span ish
Chin ese
Japa nese
OFF
Rear-S eat E ntert ainment
14
Page 16

Installation and Conn ections
Before instal lin g or co nne cti ng th e uni t, pl eas e read
the following a nd pa ge 2~ 3 of th is ma nua l
thoroughly fo r pro per u se.
CAUTION:
The back seat pas sen ger m ust t ie th e saf ety b elt
before operat ing t he un it.
Limit ation
The width be twe en th e fro nt seats mus t be
‧
greater th an th e wid th of t he monitor.
◎ 8” LCD Monit or 22 cm
‧The chink betwe en th e fro nt se at an d cen ter c ons ole
box must be great er th an th e thi ckn ess o f the b rac ket
arms (At lea st 1. 5cm ).
‧The top cover of th e Cen ter c ons ole b ox sh oul d be
operated. We pro pose that the tra nsv ers e axl e mus t
be higher than th e top c ove r by 3- 5 cm.
‧Both sides of the b rac ket s sho uld n ot go b eyo nd th e
case edge of Cent er co nso le bo x and t oo ne ar to d riv er.
Have th e wiring and instal latio n done by e xperts.
The wiring and in sta lla tio n of th is un it re qui res
special techn ica l ski ll an d exp eri enc e. To ens ure
safety, alwa ys co nta ct th e dealer where yo u
purchased thi s uni t to ha ve th e wor k don e.
→
Use spe cified accessory pa rts and installs them
secur ely.
Be sure to use only t he sp eci fie d acc ess ory p art s.
Use of other than d esi gna ted p art s may d ama ge th is
unit internal ly or m ay no t sec ure ly in sta ll th e uni t in
place. This may c aus e par ts to b eco me lo ose
resulting in ha zar ds or p rod uct f ail ure .
Arran ge the wiring so it is no t crimp ed or
pinch ed by a sharp metal edg e.
Route the cable s and w iri ng aw ay fr om mo vin g par ts
(like the seat ra ils ), sh arp o r poi nte d edg es. T his w ill
prevent crimp ing a nd da mag e to th e wir ing . If
wiring passes t hro ugh a h ole i n met al, u se a ru bbe r
grommet to prev ent t he wi res i nsu lat ion f rom b ein g
cut by the metal ed ge of t he ho le.
Drill ing can cause airbo rne deb ris.
Airborne debr is ca n cau se se rio us in jur y to th e eye s.
Wea r pro tec tiv e eye-wear when dril lin g.
WARNING:
Make th e correct connect ions.
Fai lur e to ma ke th e pro per connectio ns ma y
result in fire or p rod uct d ama ge.
Use onl y in cars with A 12 volt ne gativ e groun d.
(Check with you r dea ler i f you a re no t sur e.) F ail ure
to do so may result i n ele ctr ic sh ock o r inj ury d ue to
electrical sh ort s.
Do not al low cables to becom e entan gled in
surro und objects.
Arrange wirin g and c abl es in c omp lia nce w ith t he
manual to preve nt ob str uct ion s whe n dri vin g.
Do not sp lice into electri cal cab les.
Never cut away ca ble i nsu lat ion t o sup ply p owe r to
other equipment. D oin g so wi ll ex cee d the c urr ent
carrying capa cit y of th e wir e and r esu lt in f ire o r
electric shoc k.
Do not da mage the electric al wire w hen dri lling
holes .
When drilling hole s in th e con sol e box f or
installatio n, ta kes p rec aut ion s so as n ot to c ont act,
damage the electri cal w iri ng. Failure t o tak e suc h
precautions m ay re sul t in fi re.
Kee p small o bject s such as batteries o ut of the
reach o f children.
Swallowing them ma y res ult i n ser iou s inj ury.
If swallowed, c ons ult a p hys ici an im med iat ely.
PRECAUTIONS:
Be sure t o disconnect the ca ble fro m the (-)
batte ry post b efore i nstal ling th is unit.
This will reduc e any c han ce of d ama ge to t he un it in
case of a short-ci rcuit.
Be sure t o connect the color c oded le ads
accor ding to the diagram .
Incorrect con nec tio ns ma y cau se th e uni t to
malfunction o r dam age t o the v ehi cle 's el ect ric al
system.
When ma king connection s to the ve hicle 's
elect rical system, be aw are of th e facto ry
insta lled components . Do not ta p into th ese lea ds
to prov ide power for this un it.
Fai lur e to do s o may r esu lt in damage to the u nit o r
vehicle. When it dou bt, p lea se co nsu lt yo ur de ale r.
This un it uses female RCA- type ja cks for
conne ction to other unit s (e.g. a mplif ier) ha ving
RCA con nectors.
You ma y nee d an ad apt or to c onn ect o the r uni ts. If
so, please cont act y our a uth ori zed d eal er fo r
assistance.
Cente r Arm rest Mo nitor
15
Page 17

Parts Indication
LCD Monitor
Open Cover DVD Player
Signal Cable (b lue )
Outside Cover O f Trans ver se Ax le
Signal Cable (b lac k)
Antenna
Transve rse A xle
Installation and Conn ections
Outside Cover Of Rig ht (l eft ) Bra cke t
Plastic Was her
Mounting Plat e
Rear-S eat E ntert ainment
16
Page 18

Installation and Conn ections
CAUTION:
The bac k sea t pas senge r mus t tie
the saf ety b elt b efore o per ati ng
the uni t.
LIMITATION
●
The width be twe en th e fro nt seats mus t be gr eat er
than the wid th of t he mo nit or.
8” LCD Monit or 22 cm
● The chink be twe en th e fro nt seat and ce nte r
console bo x mus t be gr eat er than the th ick nes s of
the bracke t arm s (At l eas t 1.5cm).
● Both sides o f the b rac ket s should not g o bey ond
the case edg e of ce nte r con sole box and t oo ne ar
to driver
● When you ins tal l the b rac ket, pleas e mak e sur e
the height o f the l eft & r igh t bracket sh oul d be th e
same, and ve rti cal w ith t he transve rse a xle .
● To ensu re the top cov er of t he co nso le box can be
operated , the t ran sve rse axle mus t be hi ghe r tha n
the top cove r of co nso le bo x 3~5cm dist anc e..
→
22cm
1.5cm
CAUTION:
Pleas e acc ord ing to th e sha pe of the
conso le bo x and m onito r fol ding po sit ion
to deci de th e bra cket in sta lla ti on an gle a nd
posit ion .
When th e mon ito r is fold ed, i t shoul d be
paral lel t o the f ront of c ons ole box , and
keep di sta nce m ore tha n 1cm .(Fig ure B )
VERTI CAL INSTALL ATION:
If the shape of con sol e box i s sim ila r to Fi gur e A,
please let the br ack et an d top c ove r of co nso le bo x as
90 degrees, and s tar t to in sta ll.
90
Figure A
OBLIQ UE INSTALLAT ION:
If the shape of con sol e box i s sim ila r to Fi gur e B,
please let the br ack et an d inc lin e of co nso le bo x kee p
parallel, and s tar t to in sta ll.
● Before instal lat ion , ple ase e nsu re th e mon ito r will not
touch the car mat s whe n it’ s fol ded .
1cm
Cente r Arm rest Mo nitor
17
3~5cm
Figure B
CORRECT
INCORREC T
1cm
Paral lel
CORRECT
INCORREC T
Page 19

Installation Step
Measu re the width and heig ht of the
1
conso le box first.
※For e xam ple :
The console box i s 15( W) x 25 (H) c m. (F igu re 1)
Adjus t the width of the tran svers e axle.
2
For e xam ple :
※
The width of the co nso le bo x is 15 cm. ( Fig ure 1 )
According to th e wid th of t he Ce nte r Con sol e Box
to pull out and adj ust t he su ita ble w idt h of th e
transverse ax le. ( Fig ure 2 )
Installation and Conn ections
(Figure 1)
(Figure 2)
Choos e suitable Plasti c Was her.
3
Check both side s of th e cen ter c ons ole , if it h ave
slope, please c hoo se su ita ble p las tic w ash er
(the thick obli que w ash er/ t hin o bli que w ash er/
flat washer) an d mak e the b rac ket s per pen dic ula r
to 90 degrees. (F igu re 3)
Mark th e screw positions o f the dis c holde r.
4
After decided t he in sta lla tio n ang le of t he br ack et,
please mark the s cre w pos iti ons o f the d isc h old er,
in the both side of c ons ole b ox. ( Fig ure 4 )
After that, dri ll fo ur 4 ho les i n the b oth s ide o f
console box.
90 degr ees
3~5cm
Rear-S eat E ntert ainment
Plast ic Washe r
(Figure 3)
(Figure 3-2 )
18
Page 20

Installation and Conn ections
Choos e the installatio n way of th e screw s.
5
‧A Type ( Figur e 5-1)
Put the m oun tin g pla te in sid e of th e con sol e box,
and fix the mount ing p lat e fro m out sid e to in sid e
with 4pcs 4x25 se lf-tapping scr ews . sam e as ri ght
bracket.
‧B Type ( Figur e 5-2)
Use 4x25 self-ta pping screws an d spr ing
buckle to fix the b rac ket o n the b oth s ide s of
the console box .
Drill c able hole.
6
After chosen th e sui tab le pl ast ic wa she r, please
drill a 15mm hole w ith p las tic w ash er in t he U
breach place. ( Fig ure 6 )
(Figure 6)
15mm Ca ble H ole
Fix the t ransverse axle
7
After adjusti ng an d con fir min g the w idt h of
transverse ax le, p lea se us e the A lle n Key t o tig hte n
the 5x12 screws . (Fi gur e 7)
A Type
B Type
Allen Key
Assem ble the outside cov er of the R ight/
8
Lef t Brack ets.
Use 3x8 screws to f ix th e out sid e cov er of t he
right and left br ack et ar ms. ( Fig ure 8 )
The above is all in sta lla tio n.
Cente r Arm rest Mo nitor
19
(Figure 7)
(Figure 8)
Page 21

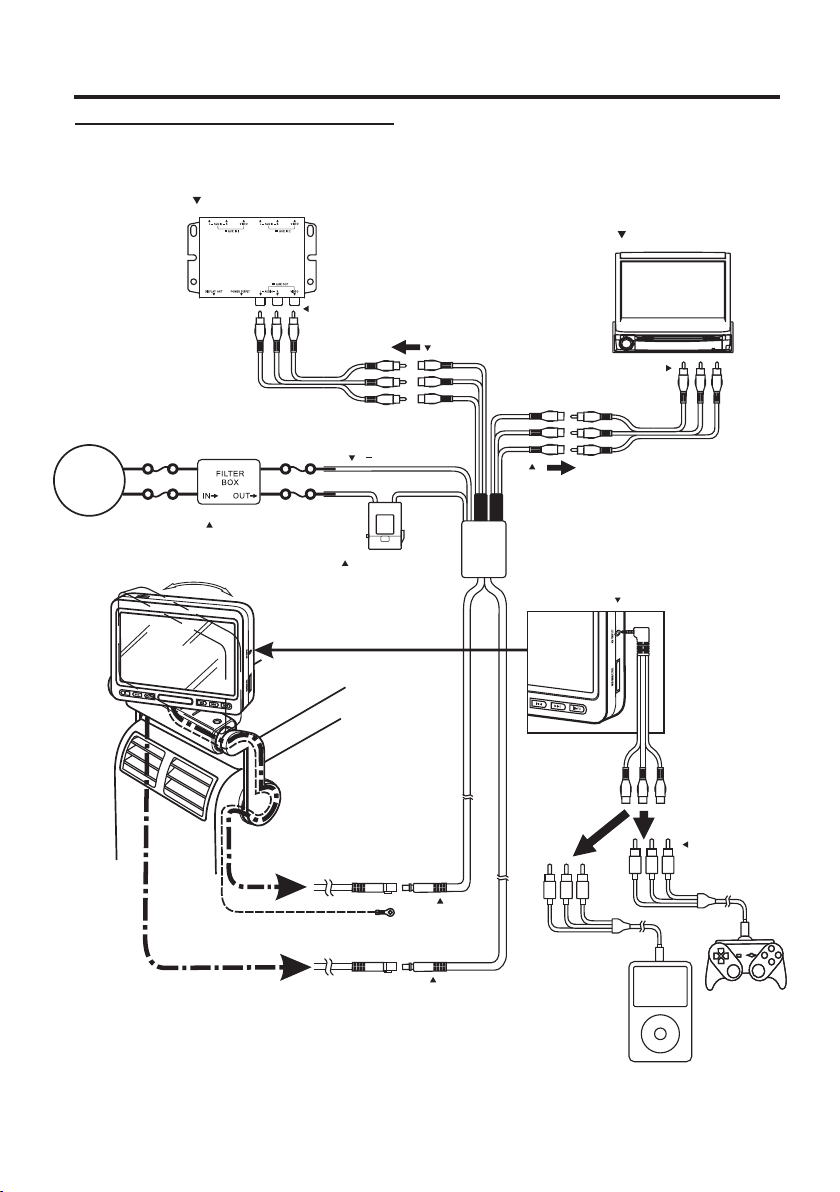
Connections
AV Conn ectors
Gre en / Yello w
Installation and Conn ections
Video I nput Connector
This connecto r is us ed in c omb ina tio n wit h the v ide o inputs of other v ide o
products (AV hea d out or TV Tune r).
Bla ck
Blu e
Whi te(L)
Red ( R )
Blu e / Yel low
Bro wn / Whit e(L)
Yell ow / Red ( R )
Bla ck
Red
Audio I nput Connectors
These connect ors a re us ed in c omb ina tio n wit h a hea d unit or TV Tun er wi th
audio output co nne cto rs.
Video O utput Connector
This connecto r is us ed in c omb ina tio n wit h the v ide o inputs of other v ide o
products (AV hea d unit or LCD monit or) .
Audio O utput Connector s
These connect ors a re us ed in c omb ina tio n wit h a hea d unit or LCD monit or
with audio inpu t con nec tor s.
GND
Connect this li ne to t he ve hic le’ s GND l ine .
ACC
Connect this li ne to t he ve hic le’ s ACC l ine . (Sw itc hed 1 2V, ign iti on)
CAUTION
The factory def aul t wil l hav e a con nec tor. Please cut the c onn ect or
before connec t to th e sys tem .
( )GN D (Blac k)
(+) ACC (Re d)
Rear-S eat E ntert ainment
20
Page 22
Installation and Conn ections
System Connections
TV Tuner
AV Ou tpu t
V
R
ACC - out
TH080 C
L
(Black) (Black)
(Red) (Red)
Pow er Fi lte r(Option )
( )12V (Blac k)
(+)12V ACC
(Red)
V
R
L
AV In put ( Black)
V
R
L
V
V
R
R
L
L
AV Ou tpu t (Blue)
AV 2
Multi M edi a Stati on
AV In put
V
AV In put
L
R
Cente r Arm rest Mo nitor
21
Signal Cab le( Bla ck)
Antenna (Opti on)
Signal Cab le( Blu e)
AV In put
(Black)
AV Ou tpu t
(Blue)
L
R
V
AV Ou tpu t
L
R
V
L
R
V
Game Playe r
iPo d
Page 23

Information
Accessories
Screen
Outside Cover s Of
Bracket
Plastic Washers
1
Thi ck obli que was her x2
2
Thi n obliq ue wash er x2
3
Fla t washe r x 2
2
3
Rem ote C ontrol
OSD
RETURN
FUNCTION
0/10
1
DIMMER
ZOO
M
4
F/R
2
TITLE
SLOW
A-B
7
5
3
DISPLAY
RAN
DOM
USB
8
6
/DVD
ANGLE
9
SETUP
SOU
RCE
MEN
U
ENTE
SUB.
R
AUDIO
VO
L
RPT.
VOL
MUTE
Bracket Ar m
x1 x1
Screws (F⊕3×8)
- For O uts ide covers
of Bracket
x2 x4
Allen Ke y
1
x6
User Manual
USER MANUAL
x1
x1
x1
A Type
Mounting Plat es Scr ews
(F⊕4×25)
- For M oun ting Plates
x2
B Type
Spring Buckle s Self- tap ping Screws
(F⊕4 25)
×
- For S pri ng Buckles
x8 x8
x8
Rub ber P lugs
AV2 C abl eSignal Cable
x1 x1
Rub ber B ars
x4
x2
Rear-S eat E ntert ainment
22
Page 24

Information
General Specifications
DISPLAY SCREEN
Size
Aspect Rat io
LCD -Type
DVD Loader System
Number of Elements
Effective Numb er of Ele ment s
Back Light
GENERAL
Operating Volta ge
Power Consumption
Video Inpu t
Video Outp ut
Audio Inpu t
Audio Outp ut
IR Transmitter
FM Transmitter Modulator (Option)
Operating Temperature
8 inch
16:10
Digital ty pe TFT Liquid Cryst alDi spla y
Open Cover (Made in China)
800(W)x480(H)x3
99.9% or more
LED La mp
10 - 16VDC (Typical: 12 V)
1.2 A (MAX)
0.82 A(TYP )
0.08A (Sta nd by)
1.0V p-p 75
1.0V p-p 75
2.0V rms (MAX)
2.0V rms (MAX)
CH A:2.3MHz/2.8MHz
87.7MHz-88.9MHz
Freq uenc y (Wir eles s)
32°F to +122°F (0°C to +50°C )
MONITOR
Size
Wid th
Depth
Height
Weig ht
8 inch
213mm
154mm
34mm
0.78 Kg
UNIVERSAL BRACKET
Bracket Type
Wid th
Heigh
Depth
Weig ht
Not e:
‧Spe cific ation s and the d esign a re subject to modification without notice d ue to i mpr ove men ts in t ech nol ogy.
‧Som e figur es and il lustr ations on this manual may be different from you r pro duc t.
Cente r Arm rest Mo nitor
23
D Type
150~260mm
12mm
255mm
0.50kg
Page 25

Information
Troubleshooting
CAUTION
If you encounte r a pro ble m, pl eas e tur n the p owe r
off, the n on ag ain . If the unit still n o fun cti on
normally, pl eas e rev iew t he items in the fol low ing
checklist. Th is gu ide w ill h elp y ou is ola te th e
problem if the un it is a t fau lt. O the rwi se, m ake
sure the rest of yo ur sy ste m is pr ope rly c onn ect ed
or consult your a uth ori zed d eal er.
No func tion or display.
Veh icl e’s i gni tio n off .
- If connected fo llo win g the i nst ruc tio ns, t he un it
will not operat e wit h the v ehi cle s ign iti on of f.
Improper power lea d con nec tio ns.
- Check if the powe r lea d is pr ope rly c onn ect ed.
No fuse or blown fu se.
- Replace the fus e on th e bat ter y lea d of th e uni t
with the proper v alu e.
Veh icl e’s b att ery i s wea k.
- Check the voltage of v ehi cle ’s ba tte ry.
Disc pl ayback sound is wav ering .
Moisture cond ens ati on in t he di sc un it.
- Allow enough ti me fo r the c ond ens ati on to
evaporate (ab out 1 h our ).
Unabl e to fast-forw ard or fa st-re verse the disc.
The disc has been d ama ged .
- Eject the disc an d dis car d it. U sin g a dam age d dis c
in your unit can ca use d ama ge to t he me cha nis m.
Disc pl ayback sound skip s due to vi brati on.
Improper mountin g of th e uni t.
- Securely re-m oun t the u nit .
The disc is very di rty.
- Clean the disc
The disc has scra tch es.
- Change the disc .
The pick-up l ens i s dir ty.
-Do not use a comme rci al av ail abl e len s cle ane r
disc. Consult y our n ear est d eal er.
Disc pl ayback sound skip s witho ut vibr ation .
Dirty or scratc hed d isc .
- Clean the disc. D ama ged d isc s hou ld be r epl ace d.
CD-R/CD -RW pla yback i s not possible.
Close session ( fin ali zat ion ) has n ot be en pe rfo rmed.
- Per for m fin ali zat ion a nd attempt play bac k aga in.
Unit do es not operate.
Monitor’s pow er is n ot tu rne d on.
- Turn on t he mo nit or po wer.
Condensatio n
-Wai t a whi le (a bou t 1 hour) for the con den sat ion t o
dry.
No pict ure is display.
Monitor’s mod e is no t swi tch ed to t he mo de yo u
want to see.
- Switch to the mod e you w ant t o see .
Monitor’s par kin g bre ak co rd is n ot co nne cte d.
- Connect the mon ito r par kin g bra ke co rd an d set t he
parking break . (For d etails, refer t o the m oni tor
instruction .)
Brightness co ntr ol is s et fo r min imu m bri ght nes s
control.
- Adjust the brig htn ess .
Incorrect set tin g of th e mod e.
- Switch to the cor rec t mod e.
- Check the conne cti on to t he so urc e uni t.
- Check the power o f the s our ce un it.
Incorrect or op en co nne cti on wi th th e Mon ito r, AV
interface uni t.
- Check the conne cti on an d rem edy.
Playb ack does not start.
Disc is loaded up sid e-d own .
- Check the disc an d loa d it wi th th e lab el si de fa cin g
you.
The disc is dirty.
- Clean the disc.
A disc not able to pl ayb ack w ith t his u nit i s loa ded .
- Check if the disc i s abl e to be p lay ed ba ck.
Par ent al lo ck is s et.
- Cancel the pare nta l loc k or ch ang e the r ati ng le vel .
Setup menu is dis pla yed .
- Press to turn the m enu o ff.
SETU P
Image s tops sometimes.
Disc is scratch ed.
- Replace with an n on- scr atc hed d isc .
Pictu re color is poor.
Brightness/ Con tra st/ Col or co ntr ols a re no t set to the
proper positi ons .
- Check each cont rol .
Pictu re was very dark w hen sta rting the mach ine.
The temperatu re is t oo lo w.
- Wai t a whi le (a bou t 1 hour) for the war m up. A fte r tha t,
the monitor wil l ret urn t o the n orm al co ndi tio n.
Rear-S eat E ntert ainment
24
Page 26

Information
Pictu re is unclear or nois y.
Disc is being fas t-forwarded or f ast-reversed .
- The picture may b e unc lea r, but th is is n orm al.
Veh icl e’s b att ery p owe r is we ak.
- Check the batte ry po wer a nd wi rin g. (T he un it ma y
malfunction i f the b att ery p owe r is un der 1 1 vol ts
with a load appli ed. )
Monitor’s flu ore sce nt tu be is w orn o ut.
- Replace the mon ito r flu ore sce nt tu be.
Image s tops sometimes.
Disc is scratch ed.
- Replace with a no n-s cra tch ed di sc.
The rem ote control does no t work.
IR Received ran ge is n ot en oug h.
- The remote cont rol c an be u sed w ith in 2 me ter s.
Something int erf ere t he IR t ran smi tte r.
- Please remove a ny po ssi ble o bje cts .
Battery is exha ust ed.
- Replace the rem ote c ont rol b att ery.
Spots o r dotted lines-st ripes a ppear.
The LCD panel is ma nuf act ure d usi ng an e xtr eme ly
high precisio n man ufa ctu rin g tec hno log y.
- Its effective p ixe l rat io is o ver 9 9.9 9%. T his m ean s
that 0.01% of the p ixe ls co uld b e eit her a lwa ys ON o r
OFF.
Caused by neon si gns , hig h-v olt age p owe r lin es, C B
transmitter, ot her v ehi cle ’s ig nit ion plugs, etc.
- Change the loca tio n of yo ur ve hic le.
CAUTION
Due to continuo us pr odu ct im pro vem ent ,
specificati ons a nd de sig n are s ubj ect t o cha nge
without notic e.
Warranty
CAUTION :
‧
Please make sur e to re ad th e use r man ual
carefully.
‧
Please make sur e to as k for t he au the nti cat ion
seal from the ret ail ing s hop o n the w arr ant y car d
for certifica tio n and k eep p rop erl y in or der t o
guaranteein g you r rig hts .
‧
Please mak e sur e the u nit s have seria l num ber
before you s end i t bac k for r epairing . If th e uni ts
didn’t hav e ser ial n umb er or miss it, w e wil l
unable to of fer w arr ant y for the unit s.
‧War ran ty vo id if sea l is br oke n or re mov ed.
Warranty period:
Fro m the d ate o f ori ginal retail pu rch ase .
Within the warranty period:
Please comply w ith i nst ruc tio n of wa rra nty c ard a nd
‧
inquire your re tai lin g sho p abo ut ma int ena nce .
If the unit break s dow n und er no rma l usa ge, w e wil l
‧
repair the unit s fre e of ch arg e. Furth erm ore , we wi ll
be responsibl e for t he tw o-w ay fr eig hta ge fe es.
If the unit break s dow n bec aus e ext ern al fo rce , suc h
‧
as, man-made da mag e, hi t, sp las h and s o on, w e wil l
charge the comp one nt fe es an d tec hno log ic fe es
from customer s. Fur thermore, the c ust ome rs sh oul d
responsible f or th e two -wa y fre igh tag e fee s.
Exceed the warranty period:
‧
If the product br eak s dow n, pl eas e inq uir e you r
retailing sho p.
If the unit break s dow n bec aus e ext ern al fo rce o r not
‧
external forc e, we w ill c har ge th e com pon ent f ees
and technolog ic fe es fr om cu sto mer s. Fu rth erm ore ,
the customers s hou ld be r esp ons ibl e for t he tw o-w ay
freightage fe es.
In order to maint ain t he fu nct ion o f the p rod uct , we
‧
will charge the m ain ten anc e cos t in ac cor dan ce wi th
the state of cust ome r's p rod uct s.
Cente r Arm rest Mo nitor
25
About the repairing fees :
>>Techn ologic fees :
We will c harge the repa iring fees in accorda nce wit h the
state of cust omer's products after rep airin g.
The re pairing fees will inc lude te chnical sta ff fees ,
tech nolo gic edu cational fees, tes t equip ment fe es of
devi ce and ge neral administra tion fe es and so on .
>>Co mponents fee s :
The cu stomers will be respo nsible for the compon ents
fees a nd mate rial fe es of the de fective product.
>>Freight age fees:
If the pr oduc t break s down because extern al forc e,
such as man-m ade dam age, hi t, spla sh and so on ,
the cu stomers should responsi ble for a ll frei ghtage fees.
Other :
When s ending the pro duct to repair, ple ase pac k the
prod uct perfect ly, so as to prevent damage again on
the wa y of transport . Thank s.
Page 27

Information
Warranty Card
‧We will d elivery the pr oduct after it passed the tigh t
qual ity con trol an d detai led exa mining.
‧Unde r normal usage, if the product is out of order,
plea se inqu ires yo ur reta iling shop or particu lar
cust omer's service center, we will re pair it for free
duri ng warr anty pe riod.
‧If you ne ed any pr oduct service, please present th is
warr anty ca rd for certifi cation.
‧Plea se remember to ask for the authentica tion se al
from the retailing shop while buying this pr oduc t.
If it’s i ncorrectl y or there is not authenti cati on seal ,
we will n ot guar antee your rig ht.
Brac ket Type
Seri al numb er
Purc hasing Date
User data
Retailer dat a
Item
Mode l
Colo r
User Na me
Addr ess
Shop Na me
Addr ess
Center Armrest Monitor
Blac k
TH08 0C
D Type
CAUTION:
‧Please test all Functions Before Insta lling.
‧Please record the se rial number of your uni t
in the sp ace pro vide be low and keep it as a
perm anent recor d. The serial number plate
is loca ted on th e back of th e monit or.
‧If the un its didn’t have serial number or miss
it, we wi ll unab le to offer warranty for the unit s.
CAUTION:
In ord er to guarantee your ri ghts, pleas e
remember to fill in re tailing shop name,
address and telep hone nu mber ce rtai nly whi le
purchasi ng.
Warra nty per iod
Beig e
(Thi s is necessar y.)
( YY /MM /DD )
Tel.
Tel.
From th e date of origina l
reta il purchasin g
Retailer ’s Seal
Sell ing dat e:
(Thi s is necessar y.)
Rear-S eat E ntert ainment
26
Page 28

TH080C-100072610
 Loading...