

Page 1
1493 Bentley Drive • Corona, CA 92879 • 951-272-1996 • 800-624-7960 • Fax 951-272-1584
www.vizualogic.com
99-9138-000 Rev. 1 7/06
Page 2
Table of Contents
Welcome
Congratulations on your purchase of a Vizualogic All-In-One System that will
provide your family with many years of enjoyment. This sophisticated product
provides video entertainment to rear seat passengers without altering the
appearance of your vehicle’s original interior.
Reviewing this owner’s manual thoroughly prior to operation will provide you
with the best performance and help explain the simple requirements for proper
care.
Important Safety Information:
This video product is designed and intended for positioning in back seating
areas of a vehicle where it cannot be viewed directly or indirectly by the driver
and possibly cause him/her to be distracted from the task of operating the
vehicle. Driver distraction is a major cause of accidents and for this reason
many states specifically prohibit the viewing of motion video within view of the
driver while the vehicle is in motion.
For safety reasons, when changing discs it is recommended that the vehicle be
stationary, and that you do not allow children to unfasten seat belts to change
discs or make any adjustments to the system. System adjustments can be safely
accomplished using the remote control unit. Enjoy your Vizualogic
System but remember the safety of all passengers is the number one priority.
All-In-One
Welcome . . . . . . . . . . . . . . . . . . . . . . . . . . . . . . . . . . . . . . . . . . . . . . . . . . . . . . . . . 2
Purchase Information . . . . . . . . . . . . . . . . . . . . . . . . . . . . . . . . . . . . . . . . . . . . . . . 2
Features . . . . . . . . . . . . . . . . . . . . . . . . . . . . . . . . . . . . . . . . . . . . . . . . . . . . . . . . . . 3
A-1250 Monitor Layout . . . . . . . . . . . . . . . . . . . . . . . . . . . . . . . . . . . . . . . . . . . . . . 4
A-1150 Monitor Layout . . . . . . . . . . . . . . . . . . . . . . . . . . . . . . . . . . . . . . . . . . . . . . 5
Loading a Disc . . . . . . . . . . . . . . . . . . . . . . . . . . . . . . . . . . . . . . . . . . . . . . . . . . . . . 6
A-1250 Monitor On-Screen Basic Functions . . . . . . . . . . . . . . . . . . . . . . . . . . . . . 7
Soft Button Controls . . . . . . . . . . . . . . . . . . . . . . . . . . . . . . . . . . . . . . . . . 7
Monitor Controls . . . . . . . . . . . . . . . . . . . . . . . . . . . . . . . . . . . . . . . . . . . . 7
DVD Controls . . . . . . . . . . . . . . . . . . . . . . . . . . . . . . . . . . . . . . . . . . . . . . . 8
Adjusting the Picture Settings . . . . . . . . . . . . . . . . . . . . . . . . . . . . . . . . . . . . . . . . . 8
Connecting External Devices . . . . . . . . . . . . . . . . . . . . . . . . . . . . . . . . . . . . . . . . . 9
Using the Auxiliary Input Jack . . . . . . . . . . . . . . . . . . . . . . . . . . . . . . . . . . 9
Using the Wired Headphone Jack . . . . . . . . . . . . . . . . . . . . . . . . . . . . . . 9
Using the A/V Control Module Auxiliary Input . . . . . . . . . . . . . . . . . . . . 9
Remote Control Operations . . . . . . . . . . . . . . . . . . . . . . . . . . . . . . . . . . . . . . . . . 10
Playing Audio CDs . . . . . . . . . . . . . . . . . . . . . . . . . . . . . . . . . . . . . . . . . . . . . . . . . 14
Playing MP3 CDs . . . . . . . . . . . . . . . . . . . . . . . . . . . . . . . . . . . . . . . . . . . . . . . . . . 14
Audio Playback. . . . . . . . . . . . . . . . . . . . . . . . . . . . . . . . . . . . . . . . . . . . . . . . . . . . 16
FM Modulator Playback. . . . . . . . . . . . . . . . . . . . . . . . . . . . . . . . . . . . . . . . . . . . . 16
IR Headphones. . . . . . . . . . . . . . . . . . . . . . . . . . . . . . . . . . . . . . . . . . . . . . . . . . . . 17
Optional Accessories . . . . . . . . . . . . . . . . . . . . . . . . . . . . . . . . . . . . . . . . . . . . . . . 18
Care & Maintenance. . . . . . . . . . . . . . . . . . . . . . . . . . . . . . . . . . . . . . . . . . . . . . . . 19
Troubleshooting. . . . . . . . . . . . . . . . . . . . . . . . . . . . . . . . . . . . . . . . . . . . . . . . . . . 20
Specifications . . . . . . . . . . . . . . . . . . . . . . . . . . . . . . . . . . . . . . . . . . . . . . . . . . . . . 20
Limited Warranty . . . . . . . . . . . . . . . . . . . . . . . . . . . . . . . . . . . . . . . . . . . . . . . . . . 21
Warranty Service . . . . . . . . . . . . . . . . . . . . . . . . . . . . . . . . . . . . . . . . . . . . . . . . . . 22
Features
Purchase Information
Please fill out this section for your reference and retain the original bill of sale to
validate your Limited Warranty should service become necessary:
Date of Purchase:
Place of Purchase:
Unit Serial Number:
2 3
• 7-inch Color TFT-LCD Panel with 16:9 aspect ratio
• Built-in Top-loading Slot-in DVD player.
• Integrated Infrared Transmitters for wireless Headphones
(1) Channel A
Audio-R: 2.3 MHz
Audio-L: 2.8 MHz
• RCA axillary input
• Two sets of RCA slave outputs
• Two sets of DIN-cable monitor outputs
• OSD (On-Screen Display) Control
• Monitor-mounted auxiliary input and headphone jack on each headrest (A-1250 only)
• DVD and monitor control via buttons on front panel (A-1250 only)
(2) Channel B
Audio-R: 3.2 MHz
Audio-L: 3.8 MHz
Page 3

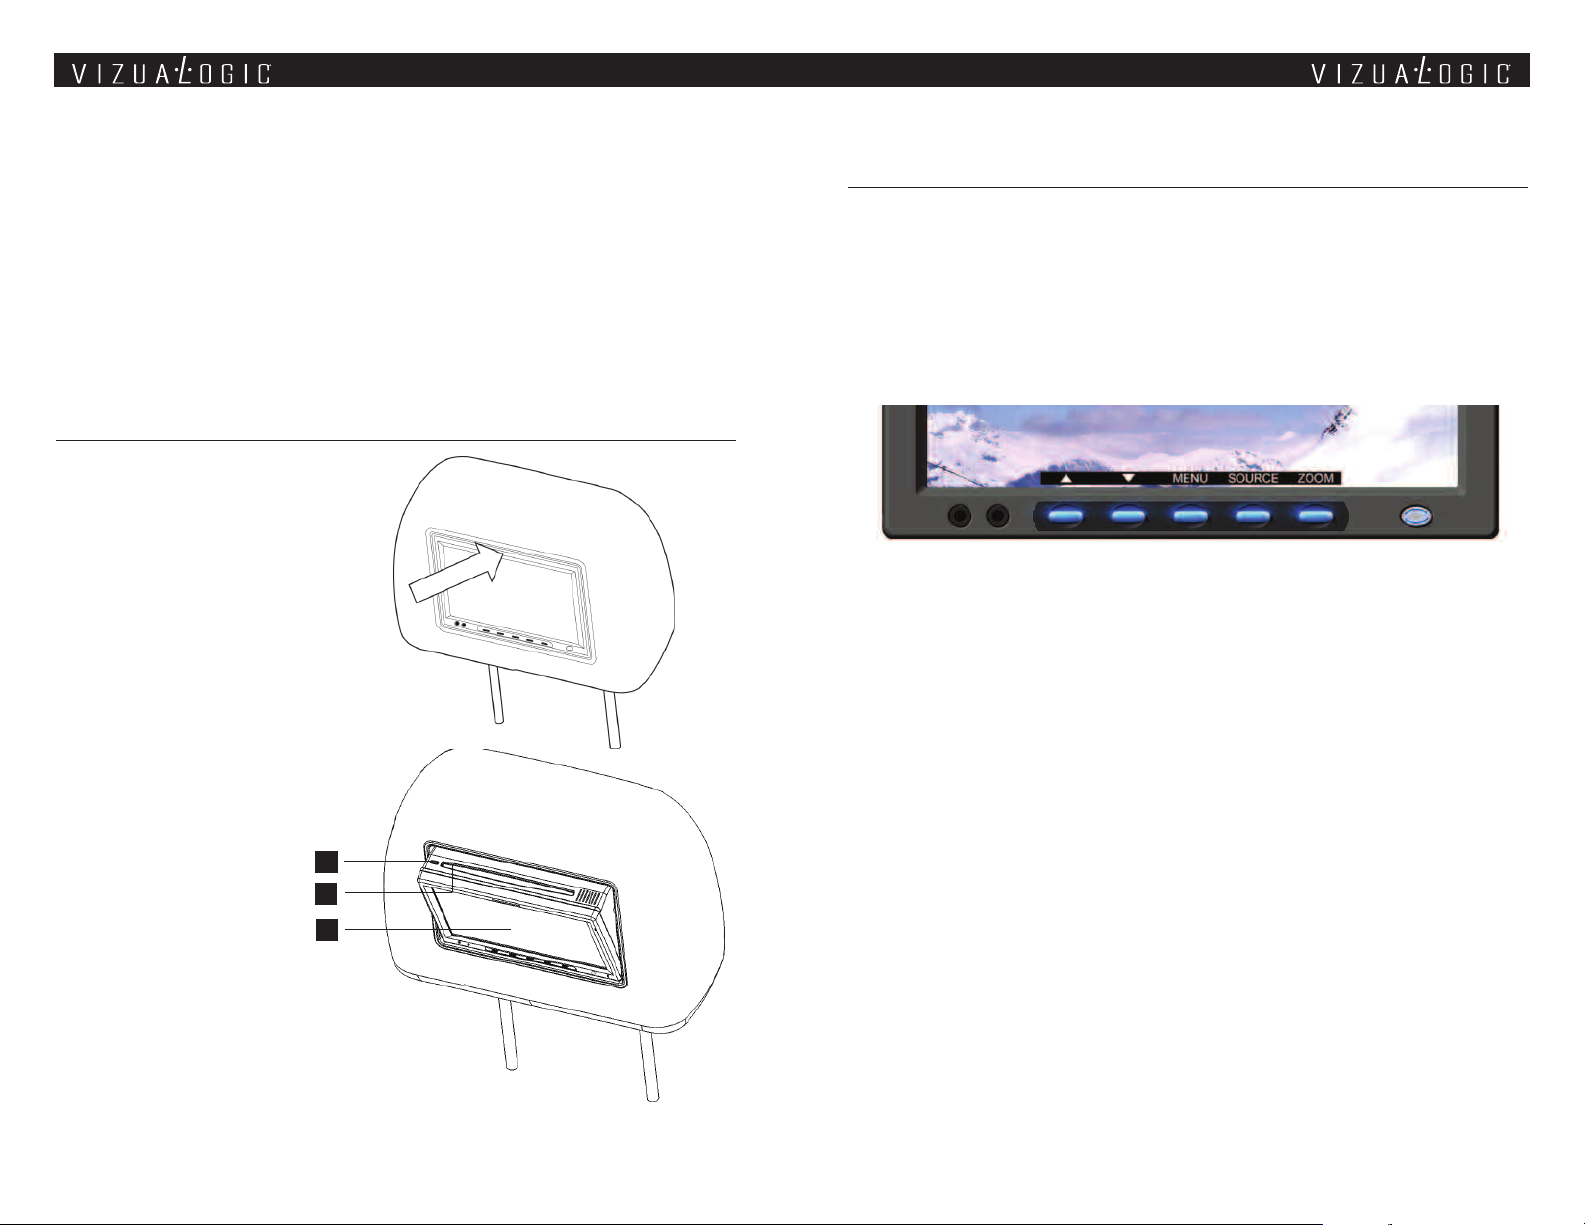
A-1250 Monitor Layout
1
2
3
4
5
6
7
8
9
10
11
AUX
3
4
7
1
2
5
6
MENU
MENU
SOURCESOURCE POWERPOWER
1. IR Sensor – Allows the remote to navigate the OSD (On Screen Display) on
this unit and to control other functions and accessories.
2. Light Sensor – Detects ambient light levels and dims the screen accordingly.
3. MONITOR / DVD CONTROL BUTTON #1 - When set to Monitor Control
mode, operates as the UP button. When set to DVD Control mode,
operates as the PLAY button.
4.
MONITOR / DVD CONTROL BUTTON #2 – When set to Monitor Control
mode, operates as the DOWN button. When set to DVD Control mode,
operates as the PAUSE button.
MONITOR / DVD CONTROL BUTTON #3 – When set to Monitor Control
5.
mode, operates as the MENU button. When set to DVD Control mode,
operates as the STOP button
6. MONITOR / DVD CONTROL BUTTON #4 – When set to Monitor Control
mode, operates as the SOURCE button. When set to DVD Control mode,
operates as the PREVIOUS button.
7. MONITOR / DVD CONTROL BUTTON #5 – When set to Monitor Control
mode, operates as the ZOOM button. When set to DVD Control mode,
operates as the NEXT button.
POWER / TOGGLE – Press momentarily to toggle between on-screen DVD
8.
and Monitor Control functions. Press and hold to turn the monitor off.
4
9. INFRARED TRANSMITTERS – Transmits audio information from the
source displayed on-screen to the wireless headphones.
10. AUXILIARY INPUT JACK – Allows an external A/V source to be connected
and viewed. The external source can only be viewed on the monitor that it is
physically connected to.
11. HEADPHONE JACK – Allows the use of wired headphones (not included)
to be connected to the monitor.
A-1150 Monitor Layout
1. IR Sensor – Allows the remote to navigate the OSD (On Screen Display) on
this unit and to control other functions and accessories.
2. Power LED – Illuminates in green when the headrest monitor is turned on.
3.
Power – Press to turn the headrest monitor on or off.
4. Source – Changes the source displayed on the monitor. Each press of the
SOURCE button advances the source in the following sequence:
Dual DVD system: DRIVER DVD
Single DVD system: DRIVER DVD 4 EXT AUX
5.
Menu – Accesses monitor picture adjustment settings. Each press of the
MENU button advances through the functions as follows:
4 PASSENGER DVD 4 EXT AUX
5
Page 4
CONTRAST 4 BRIGHTNESS 4 COLOR 4 TINT 4 SHARPNESS 4
DIMMER 4 RESET DEFAULT
Once the desired selection has been made, use the
the function setting.
5(UP) – Increases volume output of wired headphone jack. When in MENU
6.
mode also increases the value of the desired function.
7.
6(DOWN) – Decreases volume output of wired headphone jack. When in
MENU mode also decreases the value of the desired function.
5 or 6 buttons to change
SOFT BUTTON CONTROLS
When any of the DVD / Monitor Control buttons are pressed, a row of icons will
appear directly above the buttons. To alternate between DVD and Monitor
Control functions, momentarily press the POWER / TOGGLE button. To perform
a desired function, press the button directly underneath the desired icon.
A-1250 Monitor On-Screen Functions
MONITOR CONTROLS
Loading a Disc
To open/reveal the DVD loading
slot, PRESS on the top-center of
the monitor frame (indicated by
the Vizualogic logo).
NOTE: Do not put pressure
directly on the screen. Latch
the monitor in the fully closed
position when DVD loading slot
is not in use.
1. EJECT – Press this
button to eject the disc.
2. Disc Slot
3. LCD Panel
To load a disc, insert the the disc
vertically with the label surface
facing the rear of the vehicle.
Gently lower the disc into the disc
slot, until the loader motor accepts
the disc and lowers it into the DVD player. Once the disc has been loaded,
press on the monitor frame to conceal the DVD loading slot.
6 7
1
2
3
5 (UP) – Increases volume output of wired headphone jack. When in MENU
mode also increases the value of the desired function.
6 (DOWN) – Decreases volume output of wired headphone jack. When in
MENU mode also decreases the value of the desired function.
MENU – Accesses monitor picture adjustment settings. Each press of the MENU
button advances through the functions as follows:
CONTRAST 4 BRIGHTNESS 4 COLOR 4 TINT 4 SHARPNESS 4
DIMMER 4 RESET DEFAULT
Once the desired selection has been made, use the 5 or 6 buttons to change
the function setting.
SOURCE – Changes the source displayed on the monitor. Each press of the
SOURCE button changes the source in the following sequence:
Dual DVD system:
DRIVER DVD 4 PASSENGER DVD 4 EXT AUX 4 AUX
Single DVD system:
DRIVER DVD 4 EXT AUX 4 AUX
ZOOM – Changes the size of the image displayed on-screen from wide, normal,
or zoom
Page 5

DVD CONTROLS
4 (Play) – Plays a disc that is loaded into the integrated DVD player.
< (Stop) – Stops playing a disc that is loaded into the integrated DVD player.
; (Pause) – Pauses a disc that is loaded into the integrated DVD player.
9 (Previous) – Accesses the previous chapter or track.
: (Next) – Accesses the next chapter or track.
Connecting External Devices
USING THE AUXILIARY INPUT JACK (A-1250 ONLY)
Each A-1250 monitor has a 3.5mm auxiliary input jack labeled AUX located
on the bottom left of the screen. To connect an external source (video
game system, camcorder, etc.) to the monitor, use the available 3.5mm to
RCA auxiliary input adapter cable (to connect an iPod
Vizualogic Video Input cable). Using either the remote or the monitor-control buttons, press the SOURCE button until AUX has been selected. The
auxiliary device can now be viewed.
NOTE: Any source connected via the screen-mounted AUX jack can only
be viewed on the screen that the auxiliary source is physically connected
to.
®
use the available
Adjusting the Picture Settings
The A-1250 and A-1150 features multiple picture adjustment settings that allow the
user to tailor the picture to their preferences. To access the picture adjustment settings, press the MENU button. Each press of the MENU button will advance through
the settings shown below. Once the desired selection has been made, use the
6buttons to change the setting level.
CONTRAST - Adjust to increase or decrease picture contrast.
BRIGHTNESS - Adjust to brighten or darken the picture.
COLOR - Adjust to increase or decrease the color intensity.
TINT - Adjust to increase or decrease the color hue.
SHARPNESS - Adjust to sharpen or soften the picture.
DIMMER - Adjust to brighten or darken the monitor backlight. Select from:
DIMMER HI (100% backlight), DIMMER MED (85% backlight) and
DIMMER LOW (65% backlight)
RESET DEFAULT - Resets the above picture settings to the default values.
5 or
USING THE WIRED HEADPHONE JACK (A-1250 ONLY)
Each A-1250 monitor has a 3.5mm wired headphone jack labeled .
To use, simply connect a pair of wired headphones (not included) to the
wired headphone jack and use the ‘5’ or ‘6’ monitor control buttons to
adjust the headphone volume output.
NOTE: Using the monitor control buttons to change the wired headphone
volume output will not affect the volume output of the wireless IR
headphones.
USING THE A/V CONTROL MODULE AUXILIARY INPUT
The A-1250 and A-1150 system features auxiliary component RCA input
jacks on the A/V Control Module. Devices connected to this input can be
viewed on either screen (independently or simultaneously), as well as output through the vehicle stereo via the integrated FM Transmitter. To view
this input press the SOURCE button until EXT. AUX is displayed.
NOTE: Consult your installer to determine how to access this input.
8
9
Page 6

MONITOR
FM
SOURCE
PICTURE
Z
OOM
FREQ
ENTER
SETUP
PLAY
PAUSE
STOP
PREV
FR
FF
NEXT
SLOW
12
3
4
5
6
7
89
0
M
ENU
TITLE
TITLE
SUB
A-B
GO
PBC
ZOOM
RETURN
MUTE
AUDIO
DISP.
R
EPEAT
11
12
13
14
15
10
9
16
17
SOURCE
Remote Control Operations
MONITOR
FM
SOURCE
PICTURE
ZOOM
FREQ
E
NTER
SETUP
PLAY
PAUSE
STOP
PREV
FR
FF
NEXT
SLOW
12
3
4
5
6
7
89
0
MENU
TITLE
TITLE
SUB
A-B
GO
PBC
ZOOM
R
ETURN
MUTE
AUDIO
DISP.
REPEAT
1
2
3
4
5
6
7
8
S
OURCE
NOTE: The remote control will control all Monitor and integrated DVD functions.
The remote is not a fully universal remote control and is only guaranteed to
work with Vizualogic products.
MONITOR FUNCTIONS
1. MONITOR POWER – Press
this button to turn the monitor
ON. The current video source
will be displayed on-screen, and
within a few seconds the picture
will appear. Press the button
again to turn the monitor OFF.
2.
SOURCE SELECT – All video
sources connected to the AV
inputs can be viewed on the
monitor by pressing this
button. Each time the button is
pressed, the AV source will
change in the following
sequence: DRIVER DVD,
PASSENGER DVD (if equipped)
EXT AUX, AUX.
UP – Shifts right or up OSD
3.
menu. Increases the value of
CONTRAST, BRIGHTNESS,
COLOR, TINT, SHARPNESS or DIMMER.
4
. DOWN – Shifts left or down OSD menu. Decreases the value of
CONTRAST, BRIGHTNESS, COLOR, TINT, SHARPNESS, or DIMMER.
5.
PICTURE Press this button to adjust the value of CONTRAST,
BRIGHTNESS, COLOR, TINT, SHARPNESS, or DIMMER.
6. ZOOM – Selects the screen among wide/normal/zoom.
FM SOURCE SELECT – While aiming the remote at the Driver Side Monitor,
7.
press this button to turn on the Frequency Modulator. Press this button
repeatedly to change the Frequency Modulator’s audio source between
DRIVER DVD, PASSENGER DVD, EXT AUX, and FM OFF.
FREQUENCY SELECT – While aiming the remote at the Driver Side Monitor,
8.
press this button to select the desired Frequency Modulator channel.
10
DVD FUNCTIONS
9. UP – Moves up within the
DVD SETUP menu.
10. DOWN – Moves down
within the DVD SETUP
menu.
11. RIGHT – Moves right within
the DVD SETUP menu.
12. LEFT – Moves left within the
DVD SETUP menu.
13. ENTER – Confirms a
selection.
14.
RETURN – Return to
previous menu screen or
playing point.
15. SETUP – Navigates SETUP
MENU. There are 4 pages to
configure System
(1) General Setup
(2) Audio Setup
(3) Video Setup
(4) Password Setup.
16. MENU – Goes to the Root Menu on the disc.
1
7. TITLE – Navigates the Title Menu on the disc.
11
Page 7

MONITOR
F
M
SOURCE
PICTURE
ZOOM
FREQ
ENTER
S
ETUP
PLAY
PAUSE
STOP
PREV
FR
FF
NEXT
SLOW
12
3
4
5
6
7
89
0
MENU
TITLE
TITLE
SUB
A-B
GO
PBC
ZOOM
RETURN
MUTE
AUDIO
DISP.
REPEAT
29
27
32
28
30
33
31
34
35
SOURCE
Remote Control Operations (continued)
M
ONITOR
FM
SOURCE
PICTURE
ZOOM
FREQ
ENTER
SETUP
PLAY
PAUSE
STOP
P
REVFRFFNEXT
SLOW
12
3
4
5
6
7
89
0
MENU
T
ITLE
TITLE
SUB
A-B
GO
PBC
ZOOM
RETURN
MUTE
AUDIO
DISP.
REPEAT
22
25
23
24
20
21
19
18
26
S
OURCE
18. PLAY – Press this button to play a disc that is loaded into the integrated
DVD player.
PAUSE – Press this button to
19.
pause a disc that is loaded into
the integrated DVD player. For
more information, consult the
DVD Basics section.
STOP – Press this button to stop
20.
playing the movie or song.
4PLAY: Resumes play from
STOP
where disc was stopped.
4STOP4PLAY: Restarts
STOP
play from the beginning of the
disc.
PREV – Plays the previous
21.
chapter or track.
27. DISPLAY – Shows information on the top of the screen including title,
chapter/track, time elapsed, and time remaining, or turns off the display.
28.
SUBTITLE – Changes the subtitle language to other available languages or
turns the subtitles off
(only applicable if the
disc contains multiple
subtitle languages).
29.
GOTO – Navigates the
Go To Menu and allows
the selection of the
desired title, chapter,
track or song on the disc.
30. A-B (Except MP3) –
Repeats disc from user
selected point A to
point B.
PBC (Video CD only)
31.
Turns the PBC (Play Back
Control) on or off
t of a chapter,
NEXT – Plays the next chapter
22.
or track.
FR (Fast Rewind) – Press this button to search disc backward continuous-
23.
ly. There are 5 speed options to choose from: 2X, 4X, 8X, 16X, and 32X.
FF (Fast Forward) – Press this button to search disc forward continuously.
24.
There are 5 speed options to choose from: 2X, 4X, 8X, 16X, and 32X
SLOW – Press this button to slow playback. There are 4 speed options to
25.
choose from: 1/2, 1/4, 1/8, 1/16.
REPEAT – (Except VCD with PBC on) Repeats all or a par
26.
title, track, or an entire disc.
12
ZOOM – Enlarges the
32.
picture in the movie by
2x, 3x or 4x. Shrinks the
picture in the movie by 1/2x, 1/3x, or 1/4x.
33.
AUDIO – Changes the audio track to another available language (only
applicable if the disc contains multiple audio tracks).
MUTE – Press this button to mute the audio to the wireless headphones.
34.
The screen will display ‘MUTE’ in the lower left corner when using this
feature. Press the button again to restore audio to the previously set level.
NUMBERS 0 to 9 – Use these these buttons to access a specific chapter
35.
or track.
13
Page 8

Playing Audio CDs
When playing an audio CD, the DISPLAY banner appears automatically. It
displays the current track and the amount of the time for that track playing, the
total amount of time on the disc and the current time running on the disc. Press
the
DISPLAY button on the remote to display the DISPLAY banner. The options
below show you what happens when you press the DISPLAY button.
Press DISPLAY (1x) – ”Single Elapsed” appears along with the current track
number playing and the time of that track .
Press DISPLAY (2x) – ”Total Remain” appears along with the current track
number playing and the amount of time remaining on
the entire CD.
Press DISPLAY (3x) – ”Single Remain” appears along with the current track
number playing and the amount of time remaining.
Press DISPLAY (4x) – ”Total Elapsed” appears along with the current track
number playing and the total time playing on CD.
Using the REPEAT Feature
The default mode for the REPEAT feature is OFF. Pressing
multiple times changes the REPEAT options as follows:
Track - repeats the current track that is playing.
All - repeats the entire disc that is currently playing.
REPEAT button
Playing MP3 CDs
SELECTING FOLDERS AND SONGS
When an MP3 disc is inserted in the player, the navigation screen appears
automatically. You can change folders and songs by navigating through the
file system. The DVD player plays the songs in order they were burned onto
the disc.
1. If a disc is playing, press
through the folder list on the left side of the navigation screen.
2. Once the folder you want is highlighted, press ENTER.
3. Press the
the song you want. Press ENTER to begin the playback of the highlighted song.
SKIPPING SONGS
Use
NEXT (:) button on the remote control to move to the next song. Use
the PREV (9) button to move to the beginning of the song currently playing.
Press the button twice to move to the previous song.
SELECTING A PLAY MODE
You can temporarily choose what order the songs will play on a disc. The
FOLDER play mode is the default playback mode. To access the play mode
options, press REPEAT button.
The play mode options are as follows:
Single: Plays a selected song.
UP or DOWN arrow button going through the song list and highlight
STOP. Press the UP or DOWN arrow button to go
MP3 is a format for storing digital audio. An audio CD quality song can be
compressed into the MP3 format with very little loss of quality, while taking up
much less disc space. CD-R/RW discs that have been encoded in MP3 format
can be played on the integrated DVD player.
14 15
Folder: Plays the folder in the order the songs were recorded.
Random: Plays the songs in the random order.
Shuffle: Plays the songs in random order (from within the selected folder).
USING THE REPEAT FEATURE
The default mode for the repeat feature is OFF. Pressing REPEAT multiple times
changes the repeat option:
REPEAT One – repeats the song that is playing.
REPEAT Folder – repeats the folder that is playing.
Page 9

Audio Playback
IR Headphones
The Vizualogic A-1250 and A-1150 System features multiple ways to enjoy the
audio portion of a desired source. The audio can be experienced through the
use of Infrared Headphones or with the integrated wireless FM Modulator
FM Modulator Playback
To listen to the audio portion of the viewed source though the vehicle’s
stereo system aim the remote at the driver’s side monitor and simply press the
FM SOURCE button to turn the FM modulator on. The screen will now display
FM SOURCE: DRIVER DVD. The Audio portion of the source originating from
the Driver's side headrest will now be audible through the vehicle's stereo. If a
different audible source is desired, press the
from PASSENGER DVD, EXT AUX, and OFF. Once the desired audible source
has been selected, the transmitting frequency the FM modulator transmits on
can be changed by pressing the
cle’s radio to the corresponding station to listen to the source that is displayed
on the driver’s side monitor.
To change the transmitting frequency, aim the remote at the driver’s side
monitor and press the
frequency as follows:
FM FREQ button. Each press of the button advances the
FM FREQ button on the remote. Tune the vehi-
FM SOURCE button again to select
The Vizualogic All-In-One System features integrated Infrared (IR) transmitters on
the front of each monitor. The driver’s side monitor transmits on channel ‘A’ and
the passenger side transmits on channel ‘B’. To listen to the source displayed on
monitor, turn on the headphones and select the corresponding audio channel
for the monitor being viewed.
headphones to the lowest setting before turning them on.
NOTE: Always adjust volume control on the
FM CH1 88.5MHz
89.1MHz4FM CH5 89.3MHz4FM CH6 89.54FM CH7 89.74FM8 89.9
To turn the FM Modulator Off aim the remote at the driver’s side monitor and
press the FM SOURCE button repeatedly until FM OFF is displayed.
NOTE: All of the FM Modulator control functions can also be controlled in a
similar fashion using the buttons on the front of the monitor.
16 17
4FM CH2 88.7MHz4FM CH3 88.9MHz4FM CH4
1. POWER OFF-ON – Manually turns the headphones on or off. POWER LED
will illuminate while the headphones are on.
IR CHANNEL SELECTOR – Switches audio reception between IR Channel A
2.
and IR Channel B.
3. POWER LED – Illuminates in red to indicate that headphones are on.
VOLUME – Increases or decreases the volume output of the wireless
4.
headphones.
Page 10

Optional Accessories
Care and Maintenance
To increase the enjoyment and utility of your Vizualogic System, several
accessories are available from your local authorized distributor/retailer. For more
information visit www.vizualogic.com.
WIRELESS STEREO HEADPHONES
• 2-channel
• IR headphones
AUXILIARY INPUT ADAPTER CABLE
• 3.5mm to RCA
Your Vizualogic System is a product of superior design and craftsmanship and
should be treated with care. The suggestions below will help to fulfill any
warranty obligations and provide many years of enjoyment.
• Cleaning the Monitor Screen and Housing: The components may be cleaned
by occasionally wiping with a soft, lint-free, cotton cloth that has been slightly
dampened with water.
CAUTION: Do not use liquids, abrasives, aerosol cleaners, or paper
cleaning products because they will result in permanent damage to the
finish of your components! The LCD screen is made of a specially coated
glass and can be scratched or damaged by abrasive or ammonia-based
window cleaners.
• Use and Storage:
- These units contain precision electronics that must be protected from dust,
dirt, and moisture.
- Never spill liquids on any of the components. Liquids, humidity, and
precipitation contain minerals that will corrode electronic circuits.
• Take care to avoid the following:
- Rough handling can break internal circuit boards. Do not drop, knock, or
shake the components.
- Do not attempt to paint or refinish the components. Paint can clog moving
parts and prevent proper operation.
- The components can be damaged by non-expert handling. Attempting to
open any of the components may void the limited warranty.
VIZUALOGIC VIDEO INPUT CABLE (V VI C)
• 3.5mm to iPod dock connector
18
19
Page 11

Troubleshooting
Limited Warranty
No Picture
(1) Verify that the correct video input mode is used on the monitor.
(2) Verify that the video cables are securely connected.
No Sound
(1) Verify that the correct audio output mode is used on the monitor.
(2) Verify that the audio cables are securely connected.
(3) Ensure that the FM Transmitter has been turned on.
IR Sensor Inoperative
(1) Verify that the batteries in the remote are installed correctly and in good
condition.
(2) Verify that the remote sensor eye is not obstructed.
Specifications
Display Type . . . . . . . . . . . . . . . . . . . . . . . . . . . . . . . . . . . . . . . . . . . . . . . . . . . .LCD
Screen Size . . . . . . . . . . . . . . . . . . . . . . . . . . . . . . . . . . . . . . . . . . . .7.0˝ (Diagonal)
Resolution . . . . . . . . . . . . . . . . . . . . . . . . . . . . . . . . . . . . . . . . . . . .480(w) x 234(h)
Brightness . . . . . . . . . . . . . . . . . . . . . . . . . . . . . . . . . . . . . . . . . . . . . .500 nits (typ.)
Video Display System . . . . . . . . . . . . . . . . . . . . . . . . . . . . . . . . . . . . . . . .NTSC/PAL
Terms of Warranty
TMI Products, Inc (Company) warrants to the original retail purchaser that the automotive
video product(s) purchased from a Company authorized installer, within the first ninety
(90) days after new vehicle delivery, are free from defects in materials or workmanship
under normal use and conditions for a period of at least three (3) years from date of
purchase or the first 36,000 miles as registered on the vehicle’s odometer at time of
installation, whichever occurs first, with exception of remote control(s), and / or
headphones which is warranted for a period of sixty (60) days from date of purchase.
Products purchased or installed more than ninety (90) after new vehicle delivery are
warranted for a period of one (1) year from date of purchase. A sales receipt is required
to provide proof of date of purchase.
Should the product(s) be determined defective during the applicable warranty period, the
defect(s) will be repaired or replaced with a new or reconditioned part(s), at the
Company’s option.
EXCEPT AS EXPRESSLY SET FORTH IN THIS WARRANTY, THE COMPANY MAKES NO
OTHER WARRANTIES, EXPRESSED OR IMPLIED, INCLUDING ANY IMPLIED
RANTIES OF MERCHANTABILITY AND FITNESS FOR A PARTICULAR
WAR
PURPOSE. THE COMPANY EXPRESSLY DISCLAIMS ALL WARRANTIES NOT
STATED IN THIS LIMITED WARRANTY. ANY IMPLIED WARRANTIES THAT MAY
BE IMPOSED BY LAW ARE LIMITED TO THE TERMS OF THIS EXPRESSED
LIMITED WARRANTY.
Horizontal View Angle . . . . . . . . . . . . . . . . . . . . . . . . . . . . . . . . . . . . . . . . . . . .120°
Vertical View Angle . . . . . . . . . . . . . . . . . . . . . . . . . . . . . . . . . . . . . . . . . . . . . . .100°
Operating Temperature . . . . . . . . . . . . . . . . . . . . . . . . . . . . . . . . . . . .-30° to 80° C
Expected Backlight Life . . . . . . . . . . . . . . . . . . . . . . . . . . . . . . .15,000 hours (typ.)
Operating Voltage . . . . . . . . . . . . . . . . . . . . . . . . . . . . . . . . . . . . . . . .10 to 16V DC
20 21
Page 12

How to Obtain Warranty Service
To obtain warranty service, the product(s) must be returned to a Company
authorized installer accompanied by proof of warranty coverage.
How State Law Relates to the Warranty
Some states do not allow limitation on how long an implied warranty lasts. In
such states, the limitations or exclusions of this Limited Warranty may not apply.
Some states do not allow the exclusion or limitation of incidental or
consequential damages. In such states, the exclusion or limitation of this
Limited Warranty may not apply to you. This Limited Warranty gives you
specific legal rights and you may have other rights which vary from state to
state.
What is Excluded from this Limited Warranty
This limited warranty excludes:
• Elimination of externally generated static or noise, or the correction of
antenna problems or weak television reception.
• Costs incurred for installation, removal or reinstallation of the product(s).
• Damage to tapes, video games, software, camcorders, discs, speakers,
accessories or vehicle electrical systems.
• Cosmetic damage or damage due to negligence, misuse, abuse, failure to
follow operating instructions, accidental spills or customer applied cleaners.
• Damage due to environmental causes such as floods, airborne fallout,
chemicals, salt, hail, windstorms, lightning or extreme temperatures.
• Damage due to accidents, road hazards, fire, theft or vandalism.
• Damage due to improper installation or connection, including connection to
equipment of another manufacturer, modification of existing equipment, use
of a faulty cassette tape or VCP head cleaning.
• Product(s) which have been opened or tampered with for any reason or
which have been damaged due to alteration or service performed by anyone
other than the Company or a Company authorized installer.
Notes
22
23
Page 13

Notes
24
 Loading...