

Page 1
Instructions Specically
Developed for Dealer and Port Installers
Description: Touareg Rear Seat Entertainment
Option Code: N/A
Part Number: 7L6 063 500 XXX
Quantity: 1 Each
Supplier: Vizualogic
Publish Date: December 1, 2008
Installation: Level 3
For Technical Assistance Please Call: 1-800-624-7960 ext. 170
Attention
!
Before starting, make sure painted and trim surfaces are protected to avoid scratching during
installation process of the items. Use proper surface protection covers and work attire free of
dirt and grease.
© 2008 TMI Products, Inc. All rights reserved. Information contained in this document is based on the latest
information available at the time of printing and is subject to the copyright and other intellectual property rights
of TMI Products, Inc., its afliated companies and its licensors. All rights are reserved to make changes at any
time without notice. No part of this document may be reproduced, stored in a retrieval system, or transmitted in
any form or by any means, electronic, mechanical, photocopy, recording or otherwise, not may these materials
be modied or reposted to other internet sites, with the expressed written permission of the publisher.
Page 1 of 20
99-9543-100-E DEC-08
Page 2
Part Number:
Description:
Fitment:
Supplier:
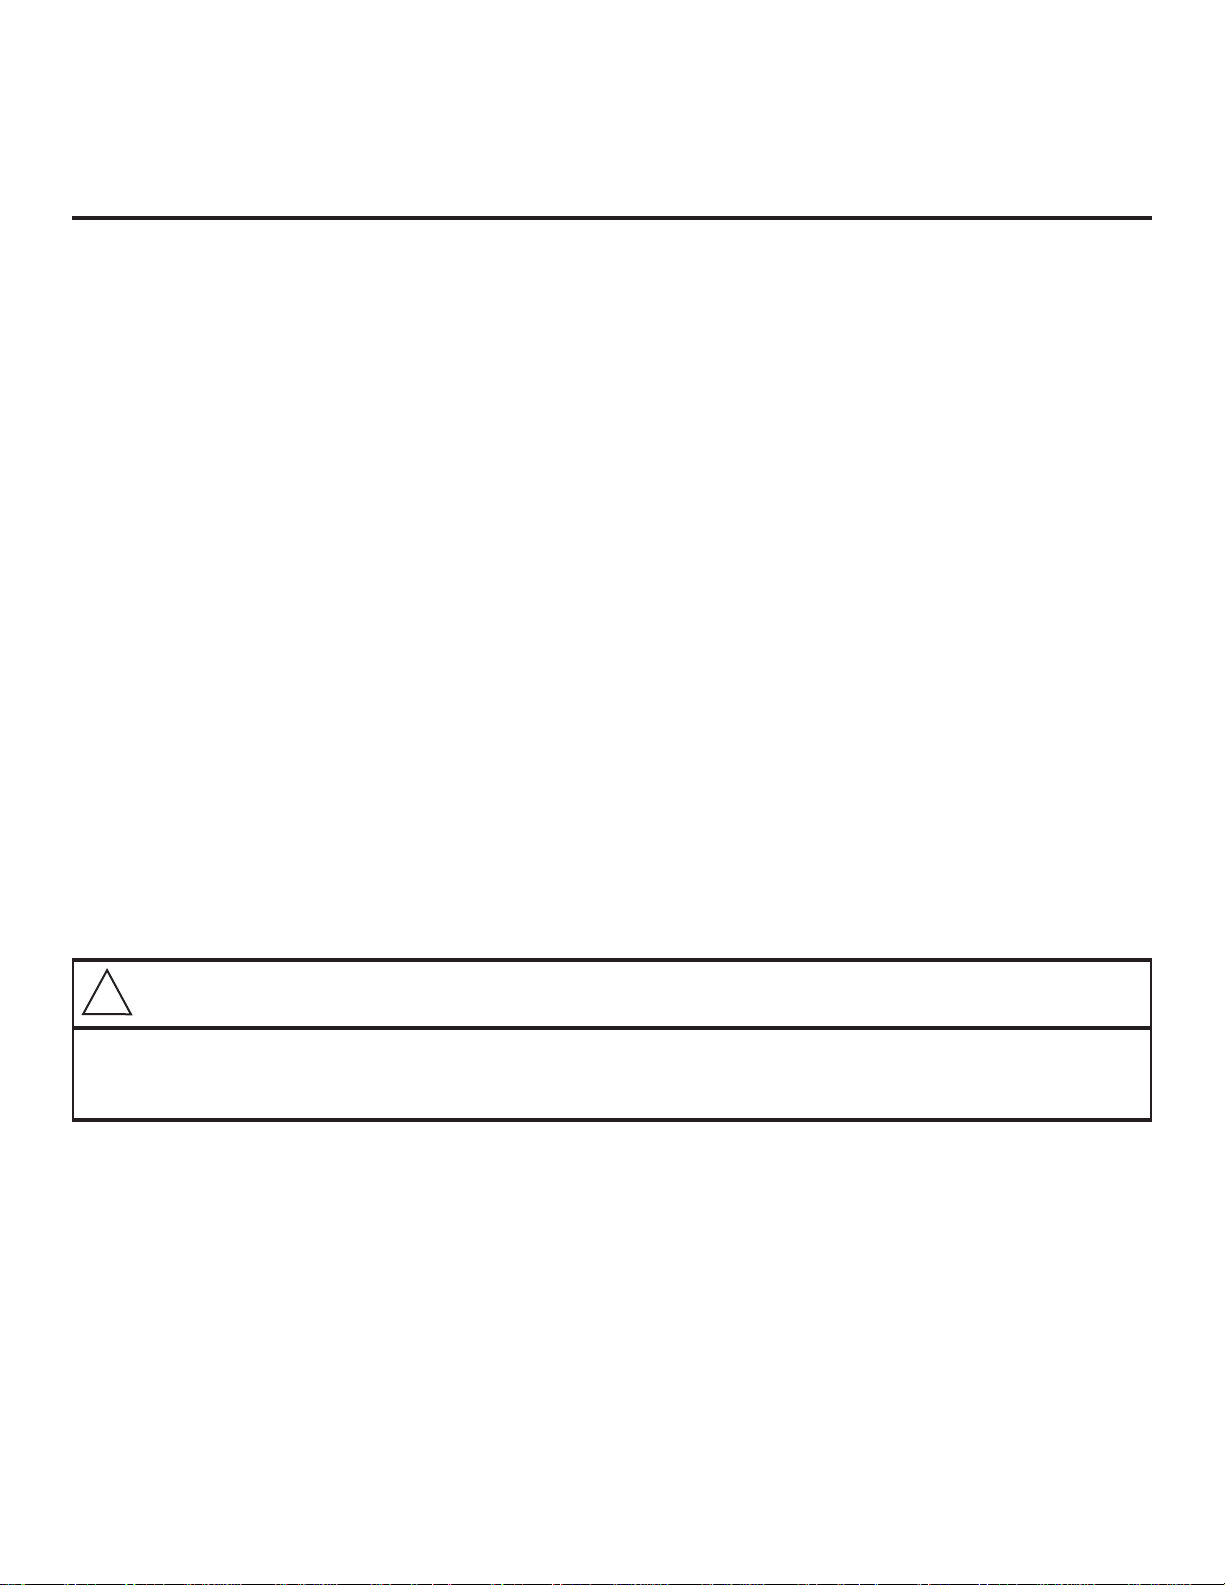
A/V Box Connections:
jA/V Box Module
Driver/Passenger Monitor A/V
k
Outputs
FM Modulator Antenna Connection
l
m External A/V inputs
n Pos (+) / Neg (-) Connection
o Driver/Passenger Monitor
Connection
7L6 063 500 XXX
Rear Seat Entertainment
Touareg 2004+
Vizualogic
Publish Date: December, 01 2008
A/V Box Main Harness Connections:
j A/V Box Power Connection
- Goes to A/V Box
k MALE Jumper Connection
- Goes to factory FEMALE harness
FEMALE Jumper Connection
l
- Goes to MALE Climate Control
m In-line Fuse - 7.5A
n Main Power Harness
Page 2 of 20
Page 3
Part Number:
Description:
Fitment:
Supplier:
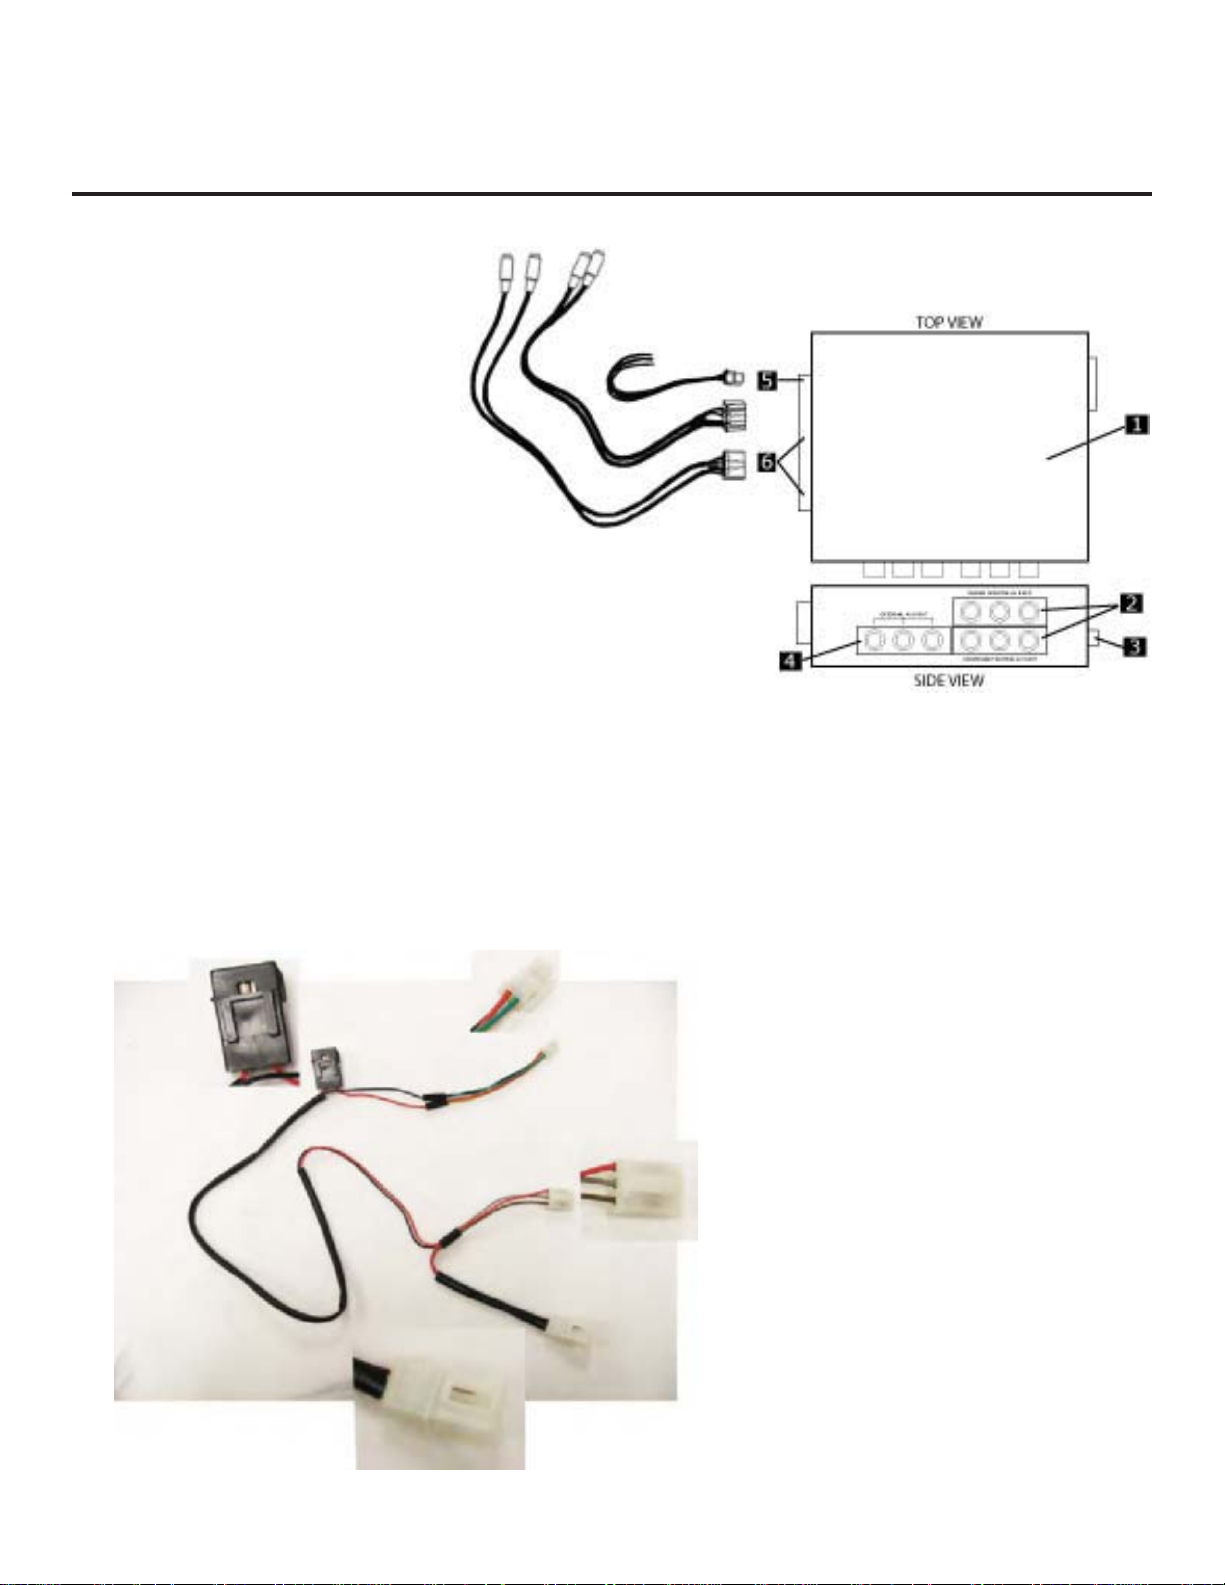
Parts Contained in This Kit:
7L6 063 500 XXX
Rear Seat Entertainment
Touareg 2004+
Vizualogic
Publish Date: December, 01 2008
A
C
G
H
A. Driver/Passenger DVD/Monitor Headrest
B. A/V Control Module
C. (2) Wireless Headphones (Batteries Included)
D. Main Power Harness
E
B
A
C
D
E. Driver/Passenger Power Connectors
F. Remote Control (Batteries Included)
G. FM Module Antenna
H. Miscellaneous Items
F
Tools Required for Touareg Rear Seat Entertainment Installation
Caution:
!
Always wear protective gear and use caution when using hand tools throughout the installation
process.
Trim Removal Wedge
Small (pocket) at
head screwdriver
(Torx™ T20 Bit)
Pin Removal tool
Page 3 of 20
Driver (for T20 Bit)
Wire Cutter
Page 4
Part Number:
Description:
Fitment:
Supplier:
Note:
!
Before beginning, make sure painted and trim surfaces are protected to avoid scratching
during installation process of the items. Use proper surface protection covers and work attire
free of dirt and grease.
7L6 063 500 XXX
Rear Seat Entertainment
Touareg 2004+
Vizualogic Publish Date: December, 01 2008
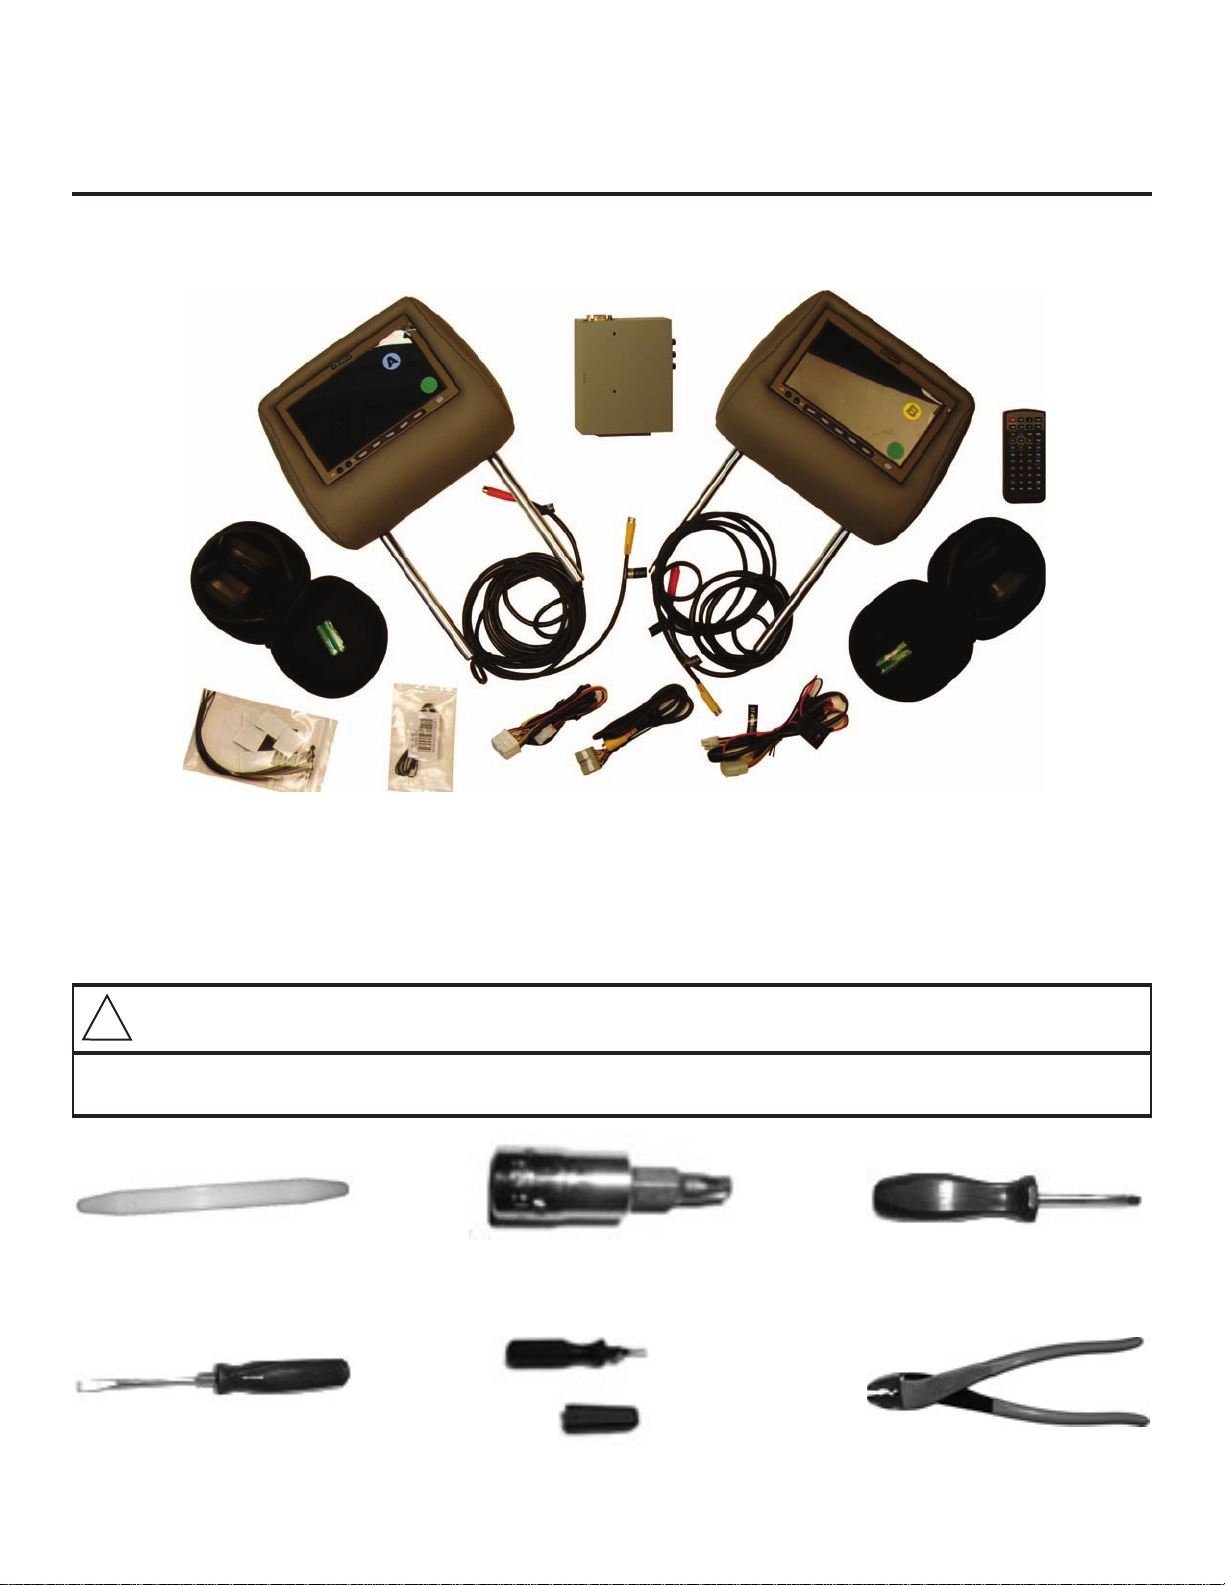
Step #01
Center Console Removal:
On the drivers side oor, pull up the plastic cover in
the front corner, nearest the center console. Using
a 13mm socket, remove the negative battery cable
from the post.
Note:
!
On the V10 TDI, you will also have to disconnect
the rear battery using a 10mm socket. Simply
remove the negative (-) lead from the battery.
The battery is located under the spare tire in
the rear.
Note:
!
Make sure to protect the negative lead so that
it may not come in contact with metal during
this installation.
Page 4 of 20
Page 5
Part Number:
Description:
Fitment:
Supplier:
7L6 063 500 XXX
Rear Seat Entertainment
Touareg 2004+
Vizualogic Publish Date: December, 01 2008
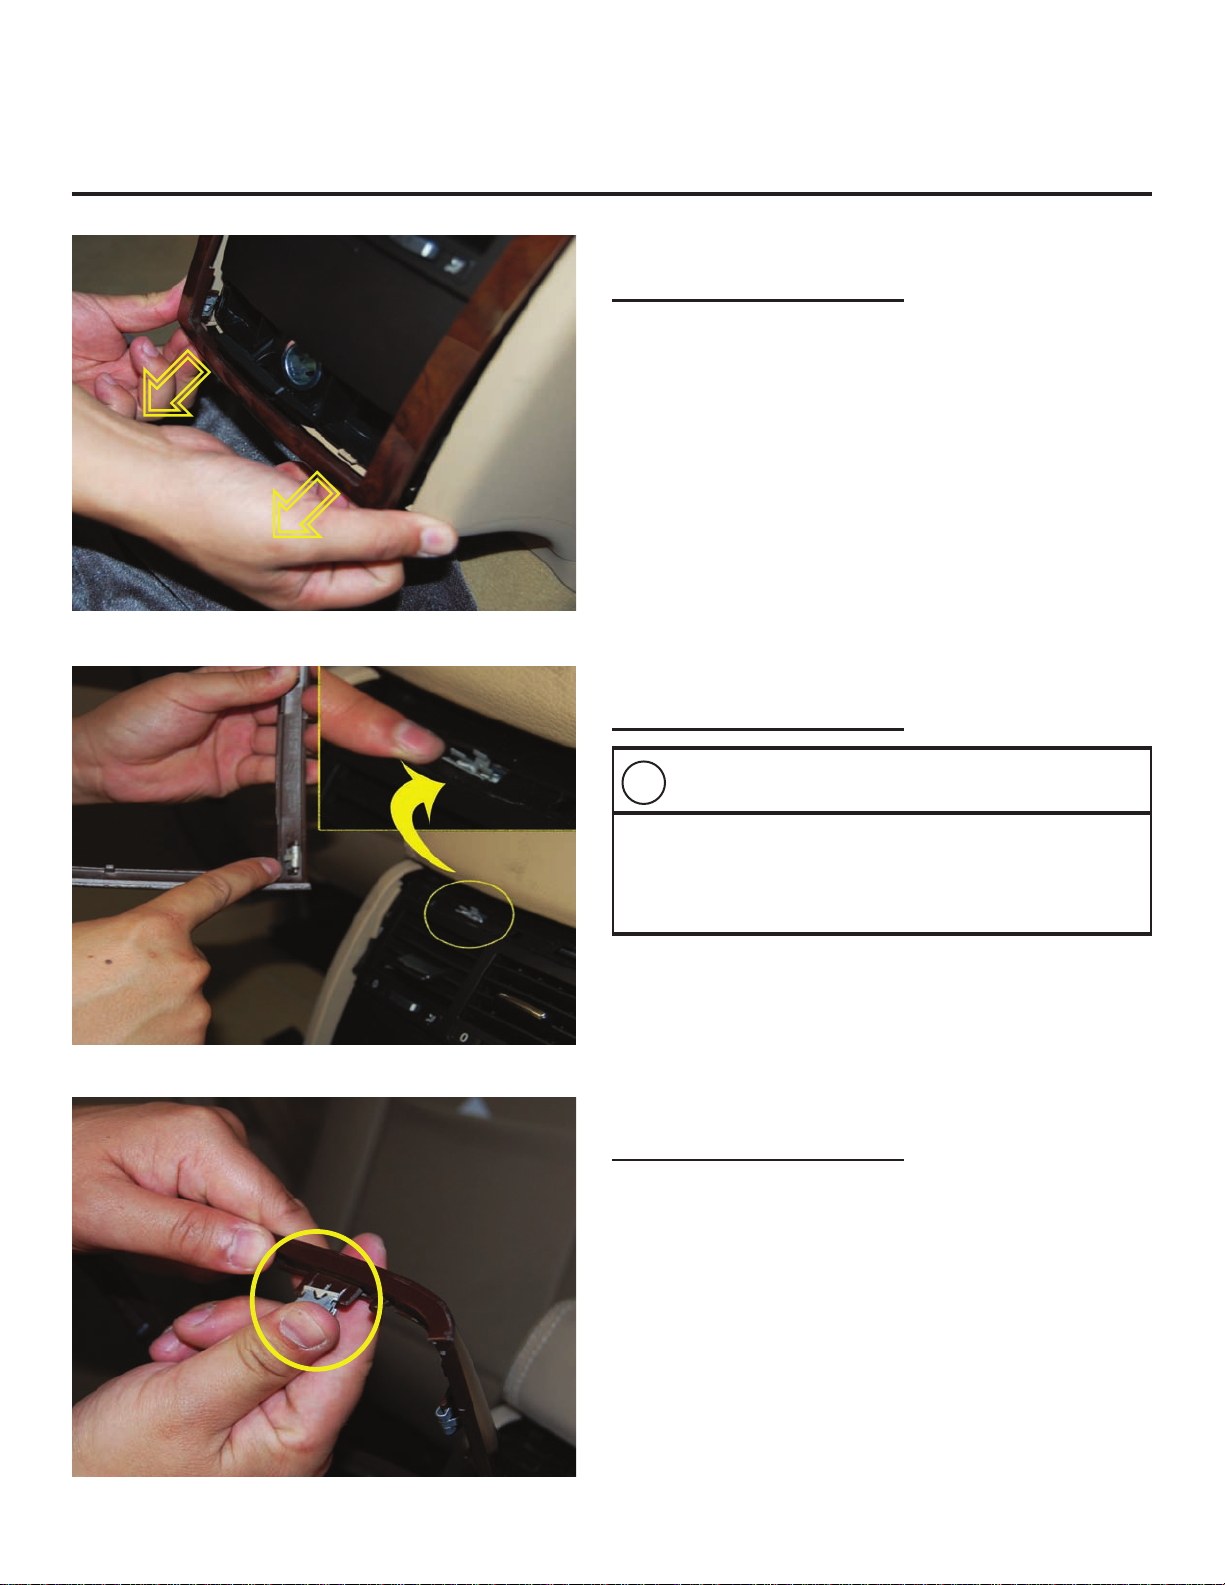
Step #02
Center Console Removal:
Remove the bezel on the rear of the center console
by pulling the bottom with a little force.
Step #03
Center Console Removal:
Note:
!
Visually inspect trim panel mounting points
for presence of metal clips. Retrieve with at
head screw driver and/or replace any that are
missing.
Step #04
Center Console Removal:
Make sure to reinstall the metal retaining clips on
the bezel and set it aside.
Page 5 of 20
Page 6
Part Number:
Description:
Fitment:
Supplier:
7L6 063 500 XXX
Rear Seat Entertainment
Touareg 2004+
Vizualogic Publish Date: December, 01 2008
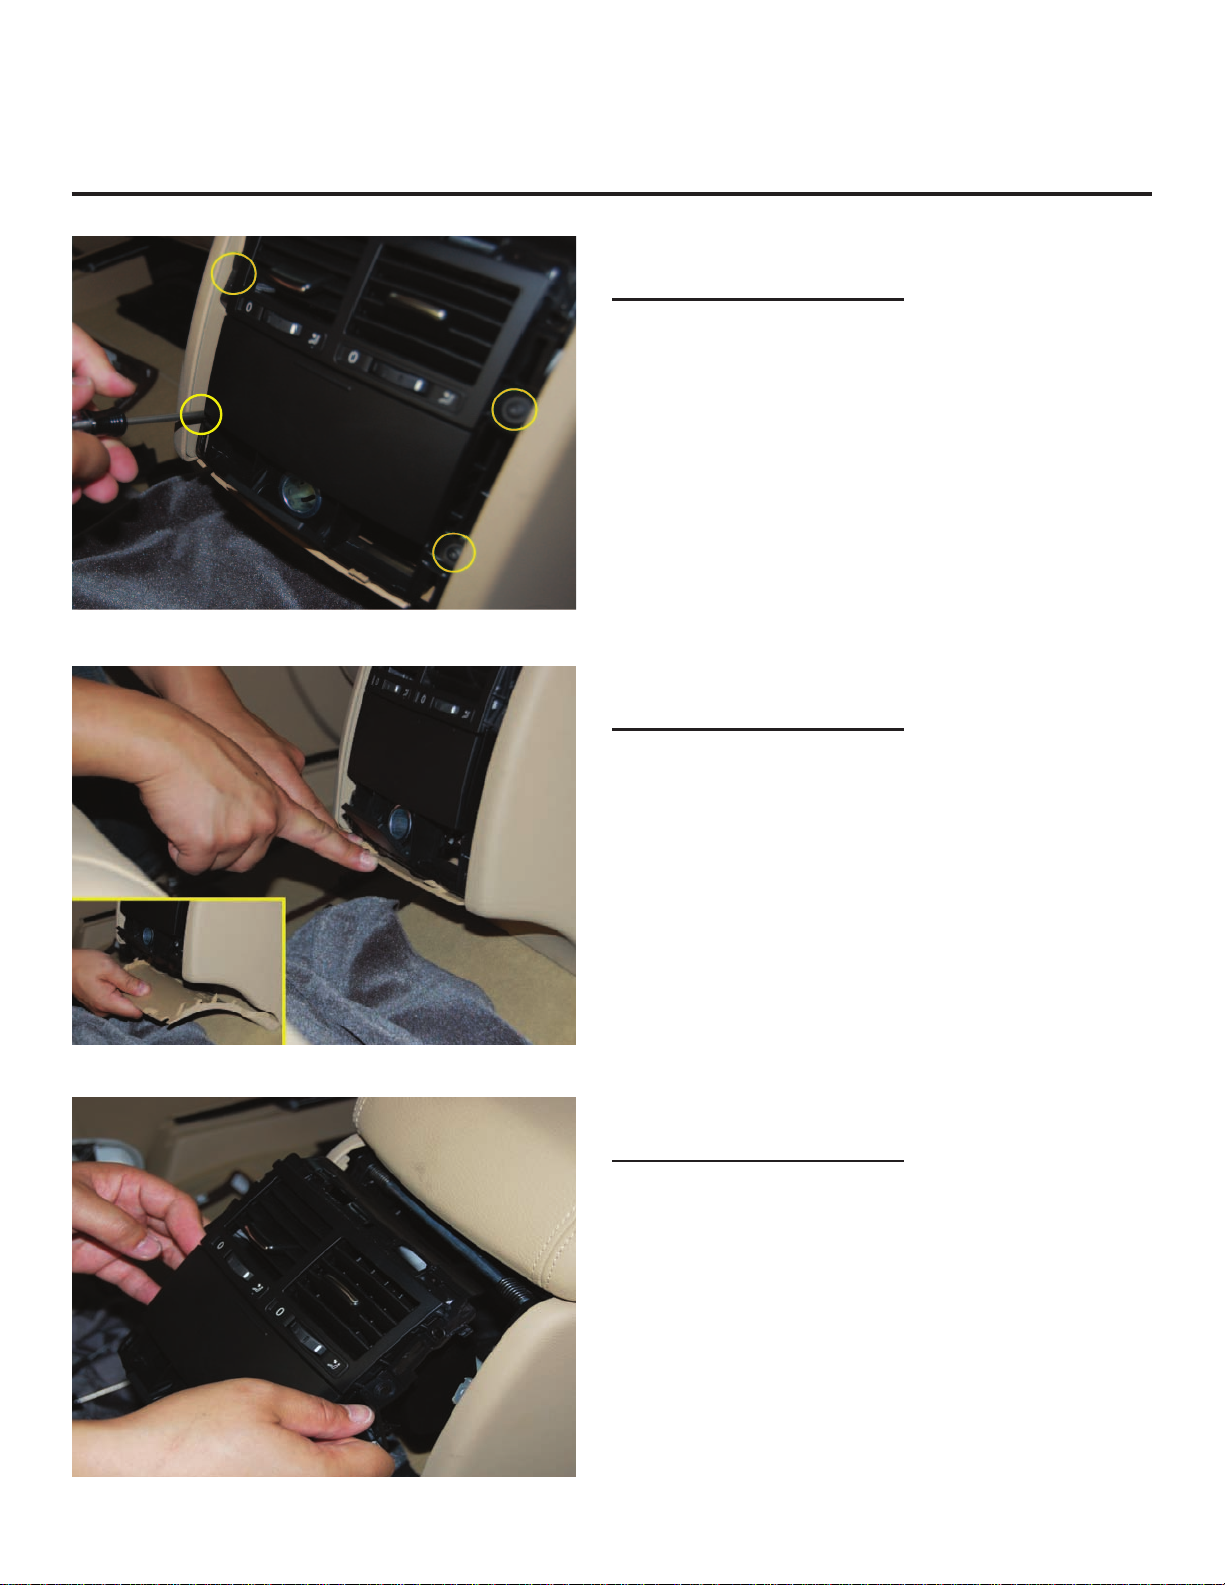
Step #05
Center Console Removal:
Remove the 4 torx screws using a T20 trox driver.
Step #06
Center Console Removal:
Make sure to reinstall the metal retaining clips on
the bezel and set it aside.
Step #07
Center Console Removal:
After the lower panel has been removed, carefully
remove the air vent assembly.
Page 6 of 20
Page 7

Part Number:
Description:
Fitment:
Supplier:
7L6 063 500 XXX
Rear Seat Entertainment
Touareg 2004+
Vizualogic Publish Date: December, 01 2008
Step #08
Center Console Removal:
Now unhook the big white plug as well as the small
black plug.
Step #09
Center Console Removal:
You should be left with the small black plug as well
as the white plug shown in the photo.
Step #10
Center Console Removal:
The A/V Box Main Power harness can now be
connected at this time.
Page 7 of 20
Page 8

Part Number:
Description:
Fitment:
Supplier:
7L6 063 500 XXX
Rear Seat Entertainment
Touareg 2004+
Vizualogic Publish Date: December, 01 2008
Step #11
A/V Box Installation:
Connect the MALE A/V plug to the FEMALE factory
plug.
Step #12
A/V Box Installation:
You will be left with the A/V FEMALE plug identical to
the factory plug as well as the factory Black plug.
Step #13
A/V Box Installation:
Route the Main A/V Power Harness under the left
(from the back) passenger side seat rail.
Note:
!
Removal of seat rail trim is optional.
Warning:
!
Pay attention to the routing of wires, wiring connections,
and harnesses. Keep clear of moving parts that could
cut, damage or crush them, resulting in damaged or
inoperative system.
Page 8 of 20
Page 9

Part Number:
Description:
Fitment:
Supplier:
7L6 063 500 XXX
Rear Seat Entertainment
Touareg 2004+
Vizualogic Publish Date: December, 01 2008
Step #14
A/V Box Installation:
Connect the A/V Power Harness to the A/V Box.
Step #15
A/V Box Installation:
Also connect the FM Modulator Antenna at this
time.
Note:
!
Not applicable for units sold in the E.U.
Step #16
A/V Box Installation:
Make sure to route the FM Modulator Antenna along
the rear of the center console.
Note:
!
The A/V Box can be set aside until both the
driver and passenger side headrest are
installed.
Warning:
!
Pay attention to the routing of wires, wiring connections,
and harnesses. Keep clear of moving parts that could
cut, damage or crush them, resulting in damaged or
inoperative system.
Page 9 of 20
Page 10

Part Number:
Description:
Fitment:
Supplier:
7L6 063 500 XXX
Rear Seat Entertainment
Touareg 2004+
Vizualogic Publish Date: December, 01 2008
Step #17
Headrest Installation:
To remove the headrest, you need to lean the seat
back as shown in the photo.
Note:
!
Temporarily reconnect Battery
Step #18
Headrest Installation:
Press in the headrest release button on the left post
guide and pull the headrest up.
Step #19
Headrest Installation:
The headrest should come out smoothly.
Page 10 of 20
Page 11

Part Number:
Description:
Fitment:
Supplier:
7L6 063 500 XXX
Rear Seat Entertainment
Touareg 2004+
Vizualogic Publish Date: December, 01 2008
Step #20
Headrest Installation:
Now move the seat all the way up and forward. This
will allow more room to access the Black plug that
must be removed at this point.
Note:
!
Temporarily reconnect Battery.
Step #21
Headrest Installation:
Now unclip the straps that secure the rear ap onto
the bottom of the seat.
Step #22
Headrest Installation:
With the clips unhooked, the ap should be able to
move as shown in the photo.
This allows you to access the inside of the seat to
pull the cables through.
Page 11 of 20
Page 12

Part Number:
Description:
Fitment:
Supplier:
7L6 063 500 XXX
Rear Seat Entertainment
Touareg 2004+
Vizualogic Publish Date: December, 01 2008
Step #23
Headrest Installation:
Unhook the J-Clip that runs across the seat.
Step #23
Headrest Installation:
You should be left with an opening where the J-Clip
was unhooked.
Note:
!
The sides of the seat back can also be
unclipped. However, this is not required to
complete the installation.
Step #25
Headrest Installation:
Now feed the Red A/V cable through the right post
guide.
Page 12 of 20
Page 13

Part Number:
Description:
Fitment:
Supplier:
7L6 063 500 XXX
Rear Seat Entertainment
Touareg 2004+
Vizualogic Publish Date: December, 01 2008
Step #26
Headrest Installation:
Now feed the Yellow A/V cable through the left post
guide. Make sure the wires don’t cross.
Step #27
Headrest Installation:
Now lean the seat back to allow enough room to
mount the Vizualogic headrest.
Step #28
Headrest Installation:
Both the Red and Yellow A/V Cables can now be
pulled through the opening of the bottom of the
seat.
!
The excessive wires can be secured inside the
seat with the provided wire tires
Page 13 of 20
Note:
Page 14

Part Number:
Description:
Fitment:
Supplier:
7L6 063 500 XXX
Rear Seat Entertainment
Touareg 2004+
Vizualogic Publish Date: December, 01 2008
Step #29
Headrest Installation:
With the headrest mounted on the seat, route the
A/V cables under the right seat rail (Driver Seat)
and then under the center console.
Warning:
!
Pay attention to the routing of wires, wiring connections,
and harnesses. Keep clear of moving parts that could
cut, damage or crush them, resulting in damaged or
inoperative system.
Step #30
Headrest Installation:
Make sure to tuck the A/V cables under the carpet
inside the center console.
Warning:
!
Pay attention to the routing of wires, wiring connections,
and harnesses. Keep clear of moving parts that could
cut, damage or crush them, resulting in damaged or
inoperative system.
Step #31
Headrest Installation:
Pull the driver side A/V cables through the right side
of the center console. Route them under the right
seat rail (Passenger seat) as you did with the Main
A/V Power Harness.
!
Pay attention to the routing of wires, wiring connections,
and harnesses. Keep clear of moving parts that could
cut, damage or crush them, resulting in damaged or
inoperative system.
Page 14 of 20
Warning:
Page 15

Part Number:
Description:
Fitment:
Supplier:
7L6 063 500 XXX
Rear Seat Entertainment
Touareg 2004+
Vizualogic Publish Date: December, 01 2008
Step #32
Headrest Installation:
Connect the driver side monitor’s A/V cables to the
MONITOR A inputs on the A/V box.
Step #33
Headrest Installation:
Now re-hook the J-Clip that seals the back ap to
the back of the seat. Gently pull the sides of the
seat out to tuck away the sides of the ap.
Step #34
Headrest Installation:
Once the ap has been tucked into the sides of the
seat, rehook the J-Clips on the bottom of the seat.
Then reinstall the Black plug.
Repeat steps 17-34 to install the passenger side
headrest.
!
The passenger side does not have the black
plug.
Page 15 of 20
Note:
Page 16

Part Number:
Description:
Fitment:
Supplier:
7L6 063 500 XXX
Rear Seat Entertainment
Touareg 2004+
Vizualogic Publish Date: December, 01 2008
Step #35
A/V Box Location:
Once both headrests have been mounted, the A/V
box can now be tucked away under the passenger
seat next to the air vent.
Note:
!
Connect all power connections to the A/V box
at this time.
Step #36
A/V Box Location:
Connect the A/V cables to the A/V box and tuck
under the left seat rail.
Warning:
!
Pay attention to the routing of wires, wiring connections,
and harnesses. Keep clear of moving parts that could
cut, damage or crush them, resulting in damaged or
inoperative system.
Step #37
A/V Box Location:
Secure A/V cables to existing wire loom with wire
ties.
Page 16 of 20
Page 17

Part Number:
Description:
Fitment:
Supplier:
7L6 063 500 XXX
Rear Seat Entertainment
Touareg 2004+
Vizualogic Publish Date: December, 01 2008
Step #38
Center Console Re-Install:
Connect the factory MALE plug to the FEMALE A/V
power harness.
Step #39
Center Console Re-Install:
Now connect the small factory black plug.
Step #40
Center Console Re-Install:
Now install the rear climate control. The sides of the
center console will need to be pushed out slightly to
clear the xed clip on the climate control.
Page 17 of 20
Page 18

Part Number:
Description:
Fitment:
Supplier:
7L6 063 500 XXX
Rear Seat Entertainment
Touareg 2004+
Vizualogic Publish Date: December, 01 2008
Step #41
Center Console Re-Install:
Using a T20 torx driver, reinstall the four (4) torx
screws.
Step #42
Center Console Re-Install:
Now reinstall the bottom panel. The rear of the panel
needs to be installed rst, then push the panel up to
snap it into place.
Step #43
Center Console Re-Install:
Check to make sure all the retaining metal clips are
present.
Page 18 of 20
Page 19

Part Number:
Description:
Fitment:
Supplier:
7L6 063 500 XXX
Rear Seat Entertainment
Touareg 2004+
Vizualogic Publish Date: December, 01 2008
Step #44
Center Console Re-Install:
Reinstall the center console’s bezel starting from
the top and working your way down.
Step #45
A/V Cable Clean-Up:
Using the provided wire ties, secure the A/V cables
to the existing harnesses underneath the passenger
seat.
Note:
!
Make sure to leave enough slack for the seat
movement.
Step #46
A/V Cable Clean-Up:
The driver side A/V cable as well as the A/V Box
Power Harness should also be secured down with
the provided wire ties.
Page 19 of 20
Page 20

Part Number:
Description:
Fitment:
Supplier:
7L6 063 500 XXX
Rear Seat Entertainment
Touareg 2004+
Vizualogic Publish Date: December, 01 2008
Step #47
Finalizing the Install:
Reconnect the negative battery lead to the terminal
post on the drivers’ side oor.
Tighten down the nut with a 13mm socket and
replace the plastic cover.
Step #48
Testing: Perform a quick test to make sure
everything is working properly.
1) Insert a DVD.
2) Make sure images appear on both screens. (Both
monitors must be set to the same source)
3) Make sure both headphones are working.
(The headphone must be set to the same
channel as the output on the monitor (A or B)).
4) Make sure the remote control is working.
5) Repeat with second Headrest.
6) If everything is working, go to step 49.
Step #49
Place the Owner’s Manual and related paperwork
in the glove compartment or give it to the customer
Note:
!
Make sure to test the Vizualogic unit at this time.
Page 20 of 20
INSTALLATION IS NOW COMPLETE
 Loading...