

Vizion RS120-B3 Installation Manual

INSTALLATION GUIDE
Model RS120-B3
VIZIO

storms.
• Unplug your display during a lightning storm or when it will not be used for long period of time. This will protect
your display from damage due to power surges.
• Do not attempt to repair or service your display yourself. Opening or removing the back cover may expose you to
high voltages, electric shock, and other hazards. If repair is required, contact your dealer and refer all servicing to
qualied service personnel.
• WARNING: Keep your display away from moisture. Do not expose your display to rain or moisture. If water
penetrates into your display, unplug the power cord and contact your dealer. Continuous use in this case may
result in re or electric shock.
• Do not use your display if any abnormality occurs. If any smoke or odor becomes apparent, unplug the power cord
and contact your dealer immediately. Do not try to repair your display yourself.
• Avoid using dropped or damaged appliances. If your display is dropped and the housing is damaged, the internal
components may function abnormally. Unplug the power cord immediately and contact your dealer for repair.
Continued use of your display may cause re or electric shock.
• Do not install your display in an area with heavy dust or high humidity. Operating your display in environments with
heavy dust or high humidity may cause re or electric shock.
• Follow instructions for moving your display. Ensure that the power cord and any other cables are unplugged before
moving your display.
• When unplugging your display, hold the AC/DC power adapter, not the cord. Pulling on the power cord may
damage the wires inside the cord and cause re or electric shock. When your display will not be used for an
extended period of time, unplug the power cord.
• To reduce risk of electric shock, do not touch the connector with wet hands.
• Insert batteries in accordance with instructions. Incorrect polarities may cause the batteries to leak which can
damage the remote control or injure the operator. Do not expose batteries to excessive heat such as sunshine,
re or the like.
• If any of the following occurs, contact the dealer:
• The power cord fails or frays.
• Liquid sprays or any object drops into your display.
• Your display is exposed to rain or other moisture.
• Your display is dropped or damaged in any way.
• The performance of your display changes substantially.
• This apparatus shall not be exposed to dripping or splashing and no objects lled with liquids, such as vases, shall
be placed on the apparatus.
• The mains plug or appliance coupler is used as the disconnect device, the disconnect device shall remain readily
operable.
• CAUTION - These servicing instructions are for use by qualied service personnel only. To reduce the risk of electric
shock, do not perform any servicing other than that contained in the operating instructions unless you are qualied
to do so.
• The lightning ash with arrowhead symbol within an equilateral triangle is intended to alert the
user to the presence of uninsulated DANGEROUS VOLTAGE within the product’s enclosure that
may be of sucient magnitude to constitute a risk of electrical shock to persons.
• Please use caution around the display: pulling or pushing on the display may cause the display to
tip or fall over resulting in personal injury and/or property damage.
• -WARNING: Exposure to loud sounds can damage your hearing causing hearing loss and tinnitus (ringing or buzzing
in the ears). With continued exposure to loud noises, ears may become accustomed to the sound level, which may
result in permanent damage to hearing without any noticeable discomfort.
• Install the TV where it cannot be pulled, pushed or knocked over.
• Do not allow children to hang onto the product.
• Store the accessories (remote, batteries, etc.) in a location safely out of the reach of children.
• The American Academy of Pediatrics discourages television viewing for children younger than two years of age.
h
Your TV is designed and manufactured to operate within dened design limits. Misuse may result in electric shock
or re. To prevent your TV from being damaged, the following instructions should be observed for the installation,
use, and maintenance of your TV. Read the following safety instructions before operating your TV. Keep these
instructions in a safe place for future reference.
• To reduce the risk of electric shock or component damage, switch o the power before connecting other
components to your TV.
• Read these instructions.
• Keep these instructions.
• Heed all warnings.
• Follow all instructions.
• Do not use this apparatus near water.
• Clean only with dry cloth.
• Do not block any ventilation openings. Install in accordance with the manufacturer’s instructions.
• Do not install near any heat sources such as radiators, heat registers, stoves, or other apparatus (including
ampliers) that produce heat.
• Do not defeat the safety purpose of the polarized or grounding-type plug. A polarized plug has two blades with
one wider than the other. A grounding type plug has two blades and a third grounding prong. The wide blade
or the third prong are provided for your safety. If the provided plug does not t into your outlet, consult an
electrician for replacement of the obsolete outlet.
• Protect the power cord from being walked on or pinched particularly at plugs, convenience receptacles, and the
point where they exit from the apparatus.
• Only use attachments/accessories specied by the manufacturer.
• Use only with the cart, stand, tripod, bracket, or table specied by the manufacturer, or sold with the
apparatus. When a cart is used, use caution when moving the cart/apparatus combination to avoid injury
from tip-over.
• Unplug this apparatus during lightning storms or when unused for long periods of time.
• Refer all servicing to qualied service personnel. Servicing is required when the apparatus has been damaged
in any way, such as power-supply cord or plug is damaged, liquid has been spilled or objects have fallen into
the apparatus, the apparatus has been exposed to rain or moisture, does not operate normally, or has been
dropped.
• When moving your display from an area of low temperature to an area of high temperature, condensation may
form in the housing. Wait before turning on your display to avoid causing re, electric shock, or component damage.
• A distance of at least three feet should be maintained between your display and any heat source, such as a radiator,
heater, oven, amplier etc. Do not install your display close to smoke. Operating your display close to smoke or
moisture may cause re or electric shock.
• Slots and openings in the back and bottom of the cabinet are provided for ventilation. To ensure reliable operation
of your display and to protect it from overheating, be sure these openings are not blocked or covered. Do not place
your display in a bookcase or cabinet unless proper ventilation is provided.
• Never push any object into the slots and openings on your display cabinet. Do not place any objects on the top of
your display. Doing so could short circuit parts causing a re or electric shock. Never spill liquids on your display.
• Your display should be operated only from the type of power source indicated on the label. If you are not sure of the
type of power supplied to your home, consult your dealer or local power company.
• Do not apply pressure or throw objects at your display. This may compromise the integrity of the display. The
manufacturer’s warranty does not cover user abuse or improper installations.
• The power cord must be replaced when using dierent voltage than the voltage specied. For more information,
contact your dealer.
• When connected to a power outlet, power is always owing into your display. To totally disconnect power, unplug
the power cord.
• The lightning ash with arrowhead symbol within an equilateral triangle is intended to alert the user to the presence
of un-isolated, dangerous voltage within the inside of your display that may be of sucient magnitude to constitute
a risk of electric shock to persons.
• Do not overload power strips and extension cords. Overloading can result in re or electric shock.
• The wall socket should be installed near your display and easily accessible.
• Only power of the marked voltage can be used for your display. Any other voltage than the specied voltage may
cause re or electric shock.
• Do not touch the power cord during lightning. To avoid electric shock, avoid handling the power cord during electrical
IMPORTANT SAFETY INSTRUCTIONS
ii
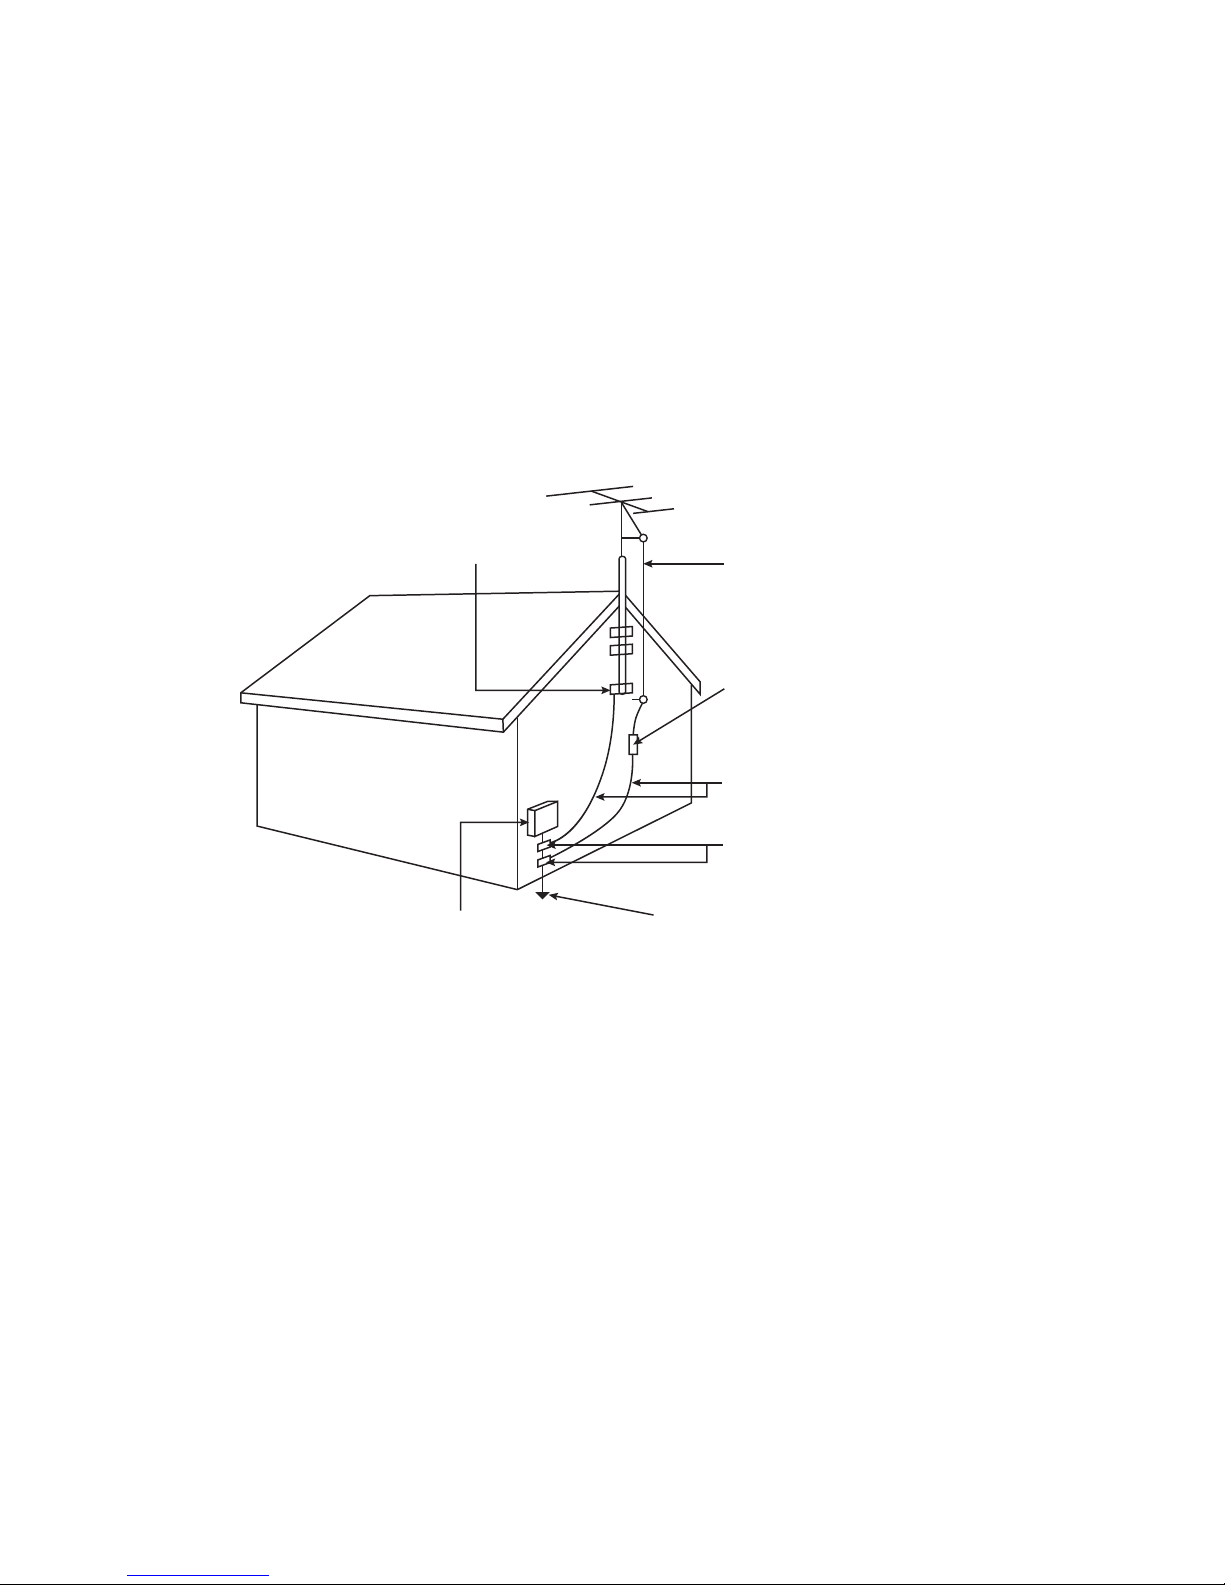
• If an outside antenna/satellite dish or cable system is to be connected to the
TV, make sure that the antenna or cable system is electrically grounded to
provide some protection against voltage surges and static charges.
• Article 810 of the National Electrical Code, ANSI/NFPSA 70, provides
information with regard to proper grounding of the mast and supporting
structure, grounding of the lead-in wire to an antenna discharge unit, size of
the grounding conductors, location of antenna discharge unit, connection to
grounding electrodes, and requirements of the grounding electrode.
TELEVISION ANTENNA CONNECTION PROTECTION
Ground Clamp
Antenna Lead In Wire
Antenna Discharge Unit
(NEC Section 810-20)
Grounding Conductors
(NEC Section 810-21)
Ground Clamps
Power Service Grounding Electrode System
(NEC ART 250, part H)
Electric Service Equipment
• Lightning Protection: For added protection of the TV during a lightning storm
or when it is left unattended or unused for long periods of time, unplug the TV
from the wall outlet and disconnect the antenna or cable system.
• Power Lines: Do not locate the antenna near overhead light or power circuits,
or where it could fall into such power lines or circuits. Remember, the screen
of the coaxial cable is intended to be connected to earth in the building
installation.
iii

iv
WARNING: BEFORE YOU BEGIN
THE WALL STRUCTURE MUST BE CAPABLE OF SUPPORTING 2000LBS. IF NOT, THE WALL
STRUCTURE MUST BE REINFORCED.
FOLLOW THE INSTRUCTIONS PROVIDED BY THE MANUFACTURER WHEN LIFTING THE DISPLAY.
PERFORM ALL STRUCTURAL REINFORCEMENTS BEFORE ATTACHING THE DISPLAY TO THE WALL.
USE THE APPROPRIATE LIFTING DEVICE WHEN LIFTING THE DISPLAY INTO PLACE.
THIS TELEVISION HAS NO BUILT-IN SPEAKERS OR SOUND SYSTEM. A SEPARATE AUDIO SYSTEM
(NOT INCLUDED) IS REQUIRED.
ENSURE THERE IS 20A CIRCUIT BREAKER DEDICATED TO JUST THIS TELEVISION. NO OTHER
PRODUCTS SHOULD BE USING THE DEDICATED CIRCUIT BREAKER
THIS TV INSTALLATION IS INTENDED FOR A
PROFESSIONAL ONLY!
A DEDICATED 20A CIRCUIT BREAKER IS REQUIRED!
FOR HELP, CONSULT YOUR LOCAL RETAILER OR
VISIT SUPPORT.VIZIO.COM.
STOP
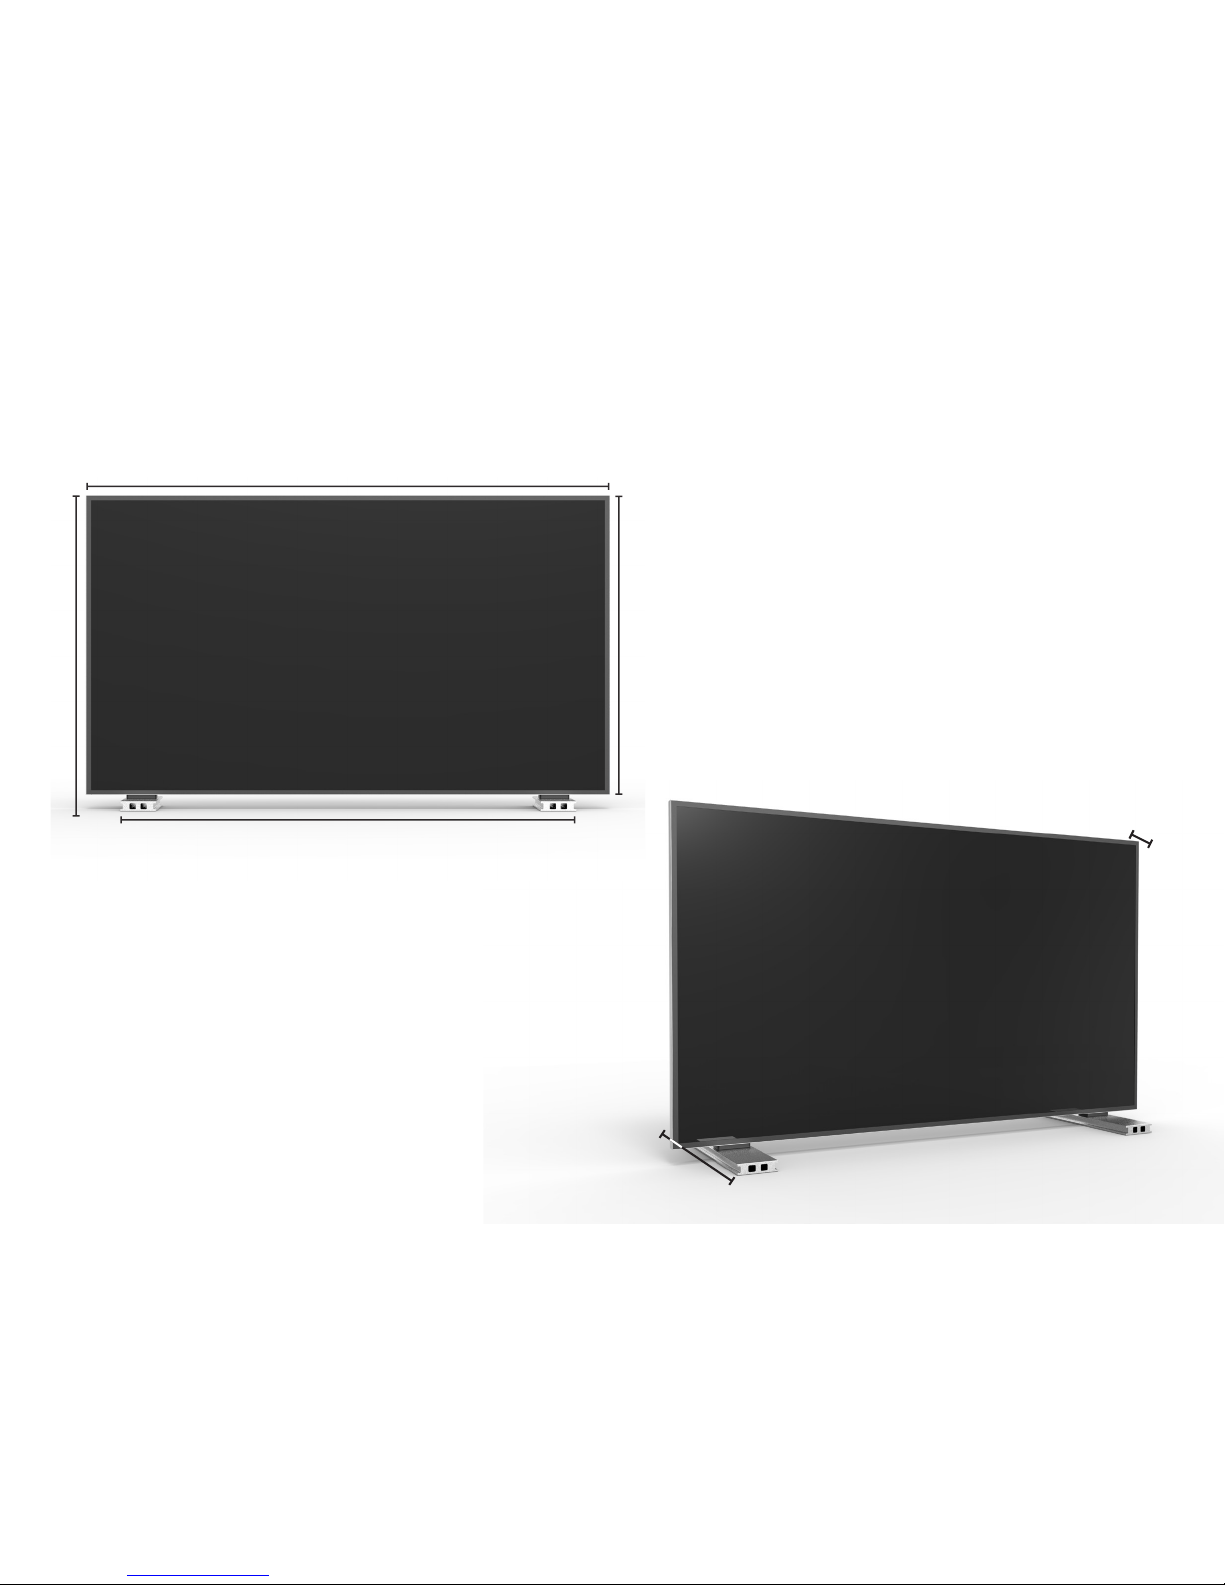
TV Weight w/o Temporary Legs:
385.8 lb
DIMENSIONS AND WEIGHT
91 5/8"
107"
61 1/4"
64 1/8"
29 1/4"
3 3/4"
Depth of Legs
Depth of TV

INSTALLATION SITE SURVEY
1. Are there any landings and/or steps at facility entrance?: Yes [ ] No [ ]
i. How many landings?:________ How many steps?:________
2. Will this TV be delivered on ground level?: Yes [ ] No [ ]
3. Does the delivery entrance allow for the passage of a crate 115” x 74” x 37”
i. Double doors?: Yes [ ] No [ ]
a. Is there a removable center post?: Yes [ ] No [ ]
ii. Is there a freight elevator? Yes [ ] No [ ]
iii. Can freight elevation accommodate 115” length? Yes [ ] No [ ]
4. Doorway dims:________________ Hallway dims: _______________ No. of turns:____________________
5. TypesofooringoverwhichTVwillbetransported(i.e.:wood,carpet,tileetc.):
________________________________
6. What is the lowest ceiling height in the area your TV is to be
transported?:_____________________

TABLE OF CONTENTS
Warning: Before you Begin ............................................................................... iv
Dimensions and Weight .................................................................................... v
Installation Site Survey ...................................................................................... vi
Package Contents .............................................................................................. 9
Using the Remote .............................................................................................. 11
Remote Control - Inserting Batteries ............................................................... 12
Opening the Shipping Container ..................................................................... 16
Assembling and Attaching the Mount ............................................................. 18
Attaching the Mounting Brackets to the TV .................................................... 26
Mounting the TV to the Wall ............................................................................. 30
Connecting the IR Remote Receiver ................................................................ 33
Connecting Devices ........................................................................................... 34
Viewing the On-Screen User Manual ............................................................... 36
Connecting to a Network .................................................................................. 38
Getting Started with VIZIO Internet Apps Plus
®
............................................. 46
Help Topics ......................................................................................................... 49
Regulatory Information ..................................................................................... 54
Limited Warranty ............................................................................................... 55
Legal Information............................................................................................... 58

Do you have questions? Find answers at
Find help with:
• New product setup
• Connecting your devices
• Technical problems
• Product updates and more
SUPPORT.VIZIO.COM
You can also contact our
award-winning support team at:
Hours of Operation:
Monday - Friday: 7 am to 11 pm (CSt)
Saturday - Sunday: 9 a m to 6 pm (CSt)
Live chat
support available
Phone: (844) 254-8088 (toll-free)
Se habla Español • Nous parlons Français
viii
9
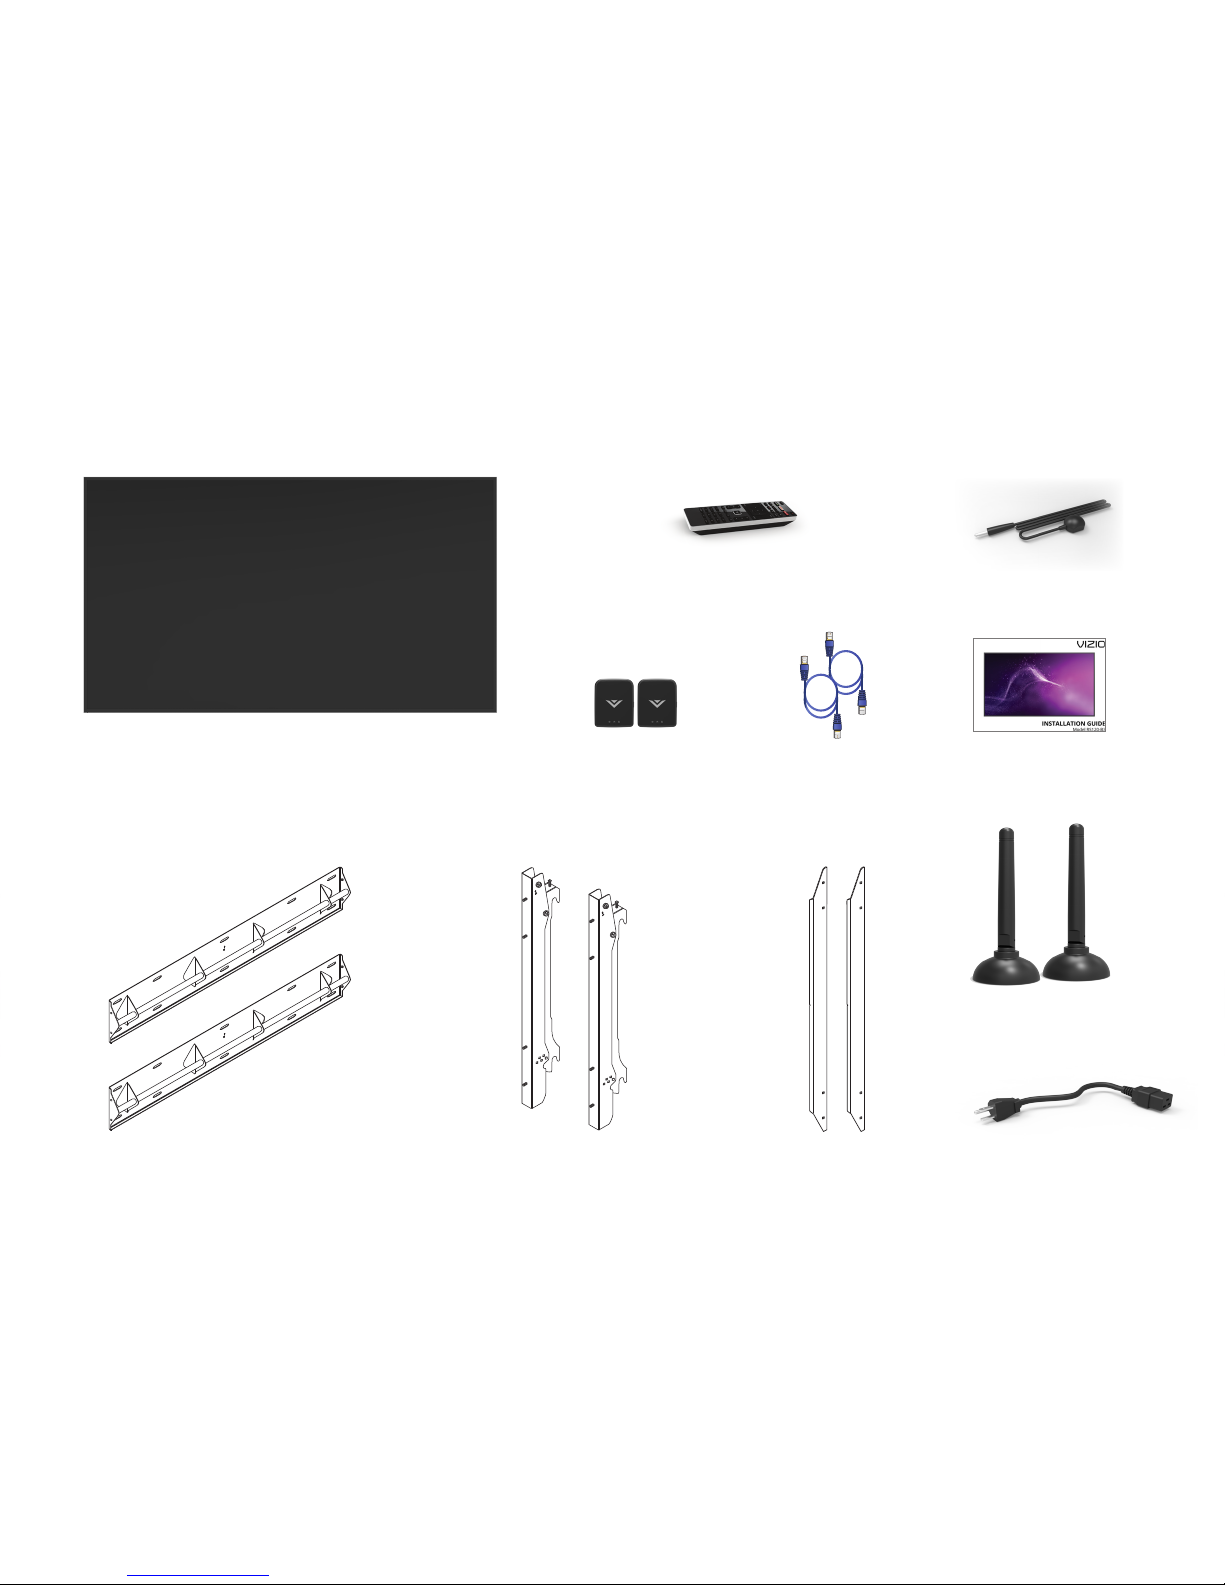
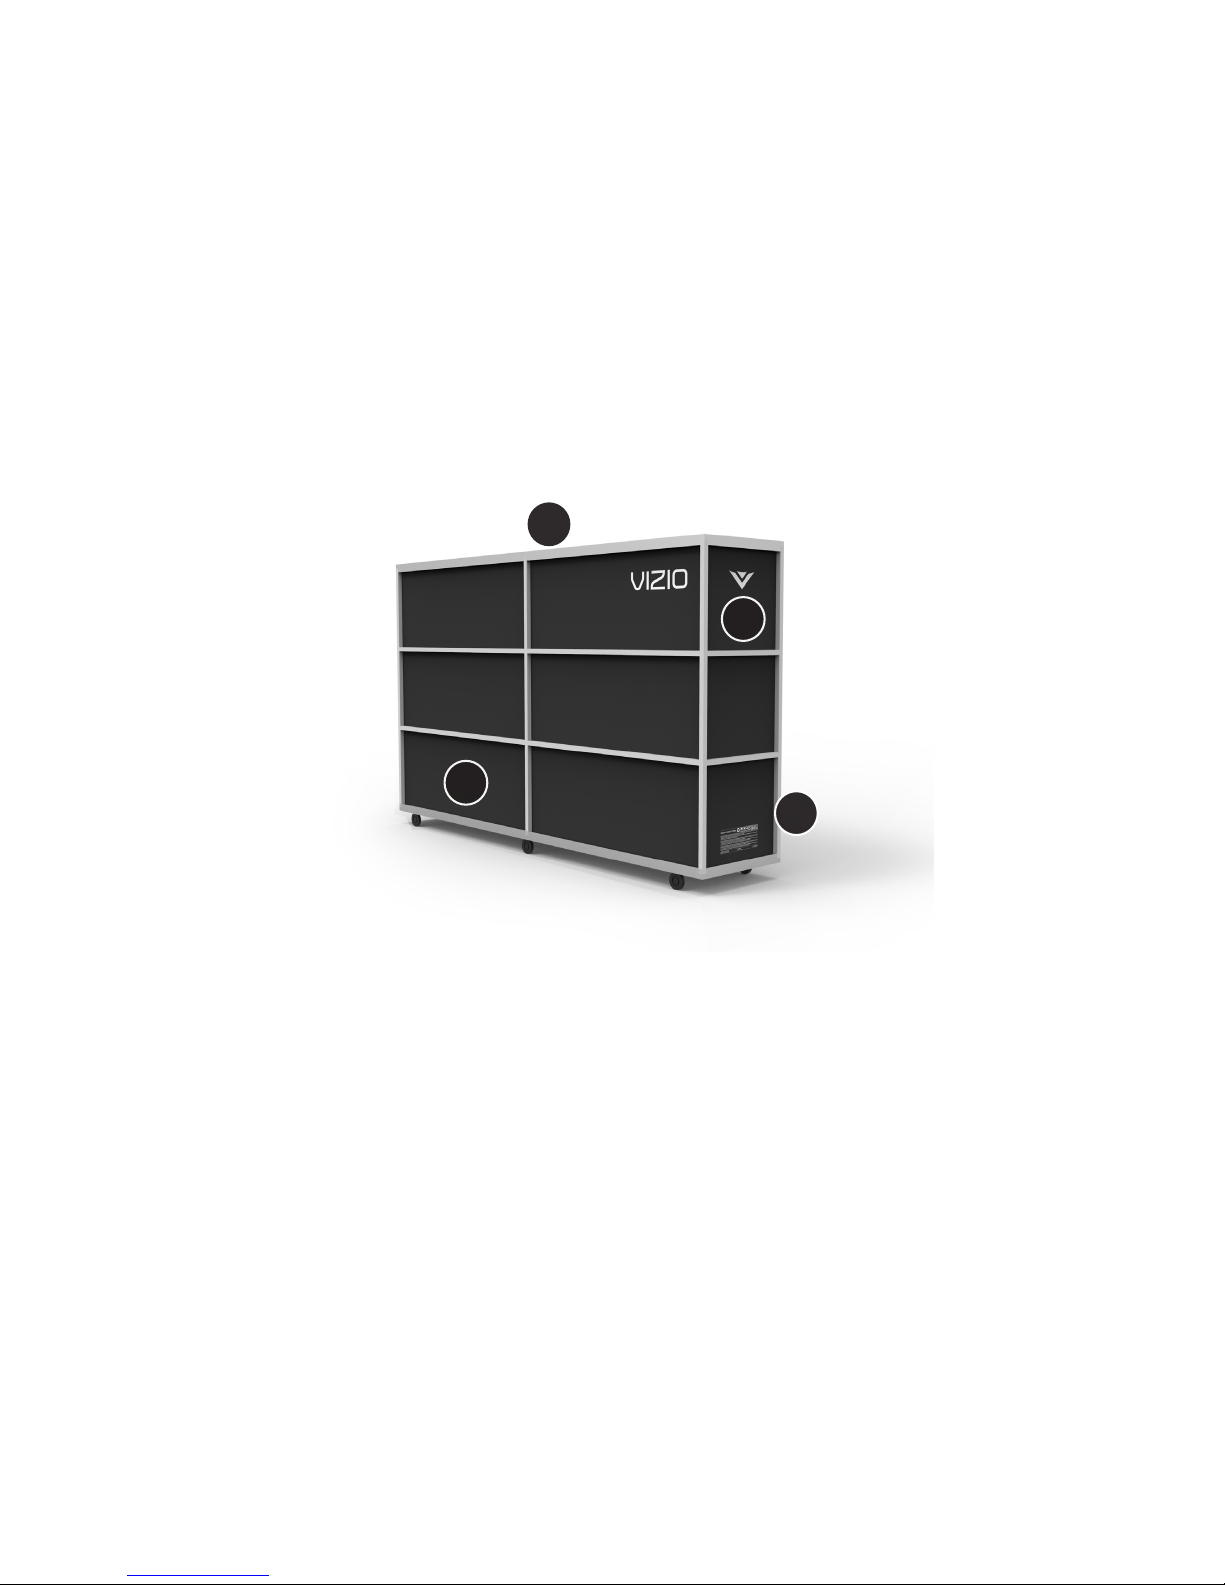
PACKAGE CONTENTS
VIZIO RS120-B3 LED UHDTV
mounted on temporary legs
Remote Control
(with 2 x AAA Batteries)
Installation Guide
2 x Wall Mounting Plates 2 x Mounting Brackets 2 x Side Straps
IR Remote Receiver
2 x Powerline
Ethernet
Adapters
2 x RJ45
Ethernet Cables
2 x External Wi-Fi Antenna
Power Cable
10
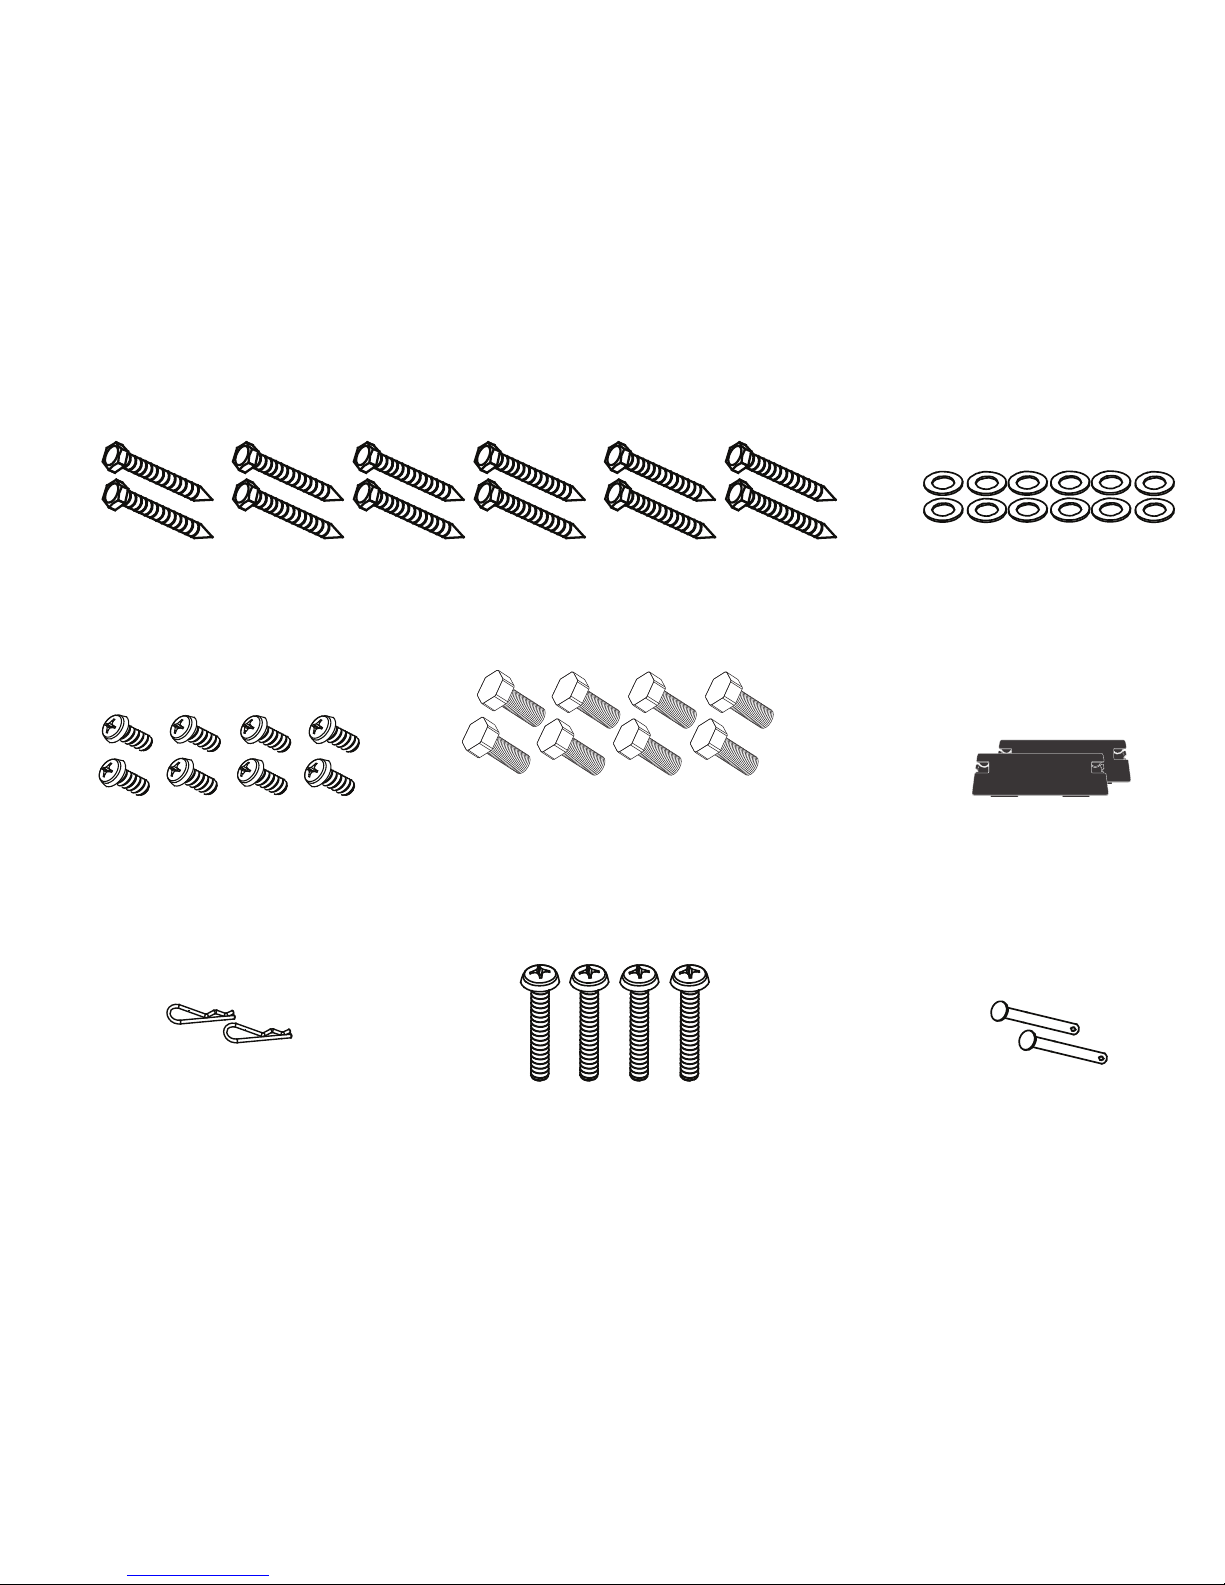
8 x M5 12 mm Phillips
Head Screws
8 x M8 25 mm hex screws
2×Leg Hole Covers
4 x M8 70mm Lateral Shift
Locking Screws
(Pre-Installed)
2 x Clevis Pins
(Pre-Installed)
2 x Clevis Pin
Spring Clips
(Pre-Installed)
12 x 5/16"×3" Lag Bolts 12 x 5/16" Flat Washers
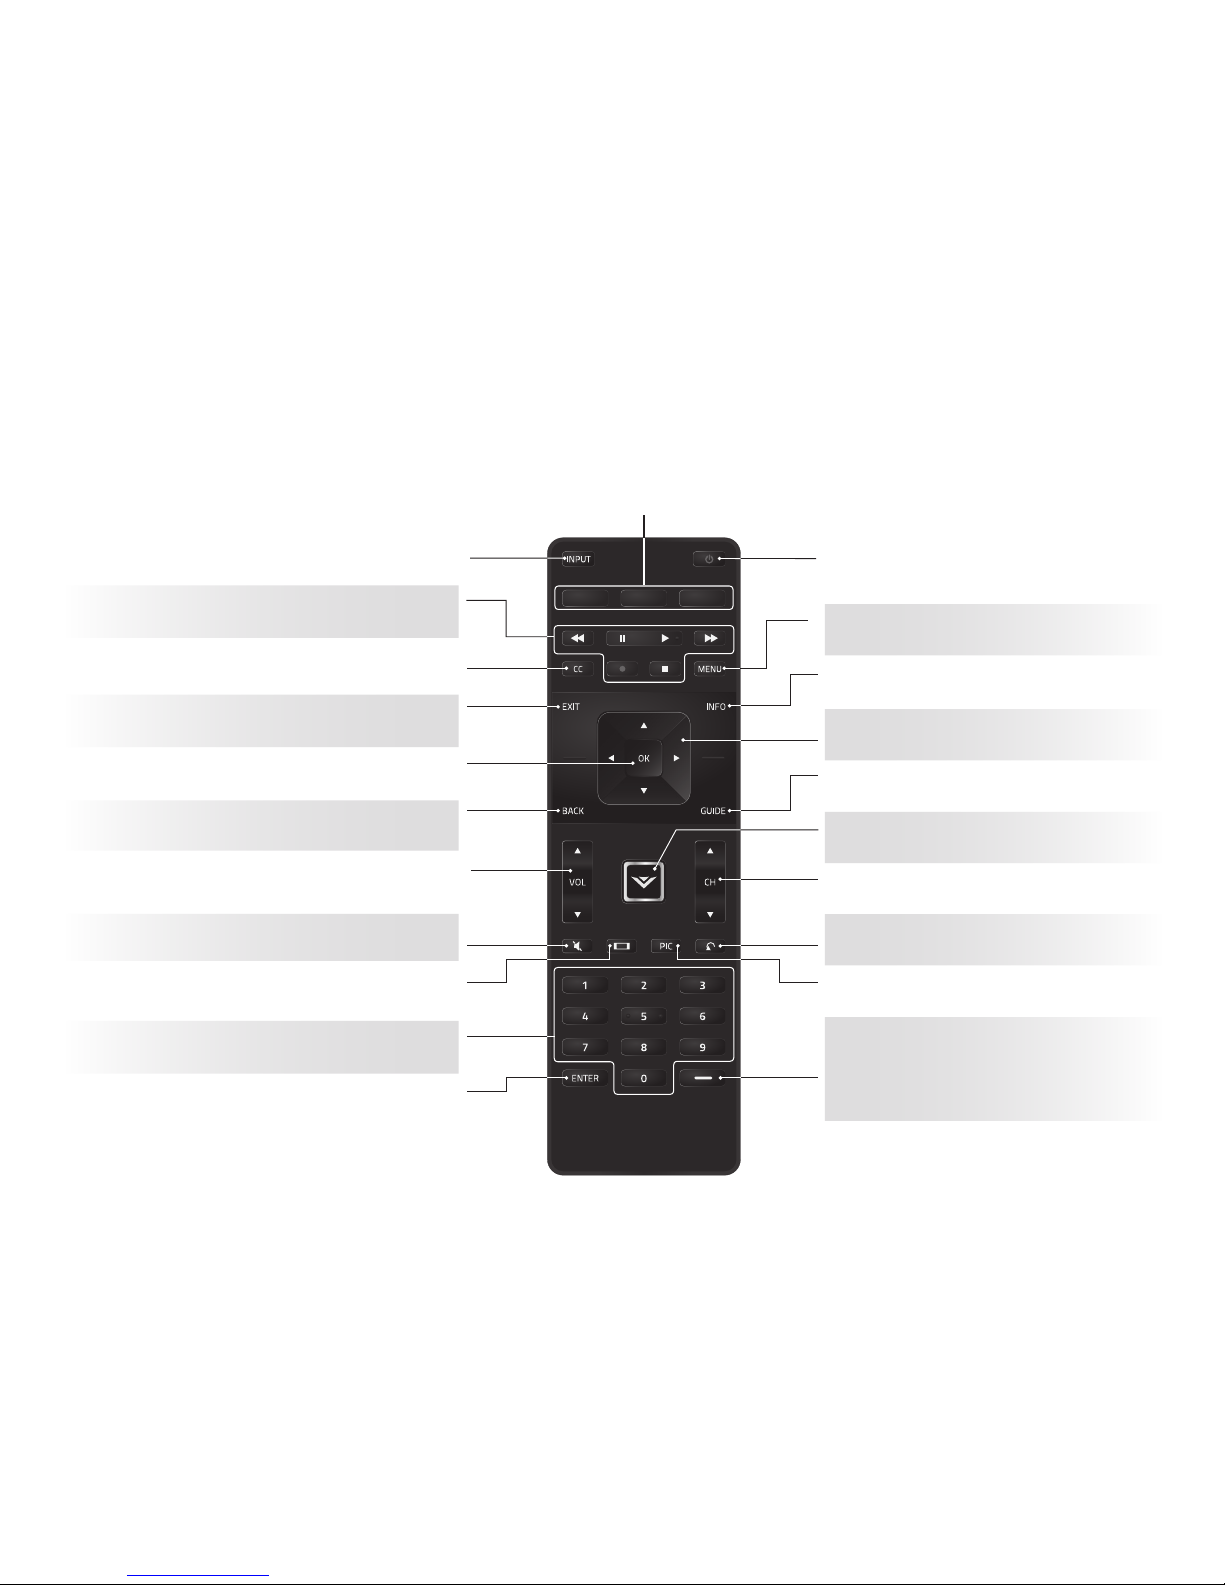
INPUT
Change the currently-displayed input.
ARROW
Navigate the on-screen menu.
EXIT
Close the on-screen menu.
CLOSED CAPTIONS
Open the closed caption menu.
A/V CONTROLS
Control USB media player and some apps.
NUMBER PAD
Manually enter a channel.
MUTE
Turn the audio o or on.
BACK
Go to the previous on-screen menu.
POWER
Turn TV on or o.
INFO
Display the info window.
MENU
Display the on-screen menu.
PIC
Opens the picture mode menu.
CHANNEL UP/DOWN
Change the channel.
GUIDE
Display the info window.
LAST
Return to the channel last viewed.
WIDE
Change the display mode.
ENTER
Conrm channel or passcode
entered using the number pad.
VOLUME UP/DOWN
Increase or decrease loudness of the audio.
OK
Select the highlighted menu option.
V BUTTON
Open the VIA dock.
DASH
Use with number pad to manually
enter a digital sub-channel.
(For example, 18-4 or 18-5.)
APP LAUNCHER
Quickly launch the pictured App.
(Also turns the TV on if it is o.)
11
USING THE REMOTE
12
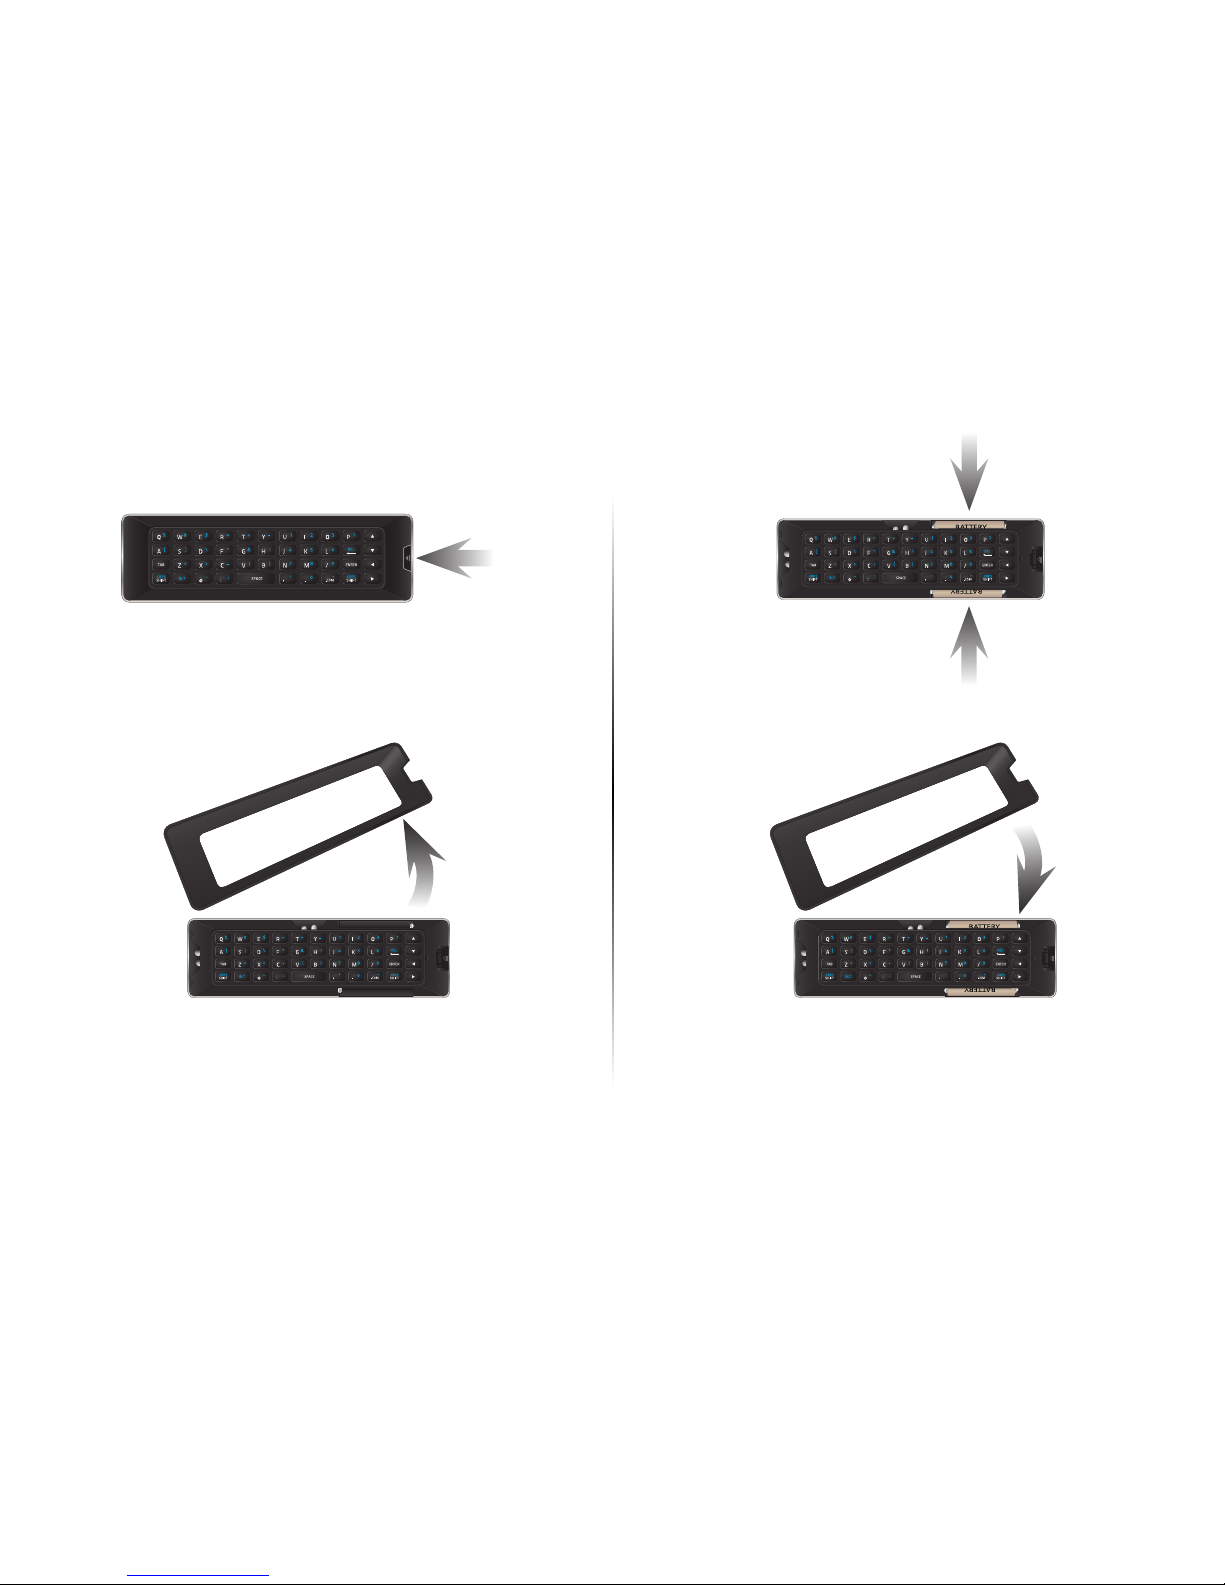
1
Press in on the button on
the rear of the remote.
Lift the cover up to remove
the battery cover.
Insert two batteries into the remote control.
Make sure that the (+) and (-) symbols on the
batteries match the (+) and (-) symbols inside
the battery compartment.
Replace the battery cover
.
2
+ -
- +
REMOTE CONTROL - INSERTING BATTERIES
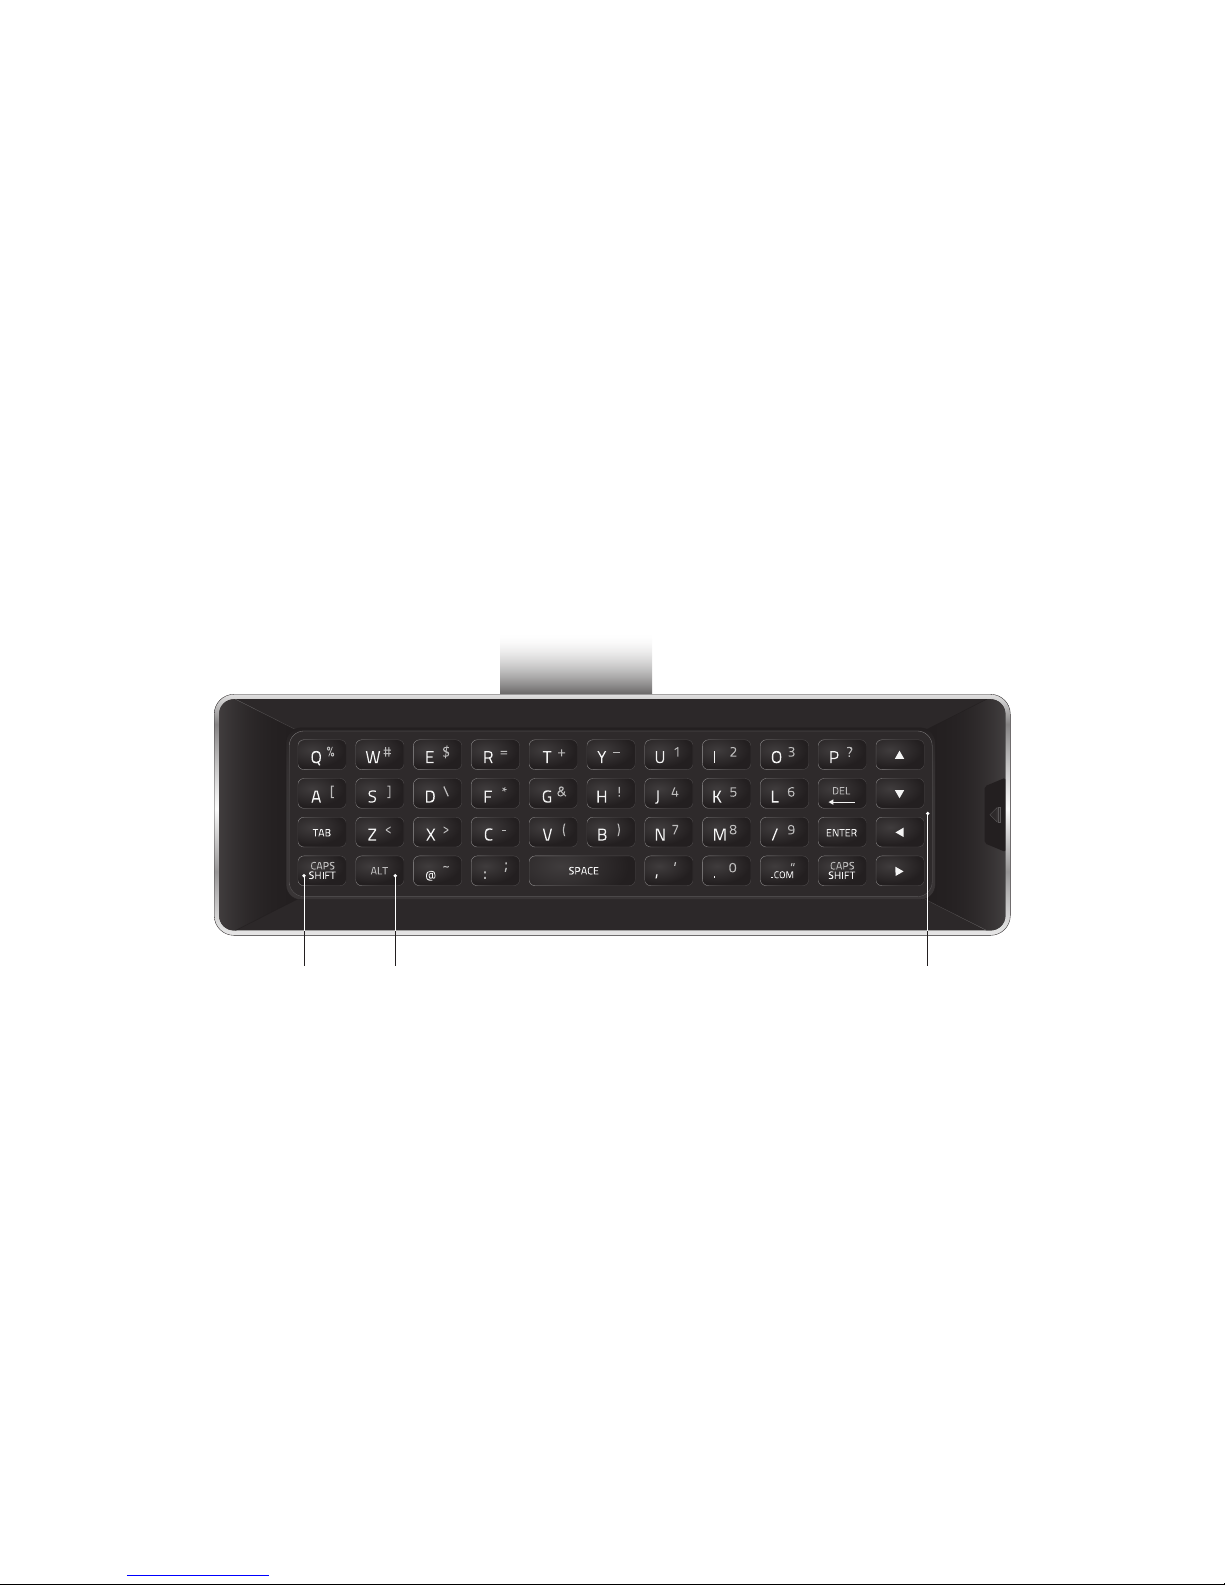
ALT
Press and hold while pressing another
key to enter a blue character. For
example, press ALT and W to enter
a # character.
ARROW
Navigate the on-screen menu.
DO NOT COVER THIS AREA
The IR blaster is located here.
SHIFT
Press and hold while pressing
another key to enter a
capital letter.
13
14
INSTALL THE DISPLAY ACCORDING TO THESE INSTRUCTIONS. PERFORM ALL STRUCTURAL
REINFORCEMENTS BEFORE ATTACHING THE DISPLAY TO THE WALL. USE THE APPROPRIATE LIFTING
DEVICE WHEN LIFTING THE DISPLAY INTO PLACE.
PRIOR TO THE INSTALLATION OF THIS PRODUCT, THE INSTALLATION INSTRUCTIONS SHOULD BE
READ AND COMPLETELY UNDERSTOOD. THE INSTALLATION INSTRUCTIONS MUST BE READ TO
PREVENT PERSONAL INJURY AND PROPERTY DAMAGE. KEEP THESE INSTALLATION INSTRUCTIONS IN
AN EASILY ACCESSIBLE LOCATION FOR FUTURE REFERENCE.
VIZIO DOES NOT WARRANT AGAINST DAMAGE CAUSED BY THE USE OF ANY VIZIO PRODUCT
FOR PURPOSES OTHER THAN THOSE FOR WHICH IT WAS DESIGNED OR DAMAGE CAUSED
BY UNAUTHORIZED ATTACHMENTS OR MODIFICATIONS, AND IS NOT RESPONSIBLE FOR
ANY DAMAGES, CLAIMS, DEMANDS, SUITS, ACTIONS OR CAUSES OF ACTION OF WHATEVER
KIND RESULTING FROM, ARISING OUT OF OR IN ANY MANNER RELATING TO ANY SUCH USE,
ATTACHMENTS OR MODIFICATIONS.
SAFETY MEASURES MUST BE PRACTICED AT ALL TIMES DURING THE INSTALLATION OF THIS
PRODUCT. USE PROPER SAFETY GEAR AND TOOLS FOR THE INSTALLATION PROCEDURE TO PREVENT
PERSONAL INJURY AND DAMAGE TO THE FLAT PANEL DISPLAY AND BUILDING STRUCTURE.
FOR SAFETY, THREE OR FOUR PEOPLE SHOULD INSTALL THE MOUNT AND FLAT PANEL DISPLAY
WITH THE AID OF AN APPROPRIATE ASSISTED LIFTING DEVICE. SERIOUS INJURY AND SERIOUS
DAMAGE TO THE FLAT PANEL DISPLAY OR BUILDING STRUCTURE CAN RESULT FROM DROPPING OR
MISHANDLING THE FLAT PANEL DISPLAY.
DO NOT INSTALL NEAR ANY HIGH HEAT SOURCES. FAILURE TO DO SO MAY RESULT IN DAMAGE TO
THE FLAT PANEL DISPLAY AND COULD INCREASE THE RISK OF FIRE.
PROVIDE ADEQUATE VENTILATION ON ALL SIDES OF THE FLAT PANEL DISPLAY. FAILURE TO DO SO
MAY RESULT IN DAMAGE TO THE FLAT PANEL DISPLAY AND COULD INCREASE THE RISK OF FIRE.
WARNINGS FOR MOUNTING THE RS120-B3

15
THE WALL STRUCTURE MUST BE CAPABLE OF SUPPORTING 2000LBS. IF NOT, THE WALL STRUCTURE
MUST BE REINFORCED. PROPER INSTALLATION PROCEDURE BY A QUALIFIED SERVICE TECHNICIAN,
AS OUTLINED IN THE INSTALLATION INSTRUCTIONS, MUST BE ADHERED TO. FAILURE TO DO SO
COULD RESULT IN SERIOUS PERSONAL INJURY, OR EVEN DEATH.
WHEN MOUNTING TO WOODEN STUDS, USE A MAXIMUM OF 5/8" THICK PLASTER BOARD WITH THE
5/16" LAG BOLTS AND FLAT WASHERS.
WHEN MOUNTING ON A CONCRETE WALL, THE WALL MUST BE AT LEAST A 3000 PSI POURED
CONCRETE WALL. USE SUITABLE CONCRETE ANCHORS FOR THE WALL. THIS INSTALLATION
GUIDE ONLY PROVIDES INSTRUCTIONS FOR MOUNTING TO WOODEN STUDS. ONLY A QUALIFIED
TECHNICIAN, USING PROPER PROFESSIONAL JUDGMENT, SHOULD INSTALL THIS MOUNT AND FLAT
PANEL DISPLAY ON A CONCRETE WALL.
THIS MOUNT IS NOT RECOMMENDED FOR USE WITH STEEL STUD WALL STRUCTURES THAT ARE
LESS THAN 10 GAUGE IN THICKNESS ON THE PROPOSED INSTALLATION WALL. THIS INSTALLATION
GUIDE ONLY PROVIDES INSTRUCTIONS FOR MOUNTING TO WOODEN STUDS. ONLY A QUALIFIED
TECHNICIAN, USING PROPER PROFESSIONAL JUDGMENT, SHOULD INSTALL THIS MOUNT AND FLAT
PANEL DISPLAY ON A STEEL STUD WALL STRUCTURE.
DO NOT ATTACH THE POWER PLUG OR CONNECT THE POWER CORD TO ELECTRICAL POWER UNTIL
THE INSTALLATION AND MOUNTING PROCEDURE IS COMPLETE.
CONTACT VIZIO TECHNICAL SUPPORT WITH ANY QUESTIONS AT (844) 254-8088.

16
OPENING THE SHIPPING CONTAINER
Roll crate near desired installation location, leaving plenty of room around it to work and to move the
panels of the shipping container.
17
1. Unlatch and remove the top.
2. Unlatch and remove the sides.
3. Unlatch and remove the rear.
4. Unlatch and remove the front.
The only way to safely move the RS120-B3 is with the shipping container and
shipping stand. Store them so that the TV can be relocated in the future.
Lift the TV to remove it from the base portion of the shipping container.
1
2
3
4
18
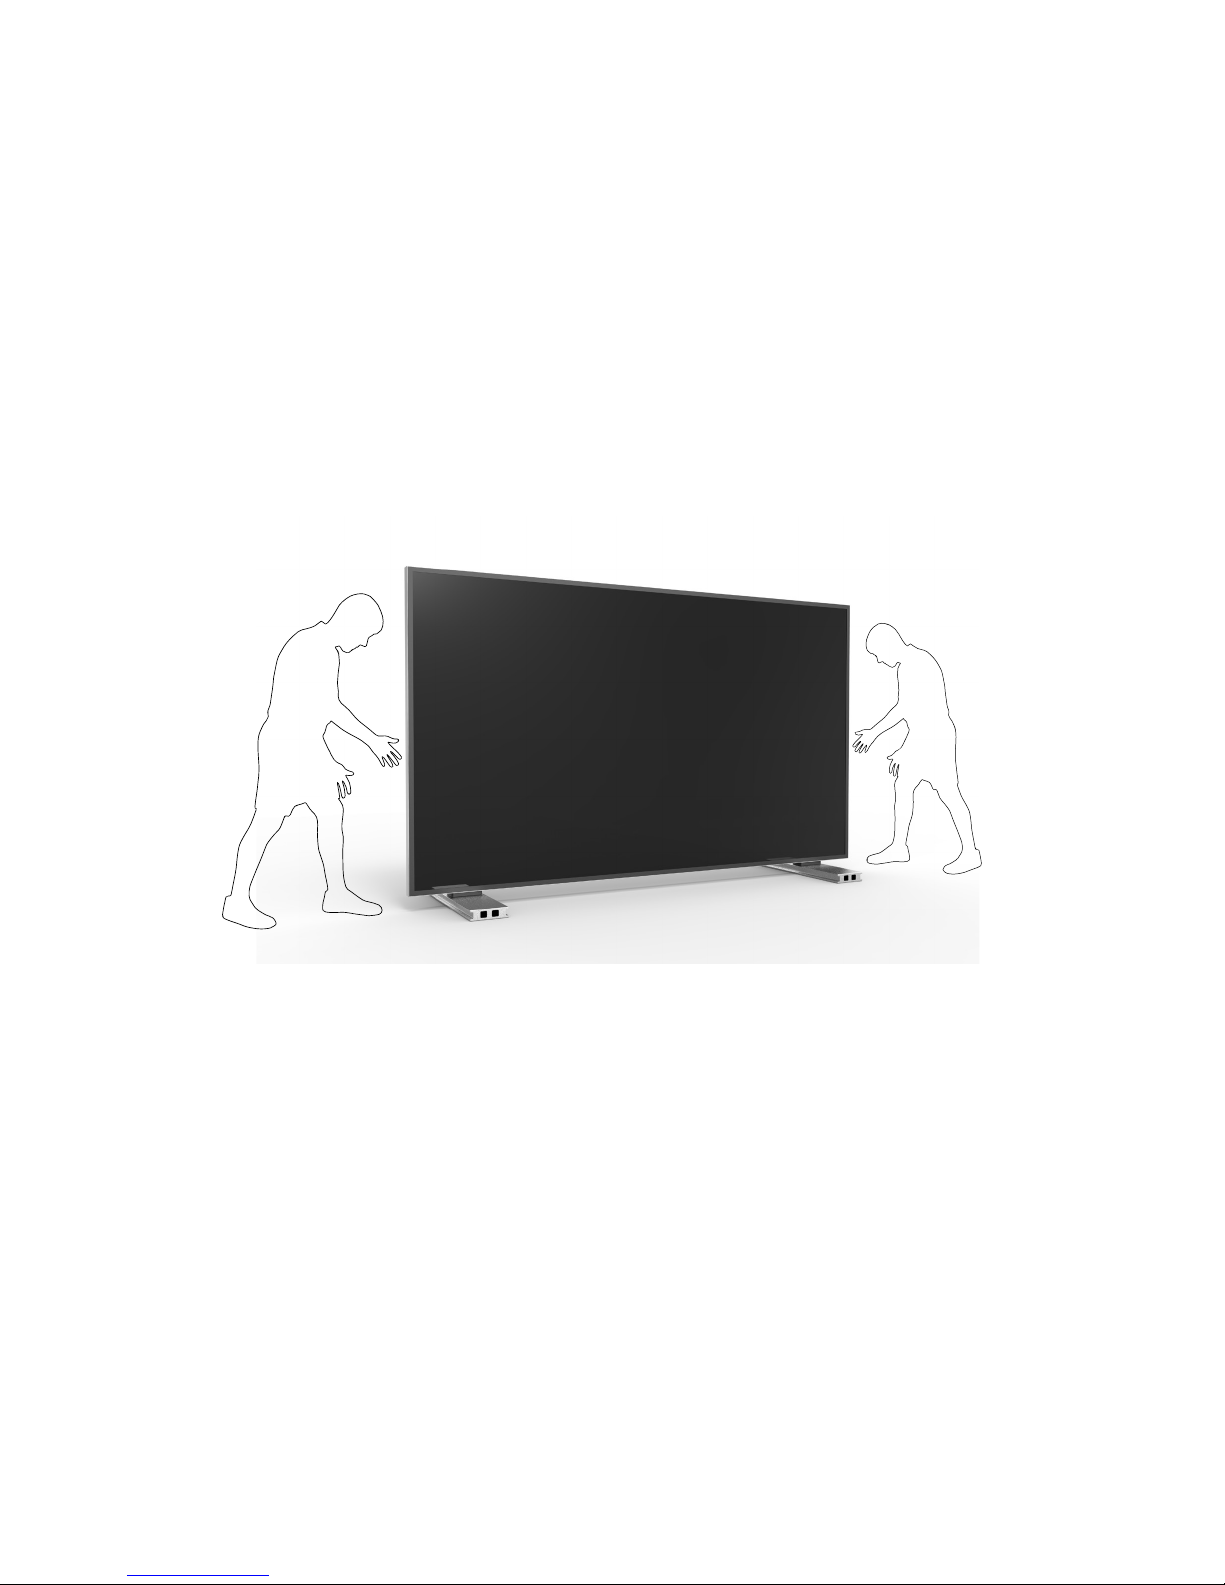
At least three people should assemble and install the TV. For most installations, a fourth person will be
helpful.
Inspect the wall mount parts and make sure that none of them are missing or damaged. If any parts are
missing or damaged, stop installing the wall mount and contact VIZIO Customer Service at (844) 254-8088
(toll-free).
ASSEMBLING AND ATTACHING THE MOUNT
 Loading...