

Page 1
#°Zi©
Dear VlZlO Customer,
Congratulations on your new VtZlO P42 High
Definition Plasma Television purchase. Thank
you for your support. For maximum benefit of
your set, please read these instructions before
making any adjustments, and retain them for
future reference. We hope you will experience
many years of enjoyment from your new VlZtO
P42 High Definition Television.
For assistance, please call 714-668-0588 or e-
mail us at techsupport@vinc.com.
To purchase or inquire about accessories and
installation services for your VlZlO Plasma TV,
please visit our website at www.vizioce.com or
call toll free at 888-VlZIOCE (888-849-4623).
VIZtO P42 HDTV User Manual
We recommend you register your VlZlO P42
HDTV either at our website www.vizioce.com or
fill in your registration card and mail it in. For
peace of mind and to protect your investment
beyond the standard warranty, VlZlO offers on-
site extended warranty service plans. These
plans give additional coverage during the
standard warranty period. Visit our website or call
us to purchase a plan.
Write down the serial number located on the back
of your P42.
ASP
Purchase Date
VlZlO is a registered trademark of V, Inc.
HDMI logo and "High Definition Multimedia Interface" are registered trademarks of HDMI Licensing LLC.
Version 6/14/2006
www.VlZlOCE.com
' O
Page 2
VIZtOP42HDTVUserManual
THIS PRODUCT HAS BEEN DESIGNED AND TESTED FOR COMPLIANCE WITH REGULATORY SAFETY CERTIFICATIONS
This product is designed and manufactured to operate within defined design limits, and misuse may result in electric
shock or fire. To prevent the product from being damaged, the following rules should be observed for the installation,
use and maintenance of the product. Read the following safety instructions before operating the display. Keep these
instructions in a safe place for future reference.
• To avoid the risk of electric shock or component damage, switch off the power before connecting other components to the P42 Plasma
HDTV.
• Unplug the power cord before cleaning the P42 Plasma HDTV. A damp cloth is sufficient for cleaning the P42 Plasma HDTV. Do not
use a liquid or a spray cleaner for cleaning the product. Do not use abrasive cleaners.
• Always use the accessories recommended by the manufacturer to insure compatibility.
• When moving the P42 Plasma HDTV from an area of low temperature to an area of high temperature, condensation may form on the
housing. Do not turn on the P42 Plasma HDTV immediately after this to avoid causing fire, electric shock or component damage.
• Do not place the P42 Plasma HDTV on an unstable cart, stand, or table. If the P42 Plasma HDTV fails, it can injure a person and
cause serious damage to the appliance. Use only a cart or stand recommended by the manufacturer or sold with the P42 Plasma
HDTV.
• A distance of at least 3 feet should be maintained between the P42 Plasma HDTV and any heat source, i.e. radiator, heater, oven,
amplifier etc. Do not install the product close to smoke. Operating the product close to smoke or moisture may cause fire or electric
shock.
• Slots and openings in the back and bottom of the cabinet are provided for ventilation. To ensure reliable operation of the P42 Plasma
HDTV and to protect it from overheating, be sure these openings are not blocked or covered. Do not place the P42 Plasma HDTV in a
bookcase or cabinet unless proper ventilation is provided.
• Never push any object into the slot on the P42 Plasma HDTV cabinet. Do not place any objects on the top of the product. It could short
circuit parts causing a fire or electric shock. Never spill liquids on the P42 Plasma HDTV.
• The P42 Plasma HDTV should be operated only from the type of power source indicated on the label. If you are not sure of the type of
power supplied to your home, consult your dealer or local power company.
• The power cable must be replaced when using different voltage from that specified in the User Manual. For more information, contact
your dealer.
• The P42 Plasma HDTV is equipped with a three-pronged grounded plug, a plug with a third (grounding) pin. This plug will fit only into a
grounded power outlet as a safety feature. If your outlet does not accommodate the three-wire plug, have an electrician install the
correct outlet, or use an adapter to ground the appliance safety. Do not defeat the safety purpose of the grounded plug.
• Do not overload power strips and extension cords. Overloading can result in fire or electric shock.
• The wall socket shall be installed near the equipment and shall be easily accessible.
• Only the marked power source can be used for the product. Any power source other than the specified one may cause fire or electric
shock.
• Do not touch the power cord during lightning. To avoid electric shock, avoid handling the power cord during electrical storms.
• Unplug the unit during a lightening storm or when it will not be used for long period of time. This will protect the P42 Plasma HDTV
from damage due to power surges.
• Do not attempt to repair or service the product yourself. Opening or removing the back cover may expose you to high voltages, the risk
of electric shock, and other hazards. If repair is required, please contact your dealer and refer all servicing to qualified service
personnel.
• Keep the product away from moisture. Do not expose this appliance to rain or moisture. If water penetrates into the product, unplug
the power cord and contact your dealer. Continuous use in this case may result in fire or electric shock.
• Do not use the product if any abnormality occurs. If any smoke or odor becomes apparent, unplug the power cord and contact your
dealer immediately. Do not try to repair the product yourself.
• Avoid using dropped or damaged appliances. If the product is dropped and the housing is damaged, the internal components may
function abnormally. Unplug the power cord immediately and contact your dealer for repair. Continued use of the product may cause
fire or electric shock.
• Do not install the product in an area with heavy dust or high humidity. Operating the product in environments with heavy dust or high
humidity may cause fire or electric shock.
• Follow instructions for moving the product. Ensure that the power connector and any other cables are unplugged before moving the
product.
• Hold the power connector when removing the power cable. Pulling the power cable itself may damage the wires inside the cable and
cause fire or etectric shock. When the product wilt not be used for an extended period of time, unplug the power connector.
• To avoid risk of electric shock, do not touch the connector with wet hands.
• Insert batteries in accordance with instructions. Incorrect polarities may cause damage and leakage of the batteries, operator injury
and contamination the remote controller.
• If any of the following occurs please contact the dealer:
• Operating environment. Temperature: 40°F - 95°F, Humidity: I0% - 90% non-condensing, Altitude: 0 ~ 650Oft (O ~ 20O0m)
o The power connector fails or frays.
o Liquid sprays or any object drops into the P42 Plasma HDTV.
o The Display is exposed to rain or other moisture.
o The Display is dropped or damaged in any way.
o The performance of the Display changes substantially.
Version 6/14/2006 2
www.VlZlOCE.com
V
Page 3
VIZIOP42HDTVUserManual
TeLevision Antenna Connection Protection
External TeLevision Antenna Groundinq
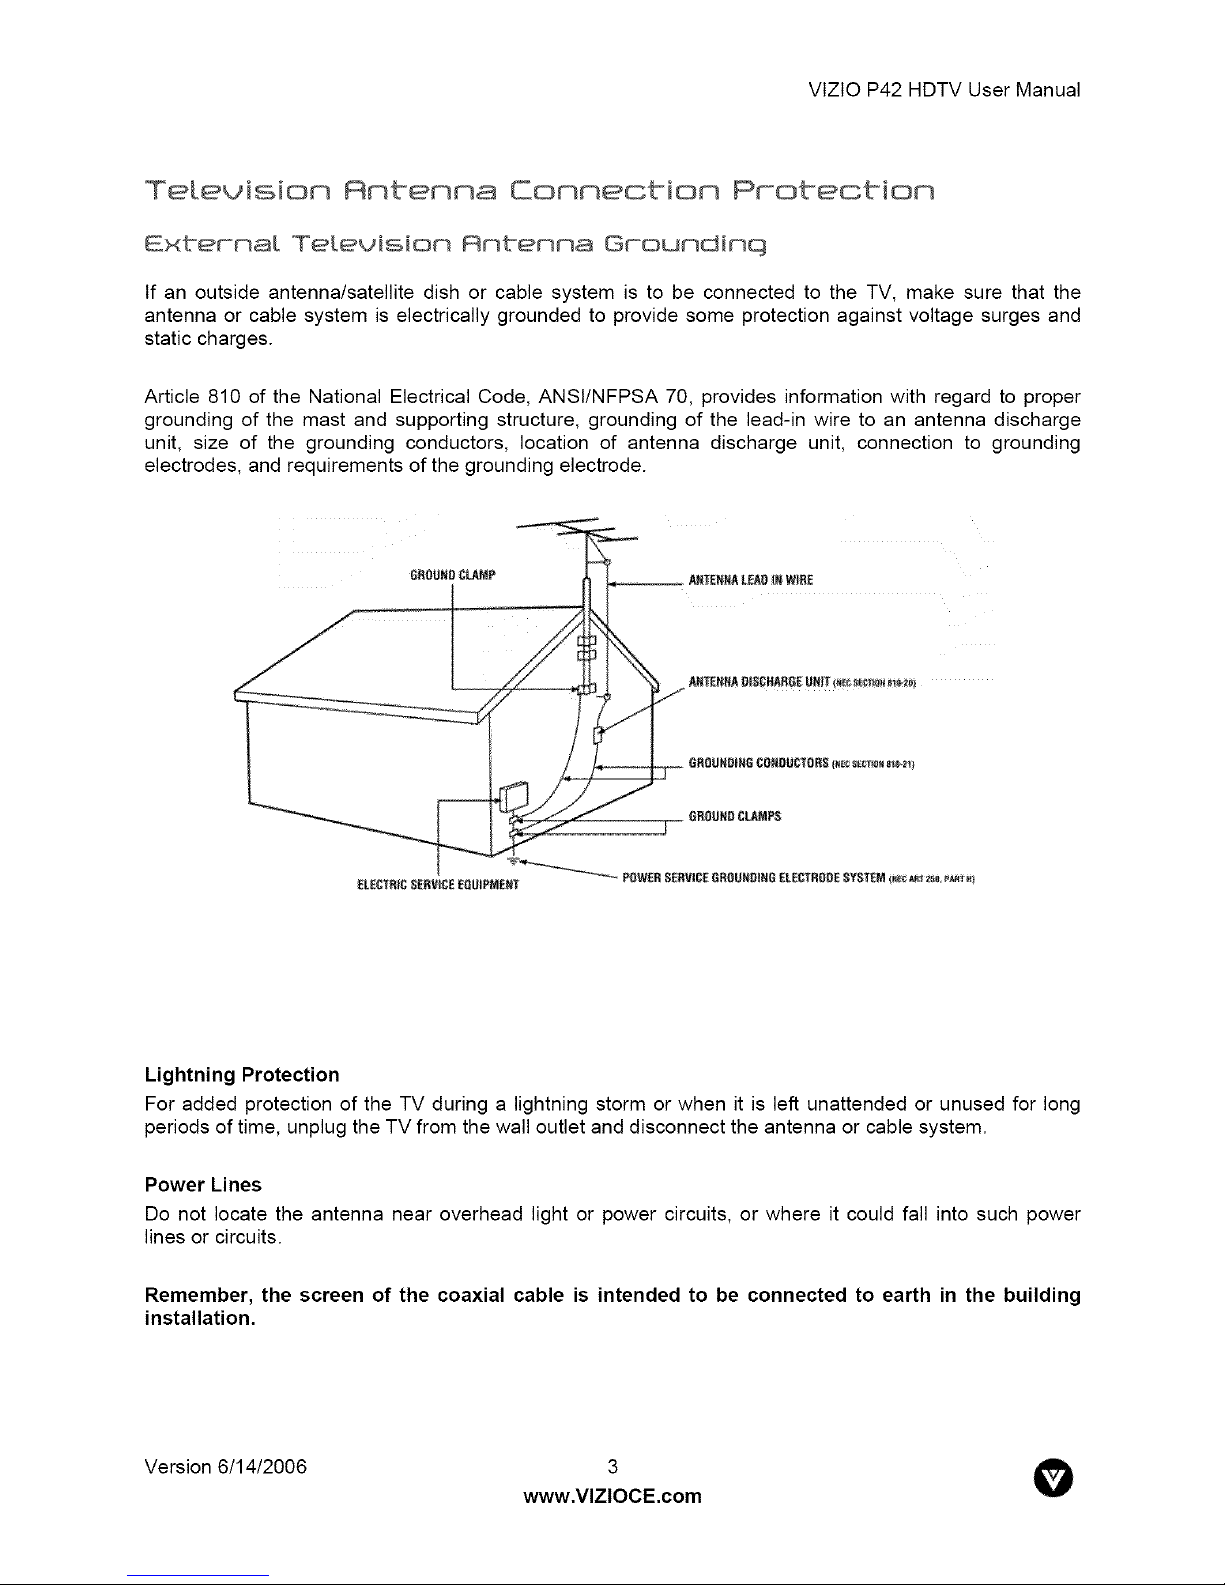
If an outside antenna/satellite dish or cable system is to be connected to the TV, make sure that the
antenna or cable system is electrically grounded to provide some protection against voltage surges and
static charges.
Article 810 of the National Electrical Code, ANSt/NFPSA 70, provides information with regard to proper
grounding of the mast and supporting structure, grounding of the lead-in wire to an antenna discharge
unit, size of the grounding conductors, location of antenna discharge unit, connection to grounding
electrodes, and requirements of the grounding electrode.
Lightning Protection
For added protection of the TV during a lightning storm or when it is left unattended or unused for long
periods of time, unplug the TV from the wall outlet and disconnect the antenna or cable system.
Power Lines
Do not locate the antenna near overhead light or power circuits, or where it could fall into such power
lines or circuits.
Remember, the screen of the coaxial cable is intended to be connected to earth in the building
installation.
Version 6/14/2006 3
www.VlZlOCE.com
V
Page 4
VIZtOP42HDTVUserManual
Opeoioq maokaqe
Your VlZlO P42 HDTV and it accompanying accessories are carefully packed in a cardboard carton that
have been designed to protect it from transportation damage. Now you have opened the carton check
that the P42 HDTV is in good condition and that all of the accessories are included.
The P42 HDTV weighs approximately 1001b (45kg) and about 43" wide x 32" tall we strongly advise that
you have at least 2 people to unpack and install the HDTV.
The glass surface can easily be scratched or broken so please handle the product gently and never place
the HDTV with the glass facing downwards on a surface without protective padding.
IMPORTANT: Save the carton and packing material for future shipping.
maokaqe Com eo s
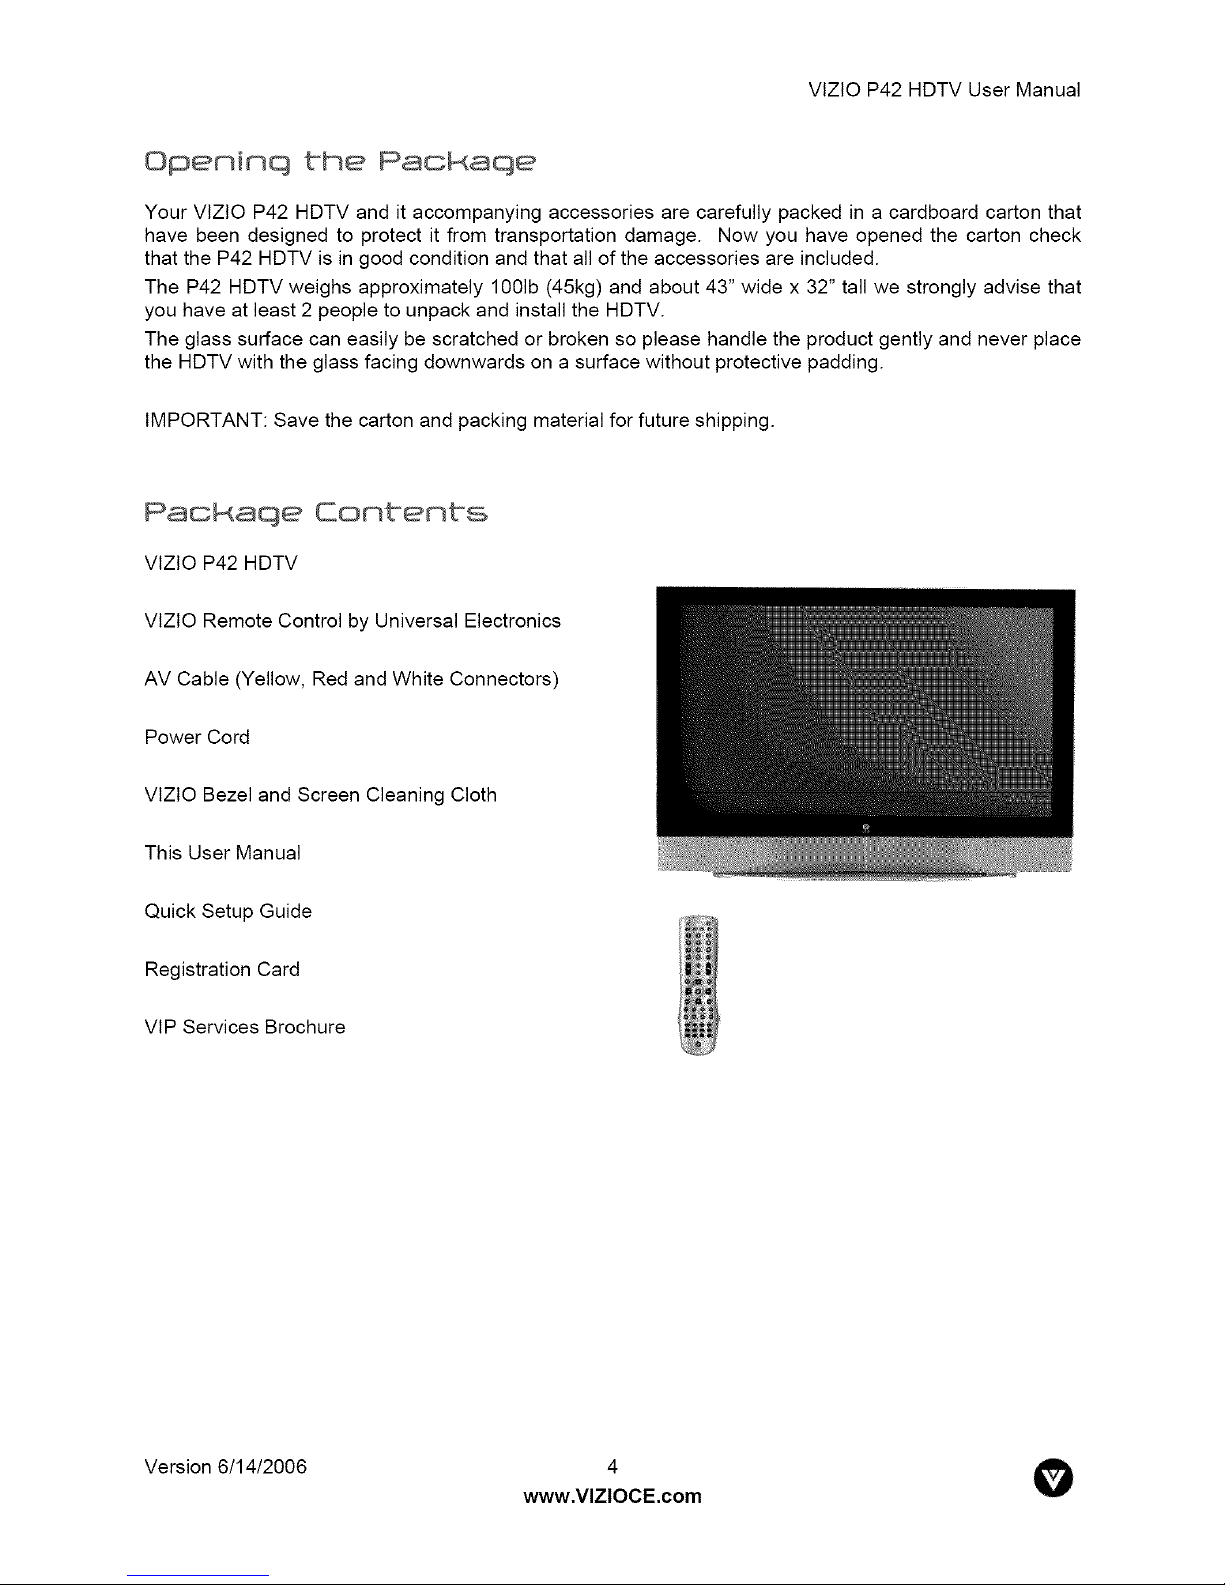
VlZtO P42 HDTV
VlZtO Remote Control by Universal Electronics
AV Cable (Yellow, Red and White Connectors)
Power Cord
VlZlO Bezel and Screen Cleaning Cloth
This User Manual
Quick Setup Guide
Registration Card
VlP Services Brochure
Version 6/14/2006
www.VlZlOCE.com
4 O
Page 5
VIZtOP42HDTVUserManual
Certified Rooessomies
P4s HDTV are sold sepamateLv
Wall Mounts
High Definition Cables
Extra or replacement Remote
VIZtO also offers Installation Services and Extended Warranty Services for your VIZtO P42 HDTV
To purchase or inquire about additional accessories and services for your VIZIO product, visit our web
site at www.vizioce.com or call us toll free at 888-VIZtOCE (888-849-4623)
InstaLLation Preparation
Please read this user manual carefully before installing your VlZtO HDTV.
The power consumption of the TV is about 380W, please use the power cord designated for TV. When
an extension cord is required, use one with the correct power rating. The cord must be grounded and the
grounding feature must not be defeated.
The TV should be installed on a flat surface to avoid tipping. For proper ventilation, you must allow space
between the back of the TV and the wall. tf you would like to mount your TV on the wall, please see
below 'Preparing Your Plasma TV for Wall Mounting' for additional information. Avoid installing the TV in
places with high humidity, dust or smoke so as not to shorten the service life of the electronic components.
Install the TV in landscape orientation; any 90 ° clockwise or counter-clockwise installation may induce
poor ventilation and excessive component damage.
VlZlO offers professional installation services. Please contact VlZtO for more information on these
services at 888-VIZtOCE (888-849-4623) or www.vizioce.com.
Version 6/14/2006 5
www.VlZlOCE.com
V
Page 6
VIZIOP42HDTVUserManual
Preparinq Your Plasma TV for Wall Mountinq
The VIZtO P42HDTV can either be kept on the stand base or mounted on the wall for viewing. If you
choose to mount the P42HDTV on the wall, please follow the instructions below for removing the stand
base.
To remove bhe sband base
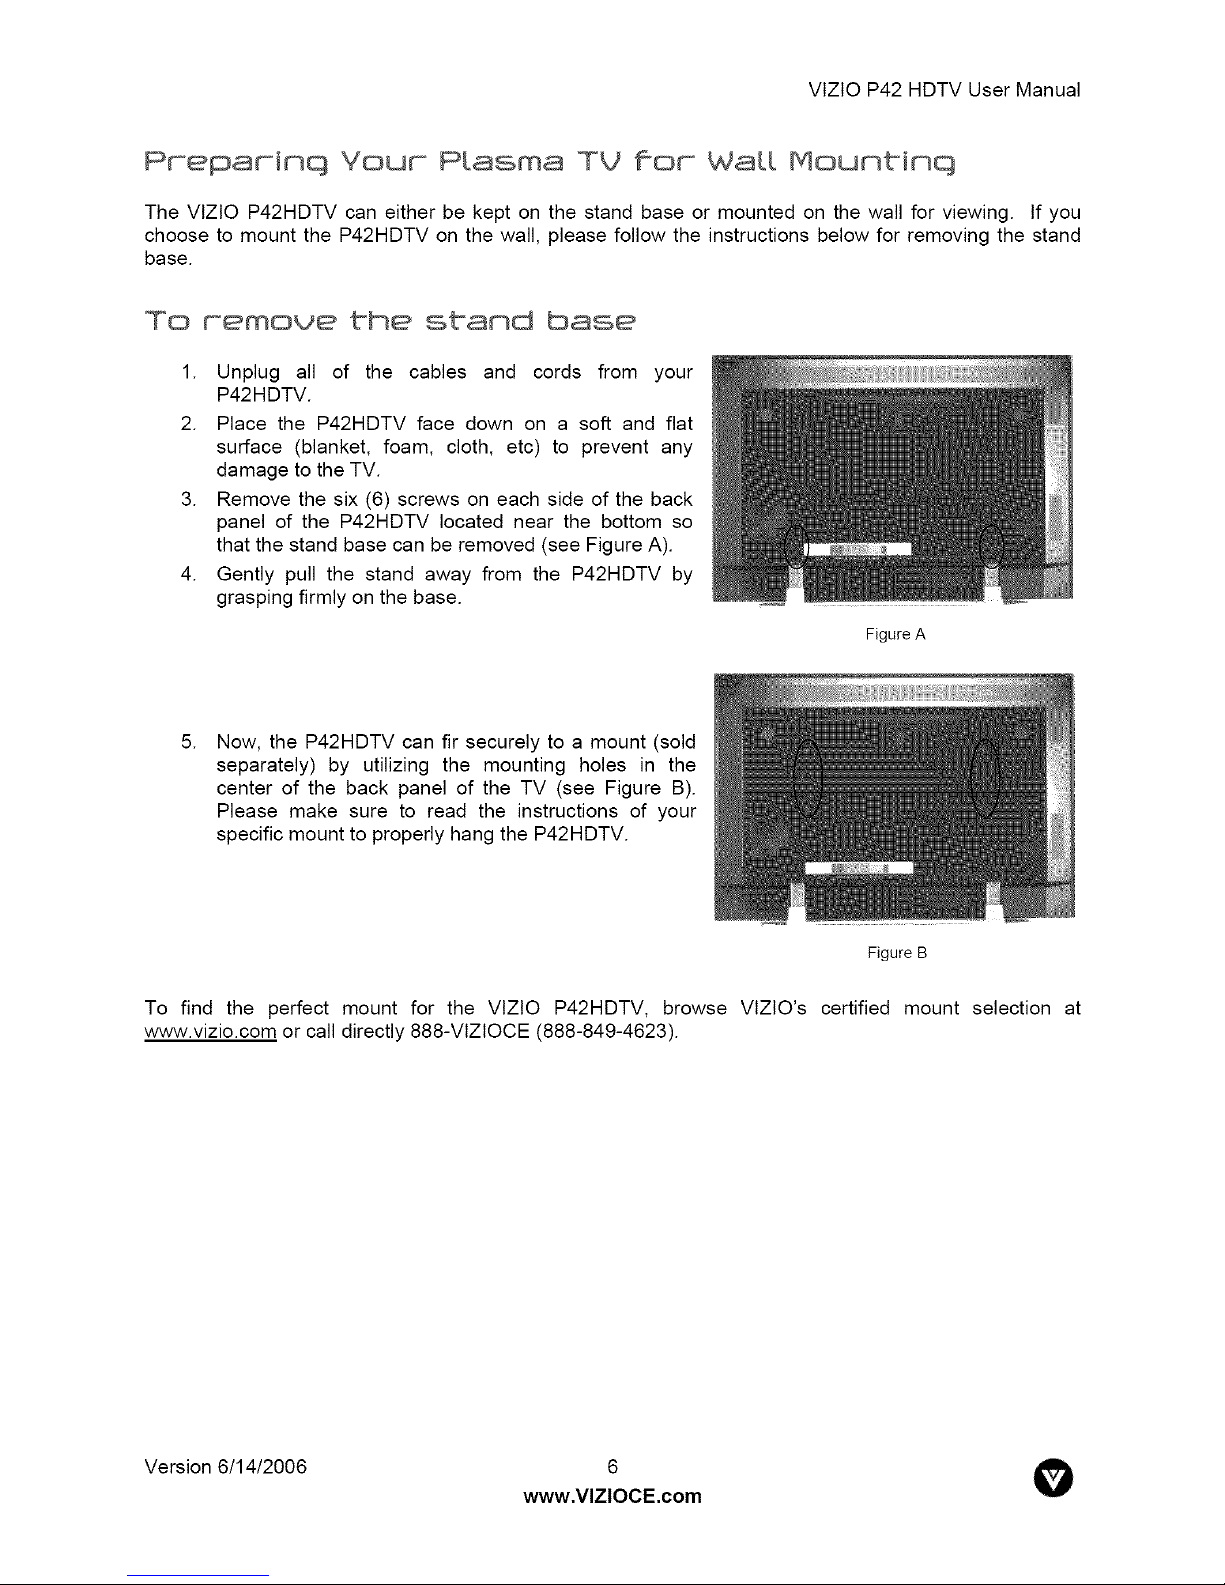
1. Unplug all of the cables and cords from your
P42HDTV.
2. Place the P42HDTV face down on a soft and flat
surface (blanket, foam, cloth, etc) to prevent any
damage to the TV.
3. Remove the six (6) screws on each side of the back
panel of the P42HDTV located near the bottom so
that the stand base can be removed (see Figure A).
4. Gently pull the stand away from the P42HDTV by
grasping firmly on the base.
Figure A
.
Now, the P42HDTV can fir securely to a mount (sold
separately) by utilizing the mounting holes in the
center of the back panel of the TV (see Figure B).
Please make sure to read the instructions of your
specific mount to properly hang the P42HDTV.
Figure B
To find the perfect mount for the VlZlO P42HDTV, browse VlZtO's certified mount selection at
www.vizio.com or call directly 888-VlZlOCE (888-849-4623).
Version 6/14/2006 6
www.VlZlOCE.com
V
Page 7
VIZIOP42HDTVUserManual
Tabte off Contents
Oqapber & Basic Contro[.s and Conr_ections .................................................................. q
1.1 Front Panel .......................................................................................................................................................... 9
1.2 Side Panel Controls ............................................................................................................................................. 9
1.3 Rear Panel Connections ................................................................................................................................... 10
1.4 VlZIO Universal Remote Control ....................................................................................................................... 12
1.4.1 Insertion of Batteries in the Remote Control .............................................................................................. 15
1.4.2 Remote Control Range .............................................................................................................................. 15
1.4.3 VlZIO Universal Remote Control Precautions ........................................................................................... 15
Chaptef 2 Connectimq Equipment ..................................................................................&5
2.1 Which Video Connection Should IUse? ............................................................................................................16
2.2 Connecting Your DVD Player ............................................................................................................................17
2.2.1 Using HDMI ...............................................................................................................................................17
2.2.2 Using Component Video ............................................................................................................................19
2.2.3 Using S-Video (AV3) ..................................................................................................................................20
2.2.4 Using Composite (AV) Video .....................................................................................................................21
2.3 Connecting Your HDTV Set-Top Box ................................................................................................................22
2.3.1 Using HDMI ...............................................................................................................................................22
2.3.2 Using Component Video ............................................................................................................................24
2.4 Connecting Your VCR or Video Camera ........................................................................................................... 25
2.5 Connecting Coaxial (RF) ................................................................................................................................... 26
2.5.1 Using Your Antenna or Digital Cable for DTV ............................................................................................ 26
2.5.2 Using Your Antenna or Cable for TV ......................................................................................................... 27
2.5.3 Using the Antenna or Cable through your VCR ......................................................................................... 27
2.6 Connecting an external Receiver/Amp .............................................................................................................. 28
2.7 Connecting a PC Computer .............................................................................................................................. 29
Chapter 3 Settimq Up to Watch Te_.e_isiom ................................................................... 30
3.1 Basic Plasma TV Start Up ................................................................................................................................. 30
3.2 Watching a TV Program .................................................................................................................................... 32
3.3 Adjusting Basic Plasma TV Settings ................................................................................................................. 32
3.4 DTV Tuner Setup .............................................................................................................................................. 33
3.4.1 Parental Controls for DTV .......................................................................................................................... 40
3.4.2 DTV Channel Information .......................................................................................................................... 42
3.4.3 Program Information .................................................................................................................................. 43
3.4.4 Setting a Password .................................................................................................................................... 44
3.5 Using the On Screen Display (OSD) ................................................................................................................. 45
3.5.10SD Menu Operations .............................................................................................................................. 45
3.5.2 Picture Adjust ............................................................................................................................................ 46
3.5.3 PC Picture Adjust ...................................................................................................................................... 46
3.5.4 PC Color Temperature ............................................................................................................................... 47
3.5.5 Audio Adjust .............................................................................................................................................. 47
3.5.6 TV Tuner Setup for TV ............................................................................................................................... 47
3.5.7 Parental Controls for TV ............................................................................................................................ 48
3.5.8 PIP/POP Setup .......................................................................................................................................... 48
3.5.9 Special Features ........................................................................................................................................ 48
3.5.10 Understanding Viewing Features ............................................................................................................. 49
3.5.11 Viewing Modes ........................................................................................................................................ 49
3.5.12 Picture-ln-Picture(PIP)/Picture-by-Picture(POP)Mode ............................................................................. 50
3.5.13 Adjusting Basic PIP/POP Settings ........................................................................................................... 50
3.5.14 Using the Parental Controls ..................................................................................................................... 51
3.5.15 Setting the Sleep Timer ........................................................................................................................... 52
3.6 Programming the VlZIO Universal Remote Control ........................................................................................... 53
3.6.1 Programming for VCR ............................................................................................................................... 53
3.6.2 Programming for Cable Set-Top Box ......................................................................................................... 53
3.6.3 Programming for DVD Player .................................................................................................................... 54
3.6.4 Searching for Component Codes .............................................................................................................. 54
3.7 Using a Cable or Satellite Remote .................................................................................................................... 54
Chapter 4 Maintenar3oe and T_oobteshootinq .............................................................SS
4.1 Maintenance ......................................................................................................................................................55
4.2 Troubleshooting Guide ......................................................................................................................................55
Version 6/14/2006 7
www.VlZlOCE.com
V
Page 8
VIZtOP42HDTVUserManual
4.3 Telephone & Technical Support ........................................................................................................................ 57
4.4 Compliance ....................................................................................................................................................... 58
4.5 FCC Class B Radio Interference Statement ...................................................................................................... 58
OqaP _:°_÷r S MIscellaneoos In_orrna_iom ........................................................................... Sq
5.1 Specifications .................................................................................................................................................... 59
5.2 Glossary - Standard Definitions ........................................................................................................................ 60
5.3 Index ................................................................................................................................................................. 61
5.4 Limited Product Warranty .................................................................................................................................. 63
5.4.1 VIZIO EXTENDED SERVICE WARRANTY ............................................................................................... 63
5.5 Component Program Codes .............................................................................................................................. 64
Version 6/14/2006 8
www.VlZlOCE.com
V
Page 9
VIZtOP42HDTVUserManual
Chapter 1 Basic ControLs and Connections
,z°s Front Pane[
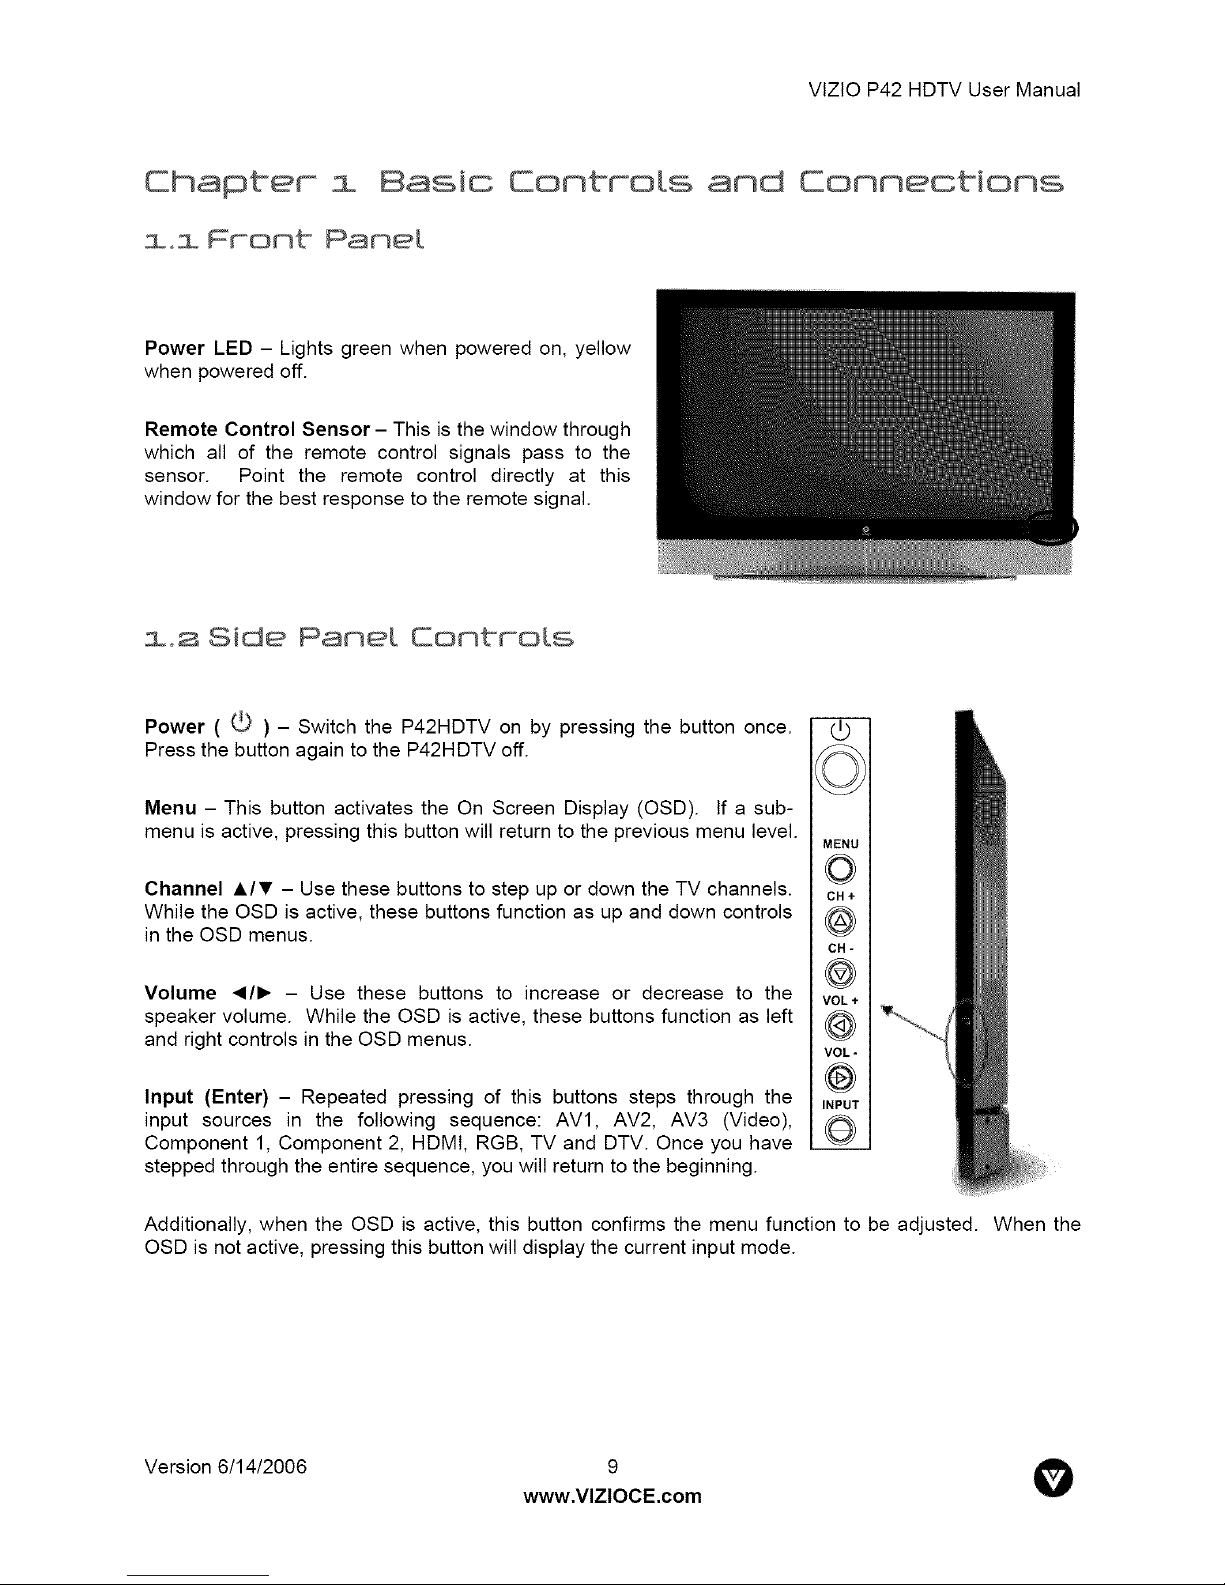
Power LED - Lights green when powered on, yellow
when powered off.
Remote Control Sensor - This is the window through
which all of the remote control signals pass to the
sensor. Point the remote control directly at this
window for the best response to the remote signal.
i.s Side Panet Controts
Power ( _'_ ) - Switch the P42HDTV on by pressing the button once.
Press the button again to the P42HDTV off.
Menu - This button activates the On Screen Display (OSD). If a sub-
menu is active, pressing this button will return to the previous menu level.
Channel A/T - Use these buttons to step up or down the TV channels.
While the OSD is active, these buttons function as up and down controls
in the OSD menus.
Volume _1/1_ - Use these buttons to increase or decrease to the
speaker volume. While the OSD is active, these buttons function as left
and right controls in the OSD menus.
Input (Enter) - Repeated pressing of this buttons steps through the
input sources in the following sequence: AV1, AV2, AV3 (Video),
Component 1, Component 2, HDMI, RGB, TV and DTV. Once you have
stepped through the entire sequence, you will return to the beginning.
Additionally, when the OSD is active, this button confirms the menu function to be adjusted. When the
OSD is not active, pressing this button will display the current input mode.
5,
Version 6/14/2006 9
www.VlZlOCE.com
V
Page 10
i03 Ream Panel Conneotions
Le#t Porbion
VIZtOP42HDTVUserManual
.
2.
.
4.
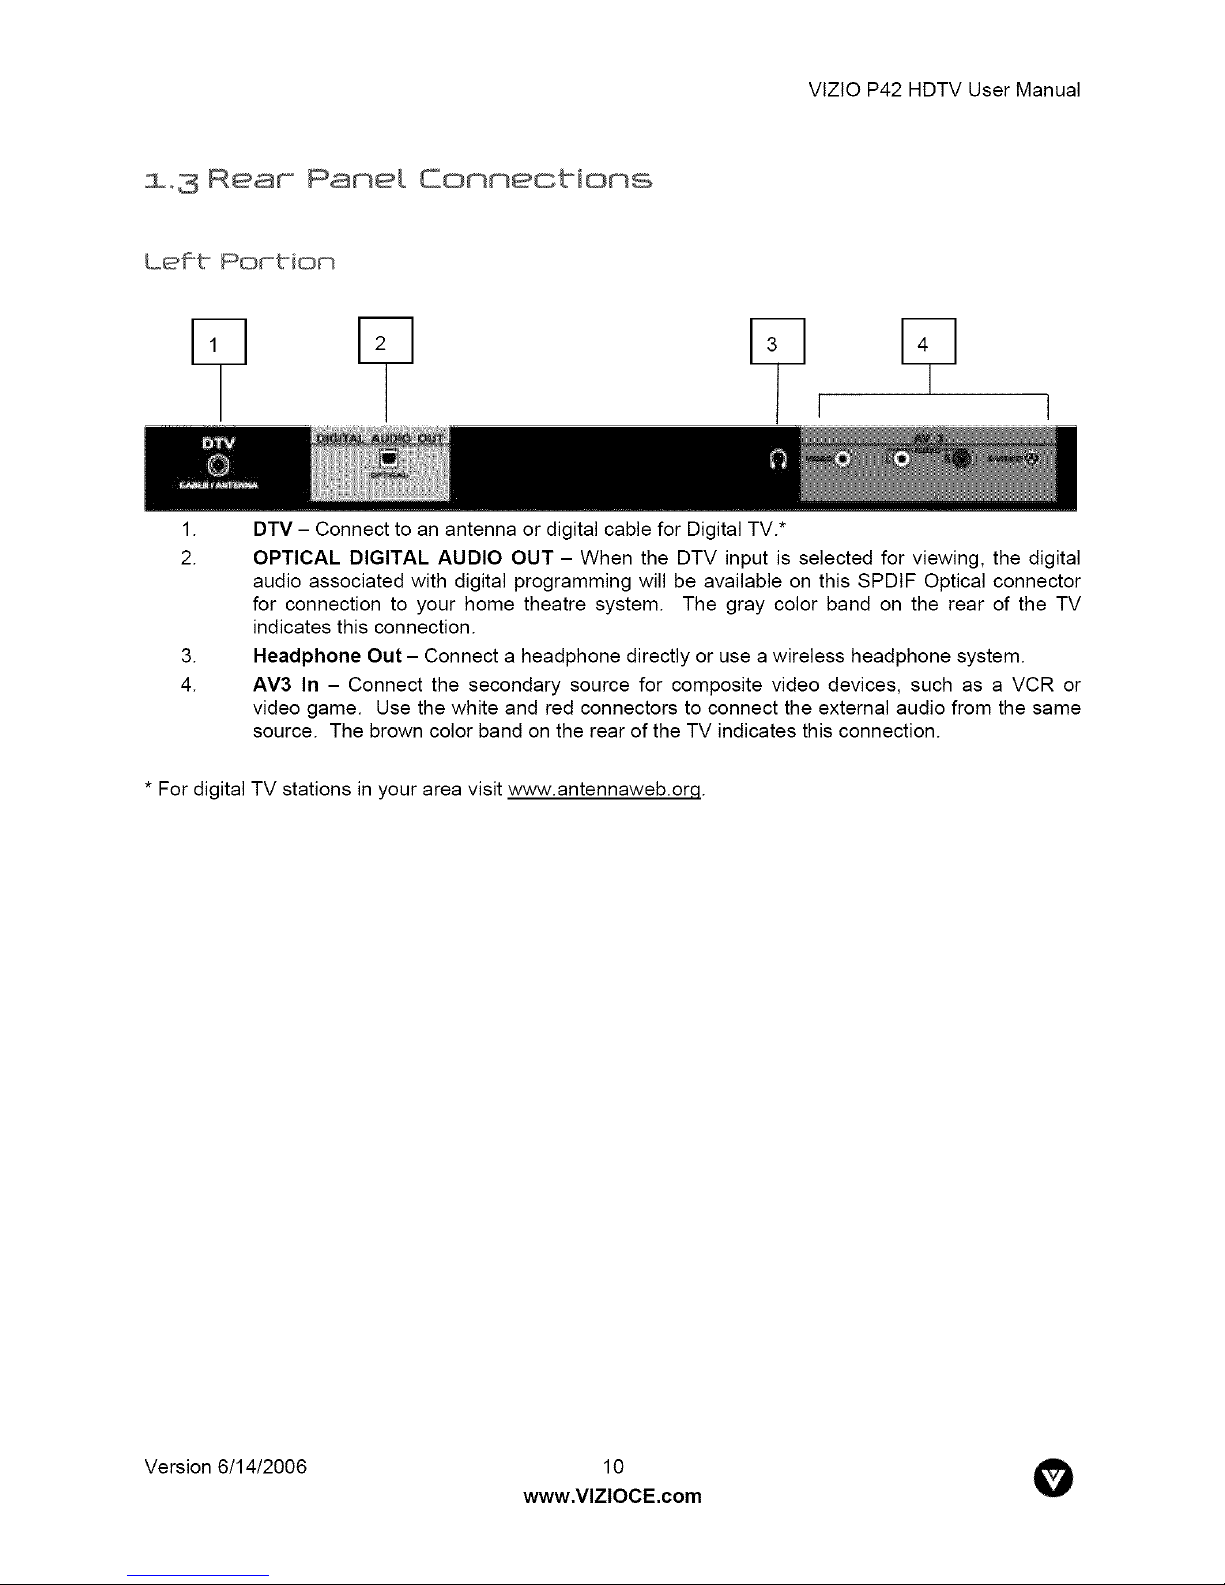
* For digital TV stations in your area visit www.antennaweb.orq.
DTV - Connect to an antenna or digital cable for Digital TV.*
OPTICAL DIGITAL AUDIO OUT - When the DTV input is selected for viewing, the digital
audio associated with digital programming will be available on this SPDIF Optical connector
for connection to your home theatre system. The gray color band on the rear of the TV
indicates this connection.
Headphone Out - Connect a headphone directly or use a wireless headphone system.
AV3 In - Connect the secondary source for composite video devices, such as a VCR or
video game. Use the white and red connectors to connect the external audio from the same
source. The brown color band on the rear of the TV indicates this connection.
Version 6/14/2006
www.VlZlOCE.com
lO O
Page 11

Riqht Portion
.
SERVICE - This custom communication port is for factory service only.
6.
.
8.
.
10.
11.
12.
13.
14.
HDMI - Connect a DVD multimedia player or set top box through this all digital connector.
The white color band on the rear of the TV indicates this connection. For users who want to
connect to a DVl enabled device, use a DVI-HDMI cable and connect the Analog Audio
output of the device to the L+R AUDIO here. Your VlZIO Certified HDMI and HDMI-DVl
cables are available for purchase from www.vizioce.com or by calling 888-VIZtOCE (888-
849-4623).
RGB PC - Connect the video and audio from a computer here. The purple color band on the
rear of the TV indicates this connection.
COMPONENT 1 (YPb/CbPr/Cr with Audio L/R) - Connect the primary source for
component video devices such as a DVD Player or set top box here. From left to right, use
green for Y, blue for Pb (or Cb), red for Pr (or Cr), white for left audio and red for right audio
inputs. The green color band on the rear of the TV indicates this connection.
COMPONENT 2 (YPb/CbPr/Cr with Audio L/R) - Connect the secondary source for
component video devices such as a DVD Player or set top box here. From left to right, use
green for Y, blue for Pb (or Cb), red for Pr (or Cr), white for left audio and red for right audio
inputs. The blue color band on the rear of the TV indicates this connection.
AVl In - Connect the primary source for composite video devices, such as a VCR or video
game. Use the white and red connectors to connect the external audio from the same source.
The yellow color band on the rear of the TV indicates this connection.
AV2 In - Connect the secondary source for composite video devices, such as a VCR or
video game. Use the white and red connectors to connect the external audio from the same
source. The orange color band on the rear of the TV indicates this connection.
Audio Out - Connect the audio from the Plasma TV to an external device, such as a home
theatre system, external amplifier or stereo. Speakers cannot be connected directly to here.
The gray color band on the rear of the TV indicates this connection.
TV - Connect to an antenna or cable service for standard NTSC TV.
AC IN - Plug-in the supplied AC Power Cord here.
VIZtOP42HDTVUserManual
I II I
HDMI logo
Version 6/14/2006
and "High Definition Multimedia Interface" are registered trademarks of HDMI Licensing LLC.
www.VlZlOCE.com
11 O
Page 12
VIZtOP42HDTVUserManual
,1,4 VIZIO Universat Remote Control
The VlZtO Universal Remote Control is a comprehensive remote that can be used to control up to four
different components. The remote button functions are explained on the following pages.
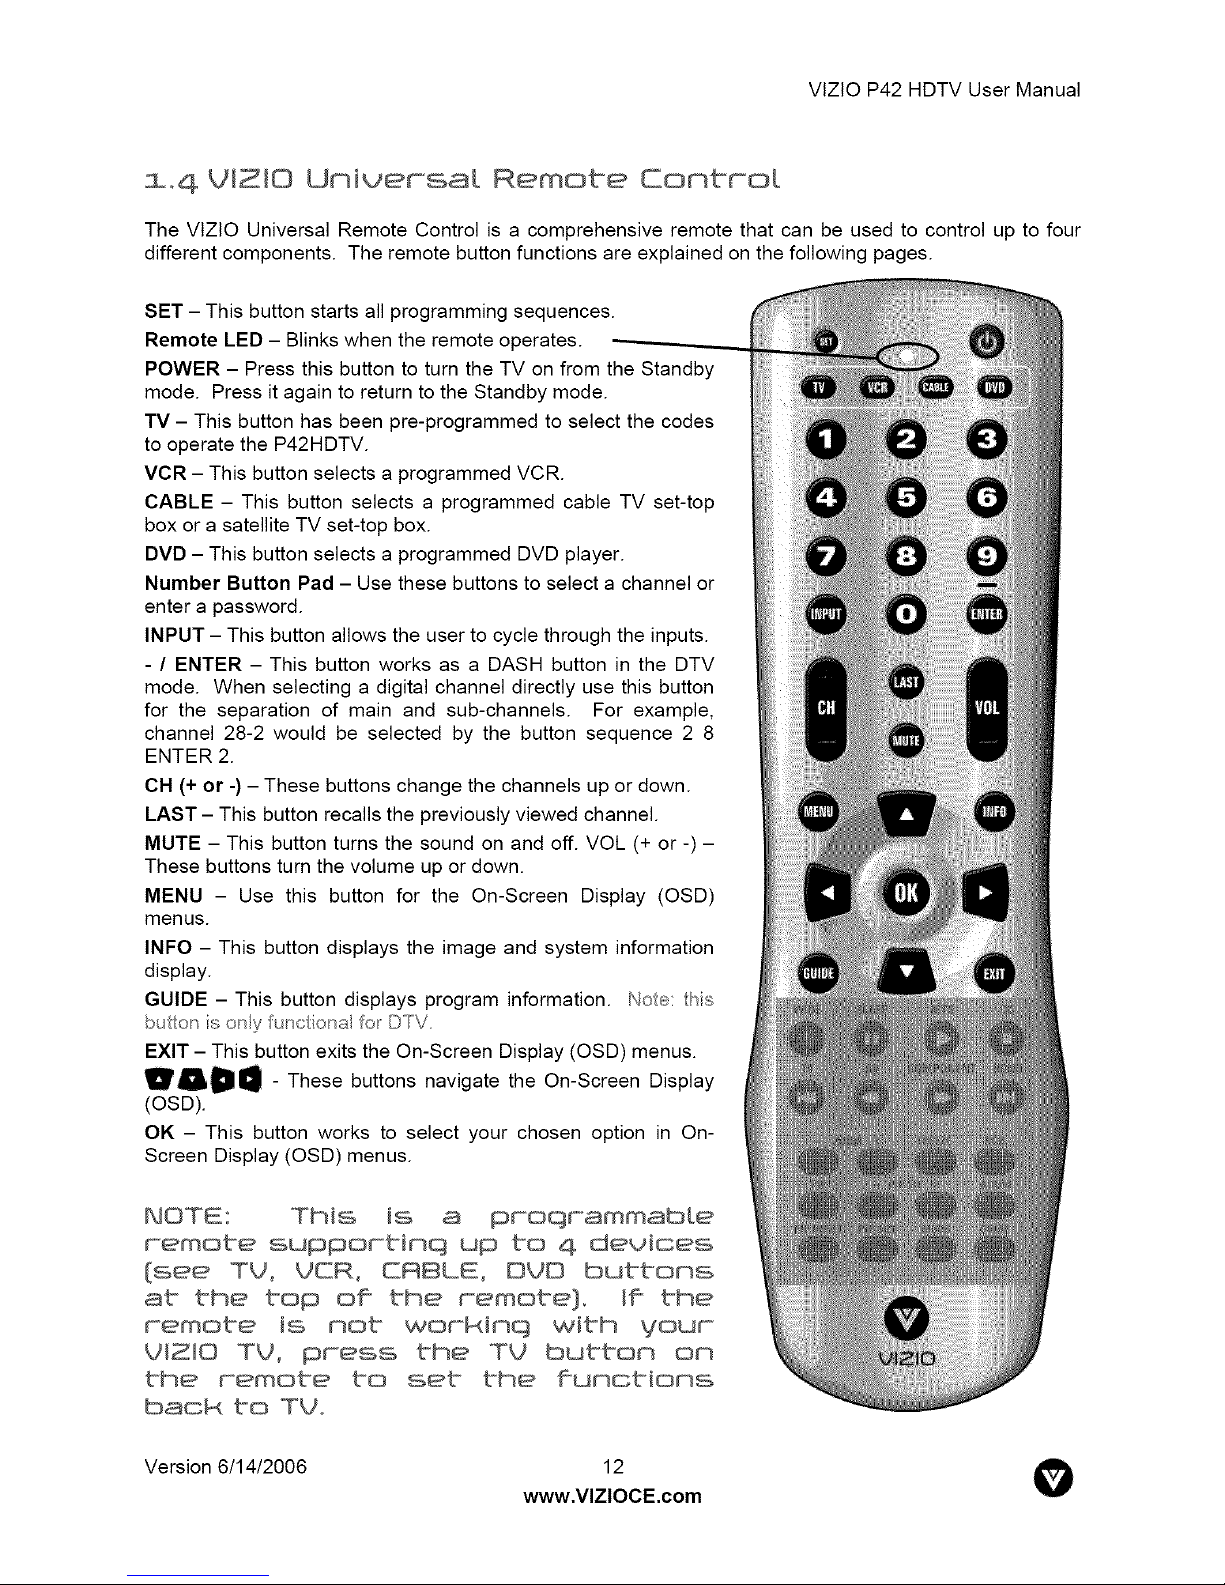
SET - This button starts all programming sequences.
Remote LED - Blinks when the remote operates.
POWER - Press this button to turn the TV on from the Standby
mode. Press it again to return to the Standby mode.
TV - This button has been pre-programmed to select the codes
to operate the P42HDTV.
VCR - This button selects a programmed VCR.
CABLE - This button selects a programmed cable TV set-top
box or a satellite TV set-top box.
DVD - This button selects a programmed DVD player.
Number Button Pad - Use these buttons to select a channel or
enter a password.
INPUT - This button allows the user to cycle through the inputs.
- / ENTER - This button works as a DASH button in the DTV
mode. When selecting a digital channel directly use this button
for the separation of main and sub-channels. For example,
channel 28-2 would be selected by the button sequence 2 8
ENTER 2.
CH (+ or -) - These buttons change the channels up or down.
LAST - This button recalls the previously viewed channel.
MUTE - This button turns the sound on and off. VOL (+ or -) -
These buttons turn the volume up or down.
MENU - Use this button for the On-Screen Display (OSD)
menus.
INFO - This button displays the image and system information
display.
GUIDE - This button displays program information. Noe: this
butch iso_y rciora o_DTV
EXIT - This button exits the On-Screen Display (OSD) menus.
_D_-These buttons navigate the On-Screen Display
(OSD).
OK - This button works to select your chosen option in On-
Screen Display (OSD) menus.
This is 8
remote supportinq up to 4 devices
{see Tt/, CR@LE, DVD buttons
at the bop of the remobe}_ if the
remote is not with
the remote to set the ffunotions
bsok to Tgo
Version 6/14/2006
the TV button on
www.VlZlOCE.com
12 O
Page 13
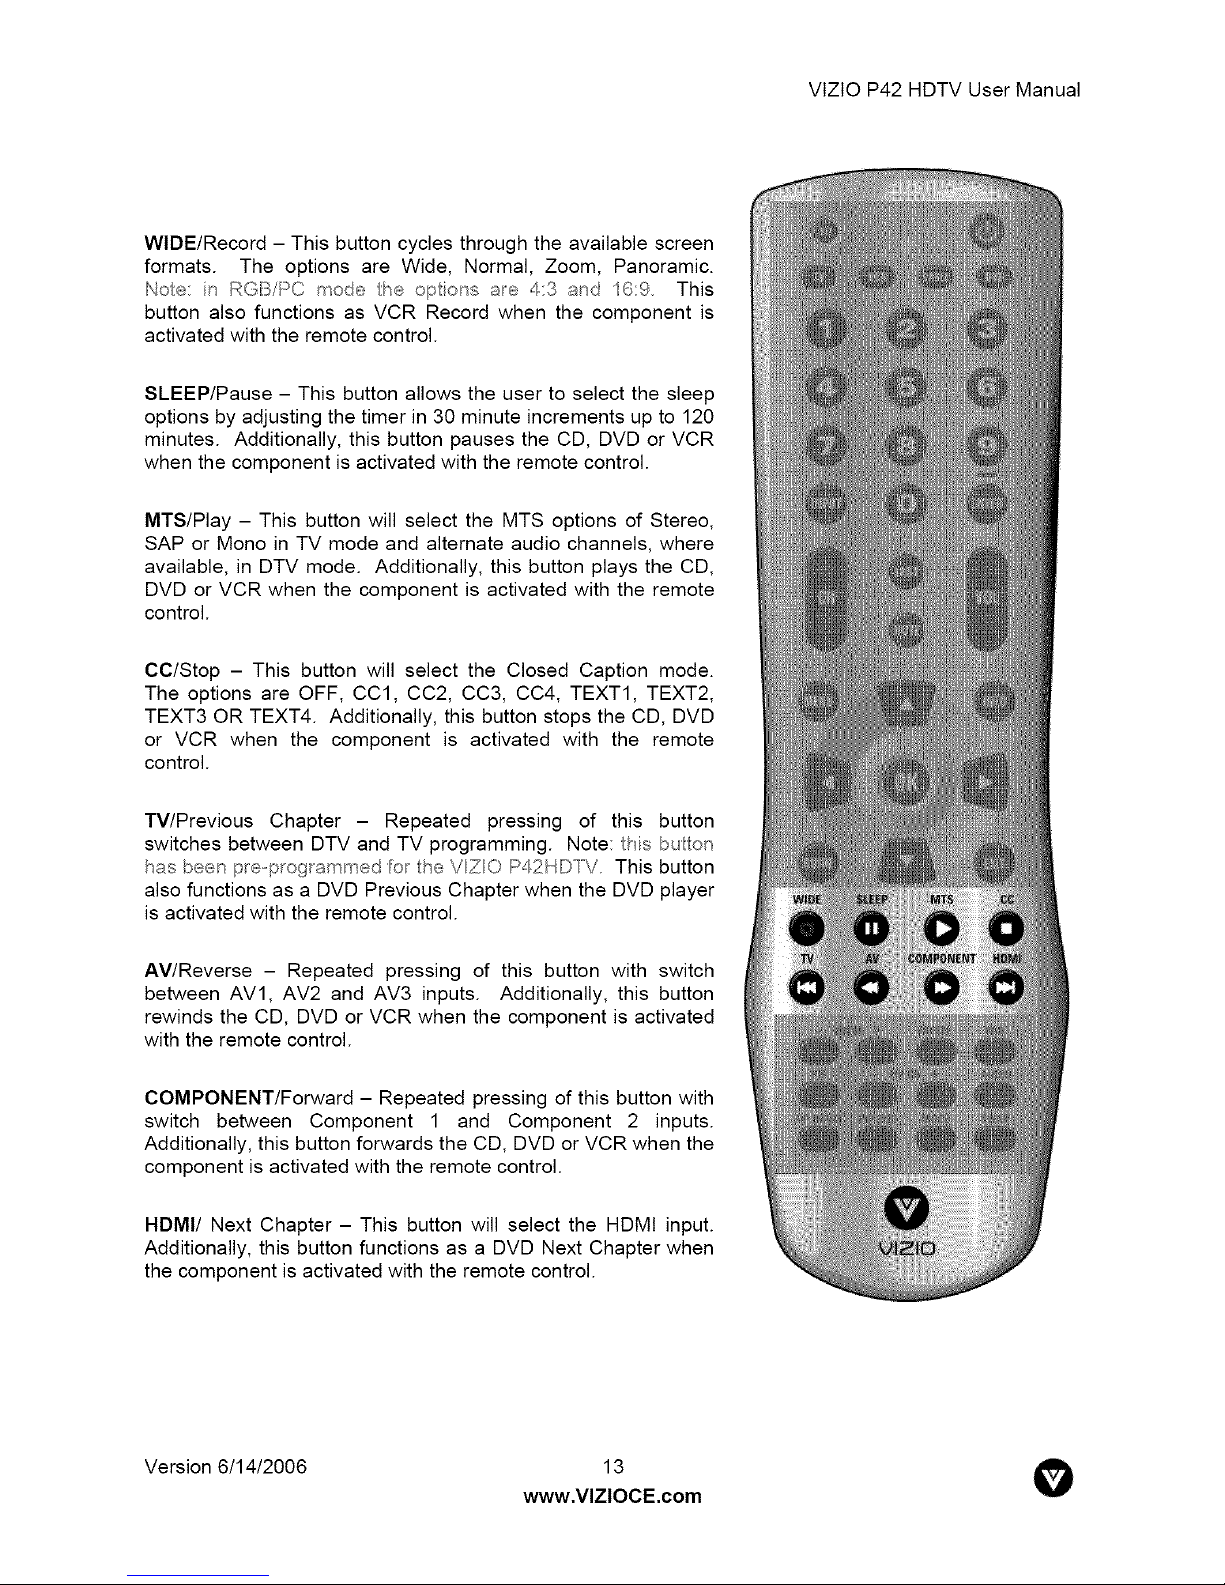
WIDE/Record- Thisbuttoncyclesthroughtheavailablescreen
formats. Theoptionsare Wide,Normal,Zoom,Panoramic.
Noe: in GF_!PCmodc_hc_opio_sa_c._4:3 _nd 'IG:9 This
buttonalsofunctionsasVCRRecordwhenthecomponentis
activatedwiththeremotecontrol.
SLEEP/Pause- Thisbuttonallowstheusertoselectthesleep
optionsbyadjustingthetimerin30minuteincrementsupto 120
minutes.Additionally,thisbuttonpausestheCD,DVDorVCR
whenthecomponentisactivatedwiththeremotecontrol.
MTS/Play- ThisbuttonwillselecttheMTSoptionsof Stereo,
SAPor MonoinTVmodeandalternateaudiochannels,where
available,inDTVmode.Additionally,thisbuttonplaystheCD,
DVDorVCRwhenthecomponentisactivatedwiththeremote
control.
VIZIOP42HDTVUserManual
CC/Stop- Thisbuttonwillselectthe ClosedCaptionmode.
TheoptionsareOFF,CC1,CC2,CC3,CC4,TEXT1,TEXT2,
TEXT3ORTEXT4.Additionally,thisbuttonstopstheCD,DVD
or VCRwhen the componentis activatedwith the remote
control.
TV/PreviousChapter- Repeatedpressingof this button
switchesbetweenDTVandTVprogramming.Note:lis bulon
hJ_sbc_;.__pr_'_prog_mm_dt_:_he._VZO 42HDI°V Thisbutton
alsofunctionsasaDVDPreviousChapterwhentheDVDplayer
isactivatedwiththeremotecontrol.
AV/Reverse- Repeatedpressingof this buttonwith switch
betweenAVl, AV2andAV3inputs. Additionally,thisbutton
rewindstheCD,DVDorVCRwhenthecomponentisactivated
withtheremotecontrol.
COMPONENT/Forward- Repeatedpressingofthisbuttonwith
switch betweenComponent1 and Component2 inputs.
Additionally,thisbuttonforwardstheCD,DVDorVCRwhenthe
componentisactivatedwiththeremotecontrol.
HDMI/NextChapter- ThisbuttonwillselecttheHDMIinput.
Additionally,thisbuttonfunctionsas a DVDNextChapterwhen
thecomponentisactivatedwiththeremotecontrol.
Version6/14/2006
www.VlZlOCE.com
13 O
Page 14
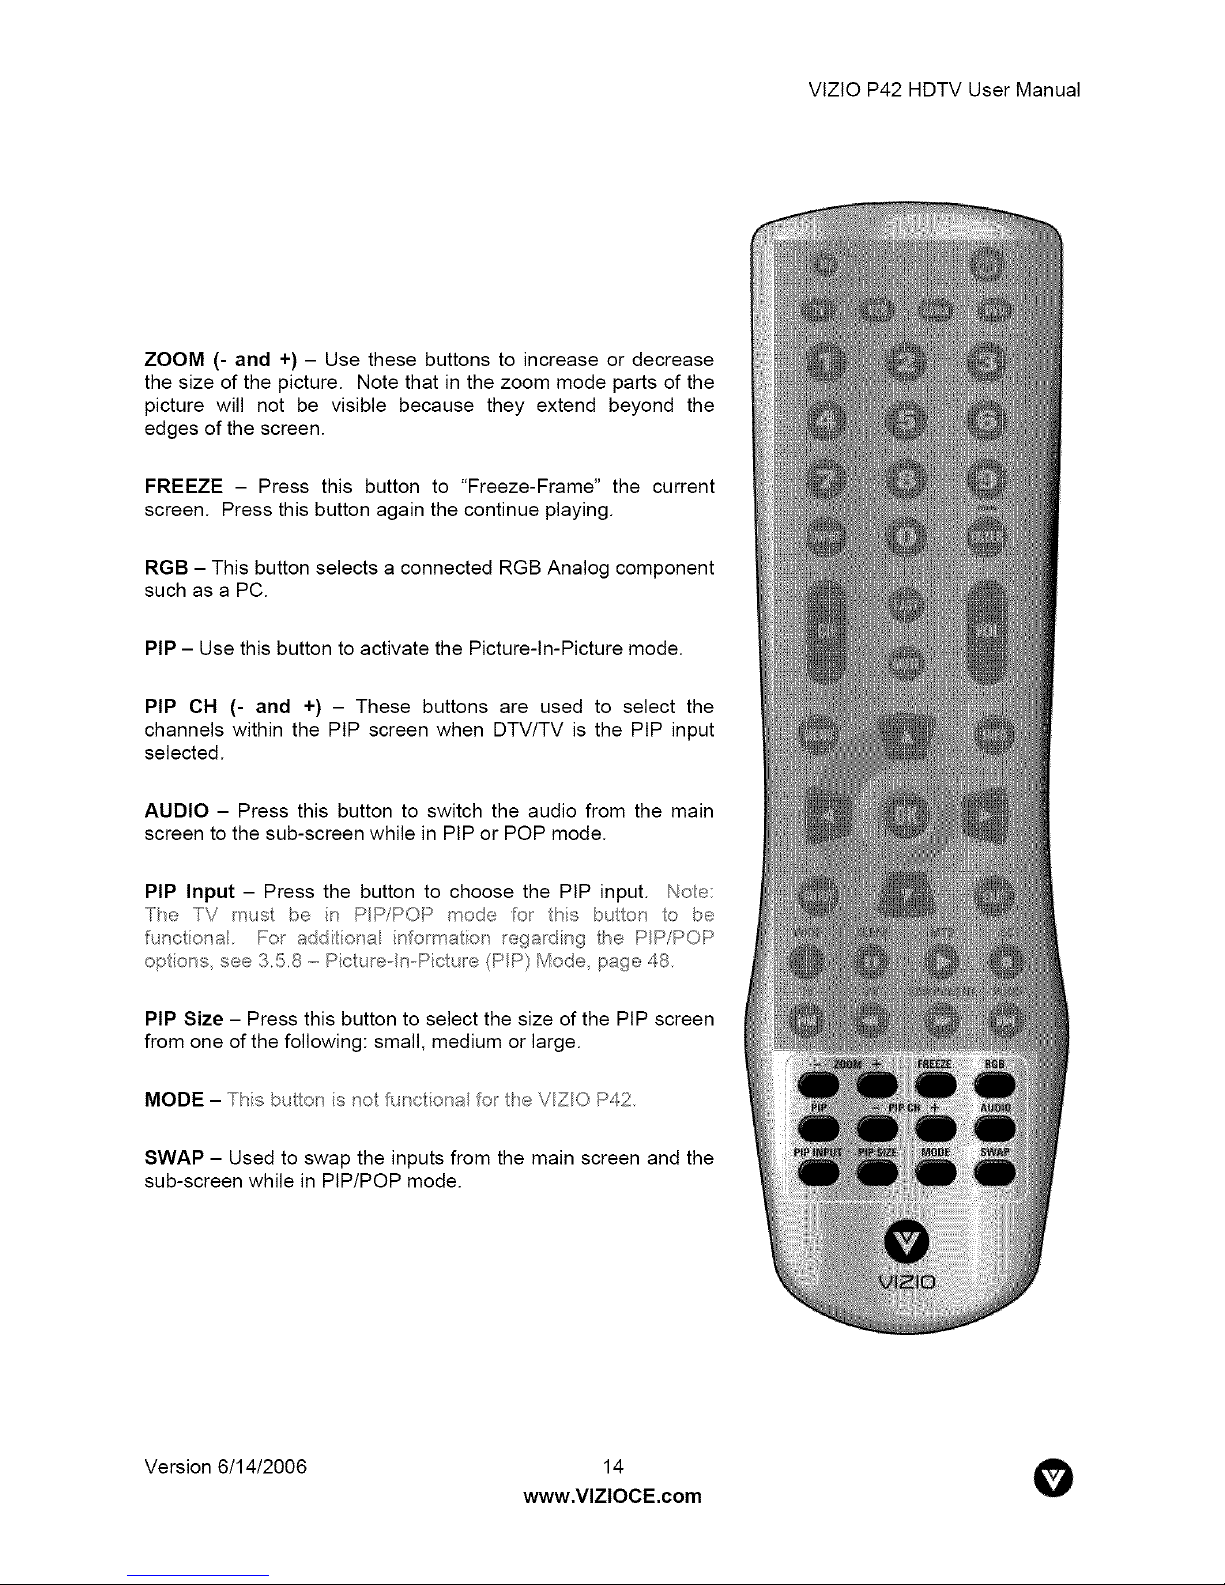
ZOOM(- and+)- Usethesebuttonstoincreaseordecrease
thesizeofthepicture.Notethatinthezoommodepartsofthe
picturewill not be visiblebecausetheyextend beyond the
edges of the screen.
FREEZE - Press this button to "Freeze-Frame" the current
screen. Press this button again the continue playing.
RGB - This button selects a connected RGB Analog component
such as a PC.
PIP - Use this button to activate the Picture-In-Picture mode.
VIZtOP42HDTVUserManual
PIP CH (- and +) - These buttons are used to select the
channels within the PIP screen when DTV/TV is the PIP input
selected.
AUDIO - Press this button to switch the audio from the main
screen to the sub-screen while in PIP or POP mode.
PIP Input - Press the button to choose the PIP input. Noe:
The TV mus be in /POP mode _o_ his bulo_ o be
u_cior_a. Yo_ addiliona/ inomaio_'_ re[_a_ding _e PP/POP
op ions see 3.5.8 - Pic ule n Pic ule (PP} Mode parle 48
PIP Size - Press this button to select the size of the PIP screen
from one of the following: small, medium or large.
MODE-T isbutto_ is no urcSo_a o_fieVZOP42
SWAP - Used to swap the inputs from the main screen and the
sub-screen while in PIP/POP mode.
Version 6/14/2006
www.VlZlOCE.com
14 O
Page 15
VIZIOP42HDTVUserManual
i°4ol insertion of Batteries in the Remote Conbrot
Insert two AA batteries into the remote control. Make sure that you match the (+) and (-) symbols on the
batteries with the (+) and (-) symbols inside the battery compartment. Re-attach the battery cover.
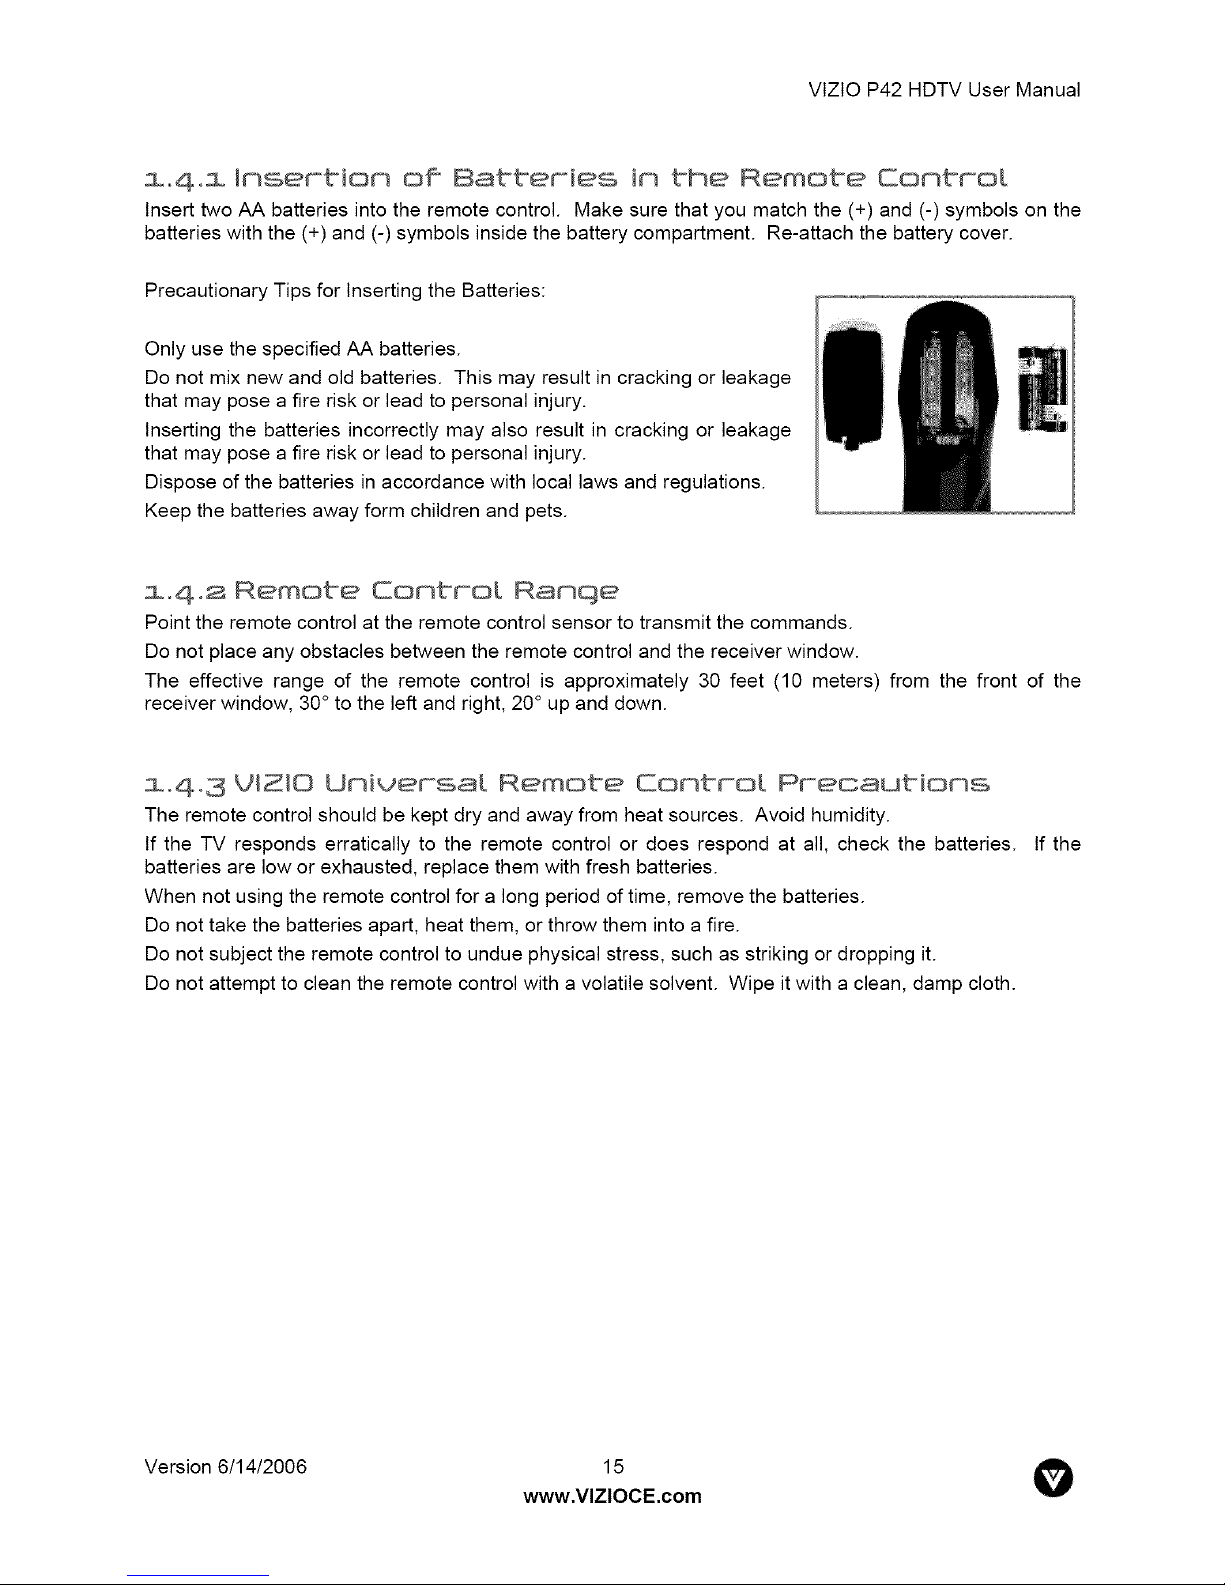
Precautionary Tips for Inserting the Batteries:
Only use the specified AA batteries.
Do not mix new and old batteries. This may result in cracking or leakage
that may pose a fire risk or lead to personal injury.
Inserting the batteries incorrectly may also result in cracking or leakage
that may pose a fire risk or lead to personal injury.
Dispose of the batteries in accordance with local laws and regulations.
Keep the batteries away form children and pets.
s°4°a Remote Control Range
Point the remote control at the remote control sensor to transmit the commands.
Do not place any obstacles between the remote control and the receiver window.
The effective range of the remote control is approximately 30 feet (10 meters) from the front of the
receiver window, 30° to the left and right, 20° up and down.
i°4° 3 VlZIO Universal Remote Control Precautions
The remote control should be kept dry and away from heat sources. Avoid humidity.
If the TV responds erratically to the remote control or does respond at all, check the batteries. If the
batteries are low or exhausted, replace them with fresh batteries.
When not using the remote control for a long period of time, remove the batteries.
Do not take the batteries apart, heat them, or throw them into a fire.
Do not subject the remote control to undue physical stress, such as striking or dropping it.
Do not attempt to clean the remote control with a volatile solvent. Wipe it with a clean, damp cloth.
Version 6/14/2006 15
www.VlZlOCE.com
V
Page 16
VIZIO P42 HDTV User Manual
Chapter 2 Connectinq Equipment
a°i Which Video Connection Shou{d I Use?
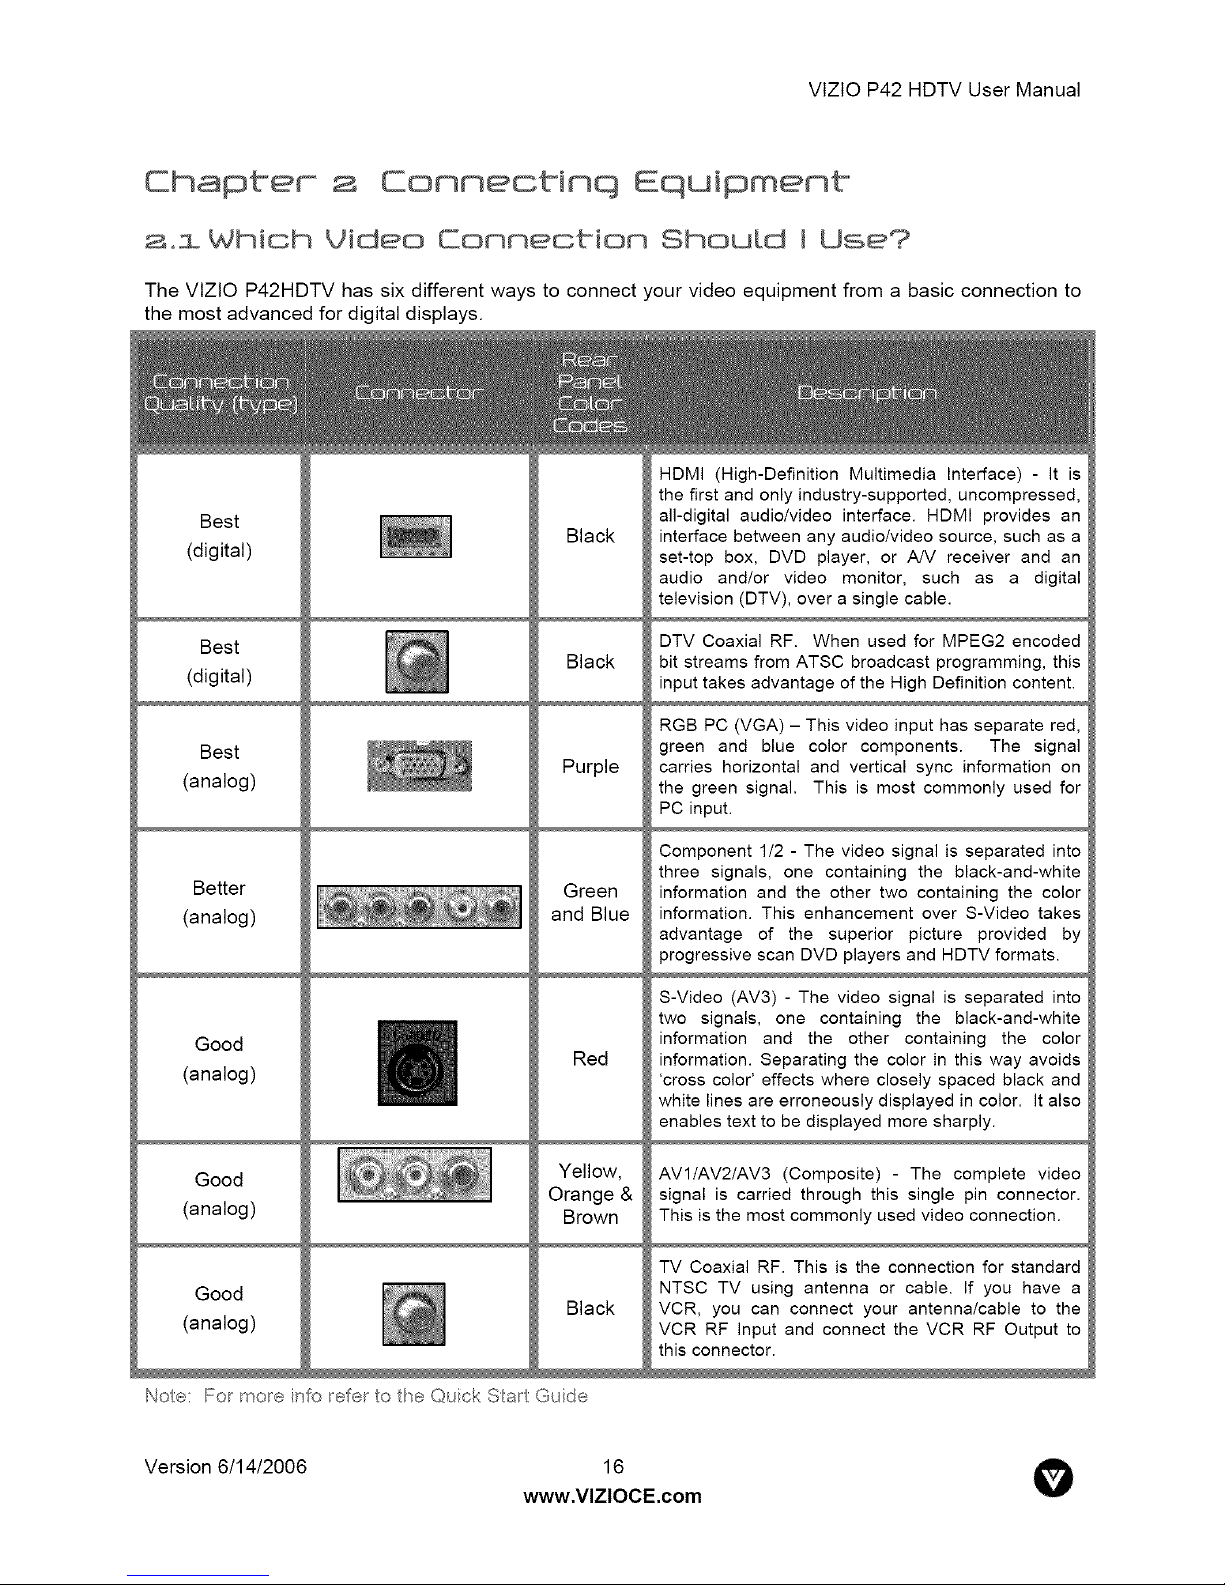
The VIZIO P42HDTV has sixdifferentways to connectyourvideoequipmentfrom a basicconnectionto
themost advanced fordigitaldisplays.
HDMI (High-Definition Multimedia Interface) - It is
the first and only industry-supported, uncompressed,
Best
(digital)
Best
(digital)
Black
Black
all-digital audio/video interface. HDMI provides an
interface between any audio/video source, such as a
set-top box, DVD player, or A/V receiver and an
audio and/or video monitor, such as a digital
television (DTV), over a single cable.
DTV Coaxial RF. When used for MPEG2 encoded
bit streams from ATSC broadcast programming, this
input takes advantage of the High Definition content.
i
Best
(analog)
Better
(analog)
Good
(analog)
Good
(analog)
Good
(analog)
Purple
Green
and Blue
Red
Yellow,
Orange &
Brown
Black
RGB PC (VGA) - This video input has separate red,
green and blue color components. The signal
carries horizontal and vertical sync information on
the green signal. This is most commonly used for
PC input.
Component 1/2 - The video signal is separated into
three signals, one containing the black-and-white
information and the other two containing the color
information. This enhancement over S-Video takes
advantage of the superior picture provided by
progressive scan DVD players and HDTV formats.
S-Video (AV3) - The video signal is separated into
two signals, one containing the black-and-white
information and the other containing the color
information. Separating the color in this way avoids
'cross color' effects where closely spaced black and
white lines are erroneously displayed in color. It also
enables text to be displayed more sharply.
AVl/AV2/AV3 (Composite) - The complete video
signal is carried through this single pin connector.
This is the most commonly used video connection.
TV Coaxial RF. This is the connection for standard
NTSC TV using antenna or cable. If you have a
VCR, you can connect your antenna/cable to the
VCR RF Input and connect the VCR RF Output to
this connector.
Noe: Fo_mo_e
i°ffo rete_ to fie Quick Sat Guide
Version 6/14/2006
www.VlZlOCE.com
16 O
Page 17
VIZtOP42HDTVUserManual
a,a Connectinq Your OYO Player
You have several options for connecting your DVD player to your P42HDTV - HDMI, Component, S-
Video and Composite (AV) inputs. Based on your home theater configuration, you can decide which
option is the right one for you.
_,a°l Usinq HDMI
DVD players that have a digital interface such as HDMI (High Definition Multimedia Interface) should be
connected to the HDMI input of the VlZtO P42HDTV for optimal results.
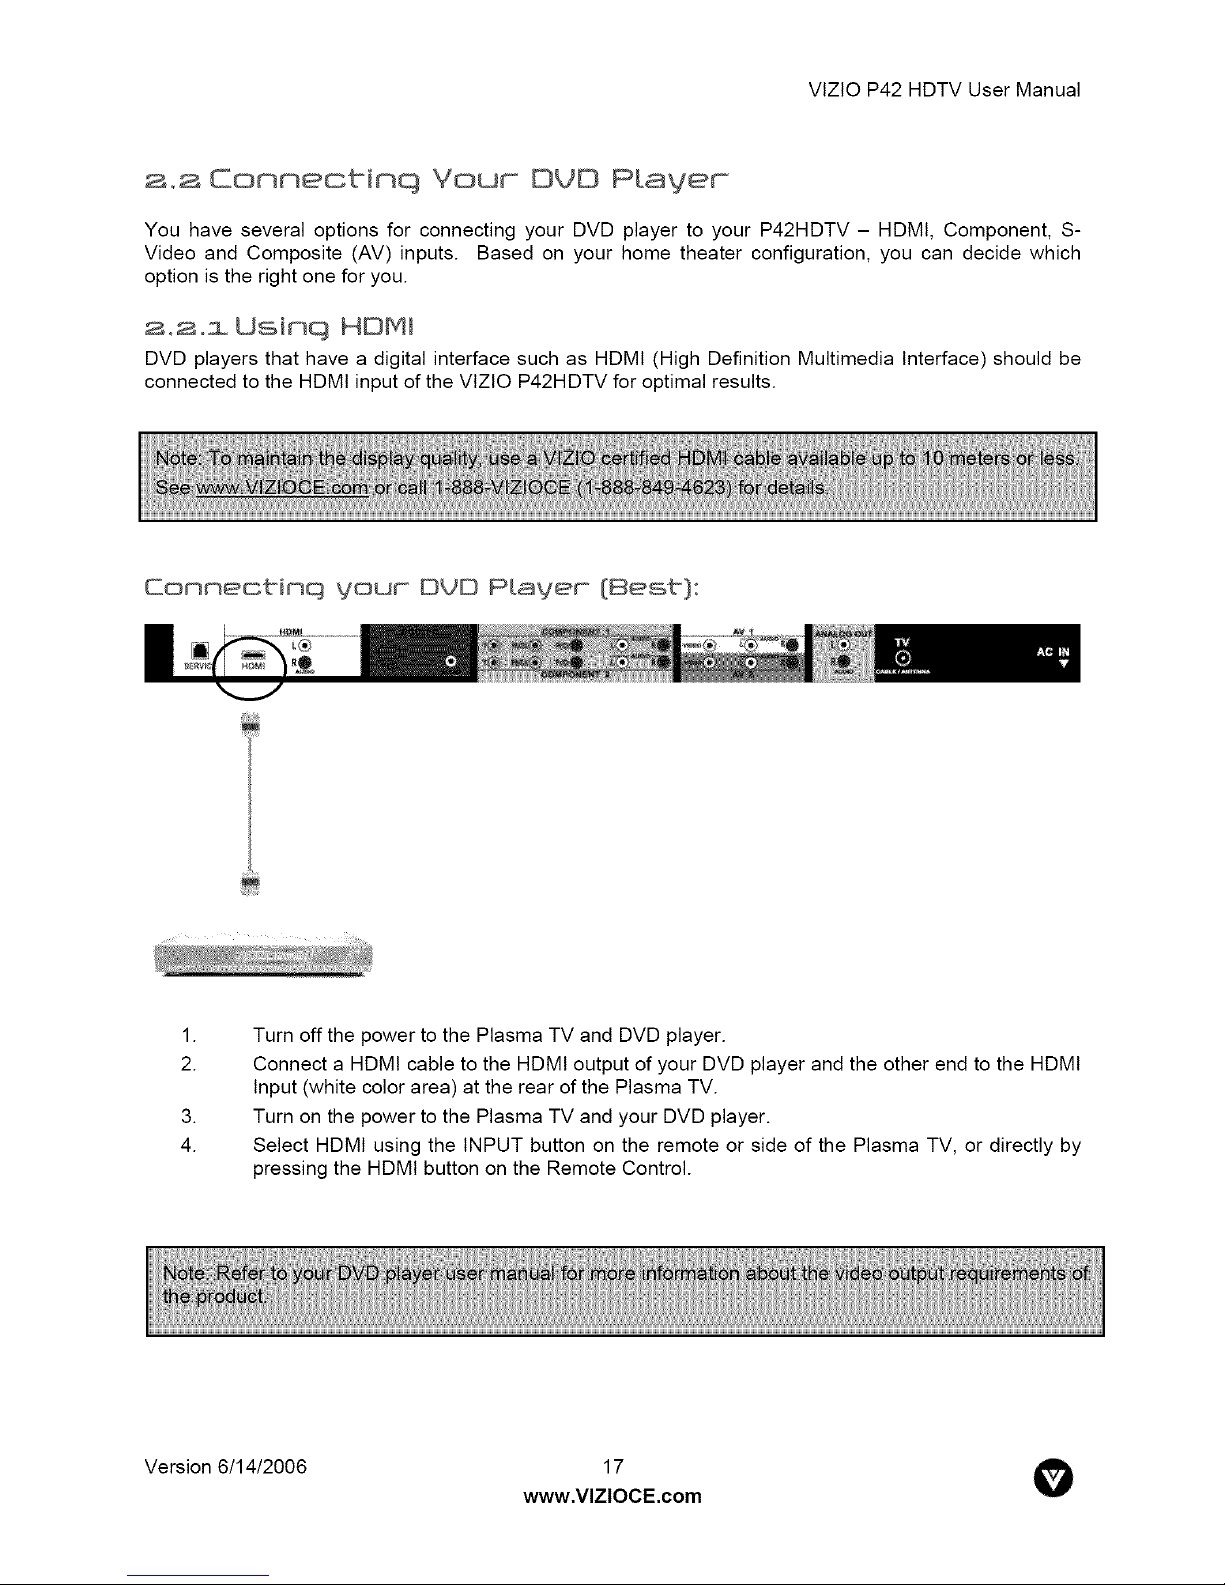
Connectin_ your DUD Player {Best}:
.
Turn off the power to the Plasma TV and DVD player.
2.
4.
Version 6/14/2006
Connect a HDMI cable to the HDMI output of your DVD player and the other end to the HDMI
Input (white color area) at the rear of the Plasma TV.
.
Turn on the power to the Plasma TV and your DVD player.
Select HDMt using the INPUT button on the remote or side of the Plasma TV, or directly by
pressing the HDMI button on the Remote Control.
www.VlZlOCE.com
17 O
Page 18
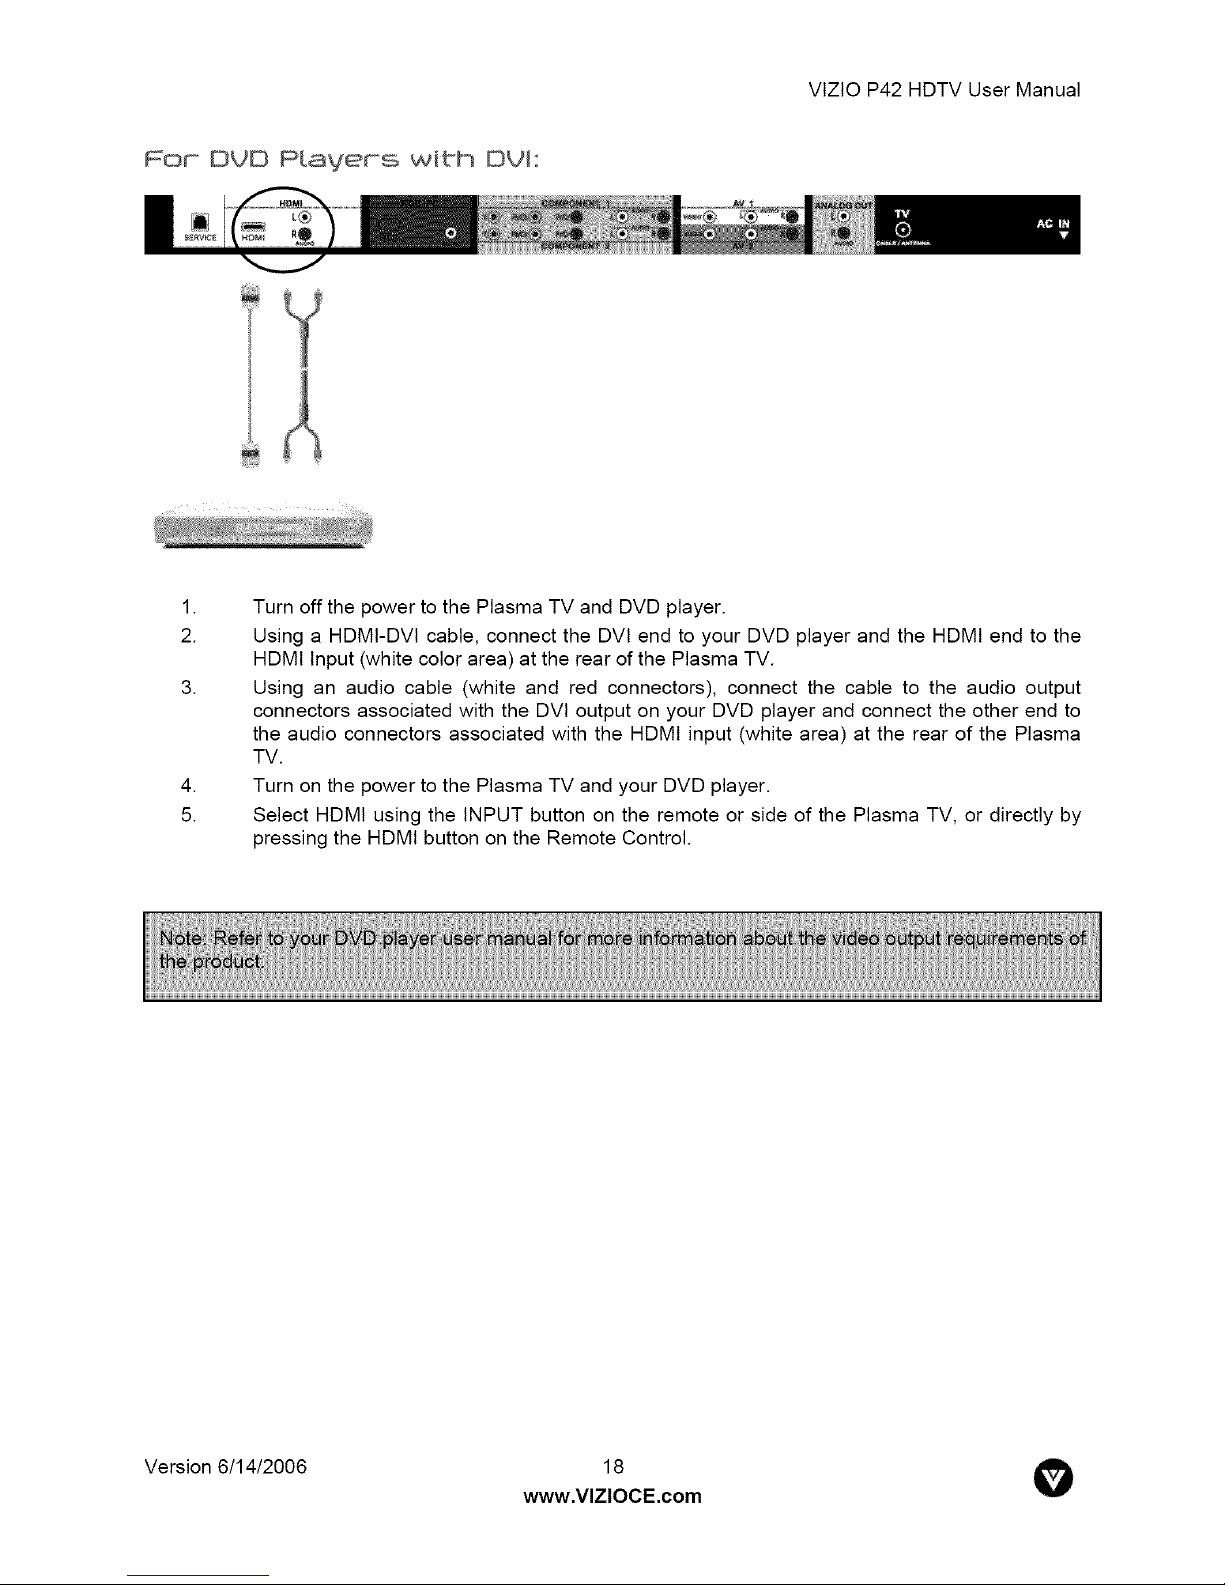
For OgO Ptsvers wibh OVl:
.
Turn off the power to the Plasma TV and DVD player.
2.
.
.
5.
Using a HDMI-DVl cable, connect the DVl end to your DVD player and the HDMI end to the
HDMI Input (white color area) at the rear of the Plasma TV.
Using an audio cable (white and red connectors), connect the cable to the audio output
connectors associated with the DVl output on your DVD player and connect the other end to
the audio connectors associated with the HDMI input (white area) at the rear of the Plasma
TV.
Turn on the power to the Plasma TV and your DVD player.
Select HDMI using the INPUT button on the remote or side of the Plasma TV, or directly by
pressing the HDMI button on the Remote Control.
VIZtOP42HDTVUserManual
Version 6/14/2006
www.VlZlOCE.com
,8 O
Page 19
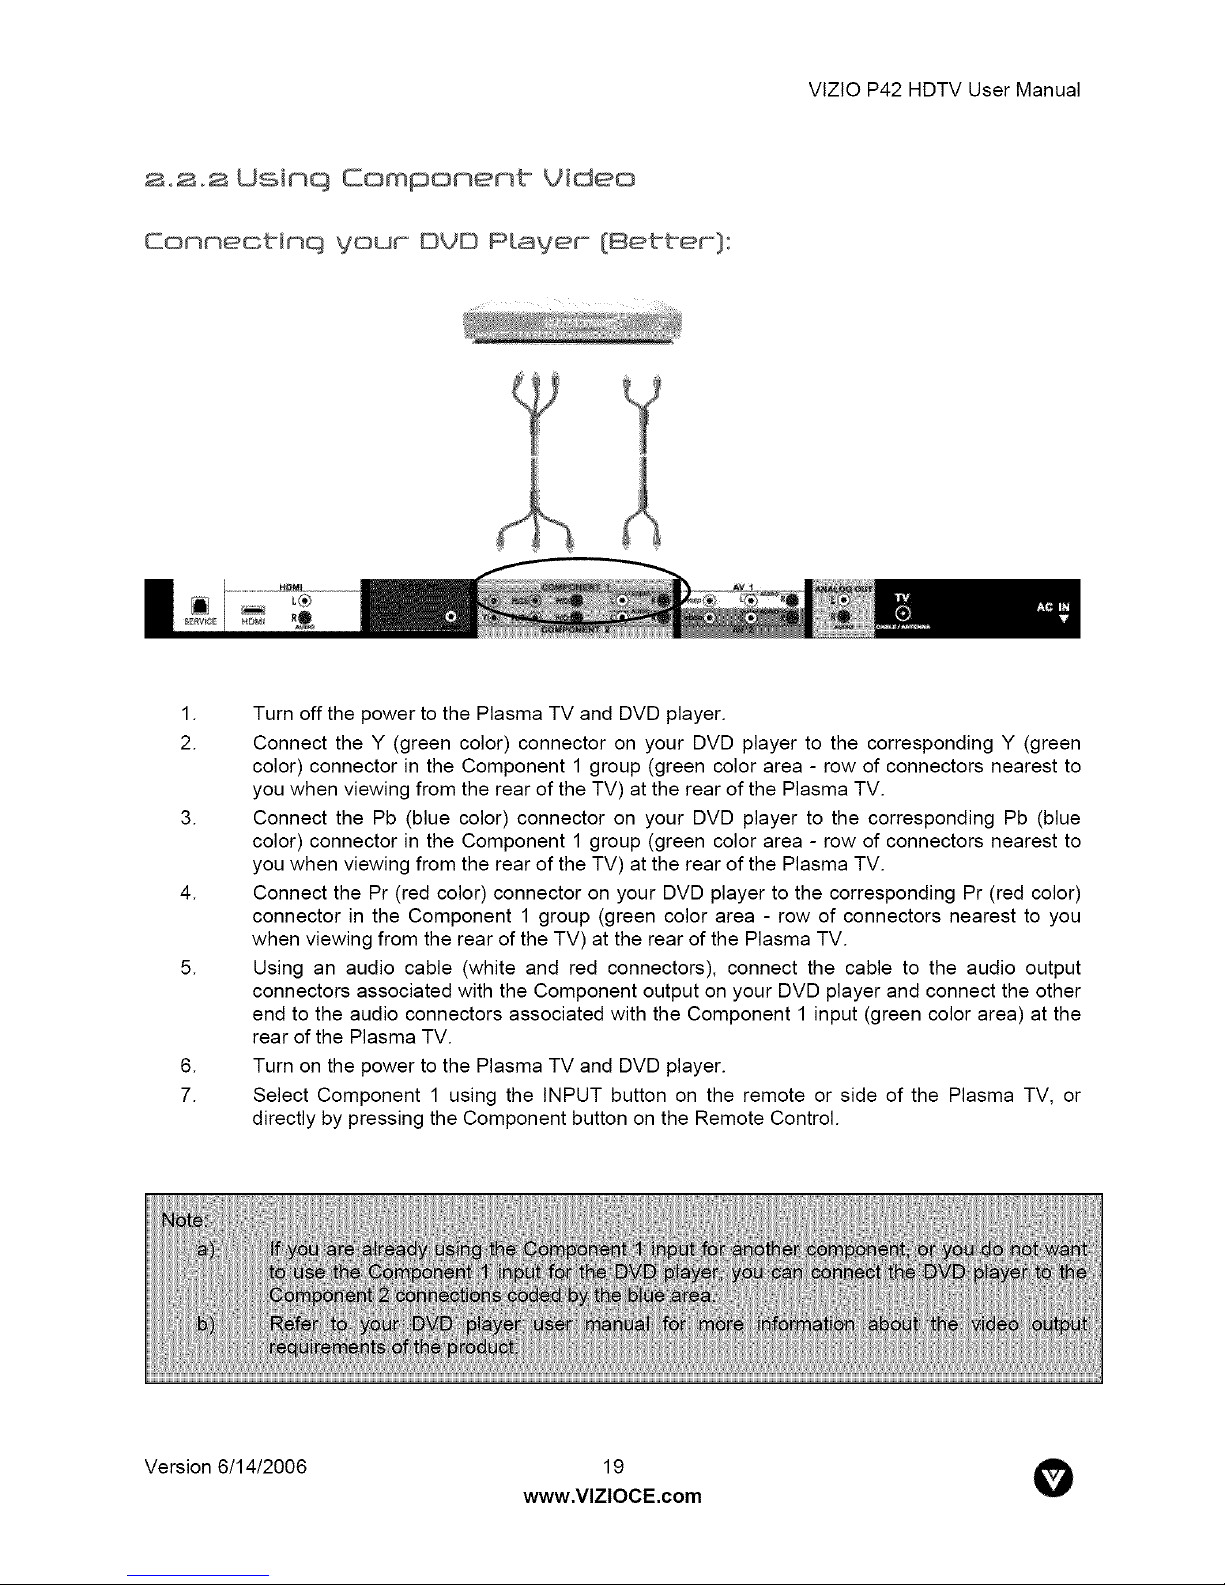
s.s_s Usinq Component Video
Eonnectinq vour OYO Prayer (Better):
VIZtOP42HDTVUserManual
.
Turn off the power to the Plasma TV and DVD player.
2.
Connect the Y (green color) connector on your DVD player to the corresponding Y (green
color) connector in the Component 1 group (green color area - row of connectors nearest to
you when viewing from the rear of the TV) at the rear of the Plasma TV.
.
Connect the Pb (blue color) connector on your DVD player to the corresponding Pb (blue
color) connector in the Component 1 group (green color area - row of connectors nearest to
you when viewing from the rear of the TV) at the rear of the Plasma TV.
.
Connect the Pr (red color) connector on your DVD player to the corresponding Pr (red color)
connector in the Component 1 group (green color area - row of connectors nearest to you
when viewing from the rear of the TV) at the rear of the Plasma TV.
.
Using an audio cable (white and red connectors), connect the cable to the audio output
connectors associated with the Component output on your DVD player and connect the other
end to the audio connectors associated with the Component 1 input (green color area) at the
rear of the Plasma TV.
.
Turn on the power to the Plasma TV and DVD player.
7.
Select Component 1 using the INPUT button on the remote or side of the Plasma TV, or
directly by pressing the Component button on the Remote Control.
Version 6/14/2006
www.VlZlOCE.com
19 @
Page 20

2.2_3 Usinq Soyideo (RV3]
Connecbinq vour OVO Player (Good):
VIZtOP42HDTVUserManual
.
Turn off the power to the Plasma TV and DVD player.
2.
5.
Connect the S-Video jack on the rear of your DVD player to the S-Video jack in the AV3
group (brown area) at the rear of the Plasma TV.
.
.
Using an audio cable (white and red connectors), connect the cable to the audio output
connectors associated with the S-Video output on your DVD player and connect the other
end to the audio connectors associated with the AV3 input (brown area) at the rear of the
Plasma TV.
Turn on the power to the Plasma TV and DVD player.
Select AV3 using the INPUT button on the remote or side of the Plasma TV, or directly by
pressing the AV button on the Remote Control.
Version 6/14/2006
www.VlZlOCE.com
20 O
Page 21
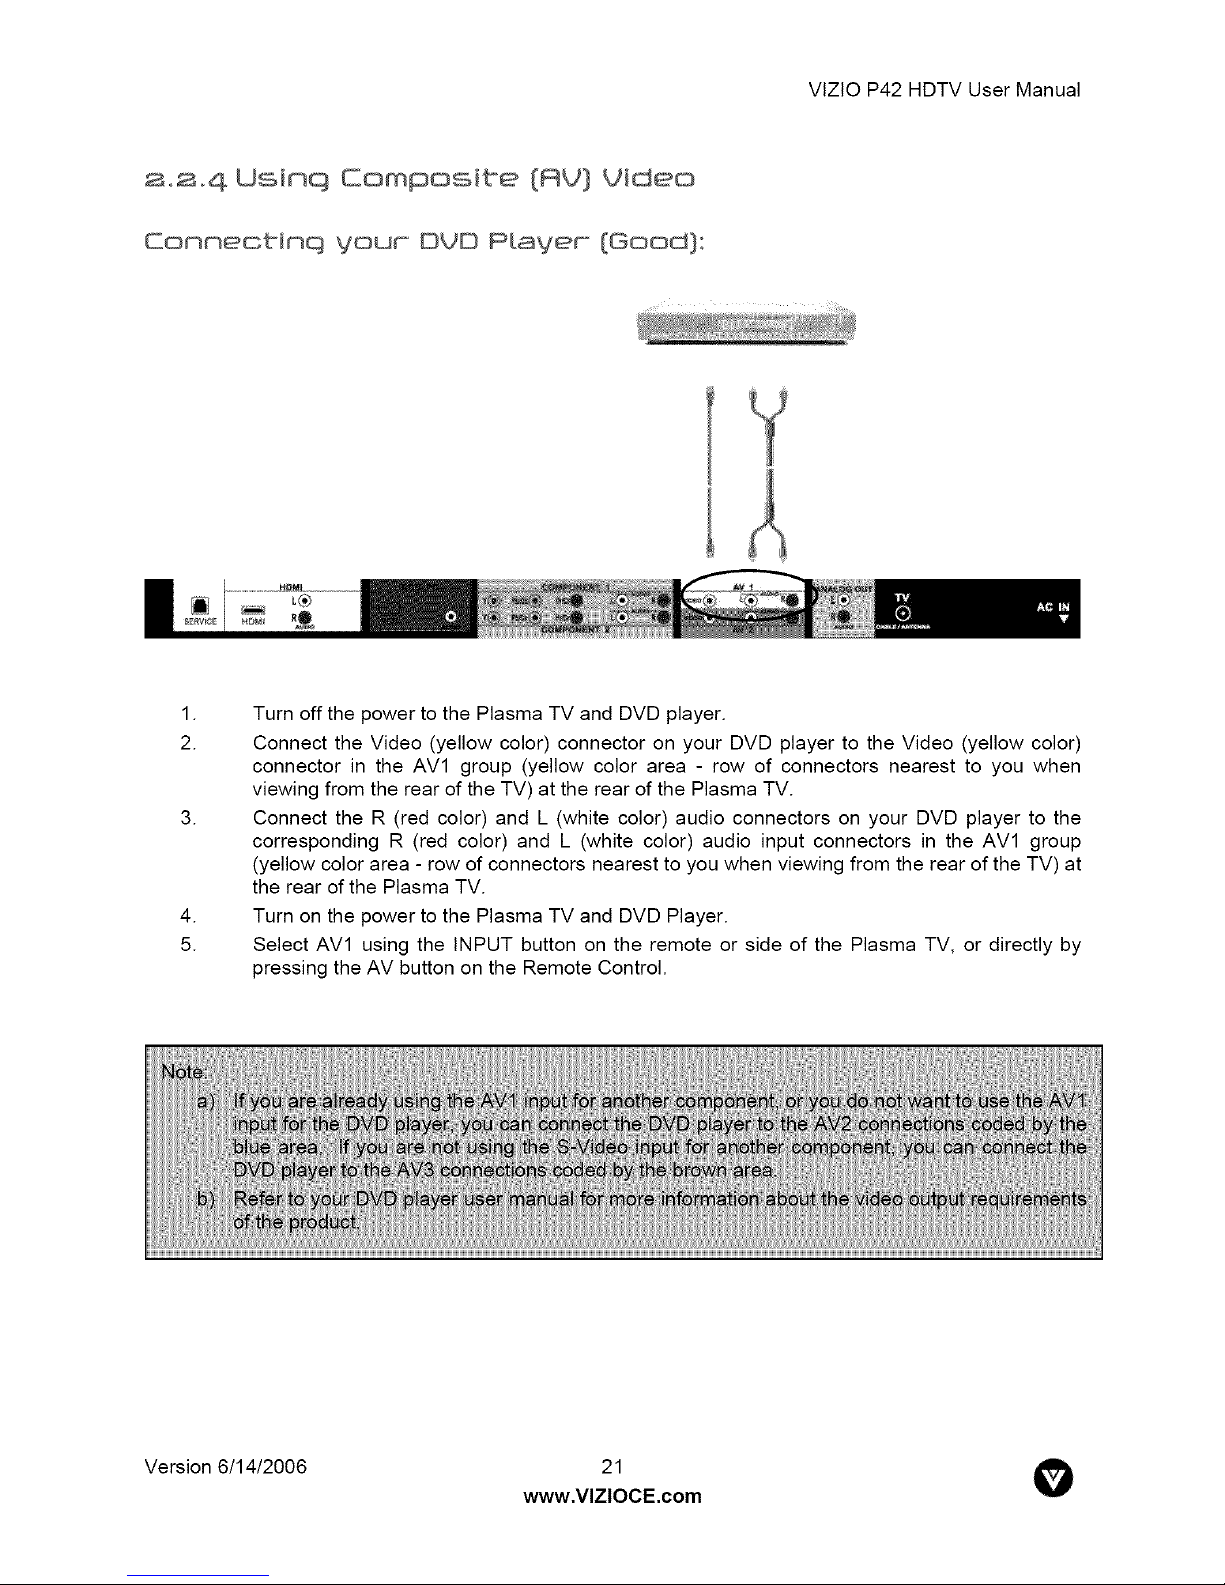
2.2 4 Usinq Composibe (RV} t/idea
Connecbinq voor OVO Player {Good}:
VIZtOP42HDTVUserManual
.
Turn off the power to the Plasma TV and DVD player.
2.
5.
Connect the Video (yellow color) connector on your DVD player to the Video (yellow color)
connector in the AV1 group (yellow color area - row of connectors nearest to you when
viewing from the rear of the TV) at the rear of the Plasma TV.
.
Connect the R (red color) and L (white color) audio connectors on your DVD player to the
corresponding R (red color) and L (white color) audio input connectors in the AV1 group
(yellow color area - row of connectors nearest to you when viewing from the rear of the TV) at
the rear of the Plasma TV.
.
Turn on the power to the Plasma TV and DVD Player.
Select AVl using the INPUT button on the remote or side of the Plasma TV, or directly by
pressing the AV button on the Remote Control.
Version 6/14/2006
www.VlZlOCE.com
21 O
Page 22
VIZIOP42HDTVUserManual
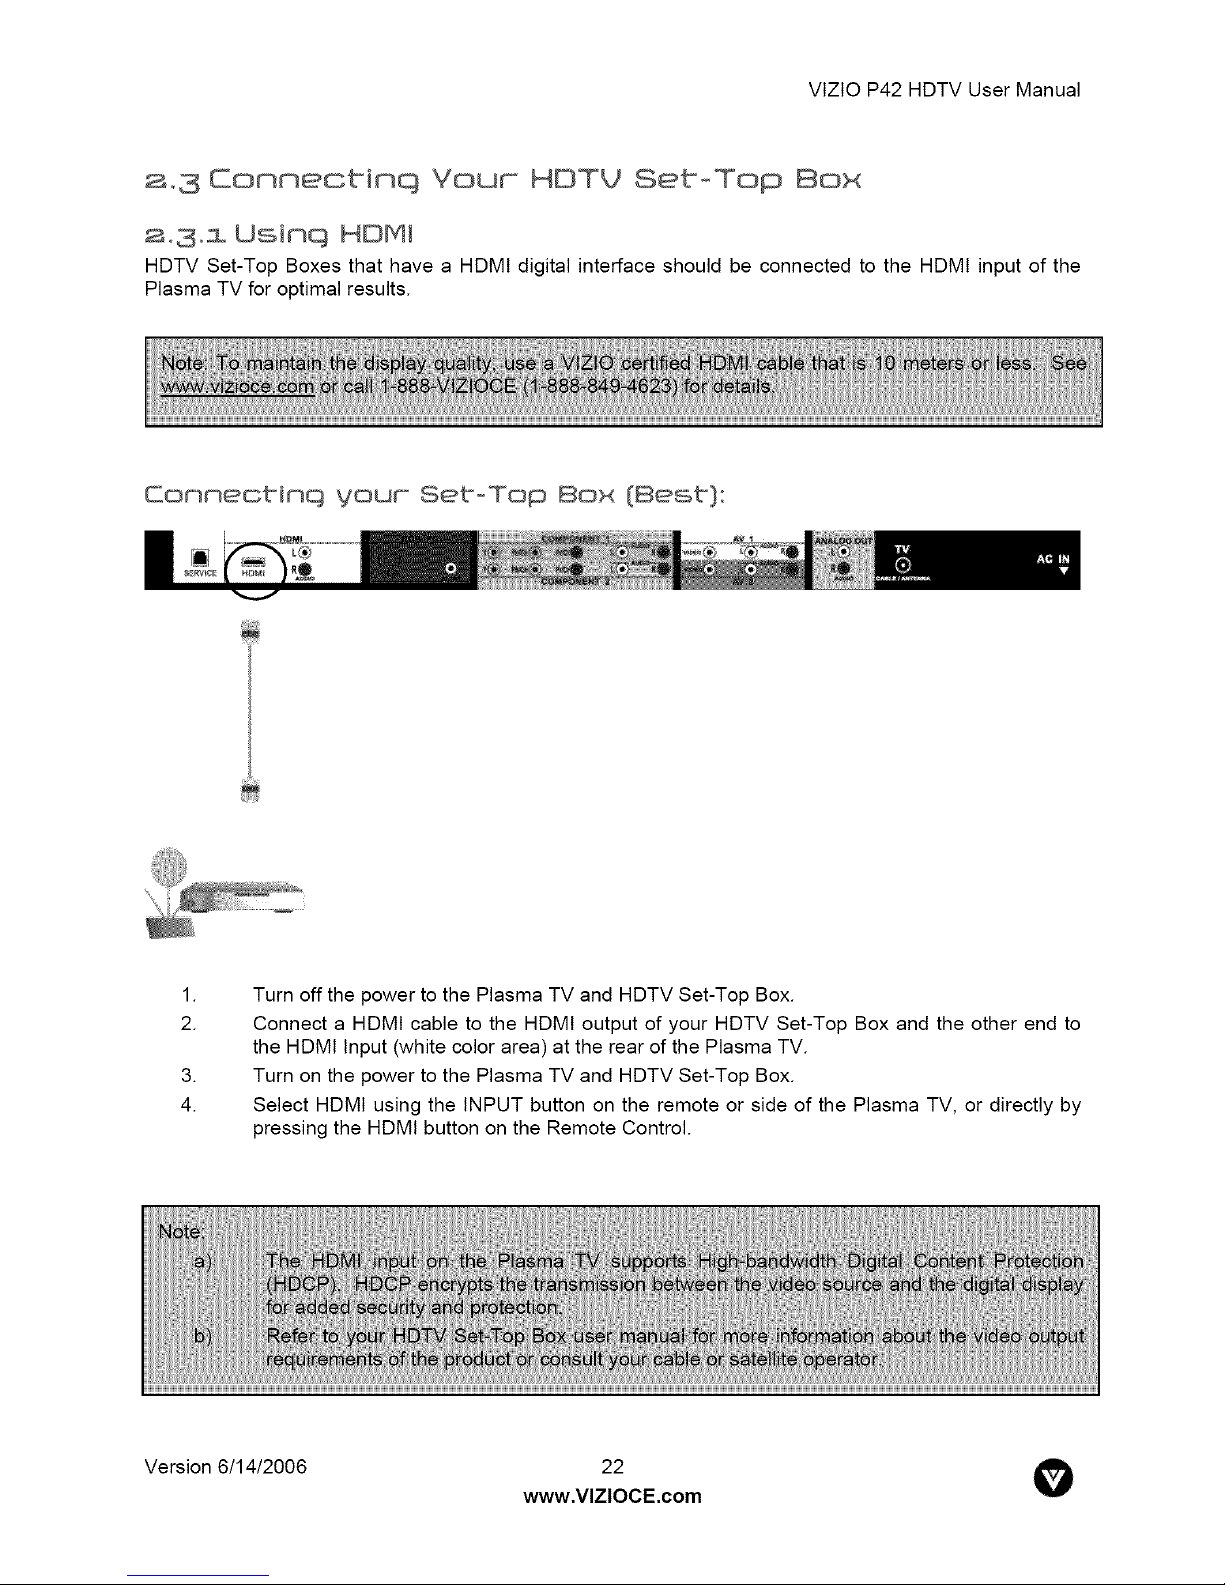
a,3 Connectinq Your HDTV Set-Top Box
2o3oi Usinq HDMI
HDTV Set-Top Boxes that have a HDMI digital interface should be connected to the HDMI input of the
Plasma TV for optimal results.
Connecbinq your SeboTop Box {Best}:
I.
2.
4.
Version 6/14/2006
Turn off the power to the Plasma TV and HDTV Set-Top Box.
Connect a HDMI cable to the HDMI output of your HDTV Set-Top Box and the other end to
the HDMt Input (white color area) at the rear of the Plasma TV.
.
Turn on the power to the Plasma TV and HDTV Set-Top Box.
Select HDMI using the INPUT button on the remote or side of the Plasma TV, or directly by
pressing the HDMI button on the Remote Control.
www.VlZlOCE.com
22 O
Page 23

Fore Se_Top Boxes with DU_:
VIZtOP42HDTVUserManual
.
Turn off the power to the Plasma TV and HDTV Set-Top Box.
2.
.
.
5.
No'_e: The HDM npu is Io_ HD Video and wi o_y suppo_ 640x480 a 60Hz f_o_ a PC. Use tie RGB
PCinpu t%_ageae_seecio_ o PC_o_mas
Using a HDMI-DVl cable, connect the DVl end to your HDTV Set-Top Box and the HDMI end
to the HDMI Input (white color area) at the rear of the Plasma TV.
Using an audio cable (white and red connectors), connect the cable to the audio output
connectors associated with the DVl output on your HDTV Set-Top Box and connect the other
end to the audio connectors associated with the HDMI input (white area) at the rear of the
Plasma TV.
Turn on the power to the Plasma TV and HDTV Set-Top Box.
Select HDMI using the INPUT button on the remote or side of the Plasma TV, or directly by
pressing the HDMt button on the Remote Control.
Version 6/14/2006
www.VlZlOCE.com
23 O
Page 24

2°3,2 Usinq Component Video
Connectinq vour Set°Top Box (Setter]:
VIZtOP42HDTVUserManual
I.
2.
7.
Turn off the power to the Plasma TV and HDTV Set-Top Box.
Connect the Y (green color) connector on your HDTV Set-Top Box to the corresponding Y
(green color) connector in the Component 1 group (green color area - row of connectors
nearest to you when viewing from the rear of the TV) at the rear of the Plasma TV.
.
Connect the Pb (blue color) connector on your HDTV Set-Top Box to the corresponding Pb
(blue color) connector in the Component 1 group (green color area - row of connectors
nearest to you when viewing from the rear of the TV) at the rear of the Plasma TV.
.
Connect the Pr (red color) connector on your HDTV Set-Top Box to the corresponding Pr (red
color) connector in the Component 1 group (green color area - row of connectors nearest to
you when viewing from the rear of the TV) at the rear of the Plasma TV.
.
Using an audio cable (white and red connectors), connect the cable to the audio output
connectors associated with the Component output on your HDTV Set-Top Box and connect
the other end to the audio connectors associated with the Component 1 input (green color
area) at the rear of the Plasma TV.
.
Turn on the power to the Plasma TV and HDTV Set-Top Box.
Select Component 1 using the INPUT button on the remote or side of the Plasma TV, or
directly by pressing the Component button on the Remote Control.
Version 6/14/2006
www.VlZlOCE.com
24 O
Page 25

VIZIOP42HDTVUserManual
s,4 Connecbinq Your VCR or Video Camera
I.
2.
5.
Turn off the power to the Plasma TV and VCR or Video Camera.
Connect the S-Video jack on the rear of your VCR or Video Camera to the S-Video jack in the
AV3 group (brown area) at the rear of the Plasma TV.
.
Using an audio cable (white and red connectors), connect the cable to the audio output
connectors associated with the S-Video output on your VCR or Video Camera and connect
the other end to the audio connectors associated with the AV3 input (brown area) at the rear
of the Plasma TV.
.
Turn on the power to the Plasma TV and VCR or Video Camera.
Select AV3 using the INPUT button on the remote or side of the Plasma TV, or directly by
pressing the AV button on the Remote Control.
Version 6/14/2006
www.VlZlOCE.com
Page 26

VIZtOP42HDTVUserManual
Connectinq Eoaxiat {RF}
There are several options for RF connection to the Plasma TV depending upon whether you are
connecting digital or standard TV, and whether you are using an antenna or cable.
2osoiUsinq Your Anbenna or Oiqiba[ Cable _or OTV
I.
2.
4.
Turn off the power to the Plasma TV.
Connect the coaxial (RF) connector from your antenna or digital cable to the DTV connector
at the rear of the Plasma TV.
.
Turn on the power to the Plasma TV.
Select DTV using the INPUT button on the remote or side of the Plasma TV, or directly by
pressing the TV button on the Remote Control.
Version 6/14/2006
www.VlZlOCE.com
26 O
Page 27

VIZtOP42HDTVUserManual
2oSo2 Usioq Your Robeooa or Cable _or TV
|
I.
2.
4.
Turn off the power to the Plasma TV.
Connect the coaxial (RF) connector from your antenna or cable
to the TV connector at the rear of the Plasma TV
.
Turn on the power to the Plasma TV.
Select TV using the INPUT button on the remote or side of the
Plasma TV, or directly by pressing the TV button on the
Remote Control.
2oSo3 Usinq bhe Anbenna or Gable throuqh your VCR
.
Turn off the power to the Plasma TV and VCR.
2.
4.
Connect the "Output to TV", "RF Out" or "Antenna Out"
connector on the rear of your VCR to the TV CABLE/ANTENNA
connector at the rear of the Plasma TV.
.
Turn on the power to the Plasma TV and VCR.
Select TV using the INPUT button on the remote or side of the
Plasma TV, or directly by pressing the TV button on the
Remote Control.
Version 6/14/2006
www.VlZlOCE.com
27 O
Page 28

s_8 Connectinq an e×terna[ Receiver/Amp
.
Turn off the power to the Plasma TV and Receiver/Amp.
2.
.
4.
.
6.
7.
Using an audio cable (white and red connectors), connect the cable to the audio input
connectors on the Receiver/Amp and connect the other end to the ANALOG OUT (gray area)
audio connectors at the rear of the Plasma TV.
Turn on the power to the Plasma TV and Receiver/Amp.
Then press the MENU button on the
remote control to open the On-Screen
Display (OSD) menu.
Press the I on the remote control to
select the Audio Adjust menu.
Press the _ll on the remote control to
select SPEAKERS.
Press the _ on the remote control to
select OFF so that the sound from the
Plasma TV will now be routed through
your Receiver/Amp system.
VIZIOP42HDTVUserManual
Opticat Output of Audio received with HO Proqrams
If your sound system has a SPDIF (optical) digital audio you can connect it to the optical DIGITAL
AUDIO OUT (gray area) at the rear of the
Plasma TV. This is active when receiving
digital audio with the programs from the
DTV input.
Version 6/14/2006 28
www.VlZlOCE.com
V
Page 29

Eonnecbinq a PC Computer
VIZtOP42HDTVUserManual
.
Turn off the power to the Plasma TV and PC Computer.
2.
3.
4.
5.
Connect a 15-pin D-Sub RGB (VGA) cable to the RGB output of your pc computer and the
other end to the RGB PC input (purple area) at the rear of the Plasma TV.
Connect the Audio Out on your pc computer to the RGB PC Audio input (purple area) at the
rear of the Plasma TV.
Turn on the power to the Plasma TV and PC Computer.
Select RGB using the INPUT button on the remote or side of the Plasma TV, or directly by
pressing the RGB button on the Remote Control.
Version 6/14/2006
www.VlZlOCE.com
29 O
Page 30

VtZtOP42HDTVUserManual
Chapter 3 Se ioq Up to Watch Television
For 'Preparing Your Plasma TV for Wall Mounting', see page 6.
Basic Plasma TV Start Up
.
Connecting the Power Cable
Connect the power cord to the power cord connector on the back of the Plasma TV, and then
plug the power cord into an AC wall socket.
.
Connect Audio and Video Cables to the Plasma TV
(see pages 16-29 for detailed steps)
3.
Turning Power On
Once all the components are connected, press the Power ON button on the side of the Plasma
TV, or press the Power ON (Red) button on the remote control.
.
Select Input Source
Select the Input Source for the Plasma TV by pressing the INPUT button
on the side of the TV or using the Input button on the remote control.
Pressing this button will cycle you through the following options: AV1, AV2,
AV3 (Video), Component 1, Component 2, HDMI, RGB, TV and DTV.
.
Using TV with an Antenna or Cable
If connecting to an antenna or cable source for the TV input, you will need
to select the appropriate source within the On-Screen Display (OSD)
menu and Auto Scan for the available TV channels.
Please follow the instructions below:
a. Select TV input by pressing the INPUT button on the side of the Plasma TV or using the
INPUT button on the remote control, or directly by pressing the TV button on the remote
control.
b. Press the MENU button on the remote control to show the OSD menu.
c. Press the _ button on the remote control twice to highlight the TV TUNER SET UP
menu.
Version 6/14/2006
www.VlZlOCE.com
3o O
Page 31

VIZtOP42HDTVUserManual
d. Pressthe_ buttontwiceto
highlight
TV/Cable.UsetheII buttonto
selecteitherTVorCable.TVsetsthe
tunerforanantennaandCablesets
thetunerforacableorsatellitedish.
e. Onceselected,pressthe_ button
oncemoretohighlightChannel
Searchtoscantheavailablechannels.
Usethe I buttontostartthesearch.
Noe:Thiswi akea ewminues o
f. PresstheMENUbuttonrepeatedlytoexittheOnScreenDisplay(OSD).
Toaddordeletea channelpress_ to SetChannel.Usethe_1or___buttonstorotateg.
tothedesiredchannelnumberandchangetoYesorNounderSkipChannelsetting.
6. UsingDTVwithanAntennaor Cable
WhenconnectingtoanantennaorcablefortheDTVinput,youwillneedtoselecttheDTV
sourcewithintheOnScreenDisplay(OSD)menuandAutoSearchfortheavailableTVchannels.
SeeSec.3.4DTVTunerSetup.Noe:DTVdi@tabroadcasisr_olawaiabeins aeas Re/k':s_
towww.antennaweb.orqoge inlo_maionabo_ava[abiilyinyo _a_eaypeo_anennaandin
w_ichdirecior_o pointyou_ar_tenna.Thechan°eavaiabiilyhough cabedependsupon
w_ichc}annesyou_cabeoperao_suppiesinCea QAMco_sul you_cableoperao__o_mo_e
inormaion
7. UsingaPC
IfconnectingtoaPCthroughtheRGBPCinput,settheTVtimingmodetoVESA1024x768at
60Hzforbestpicturequality(refertothegraphiccard'suserguideforquestionsonhowtoset
thistimingmode).
Version6/14/2006 31
www.VlZlOCE.com
Page 32

VIZtOP42HDTVUserManual
Wabchinq a TY ProqraM
Before you start watching TV, please make sure that any cable, satellite or off-air antenna connections
are secure. Also, verify that the power cord is plugged into a correctly grounded electrical outlet or surge
protector.
.
2.
. Press the Channel buttons on the remote or the +/- buttons on the side of the Plasma TV to
Press the power button on the remote or on the side of the Plasma TV. The status LED on
the front will change to solid green.
There are 4 options for selecting your programming:
a. If you are using an antenna or cable connected through the DTV CABLE/ANTENNA input,
you can select DTV using the INPUT button on the side of the Plasma TV.
b. If you are using an antenna or cable connected through the TV CABLE/ANTENNA input,
you can select TV using the INPUT button on the side of the Plasma TV.
c. If you are watching broadcasts through a cable or satellite set-top box connected by an
HDMI cable, select HDMI using the INPUT button on the side of the Plasma TV.
d. If you are watching broadcasts through a cable or satellite set-top box connected by a
Component (YPbPr) cable, select Component 1 or Component 2 using the INPUT button
on the side of the Plasma TV.
change the channel. No÷: 17÷ Cha_÷ b to_s or the side o the Pasma and or the
remoe con_o wi _o work i/: you are watching a program using HDM Compo_en '1
Compone_ 2 AV1 AV2 or AV3 il_pu s.
3°3 Ad]ustinq Basic Plasma TY Sebbinqs
Volume
To increase the volume, press and hold the VOL+ or VOL- button on the side of the Plasma TV or remote
control until the desired level is reached.
TV Channels
To step up or down through the available TV channels, press the CH+ or CH- button on the side of the
Plasma TV or remote control once for the next or previous channel, or hold it depressed until the desired
channel is reached. Noe:Chann÷ uparddow wi o_yope_aeinDfVard_Vmodes
Wide
Using this feature, you can watch video content in different size modes on the TV.
button on the remote control to switch among the modes.
Fore more information see Section 3.5.9.
Version 6/14/2006
www.VlZlOCE.com
32 @
Press the WIDE
Page 33

3,4 DTU Tuner Setup
When the MENU button is pressed, the On Screen
Display (OSD) appears on the PICTURE ADJUST
page.
the TV selection.
Press the RIGHT arrow button _1 to
highlight
VIZtOP42HDTVUserManual
This will display the DTV TUNER SETUP menu.
Time Zone - Setting the correct Time Zone for your
area will ensure that the correct program times are
shown after pressing the GUIDE button on the remote
control.
Press the _ button to highlight Time Zone. Select
your area using the D or a buttons. If finished, use
the EXIT button to rem-ove the OSD.
Version 6/14/2006
www.VlZlOCE.com
33 O
Page 34

Cable/Air/Auto- ThedefaultselectionisAuto. This
meansthatthe TVwill scanforantennaand cable
channelsand takesthe mosttime. If youhavean
antennaconnectedchooseAir,or if youhavecable
connectedchooseCable,and the TVwill takeless
timeinsearchingforchannels.
Scan- Pressthe_ buttontohighlightScan. Press
theOKbuttontoactivate.Noe: ]_is wi ake _ tew
VIZtOP42HDTVUserManual
OnceAutoScanhasfinished,presstheEXITbuttonto
returntothe previousmenu. Note: /_youpressOK
fieA_oSca_processwi sadaf_ain.
ManualScan- Ifyoufeelthatnotalloftheavailable
digitalTV channelswerefoundwithAutoScan,then
selectingthisoptionmakestheTVtryagaintofindany
missingchannels.Pressthe_ to highlightManual
ScanandthenpresstheOKbutton.
Note:A cha_e wi bemissedif it is _qo_a_"_smi_lin{l
at_e timeo[t_escarlandsoyoushoudt_yagair_a a
time whe_ you k_ow the salon is bansmilirg
p_of_rams.
A channel will also be missed if it is too weak to be
received. Re-orientation of the antenna or changing to
a higher gain antenna may help, but note that any
changes to the antenna may affect other channels.
Version 6/14/2006
www.VlZlOCE.com
34 O
Page 35

TheMANUALSCANscreennowappearsandthiscan
beusedintwoways. ThescreendefaultstoAdd-On
ModeandpressingtheOKbuttonatthisstagemakes
theTV scanthewholechannelrangeagain. Press
EXITtonavigateawayfromthisscreen.
Note: f he OK bulon is p_essed then fie auomaic
sca'_ringwi sa_tagain.
If the g or Ulbutton is pressed first, then the Range
Mode is activated so that you can specify a smaller
range of channels to be scanned again. Press EXIT to
navigate away from this screen.
VIZtOP42HDTVUserManual
Channel Skip - Gives you the option to skip channels
when using the Channel+ or Channel- buttons.
If you did not EXIT from the MANUAL SCAN, press
the _ button again to highlight Channel Skip. Press
the OK button.
Version 6/14/2006
www.VlZlOCE.com
O
Page 36

Thelistof channelsavailableandstoredinmemoryis
shownon the screen. If the list is longerthan9
channels,asyourepeatedlypressthe_ buttonyou
willbe ableto scrollthroughto seethemall. The
boxestotherightofthechannelnamesareemptyby
default.
Asyouscrolldownthechannelswiththe_ button,
eachoneis highlightedinturn. Whena channelyou
wanttoskipishighlighted,presstheOKbuttonanda
checkmark(_) willappearin the boxoppositethat
channel.ThismeansthatwhensurfingwiththeCH+
orCH-buttons,thischannelwillbeskippedandnot
displayed. PressEXITto navigateawayfrom this
screenwhenfinished.
VIZtOP42HDTVUserManual
Digital Audio Out - Use the_ll or I1_ button to select
the digital optical output to be PCM, Dolby Digital or
Off.
Version 6/14/2006
A
www.VlZlOCE.com
36 O
Page 37

Closed Caption - Allowsyou to read the voice
contentoftelevisionprograms.
VIZtOP42HDTVUserManual
Pressthe _ buttononceto highlightthe Analog
ClosedCaptionoption.
Usethe__ anda buttonstoselecttheAnalogClosed
Caption,usuallyCC1. PressEXITto navigateaway
fromthisscreenwhenfinished.
Version6/14/2006
www.VlZlOCE.com
37 O
Page 38

Pressthe _ buttononceto highlightthe Digital
ClosedCaptionoption.
Usethe""gand_ buttonstoselecttheDigitalClosed
Caption,usuallySERVICE1.PressEXITto navigate
awayfromthisscreenwhenfinished.
Pressthe _ buttononceto highlightthe Digital
ClosedCaptionStyleoption.PressOK
VIZtOP42HDTVUserManual
Thedefaultstyle,AS BROADCASTER,is shownas
selected. This meansthatthe styleof the closed
captionisasreceivedfromtheTVchannel.
Version6/14/2006
www.VlZlOCE.com
38 O
Page 39

Usethe_ or _1 buttonto selectCustom.The
Custompageallowsyouto changethefontsizeand
color,thebackgroundcolor,andthetransparencyof
theclosedcaption.PresEXITtonavigateawayfrom
thisscreenwhenfinished.
VIZtOP42HDTVUserManual
Version6/14/2006
www.VlZlOCE.com
39 O
Page 40

3°4°z Parenta[ Controls tor OTV
When at the first DTV screen, press the I button
twice.
VIZtOP42HDTVUserManual
The PARENTAL CONTROL screen will be shown.
Press the OK button to highlight the bar.
Enter the four digit password. The factory default
password is 0 0 00. If you change the password,
please make a note of it in a safe place.
Version 6/14/2006
www.VlZlOCE.com
40 O
Page 41

Oncethe correctpasswordhas beenentered,the
option for blockingchannelsbecomesavailable.
PressOK.
Thelistof channelsavailableandstoredinmemoryis
shownon the screen. If the list is longerthan9
channels,asyourepeatedlypressthe_ buttonyou
willbe ableto scrollthroughto seethemall. The
boxestotherightofthechannelnamesareemptyby
default.
VIZtOP42HDTVUserManual
Asyouscrolldownthechannelswiththe_ button,
eachoneis highlightedinturn. Whena channelyou
wanttoblockishighlighted,presstheOKbuttonanda
checkmark(3 willappearin the boxoppositethat
channel. This meansthat when this channelis
selecteda passwordrequestbarwill appearon the
screenandyouwillnotbeabletoviewthischannel
withoutfirst enteringthe password.PressEXITto
navigateawayfromthisscreenwhenfinished.
Version6/14/2006
www.VlZlOCE.com
41 O
Page 42

3°4°20TV Ehannet Inffarmatian
When a channel is selected, an information header is
shown over the picture for a few seconds. This
information consists of the channel number and name,
the format in which the program is broadcast (480i SD,
480P SD, 720P HD, 1080i HD), audio channel 1/2 or
2/2 (omitted if alternate channel is not broadcast),
language, program title, program start and end time,
program rating and if CC is available.
When you press the INFO button on the remote, you
not only get the information header displayed, but also
a short summary of the program content when
available from the broadcaster. If you do nothing else
with the INFO button, these panels will remain on the
screen, even when changing channels.
VIZtOP42HDTVUserManual
Press the tNFO button and the program summary will
disappear, but the information header will remain.
Press the INFO button again and only the channel
number and name will remain. Press the INFO button
one more time and this will disappear.
Version 6/14/2006
www.VlZlOCE.com
42 O
Page 43

VIZtOP42HDTVUserManual
3°4°3 Proqram Intormation
Press the GUIDE button on the remote and program information for the channel you are watching will be
displayed on the screen with the live program content in a small window in the lower left corner of the
panel.
Press the _11or I_! button to scroll up or down the channels. Each time you pause at a channel, the
program list will update with the program schedule for the channel and the window will show the live
program for that channel. Press the GUIDE button to exit this feature.
Version 6/14/2006 43
A
www.VlZlOCE.com
V
Page 44

VIZtOP42HDTVUserManual
3°4°4 Se_inq a Passwomd
You control access to the Parental Control features with a password. The default password is "0000".
You can change the password to any four-digit number.
To change the password:
1. Press the MENU button to open the main
On Screen Display (OSD) menu.
2. Press the D button on the remote control
three times until the Parental Control
menu opens.
3. Press the _button on the remote control
to highlight Parental Lock Enable. The
"Key-In Access Code" window opens.
4. Use the number pad to type the default
password (0000) or whatever password
you have changed it to previously, then
press OK.
5. Press the _ button on the remote control
to highlight Access Code Edit.
6. Press the I_ button on the remote control
to enter the submenu. You will need to
use the number pad to type default (or
what you changed to previously) password
first.
7. Use the number pad to type the new
password.
8. Confirm the new password by retyping it.
9. Press EXIT button on the remote control immediately to exit the OSD menu.
Version 6/14/2006
www.VlZlOCE.com
44 O
Page 45

VIZtOP42HDTVUserManual
30S Us(nq the On Someen DispLay {OSO}
The remote control or the control buttons on the right hand side of the TV can control all the function
settings. The On Screen Display (OSD) allows you to adjust the save contrast, brightness and other
settings. The TV will save changes made to the settings, even if the TV is turned off.
30S°i OSO PSeoo Opematioos
The OSD consists of several menu options: Picture Adjust, Audio Adjust, TV Tuner Setup, Parental
Controls, PIP Setup and Special Features. The main menu options may very depending on your selected
input source.
Note: Some of the main menu options may have additional submenus, i.e. the TV Rating submenu for
Parental Controls.
.
2.
Press the MENU button on the front of the TV or the MENU button on the remote control.
The Main Menu will be displayed on the TV screen.
Use the Volume+ or Volume- buttons on the side of the Plasma TV, or theD or _lbuttons
on the remote control to select one of the submenus:
Picture Adjust
Audio Adjust
TV Tuner Setup
Parental Controls
PIP Setup
Special Features
.
Once the submenu is highlighted, use the Channel+ and Channel- buttons on the side of the
Plasma TV, or the_or_ buttons on the remote control to select a menu option.
4.
5.
6.
7.
Version 6/14/2006
Use the Volume+ or Volume- buttons on the side of the Plasma TV, or the I[/_1or IMIibuttons
on the remote control to select/adjust the options settings.
Press the OK button on the remote control to confirm the feature.
Repeat steps 2 through 5 to adjust additional options within this menu.
Once the adjustments are completed, press the EXIT button on the remote control to exit the
OSD completely.
www.VlZlOCE.com
O
Page 46

VIZtOP42HDTVUserManual
3oS_2 mio_ome Rdoos_
Available for the following input sources - AVl, AV2, AV3, Component 1, Component 2, HDMI, TV or
DTV
Picture Mode - Select from one of the following: User,
Vivid1, Vivid2 or Vivid3.
Brightness - Adjusts the black levels of the picture.
You may need to readjust the brightness after the TV
warms up.
Contrast - Adjusts the level of white between the
lightest and darkest portions of an image. If the
contrast is too low, picture appears dark and lacks
detail. If the contrast is too high, the picture appears
faded and lacks shadow and depth.
Color - Adjusts the levels of white and color in the
picture. Highly saturated colors tend to be deep and strong while unsaturated colors are weaker and
lighter.
Tint - Adjusts to make the flesh tones more natural.
Sharpness - Adjusts the clarity of the picture, tf the sharpness is set too high, hard edges in the picture
appear to have a ghost image.
Closed Caption - Choose one of the following options: Off, CC1, CC2, CC3, CC4, TT1, TT2, TT3 or TT4.
3oSo3 PC mio_ome Rdoos_
Available for the following input source - RGB PC
Auto Adjust - Automatically sets the position and size
of the picture.
Brightness - Adjusts the black levels of the picture.
You may need to readjust the brightness after the
Plasma TV warms up.
Contrast - Adjusts the level of white between the
lightest and darkest portions of an image. If the
contrast is too low, picture appears dark and lacks
detail. If the contrast is too high, the picture appears
faded and lacks shadow and depth.
H-Size - Adjusts the horizontal size of the image.
H-Position - Adjusts the horizontal position on the image adjustment.
V-Position - Adjusts the vertical position on the image adjustment.
Fine Tune - Allows you to manually adjust the image.
Version 6/14/2006
www.VlZlOCE.com
46 O
Page 47

3°54 PC Color Temperature
The COLOR TEMP menu option is only available
when RGB is selected as the input. The standard
color temperature for all other inputs is 6500K to
match the color temperature of TV and Movies.
Color Temp - Options include User, 5000K, 6500K
and 9300K.
Red - Adjusts the red levels of the picture.
Green - Adjusts the green levels of the picture.
Blue - Adjusts the blue levels of the picture.
3oS°S Rudio Rd3usb
Volume - Adjusts the volume.
Bass - Adjusts the bass.
Treble -Adjusts the treble.
Balance - Adjusts the balance level between the
channels.
Surround - You can select either on or off.
Reverb - Select from one of the following; Concert,
Living Room, Hall, Arena or Off.
Mute - Turns the sound either on or off.
Speaker - Turns the internal speakers on or off.
VIZtOP42HDTVUserManual
3o5°S TW Turner Setup fior TW
Sound - Changes the sound output for TV programs.
Switch between Stereo, Mono or SAP (Second Audio
Program) for audio simulcasts. The TV program must
support the output option.
TV/ Cable mode - Sets the source for the tuner.
Options include TV or Cable. TV sets the tuner for an
antenna and Cable sets the tuner for cable or a
satellite dish.
Auto Search - Adds all channels that have a signal to
the channel list.
Set Channel - Enter the channel selection to be
added or deleted.
Skip Channel - Deletes the set channel from the channel list.
Version 6/14/2006
www.VlZlOCE.com
47 O
Page 48

VIZtOP42HDTVUserManual
3°5°7 Parental Controls tor TV
Parental Lock Enable - Turns TV and movie blocking
on or off.
TV Rating - Sets the level of television programs that
will be blocked without typing in the password. For
more information, see Section 3.5.14 - Using the
Parental Controls, page 51.
Movie Rating - Sets the level for movies that will be
blocked without typing in the password. For more
information, see Section 3.5.14 - Using the Parental
Controls, page 51.
Access Code Edit - Changes the password used for
modifying the parental control settings or watching a program blacked by the parental controls. For more
information, see Section 3.4.4 - Setting a Password, page 44.
3oSo8 PIP/POP Setup
Style - Changes the type of sub-picture. Options
include Off, PIP (Picture In Picture) or POP (Picture by
Picture).
Source - Changes the video input source of the sub-
picture.
Size - Changes the size of the sub-screen picture
when in PIP mode. Choose from one of the following:
small, medium or large.
Position - Move the position of sub-picture within the
display image, when in PIP mode.
3-S-q Special Features
Language - Changes the language of the On Screen
Display (OSD) menu. The choices are English,
Fran£ais or EspaSol.
Sleep Timer - Sets sleep timer either on of off. You
can select the number of minutes the Plasma TV waits
before it automatically turns off in 30-minute
increments. The maximum available time is 120
minutes.
Wide Format - Changes the main screen size.
Choose from the following: Normal, Wide, Zoom or
Panoramic. For additional information, please see section 3.5.10 - Understanding Viewing Features,
page 49.
Reset All Settings - Resets the TV back to the factory default settings.
Image Cleaner - Activates a full white screen to clear image ghosts. If a stationary image is left too long
on the screen it will be permanently burnt-in and this function will not remove it. Press any key to return
to normal operation.
Version 6/14/2006 48
www.VlZlOCE.com
V
Page 49

VtZtOP42HDTVUserManual
3°S°io Undersbandinq Viewinq Peabures
Your Plasma TV features four viewing modes and Picture-In-Picture (PIP)/Picture-by-Picture (POP) mode.
You can switch viewing modes using the On Screen Display (OSD) or the remote control. For more
information on using the OSD, see Section 3.5.9 - Special Features, page 48.
3oSoll Viewioq Modes
Normal Mode
The original 4:3 aspect ratio (1.33:1 source) is preserved, so black bars are
added to the left and right of the display image. Standard TV broadcasts are
displayed with a 4:3 Aspect Ratio. Movies in 4:3 Aspect Ratio may be referred
to as pan-and-scan or full frame. These movies were originally filmed in 16:9
(widescreen), and then modified to fit a traditional TV screen (4:3).
Wide Mode
When watching a standard broadcast or full-frame movie in this mode,
the display image is stretched proportionately to fill the TV screen.
When watching a widescreen (1.78:1 source) program or movie, the
display image fills the TV screen. If you are watching a widescreen
(1.85:1 or 2.35:1 source) program or movie, there will still be black
bars at the top and bottom.
Zoom Mode
When watching a widescreen (1.78:1, 1.85:1, or 2.35:1 source)
program or movie, the display image is zoomed proportionally to fill the
width of the screen. The top and bottom are cut off to remove most of
the source material's black bars. This mode is good for programs or
movies with sub-titles.
Panoramic Mode
When watching a standard broadcast or full frame movie in this mode,
the 4:3 Aspect Ratio (1.33:1 source) display image is stretched
horizontally on the left and right sides to fill the TV screen. The center
of the image is not stretched.
Version 6/14/2006
www.VlZlOCE.com
49 O
Page 50

VIZIOP42HDTVUserManual
3oSoi_ PictuFe_o_PictuFe(P_P)/PictuFe_b v_PiCtUFe(POP)Mode
Your TV features PIP mode so you can watch two pictures at the same time. When PIP is turned on, you
can display two pictures at one time. One picture is displayed as the full screen (main screen) and the
other picture is displayed in a small window (sub screen). The sub-screen can be set to small, medium or
large.
See below for detailed information regarding the PIP sources.
DTV ,/ ,/ ,/ ,/
TV _ _ _ _ _ _ _
AV1 ,/ "/ "/ ,/ ,/ ,/ "/ ,/
AV2 ,/ "/ ,/ ,/ ,/ ,/ "/ ,/
AV3 ,/ ,/ ,/ ,/ ,/ ,/ ,/ ,/
Component ! ,/ ,/ ,/ ,/
Component ! ,/ ,/ ,/ ,/
HDMI ,/ ,/ ,/ ,/
RGB ,/ ,/ ,/ ,/
"_" - Indicates which inputs are available for PIP and POP modes.
*When HDMI is used for the Sub-Screen it cannot support 1080i.
3o5o13 RdDuseimq Basio PMP/POP Settinqs
PIP Channel
The PIP channel is independent of the main TV channel. To change the PIP
channel, press the PIP CH + or - button on the remote control.
Swapping PIP/POP Video
You can swap the program that is in the main picture with the program in the PIP sub-picture. To swap
the main picture program with the PIP sub-picture program, press SWAP on the remote control. If you
press SWAP again, it will return the program to the main picture. This works the same if you are in the
Picture-by-Picture (POP) mode.
Version 6/14/2006 50
www.VlZlOCE.com
V
Page 51

VIZtOP42HDTVUserManual
3°5°14 Usinq the Parental Controls
The Parental Controls feature prevents viewers from watching programs that are not age-appropriate,
such as programs containing violence or adult language.
Press the MENU button to open the main On Screen
Display (OSD) Menu.
1. Press the D button on the remote control until the
Parental Controls menu opens.
2. Press the _1_ button on the remote control to
highlight Parent Lock Enable. The "Key-In Access
Code" window opens.
3. Use the number pad to type the password (default
0 0 0 0), then press OK.
4. While the ....ParentLock enable menu is highlighted,
press the _ button on the remote control to select
"ON" to enable the blocking features.
5. Press the _ button on the remote control to highlight TV Rating, and then the _ button on the
remote control to enter into the TV Rating Menu.
6. The following window will allow the user to customize the following TV ratings:
Y (all children)
Y7 (older children)
G (general audience)
PG (guidance suggested)
14 (strongly cautioned)
MA (mature audience)
You can also customize the TV ratings for the
following content:
FV (fantasy violence)
D (sexual dialog)
L (adult language)
S (sexual situations)
V (violence)
7. Press the_or_lbbutton on the remote control to navigate through the TV menu options. Press the JI
or _ button to block (red lock) or unblock (green lock) each area.
8. Press the EXIT button on the remote control to return to the submenu.
9. Press the _ button on the remote control to highlight Movie Rating, and then the _ button on the
remote control to enter into the Movie Menu and
the MPAA window opens.
10. The following window will allow the user to
customize the following MPAA movie ratings:
G (general audience)
PG (parental guidance suggested)
PG-13 (recommended for children 13 years of
age or older)
R (mature audience)
NC-17 (no one under 17 years of age)
X (no one under 17 years of age)
Version 6/14/2006 51
www.VlZlOCE.com
V
Page 52

VIZtO P42 HDTV User Manual
11. Press the Nor _button on the remote control to navigate through the TV menu options.
or_ button to block (red lock) or unblock (green lock) each area.
12. Press the EXIT button on the remote control to return to the submenu.
Press the EXIT button the remote control to exit the OSD menu when you are finished.
Press the D
3oS.IS Se_inq _he Sleep Timer
The Sleep Timer lets you set a time delay to turn off the Plasma TV automatically.
To set the Sleep Timer using the remote control:
1. Press the SLEEP button on the remote control. The Sleep Timer appears in the center of
you screen.
2. Press the SLEEP button one or more times to select the time you want. The choices are 30,
60, 90 or 120 minutes.
To turn off the sleep time using the remote control, press the SLEEP button repeatedly until Off appears
on the screen.
Version 6/14/2006 52
www.VlZlOCE.com
V
Page 53

VIZIOP42HDTVUserManual
3°6 Proqramminq the VIZIO Universal Remote Control
You can program the remote control to work with up to four different components. Listed below are the
steps for programming your VCR, Cable Box and DVD Player.
3_E1 Proqramminq tor VER
1. Manually turn on the VCR.
2. Press the VCR button on the remote control.
3. Press and hold the SETUP button until the LED LIGHT flashes twice.
4. Find the programming code for your VCR in the code list in the back of this book and enter it using
the Number Buttons. If the code is accepted, the LED flashes twice after the last digit is entered.
If the LED does not flash twice, repeat Steps 2 through 4 with the next code listed for the component
and manufacturer.
5. Point the remote control at the VCR and press the POWER button. The VCR will turn off.
3.6.s Programming for Cable SebTop Box
1. Manually turn on the Cable Box.
2. Press the CBL button on the remote control.
3. Press and hold the SETUP button until the LED LIGHT flashes twice.
4. Find the programming code for your Cable Box in the code list in the back of this book and enter it
using the Number Buttons. If the code is accepted, the LED flashes twice after the last digit is
entered.
If the LED does not flash twice, repeat Steps 2 through 4 with the next code listed for the component and
manufacturer.
5. Point the remote control at the Cable Box and press the POWER button. The Cable Box will turn off.
Version 6/14/2006 53
www.VlZlOCE.com
V
Page 54

VIZtOP42HDTVUserManual
3°6°3 Proqramminq tor DVD Player
1. Manually turn on the DVD Player.
2. Press the DVD button on the remote control.
3. Press and hold the SETUP button until the LED LIGHT flashes twice.
4. Find the programming code for your DVD player in the code list in the back of this book and enter it
using the Number Buttons. If the code is accepted, the LED flashes twice after the last digit is
entered.
If the LED does not flash twice, repeat Steps 2 through 4 with the next code listed for the component and
manufacturer.
5. Point the remote control at the DVD Player and press the POWER button. The DVD Player will turn
off.
3.6. 4 Searchinq tot Component Codes
If you cannot find the manufacturer in the component list or the program code does not work, you can use
the remote control to search for the correct component code.
To search for a component code:
1. Turn on the component.
2. Press the matching component button on the remote control.
3. Press and hold the SETUP button until the LED flashes twice.
4. Press 9 9 1. The LED flashes twice.
5. Point the remote control at the component and then alternate between pressing the POWER
button and the component button on the remote control until the component turns off.
If the component still does not respond, clear the component button, then repeat the search
procedure.
3°7 Usinq a Cabte or SatetUte Remote
Your VtZtO remote uses codes 11758 and 10178 to work your Plasma TV. To use a cable or satellite
remote to work the Plasma TV, refer to your cable or satellite remote user guide for more information on
how to program the remote. If your cable or satellite remote uses a 5-digit code (like most Direct TV
units), first try 11758 and then, if that does not work, 10178. If your cable or satellite remote uses a 4-
digit code, try 1758 and then 0178 as an alternative. If your cable or satellite remote uses a 3-digit code
(Echostar or Dish Network for example), use code 627.
Note: Some b_ ons may_o _J cio_ as expeced on yo r cable ol sateite remoe. Typicaly powe_
voumeandmuewi wod<.
Version 6/14/2006 54
www.VlZlOCE.com
V
Page 55

VIZIOP42HDTVUserManual
Ohapber A Mainbeoamoe and Troob[eshoobimq
4°i Maiobeoaooe
I.
2.
Make sure that the power cable is removed from the socket before cleaning the TV.
Do not use volatile solvent (such as toluene, rosin and alcohol) to clean the TV. Such
chemicals may damage the housing, screen glass and remote control, and cause paint to
peel.
Eleaninq the Housinq and Remote Control
.
2.
Use the VlZlO soft cloth (included) for cleaning.
If the housing or remote control is seriously contaminated, use a soft cloth moistened with
diluted neutral cleaner to clean the display. Wring water out of the cloth before cleaning to
prevent water from penetrating into the housing. Wipe the display with a dry cloth after
cleaning.
C[eaninq the Screen
.
2.
Use the VlZlO soft cotton cloth (included) to gently clean the screen.
The screen glass is very fragile. Do not scrape it with any sharp object. Do not press or tap
the screen to avoid cracking. When the screen is seriously contaminated, use a soft cloth
moistened with diluted neutral cleaner to clean the display. Wring water out of the cloth
before cleaning to prevent water from penetrating into the housing. Wipe the display with a
dry cloth after cleaning.
4.s Troubleshoobinq Guide
If the TV fails or the performance changes dramatically, check the display in accordance with the
following instructions. Remember to check the peripherals to pinpoint the source of the failure. If the
display still fails to perform as expected, contact the VlZlO for assistance by calling 1-714-668-0588 or e-
mail us at techsupport(_,,vinc.com.
No power.
No sound.
If the screen is black.
Version 6/14/2006
Make sure the power button is ON (Green LED).
Make sure AC power cord is securely connected to the AC socket.
Plug another electrical device (like a radio) to the power outlet to verify that the
outlet is supplying the proper voltage.
Check your audio connection
Press MUTE on the remote control again, so that MUTE disappears from the screen
Check your audio settings, your TV audio may be set to SAP or minimum
Press the Volume + (Up) key on your remote control
Make sure that headphones are not connected
Check your input connections.
www.VlZlOCE.com
Page 56

VIZtOP42HDTVUserManual
Power is ON but no screen
image.
Wrong or abnormal colors If any colors (red, green, or blue) are missing, check the video cable to make sure it
appear, is securely connected.
Control buttons do not work. Press only one button at a time.
Remote Control does not Make sure batteries are inserted correctly
work. Batteries could be weak.
There appears to be image For best image quality, view HD wide screen programs where possible. If HD
quality issues, content is not available view "Standard Definition" from a digital source. Standard,
You cannot see a picture.
You see a distorted picture or
hear unusual sound.
The picture has abnormal
patterns.
The display image does not
cover the entire screen.
You can see a picture but you
cannot hear sound.
The TV has pixels that are
always dark or colored.
You see "noise" or "trash" on
the screen.
You switch to a different input
and the volume changes.
You switch to a different input The TV remembers the viewing mode from the last time you used a particular input
and the screen size changes. (AVl, AV2, AV3, Component 1, Component 2, HDMI, and TV).
Make sure the video cable supplied with the TV is secured to the correct video
output port on the back of the VCR and the TV. Make any cable you have attached
to the TV is secured to the correct output your Set-Top Box, DVD, etc.
Adjust brightness and contrast.
Check Source settings.
Make sure you have selected TV on the remote.
analog TV will always be noticeably inferior to HD because your digital flat panel TV
has video that is many times better than old TV's and so you can see interference
and deficiencies you did not know you had.
Make sure that the power cord is plugged into a grounded electrical outlet.
Make sure that the power button is turned on.
Make sure that the selected input source is connected to a working input source.
If your TV is connected to your computer in RGB or HDMI mode, press any key on
your keyboard to "wake" your computer.
You may be getting interference from electrical appliances, cars, motorcycles, or
fluorescent lights. If you have not mounted it on the wall, try moving your TV to
another location to see if this is the cause of the problem.
Make sure that the input source cable is attached securely and correctly to the back
of your TV.
Make sure that the video input source is within the range of your TV. Compare the
video input source's specifications with your TV specifications.
If you are using RGB mode, make sure that H Size and V Position in the On Screen
Display (OSD) are set correctly.
If you are using TV, AVl, AV2, AV3 or Component with 480i input, use the WIDE
button on the remote control to scroll through various screen modes.
Make sure that the volume is not turned down.
Make sure that the sound is not muted.
Make sure that your audio input source cables are connected securely and correctly.
Your Plasma TV is manufactured using an extremely high level of precision
technology, however, sometimes some pixels of your Plasma TV may not display.
Pixel defects within industry specifications are inherent to this type of product and do
not constitute a defective product.
When your Plasma TV's digital capabilities exceed a digital broadcast signal, the
signal is up-converted (increased) to match your TV's display capabilities. Up-
converting can cause noise or trash.
The TV remembers the volume level from the last time you adjusted it. If the sound
level is higher or lower from another source, then the loudness will change.
Version 6/14/2006 56
www.VlZlOCE.com
V
Page 57

VIZtOP42HDTVUserManual
Tips for High-Definition Users.
Tips for Letterbox Content Users.
The Plasma TV is an ideal platform for viewing High Definition Content.
Best Image Quality will be achieved by the HDMI Input, then YPbPr, then RGB.
However, due to variances in broadcast practices, it is possible some image
distortions can occur.
Letterboxed (or "Widescreen") versions of DVD movies are most commonly
formatted for standard 4:3 Televisions. The Plasma TV has the capability of
expanding this content so the entire screen is filled at the expense of image
accuracy. To use this function, press the "ZOOM" key on the remote control
and cycle among the available options.
4-3 Tet@phon@ 8 Technics[ Suppomb
Products are often returned due to a technical problem rather than a defective product that may result in
unnecessary shipping charges billed to you. Our trained support personnel can often resolve the problem
over the phone. For more information on warranty service or repair, after the warranty period, please
contact our Support Department at the number below.
Customer support and quality service are integral parts of VtZtO's commitment to service excellence.
For technical assistance contact our VlZtO Technical Support Department via email or phone.
E-mail: techsupport@vinc.com
Tel: (714)668-0588
Hours of operations:
6:00am - 6:00pm PST Monday - Friday
10:00am - 2:00pm PST Saturday - Sunday
Please have your VlZlO model number, serial number and date of purchase available before you call.
Version 6/14/2006
320A Kalmus Drive
Costa Mesa, CA 92626
Tel: (714) 668.0588 Fax: (714) 668-9099
Web: wwwoVl£1OCEooom
www.VlZlOCE.com
O
Page 58

VIZtOP42HDTVUserManual
6,6 Comptianoe
Caution: Always use a power cable that is properly grounded. Please use the AC cords listed below for
each area.
USA UL
Canada CSA
Germany VDE
UK BASE/BS
Japan Electric Appliance Control Act
4oS FCC Class B Radio interference Sbabemenb
NOTE: This equipment has been tested and found to comply with the limits for a Class B digital device,
pursuant to Part 15 of the FCC Rules. These limits are designed to provide reasonable protection against
harmful interference in a residential installation. This equipment generates, uses and can radiate radio
frequency energy, and if not installed and used in accordance with the instructions, may cause harmful
interference to radio communications. However, there is no guarantee that interference will not occur in a
particular installation. If this equipment does cause harmful interference to radio or television reception,
which can be determined by turning the equipment off and on, the user is encouraged to try to correct the
interference by one or more of the following measures:
.
2.
3.
.
Reorient or relocate the receiving antenna.
Increase the separation between the equipment and receiver.
Connect the equipment into an outlet on a circuit different from that to which the receiver is
connected.
Consult the dealer or an experienced radio/TV technician for help.
Notice:
1.
2.
3.
Version 6/14/2006
The changes or modifications not expressly approved by the party responsible for compliance
could void the user's authority to operate the equipment.
Shielded interface cables and AC power cord, if any, must be used in order to comply with
the emission limits.
The manufacturer is not responsible for any radio or TV interference caused by unauthorized
modification to this equipment. It is the responsibilities of the user to correct such
interference.
www.VlZlOCE.com
O
Page 59

Ehapter S Miscettaneous Infiormation
S°z Specifficabions
VIZIOP42HDTVUserManual
Panel
Resolution
Pixel (Dot) Pitch
Display Compatibility
Signal Compatibility
Colors
Brightness
Contrast
Viewing Angle
Inputs
Outputs
Features
Speakers
Panel Life
41.65" Diagonal, 16:9 Aspect Ratio
1024 x 768 pixels
0.gmm (H) x 0.676mm (V)
HDTV (720P)
480i (SDTV), 480P (EDTV), 720P (HDTV), 1080i (HDTV)
231 Billion
1,200 cd/m 2 (typical)
0,000:1 (max)
>170 ° (horizontal and vertical)
2x Co-axial RF (for DTV & TV), lx HDMI TM** with HDCP plus Stereo Audio (RCA), 2x
Component YPbPr plus Stereo Audio, lx RGB PC plus Stereo Audio, lx S-Video plus Stereo
Audio (shared in AV3), 3x Composite Video plus Stereo Audio (AVl, AV2, AV3)
lx 5.1 Audio from DTV input only (SPDIF Optical), lx Stereo Audio (RCA), lx Headphone
Stereo Mini-Jack)
Single Scan Technology for Higher Contrast, Reduced Solarisation and Reduced False
Contouring, PIP, POP, CC, V-Chip, 3D Comb Filter, Zoom, Freeze, Motion Adaptive De-
Interlace, Picture Enhancement, MPEG-2 Decoding via DTV input, NTSC Video decoding via
Video (AV, S-Video or Component), Progressive Scan Video via HDMI TM**, Component or
RGB, HDTV via HDMI TM**, Component or RGB (Set-Top Box required), Computer 640x480,
800x600, 1024x768, 1280x1024 via RGB, Sound Enhancement
Built-in, 10W x 2
60,000 hours to half the original brightness
Input
Voltage Range
Power Consumption
Operating
Non-Operating
Dimensions
Net Weight
Gross Weight
Certifications
380W Max (320W average)
Temperature: 5°C~35°C, Relative Humidity: 20~80%, Altitude: 0~6,560 ft
Temperature: -20°C~50°C, Relative Humidity: 10~90%, Altitude: 0~9,840 ft
43" W x 31" H x 11.4" D with stand; 43" W x 30" H x 4.3" D without stand
85 Ibs with stand; 76 Ibs without stand
04.5 Ibs"
CSA, FCC Class B
*Product specifications may change without notice or obligation.
** HDMI, the HDMI logo and High-Definition Multimedia Interface are trademarks or registered trademarks
of HDMI TM Licensing LLC.
Version 6/14/2006 59
www.VlZlOCE.com
V
Page 60

VIZtOP42HDTVUserManual
Glossary - Sbamdard Oefiimibioms
Analog TV: Today's TV system using radio frequency waves to transmit and display pictures and sound.
Aspect Ratio (4x3): Traditional TV "aspect ratio", that is, the screen's width as compared to its height.
For example, a "32 inch TV screen" would be 25 inches wide and 19 inches tall.
Aspect Ratio (16x9): "Wide screen TV" aspect ratio which is more like a movie screen than a traditional
TV. For example, a "32 inch TV screen" would be 28 inches wide and 16 inches tall.
Digital TV (DTV): Television delivered and displayed using radio frequency waves that contain
information that is digitally encoded for improved quality and efficiency.
Enhanced Definition TV (EDTV): A better digital television transmission than SDTV with at least 480P,
in a 16x9 or 4x3 display and Dolby digital surround sound. 480P is the quality used by most DVD players.
EDTV provides 300-400,000 pixels.
HDTV Monitor (sometimes called HDTV Ready): A set that can display HDTV programming if you have
a separate HDTV tuner, HD Cable Set-Top Box or HD Satellite Set-Top-Box Receiver.
HDTV Tuner (also decoder, receiver, set-top box): A device capable of receiving and outputting HDTV
signals for display, tt may be stand-alone or integrated in the set.
High-Definition Television (HDTV): The best quality picture, wide screen (16x9) display with at least
720 progressively scanned lines (720P) or 1080 interlaced lines (1080i) and Dolby digital surround sound.
HDTV provides 900,000-2.1 million pixels.
Integrated HDTV" An HDTV that has the digital tuner built into the set. It does not need a separate set-
top box to receive over-the-air DTV signals.
Interlace Scan: A way to scan vertical lines onto a TV picture by scanning all the odd lines first, then
filling the in the even lines (this happens instantaneously).
Plug-and-Play or Digital Cable Ready: A DTV or other device for digital cable consumers that plugs
directly into the cable jack and does not require a separate set-top box. Plug-and-Play TV owners must
obtain a CableCARD from their cable company in order to view scrambled programming services.
Progressive Scan: A way to scan vertical lines onto a TV picture by scanning all the lines consecutively
(progressively).
Standard Definition TV (SDTV): Basic digital television transmission that may be displayed with fewer
than 480 progressively scanned lines (480P) in 16 x 9 or 4 x 3 format. 480 interlaced (480i) is the quality
of today's analog TV system.
Soulce: Buying a Digital Te evisior CEA HDTV Guide 2005
Note: The Federa Comma _icaions Commission (FCC)he Consumer Eiecronics Associaion (CEA)
and he Consumer E ec n:_nics Re ai ers Coa ilion {CERC) have made a few ip @eel avai abe For digila
teevisio_ (DTV) elaiers o epoduce and disribue o cons._merson the sales oor The ie may be
downoadedoninea www.dtv.qov Whieyou_e kere checkou _eoheruseI:u/ir_ormaioni_ltleFCC
is makingavaiabie oconsumesinelesedinlearringmoeabou learalof_todigilal _ansilion.
Version 6/14/2006 60
www.VlZlOCE.com
Page 61

So3 index
A
Accessories, 5
Adjustments
Choosing Channels to Skip when Channel Surfing, 35
Closed Caption, 13, 37, 38, 46
DTV Tuner Setup, 34
Parental Controls, 40
Password for Parental Controls, 44, 48
Selecting the Screen Size, 13, 32, 48, 49, 60
Setting the Digital Audio Output On or Ofi; 36
Stepping through TV Channels, 32
Time Zone, 33
Volume, 9, 32, 45, 47, 55
C
Cleaning your VIZIO TV, 55
Co-axial RF
Connecting for DTV, 26
Connecting for TV, 27
Component
Connecting your DVD Player, 19
Connecting your Set-Top Box, 24
Composite (AV)
Connecting your DVD Player, 20, 21
Connecting your VCR, 25
Connecting your Video Camera, 25
Controls
Front Panel, 9
Side Panel, 9
D
DVI
Connecting your DVD Player, 18
Connecting your Set-Top Box, 23
E
Extended Warranty, 64
G
Glossary, 60
H
HDMI
Connecting your DVD Player, 17
Connecting your Set-Top Box, 22
I
Information
DTV Channels, 42
VIZtOP42HDTVUserManual
Programs, 43
Inputs
Antenna, 3
Connectors, 16
Rear Label, 10
Installation
Base removal, 6
Preparation, 5
Safety Instructions, 2
Wall Mounting, 5, 6, 30
O
OSD
Activate Parental Controls, 48
Add or Delete Channels ibr Channel Surfing, 47
Automatic Adjustment of Picture Size and Position with
PC Input, 46
Balance Adjustment, 47
Bass Adjustment, 47
Brightness Adjustment, 46, 59
Choosing PIP or POP, 48
Choosing the PIP or POP video source, 48
Choosing the PIP position, 48
Choosing the size of PIP, 48
Closed Caption Selection, 13, 37, 38, 46
Color Adjustment, 16, 46, 47
Color Temperature Selection with PC Input, 47
Contrast Adjustment, 46, 59
Editing the Password, 48
Find TV Channels Automatically, 47
Fine Tnne hnage with PC Input, 46
Horizontal Position Adjustment with PC Input, 46
Horizontal Size Adjustment with PC Input, 46
hnage Cleaner, 48
Operations, 45
Picture Mode Selection, 46
Return Adjustments to Factory Settings, 48
Select Cable or Antenna for TV Input, 47
Selecting the OSD Language, 48
Set Parental Control Level for Movies, 48
Set Parental Control Level for TV Programs, 48
Setting the Screen Size, 48
Setting the Sleep Timer, 48
Sharpness Adjustment, 46
Sound Mute, 47
Surround Sound Effects Selection, 47
Surround Sound On or Off, 47
Tint (Hue) Adjustment, 46
Treble Adjustment, 47
Turn the Speakers ON or Off, 47
TV Sound Selection, 47
Using the Parental Controls, 48, 51
Vertical Position Adjustment with PC Input, 46
Volume Adjustment, 47
Outputs
Using 5.1 Sun'ound with a Home Theatre System, 28
Using an external Receiver Amp, 28
Version 6/14/2006
61
www.VlZlOCE.com
0
Page 62

VIZtO P42 HDTV User Manual
P
PIP and POP Inputs, 50
R
Remote
Batteries, 15
Layout, 12, 15, 53
Range, 15
Remote Control
Codes for other devices., 65
Programming to work your DVD Player, 54
Programming to work your Set-Top Box, 53
Programming to work your VCR, 53
Setting the Sleep Timer, 52
Using your Cable or Satellite Remote to Operate your
VIZIO TV, 54
RGB
Connecting your PC, 29
S
Screen Size explanation, 48, 49
Sticking Image Removal, 48
S-Video
Connecting your DVD Player, 20, 21
T
Technical Specifications, 59
Troubleshooting Guide, 55
W
Wan'anty, 64
Watching TV
Basic connections, 30
Getting your Programs, 32
Version 6/14/2006
www.VlZlOCE.com
62 O
Page 63

VIZtOP42HDTVUserManual
S0A Limited Product Warranty
Please read this warranty card carefully, it is a "ONE-YEAR LIMITED WARRANTY" on parts and labor and is only valid when
purchased from an Authorized Reseller, only on new and non-refurbished product, and available to customers in the Continental US,
Alaska, Hawaii and Puerto Rico. See below for the VlZlO Extended Service warranty.
VlZlO's Responsibility
VIZIO Displays purchased in the United States are warranted to be free from defects in materials or workmanship for a period of one
(1) year from the date of their original retail purchase. If the unit fails to conform to this warranty, we will service the monitor using
new or refurbished parts.
Service Labor
During a period of one (1) year from the effective warranty date, VIZIO will provide, when needed, service labor to repair a
manufacturing defect at its designated Service Center. To obtain warranty service in the Untied States, you must first caII our
Customer Support at (7!4) 668-0588. The determination of service will be made by VIZIO Customer Support. PLEASE DO NOT
RETURN YOUR UNIT TO VIZIO WITHOUT PRIOR AUTHORIZATION.
Parts
New or remanufactured replacements for defective parts will be used for repairs by VlZlO at its designated Service Center for one
(1) year from the effective warranty date. Such replacement parts are warranted for the remaining portion of the original warranty
period.
Service
During the one (1) year warranty period, VIZIO will, at its option and sole discretion, repair or replace defective parts, including
replacement of the entire Panel. The Customer will be required to ship the unit to the Service Center indicated at the time
Customer Support is contacted to make the necessary repairs, you are responsible for all transportation charges to and from the
service facility. VlZlO is not responsible for the de-installation or re-installation of the unit.
Packaging and Shipping Instruction
When you send the product to an authorized VlZlO service facility you must use the original carton box and packing material or an
equivalent as designated by VIZIO
Not Covered
This warranty does not cover defects, malfunctions or failures resulting from shipping or transit accidents, abuse, misuse, operation
contrary to furnished instructions, operation on incorrect power supplies, operation with faulty associated equipment, modification,
alteration, improper servicing, tampering or normal wear and tear or TVs on which the serial number has been removed or defaced.
Image Sticking caused by operating at excessive brightness levels for extended periods or mishandling are not covered by this
warranty.
ANY IMPLIED WARRANTIES, INCLUDING ANY IMPLIED WARRANTY OF MERCHANTABILITY AND FITNESS FOR A
PARTICULAR PURPOSE SHALL BE LIMITED IN DURATION TO THE PERIOD OF TIME SET FORTH ABOVE. OUR LIABILITY
FOR ANY AND ALL LOSSES AND DAMAGES RESULTING FROM ANY CAUSE WHATSOEVER, INCLUDING OUR
NEGLIGENCE, ALLEGED DAMAGE OR DEFECTIVE GOODS, WHETHER SUCH DEFECTS ARE DISCOVERABLE OR LATENT,
SHALL IN NO EVENT EXCEED THE PURCHASE PRICE OF THE DISPLAY. WE SHALL NOT BE RESPONSIBLE FOR LOSS OF
USE, COMMERCIAL LOSS OR OTHER INCIDENTAL OR CONSEQUENTIAL DAMAGES. SOME STATES DO NOT ALLOW
LIMITATIONS ON HOW LONG AN IMPLIED WARRANTY LASTS OR THE EXCLUSION OR LIMITATION OF INCIDENTAL OR
CONSEQUENTIAL DAMAGES, SO THE ABOVE LIMITATIONS OR EXCLUSIONS MAY NOT APPLY TO YOU. This warranty
gives you specific legal rights, and you may also have other rights which vary from state to state. This is the only warranty
applicable; no one is authorized to extend or modify it or to grant any other warranty.
VlZlO retains the right to assess all warranty claims and to determine if damages are covered by the warranty. In case of a claim
that is not covered by the warranty, you will be contacted to determine whether VIZIO should repair the damage for a fee or whether
the product should be returned to you as received by the repair center.
Owner's Responsibility
Effective Warranty Date
Warranty begins on the date of sale to the end user. To ensure warranty service, keep the dated bill or sale receipt as evidence of
the purchase date.
Warranty Service
For warranty service information, contact VIZlO Customer Support at (714) 668-0588, 7:30 am to 5:30 pm PST or visit
www.vizioce.com. Parts and service labor that are VlZlO's responsibility (see above) will be provided without charge. Other service
is at the owner's expense. You must provide the model, serial number and date of purchase. Before you ask for warranty service,
read your User Manual. You might avoid a service call.
Warranty conditions are subject to change, for latest Warranty Terms and Conditions and additional information regarding your
warranty, please see complete details online at www.VIZIOCE.com.
So4.i VIZIO EXTENDED SERVICE WARRANTY
Protect your investment beyond the standard warranty and experience piece of mind with VlZlO's Extended Service Warranty.
Depending on your model, plans are offered for 2-5 years. Visit www.vizioce.com or call 1-800-988-4196 to purchase a plan today.
Version 6/14/2006 63
www.VlZlOCE.com
V
Page 64

S0S Compomeo mmoqmBm Codes
VIZtOP42HDTVUserManual
ABS 2 ! 972
Admiral 20048, 20209
Aiko 20278
Aiwa 20037, 20479
Alienware 2!972
America Action 20278
American High 20035
Amoisonic 20479
Anam 20162, 20037,
20240, 20278
Anam National 20162
Asha 20240
Audiovox 20037, 20278
Beaumark 20240
Bell & Howell 20104
Broksonic 20184, 20121,
20209, 20002,
20479
Calix 20037
Canon 20035
Carver 20081
CCE 20072, 20278
Changhong 20048, 20081
Citizen 20037, 20278
Colt 20072
Craig 20037, 20047,
20240, 20072
Curtis Mathes 20060, 20035,
20162
Cybernex 20240
CyberPower 2!972
Daewoo 20045, 20104,
20278
DelI 21972
Denon 20042
DirecTV 20739
Durabrand 20039, 20038
Electrohome 20037
EIectrophonic 20037
Emerex 20032
Emerson 20035, 20037,
20184, 20240,
20045, 20121,
20043, 20209,
20002, 20278,
20479
Fisher 20047, 20104
Fuji 20035, 20033
Fujitsu 20045
Gateway 21972
GE 20060, 20035,
20240
General 20045
Go Video 20432
GoldStar 20037, 20209,
20038, 20225
Haojie 20240
Harman/Kardon 20081,20038
Harwood 20072
Hewlett Packard 21972
HI-Q 20047
Hitachi 20037, 20042,
20055
Howard 21972
Computers
HP 21972
Hughes Network 20042, 20739
Systems
iBUYP©WER 21972
JVC 20045, 20067
KEC 20037, 20278
Kenwood 20067, 20038
KLH 20072
Kodak 20035, 20037
Kotin 20043
LG 20037, 20045,
20042, 20209,
20038
Logik 20072
LXI 20037
Magnavox 20035, 20039,
20081
Magnin 20240
Marantz 20035, 20081
Marta 20037
Matsushita 20035, 20162
Media Center PC 21972
MEI 20035
Memorex 20035, 20162,
20037, 20048,
20039, 20047,
20240, 20104,
20209, 20479
MGA 20240, 20043
MGN Technology 20240
Microsoft 21972
Mind 21972
Minolta 20042
Mitsubishi 20067, 20043
Motorola 20035, 20048
MTC 20240
Multitech 20072
NEC 20035, 20037,
20048, 20104,
20067, 20038
Newave 20037
Nikko 20037
Nobtex 20240
Northgate 21972
Olympus 20035
Optimus 21062, 20162,
20037, 20048,
20 !04, 20432
Orion 20184, 20209,
20002, 20479
Panasonic 21062, 20035,
20162, 20616,
20225
Penney 20035, 20037,
20240, 20042,
20038
Pentax 20042
Philco 20035, 20479
Philips 20035, 20081,
20739, 20618
Pilot 20037
Version 6/14/2006
www.VlZlOCE.com
64 O
Page 65

VIZtOP42HDTVUserManual
Pioneer 20042, 20067
Polk Audio 20081
Profitronic 20240
Proscan 20060
Protec 20072
Pulsar 20039
Qisheng 20060
Quasar 20035, 20!62
Radix 20037
Randex 20037
RCA 20060, 20035,
Realistic 20035, 20037,
ReplayTV 206!6
Runco 20039
Sampo 20037, 20048
Samsung 20240, 20045,
Sanky 20048, 20039
Sansui 20067, 20209,
Sanyo 20047, 20240,
Scott 20184, 20045,
Sears 20035, 20037,
Sharp 20048, 20209
Shintom 20072
Shogun 20240
Singer 20072
Sonic Blue 20616
Sony 20035, 20032,
STS 20042
Sylvania 20035, 20081,
Systemax 21972
Tagar Systems 21972
Tashiko 20037
20240, 20042,
20880
20048, 20047,
20104
20432
20479
20104
20121, 20043
20047, 20042,
20104
20033, 20636,
21972
20043
Tatung 20045, 20067
Technics 20035, 20162
Teco 20035, 20037,
20048, 20038
Teknika 20035, 20037
Tivo 20636, 20618,
21503, 20739
TMK 20240
Toshiba 20045, 20042,
20067, 20043,
21503, 21008,
21972
Totevision 20037, 20240
Touch 21972
Unitech 20240
Vector 20045
Vector Research 20038
Victor 20067
Video Concepts 20045
Videomagic 20037
Videosonic 20240
Viewsonic 21972
Wards 20060, 20035,
20048, 20047,
20081,20240,
20042, 20072
White 20209, 20072
Westinghouse
XR-1000 20035, 20072
Yamaha 20038
Zenith 20039, 20033,
20209, 20479
ZT Group 21972
ABC 00003, 00008,
00014
Americast 00899
Bell & Howell 00014
Bell South 00899
CIearmaster 00883
CIearMax 00883
Coolmax 00883
Daeryung 01877, 00877,
00477, 00008
Digi 00637
Director 00476
Dumont 00637
Gehua 00476
General 00476, 00810,
Instrument 00276, 00003,
00014
GotdStar 00144
Hamlin 00009, 00273
Hitachi 00014
Jerrold 00476, 00810,
00276, 00003,
00012, 00014
KNC 00008
LG 00144
Memorex 00000
Motorola 00476, 008 !0,
00276, 01254,
01376
MultiVision 00012
Pace 01877, 00237
Panasonic 00000, 00008,
00107
Panther 00637
Paragon 00000
Philips 00317, 01305
Pioneer 01877, 00877,
00144, 00533
Pulsar 00000
Quasar 00000
RadioShack 00883
Regal 00279, 00273
Runco 00000
Samsung 00000, 00144
Scientific Atlanta 01877, 00877,
00477, 00008
Sony 01006
Starcom 00003, 00014
Supercabte 00276
Supermax 00883
Tocom 00012
Version 6/14/2006
www.VlZlOCE.com
O
Page 66

Torx 00003
Toshiba 00000
Trans PX 00276
Tristar 00883
TS 00003
V2 00883
Viewmaster 00883
Vision 00883
Vortex View 00883
Zenith 00000, 00525,
AIphaStar 00772
Chaparral 00216
Crossdigital 01109
DirecTV
Dish Network
System
Dishpro 01005, 00775,
Echostar 01005, 00775,
Expressvu 00775
GE 00566
Generat 00869
Instrument
GOI 00775
Goodmans 01246
Hisense 01535
Hitachi 00819,00222,
HTS 00775
Hughes Network 01142,00749,
Systems 01749,01442
I-Lo 01535
00899
00392,00566,
00639,01142,
00247,00749,
01749,00724,
00819,01856,
01076,01109,
00099,01392,
01640,01442,
01414,01108
01005,00775,
01505
01505
01505
01250
JVC 00775
LG 01414,01226
Magnavox 00724,00722
Memorex 00724
Mitsubishi 00749
Motorola 00869
NEC 01270
Next Level 00869
Panasonic 00247,00701
Paysat 00724
PhiIips 01142,00749,
01749,00724,
01076,00722,
00099,01442
Proscan 00392,00566
Proton 01535
RadioShack 00869
RCA 00392,00566,
00855,00143,
01392
Samsung 01276,01109,
01108
Sanyo 01219
SKY 00856
Sony 00639,01640
Star Choice 00869
Tivo 01142, 01442
Toshiba 00749, 01749,
00790,01285
UItimateTV 0!640, 01392
Uniden 00724, 00722
US Digital 01535
USDTV 01535
Voom 00869
Zenith 00856,01856
Aiwa 20641,21912
Akai 20770
Allegro 20869
Apex Digital 20672,20717,
20797,21061,
VIZtOP42HDTVUserManual
20796,21056,
21937,20794,
21020,21915
Blaupunkt 20717
Blue Parade 20571
Broksonic 20695
Changhong 20627,21061
CineVision 20869
Coby 21086
Curtis Mathes 21087
CyberHome 21024,21023,
21129,20816,
21117
Daewoo 20833,21172,
20869
Denon 20490
DVD2000 20521
Emerson 20591,20675
Enterprise 20591
Fisher 21919
Funai 20675
Gateway 21158,21073
GE 20522, 20717
Go Video 20744,20833,
21099,20783,
21075,20869,
21730
Greenhill 20717
Harman/Kardon 20582,20702
Hitachi 20573,20664,
21919
Hiteker 20672
Initial 20717
Integra 20627,21924
JBL 20702
JVC 20558,20623,
20867
Kenwood 20490,20534
KLH 20717,21020,
21149
Koss 20651,21980
Lasonic 20798
LG 20591,20869,
20801
Liquid Video 21980
Version 6/14/2006
www.VlZlOCE.com
66 O
Page 67

VIZtOP42HDTVUserManual
Lite-On 2 ! 158, 21058
Loewe 20511
Magnavox 20503, 20539,
21976, 21914,
20675
Marantz 20539
Memorex 20695
Microsoft 20522
Mintek 20717
Mitsubishi 2152!, 20521
Nesa 20717
Norcent 2!003
Onkyo 20503, 20627,
21924, 20792
Oritron 20651, 21980
Panasonic 20490, 21762,
21990
Philips 20503, 20539,
20646, 21914
Pioneer 20525, 20571
Polaroid 21086, 21061
Polk Audio 20539
Portland 20770
Proscan 20522
Qwestar 20651
RCA 20522, 20571,
20717, 20822
Rio 20869
RoteI 20623
Sampo 20752, 20698
Samsung 20490, 20573,
21932, 21075,
20820
Sansui 20695
Sanyo 20695
Sharp 20630, 20752
Sharper Image 21117
Sherwood 20770
Shinco 20717
Shinsonic 20533
Sonic Blue 20869, 21099
Sony 20533, 20864,
21033, 21904,
21903
SVA 207 ! 7
Sylvania 20675
Symphonic 20675
Teac 207!7, 21984,
20809
Technics 20490
Theta Digital 20571
Toshiba 20503, 20695
V, Inc, 20123, 20124
Urban Concepts 20503
Xbox 20522
Yamaha 20490, 20539,
20545
Zenith 20503, 20591,
20869
Aiwa 30157
Burmester 30420
California Audio 30029
Labs
Carver 30!57, 30179
Denon 30873
DKK 30000
DMX Electronics 30157
Dynamic Bass 30179
Fisher 30179
Garrard 30420
Genexxa 30032
Harman/Kardon 30157, 30173
Hitachi 30032
Integra 30101
JVC 30072
Kenwood 30826, 30626,
30028, 30037,
30036, 30190
KreII 30157
Linn 30157
Magnavox 30157
Marantz 30626, 30029,
30157
MCS 30029
Miro 30000
Mission 30157
MTC 30420
NSM 30157
Onkyo 30868, 30101
Optimus 31063, 30000,
Panasonic 30029
Parasound 30420
Philips 30626, 30157
Pioneer 31063, 31062,
Polk Audio 30157
Proton 30157
QED 30157
Quad 30157
Quasar 30029
RadioShack 31075
RCA 31062, 30032,
Realistic 30420, 30179
Rotel 30157, 30420
SAE 30157
Sansui 30!57
Sanyo 30179
SAST 30!57
Sharp 30861, 30037
Silsonic 30888, 30036
Sonic Frontiers 30157
Sony 30490, 30000,
Soundesign 30145
TAG McLaren 30157
Tascam 30420
Teac 30420
Technics 30029
Victor 30072
Wards 30157, 30053
Yamaha 30888, 30036
30032, 30037,
30420, 30179,
31075, 30145
30032
30420, 30179,
30053
30100
Version 6/14/2006
www.VlZlOCE.com
67 O
Page 68

VIZtOP42HDTVUserManual
Zonda 30157
Bose 30674
GE 30078
JVC 30331
Marantz 30321
Nakamichi 30321
NEC 30264
Optimus 30395
Realistic 30395
Sansui 30321
Shure 30264
Sony 30689
Soundesign 30078
Victor 3033 !
Wards 30078
Yamaha 30354, 30133
ADC 30531
Aiwa 31405, 31243,
30121
Anam 31609, 31074
Audiotronic 31189
Bose 31229
Capetronic 30531
Carver 31189
Coby 31263
Denon 31360, 31!42,
30904
Fonmix 31360
Glory Horse 31263
Harman/Kardon 30110
Hitachi 31273
Inket 30027
Integra 30135
JBL 30110
JVC 30074, 31263
Kenwood 3! 313, 31570,
30027
KLH 31428
Magnavox 3! 189, 31269,
30531
Marantz 31189, 31269,
30039
MCS 30039
Onkyo 30842, 30135
Optimus 31023, 30670,
30531,31074
Panasonic 3! 518, 30039
PhiIips 3 ! 189, 31269
Pioneer 31023, 30150,
30014, 30630,
30531
Proscan 3!254
Qisheng 31609
Quasar 30039
RadioShack 3 !263
RCA 31023, 31609,
31254, 30531,
31074
Sharper Image 31263
Silsonic 30176
Sony 31058, 31441,
31258, 31759
Soundesign 30670
Stereophonics 31023
Sunfire 31313
Teac 31074, 31267
Technics 31308, 31518,
30039
Thorens 31189
Victor 30074
Wards 30014
Yamaha 30176, 31276,
31176
Addison 10092
Admiral 10093, 10463
Advent 10761, 10842
Aiko 10092
Aiwa 11914
Akai 10812, 10702,
10030, 10672,
11903
Albatron 10700, 10843
America Action 10!80
Anam 10250, 10180,
10700
Anam National 10250, 10650
Anhua 10051
AOC 10451, 10093,
10180, 10060,
10030, 10178,
10092
Apex Digital 10748, 10765,
10879, 10767,
11943
Audiovox 10451, 10180,
10875, 10092,
10623
Baile 10661
Beijing 10812, 10661
Bell & Howell 10154
BenQ 11032
Bradford 10180
Broksonic 10236, 10463,
11911, 11938,
11905, 11935,
11929
Calling !0748
Candle !0030
Carnivale 10030
Carver !0054
Celebrity !0000
Celera !0765
Changcheng 10051, 10661
Changhong 10156, 10765,
11156, 10767
Ching Tai 10092
Chun Yun 10000, 10180,
10700, 10092,
10843
Chung Hsin 10180, 10053
Cinema !0672
Version 6/14/2006
www.VlZlOCE.com
68 O
Page 69

VIZtOP42HDTVUserManual
Citizen 10060, 10030,
Clarion 10180
Commercial 11447, 10047
Solutions
Conrowa 10145,
Contec
Craig
CrosIey
Crown
Curtis Mathes 10054,
CXC
Daewoo 10451,
Dayu
Dell
Denon
Dumont
Durabrand 10!80,
EIectroband
Emerson
Envision
Ether
Firstar
Fisher
Fortress
Fujitsu 10853
Funai 10171,
Furl
Futuretech
11928, 10092
10156,
11156
10180
10180
10054
10180
10047,
10451,
10154,
10060,
10093,
10030,
10702,
10166
10145,
10180
10154,
!0030,
10180,
!0672,
10178,
!0092,
11928,
! 1909,
10661,
!0700
10623,
10661
11080
10145
10017
10463,
10171,
10178,
11034
10000
10236,
10154,
10180,
10463,
10171,
10178,
11909,
11944,
11905,
11929,
10623,
11928,
11911
10030
10030
10236
10154
10093
10809,
10180,
11904
10145
10180
Gateway 11756,11755
GE 11447,10047,
11454,10051,
10451,10160,
10030,10178,
11917,10092,
11907,11922
Gibralter 10017,10030
GeldStar 10154,10030,
10176,11926
Grunpy 10180
Haler 11034
Hallmark 10176
Hankeok 10180,10030,
10176
Harley Davidson 11904
Harman/Kardon 10054
Harvard 10180
Havermy 10093
Helios 10865
Hello Kitty 10451
Hisense 10156,10748,
10145,11156
Hitachi 10156,10030,
10178,11145,
10145,10092,
11904,11156
Hongmei 10093
Huafa 10145
Huari 10145
Huodat_i 10051
Imperial Crown !0661
Infinity 10054
Inteq 10017
JBL 10054
JCB 10000
Jean 10156,10051,
10236,10092
Jensen 10761
Jiahua 10051
Jinfeng 10051
Jinxing 10054,10156,
10145
JVC 10053,11923,
11253
Kangli 10661
KEC 10180
Kenwood 10030
KLH 10765,10767
Kolin 10180,10150,
10053
KTV 10189,10030
Kunlun 10051,10661
LG 10060,10030,
10178,10856,
10700,10025
Lloyd's 11904
LXI 10047,10054,
10154,10156,
10178
Magnasonic 11928,11913
Magnavox 11454,10054,
10030,10706,
11931,11254,
11913,11904,
11944
Magnin 11907
Marantz 10054,10030,
10704
Matsushita 10250,10650
Maxent 11755
Megapower 10700
Megatron 10178,10145
Memorex 10154,10463,
10150,10178,
11911,11926,
11924,11920,
11927
MGA 10150,10030,
10178,11907
Midland 10047,10017,
10051
Mitsubishi 10154,10250,
10093,10236,
10189,11250,
10150,10030,
10178,11917,
10836
Monivision 10843,10700
Motorola 10093
MTC 10060,10030
Mudan 10051
Multitech 10180
Version 6/14/2006
www.VlZlOCE.com
69 O
Page 70

VIZtOP42HDTVUserManual
NAD 10156,10178,
10866
National 10051
NEC 10154,10156,
10051,10053,
10030,10178,
11704
Newave 10093,10178,
10092
Nikko 10030,10178,
10092
Norcent 10748,10824
NTC 10092
Onwa 10180
Optimus 10154,10250,
10166,10650,
11927,11924,
11913
Optonica 10093
Orion 10236,10463,
11929,11911,
11905
Panasonic 10054,10250,
10051,10650,
11941,11927,
11924
Panda 10051,10706
Penney 10047,10156,
10051,10060,
10030,10178,
11926,11907
Philco 10054,10180,
10030,10178
Philips 11454,10054,
10000,10051,
10030,10178,
10092,10690
Pilot 10030
Pioneer 10186,10866,
10679
Portland 10092
Prima 10761
Princeton 10700
Prism 10051
Proscan 11447,10047,
11922
Proton 10030,10178
Pulsar 10017
Qingdao
Quasar 10250, 10051,
RadioShack 10047, 10154,
RCA
Realistic 10180,
Rowa 10748
Runco 10017,10030
Sampo 10154,10093,
Samsung 10154,10156,
Sansui 10463,11904,
Sanyo 10154,10156,
Sanyuan 10093
Scotch 10178
Scott 10236,10180,
Sears 10047,10054,
Shaofeng 10145
Sharp 10093,10030,
Shen Ying 10092
Shencai 10145
Sheng Chia 10093,10236
Skygiant 10180
Skywo_h 10748
Sony 11100,10000,
1!924, 10650
10180, 10030,
10178, 11920,
1! 904
11447,
10047,
11454,
10000,
10030,
10178,
11547,
11922,
11917,
10092,
11907,
11948,
10679
10090,
10154,
10178
10030,
10030,10178,
10171,10700,
10650,11755,
10092
10060,10812,
10702,10030,
10178,11060,
10814,10092,
11903,10090,
10766
11935,11929,
11911
10180,10145,
11907
10178
10154,10156,
10178,10171,
11926,11904
10650,11917
10650,11925,
11904
Soundesign 10180,10178
Sowa 10156,10051,
10060,10178,
10092
Squareview 10171
SSS 10180
StarIite 10180
Studio Experience 10843
Supreme 10000
SVA 10748,10865
Sylvania 10054,10030,
10171,11944,
11931
Symphonic 10180,10171,
11913,11904
Synco 10000,10451,
10093,10060,
10178,10092
Tacico 10178,10092
Tandy 10093
Tashiko 10092,10650
Tatung 10054,10154,
10156,10051,
10060,11156,
11756,11254
Technics 10250,10051
Techwood 10051
Teco 10051,10093,
10178,10092
Teknika 10054,10180,
10150,10060,
10092
Telefunken !0702
Tera 10030
Thomas ! 1904
Tiane 10093
TMK 10178
TNCi 10017
Tobo 10748
Toshiba 10154,10156,
10060,10145,
11945,11704,
11936,11156,
11935,10650,
11918
Tuntex 10030,10092
Version 6/14/2006
www.VlZlOCE.com
70 O
Page 71

VIZtOP42HDTVUserManual
TVS 10463
VlZIO 11758,11756,
10885,10864
Ve_or Research 10030
Victor 10250,10053,
10650
Vidikron 10054
Vidtech 10178
Viewsonic 11755,10885,
10864
Wards 10054,10030,
10178,10886,
11156
Warumaia 10661
Waycon 10156
White 10463,11909,
Westinghouse 10623
Yamaha 10030
Yapshe 10250
Zenith 10017,10463,
10178,11904,
11929,11911,
11909,10092
Version 6/14/2006
www.VlZlOCE.com
71 O
 Loading...