

Page 1
※ 機 種 名
Model Name
製 造 番 号
S e r i a l N o .
※保証期間
Purchase Date
※ お 客 様
Use r N a me
※販売店名
Dealer Name
双眼鏡保証書
Th e w ar r an ty is v oi d o ut s id e J ap an .
AR T E S
購入日 年 月 日より5年間
Y M D
ご住所
Addre ss
ご芳名
N a m e
店名・住所
本保 証書 は本 書記 載の 内容 で 無料 修理 を
行うことを約束するものです。
1.取 扱説明 書における 正常な 使用状態で 、
お買い上げの日から 左記の期間中に 故障
した場合は購入店に 修理を依頼して くだ
さい。無料修理となりま す。
2.本書の※印 横に記入のな い場合は無効と
なります。
3.本書は日本国内においてのみ有効です。
4.有 料修理 の場合もあ ります ので、無 料修
理規定・アフターサー ビスの 項目も お読
みください。
5.本 書にご 記入の個人 情報は 、保 証期 間内
のサービス活動のた めに利用させて 頂く
場合がございますので、ご了承ください。
Vixen lim ited warr anty shal l guarante e
free rep air serv ice in accordanc e with
terms and conditions described herein.
1.The free repair service sha
effective for a period of five year from
date of original purchase from the
dealer stated on the left on the
conditions that the product should be
treated correctly according to the
operating instructions.
2.The limited warranty shall be void and
of no force of effect in the event that
a model name, purchase date, user
name or dealer name is blank.
3.The limited warranty
in Japan only.
4.Depending on the conditions for repair
service, the repair cost may be
charged. Go through the section of
"REPAIR SERVICE".
5.The provided personal information may
be applied to service to the customers
58キ‐4
during a warranty period.
アルテス シリーズ
AR TES Seri es
ARTES
HR 8.5×45W P
HR 10.5×45 W P
ll be
shall be effective
取扱説明書
INSTRUCTION MANUAL
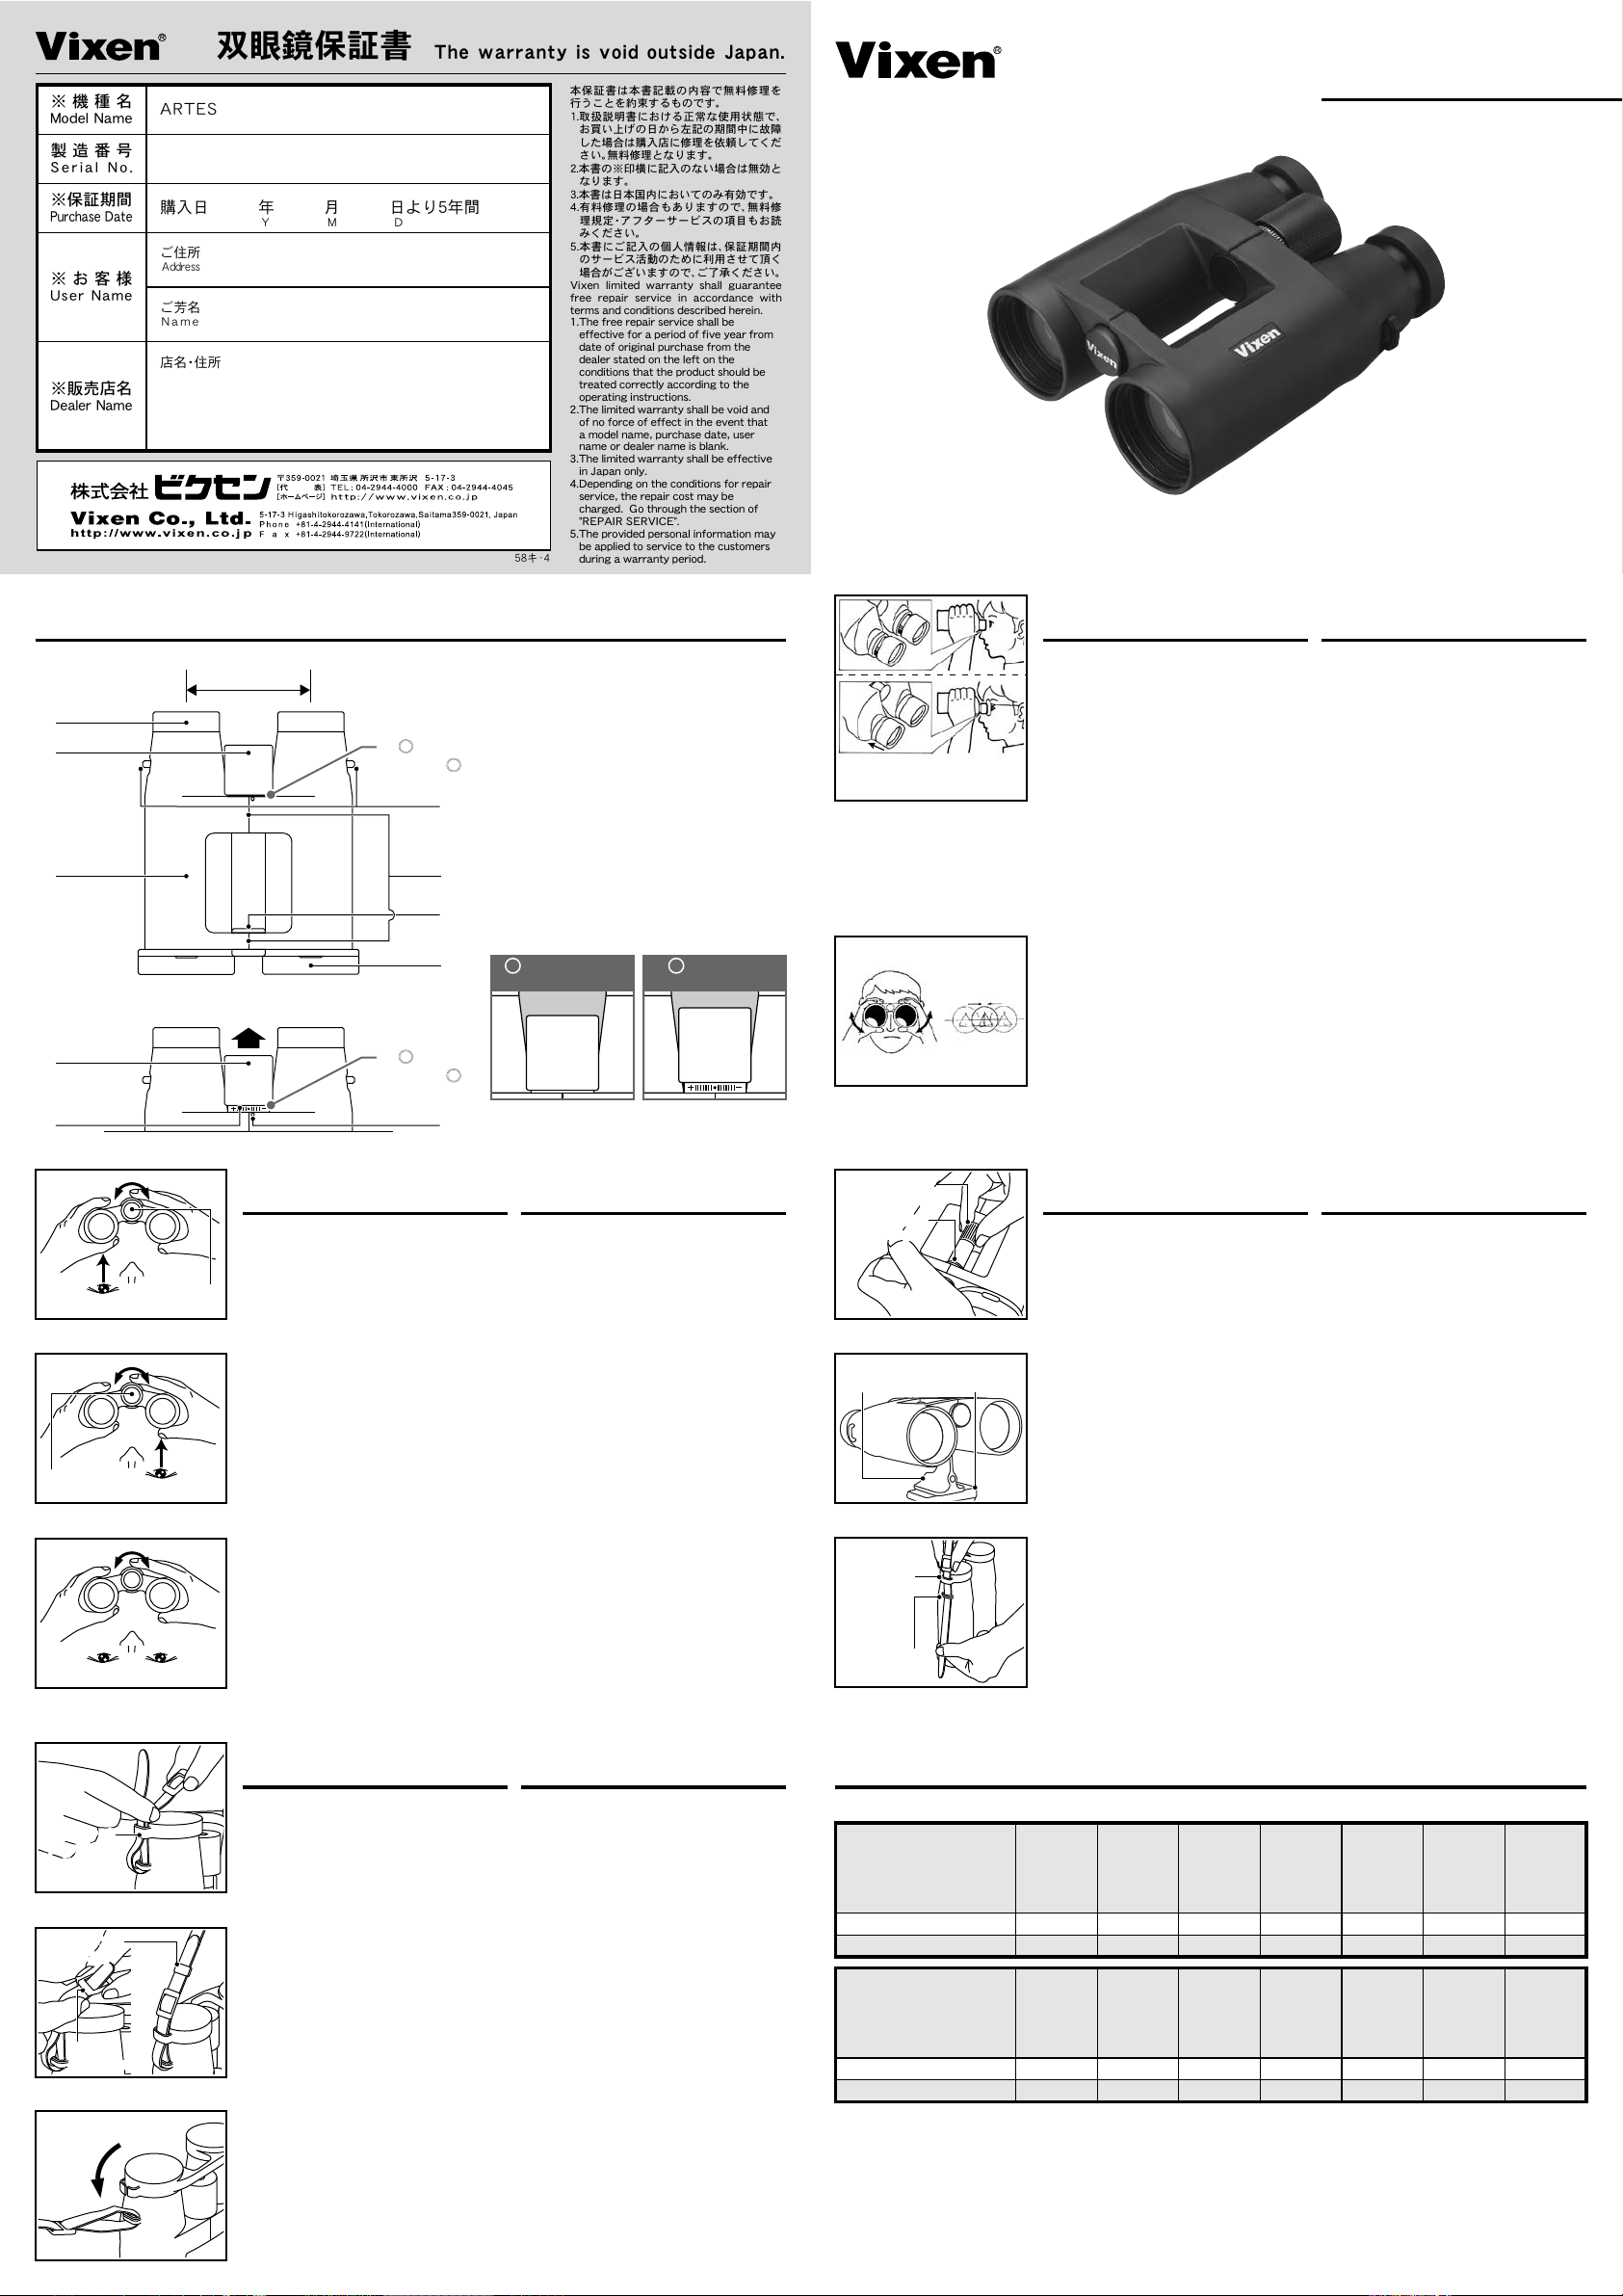
各部のなまえ
①
②
③
引き出す
Pull out
⑨
④
A
図○
Diagra m○
⑤
⑥
⑦
⑧
B
図○
Diagra m○
⑪⑩
PART NAMES
①…繰り出し式目当て
Twist-up Rubber E yecup
②…ピント合わせリング
Focusing Wheel
③…ボディ ④…眼幅
Body
⑤…
A
B
ストラップ取付部
Strap Hook Center Axis
⑦…三脚取付ネジ穴(内側)
Tri pod Adapter Socke t(inside )
⑧…ステイオン対物キャップ
Conjoined Objecti ve Cap
⑨…視度調整リング
Diopter Ring
⑩…視度目盛り
Diopter Adjustmen t Scale
⑪…視度調整指標
Diopter Indicator
a
ピント合わせ時
For focusing
押し込んだ状態
Push in the focusing wheel.
Interpupillary Di stance
⑥…中心軸
b 視 度調 整時
b 視 度調 整時
For diopter adjustment
For diopter adjustment
引き出した状態
Pull out the focusing wheel.
繰り出さない
For eyeglass wearers, do not
pull out the eyecups.
図1
図2
Diagram 1
Diagram 2
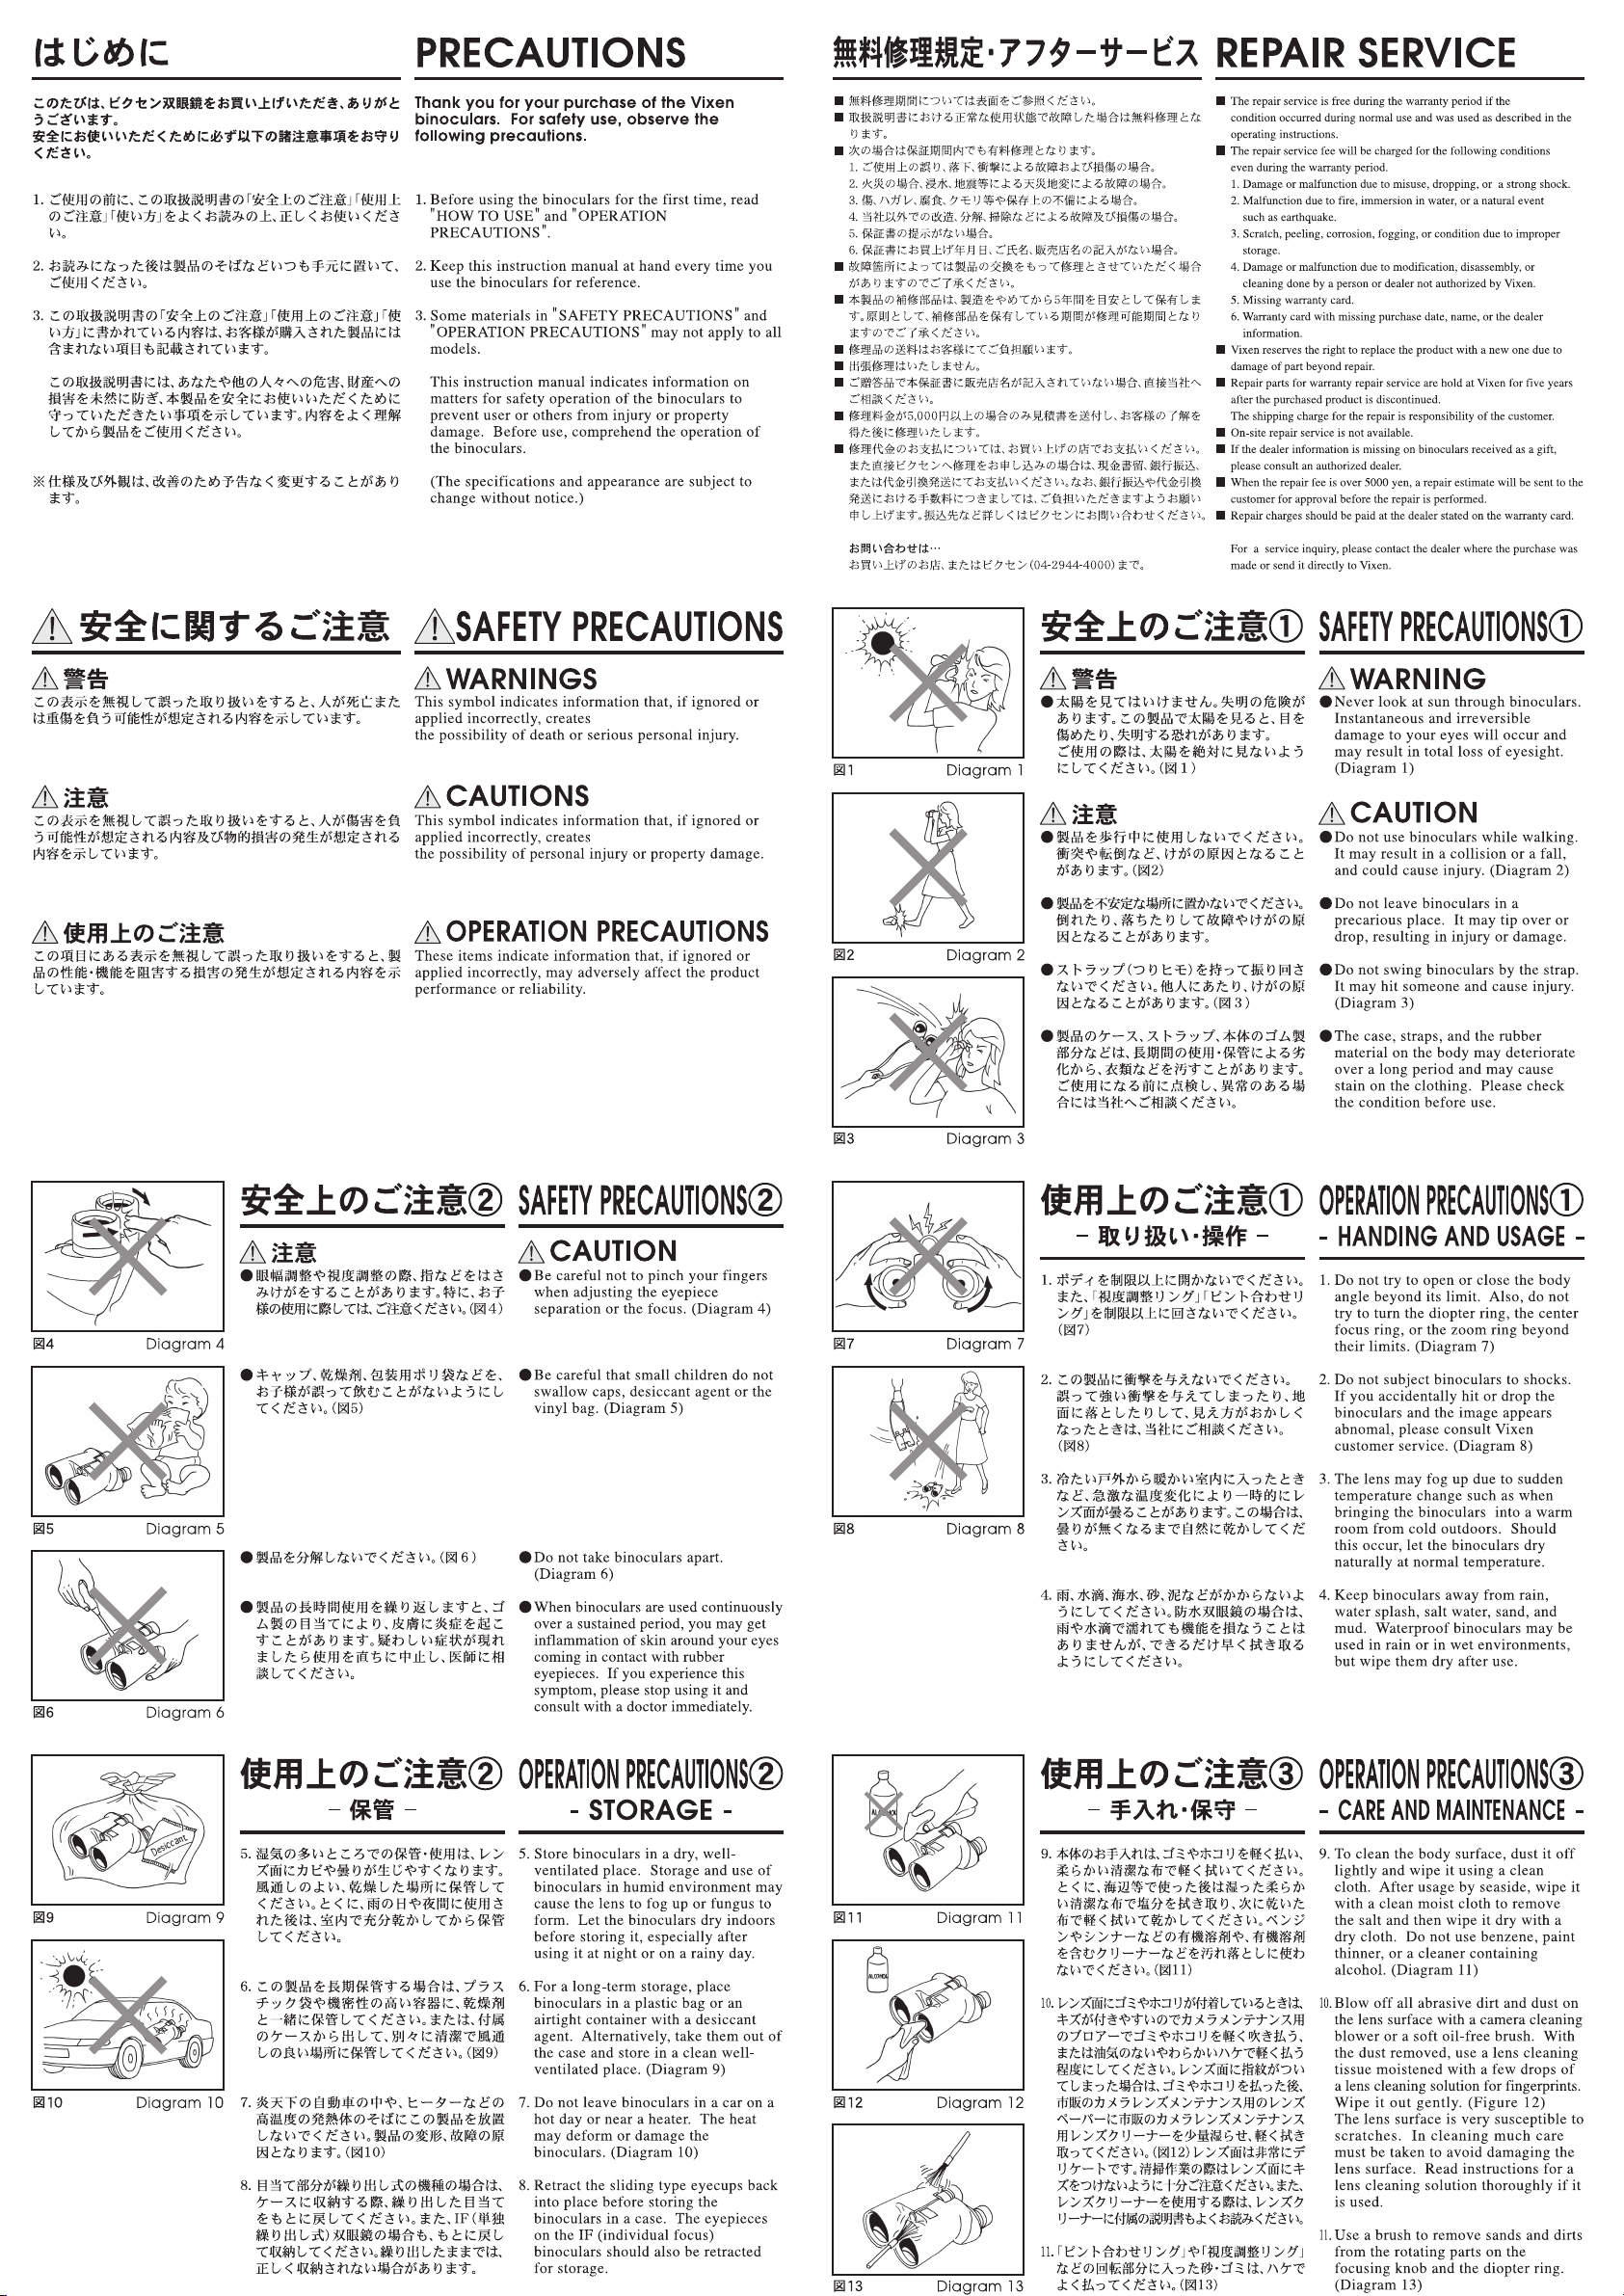
使い方①
対物・接眼レンズキャップをとります。対
1.
物キャッ プは 、本体に引っ かけ たまま観
察ができます。
繰り出し式目当て
メガネをかけたままでのぞくときは、目当
てを繰り 出さ ずにのぞい てく ださい 。メ
ガネをか けた ままのぞい ても 、十分な視
野が得られます。(図1)
ケースに 収納 の際は、目当 てと キャップ
※
を元に戻してください。
眼幅調整を行うため、両目でのぞきながら、
2.
ボディを 静か に開閉しま す。左 右の視野
が重なって一つの円になったら止めます。
眼幅調整 は、で きるだけ遠 くの ものを見
て行ってください。(図2)
眼幅調整とは
眼幅調整 とは 、接眼部の間 隔を 自分の目
の間隔に 合わ せることで す。眼 幅が合っ
ていない と、使 っているう ちに 目が疲れ
る場合があります。
HOW TO USE
1.
Detach the objective caps and eyepiece
cap. The objective caps are tied into
the body.
Twist-up Rubber Eyecups
For eyeglass wearers, the twist-up
rubber eyecups should not be pulled
out. Even for those who wear
eyeglasses, it is possible to have a
good field of view. (Ref. Diagram 1)
When containing the binoculars in the
carrying case, put the eyecups back to
the retracted position and attach the
objective caps and eyepiece cap.
2.
While looking through the binoculars
with both eyes, adjust the interpupillary
distance by folding or unfolding the
body so that the field of view can be
seen as one circle. When you do this
adjustment, try to find an object in
the distance. (Ref. Diagram 2)
Interpupillary Distance Adjustment
This is to adjust the distance between
the two eyepieces to fit your eyes.
Improper interpupillary distance may
result in eyestrain.
①
図3
視度調整リング
Diopter Ring
図4
図5
ピント合わせリング
Focusing Wh ee l
Diagram 3
Diagram 4
Diagram 5
使い方②
視度調整を行います。まず、左側の接眼レ
1.
ンズを左目でのぞきながら、「ピント合わ
せリング」を回します。この時、「各部のな
まえ」の図を参考に、ピント合わせリング
A a
が図○・○の位置 であ ることを確 認し て
ください 。目標 物に正しく ピン トが合っ
たら止め ます 。できるだけ 遠く のものを
見て行ってください。(図3)
わせリングを視度調整リングに
ピント合
2.
切り替えます 。「各 部のなまえ 」の図 を参
考に、ピント合わせリングを3mmほど引
き出してください。(ピント合わせリング
B
b
を図○・○の位置にしてください)視度調
整リングになります。
次に、右目で右側の接眼レンズをのぞきなが
3.
ら、「視度調整リング」を回します。同じ目標
物に正しくピントが合ったらとめます。(図4)
調整が終 わり ましたら、視 度調 整リング
を静かに 押し 込んで元の 位置 に戻し 、ピ
ント合わせリング(図○・○の位置)に切り
替えます。
目標物を変えて見るときは、「ピント合わせリ
4.
ング」のみを回してピントを合わせます。(図5)
視度調整 とは …左目と右 目と では、視力
が違う場合が あり ます 。その 場合、「 左目
はピントが合うが右目ではピントが合わ
ない」または、その逆のことが起こります。
こうした こと を防ぎ、左目 と右 目の視力
のバランスをとるのが「視度調整」です。
A a
HOW TO USE
1.
For diopter adjustment, try to find an
object in the distance. While looking
through the left eyepiece with the left
eye, focus on the object by turning the
focusing wheel. At that time, make
sure that the focusing wheel is retracted
as shown in the Diagram
Diagram 3)
To switch the focusing wheel to the
2.
diopter adjustment wheel, pull it out by
3mm as shown in the Diagram
3.
Then, while looking through the right
eyepiece with the right eye, focus on
the same object by turning the diopter
adjustment wheel. (Ref. Diagram 4)
When the diopter adjustment is completed,
push in the diopter adjustment wheel
in order to switch to the focusing
wheel as shown in the Diagram
4.
Once both eyes are focused on the
object, you can focus on different
objects only with the
(Ref. Diagram 5)
Diopter Adjustment
The diopter adjustment is for those
who have different eyesight in right
and left eyes. The difference in the
right and left eyesight can be compensated
with the above adjustment procedure.
A a . (Ref.
○
○
B
○○
○ ○
focusing wheel.
②
.
b
A a .
ビノホルダーM H
ビノホルダーM H
Tri po d Ada pt er-MH
Tri po d Ada pt er-MH
三脚取付ネジ穴
三脚取付ネジ穴
Tri po d Ada pt er
Tri po d Ada pt er
Socket
Socket
図6
ビノホルダーM H
ビノホルダーM H
Tri po d Ada pt er-MH
Tri po d Ada pt er-MH
図7
接 眼 レ ン ズ
キャップの穴
Loop on
eyepiece
cap
ストラップ取付部
Strap Hook
図8
Diagram 6
カメラ三脚
Tri po d
Diagram 7
Diagram 8
使い方③
三脚取付について
ビノホルダーMH(別 売)を使 用すること
により、カ メラ 三脚に取り 付け て使用で
きます。
双眼鏡の 三脚 取付ネジ穴( アー ムの内側
にあります)にビノ ホル ダー M H の固定
ネジ を ね じ 込み固定 し ま す 。( 図6 )ビノ
ホルダ ーMHをカメラ 三脚の雲台 に取 り
付けます。(図7)
※ キャップを取り外すとネジ穴があります。
ストラップ(つりヒモ)について
ストラップの取付けは接眼レンズキャッ
プを取付けた状態で行います。
1.
図のように付属の
レンズキ ャッ プの穴に通 し、続 けて本体
のストラップ取付部に通します。(図8)
ストラップ先端を接眼
HOW TO USE
Using tripod
ARTES series can
tripod by using the optionally
available Tripod Adapter-MH.
Remove the cap on the end of the
center (inside the arm) to expose the
tripod adapter socket. (Ref. Diagram
6) Screw on the Tripod Adapter-MH
to the tripod adapter socket and attach
the tripod adapter to a tripod. (Ref.
Diagram 7)
Attaching the straps
Doing the neck strap attachment with
eyepiece cap is set in place.
Put
the tip of the neck strap through
1.
the loop on eyepiece cap and then
stick it through the loop for the neck
strap (strap hook) on the binocular
body as shown in the figure.
(Ref. Diagram 8)
be attached to a
③
接 眼 レ ン ズ
接 眼 レ ン ズ
キャップの穴
キャップの穴
Loop on
Loop on
eyepiece cap
eyepiece cap
図9
開き止めリング
開き止めリング
Strap Ring
Strap Ring
留め具
留め具
Strap Binder
Strap Binder
図10
外れる
Remove
図11
Diagram 9
Diagram 10
Diagram 11
使い方④
ストラッ プ先 端を手前に 返し 、接眼レン
2.
ズキャップの穴に再度通します。(図9)
図のようにストラップを固定する留め具
3.
及び開き止めリングに通して取付けます。
(図10)反対側も同様の手順で取付けます。
※接眼キャップの右側は簡単にストラッ
プの着脱ができるように切込みがあり
ます。(図11)
HOW TO USE
Fold over the tip of the neck strap and
2.
put it through the loop on eyepiece
cap again. (Ref. Diagram 9)
Then put the tip of the neck strap
3.
through each of the strap ring and
strap binders in turn as shown in the
figures. (Ref. Diagram 10) Repeat the
above procedure on the opposite side.
Note: There is a cut on the right side
loop on eyepiece cap to remove the
neck strap from eyepice cap easily.
(
Ref. Diagram 11)
④
主な仕様
品 名
Mode l
HR10.5x45 WP
品 名
Mode l
HR8.5x45W P
HR10.5x45 WP
*1 補助プリズム1面に誘電体多層膜による超高反射率コーティングを採用。
(従来の高反射コーティングを施したプリズムに比べ、更に明るい視界が
得られます)
As a supe r hi gh refl ecti on-e nha nced coa tin g (R efle cti ve
Di elec tri c-Ma teri al M ulti -Coa ting ) i s ap plie d to an assi st
pr ism, thei r vie w fie ld i s bri g hter tha n tha t of the m odel s
with a specia l ref lection -enhanc ed co ating.
*2 JIS B7157:20 03 に基づいた計算方法による。
calcul ated ac cordi ng to t he stan dard JIS B71 57:2003
倍 率
Magn if icati on
対物レンズ
有効径
Obje ct ive
プリズム
材質
Pris m
Aper tu re
8.5x 45mm
10.5x 45mm
ひとみ径
Exit P upil
明るさ
Brig ht ness
BaK4 SK15
BaK4 SK15
アイレリーフ
Eye Re lief
5.3mm 28.1 17.5mm 〜2.2m
4.3mm 18.5 15mm 〜2.2m 885g ○(MH)
SPECIFICATIONS
コーティング
Coat in gs
FMC,HRC,P HC,ORC
FMC,HRC,P HC,ORC
至近距離
Near F ocus
FMC
:
HRC
:
PHC
:
ORC
:
仕様お よび 外観 は改 善の ため 、予告なく 変更 する 場合が あり ます 。
Specifications are sub ject to change without prior notice.
実視界
Real F ield
Appa re nt Fi el d
of View
7.0° 54.9° 122mHR8.5x45W P
6.0° 57.6° 105m
サイズ
高さ×幅×厚み
Size
H× W× D
15.6×13.4 ×5.9cm
15.6×13.4 ×5.9cm
フラットマルチコート。
高反射コート。
フェイズ(位相差)コート。
撥油コート。
High R eflect- Coate d
Oil Re pellent -Coat ed
見掛視界
*2*1
1000m先
視界
Fiel d
of View
at 1 00 0m
三脚取付
Weig ht重さTri po d Adap te r
Sock et
885g ○(MH)
Flat M ulti-Co ated
Phase- Coated
*1
Page 2
 Loading...